A quality desk mount for ultrawide monitors adds a range of motions, and helps clear space on your desk. Select desk mounts are simple to install and can sustain the weight of heavy ultrawide monitors. If you have a sturdy desk, you can clamp it via the C-clamp to your desk. So, if you are in the market looking for desk mounts for ultrawide monitors, here are the best options.
ErGear Ultrawide Monitor Arm
Size Capacity: 13-35-inch | Weight: Up to a 26.5lbs
The ErGear monitor desk mount is affordable and can hold monitors up to 35-inches. So, if you have a unit like the Samsung SJ55W or the BenQ EX3501R, this mount will fit your requirement just fine. It allows you a range of motions, including rotation, height adjustment, and swivel. The wide berth for height means you will be able to adjust the monitor as per your preference.
If your work desk allows it, you can even work on this monitor standing up. It’s sturdy and can hold ultrawide monitors with ease. The ErGear desk mount comes with two installation options. You can either use the C-clamp or the grommet option. That said, installation is effortless and doesn’t take much time. If you are looking for a frills-free yet affordable desk mount, this ErGear mount is a good pick.
What We Like
Offers various adjustment options
Effortless installation
What We Don’t Like
Average build quality
Huanuo Single Monitor Arm
Size Capacity: 13-35-inch | Weight: Between 4.4lbs and 26.4lbs
The Huanuo monitor arm is one of the most popular arms and all for the right reasons. For one, it isn’t too expensive. Secondly, it ensures smoother movements. That means you can swivel, adjust height or angle of the monitor without worries.
It supports height adjustment, tilt, and swivel, and the arm can go up to 21.65-inches in height. Plus, you can pull it towards yourself as per your preference. And since the base rotates around 240-degree, you can have the mount sit close to the wall. This is important if you have a narrow desk or don’t want the screen too close to your face.
What We Like
Affordable
Sturdy
What We Don’t Like
Not good for heavy monitors
MountUp Ultrawide Single Monitor Desk Mount
Size Capacity: Up to 35-inch | Weight: Up to 26.4lbs
The MountUp desk mount combines both style and functionality. It’s one of the most stylish mounts around. The slick black polish and the hollow joint give it a futuristic look. Moreover, it supports a range of motions for both axes. In short, you will be able to adjust the monitor extensively.
Another highlight of this desk mount is the neat cable management. Instead of the conventional cable slips and ties, it comes with concealed channels to route the power cord and the HDMI cable. And this ends up giving your desk a clean look. It’s sturdy and can hold its share of ultrawide monitors without swaying or dropping. The gas-spring arm means movements are smooth. And the 360-degree base is the cherry on top.
What We Like
Offers neat cable management
Looks good
What We Don’t Like
Slightly expenisve
VIVO Aluminum Mount
Size Capacity: Up to 49-inch | Weight: Up to 39.6lbs
The VIVO Aluminum Mount is the one for you if you can’t afford to have open space behind your work desk. It comes with a sturdy central pole and pneumatic arm. The latter allows you significant flexibility, including height adjustment up to 25.5-inches.
The installation process is pain-free. But if you have a narrow desk, the monitor will be far forward, and you’ll have to install it a little towards the sides. The gas springs arms make it a child’s play to move the arms. The company provides an Allen key to adjust the tension. It’s a well-built desk mount for ultrawide monitors, and if you want to save money (without compromising quality), it’s a good pick.
What We Like
Good build quality
Offers a lot of flexibility
What We Don’t Like
N/A
AVLT Single Monitor Arm Desk Mount
Size Capacity: Up to 13 to 43-inch | Weight: Up to 33lbs
The AVLT desk mount is expensive. It’s designed for big monitors like the Dell U4021QW or the LG 38WN75C-W and can sustain weights up to 33lbs. The increased flexibility around the base and the monitor arm gives you room to place it anywhere.
So even if you do not have space behind your desk, you can adjust this arm likewise. Again, the metal construction ensures you have a sturdy desk mount in your hands. And the gas-spring arms translate into easy maneuverability.
Add Custom Bullet Points in Google Docs on Desktop
Using Google Docs in a web browser on a desktop is convenient for working on a document. For example, content writers can easily write and share their drafts via Google Docs. Business professionals get access to ready-to-use templates in Google Docs. You can also create documents and collaborate with your peers to track changes.
When presenting your content in an organized manner, bullet points can showcase the highlights and important aspects without making the document verbose.
Step 1: Visit Google Docs and sign in to your account.
Step 2: Once the page loads, click on New Document. You can also choose to edit from Recent Documents.
Step 3: Place the cursor in the document where you want to add bullet points.
Step 4: Look for the three icons at the top-right menu bar above your page.
The first option lets you add a Checklist.
The second option lets you add a Bulleted List. Click the icon and choose from the default bullet designs.
The third option lets you add a Numbered List. Click the icon to choose from the default bullet designs.
Step 5: After selecting your design, start adding your bullet points to the page.
Step 6: Once done, press Command/Control + S to save changes.
Customize Bullet Points in Google Docs on Desktop
Step 1: Bring your mouse pointer to the top of the previously created bullet points.
Step 2: Click to select them and right-click to reveal additional options.
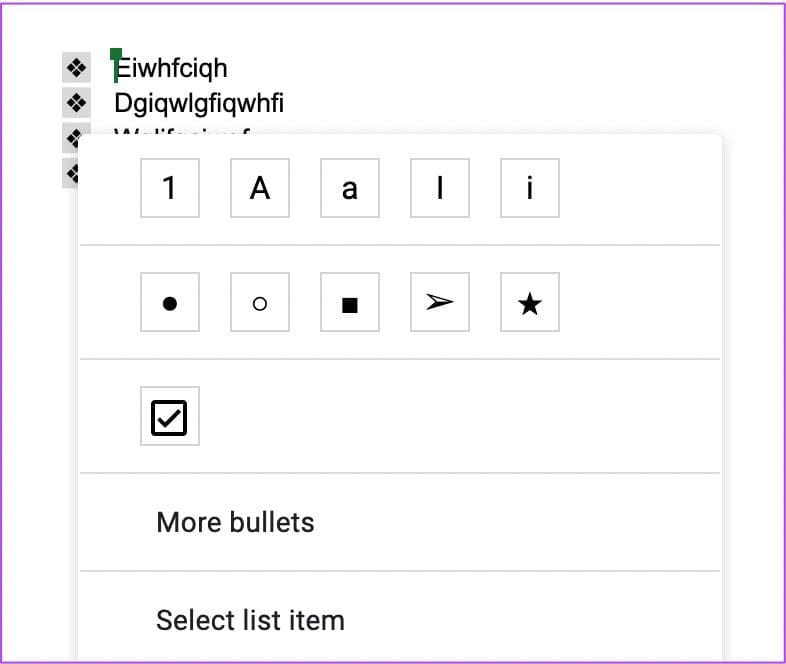
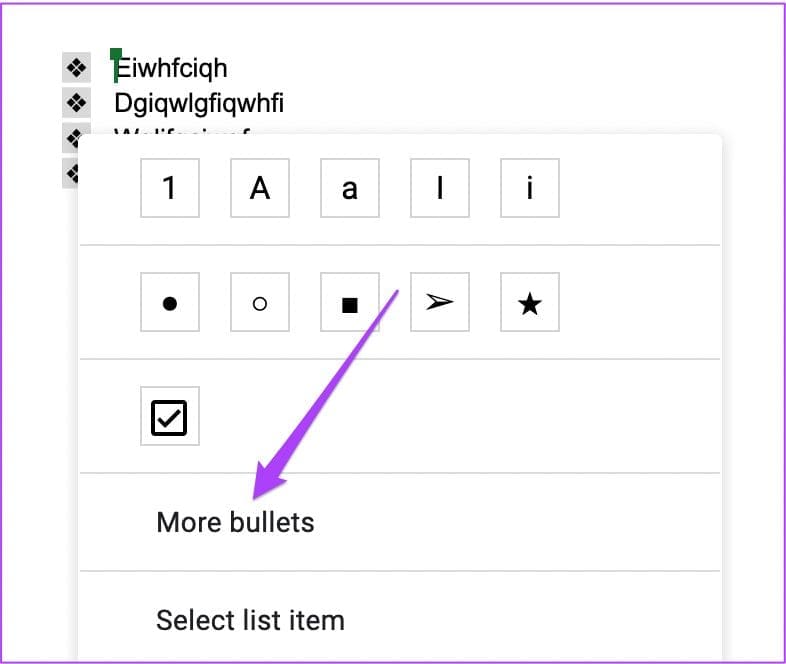
Step 3: Click on More Bullets.
You will now see a dialog box with various options for bullet point design. You can even draw a bullet point design using a stylus.
Step 4: Select a bullet point design. The newly selected design will appear on your page.
Step 5: Press Command/Control + S to save changes.
Add Custom Bullet Points in Google Docs on Mobile
The Google Docs app and other Google Productivity Suite apps are available to download for Android and iPhone. When you have to edit your documents on the go, the Google Docs app works perfectly. Ensure that you have a strong internet connection to access your synced documents. Make sure to use the latest version of Google Docs on your device.
Follow these steps to add bullet points. The steps remain the same for Android and iPhone users.
Step 1: Open the Google Docs app on your Android or iPhone.
Step 2: Open a New Document or access a previous one you want to edit.
Step 3: Tap the Pencil icon at the bottom right to edit your document.
Step 4: Place the cursor in the document where you want to add bullet points.
Step 5: Tap the Font icon at the top right and select the Paragraph tab.
Step 6: Tap to add Bulleted List or Numbered List to your document.
If you select Bulleted List, tap the encircled arrow icon to reveal more bullet point design options.
If you select Numbered List, tap the encircled arrow icon to reveal more bullet point design options.
Step 7: Select the design and add bullet points to the document.
Step 8: Tap the blue arrow icon at the top-left corner to save changes.
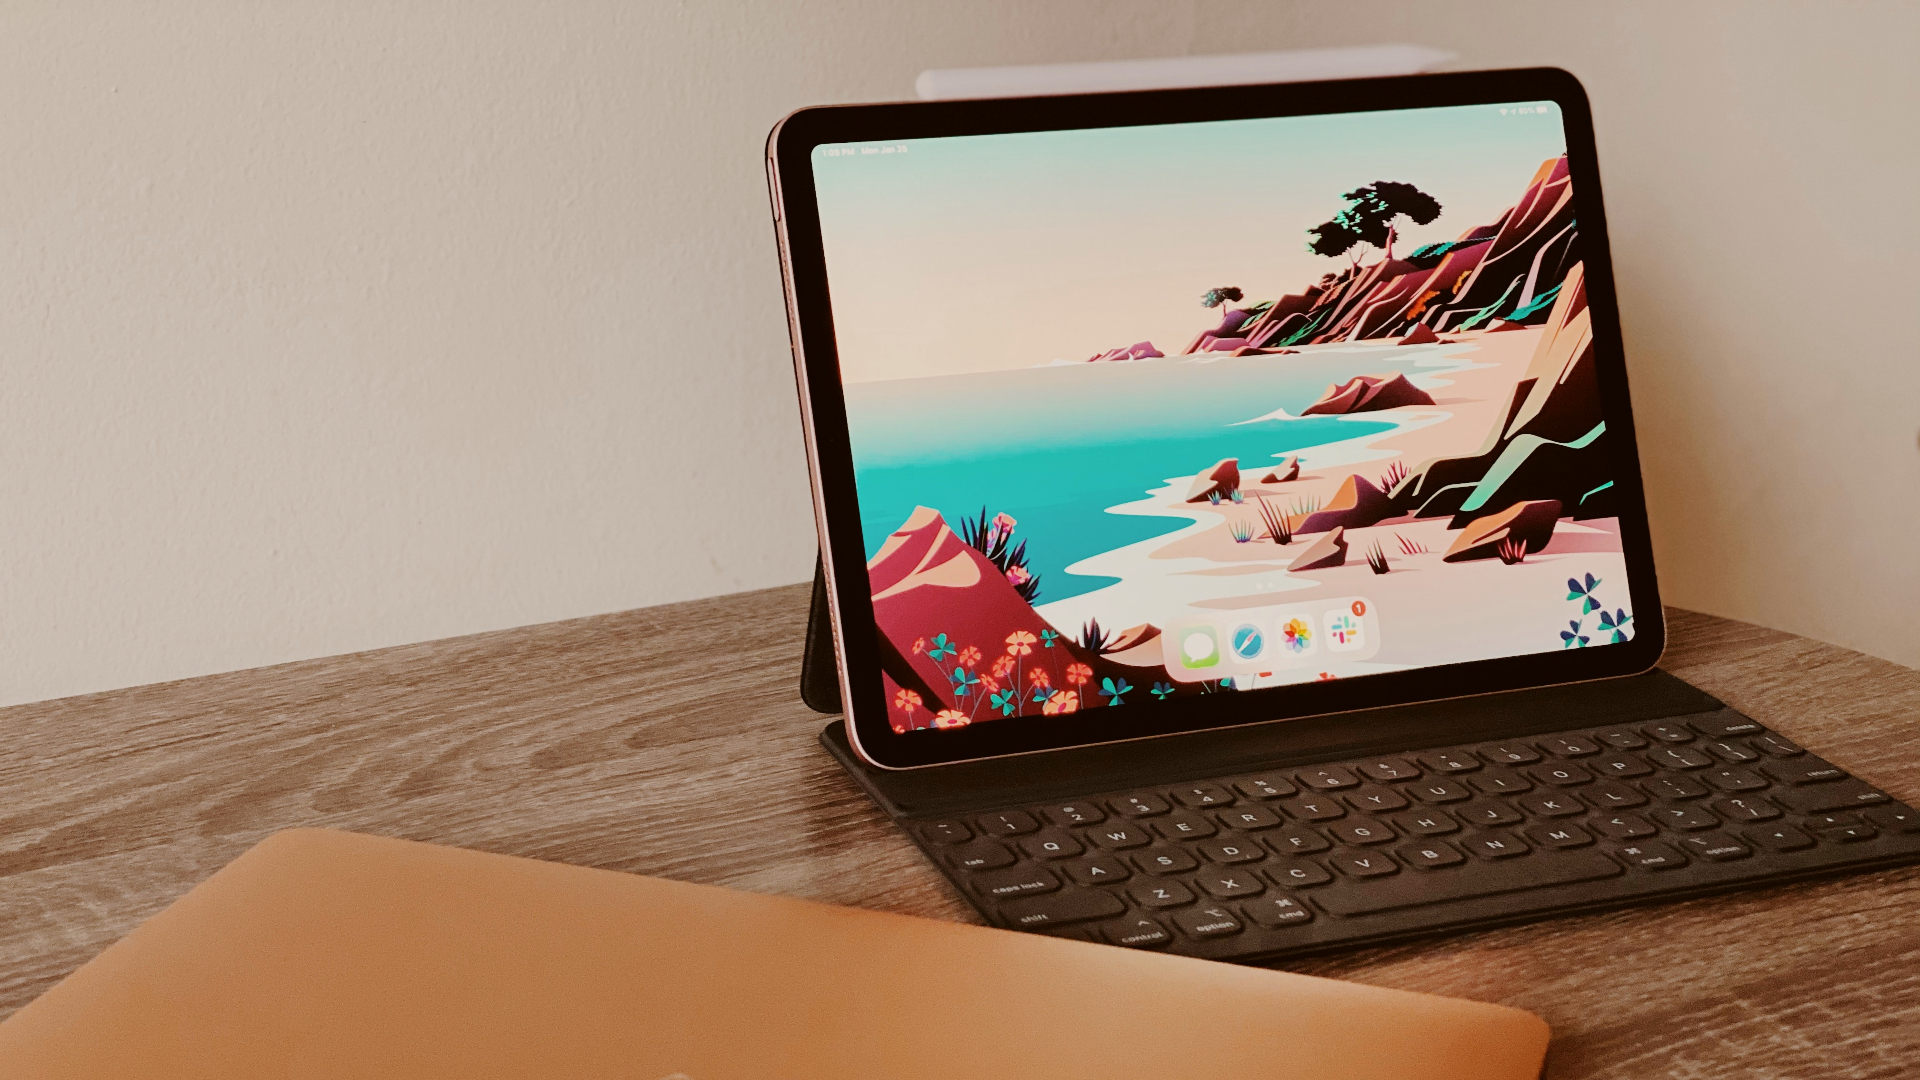
Apple’s iPad Air is now more powerful than ever before. It comes with an M1 chip, the same as the one found on the 13-inch MacBook Pro, along with iPad OS. After several versions, iPadOS has matured significantly and is inching closer to providing a desktop-like user experience on the iPad. However, just the UI isn’t enough to replicate a desktop.
You will need a keyboard or a folio cover with a trackpad for some serious work on the iPad. While you can connect an external keyboard via Bluetooth, it’s not as seamless as you will have to carry it along. The best solution to this problem is to get a keyboard case. A keyboard case can be a great companion to house the Apple Pencil. Here are some of the best keyboard cases for the Apple iPad Air 5th Generation to increase your productivity.
Before we get to the cases, here’s something else you might be interested in:
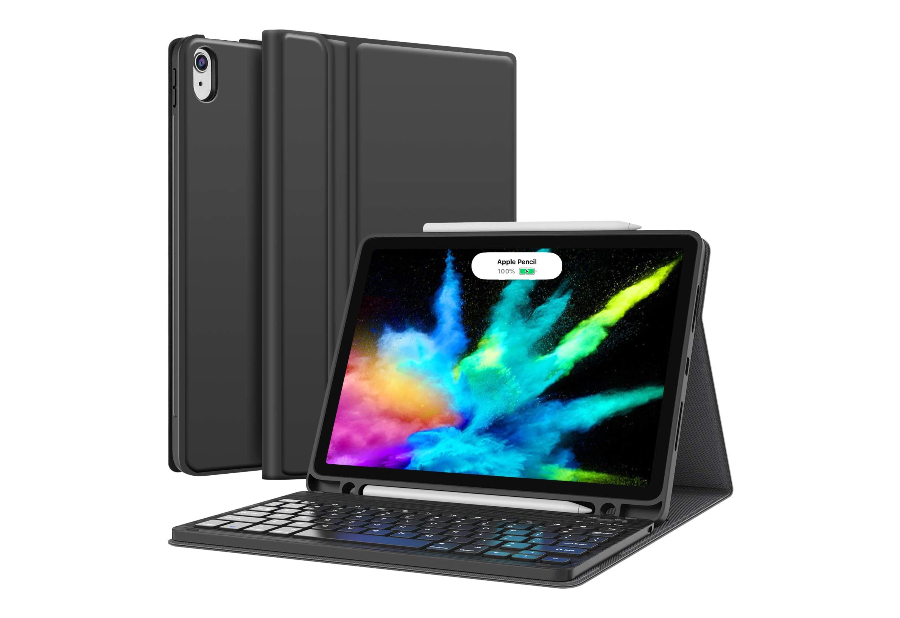
The Gokoco wireless keyboard case is an inexpensive folio case that comes with a detachable magnetic keyboard. You can use it as a normal case and when you want to get serious work done, snap the keyboard on.
Keyboard cases for the iPad Air are generally on the expensive side, but this one from Gokoco brings the price down by converting it into a folio case with a detachable keyboard. Unlike Apple’s official version, this case comes with a snap-on Bluetooth keyboard that sits right when the case is open.
Binging your favorite shows on the iPad? Remove the keyboard and place it to the side. Need to edit some documents on the go, just flip open the case and snap the keyboard in place. You also get a slot to house the Apple pencil making it a good option if you’re looking for a cheap keyboard case for your iPad Air 5th generation.
The Chesona case is similar to the previous one in the sense that it has a detachable keyboard hooked onto a magnetic folio case. The keyboard connects via Bluetooth and the case also has a slot for the Apple pencil.
The Chesona keyboard case has a slightly more sober look compared to the Gokoco option mentioned previously. It’s a good folio case that can serve multiple purposes. You can use it as a standard folio case to protect your iPad while traveling and even convert the flap into a kickstand to rest the iPad on a surface while viewing content.
When you want to get some work done on the go, just flip out the keyboard attachment and place it on the bottom surface of the case to keep it in place with the help of magnets. Then, the keyboard connects to the iPad via Bluetooth giving you an additional way to input text on the iPad. This is another inexpensive option that you can consider for your iPad Air.
If you want a proper keyboard case that’s not a makeshift version with a detachable keyboard, this is your most affordable option out there. The Zagg Pro Keys is essentially a more affordable version of Apple’s Smart Keyboard Cover.
Willing to spend more on a premium keyboard that attaches right onto the back of your iPad Air 5th generation? Then, this is a good option to consider. For just over $100, you’re getting a detachable folio case that goes on the back of your iPad. It attaches magnetically and is hence easily detachable.
There is an outer layer to the case that protects the iPad when you’re not using the keyboard attachment. This makes it a good accessory since Apple’s own Magic Keyboard also doesn’t offer any protection for the sides of the iPad. Another advantage of this case is that the keys are backlit to them in the dark. This is the best entry-level keyboard attachment for the iPad Air 5.
For a little extra compared to the Zagg Pro Keys, the ESR Rebound Case adds a trackpad to the keyboard attachment that makes it an excellent purchase, especially at the price point at which it’s available. If you plan on using your iPad as a laptop, this is a great pick.
If the Zagg Pro Keys was an affordable version of Apple’s Smart Folio, the ESR Rebound is an affordable version of Apple’s top-of-the-line Magic Keyboard. It has the same design with a slim back that attaches magnetically to the back of your iPad Air 5. The case uses Apple’s smart connector pins at the back of the iPad to communicate with it.
Like the Magic Keyboard, the ESR Rebound has a trackpad beneath the keyboard giving you a proper laptop-like experience. It even has an additional trick up its sleeve. Quite literally. There’s a small flap that you can extend at the bottom of the case to replicate a small wrist rest of sorts while typing. This can be useful for long typing sessions. Since Apple’s Magic Keyboard is expensive, this is a great alternative for almost a third of the price.
This is hands down one of the best keyboard cases that you can get for your iPad Air 5th Generation. We would go as far as saying it’s even better than Apple’s Magic Keyboard. It has a protective layer for your iPad, a backlit keyboard, and a nice trackpad. An easy recommendation.
The Logitech folio is available for half the price of Apple’s Magic Keyboard and even betters it in some ways. While the Magic Keyboard does not provide any protection for the iPad, the Logitech Folio has a proper bumper that goes all around the iPad and protects it from scratches or dents. There’s a slot at the top where the Apple Pencil can fit perfectly.
The keyboard is backlit, and there is a trackpad at the bottom that you can use in place of touching the iPad’s screen. When you don’t want to use the keyboard and instead use the iPad for sketching or just viewing content, there are various angles that the case provides, including a dedicated sketch mode. You cannot go wrong with the Logitech Folio Touch if you have an iPad Air.
This is Apple’s default option for those looking for a keyboard case for their iPad Air 5th generation. Since it’s Apple’s first-party accessory, you get the best compatibility and an additional USB-C port on the side to charge the keyboard and the iPad.
If you’re into the Apple ecosystem, you must be family with the Apple’s hardware and software integrateions. If you are looking for that level of integration, Apple’s Magic Keyboard is your best option. It has a magnetic back that attaches to the iPad via the smart connector pins on the rear. You get a backlit keyboard along with a smooth trackpad that supports gestures.
An extra port on the side is an additional perk that you get with the Magic Keyboard. This USB-C port can pass-through power to the iPad, thus simultaneously charging the case and the iPad. You can adjust the angle of the case as per your usage. If you’re willing to spend almost $300 on a case, the Magic Keyboard is for you. Or else, you can get the same amount of features with better protection with the Logitech Folio Touch.
Use Your iPad Like a Computer
With Apple consistently improving iPadOS, we’ve come to a point where you can get a lot of work done on just an iPad without a dedicated computer. A keyboard case makes it a lot easier to achieve this, especially if your work involves a lot of typing or browsing.
Check the Android version: To use call recording features, your Android phone must run Android version 9 and above. So, check and ensure your device’s software is updated.
Restart the Phone app: Open all background apps and force them to close. Then, reopen the Phone app and try placing the call again to see if the call recording feature is working as expected.
Check for Phone app updates: Software-related bugs can also cause the Phone app to not record incoming voice when recording calls. Software updates usually include bug fixes to resolve such issues. So, check and update the Phone app to the latest version.
Try using other apps: If you’re a Samsung user, you can switch to Samsung’s Phone app and try recording the call again. Android users can also try using other third-party calling apps to see if this fixes the issue.
Fix 1: Manually Record the Call
If your call recordings don’t have the incoming voice, try recording the call manually. To do this, use the Phone app options. This way, you can start the recording mid-call and avoid any network issues that might be cutting the incoming voice. Here’s how to do it.
Step 1: Once the call is connected, tap on More. Tap on Record.
Step 2: If prompted, tap on Start recording. This will announce and start the call recording.
Fix 2: Clear the Phone App Cache
Caches help improve app performance. However, if this cache gets too big, it can cause apps to stutter or not work properly. So, if the call recordings have been missing the incoming voice, clearing the Phone app cache can fix it. Follow the below steps to do it.
Step 1: Open Settings and tap on Apps. Tap on Phone.
Step 2: Tap on Storage. Then, tap on Clear cache.
Fix 3: Enable All Phone App Permissions
The Phone app requires several permissions to function properly, including microphone and phone permissions. Disabling any of these permissions can prevent call recording from working properly. So, use the below steps to check and ensure all Phone app permissions are enabled.
Step 1: Open Settings and tap on Apps. Tap on Phone.
Step 2: Tap on Permissions. Go to the relevant permission and select Allow.
Repeat these steps until all Phone app permissions have been enabled. Then, try recording the relevant call again.
Fix 4: Uninstall the Phone App
If you’re using the Phone app as a secondary app, you can uninstall and reinstall the app to remove any custom settings that might be causing call recording interference. Here’s how to do it.
Step 1: Open Settings → Apps → Phone. Tap on Uninstall.
Note: If there is no option to uninstall, tap the three-dot icon at the top-left corner → Uninstall updates.
Step 2: When prompted, tap on OK to confirm.
Now, go to the Google Play Store and reinstall the Phone app. Once you have set it up, record the relevant call again to see if the issue has been fixed.
Turn off silent mode or increase the volume – Instagram’s sounds are automatically muted on silent mode. So, increase the volume or disable silent mode to hear back sound in stories.
Disable/disconnect Bluetooth devices – Maybe the sound is directed to the connected Bluetooth device. Disable or disconnect it to use iPhone speakers.
Check the story – If you don’t see a music icon or tune name at the top, the story is without music. Check another story to be sure.
Check for restricted audio – Some music might not be licensed to stream in your region. So, Instagram mutes the story to avoid any legal troubles. You can use a VPN as a workaround for this issue.
Update or reinstall Instagram – To fix bugs or any settings-related issues, update or reinstall the app.
Fix 1. Logout and Log in to Instagram
This trick has worked wonders to fix Instagram glitches such as the feed not refreshing, stickers not working, and more. Instagram might limit you from some functions when it fails to authenticate your account. You need to sign out from your account and log in again.
Step 1: Open Instagram on iPhone or Android.
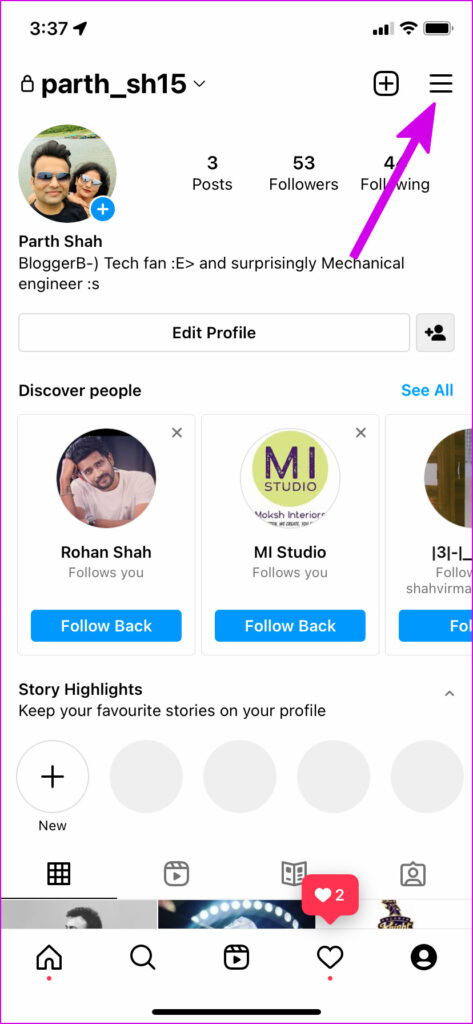
Step 2: Go to the Profile icon from the bottom-right corner. Tap the hamburger menu at the top.
Step 3: Scroll down and log out from your account.
Login with the same account details and start browsing Instagram stories.
Fix 2. Clear Instagram Cache (Android)
This trick applies to power Instagram users. Your Instagram experience might bog down due to heavy use and high cache data. Remove the Instagram cache on Android and try again.
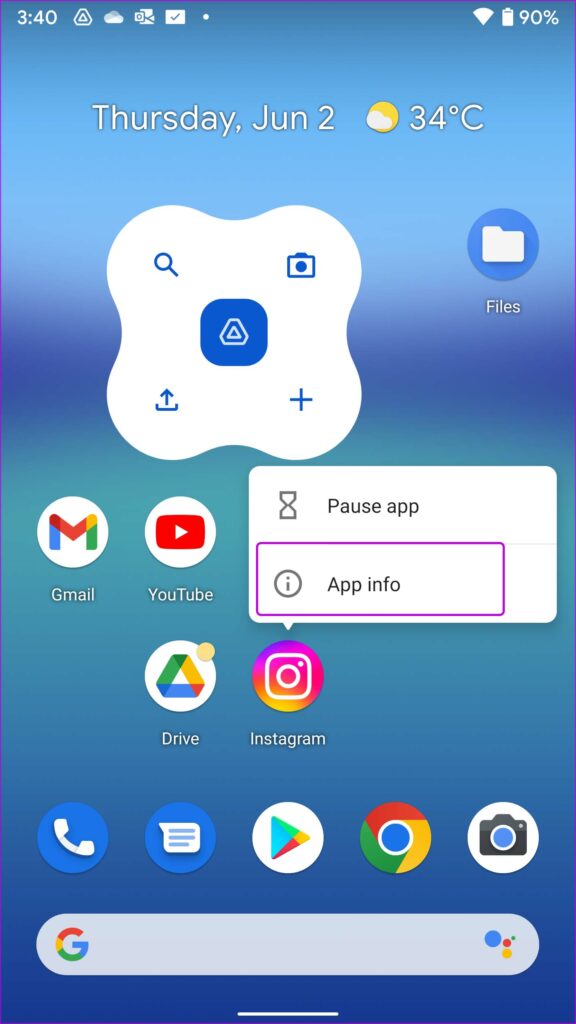
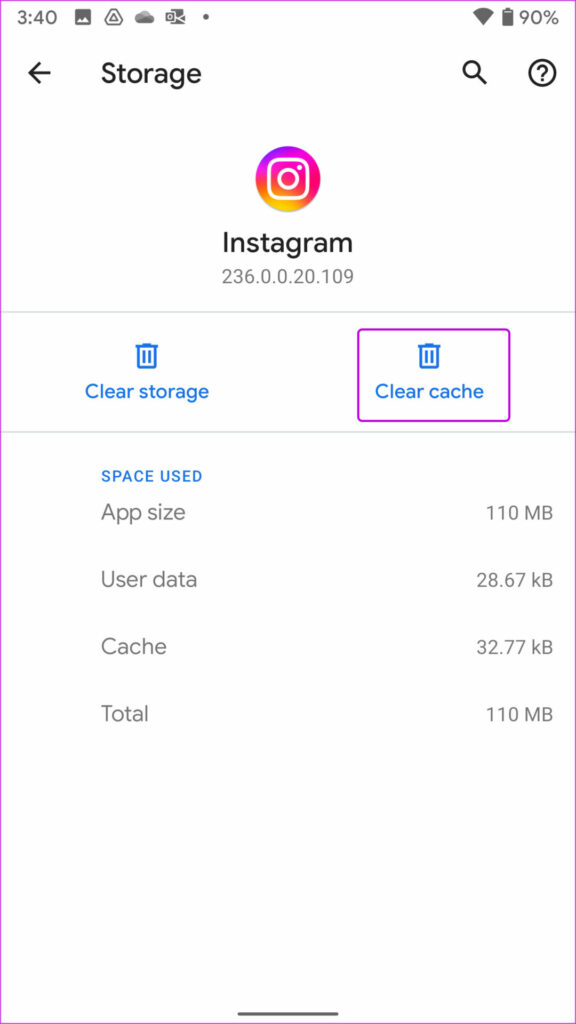
Step 1: Long-tap on the Instagram app icon > open the app info menu.
Step 2: Go to the Storage & cache menu > tap Clear cache from the following menu.
Fix 3. Report the Problem to Instagram
If your Instagram Story sound is still not working, it’s time to complain to the developers. The Meta team usually addresses such problems promptly and helps resolve the issue.
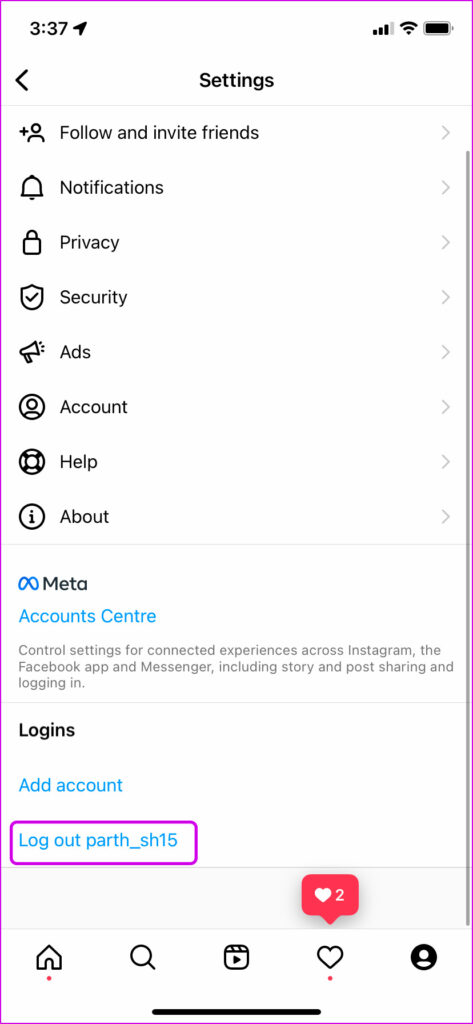
Step 1: Open the Instagram app → Profile tab. Tap the three-line icon (menu) and select Settings.
Step 2: Scroll down and select Help. Choose Report a Problem.
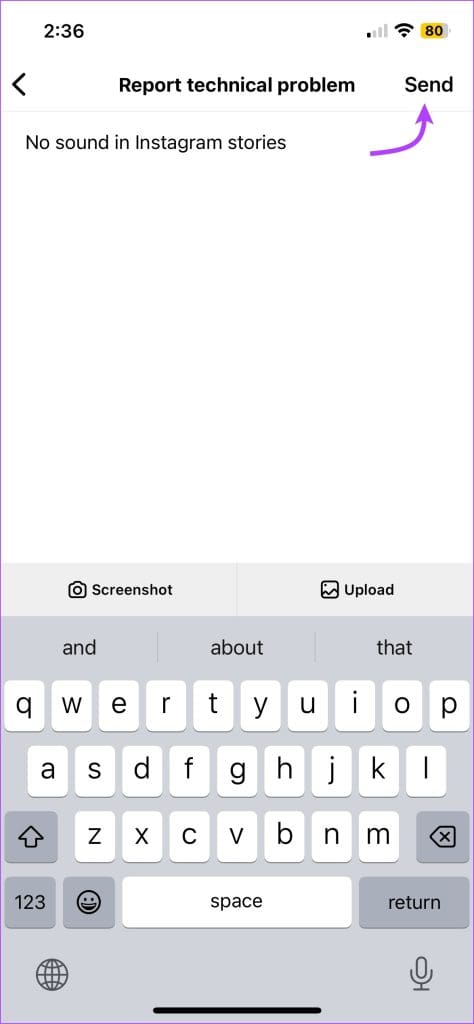
Step 3: In the pop-up window, select Report problem without shaking.
Step 4: Briefly describe the problem you’re facing and tap Send.
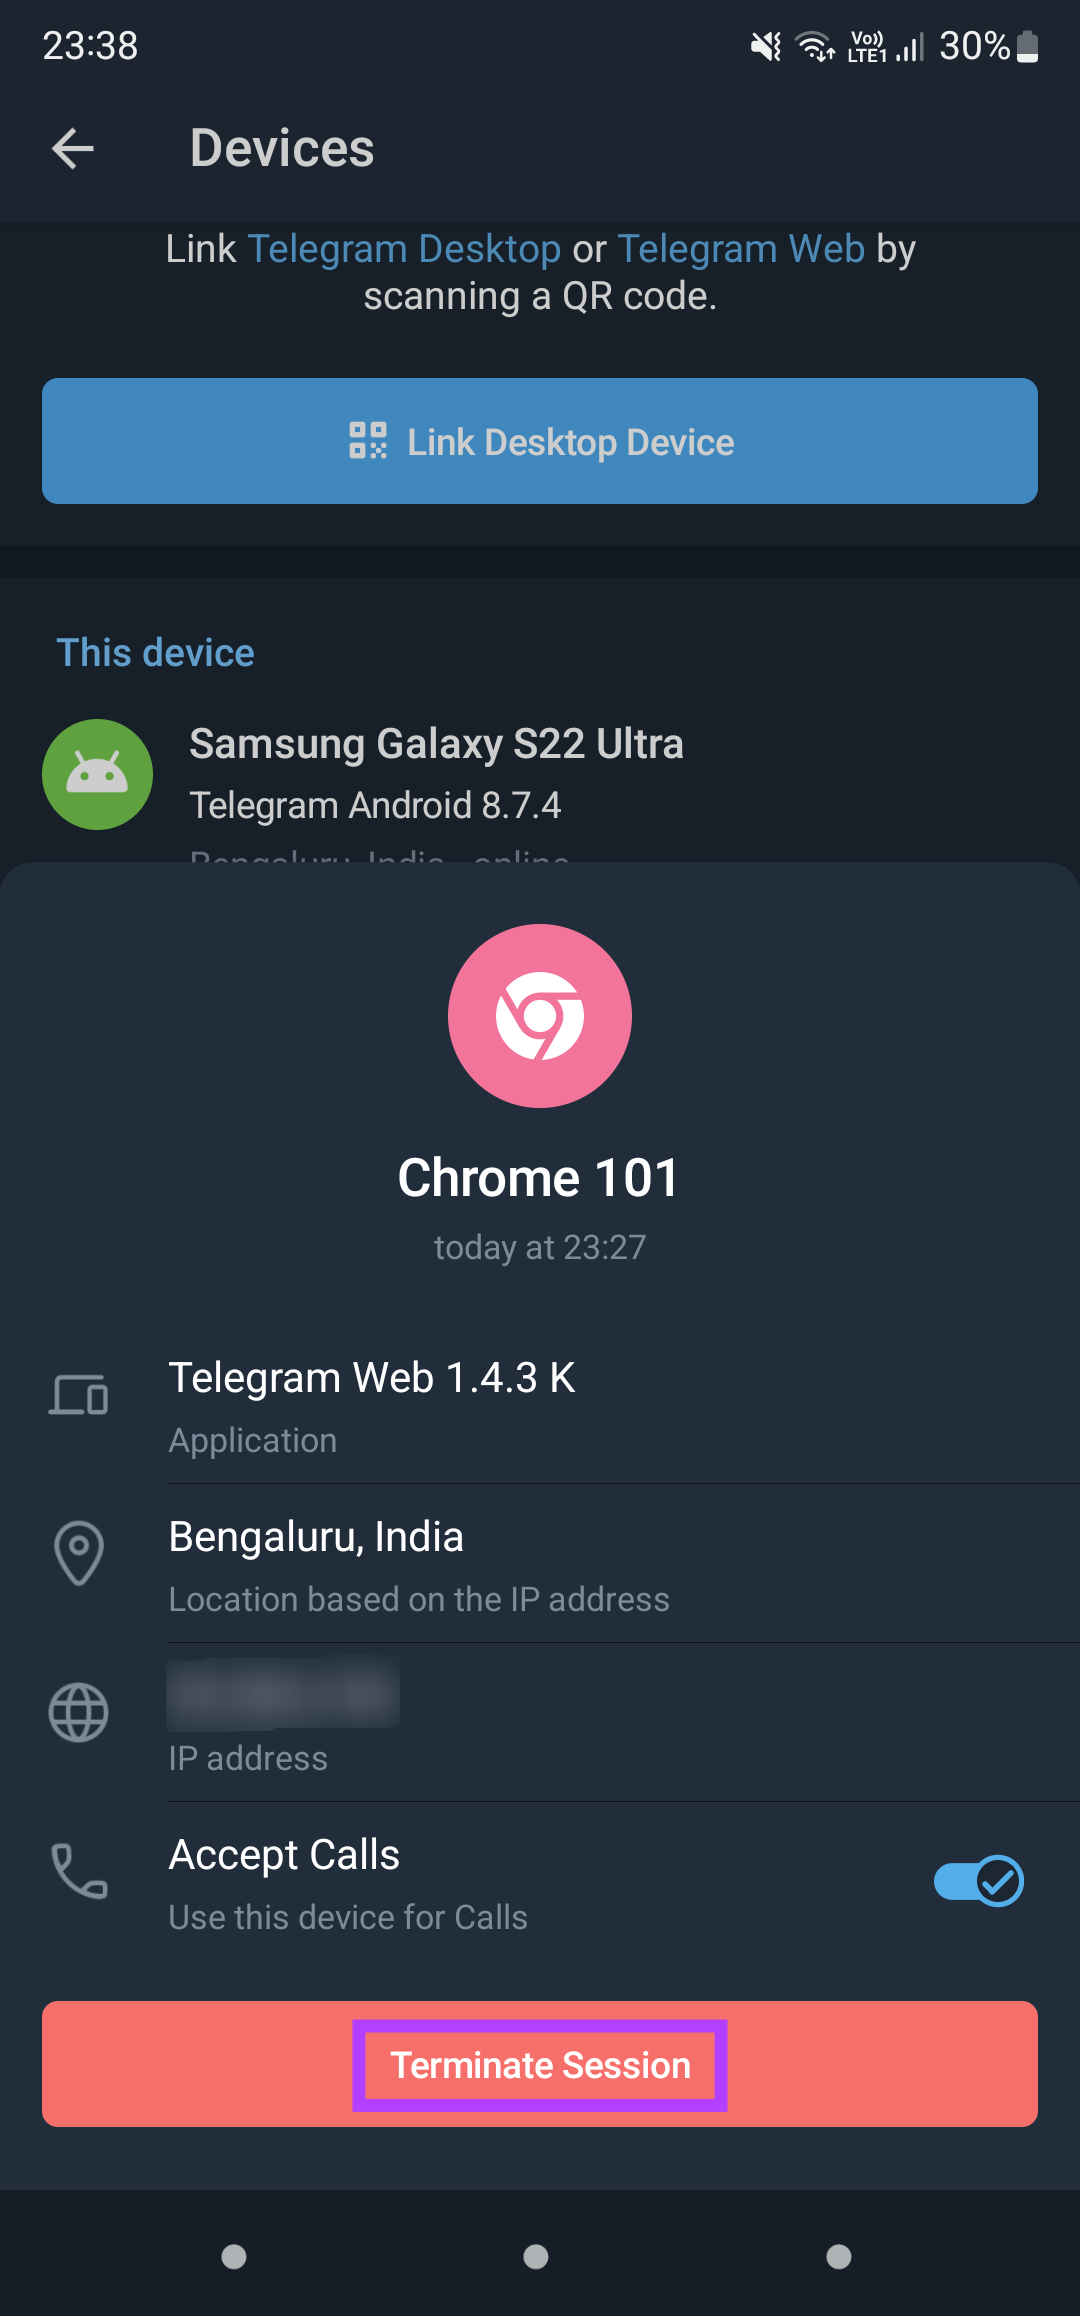
Telegram is available for a wide variety of device platforms. Plus, there is no limit to adding your linked devices. So let’s begin the steps for removing linked devices from your Telegram account on mobile. The steps remain the same for iPhone and Android phone users.
Open the app > Settings > Devices > tap the device name > Terminate Session.
Telegram offers a dedicated Desktop app for Mac users. If you want to avoid using your phone, download the app from Mac App Store. The Desktop apps also allow you to accept audio and video calls which is a big bonus.
Follow these steps.
Step 1: Open Telegram > Settings > Active Sessions.
Step 2: Click on Terminate Session at the bottom to log out the device.
Log Out Device in Telegram on Windows
Windows users can also download the dedicated Telegram Messenger app from the Microsoft Store. Before moving ahead, please ensure that you are using the latest version of the app.
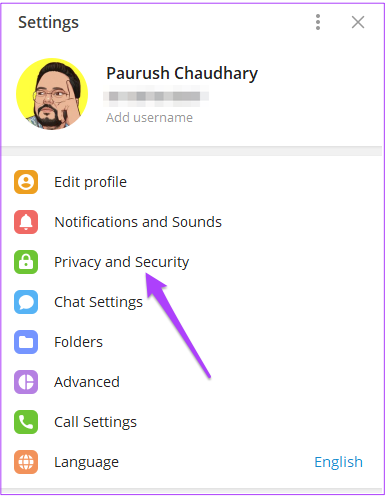
Step 1: Open Telegram > Settings > Privacy and Security.
Step 2: Select Show All Sessions > Terminate Session.
Step 1: Select File at the top and click on Reduce File Size.
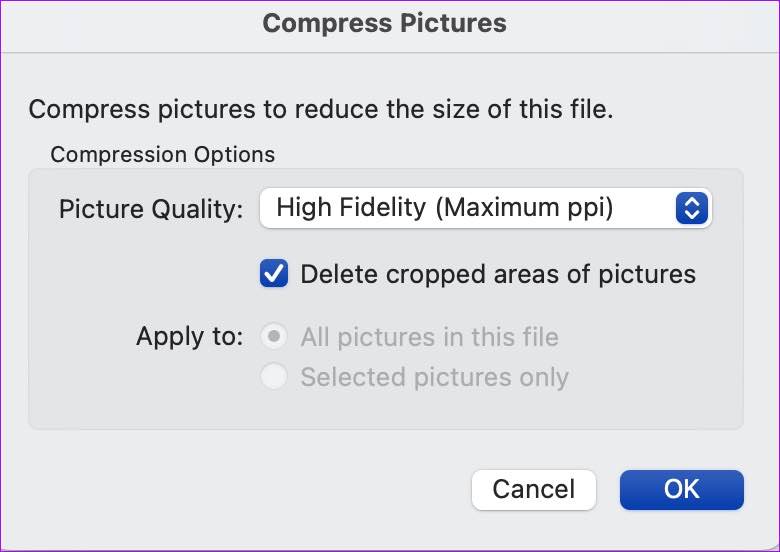
Step 2: Select picture quality and other compression options from the following menu. Hit Ok.
Try saving the Word document again on Mac.
Fix 2: Change Default Save Location
Unlike Windows, Mac users don’t get the option to change the default location to save Word documents. So, you need to manually select your document storage location.
Step 1: In your Word document window, click on File at the top left corner and then select Save As.
Step 2: Choose the location where you want to save your document on your Mac. You will have to repeat the same process every time to change the download location.
Fix 3: Check Microsoft Word Version History
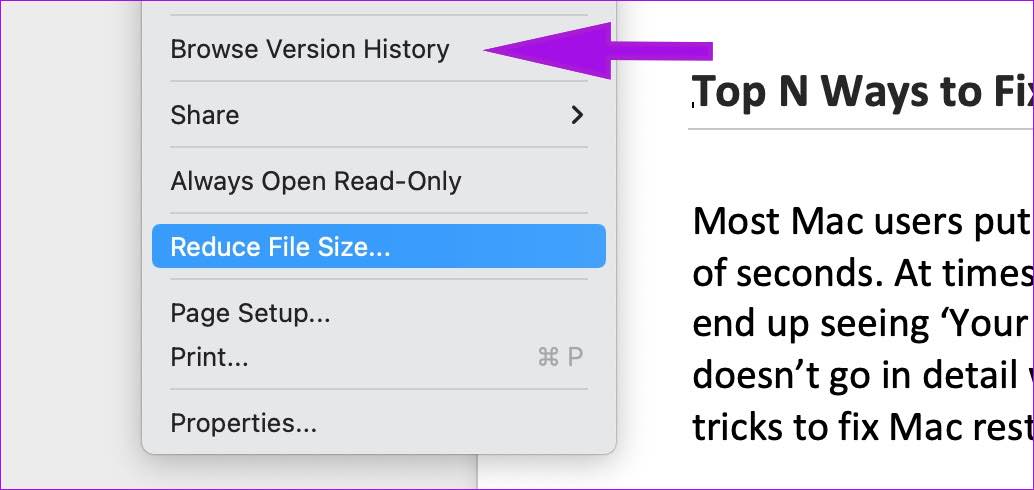
Step 1: Open a document in Microsoft Word, click on File, and select Browse Version History.
Step 2: Open the previous version. You can check who modified it at which time.
Restart the router and iPad: Power off your iPad and Wi-Fi router. Wait a few minutes and turn the router back on. Then, restart your iPad and wait for it to connect to the Wi-Fi.
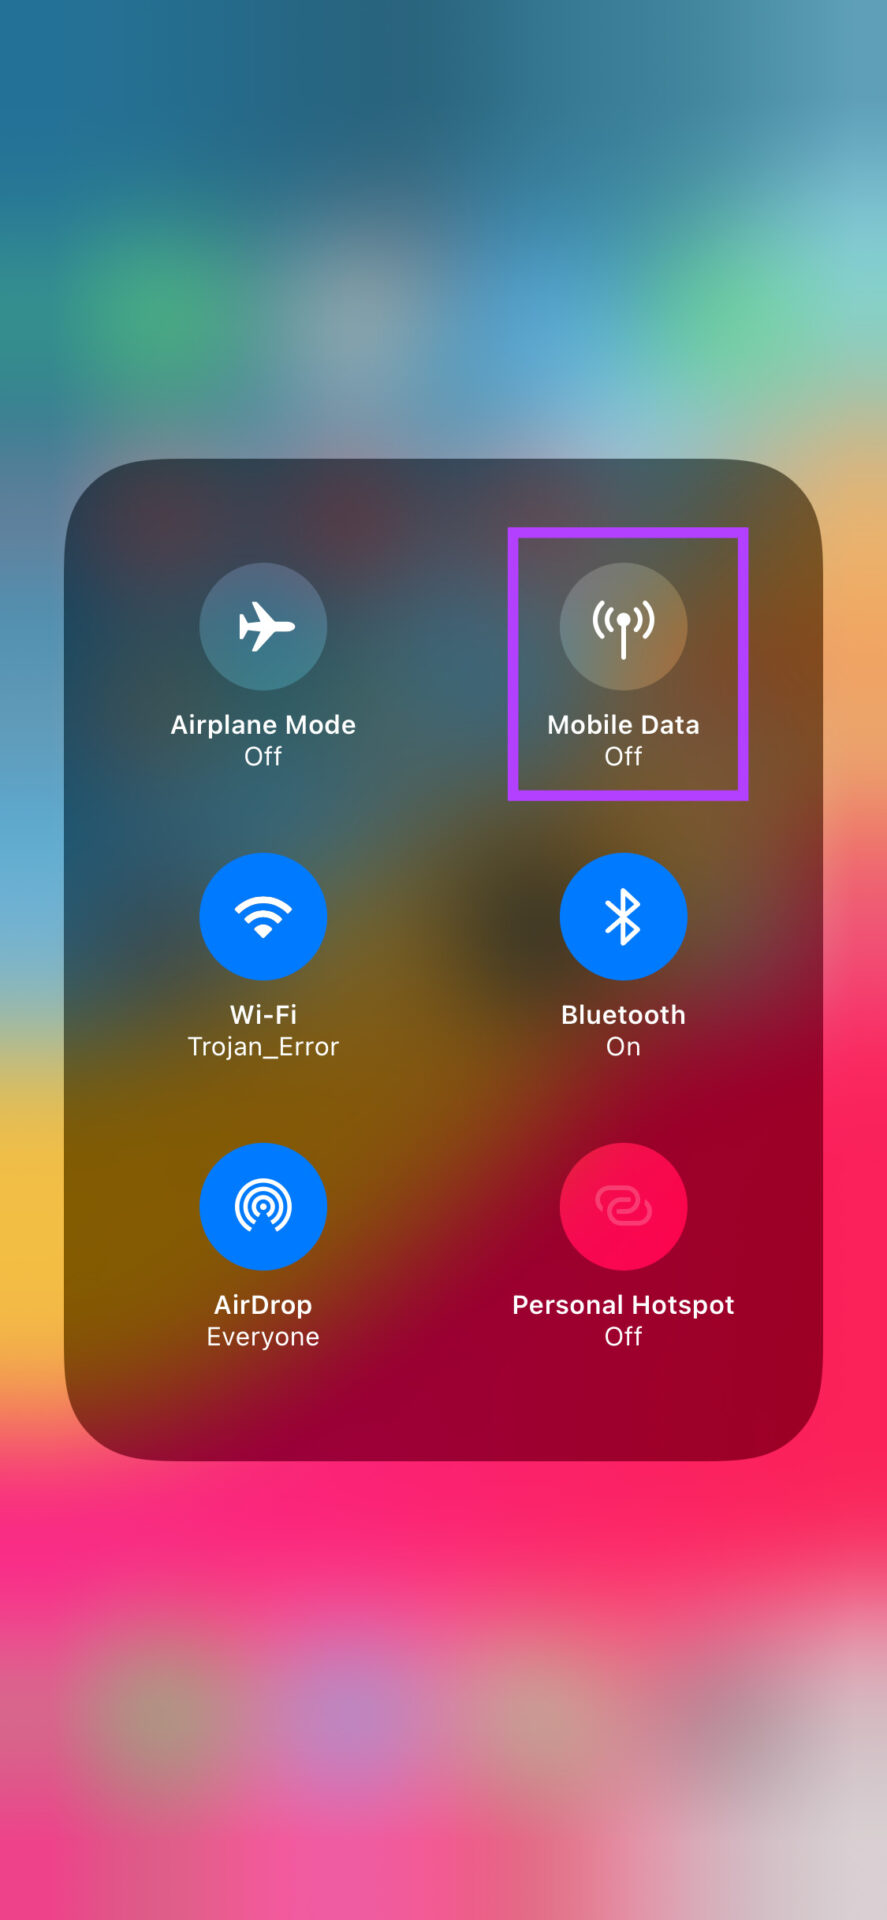
Enable and disable Airplane Mode: Turning on Airplane Mode disables all the network connectivity on the iPad, allowing you to reboot the network connection. Open the Control Center and enable Airplane mode. Disable it after a minute or two and check again.
Turn off VPN: When one of the connected VPN servers faces an outage, you will face issues with Wi-Fi connectivity on the iPad. Disconnect the VPN service on your iPad and try again.
Check for iPadOS updates: Since you don’t have internet connectivity on your iPad, you can’t download the newest iPadOS update. Connect your iPad to a computer, open iTunes, and install pending iPadOS updates to fix Wi-Fi issues.
Fix 1: Forget and Reconnect Wi-Fi Network
You can disconnect the current Wi-Fi network and reconnect it. This can help fix any temporary Wi-Fi glitches. Here’s how to do it.
Step 1: Open Settings and tap on Wi-Fi. Tap the i button beside the relevant Wi-Fi.
Step 2: Select Forget This Network. Connect to the Wi-Fi again and check.
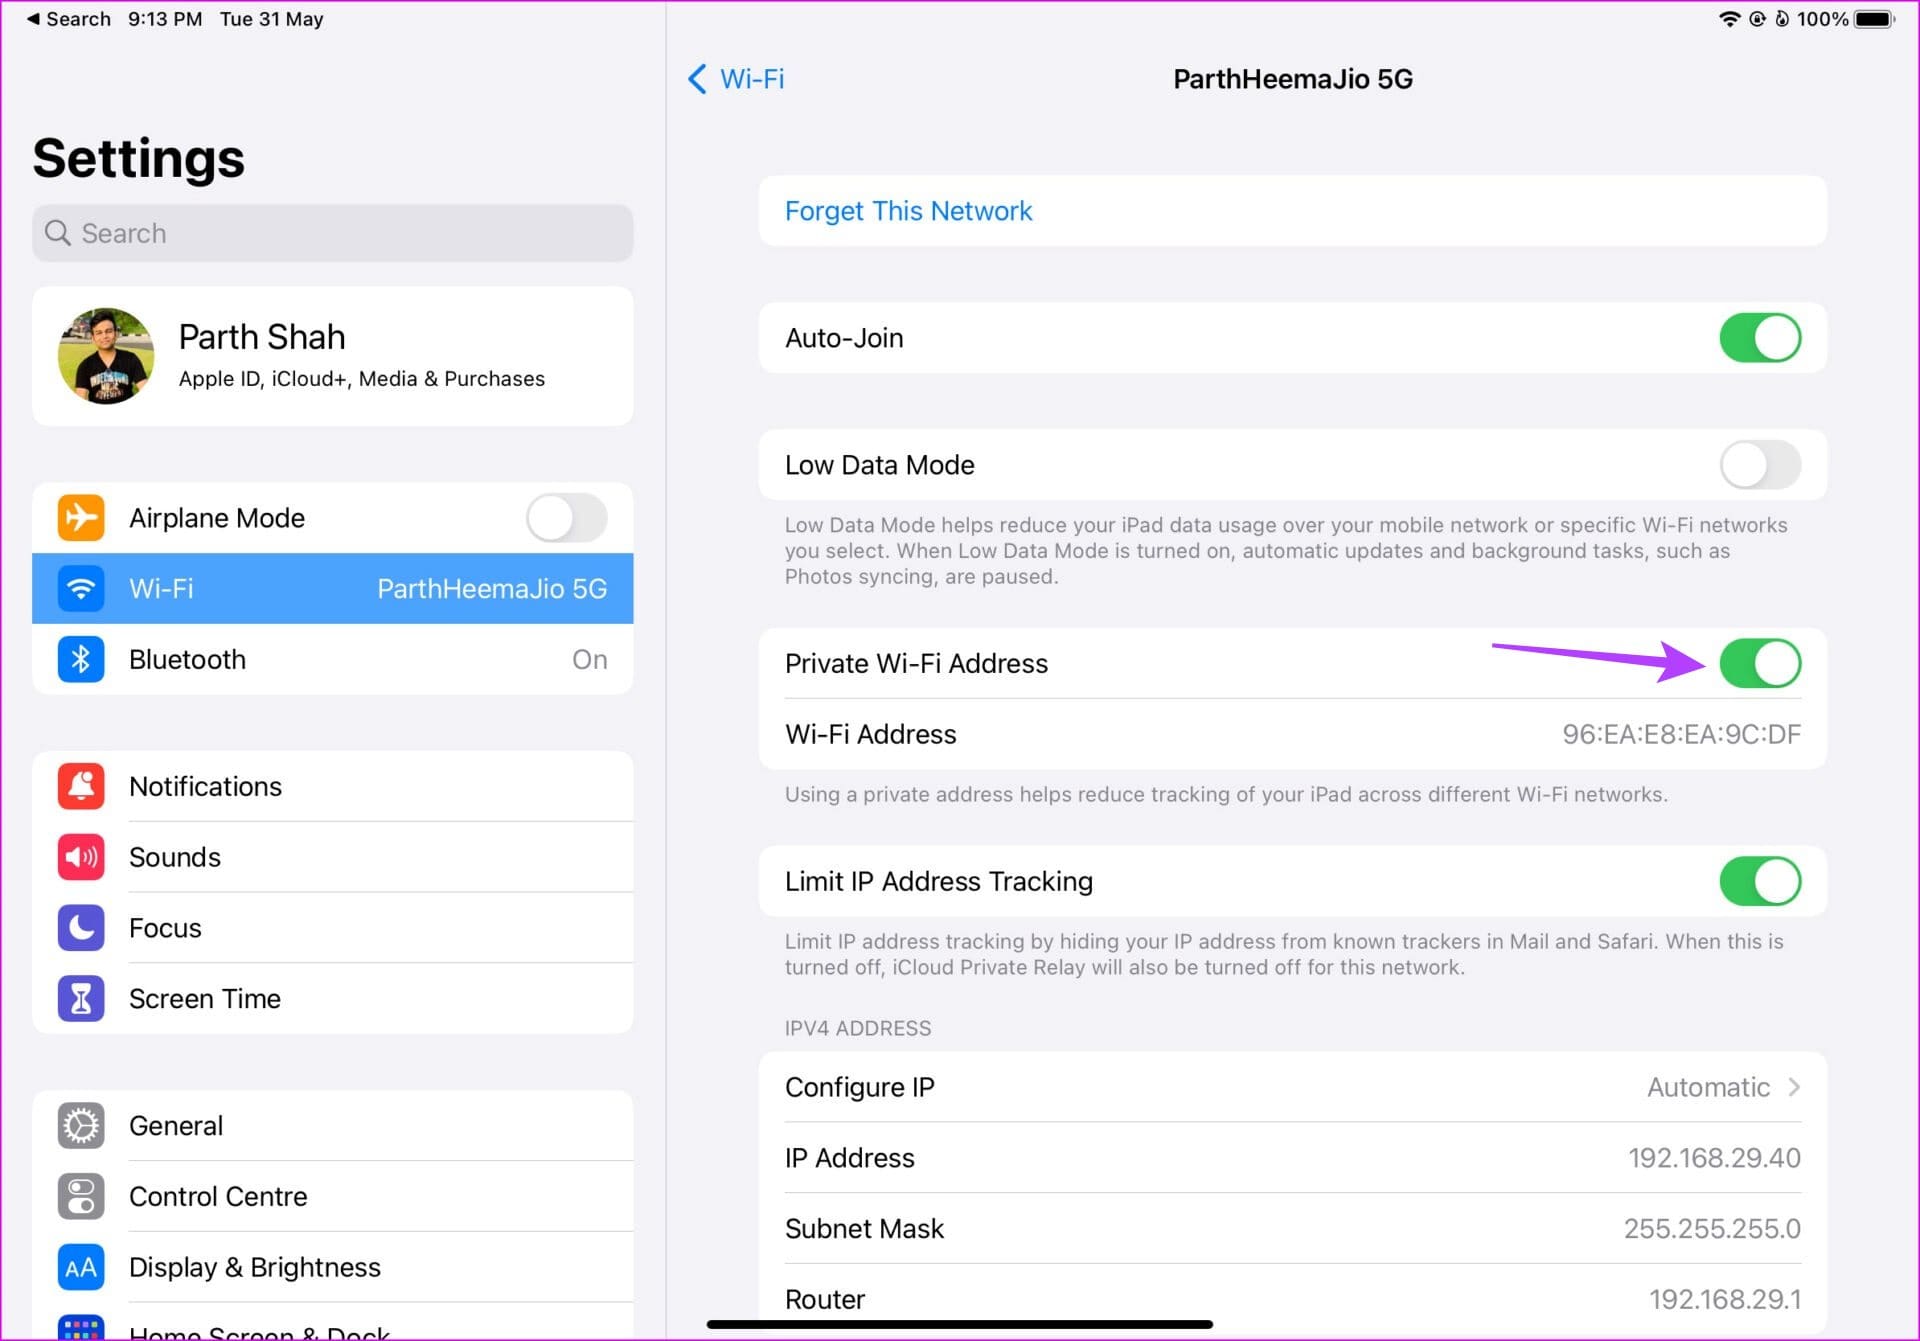
Fix 2: Disable Private Wi-Fi Address
Apple allows you to change your device’s Media Access Control (MAC) address for different networks, helping you hide your identity. However, this can also cause Wi-Fi not to work in some cases. So, disable this setting on your iPad and see if this fixes the issue. Here’s how.
Step 1: Open Settings → Wi-Fi → i button beside the relevant Wi-Fi.
Step 2: Turn off the Private Wi-Fi Address toggle.
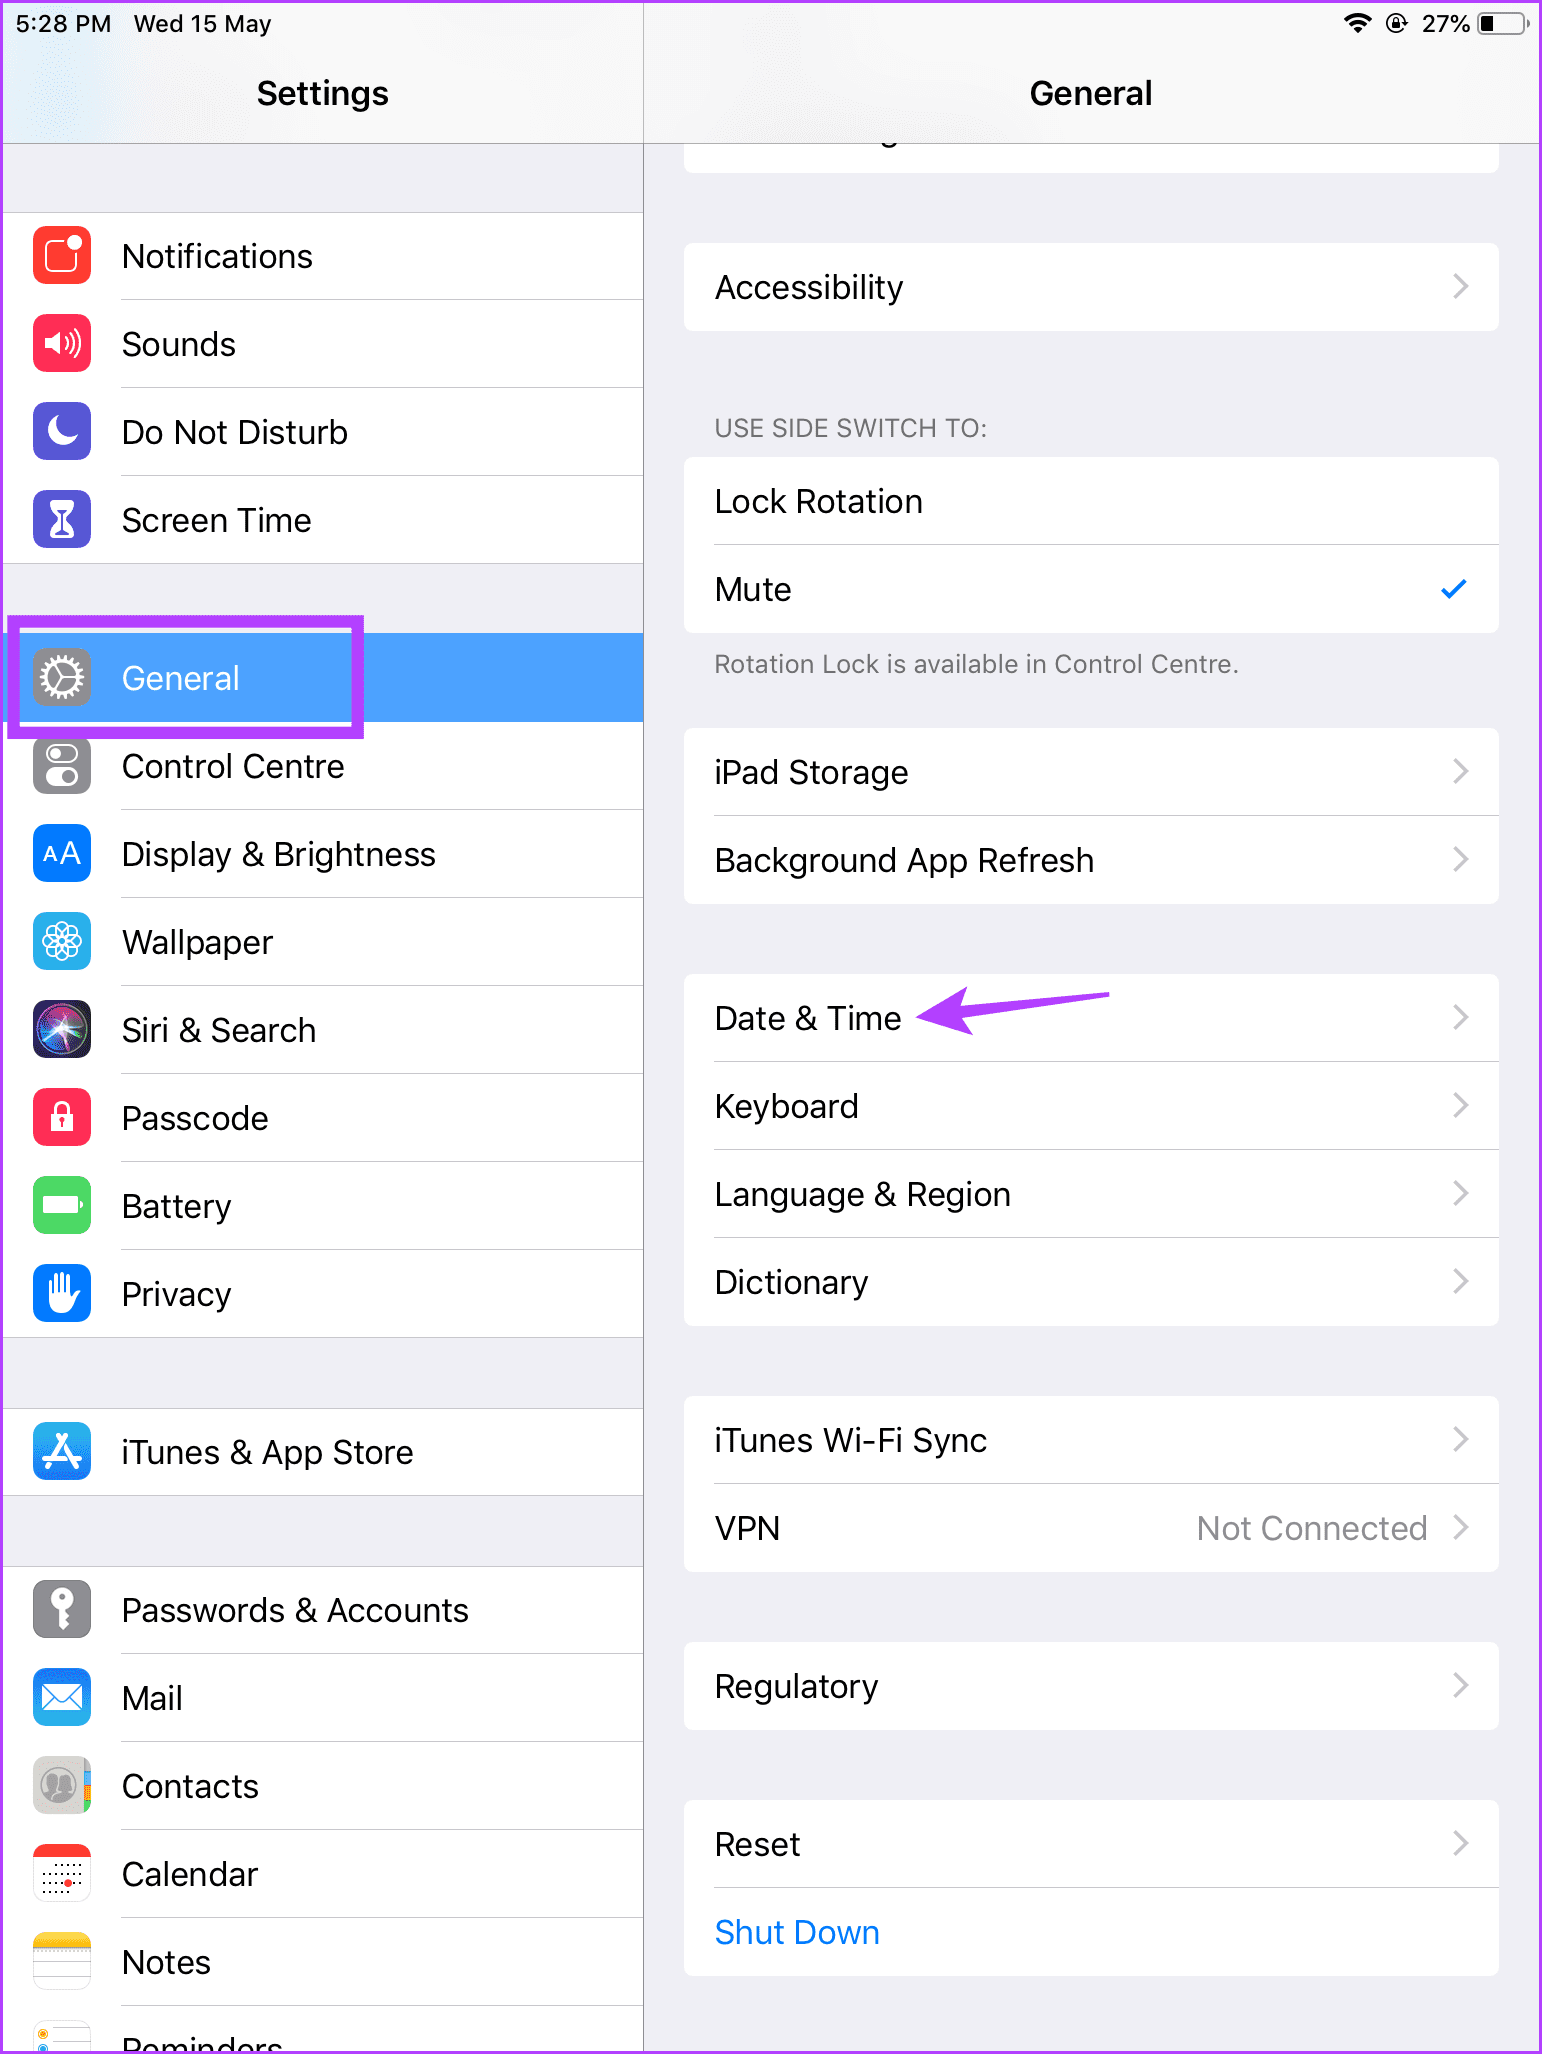
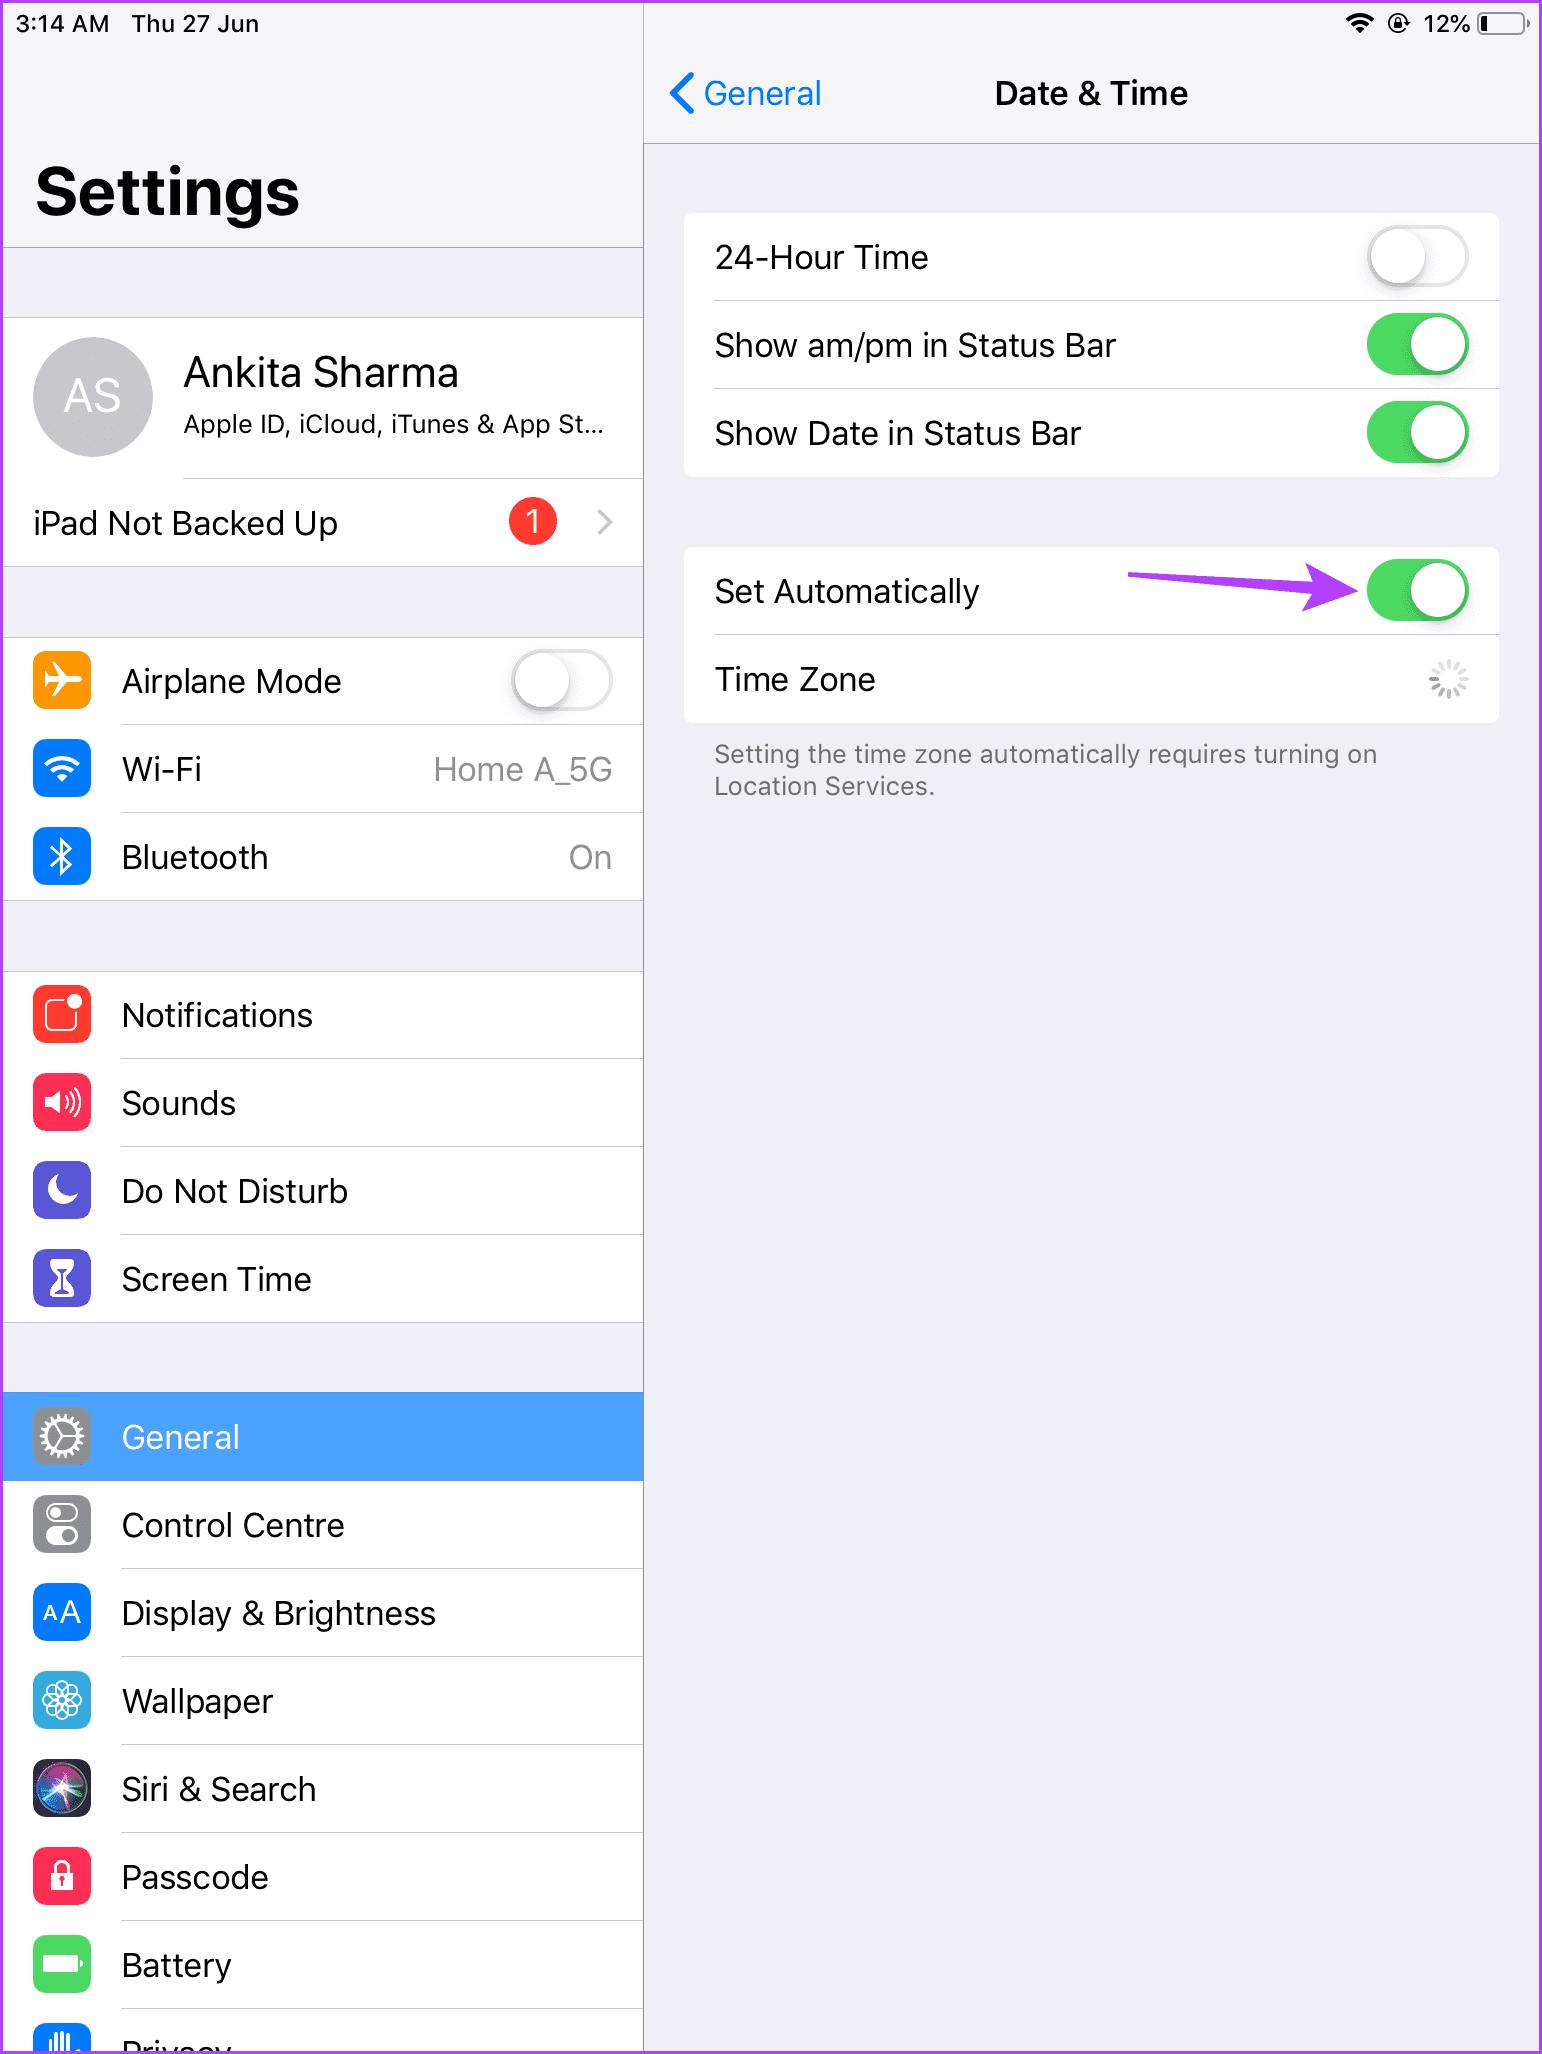
Fix 3: Set Date and Time to Automatic
If your iPad’s date and time settings are not correct as per your current timezone, it might cause issues when using certain iPad services. To ensure this does not happen, set the date and time to update automatically on your iPad using the below steps.
Step 1: Open Settings and tap on General. Tap on Date & Time.
While the Low Data Mode is designed to reduce data usage on iPad, the function may interfere with normal Wi-Fi operations on the device. Disable Low Data Mode for a working Wi-Fi connection. Here’s how to do it
Step 1: Open Settings → Wi-Fi → i button beside the relevant Wi-Fi.
Step 2: Disable the Low Data Mode toggle.
Fix 5: Disable Limit IP Address Tracking
Are you facing Wi-Fi connectivity issues in Safari for iPad? The problem might be related to iCloud Private Relay, which reroutes the traffic through Apple-branded servers. You must disable the Limit IP Address Tracking toggle to turn off iCloud Private Relay for the Wi-Fi network. Here’s how.
Step 1: Open Settings → Wi-Fi → i button beside your Wi-Fi.
Step 2: Disable Limit IP Address Tracking toggle.
Fix 6: Reset Network Settings
Glitches in network settings can also lead to issues with internet connectivity on your iPad. To fix them, use the reset network settings option on your iPad. This will delete all custom network settings without affecting device data. Here’s how to do it.
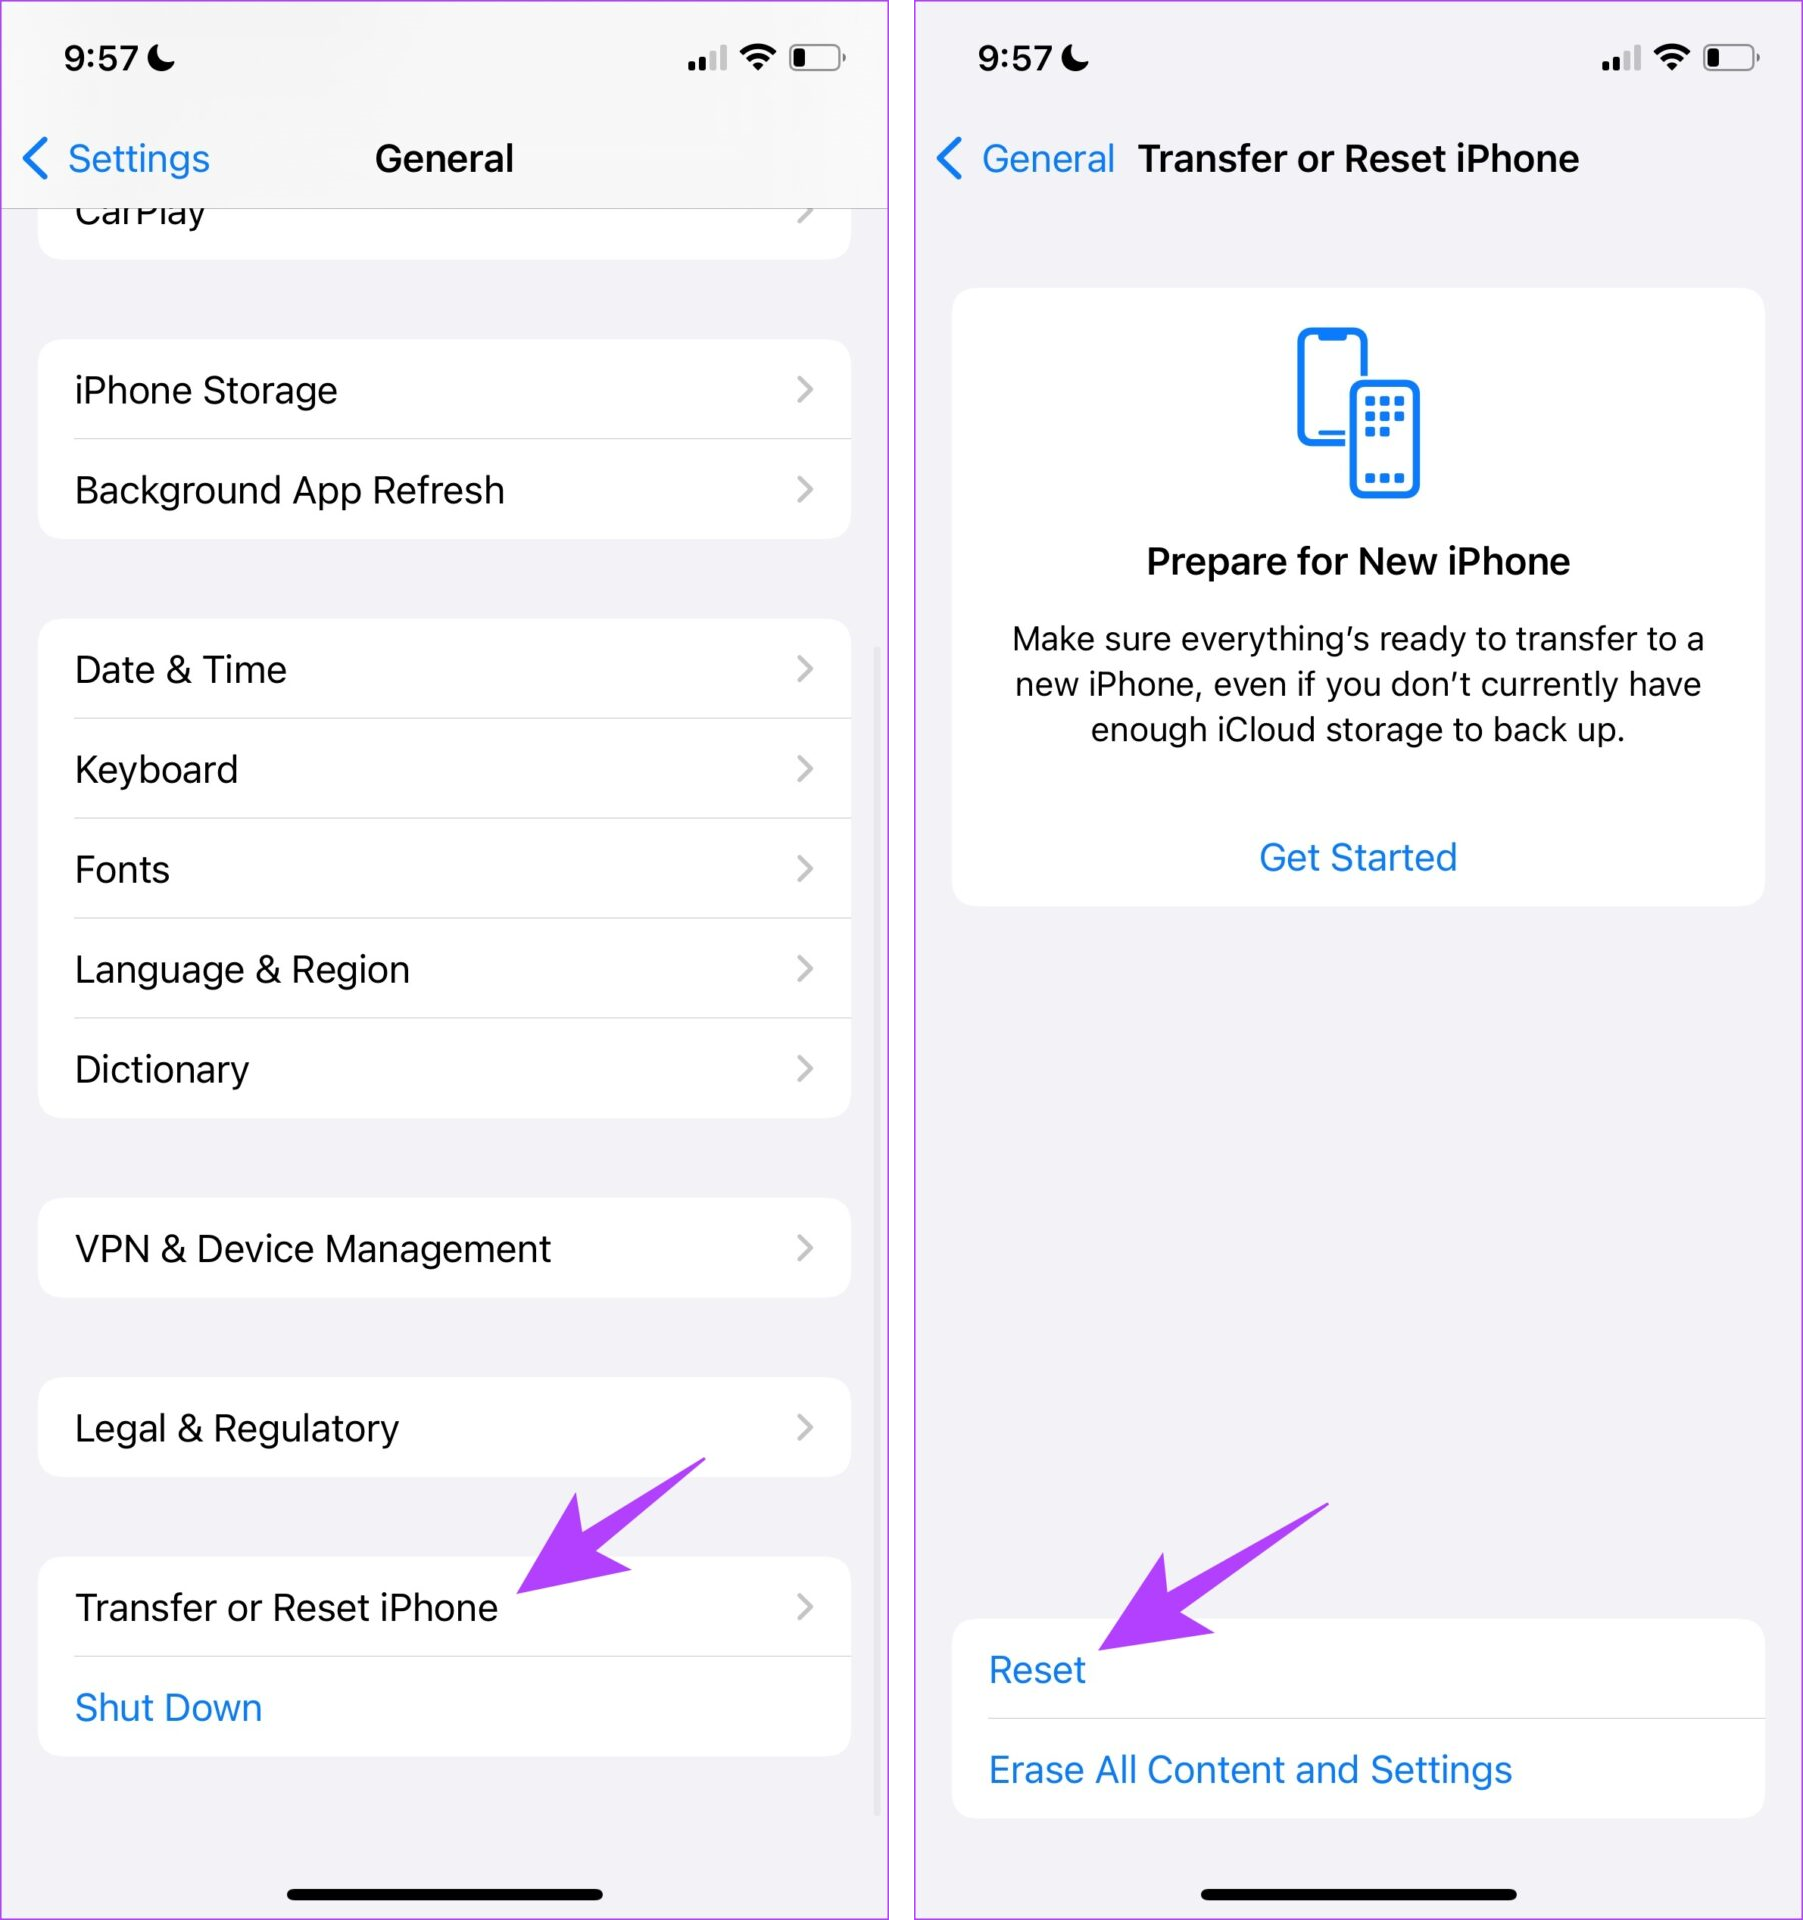
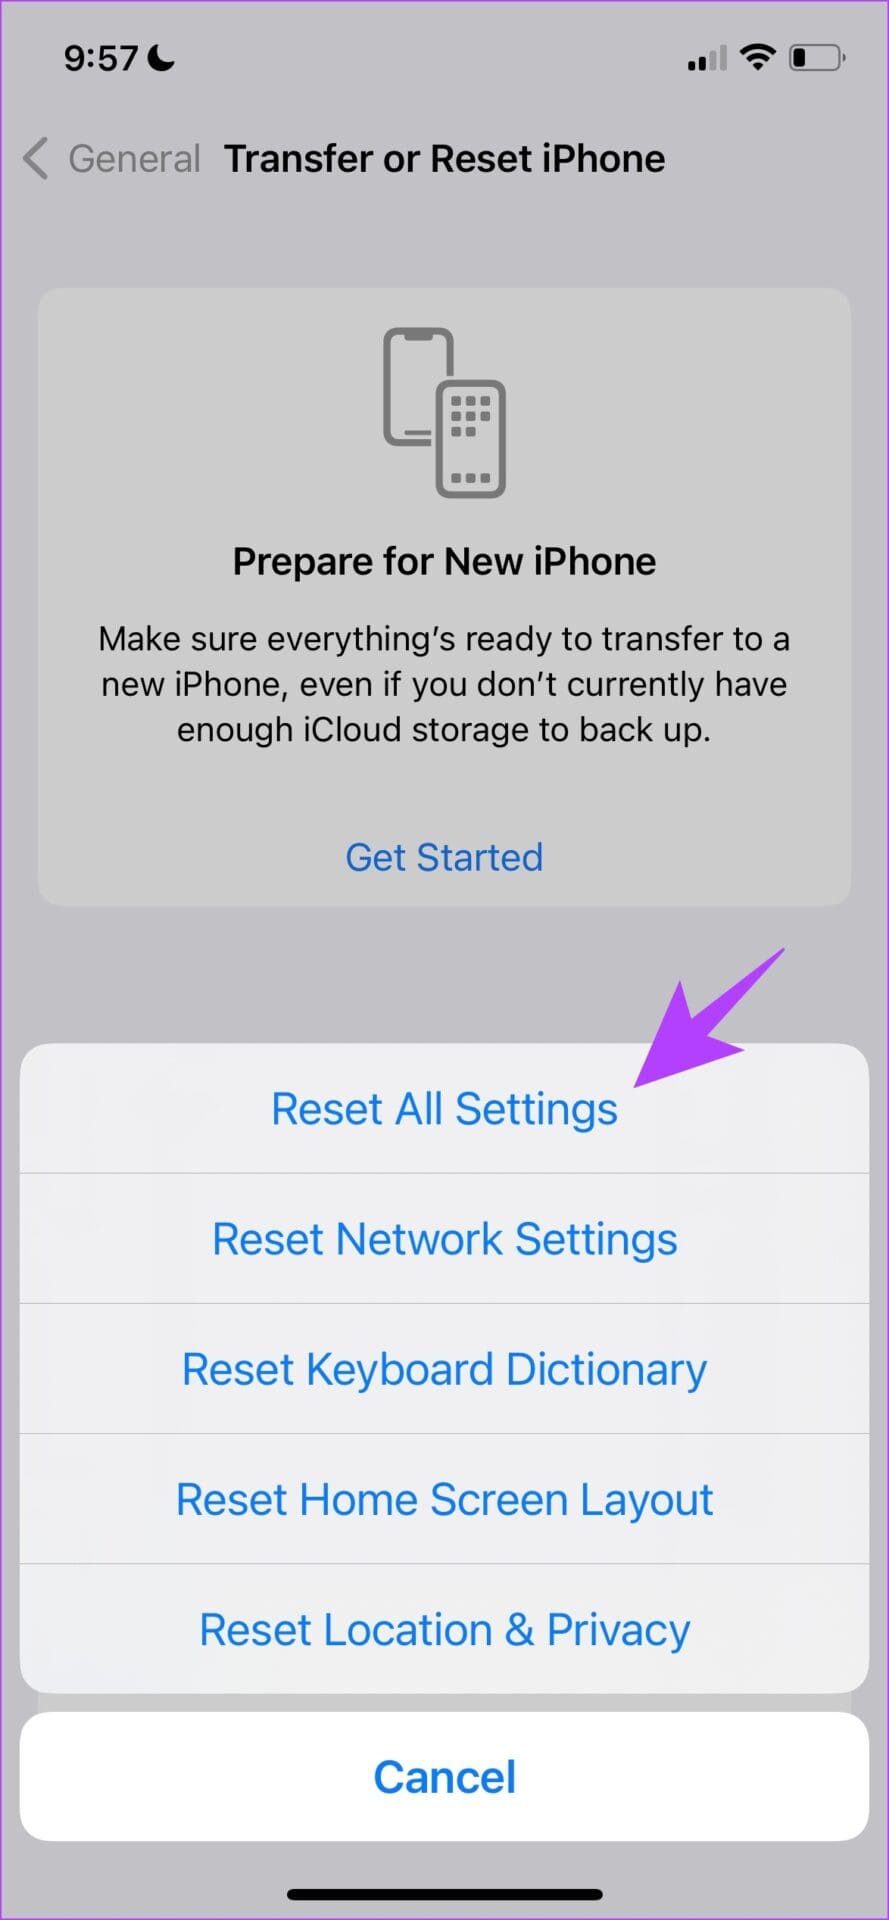
Step 1: Open Settings and tap on General. Tap on Transfer or Reset iPad.
Step 2: Tap on Reset and select Reset Network Settings.
Follow the on-screen instructions to finish the process. Once done, connect to your Wi-Fi network and check if the Wi-Fi is working as expected on your iPad.
Check Mac volume levels: Ensure that you have set the volume level to high on your Mac so you can hear the audio while using Safari.
Force quit and relaunch Safari: Click on the Apple logo > select Force Quit > Safari > Force Quit.
Update macOS: This will install the latest version of Safari on your Mac.
Fix 1: Check if Your Currently Opened Tab Is Muted
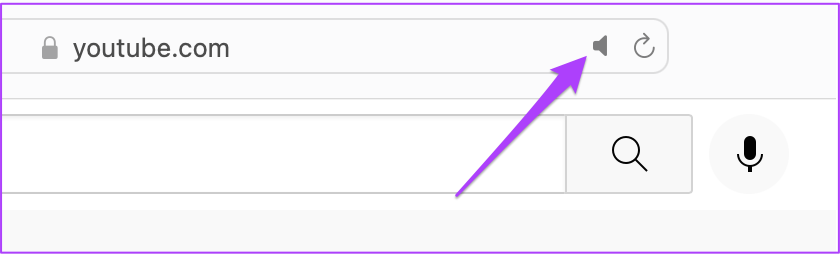
While browsing, many enjoy listening to music or watching videos on YouTube. The first thing you must check in Safari is the tab on which the media is playing is muted. Every browser gives you the option to mute your currently opened tab. In the case of Safari, you can easily check the same by following these steps.
Step 1: Play an audio or video in a Safari tab.
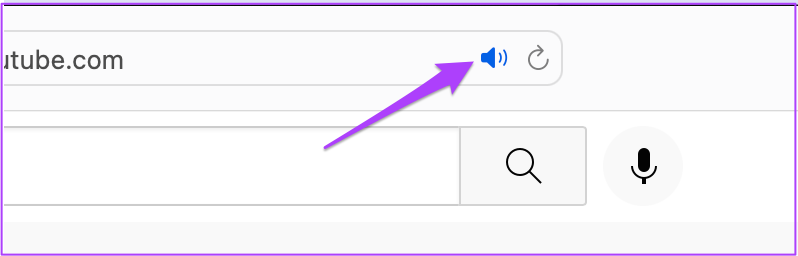
Step 2: While the media plays, you will notice an audio (speaker) icon on the right of your tab.
Step 3: Click the tab to unmute audio.
The Mute Tab option allows you to instantly mute audio for any audio or video playing on that tab. So, if you’ve muted a tab by mistake and forgotten about it, check the address bar in Safari.
Fix 2: Check Output Source on Your Mac
If the first two steps have not solved the issue, take a deep dive. If you can’t hear anything even after unmuting the tab and bumping up the volume, then something else is amiss.
By default, Mac uses the built-in speakers as a default output source. If you’ve connected earphones or external speakers, your Mac may not have switched the output source back to the internal speakers. However, you must check that from sound settings. Follow these steps.
Open Settings > Sound > Output > check the output source.
Additionally, you can also check if Output Volume is set to maximum or closer to that level.
Fix 3: Check Safari Preferences for Website Autoplay
Sometimes, we open websites that start playing media automatically. To save yourself from this situation, Safari users can turn off auto-play and mute audio while browsing that particular website.
If selecting the right Output Source does not help, the next step is to check whether Stop Media with Sound is still enabled. Follow these steps.
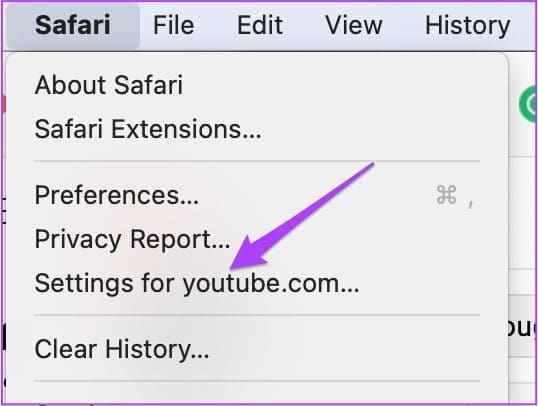
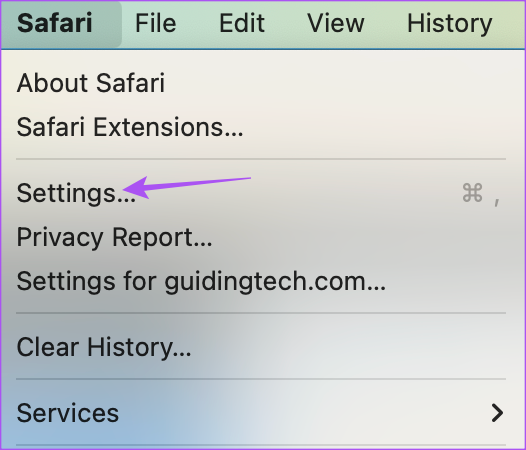
Step 1: Open the website that causes the playback issue in Safari browser > click on Safari > Settings for (website name).
You will see a pop-up menu appearing right below the currently opened tab.
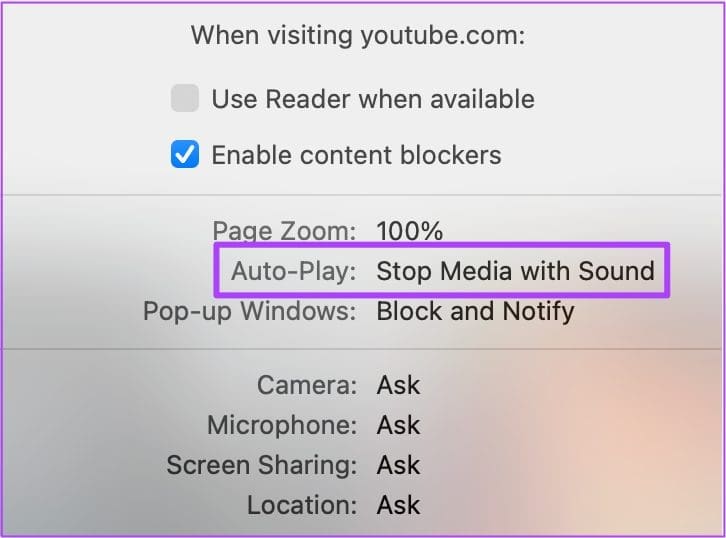
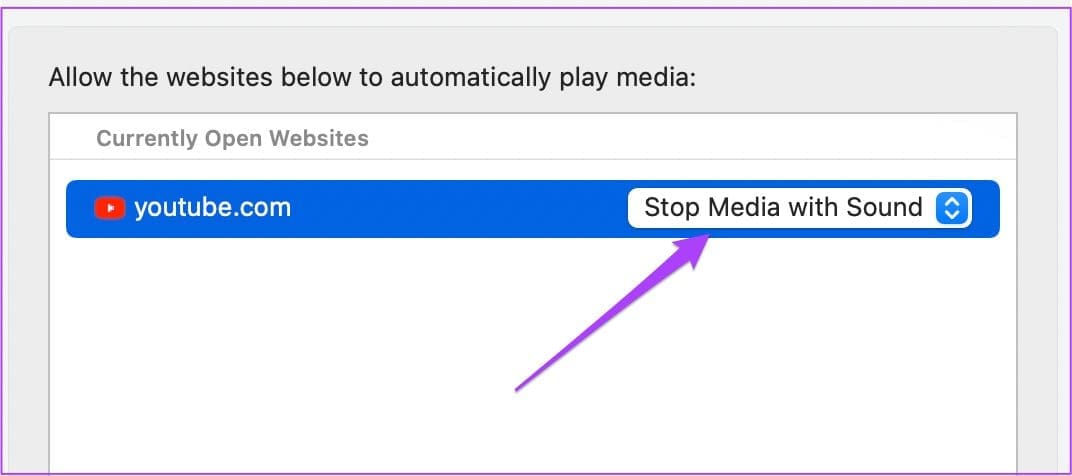
Step 2: Check for Stop Media with Sound enabled alongside Auto-Play.
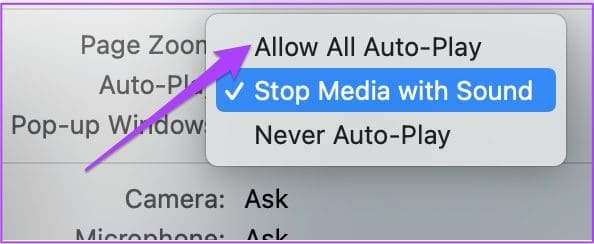
Step 3: Tap on the option to reveal a dropdown menu > choose Allow All Auto-Play.
Step 4: Close the menu by clicking anywhere on the webpage.
Alternatively, you can choose to do the same from Safari Preferences. Follow these steps.
Step 1: Click on Safari at the top menu bar and choose Settings.
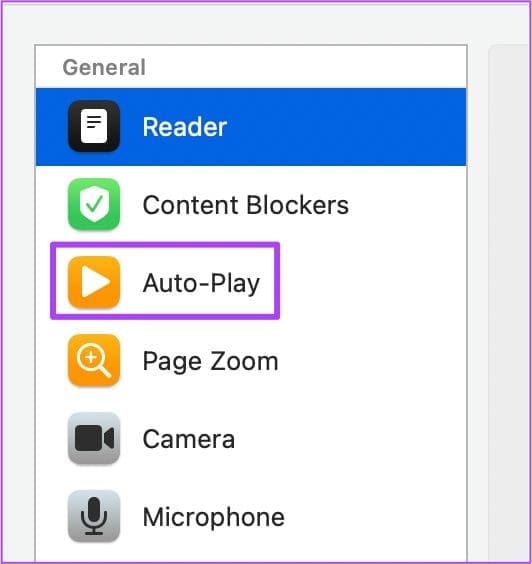
Step 2: Click on the Websites tab and choose Auto-Play from the left menu.
Step 3: In the Auto-Play tab on the right, select the website name.
Step 4: Click the dropdown tab on the right side > select Allow All Auto-Play.
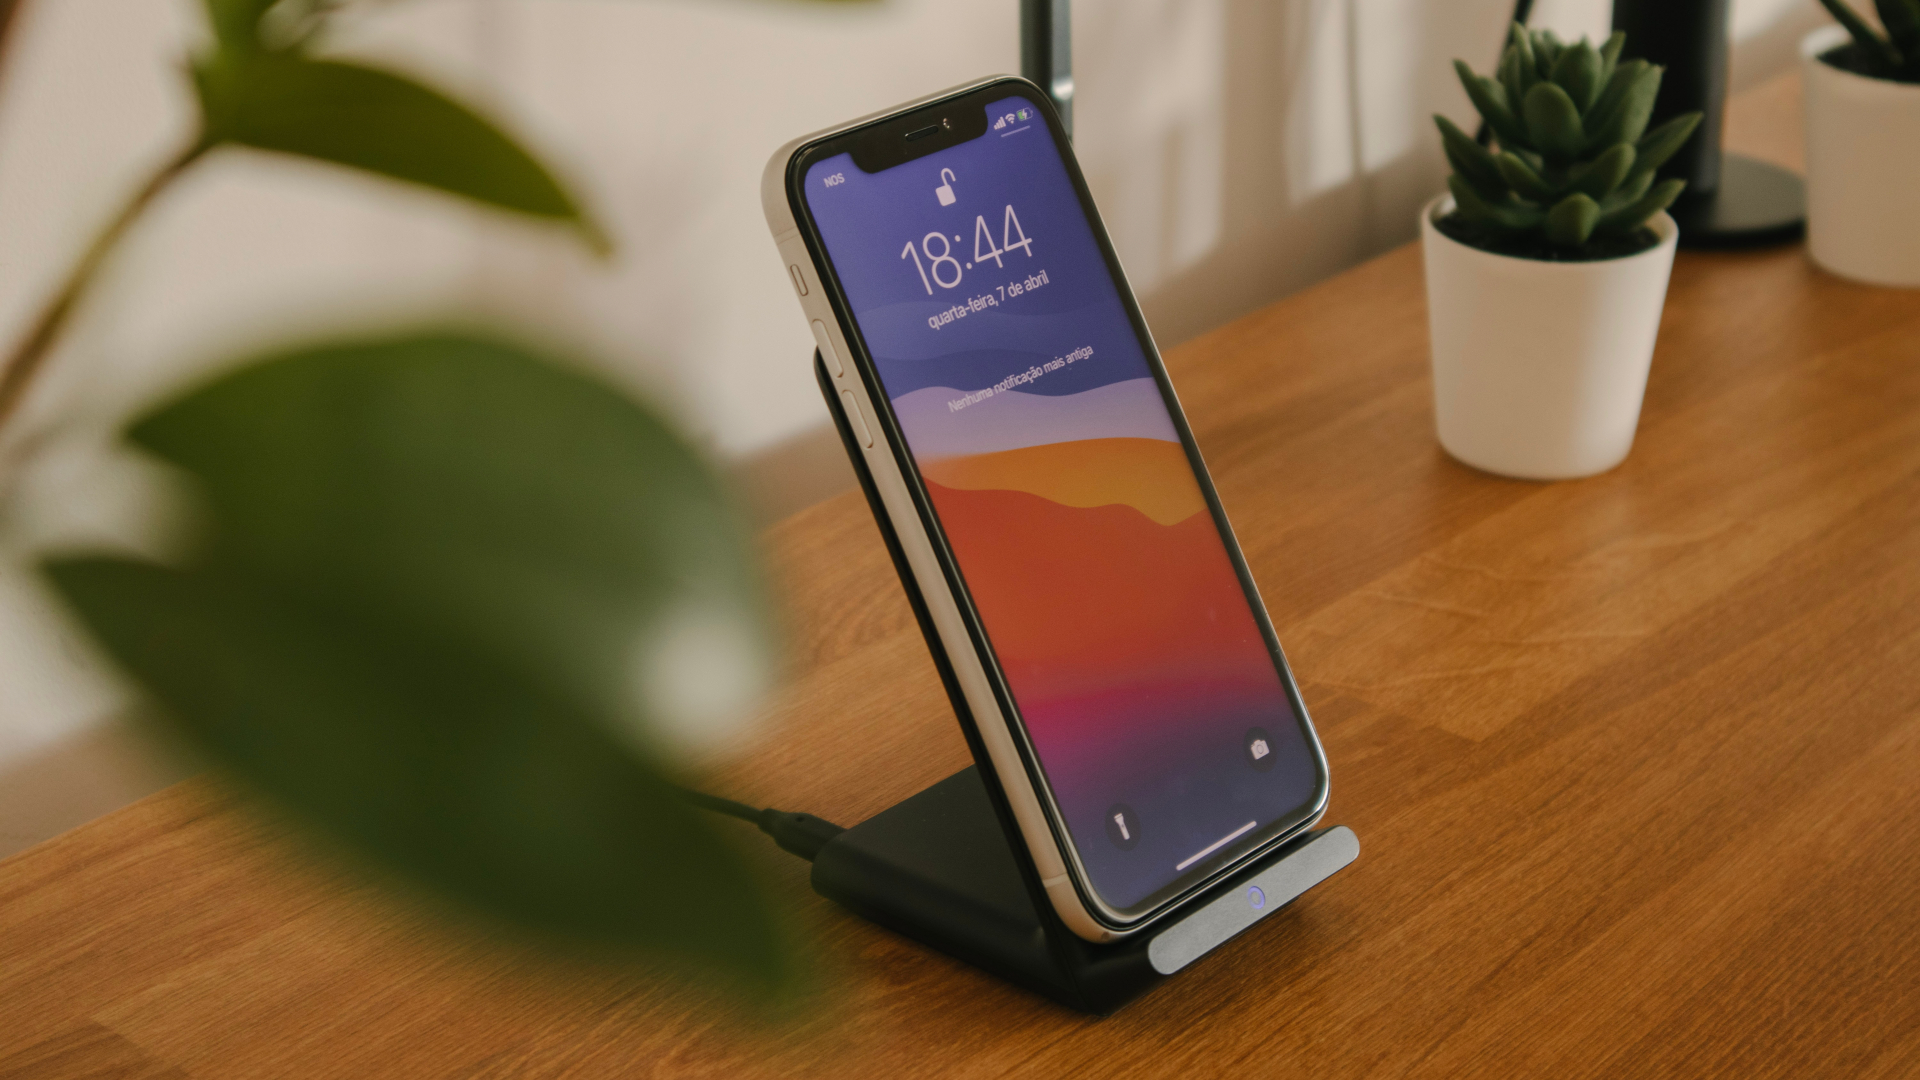
The cable you use to attach the charging brick to the wireless charger plays an important role. A bad cable can stop the wireless charger from working completely or cause intermittent disconnections that can pause wireless charging. Try switching your existing cable with a high-quality one.
Fix 2: Remove Your Phone’s Case and Charge
Wireless charging relies on coils present on the smartphone and the wireless charging pad. For wireless charging to work properly, these coils need to align on top of each other without any obstructions between them. If you use a thick protective case on your smartphone, there’s a good chance it’ll interfere with wireless charging.
Also, some materials like metal don’t play well with wireless charging. So, if your case is too thick or has metal in it, get rid of it.
Fix 3: Reposition the Phone on the Wireless Charger
One drawback of wireless charging is that you must position your phone in a specific way. If the coils do not align properly, wireless charging will stop working or keep disconnecting. To avoid this, ensure the center of your phone aligns with the center of the wireless charger.
Fix 4: Enable Fast Wireless Charging on Some Phones
Some phones integrate support for fast wireless charging that you can enable manually. Here’s how to enable it on Samsung devices, for example.
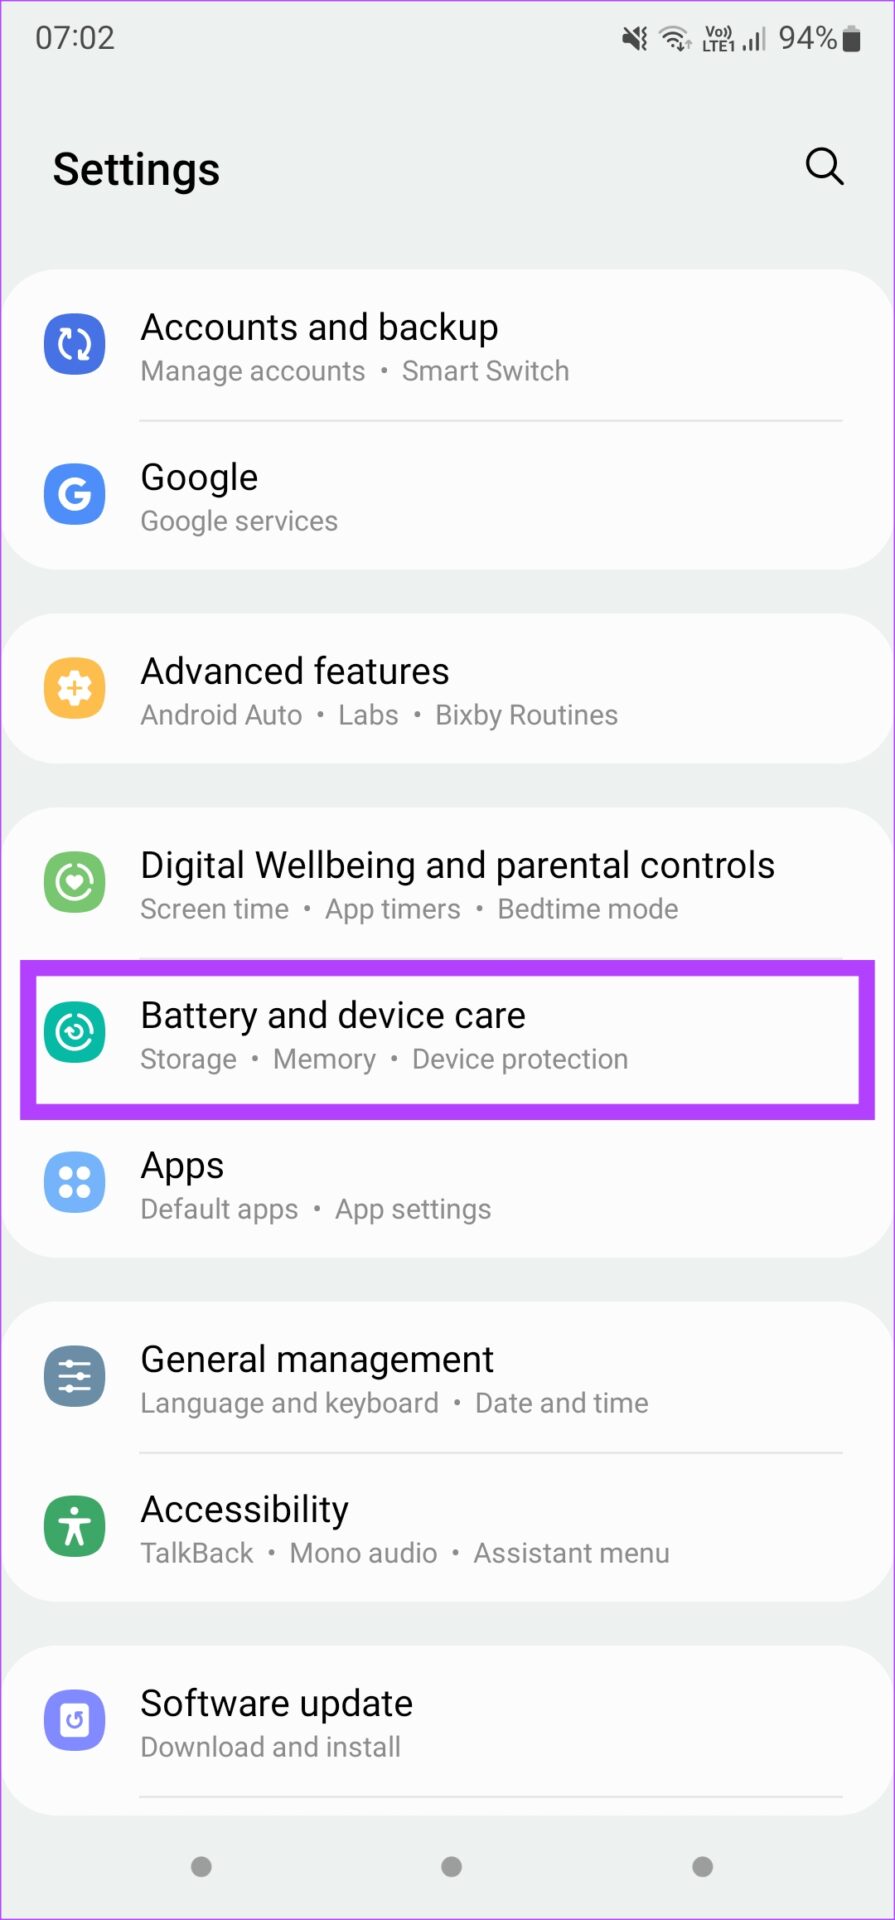
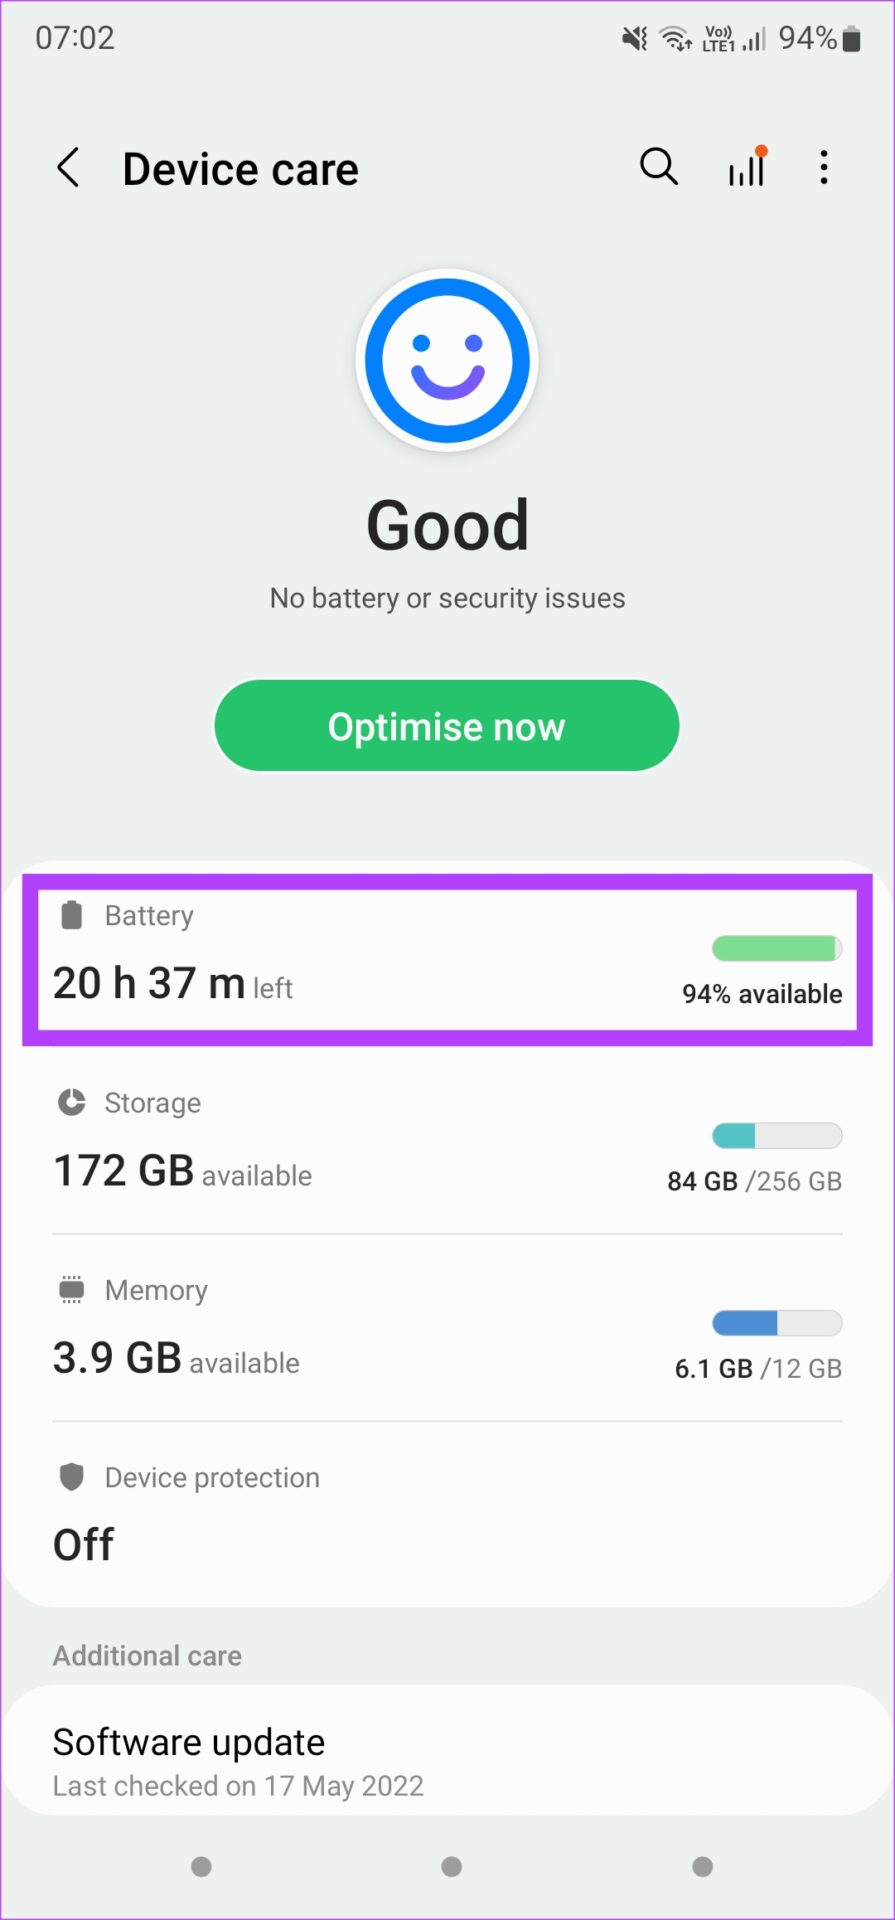
Step 1: Open the Settings app and go to Battery and device care. Here, select Battery.
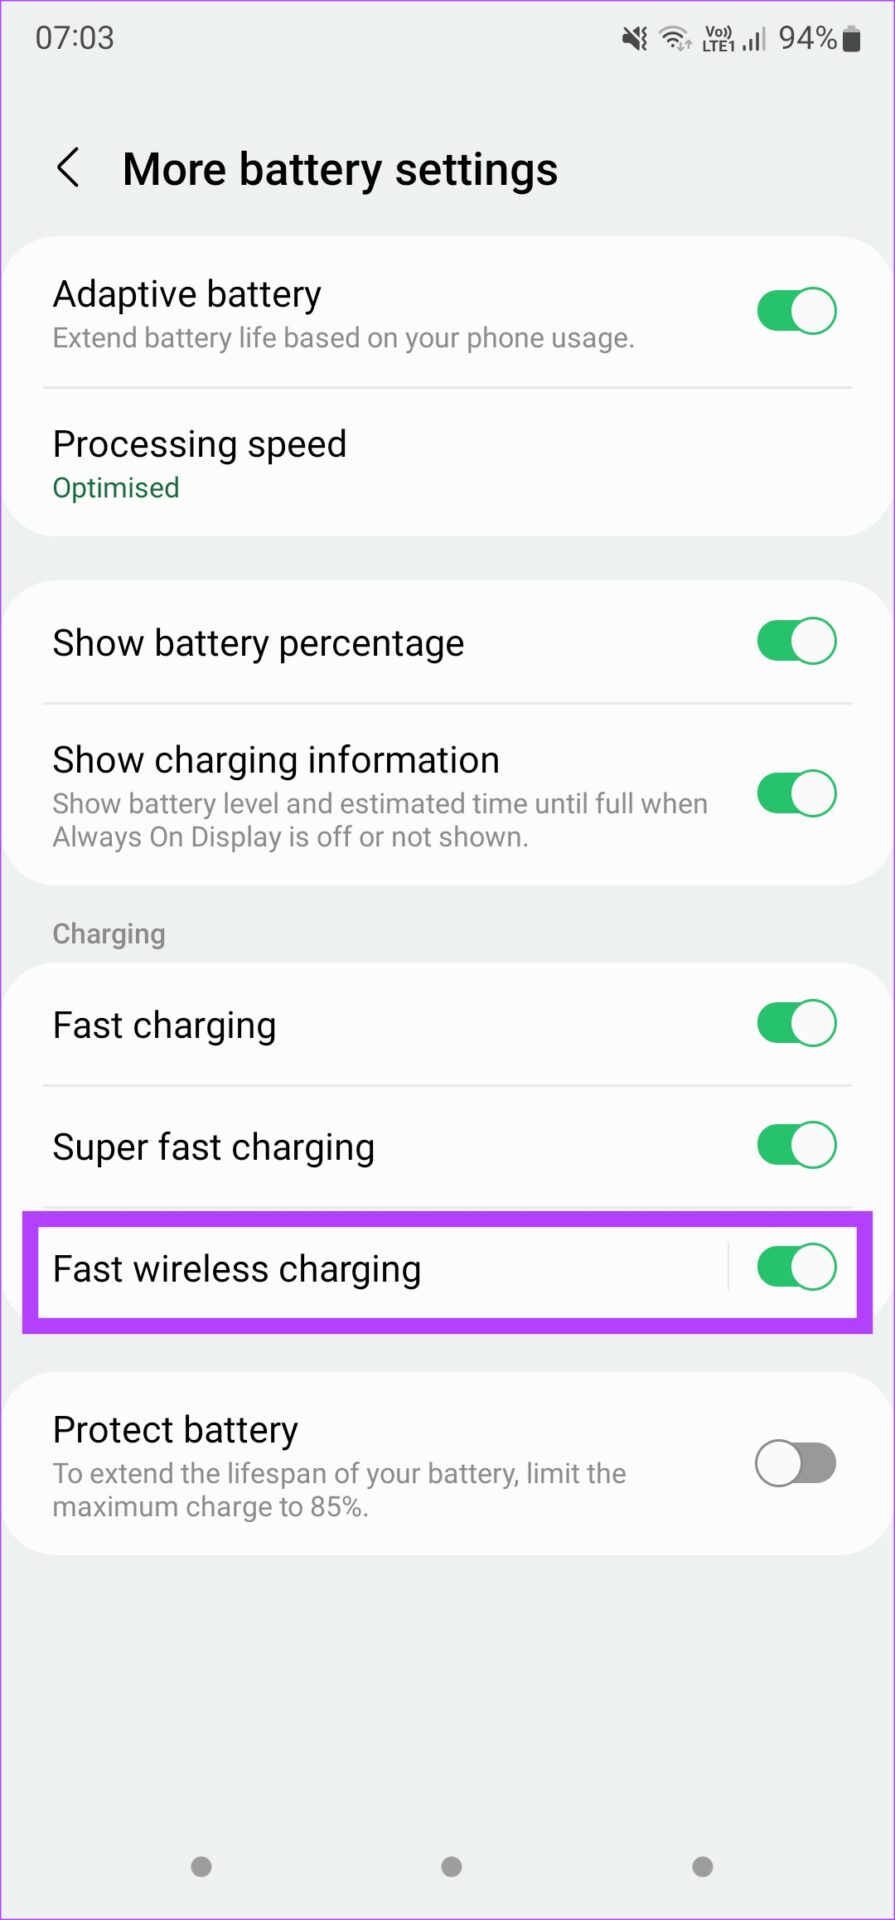
Step 2: Under More battery settings, enable the toggle for Fast wireless charging.
Apple CarPlay is quite helpful while driving. You can check out several CarPlay tips and tricks to get the most out of it. Besides that, you can even set up specific Shortcuts to automate repetitive tasks. As intuitive as it is, the objective of CarPlay is to let you drive without any distractions. But if you’re heavily reliant on it while driving, it’s not ideal if Apple CarPlay keeps disconnecting frequently.
The disconnections on CarPlay aren’t as frequent as that on Android Auto according to our Android Auto vs. Apple CarPlay comparison. However, it’s still present and can get annoying. If you are facing this issue, here are a few ways in which you can fix Apple CarPlay keeps disconnecting when driving.
But why does the issue occur in the first place? Let’s find out!
Why Does CarPlay Keep Disconnecting
Here are some of the reasons why Apple CarPlay keeps disconnecting :
Faulty or damaged cables can cause intermittent connections.
Bugs in the CarPlay software or iOS may lead to disconnections.
Using an outdated or incompatible iOS version might disrupt CarPlay.
A malfunctioning USB port or connection can cause CarPlay to disconnect.
We’ll elaborate on the above reasons and help you fix the issue at the earliest.
Apple CarPlay Disconnects Randomly: How to Fix the Issue
Here are fourteen effective ways you can use if Apple CarPlay keeps disconnecting randomly. Let’s begin.
1. Enable the CarPlay Toggle for Your Car on Your iPhone
If you have multiple cars, there’s a chance that you have linked your iPhone to more than one CarPlay head unit. In that case, the iPhone may disable the CarPlay toggle for some connected cars. Even if it’s not disabled, you can try turning the CarPlay toggle off and then turning it back on to see if it fixes your issue. Here’s how to do it.
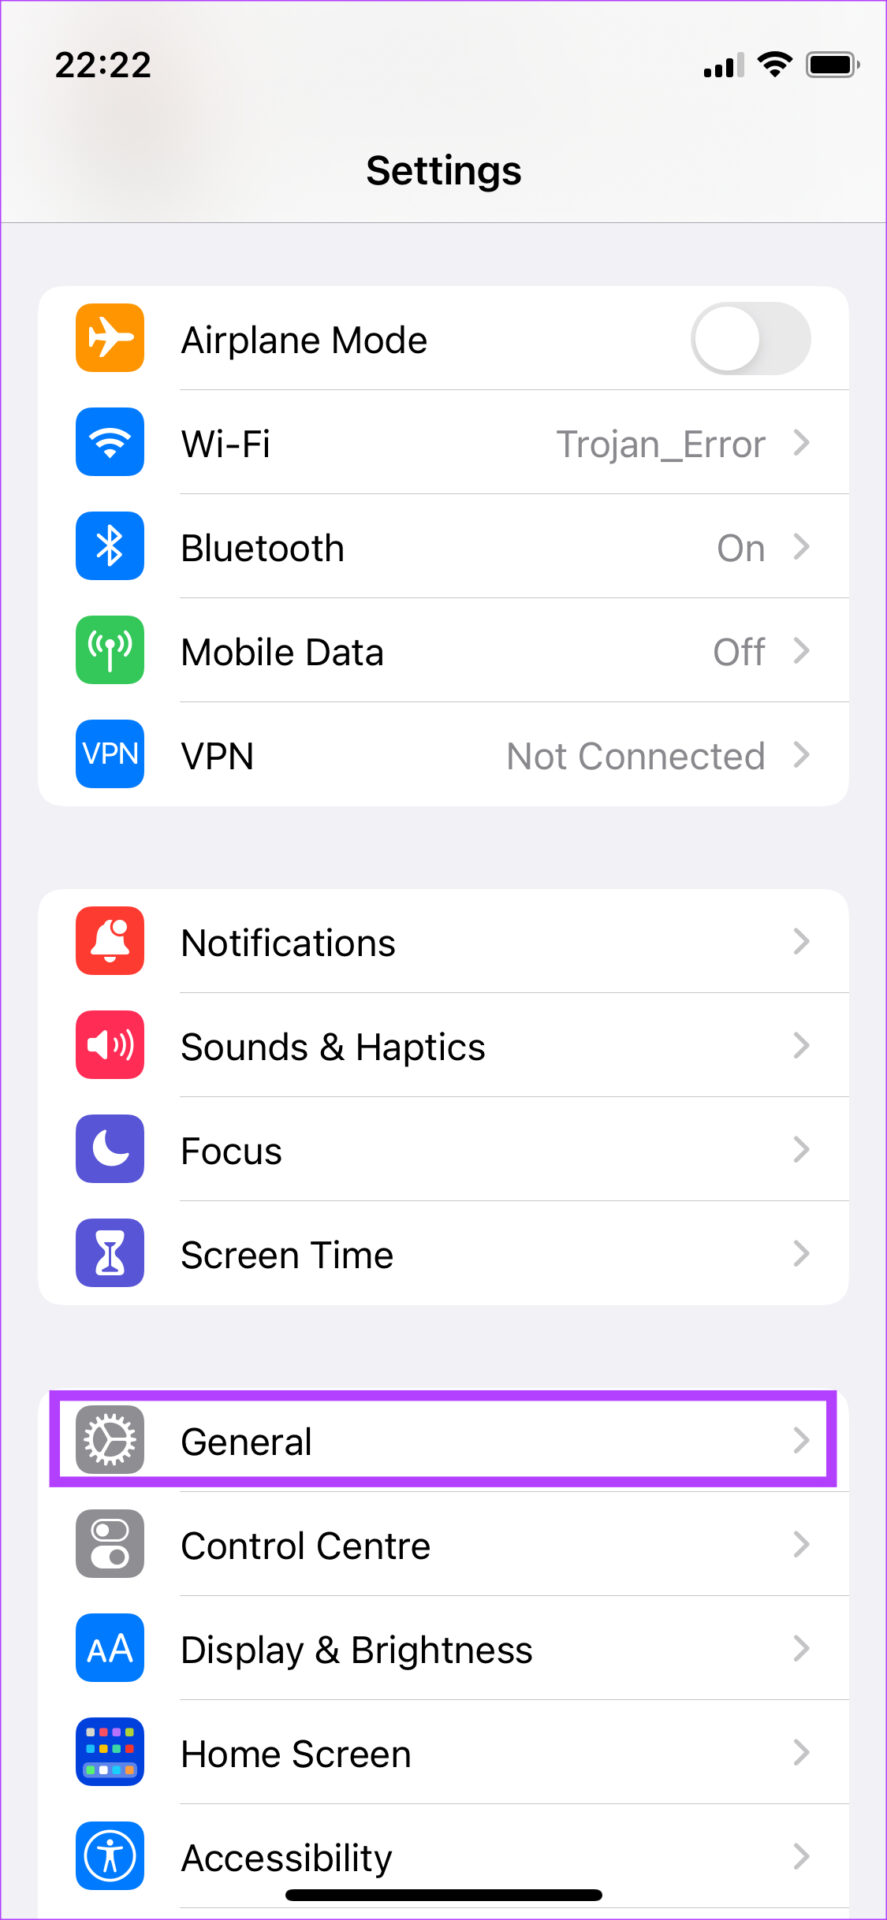
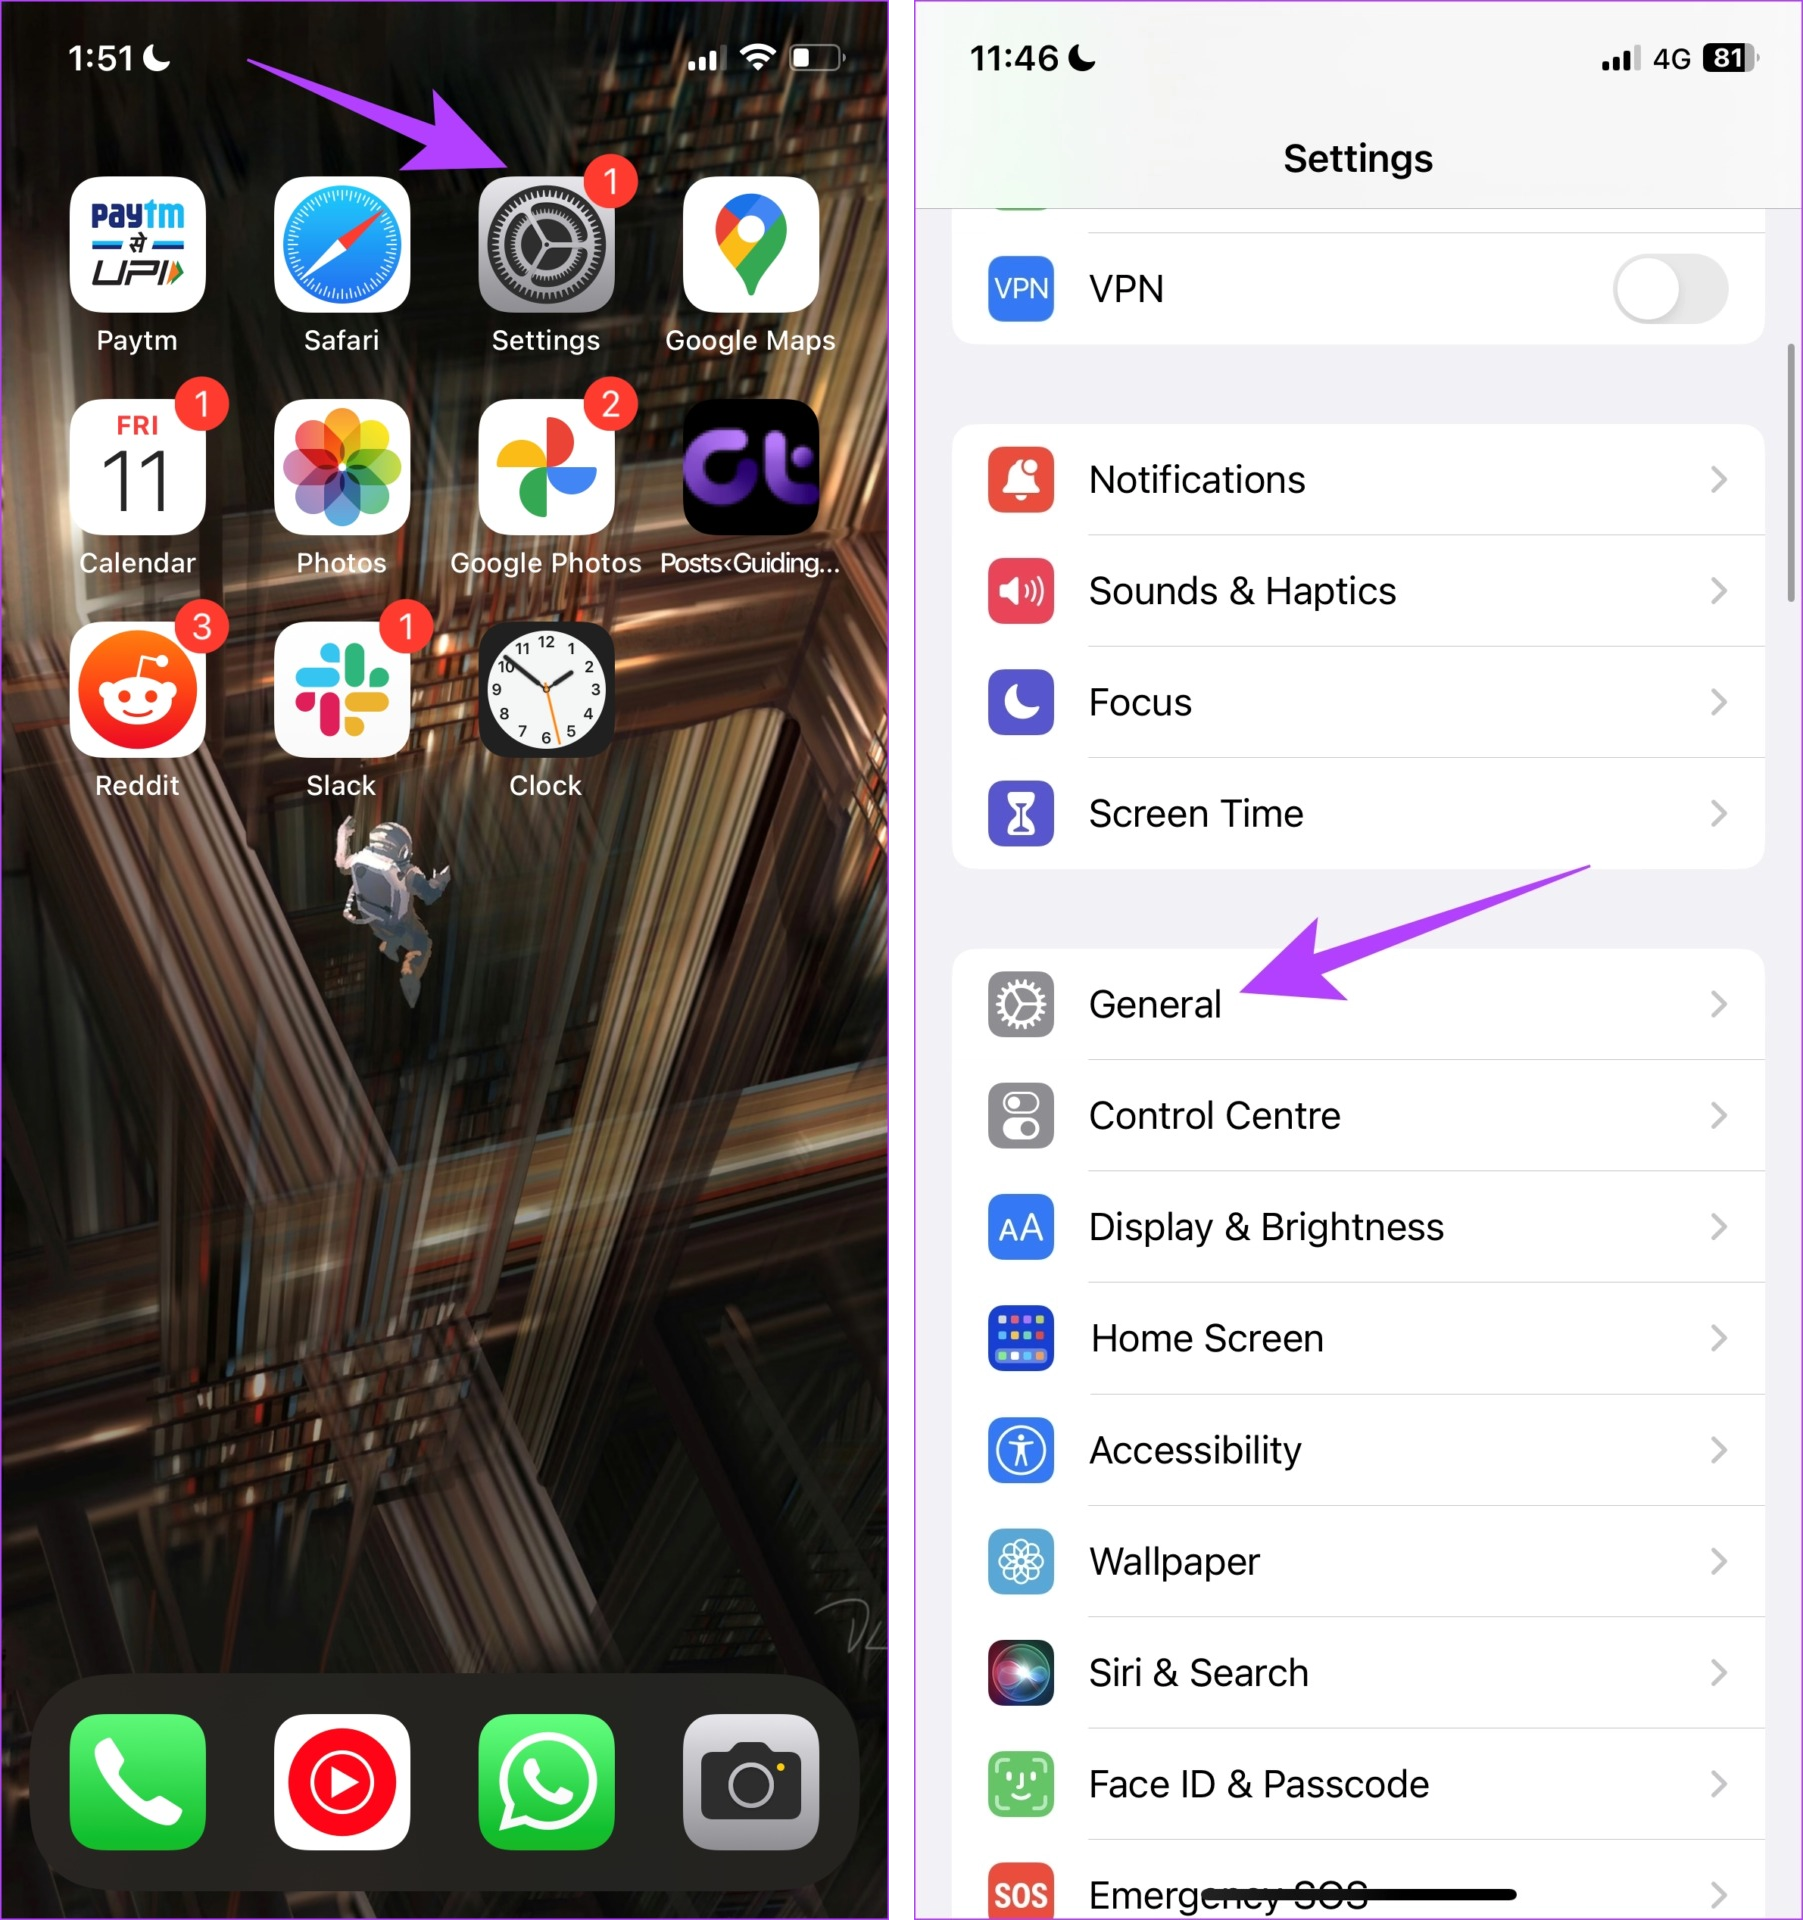
Step 1: Open the Settings app on your iPhone and navigate to the General section.
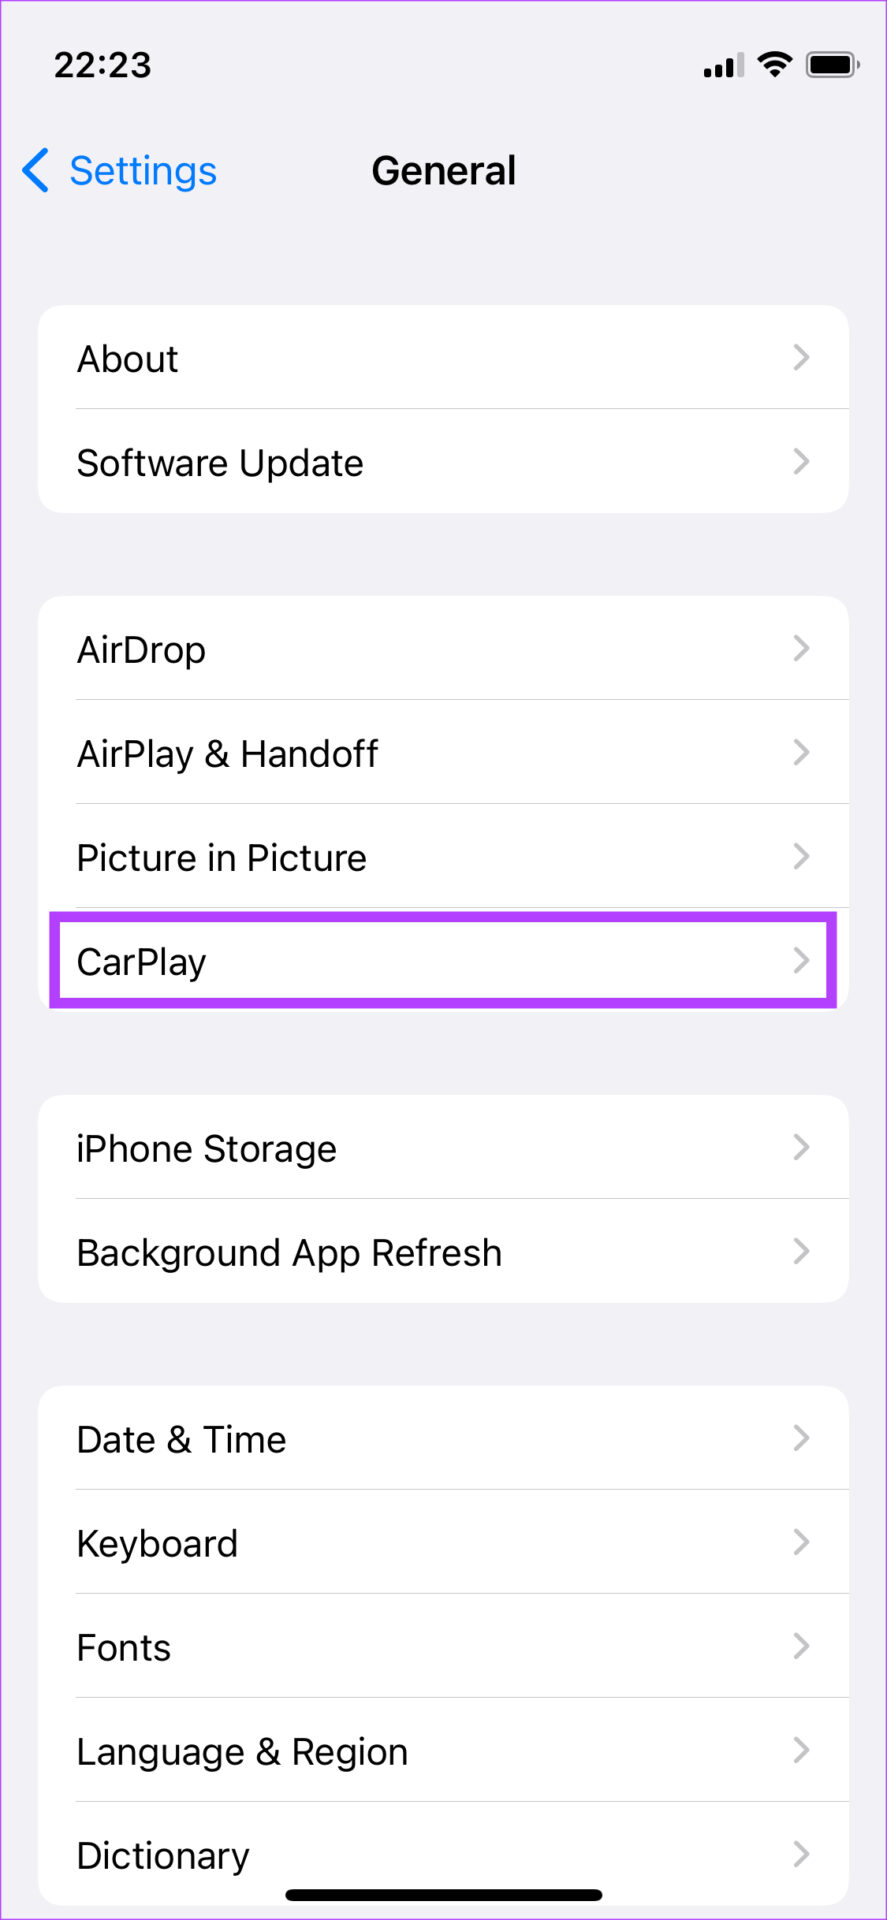
Step 2: Select the CarPlay option.
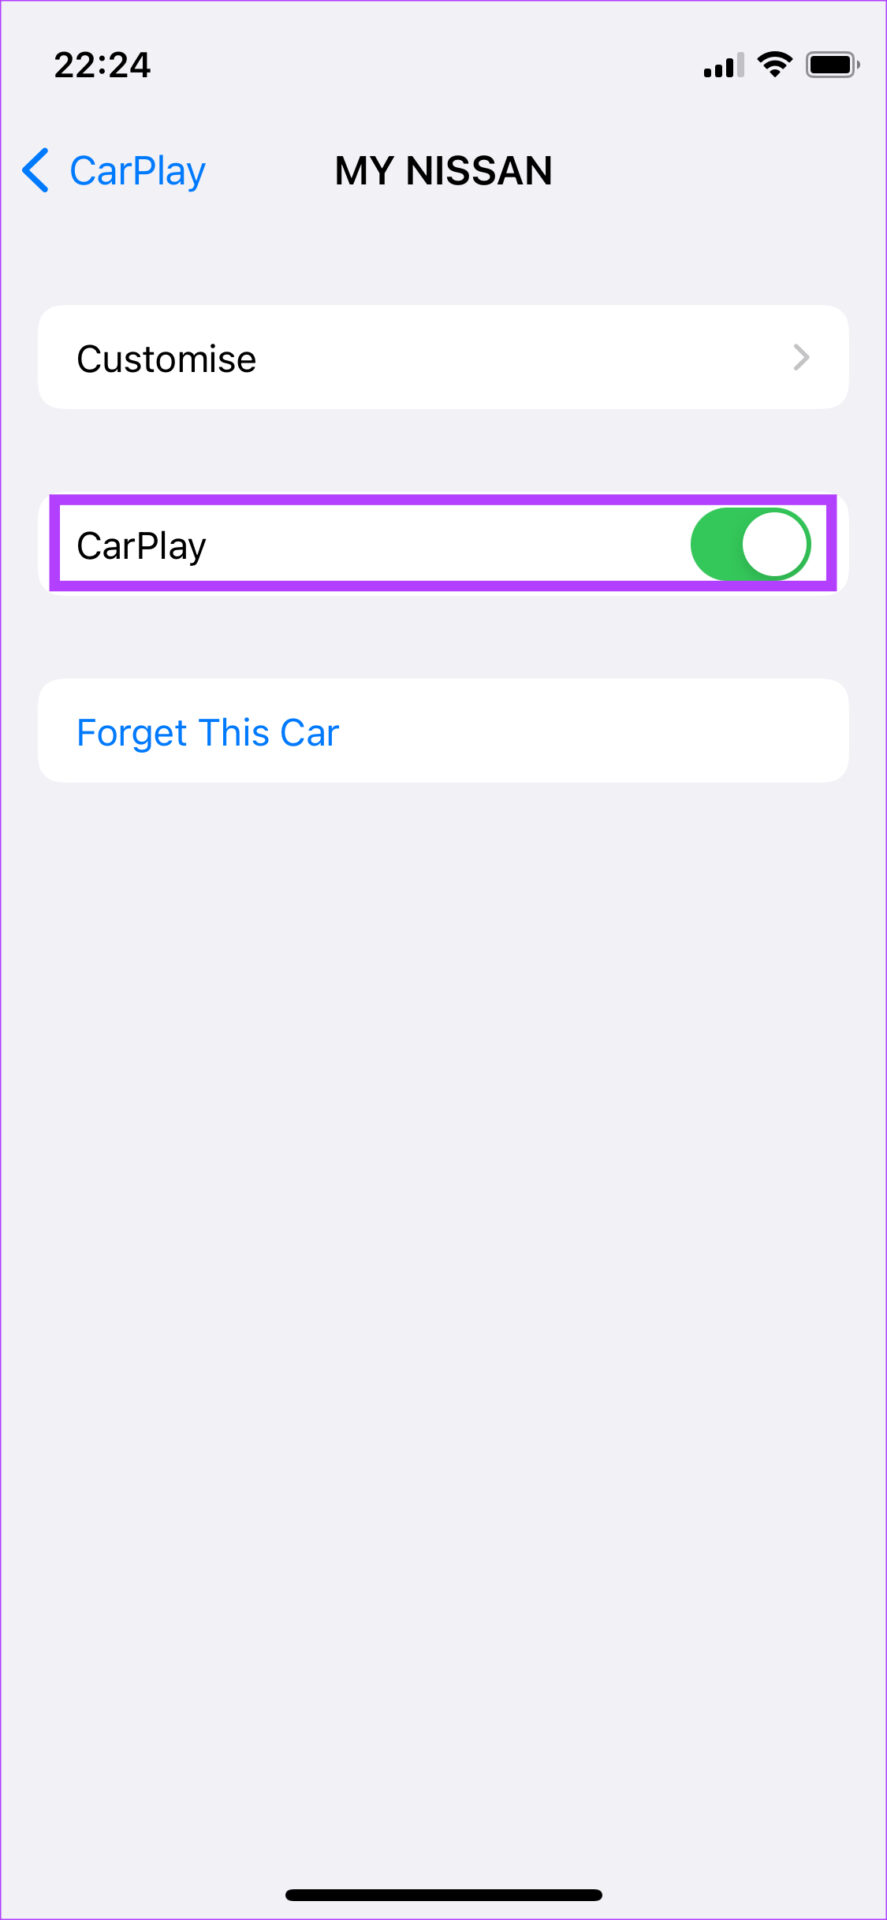
Step 3: Tap on the car to which you’re connected.
Step 4: Enable the toggle next to CarPlay. If it is already enabled, turn off the toggle. Wait for a while and turn it back on.
2. Enable Wi-Fi and Bluetooth for Wireless CarPlay
Apple CarPlay is available to use in two modes – Wired and wireless. If you’re using Wireless CarPlay, it’s essential to turn on your iPhone’s Bluetooth and Wi-Fi toggles.
This will ensure your iPhone can communicate with your car’s stereo system in a stable manner.
3. Enable Siri on iPhone
For reasons unknown, you need to keep Siri turned on, in your iPhone for CarPlay to function. Here’s how you can do it.
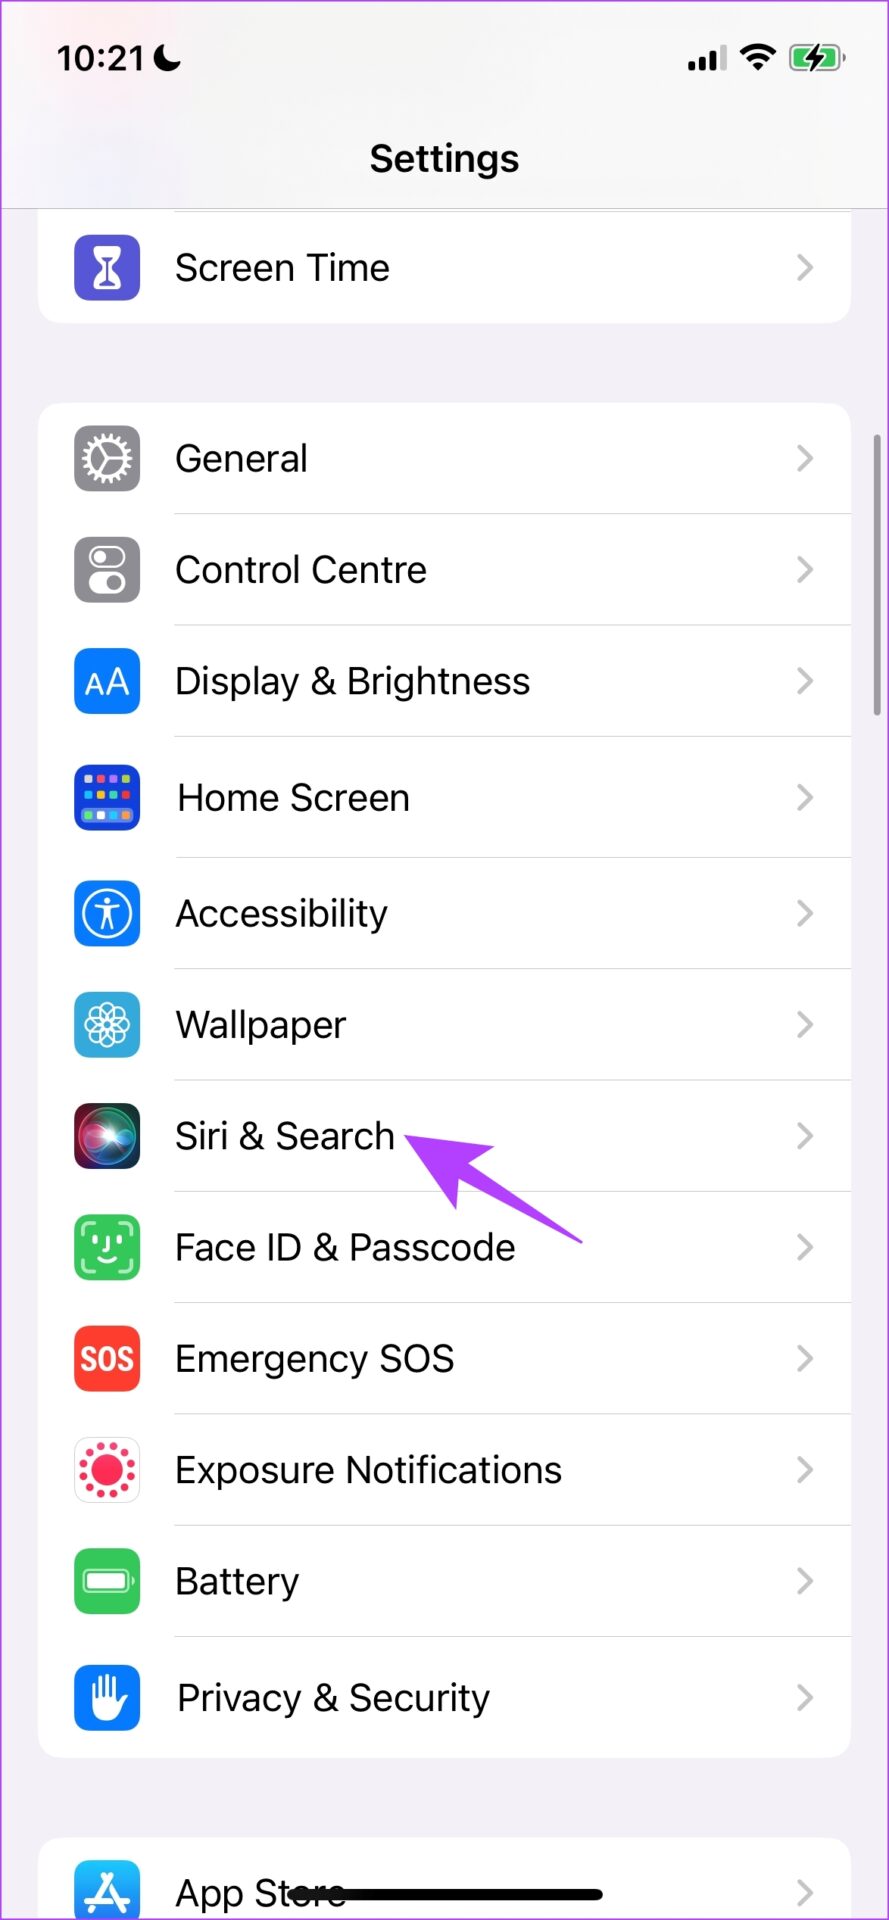
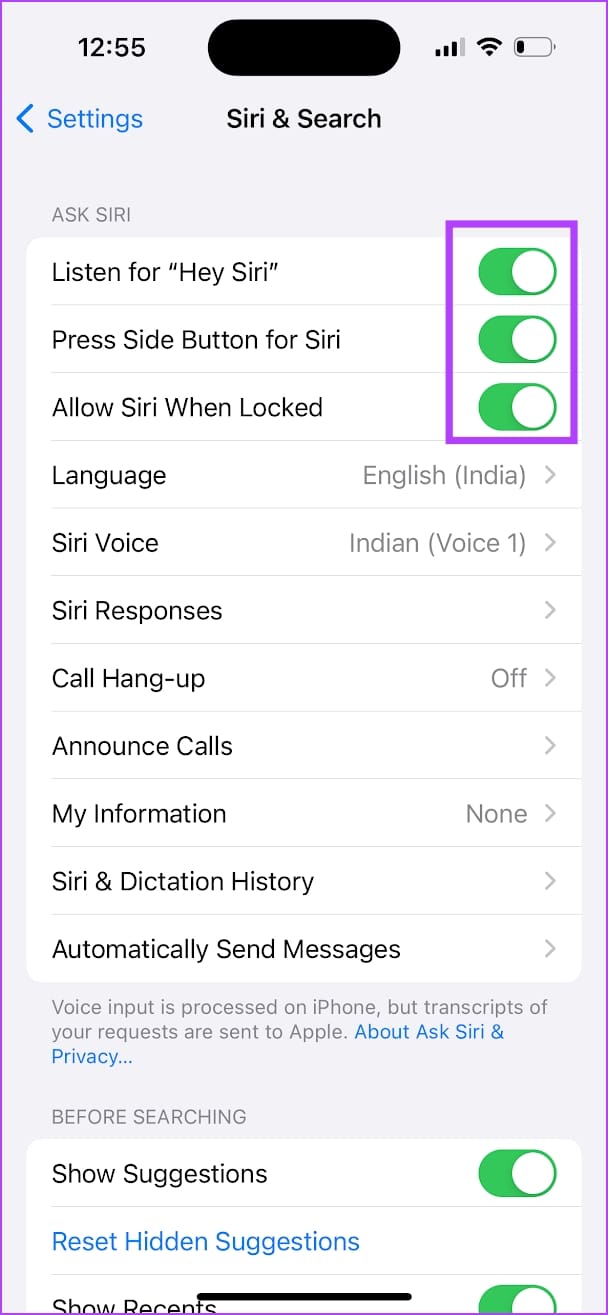
Step 1: Open the Settings app. Tap on ‘Siri and Search.
Step 2: Turn on the toggle for :
Listen for “Hey Siri”.
Press the Side Button for Siri.
Allow Siri When Locked.
4. Restart iPhone
If there’s any bug affecting the CarPlay feature on your iPhone, simply restarting your iPhone can fix the issue. Restarting your iPhone closes all the running services and elements – including the bugs, if any, and starts a fresh session in which the bugs are not likely to appear again.
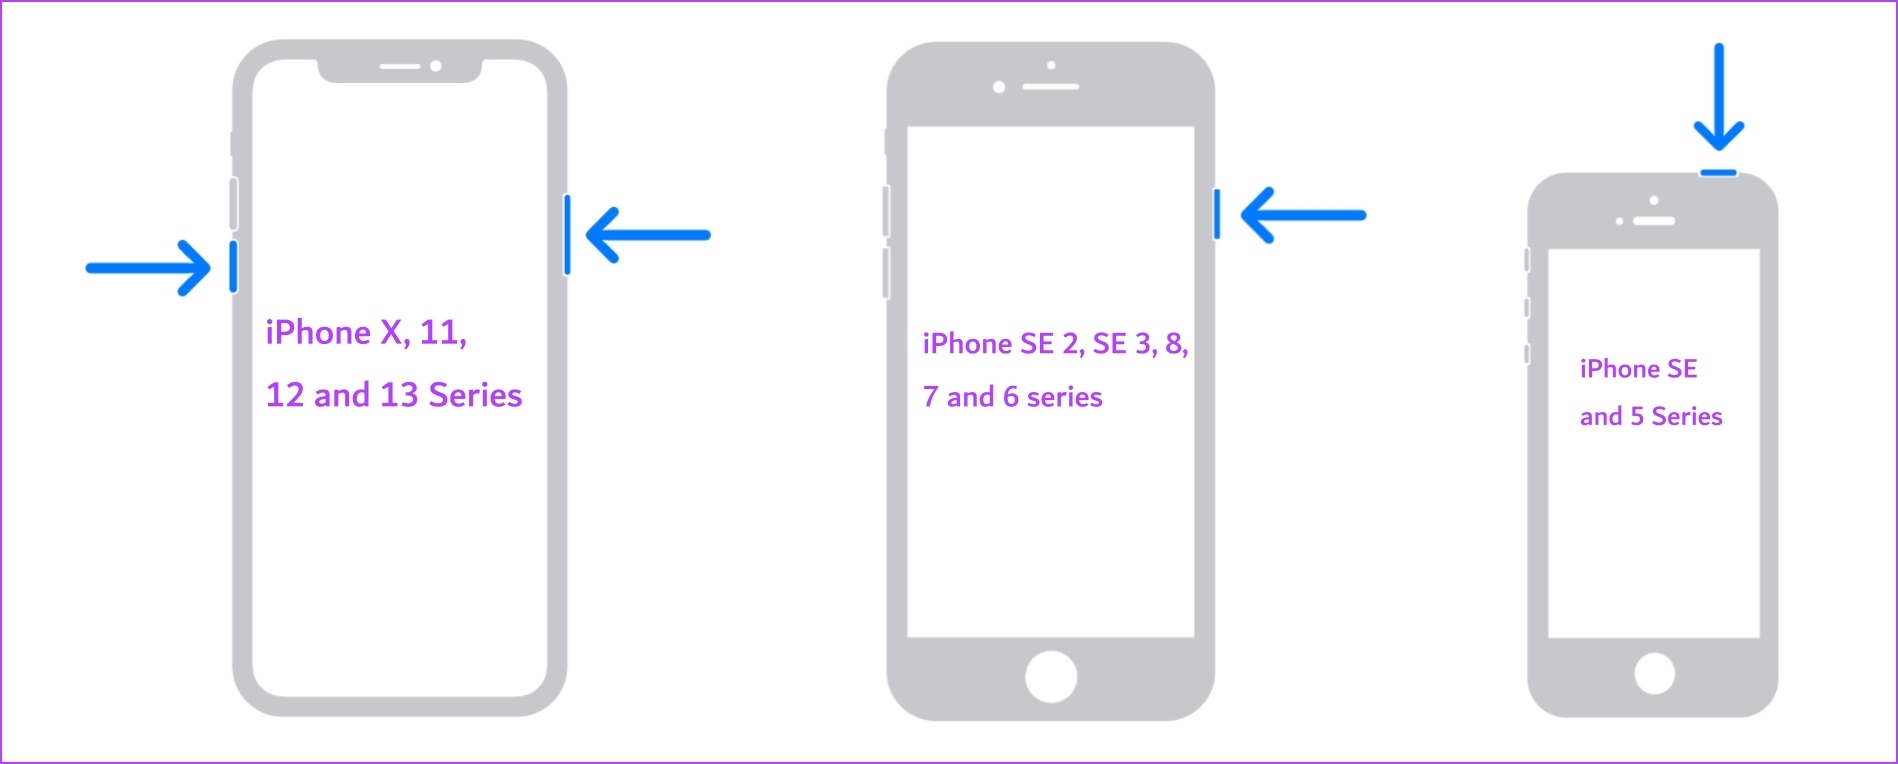
Step 1: First, shut down your device.
On iPhone X and above: Press and hold the volume down and the side button.
On iPhone SE 2nd or 3rd gen, 7, and 8 series: Press and hold the side button.
On iPhone SE 1st gen, 5s, 5c, or 5: Hold the power button at the top.
Step 2: Now, drag the power slider to turn off the device.
Step 3: Next, turn on your device by pressing and holding the power button.
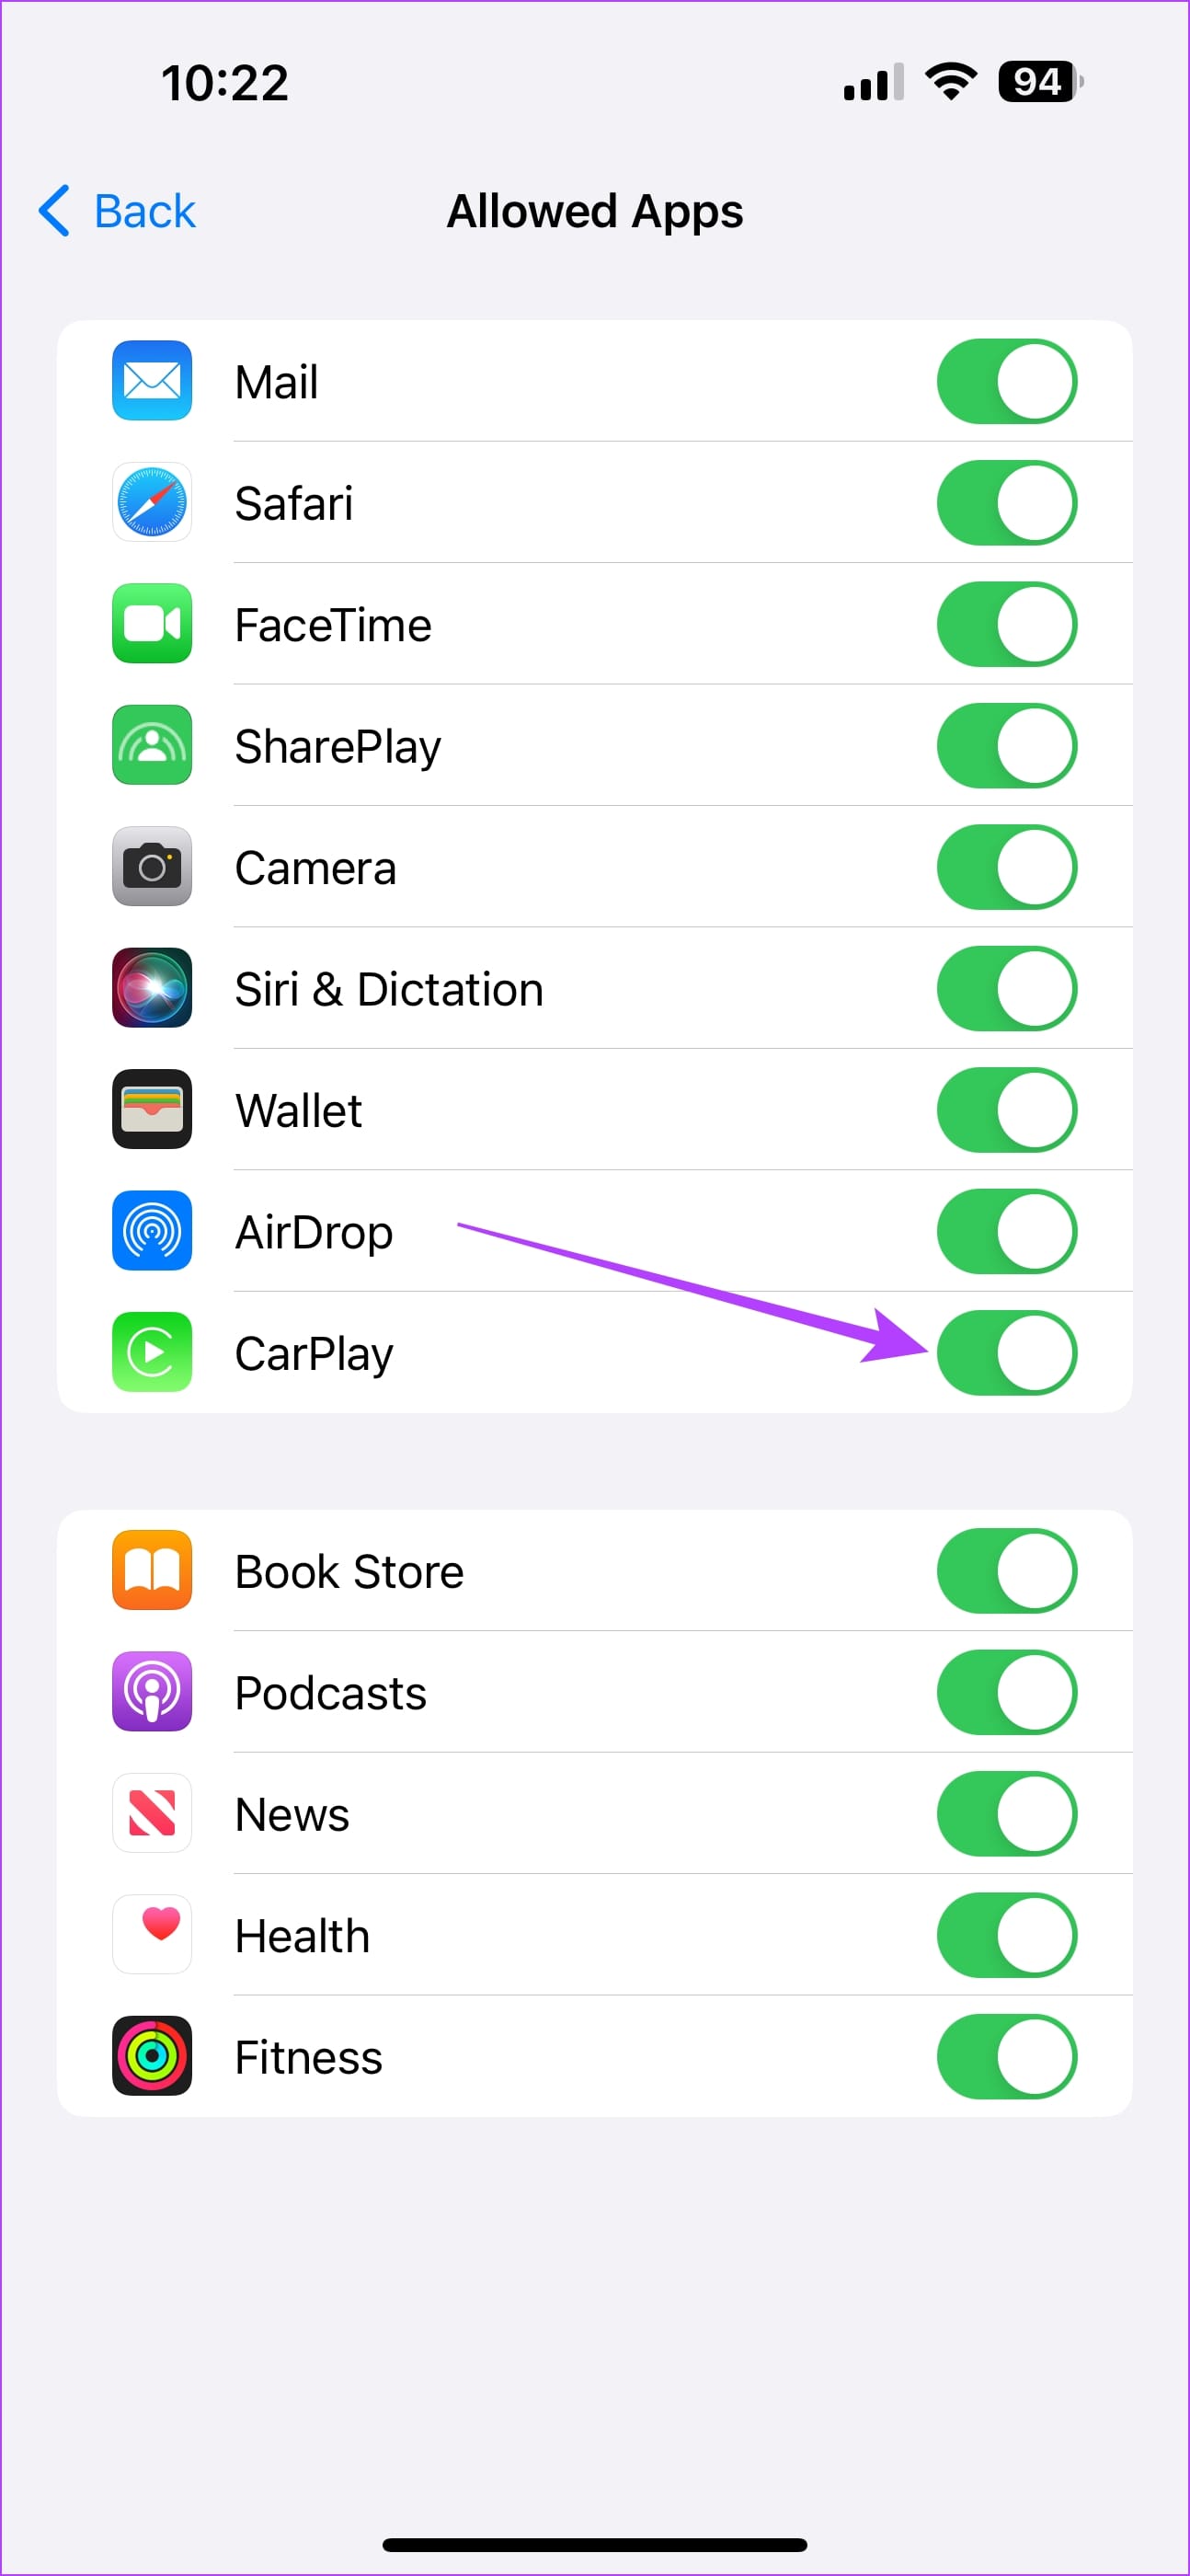
5. Ensure CarPlay Is Not Restricted
If CarPlay is restricted on your iPhone, you may face problems in maintaining an interrupted connection. Here’s how you can check for, and disable any restrictions for CarPlay.
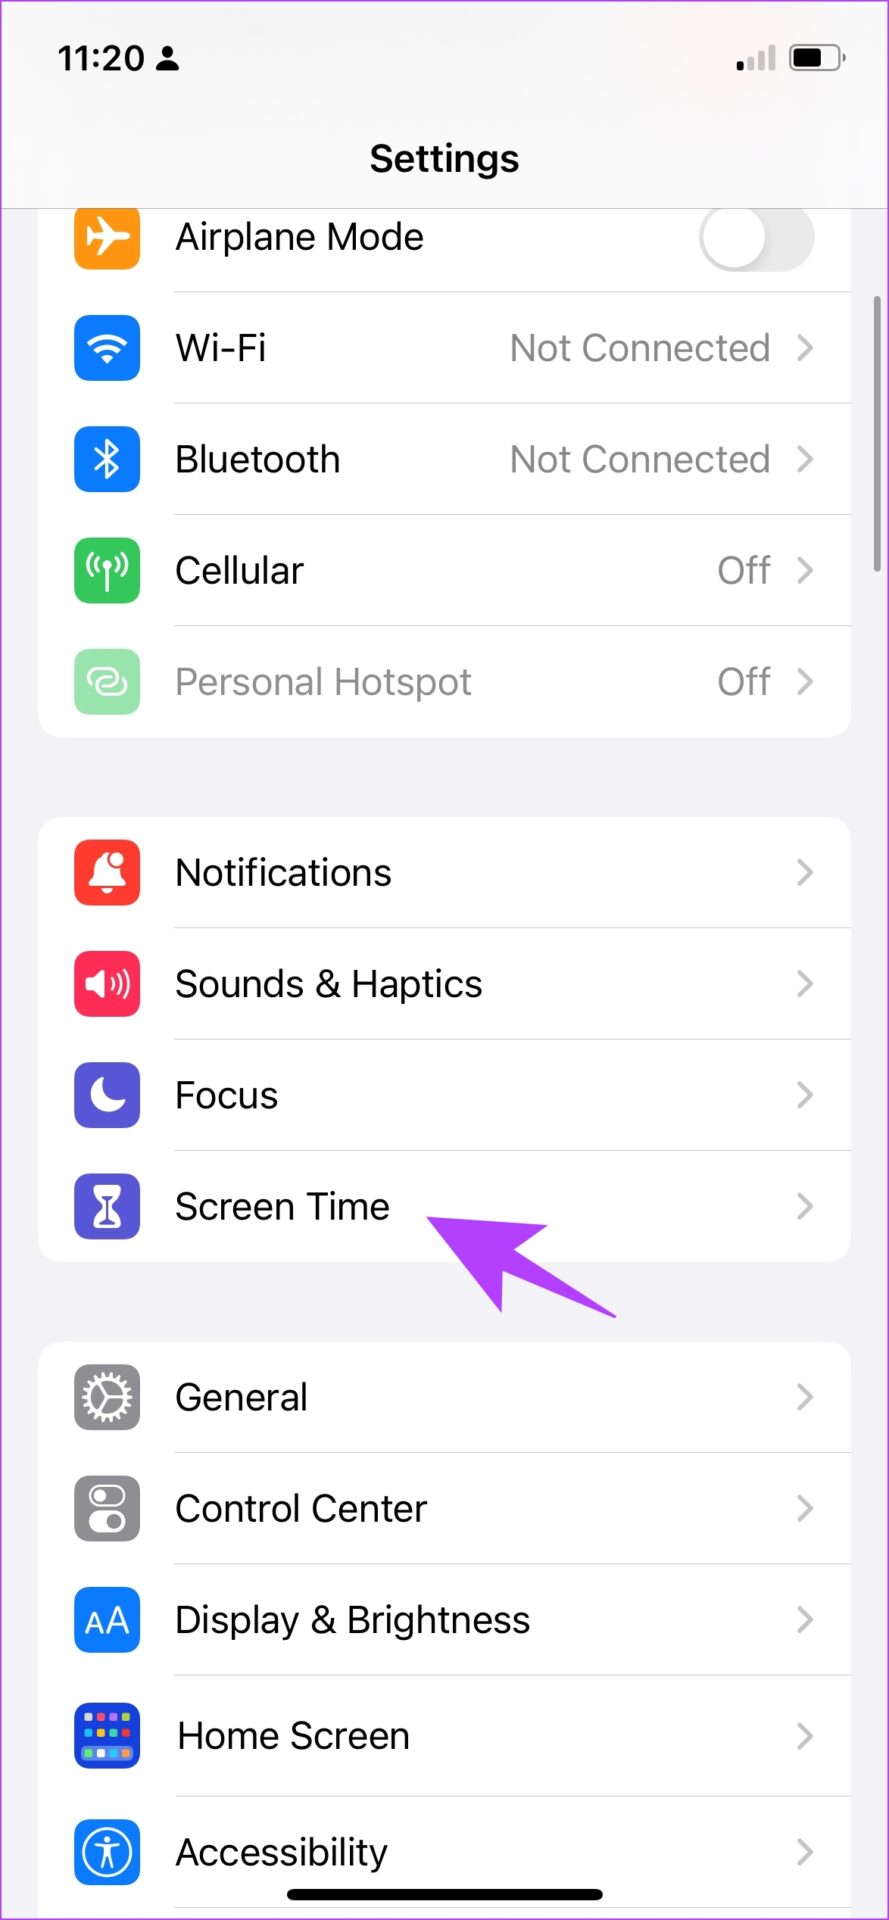
Step 1: Open the Settings app on your iPhone. Select Screen Time.
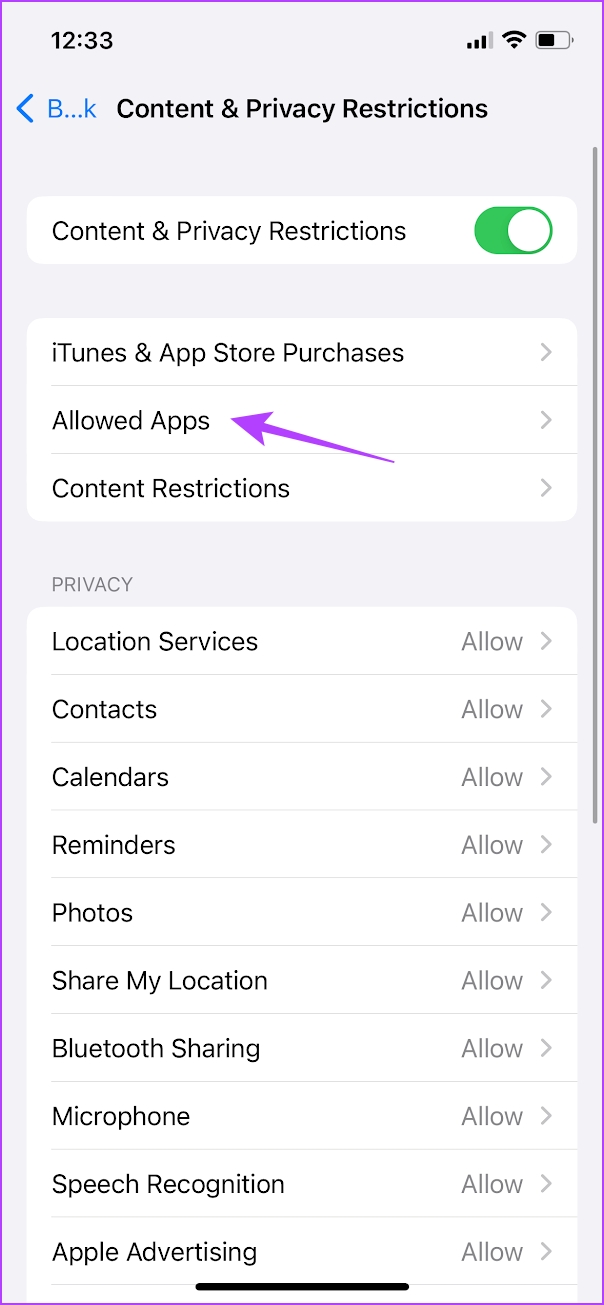
Step 2: Tap on ‘Content & Privacy Restrictions’.
Step 3: Tap on Allowed Apps. Make sure to turn on the toggle for CarPlay.
6. Try Wired Apple CarPlay if Wireless Doesn’t Work
There is a possibility that your iPhone cannot establish a wireless connection with the car’s head unit or the connection isn’t stable. In such a case, wireless CarPlay will not work properly. Instead of connecting your iPhone wirelessly to the car, use a USB cable. If Apple CarPlay works fine via the wired method, you’ll need to pair your smartphone again to your car via Bluetooth for the wireless mode to work.
7. Use MFI-Certified Cables
It’s best to use Apple’s original accessories that ship with the phone regardless of charging it or using it for CarPlay. Use the lightning to USB-C cable that shipped with your iPhone to connect your iPhone to your car. If your car doesn’t have a USB-C port, you will have to separately purchase a lightning to USB-A cable.
Ensure you purchase MFI-certified cables for this purpose, as some other aftermarket cables may not work properly and cause frequent disconnections. Here are some of the best lightning cables for Apple CarPlay that you can purchase for your iPhone.
8. Clean iPhone Charging Port
Over time, dust or debris can accumulate in the port, leading to an inconsistent connection between the iPhone and the car’s infotainment system. By gently removing any buildup from the charging port, a more secure and stable connection for CarPlay can be established, reducing the chances of random disconnections.
9. Clean Infotainment Port
Similarly, check for any dust particle build-up in the infotainment port. Gently clean the port, and remove any dust particles to ensure a secure connection between your iPhone and the infotainment system. The lack of which, can cause CarPlay to randomly disconnect.
10. Update iOS Version
A particular software version may have caused an issue with Apple CarPlay. Updating your iPhone to the latest software can fix such issues.
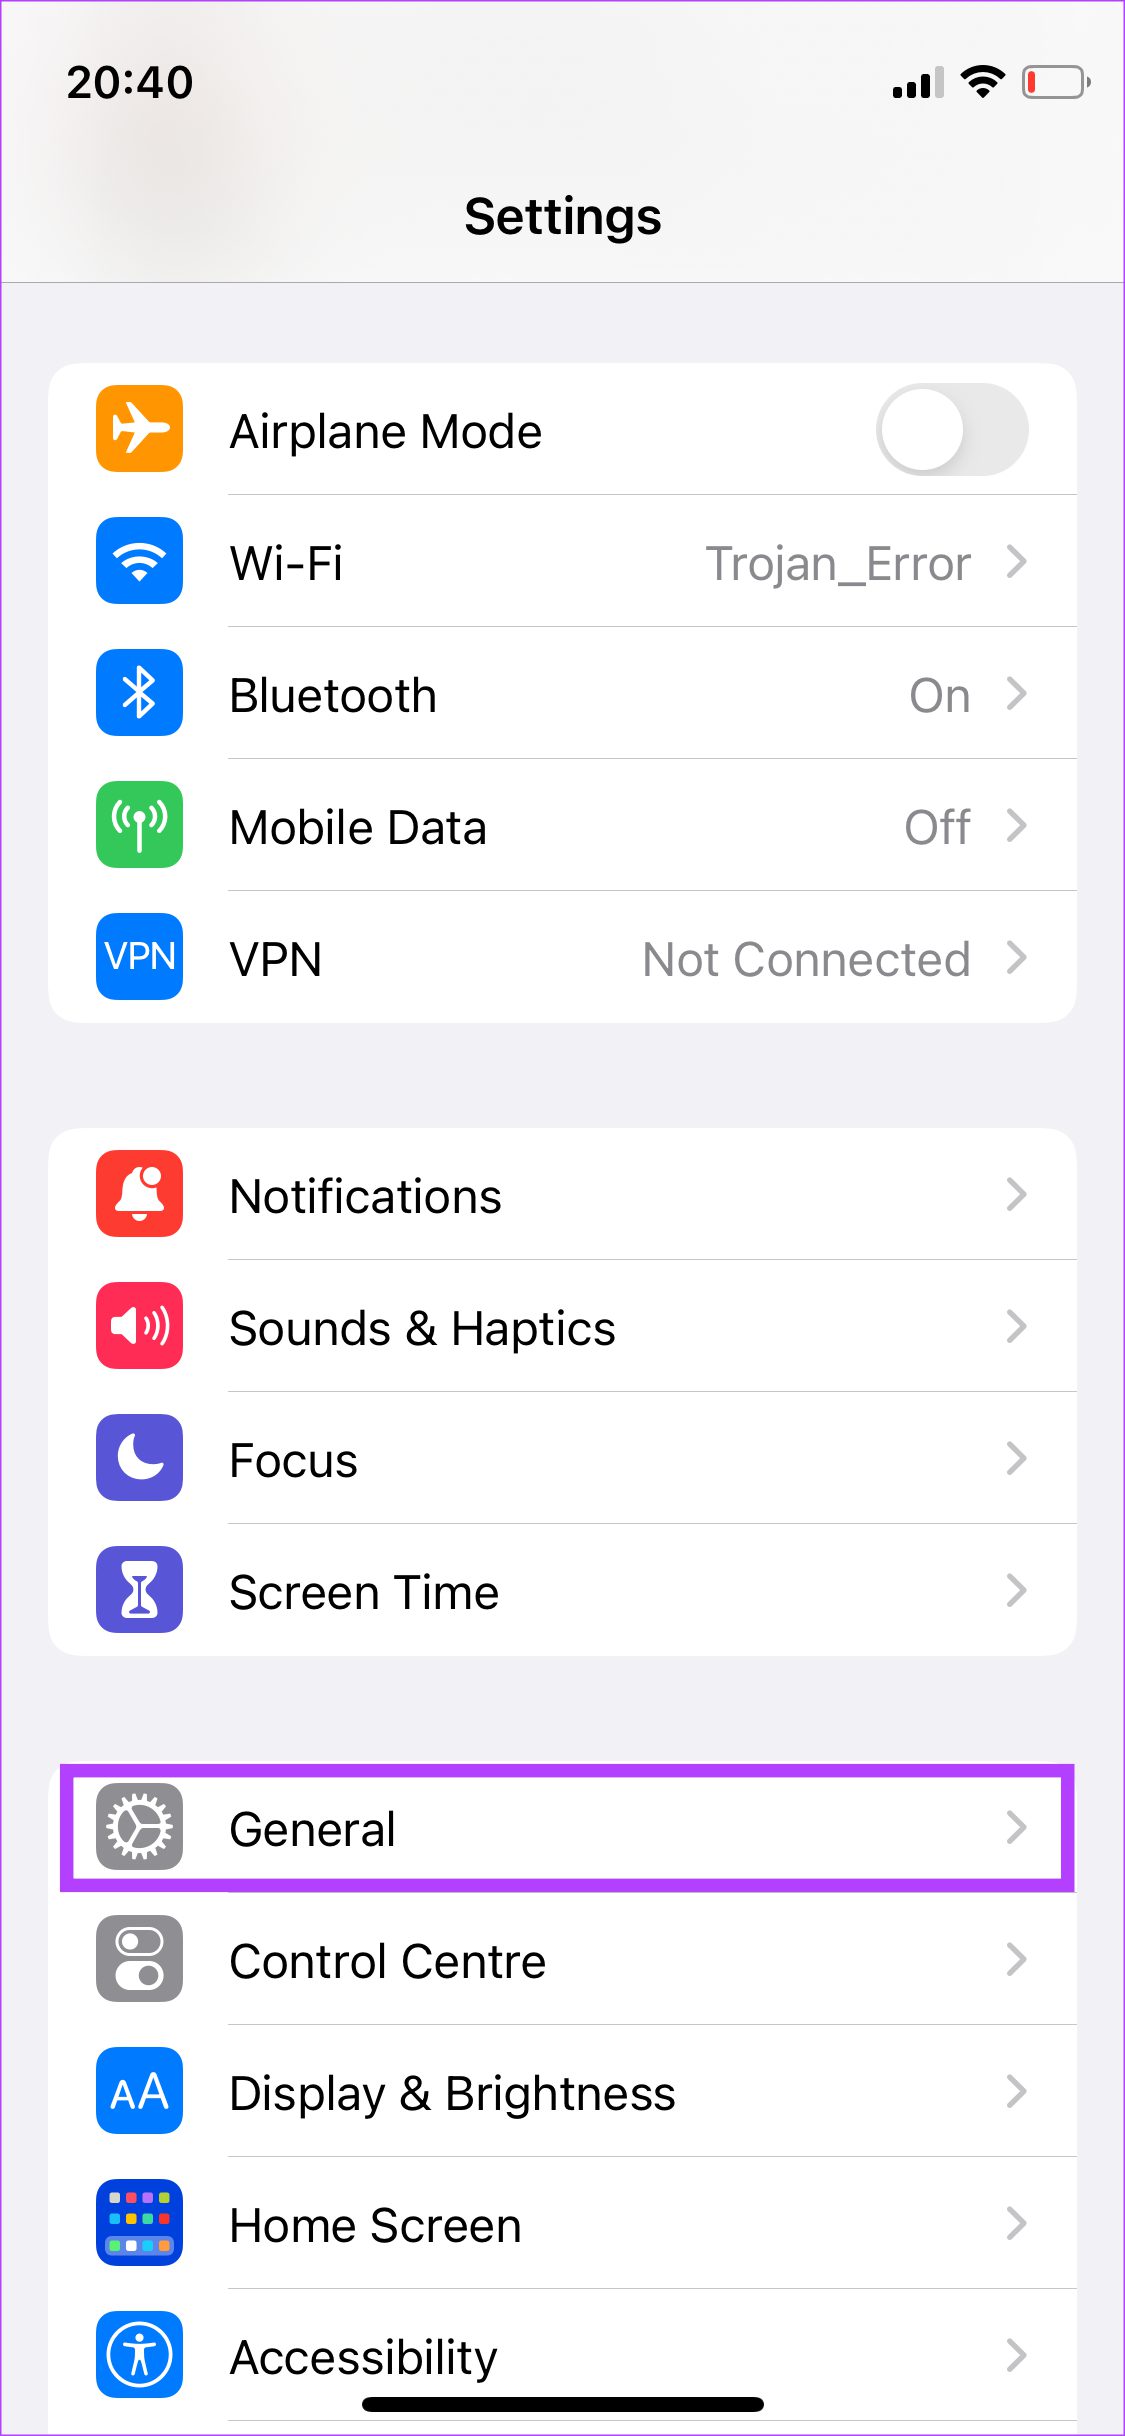
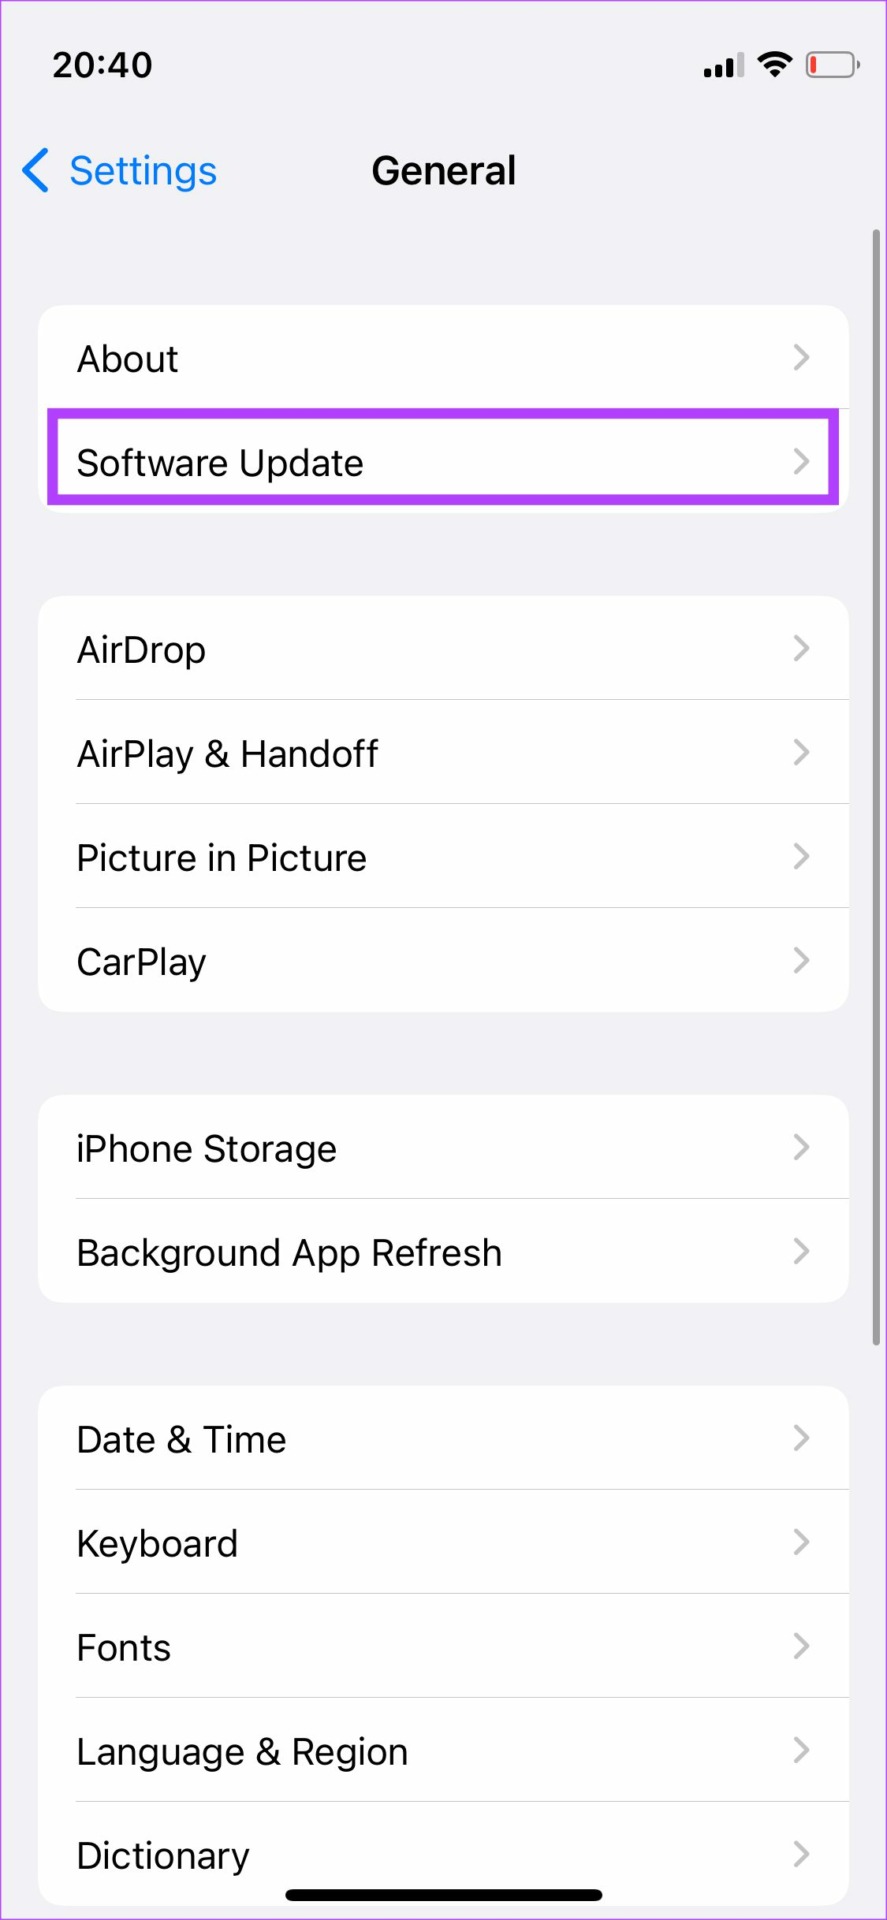
Step 1: Open the Settings app on your iPhone and select General.
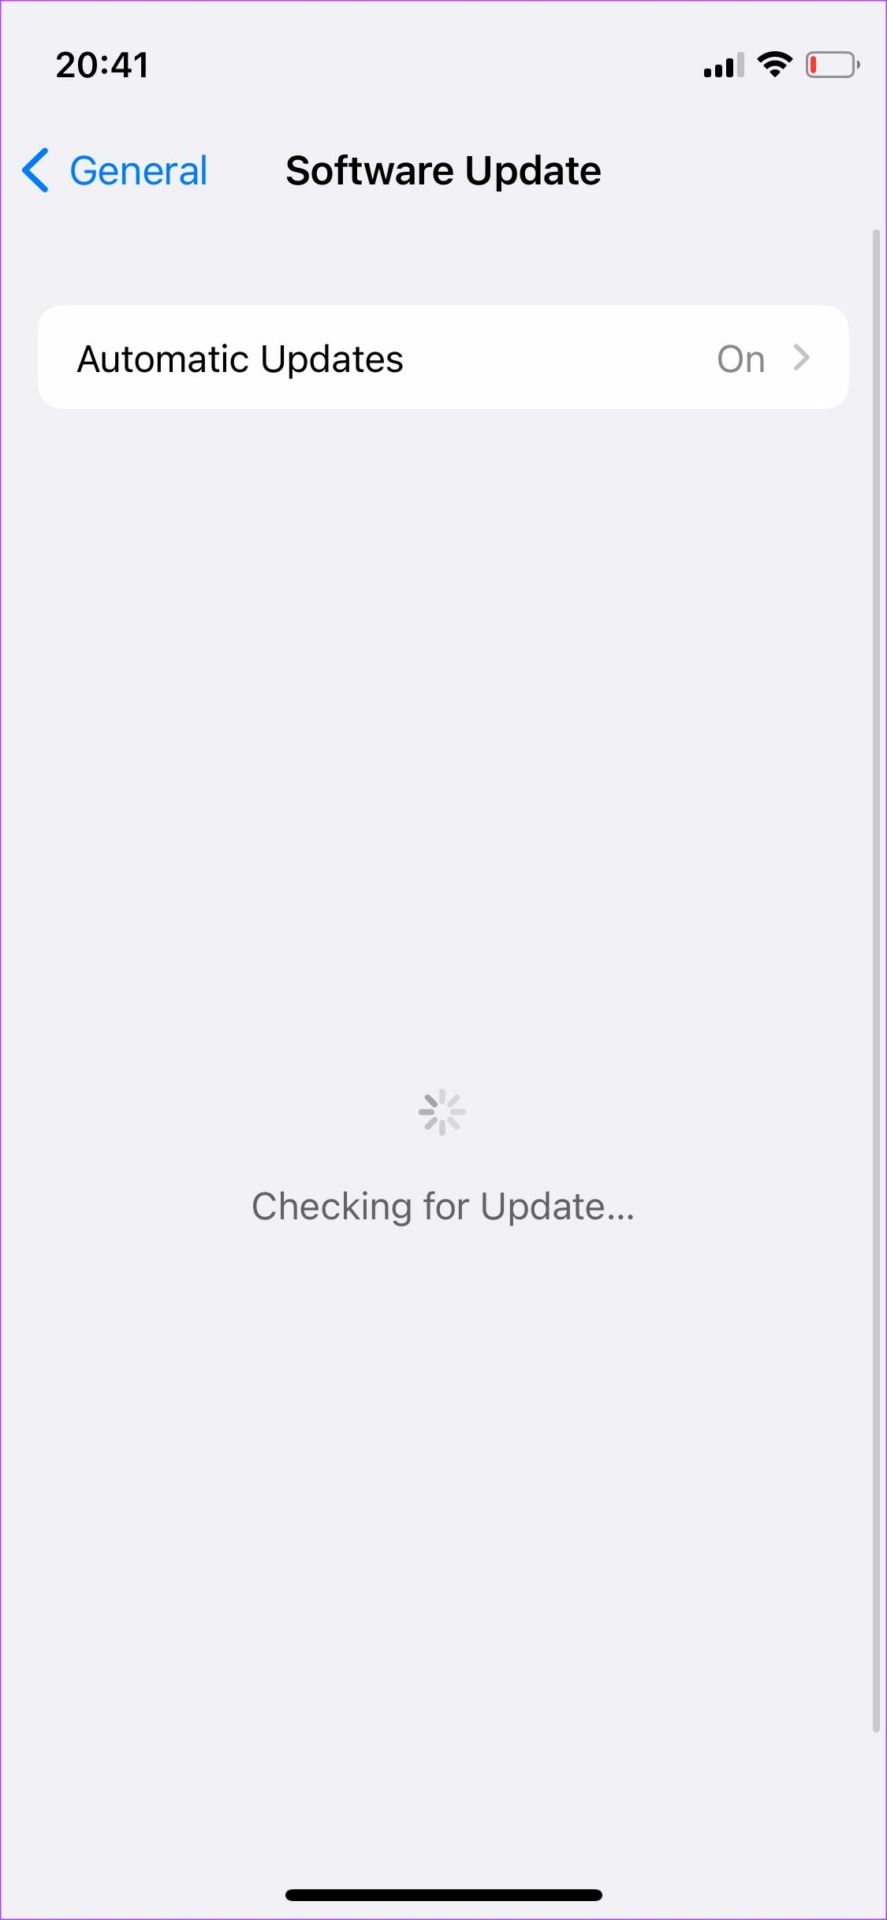
Step 2: Tap on Software Update.
Step 3: If a new update is available, it will be listed there. Select Install and wait for the installation to complete.
11. Ensure You Have a Working Mobile Data Connection
While mobile data isn’t important for Apple CarPlay to work, the apps and services within the CarPlay UI are dependent on an active internet connection to function. This is why having an active mobile data connection is vital.
If your iPhone does not have mobile data, the connection to Apple CarPlay will occur, but apps like Maps, Music, etc., may not work properly.
12. Forget Connected Cars and Add Them Again
If none of the above solutions helped, you can forget connected cars and disconnect from them via CarPlay settings on your iPhone. You can do this and pair the iPhone again with your car’s head unit. Here’s how it’s done.
Step 1: Open the Settings app on your iPhone and navigate to the General section.
Step 2: Select the CarPlay option.
Step 3: Tap on the car to which you’re connected.
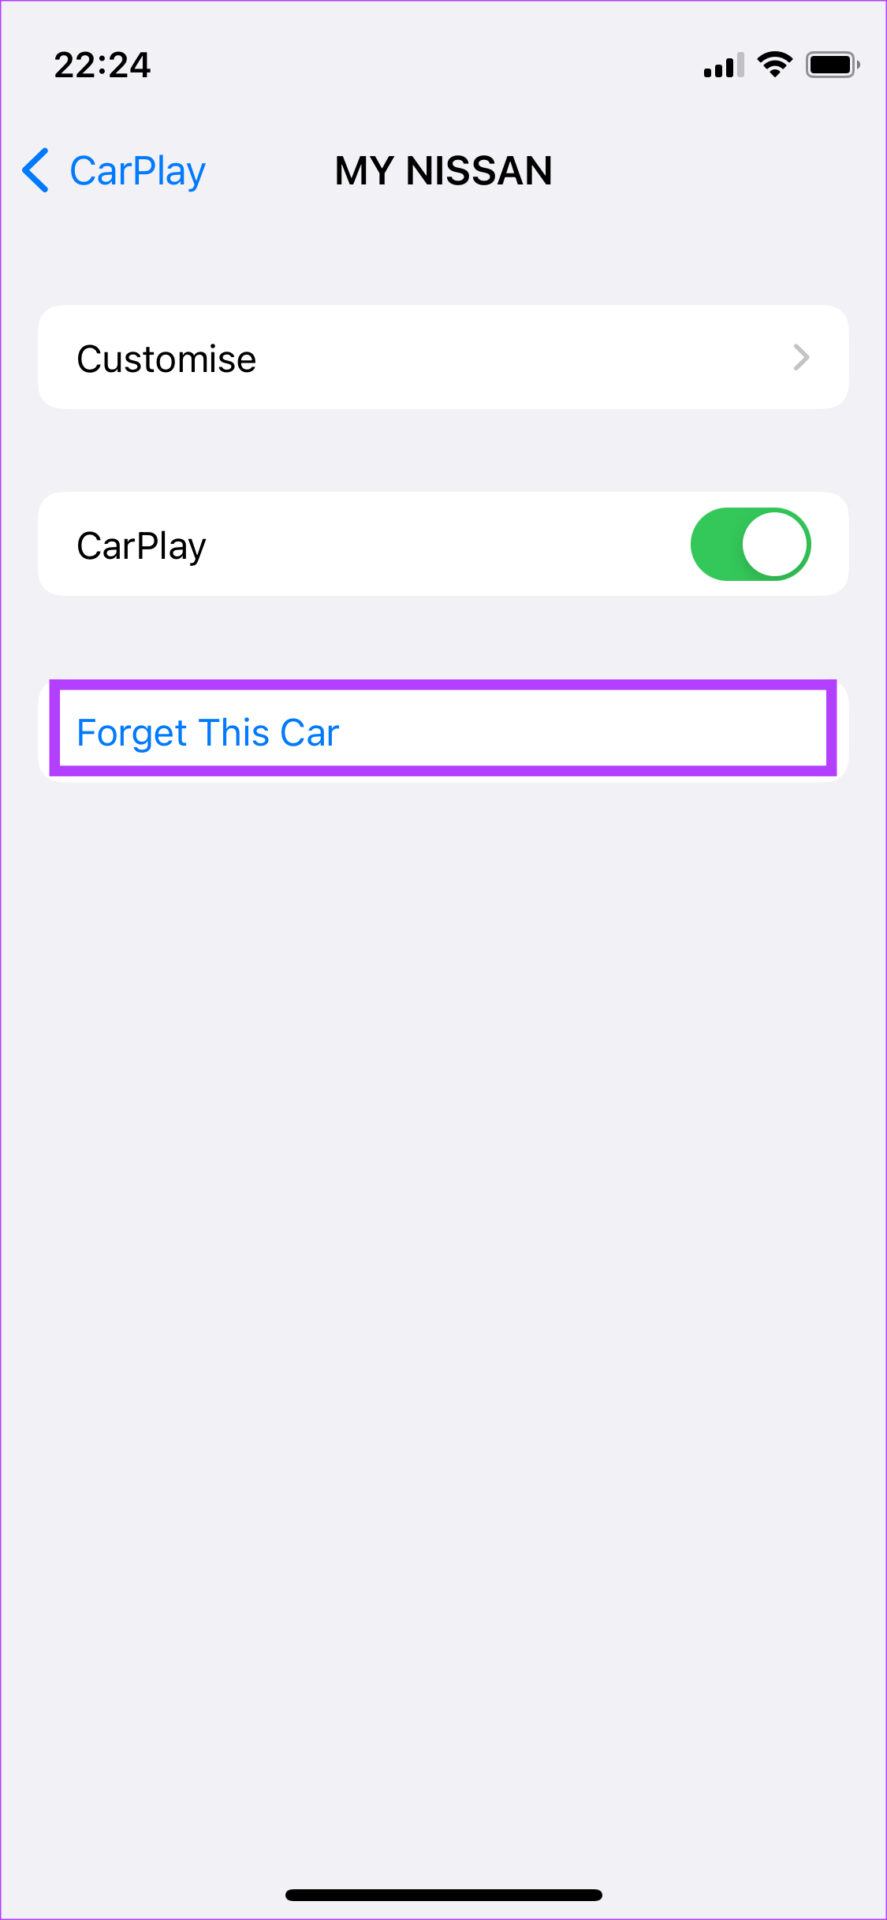
Step 4: Select Forget this Car.
This will disconnect your iPhone from the car’s stereo system. Reconnect your iPhone over Bluetooth or use a USB cable to set up CarPlay once again from scratch.
13. Restart the Car’s Head Unit
The problem may not even be with Apple CarPlay or even with your iPhone. It could be that your car’s stereo system or head unit is malfunctioning, so CarPlay keeps disconnecting. A quick fix for this issue is to restart your car’s head unit.
You can do so by turning off the ignition in your car and waiting for the head unit to turn off automatically. After that, restart your car and let the infotainment system turn back on. Try connecting your phone now, and Apple CarPlay should work perfectly if the issue is with the head unit.
14. Reset iPhone
If none of the above methods work, try resetting your iPhone. This resets any misconfiguration causing the problem with CarPlay on your iPhone.
Note: Resetting will revert all system-related settings and erase any saved Wi-Fi networks. Expect to spend some time reconfiguring your device afterward. You will not lose your data, however.
Step 1: Open the Settings app and tap on General.
Step 2: Select ‘Transfer or Reset iPhone’.
Step 3: Tap on Reset.
Step 4: Tap on ‘Reset All Settings’ to return all configurations to their default state.
Enter your passcode if prompted to reset the iPhone. This will most probably fix this issue.
FAQs: Apple CarPlay Keeps Turning Off
1. Can I manually update Apple CarPlay software?
You cannot manually update the CarPlay software. Any updates will be sent through the iOS updates from your iPhone.
2. Can Low Power Mode cause CarPlay to disconnect?
Ideally, Low Power Mode is not expected to interfere with CarPlay. However, you can try disabling Low Power Mode on your iPhone to see if it can fix the problem.
Drive Around With Apple CarPlay
With Apple CarPlay back and running as intended, you can rely on functions like Maps for navigation while you play your favorite tracks via a music streaming service of your choice. Whether Apple CarPlay keeps disconnecting or doesn’t connect, these solutions should help you fix the problem.
Telegram is one of the most popular instant messaging apps for multiple reasons. It has more features than WhatsApp and is arguable more privacy-focused too. You can create a channel on Telegram, add bots, and engage in several other cool things. You can check out the best Telegram tips and tricks to learn more about the app.
While Telegram works great on your phone, you can also use Telegram Web on your computer. It’s a good way to keep track of your chats without reaching out for your phone often. However, you may encounter some issues with notifications while using Telegram on your PC. If that’s the case, here are some ways in which you can fix Telegram Web notifications not working.
1. Ensure That Your Computer Is Connected to a Stable Internet Connection
Unlike WhatsApp, Telegram works independently on all devices, including your smartphone. Telegram Web should work fine if your computer is connected to an active internet connection. And your phone need not connect to an active internet.
Ensure your PC is connected to the Internet with an ethernet connection or a stable Wi-Fi network for Telegram Web to function properly and deliver notifications. Using metered connections or mobile hotspots may cause issues with Telegram Web notifications.
2. Enable Notifications Alerts on Telegram Web
There’s a settings panel that you can access from within Telegram Web to configure notifications. Make sure notification alerts are enabled. Here’s how to do it.
Step 1: Open Telegram Web on your computer and click on the hamburger menu in the left pane.
Step 2: Now, select the Settings option.
Step 3: Click on Notifications and Sounds.
Step 4: Enable the checkboxes next to ‘Notifications for private chats’ and ‘Notifications for groups.’
This should allow all your Telegram Web notifications to come through.
3. Allow Telegram Web to Send You Notifications on Your Browser
Even if you’ve enabled Telegram Web notifications by following the previous step, the web app won’t deliver the notifications if you didn’t change your browser’s notification settings. Here’s how you can enable Telegram Web notifications in your web browser.
We’re demonstrating the steps on Google Chrome, but it should be similar on most web browsers.
Step 1: Open Telegram Web on your web browser.Tap on the small lock icon in the address bar before the URL.
Step 2: Enable the toggle next to Notifications.
Restart your web browser, and Telegram Web notifications should now work normally.
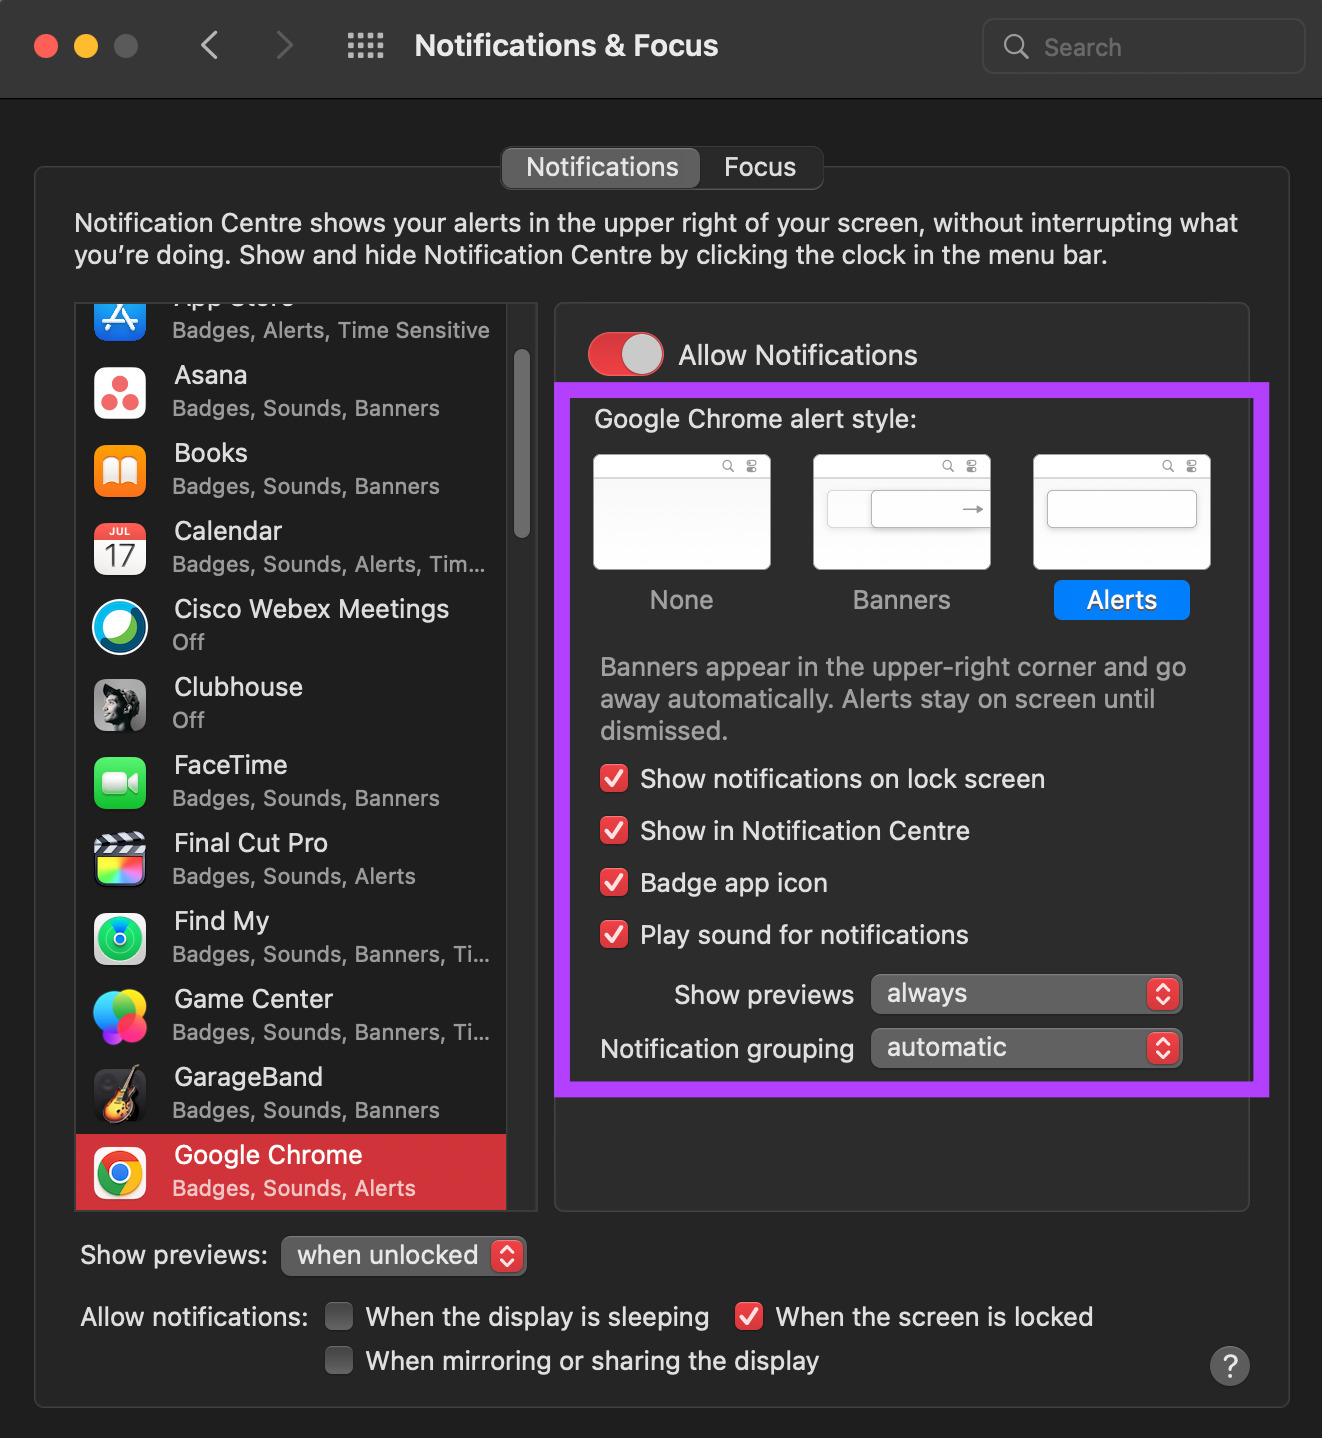
4. Grant Notification Permission to Your Web Browser on Mac
This step is applicable if you’re using WhatsApp Web on a Mac. Suppose WhatsApp Web notifications are not working even after enabling notifications via your browser. In that case, there’s a chance that your web browser doesn’t have permission to display notifications on your Mac. Here’s how you can change that.
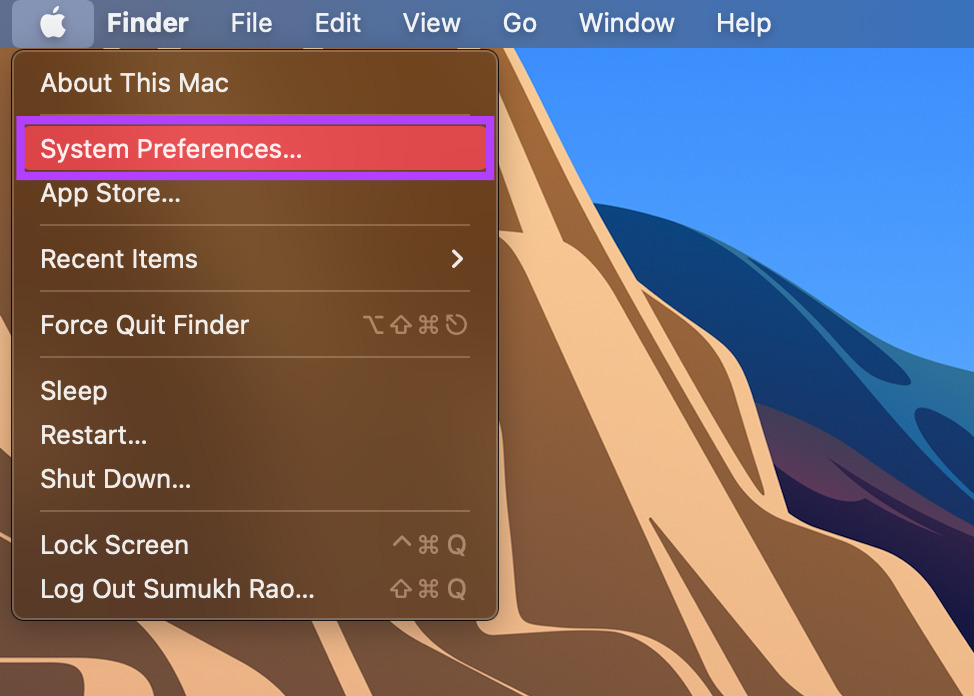
Step 1: Click on the Apple logo in the top-right corner of the screen.
Step 2: Select System Preferences.
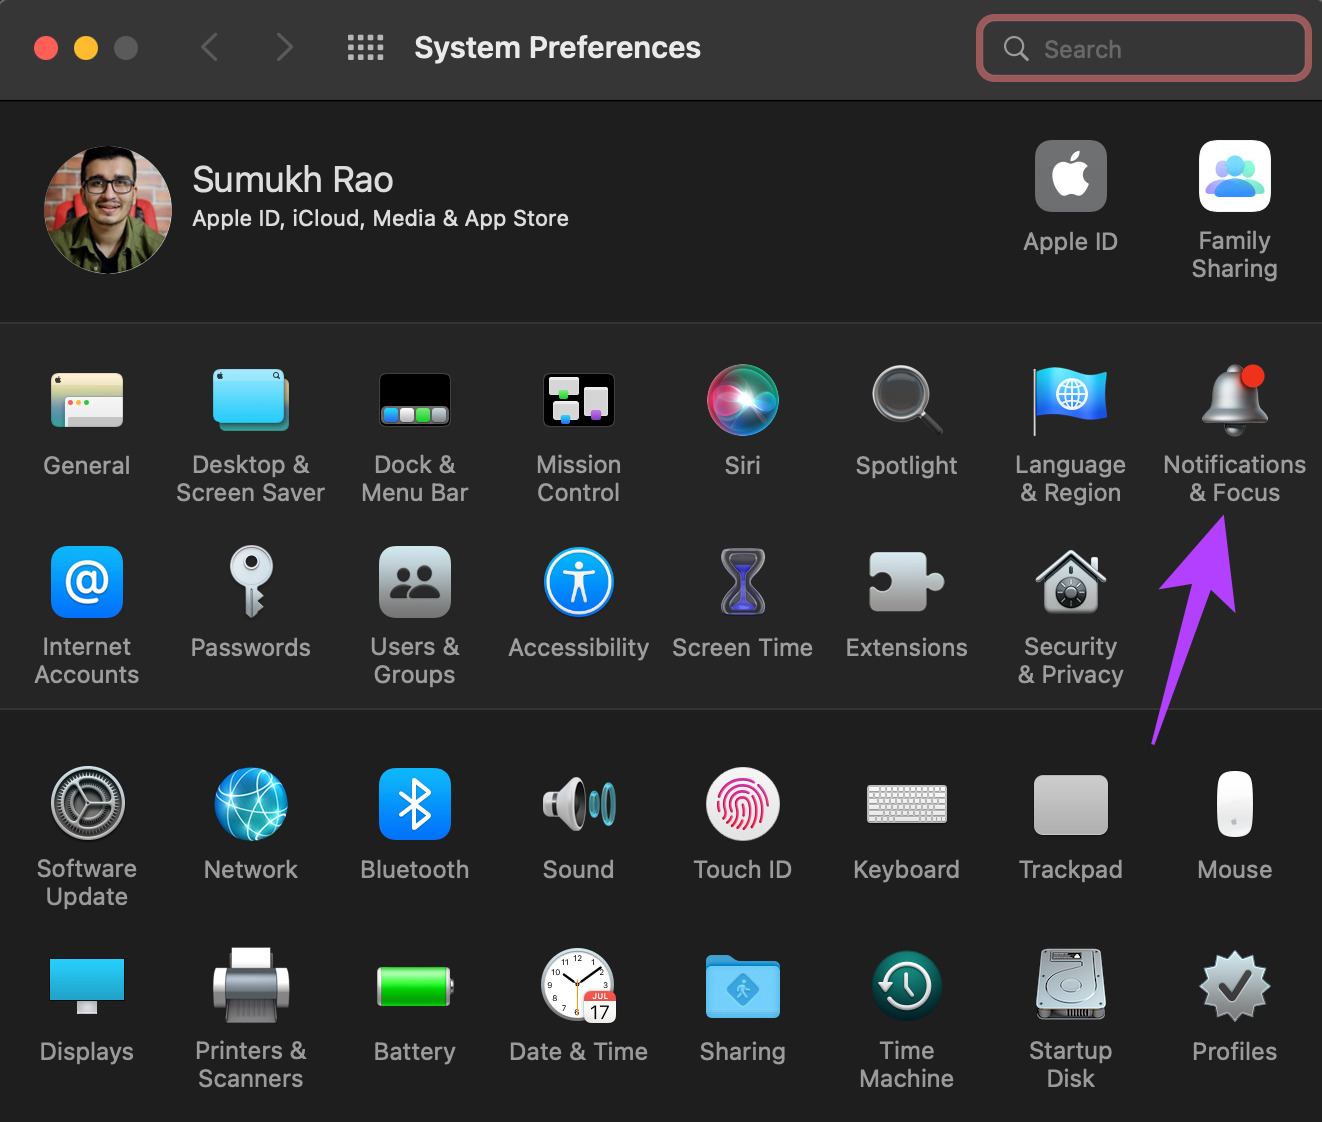
Step 3: Head to the Notifications & Focus section.
Step 4: Look for your browser in the left panel and click on it.
Step 5: Enable the toggle next to Allow Notifications.
Step 6: Select the relevant options like Banners/Alerts, whether or not you want to play a sound for notifications, etc.
Restart your browser and check if Telegram Web notifications are now working.
5. Terminate the Session on Your Smartphone and Log in Again
There could be an issue with how Telegram functions on your computer. You can try removing your computer from the list of linked devices by terminating the session from your smartphone to solve this. Then, link the device again and see if it makes a difference. Here’s how to do it.
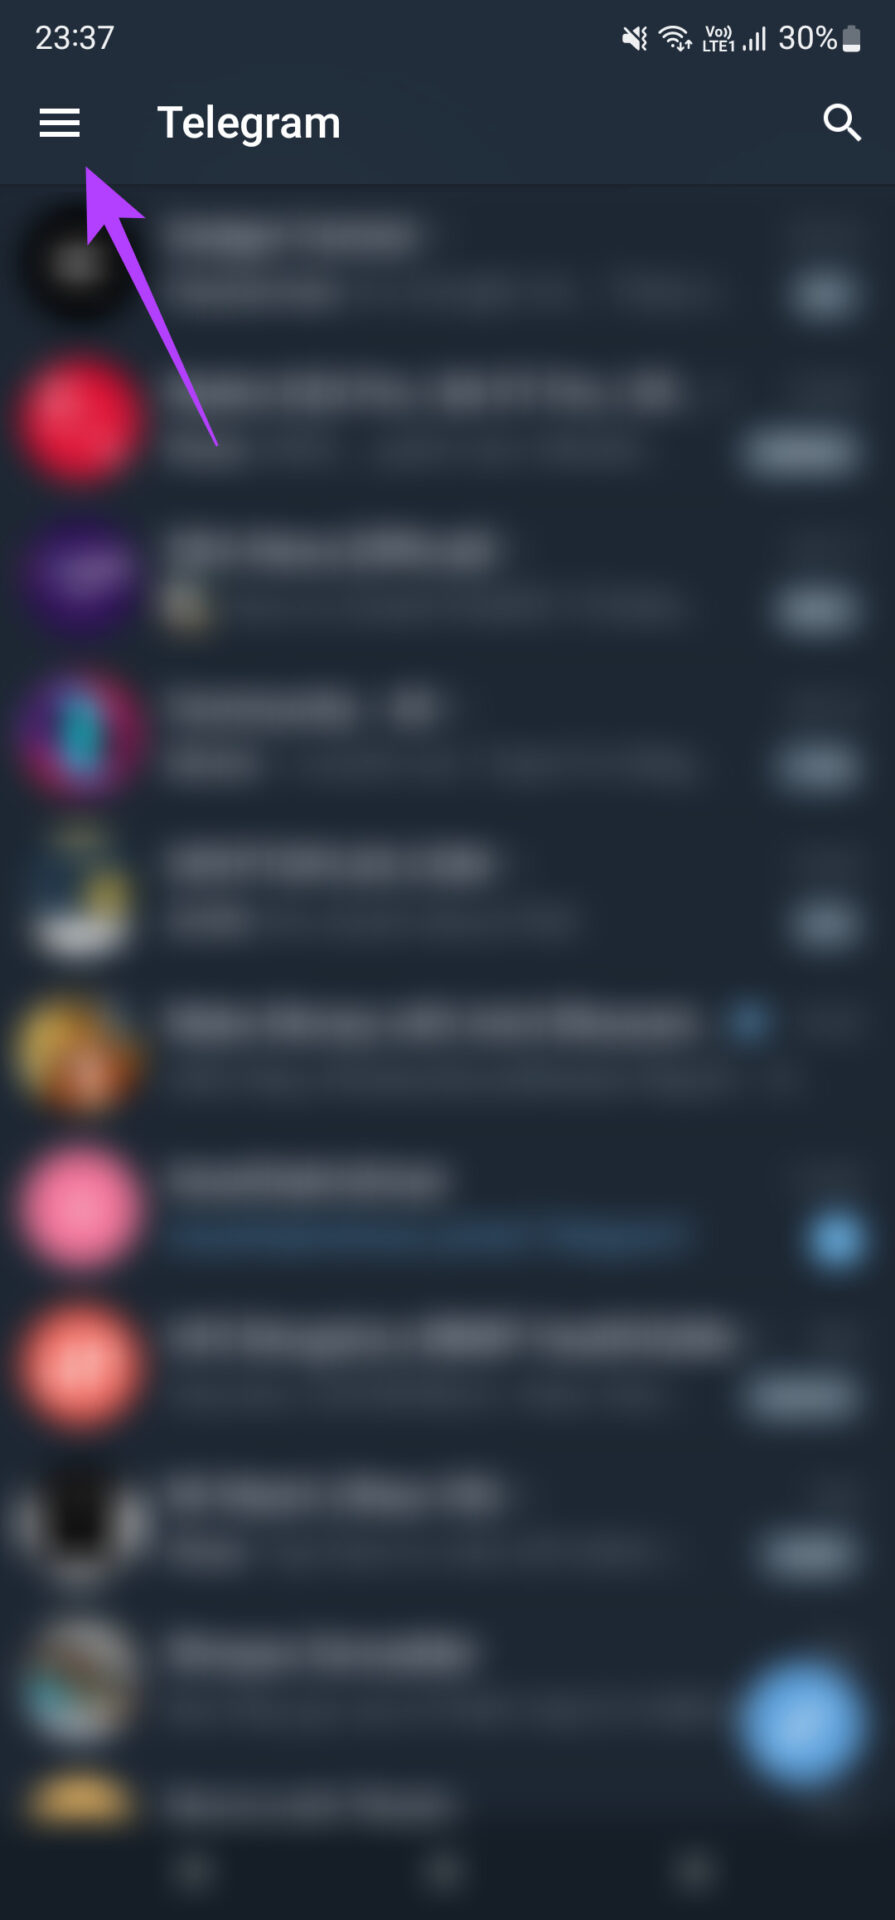
Step 1: Open the Telegram app on your smartphone and tap on the hamburger menu in the top-left corner.
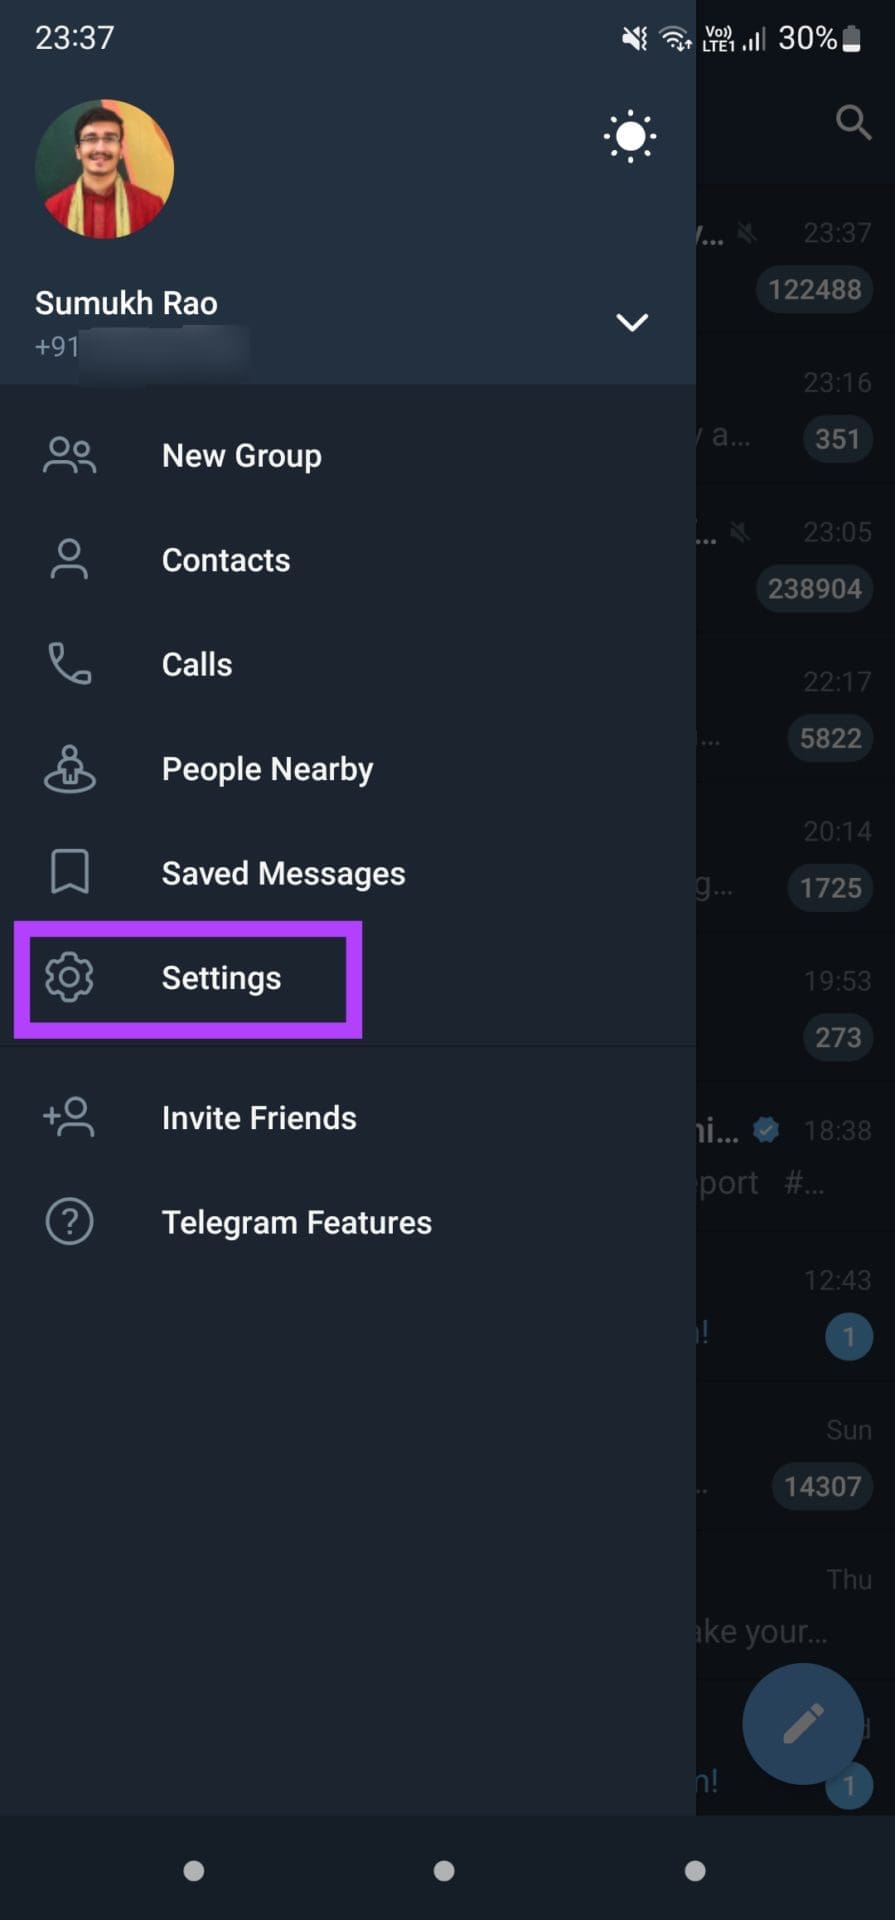
Step 2: Select the Settings option.
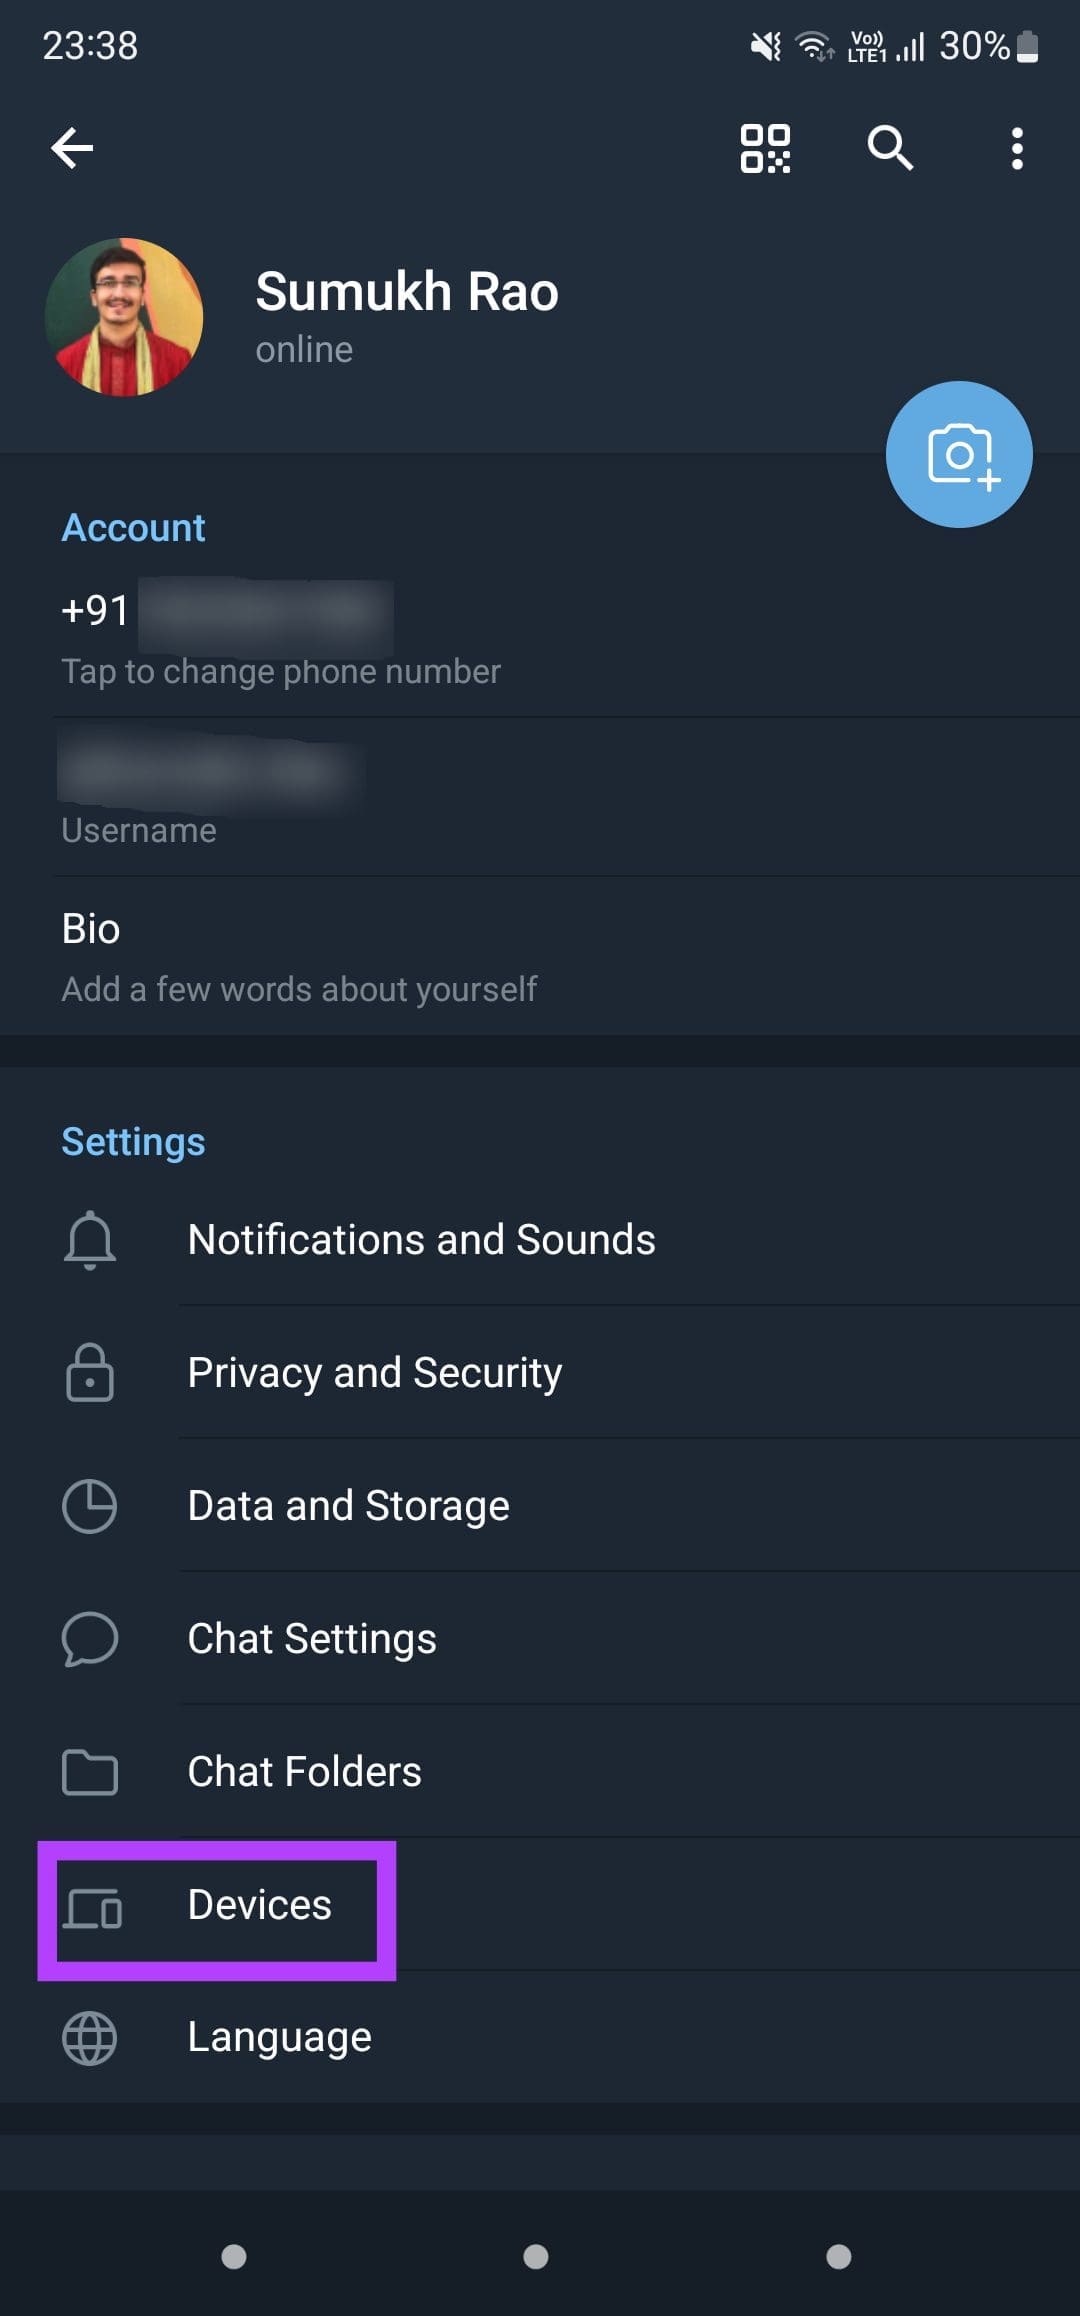
Step 3: Tap on the Devices tab.
Step 4: Scroll down to see a list of your active sessions. Select the session that’s running on your computer by tapping on it.
Step 5: Now, tap on Terminate Session.
This will log you out of Telegram Web on your computer.
Step 6: Return to the same screen on Telegram on your smartphone and now select Link Desktop Device.
Step 7: Open Telegram Web on your computer and scan the QR code with your smartphone to link the device.
6. Switch to the Telegram Desktop App
Telegram Web may not play nicely with your web browser, thus causing notifications or sync issues. If there’s no particular reason for you to stick to Telegram Web, we recommend using the Telegram desktop app on your PC or Mac.
While Telegram rolls out updates for the desktop app often, you can only hope that the notifications-related issues get resolved in future updates. You can download the Telegram Desktop app for Mac or Windows computer.
Fix issues with Telegram Web notifications by following these simple steps on your PC and smartphone. Missing notifications can be annoying, especially if they’re some close friends or family members. These steps should help you avoid that.
How to Check Call Duration on Google Phone App on Android
Most Android devices use the Google Phone app as the phone’s default dialer app. And even if that’s not the case, you can always install the Google Phone app and make it your default phone app. Once done, follow the steps below to check the call duration on the Google Phone app.
Step 1: Open the Phone app and go to Recent. Tap on a contact name or number.
Step 2: Tap on History and see the call duration for the relevant call.
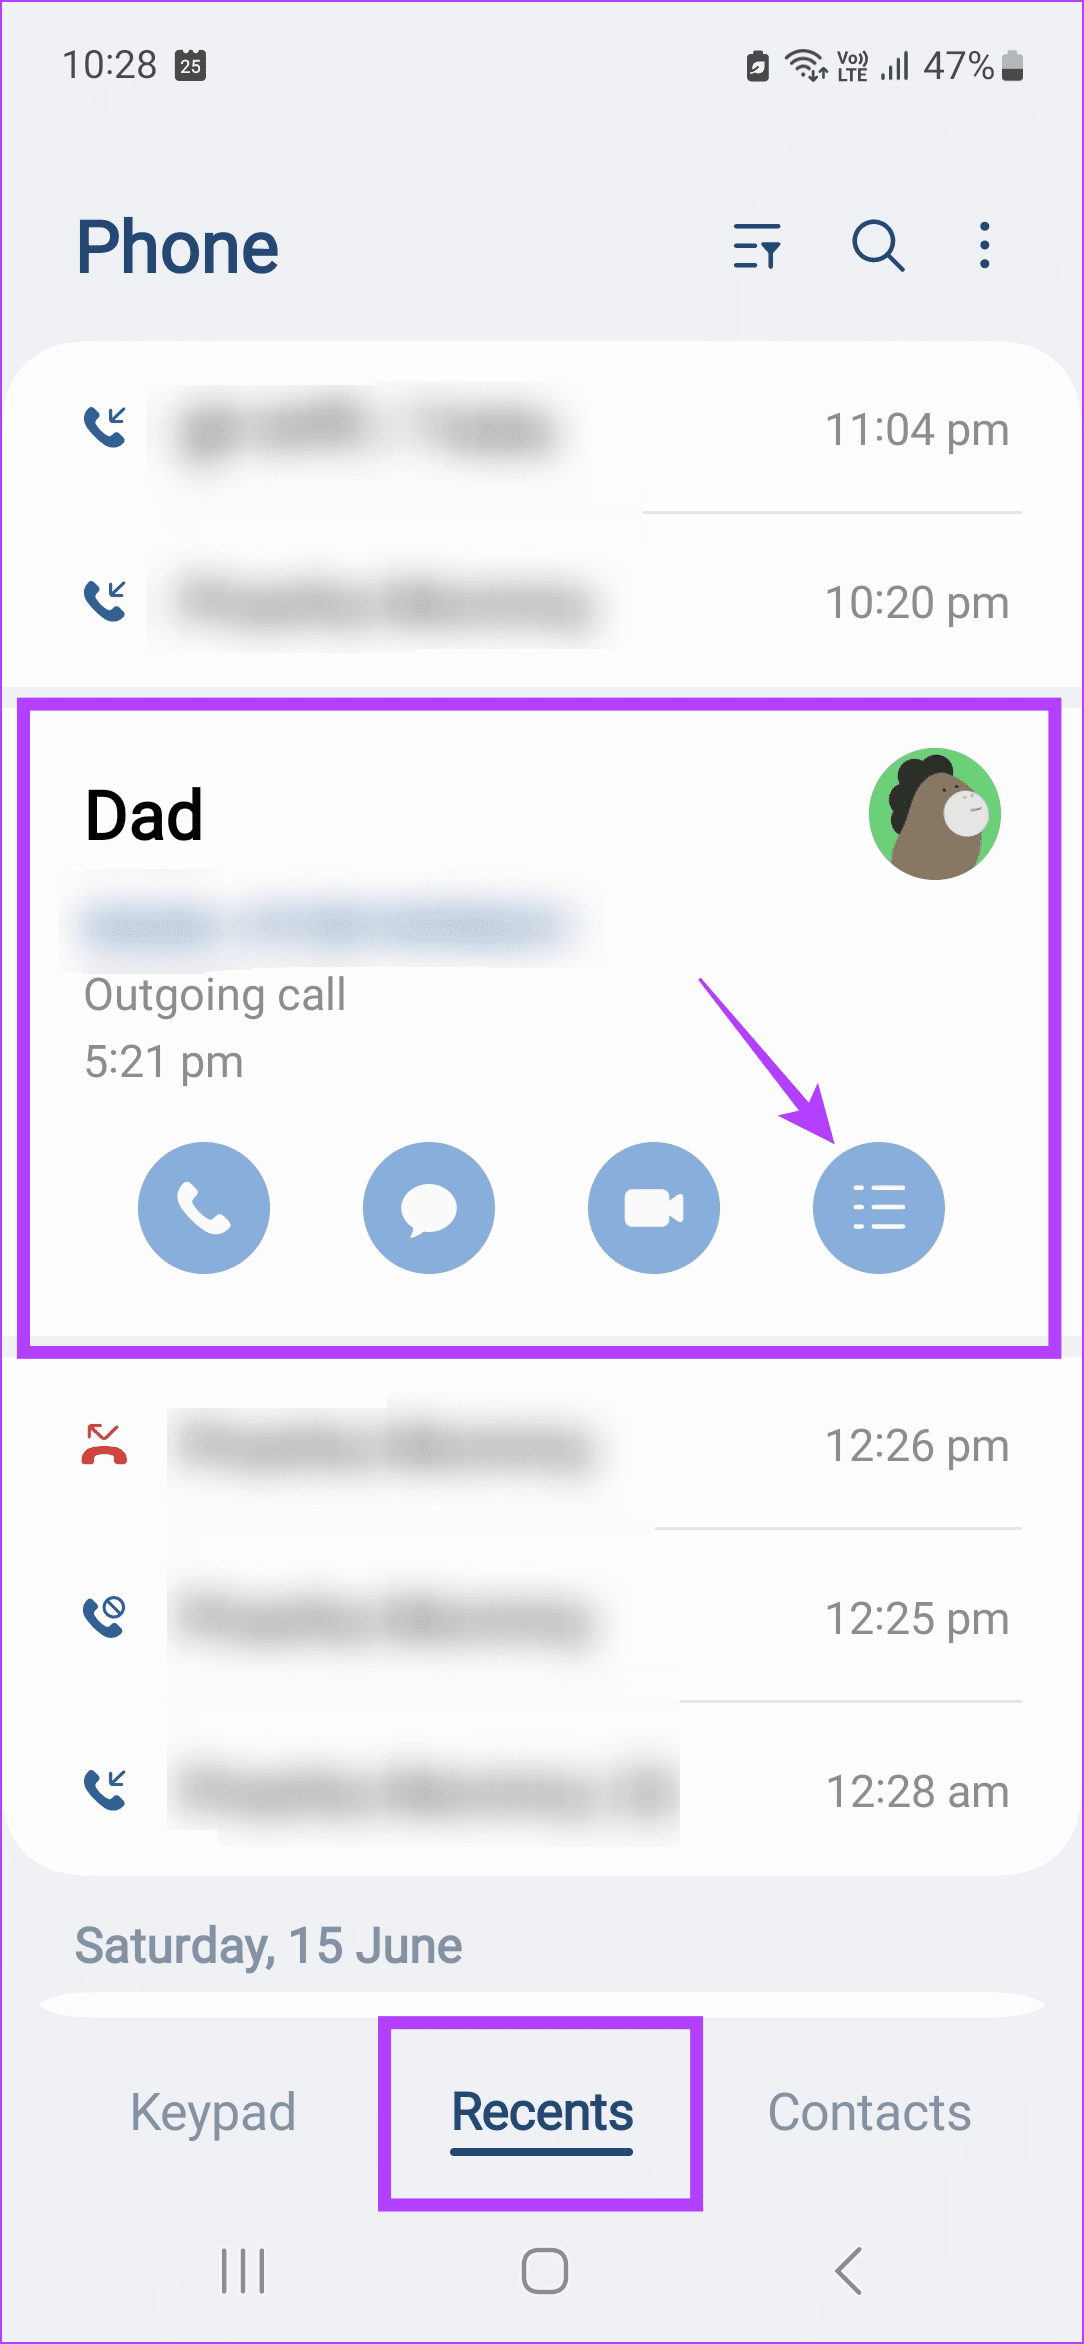
How to Check Call Duration on Samsung Galaxy Phones
Samsung users can enjoy a customized experience with the native Samsung app. This includes the Samsung Phone app. Using this, you can also check your previous calls and their corresponding durations. Here’s how to do it.
Step 1: Open the Samsung Phone app and tap on Recents. Tap on the relevant contact.
Step 2: Once visible, tap on the menu icon. Check the duration of the relevant call.
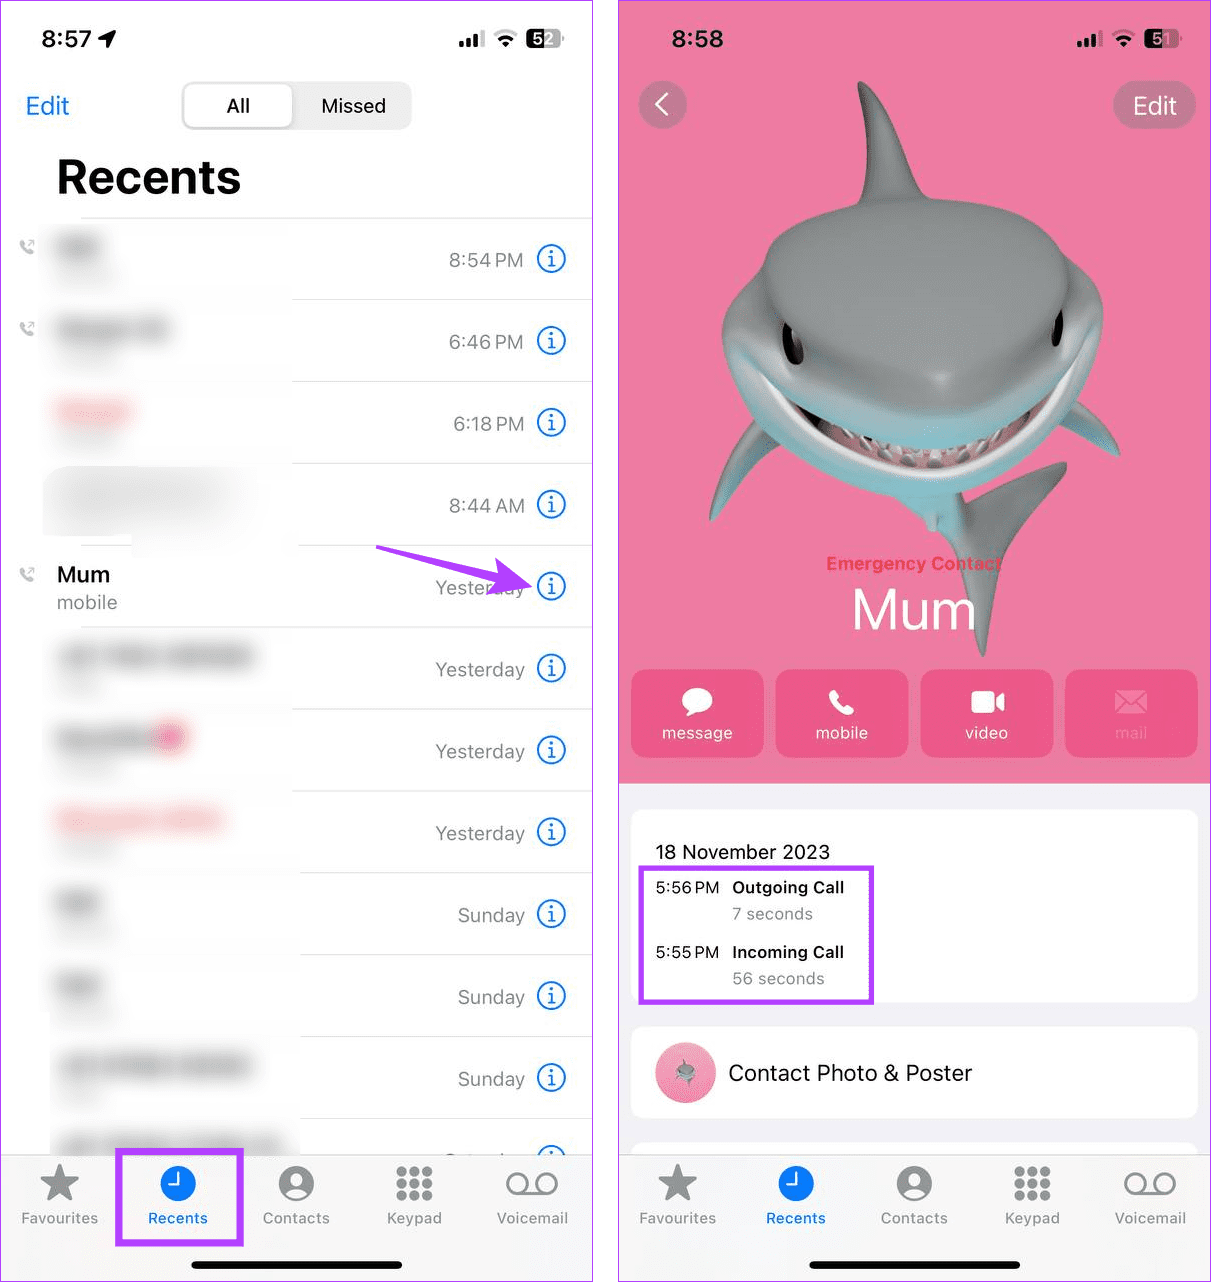
How to Check Call Duration on iPhone
Similar to Android, the iPhone also comes with its Phone app. Using this app, you can check the call duration. However, note that you will have to go to the relevant contact listing from the main Recents tab to see the duration of that particular call. Here’s how to do it.
Step 1: Open the Phone app and tap on Recents. Tap the i icon before the relevant contact.
Step 2: Check the recent call duration for recent calls.
Now, if you want to see the duration for other calls from the same contact, go back to the Recents page and open the call info for the relevant listing.
First, we will discuss the Gmail web version and cover the Gmail mobile apps for inserting and sending GIFs. Without further ado, let’s get started.
Step 1: Open Google Chrome, navigate to the Chrome Web Store, and search GIPHY for Gmail on your Computer (Mac or Windows)
Step 2: Click on the Add to Chrome button to install it.
Step 3: Open Gmail, click the Compose button at the top left, and select the message body where you type the email.
Step 4: Since you have already installed the GIPHY extension, it will appear in the Gmail toolbar at the bottom of the compose window.
Step 5: Click on the GIPHY icon and search for GIFs. Select a GIFyou want to install and use other Gmail formatting options to compose the perfect email.
Step 6: Compose the rest of the email, fill in the email addresses, and press Send.
Method 2. Send GIFs From Microsoft Outlook for Windows
Outlook has a dedicated store to install required add-ons to send GIFs in an email.
Step 1: Open Outlook on Windows and go to the Home tab
Step 2: Click the More Apps icon at the top and click Get Add-ins.
Step 3: Search for Giphy at the top. Select Add from the following menu to install it.
Step 4: Compose a new email and select the message body. Then, click the three-dot menu at the top right.
Step 5: Scroll down and select GIPHY. Outlook will open a dedicated GIPHY menu where you can search for GIFs.
Step 6: Search and insert a GIF to send in an email.
Once installed on the Outlook app on Windows, the Giphy app will also be available on the Outlook web. The menu is available in the compose option menu.
Method 3. Send GIFs on Outlook and Gmail Mobile Apps
You don’t need to use any add-on to insert GIFs on Gmail or Outlook mobile apps. Gboard – Google’s default Android keyboard already has a dedicated GIF function to search and add them to conversations or emails. iPhone and Android users can download Gboard from the Play Store and App Store, respectively, and set it as the preferred keyboard on their phone.
Step 1: Open Gmail or the Outlook app on iPhone or Android. Both apps use the same interface on iOS and Android.
Step 2: Compose an email and add relevant details; tap on the emoji icon in Gboard.
Step 3: You can add emojis, stickers, and GIFs. Go to the GIF menu, tap on a GIF to copy it, and long-press on the compose window to paste it.
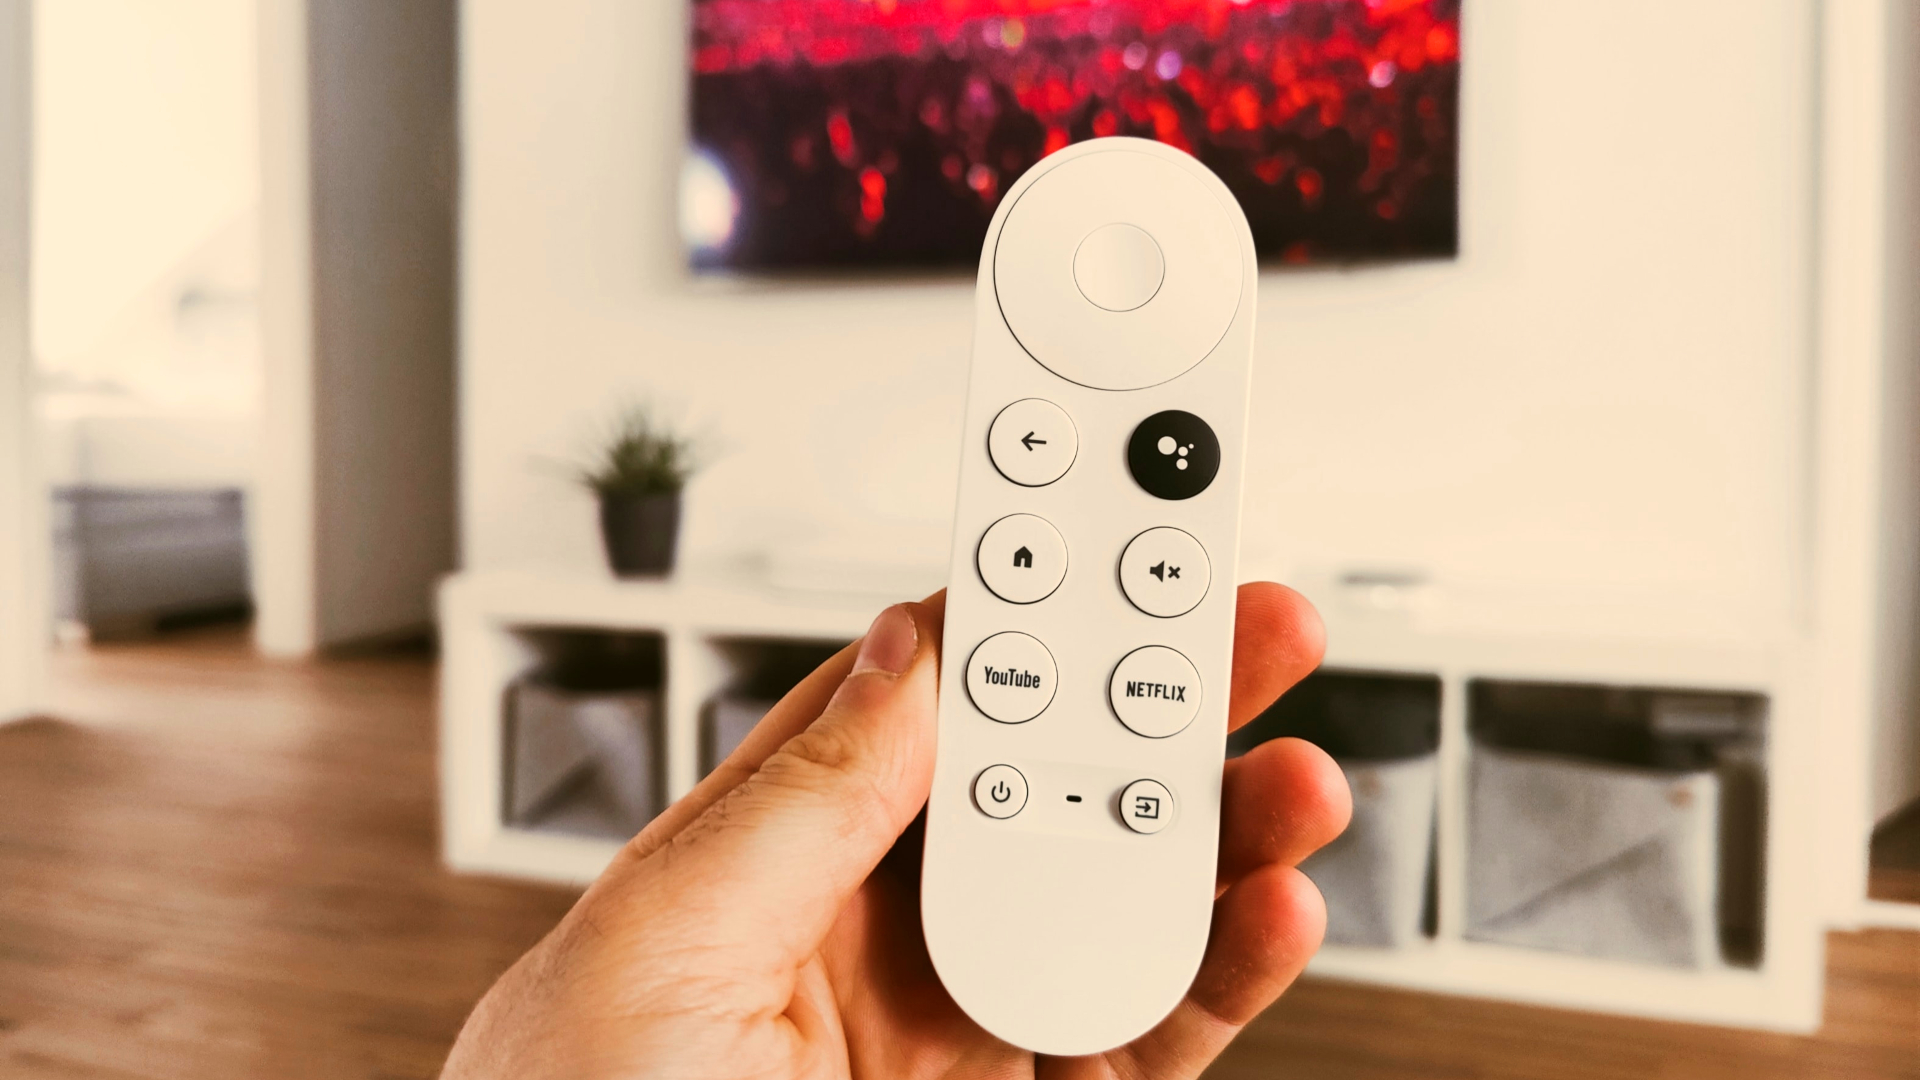
Restart your Android TV: A simple restart can sometimes help fix such issues.
Replace the Android TV remote batteries: Your Android TV remote might need replacing.
Fix 1: Check if the IR Emitter Is Working Under a Camera
If your Android TV has a traditional IR remote, there is a quick way to check if the IR emitter on your remote is working. You will need your smartphone to perform this step.
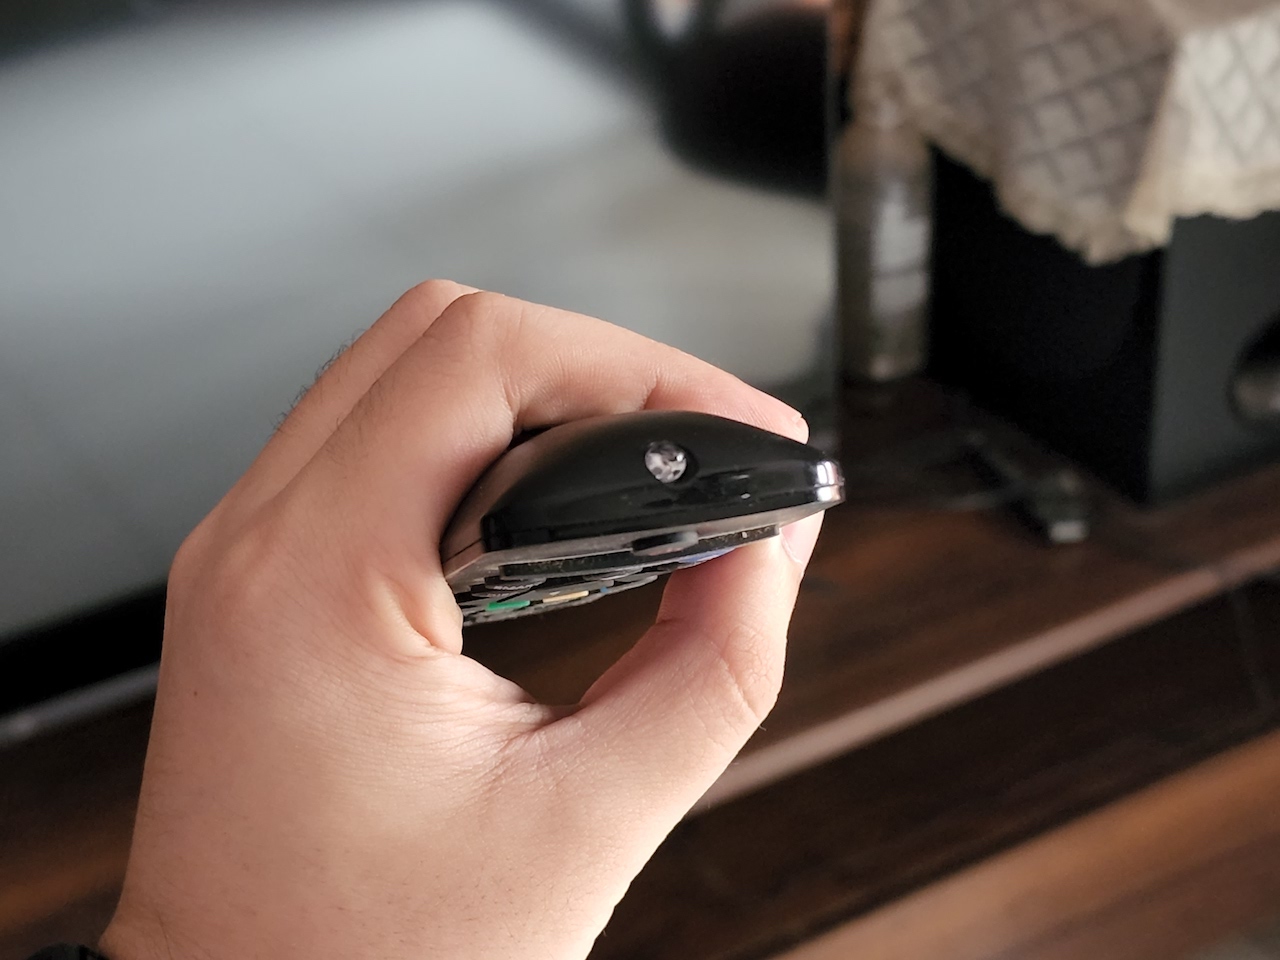
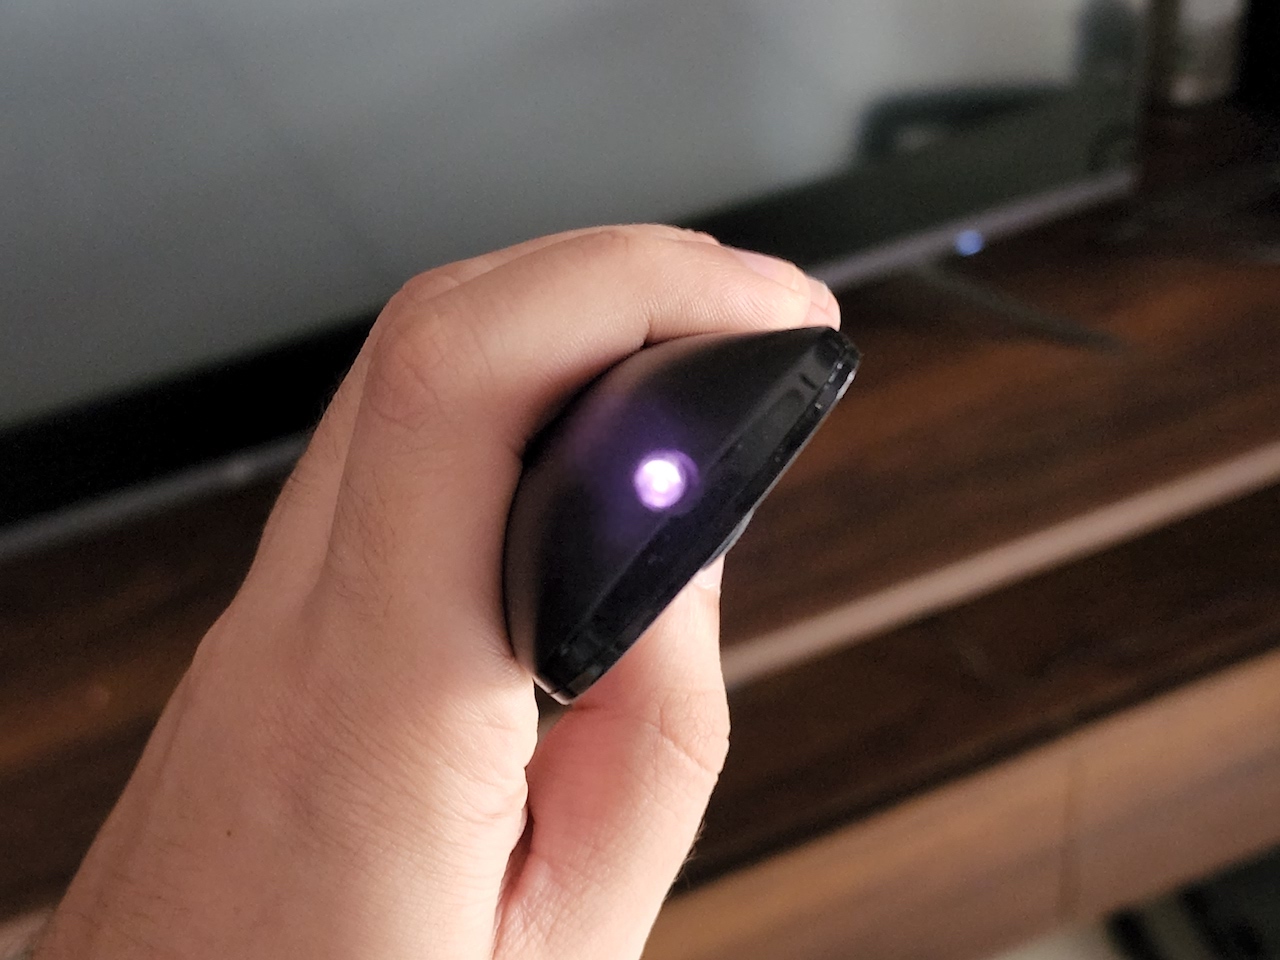
Step 1: Open the camera app on your smartphone. Point the camera at the IR transmitter on the remote. It is generally located on the top portion of the remote.
Step 2: Press any button on the remote, and you should see a light blink in your smartphone’s camera viewfinder.
If you see a light blink, the remote works fine, and the issue might be with something else. If you do not see the LED blinking, it might indicate a problem with the hardware on your remote.
Fix 2: Use Mouse or Any Other Input Device to Re-Pair the Remote
Once you’ve connected the mouse, pair your remote again with the TV via the settings menu.
Step 1: Connect a mouse or keyboard to your Android TV using one of the USB ports.
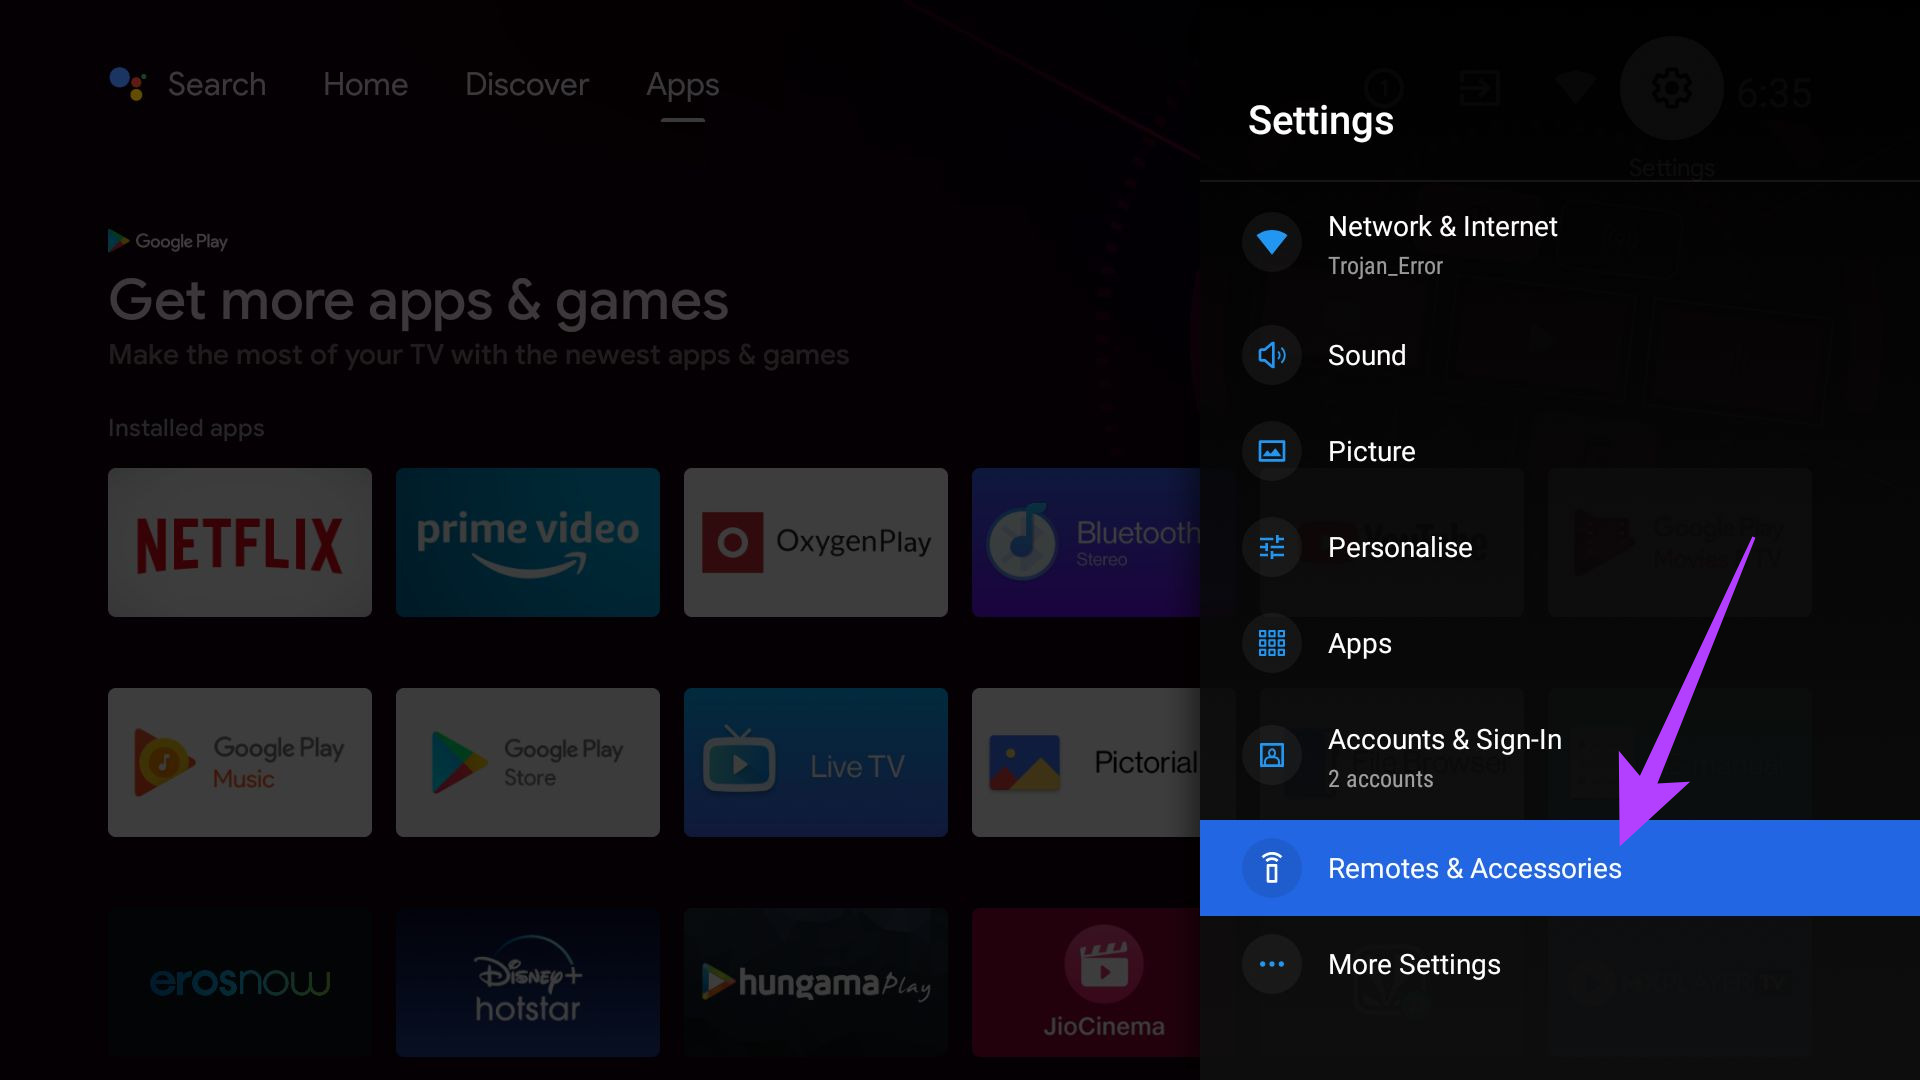
Step 2: Click on the Settings icon at the top-right corner > select Remotes & Accessories.
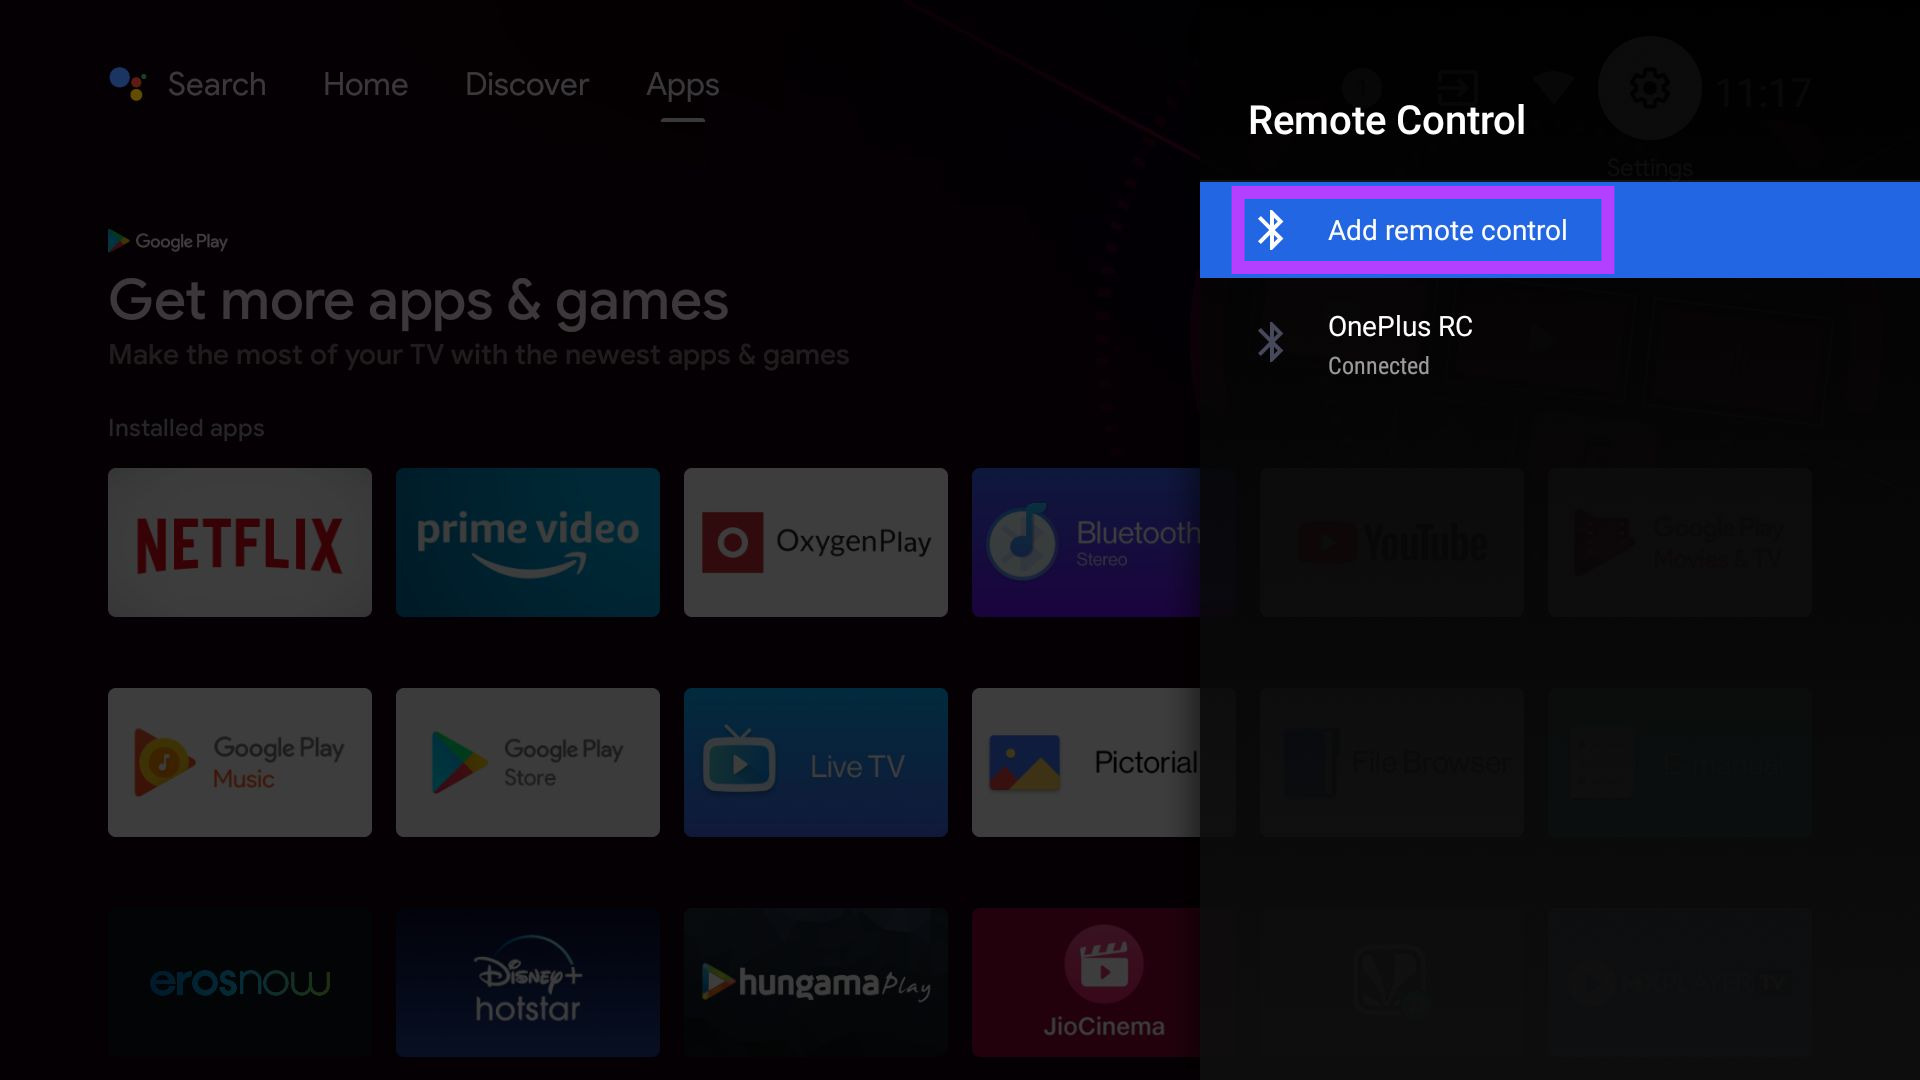
Step 3: Click on Remote Control > select Add remote control.
Now, follow the steps on the screen to pair your remote with the TV again.
Fix 3: Use the Google TV App as a Remote
If all fails, your last resort is to use the Google TV app as a remote for your TV. You can also download the app for your iPhone.
Step 1: Open the Google TV app on your smartphone and select the TV remote option at the bottom right corner.
Step 2: When prompted, tap on Allow to grant permission to the app.
Step 3: Select the Android TV you want to control. A code will now be displayed on your TV screen. Enter it on the phone and tap on Pair.
Your smartphone will pair with your TV, and you can now use your phone as a remote with the Android TV.
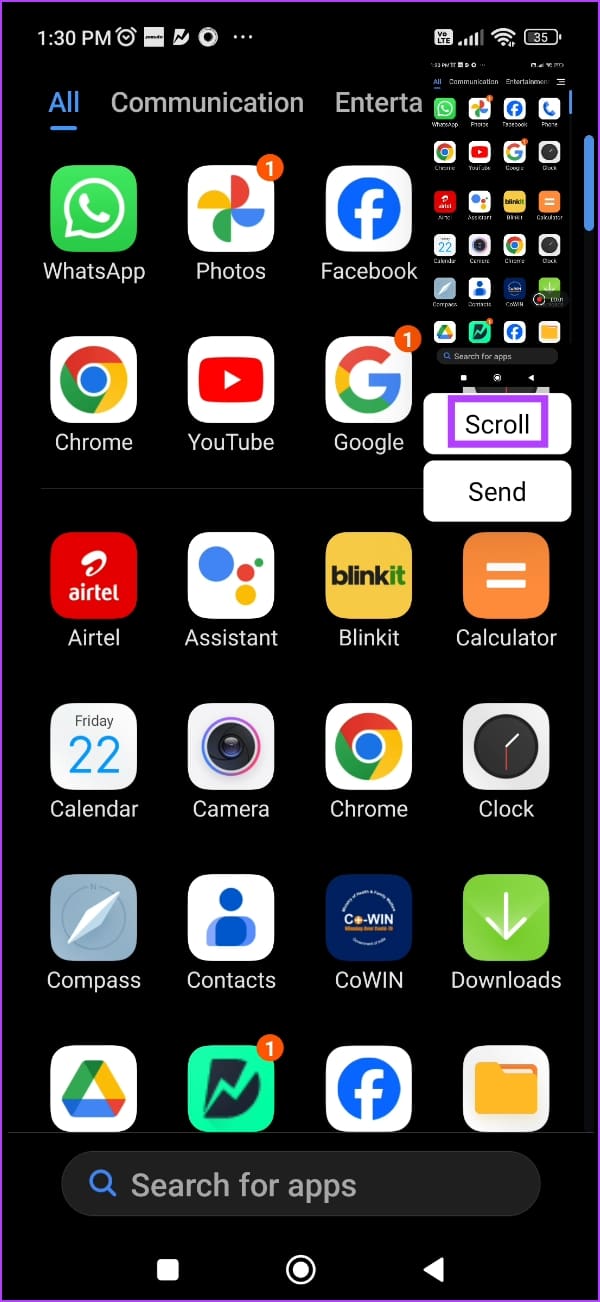
Step 1: Press the power button and volume down together. A screenshot menu will appear.
Step 2: Once the screenshot menu appears, keep tapping the down icon till where you want the screenshot to be.
Once you complete taking the required screenshot, tap on the image thumbnail (on the leftmost side – which is the first option in the menu) to save the screenshot.
How to Take a Full Page Screenshot on Pixel (Stock Android) Devices
Step 1: Press and hold the power button and the volume down button simultaneously.
Step 2: Once the screenshot of the visible area is captured, tap on the Capture More button.
Step 3: Drag the slider down to capture all the areas that you need. You will see a magnification of the display to help you understand where to stop. Tap on Save.
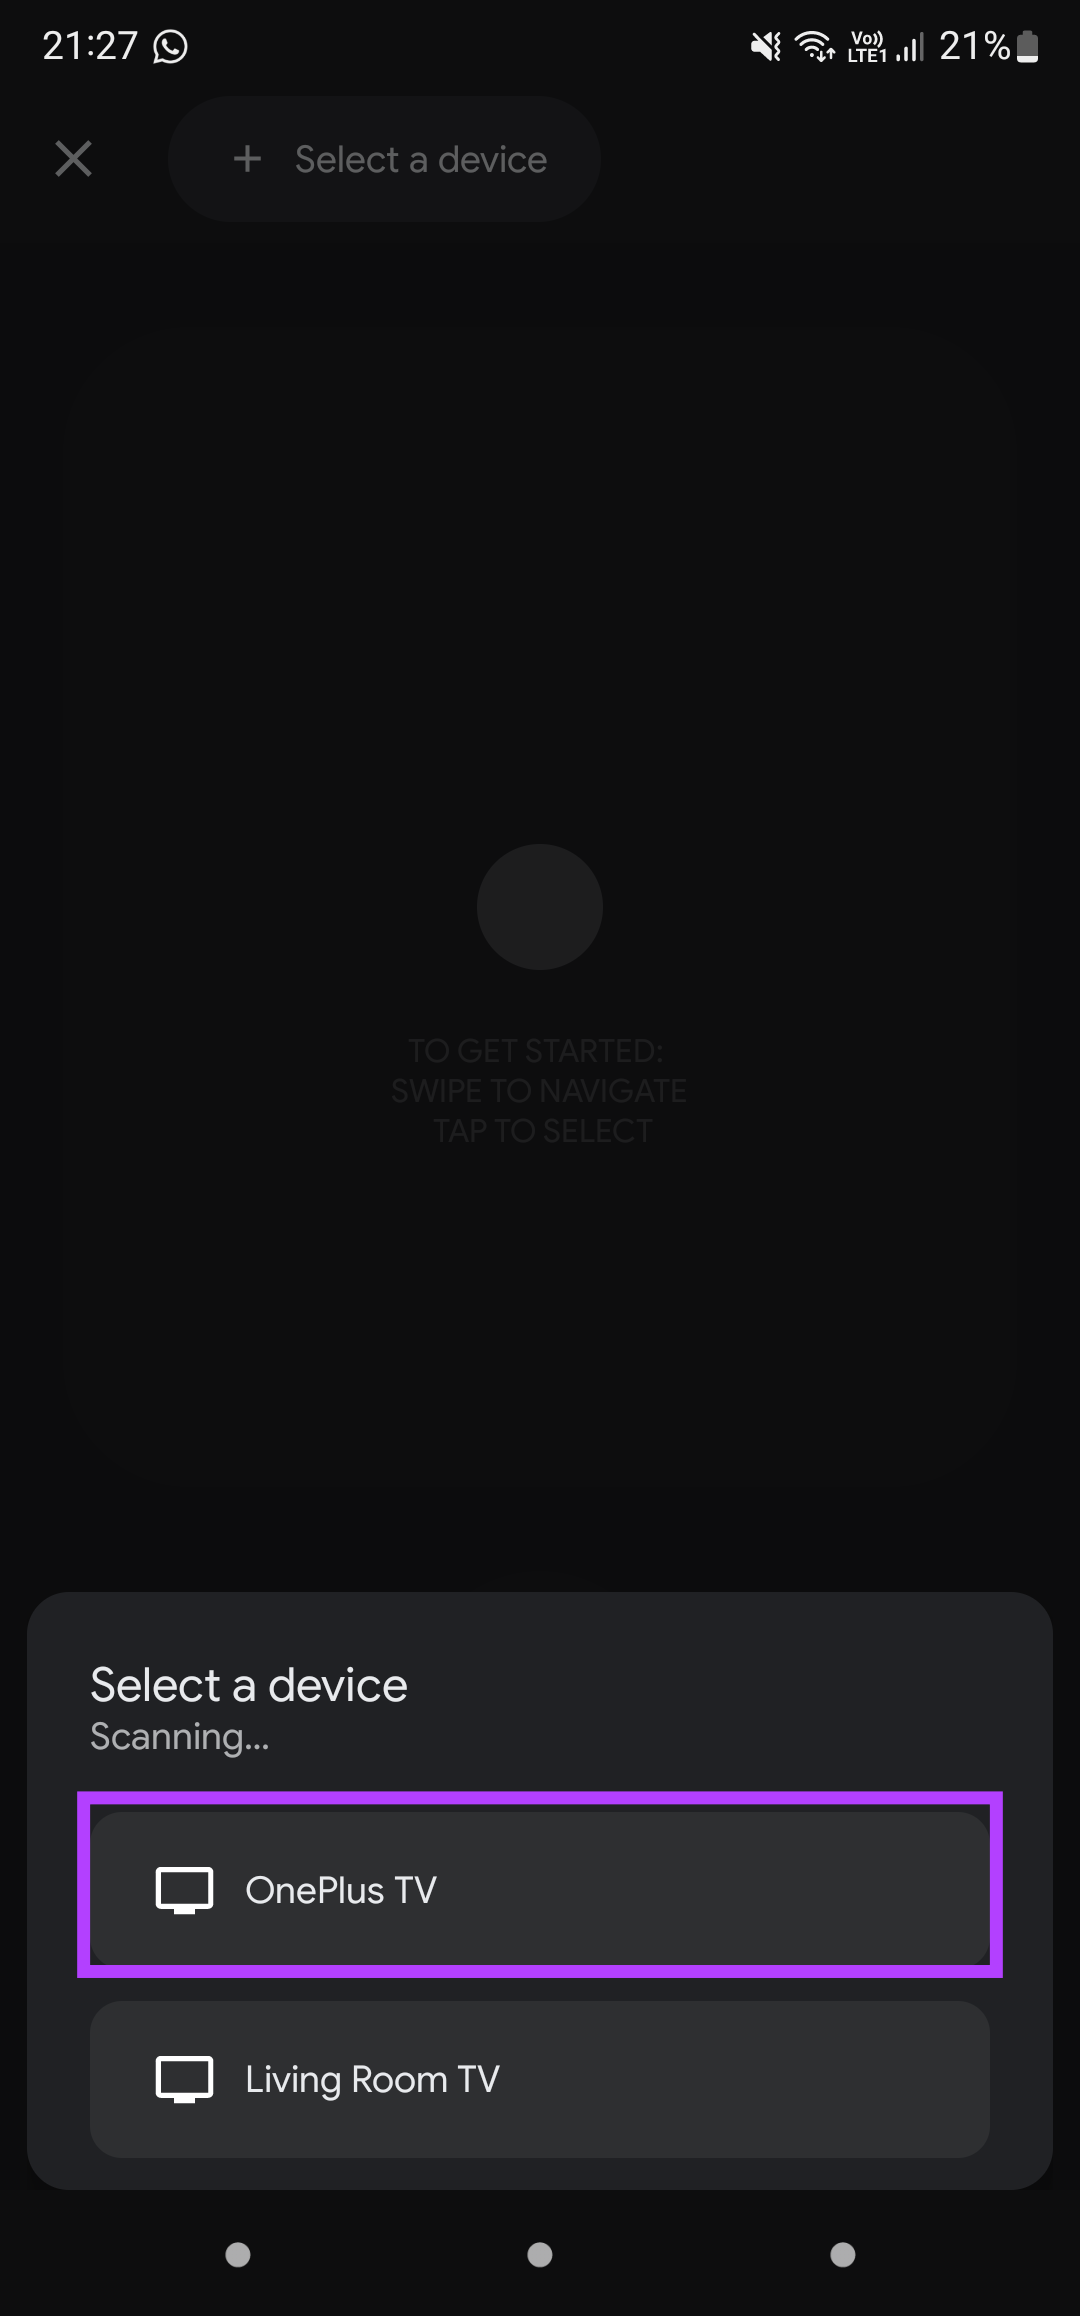
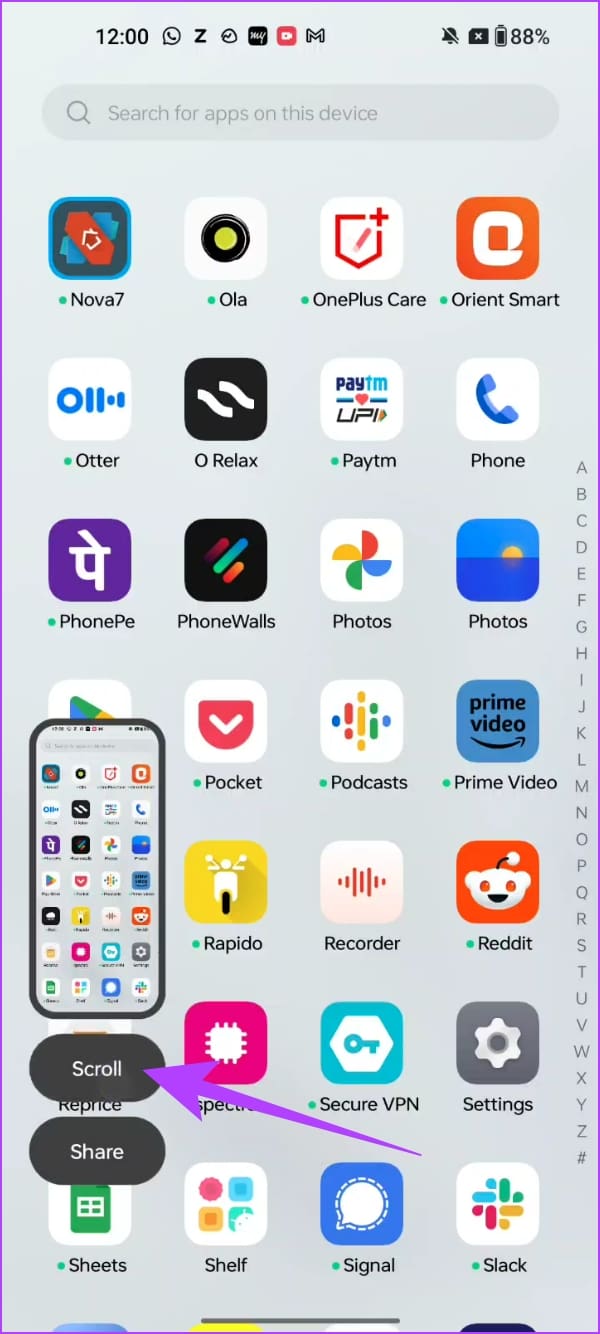
How to Take a Scrollable Screenshot on OnePlus, Oppo, and Realme Devices
Step 1: Press and hold the power button and the volume down button simultaneously.
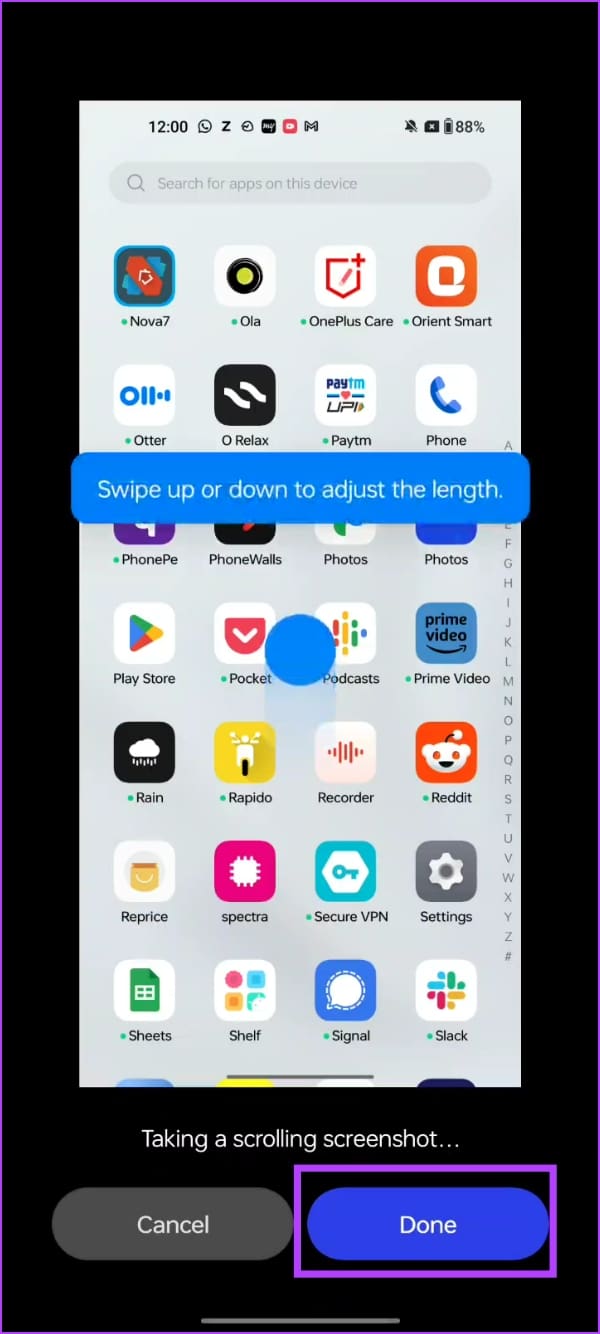
Step 2: The screenshot of the visible area will be captured. Tap on Scroll.
Step 3: The display will automatically scroll down, and you can tap on Done once you reach the desired area of the screen. Additionally, you can also swipe/up or down to adjust the selection for the screenshot.
How to Take a Scrolling Screenshot on MIUI (Xiaomi, Redmi, and Poco Devices)
Step 1: Press and hold the power button and the volume down button simultaneously.
Step 2: Once the screenshot of the visible area is captured, you will see a pop-up. Tap on Scroll.
Step 3: The window will automatically scroll the screen, and tap on Done once the desired area is captured. Now, tap on the check mark icon to save the screenshot.
Best Third-Party App to Take an Extended Screenshot on Android
While most Android devices have the option to capture a scrolling screenshot, if yours does not – do not worry. Here’s a third-party app that you can install to capture full-size scrollable screenshots on your Android device.
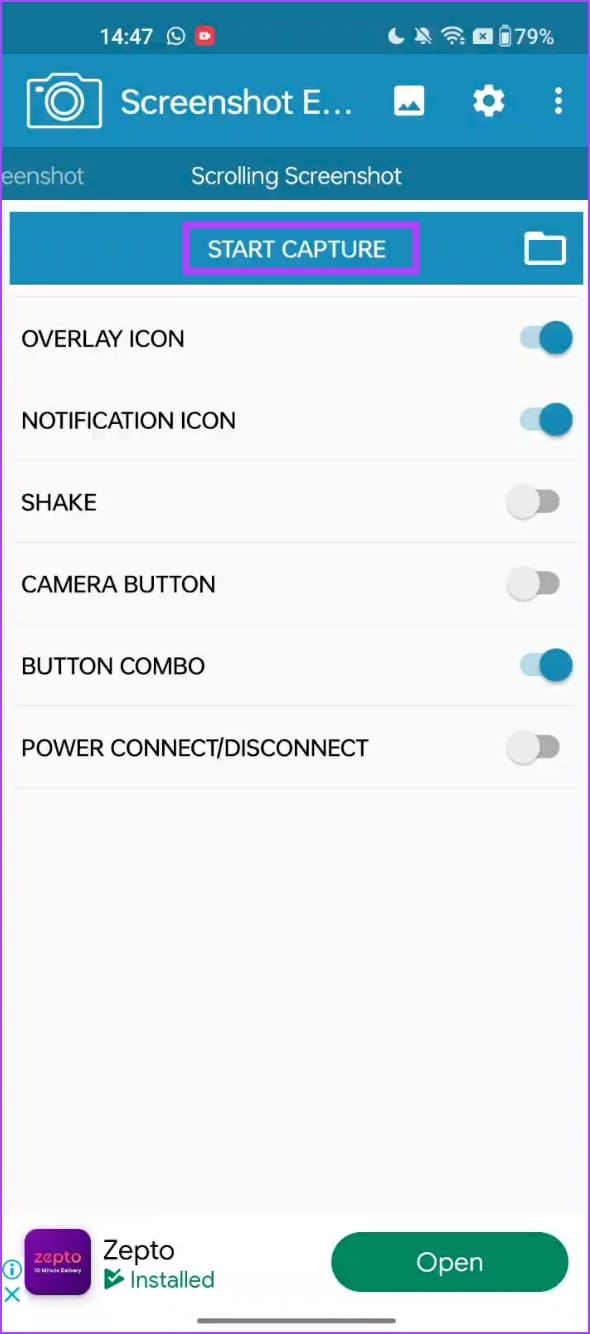
Step 1: Download the app called Screenshot Easy from the Play Store.Open the app, and provide all the necessary permissions.
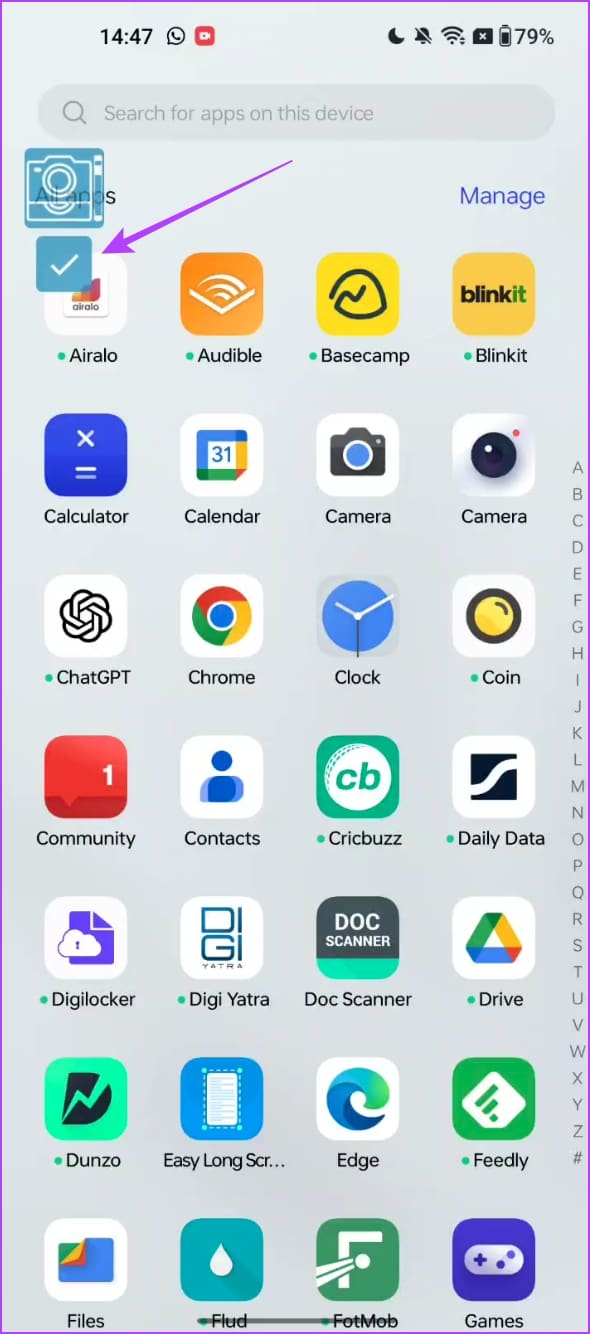
Step 2: Swipe across the menus, and go to the Scrolling Screenshot Menu.
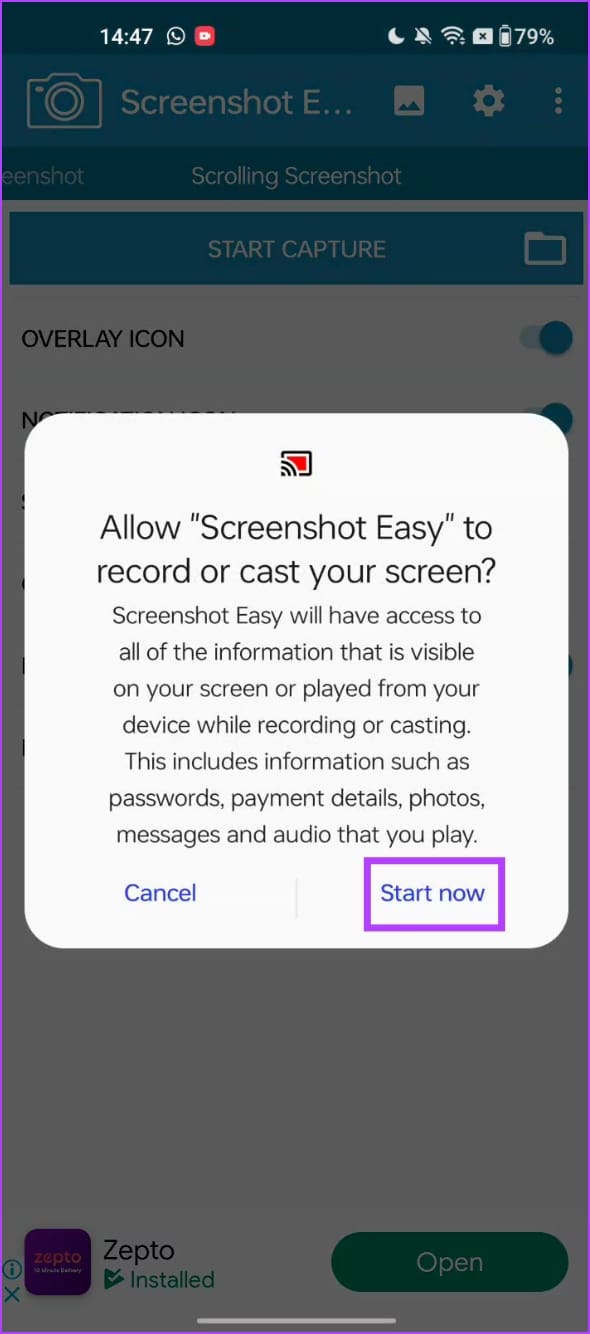
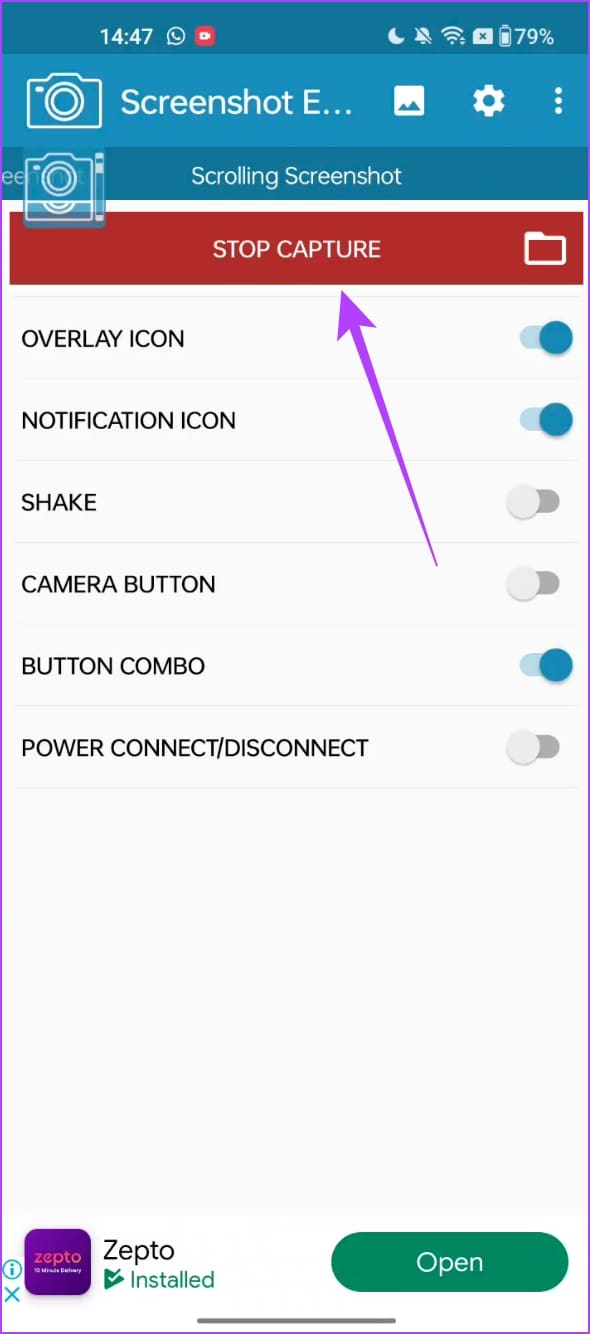
Step 3: Tap on Start Capture. Tap on Start Now.
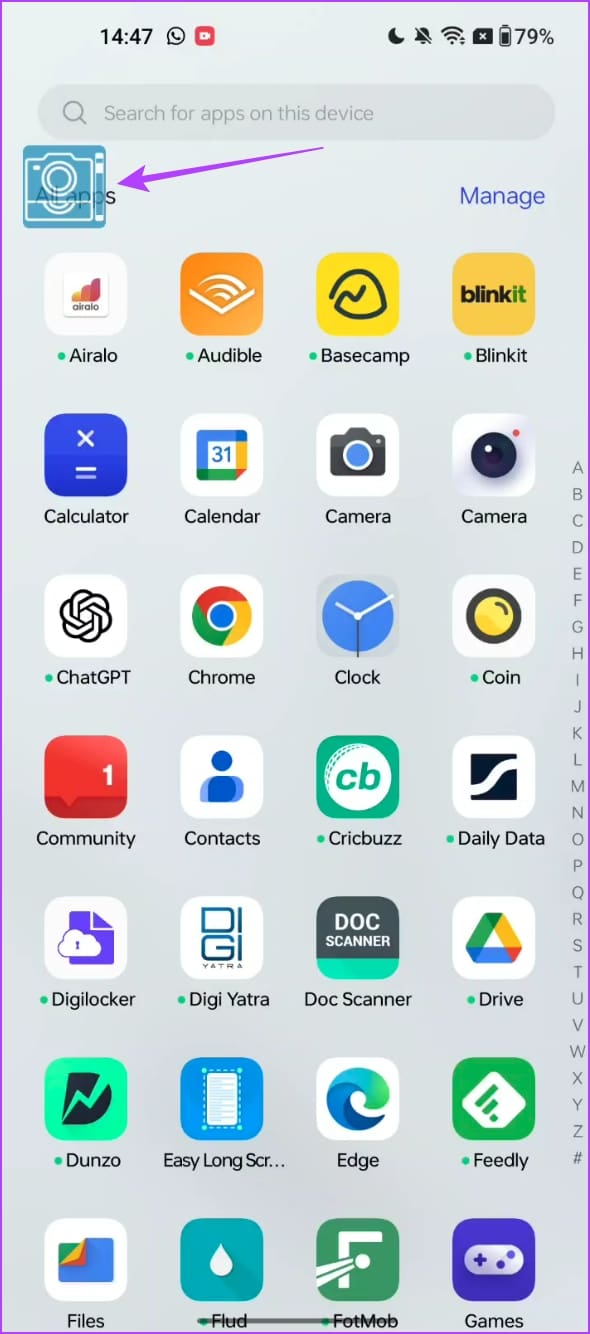
Step 4: Tap on the floating camera button. This will capture the screenshot of the visible area.
Scroll down to the next area, and capture the button again. Repeat the process until you scroll down, and capture all of the required area.
Step 5: Once you complete it, tap on the check mark.
You will see the preview within the app. The app essentially captures multiple images and stitches them together.
You can use the tool to crop the individual screenshots and prevent any redundant areas from being stitched.
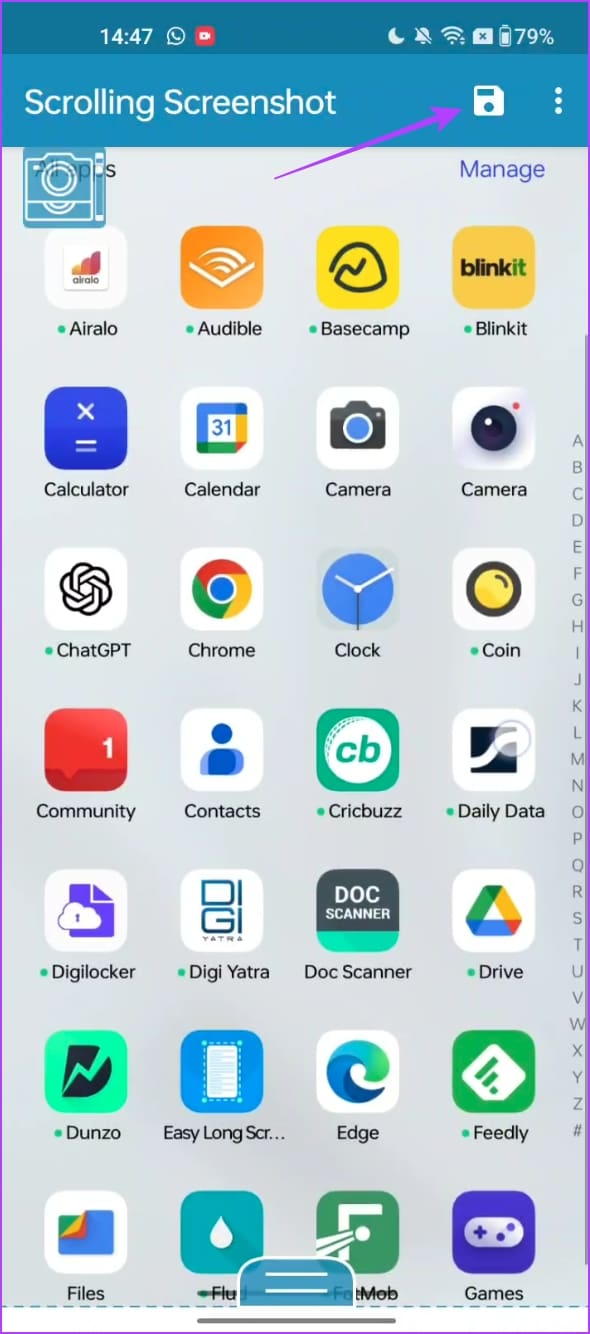
Step 6: Tap on the save icon. Open the app once again, and tap on stop capture to hide the camera overlay button.
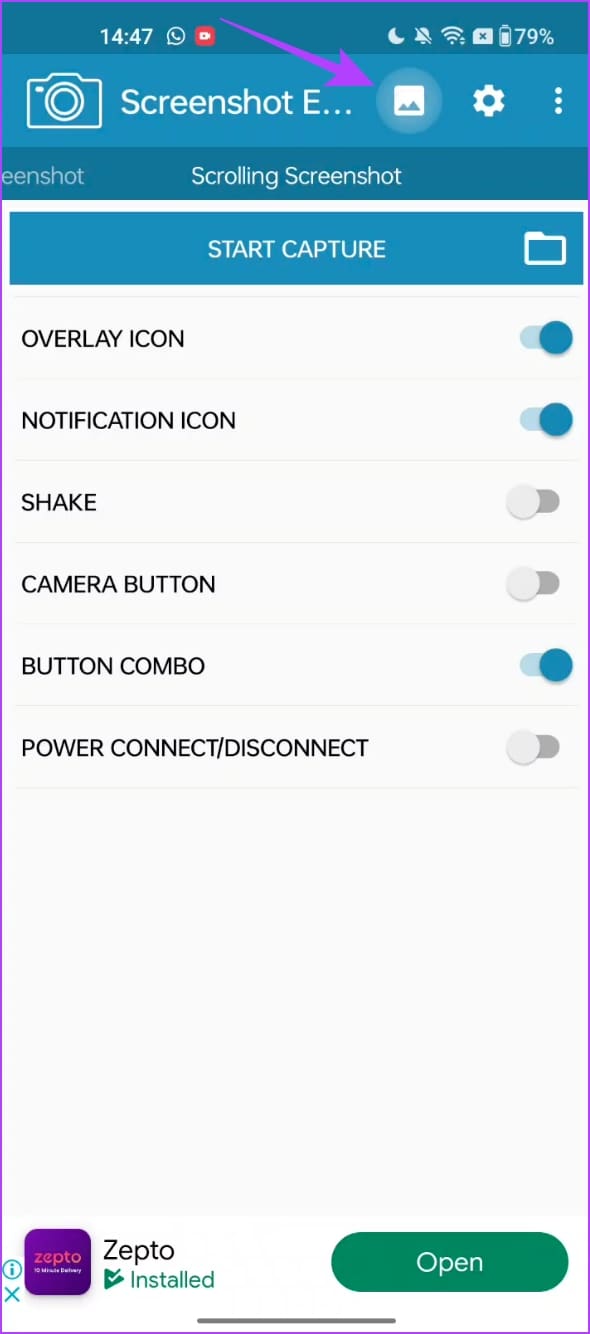
Step 7: Tap on the image icon to view your captured screenshots. You can save the images to your local folders as well.
It’s sufficient to say that IM (instant messaging) platforms like WhatsApp and Messenger have become the preferred way to send or receive media files. WhatsApp supports up to a 2GB file limit, and in its current state, you can easily send multiple photos to a personal chat or group in the app. Here’s how to send multiple photos on WhatsApp for iPhone and Android.
You can share up to 100 photos at a time. The limit should be enough for the most users out there. And if you want to share more, you can always perform the steps again and send more photos. Follow the steps below to send multiple pictures on WhatsApp.
Send Multiple Photos on WhatsApp for iPhone
There are two ways to send multiple photos on WhatsApp for iPhone. You can either send images from the Photos app or the WhatsApp conversation.
Send Multiple Photos From a WhatsApp Conversation
You are most likely to send multiple photos from a WhatsApp conversation. After all, not many prefer to close WhatsApp and open the Photos app to send media files. Follow the steps below.
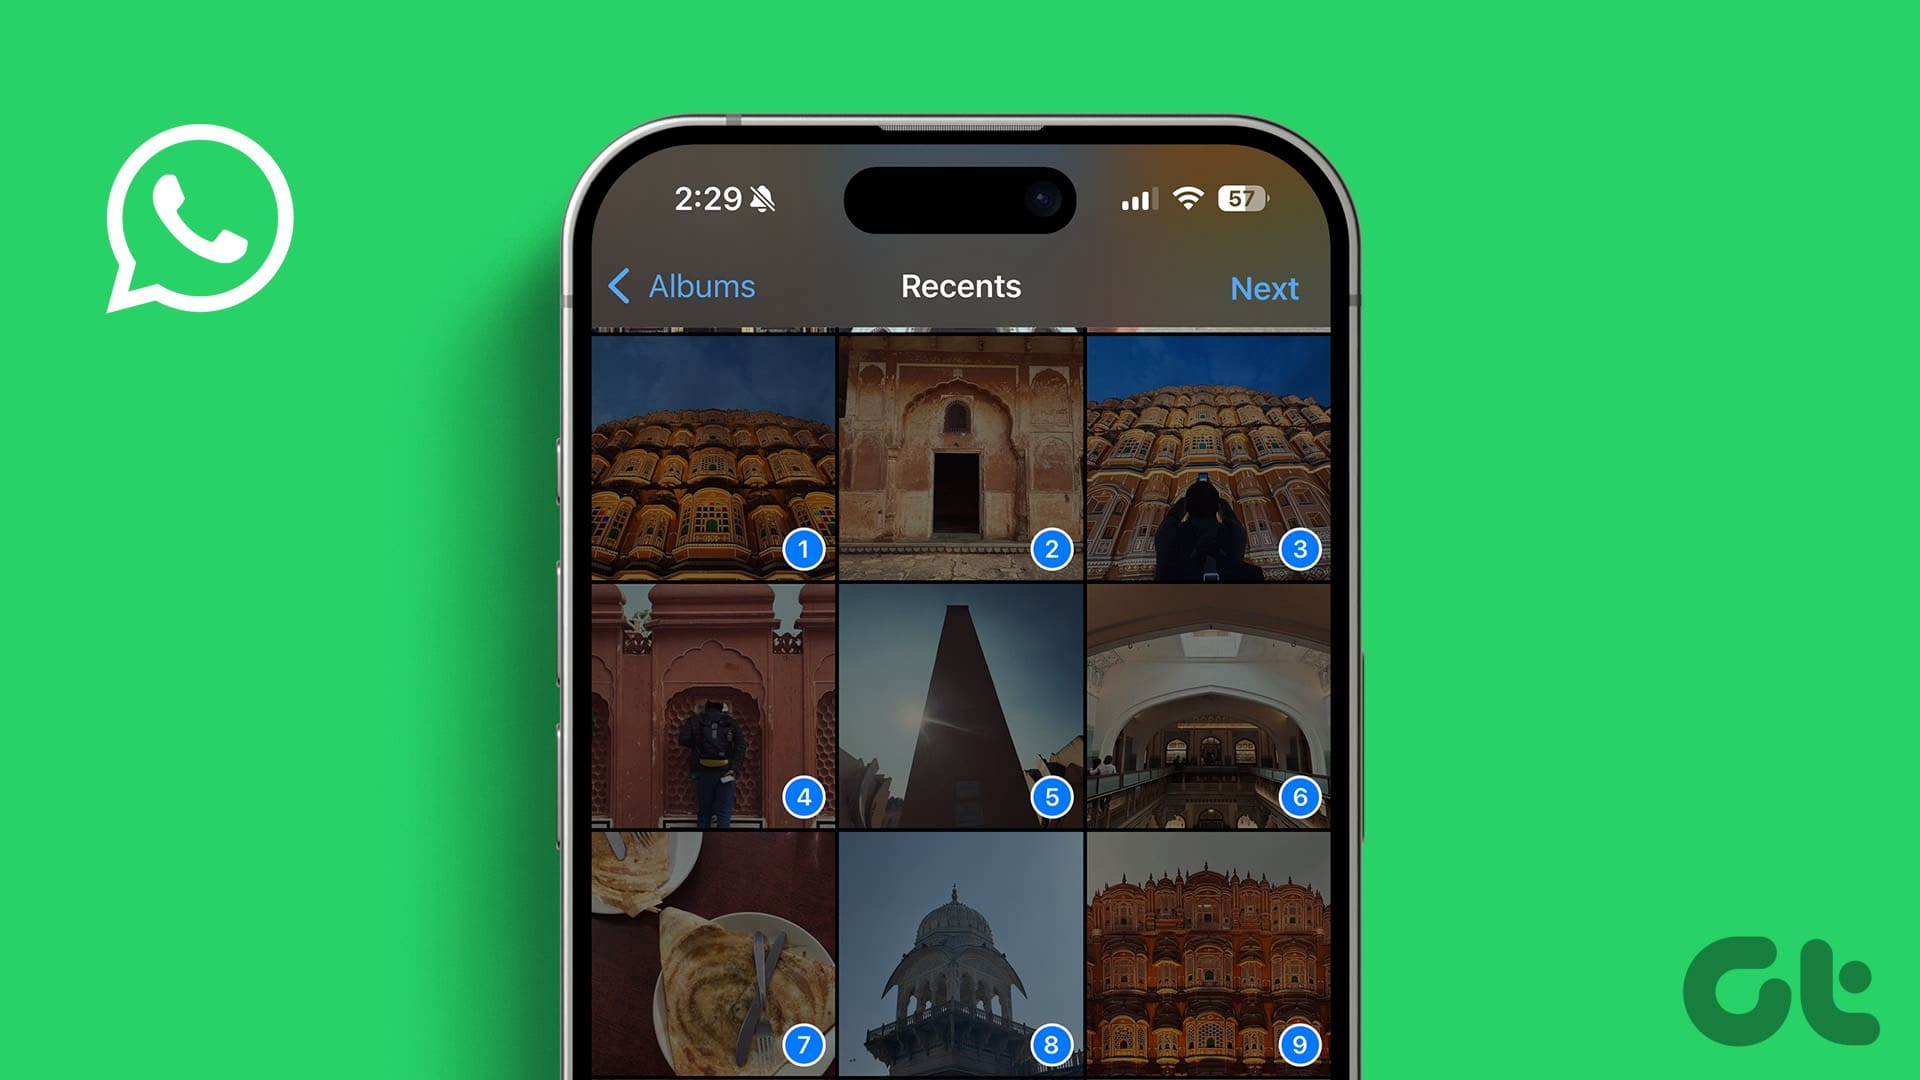
Step 1: Open a WhatsApp conversation and tap on the + icon in the bottom left corner. Select Photo & Video Library.
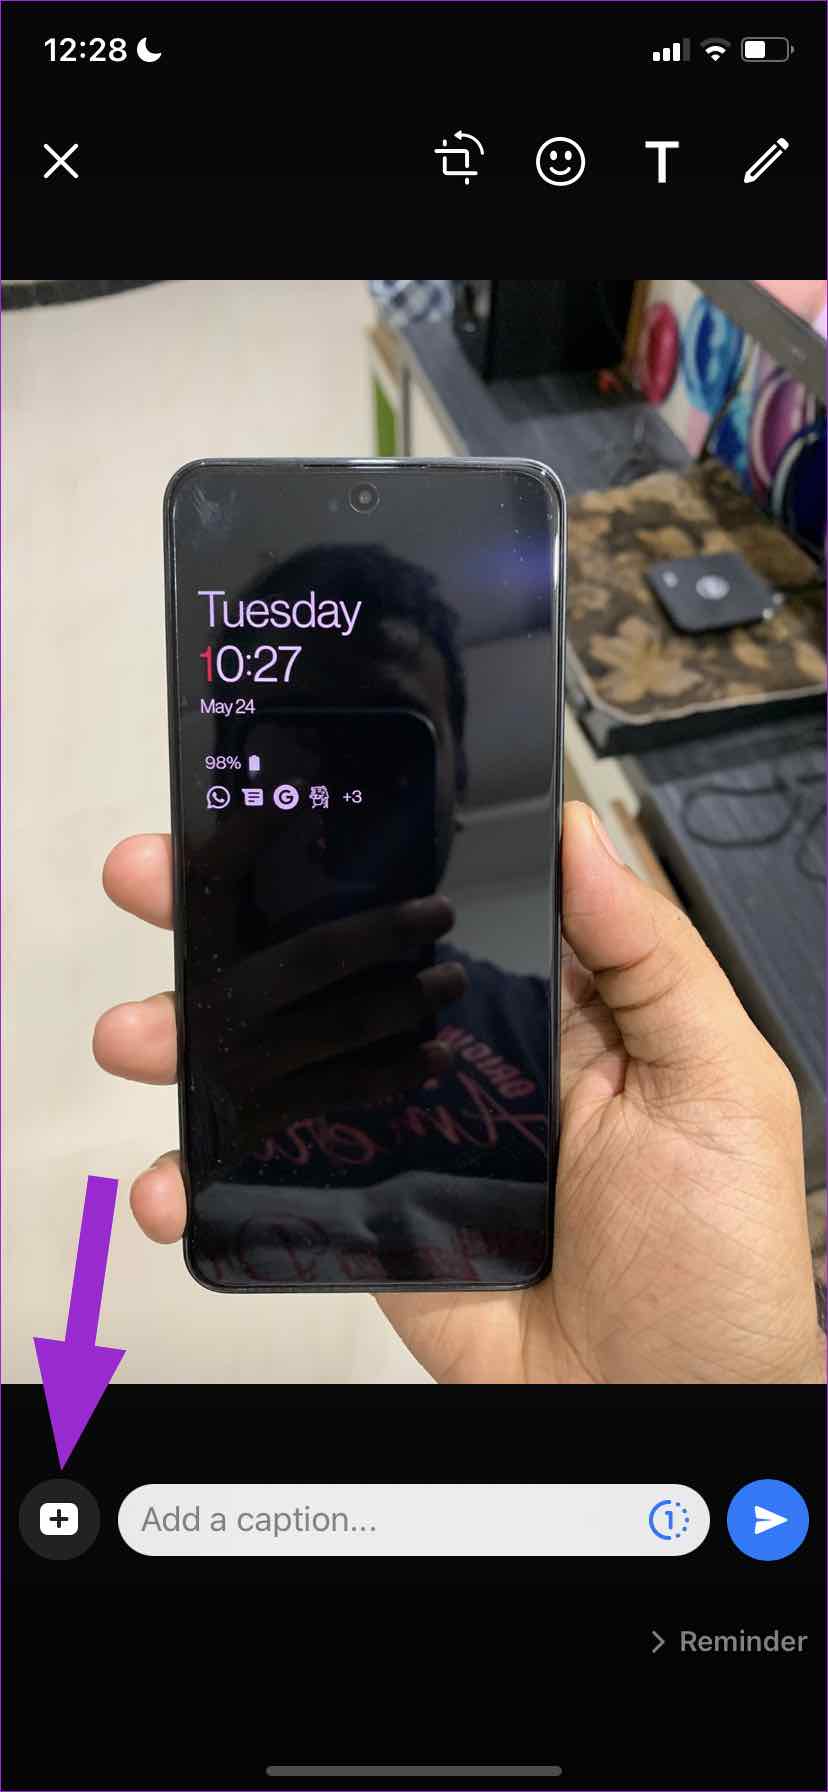
Step 2: From the Photos app, tap on a picture, and it will open the image preview. To add more photos, tap on the + icon beside ‘Add a caption.’
Step 3: Select more photos from the following menu. You can select up to 100 images at once. Hit the Done button at the top to open the image preview in WhatsApp.
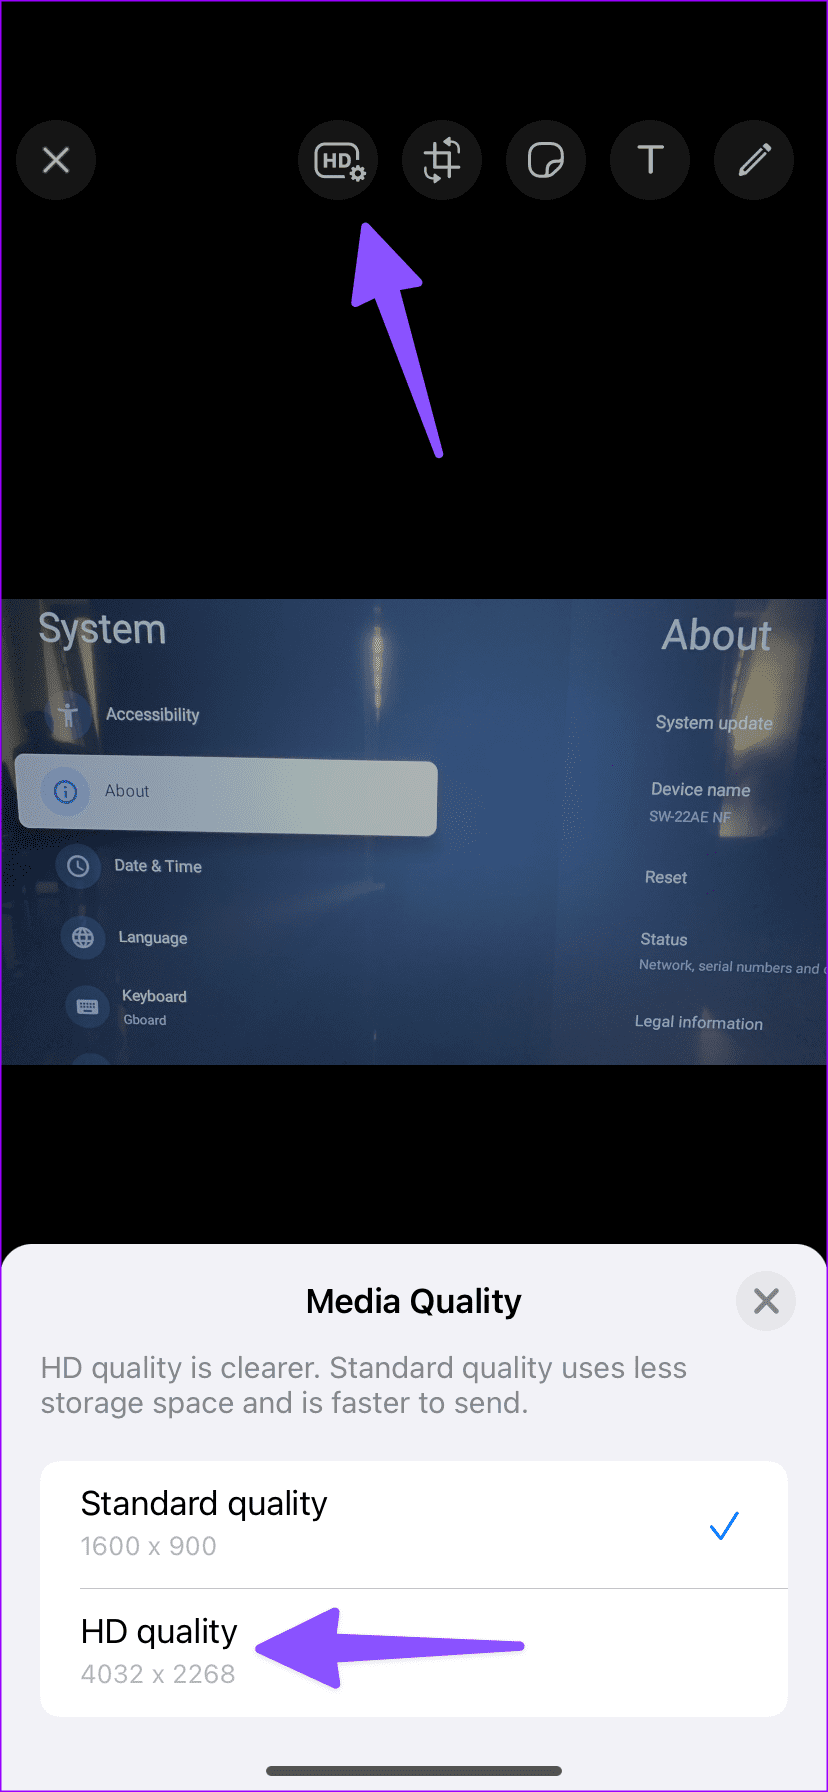
Step 4: You can rotate, add stickers, text, and even doodle on images. Tap on the blue send button and share memories with others. You can also tap HD at the top and select HD quality to send images in high resolution. Hit send.
WhatsApp offers an effective way to add stickers to photos on an iPhone. Check our dedicated guide to spice up your pictures with emoji stickers on iPhone.
Use Photos App on iPhone
When scrolling through a large media library in the Photos app, you can select and send up to 30 images over a WhatsApp conversation.
Step 1: Open the Photos app on your iPhone.
Step 2: Tap on the Select button at the top and select multiple photos. Don’t select more than 30 photos. Otherwise, you won’t see WhatsApp in the share sheet.
Step 3: Tap on the share icon in the bottom-left corner and select WhatsApp from suggestions. Select one of the WhatsApp contacts or groups and hit the Next button.
WhatsApp for Android uses a completely different UI compared to the iOS version. The steps to send multiple photos differ on Android. Follow the steps below.
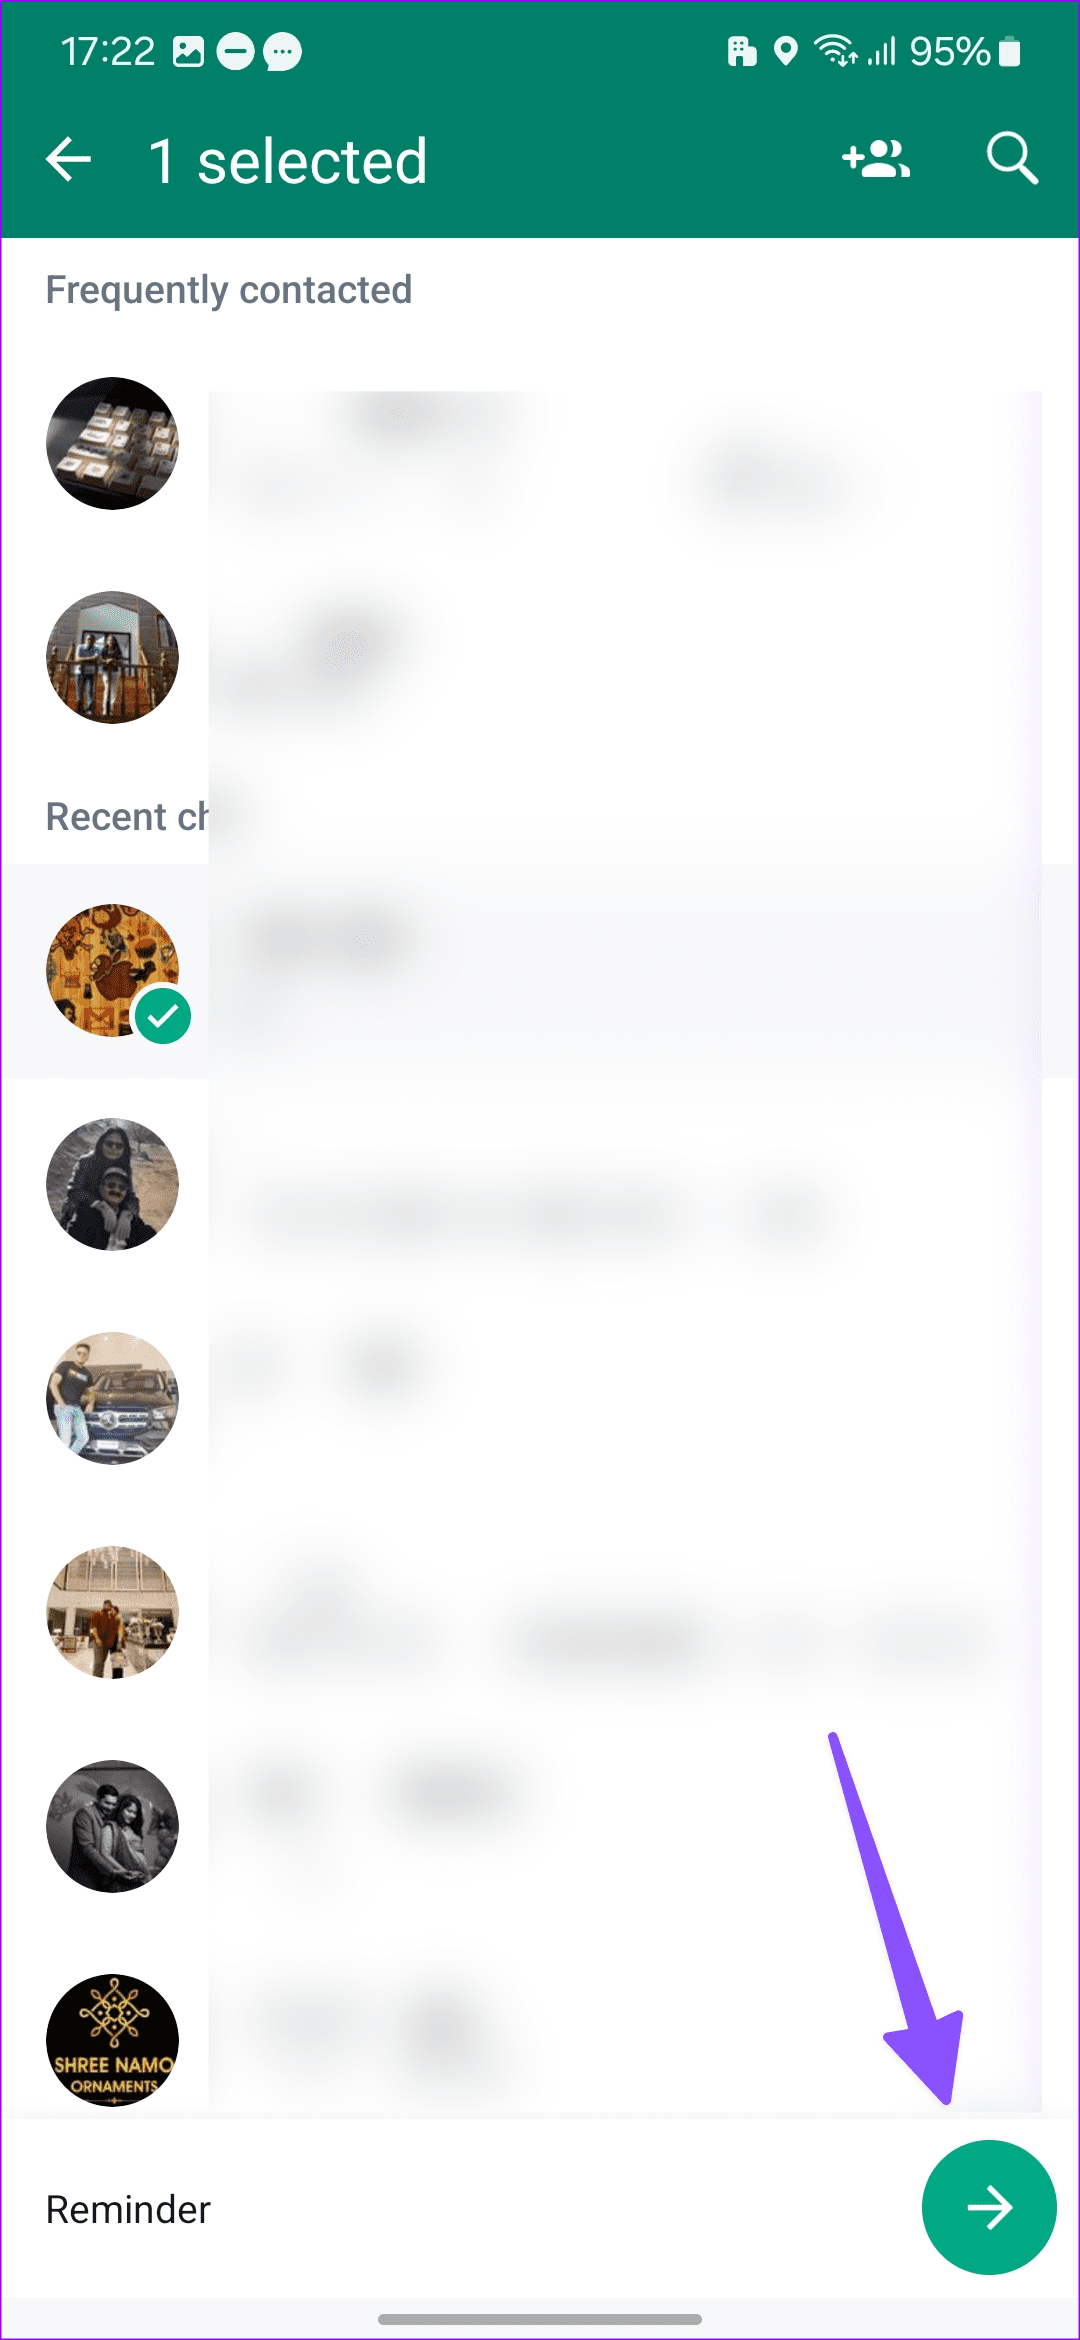
Step 1: Go to a conversation in WhatsApp on your Android phone.
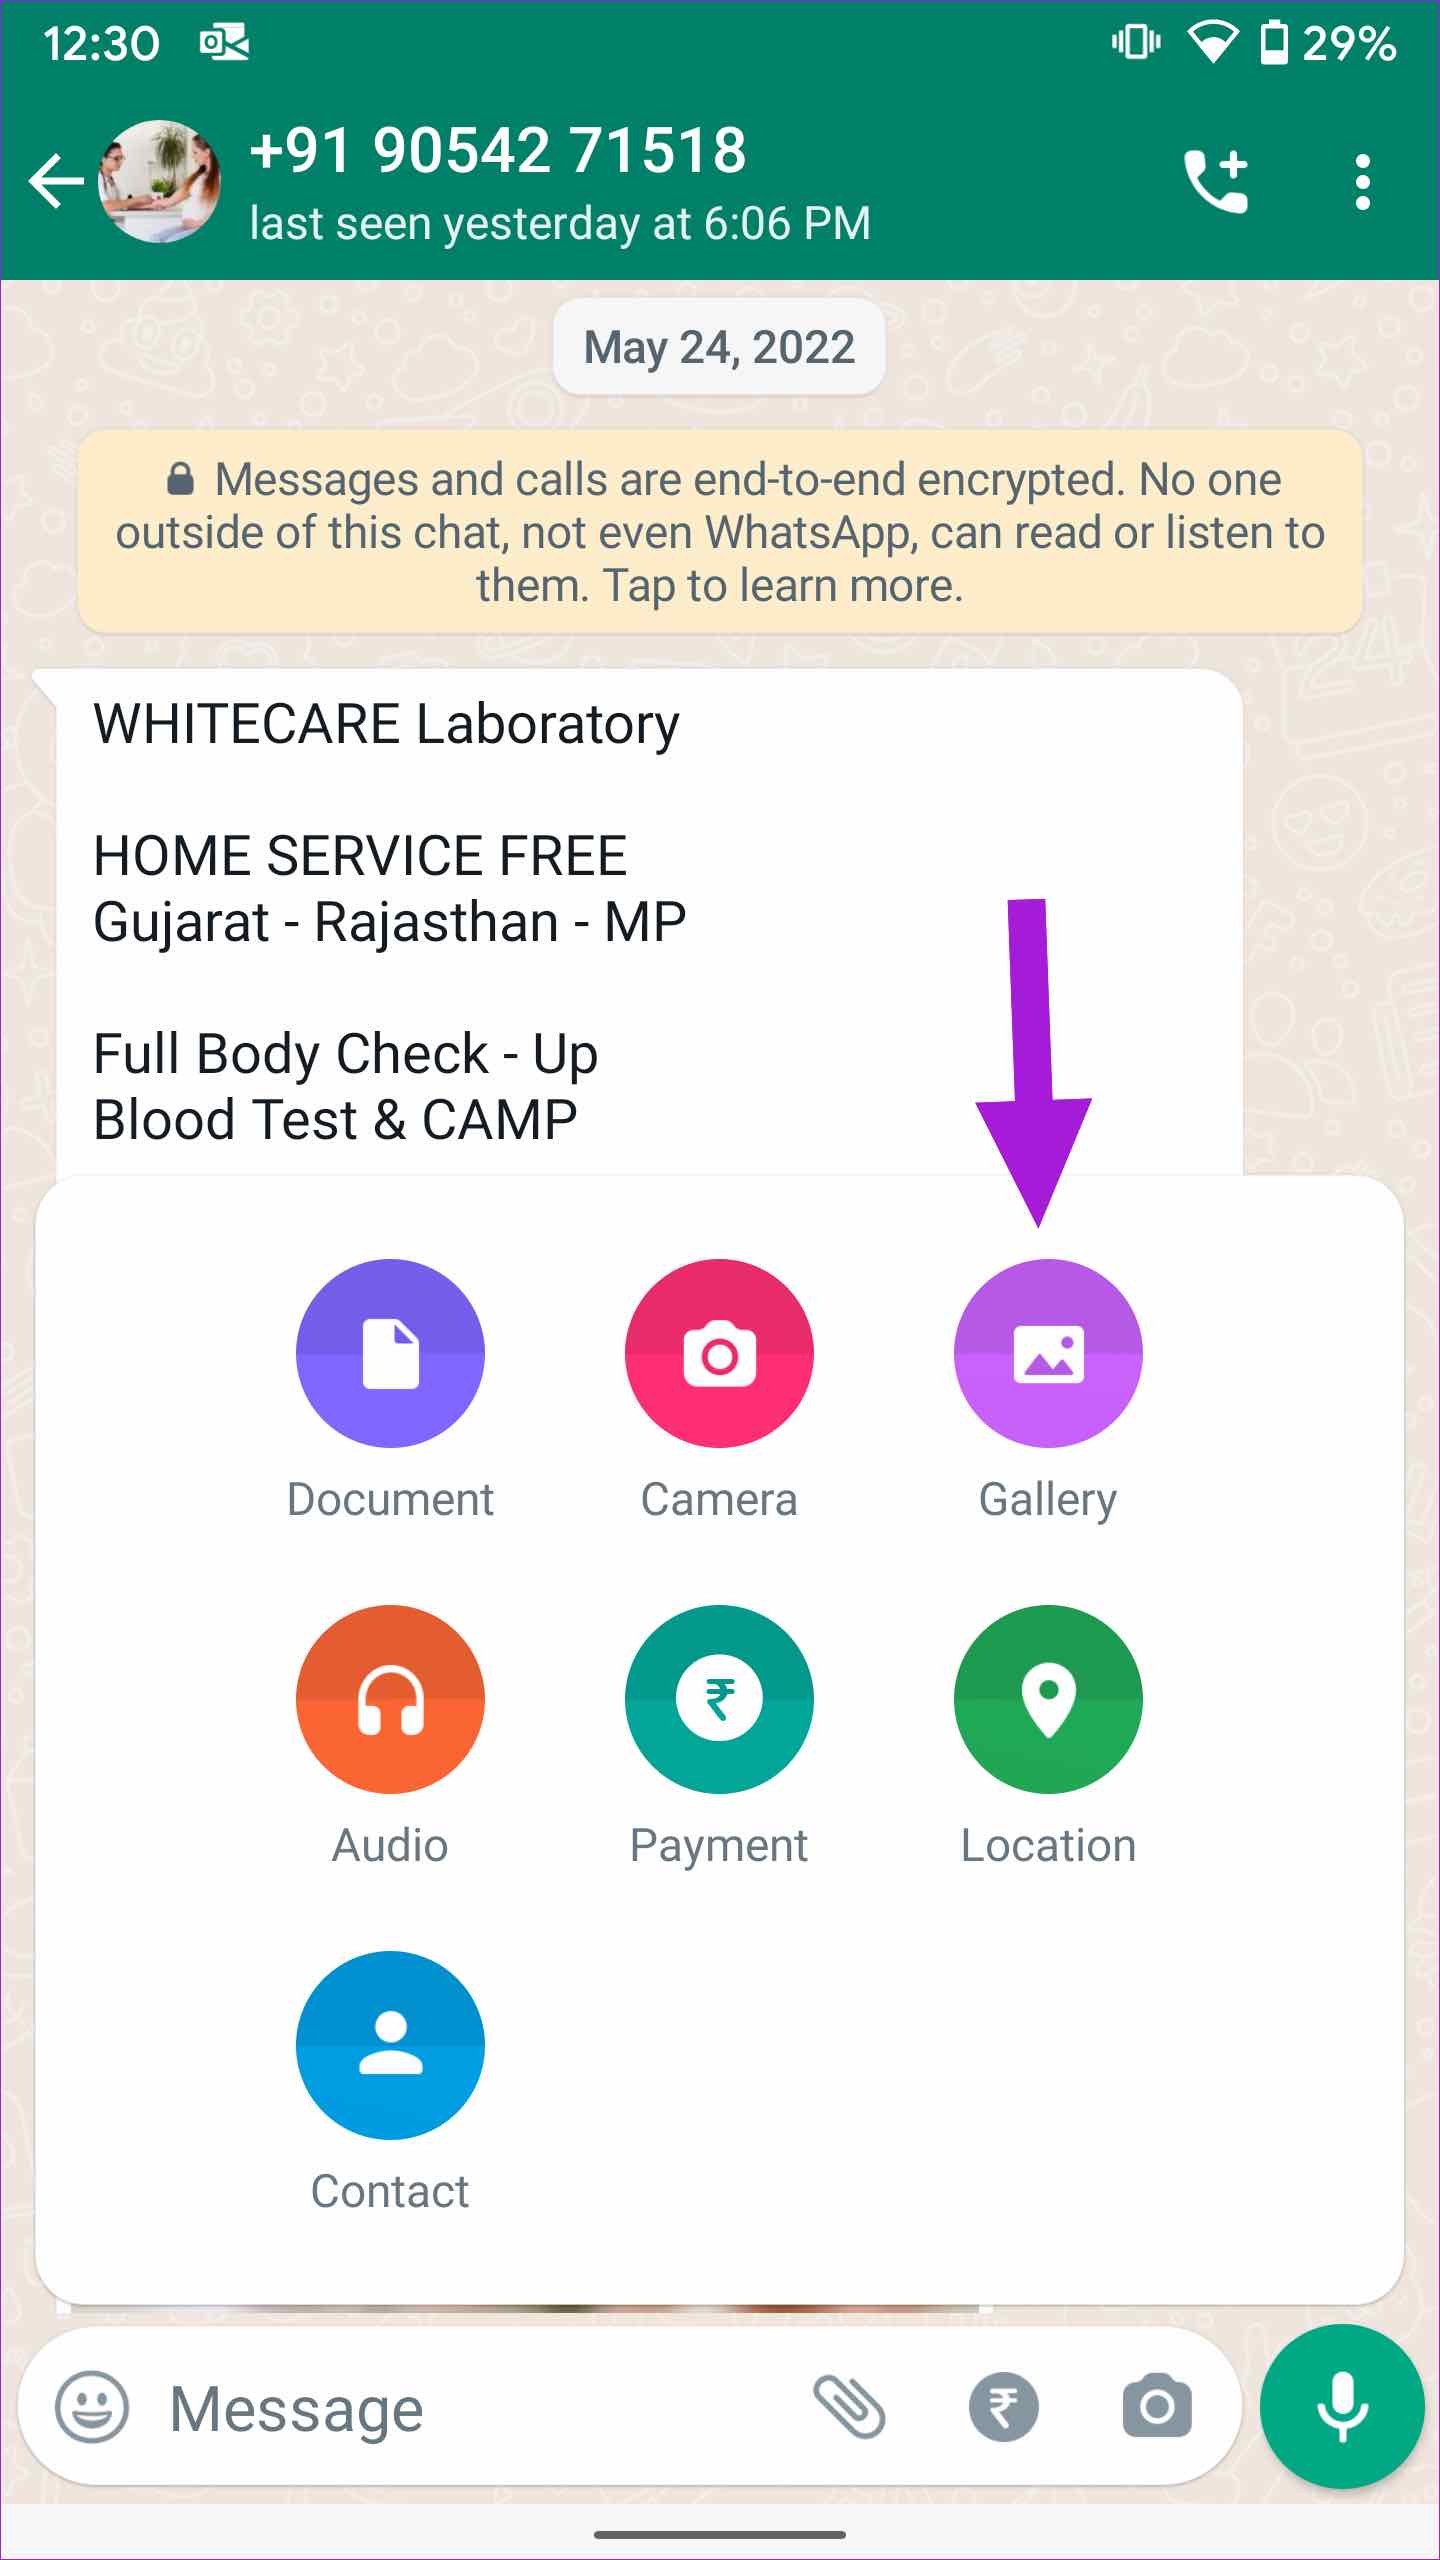
Step 2: Tap on the little pin icon in the message menu. Select Gallery.
Step 3: Select an image and tap on the gallery icon from the following menu. Tap on multiple images and hit the OK button at the top.
Step 4: Glance over WhatsApp’s editing features. Select HD to send photos in high resolution. Hit the send icon and you are good to go.
Similarly, you can use the Google Photos app (the default gallery app on Android) and share multiple photos at once on WhatsApp.
Step 1: Open the Google Photos app on your Android phone.
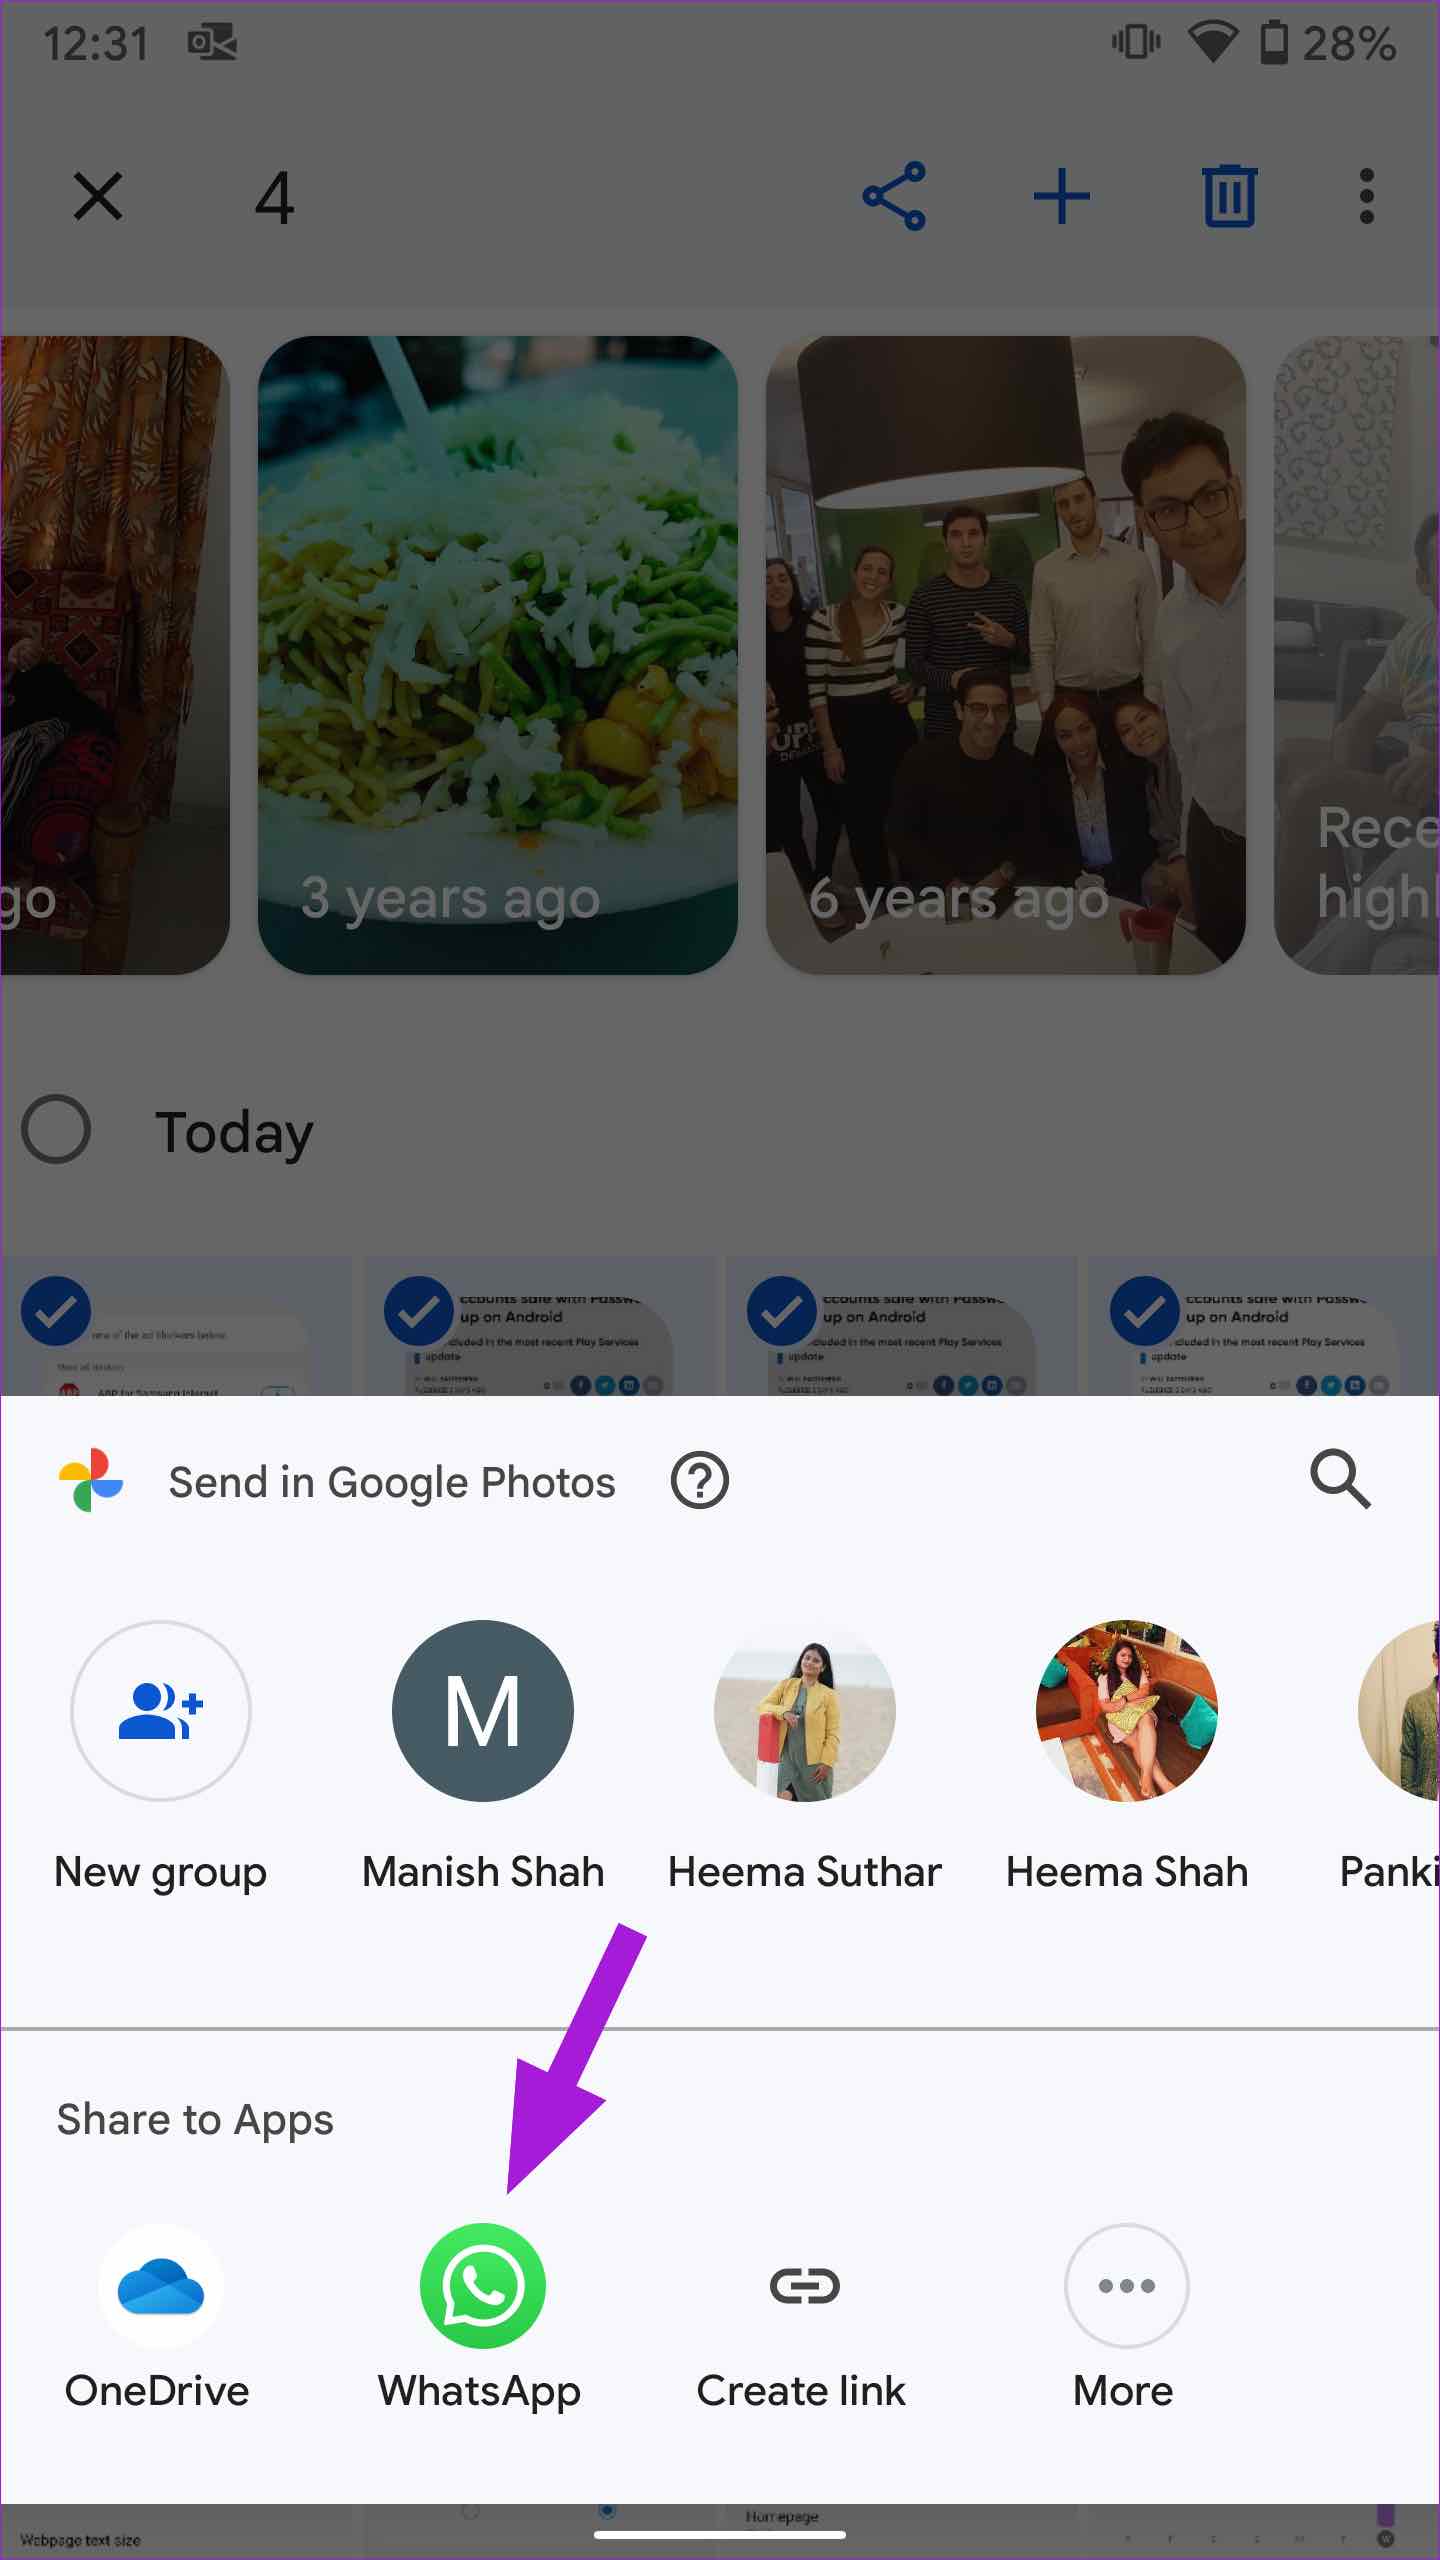
Step 2: Select multiple images and tap on the share icon at the top.
Step 3: It will open the default share UI in Google Photos.
Step 4: Tap on the WhatsApp app icon from the share sheet.
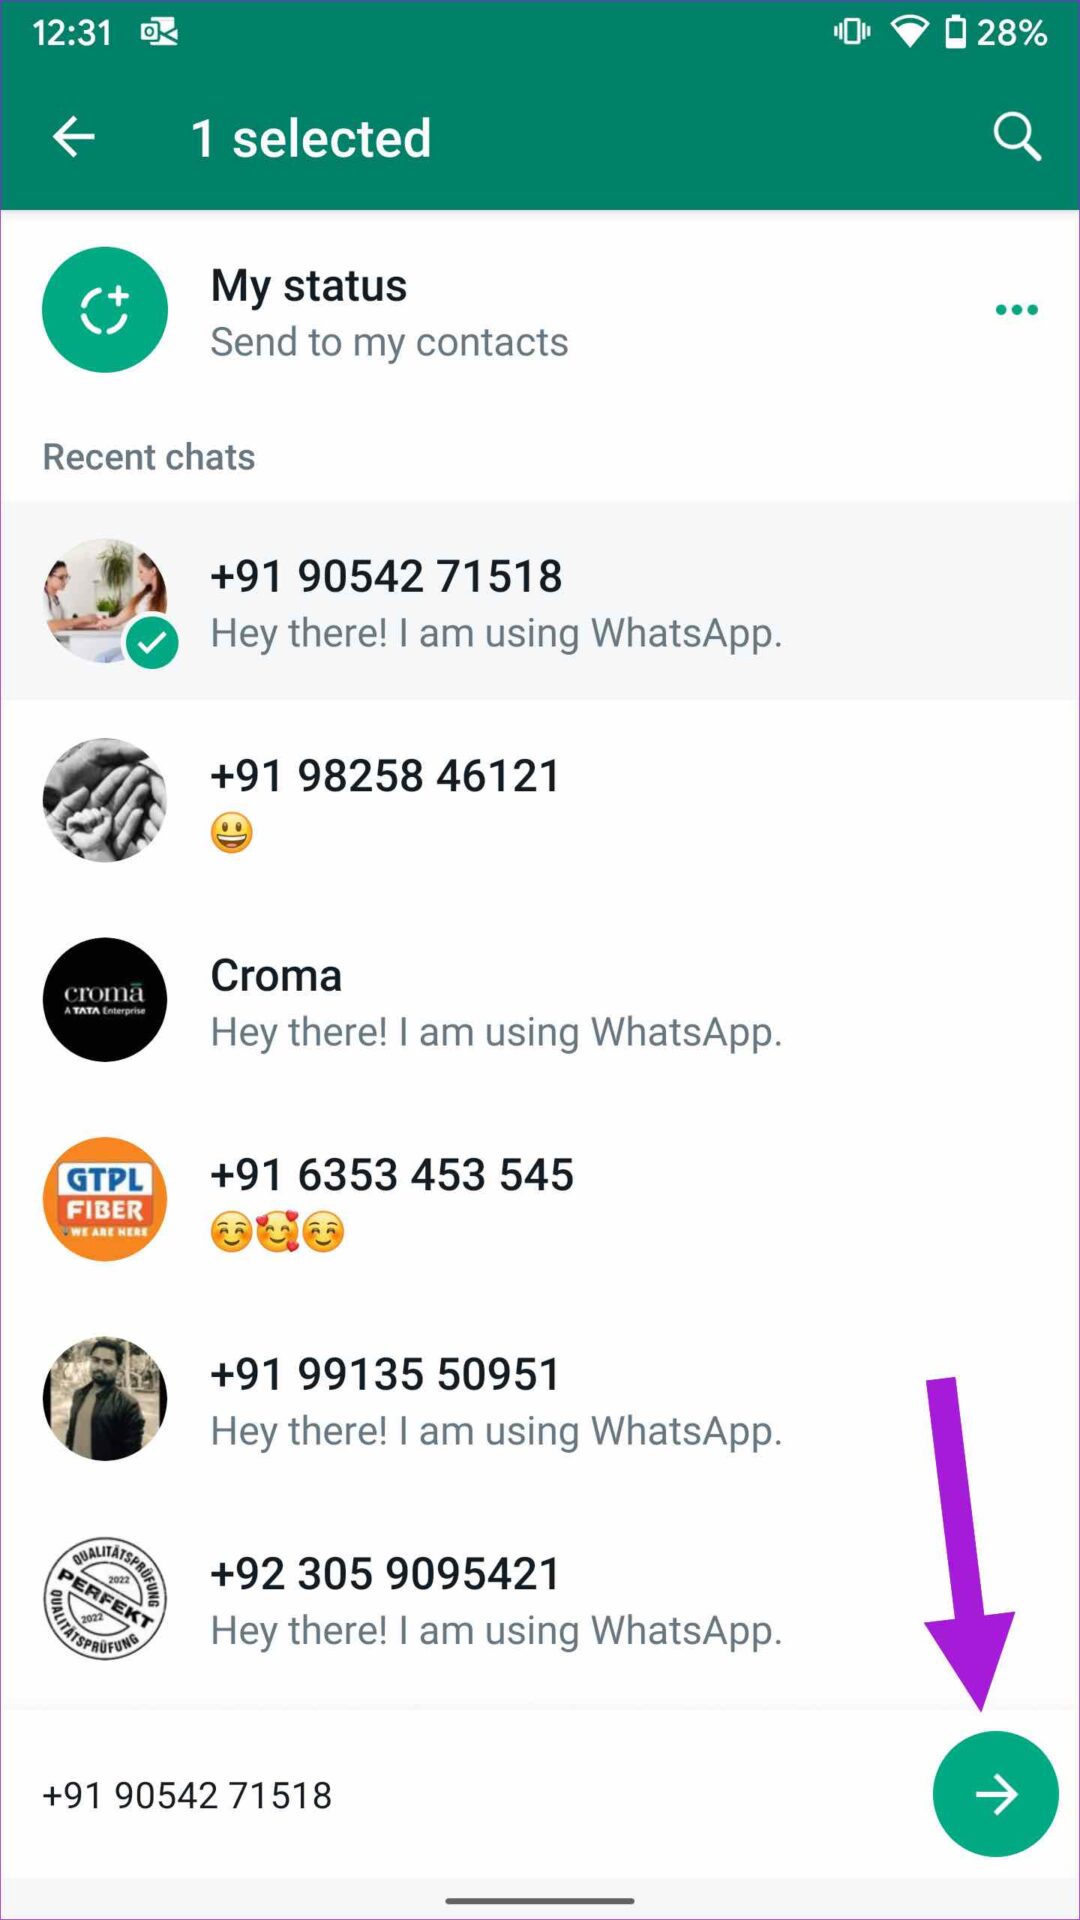
Step 5: Select a conversation and hit the send icon.
The same WhatsApp sharing limit applies here as well. WhatsApp will limit the sharing to five chats to combat growing misinformation.
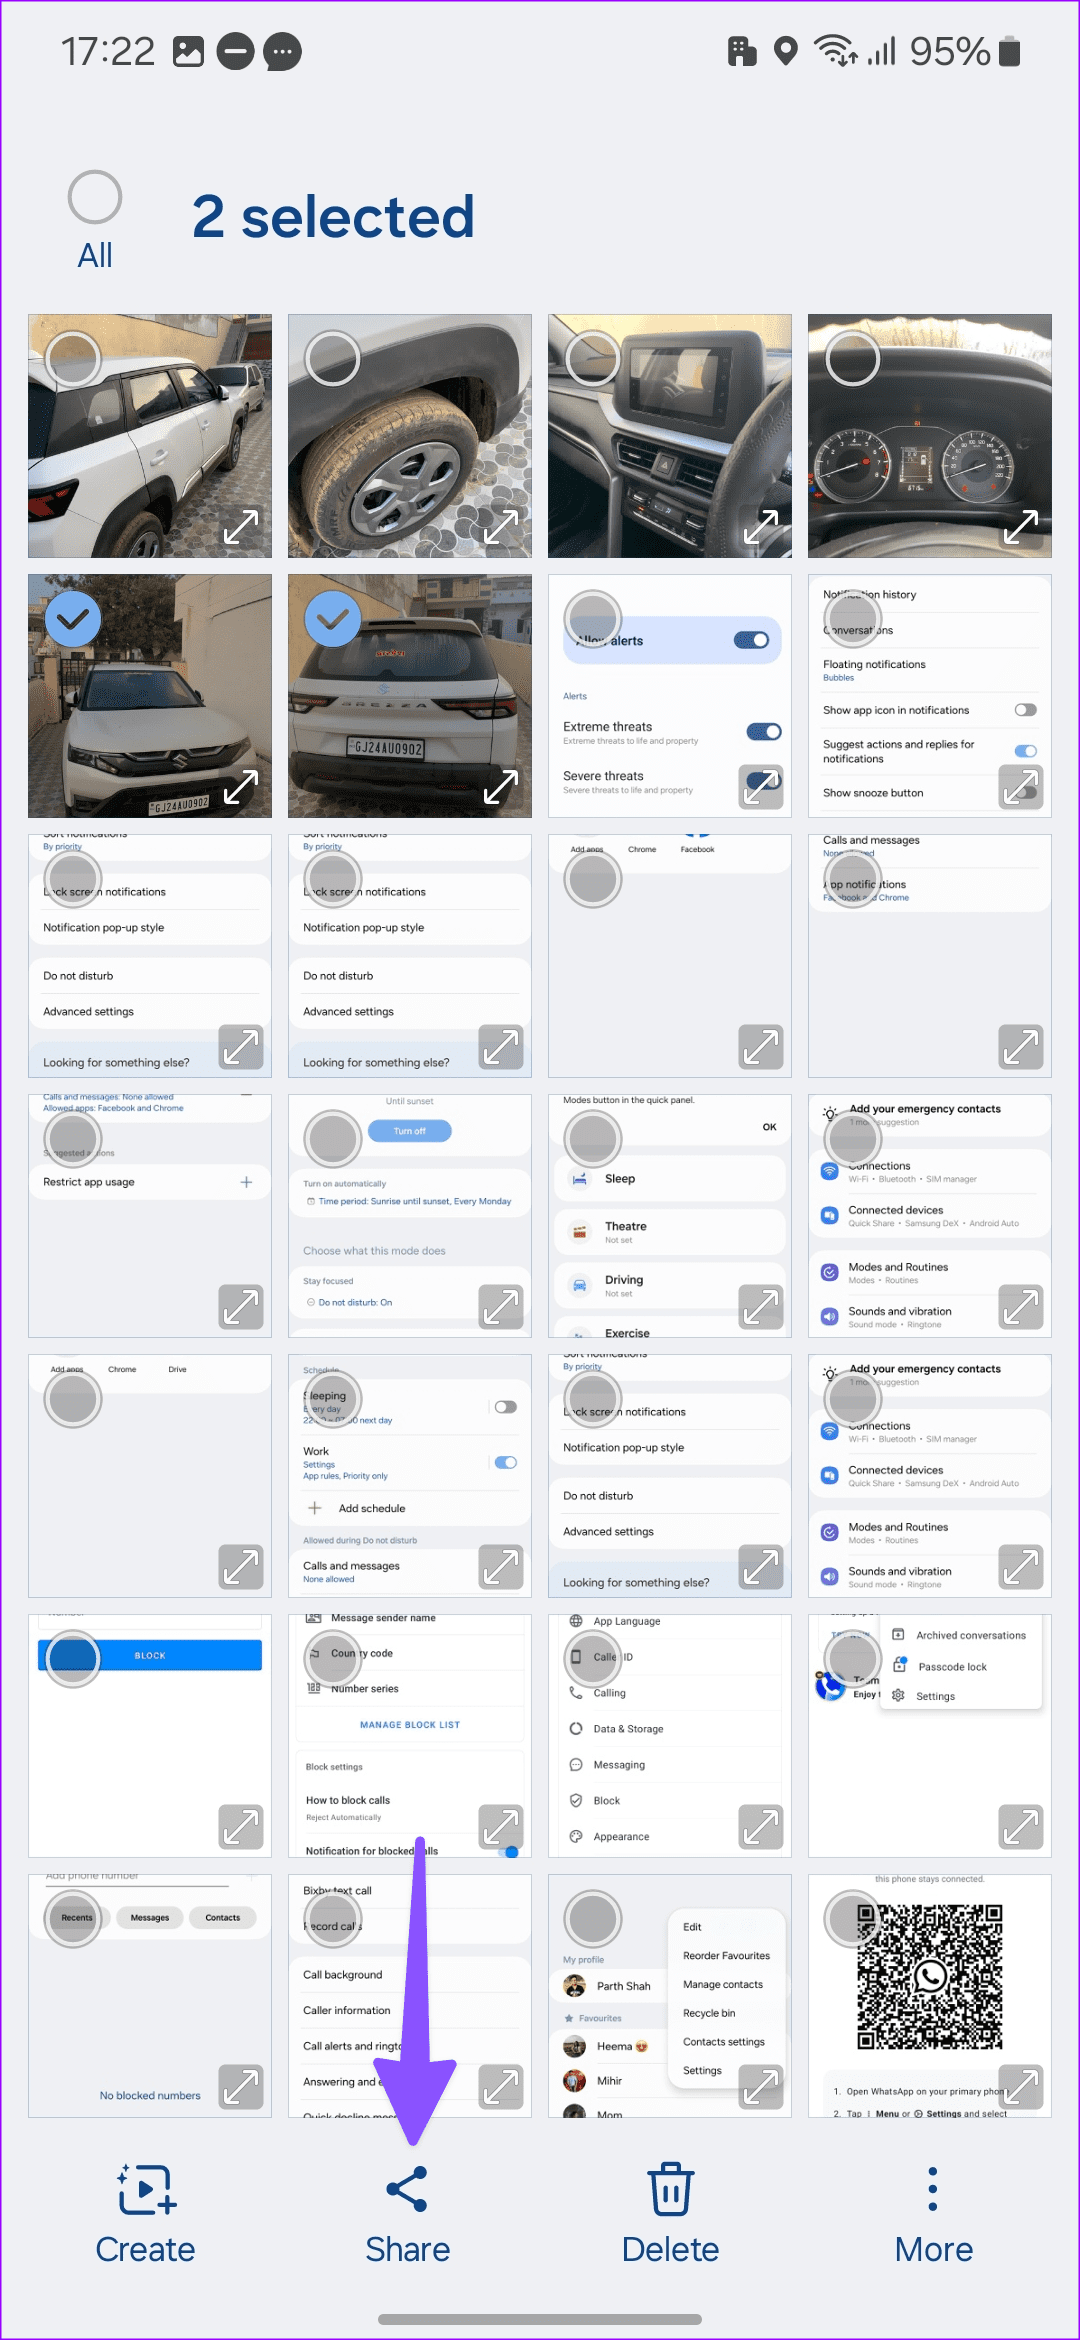
If you use a Samsung Galaxy phone, go through the steps below to attach multiple photos on WhatsApp via the default Gallery app.
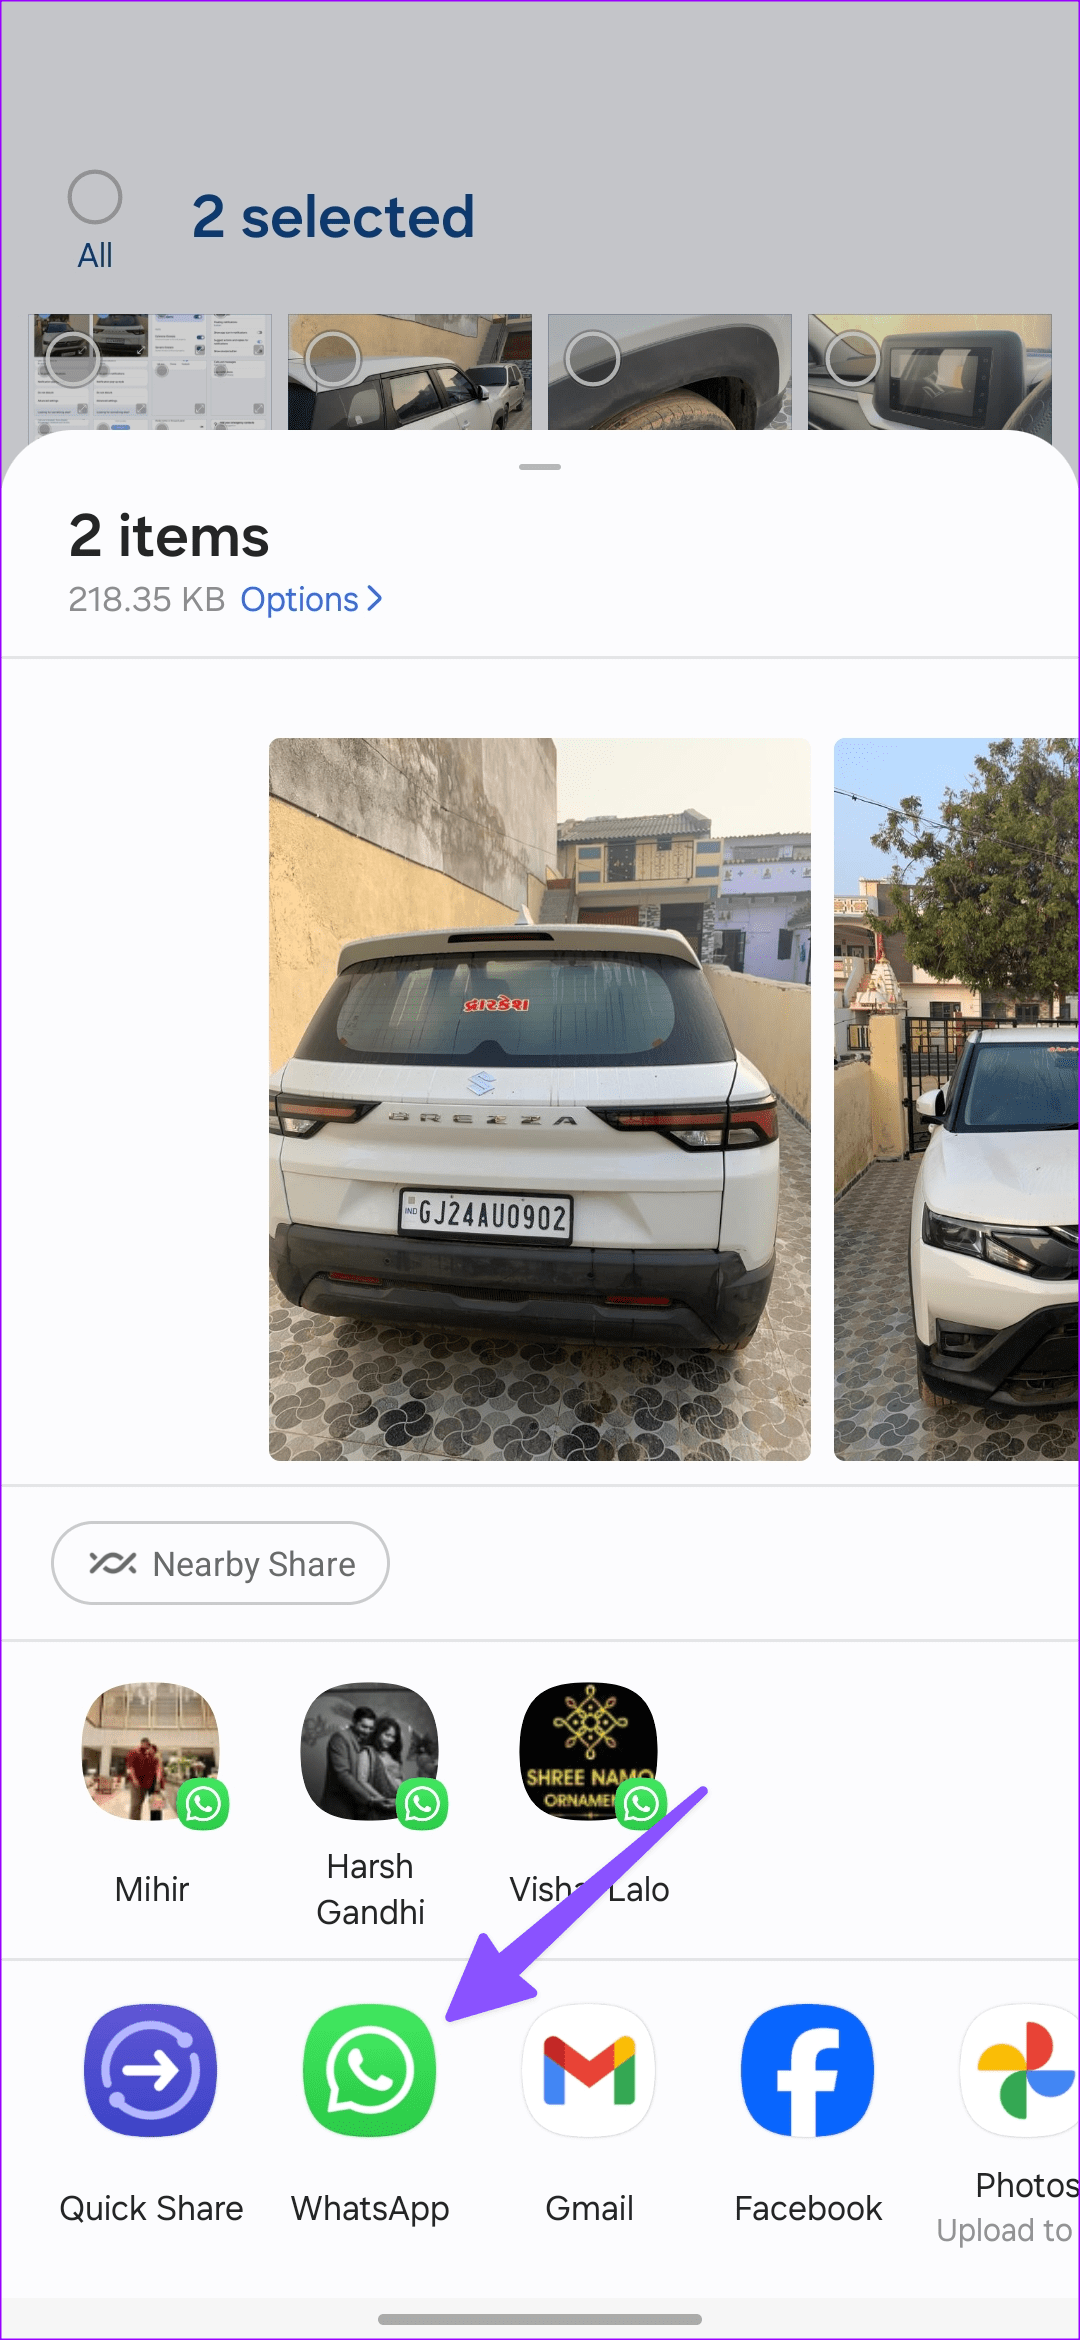
Step 1: Launch Gallery on your Samsung phone. Open an album and select the photos you want to send on WhatsApp.
Step 2: Tap Share and select WhatsApp.
Step 3: Select a conversation and hit send. Check the familiar WhatsApp editing features and hit send.
Send Multiple Photos as Files on WhatsApp
You can also select multiple photos and send them as documents. There are a couple of advantages here. The instant messaging app sends images in full resolution, and you don’t need to deal with media (up to 100) limit either. The only con is WhatsApp disables file/media preview.
WhatsApp for iPhone
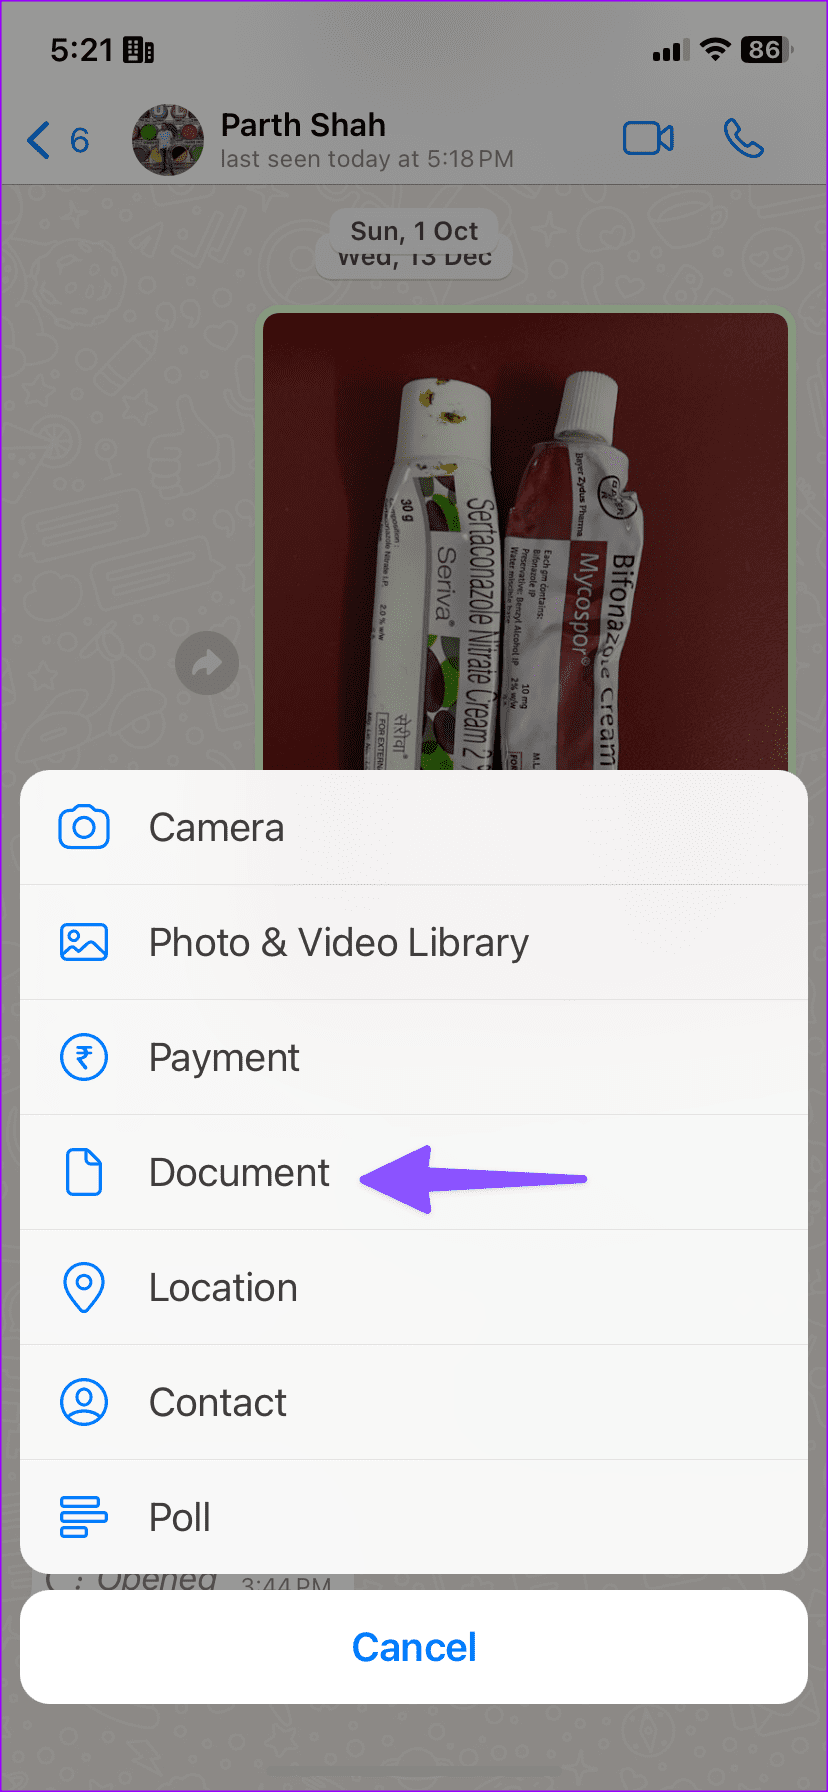
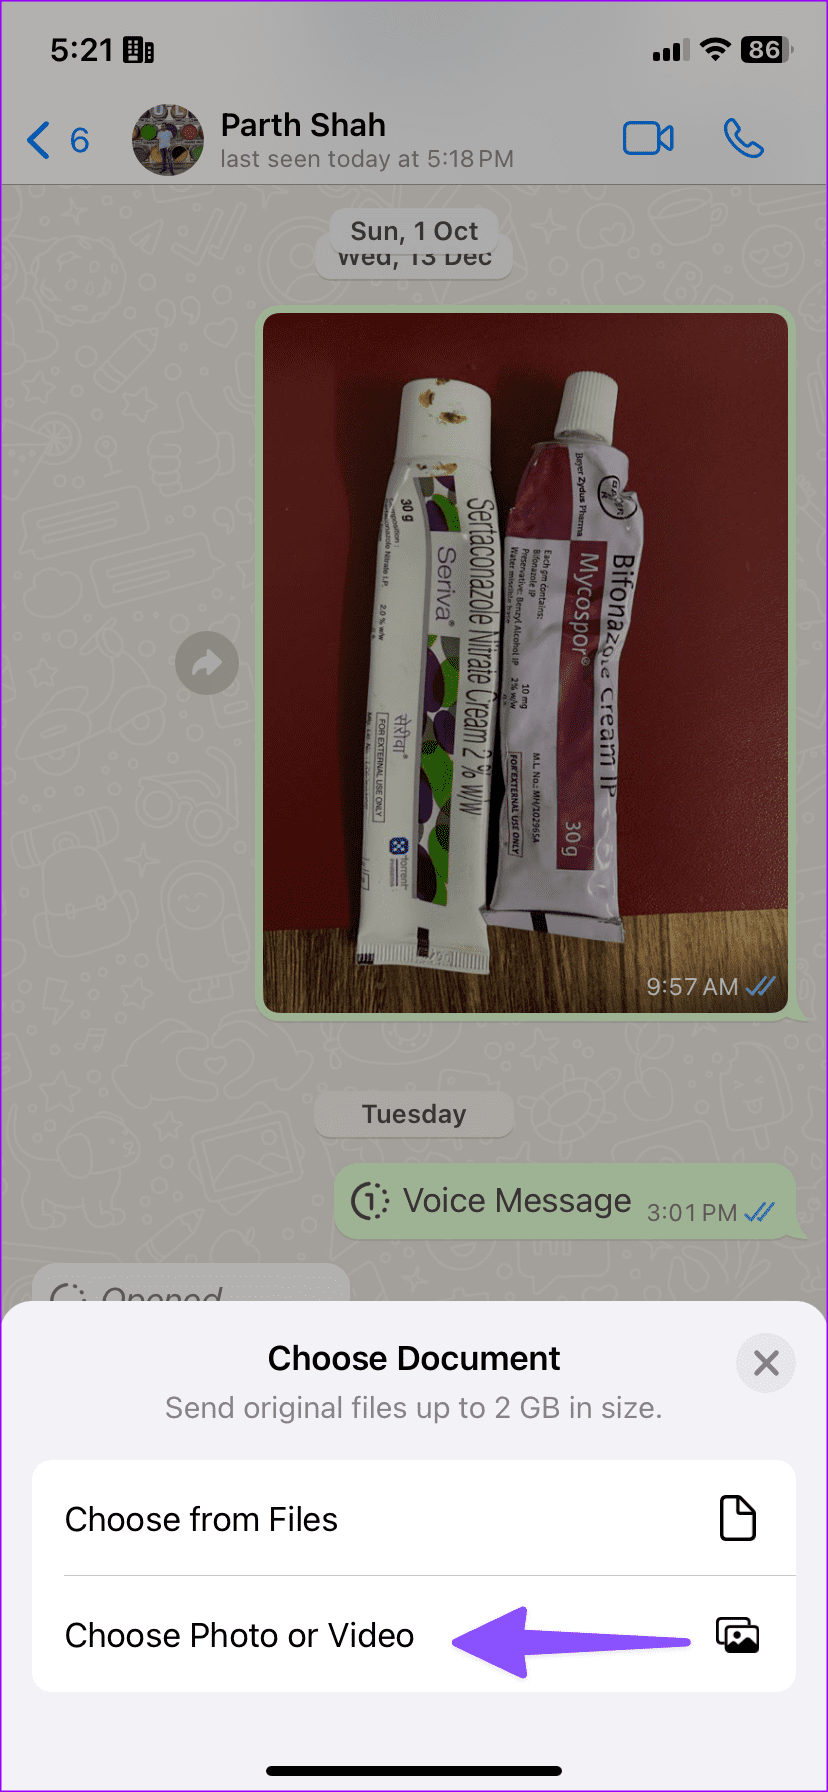
Step 1: Open a conversation in WhatsApp for iPhone.
Step 2: Tap + and select Document. Tap Choose Photo or Video.
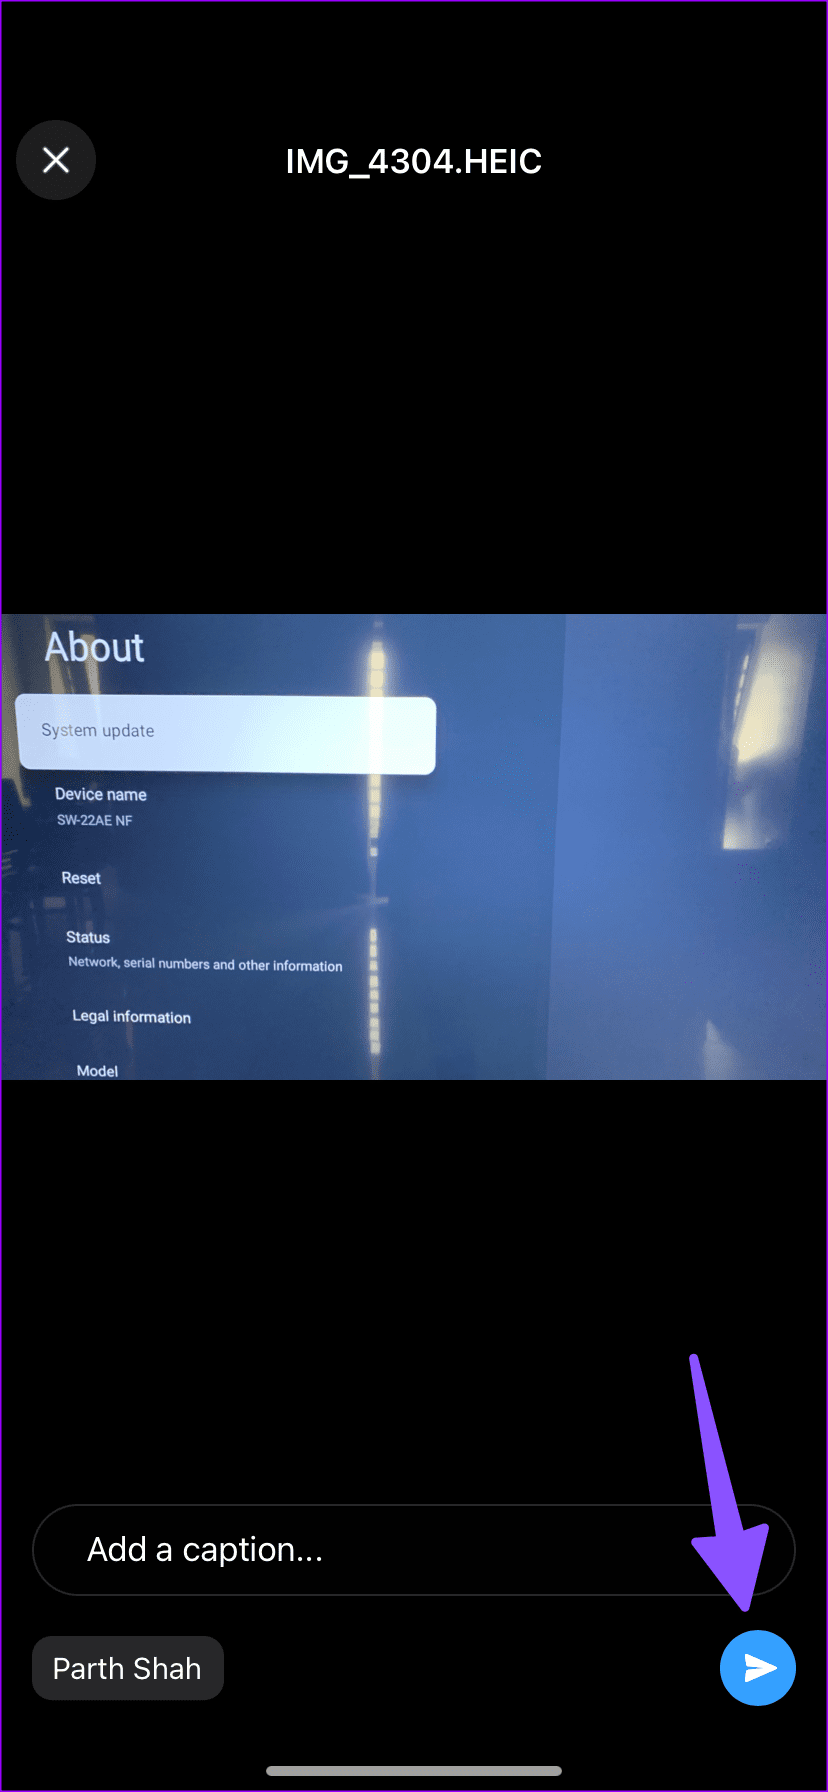
Step 3: Long-tap on photos and hit Next.
Step 4: You can tap the pencil icon in the bottom right corner to annotate an image. Tap Send.
WhatsApp for Android
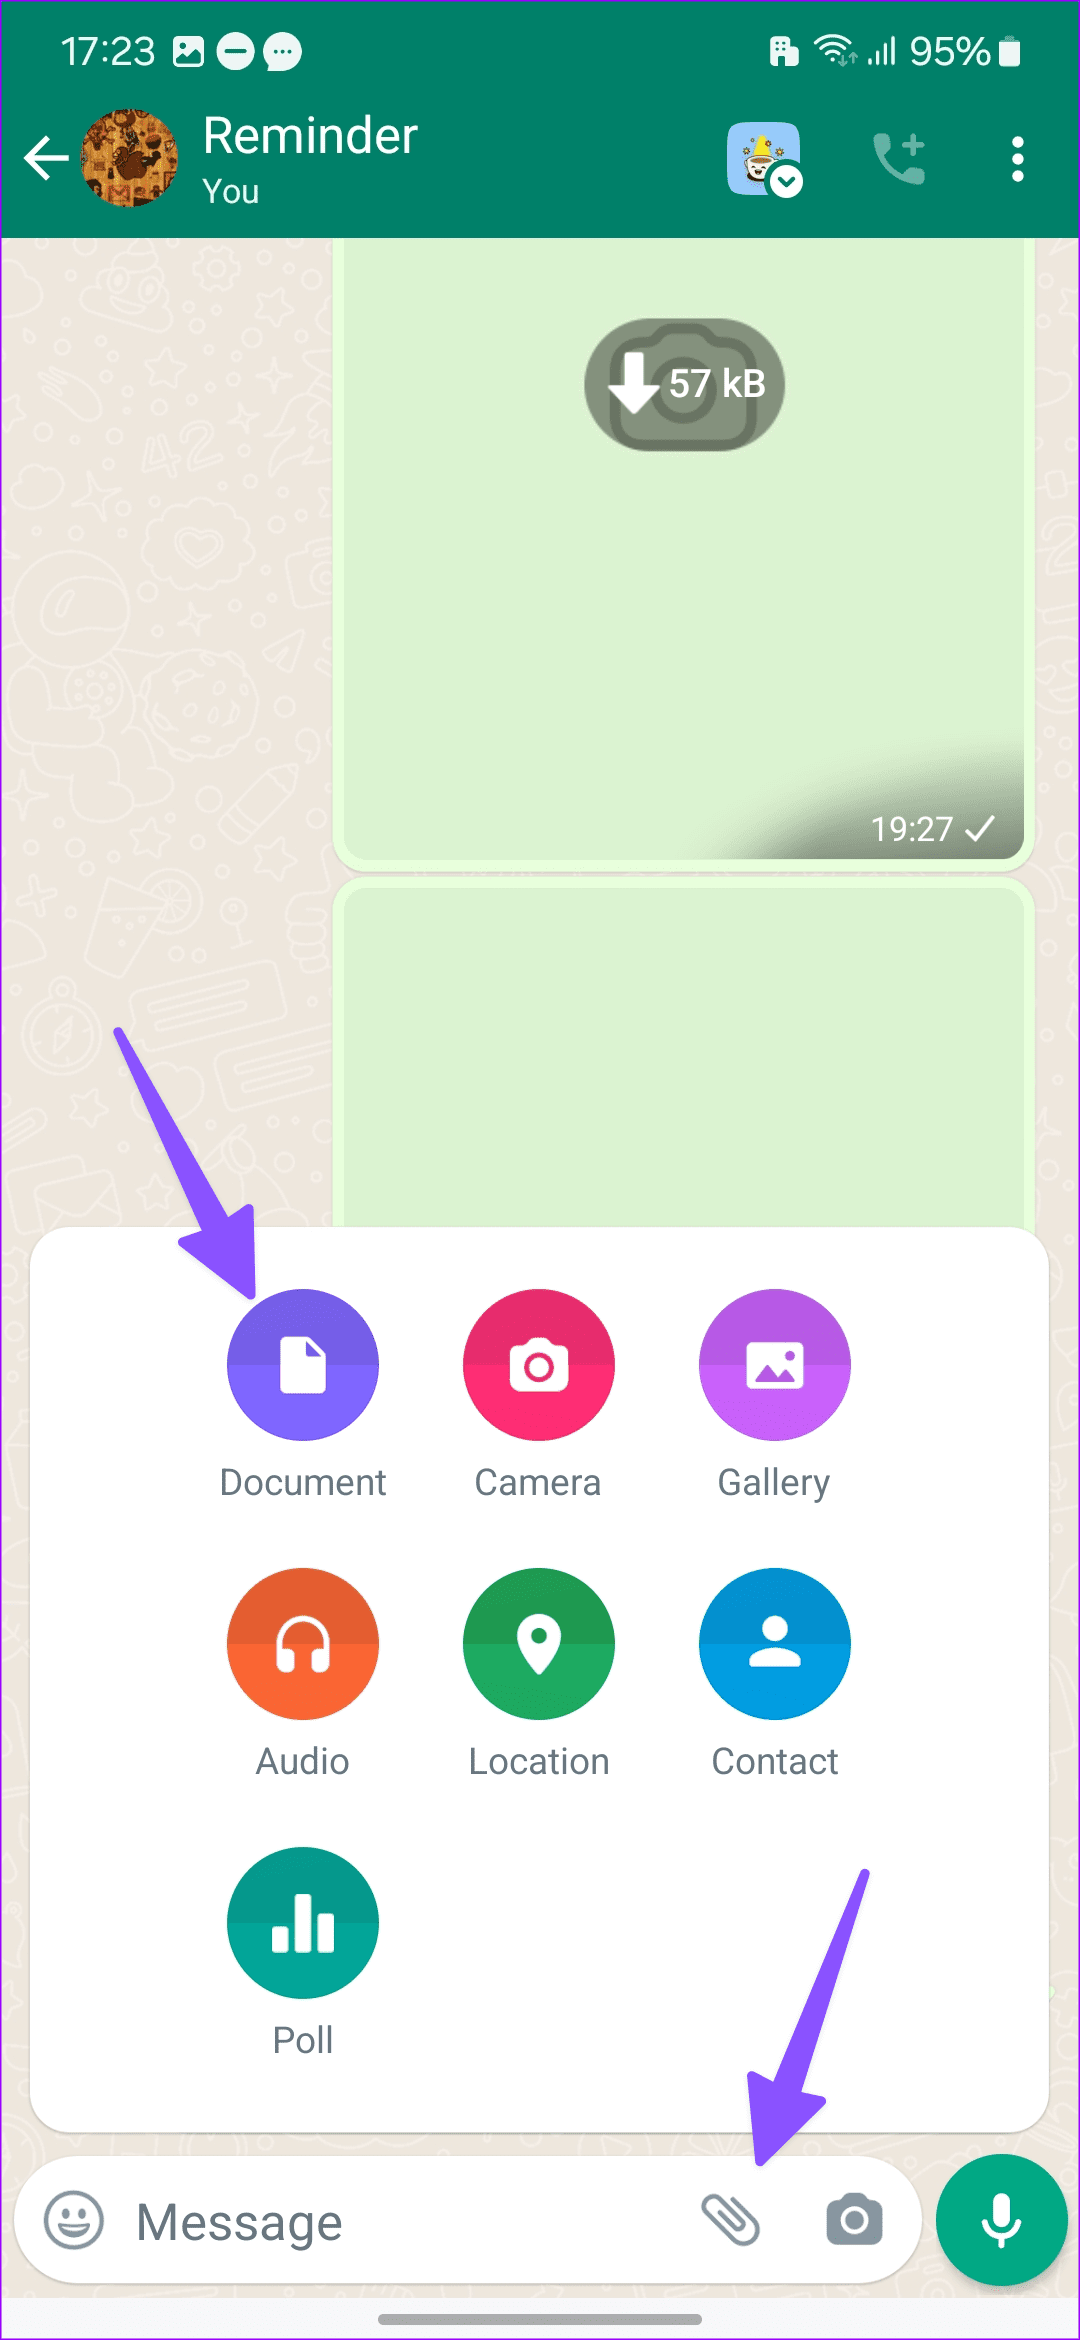
Step 1: Head to a conversation in WhatsApp for Android. Tap the pin icon in the message box. Select Document.
Step 2: Tap Choose from gallery.
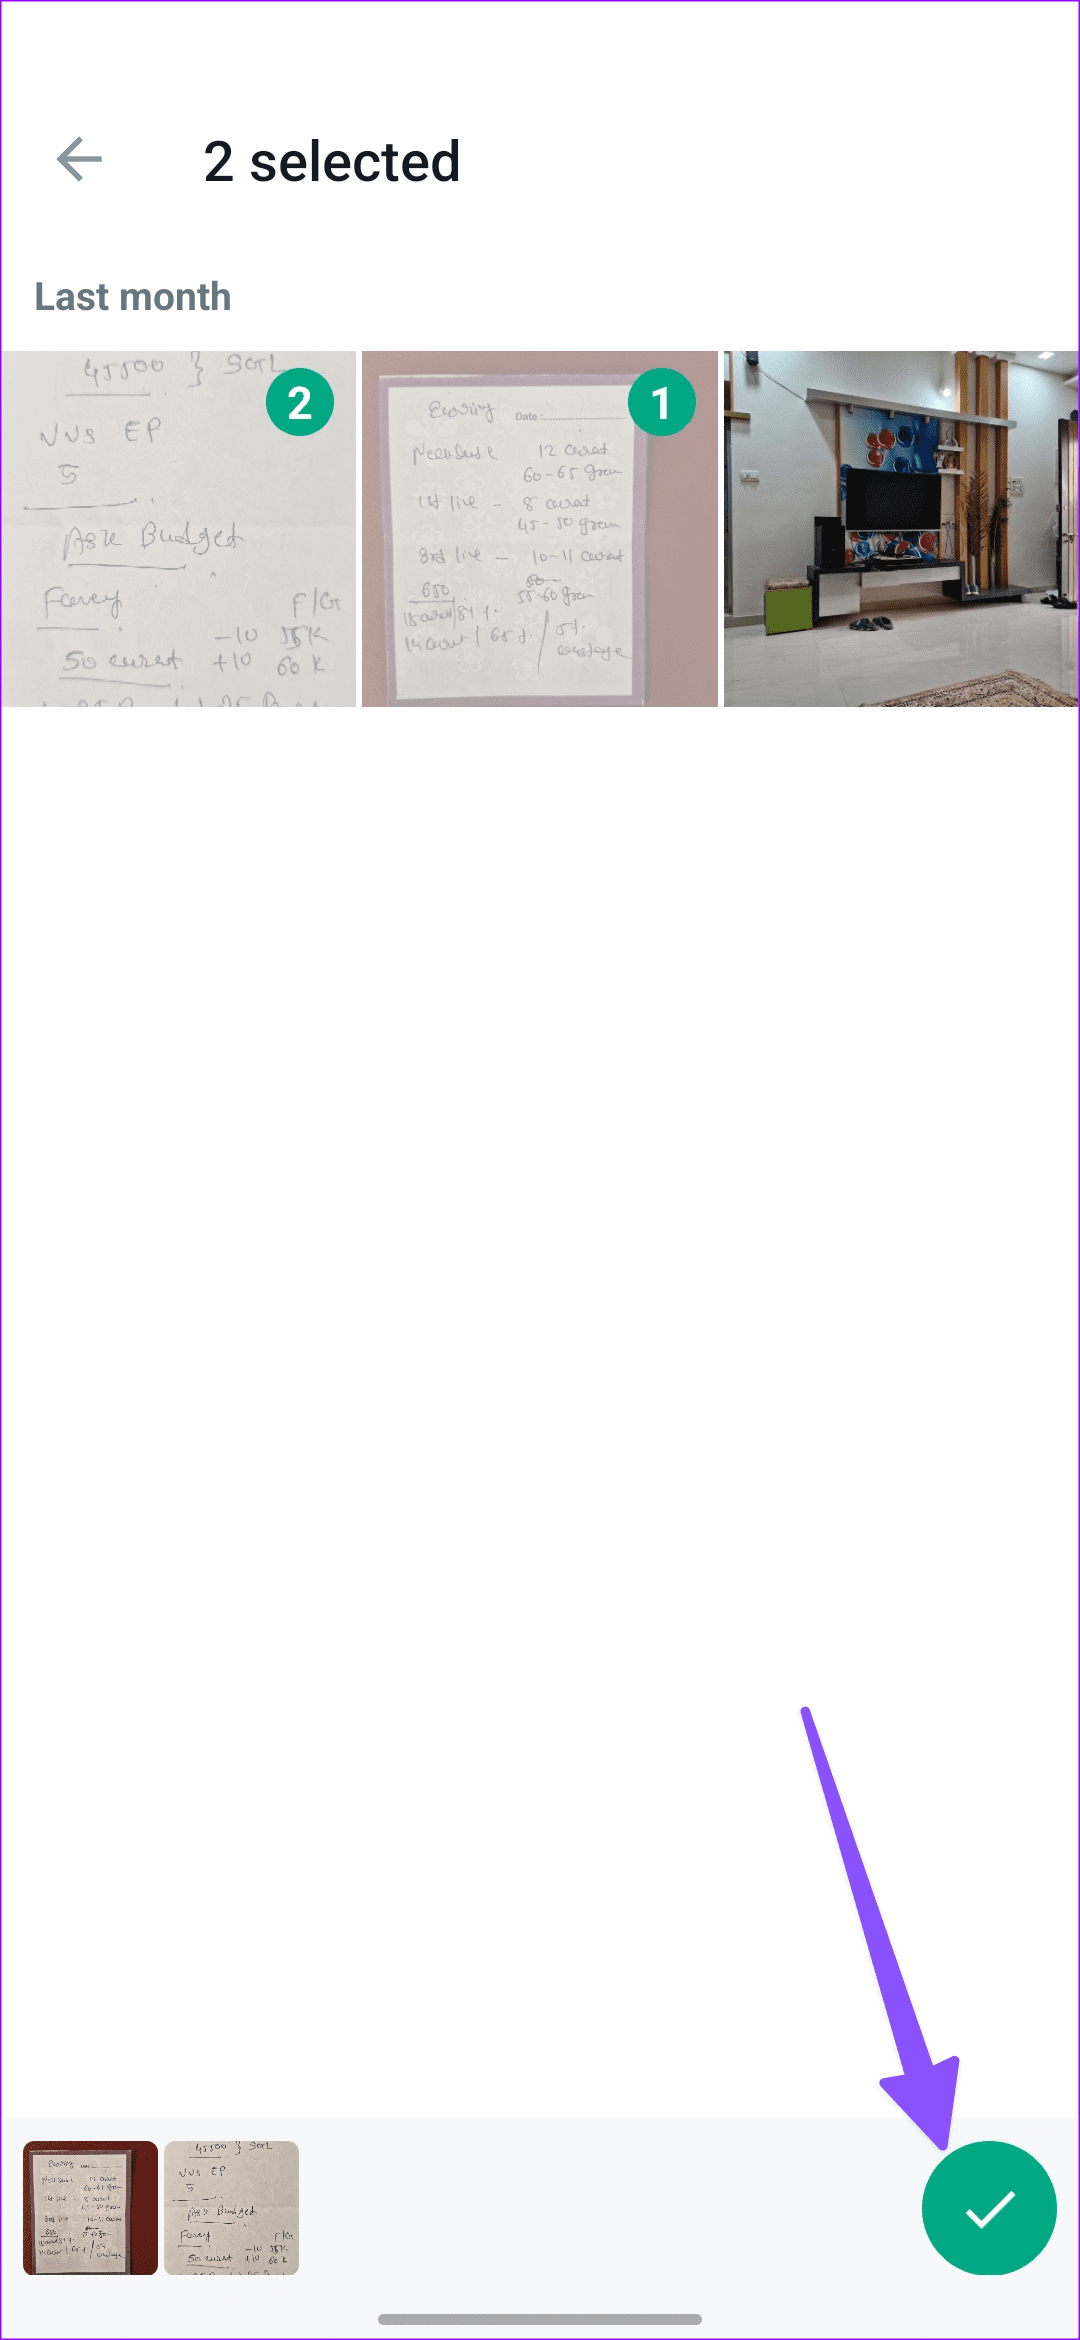
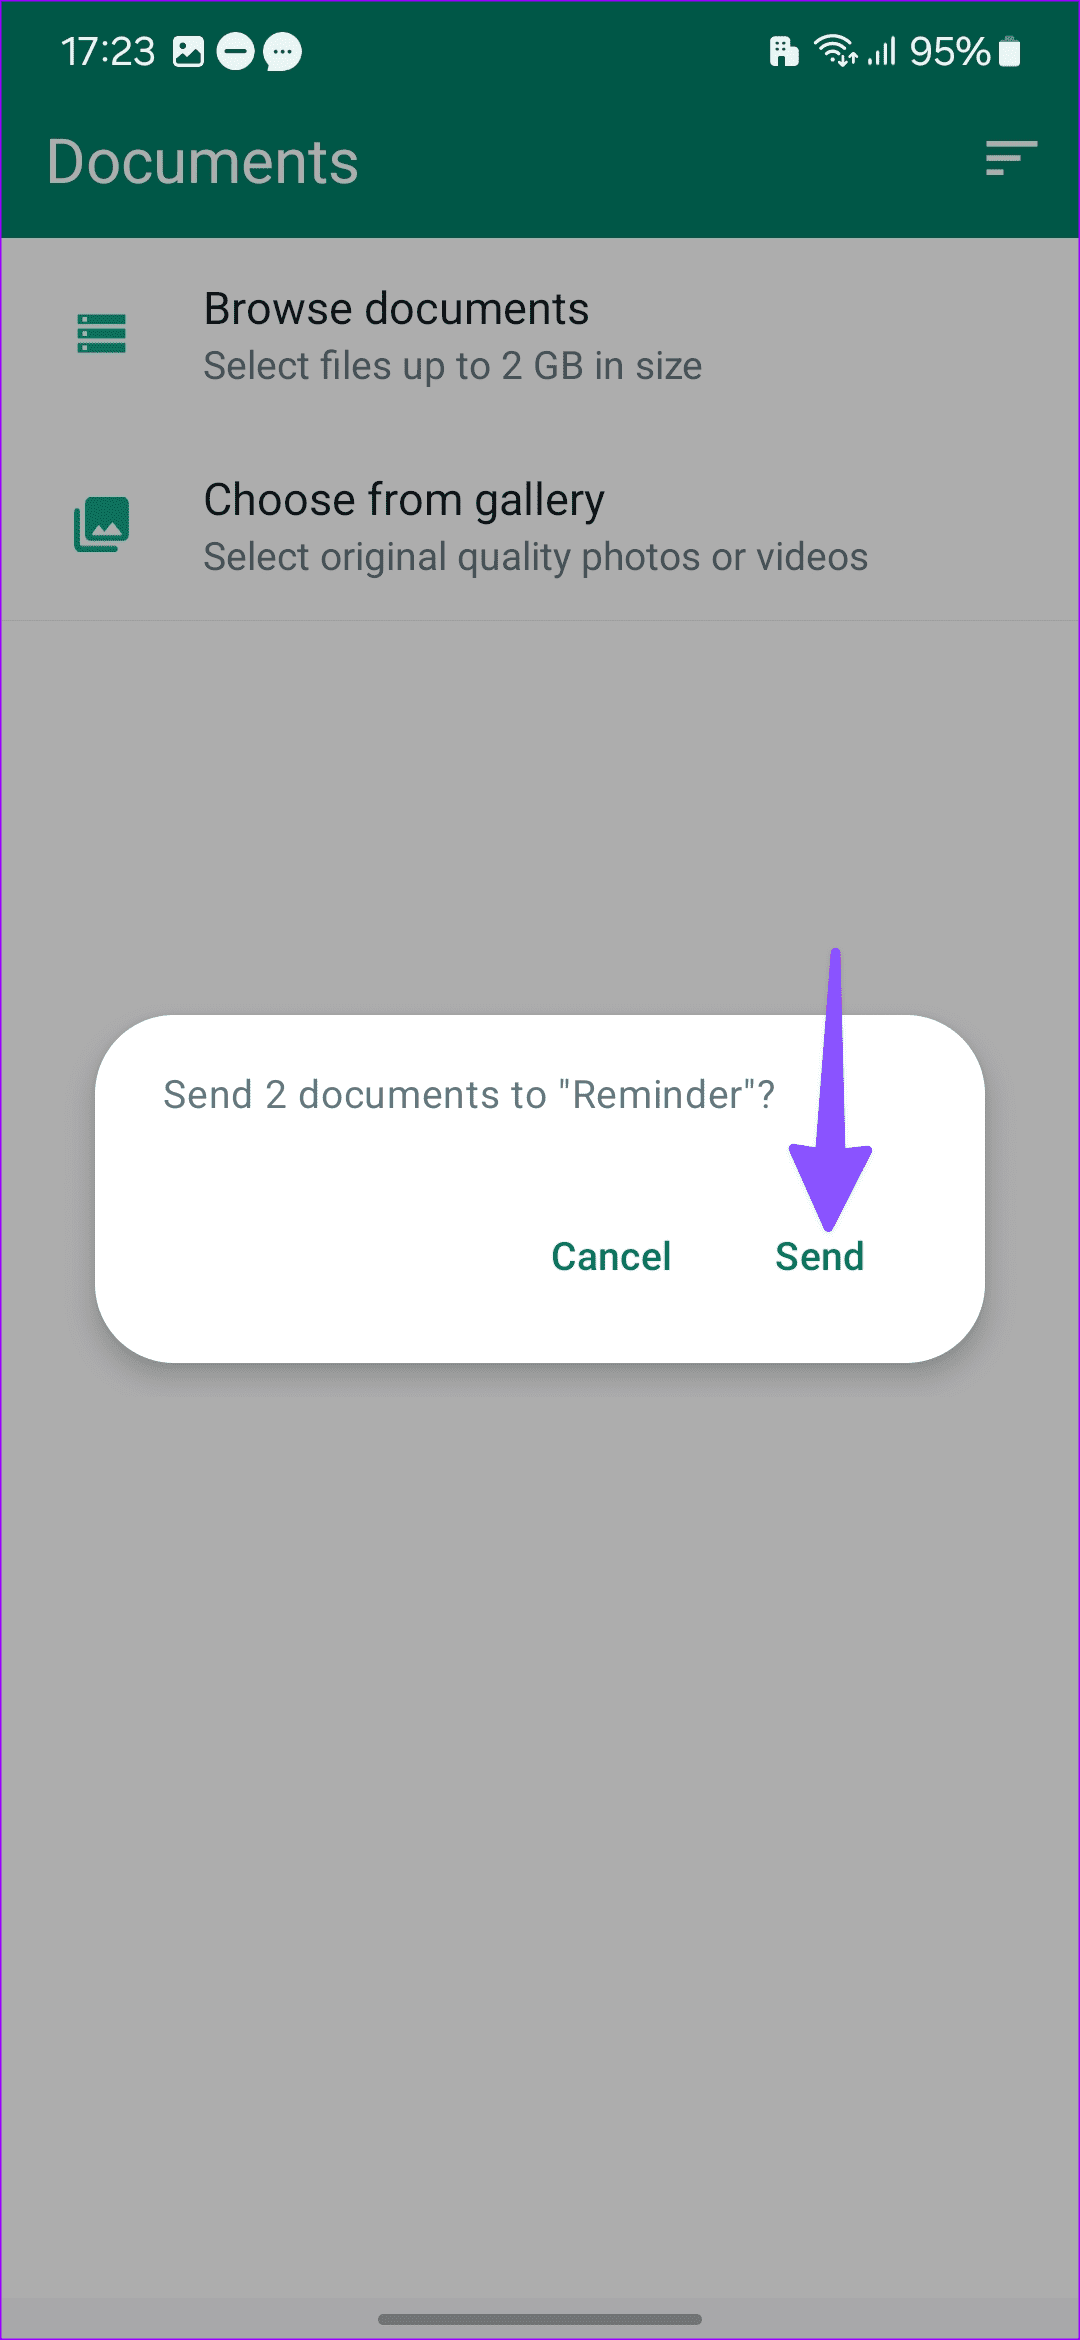
Step 3: Long-tap on photos and hit the checkmark. Tap Send.
Send Disappearing Media on WhatsApp
Sometimes, you may want to share private and sensitive media files on WhatsApp. The platform allows you to send disappearing images. Once the recipient opens the image, WhatsApp will delete it from the server side. Read our dedicated post to learn about how to send disappearing images on WhatsApp.
Share Your Memories on WhatsApp
Sending multiple photos over a messaging app is a standard function, and WhatsApp has nailed the execution here. The UX (user experience) might get confusing to some. Use the steps above and share multiple photos on WhatsApp without any issue.
Clean the true-depth camera: Apple recommends using a clean, damp-free lint cloth and some warm, soapy water for this purpose. After you clean the Notch area, try using Face ID to unlock the Note.
Unlock and lock your note again: Open the Notes app > Unlock it > Remove the lock and then add the lock again.
Force quit and relaunch the Notes app: This will give the app a fresh start on your iPhone if it has been running in the background for quite some time.
Update iOS to update the Notes app: Open Settings > General > Software Update.
Fix 1: Check if Face ID Is Enabled for Notes App
While several note-taking apps are available for iPhone, the default Notes app is convenient option to jot down thoughts and ideas. If you have protected a note or more using Face ID, but it is not working on your iPhone, you should check whether you did enable Face ID in the Notes app. Follow these steps to inspect that.
Step 1: Open Settings > Notes > Password.
Step 2: From the following screen, ensure that Face ID is enabled. If not then tap the toggle to enable it.
Step 3: Go back and then go to Face ID and Passcode > Other Apps > Enable for Notes.
Fix 2: Set up an Alternative Appearance
With the iOS 12 update, Apple brought the Alternative Appearance in Face ID for the iPhone. You can use this feature, especially if you wear glasses or someone from your family needs to access your iPhone. You can easily set this up by following these steps.
Step 1: Open Settings > Face ID and Passcode > Set Up Alternative Appearance.
Step 2: Follow the on-screen instructions to enter your facial data.
Fix 3: Reset All Settings
If nothing works, you can reset all settings on your iPhone. This will restore all system settings to default.
Are you tired of unwanted noise or constant disruptions on your Discord server? Muting someone on Discord can be the perfect solution to maintain a peaceful and enjoyable community. By muting an individual, you can temporarily silence their messages, ensuring a more focused and harmonious environment for everyone involved. This article will guide you on how to mute someone on Discord Server quickly and easily.
The ability to mute someone is valuable in various scenarios. Perhaps someone is consistently posting spam, engaging in inappropriate behavior, or simply being excessively loud. Muting allows you to address these issues without resorting to more drastic measures like banning or blocking the individual.
Additionally, muting is reversible, meaning you can easily unmute someone if the situation improves. However, it’s important to consider alternatives to muting, such as conversing with the individual or assigning moderation roles, as these approaches can sometimes lead to more effective resolutions. With that in mind, let’s begin with the article.
Things to Know Before Muting Someone in Discord
Before muting someone on Discord, keeping a few things in mind is important. Firstly, muting someone means you won’t receive notifications for their messages, giving you a break from their presence or minimizing distractions. However, remember that muting someone doesn’t stop them from sending or seeing your messages, so they can still interact with you and view your conversations.
Another key aspect to note is that muting someone doesn’t automatically hide the fact that you’ve muted them. They might notice the lack of responses or engagement from your side, which could lead them to realize they’ve been muted. It’s crucial to understand the limitations of muting and consider alternative actions, like reporting, if the situation calls for it. With this understanding, let’s get into the ways to mute someone on Discord.
How to Mute Someone on a Discord Server
Muting someone on a Discord Server is quite easy. However, it is important to note that you can only mute using Discord’s desktop or web client. There’s no way to mute someone on the Discord server on Mobile. Follow the steps below.
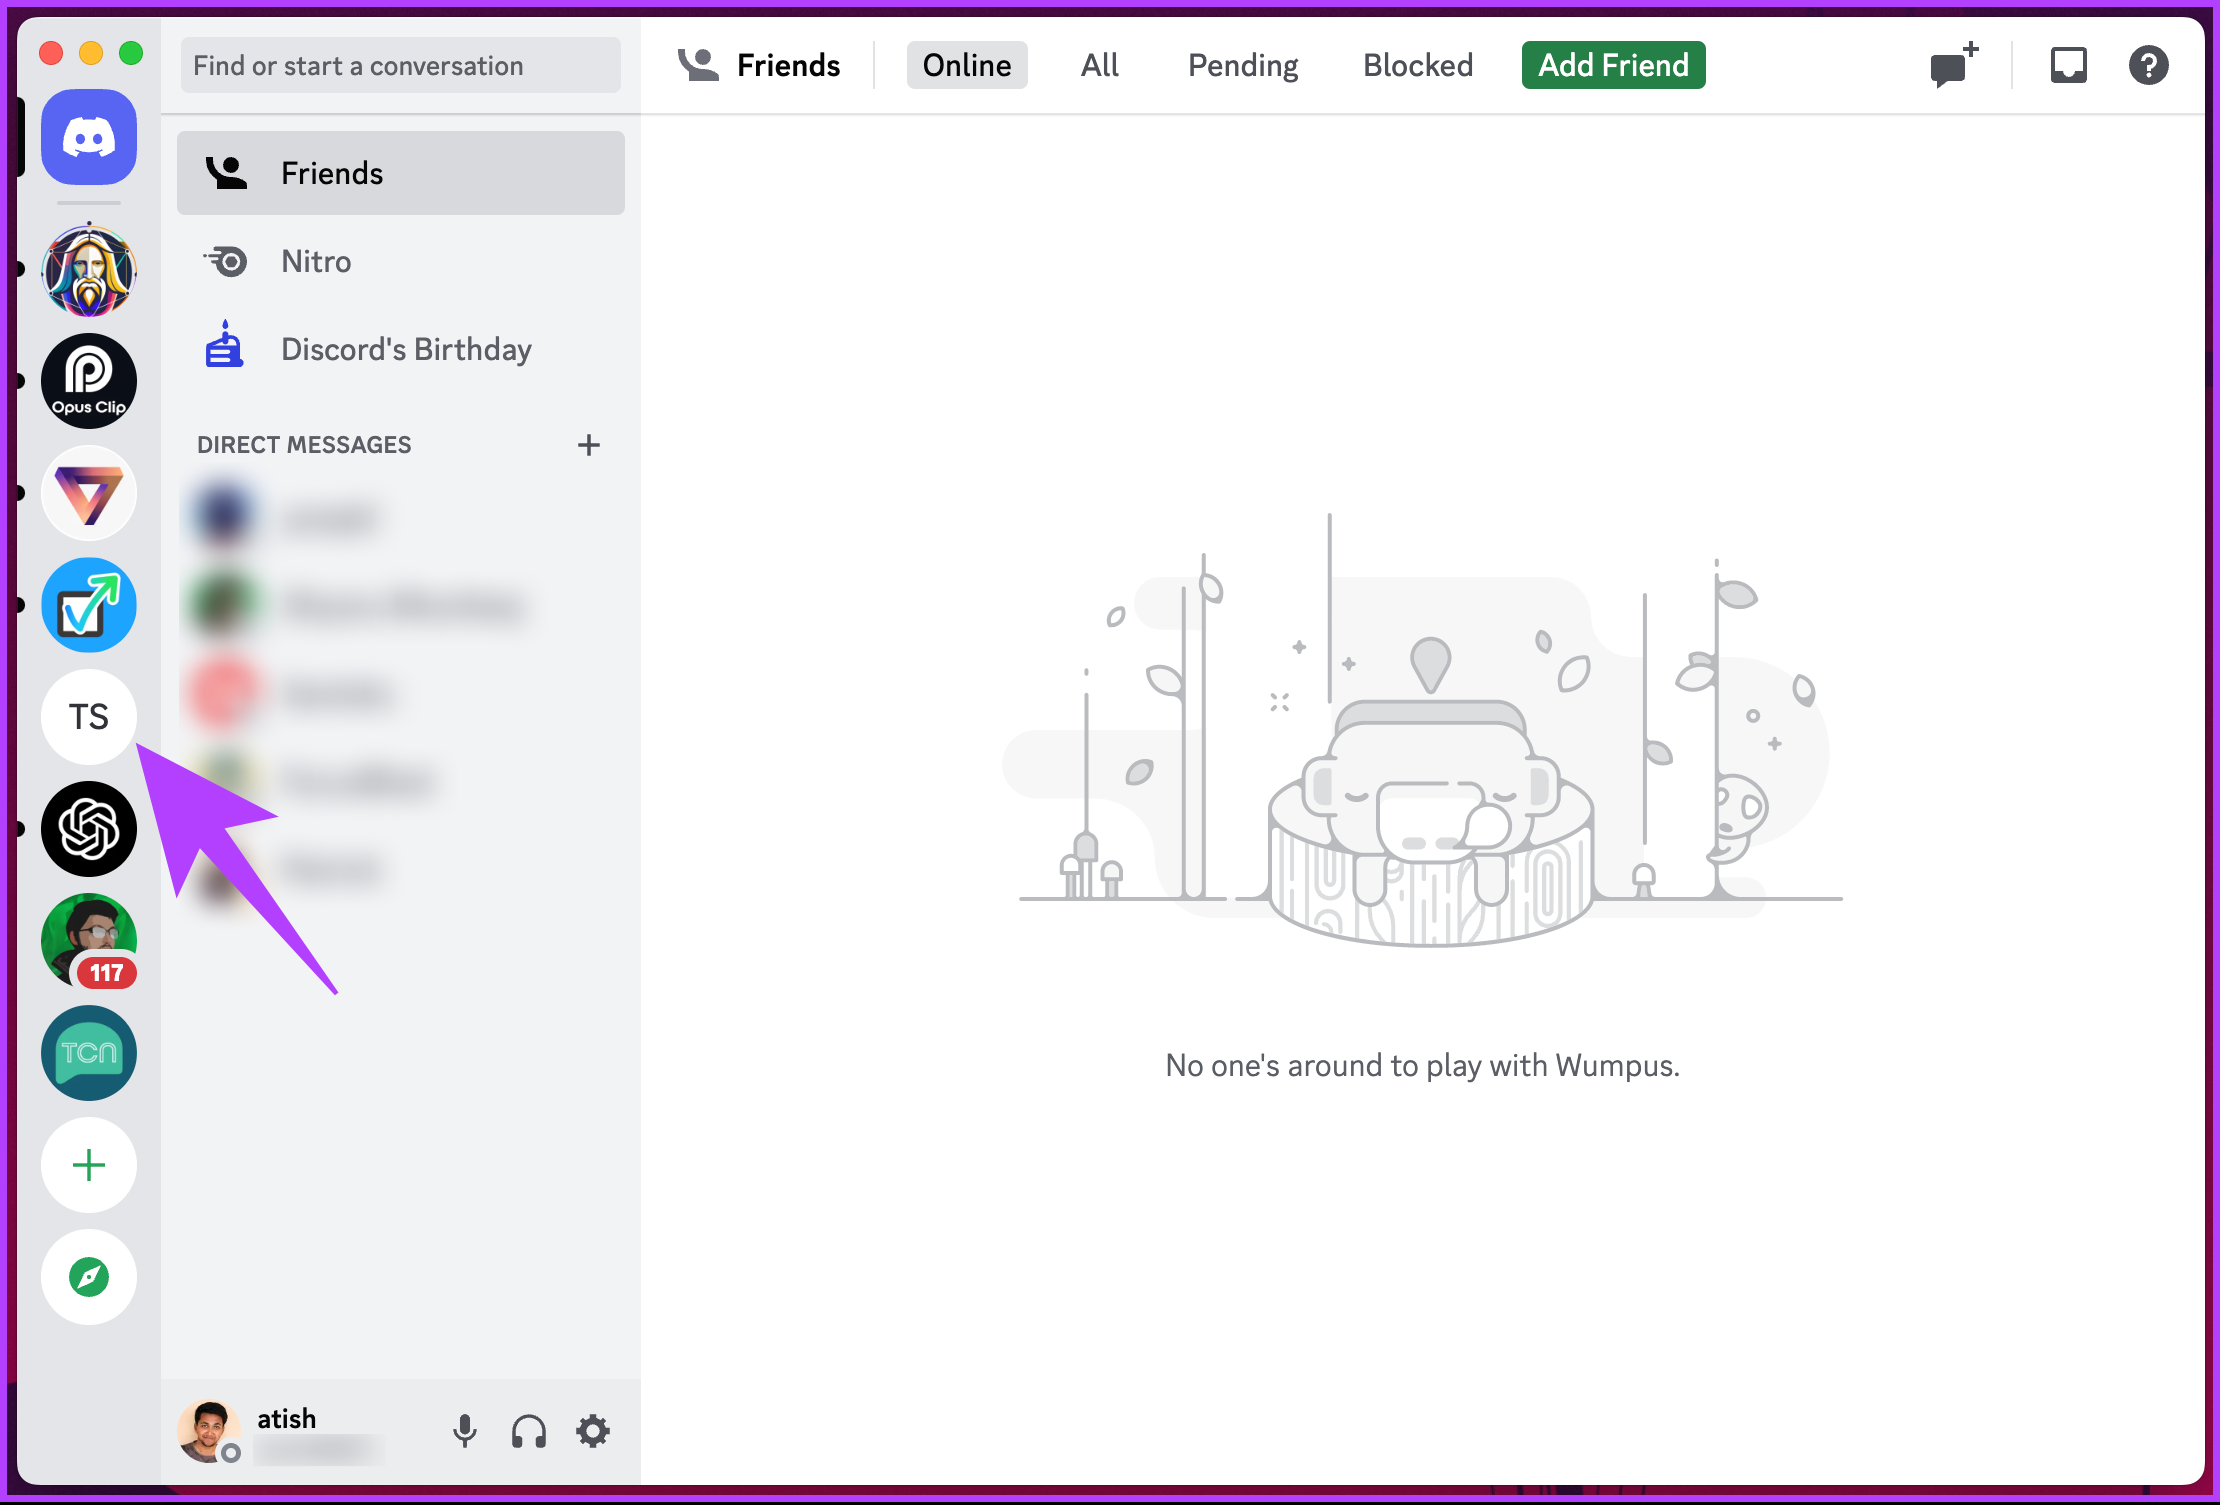
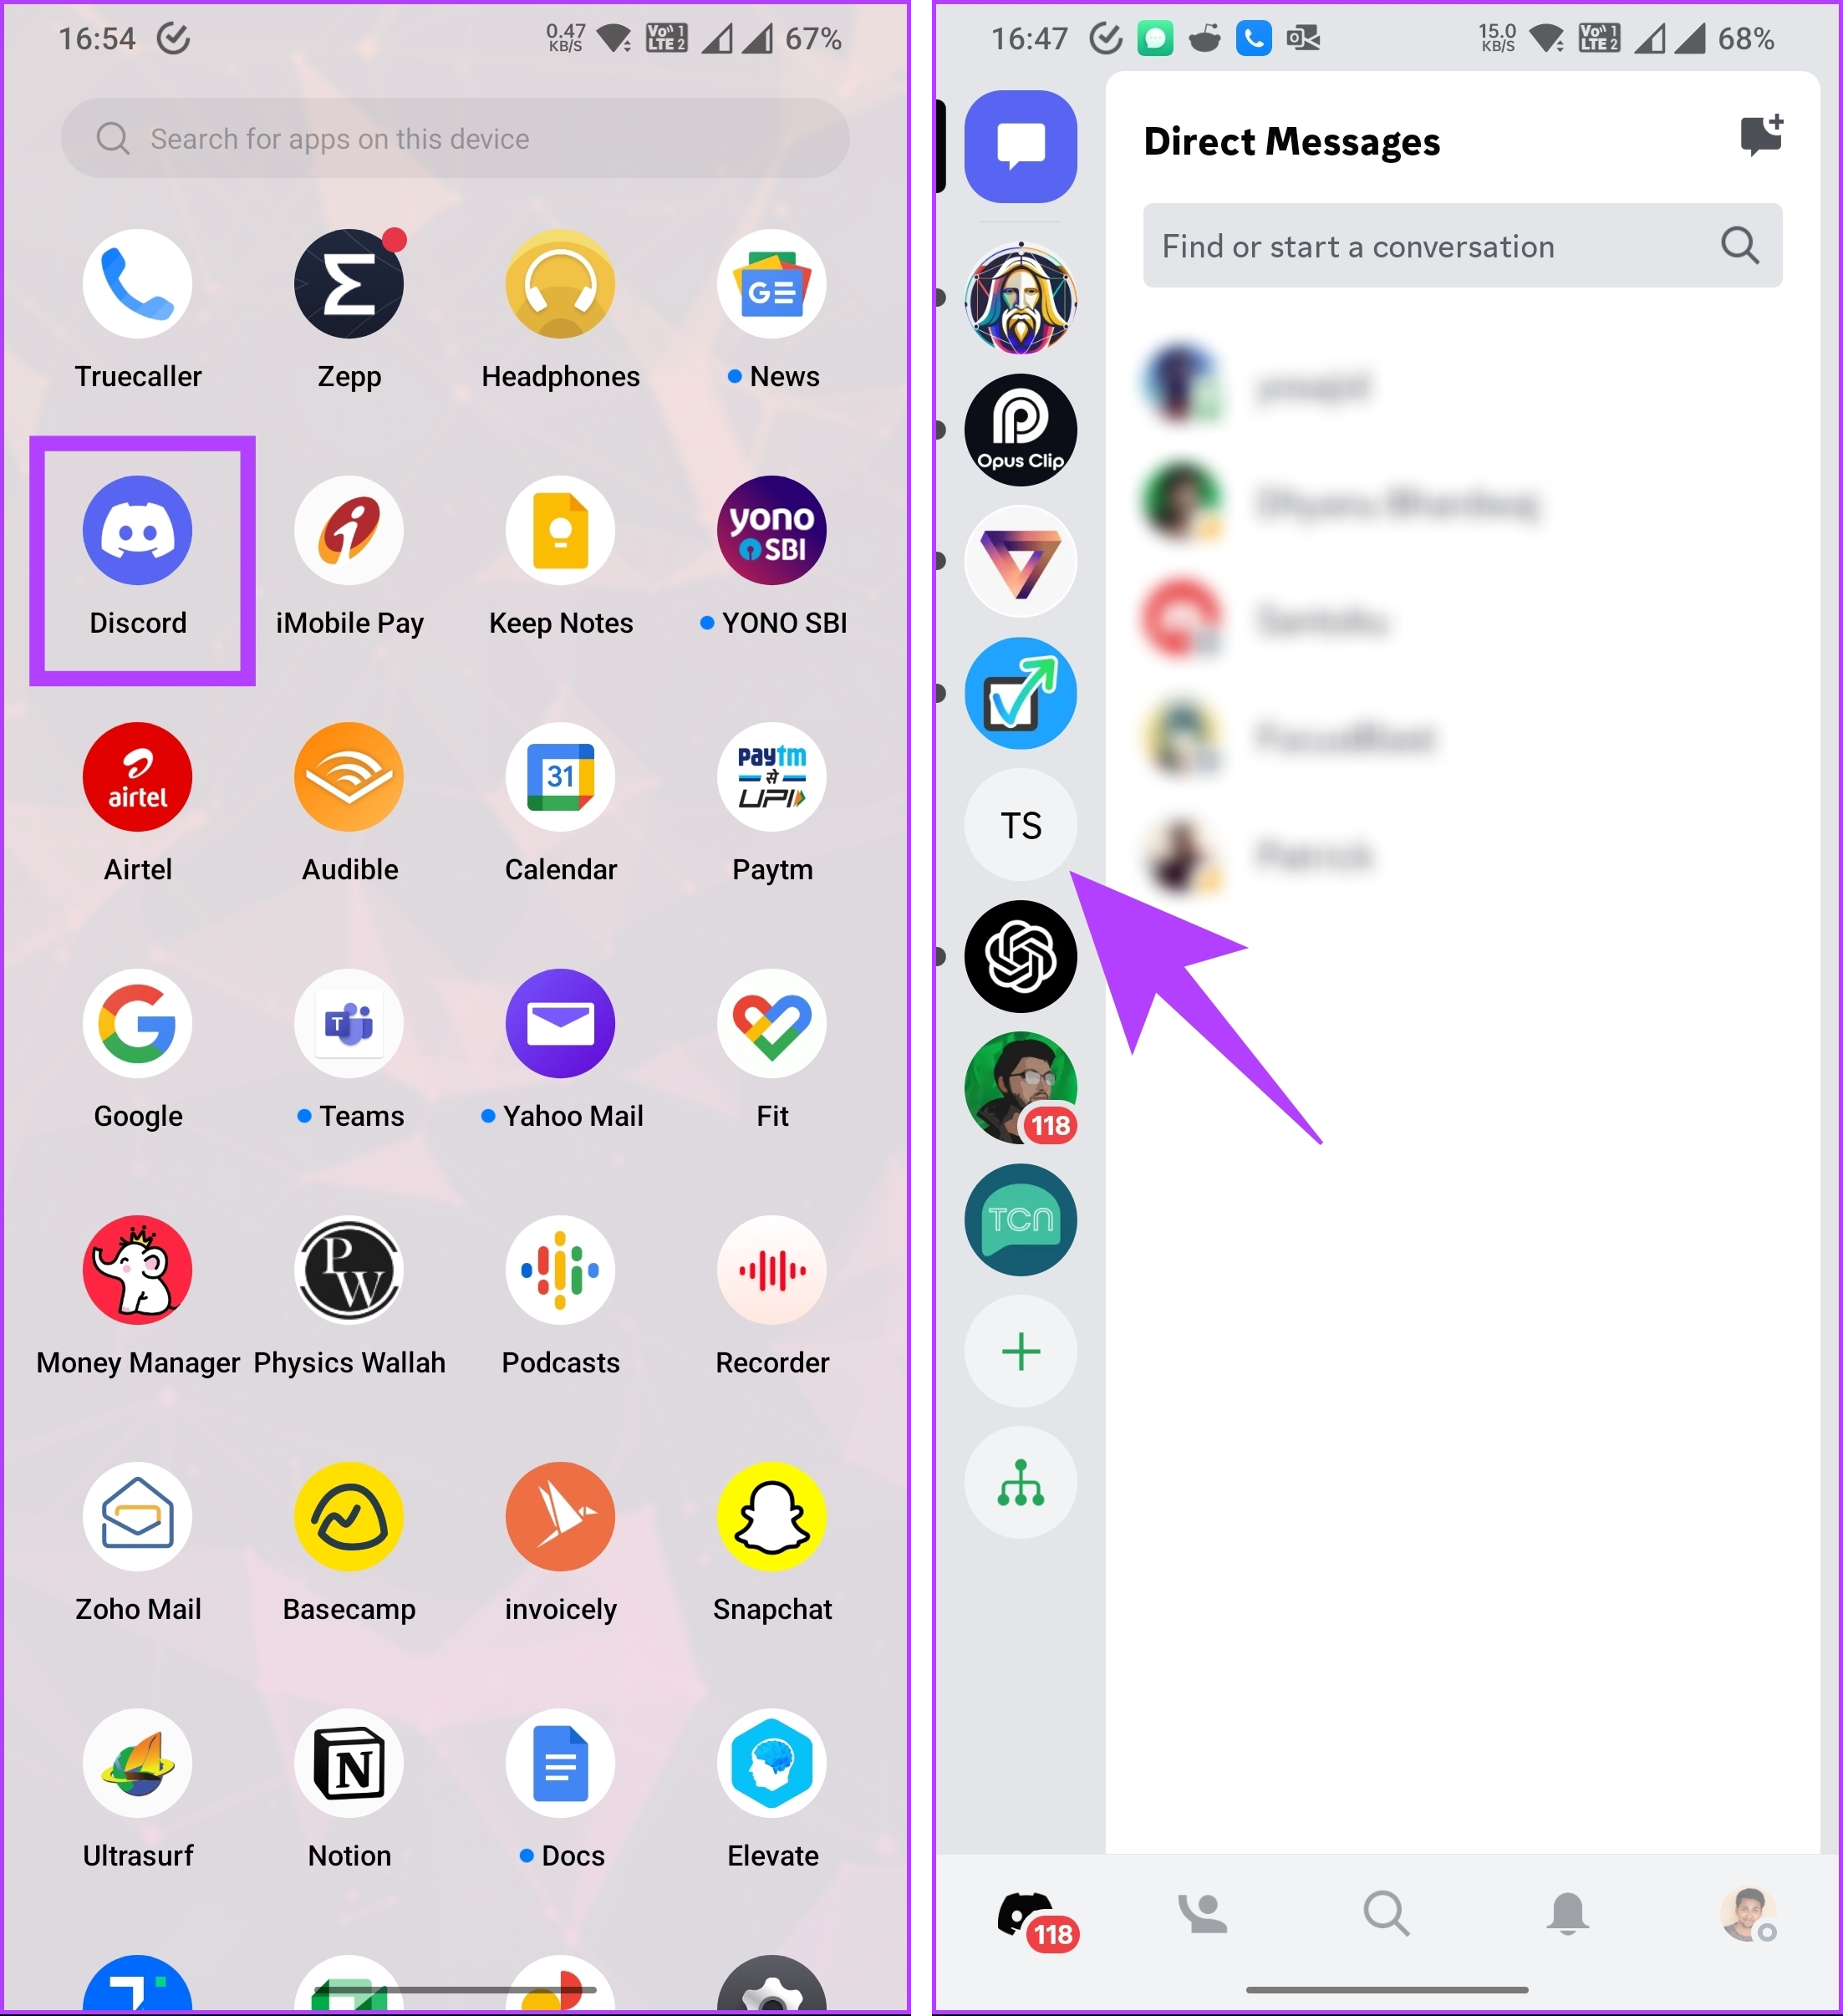
Step 1: Open the Discord app on your PC and go to the server from the left pane where you want to mute someone.
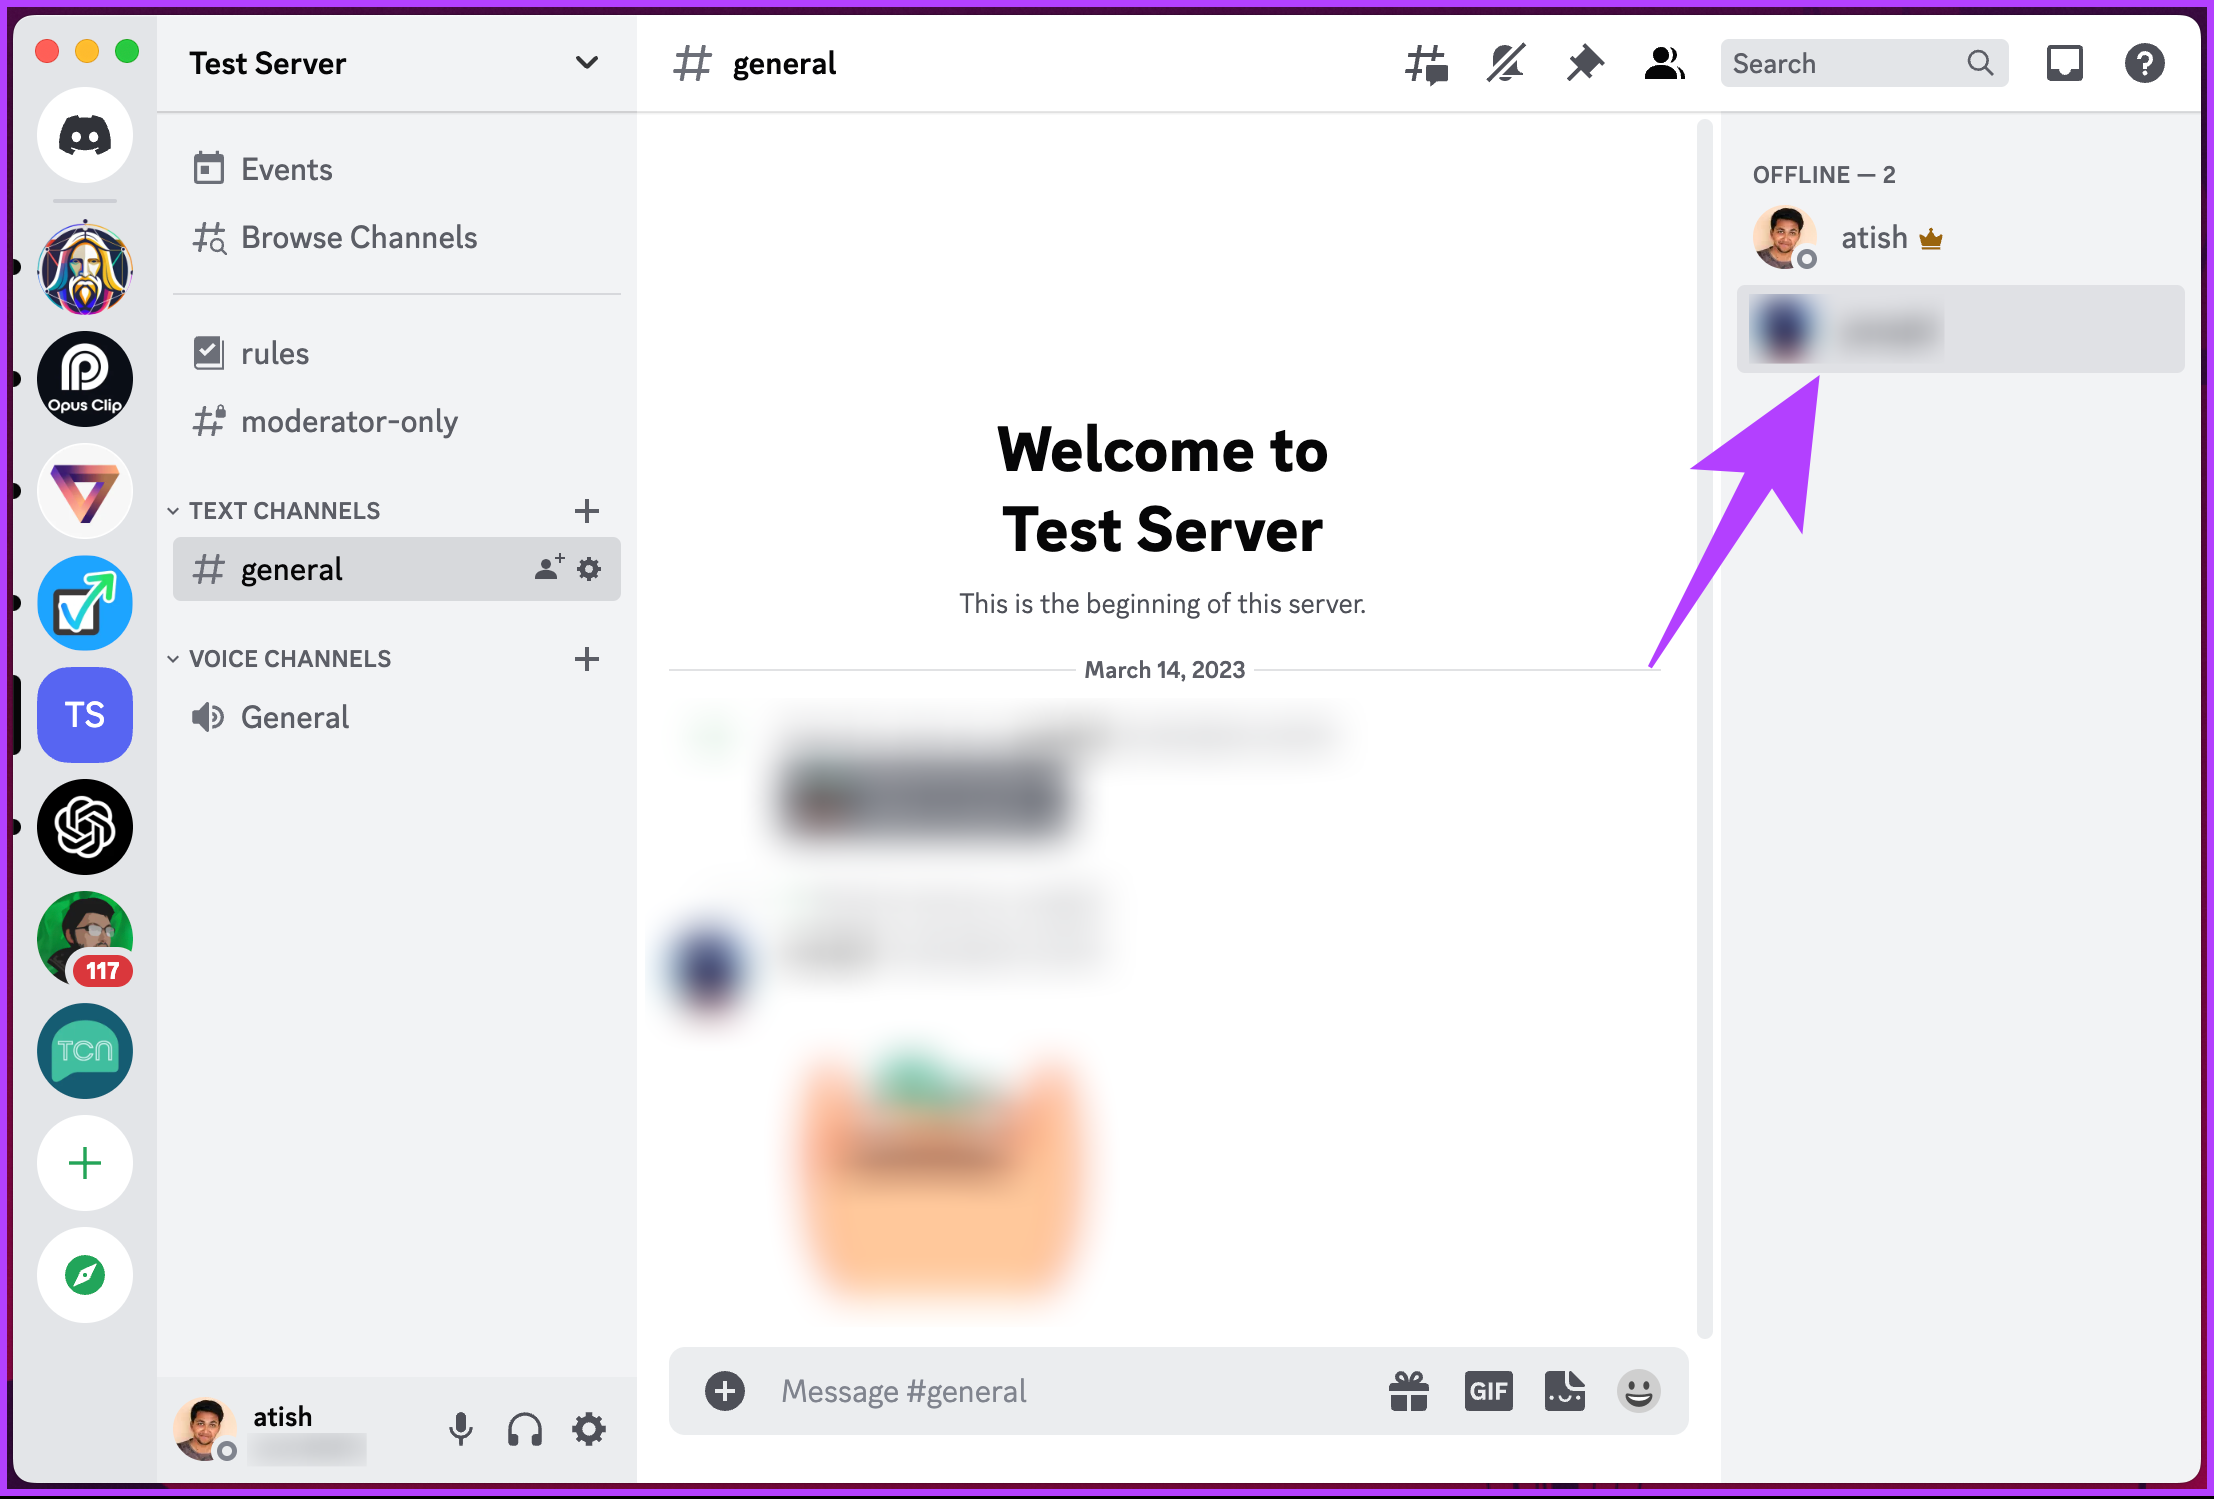
Step 2: Check the member list on the right pane of the chat area until you find them, and right-click on their nickname to bring up the menu.
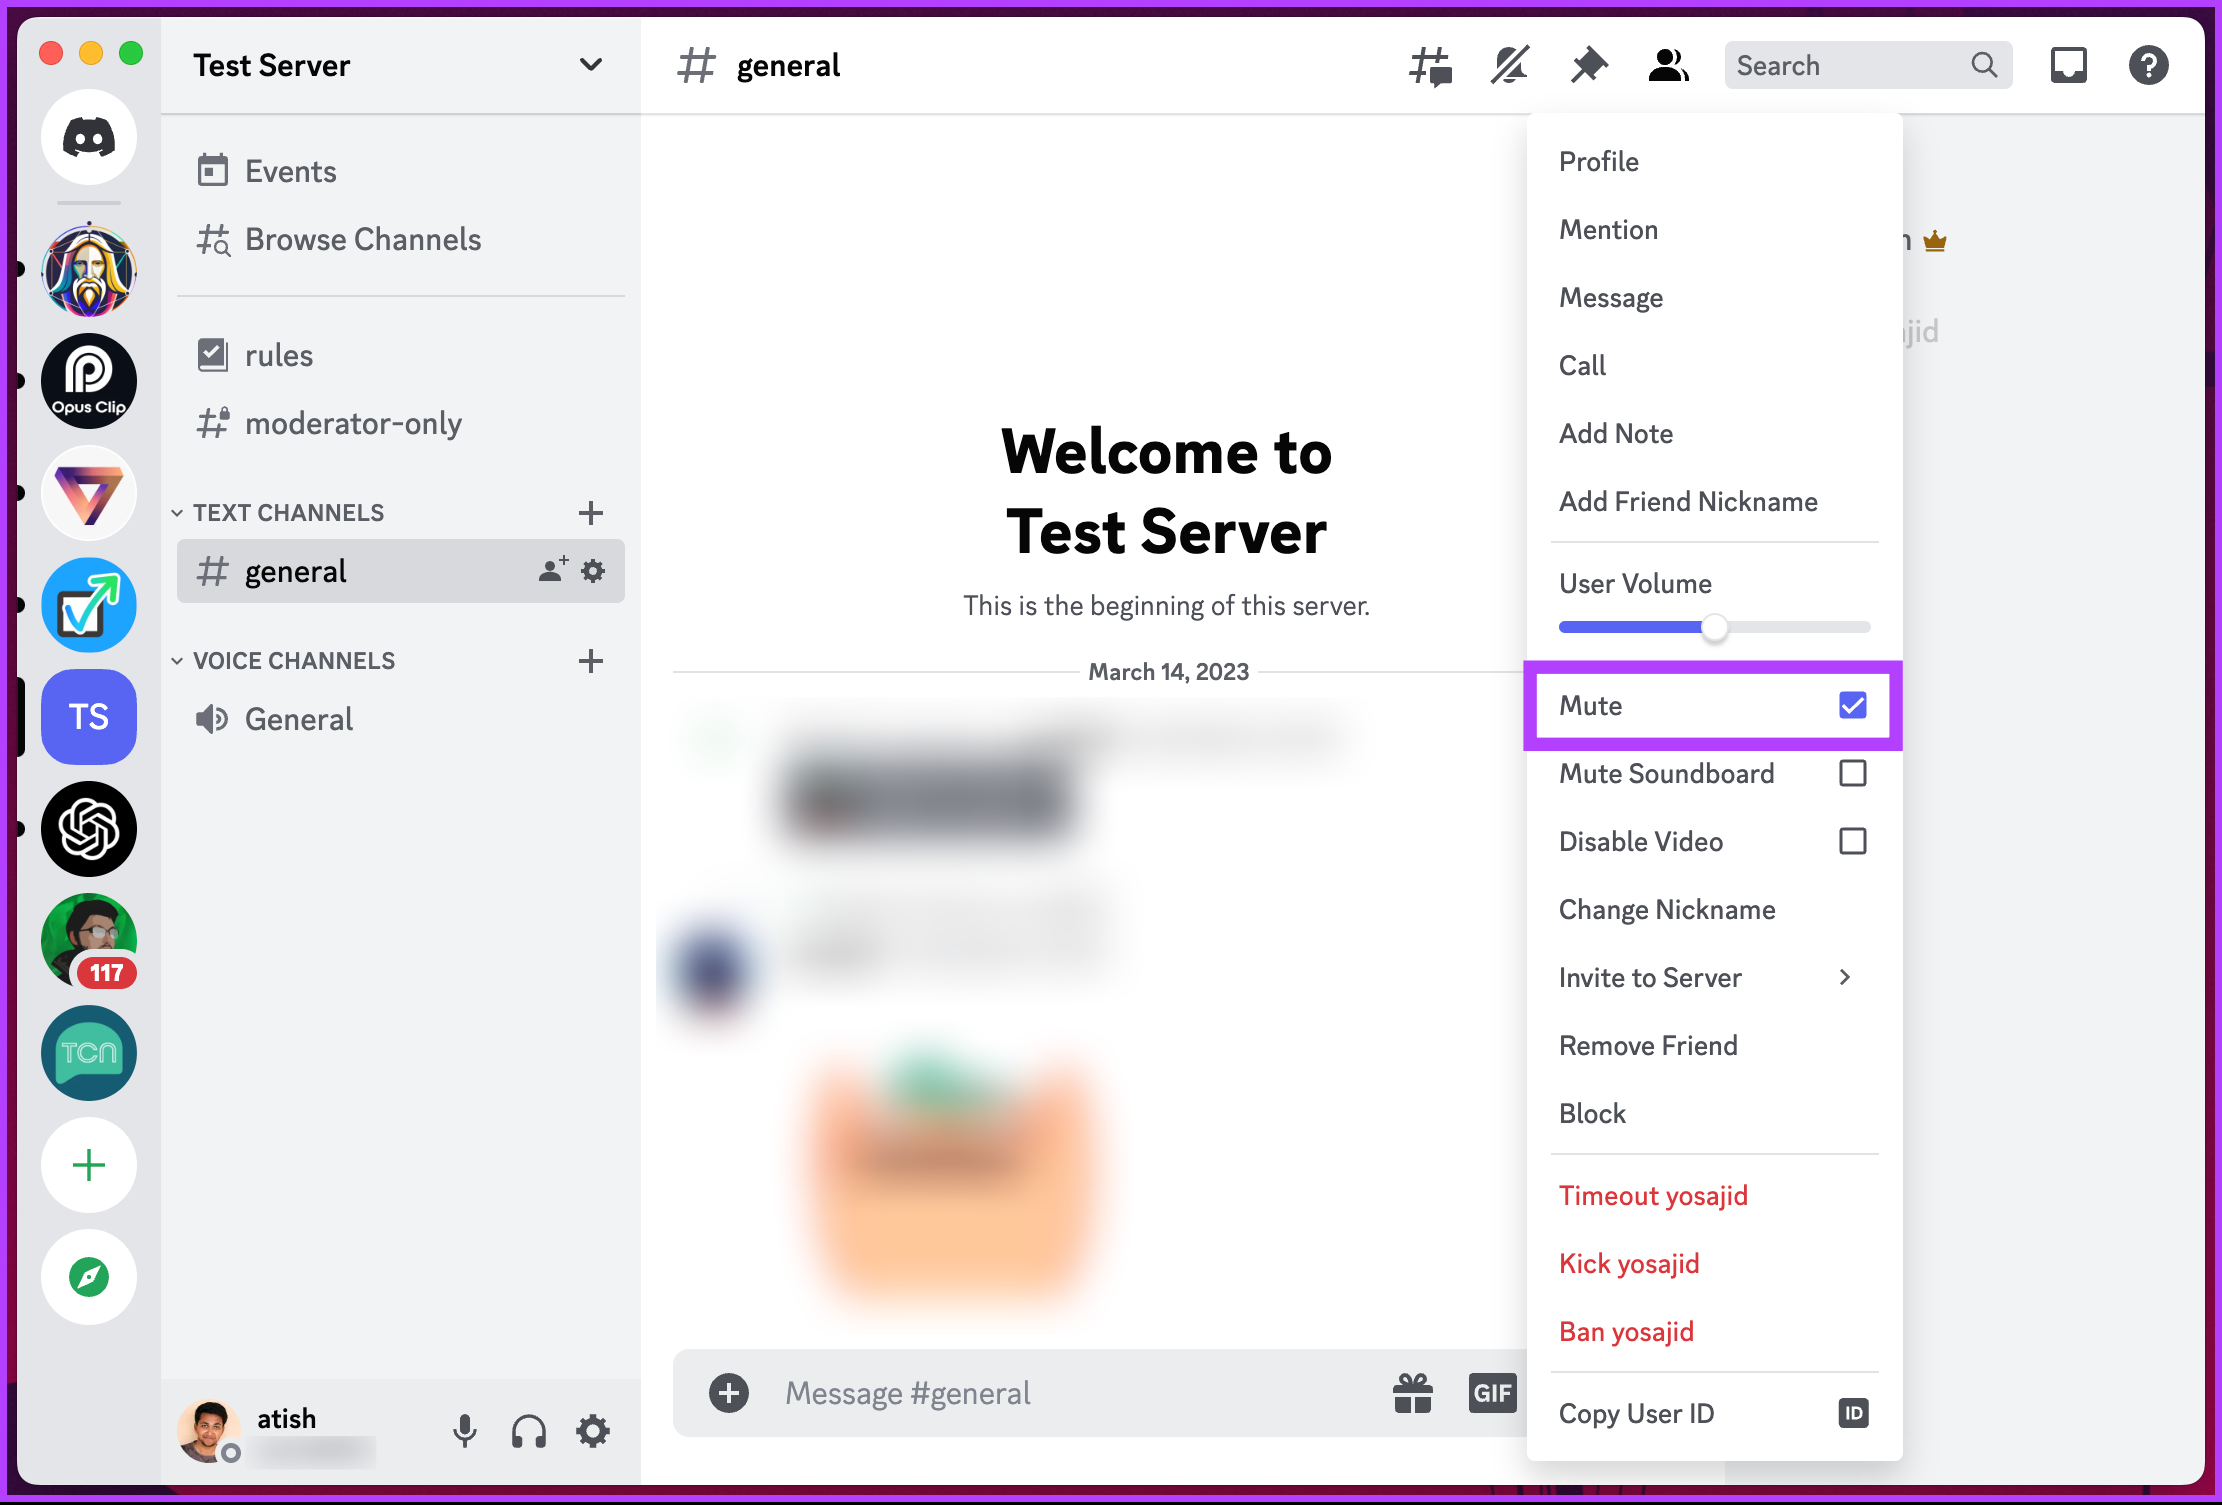
Step 3: From the menu, select Mute.
With this feature enabled, you won’t see any of their messages from the text channels you have in common on that particular server, nor will you hear them anymore. If it is not the text channel the person is bothering you with but rather the voice channel, continue reading.
How to Mute Someone in a Voice Channel on Discord
Muting someone in a voice channel is no different than muting them on a text channel on Discord. You can execute the steps on the Discord desktop or mobile app at your convenience. Follow the below-mentioned steps.
Silencing Someone in a Voice Channel on Discord Desktop Client
Do note that the Discord desktop and web app steps are the same. However, for demonstration, we are going with the Discord desktop app. Follow the steps below.
Step 1: Open Discord’s desktop client on your Windows or Mac computer and go to the specific server and its channel under which the voice channel exists.
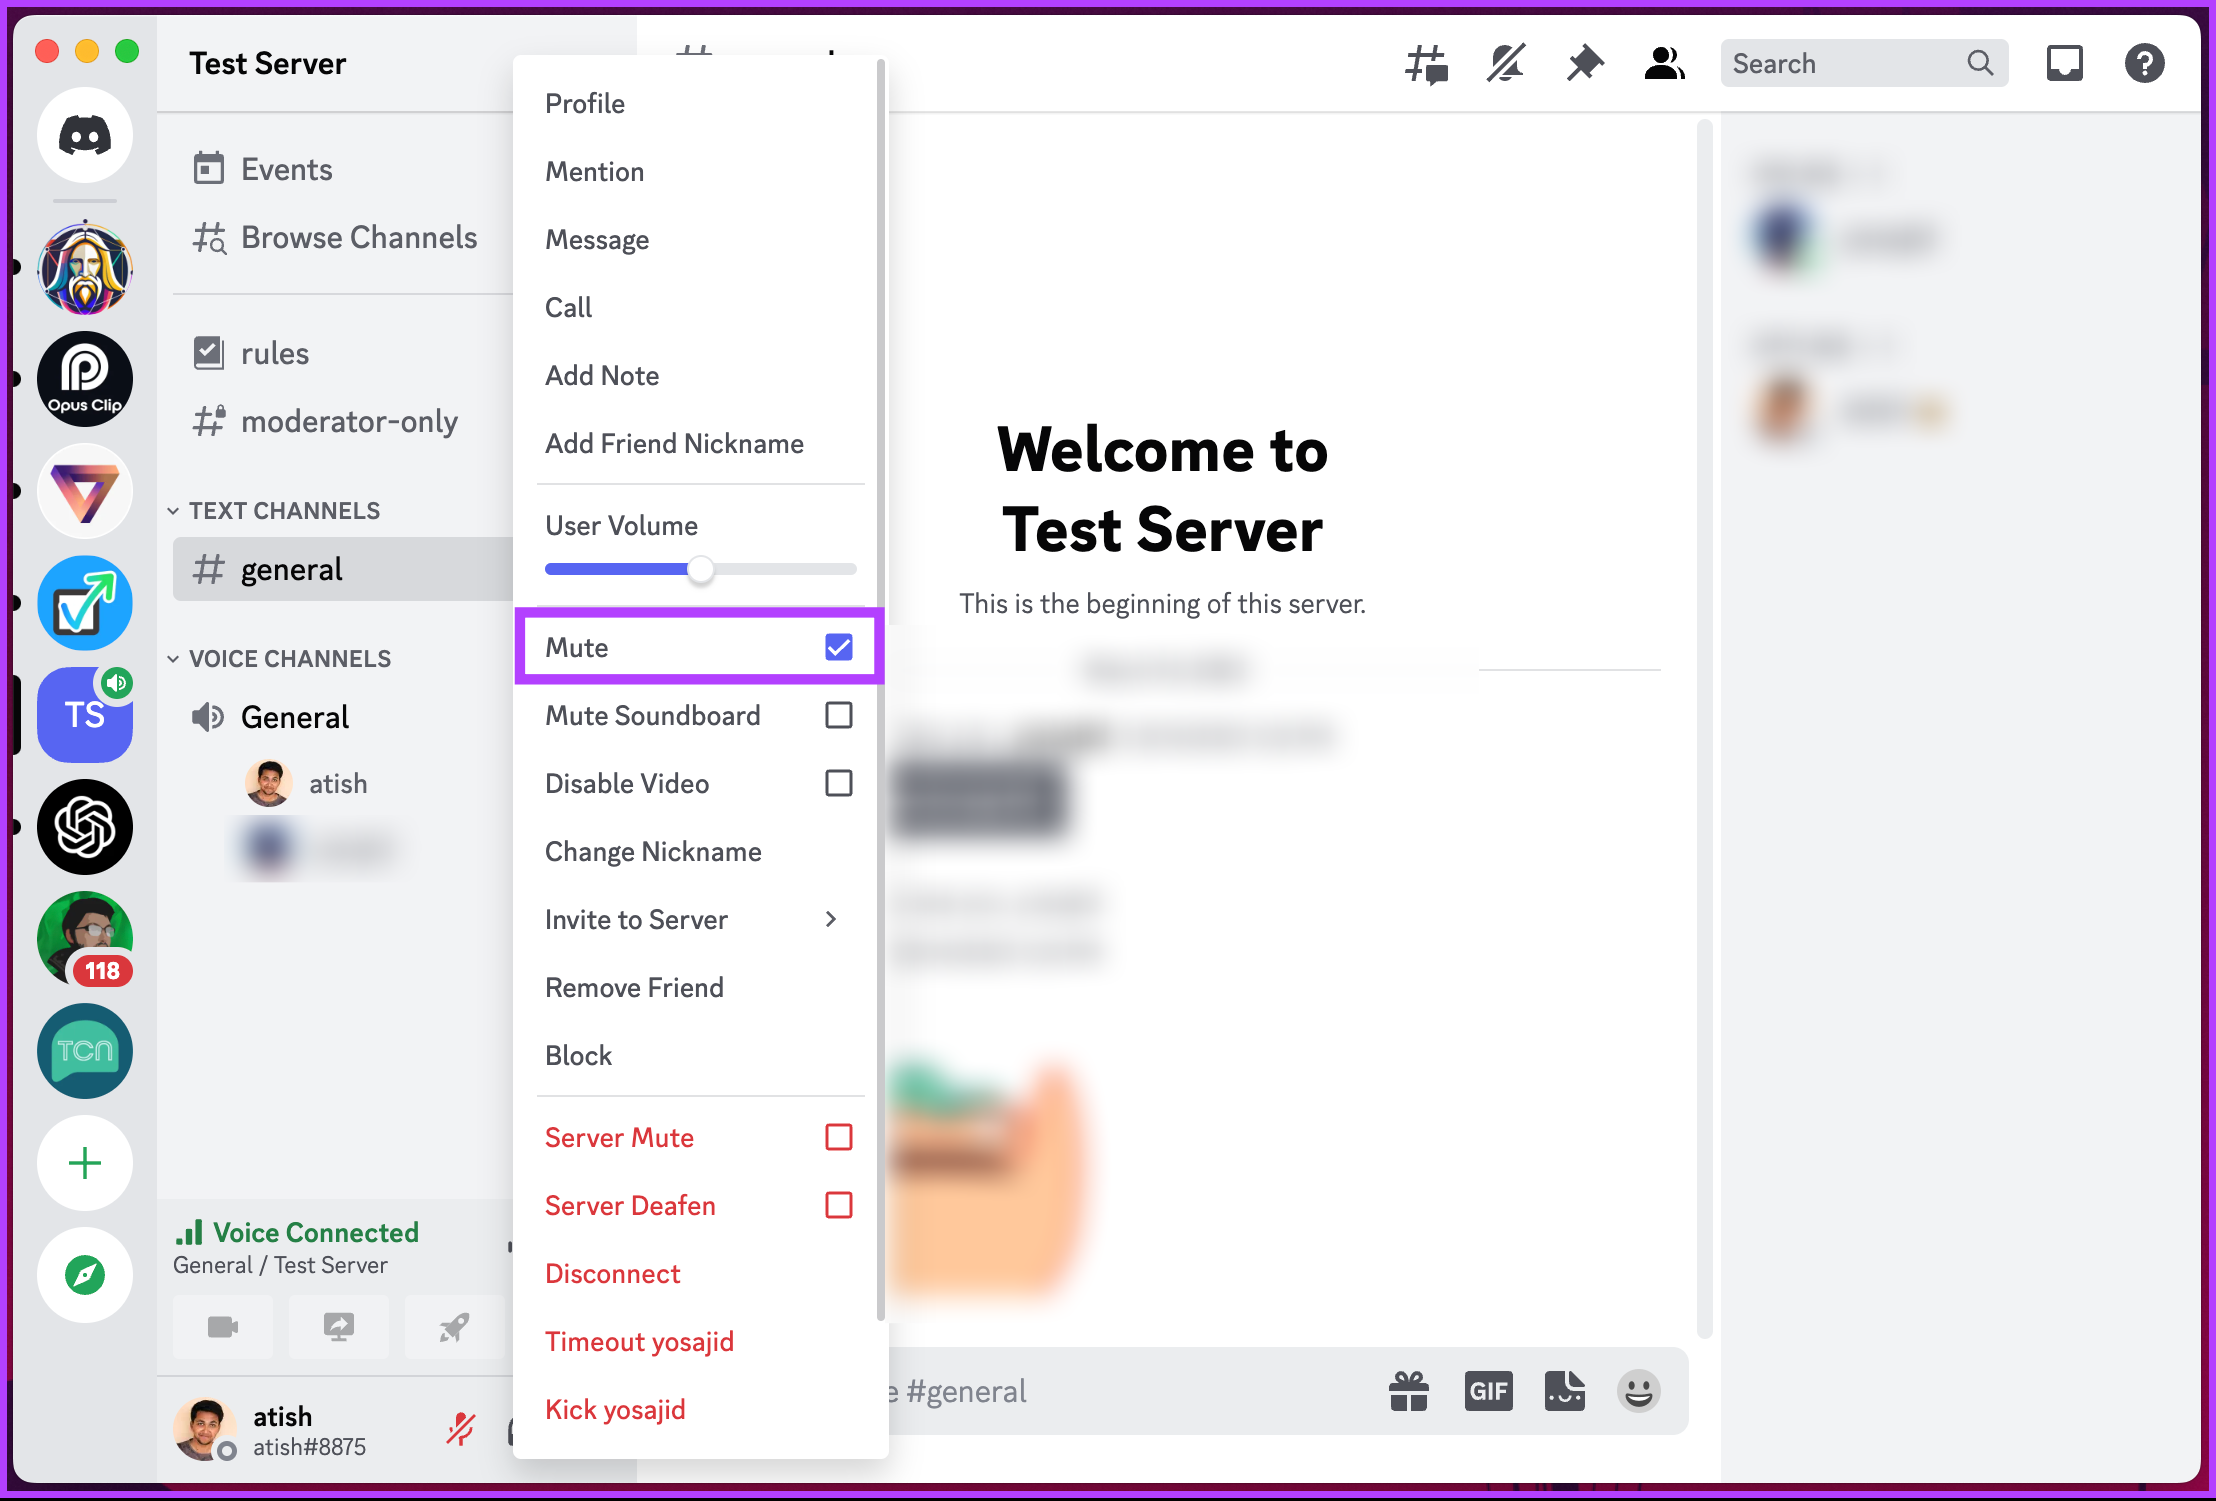
Step 2: Locate the person in the call and right-click on them.
Step 3: From the menu, select Mute.
With this, you have muted the person on the voice channel on Discord. If you don’t have access to your desktop and want to execute the same using a mobile device, continue reading.
Muting Someone in a Voice Channel on the Discord Mobile App
Muting someone on the voice channel on Discord is no different than executing the same on a desktop or web. Follow the below-mentioned instructions.
Step 1: Open the Discord app on Android or iPhone. From the side pane, select the Server under which the voice channel resides.
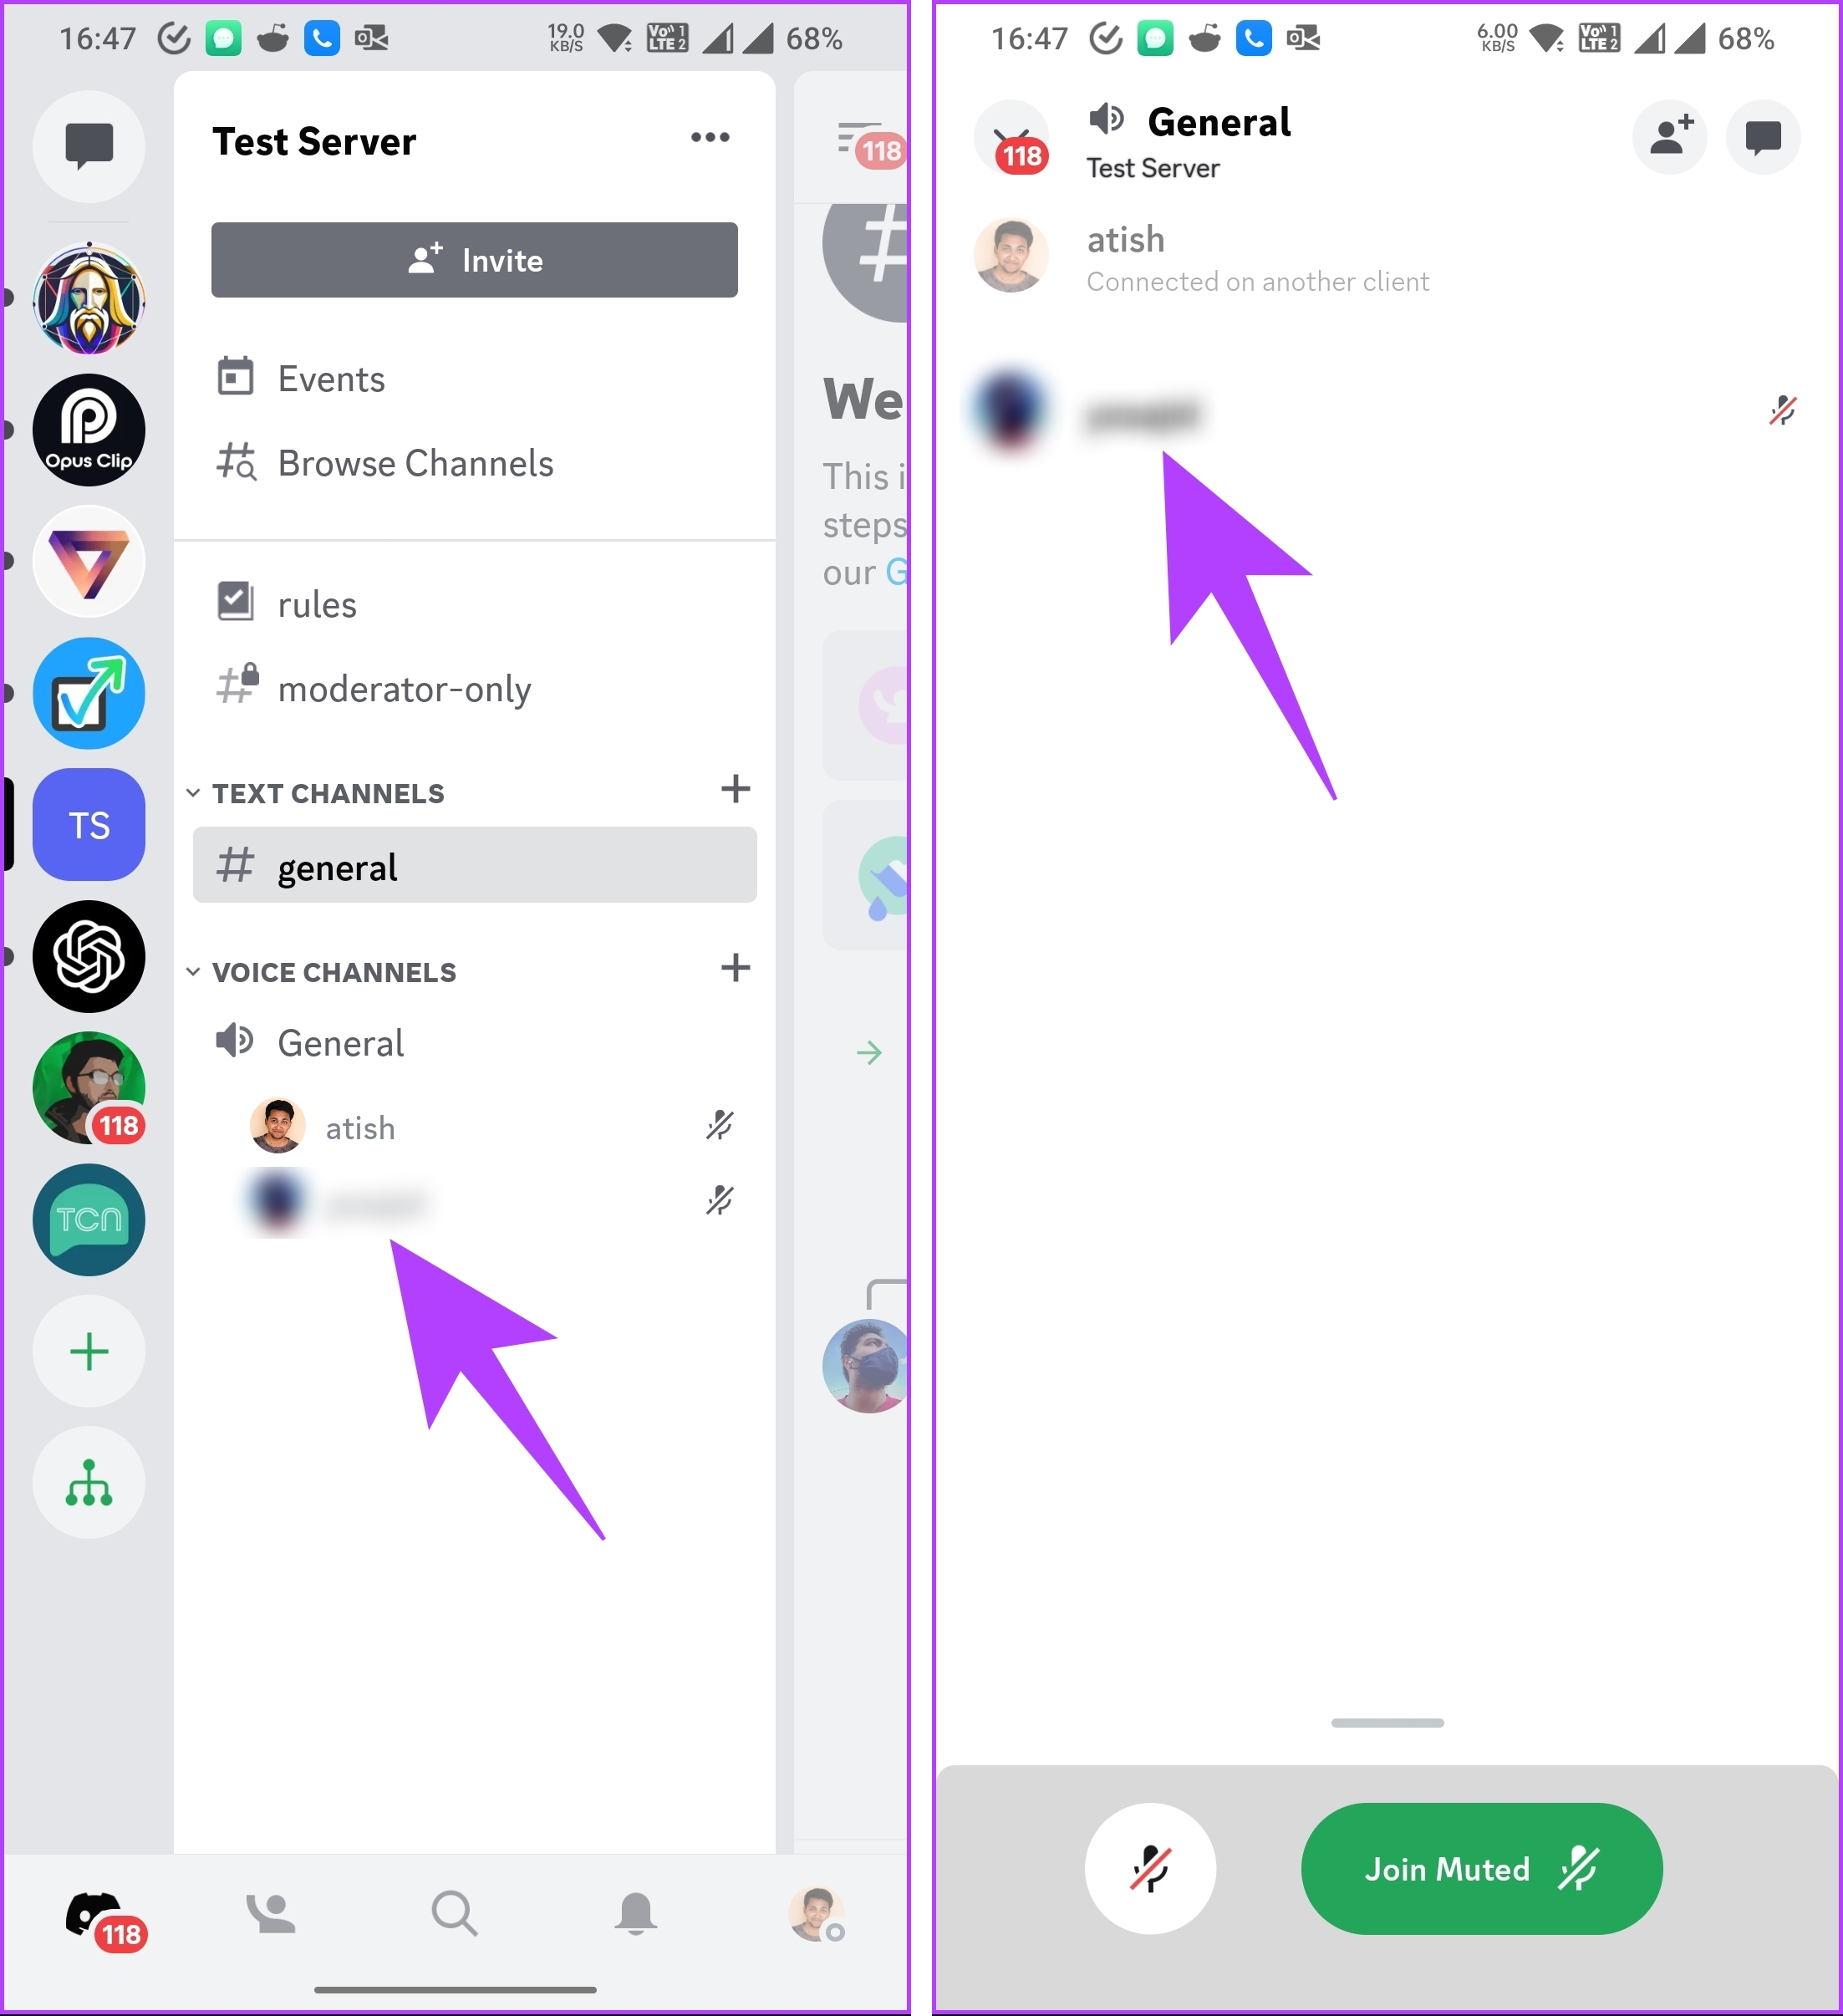
Step 2: Tap on the voice channel where the person is chatting. You should see a list of all the users in the channel.
Step 3: Tap the channel name to bring up its details from the bottom. Select the person from the list of participants.
Step 4: Discord will open the member’s profile. Toggle on the switch next to Mute.
There you go. You have successfully muted someone on a voice call in the Discord server. If you want to mute multiple people in a voice call at once, there’s no option but to repeat the same process individually.
If muting someone on a voice channel is not something you are looking for, you can mute the channel itself. So that nobody from the channel disturbs you when using Discord. Move to the next method.
Sometimes certain channels get hyperactive, and you may have to deal with an enormous count of chats and notifications. In this case, you cannot go on muting individuals. Instead, it is ideal to mute the channel in one go. Follow the below steps.
Note: The steps are quite the same for Discord desktop (or web) and mobile apps. For the demonstration, we are going with the desktop app.
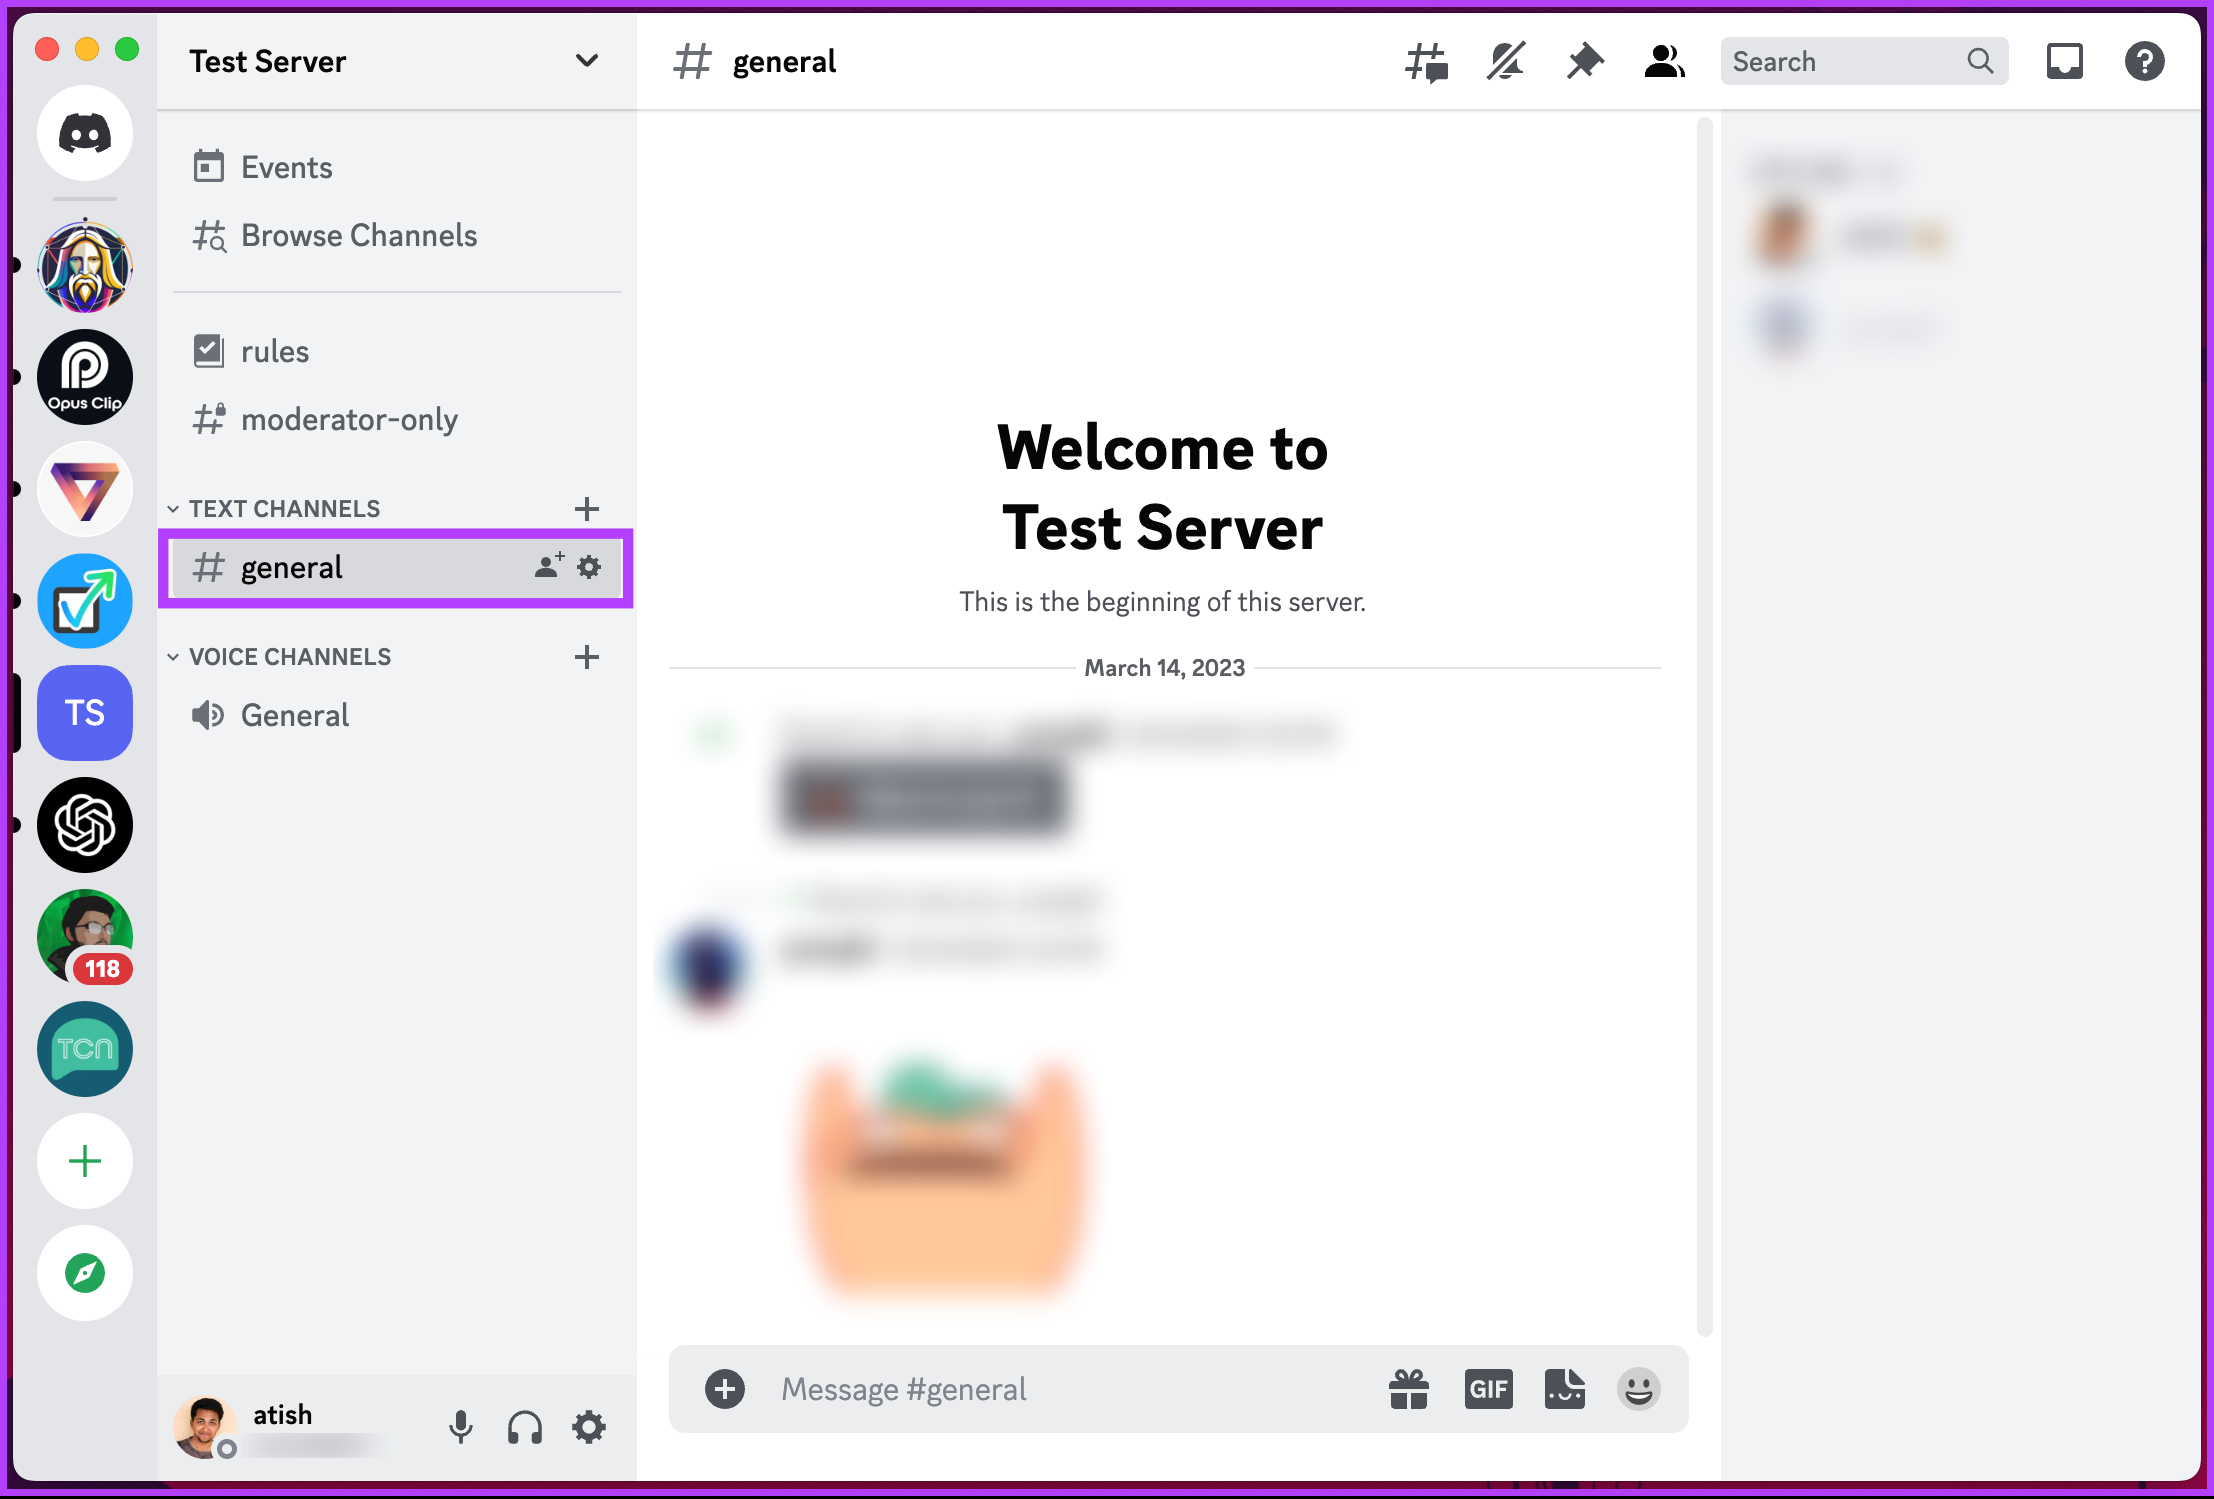
Step 1: Open Discord’s desktop client on your Windows or Mac computer and go to the Server under which the Channel you want to mute resides.
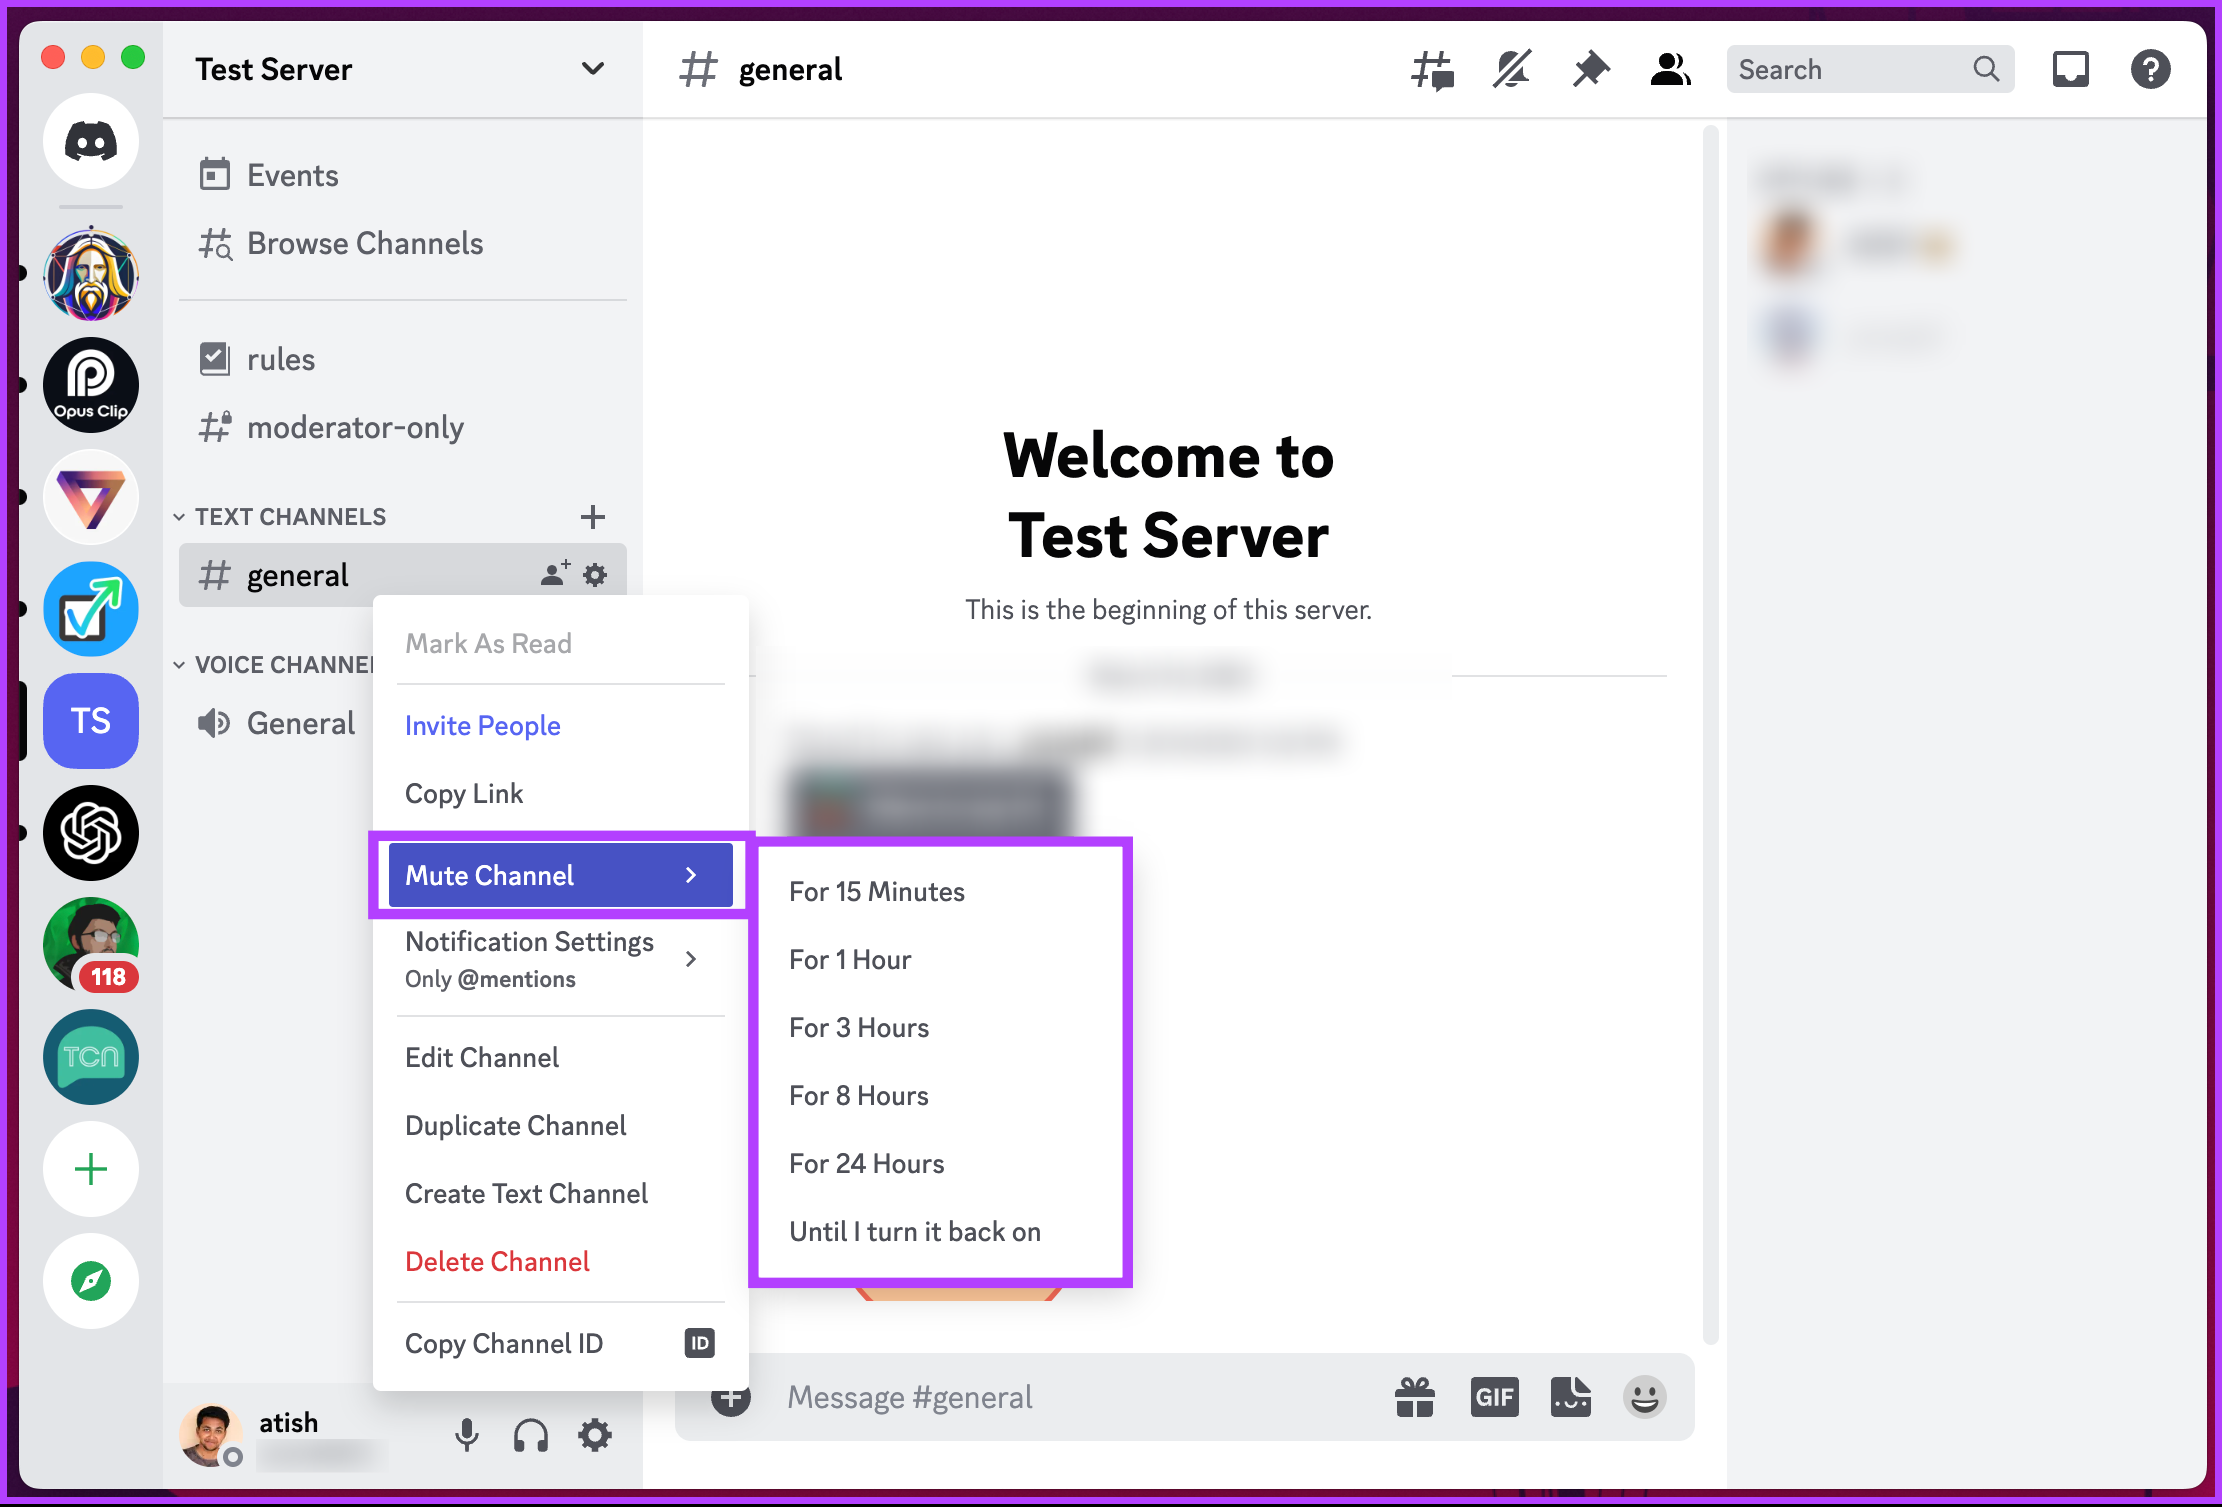
Step 2: Right-click on the Channel.
Note: If you are on mobile, you must long-press the Channel you want to mute for the menu to appear.
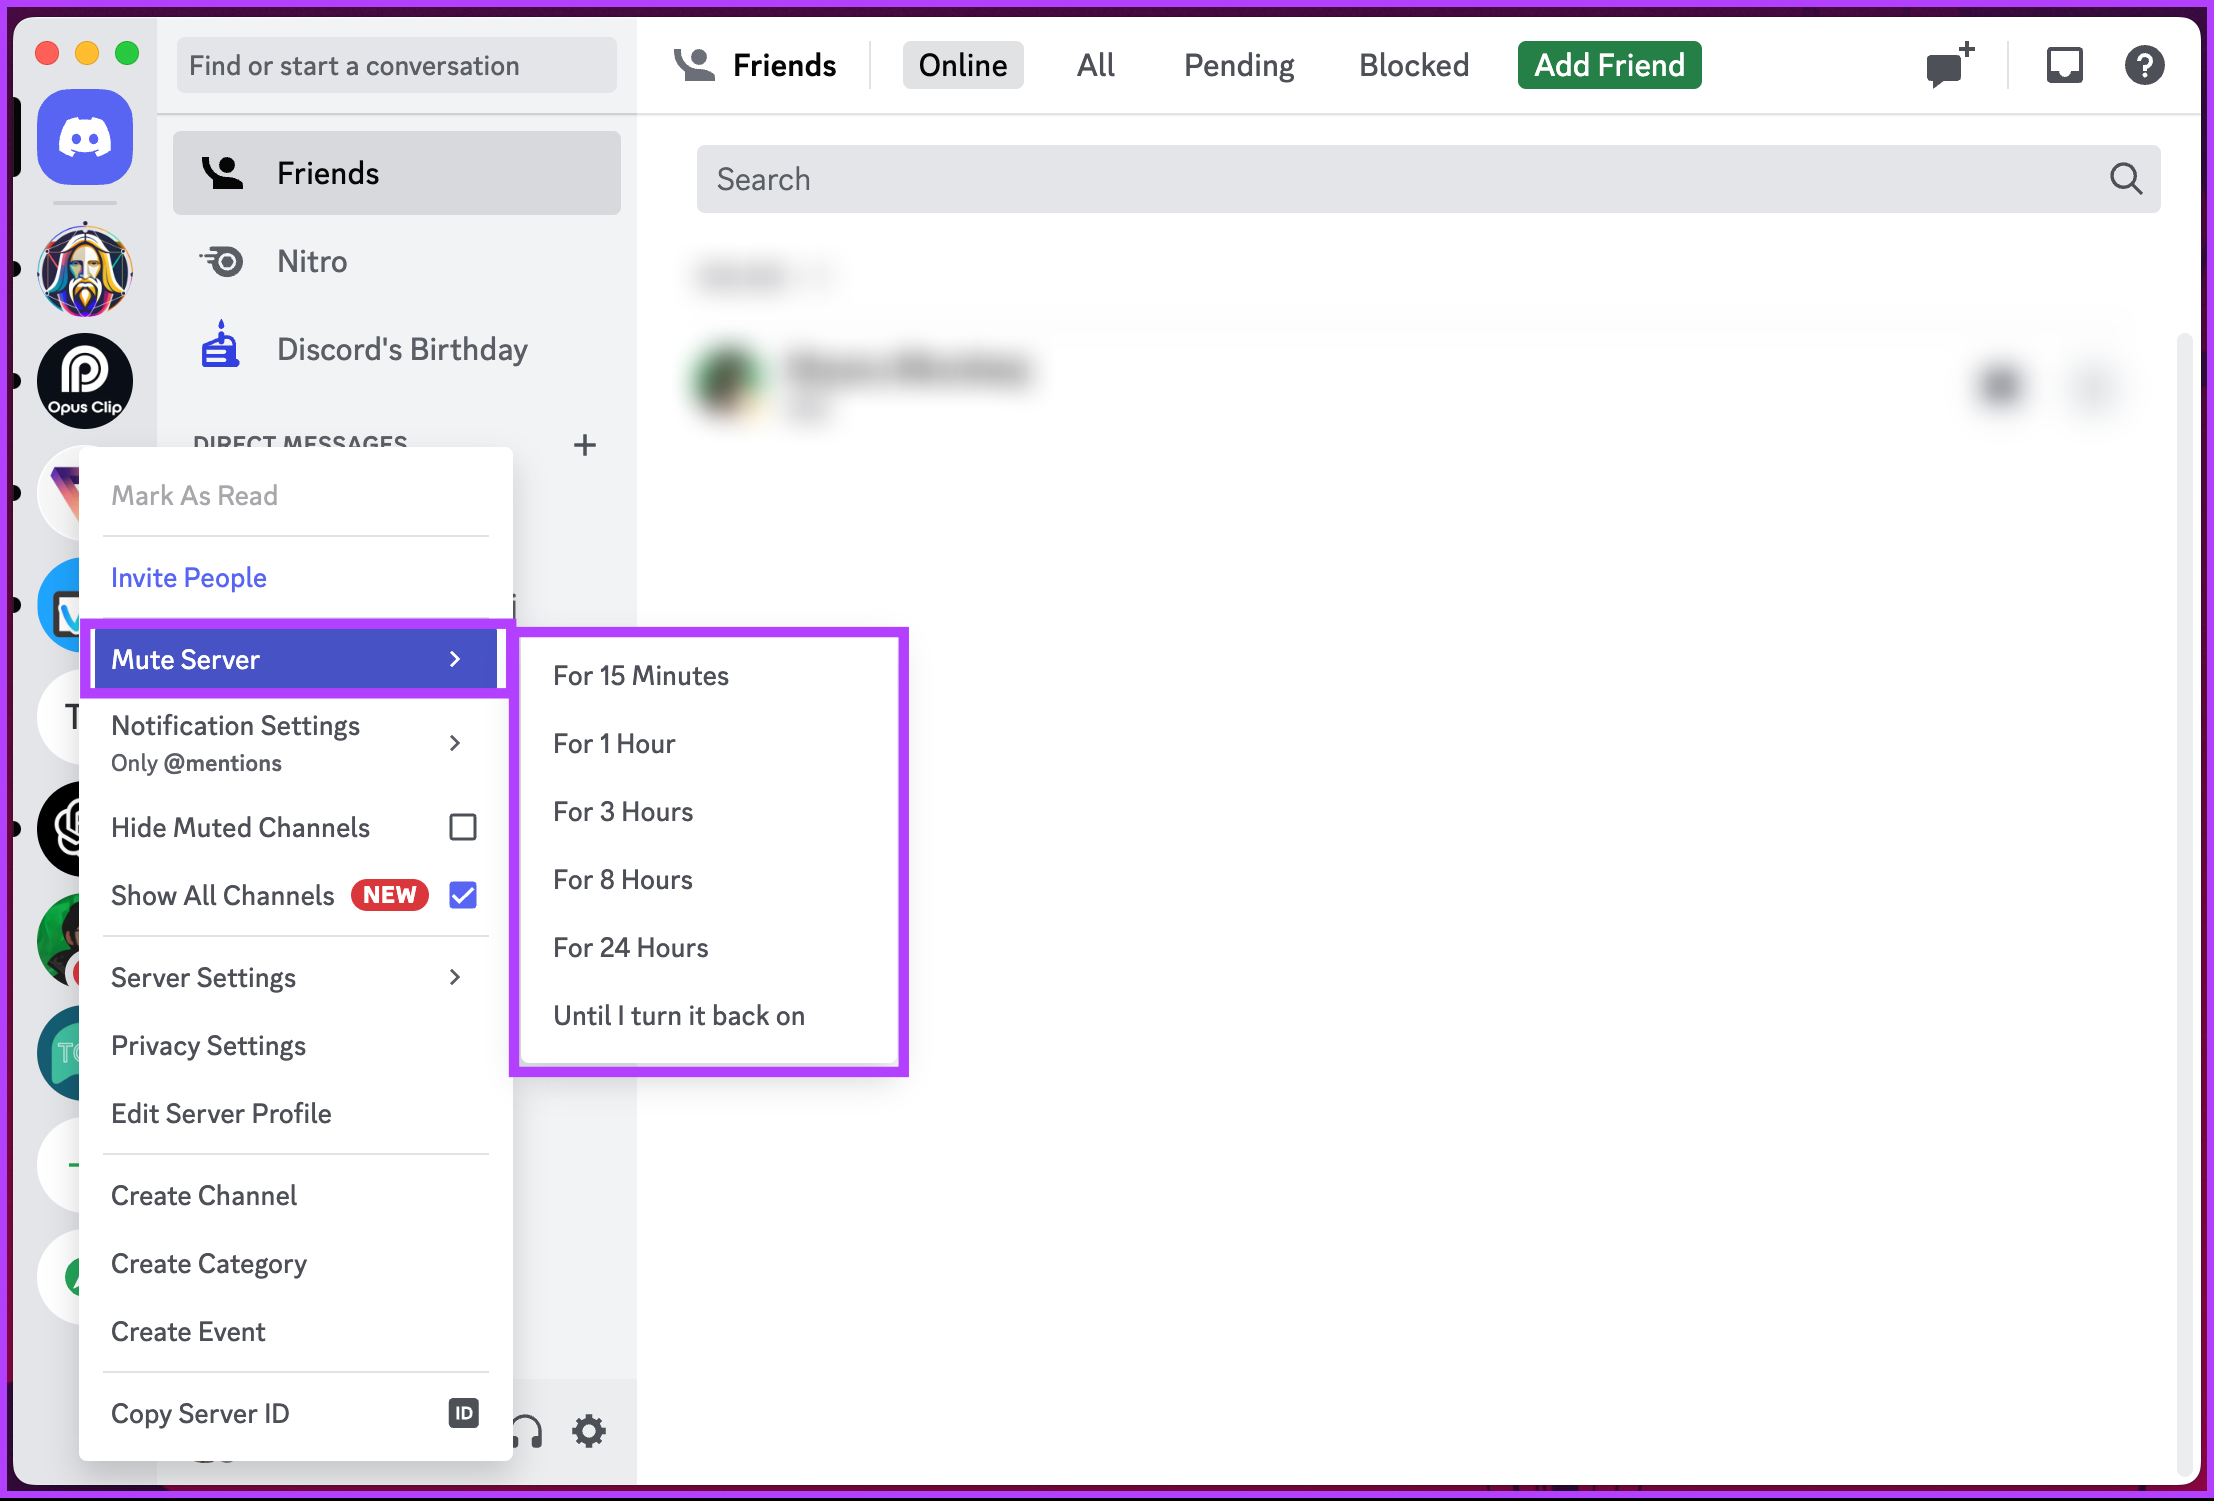
Step 3: Select Mute Channel and pick how long you want notifications muted from the options available.
Note: If you are unsure about the duration, select the ‘Until I turn it back on’ option.
There you go. You have muted the Channel that was a nuisance for you on Discord without having to leave. You can if you want to Mute the Server itself instead of muting the Channel. Keep reading.
How to Mute a Discord Server
If you don’t want to see any notifications or messages from a particular Server for the time being, you can mute and unmute it whenever you want. Follow the below-mentioned instructions.
Mute All Discord Notifications on the Desktop
The steps to mute a Discord server are the same for the Discord desktop client and the web app. However, we are going with the desktop app on Mac to demonstrate the steps below.
Step 1: Launch the Discord app on your Windows or Mac computer and right-click the Server icon you want to mute from the left pane.
Step 2: From the context menu, select Mute Server, and from the option, select the amount of time you wish for the Server to be muted.
Note: If you are unsure about the duration, select the ‘Until I turn it back on’ option.
There you have it. You won’t receive notifications from this Server until you unmute or the select duration ends. If you don’t have access to your desktop and want to execute the same on mobile, continue reading.
Silent Messages Notification on Mobile App
The steps are the same for both Android and iOS. However, for demonstration, we are going with Android. Follow the below steps.
Step 1: Launch the Discord app on your Android or iOS device and long-press the Server you want to mute.
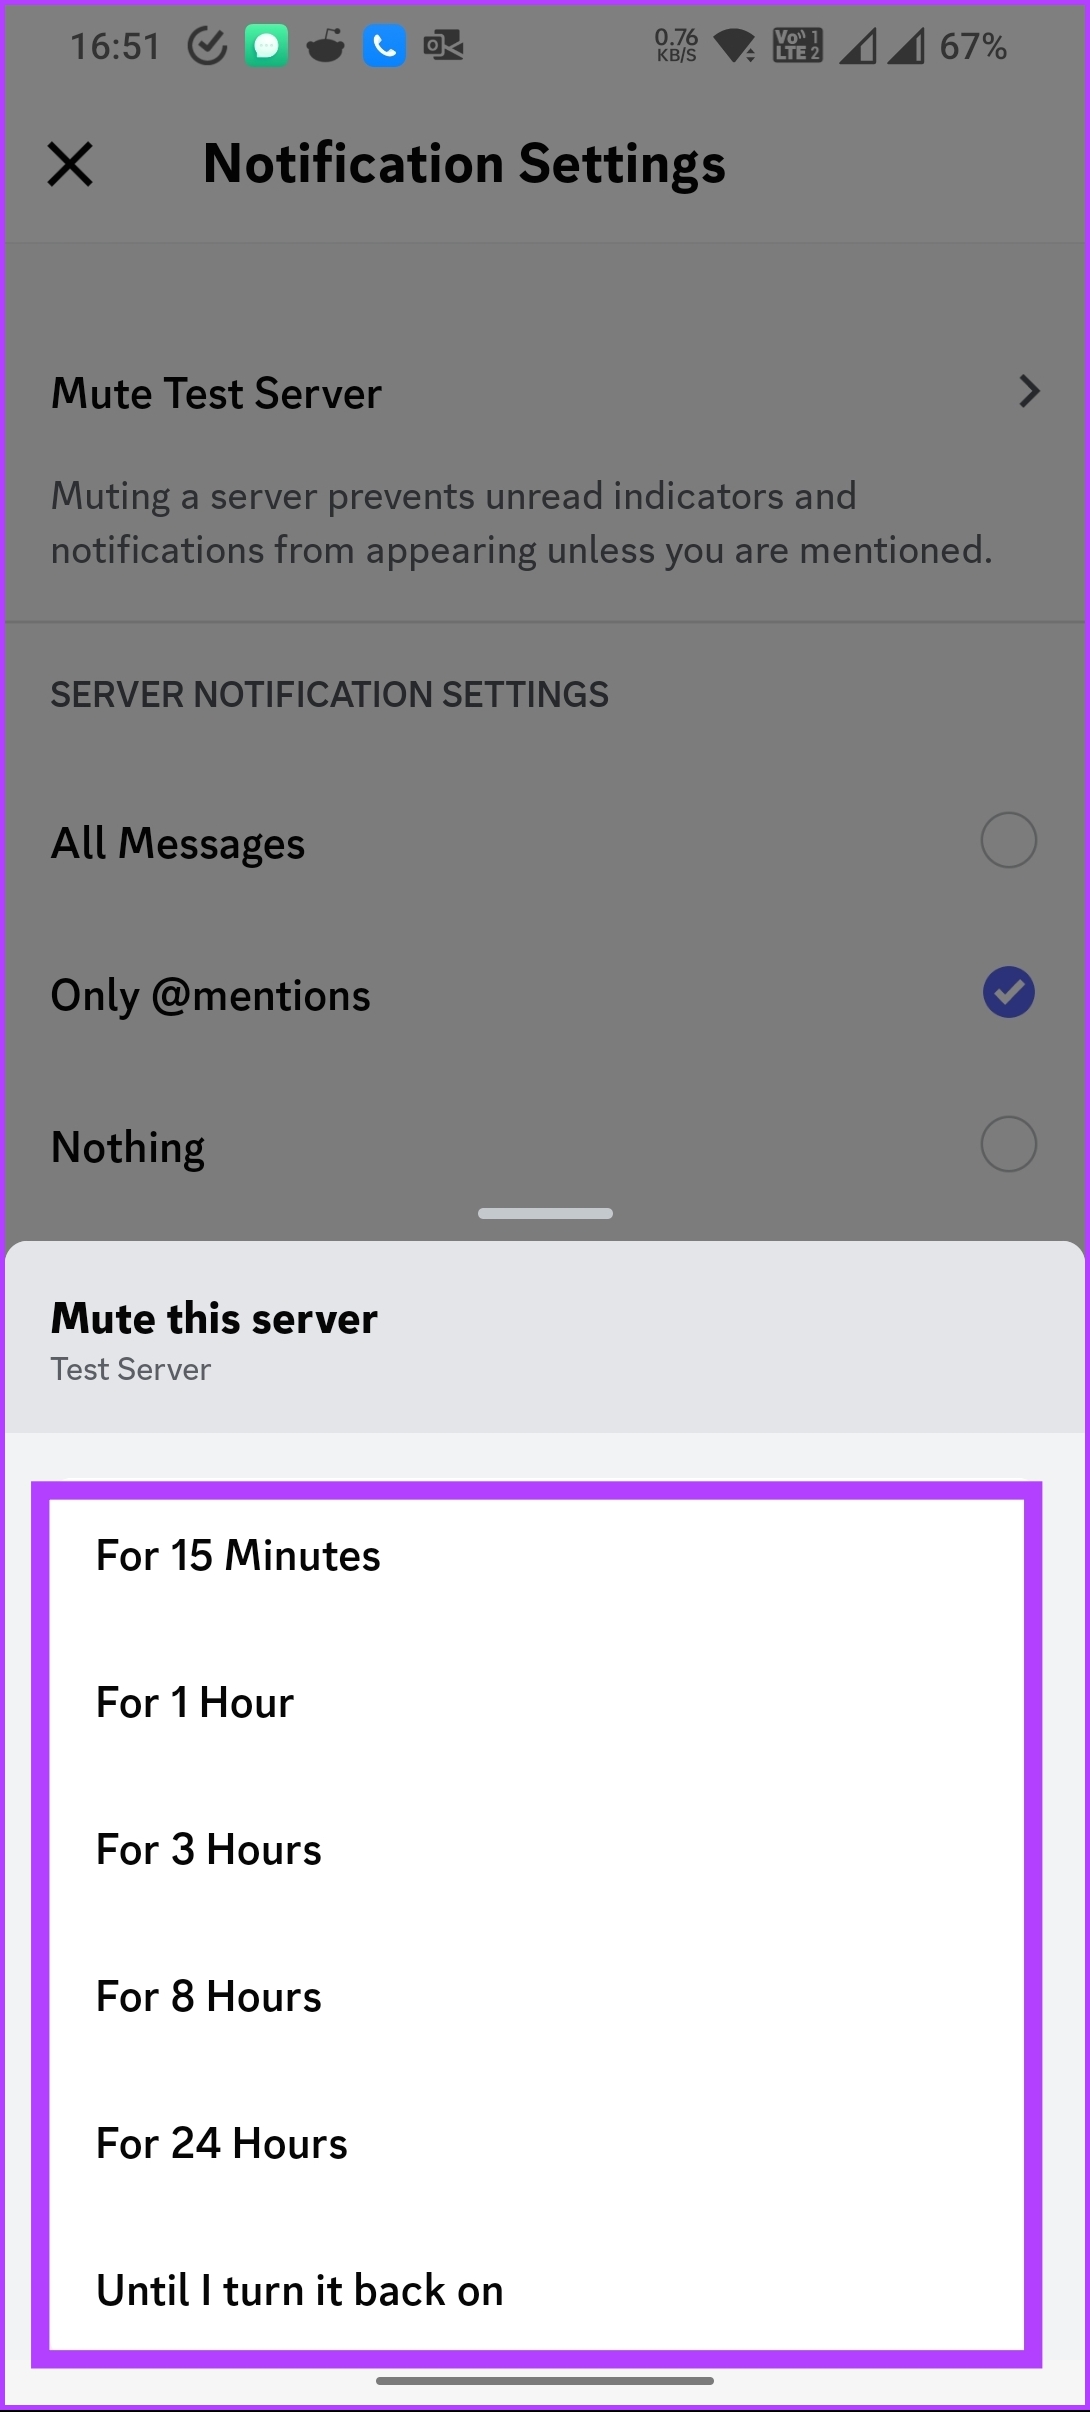
Step 2: From the modal, select Notifications, and under Notifications Settings, tap Mute [Server].
Step 3: In the bottom sheet, select the duration to keep the Server muted.
Note: If you are unsure about the duration, select the ‘Until I turn it back on’ option.
There you go. You have muted the Server from any notifications or messages. If you are the admin to a Server and don’t want to handle it anymore, either transfer the Server to someone or delete the Discord Server.
If you have any queries we missed addressing in this article, check out the FAQ section below.
FAQs on Muting Someone in Discord
1. How long does a mute last on Discord?
When you mute someone, it remains in effect until it hits the duration limit or you manually unmute them. This means the mute will persist even if you log out or close the Discord application. The mute duration is entirely under your control, allowing you to silence someone for as long as you prefer.
It’s important to note that muting a user only affects your account and does not impact their ability to interact with others on the server. They can still send messages and participate in conversations, but you won’t receive any notifications or see their messages unless you manually unmute them.
2. Can you still hear someone who muted you on Discord?
No, if someone has muted you on Discord, they will not be able to hear your voice or receive any audio from you. Being muted by someone does not affect your ability to listen or receive audio from them or other users. You can still hear and participate in the conversation, but your voice will be muted and not transmitted to others in the voice channel where the mute has been applied.
Take a Break from Some People on Discord
By following the steps outlined in this article, you know how to mute someone on Discord. Do note that muting is a valuable tool that allows you to address issues without resorting to more severe actions. You may also want to read how to delete a Discord account permanently.
Bluetooth audio adapters/receivers are the best way to bridge the gap between conventional stereo systems and new-age smartphones and tablets. The best Bluetooth audio adapters let you play your favorite tracks from Spotify or Tidal with minimal hassles. So, let’s check out the list.
The highlight of the esinkin Bluetooth receiver is its sleek and slim design, which makes it easy to store. The company packs all the required cables, and pairing it to your phone or laptop is quick and easy. Lastly, the range is not bad either, and you can walk around your room without the music dropping or breaking.
The Bluetooth receiver doesn’t have any on/off switches, which removes the hassle of manually switching it on/off. You simply need to flip the main switch, and the device will turn on. It doesn’t have a built-in battery and requires continuous power. That said, the Bluetooth connectivity and sound quality are commendable for the price.
The 1Mii B06 Plus is a budget-friendly Bluetooth audio adapter that easily hooks up to old stereo systems. Its long range makes it a cakewalk for you to move around with the phone. Further, it boasts features like aptX Low Latency and 3D surround sound. The former translates to high-quality audio with minimum latency, while the 3D sound effect boosts the sound.
The connectivity is pretty solid. Unless you have solid walls or other constructions in your way, the device will likely stay connected to your phone. For the price, the audio quality is good. Of course, you won’t get CD-quality audio, but you get the idea.
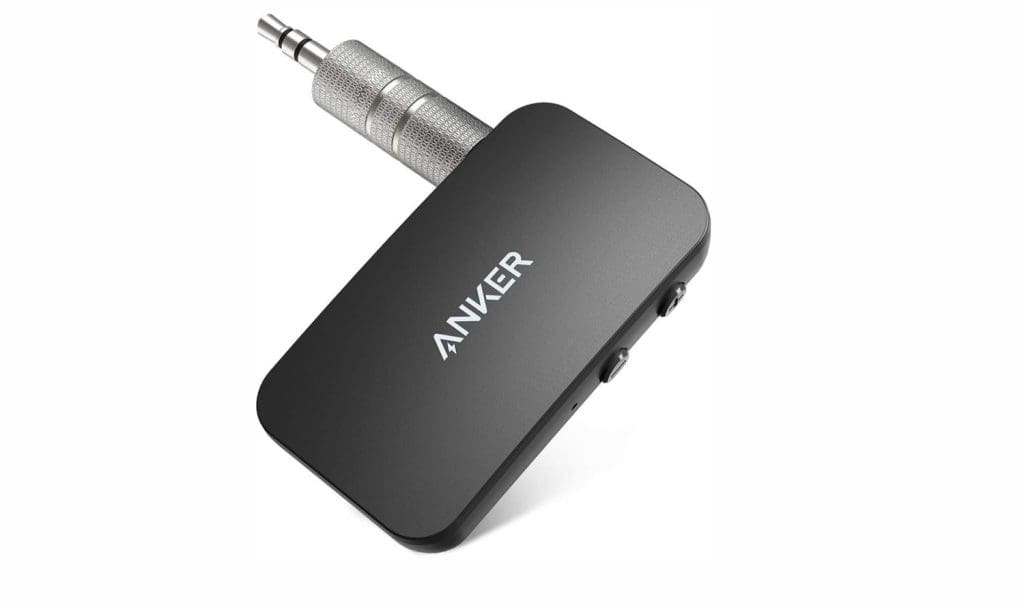
If you want an audio adapter from a name brand, you can peek at the Anker Soundsync. The Soundsync A3341 is a little more expensive than its counterparts above, but it promises nifty features like Bluetooth 5.0, 12 hours of battery life, and dual connection. The latter is a nifty addition, especially if you often have to switch between two systems.
It’s a decent Bluetooth adapter that connects easily to classic stereo systems and car stereos. The audio quality is decent, and the receiver has no lag or latency. And yes, the company ships AUX, RCA, and optical cables. It’s a compact device, and as such, it doesn’t have any indicators to display the battery levels.
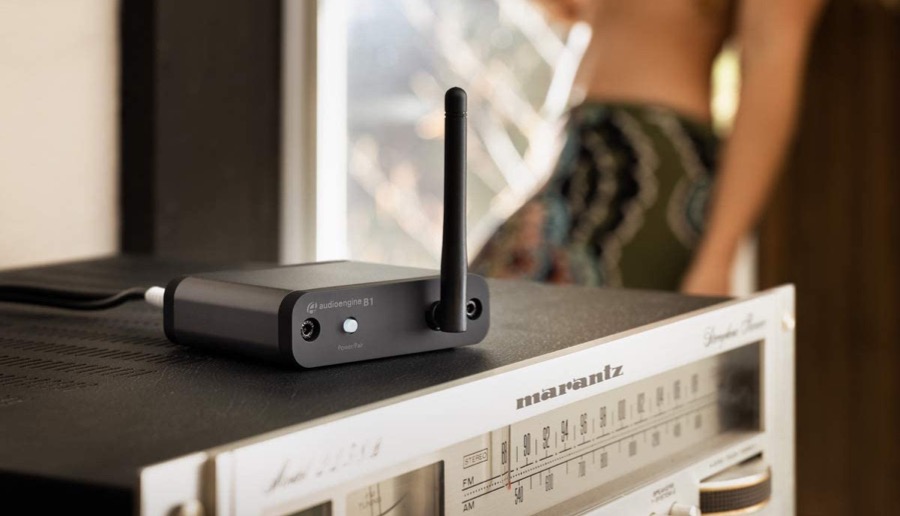
If you have a premium sound system and audio quality is your foremost priority, then the Audioengine B1 is a good pick. The folks at the Wirecutter opine that the built-in DAC (Digital to Analog) is better than those in other Bluetooth adapters. And this results in almost wire-like audio quality.
It sports a small, sleek body and has a long-range, thanks to the antenna at the top. The setup process is quick and easy. Like the Anker product above, the company ships essentials like RCA audio cable and USB AC power adapter along with the adapter. If you are okay with spending money for better audio quality and seamless Bluetooth connectivity, then the Audioengine B1 is right up your alley.


![Under Notifications Settings, tap Mute [Server]](https://www.guidingtech.com/wp-content/uploads/How-to-Mute-Someone-on-Discord_15.png)