The Apple Watch Ultra is the best smartwatch Apple has to offer currently. It’s got Pro-grade features for mountaineers, divers, and athletes, and comes with a rugged chassis. Despite being rugged, it’s quite easy to scratch the titanium frame on the Apple Watch Ultra. That’s something you wouldn’t want on your brand-new smartwatch, right? A good way to prevent such scratches and dents is to use a case.
Now, adding a case to an already bulky smartwatch may not seem like the best idea. However, it’s important if you want to improve the longevity of the watch or even maintain a high resale value. If that sounds good to you, here are some of the best Apple Watch Ultra cases that you can buy.
Before we get to the cases, here are some other articles you may be interested in –
Along with protecting the metallic chassis of the Apple Watch ultra, this package from YMHML protects the new flat display too. It’s a combo where you get both a hard TPU case and a tempered glass screen protector.
The case included in this combo is a hard polycarbonate case that is quite slim and snaps onto the Apple Watch. It’s black so if you don’t like the default colorway of the Apple Watch Ultra, you can get this slim case to give it a stealthy look. You get two cases in the box which is helpful if you end up breaking or losing one.
As for the screen protector, it’s made of tempered glass which makes it similar to just any other generic screen protector out there. It should do a good job of keeping scratches away. The only downside of the case as per the reviews is that it makes the buttons hard to press. If you can get past that, it’s a good Apple Watch Ultra case with a screen protector, that too at an affordable price.
Don’t want to rock the same case every single day? Consider getting this 2-pack set from SPGUARD then! You get two cases — one black and one clear so you can switch them up whenever you feel like it. The clear one shows off the premium titanium finish of the Apple Watch Ultra while the black one gives it a simpler look.
The Apple Watch is only available in a single variant and while a lot of people may like the look of natural titanium on their everyday watch, it doesn’t go with all types of outfits. So, if you want to show off the actual color of the Apple Watch Ultra, you can sport the clear case. When you want a more subdued look, you get a black case too.
Both the clear and black Apple Watch Ultra protective cases are made of hard polycarbonate. This means that the clear case shouldn’t turn yellow with time which is good. While most reviews are positive, a user complained that the black case isn’t actually black but is more of a smoked clear case that’s translucent. You can always return the product if the same happens to you, though.
Spigen’s famous Rugged Armor case needs no introduction. It’s a classic rugged case that’s thick and does its job of protecting the Apple Watch Ultra well. It also has some nice textures and accents that further enhance the look of the watch.
The Apple Watch Ultra is already thick and rather large on most people’s wrists. The Spigen Rugged Armor only adds to the overall dimensions of the watch. However, that’s a trade-off you should be willing to make if you want the best protection. The sharp edges of this case coupled with the carbon fiber accents make your Apple Watch Ultra look almost like a G-Shock.
You don’t have to be bothered about the screen as well since there is a thick lip on the front to protect it in case of an impact. One thing to note is that this case entirely changes the look of your Apple Watch Ultra. So, if you want to go around showing off your expensive new smartwatch, this isn’t the best option. It’s a great pick for those who don’t baby their gadgets.
It’s understandable if you don’t want to double the thickness of your Apple Watch Ultra and make it appear larger than it already is. Well, Spigen has a case for this demographic as well. The Thin Fit case is a slim case that doesn’t alter the form factor of the Apple Watch Ultra. It’s a hard polycarbonate frame that provides basic protection.
If you’re not looking for over-the-top protection, the Spigen Thin Fit is just the right kind of case for you. It’s a hard case that snaps onto the frame of the Apple Watch and protects it from scratches and dents. It has a minimalistic look and makes your Apple Watch look like it is black by default.
Despite being slim, there is a small amount of lip on the front to protect the display in case of an impact. This is the kind of case that would make your Apple Watch Ultra ready to be worn for a formal gathering or even an office meeting. It serves two purposes — protecting your Apple Watch and giving it a fresh coat of paint that easily blends into all environments. The Apple Watch Ultra doesn’t look a lot bigger with this case which is a bonus.
Ultra Protection
It’s always wise to protect all your gadgets since it improves their longevity while saving a good chunk of money in terms of repair costs. You can pick up any of these Apple Watch Ultra cases to protect it since it’s an expensive device and is prone to scratches and dents when worn every day.
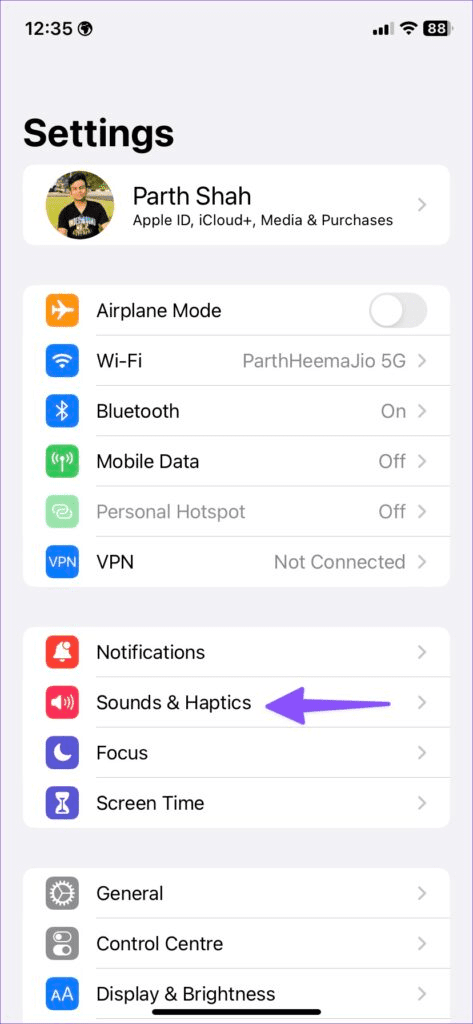
Check the notification volume – Open the Settings app, tap Sounds & Haptics, and maximize the Ringtone and Alerts volume slider.
Flick the mute switch – Disable the mute mode on your iPhone by turning off the physical mute switch on the side.
Disconnect Bluetooth devices – Toggle off Bluetooth under Settings > Bluetooth to disconnect all connected devices and get the text notification sound on your iPhone.
Close and reopen Messages – Swipe up from the bottom to switch apps and drag up the Messages card to remove it. Further, relaunch the Messages app.
Enable iMessage – Open iPhone Settings, tap Messages, and enable the iMessage toggle.
Update iOS – Open General settings on your iPhone, tap Software Update, and select Update Now (if available).
Fix 1: Change Text Message Tone
If the text message notification tone is too low or set to none, you won’t hear sound alerts for new messages. Changing the notification sound will resolve the issue.
Step 1: Open iPhone Settings > tap Sounds & Haptics > select Text Tone.
Step 2: Ensure the Alert Tone isn’t set to None, and pick an audible tone from the list.
Fix 2: Disable Focus Mode
The Focus mode on your iPhone silences notifications from all contacts and apps. Disabling it should restore the notification sound when a new text message arrives.
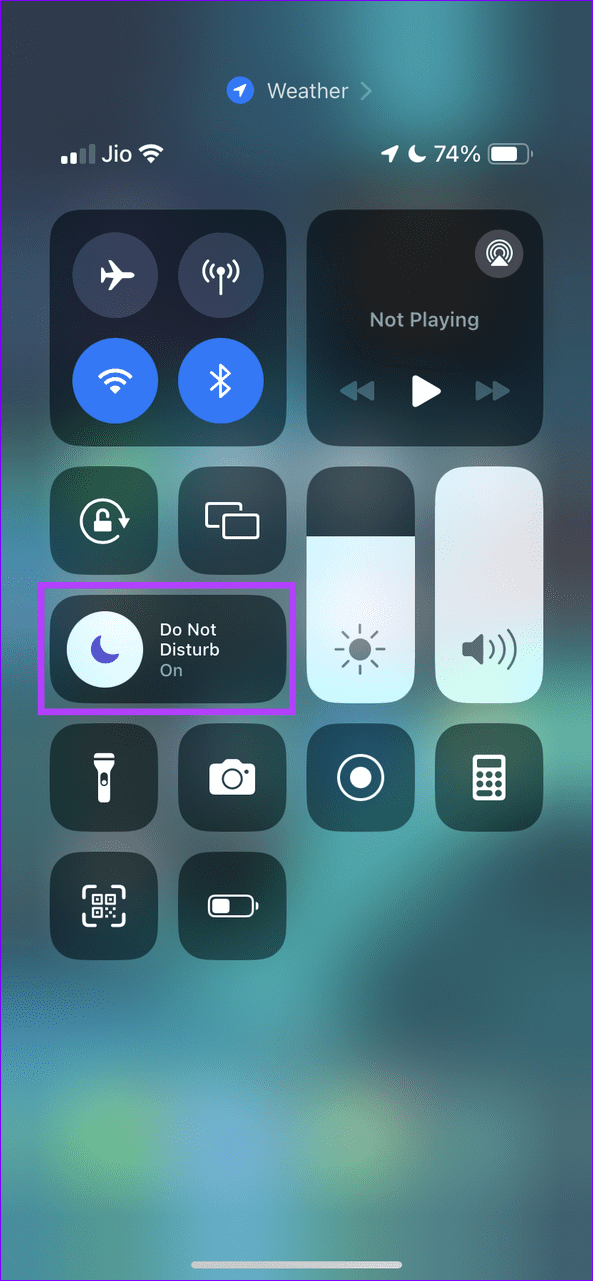
Step 1: Swipe down from the top right to open the Control Center and tap the Focus toggle.
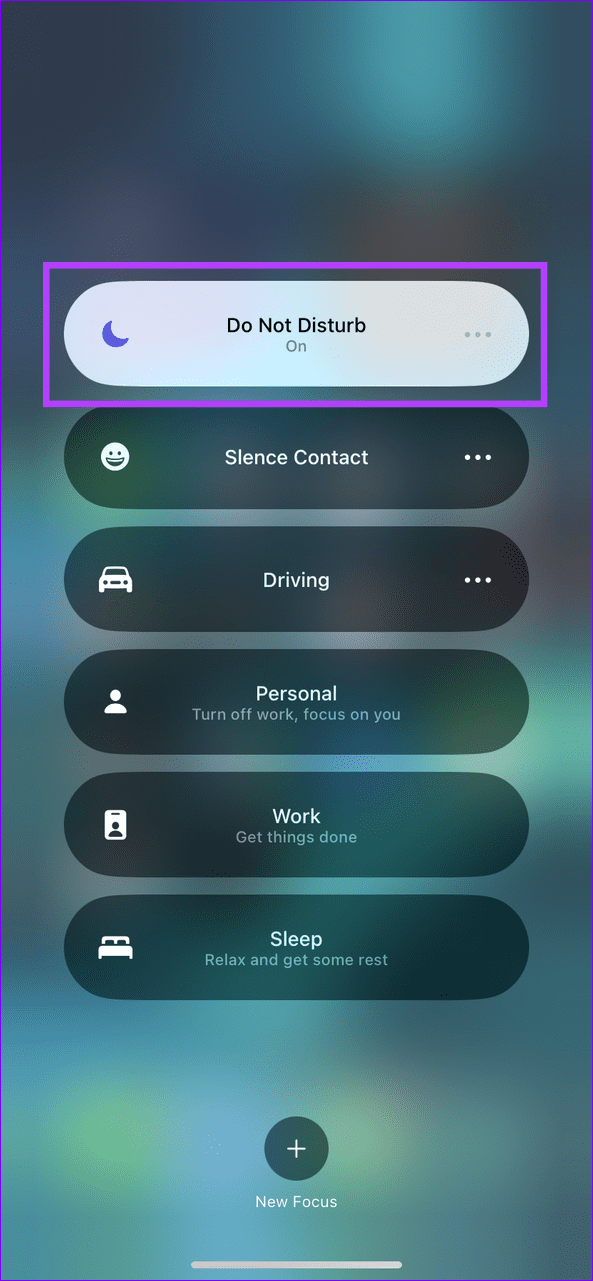
Step 2: Tap the active Focus mode toggle to turn it off.
Alternatively, exclude the Messages app from your Focus profile. Doing this will give you sound notifications for new text messages while silencing all other app alerts.
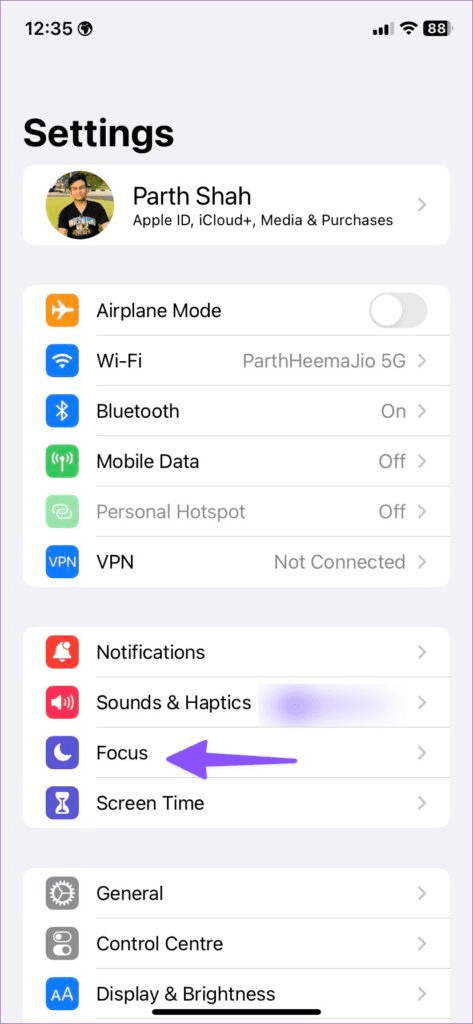
Step 1: Open Settings > tap Focus > select your desired profile to edit.
Step 2: Tap Apps > enable Allow Notifications From > add the Messages app to the list. Select Done to save changes.
Fix 3: Toggle off Hide Alerts for Conversations
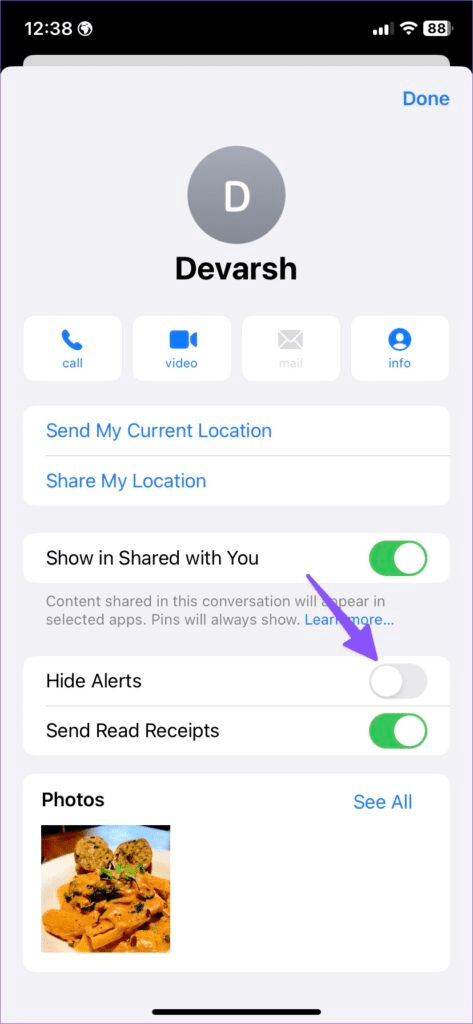
If you aren’t getting sound notifications for new texts from a specific contact, you must have enabled the Hide Alerts feature for the conversation. Disabling it should restore normalcy.
Open your desired conversation in the Messages app, tap the contact name at the top, and disable the Hide Alerts toggle.
Fix 4: Disable Filter Unknown Senders
By default, iOS blocks text messages from unknown senders. To restore sound notifications for new texts from unknown senders, disable its filter in the Messages app settings.
Open Messages in the iPhone Settings app, scroll down to select Unknown & Spam, and toggle off Filter Unknown Senders.
Fix 5: Customize Text Tone for a Specific Contact
Besides changing the message notification sound for all contacts, you can assign a different tone for specific contacts to recognize them instantly without picking up your iPhone.
Step 1: Open your preferred contact in the Contacts app, tap Edit at the top right corner, and select Text Tone.
Step 2: Pick your desired message tone and tap Done to save changes.
Alternative: Enable Vibration for Text Messages
If you still don’t get a text message notification sound after applying the above fixes, I recommend enabling the vibration alert to avoid missing any important messages.
Step 1: Open Sounds & Haptics under iPhone settings and select Text Tone.
Step 2: Tap Vibration and select one from the existing vibration patterns or create a custom vibration profile for message alerts.
1. How to Rename Files in Bulk on Windows 11 Using File Explorer
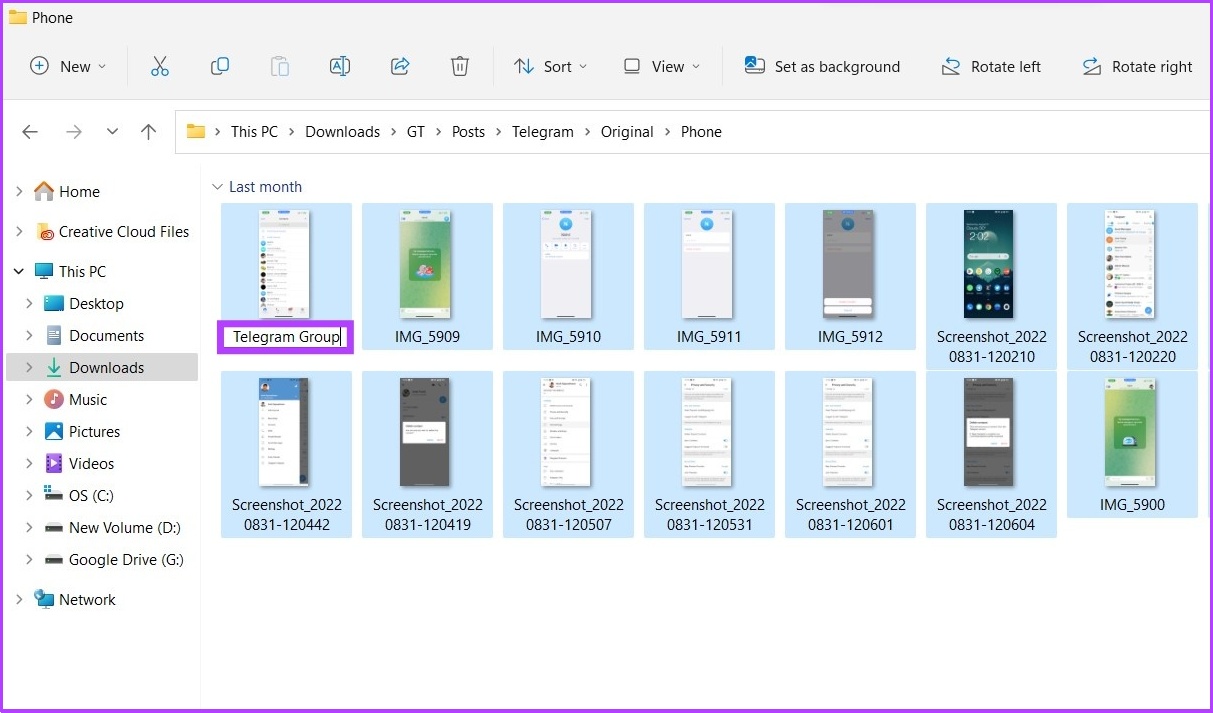
Step 1: Open File Explorer and navigate to the files and folders you want to rename.
Step 2: Click on the View tab and select Details.
Step 3: Select all the files you want to rename. Then, go to the Home tab and click the Rename button.
Alternatively, you can select the first file, press and hold the shift key, and click the last file to select all files, or simply press Ctrl + A.
Step 4: Rename the first file and press Enter.
That’s it! The selected files will be renamed using the specified structure name, with a count number in parentheses to make each file name different. Ex: telegram group (1).jpg, telegram group (2).jpg, and so on.
2. How to Rename Multiple Files at Once on Windows 11
Method 1: Using Command Prompt
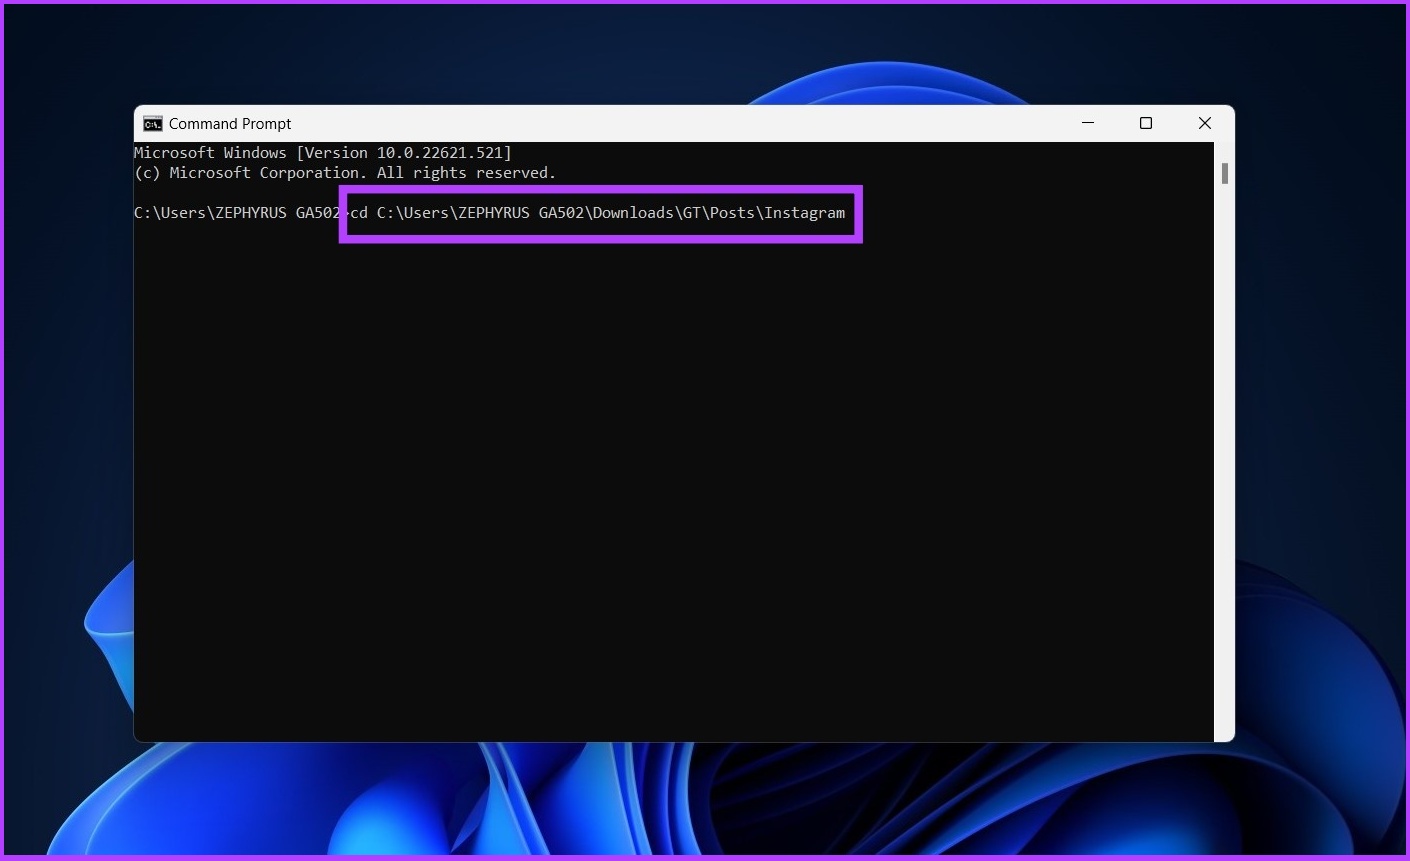
Step 1: Open Windows Search, type Command Prompt, and press Enter. Press Yes on the prompt.
Step 2: In the Command Prompt, type the following command and hit Enter.
Note: In PATH\TO\FILES, copy the file’s location or folder and paste it. Ex: ‘:cd %USERPROFILE%\Documents\files’.
cd c:\PATH\TO\FILES
Step 3: Now, type ‘ren *.FILE-EXTENSION ???-FILE-NAME.*’ to rename the files in bulk and press Enter.
The asterisk (*) tells the command to rename everything with a specific extension, while the question mark (?) represents a character of the original name you want to keep as part of the new name. Enter the file extension in ‘FILE-EXTENSION’ and enter rename file in ‘-FILE-NAME’. Ex: *.jpg ???-resetinstagram.*
And there you go. All the files you selected will be renamed.
Method 2: Using Powershell
Step 1: Open Windows Search, type PowerShell, and click Run as Administrator.
Press Yes on the prompt.
Step 2: In the PowerShell, type the following command and hit Enter.
Note: In PATH\TO\FILES, copy the file’s or folder location and paste it. Ex: ‘:cd %USERPROFILE%\Documents\files’.
cd PATH\TO\FOLDER
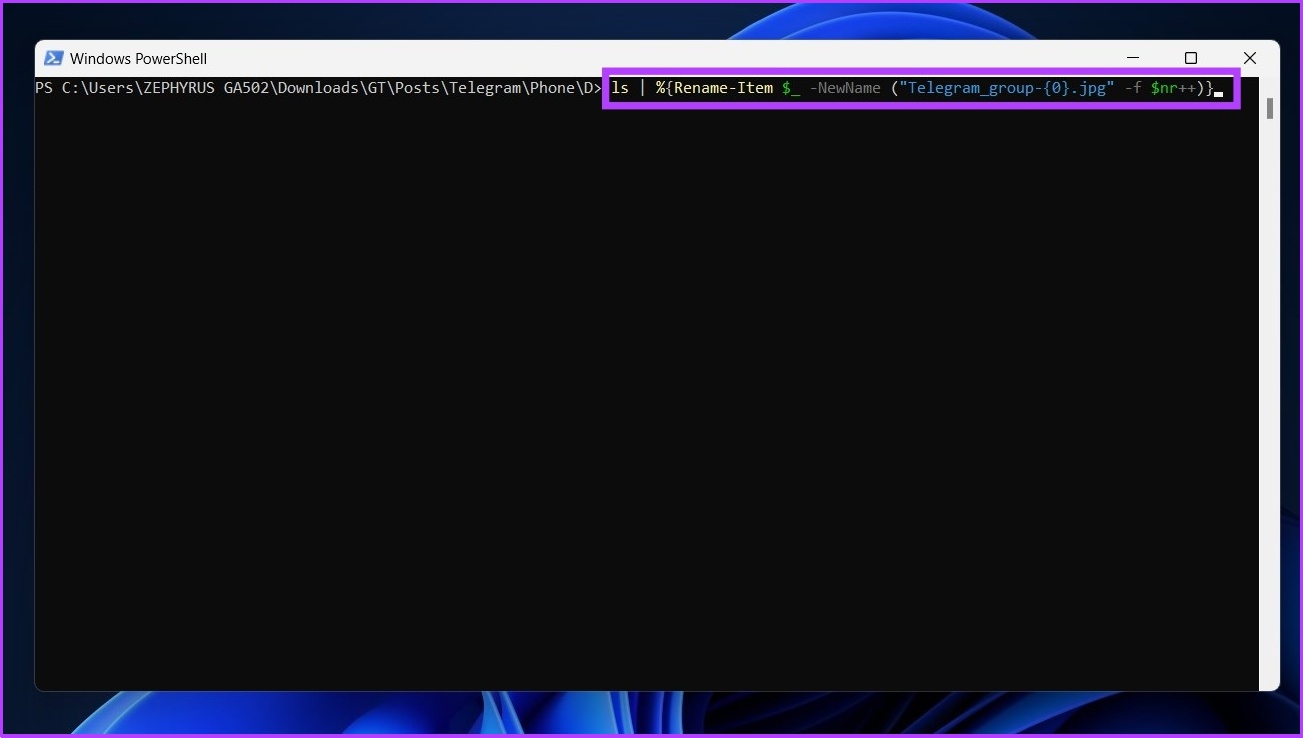
Step 3: Now type the following command and press Enter.
ls | %{Rename-Item $_ -NewName ("NEW-FILE-NAME-{0}.EXTENSION" -f $nr++)}
Replace ‘NEW-FILE-NAME’ with the structure name you want to use and add the proper file extension instead of ‘EXTENSION’.
And that’s it. Following the above steps, the selected files will be renamed using the specified format. If you want more customization and options to bulk modify files, there is PowerToys; continue reading.
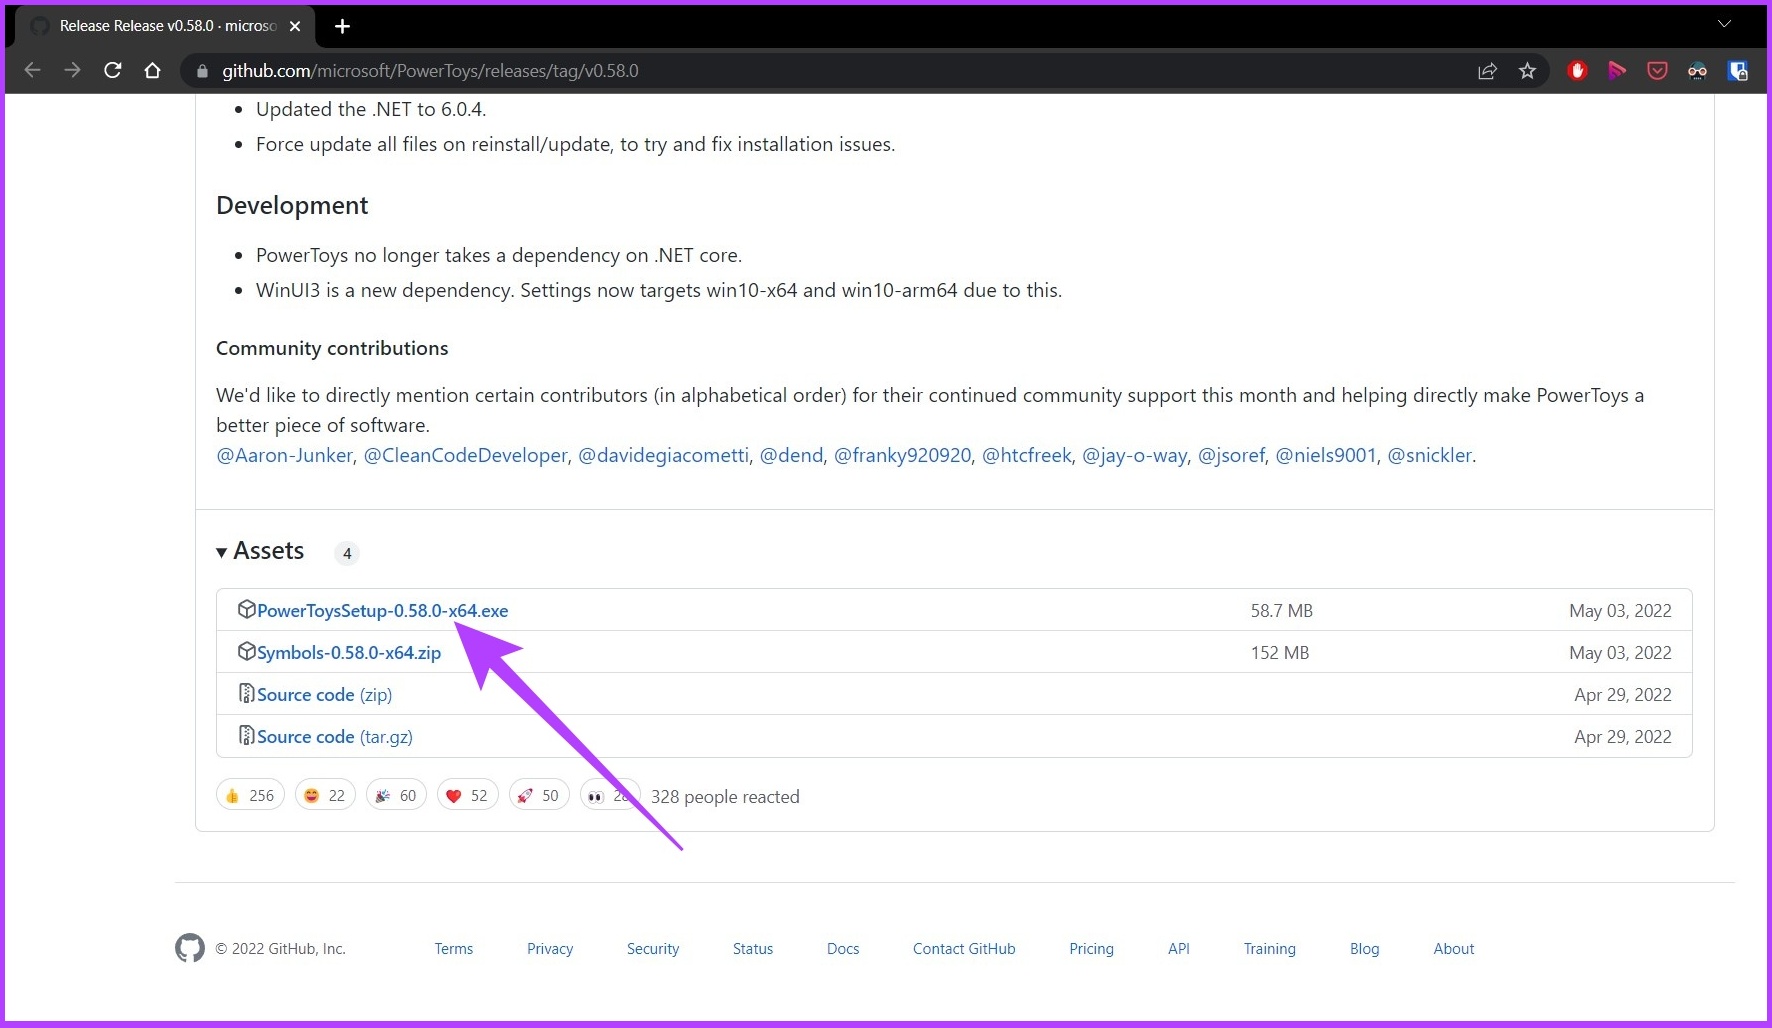
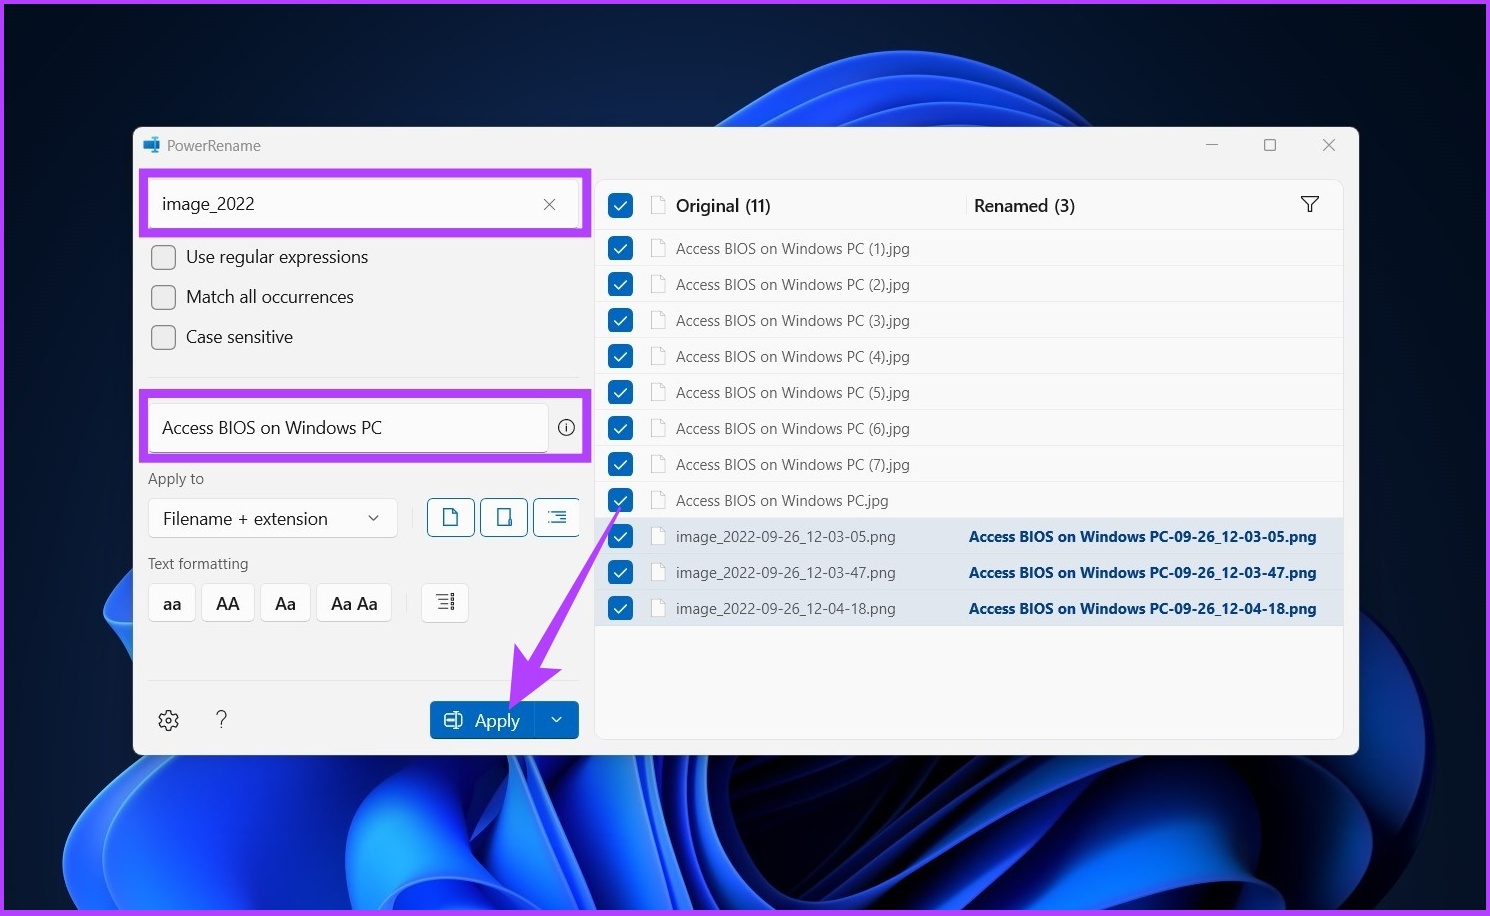
3. Using Microsoft’s PowerToys to Batch Rename Files in Windows 11
Power Tools offers batch rename files on Windows 11 using PowerRename, which is far more capable than the default tool on Windows 11.
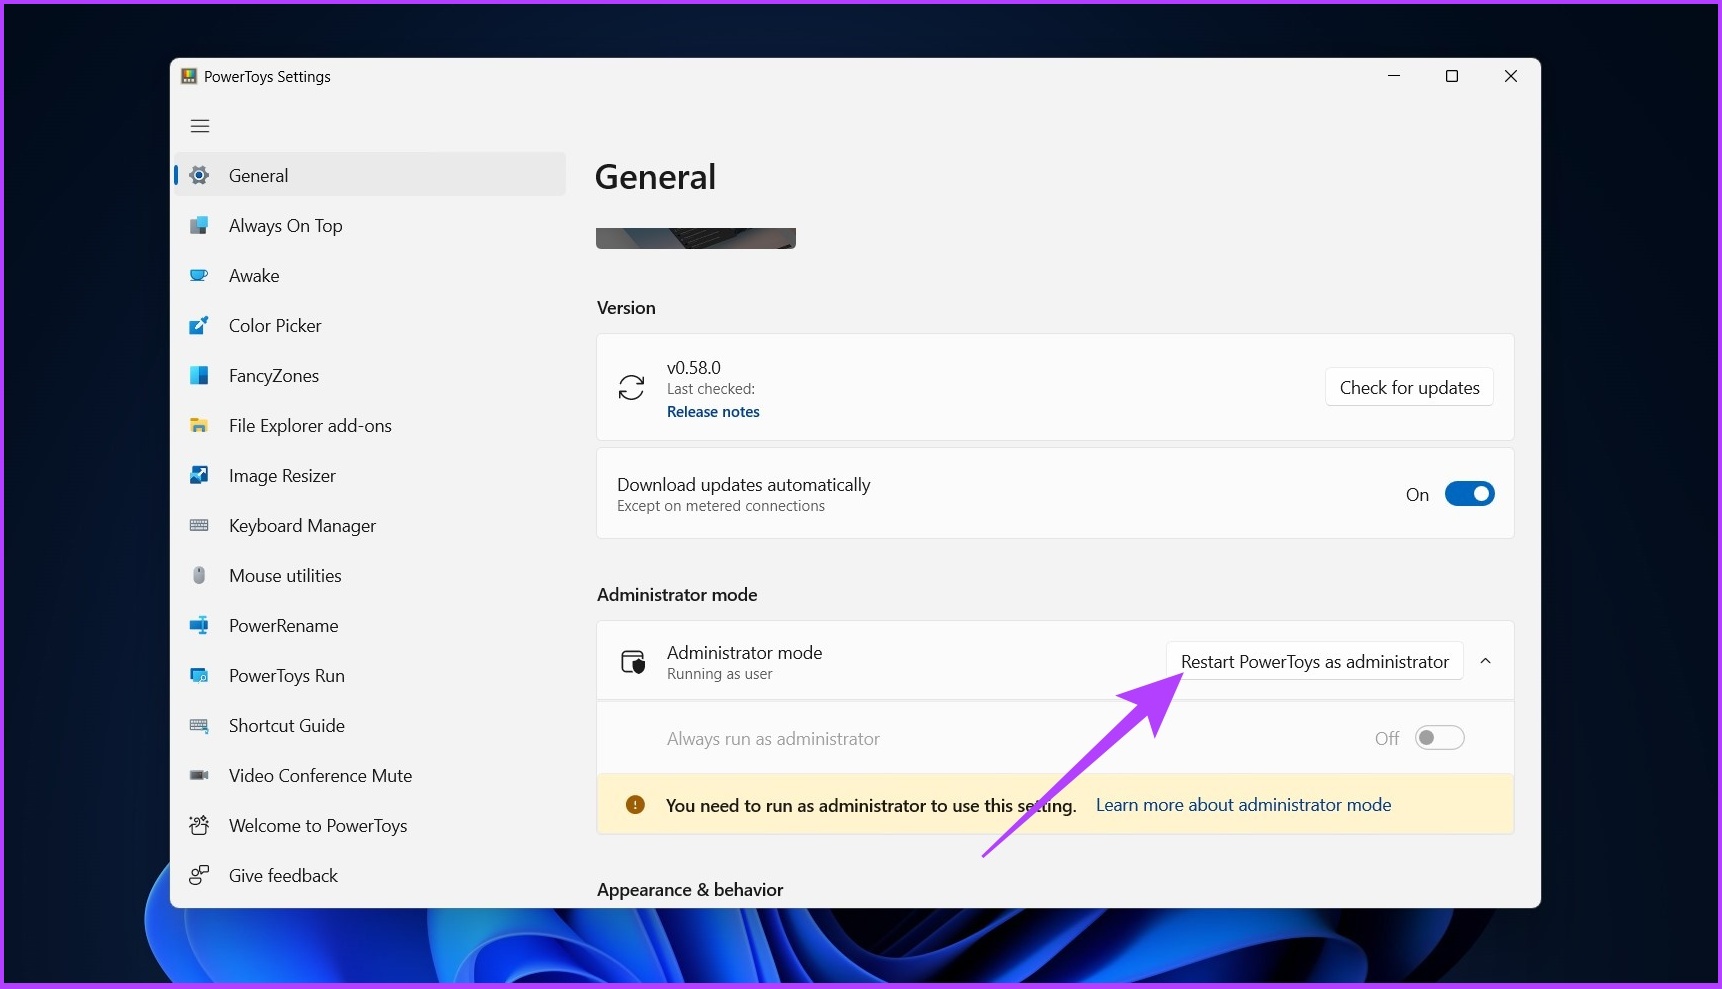
Step 2: Open PowerToys, and under Administrator mode, click Restart PowerToys as administrator.
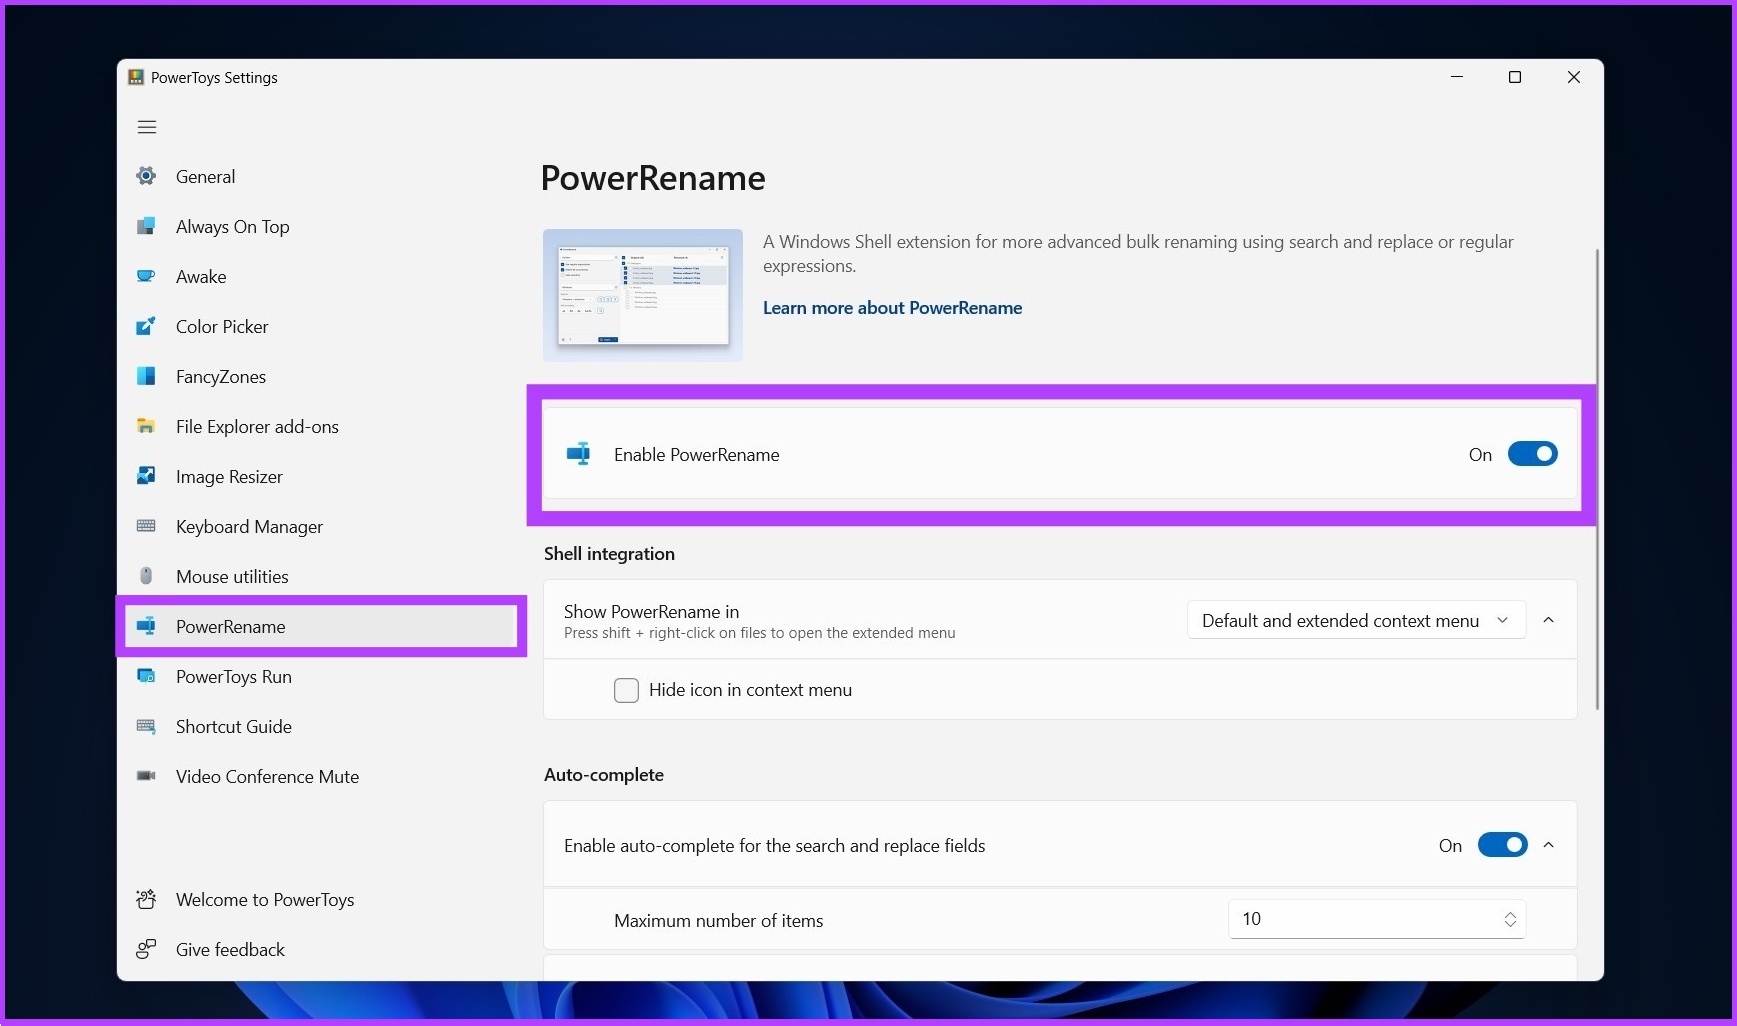
Step 3: The app will restart automatically. Once open, choose PowerRename from the side menu and turn on the toggle to Enable PowerRename if you have not already done so.
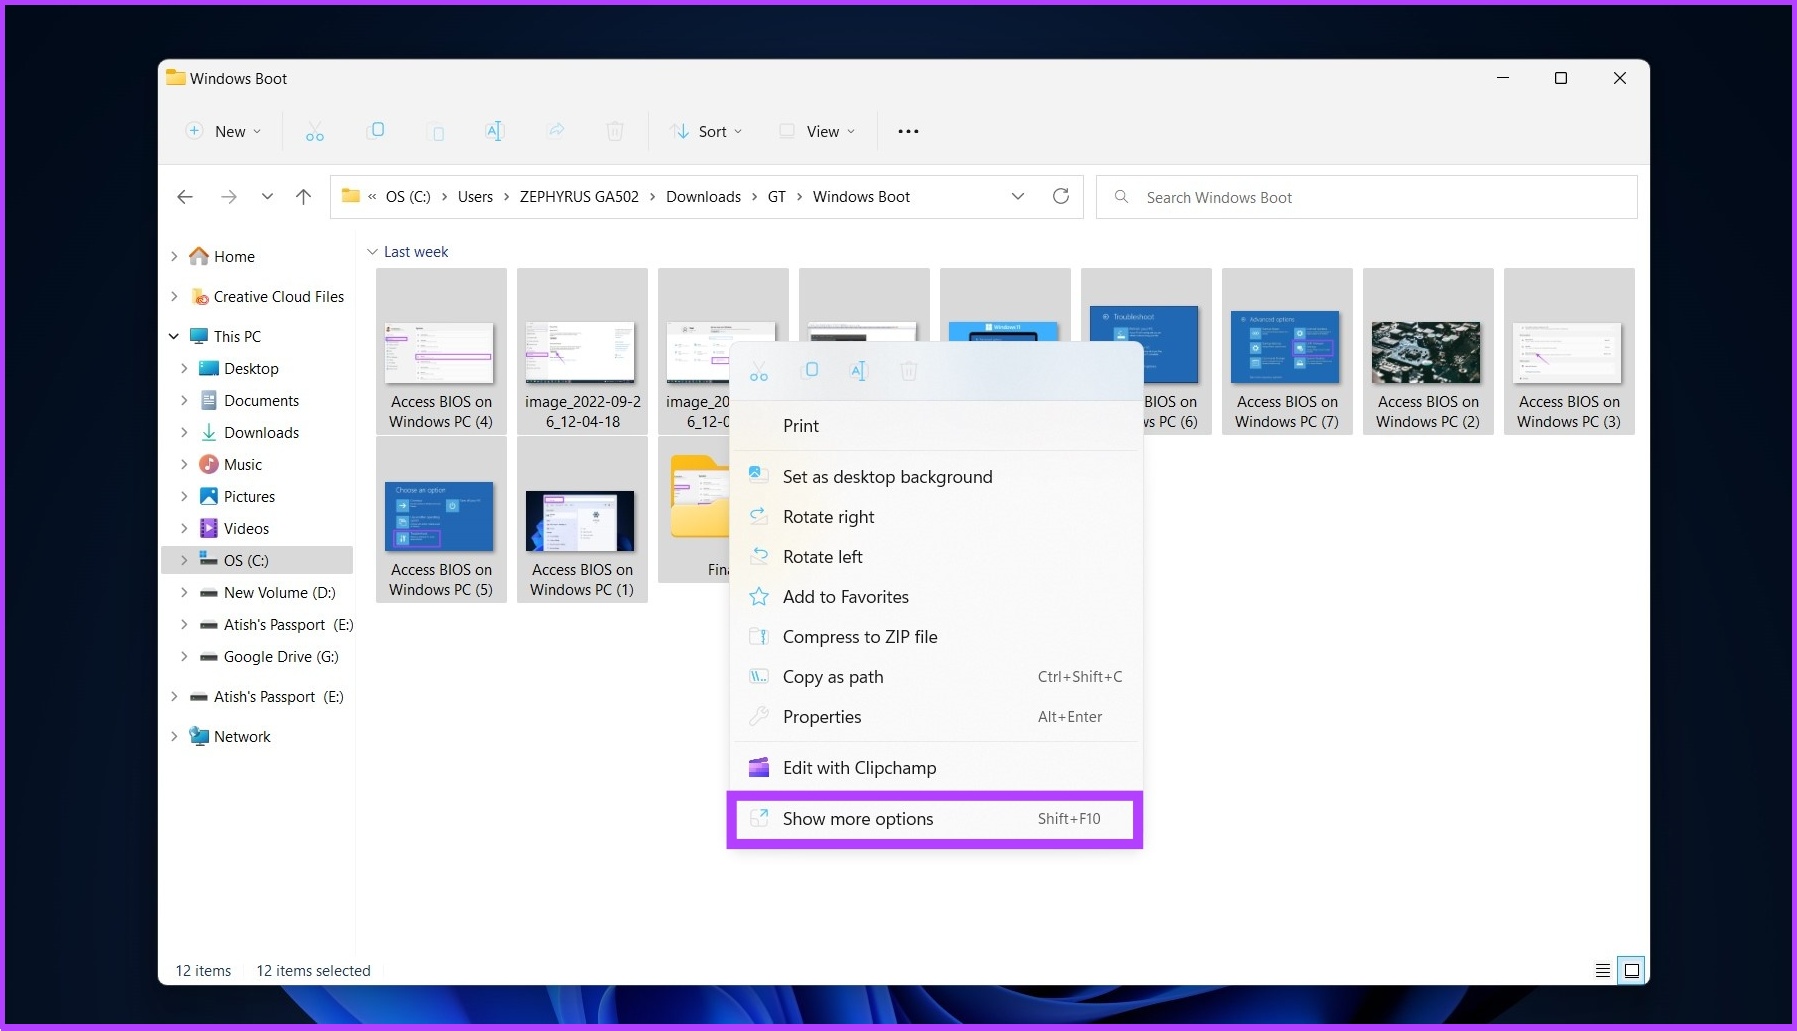
Step 4: Navigate to the files you want to rename, select them all, right-click, and choose Show more options.
Step 5: Now, choose PowerRename to open all selected files on the PowerRename interface.
Step 6: Choose the current file names to replace with a new one and click Apply.
Example: image_2022 to be replaced by ‘Access BIOS on Windows PC’
So there you have it. All the file names will be changed in a go.
Many tools are available for batch renaming files, including Bulk Rename Utility and Advanced Renamer. However, the interfaces of these tools are complex, and they do not offer easy ways to carry out the renaming process.
Therefore, we recommend using the tools mentioned in this article to batch rename files in Windows efficiently.
FAQs About Renaming Files on Windows 11
1. Is there a quick way to rename files in Windows 11?
The quickest way to rename files in Windows 11 is by using File Explorer. Select the files you want to rename > right-click> go to rename > rename the files > click save.
2. What is the shortcut key to renaming a file or folder?
The keyboard shortcut to rename a file in Windows is F2.
All the listed ways to rename files are practical and efficient. You can select the method that is most convenient for you or the easiest for you to complete your task.
If you have downloaded a corrupt MPG file from the web, you can’t play it using Windows Media Player or any third-party software. Such files won’t show thumbnails in the File Explorer app. This usually happens because of an extremely slow internet connection or when the download gets interrupted.
You’ll need to delete and download the existing file from the web again.
Method 2: Download MPEG-2 Video Extension
MPG files are mostly incorporated with MPEG-1 or MPEG-2 extensions. MPEG-2 is an upgraded version of MPEG-1 that offers better features. Microsoft doesn’t pack the required MPEG-2 video extension with the Windows Media Player in Windows 11, so you must download it from the Microsoft Store.
Step 1: Open the Microsoft Store on your Windows PC.
Step 2: Search for the MPEG-2 video extension and open it.
Step 3: Click on Get to start the installation.
Once done, Windows Media Player should be able to play MPG videos on your Windows PC without issues. If it still doesn’t work, it could be a player issue. Follow our guide to fix the Windows Media Player issue.
Method 3: Convert to MP4 Using Microsoft Clipchamp
Clipchamp in Windows is a video editor that can convert any MPG file to MP4. It also accepts OV, WEBM, AVI, DIVX, FLV, 3GP, WMV, VOB, DCM, and MKV video formats.
Step 1:Right-click on the MPG file and choose to open with Clipchamp.
Step 2: Once the initial processing is complete, drag the video and drop it into the timeline.
Step 3: Click on the Export button, select the quality, and it will instantly start converting the video.
Step 4: During the conversion, you can set the name of the file and location. Alternatively, you can upload it to the cloud or social media.
Method 4: Convert MPG Using Online Converter
If you do not want a codec, convert the video file into a widely used format, such as MP4. Many online converters can do that, but we suggest not uploading any video that contains personal or sensitive data.
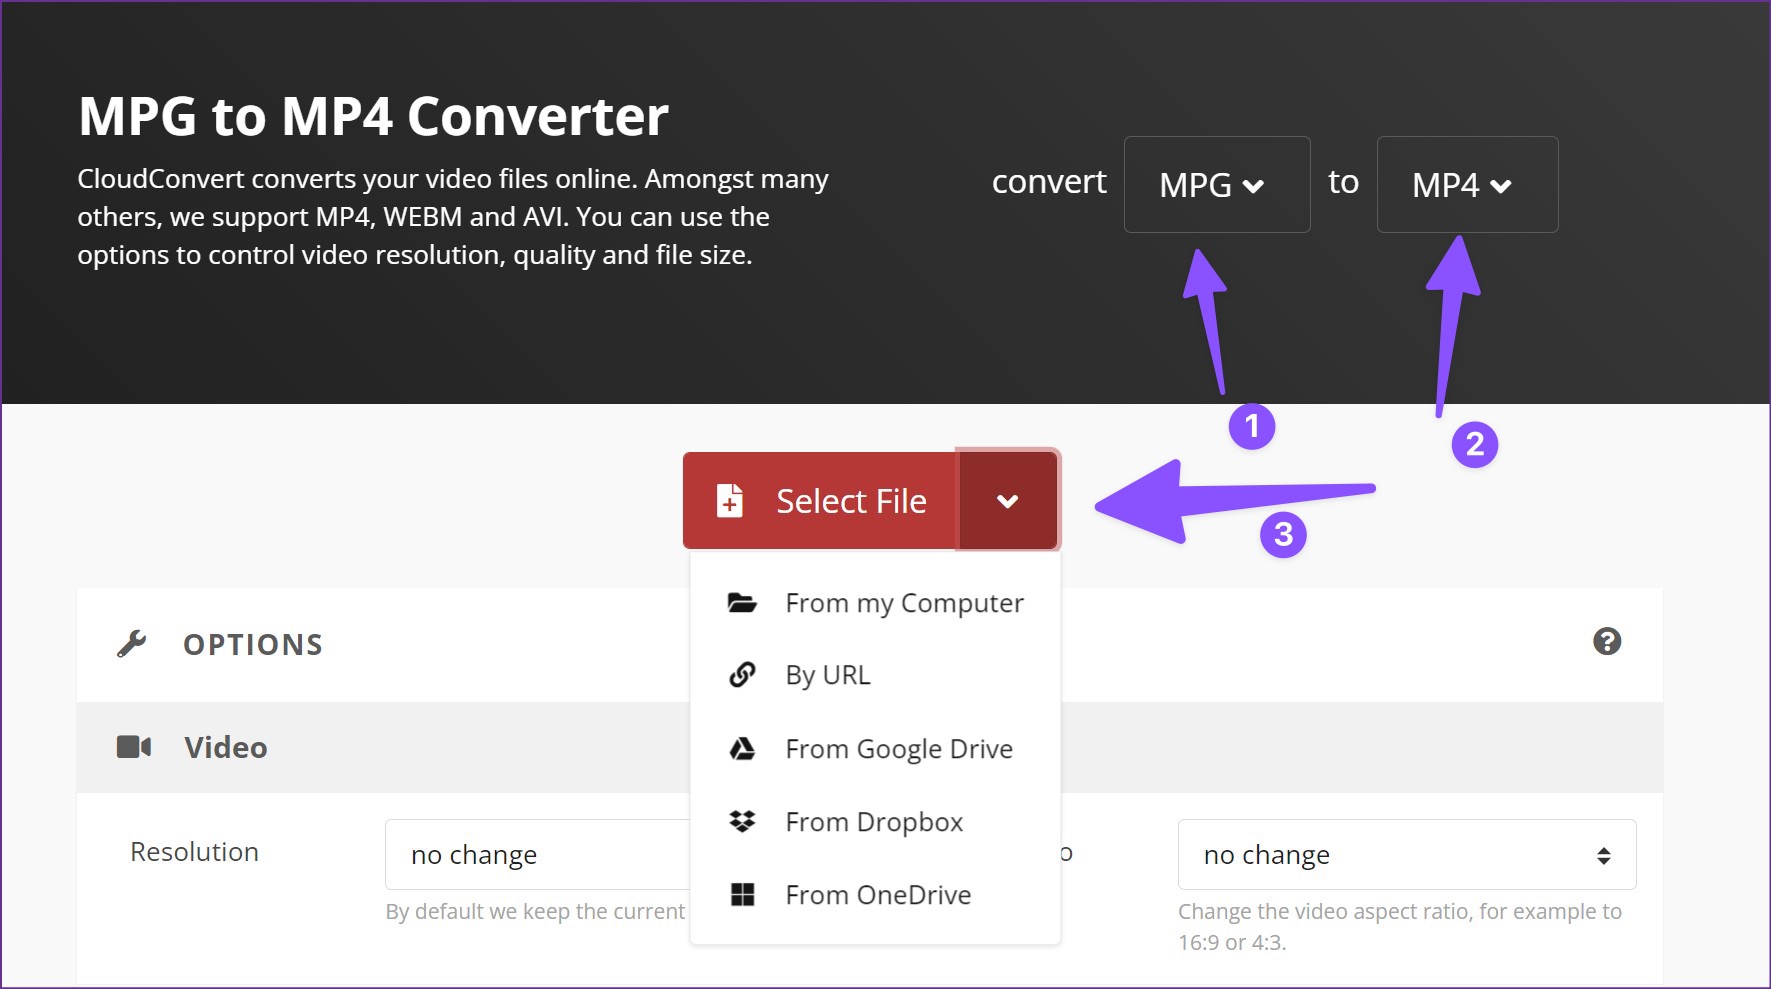
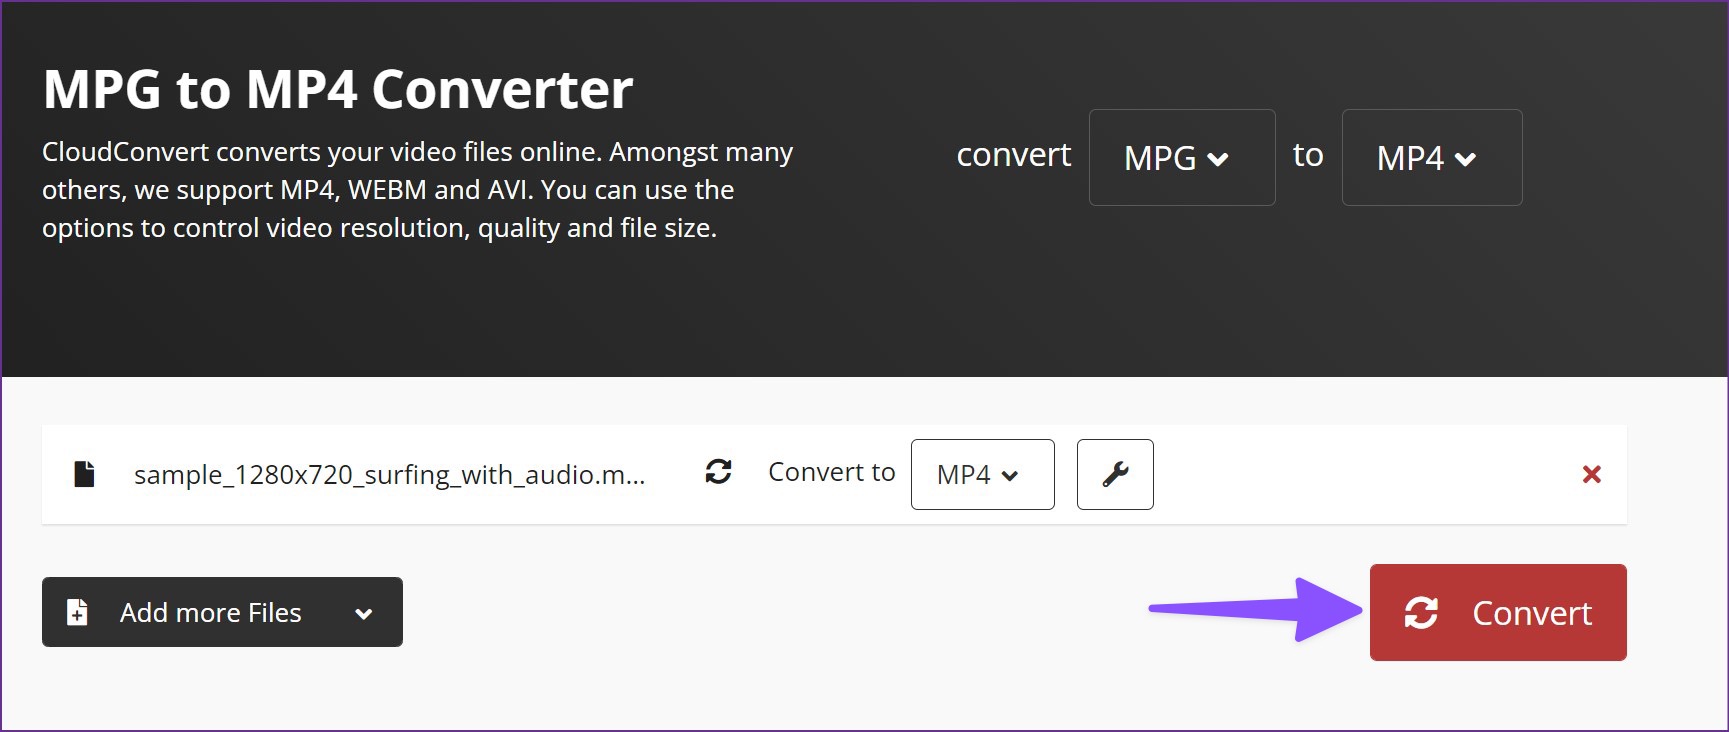
Step 1: Open your preferred web browser and head to Cloudconvert.
Step 2: Select MPG in the first menu and MP4 in the second.
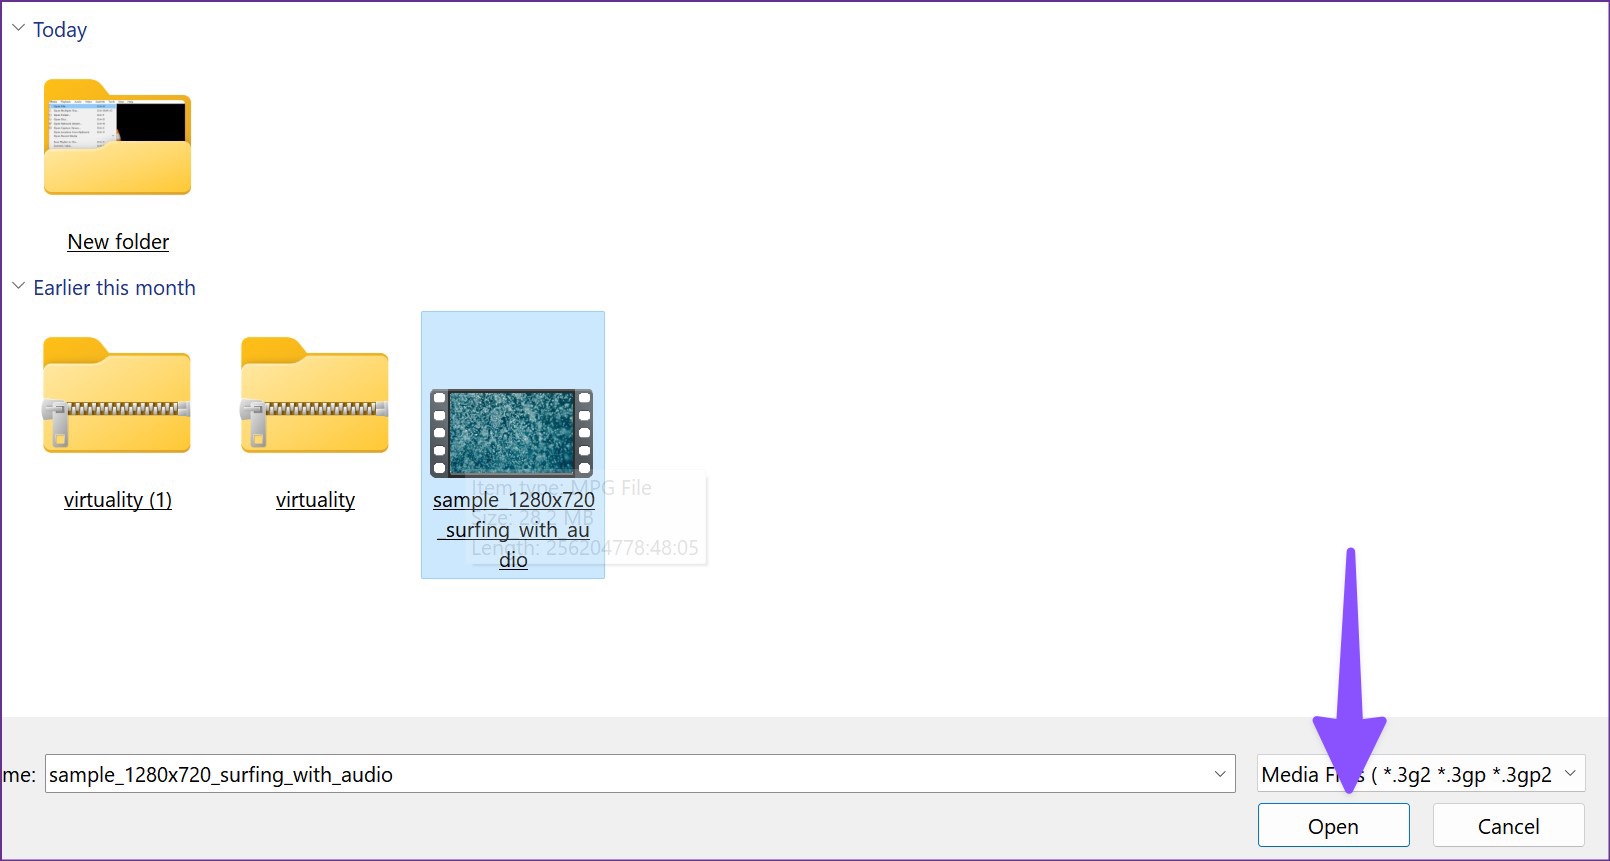
Step 3: Click Select File > From my computer, browse to select the MPG video file from the File Explorer, and press Open to upload.
Note: You can also click the down arrow button to upload a file from URL, Dropbox, Google Drive, or OneDrive.
Step 4: You can add more files (if you want) and then click the Convert button to start the process.
Step 5: After the conversion completes, click the Download button to save the converted video file on your computer.
You can use the default Media Player to play the video file without breaking a sweat.
Method 5: Use a Third-Party Video Player
If you frequently play MPG files on Windows, you shouldn’t go through the steps above to convert video files every time. It’s time-consuming and not productive at all. Instead, you can use a third-party video player such as VLC.
Step 1: Download and install VLC Media Player from the official website.
Step 2: Open the VLC media player and click Media at the top. Then select Open File (or use Ctrl + O keys shortcut).
Step 3: Select your MPG file from the File Explorer menu and click Open to start playing the video instantly.
The Restrict function is a nice blend of mute and block on Messenger. The mute function only silences notifications from a conversation. Block is an extreme solution and cuts all ties with the person.
If you don’t want to block someone on Messenger outright, you can permanently restrict them and protect your profile. How? Well, let’s check out the implications of restricting someone on Messenger.
What Happens When You Restrict Someone on Facebook Messenger?
First and foremost, the feature removes the conversation from your chats list and moves it to the Message Requests folder. Furthermore, it restricts them from contacting you via Facebook Messenger, seeing read receipts, or seeing your active status.
If You Restrict Someone on Messenger, Will They Know?
Notably, the company doesn’t send any notification when you restrict someone. Moreover, it will not affect anything on their end. The chats will remain as is, they can send messages or call you like usual (though you’ll not get notifications for them).
If you restrict someone on Messenger, can they still message or call you? Technically, yes. They can send you messages or call you. However, there will be:
No notifications – You won’t receive any notifications when the restricted person sends a message. The same goes for voice or video calls. Your phone won’t ring when the recipient calls you on Messenger.
No read receipts – Even though the messages are delivered, and you can read them later, the restricted person can’t see if you’ve read their messages.
Additionally, the same restrictions are applied to you. Even you can’t send a message or call the person. You must unrestrict the person before sending a message.
What About Group Messages?
Restricting someone does not affect your existing group messages. They can see your messages in the group, and you can see theirs. However, when you create a new chat group and try to add them, the app alerts you about the restricted accounts on Facebook.
What About Previous Messages?
As mentioned earlier, Facebook hides your current chat thread from the Messenger app when you restrict someone. Notably, it doesn’t delete any past messages; it simply hides them from view.
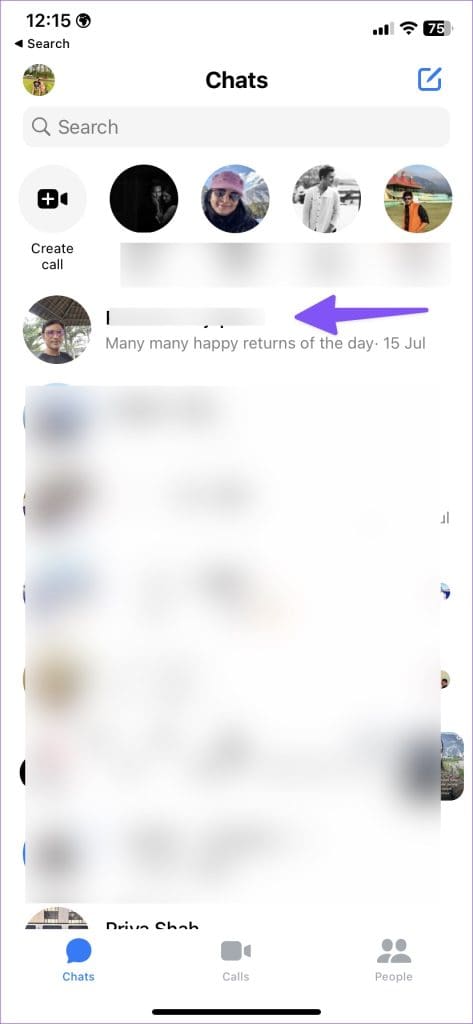
Can You Still Read Messages From a Restricted Account in Messenger?
Yes. Though you can’t see new messages in the default Chats tab, you can still read them. Search for the contact’s name at the top and open the conversation to check all new and previous messages.
Can the Restricted Person See My Active Status?
The ability to restrict someone limits the person’s reach to see your profile and other online activities. The restricted contact can’t see when you’re online or if you’ve read their messages.
Notably, you also can’t see their active online status on the platform.
Does Restricting Someone on Messenger Restrict Them on Facebook?
No, restricting someone on Messenger doesn’t restrict them on Facebook. It only limits their ability to contact you on the platform.
Can the Restricted Person See My Posts or Stories?
The restricted person can see all the previous posts. However, they can’t see any new posts or stores unless they are public or you’ve tagged them.
Do I Remain Friends with a Restricted Account?
Yes, you continue to remain friends with restricted accounts on Messenger. Facebook won’t automatically unfriend someone.
How to Restrict Someone on Facebook Messenger
Note: Facebook uses an identical UI on Messenger for iOS and Android. The steps to restrict someone on Messenger remain the same on both platforms.
Step 1: Open the Messenger app. Select a conversation with the contact you want to restrict.
Step 2: Tap the contact name at the top.
Step 3: Select Restrict under Privacy and Support.
The restrict function on Messenger indeed gets the best of Mute and Block add-ons and delivers an excellent solution to keep your Facebook account spam-free.
How to Lock a Folder on Windows 11 Using Built-in Encryption Function
Note: The steps to encrypt files on Windows 11 are the same as those for encrypting folders.
Step 1: Open Windows File Explorer and navigate to the folder you want to password-protect.
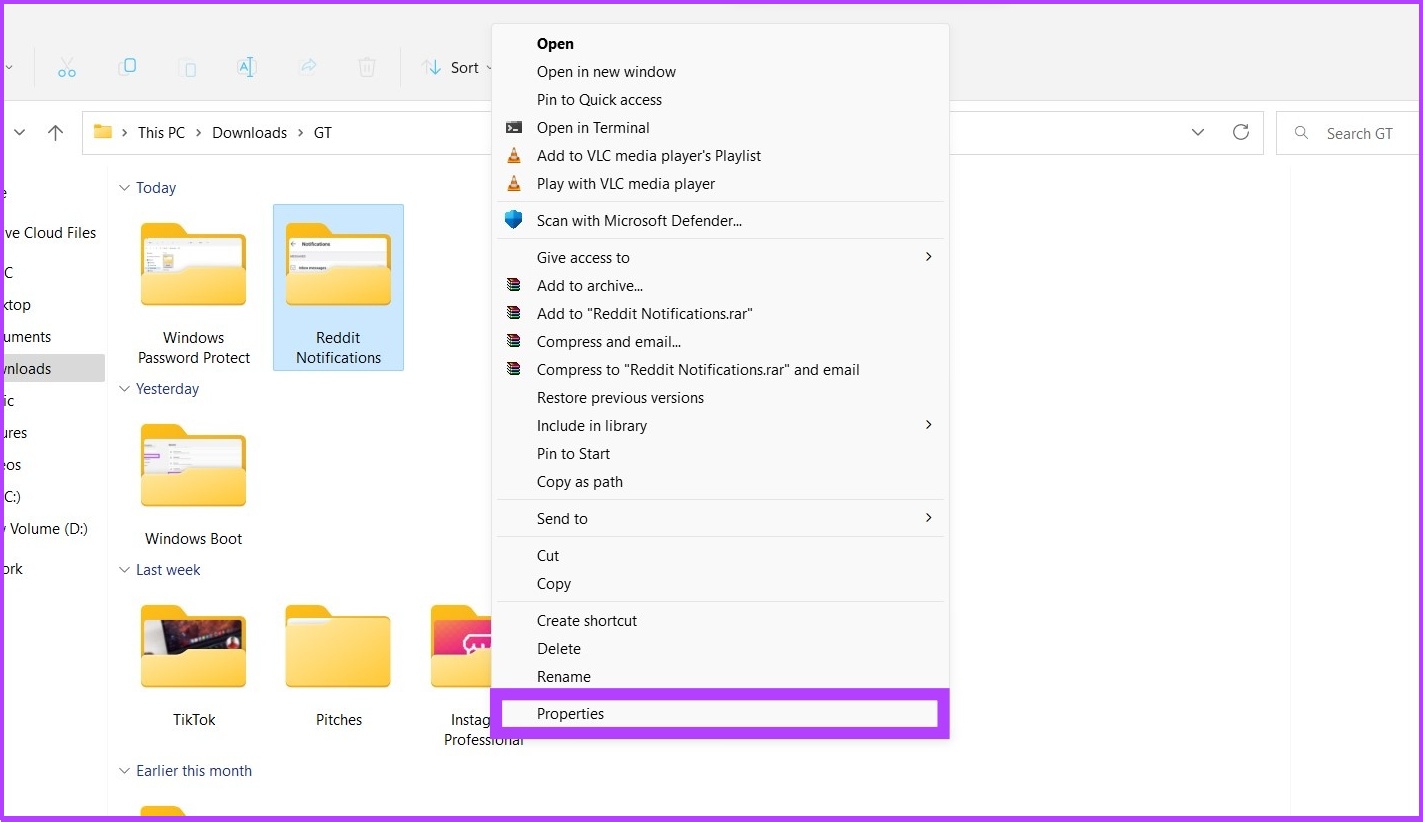
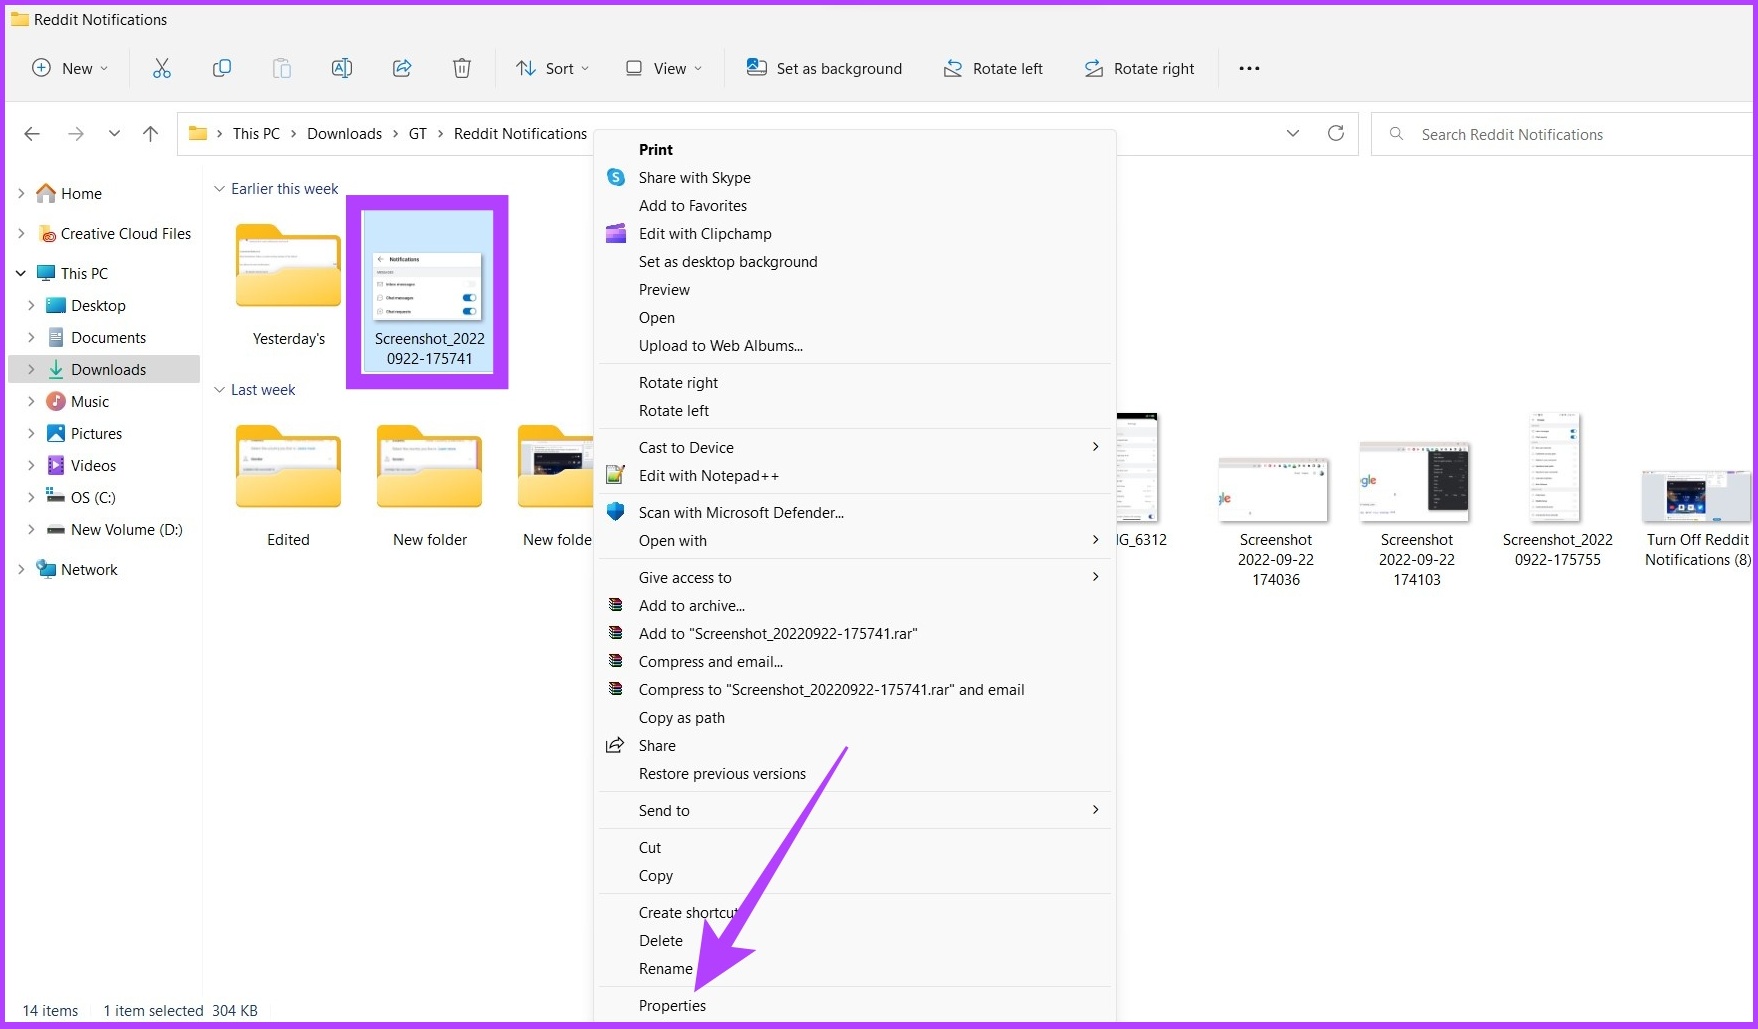
Step 2: Right-click on the folder and select Show more options. Now, go to Properties.
Step 3: Under the General tab, click Advanced.
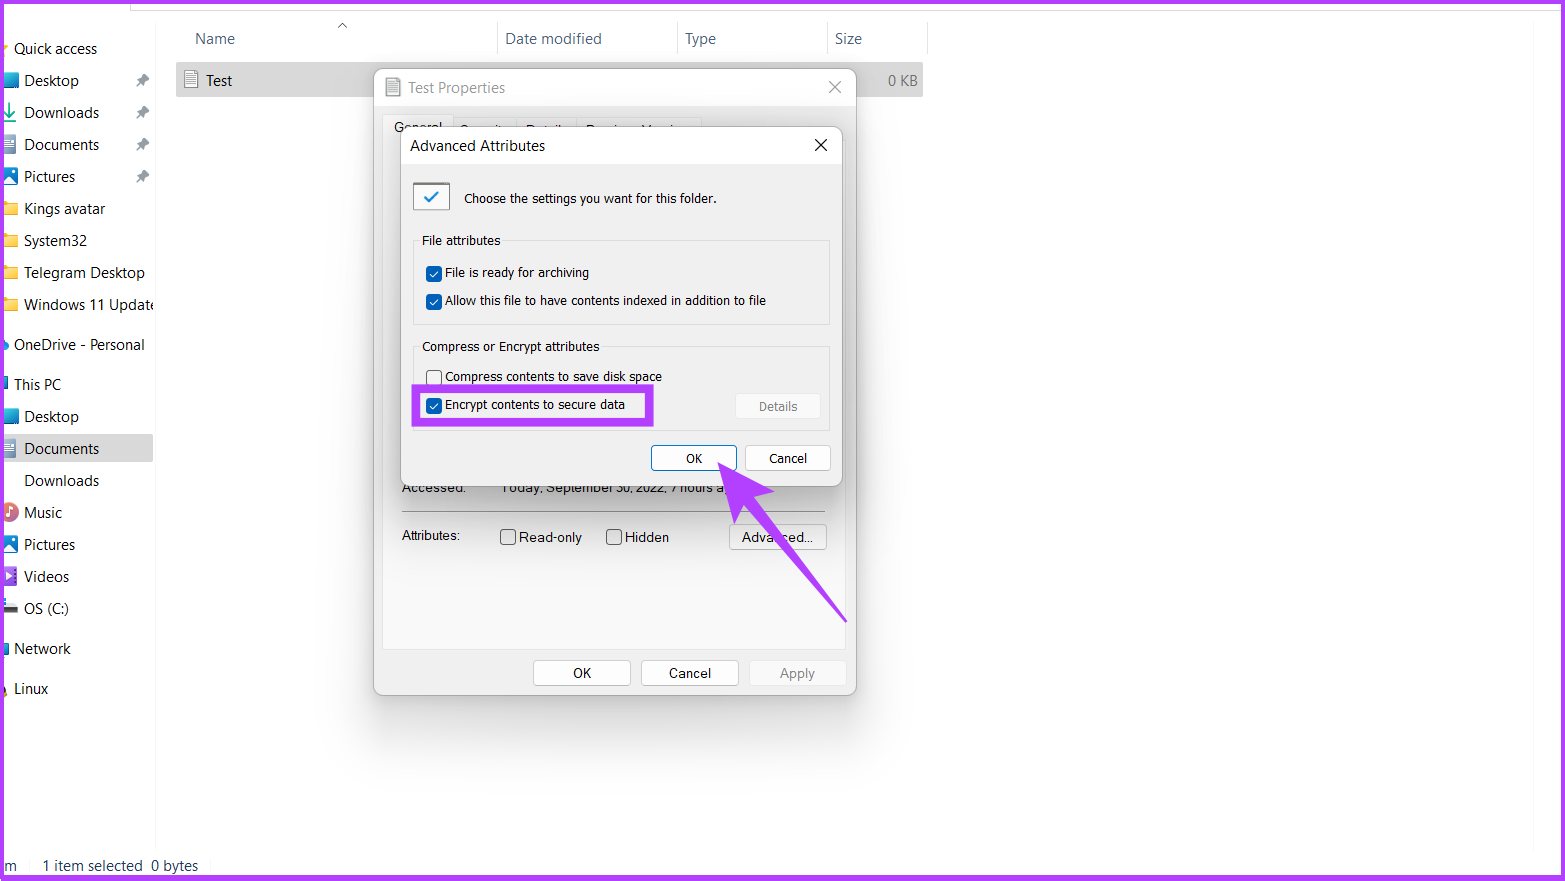
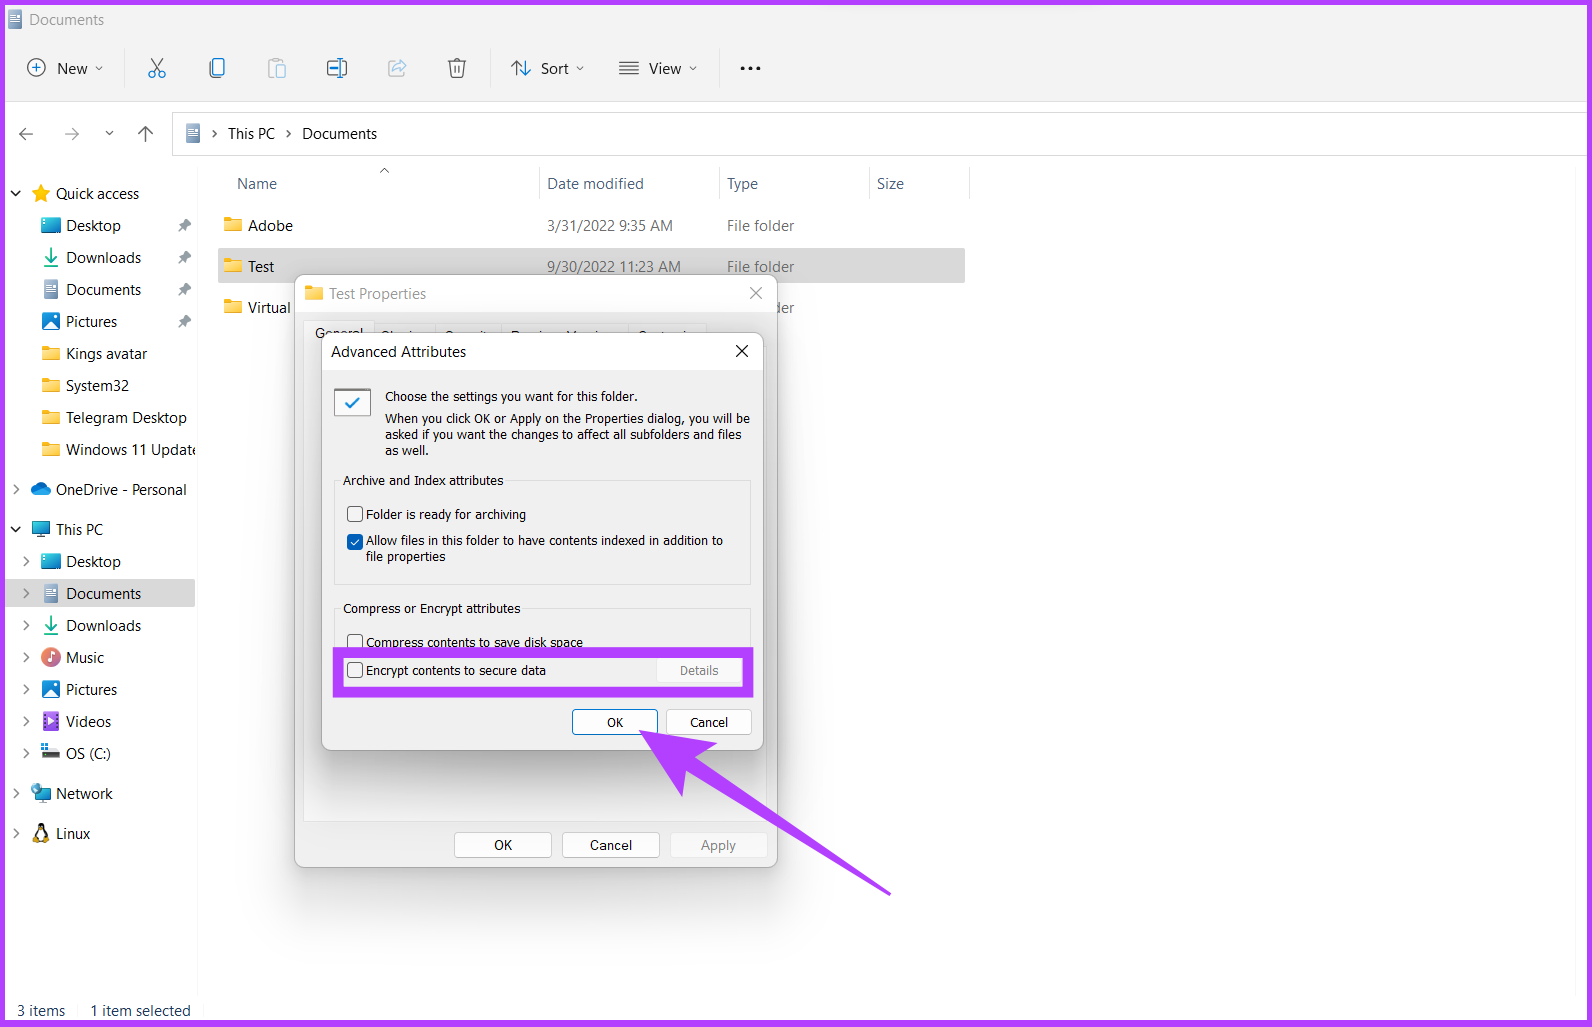
Step 4: Check the box next to Encrypt content to secure data and click OK.
Once you click OK, a Window will pop up asking you to set up a password to access the file or folder.
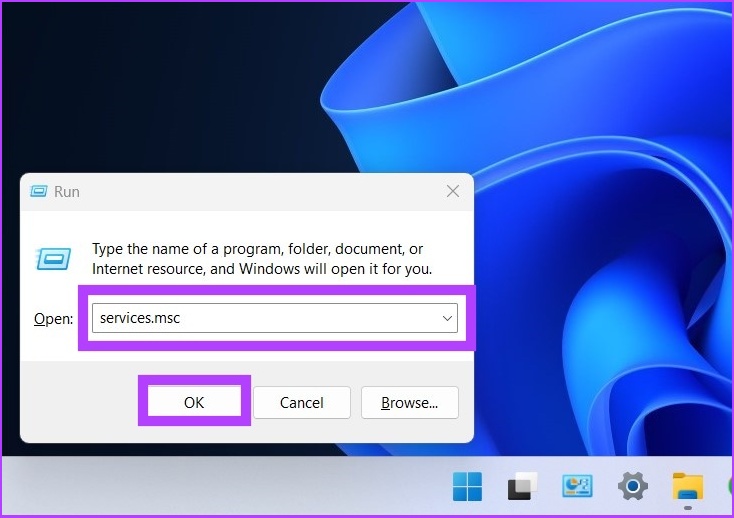
If the Encrypt content to secure data option is greyed out, follow the steps below or jump to Step 8 directly.
Step 5: Open Run or click Win key + R and type the below.
services.msc
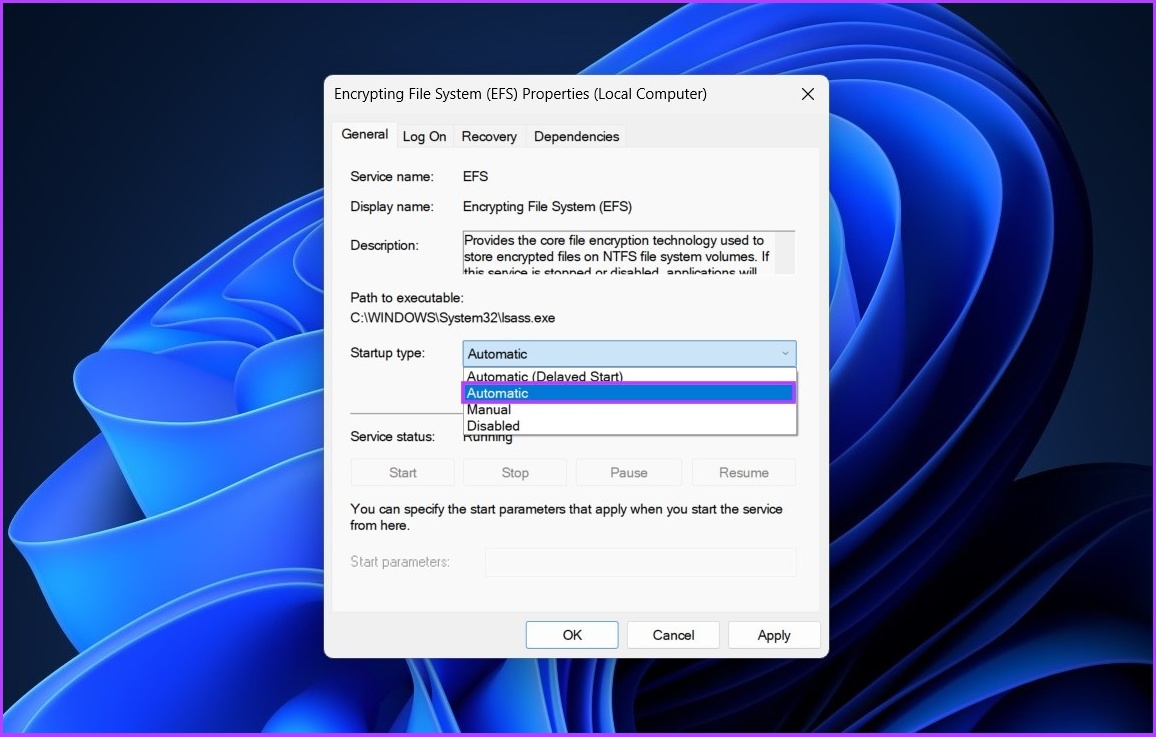
Step 6: Double-click on Encrypting File System (EFS)‘.
Step 7: Click the drop-down next to Startup type and select Automatic.
Step 8: Now, click on Apply and then OK.
It is necessary to restart the computer for the changes to take effect. If you’re on Windows 10, check out our guide on encrypting drives by bypassing TPM.
How to Remove the Added Password From a Folder on Windows 11
Step 1: Navigate to the file or folder you want to decrypt, right-click on it, and choose Show more options.
Step 2: Now, go to Properties.
Step 3: Under the General tab, click Advanced.
Step 4: Uncheck the Encrypt content to secure data option.
Step 5: Finally, press Apply and OK.
If you want another way to set a password for a folder in Windows 11, continue reading.
Bonus: Use Third-Party Software to Put Password on Windows 11
A third-party tool or software can help you secure your files and folders if you don’t want to follow the above-mentioned steps or maybe want to get things done quicker.Although third-party software doesn’t provide Windows-like security, it does your job. One such application is Folder Lock. This is an easy file locker for Windows 11.
That said, if you cannot password-protect a folder on Windows 11, you may wonder why. Continue reading to know.
Why Can’t I Password Protect a Folder
There are several reasons why you cannot password-protect a folder directly in Windows 11:
Encryption options might be limited depending on the drive’s file system and where the folder is located. For example, the older FAT32 file system does not support folder encryption. You need NTFS as the file system to use the folder encryption feature.
To encrypt a folder, you need the necessary permissions to access it and its files. Ensure you have the appropriate administrative privileges or ownership rights to perform encryption operations.
Some encryption methods, such as BitLocker, may require specific hardware components, such as a Trusted Platform Module (TPM) or a compatible USB flash drive. Check if your system meets the necessary hardware requirements for the encryption method you are trying to use.
If you are trying to encrypt a folder using third-party encryption software, ensure that the software is installed correctly and compatible with your version of Windows.
If you have any queries we missed addressing, check out the section below.
FAQs on Password Protecting a Folder on Windows 11
1. Is it safe to lock a folder?
Locking a folder can provide an additional layer of security for your files, but it is important to understand that it is not foolproof. While locking a folder can prevent casual access to its contents, it may not be sufficient to protect against determined attackers or sophisticated hacking techniques. It is always recommended to use strong, unique passwords and employ other security measures, such as encryption, to enhance the safety of your sensitive files.
2. Can I password protect a folder on previous versions of Windows?
Yes, you can password-protect a folder on previous versions of Windows, like Windows 10, Windows 8, and Windows 7. The process may vary slightly depending on the specific version, but you can typically achieve this by using third-party software or built-in encryption and compression features.
3. Can I password protect individual files within a folder?
Yes, it is possible to password-protect individual files within a folder. Some file formats, like Microsoft Office documents (Word, Excel, PowerPoint), offer built-in encryption features that allow you to set a password to protect the file. Additionally, you can use encryption software or archive files (ZIP, RAR) with a password to protect specific files within a folder.
Protecting your computer’s data ensures that no sensitive personal or professional information gets deleted or leaked by accident.
Don’t we all dread the sight of our phones not unlocking when we enter the password? With biometric authentication on all iPhones, all you have to do is rest your thumb or swipe up on the lock screen to unlock. But, when Touch ID or Face ID doesn’t work, you need to punch in your code. If you’ve forgotten it, it’s time to reset your iPhone password.
However, the process isn’t so straightforward. Apple doesn’t give you the option to reset your passcode without resetting your iPhone. Don’t worry though, as we’ll guide you through every single step and tell you what to do if you forgot your iPhone password, and even help you reset the iPhone without losing the data.
Prerequisites to Reset Your iPhone When You Forgot Your Passcode
To unlock your iPhone without a passcode, the only solution is a complete factory reset. There are a few ways in which you can reset your iPhone when it’s locked. We will discuss all the methods later on but before we get to that, here are some prerequisites.
If your iPhone isn’t connected to the internet, you will need a Mac/PC and a lightning cable.
You will need access to your Apple account, i.e. your Apple ID email/phone number and password. If you don’t remember your Apple ID or password, you can reset it by going to the Recover Your Apple ID website.
Since your data will be wiped, you will need to restore a backup after resetting your iPhone. If you don’t have one already, we’ll show how you can take a backup in the subsequent section.
How to Backup iPhone if You Forgot Password
It’s always a good idea to take an iPhone backup periodically. This way, you can ensure your data isn’t lost in situations like these. If you already have an iCloud backup or if you’ve backed up your iPhone to your Mac/PC previously, you can skip this step.
If you don’t have a prior backup and you forgot your iPhone passcode, you may or may not be able to take a backup depending on whether or not your iPhone trusts your computer. Here’s how to check it.
Note: We will perform the steps using Finder on Mac but the procedure remains the same for iTunes on Windows.
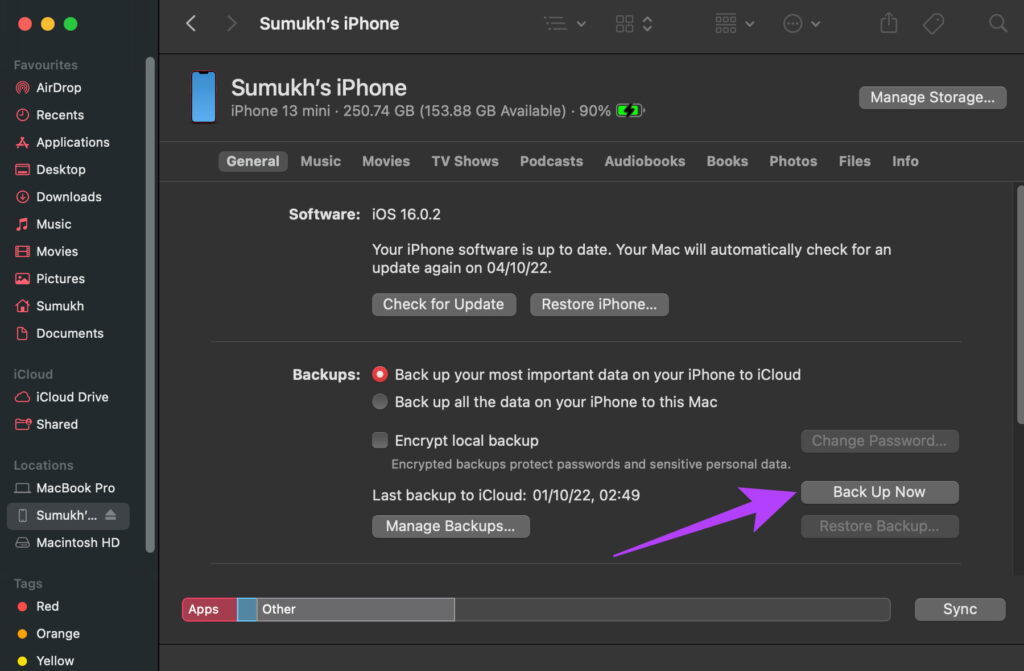
Step 1: Connect your iPhone to your Mac or PC using a lightning cable.
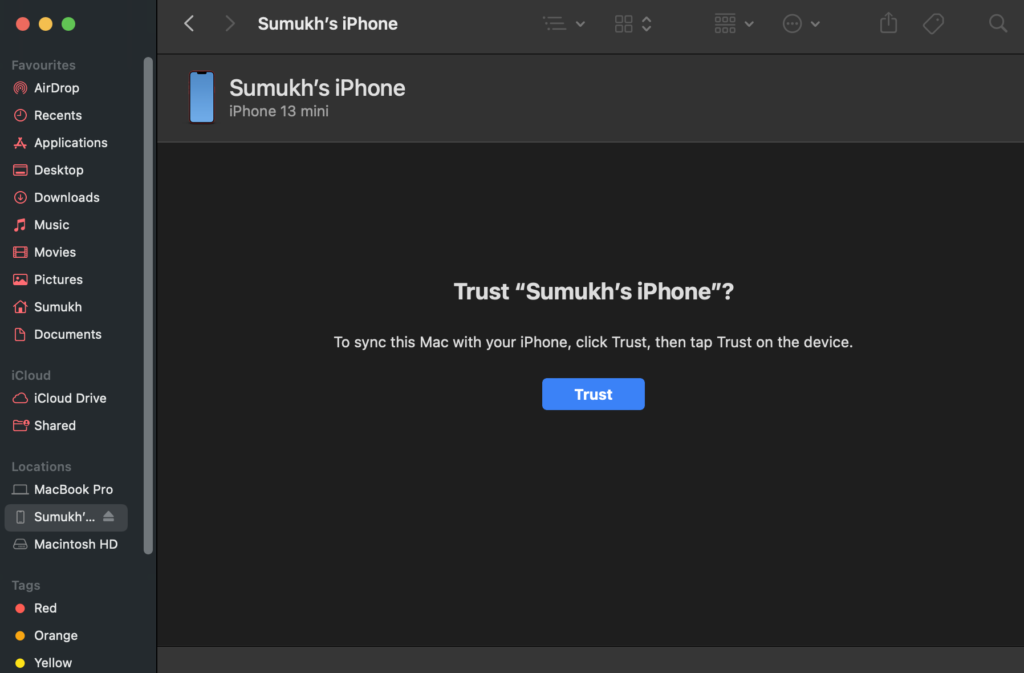
Step 2: Access the iPhone via the sidebar on Finder if you have a Mac. If you’re using iTunes, open the app and click on your iPhone.
Step 3: If you see a screen that asks you to hit the Trust button, you’re out of luck. You cannot take a backup of your iPhone and you will lose all your data.
On the other hand, if you see a screen displaying info about your iPhone, you’re in luck! Click on ‘Back Up Now’ to start backing up your iPhone to your computer.
How to Reset Your iPhone Without Password
There are 3 ways to reset your iPhone when you’re locked out. You can use the method most convenient to you.
1. Reset Locked iPhone on iOS 15.2 and Above – The Easiest Way
With iOS 15.2, Apple introduced the ability to reset your iPhone directly from the lock screen after multiple failed attempts. This is the easiest way to reset your iPhone without the password. However, if you haven’t enabled Find My, updated your iPhone to iOS 15.2, or don’t have internet conenctivity, this method won’t work. If you meet the prerequisites, follow along:
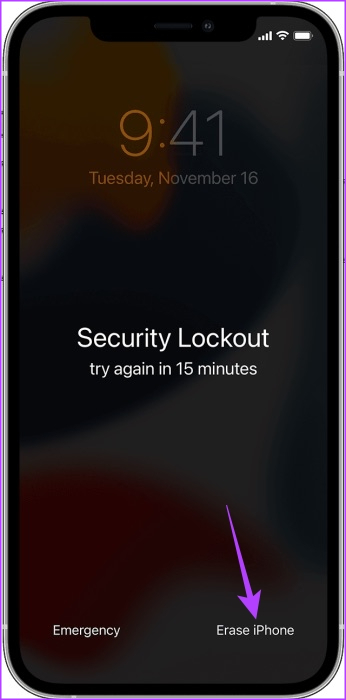
Step 1: Try entering your passcode on the lock screen. You will see the Security Lockout message after a few wrong attempts. Once you’ve input the wrong passcode several times, the option to reset your iPhone will appear.
Step 2: Select the Erase iPhone option in the bottom-right corner of your screen.
Now, enter your Apple ID and password to reset your iPhone.
2. Reset iPhone Without Password Using Find My
Find My is a tool that is generally used for tracking your lost or stolen iPhone. However, you can also use it to reset your iPhone remotely without entering the passcode. Note that for this method to work, your iPhone must be connected to the internet either via Wi-Fi or mobile data.
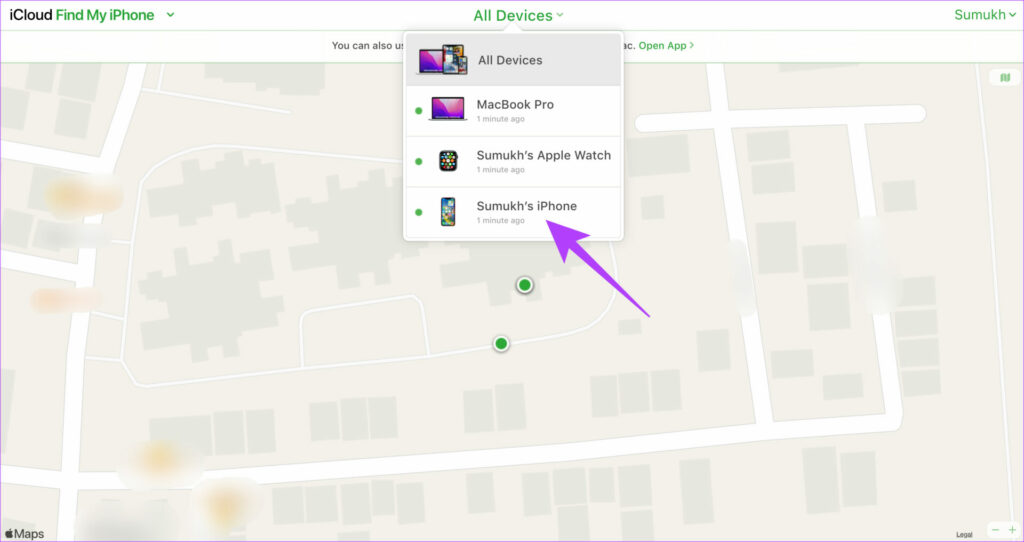
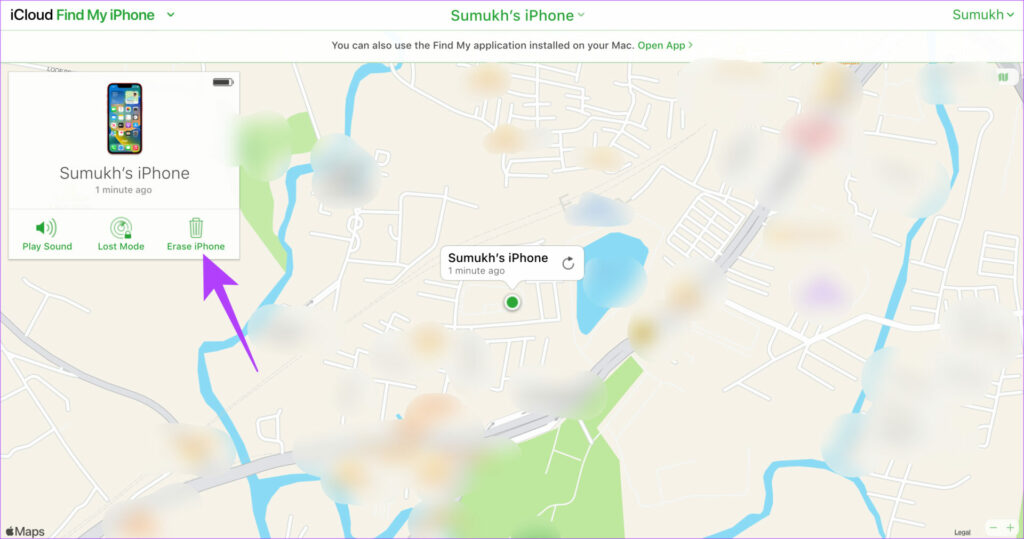
Step 1: Head over to the Find My website on another device. Log in with the same Apple ID as the one used on the locked iPhone.
Step 2: Click on All Devices on the top and select your iPhone from there.
Step 3: Now, select Erase iPhone.
If your iPhone is connected to the internet, it will reset.
3. Reset iPhone Without Passcode Using iTunes or Finder
If the other 2 solutions didn’t work for you, you will have to reset your iPhone using iTunes on Windows or Finder on Mac. Here’s how to do that.
Step 1: Connect your iPhone to your Mac or PC using a lightning cable.
Step 2: Enter the recovery mode on your iPhone by following these instructions:
For iPhone 8 and later: Press and release the volume up button, then press and release the volume down button. Now, quickly press and hold the side button until you see the recovery mode screen.
For iPhone 7 and 7 Plus: Press and hold the volume down button and the power button until you see the recovery mode screen.
For iPhone 6S and earlier: Press and hold the home button and power button until you see the recovery mode screen.
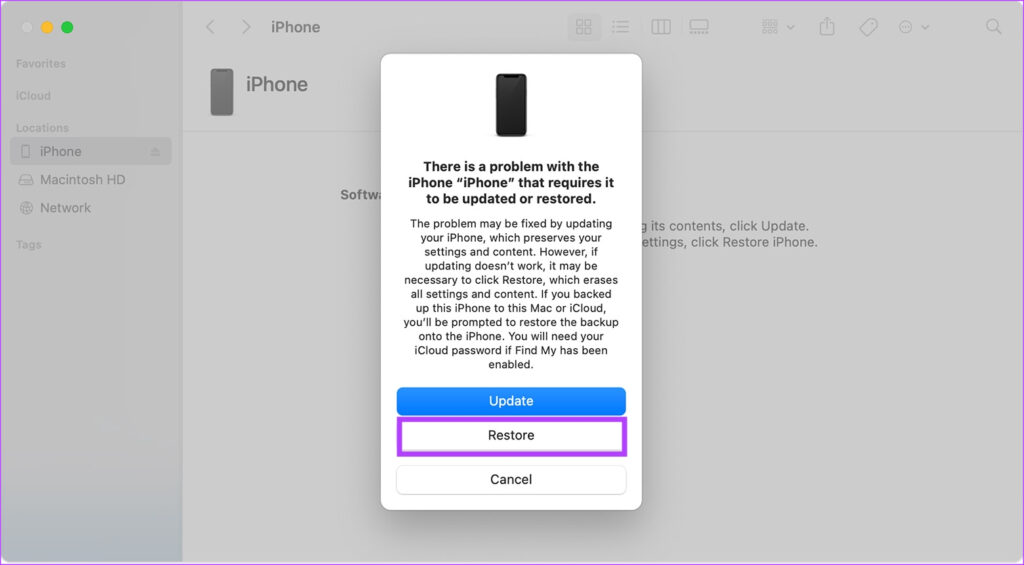
Step 3: Access the iPhone via the sidebar on Finder if you have a Mac. If you’re using iTunes, open the app and click on your iPhone.
Step 4: You will now see a prompt that says there’s something wrong with the iPhone and it needs to be updated or restored. Select the Restore option.
Your computer will now download the relevant iOS software and begin the restore process. Wait for the process to complete and your iPhone will reset without the password.
If your iPhone exits the recovery mode before the restore process starts, disconnect your iPhone from the computer, let the download complete, and connect it back.
How to Restore Backup After Resetting the iPhone
After your iPhone resets, it’s time to set it up and restore your backup. If you weren’t able to take a backup or you don’t have a prior backup, you can skip this step. Go through the setup process normally and enter the password to the Apple ID that you used previously. After that, you can use your iPhone without any passcode.
If you have a backup, though, here’s how you can restore it.
Step 1: Go through the initial setup process on the iPhone. Log in to the same Apple ID that you used to take the backup before resetting the iPhone.
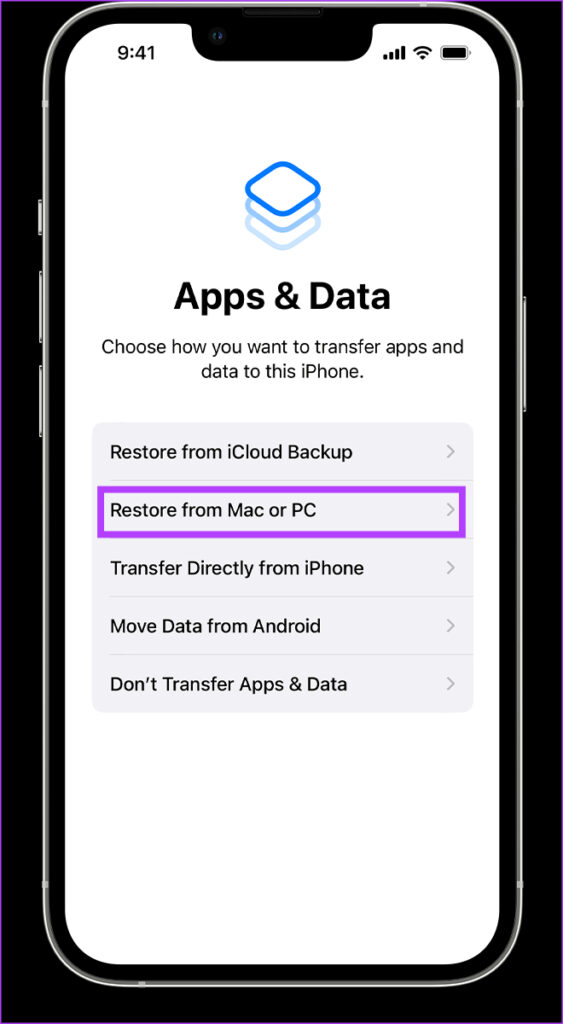
Step 2: When you reach the Apps & Data section, select which type of backup you want to restore. If you have an iCloud backup, select ‘Restore from iCloud Backup’. If you backed up your iPhone to your Mac or PC, select the second option.
Step 3: If it’s an iCloud backup, it should start restoring automatically. If it’s a backup on your computer, plug in your iPhone via a lighting cable and select the Restore Backup option.
How to Change Your iPhone Passcode
Now that you’ve set up your iPhone, here’s how you can change the password to something that’s not too simple to guess but easy to remember.
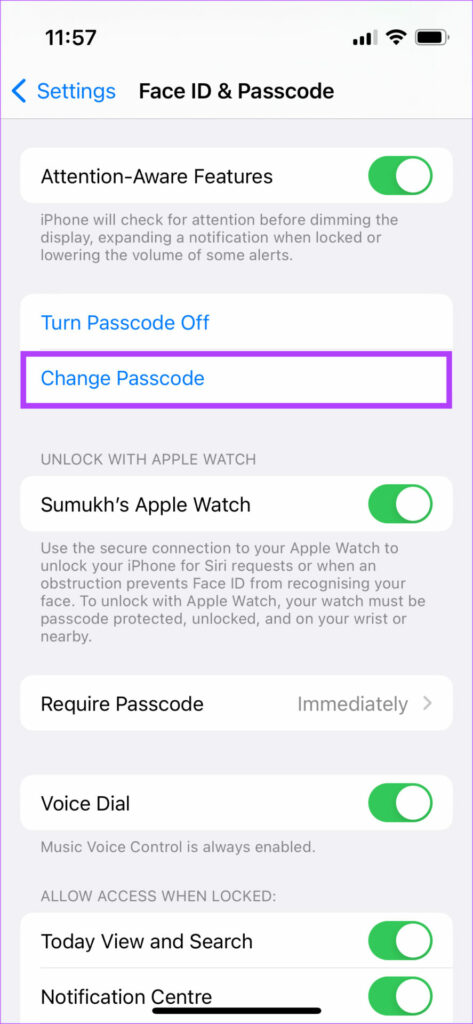
Step 1: Open the Settings app on your iPhone. Navigate to the Face ID & Passcode section.
Step 2: Scroll down and select Change Passcode.
Enter your current password and then enter the new password you want to set. You’ve successfully changed your iPhone’s passcode.
FAQs About Resetting iPhone
1. Can Apple Support unlock my iPhone without resetting it?
No, Even if you take your iPhone to Apple, they will reset it if you forgot your passcode.
2. Can I use a different Apple ID to set up my iPhone after resetting it?
Yes, you can use a different Apple ID with your iPhone. However, you will first have to enter the password to your old Apple ID to verify your identity before signing in with a new Apple ID.
3. Can I reset the iPhone password without losing my data?
That’s not possible. Resetting your iPhone will erase the data. However, if you have a backup, you can restore it and all your data will be intact.
Revive Your Locked iPhone
As you can see, if you forgot your iPhone password, it’s not the end of the world! You can always reset your iPhone password using one of the abovementioned methods and bring your locked iPhone back to life. If you’ve regularly backed up your iPhone, you can even restore the entire data so you don’t lose out on your photos, files, and apps.
Check screen brightness levels using the keyboard: If your Mac’s display doesn’t work properly after going into sleep mode, start pressing the Function keys on your Mac to increase the screen brightness levels.
Connect your MacBook to the power source: Try plugging in your charger and wait for a few minutes to check if the display turns back on. If you have a MacBook Air and have ever faced any issues with charging it, you can read our post suggesting how to fix MacBook Air not charging.
Force restart your MacBook: You can try to force restart it by long-pressing the Power Button or Touch ID button on your Mac keyboard.
Unplug and replug your cables. This is especially important if your external display does not turn on after you wake from sleep.
Visit Apple service center: You can visit your nearest Apple Store or contact customer support.
Fix 1: Reset SMC
SMC, or System Management Controller, is a chip available for Intel-based Macs or iMacs that controls and stores critical details of different hardware functions. Since we are talking about screen brightness, try to reset the SMC of your Mac or iMac to see if it solves the problem.
Note: SMC reset is not applicable for Mac models running on M-series chips. Restarting these Macs itself acts like the process of SMC reset.
Step 1: Press and hold the Power Button until your Mac shuts down.
Step 2: After your Mac shuts down, wait for a few seconds and press Shift + Left Option + Left Control key. Press and hold the Power Button too.
Step 3: Keep pressing the four keys for another 7 seconds. If your Mac turns on, it will play the default start-up chime again while you hold down the keys.
When you see the Apple logo, the display will turn on normally. But if it doesn’t boot after the Apple logo, check the next solution.
Fix 2: Reset NVRAM
Another solution for Intel-based Macs is performing an NVRAM reset. NVRAM, or Non-Volatile Random Access Memory, holds information like sound volume, startup disk selection, time zone, and more. If you can’t get the display to turn on after sleep on your Mac, try to reset the NVRAM. Do note that after the NVRAM reset, you must adjust these settings again on your Mac.
Step 1: Long-press the Power Button on your Mac.
Step 2: After your Mac shuts down, press the Power button again to boot your Mac.
Step 3: While your Mac is turning on, press Option + Command + P + R for 20 seconds.
Step 4: Release all four keys when the Apple logo appears for the second time. This means that the NVRAM reset is complete. After that, your Mac will restart.
Step 5: Check if the display is turning back on or not.
Note: The NVRAM reset is only applicable for Intel-based Macs. Restarting a Mac running on an M1, M2, M1 Pro, or M1 Max chip is equivalent to performing an NVRAM reset.
Fix 3: Detect Displays Automatically
For external displays, try replugging it with your MacBook and manually detect it again.
Open Settings > Displays > press the Option key > click on Detect Displays.
Fix 4: Disable Sleep Mode Temporarily
If your external display is working after connecting to the Mac, try disabling this feature for some time and see if the problem is solved.
Step 1: Open Settings > Battery > Options.
Step 2: Disable the toggle for Prevent automatic sleeping on power adapter when the display is off.
Charge your phone: Your Android phone may not install an update if it does not have enough battery power. This prevents your phone from shutting down in the middle of an update. Ensure your phone has over 50% battery life, or leave it plugged in while installing the update.
Free up storage space: A lack of storage space can also lead to the “Android system update failed to install” error. If your device is running low on storage space, delete unwanted large files or transfer some media files to the cloud. Conveniently, you can also free up storage space on your Android without deleting apps.
Fix 1: Correct Date and Time
Your phone may not connect to the update servers with an incorrect date and time. When that happens, your phone may fail to download system updates. To avoid this, configure your phone to use the network-provided date and time by following the steps below.
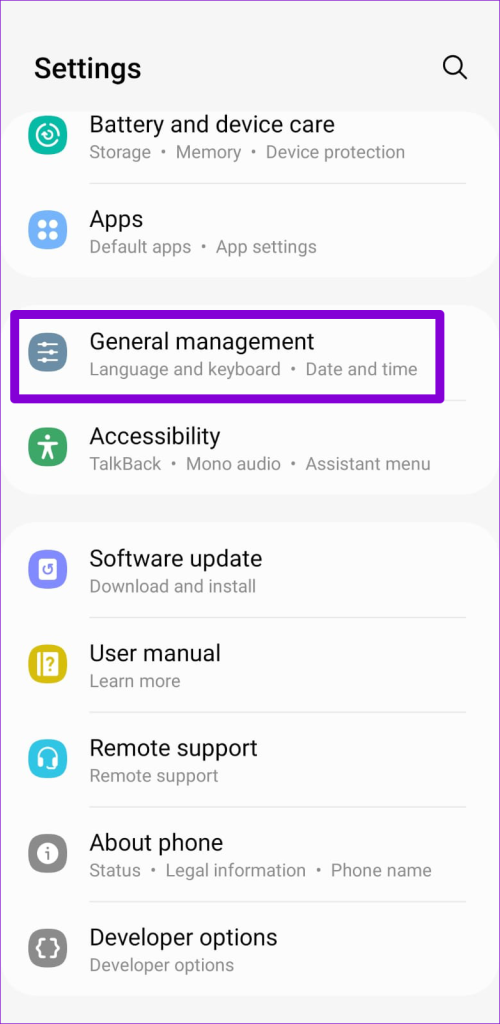
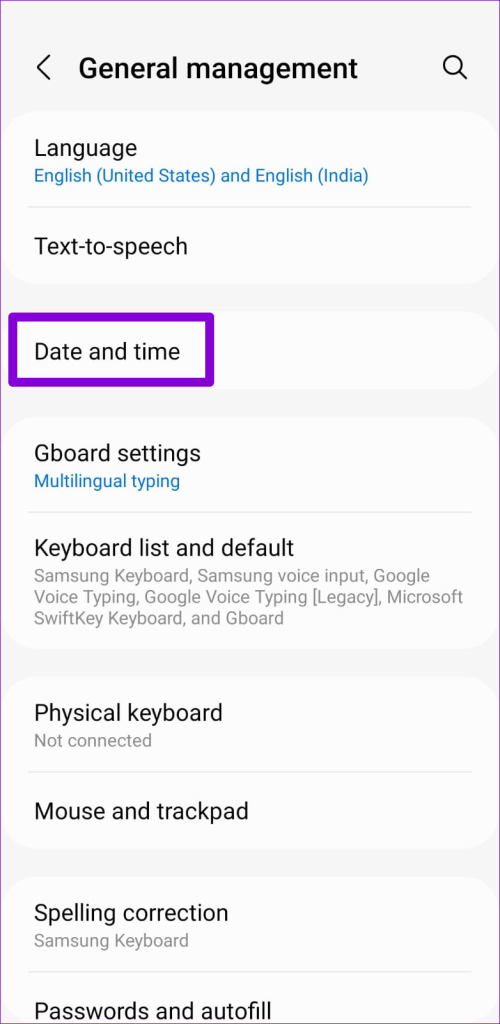
Step 1: Open the Settings app > navigate to General Management > Date and time.
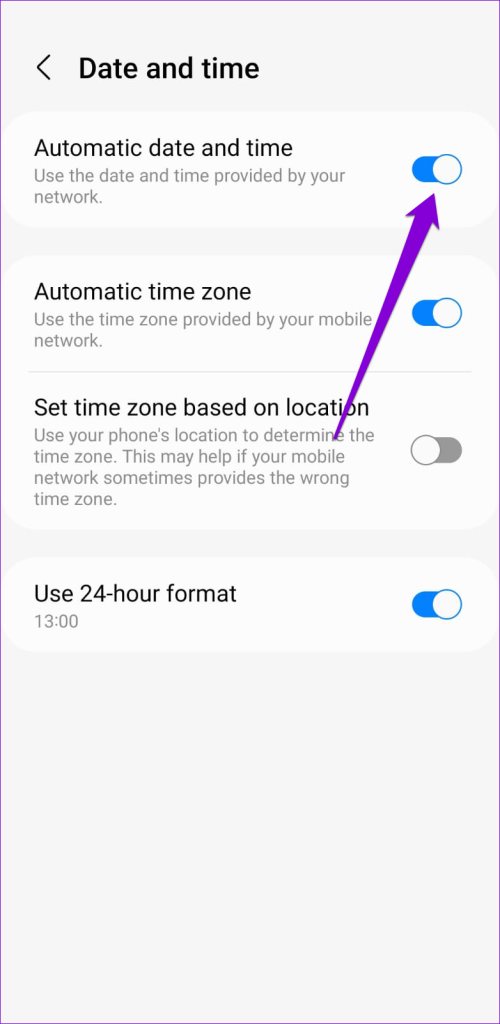
Step 2: Enable the Automatic date and time option.
Fix 2: Install Updates in Safe Mode
When you boot your phone into Safe Mode, it runs without third-party apps or services. This allows your Android device to download and install system updates without interference.
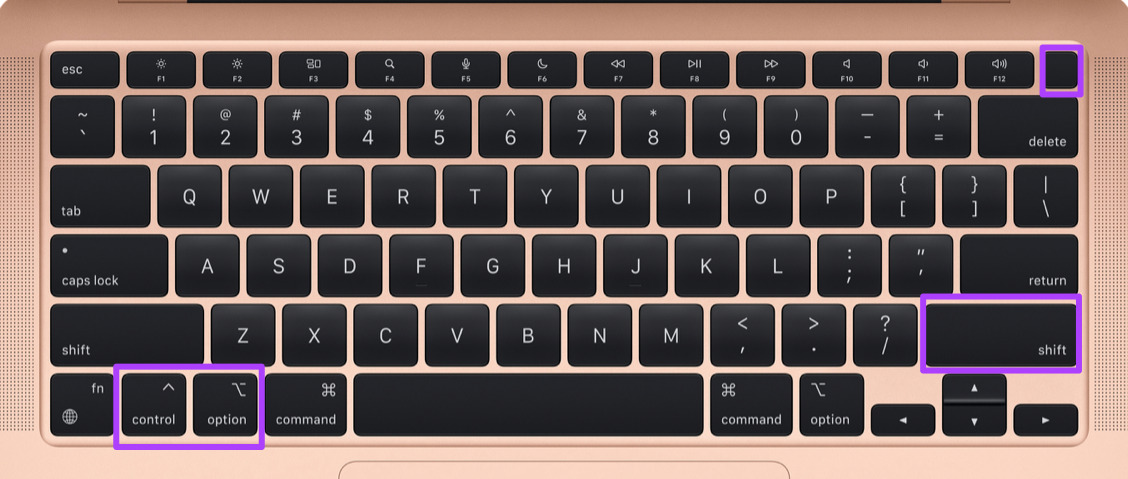
Step 1: Press and hold the power button until power options appear.
Step 2: Tap and hold the Power Off icon > tap on the green checkmark to enter Safe Mode.
After you’re in Safe Mode, open the Settings app and head to Software Update. Download and install the software update and see how it goes.
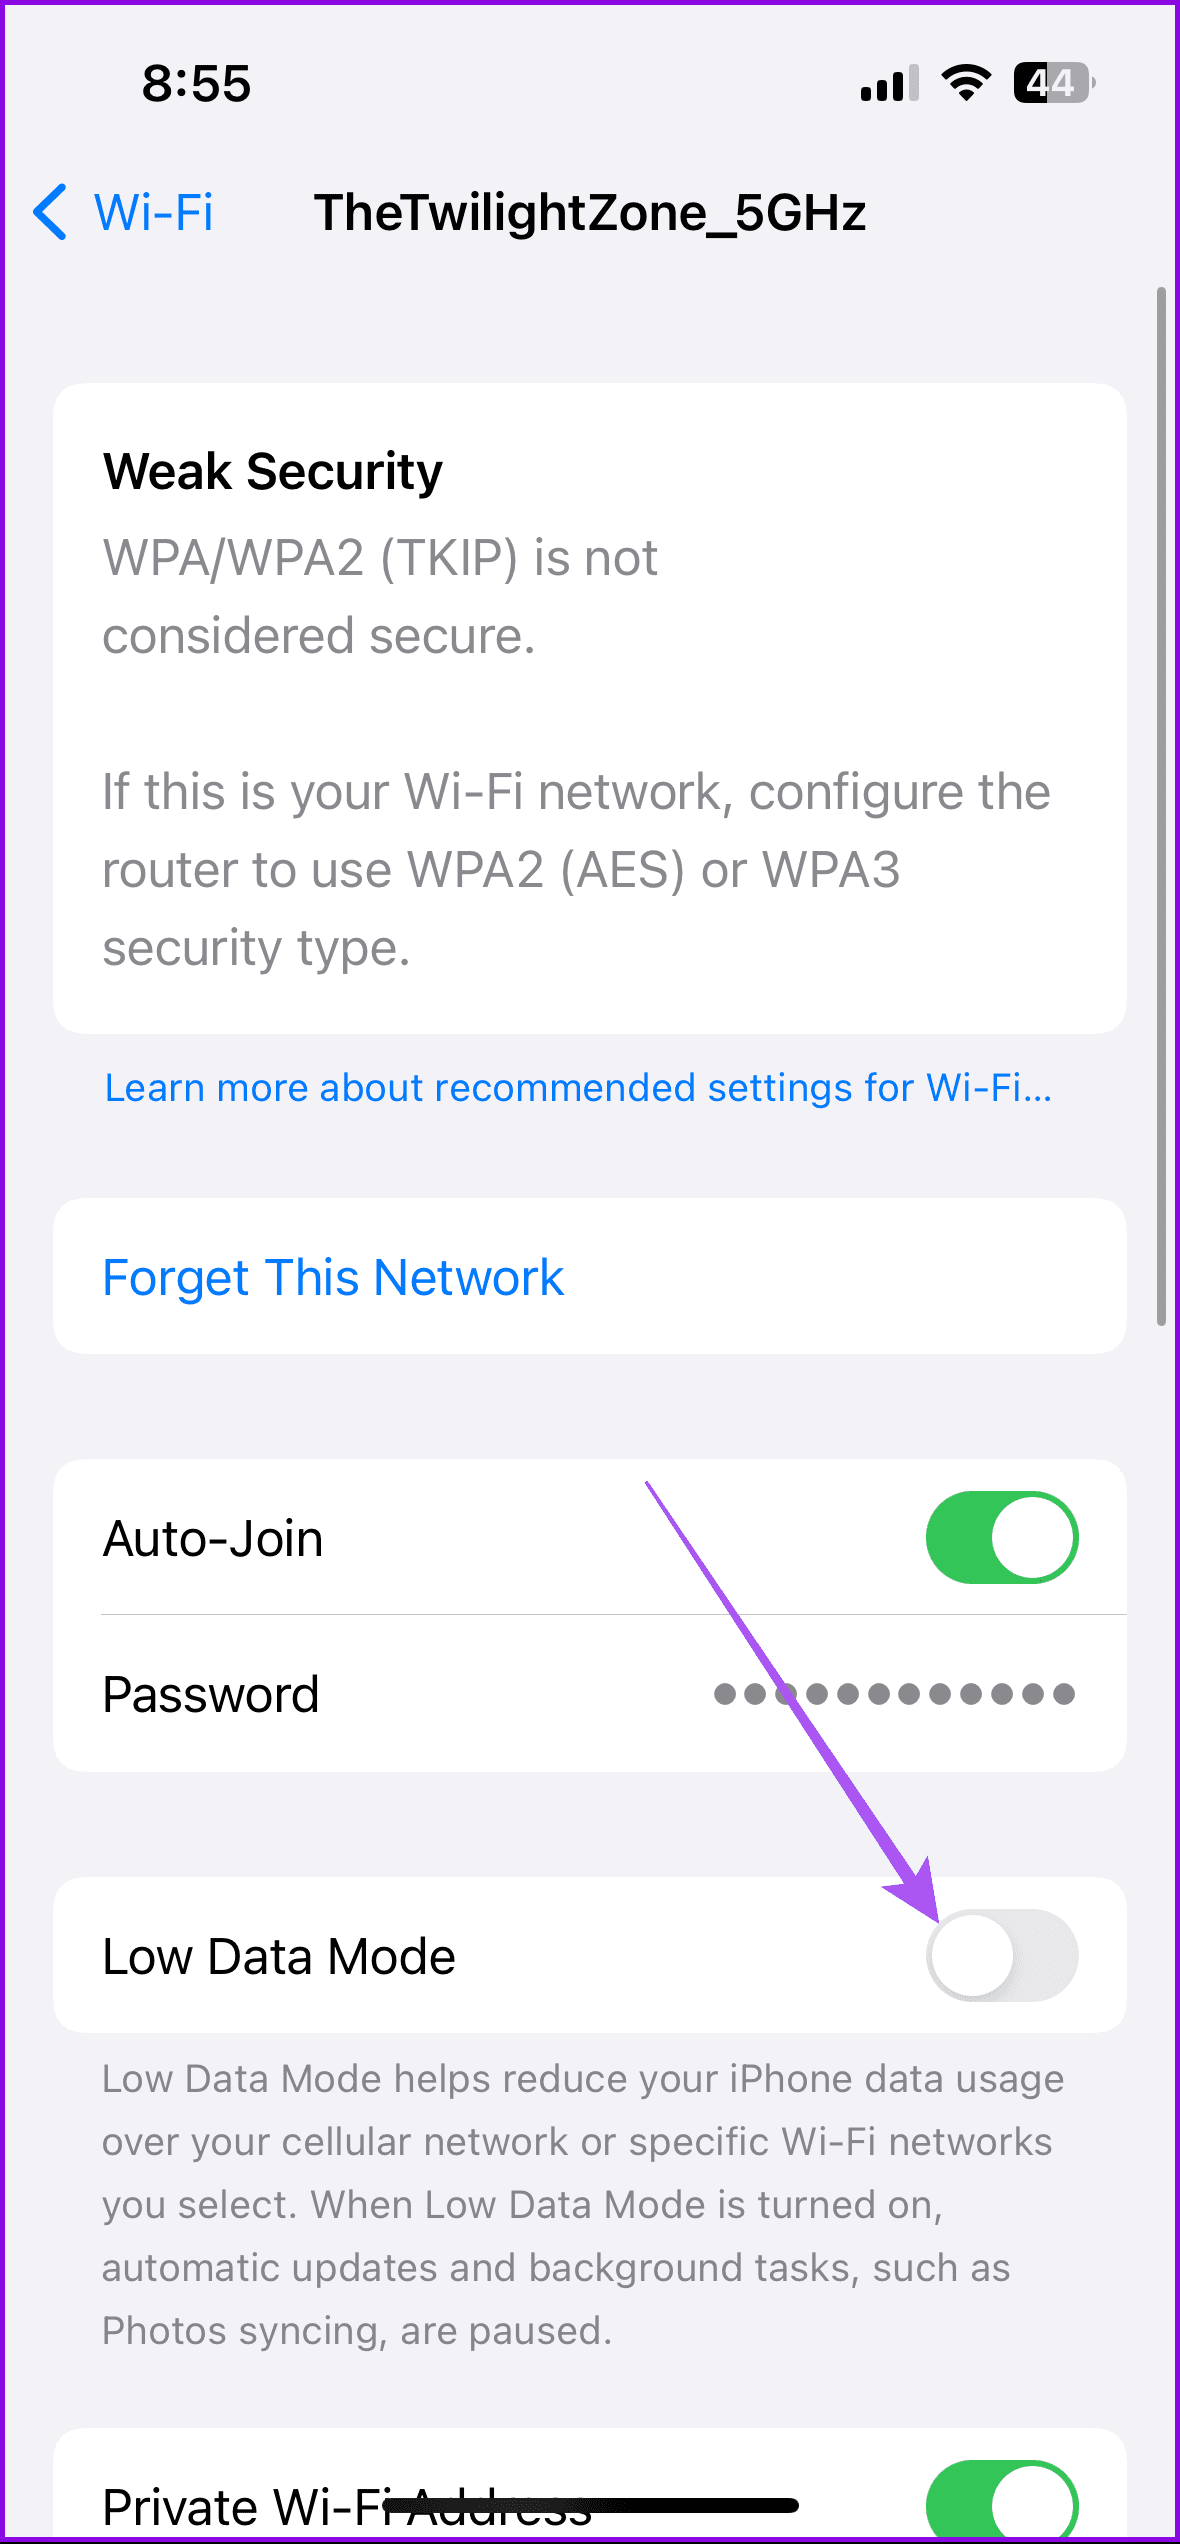
Check the network connection: First, check the network connection quality on your iPhone. If you face network issues, you can enable Airplane mode on your iPhone and disable it later to refresh the network connection. Then, check again.
Check Apple servers: When Apple servers face an outage, the Mail app gets stuck on the ‘checking for mail’ message. You can visit Apple’s system status page to check and confirm such issues. If so, wait before trying again.
Force quit the Mail app: Forcing the Mail app from running in the background will close all app functions. Then, tap on the Mail app icon to reopen the app. This should refresh app functions and fix any issues caused by temporary app glitches.
Update iOS software: All Apple apps are part of iOS software, and the company adds new features and bug fixes via iOS updates only. Mail stuck on checking for new messages might be due to a bug. So, install any new software updates to fix it accordingly.
Reinstall the Mail app: Custom app settings can also display such errors. If you can’t identify them, uninstall the Mail app and reinstall a fresh app copy. Then, set up the Mail app again and see if this fixes the issue.
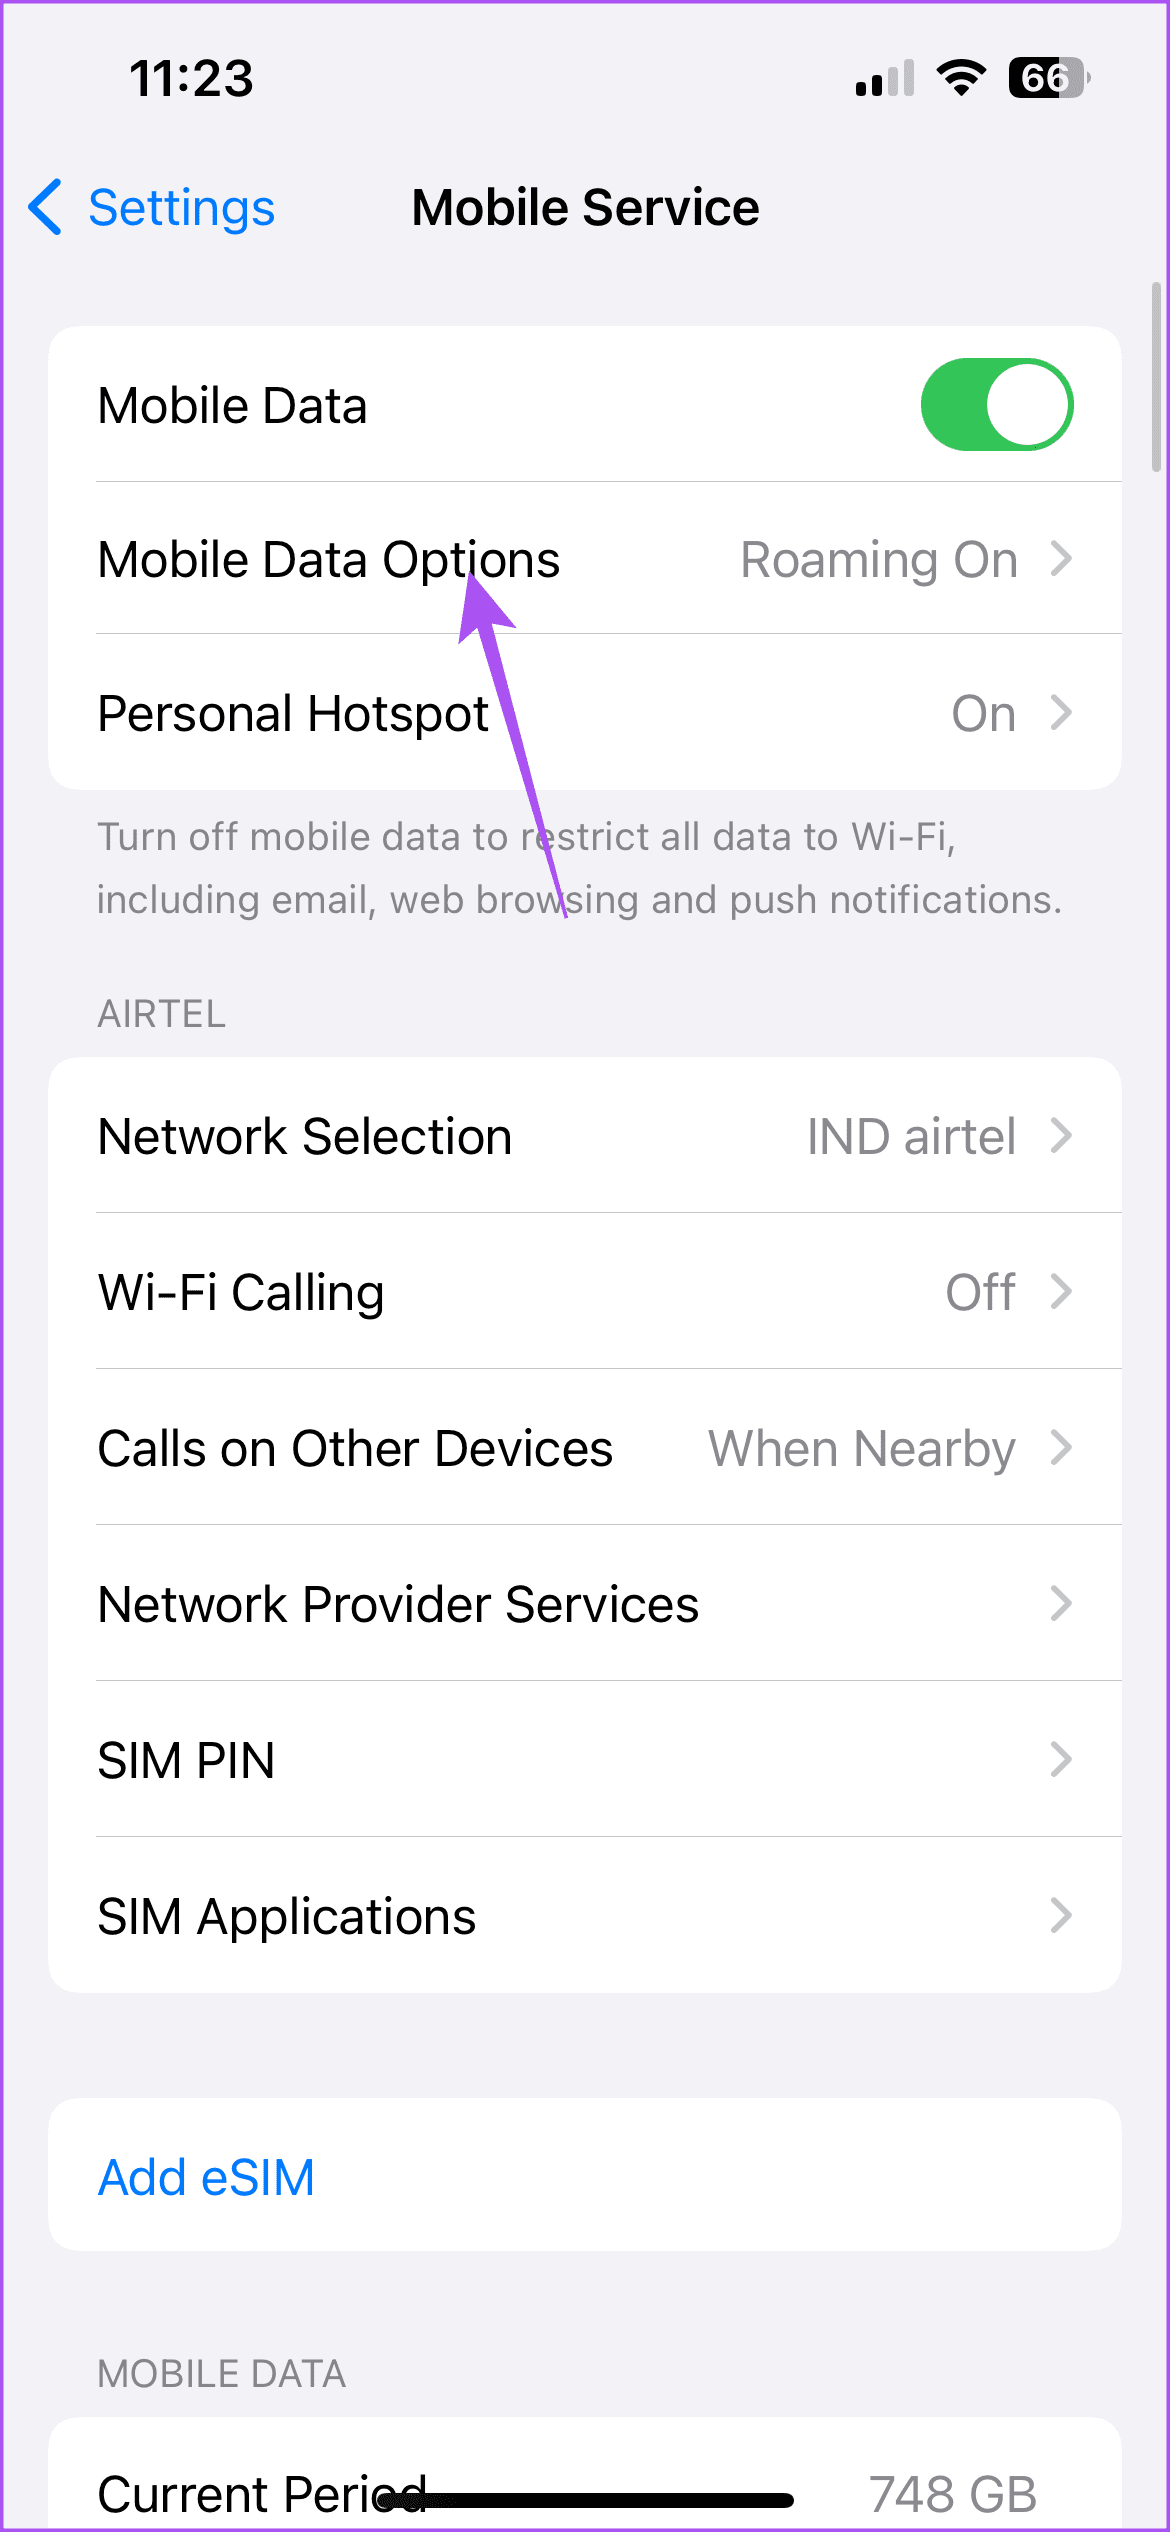
Fix 1: Enable Mobile Data for Mail
If you have disabled Mobile Data access to the Mail app, it will be stuck on checking for new mail when your iPhone is on Mobile Data. Give the Mail app Mobile Data access and download new emails without issues. Here’s how to do it.
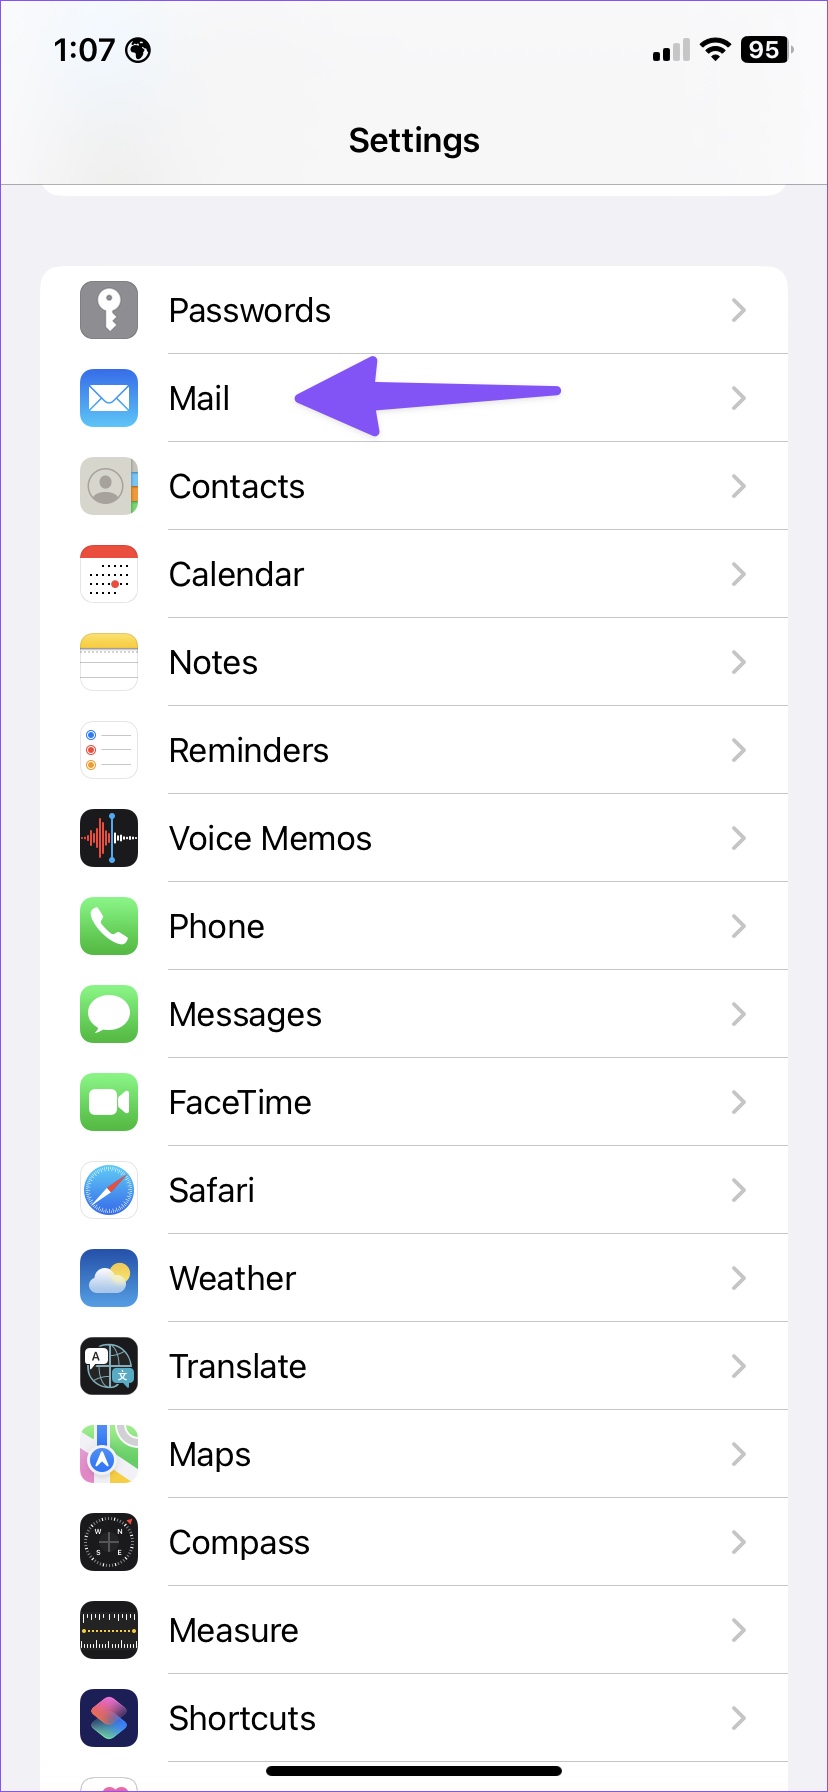
Step 1: Open the Settings app and tap on Mail. Enable the Mobile Data toggle.
Fix 2: Add the Email Account Again
Did you recently change your Gmail or Outlook password or add two-factor authentication to your email account? To download the latest emails, reauthenticate your email account in the Mail app. Follow the below steps to do it.
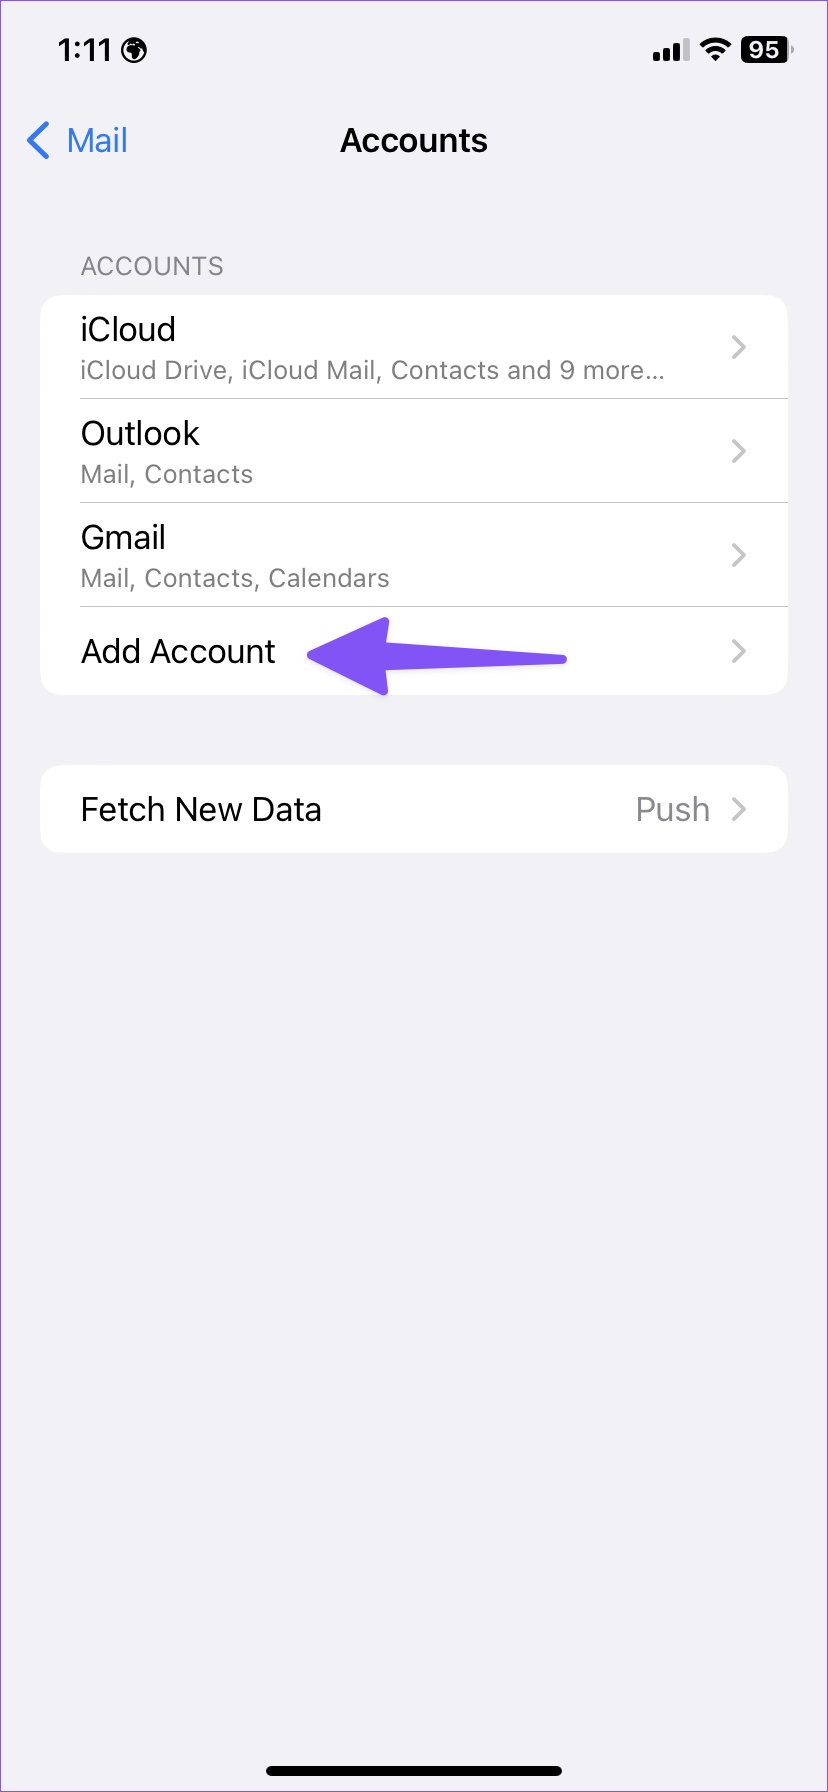
Step 1: Open the Settings app > tap on Mail > Accounts.
Step 2: Here, select the relevant mail account.
Step 3: Tap on Delete Account and confirm your decision. Once the account is deleted, tap on Add Account.
Follow the on-screen instructions to re-add your mail account. Double-check the account information. Then, check if the issue has been resolved.
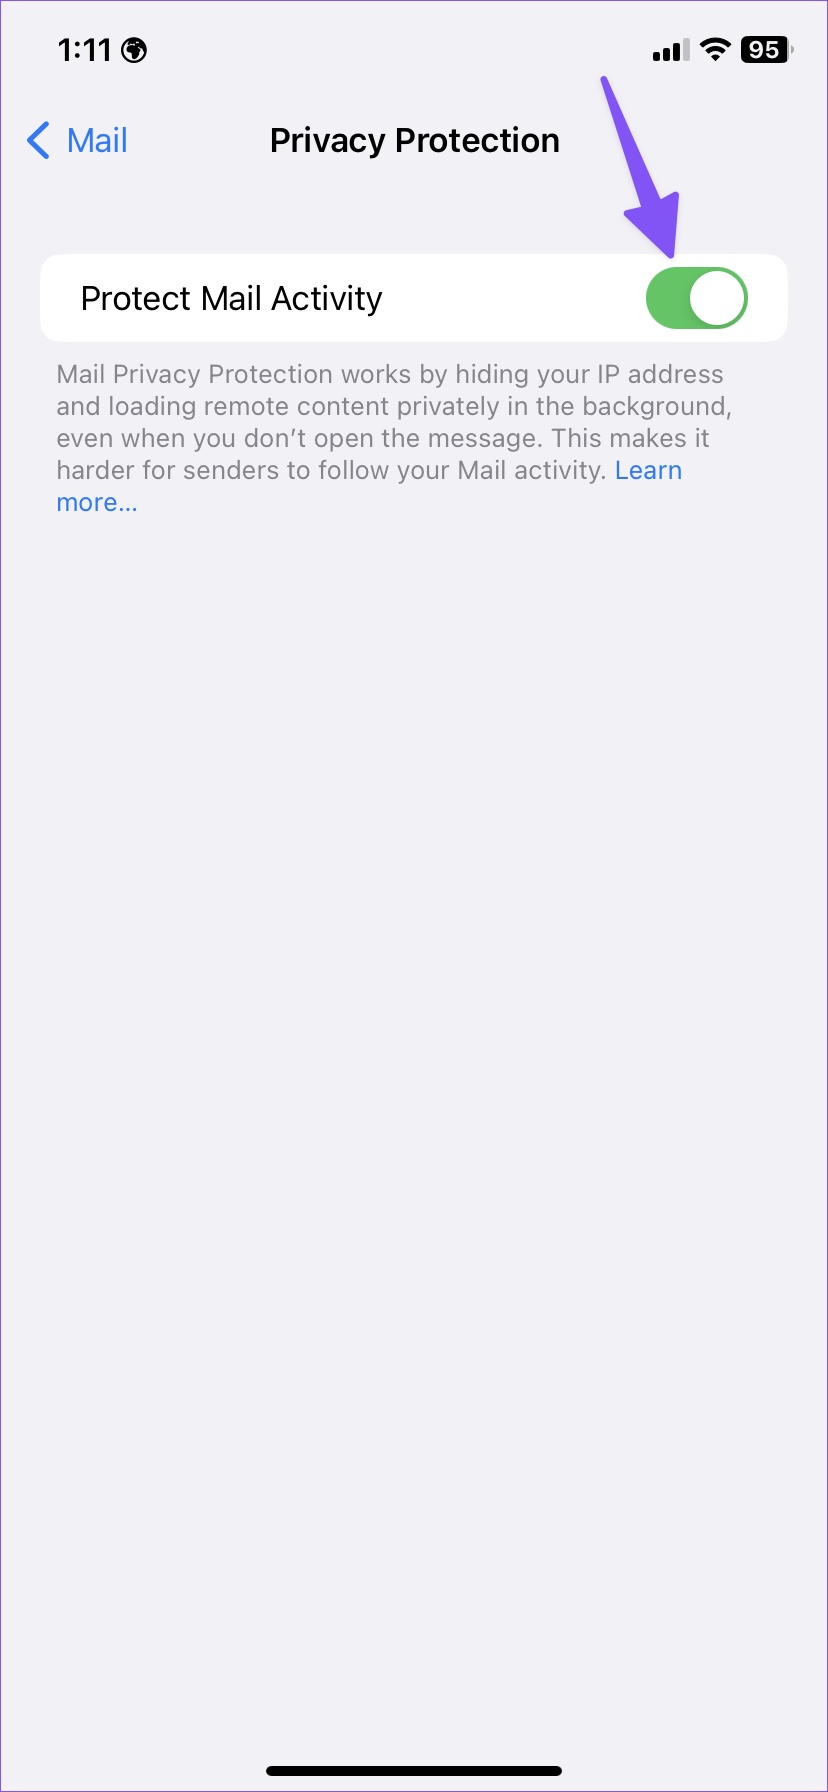
Fix 3: Temporarily Disable Privacy Protection in Mail
As a part of iCloud Private Relay on iPhone, Mail Privacy Protection hides your IP address and loads remote content privately in the background. While it adds a layer of security, you may face issues when the iCloud Private Relay service faces an outage. In this case, disable the add-on temporarily. Here’s how.
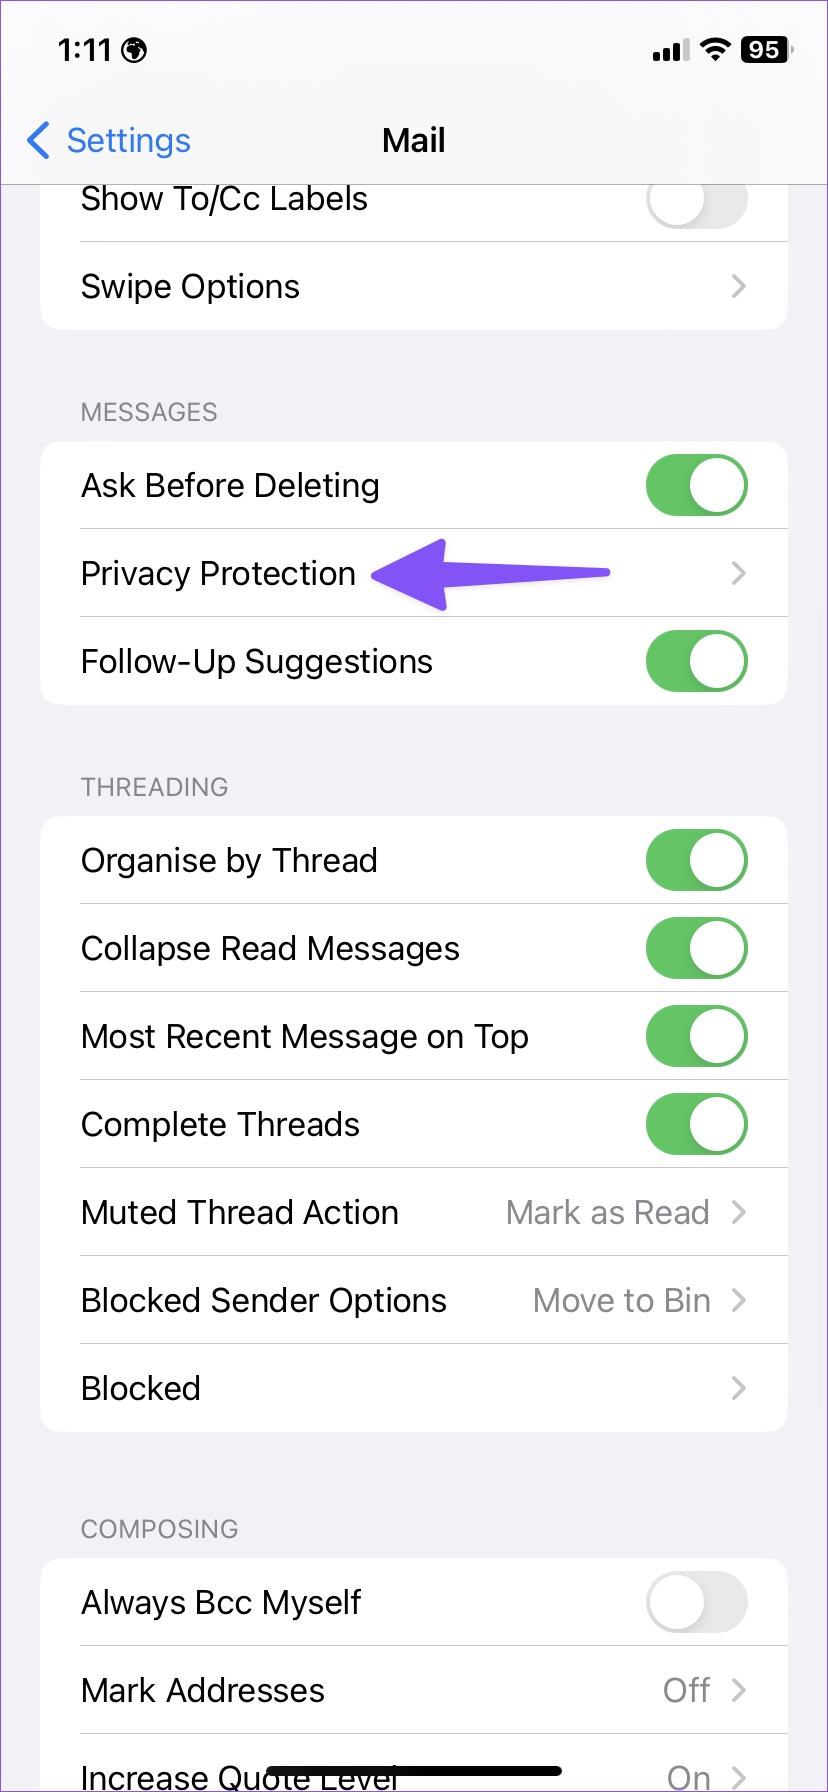
Step 1: Open the Settings app → Mail. Scroll down and tap on Privacy Protection.
Step 2: Turn off the Protect Mail Activity toggle.
Now, try using the Mail app to see if the issue has been fixed. If necessary, you can enable Protect Mail Activity for the Mail app after a while.
1. Get Battery Full Alert on Samsung Galaxy Phones
Step 1: Open Settings on your Samsung Galaxy phone.
Step 2: Go to Advanced features. Then, toggle Bixby Routines, followed by Bixby Routines text.
Step 3: Tap on the Add Routine tab at the bottom.
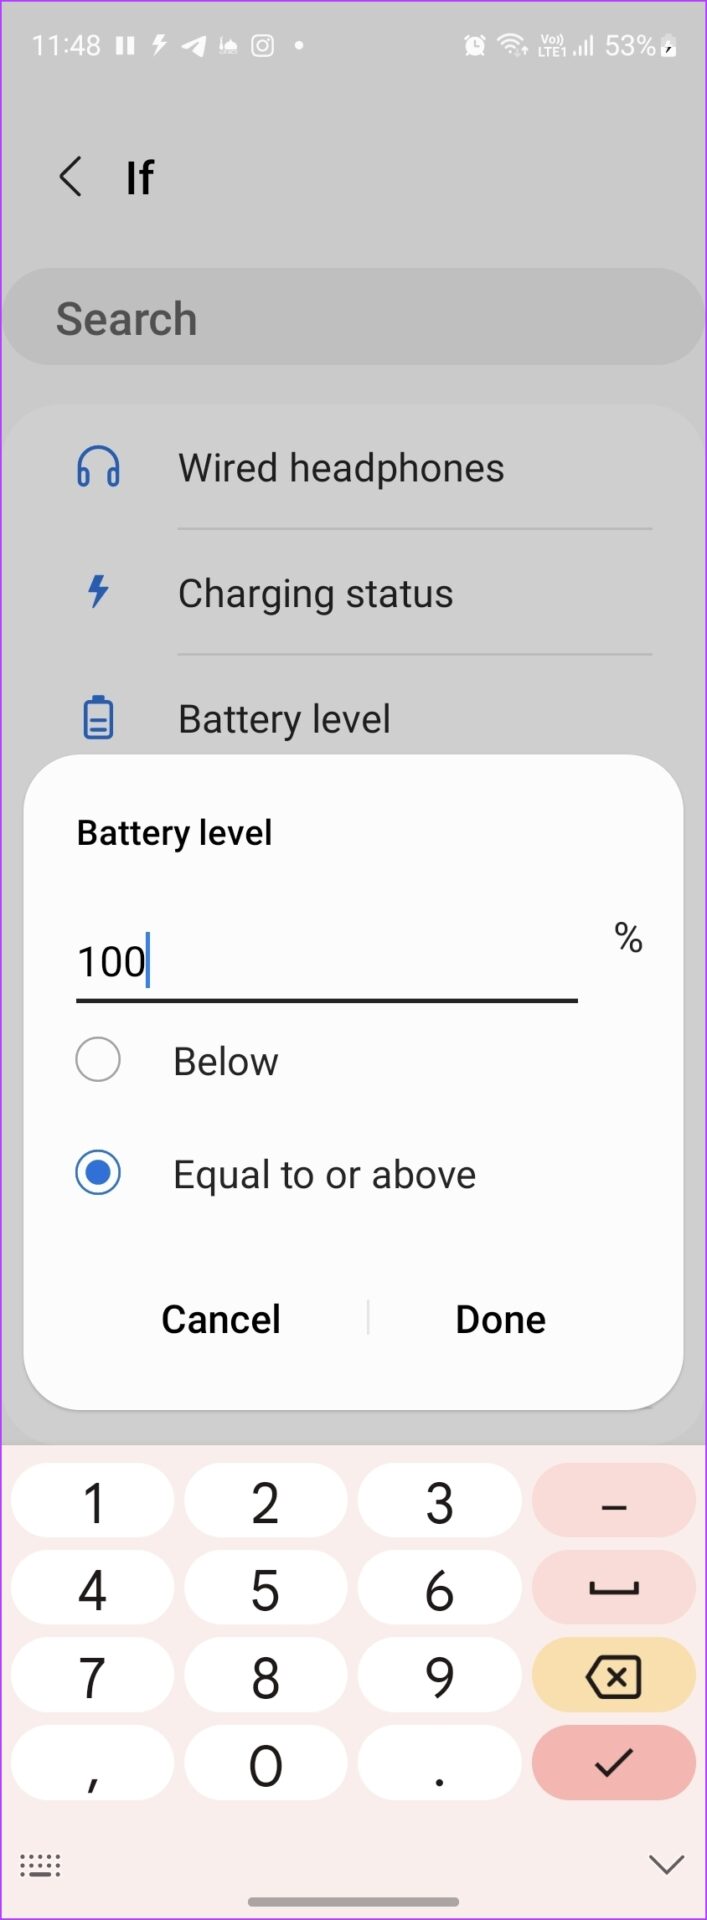
Step 4: Tap on the (+) Add icon under the If condition. Scroll down and tap on Battery level.
Step 5: Enter the battery level percentage at which your Samsung phone should alert you. Since we want to get full battery alerts, enter 100 and select the Equal to or above option. Press the Done button.
Step 6: Now, tap the (+) Add button under the Then section.
Step 7: Depending on your preference, you can make your phone do a variety of things when the battery is fully charged. For instance, you can make it vibrate, announce that the battery is fully charged, play notification, or activate edge lighting.
Note: The actions will activate in the order they appear under the Then section. You may reorder the actions as you prefer.
Step 8: Finally, tap on the Next button at the bottom.
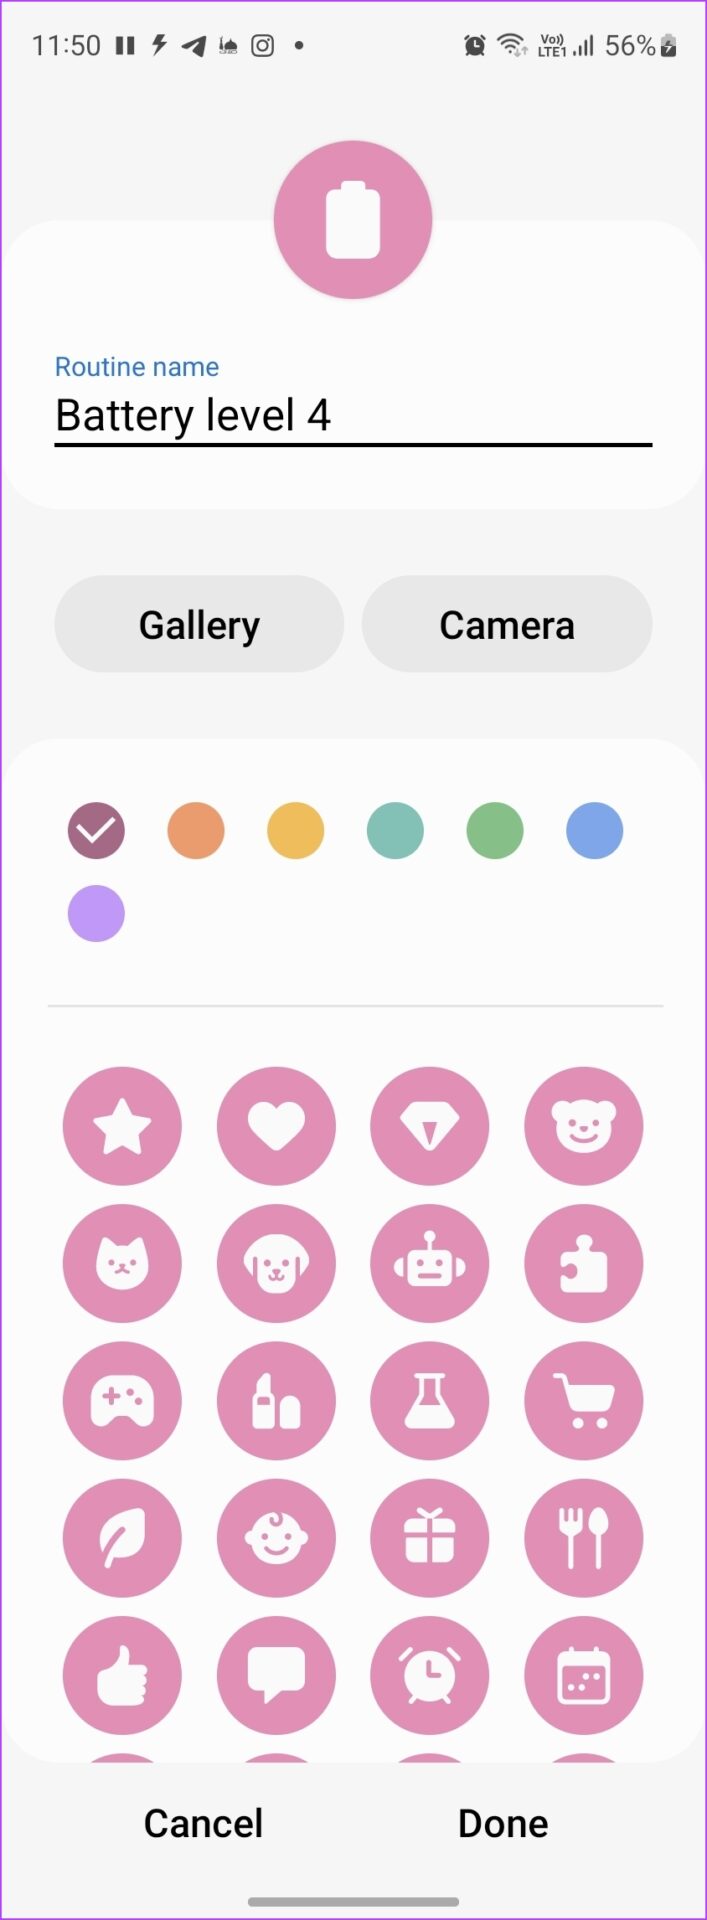
Step 9: Give a name to your routine and select an icon for it. Hit Done at the bottom.
That’s it. Now, the Routine will run automatically and alert you whenever the battery is fully charged on your Samsung Galaxy phone.
2. Get Battery Full Alarm on Any Android Phone
Sadly, not all Android phones come with a native battery full alert feature. However, you can use third-party battery alert apps to notify you about the battery’s full status on any Android phone. Follow these steps:
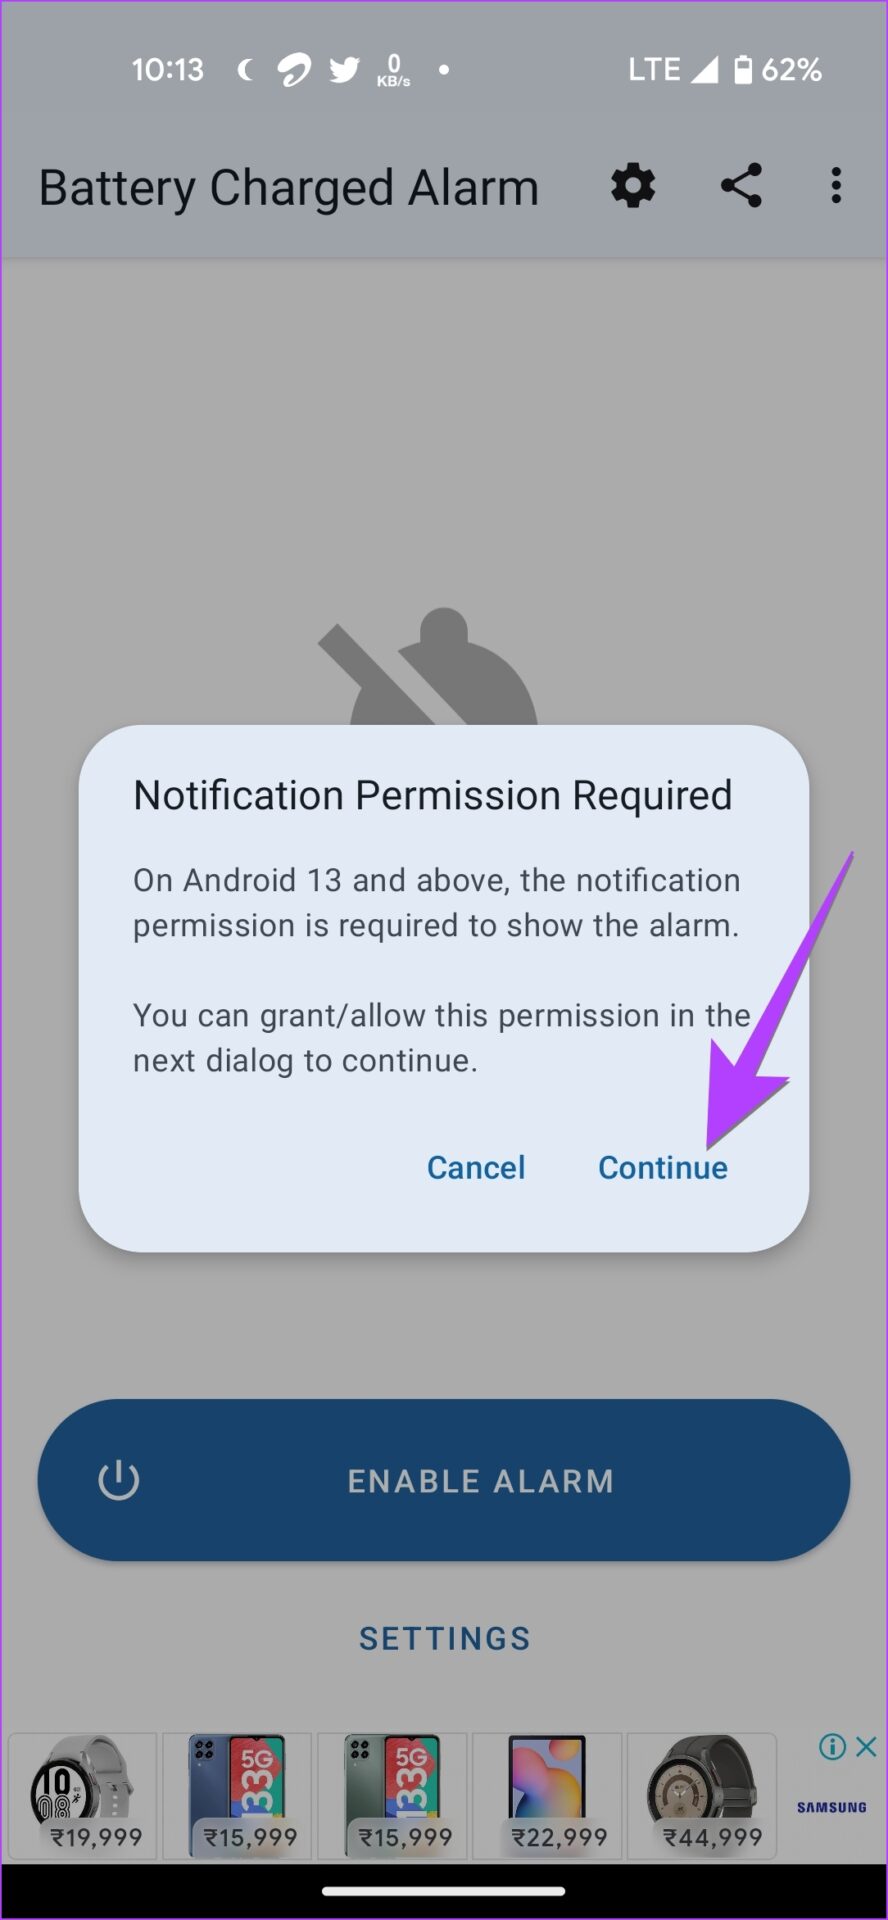
Step 3: A notification permission pop-up will show up. Tap on Continue followed by Allow.
Step 4: Another pop-up will show up saying that you will see this app’s notification in the notification panel. Tap on OK.
Note: It’s important for that notification to stay in the notification area. If the battery alarm doesn’t work, open the app and ensure you see that notification in the notification area.
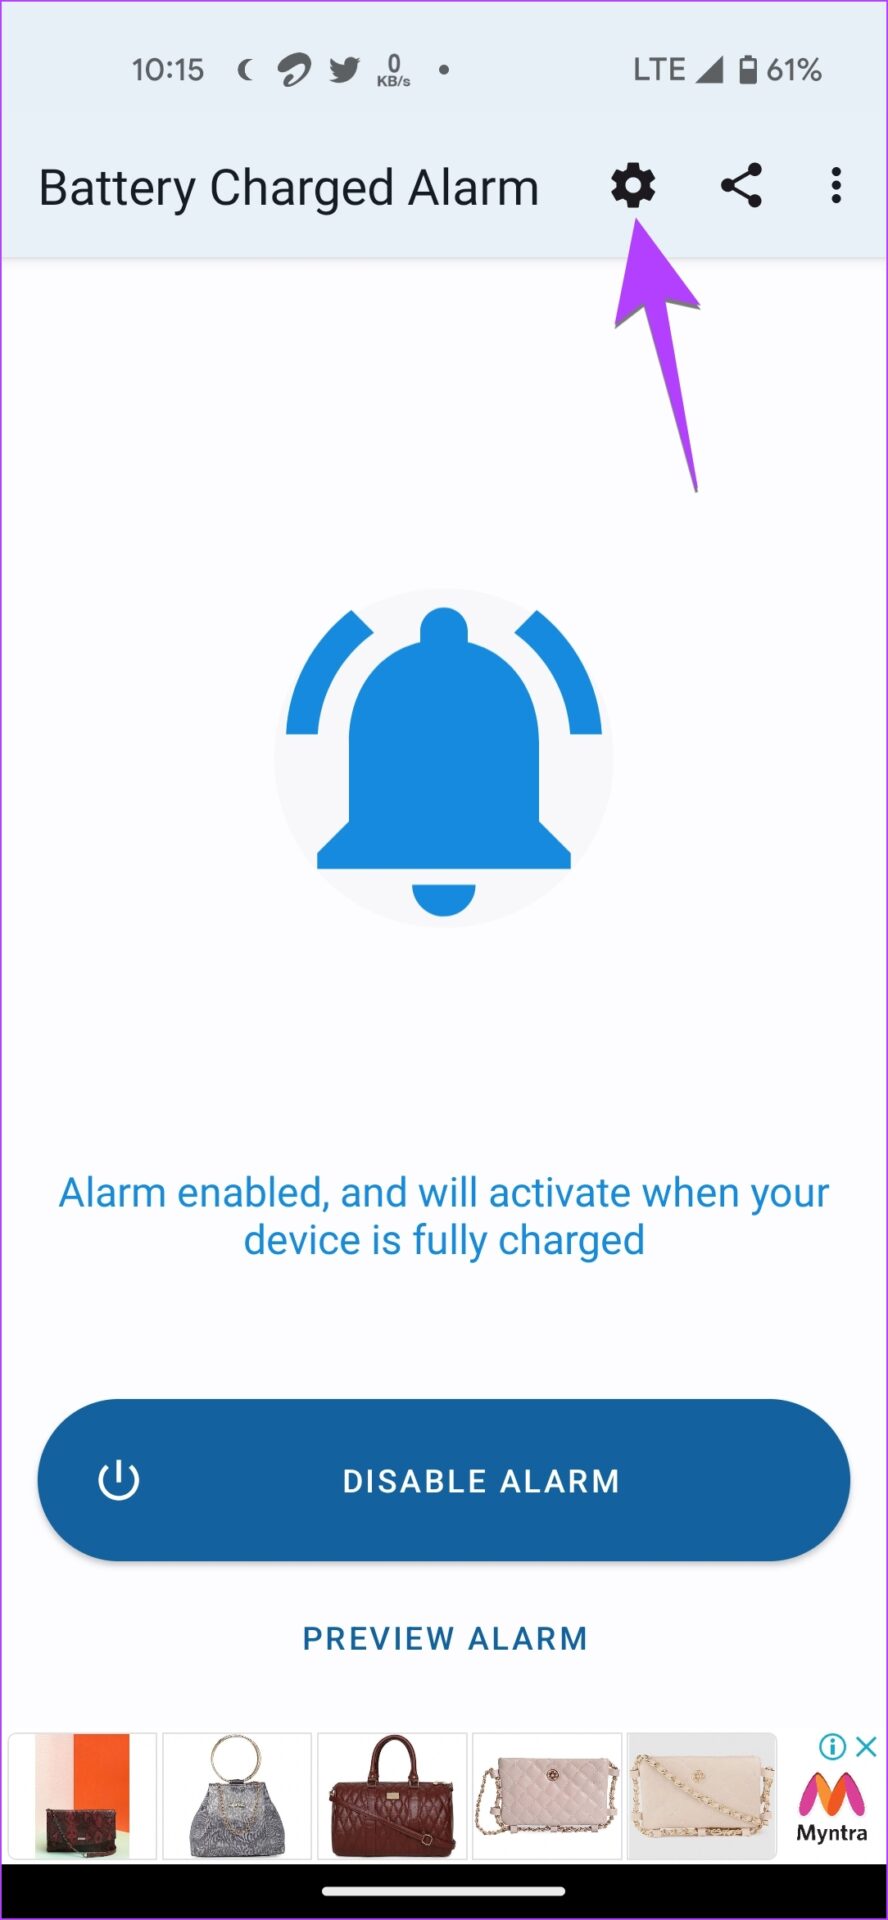
Step 5: You will see that the Enable Alarm button has converted to Disable Alarm. Now, tap on the Settings icon at the top and customize the battery full alarm notifications.
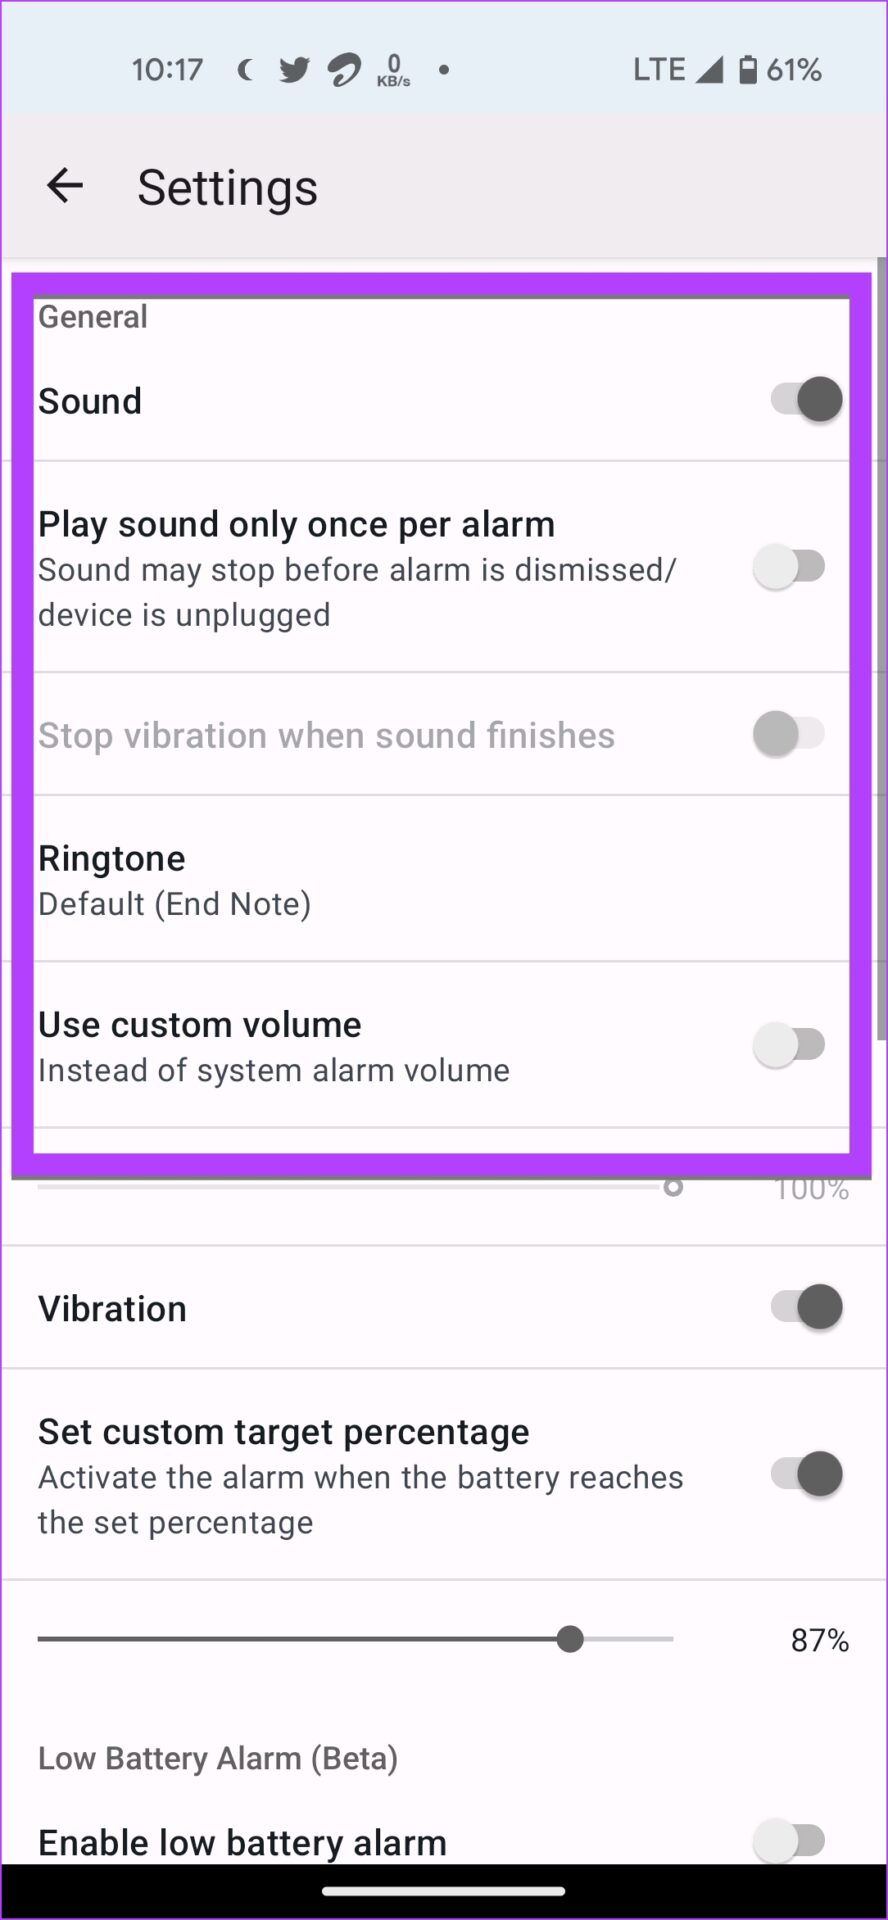
Step 6: By default, you will be alerted when the battery level reaches 100%. But, you can customize and change the target percentage. For that, first, enable the toggle next to Set custom target percentage. Then, set the desired battery percentage.
Step 7: Now, whenever you charge your phone, the app will alert you when the battery is fully charged.
Tip: Use this app to set low battery alarms as well.
Some other battery-full alarm apps for Android that you can try are:
1. Why does my Samsung phone stop charging at 85%?
Samsung Galaxy phones come with a feature that limits the maximum charge to 85%. To disable this feature, go to Settings > General management > Battery > More battery settings. Turn off the toggle for Protect battery.
2. How do I know my Android phone is charging?
When you connect your charger to the phone, you will see a lightning icon inside the battery icon in the status bar. You will also see the charging status on the always-on display on your phone.
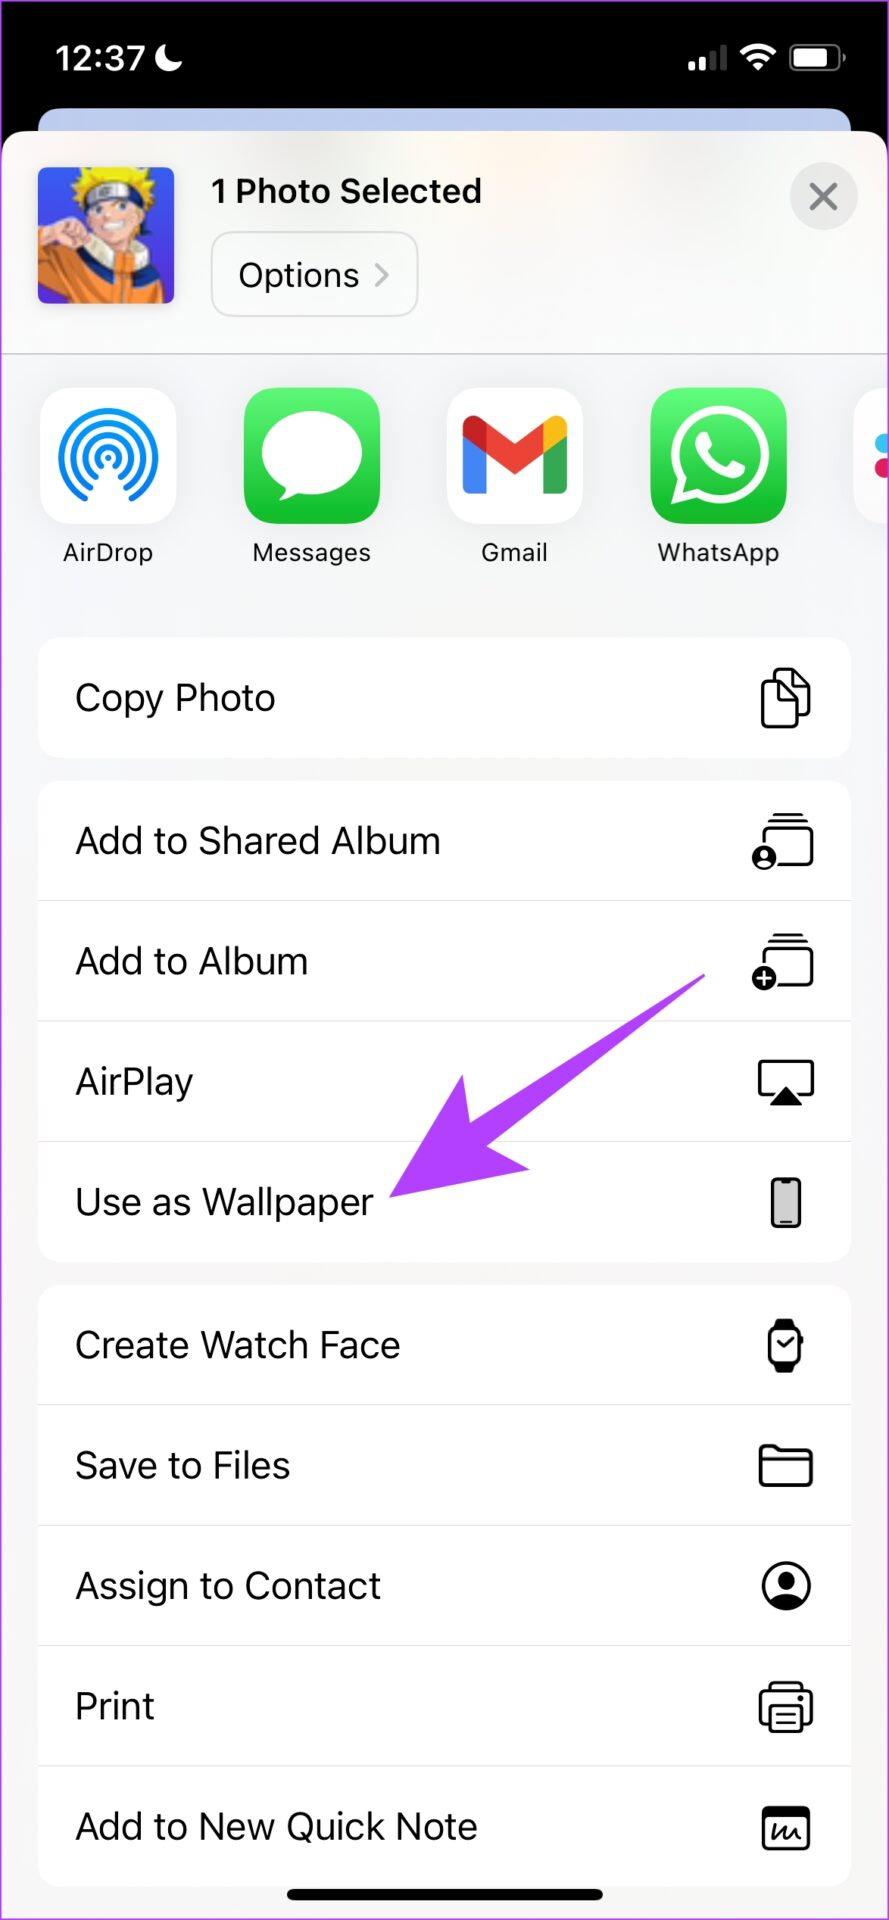
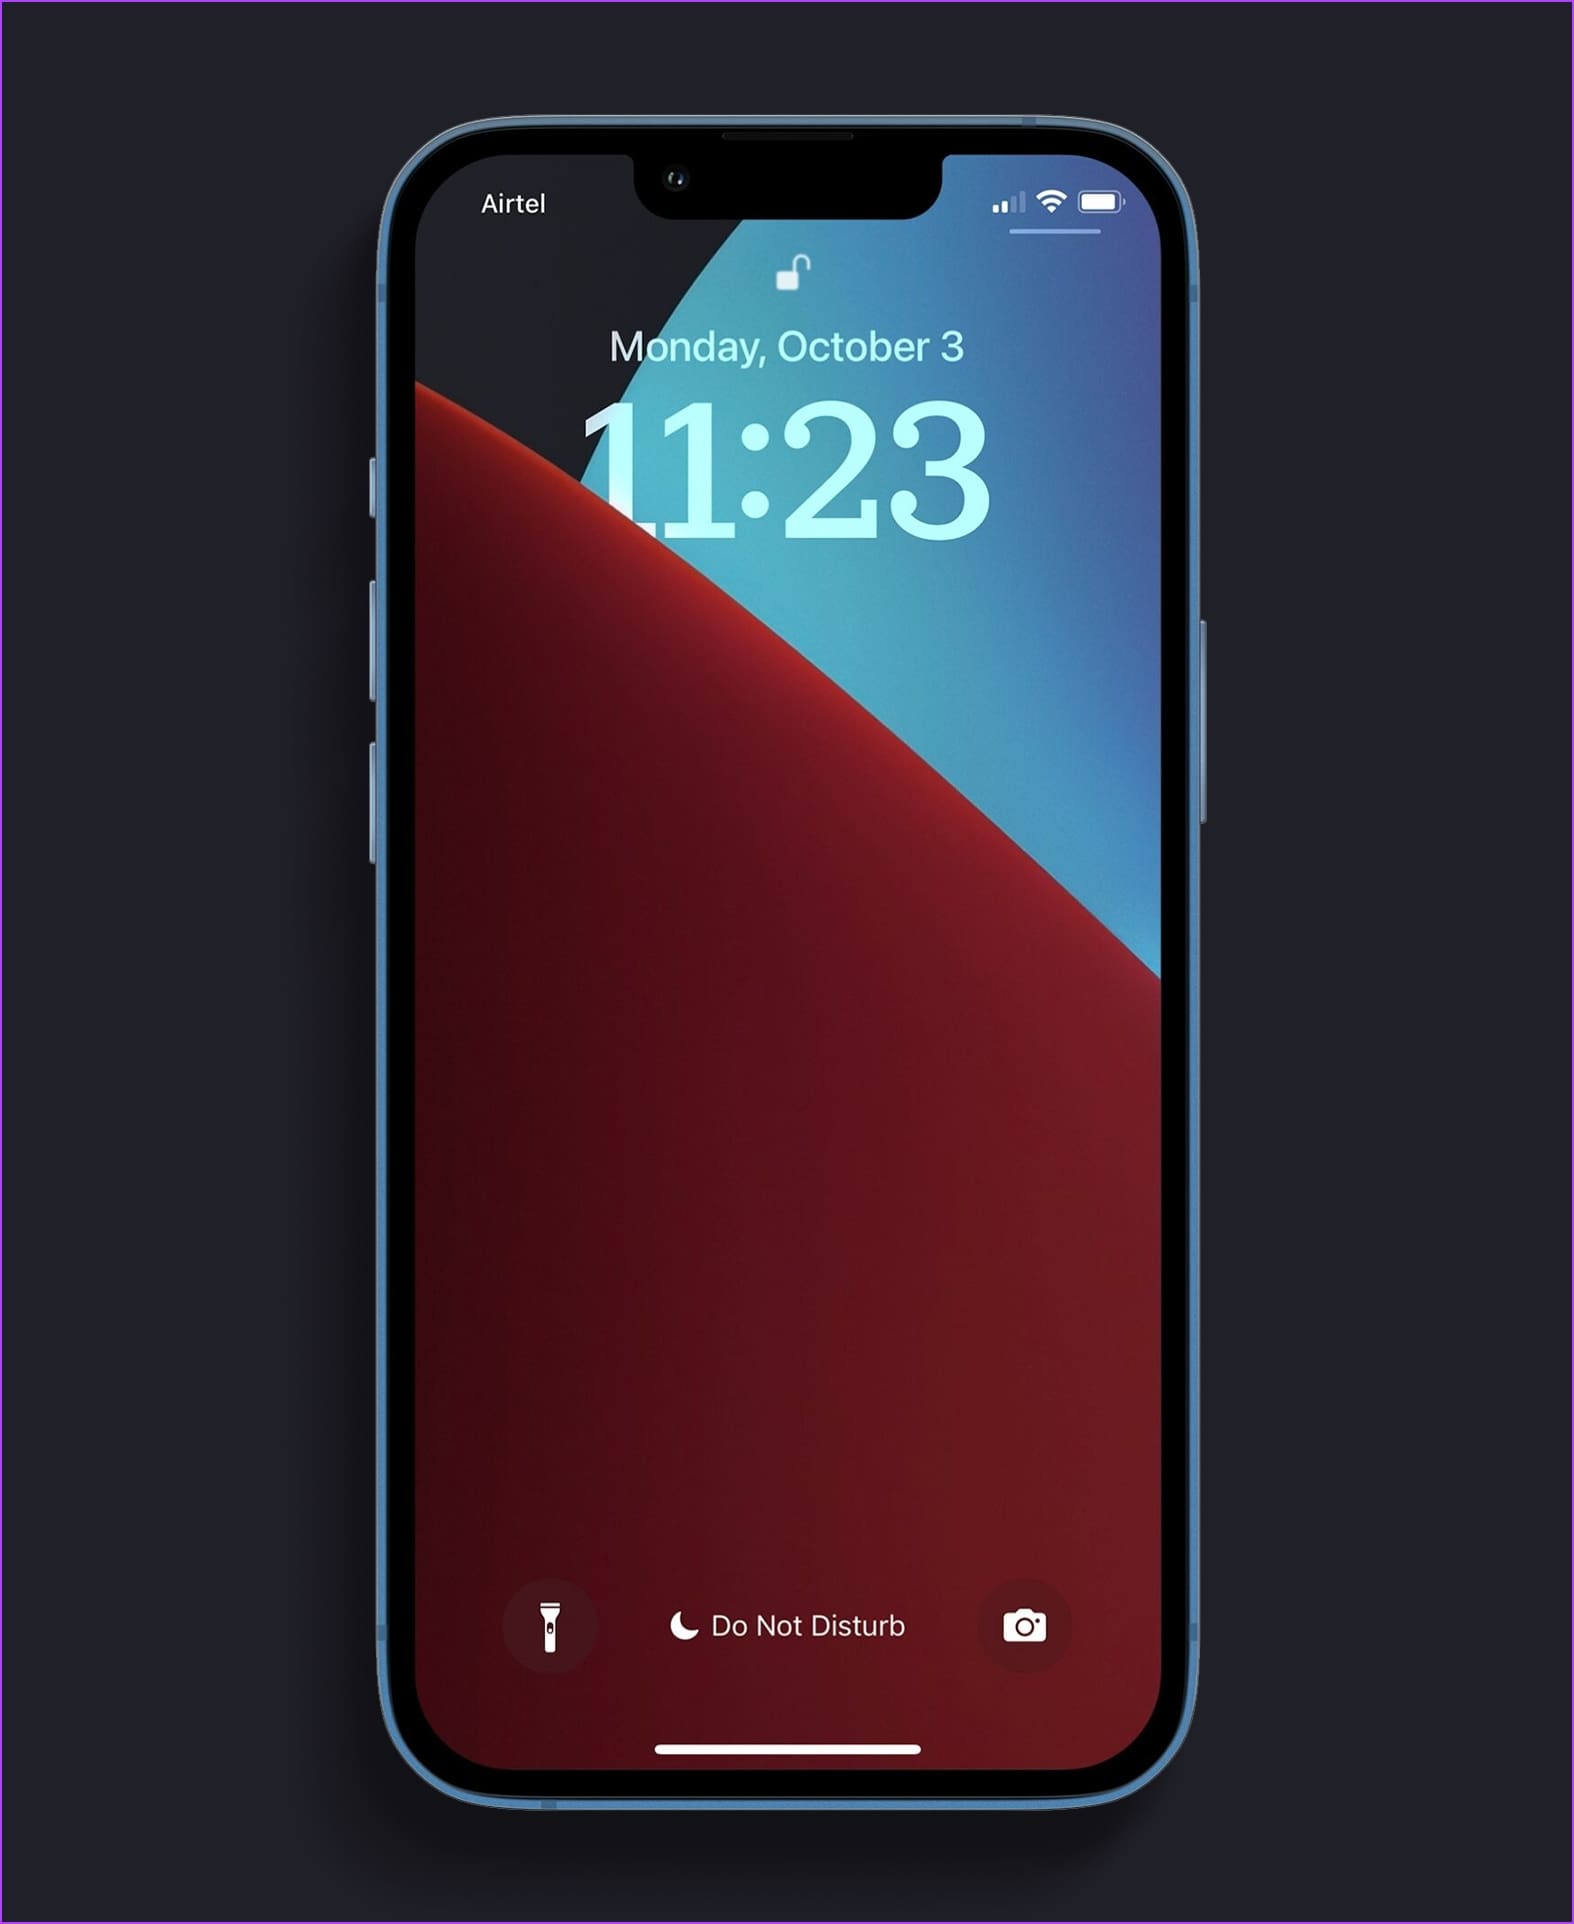
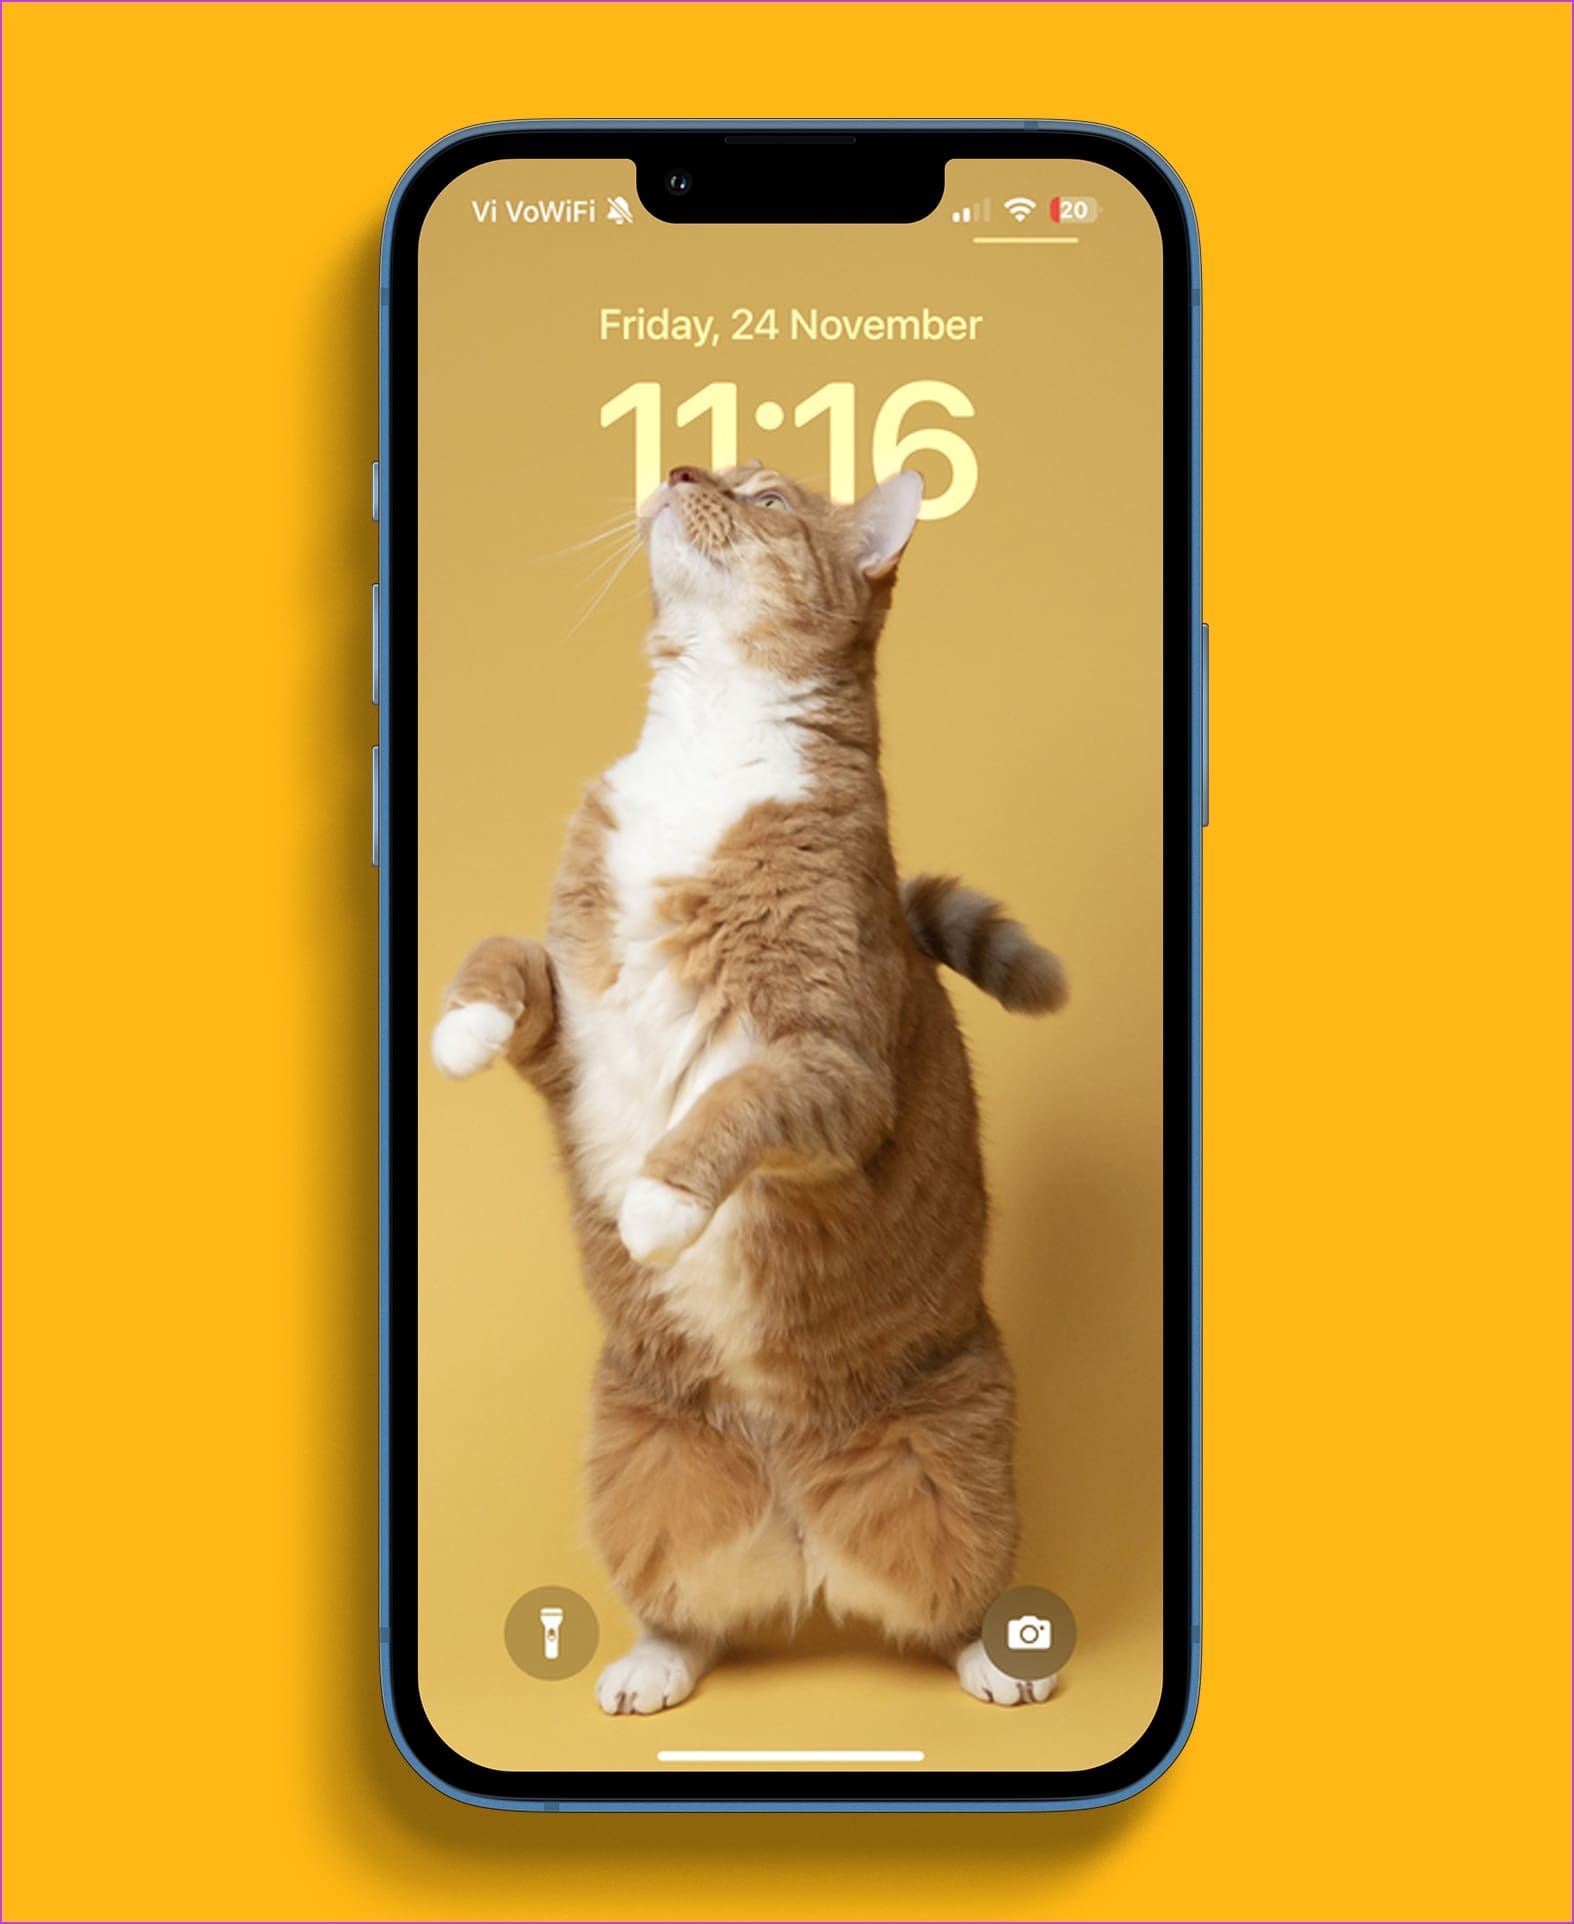
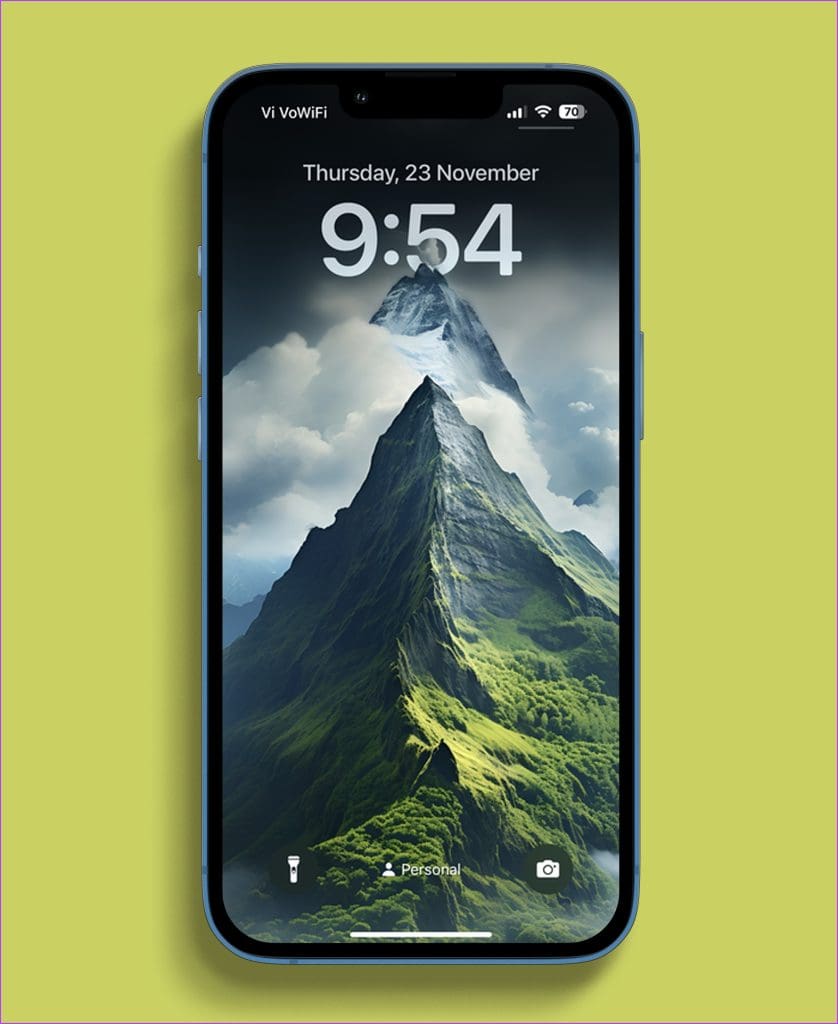
Note: Tap on the download button to get these iPhone wallpapers in high quality.
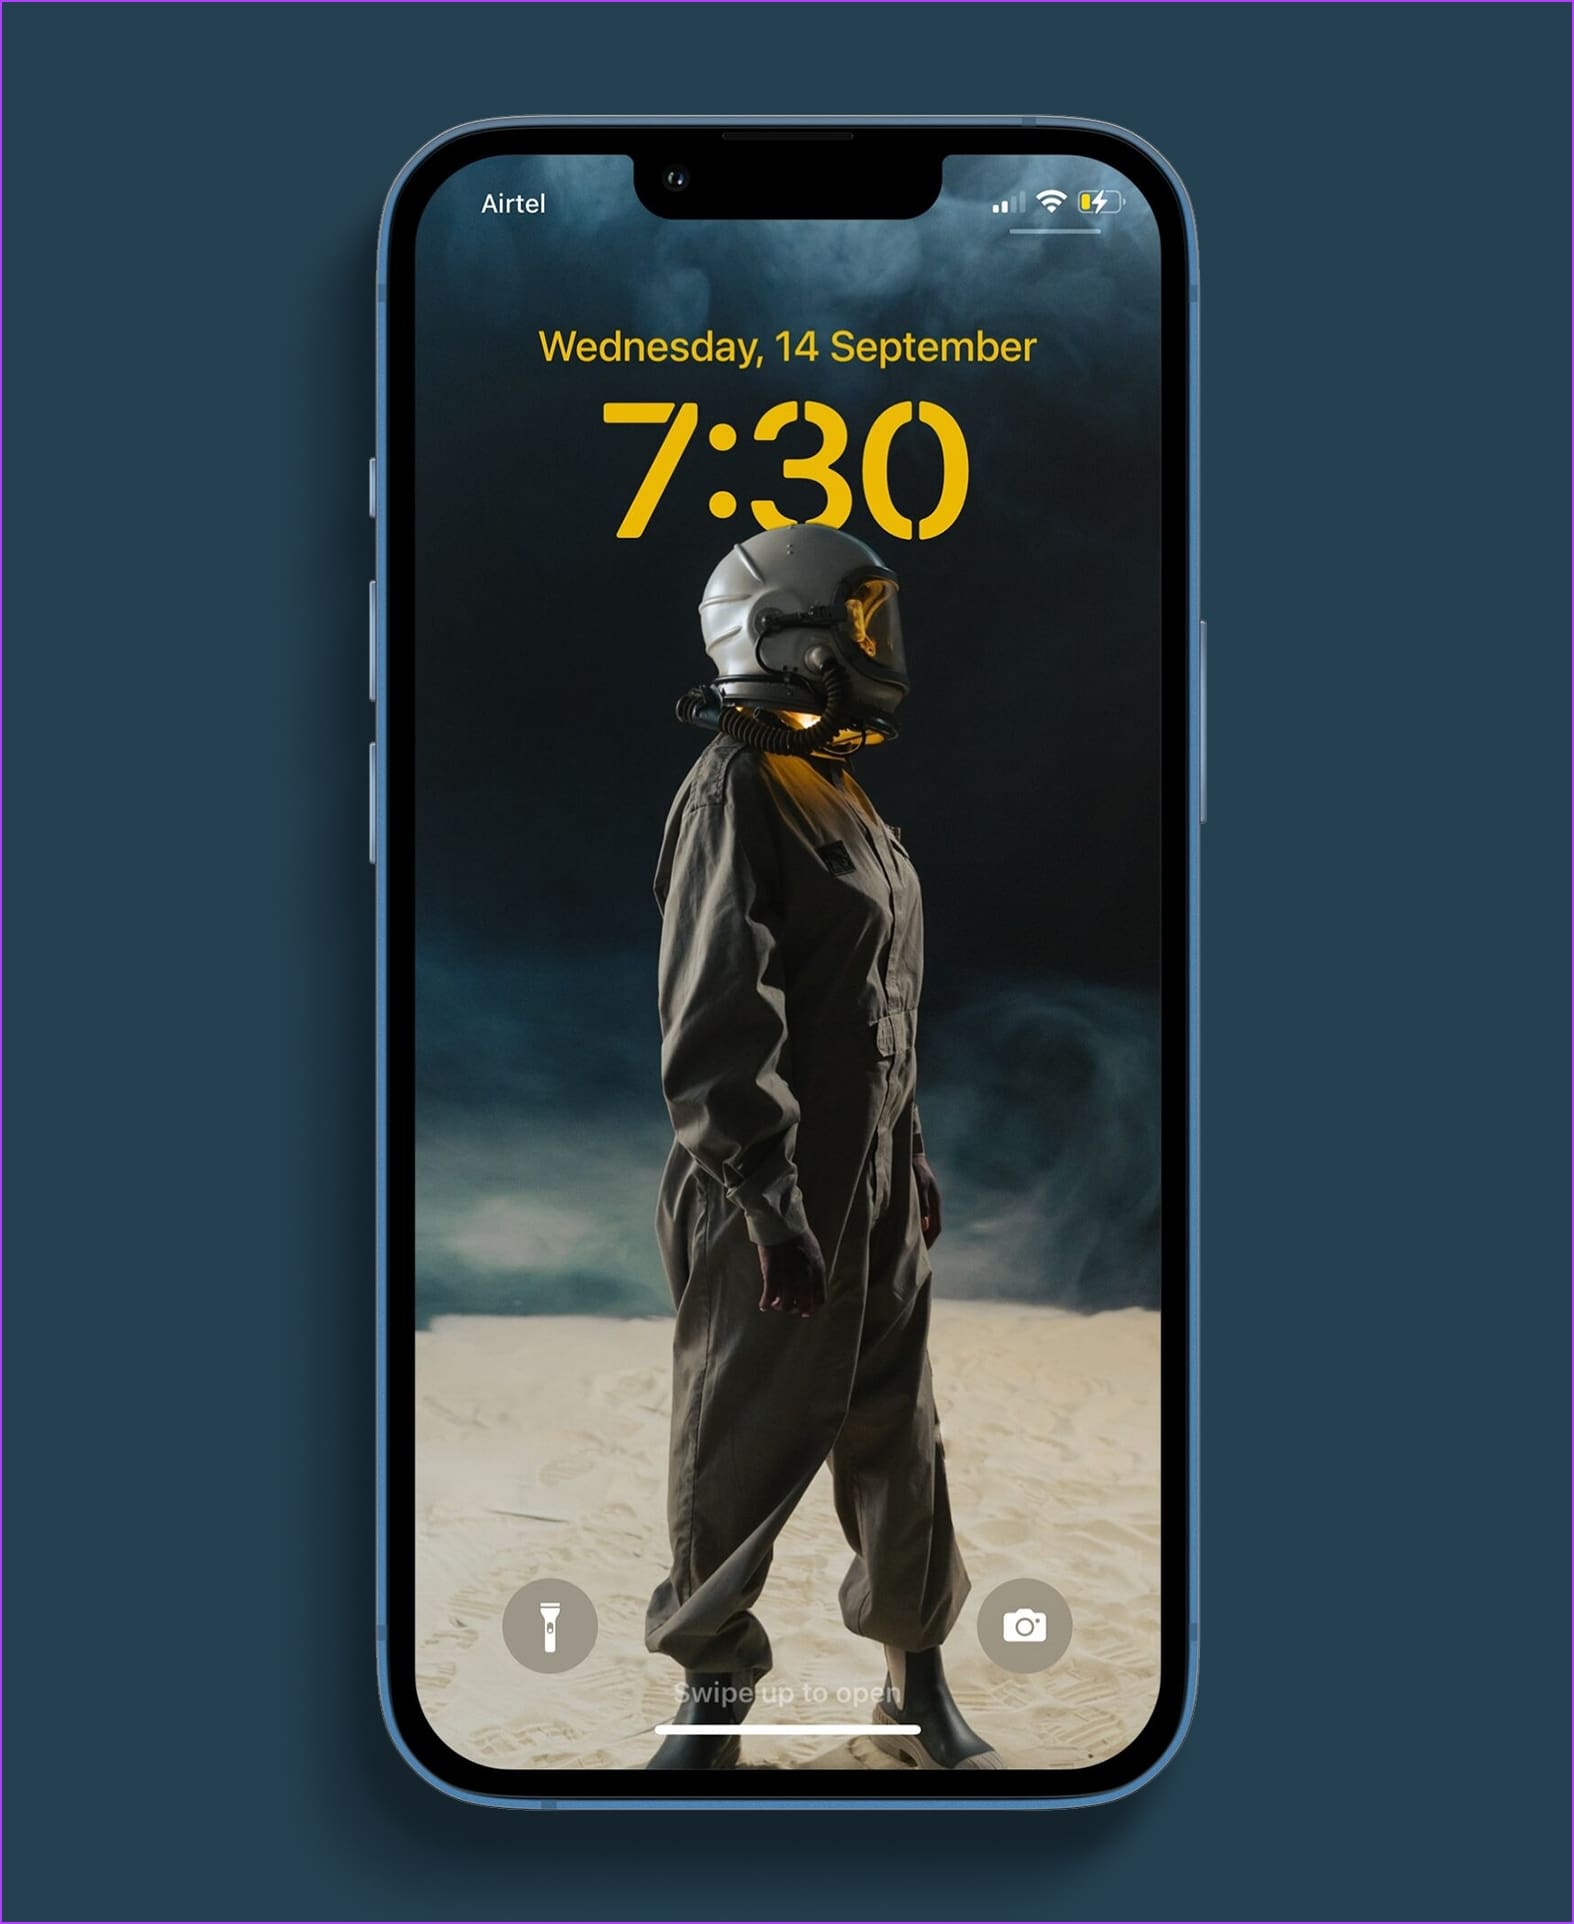
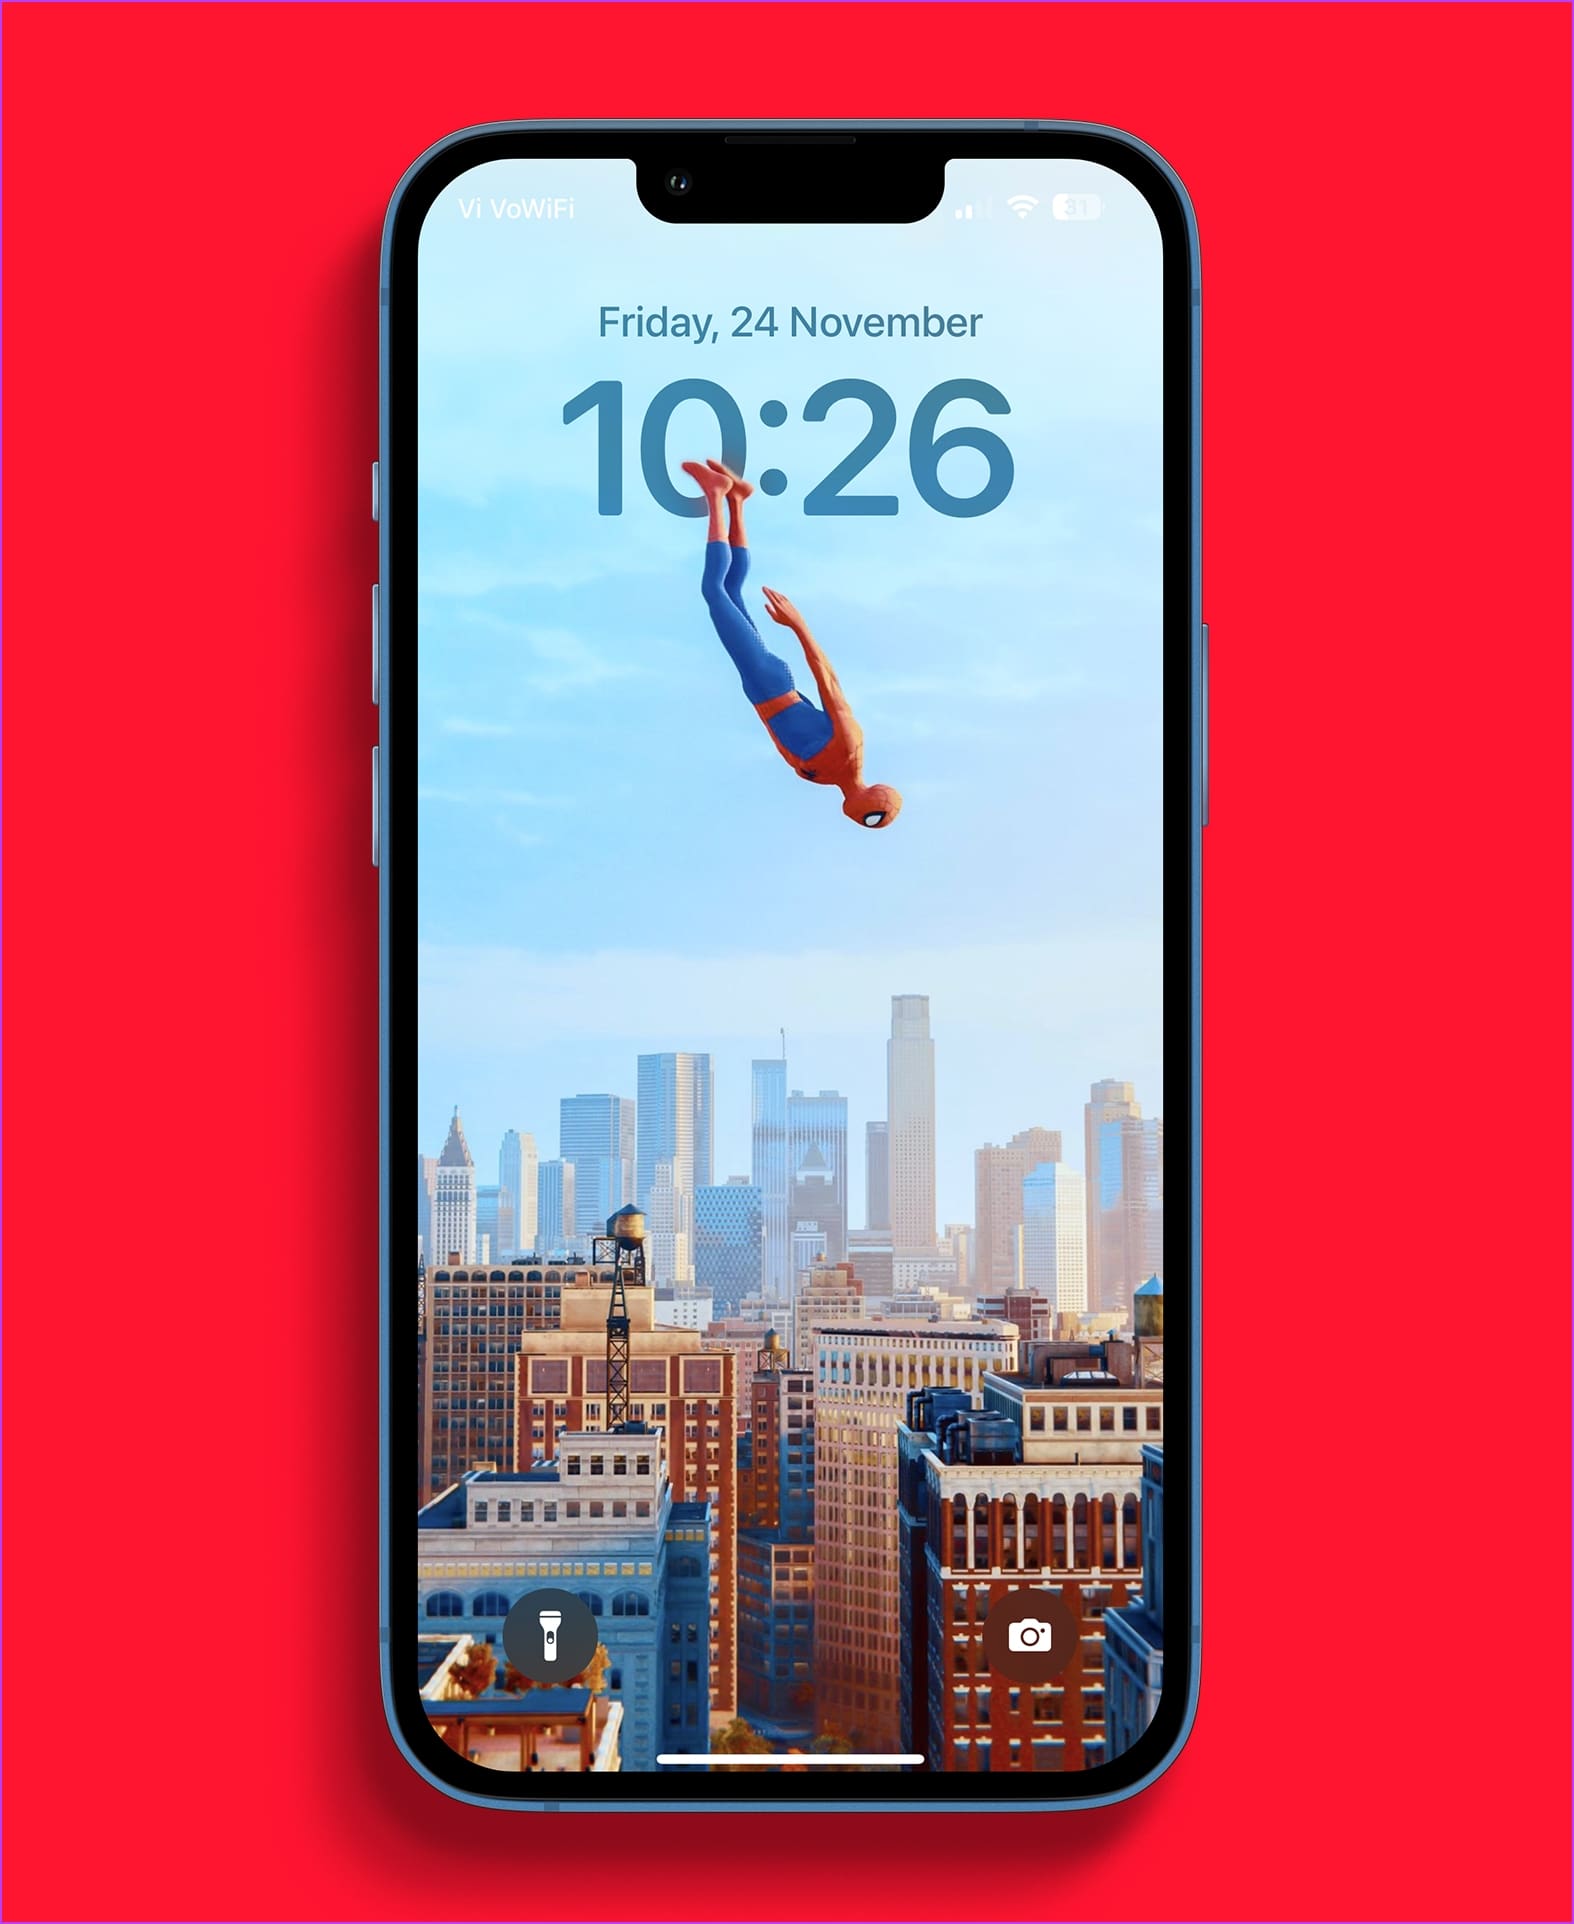
1. Spaceman Wallpaper
We really loved this render of a person in a space suit, probably trying to make something out of the planet they are on. Perhaps a preview of what the first humans might look like on Mars? Well, keep your imagination wide open, as you stare at this on your iPhone lock screen. We love how cool this one looks!
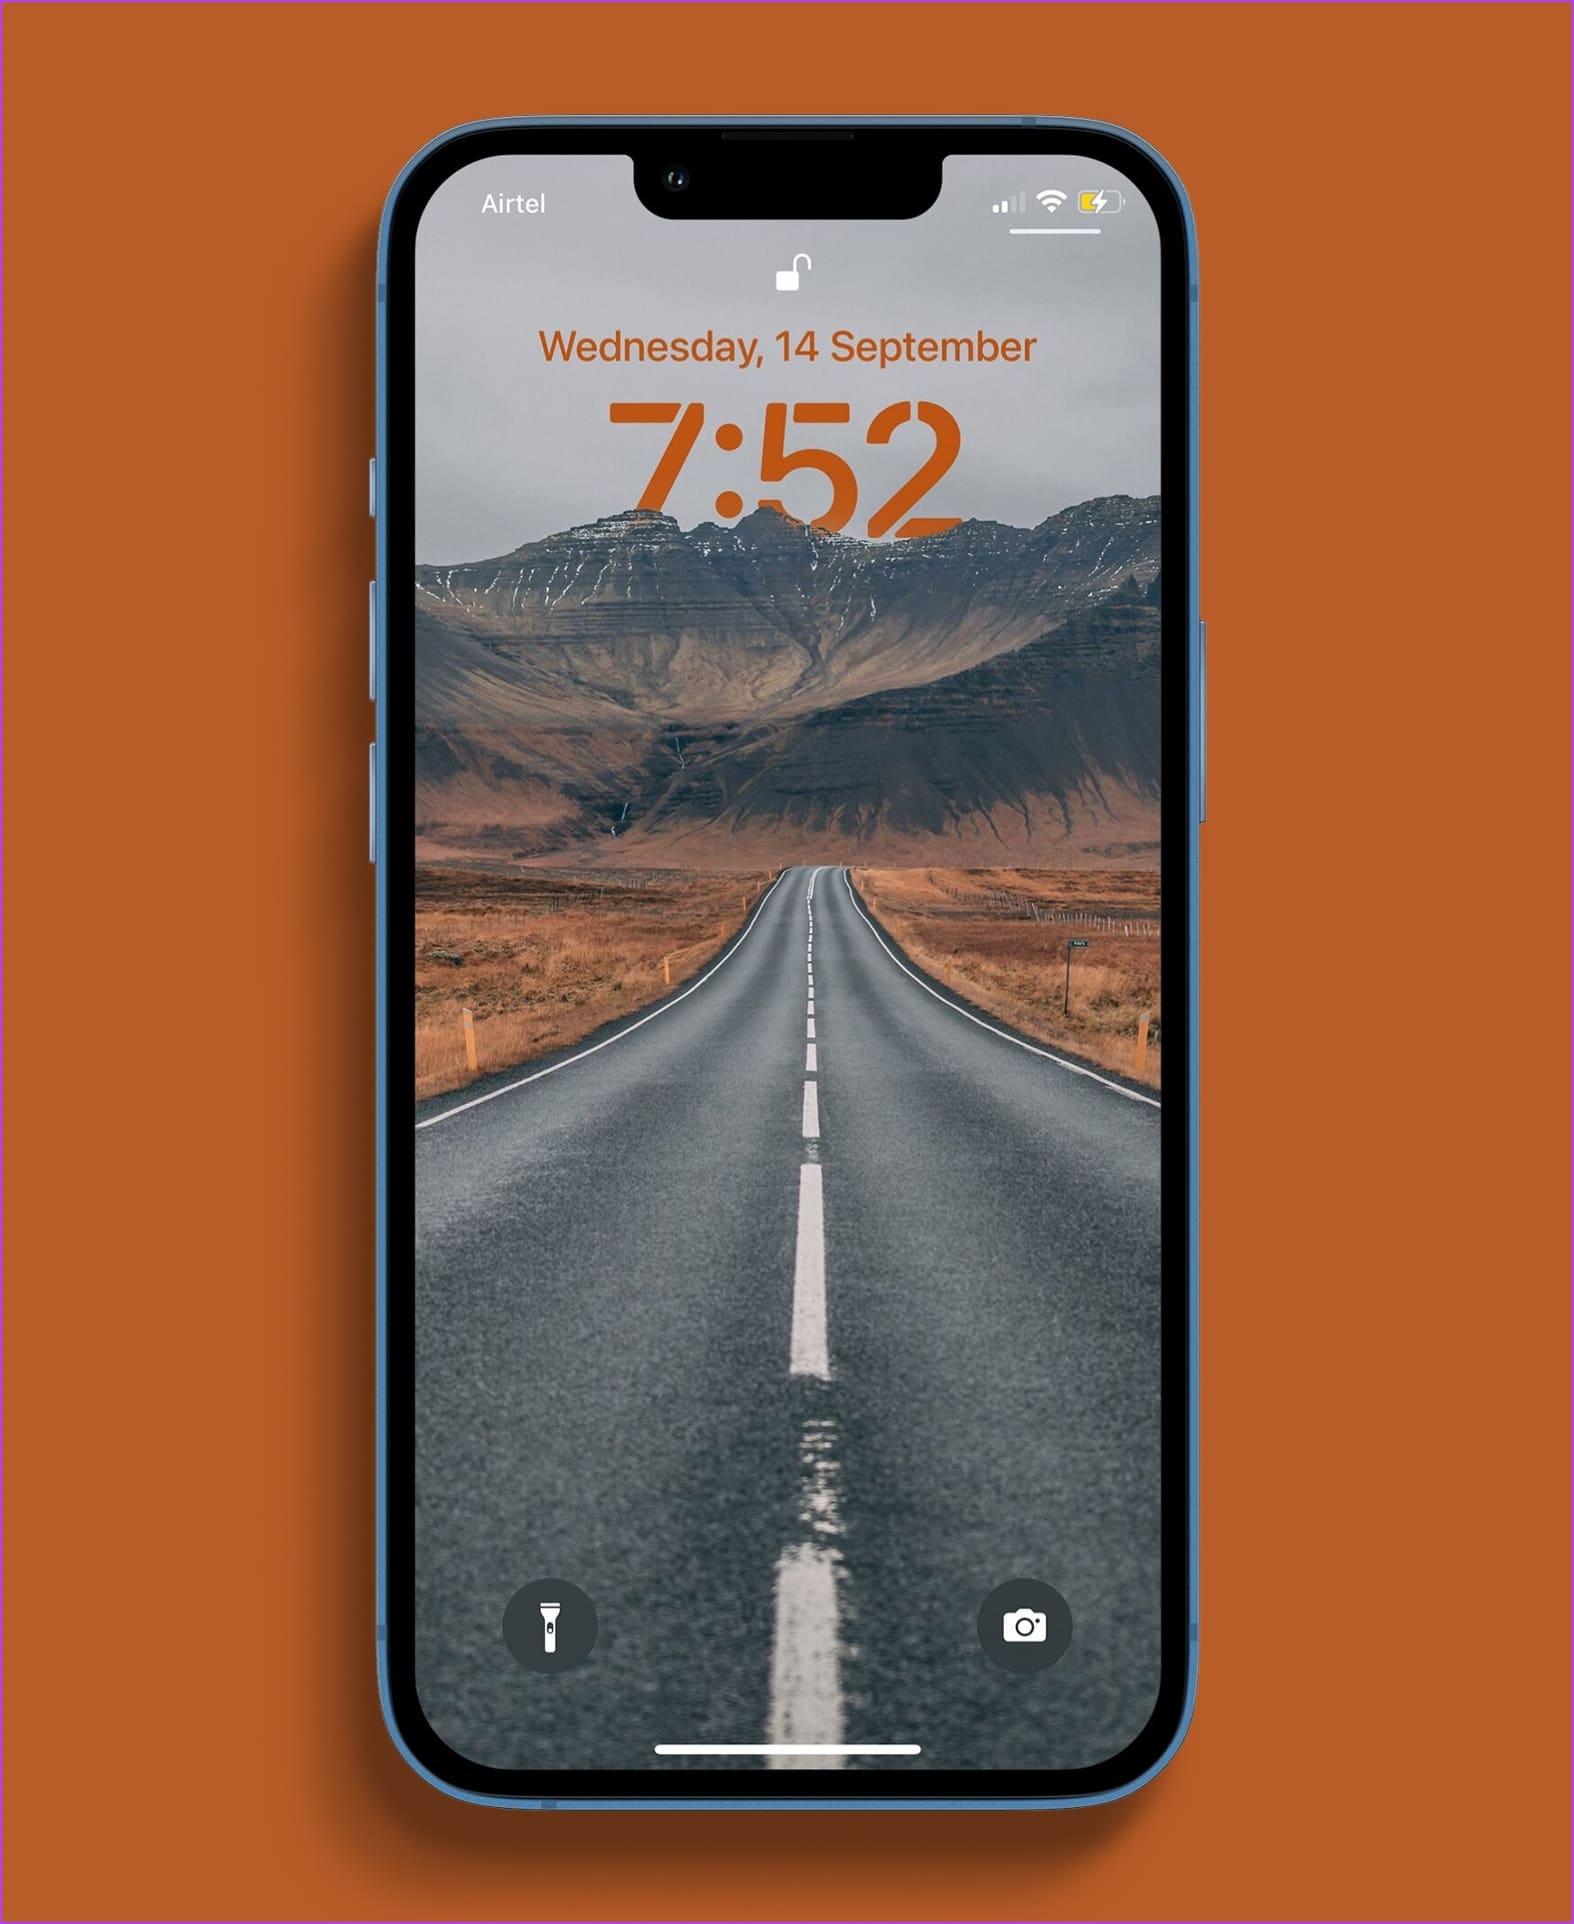
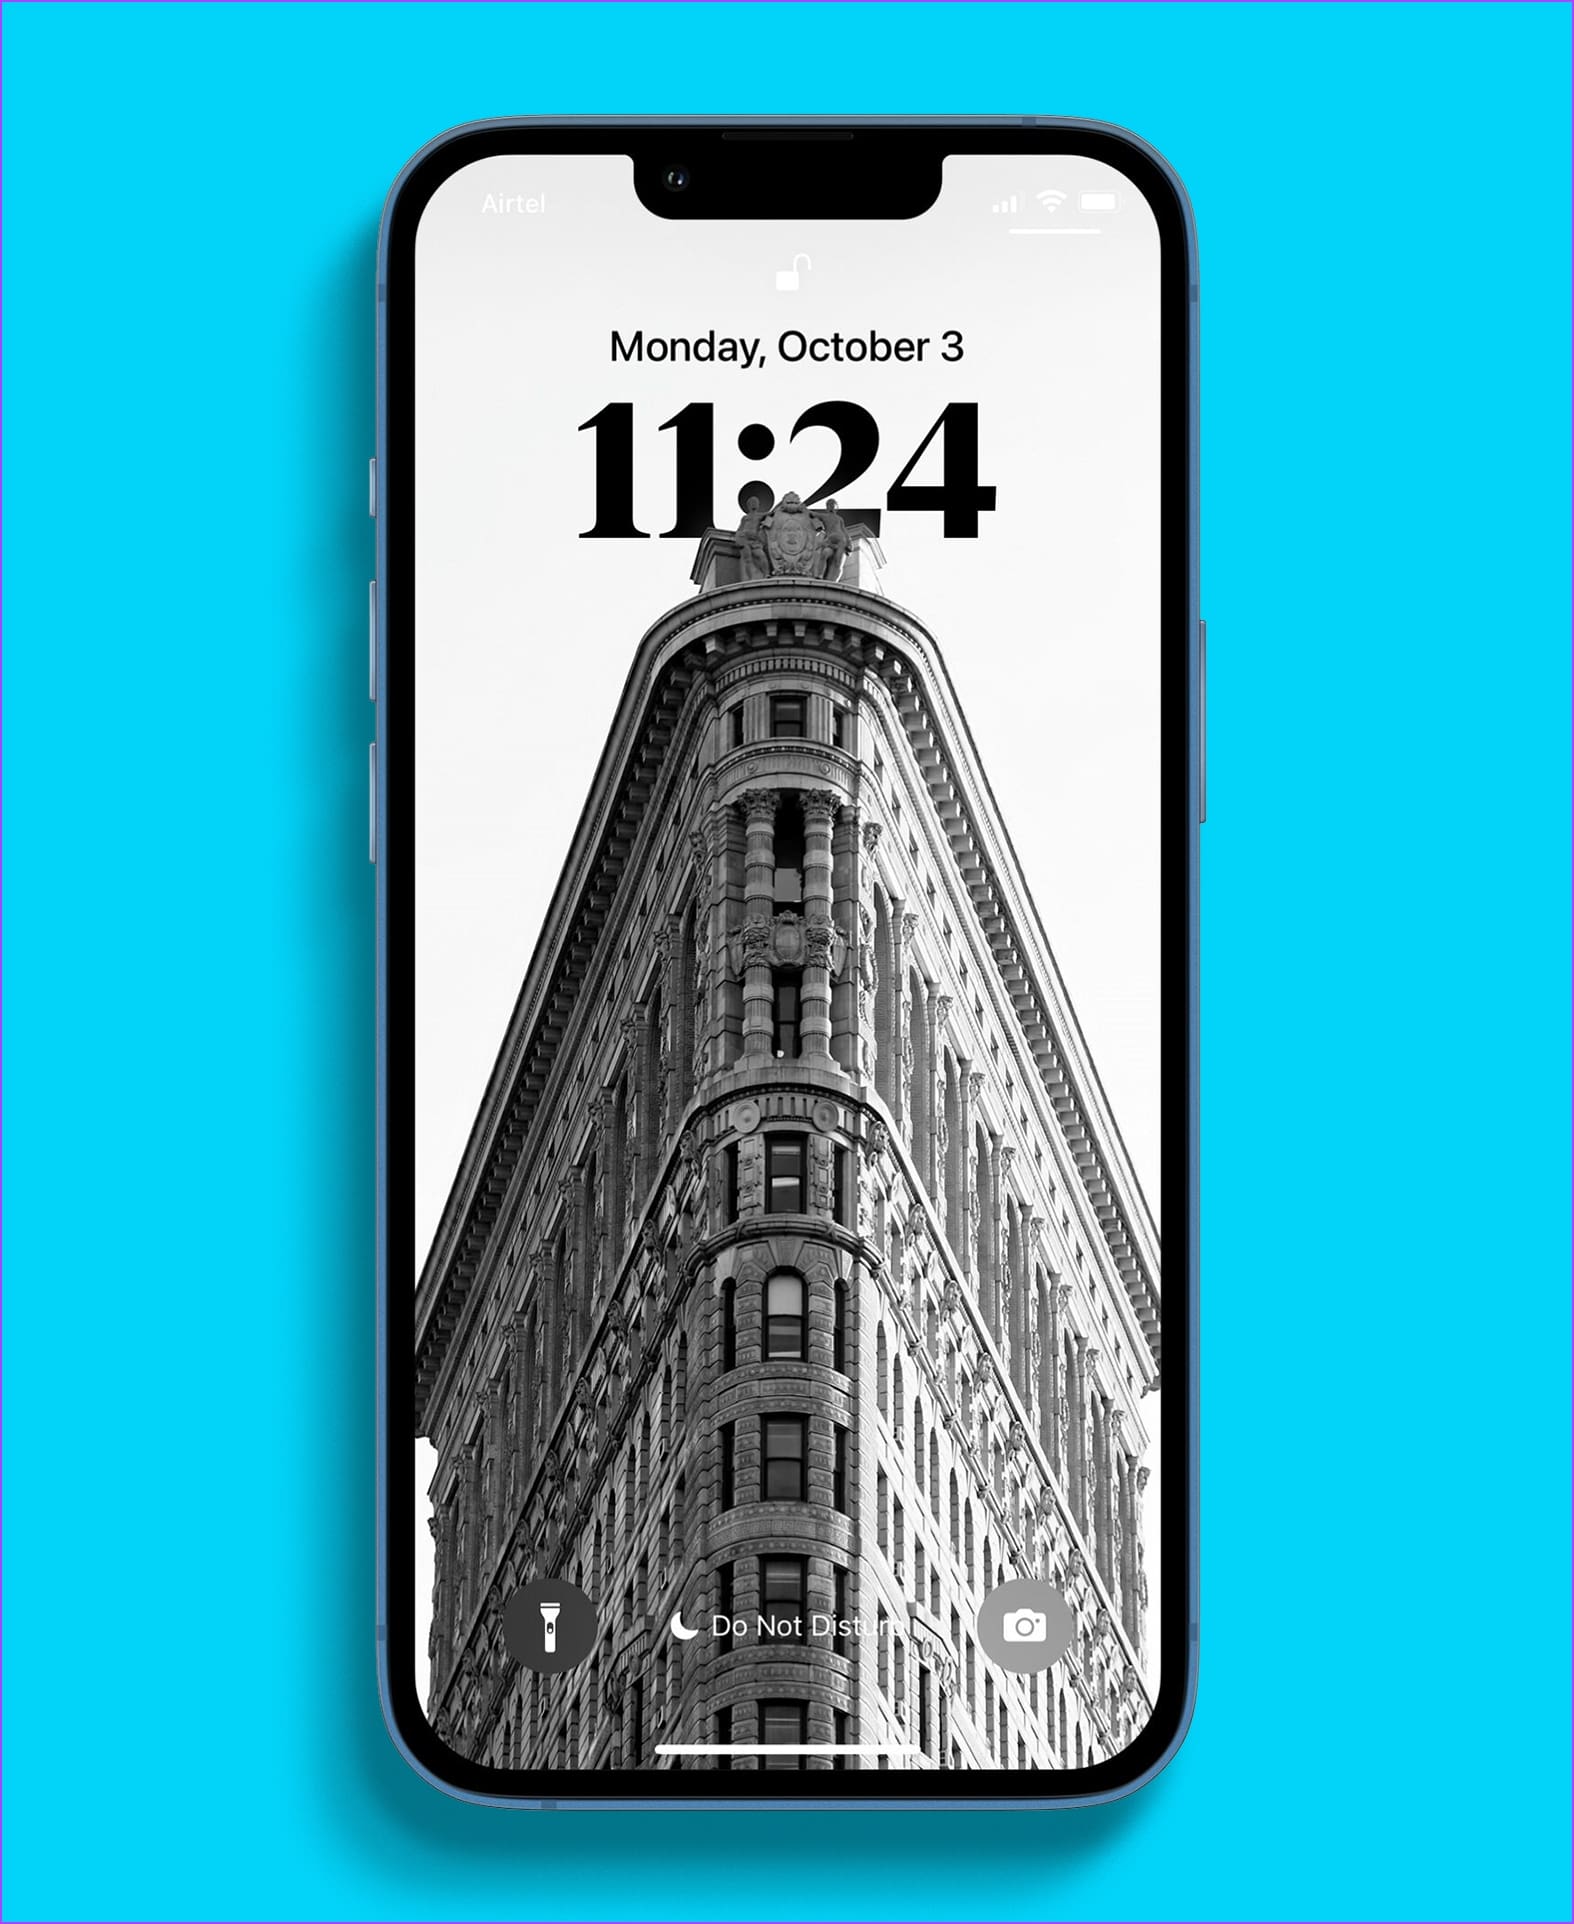
With the red-colored clock, this wallpaper did set really well on the lock screen. While there are more building wallpapers in this list, the classic look of this one and the way it helped use the depth effect is why we featured it in this list.
A tall lighthouse, in all its glory, not only helps ships find their way home safely but also helped us with a good wallpaper for the depth effect on iOS 16. We’re not sure how you like our jokes, but we’re sure you will love this wallpaper.
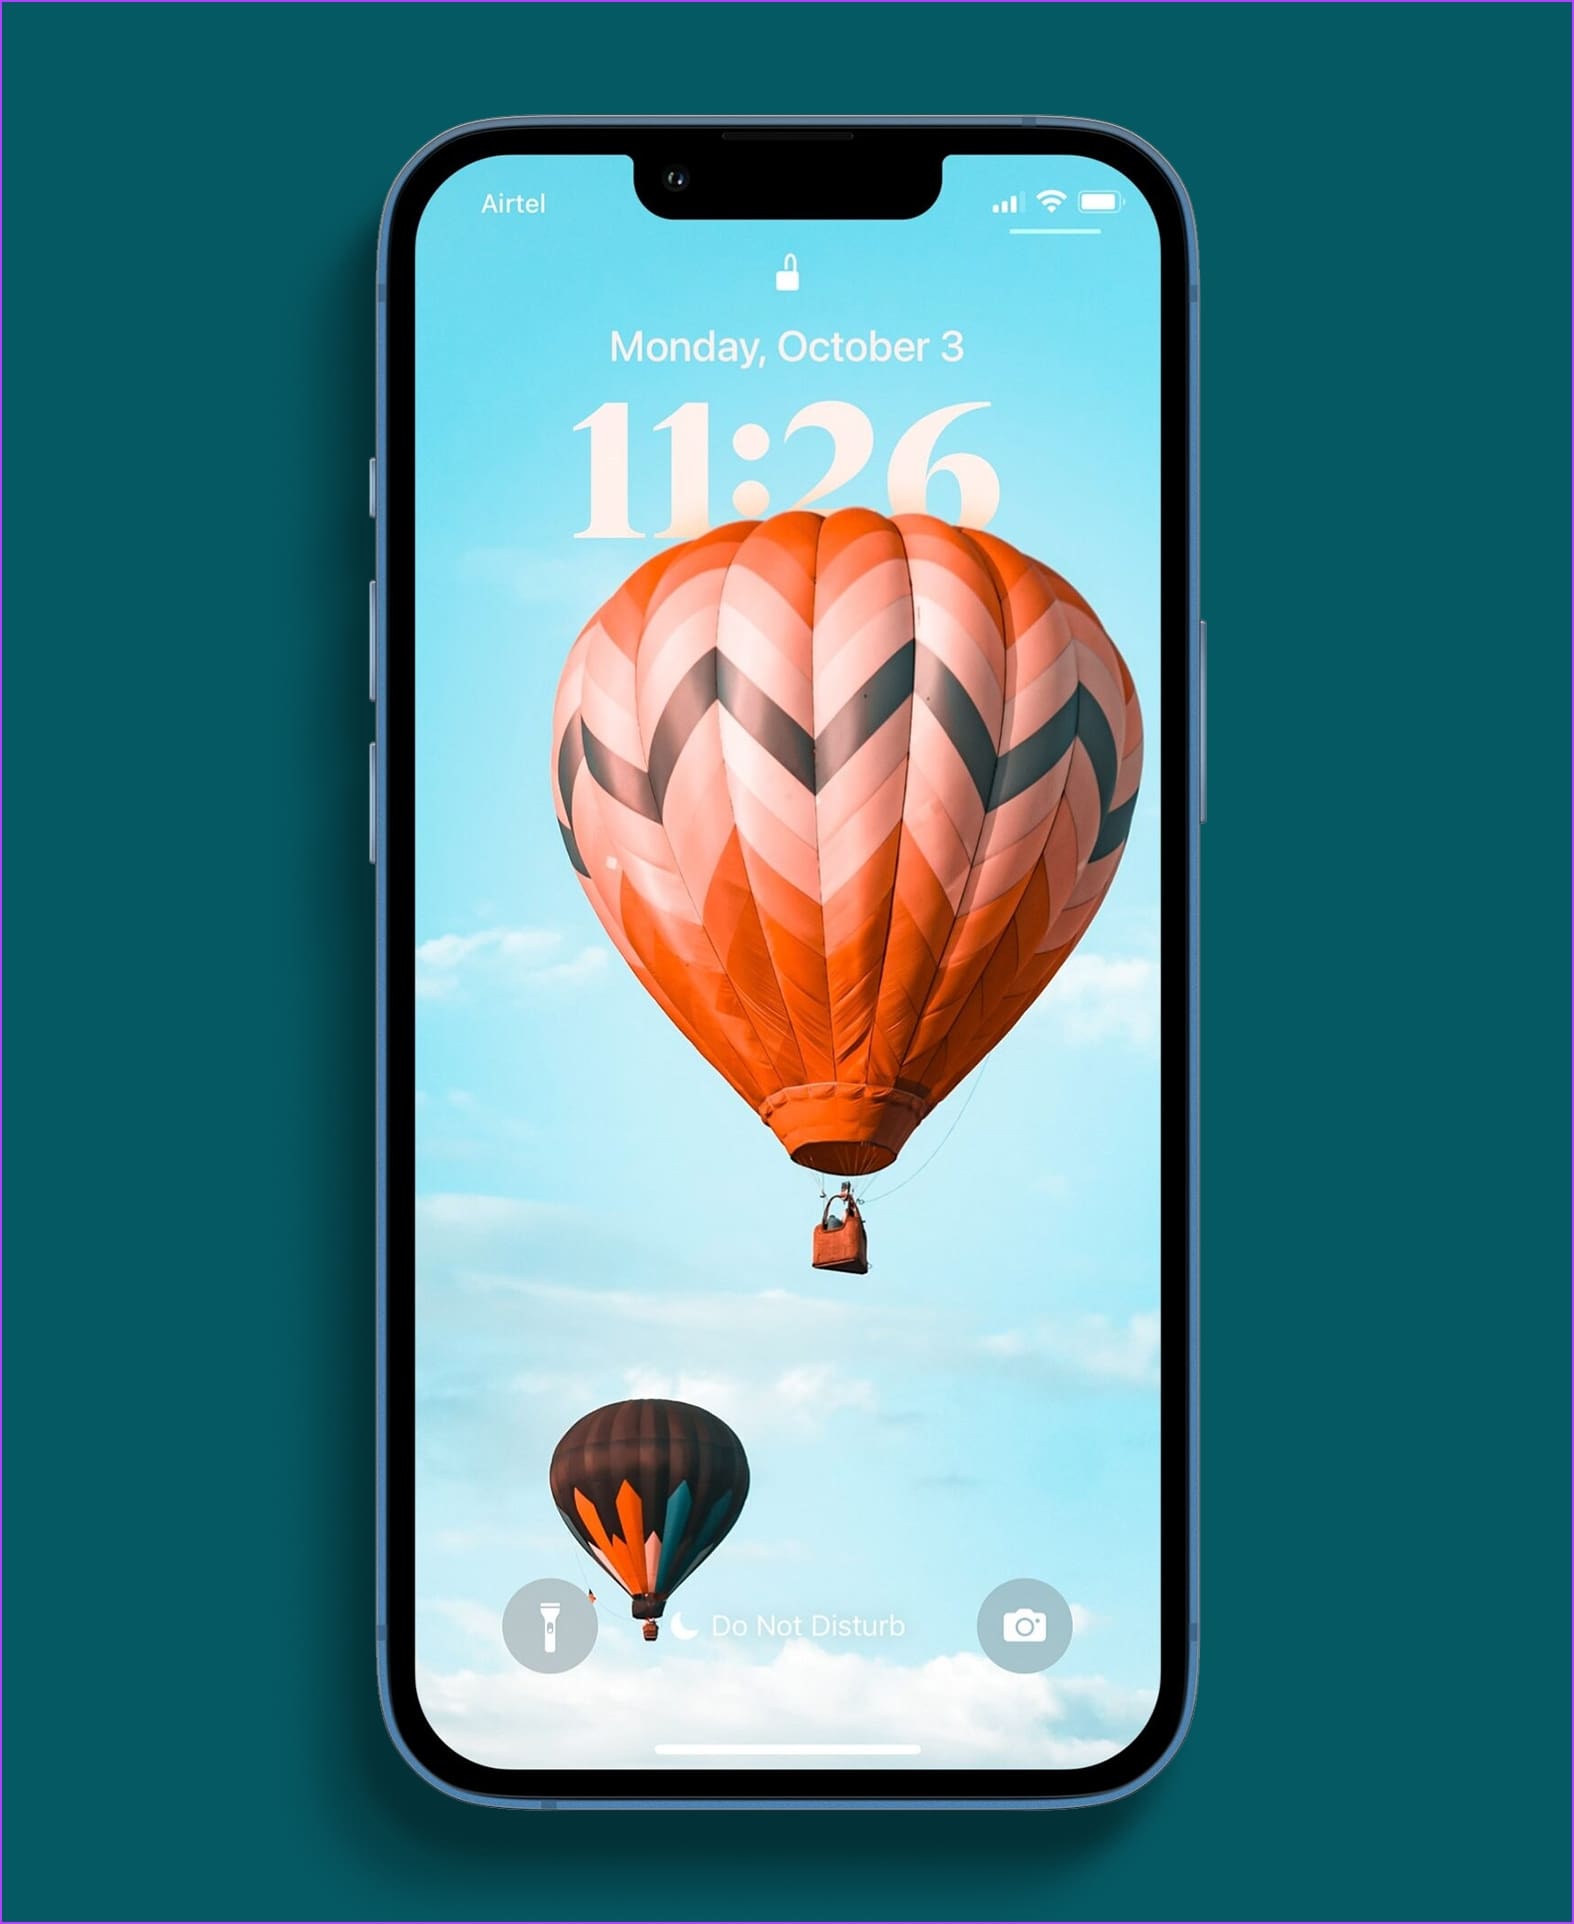
At this point, we can safely conclude buildings go best with the depth effect of iOS 16. So here’s another one. We set a blue-colored clock with a classic font, and we’re a fan of how it looks.
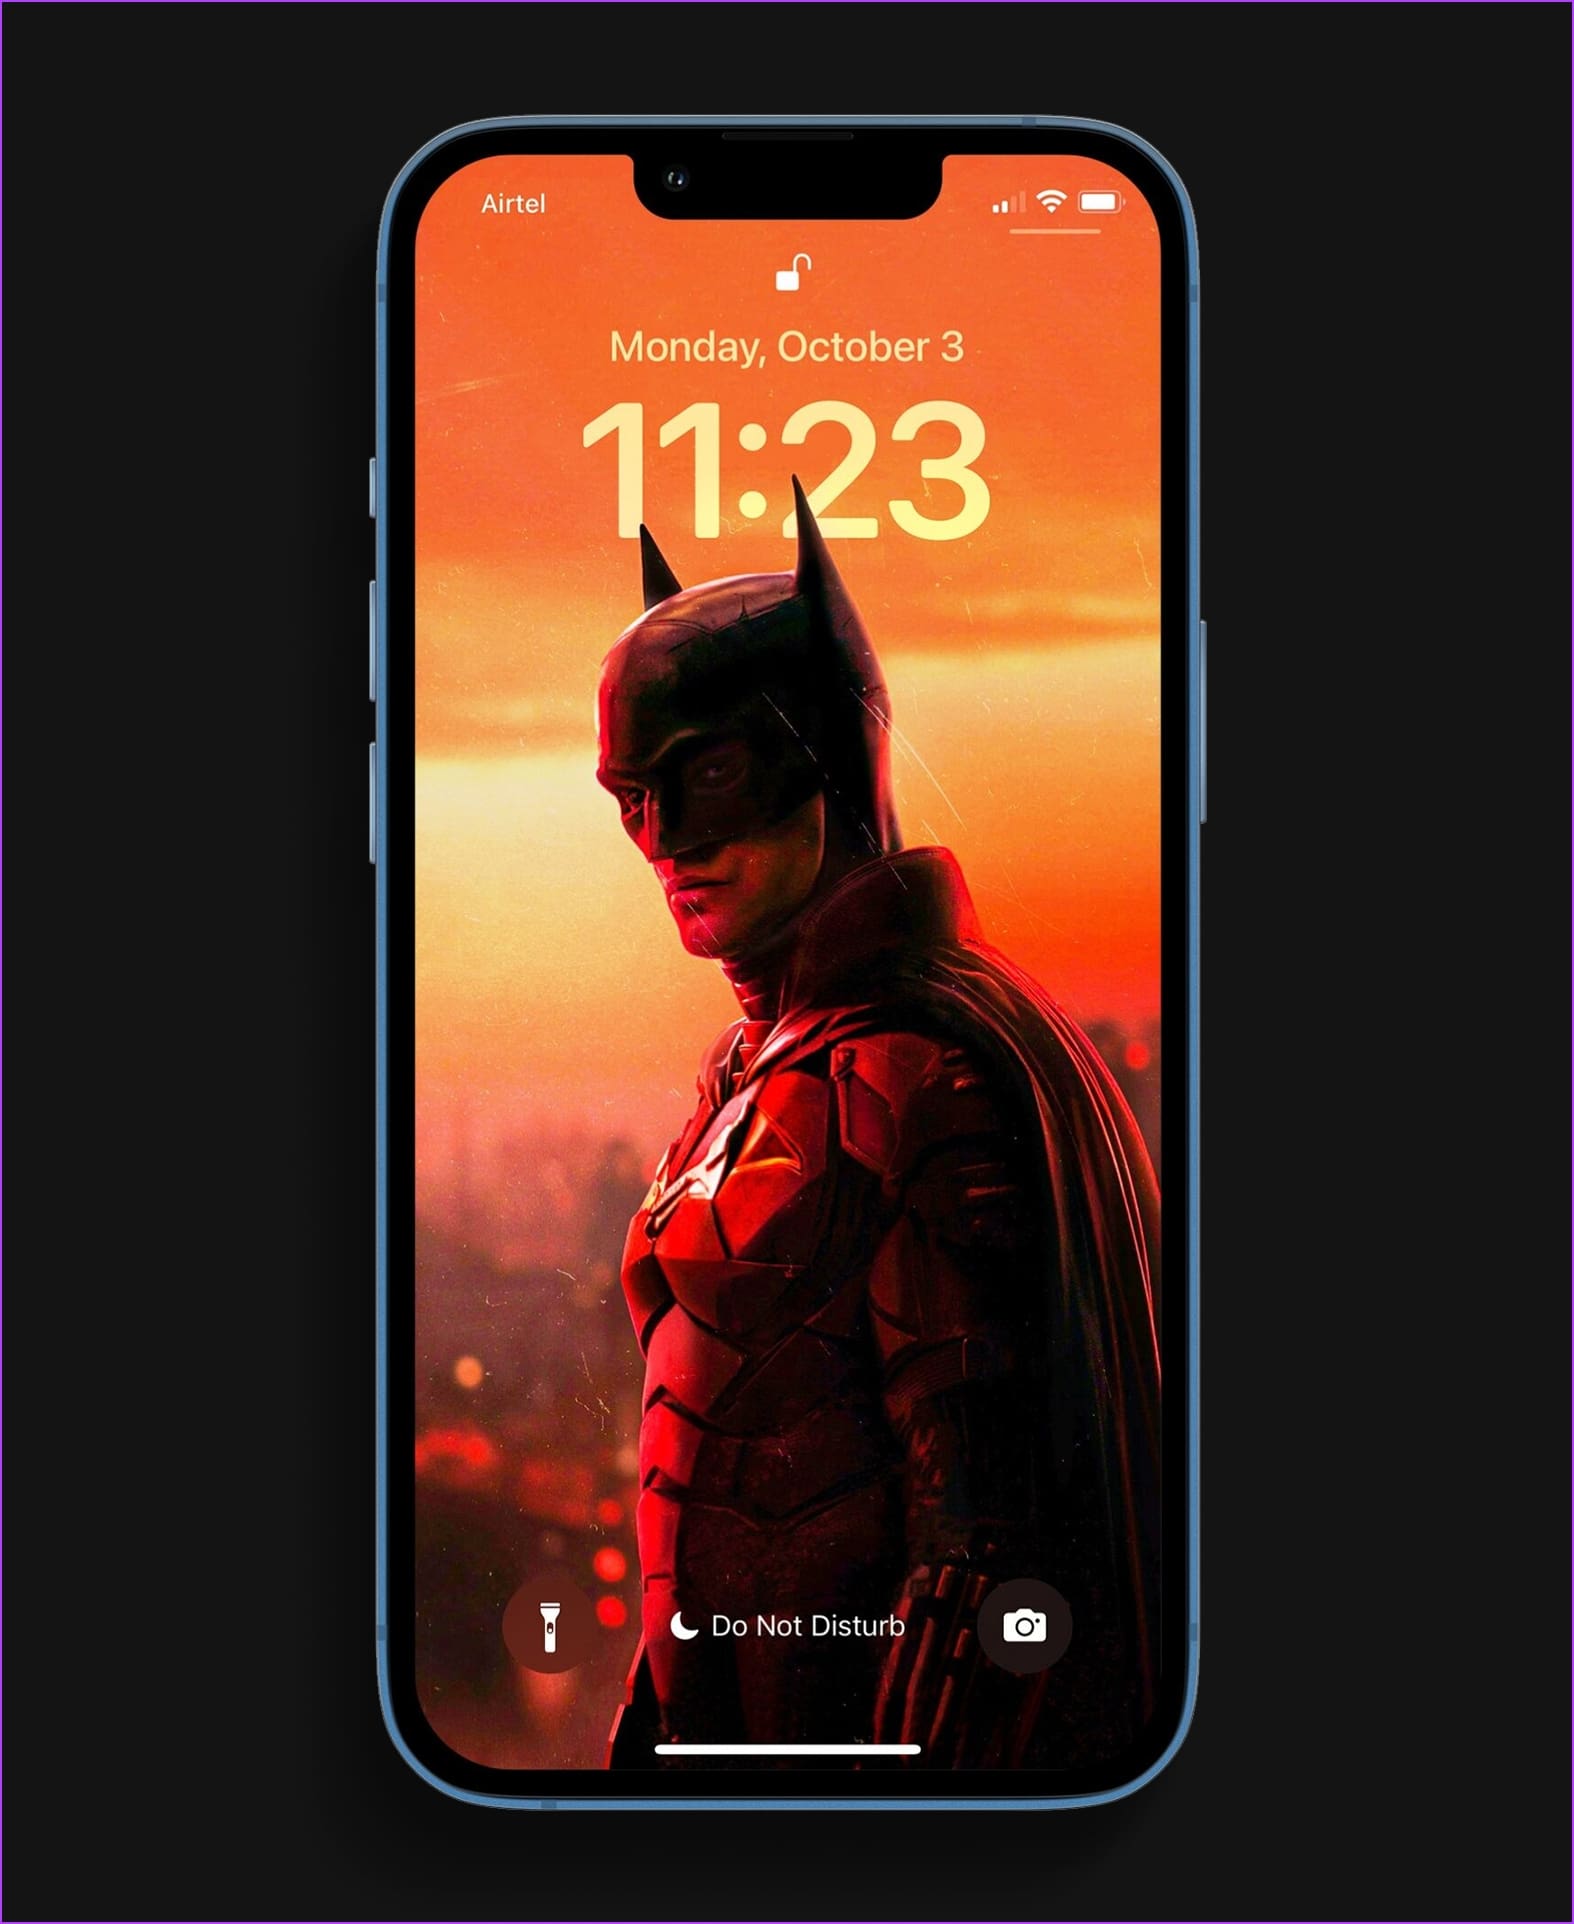
If only AC/DC released ‘Highway to Heaven’ instead, we’re sure this could be the album art. While the probability of that happening is close to zero, you can certainly use this as a depth effect wallpaper for iPhone.
This is another wallpaper that we really liked. While it seems a bit zoomed in without revealing the entire building, we’re sure you will like an abstract, architectural wallpaper.
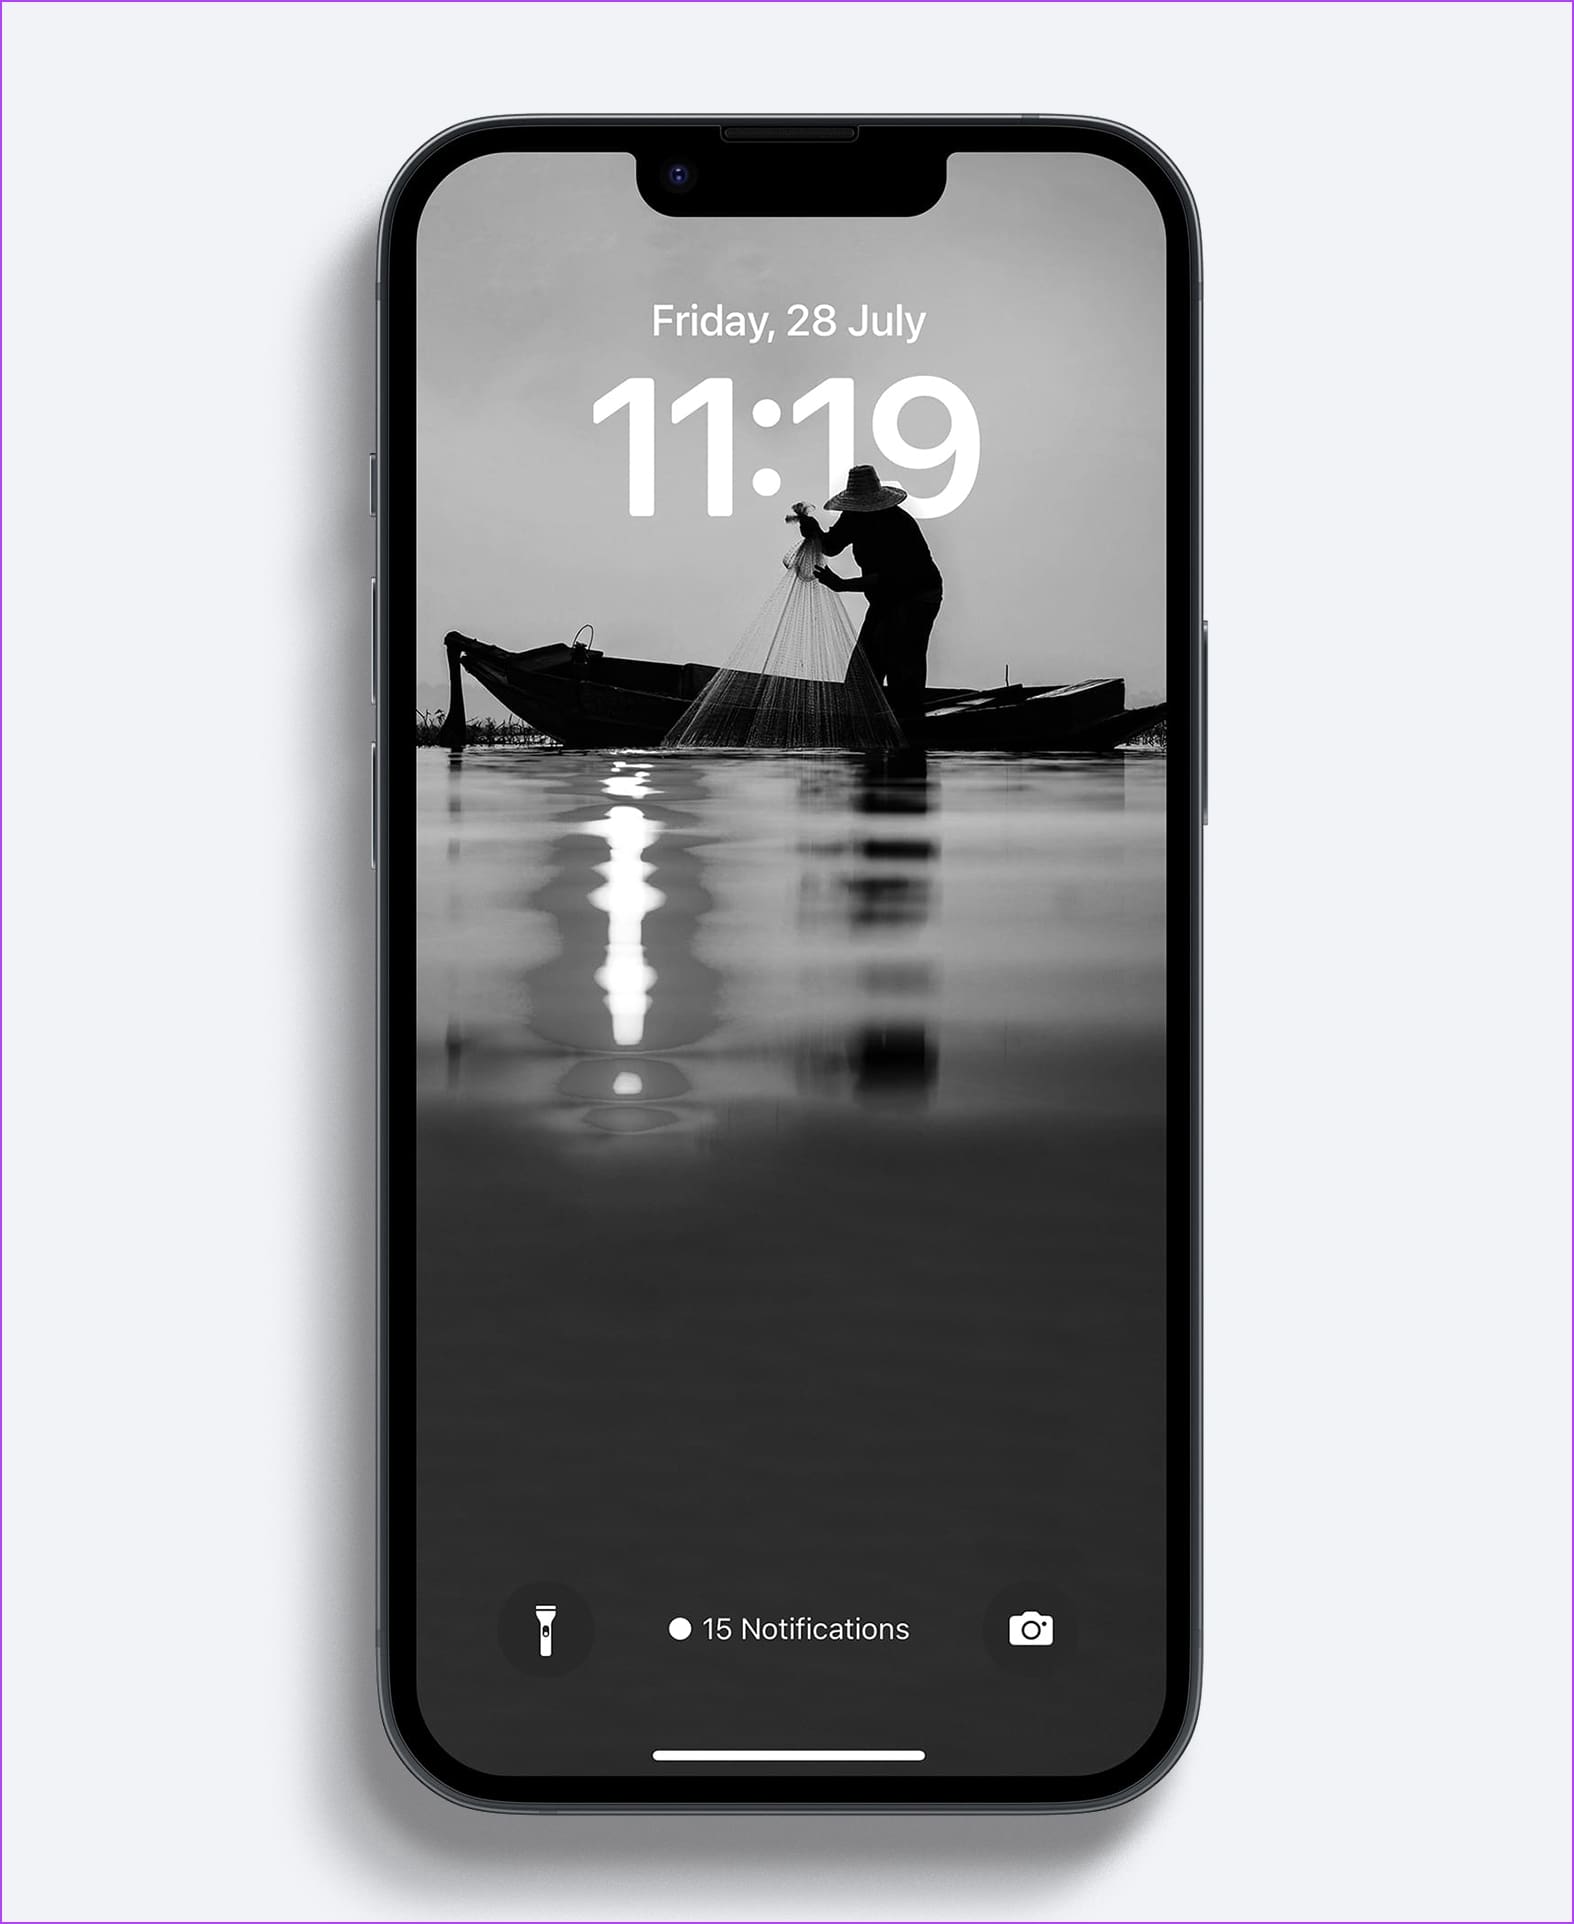
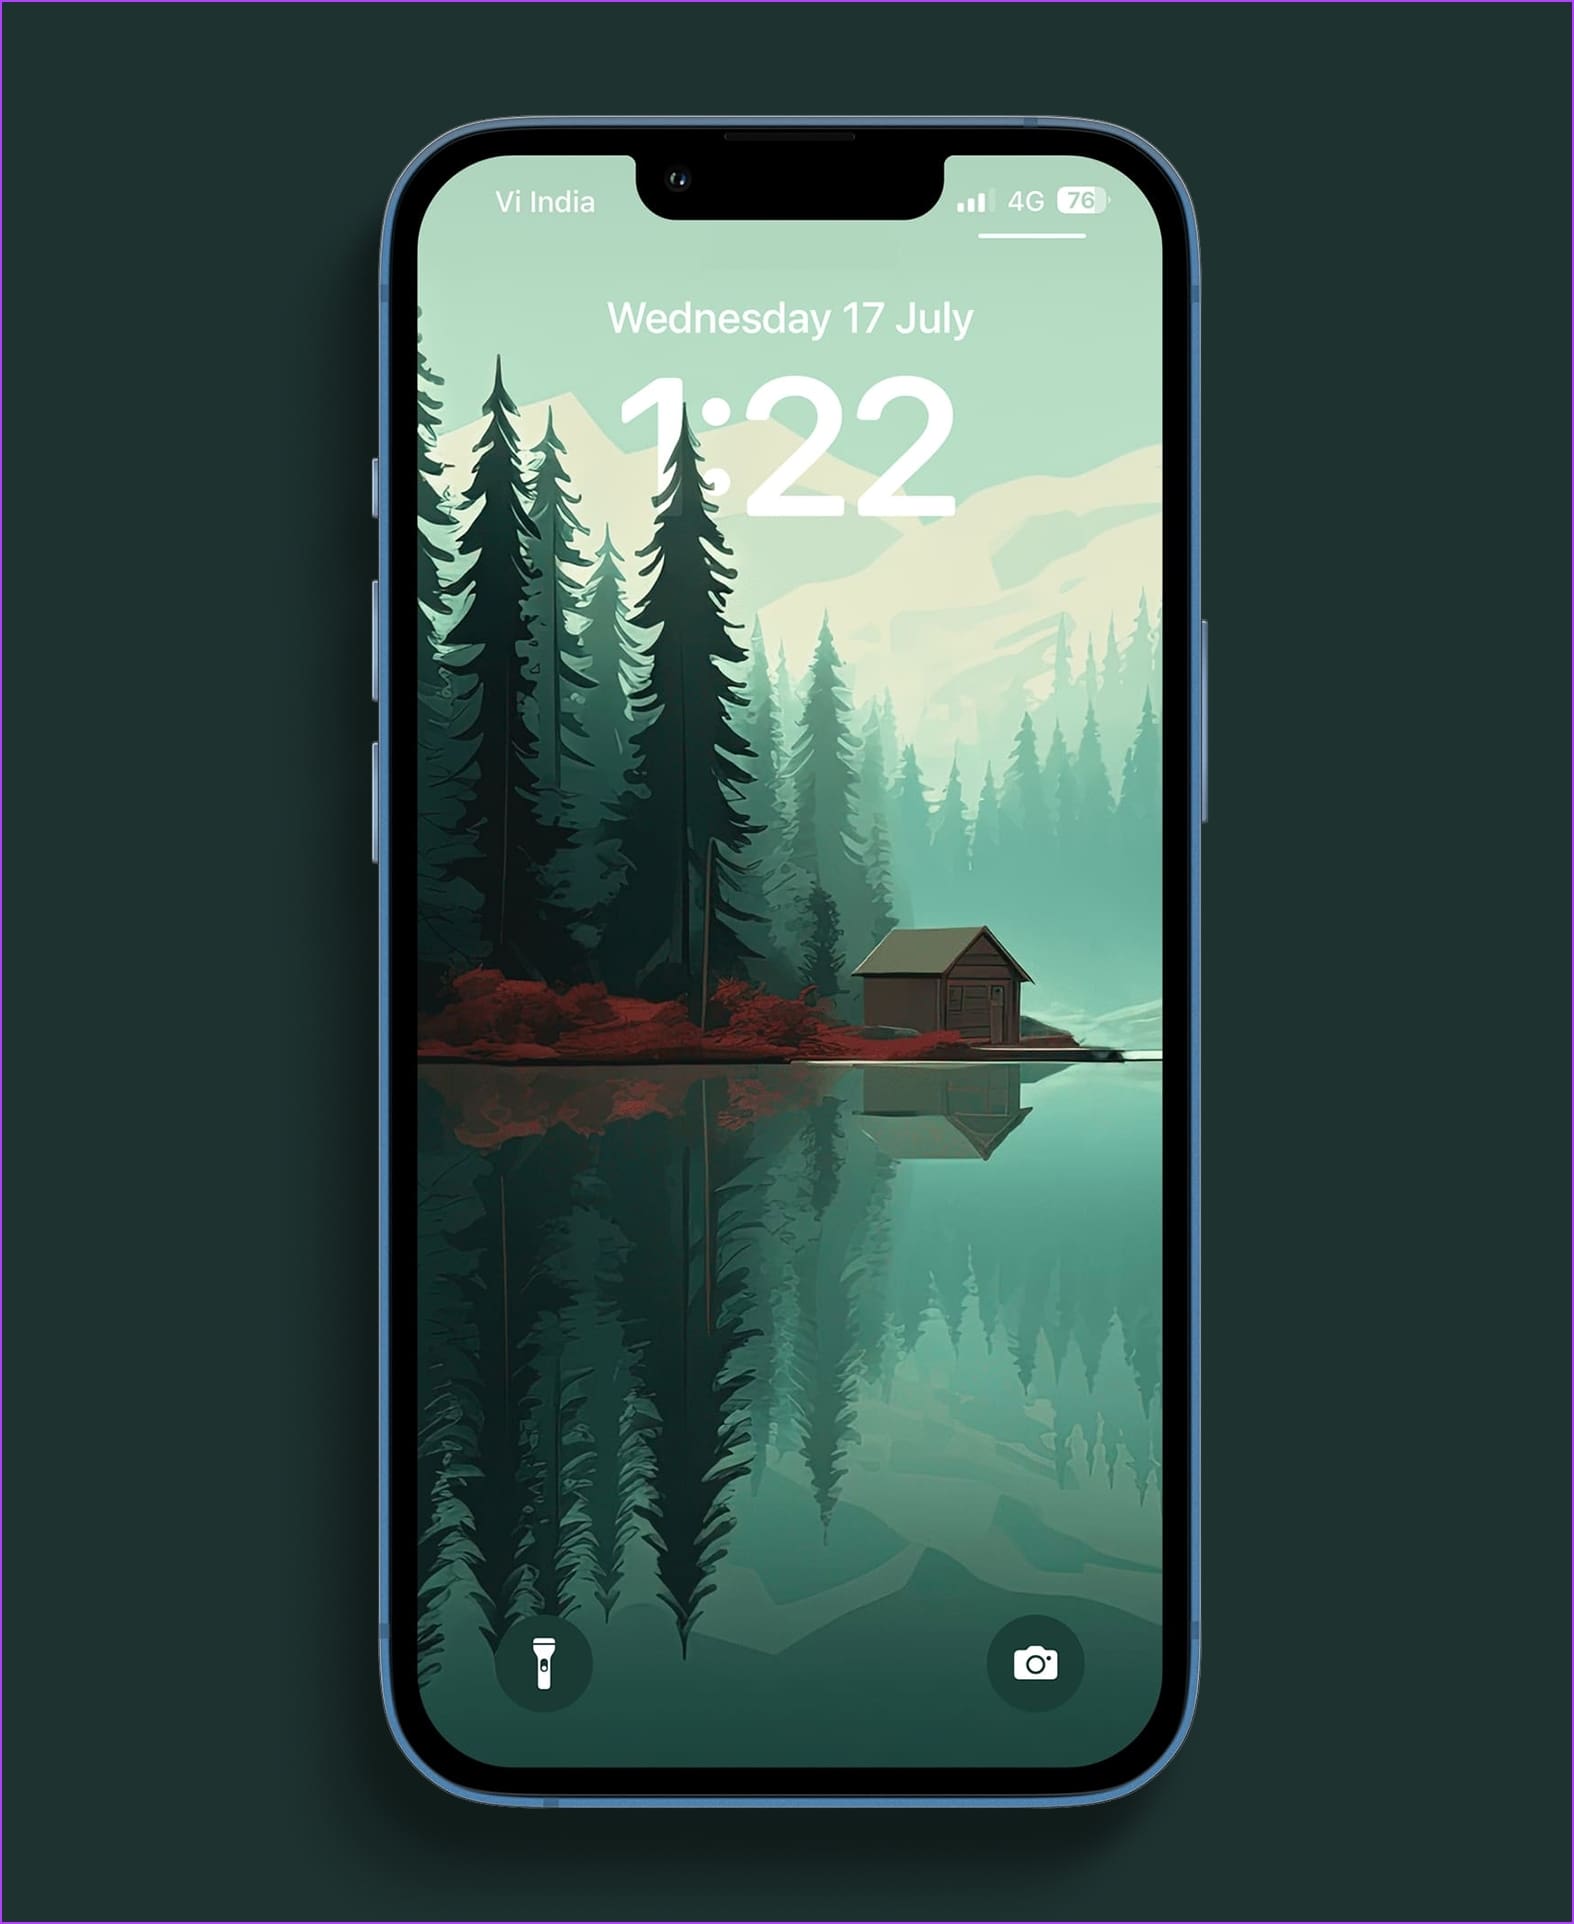
Here’s a beautiful grayscale wallpaper, that adds a depth effect for the fisherman. We like how simple it looks and if you love a greyscale theme that doesn’t hurt your eyes, then this wallpaper is for you.
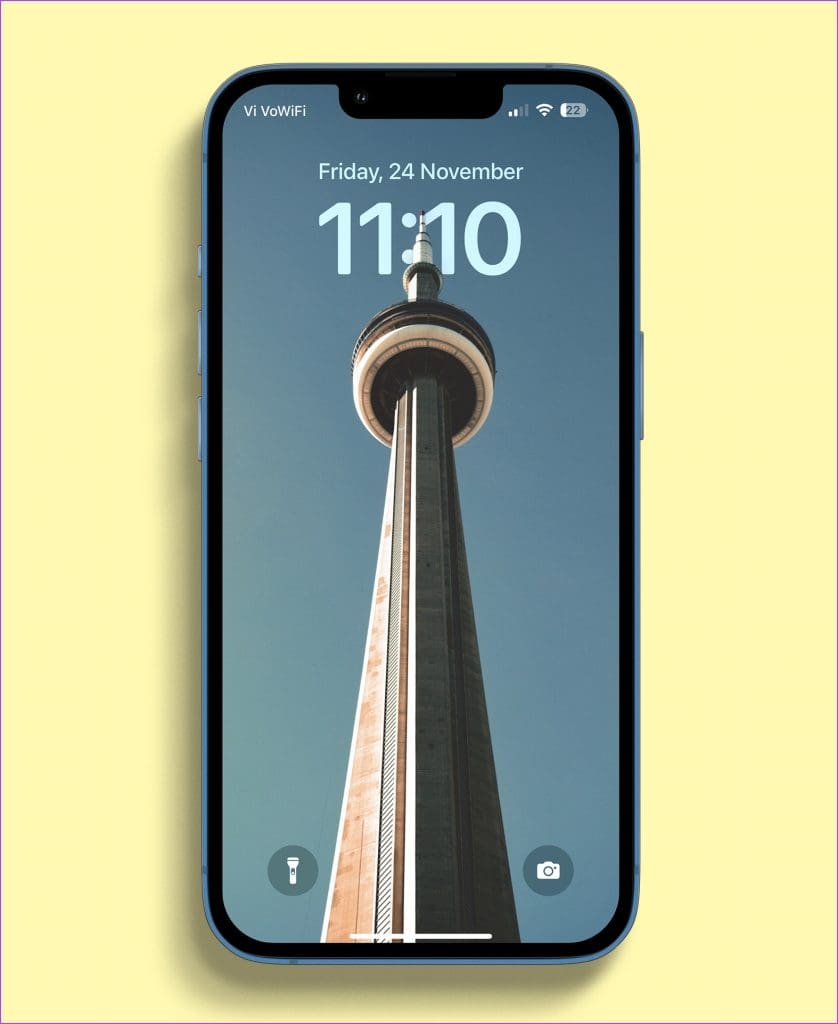
Wallpapers with buildings and towers are great options that work with the depth effect on your iPhone. Here’s a wallpaper of a tower in the middle of the ocean!
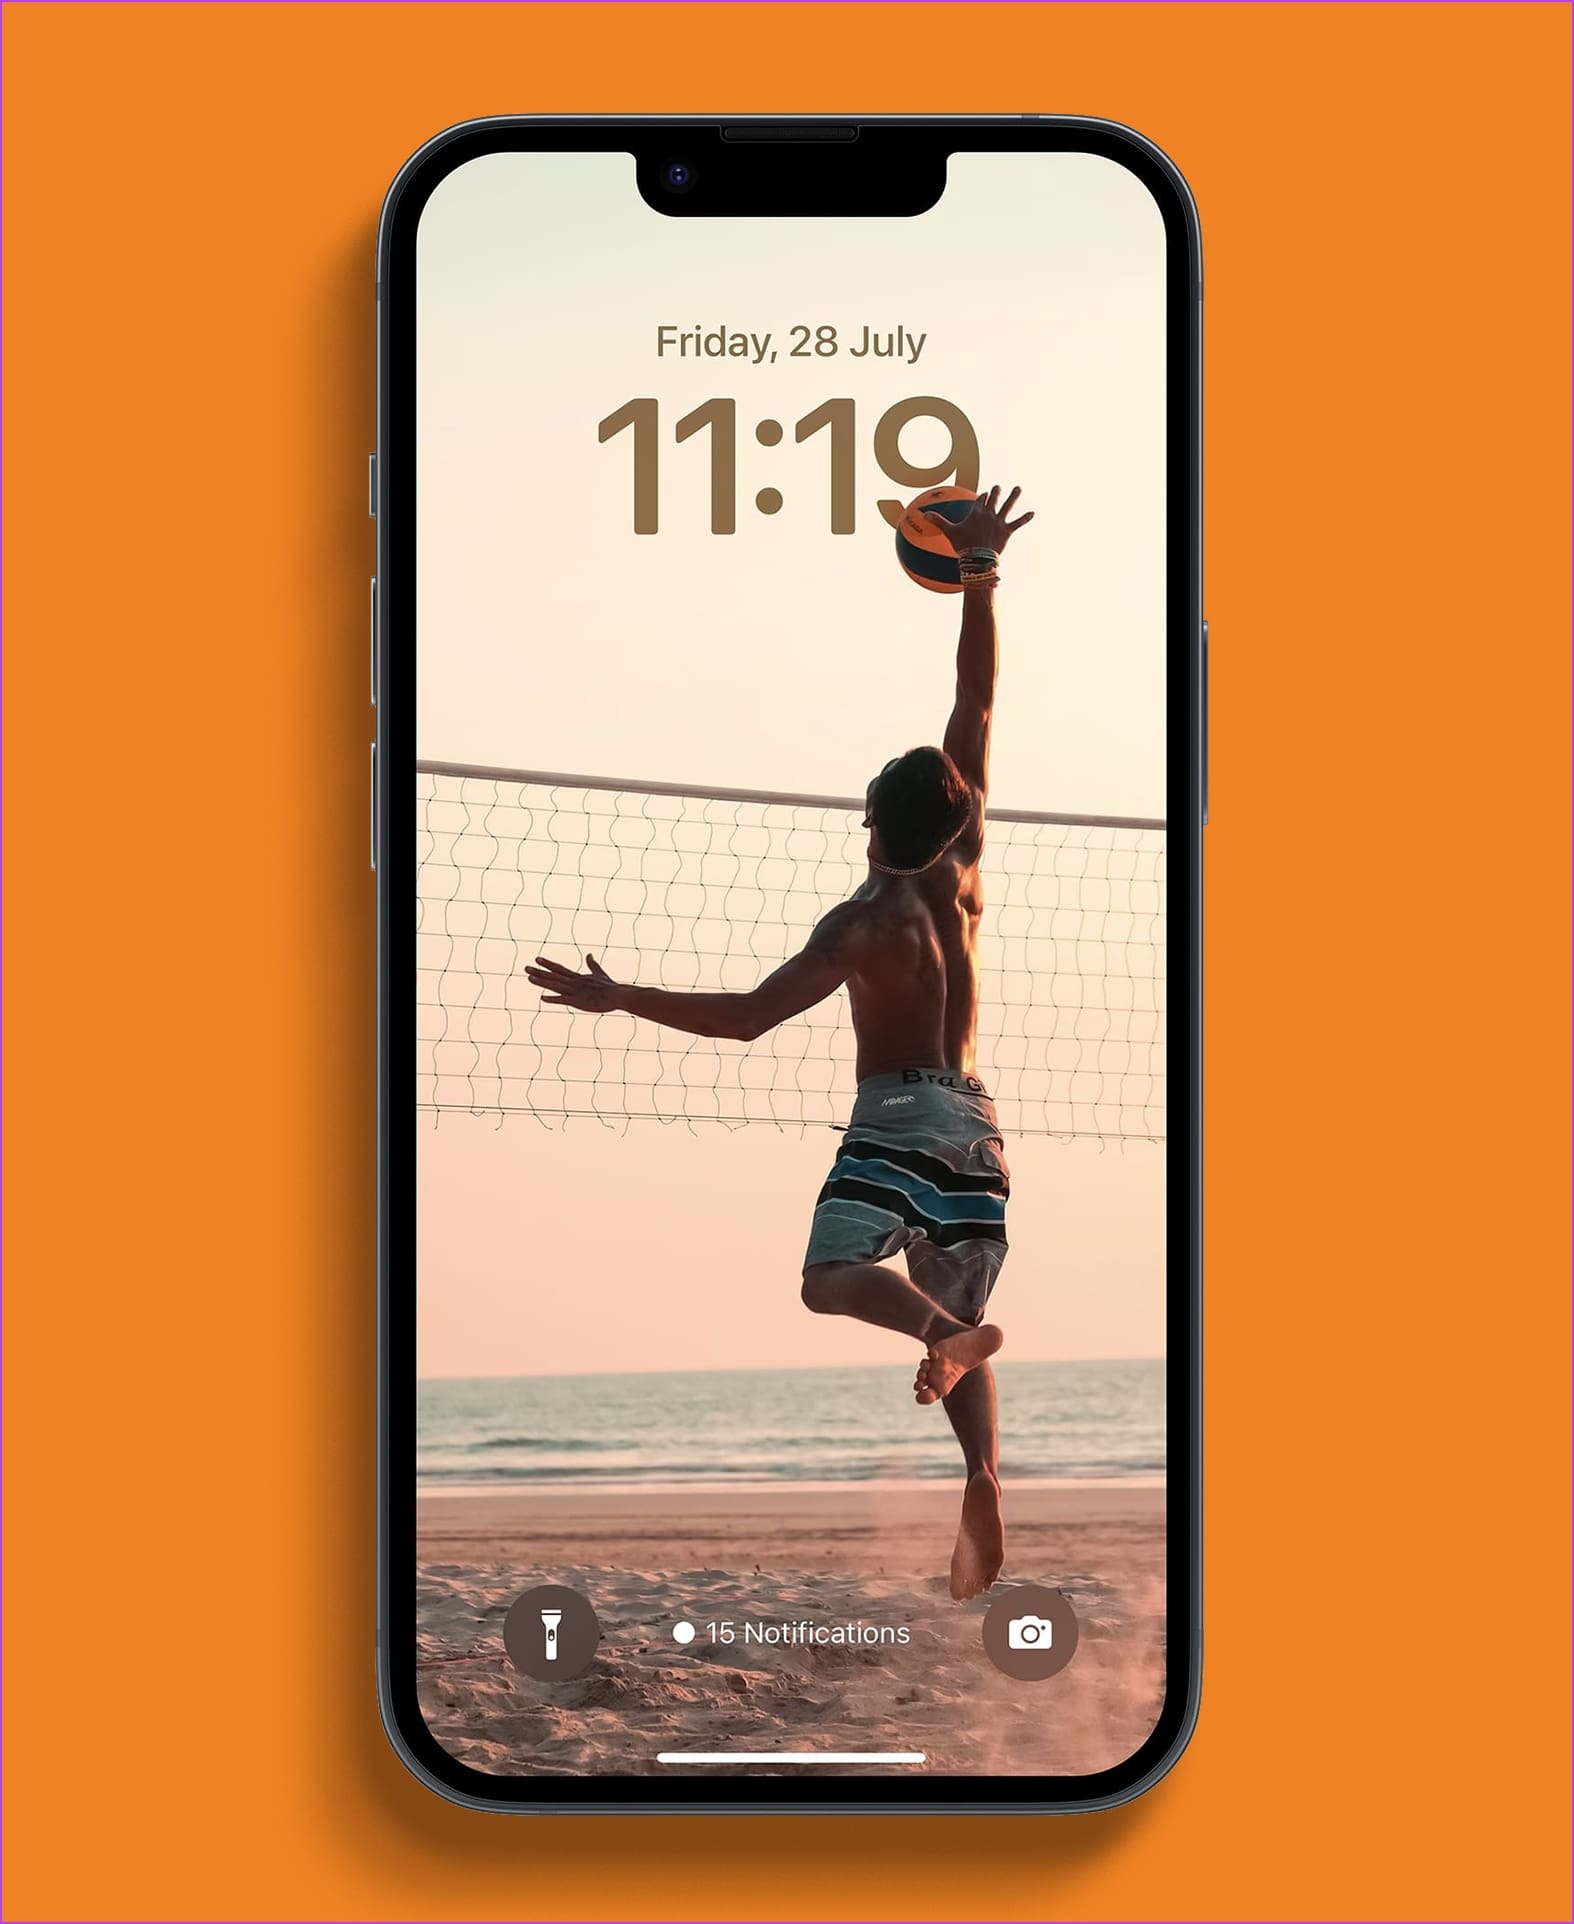
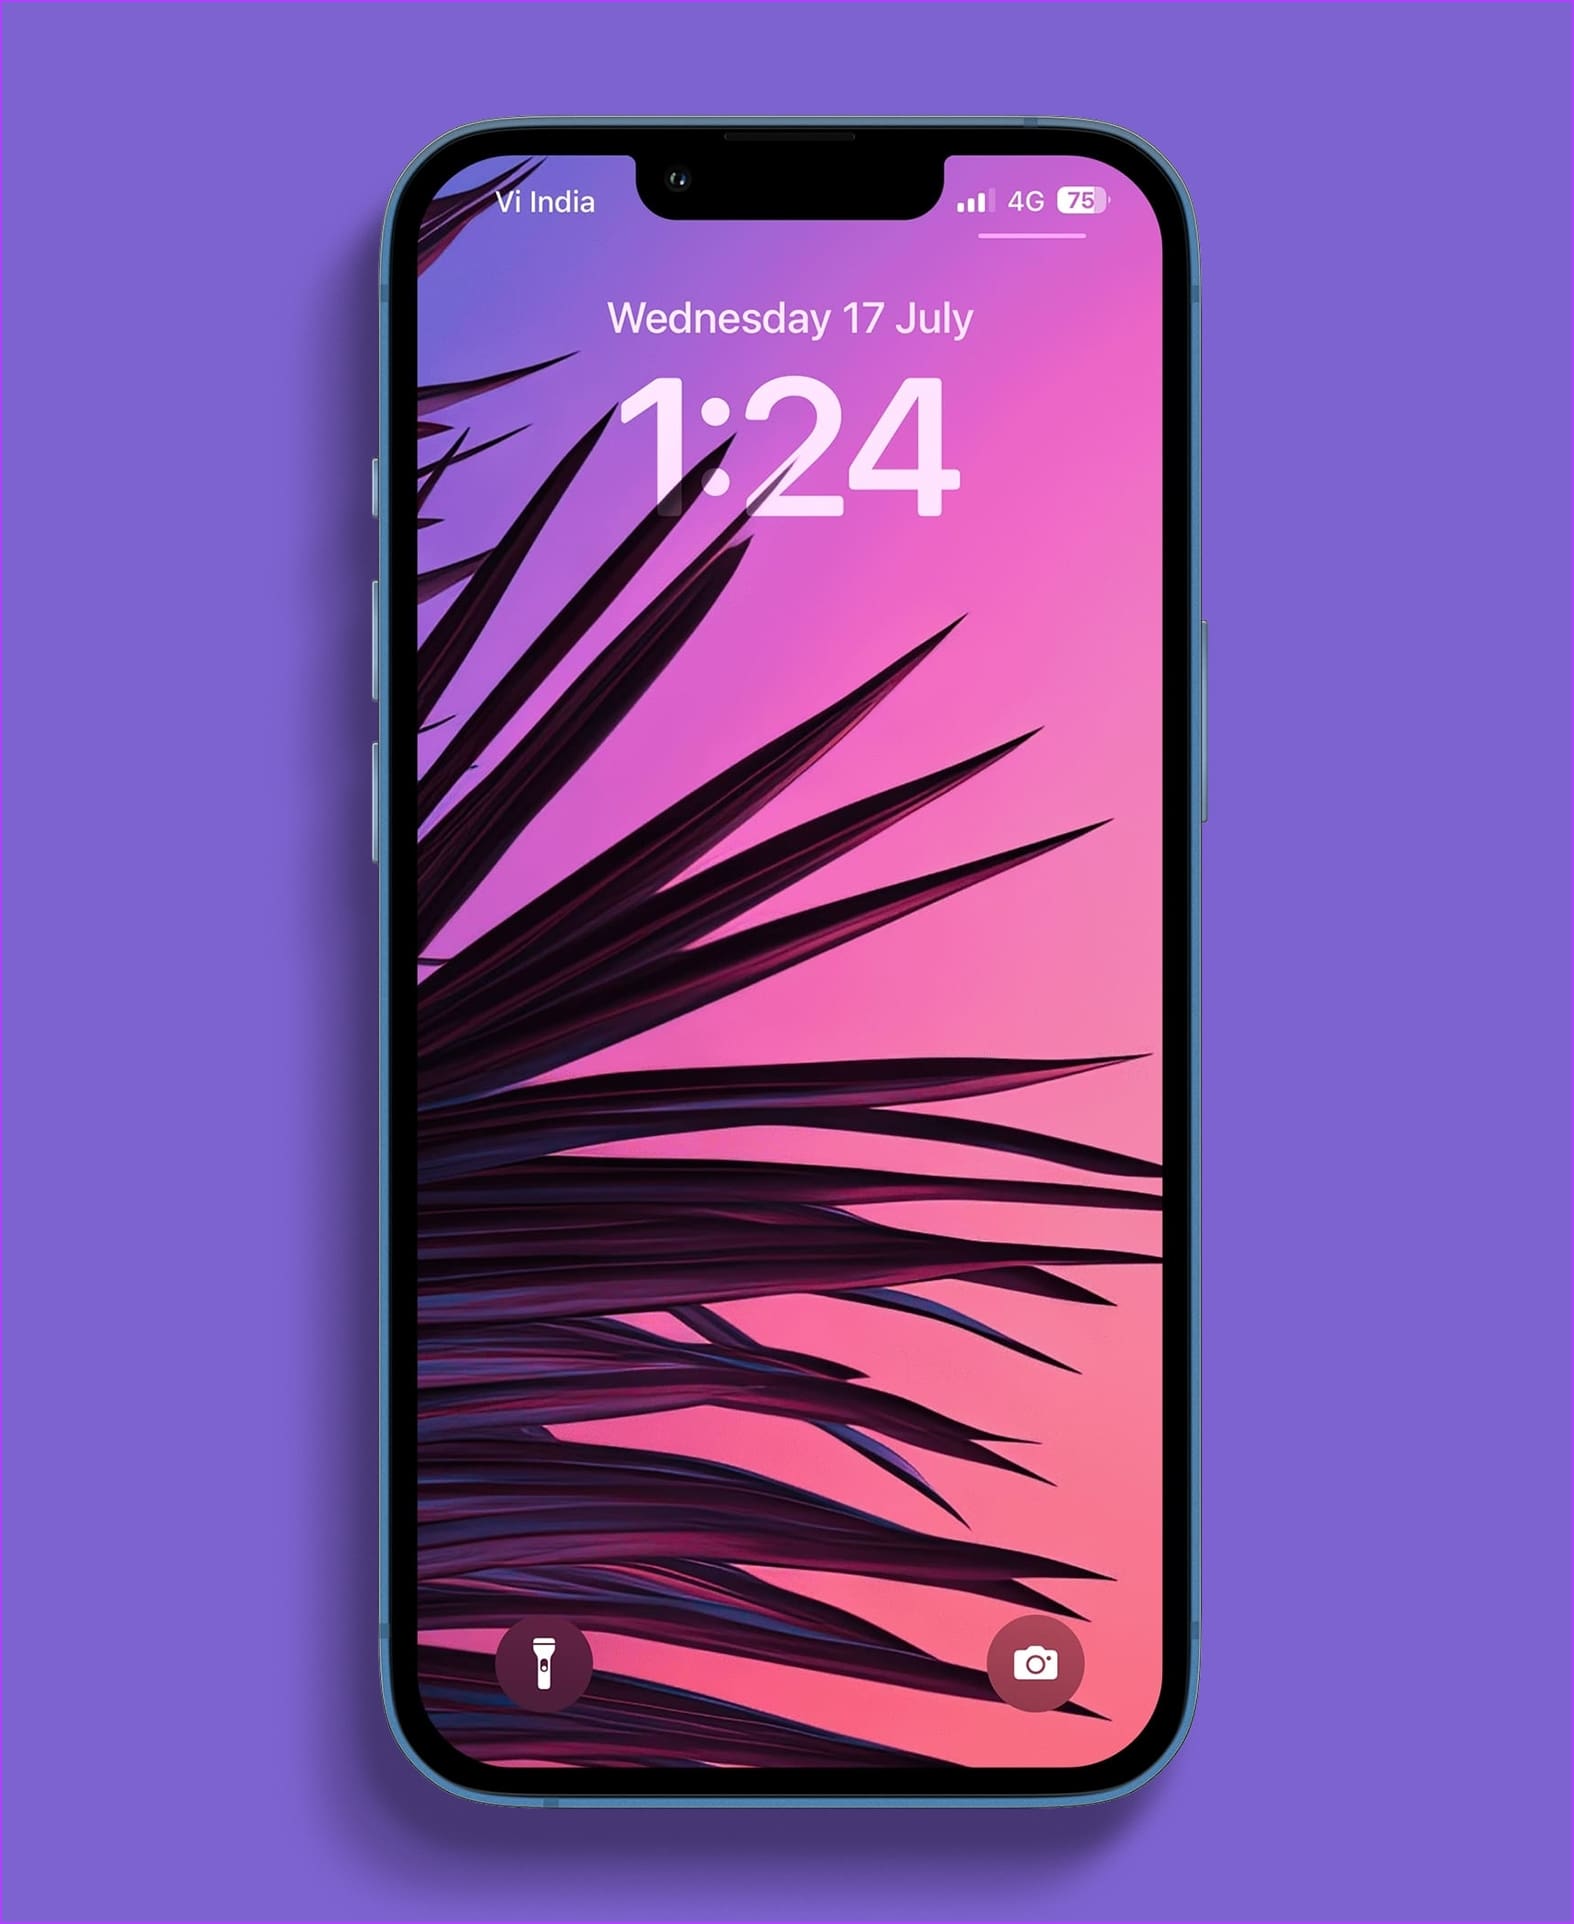
We found this one to be quite unique for a depth effect wallpaper. Here’s a challenge – why don’t you try replicating this wallpaper on your next beach outing?
We all love a shiny Dollar bill, don’t we? Here’s a wallpaper of one, that fits perfectly well with the depth effect on the lock screen of your iPhone!
Walter White, aka. Heisenberg was a total menace in Breaking Bad. If you’re in love with the character and the show – then you’ll love this wallpaper too!
While people often fight about varied opinions and argue with each other in the comment sections of social media platforms – what unites all of us is an amusing cat image. Cats can be hailed as the peacemakers of the online world – and to honor them all, here’s a depth effect wallpaper for your iPhone!
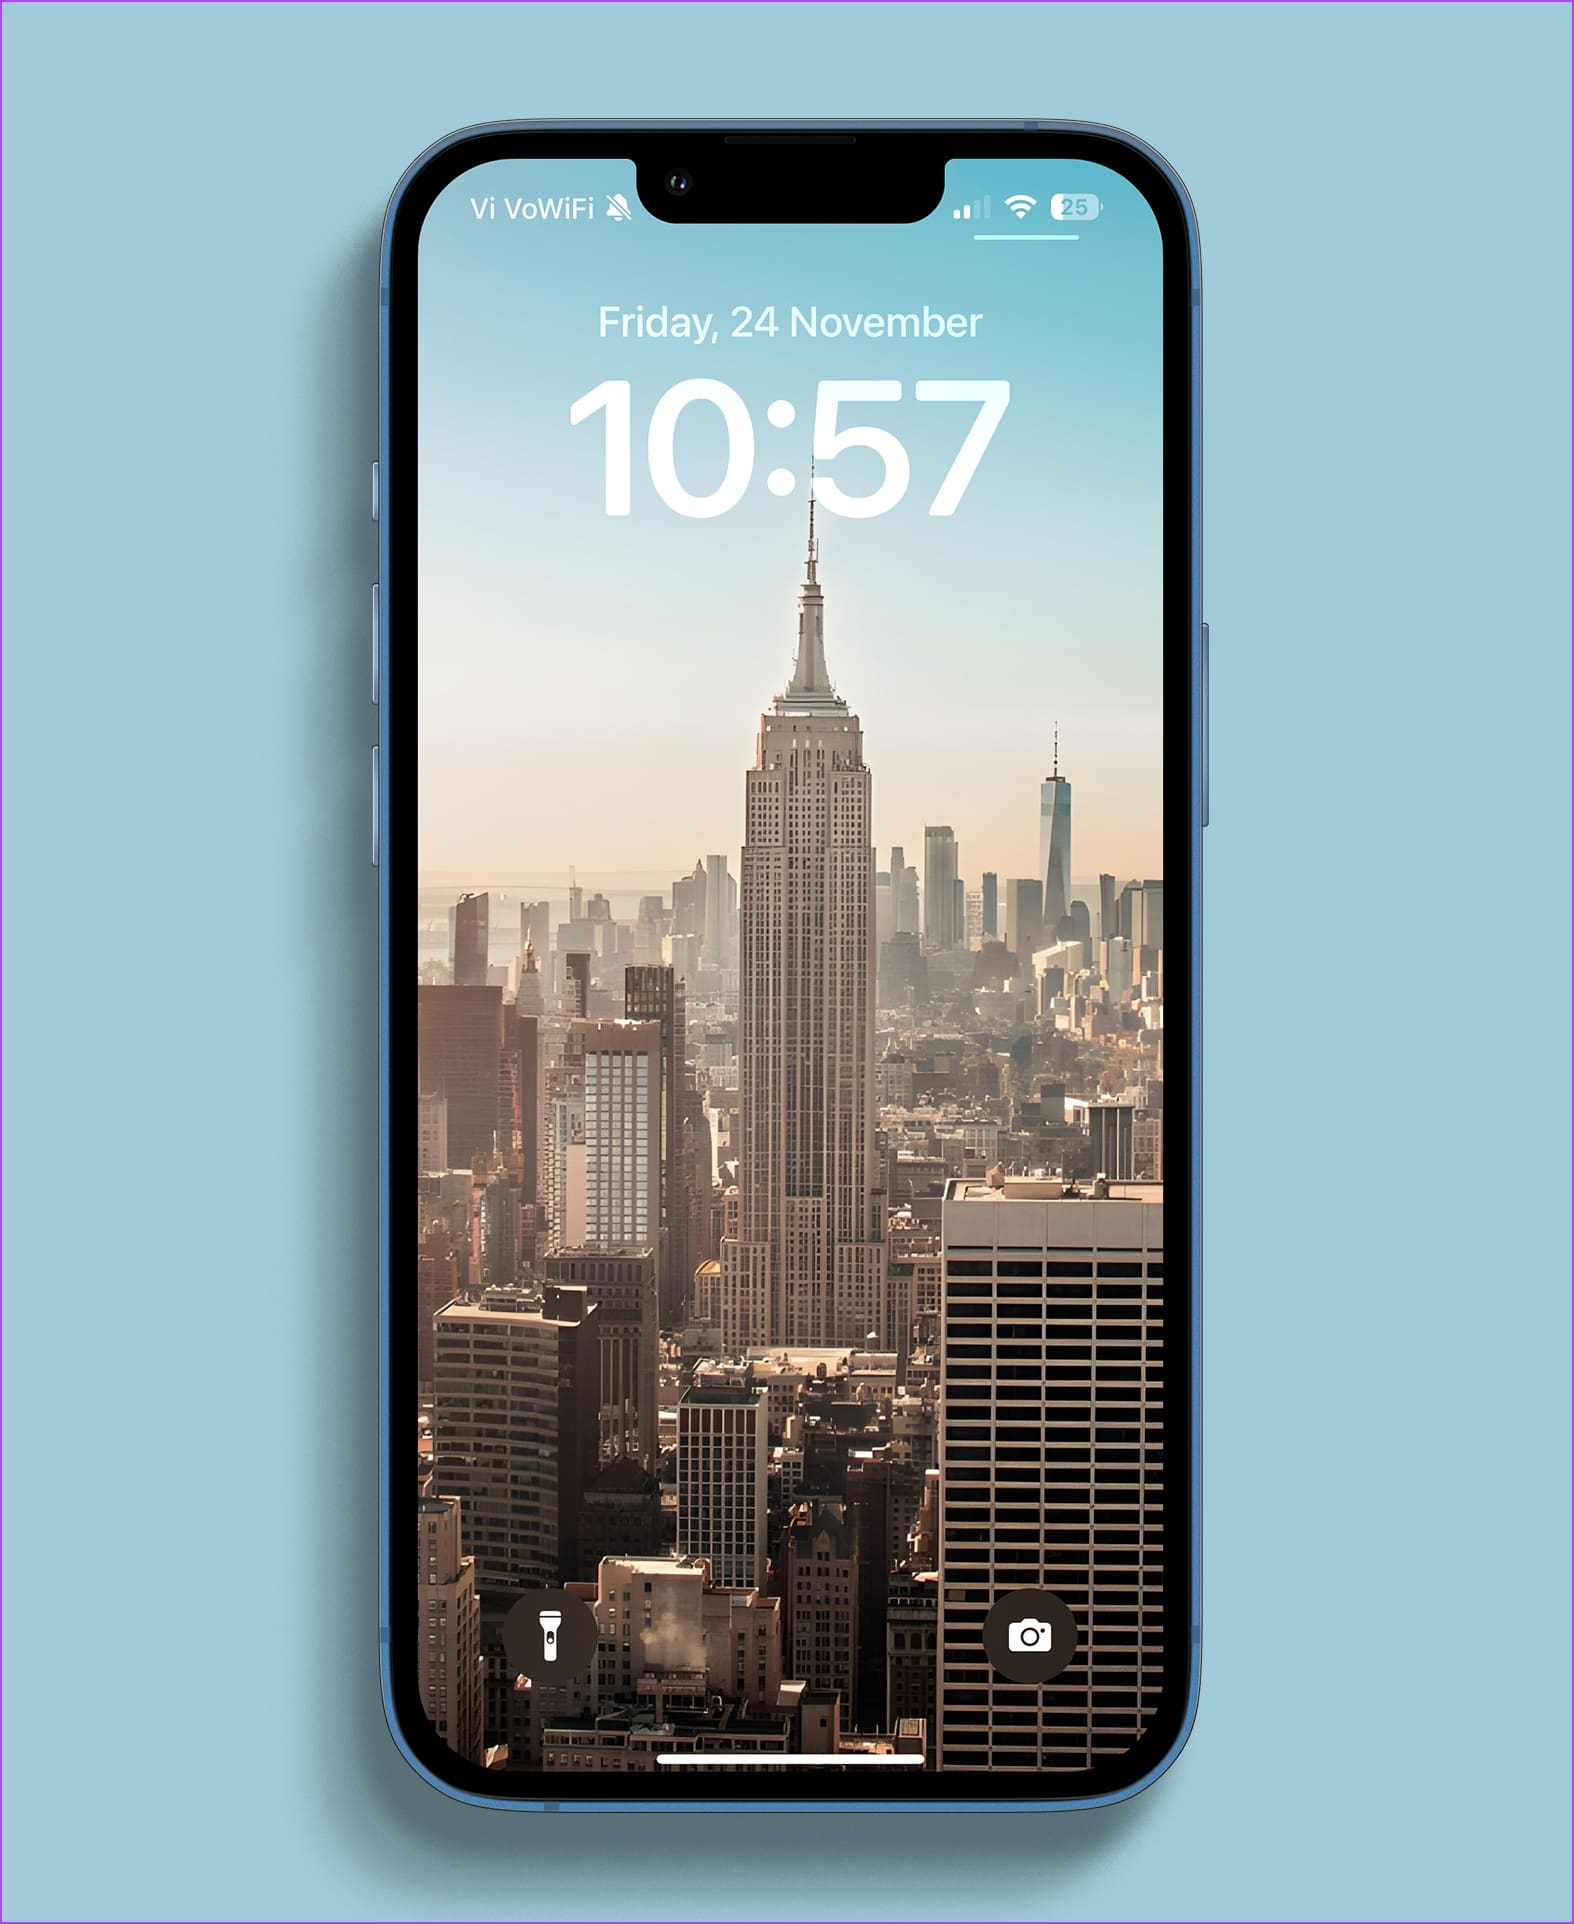
As we’ve seen before, skyscrapers and buildings are your best choice for a depth effect wallpaper on the lock screen. Here’s a wallpaper of the Empire State Building!
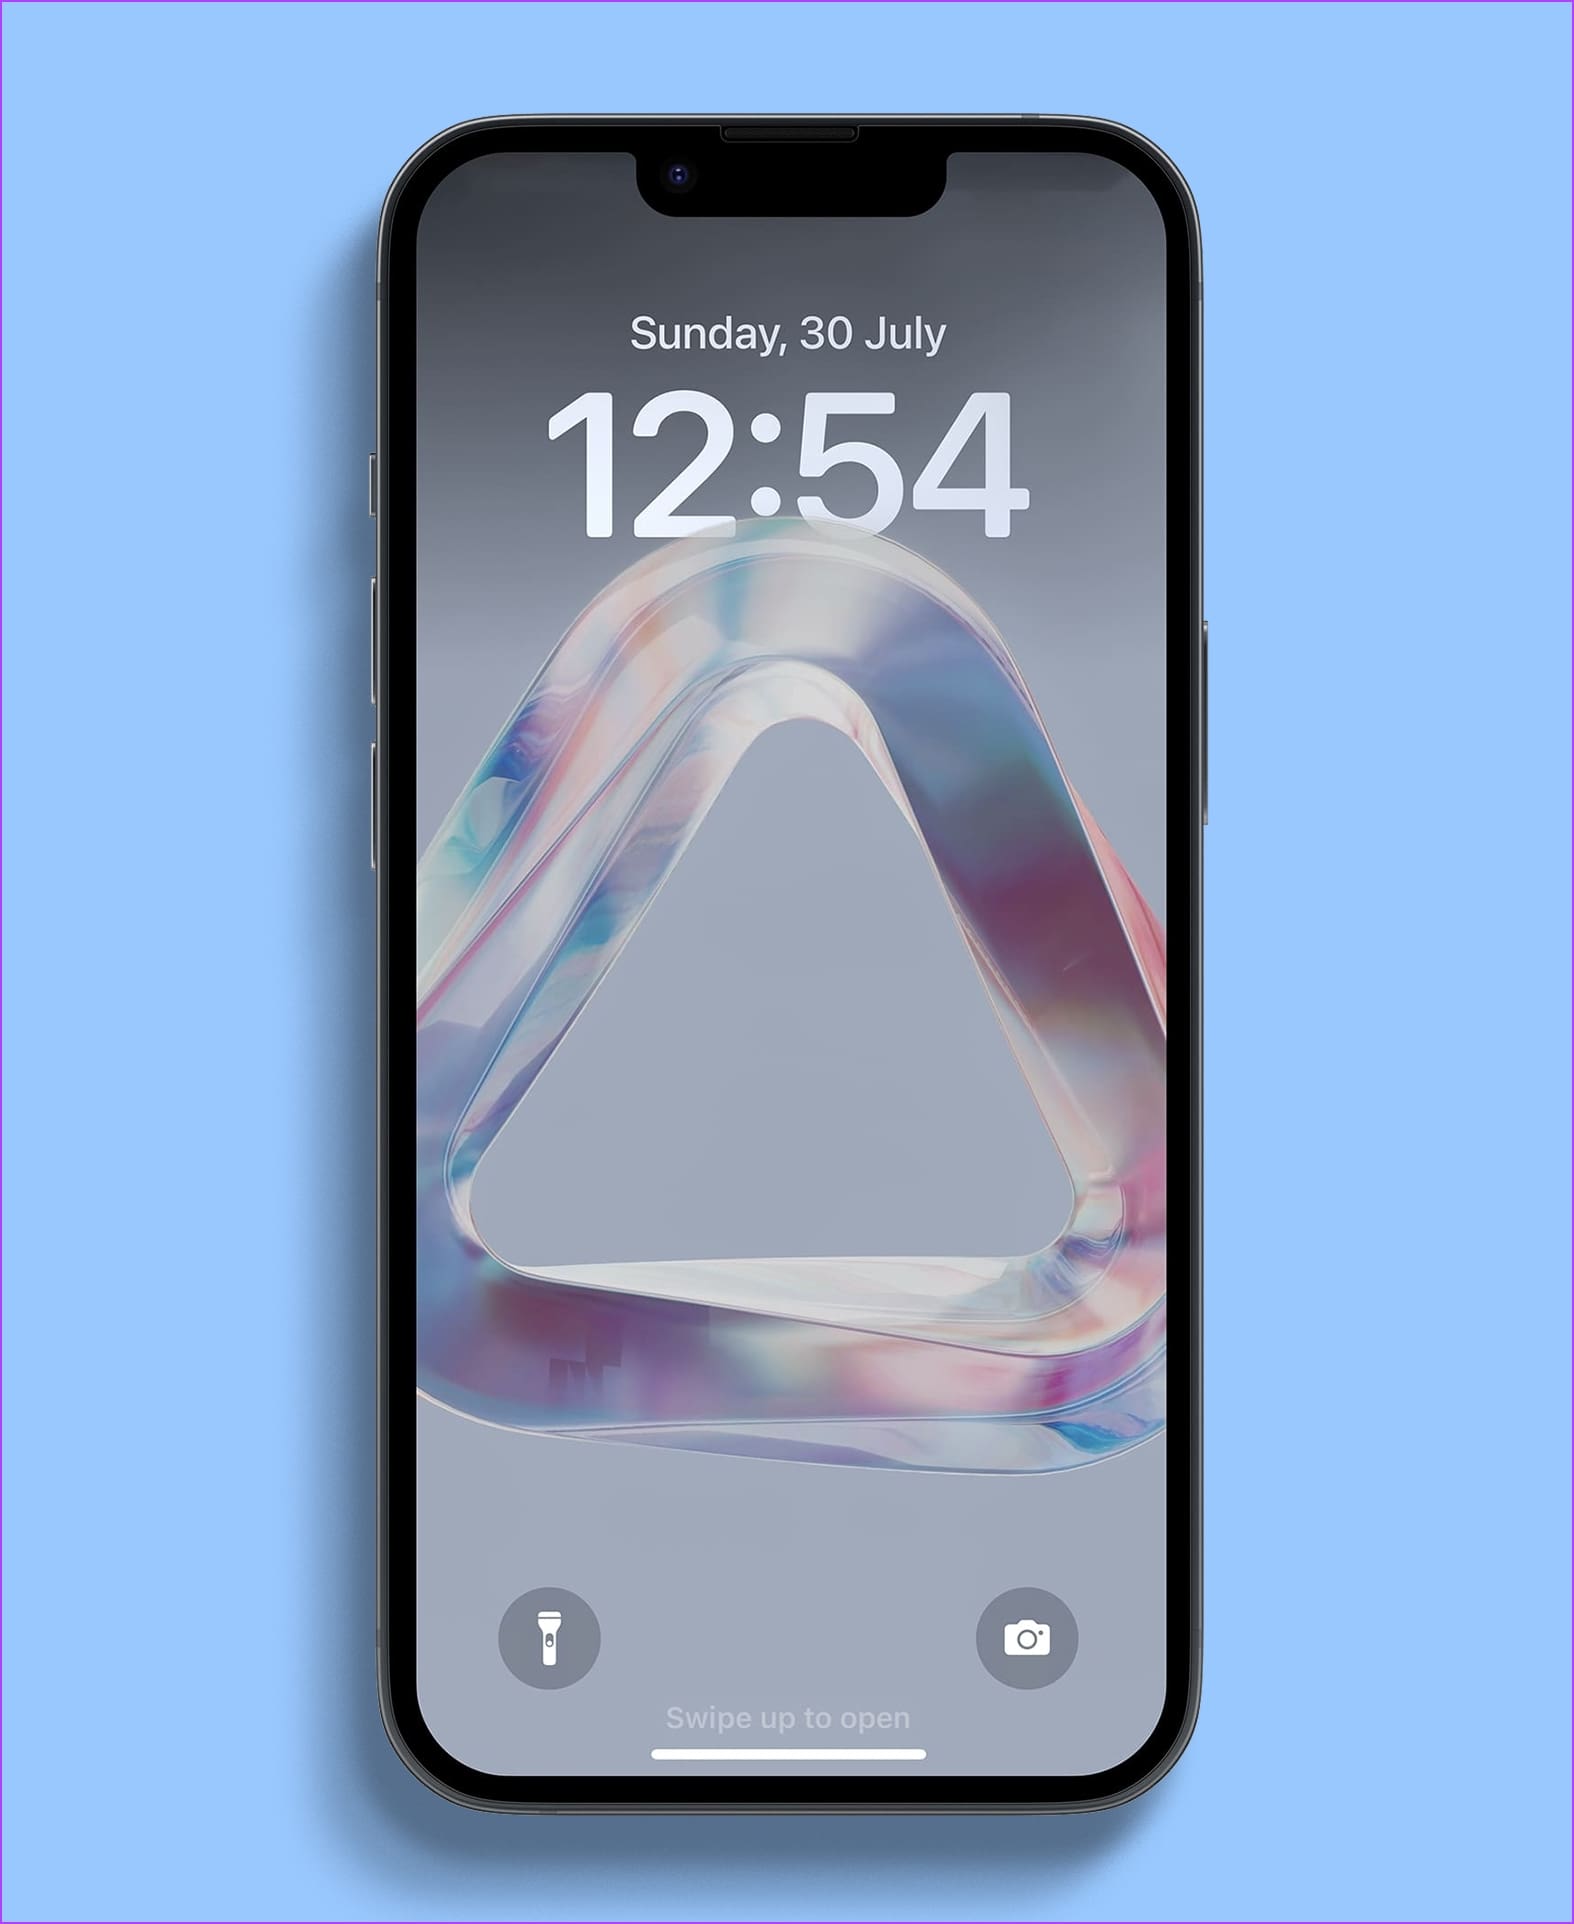
If you’re a fan of abstract wallpapers, then this one is for you. Here’s a glass slab wallpaper that creates a unique, transparent depth effect on your iPhone!
If you’re a fan of iconic American architecture, then it goes without saying you love the Golden Gate Bridge. Go on then, download this lock screen wallpaper for your iPhone!
Google offers a wide range of products in the technology space. Popular Google products include Chrome for web browsing, YouTube for video streaming, and Maps for route planning. While you can access the products online or via an app, Google recommends that users create an Account to maximize the benefits of these products.
When you use these products with your Google Account, Google saves some of your activity in a My Activity repository. The activities saved include the sites you visit, the searches you conduct, and the videos you watch. You can manage the type of activity saved using a feature on your Google Account called Activity Controls.
Types of Activity Saved to My Activity
Google only saves the activity you perform on a Google product or service only if it falls into any of the following categories:
Web & App Activity: this covers your search history and activity on Google products such as Chrome, Maps, and Search. It also includes audio recordings from your interactions with Google Assistant.
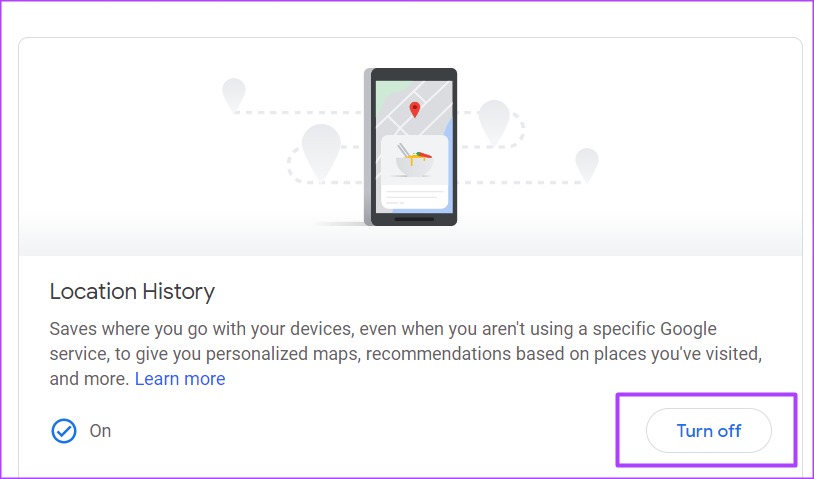
Location History: this saves the data of places you visit or search for, including commuting routes. It also provides personalized recommendations on places to visit.
YouTube History: this covers videos you search for or watch on YouTube.
According to Google, the purpose of storing the data of users’ activity is to customize the user experience. Also, users can edit the type of activity they would like saved.
How to Edit the Activity That Gets Saved on Your Google Account
For your activity to get saved, the activity must fit into the categories explained previously. Also, you must sign into your Google Account for the data to be stored under My Activity. If you meet the requirements, here’s how to edit the activity that gets saved on your Google Account:
Step 1: Open the Google Accounts page in a web browser and sign in with your account details.
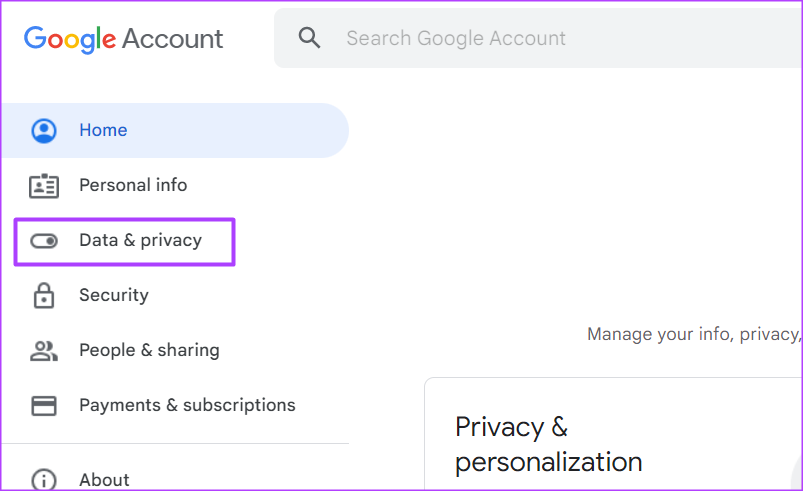
Step 2: At the left of the new window, click on Data & Privacy.
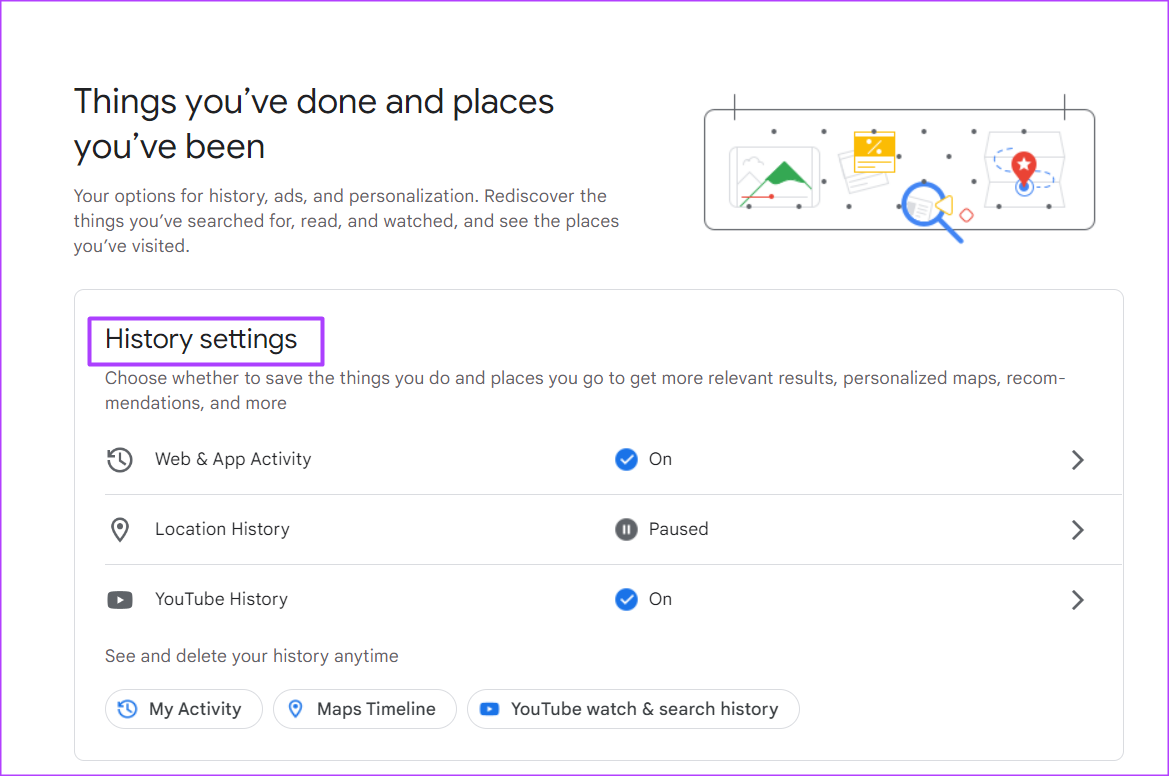
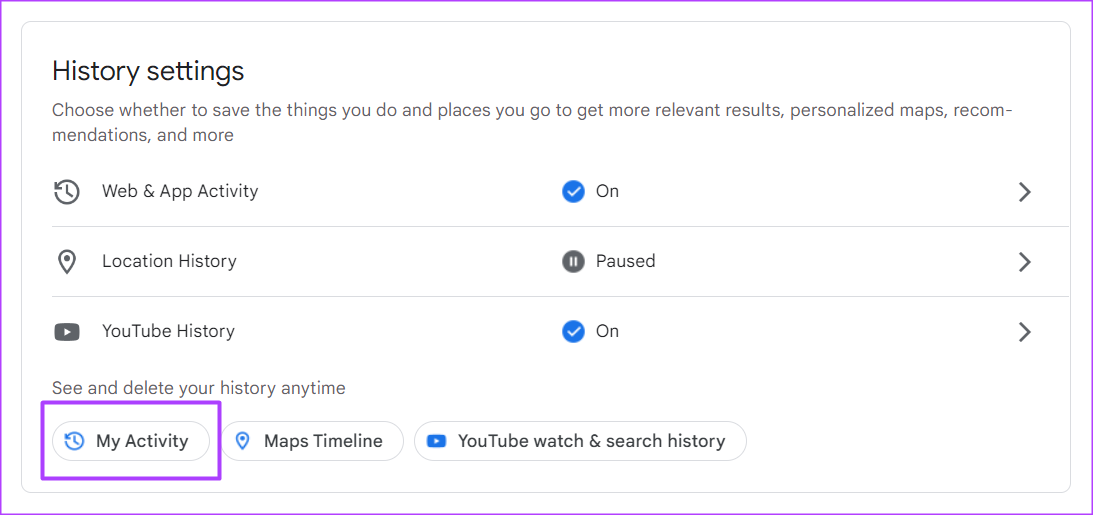
Step 3: Scroll down the window to History Settings.
Step 4: Click on My Activity to launch the My Google Activity page.
Step 5: On the new page, click any of the buttons for Web & App Activity, Location History, or YouTube History. This should take you to the Activity controls page.
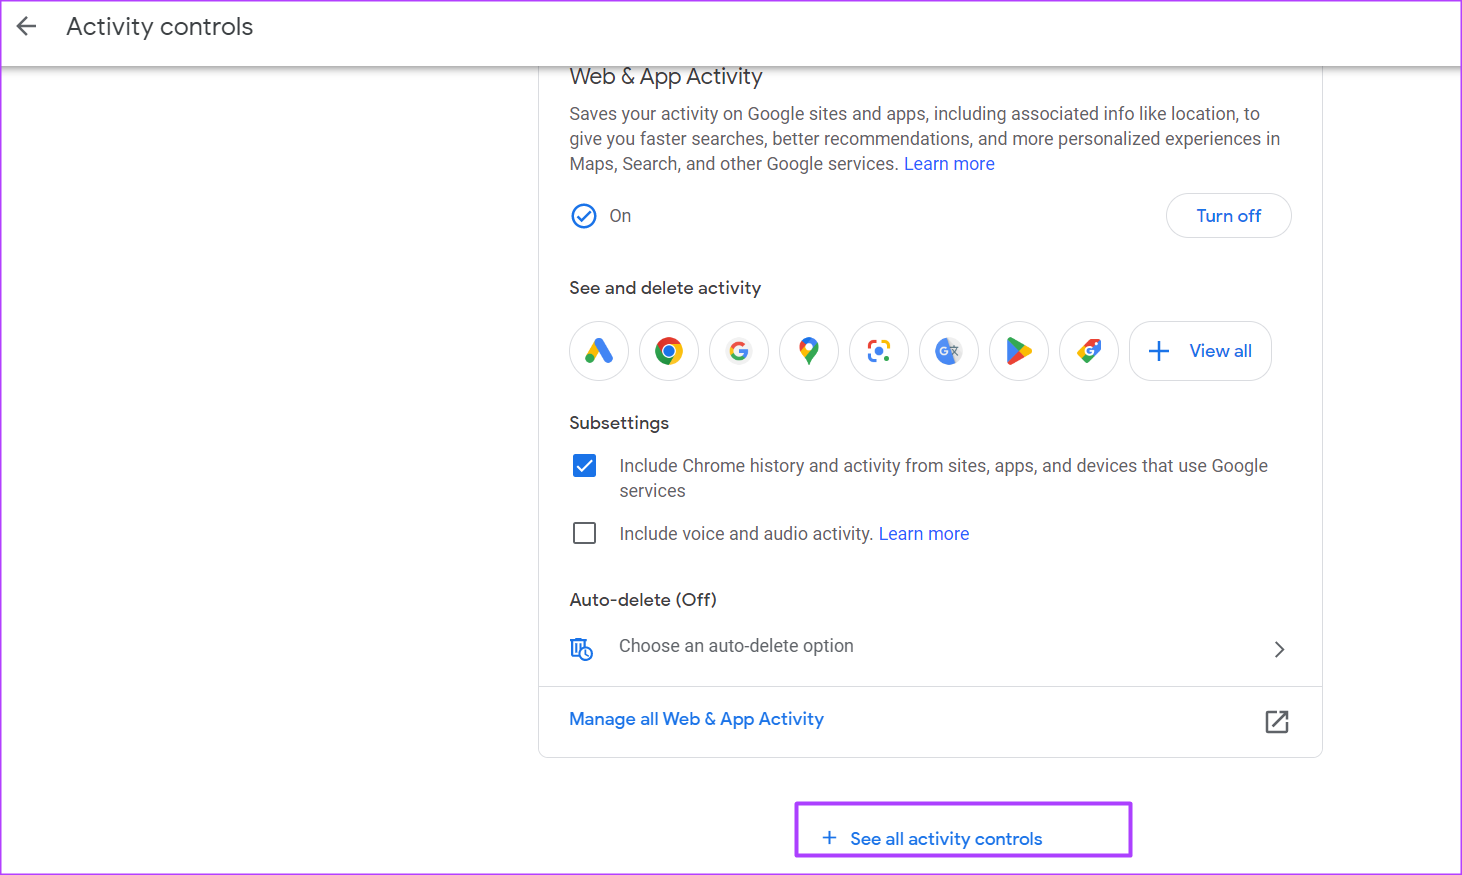
Step 6: On the Activity Controls page, scroll to the bottom and click ‘See all activity controls.’ This should reveal all Activity controls.
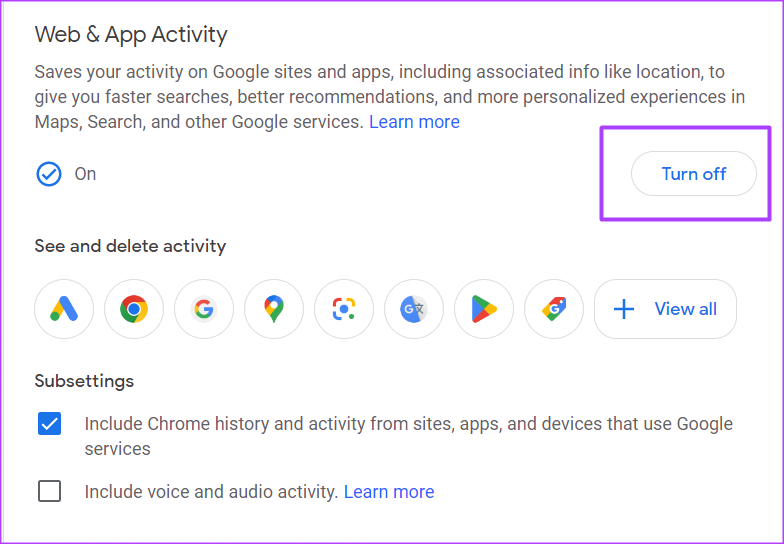
Step 7: Scroll to the Web & App control. You can click the Turn off button to prevent Google from saving data on your Web & App searches.
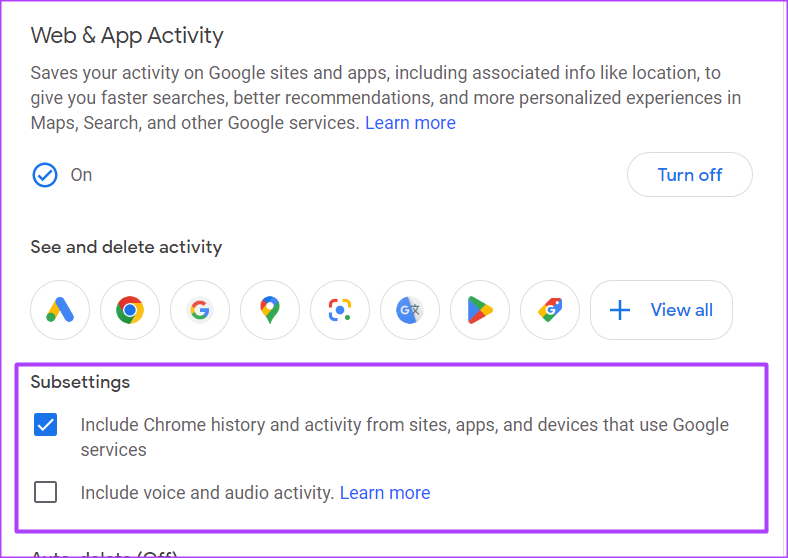
Step 8: Under the Web & App Activity subsetting, you can opt-in or opt-out of saving your Chrome history, voice, and audio activity.
Step 9: Scroll down to the Location History control. You can click the Turn off button to prevent Google from saving data on your location.
Step 10: Scroll down to the YouTube History control. You can click the Turn off button to prevent Google from saving data on your searches or watches.
Step 11: Under the YouTube History subsetting, you can opt-in or opt-out of saving your YouTube watch & search history, voice, and audio activity.
How to Delete Previous Activity Saved on Your Google Account
Turning off the setting for Google to save your web, location, and YouTube history does not delete previously saved activities. Rather, only your future activities do not get saved while the old ones get retained. To delete your previously saved activity, follow the steps below:
Step 1: Open the Google Accounts page in a web browser and sign in with your account details.
Step 2: At the left of the new window, click on Data & Privacy.
Step 3: Scroll down the window to History Settings.
Step 4: Click on My Activity to launch the My Google Activity page.
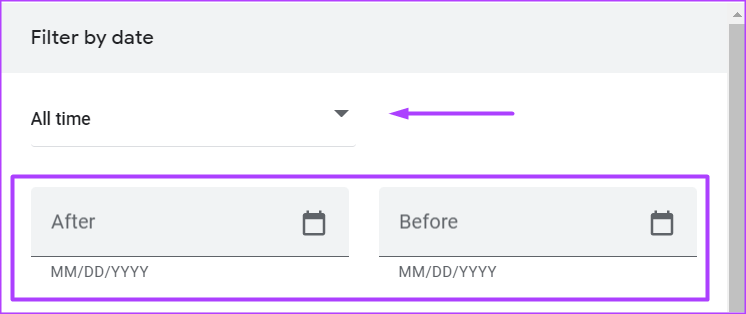
Step 5: On the My Google Activity page, click on ‘Filter by date & product.’
Step 6: Select the time range of the Activity you would like to delete.
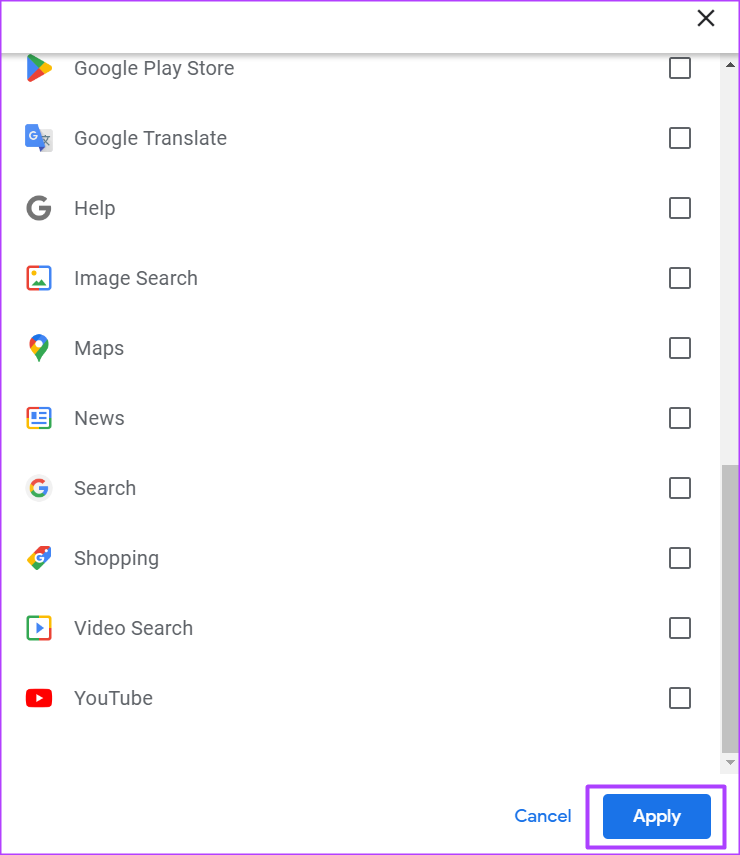
Step 7: Select the Google Product with the activity you want to delete.
Step 8: Click Apply to save your filters.
Step 9: You can either click Delete beside your selected filters or scroll through the results of the filtered activity and delete them individually.
How to Enable Two-Factor Authentication on Your Google Account
If you decide to turn on activity controls on your Google Account, you’ll need to enable two-factor authentication. That way, you can protect your data and safeguard it against theft.
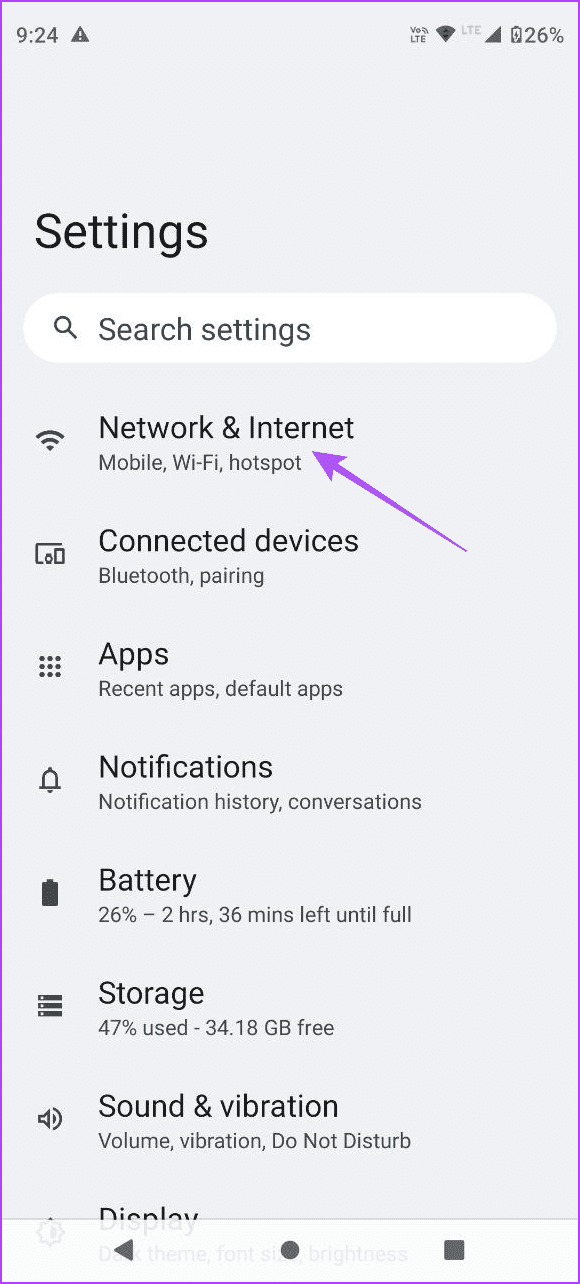
Your first step is to ensure that your PC’s network discovery feature is enabled for both public and private networks. Here’s how to do it.
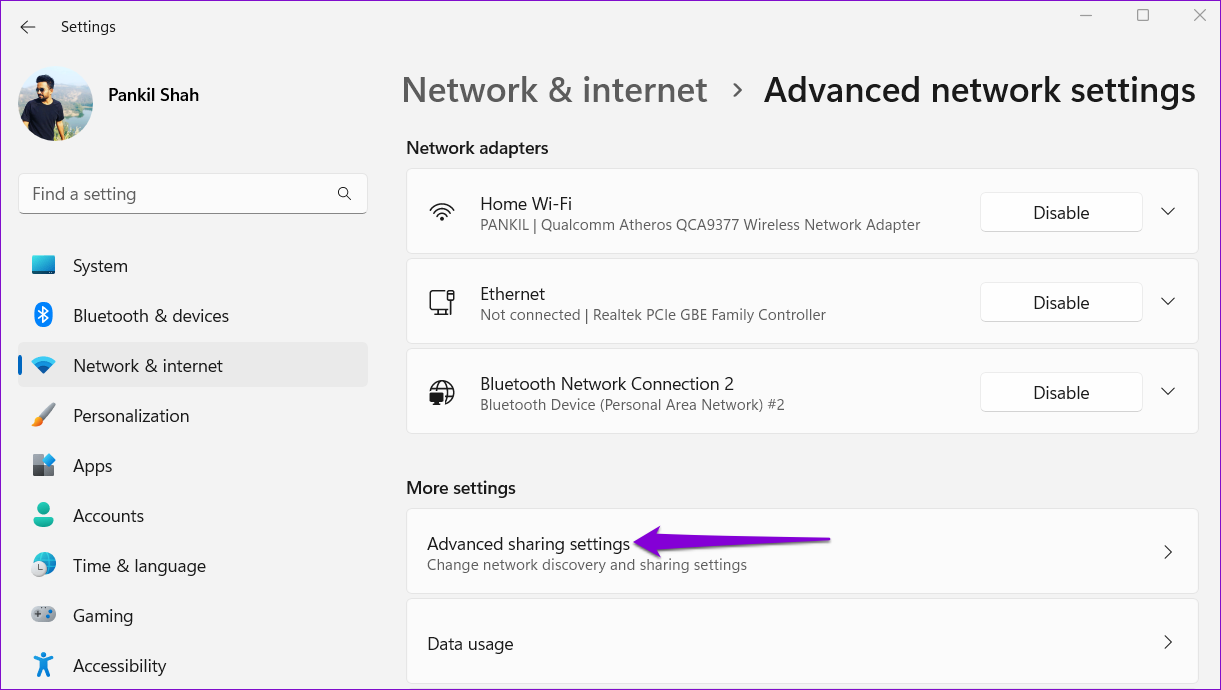
Step 1: Press the Windows key + I to open the Settings app. Then, go to Network & internet > Advanced network settings.
Step 2: Click on Advanced sharing settings.
Step 3: Expand Private networks. Then, enable the toggles for Network discovery and File and printer sharing.
Likewise, enable the toggles for Network discovery and File and printer sharing for Public networks as well.
Fix 2: Configure Services Related to Network Discovery
The Network discovery feature relies on certain Windows services to function. If one of those services is not running, you could experience errors. Here’s what to do to fix it.
Step 1: Press the Windows key + R to open the Run dialog. Type services.msc in the box and press Enter.
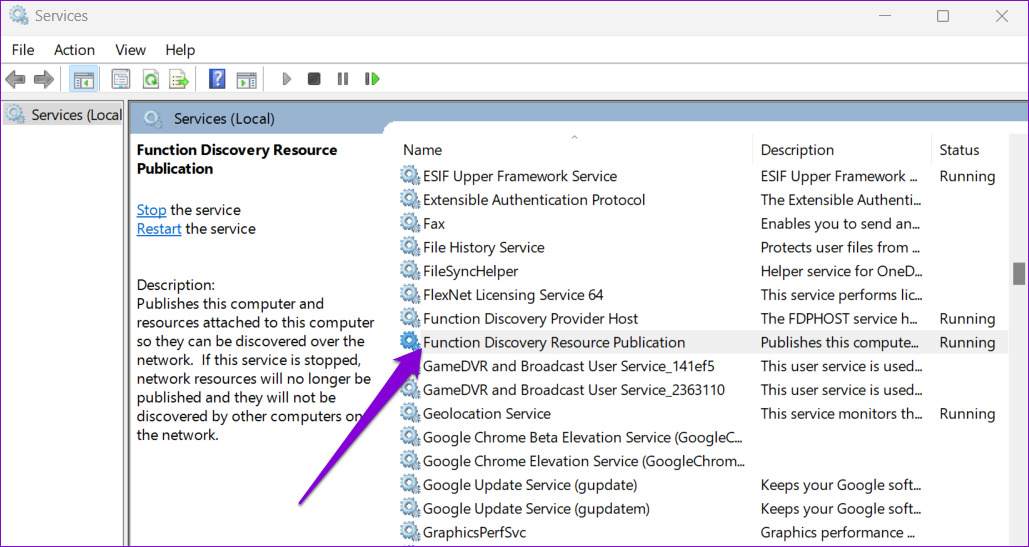
Step 2: Scroll down to locate the Function Discovery Resource Publication service. Double-click on it to open its properties.
Step 3: Use the drop-down menu next to Startup type and select Automatic. Then, hit Apply, followed by OK.
Repeat the above steps to configure DNS Client, SSDP Discovery, UPnP Device Host, and Function Discovery Provider Host services. After that, restart your PC, and the network discovery should work as before.
Fix 3: Check Windows Firewall Settings
If the problem persists after configuring Windows services, the Windows Defender Firewall is likely blocking network discovery. Here’s what to do to allow network discovery through the Windows Defender Firewall.
Step 1: Click on the search icon on the taskbar, type control panel, and press Enter.
Step 2: Use the drop-down menu at the top right corner to change the view type to Large icons and click on Windows Defender Firewall.
Step 3: Click on Allow an app or feature through Windows Defender Firewall in the left pane.
Step 4: Click on Change settings.
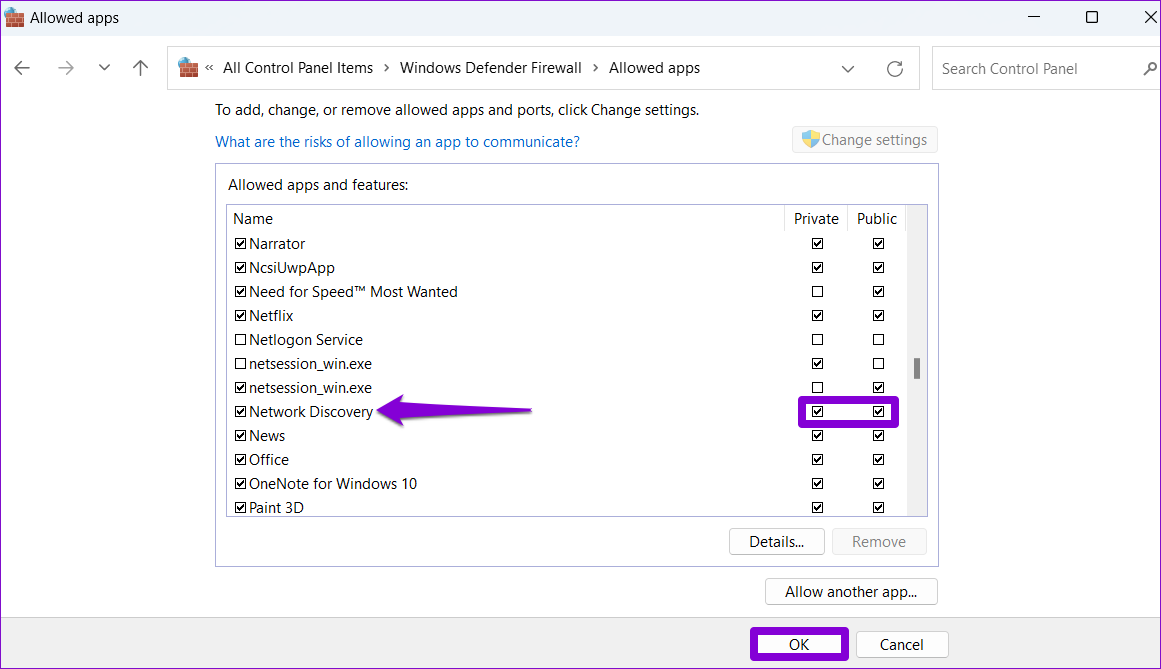
Step 5: Locate Network Discovery on the list and check the boxes for Private and Public next to it. Then, click on OK to save changes.
Fix 4: Update the Network Adapter Driver
Such issues with the network discovery can also occur due to a malfunctioning network adapter driver. In that case, try updating the driver by following the steps below.
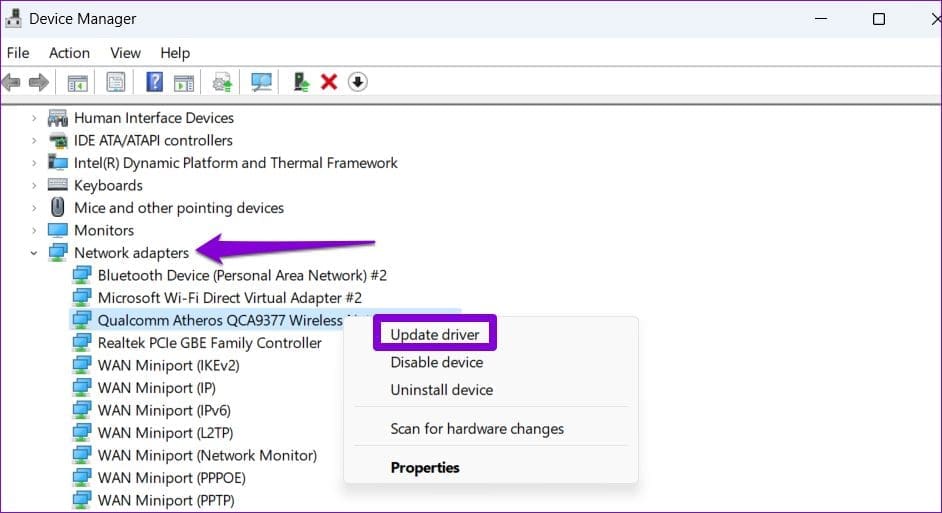
Step 1: Right-click on the Start icon and select Device Manager from the list.
Step 2: Double-click on Network adapters to expand it. Right-click your network adapter and select Update driver.
From there, follow the on-screen instructions to finish updating the network driver.
Fix 5: Reset Network Settings
If none of the above solutions work, reset your PC’s network settings as a last resort. That means you’ll lose all network configurations, such as the IP address and DNS server settings you use to connect your PC to your network.
To reset network settings on Windows 11:
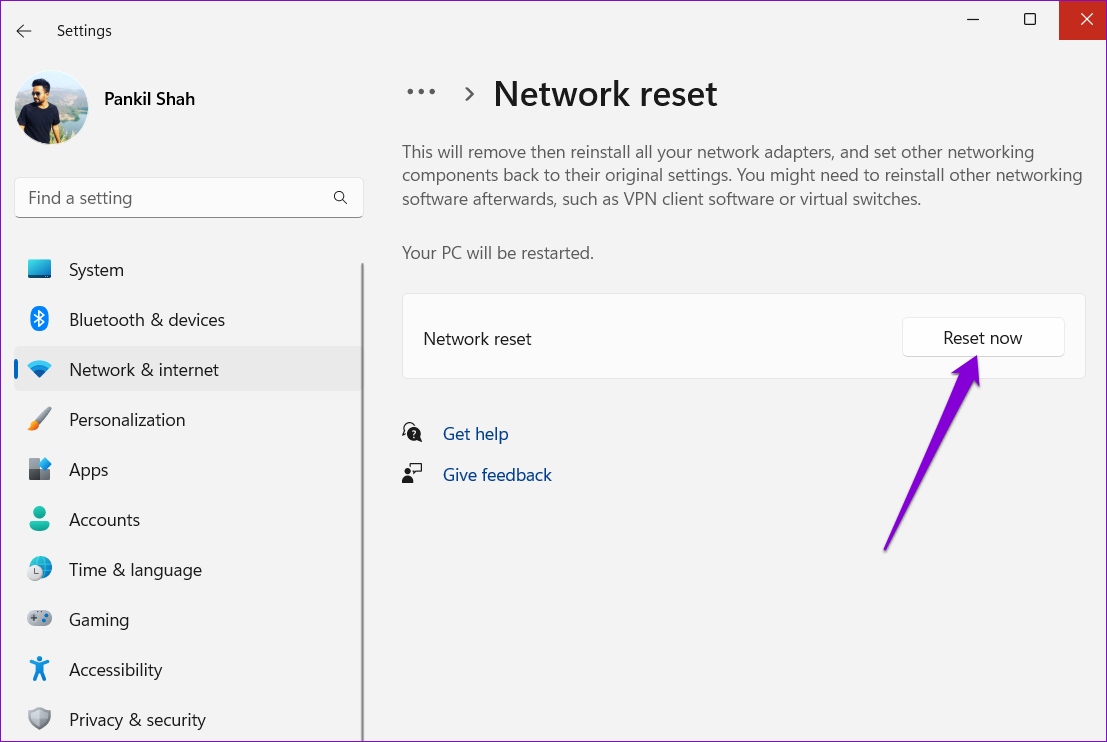
Step 1: Press the Windows key + I to open the Settings app. Then, go to Network & internet > Advanced network settings > Network reset.
Step 2: Click on Reset now next to Network reset.
Your PC will restart and revert to the default network settings. Following this, the issue will no longer bother you.
An iPhone is an excellent device for content creators for multiple reasons. The cameras are one of the best on any smartphone for videography, and you can edit videos on the go, thanks to the powerful chipset. Speaking of video editing, the iPhone and iPad come right out of the box with iMovie — Apple’s first-party video editing software. If you plan to edit videos on your iPhone or iPad, knowing how to use iMovie can be helpful.
There are a ton of features and options on iMovie that you can use to edit your videos and make them look professional. We’ll go through all the important features, tips, and tricks in this guide and tell you how to use iMovie on your iPhone and iPad.
Types of Projects on iMovie
With the latest update to iMovie, Apple gives you 3 different project modes to choose from. Each of them serves a different purpose. Here are the 3 types of projects you can create –
Movie: This is the standard video editing mode. If you want to merge clips, add music, or do any type of basic video editing, this is the project you need to select. Essentially, you’re creating a video from scratch here.
Storyboard: The storyboard mode uses predefined templates to create a video with your clips. Just choose a template, add clips, and let iMovie curate the final output.
Magic Movie: In this mode, you can select the clips of your choice and iMovie will merge them to create a compilation of sorts with automatic transitions and effects.
Let’s go over each type of project one by one and tell you how you can use them to edit your videos in the best possible way.
How to Edit iPhone Videos on iMovie Using Movie Mode
If you have a bunch of clips that you want to edit into a single video, this is the mode you should use. This is also a great way to edit videos for YouTube on your iPhone. Here’s how you can use the Movie mode on iMovie.
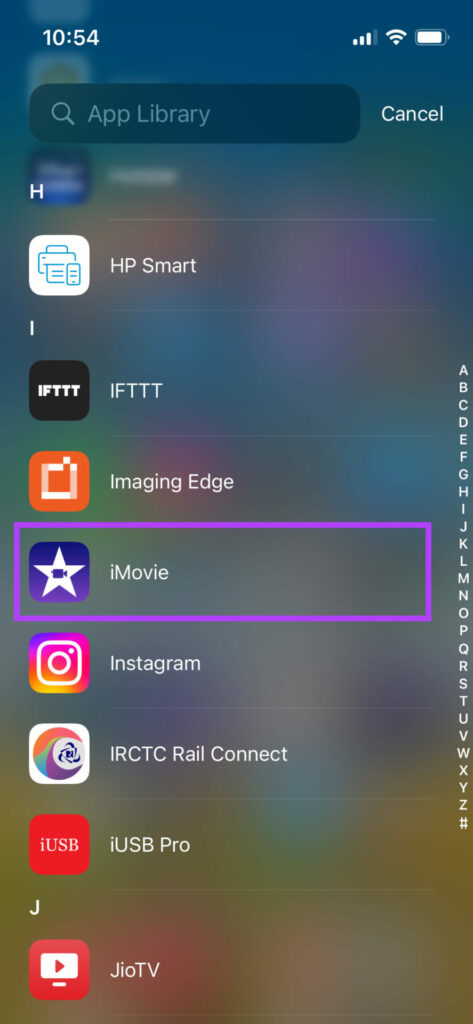
Step 1: Open the iMovie app on your iPhone. Select the Movie option at the bottom.
Step 2: Select all the media files you wish to import by tapping on them and ticking the checkbox. Once all files are selected, tap on Create Movie.
You’ll now see that all your selected media files will appear on the timeline. This is where the video editing begins.
If the selected clips don’t appear in the right order, you can press and hold on to a clip and then drag it to whatever position you wish.
How to Trim Videos in iMovie
Step 1: Tap on the video clip you want to trim or edit the length. This will select it.
Step 2: Now, drag the yellow handlebar to the right of the clip till you trim the desired portion.
Your video will now start from the point where you’ve trimmed it.
If you want to trim the end of a clip, just drag the handlebar on the other end to the left.
In case you wish to trim a portion of the video that’s in the middle of a clip, you will have to split it first.
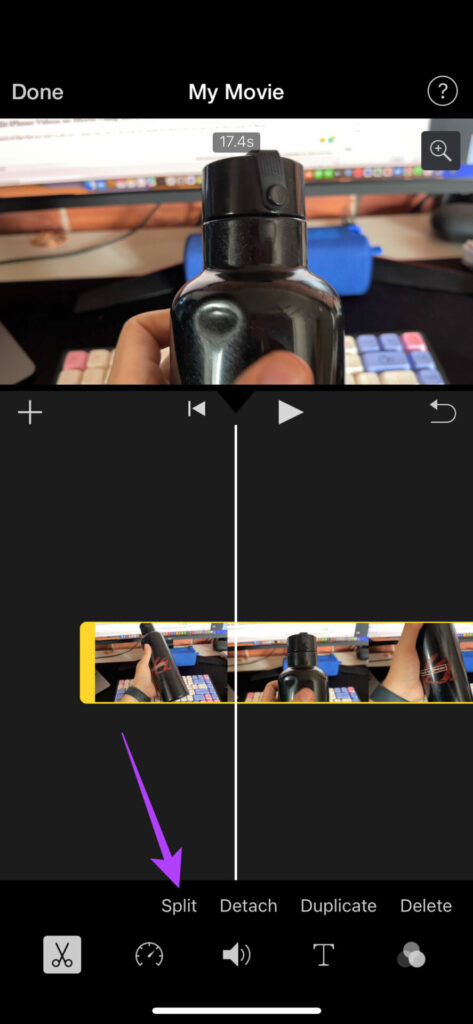
Ensure the icon with a pair of scissors is selected at the bottom before proceeding. This mode is used to cut videos.
Step 3: Move the play head to the starting position of the part you want to trim. Tap on Split
Step 4: Now, move the play head to the ending position of the part you want to trim. Tap on Split once again.
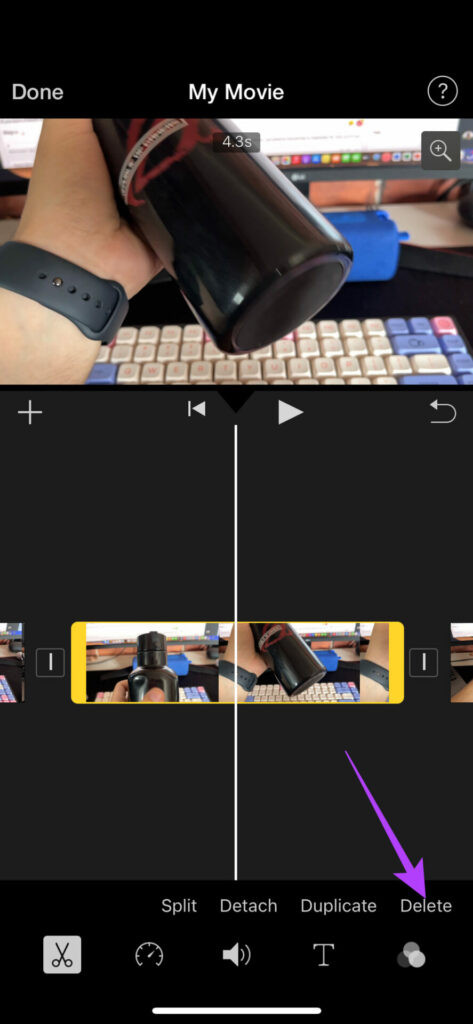
The selected portion will now be split from the original clip.
Step 5: In order to remove it, select it and tap on Delete.
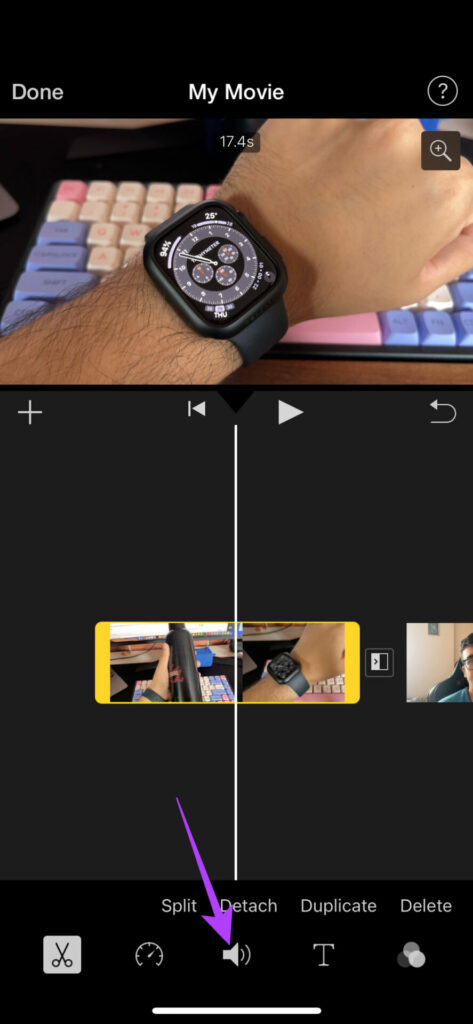
How to Detach Audio From Video in iMovie
Step 1: Tap on the clip for which you want to detach the audio. This will select it.
Step 2: Tap on the Detach option at the bottom.
The video and audio portions of the clip will be detached. You can now edit the audio clip separately or even delete it.
How to Duplicate iPhone Videos
Step 1: Tap on the video clip you want to duplicate. This will select it.
Step 2: Tap on the Duplicate button at the bottom. This will create an exact replica of the selected clip.
How to Add Videos
Apart from the clips you’ve added to the timeline, you can add more at a later stage by tapping on the ‘+’ icon and selecting the videos you wish to add.
How to Add Transitions in iMovie
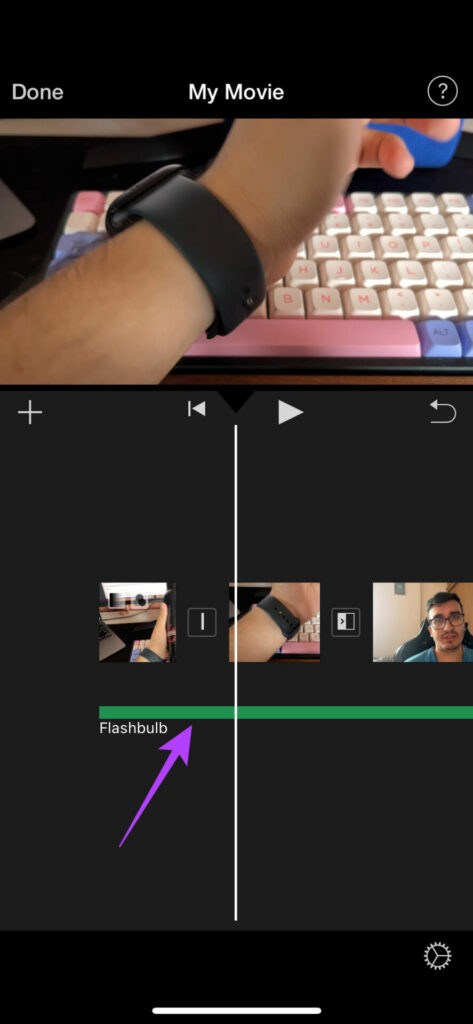
Step 1: Tap on the transition icon between 2 clips on the timeline.
Step 2: Select the transition of your choice along with other parameters like duration and sound.
How to Change the Speed of an iPhone Video in iMovie
Step 1: Tap on the clip for which you want to change the speed.
Step 2: Navigate to the speed section in the toolbar. You can control the pace of the clip from here.
Step 3: Drag the slider to set the speed. Dragging it to the left will reduce the speed while dragging it to the right will increase it.
Step 4: If you wish to have a frame still for a few seconds in the middle of the clip, move the play head to the relevant portion and tap on the Freeze button.
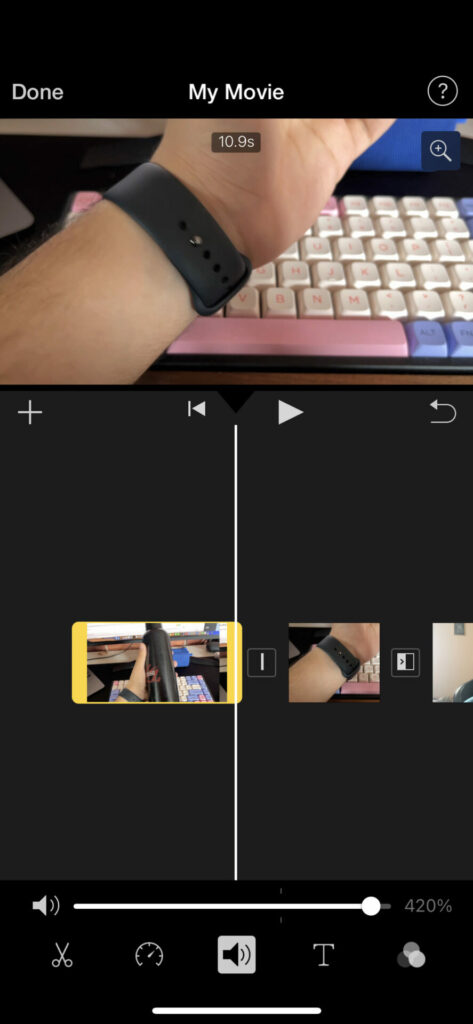
How to Edit Audio Levels of a Video in iMovie
Step 1: Tap on the clip for which you want to change the audio levels. This will select it.
Step 2: Switch to the Audio tab at the bottom.
Step 3: Drag the slider around to adjust the volume levels.
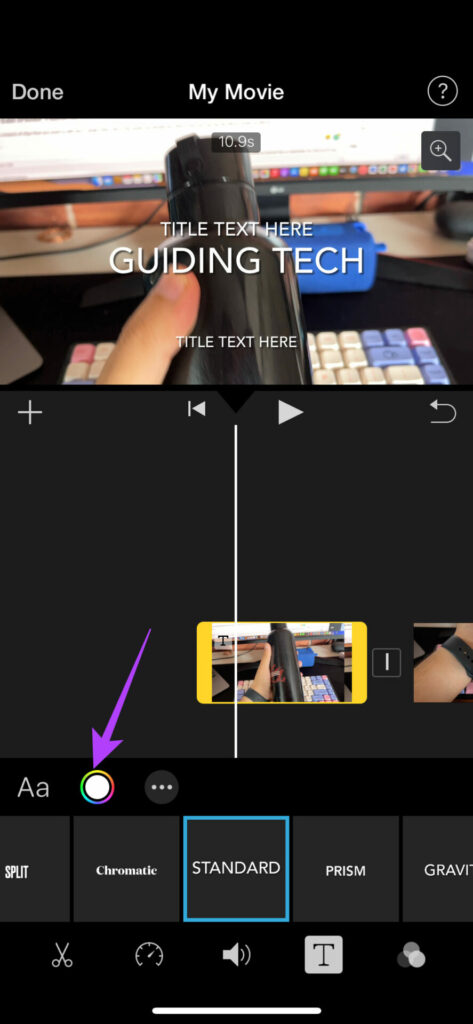
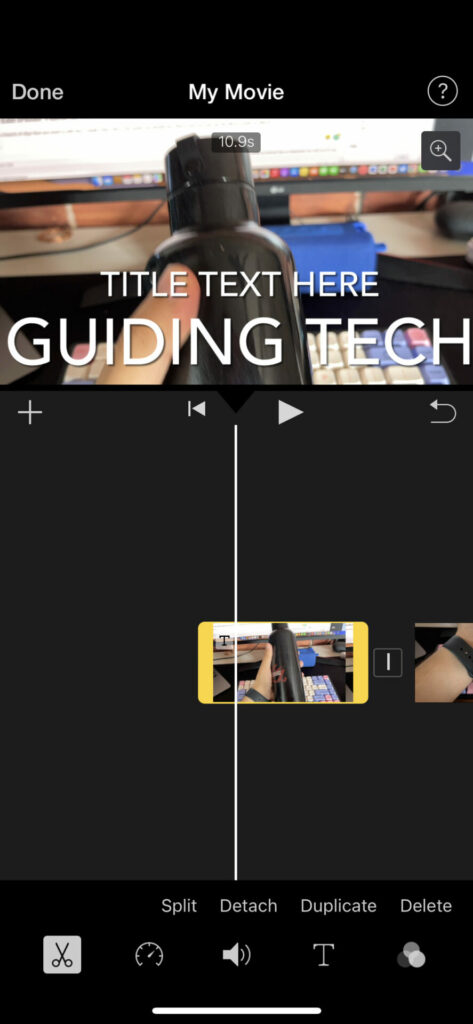
Step 1: Tap the clip on which you want to add text. Now, move the play head to the position where you want the text to appear.
Step 2: Select the Text button in the bar at the bottom.
Step 3: Scroll through and find the type of text you want to add. Tap on it to select.
Step 4: Tap on the text that appears on the video. Select Edit.
Step 5: Enter whatever text you want and it will be saved.
Step 6: You can change the font, color, and style of text by choosing the relevant options. Make all the edits to your satisfaction.
Step 7: Hold on to the text and drag it around in the video. This is how you can move the text in iMovie. You can also pinch it to zoom in or out.
How to Add Filters to Videos in iMovie
Step 1: Tap the clip on which you want to add filters. This will select it.
Step 2: Navigate to the filters section at the bottom.
Step 3: Select the filter you want to add along with its intensity.
How to Zoom In and Out of a Video in iMovie
Step 1: Tap the clip on which you want to zoom in or out. This will select it.
Step 2: Select the zoom button in the top-right corner of the video.
Step 3: Now, pinch to zoom in or out on the desired portion of the video.
How to Rotate a Video in iMovie
Step 1: Tap on the clip that you want to rotate. This will select it.
Step 2: Place two fingers on the video and rotate them in the direction in which you want to rotate the video.
Your video’s orientation will now be changed.
You can take a look at our detailed guide on how to rotate videos on iPhone if you wish to know other ways of rotating videos including changing the aspect ratio of videos.
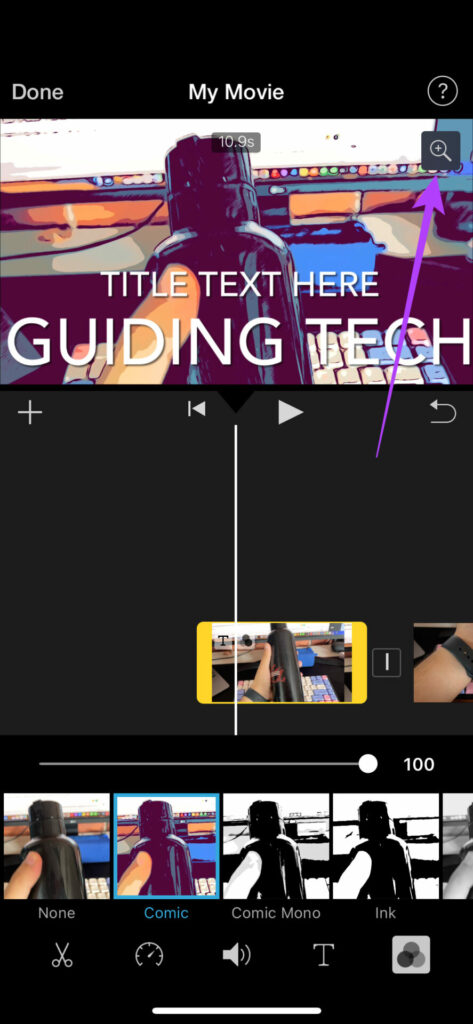
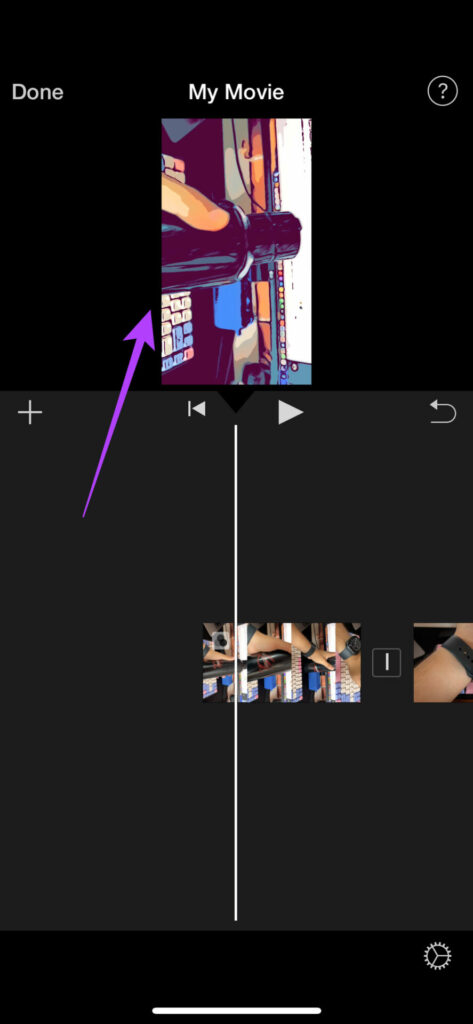
How to Add a Theme to Your Video in iMovie
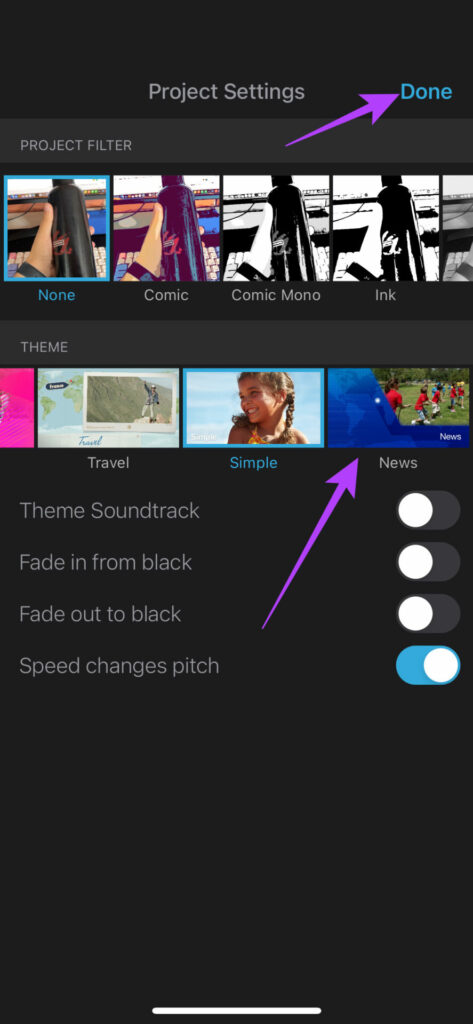
Step 1: Without selecting any clip, tap on the Settings icon in the bottom-right corner of your screen.
Step 2: Now, select a theme of your choice from the available options. You can also select other options relevant to the theme like a soundtrack and transitions. Tap on Done once you’ve made the selection.
How to Add Music to Videos in iMovie
Step 1: Tap on the ‘+’ icon to add new media.
Step 2: Choose Audio. This is where you can select the tracks you want to add.
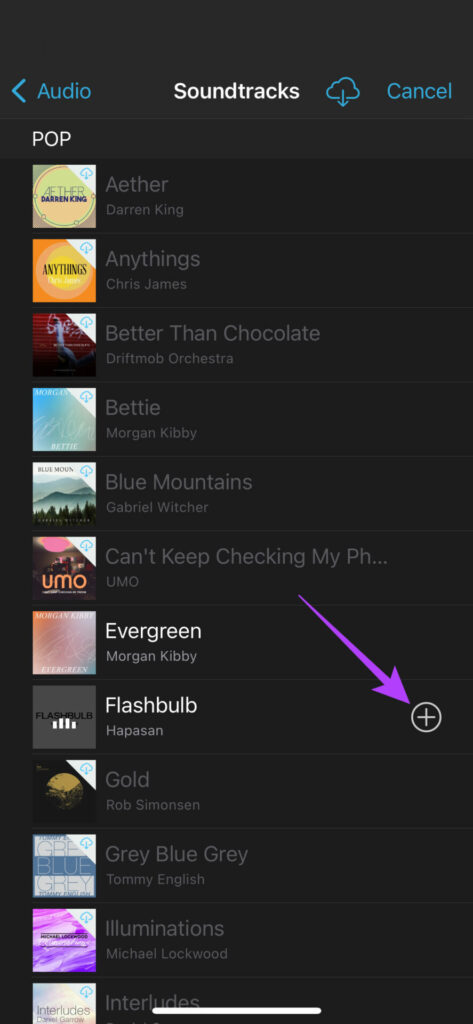
Step 3: If you wish to add your own music, select My Music. Suppose you want to choose a preset audio track, select Soundtracks.
Step 4: Select the music you want to add to your video. Now, tap on the ‘+’ button.
The music track will be added to your video. You can edit it using the instructions mentioned above to edit the audio.
This is pretty much everything you can do with videos on iMovie. While you can edit several aspects of a video, some important features like the ability to reverse a video or add effects are missing. You can’t edit videos to key out a green screen, nor can you remove the background noise from a video.
There are some limitations, but iMovie still does a great job of editing videos on your iPhone. In fact, you can also edit videos that haven’t been shot on your iPhone.
How to Export and Save an Edited Video in iMovie
Once you’ve made all the edits, it’s time to render the video and save it so that you can share or upload it on a platform of your choice. Here’s how to do that.
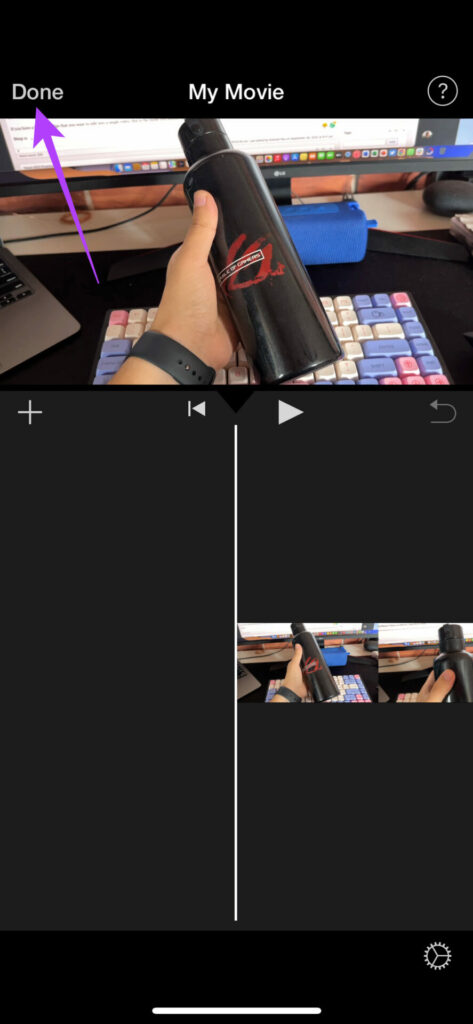
Step 1: When you’re happy with the edits, tap on Done at the top-left corner.
Step 2: The project will now be saved. It’s time to export it. Tap on the Share button at the bottom.
Step 3: Select the Options button. Here, you can select the resolution and frame rate at which you want to export the video. Choose the desired values and tap on Done.
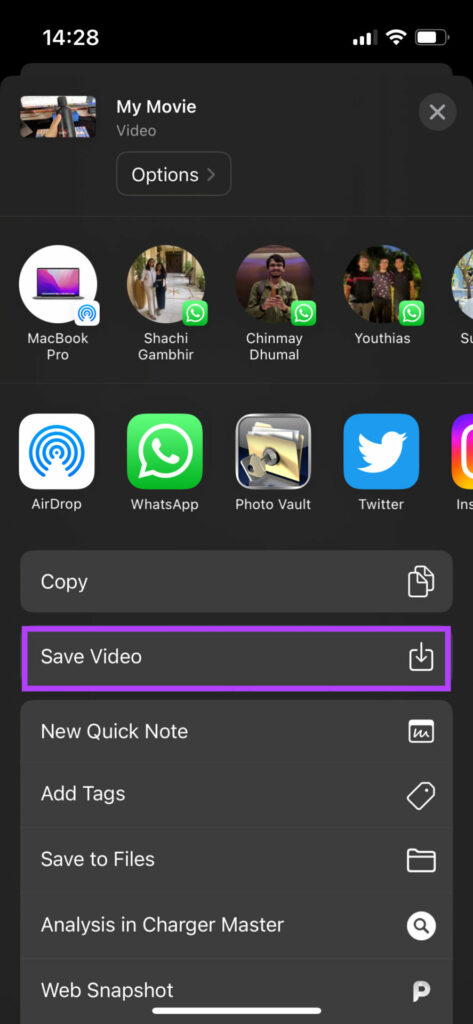
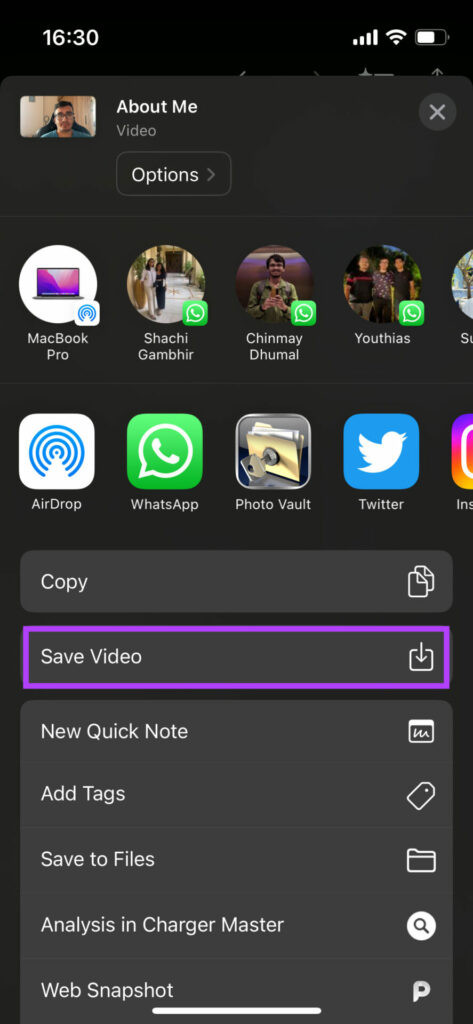
Step 4: Scroll up on the share sheet and select Save Video.
The video will now be exported and saved to the Photos app on your iPhone.
How to Edit Videos on iMovie Using Storyboard Mode
The Storyboard mode is great for people who want to use a fixed template to convey a storyline. This can be a video about yourself or related to a theme like cooking, gaming, a top 5 compilation, etc. Here’s how to use it.
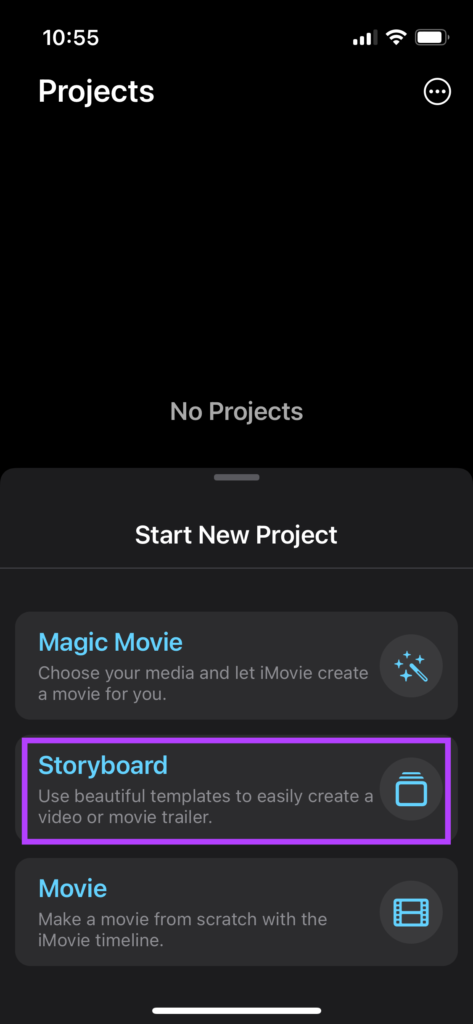
Step 1: Open the iMovie app on your iPhone. Select the Storyboard option.
Step 2: Select the type of video you want to create. This will be the basic template of your video.
Step 3: Choose the type of style you like along with other options like music, font for the text, color, and filter. Once done, tap on Create.
Step 4: Now, you will have to select relevant video clips for specific sections of the video.
For example, in the About Me template, you’ll have to select a shot introducing yourself, a wide shot, a close-up shot, and a reference shot. You will see the instructions listed on the screen.
To select the video, just tap on the section and you will get an option to either select a clip from your library or record a video straight from the camera.
Once you’ve added all the clips, iMovie will automatically crop them according to each section and create a video by combining all the clips.
Step 5: When you’re ready to save the video, tap on the Export button in the top right corner of the app. Then, select the Save Video button.
The Storyboard video will now be saved to the Photos app on your iPhone.
How to Edit Videos on iMovie Using Magic Movie Mode
This mode is for when you’re too lazy to edit multiple clips together or if you want iMovie to automatically curate a nice sequence for you with music and effects. You just have to select the clips you want to use and you’re good to go. Here’s how it works.
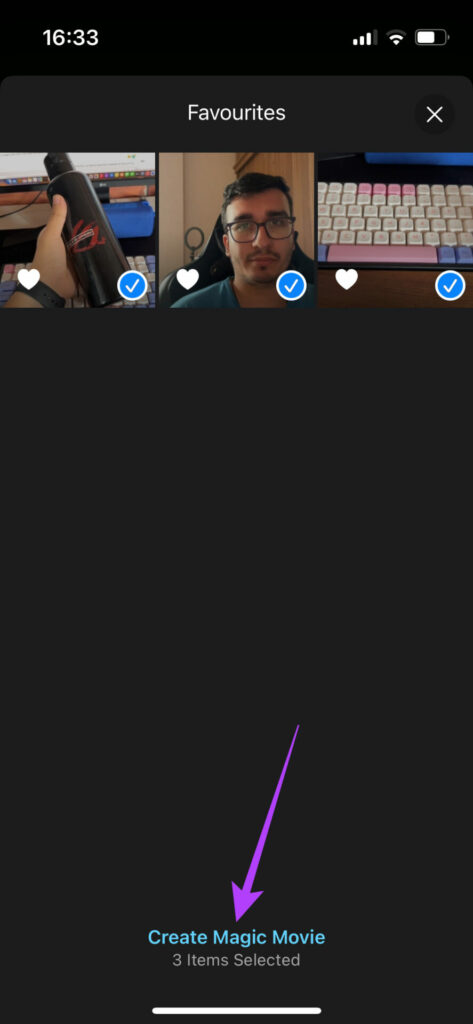
Step 1: Open the iMovie app on your iPhone. Select the Magic Movie option.
Step 2: Select the clips you want to add and tap on Create Magic Movie.
iMovie will now automatically create a video for you. The video will consist of the clips you selected.
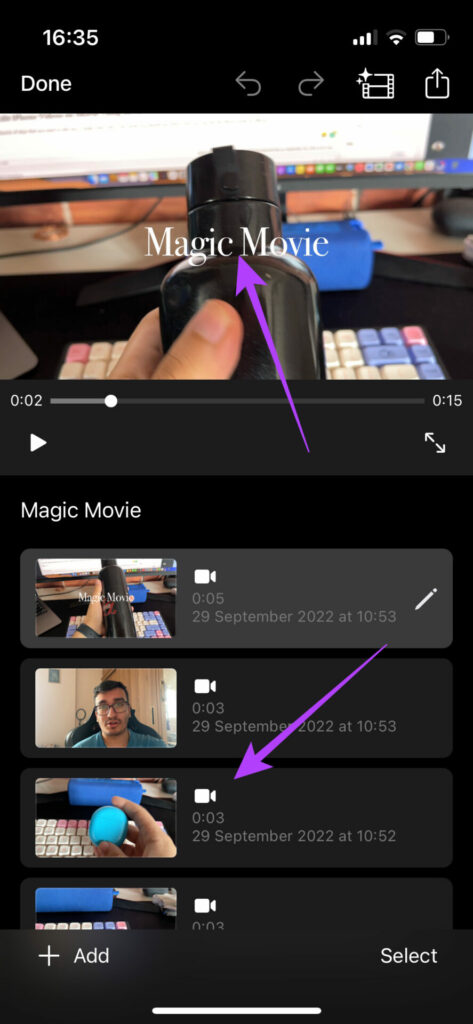
Step 3: At the bottom, you can select the clips you want to edit and make changes accordingly. You can change the text, speed, audio, etc. as per your liking.
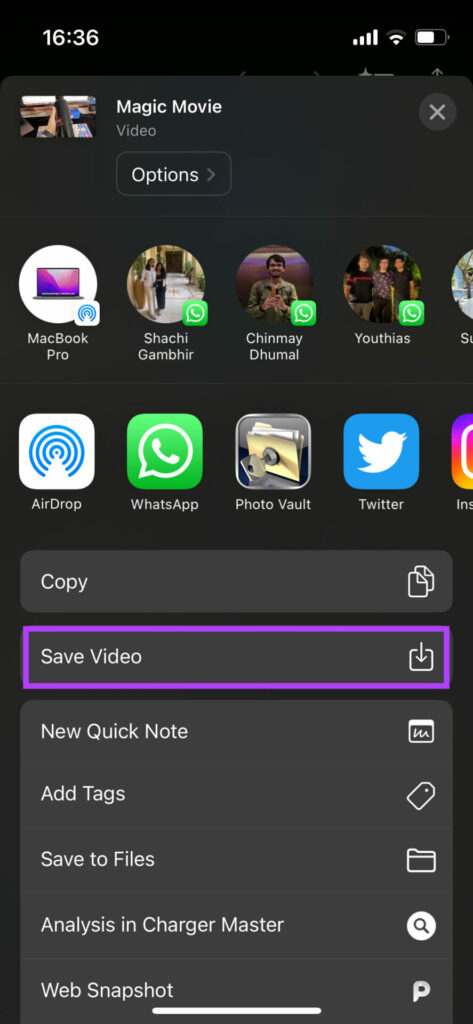
Step 4: Once you’ve made the changes, tap on the Export button in the top right corner of the app. Then, select the Save Video button.
The Magic Movie will now be saved to the Photos app on your iPhone.
Start Creating Content
Your iPhone is a powerful device. You can use it to record videos and edit them on the go which is hugely beneficial for content creators. So, what are you waiting for? Now that you know how to use iMovie on your iPhone or iPad, start right away and show your talent to the world!
Check if YouTube is down: You can check YouTube’s server status on Downdetector to know if it is facing downtime.
Check internet connection: Since YouTube has to load many elements apart from the video, you must have a good internet connection to load the comments.
Reload the video: Refresh the video, and check if you can see the comments section.
Update or Reinstall YouTube: Updating or reinstalling the latest version of YouTube from the Play Store or App Store can fix the missing comment section.
Fix 1: Change Your YouTube Account
Sometimes, a weird bug might affect your Google account signed into YouTube. Changing your YouTube account is one way to fix YouTube comments not showing up.
Step 1: Tap on the profile icon at the top right corner. Tap on the > icon next to your account name.
Step 2: You will be shown the Accounts page. Tap on Add Account. Once you add a new account, it will show up under Other accounts. Select the new account to switch.
Fix 2: Clear Cache
Accumulation of cache and junk files can execute bugs that can cause issues with the YouTube app. Here’s how to get rid of it on your smartphone.
On iPhone
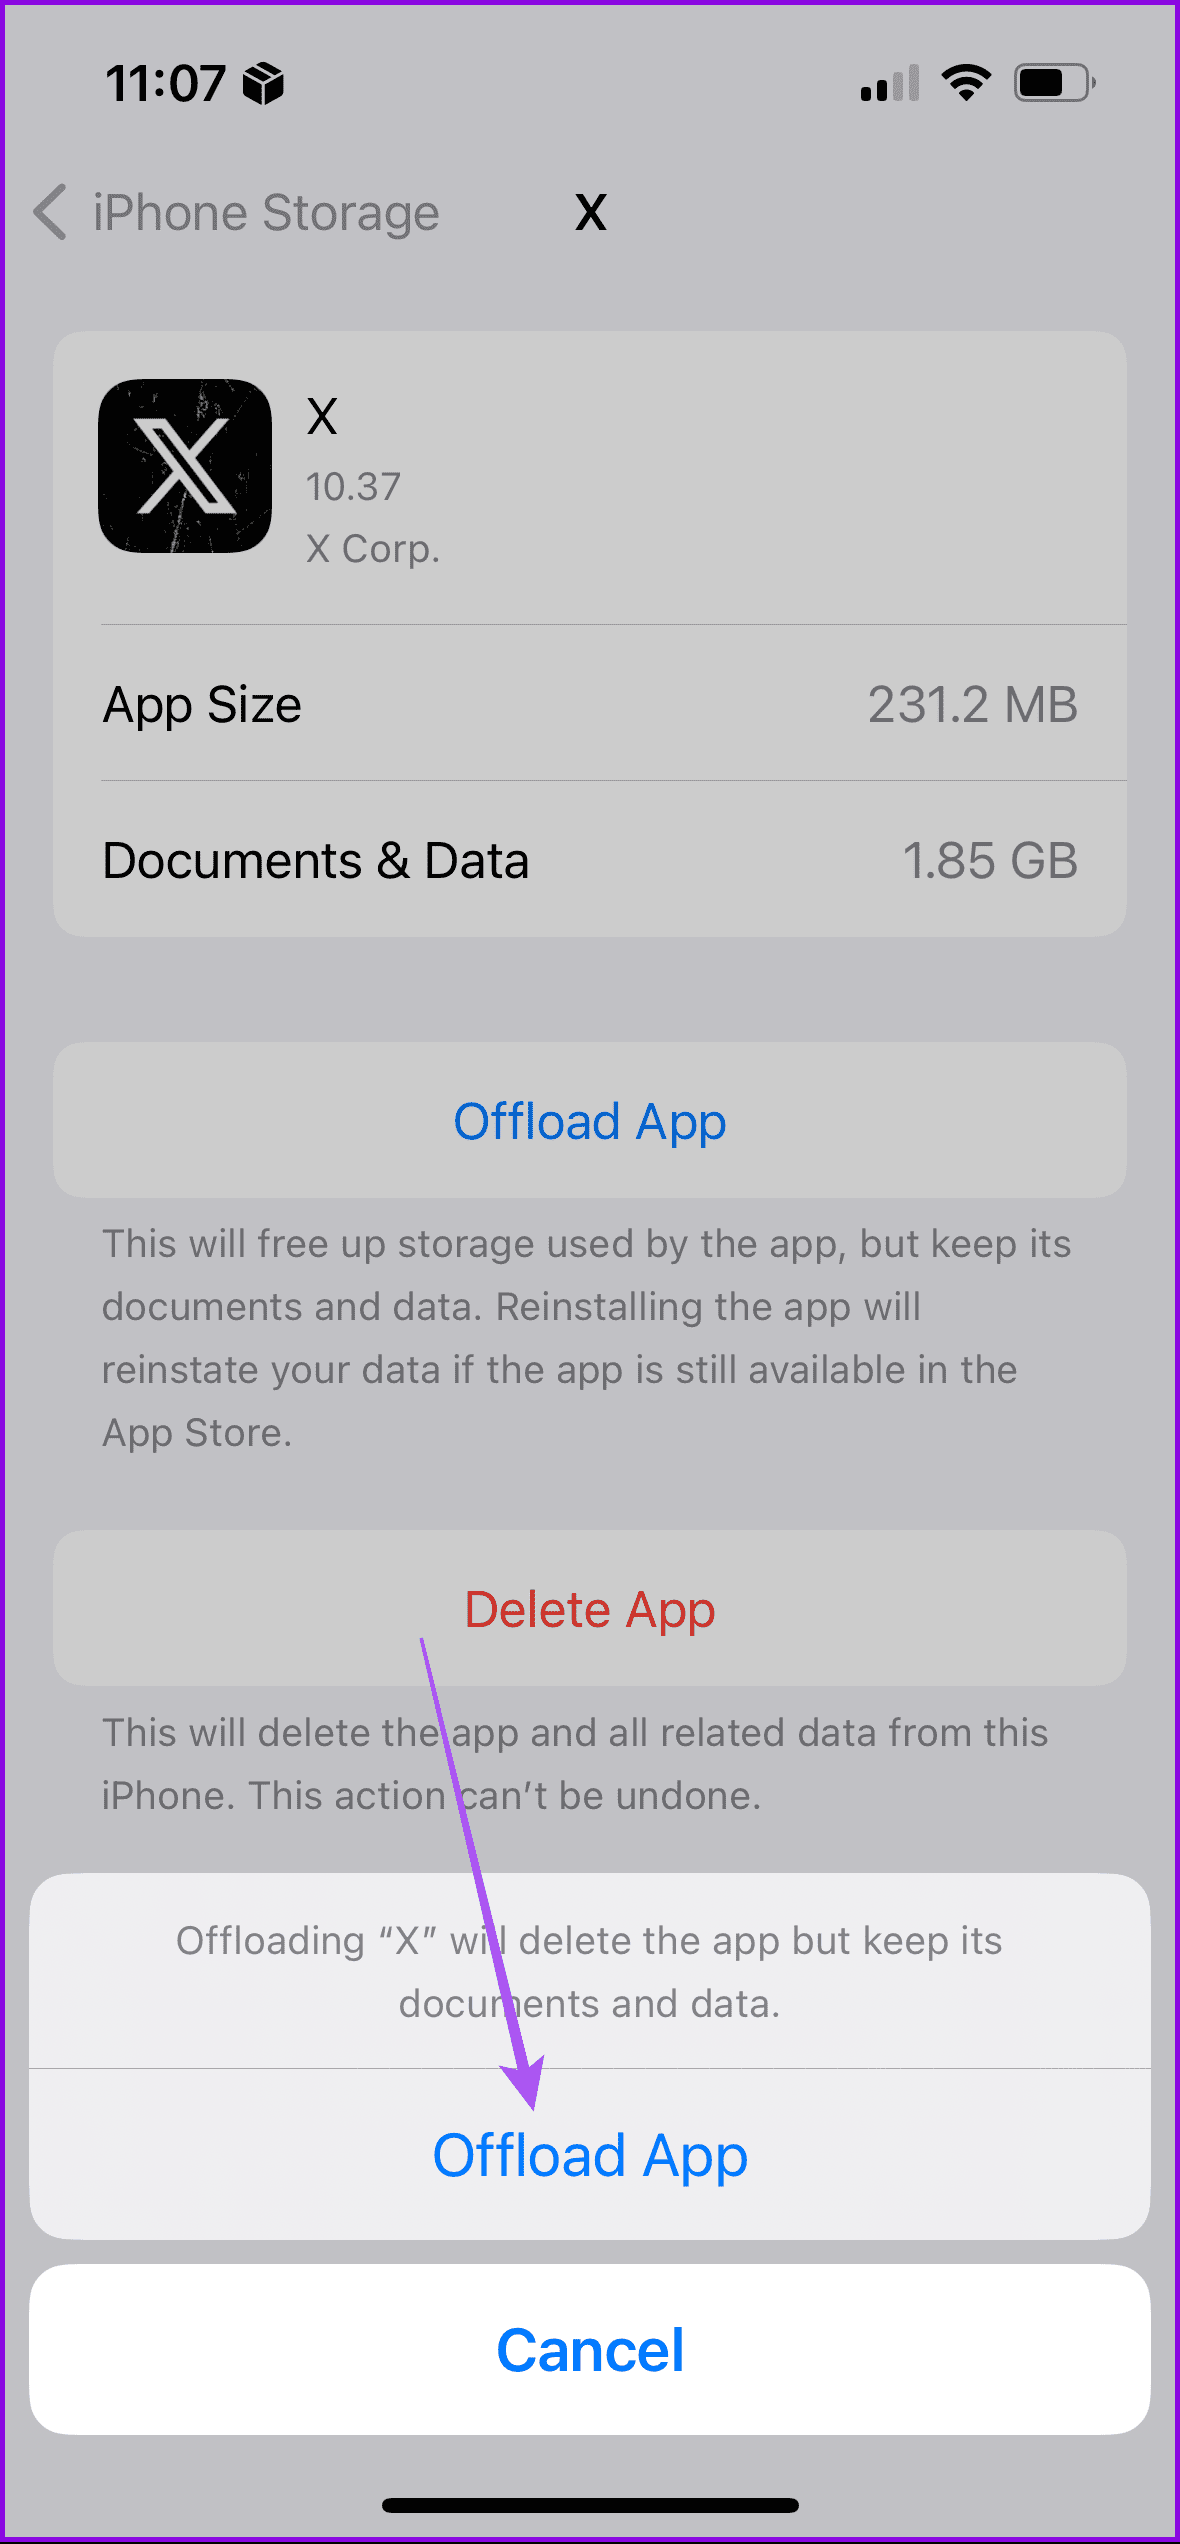
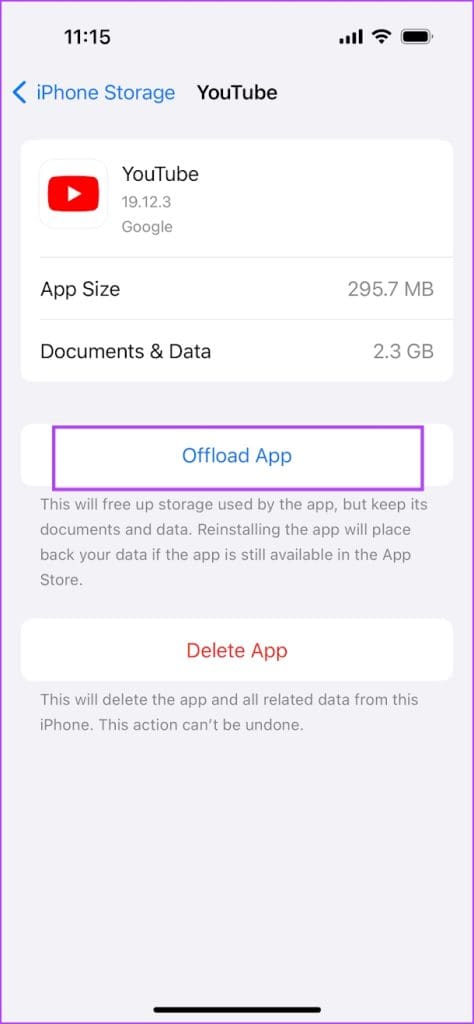
Offloading an application on your iPhone removes temporary data, including cache and junk files. However, it maintains all the other essential data, such as your sign-in information, in-app downloads and purchases, etc.
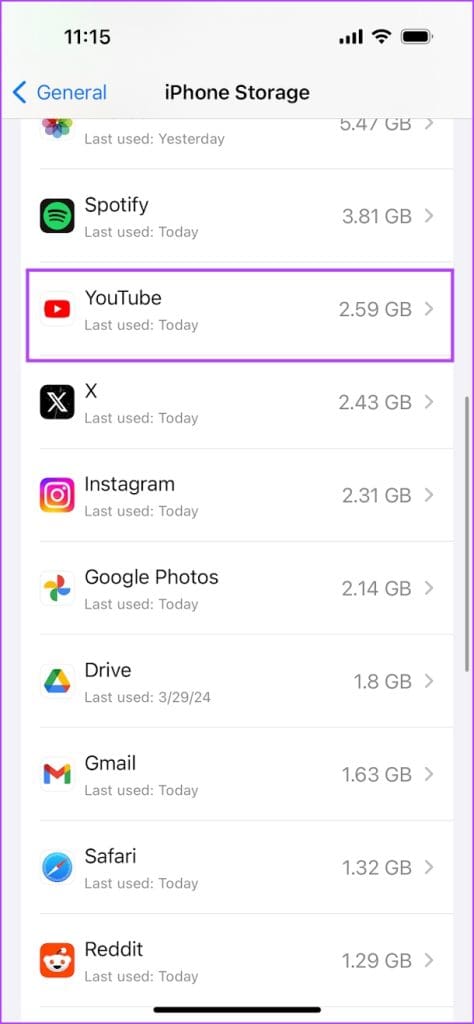
Step 1: On your iPhone, go to Settings > General > iPhone Storage
Step 2: Scroll down, select the YouTube app, and tap on Offload App. Tap on the Offload App again to confirm.
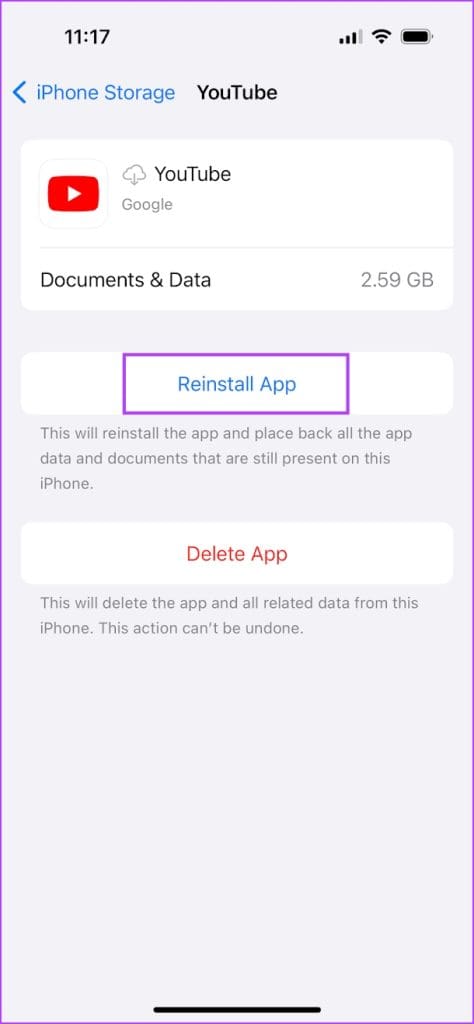
Step 3: Now, tap on Reinstall App.
On Android
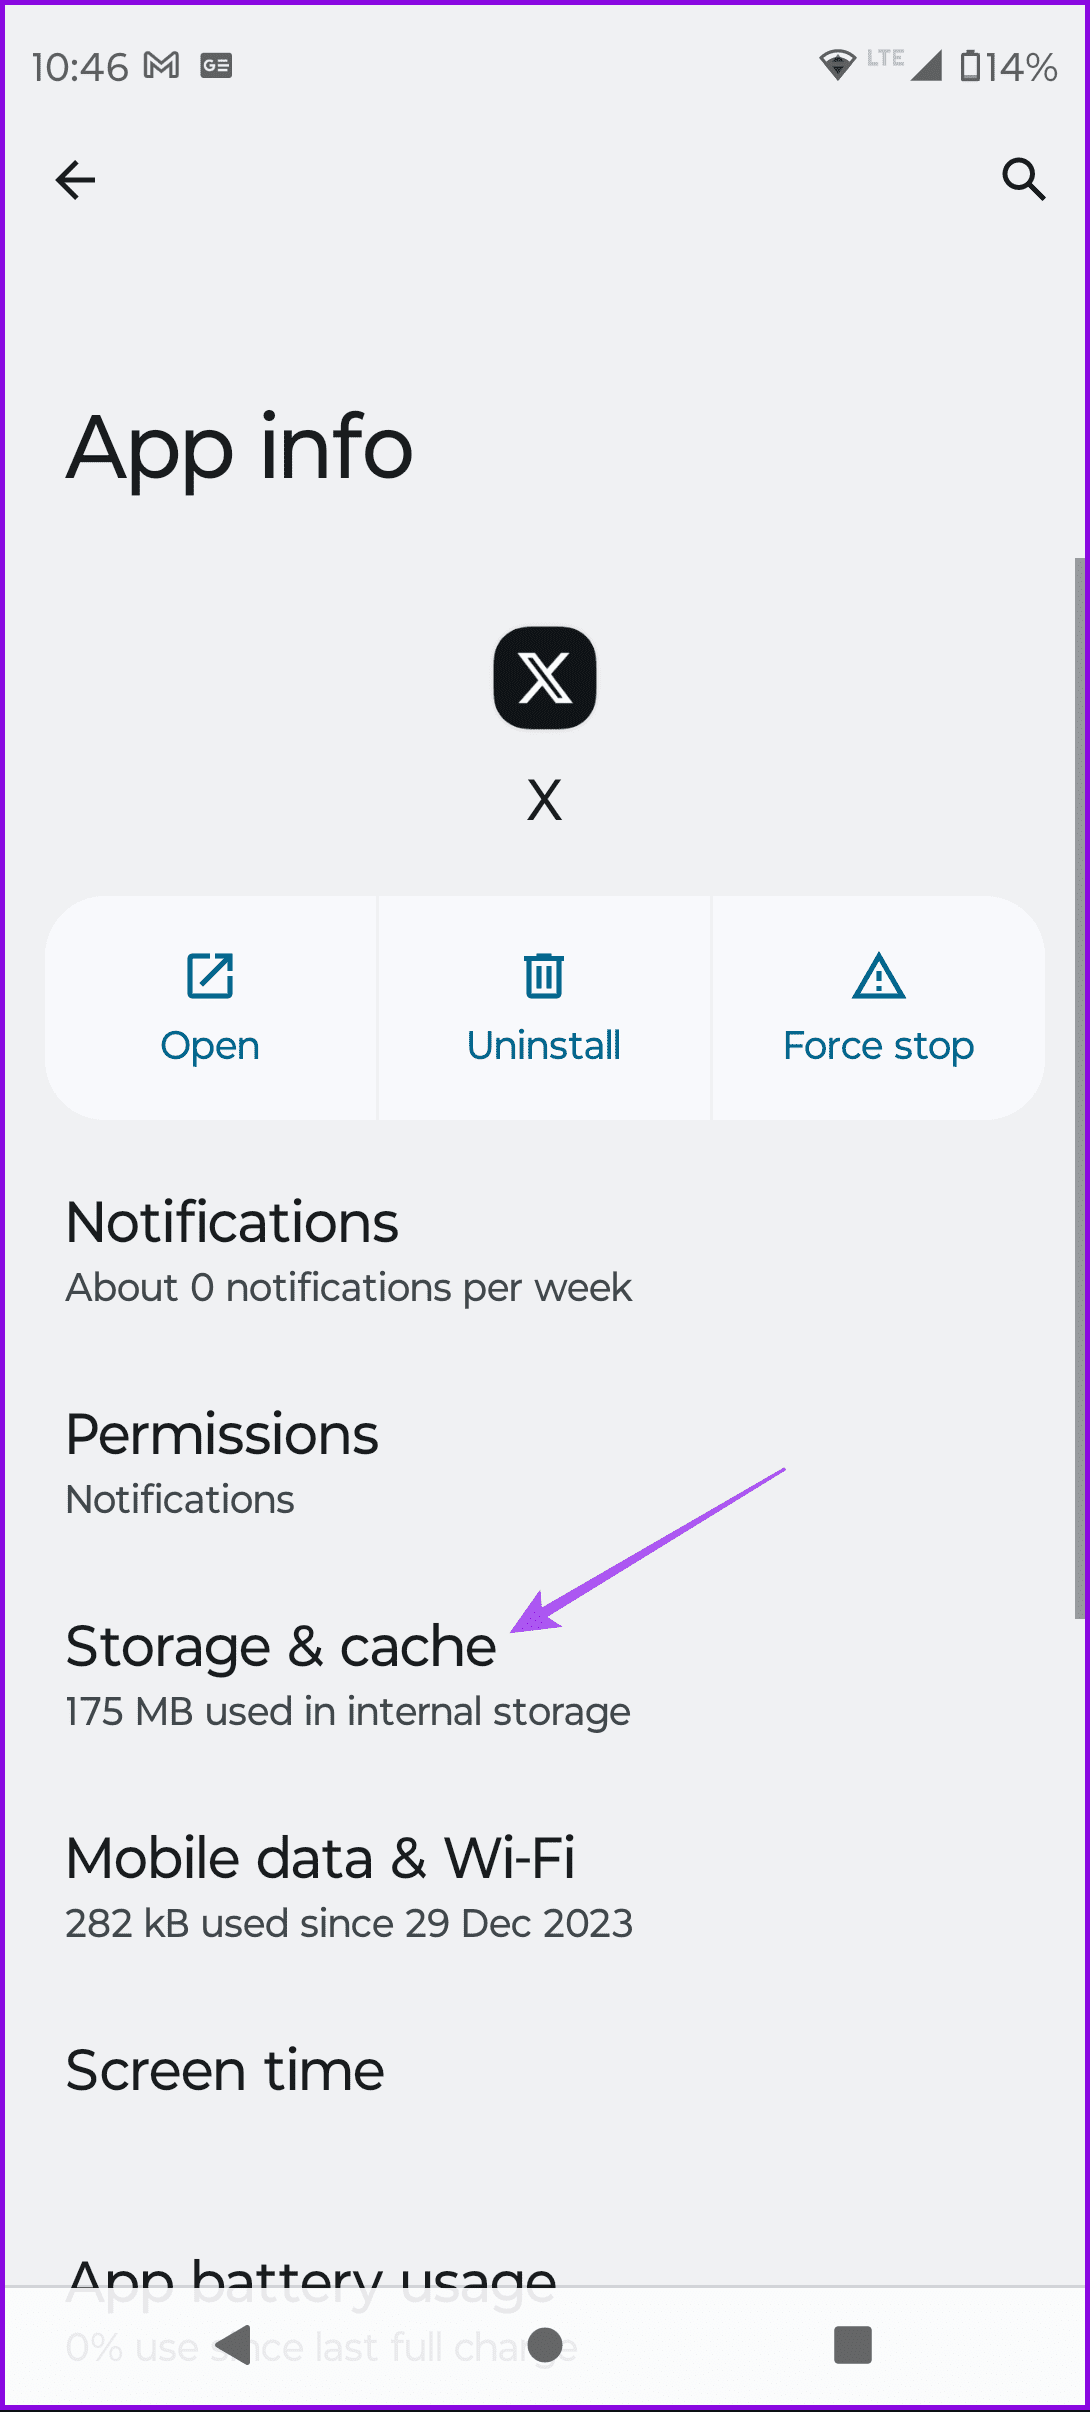
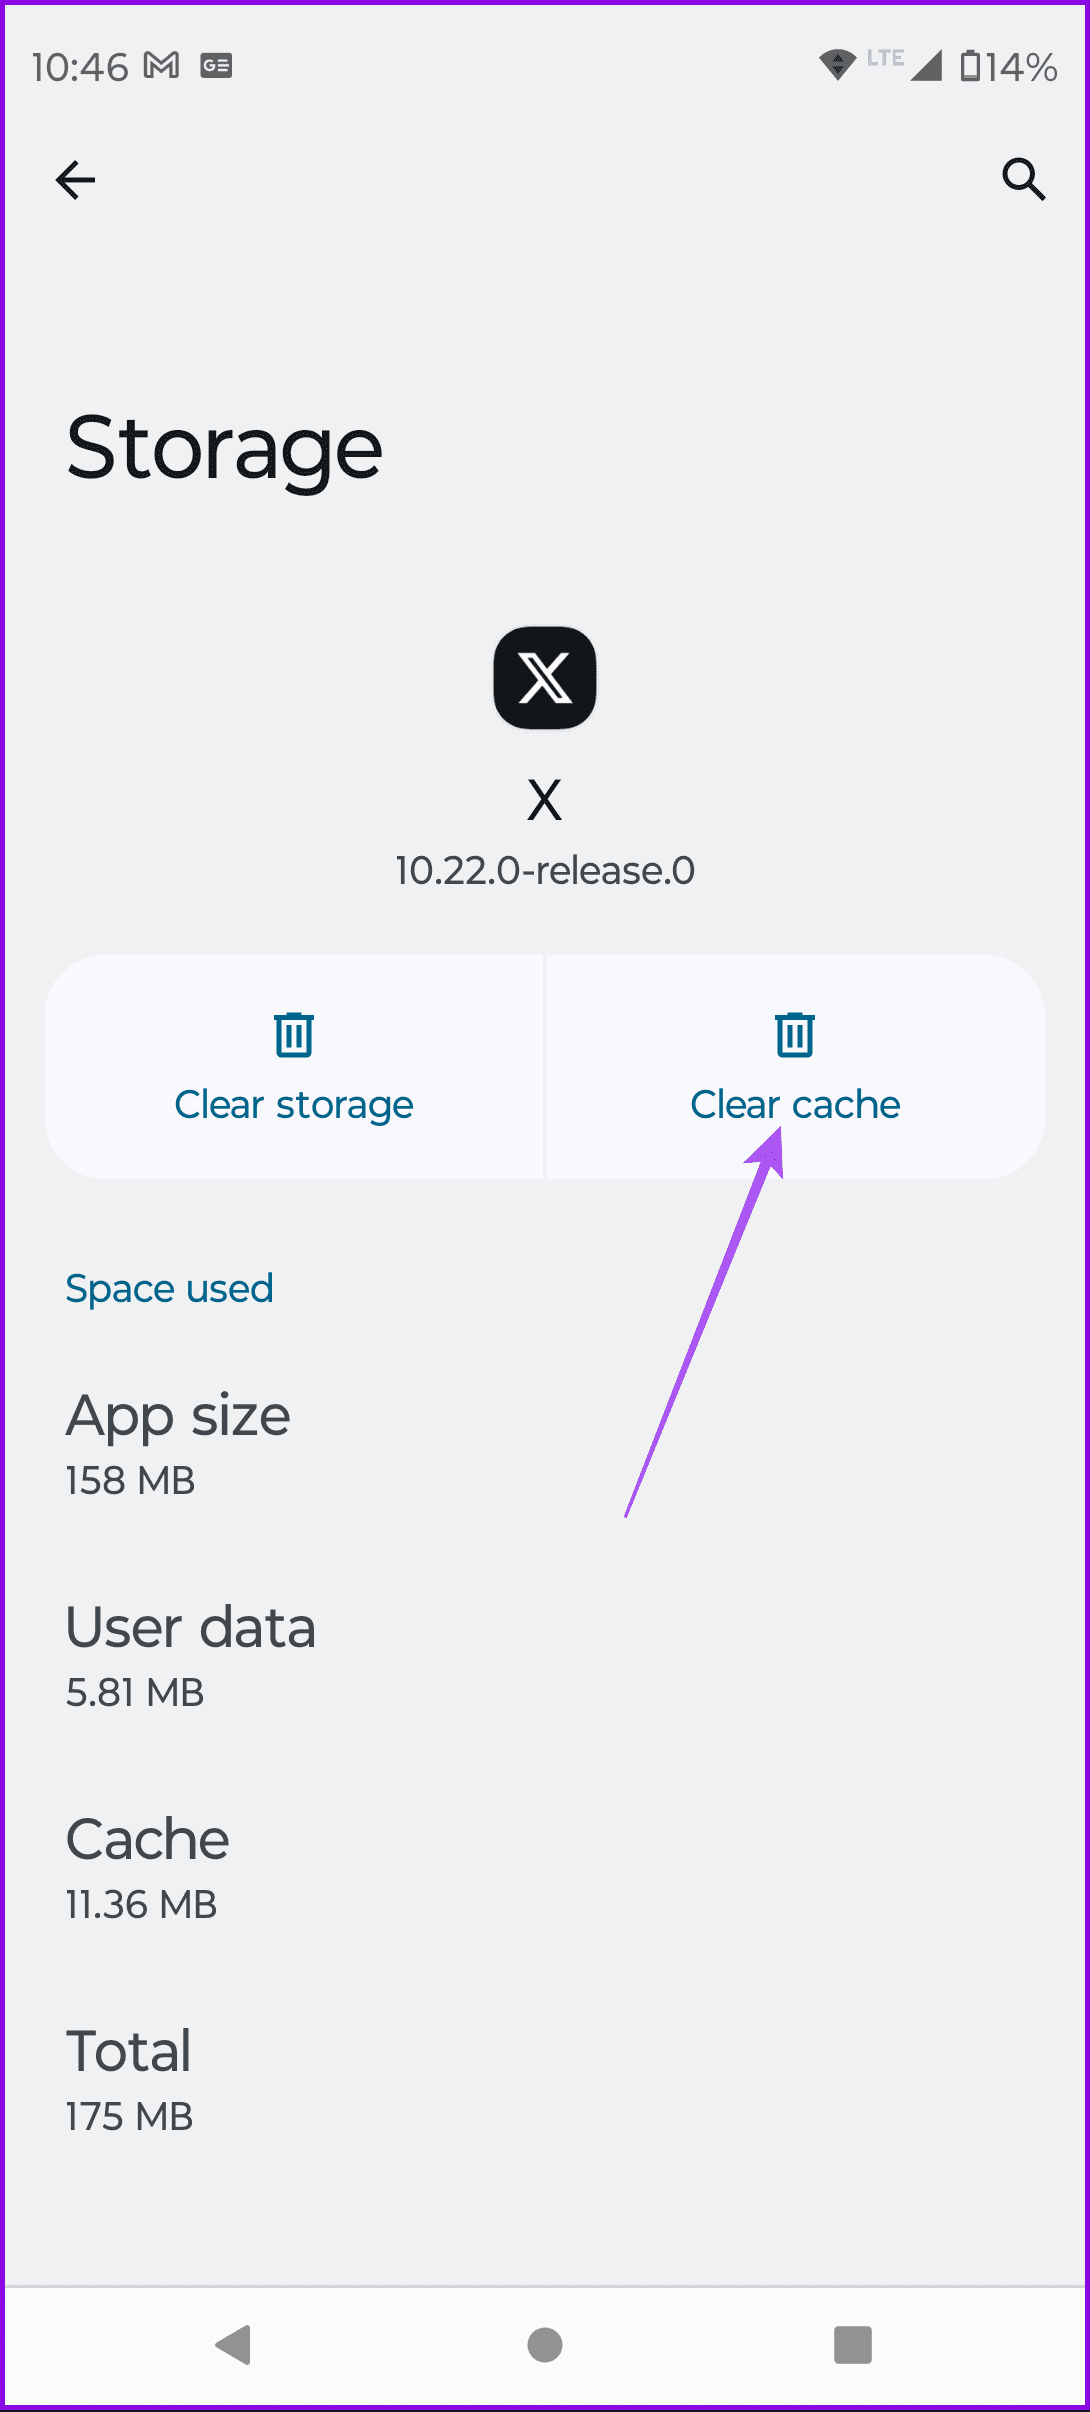
Step 1: Long-press on the YouTube app icon and select App info. Here, tap on Clear Data.
Step 2: Now, select clear cache.
Fix 3: Disable Ad Blockers
Ad Blockers might help you block intrusive and annoying ads but might cause a few issues with the functioning of the application.
On iPhone
If you are watching YouTube on Safari, here’s how to disable the ad blocker on your iPhone to get back the comments section.
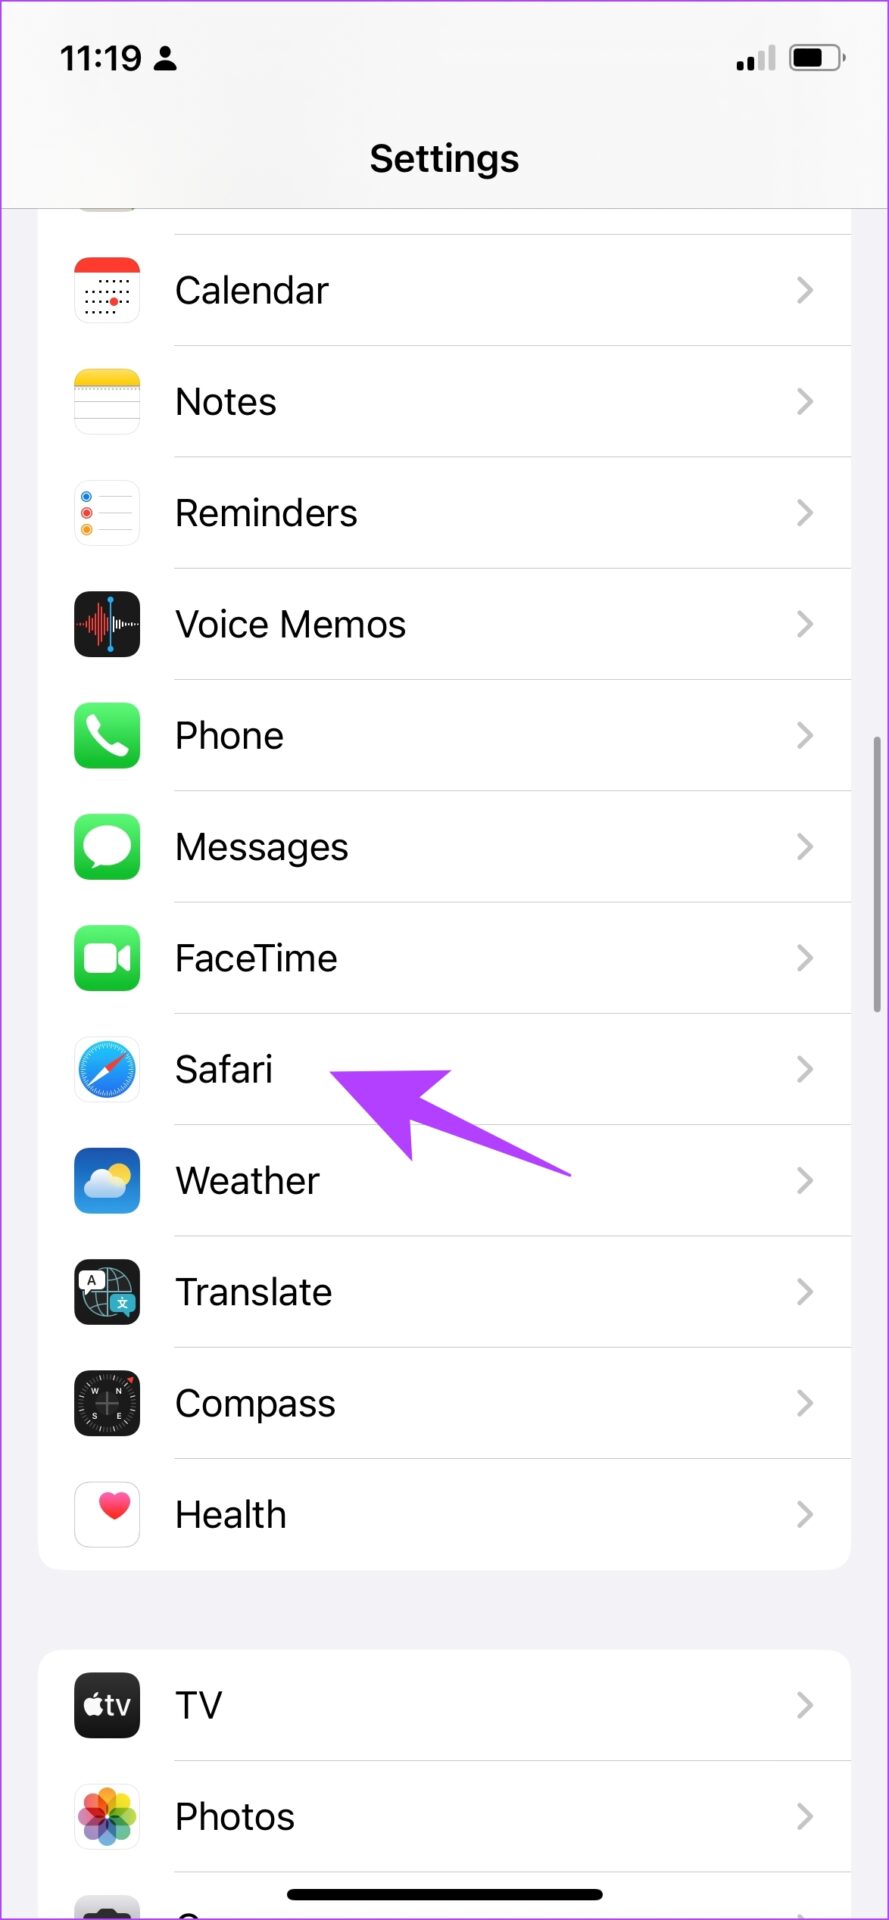
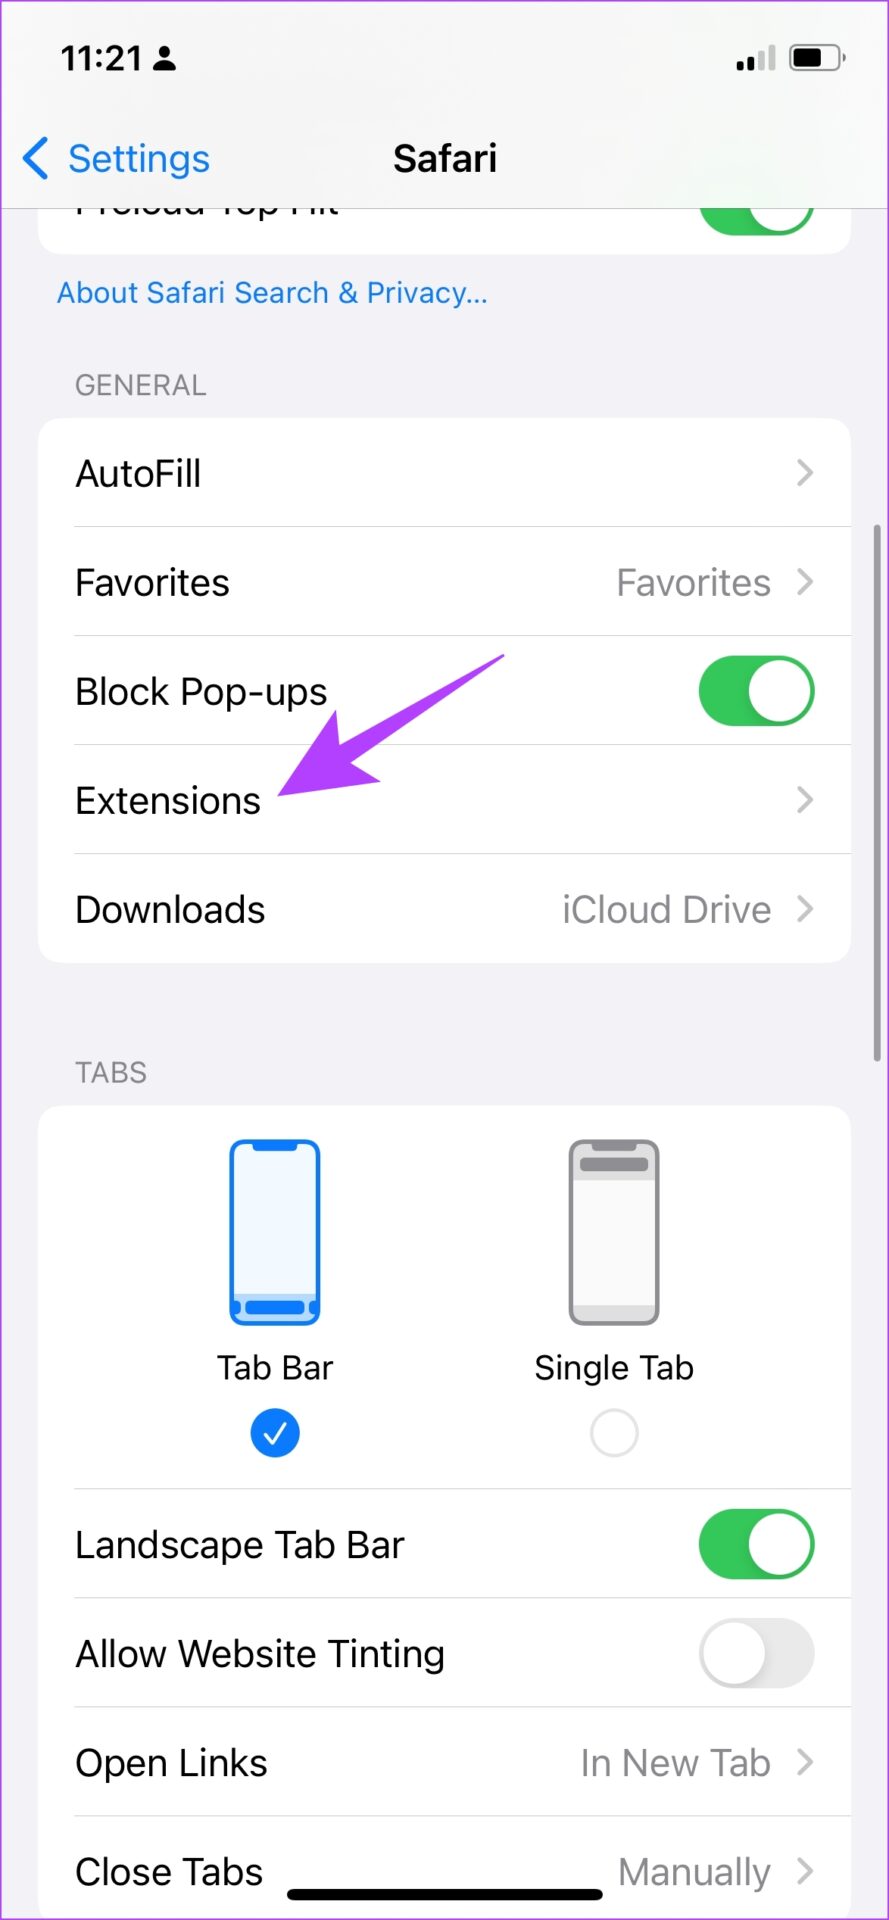
Step 1: Open the Settings app and select Safari. Tap on Extensions.
Step 2: Ensure all the toggles are turned off for any ad blockers which are extensions for Safari.
On Android
If you have an ad blocker app installed on your Android device, uninstall it to try and restore the comment section under a YouTube video.
Step 1: Long-press on the app icon > select App Info.
Step 2: Now, tap on Uninstall to delete the ad blocker app.
Let’s begin with some basic solutions to fix the Wi-Fi connected but no internet issue on your Windows machine:
Check your internet plan – If you have exceeded the allocated high-speed internet quota, your Wi-Fi stays connected without internet. Check your remaining data for the billing cycle.
Disable VPN – If your VPN server faces an outage, connecting to its services will result in such issues. Disable the VPN and see if you can connect to the internet now.
Restart the router – It will fix most configuration issues disrupting the internet connectivity. Also, install all pending firmware updates.
Use a different port – If you’re using an external Wi-Fi adapter with your system, reconnect it to a different USB port.
Fix 1: Run the Network Adapter Troubleshooter
Windows 11 has a handy network connection troubleshooter to fix all network-related issues. Here’s how you can use it to resolve the error:
Step 1: Open the Windows Settings app, click System in the left sidebar, and press Troubleshoot on the right.
Step 2: Click Other troubleshooters and press Run next to Network Adapter.
Fix 2: Connect to 5GHz Wi-Fi Frequency
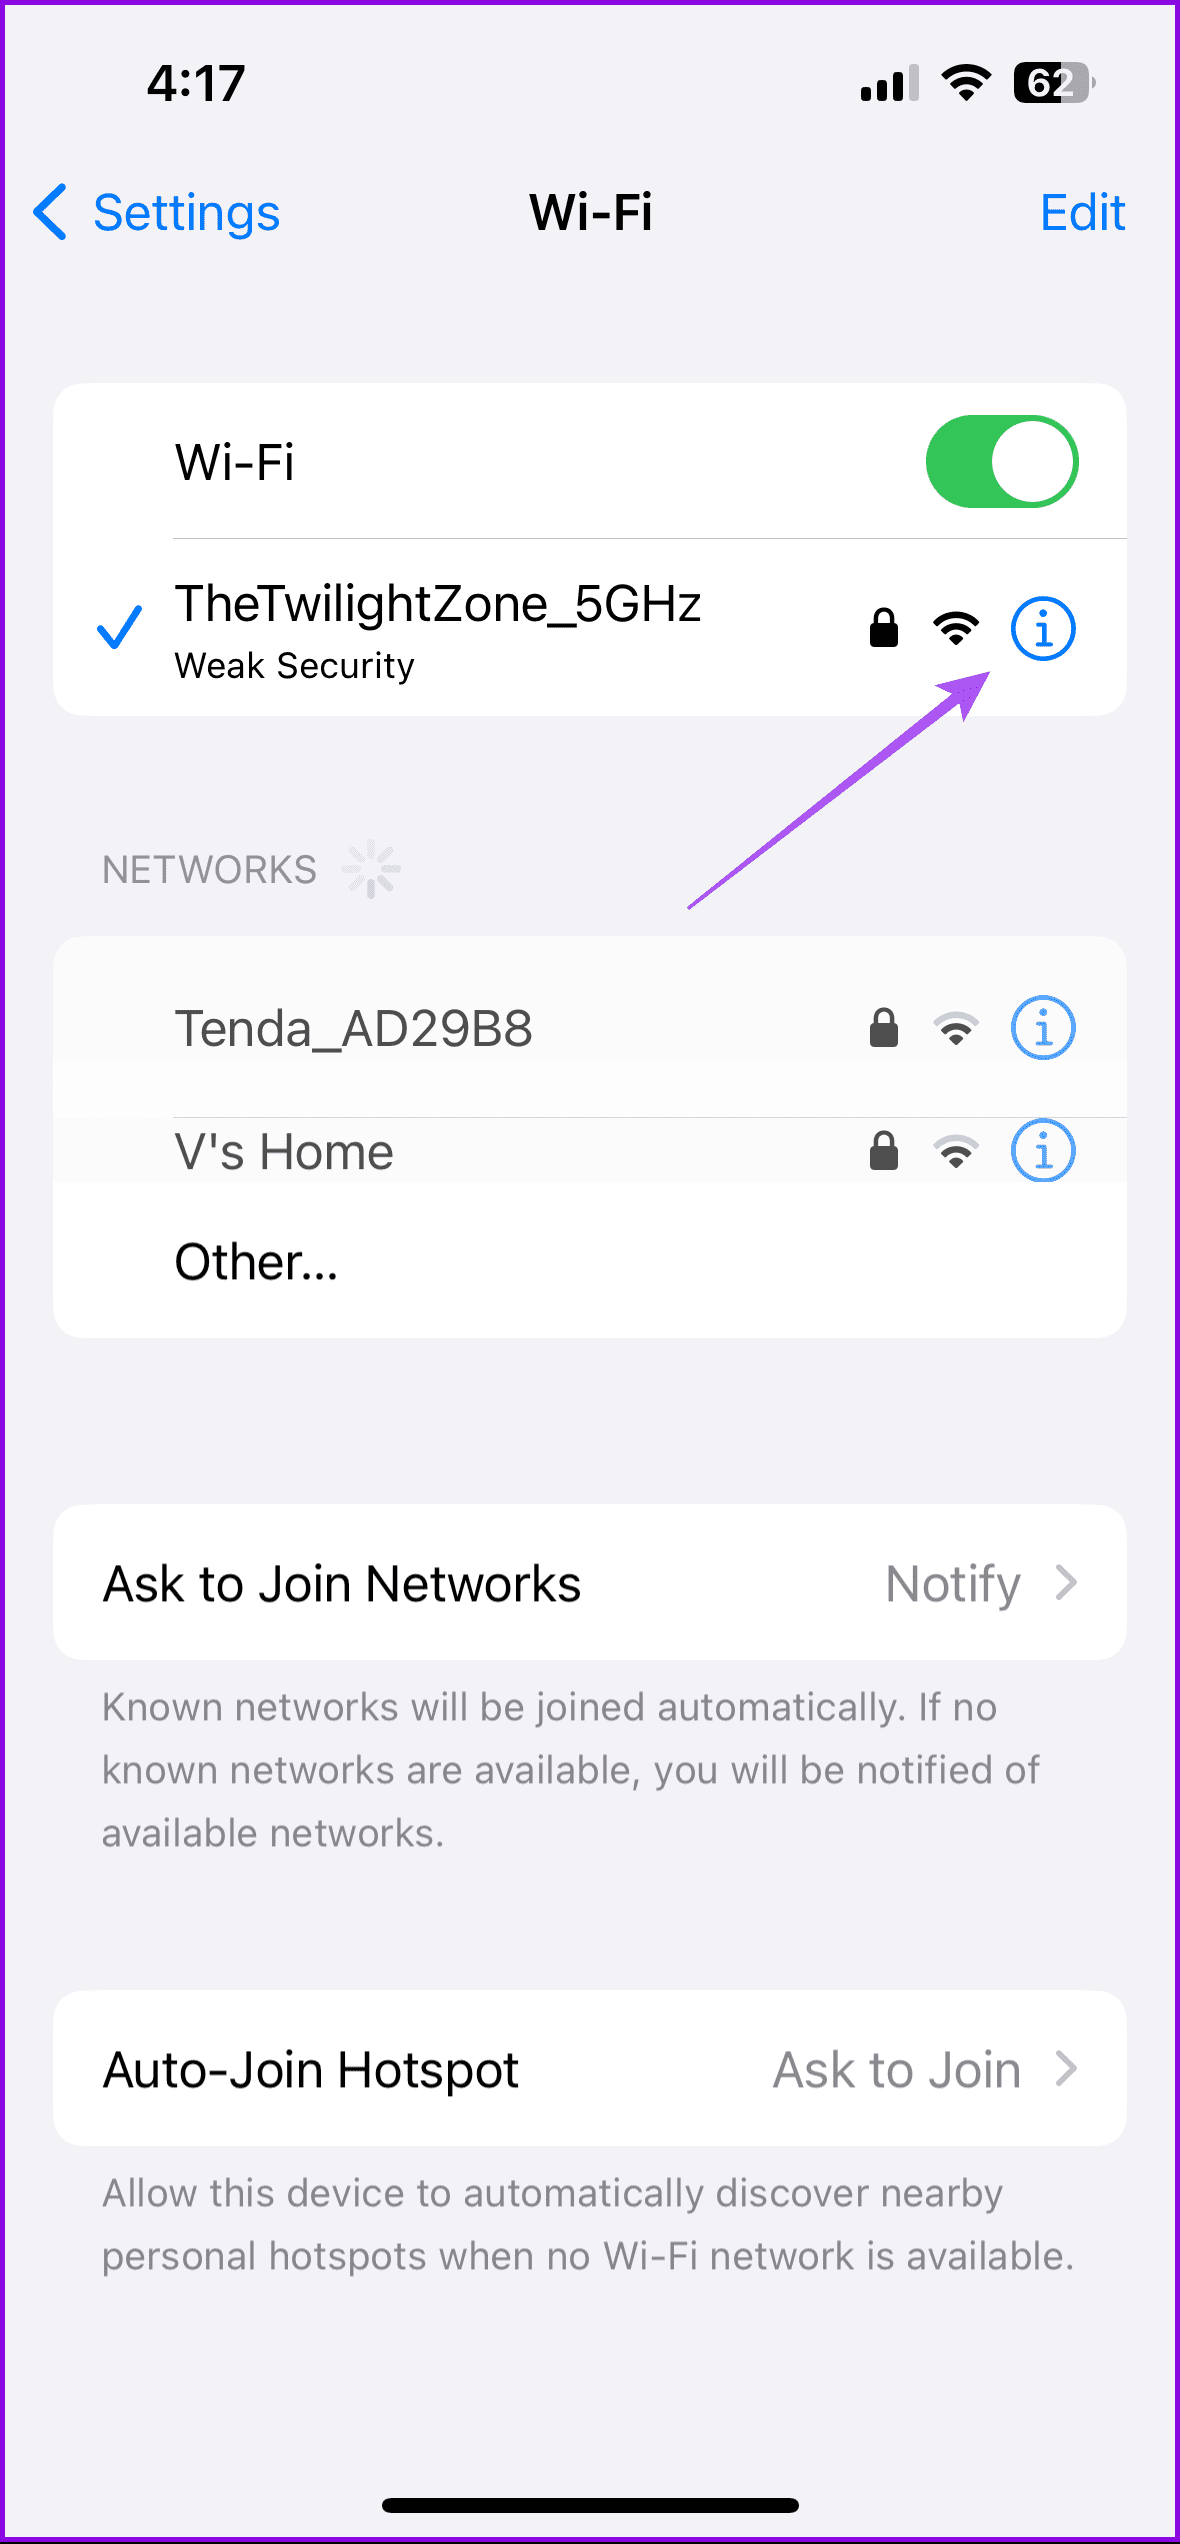
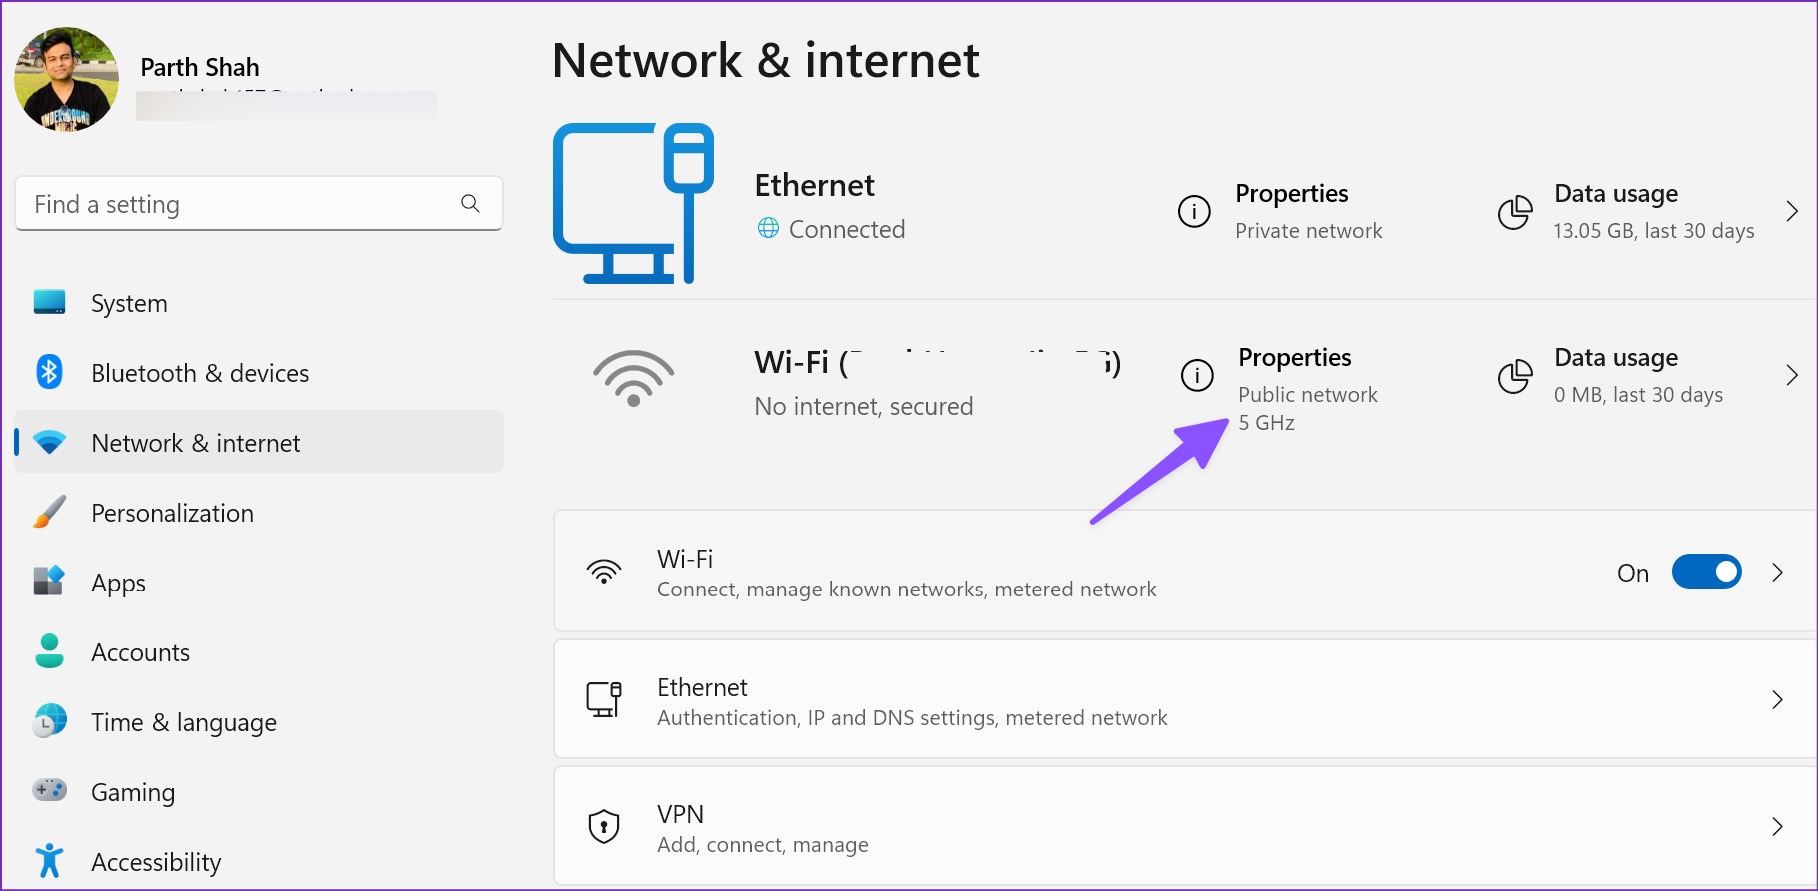
Working with a slow 2.4GHz frequency can lead to internet connection issues as it doesn’t have a long range. A physical obstruction like a wall or door can easily reduce its strength, resulting in poor or no internet connectivity. If you have a dual-band router, connect to a 5GHz Wi-Fi frequency and verify with the below steps:
Step 1: Open the Windows Settings app and click Network & internet in the left sidebar.
Step 2: Confirm connecting to 5GHz frequency under the Properties menu.
Fix 3: Disable the Windows Defender
Are you facing a Wi-Fi connected but no internet issue on a public network? Microsoft Defender may block internet connection for security reasons. Here’s how to disable Defender Firewall on public networks.
Note: Disabling the Defender Firewall for public networks makes your system more vulnerable to unauthorized access. Once you resolve the error, we recommend turning it back on for your digital safety.
Step 1: Press the Windows key, search Windows Security, and open the app.
Step 2: Click Firewall & network protection in the left sidebar and press Public Network.
Step 3: Finally, disable the Microsoft Defender Firewall toggle.
Resetting the network connection reinstalls all your network adapters and sets other networking components back to their original settings. It can be handy to fix the Wi-Fi connected, but no internet issue on Windows.
Step 1: Open Network & internet in Windows Settings and click Advanced network settings.
Step 2: Click Network reset and confirm your action by pressing Reset Now.
If you cannot launch Windows Terminal via the Start menu or Run dialog box, ensure the app is not disabled on your PC.
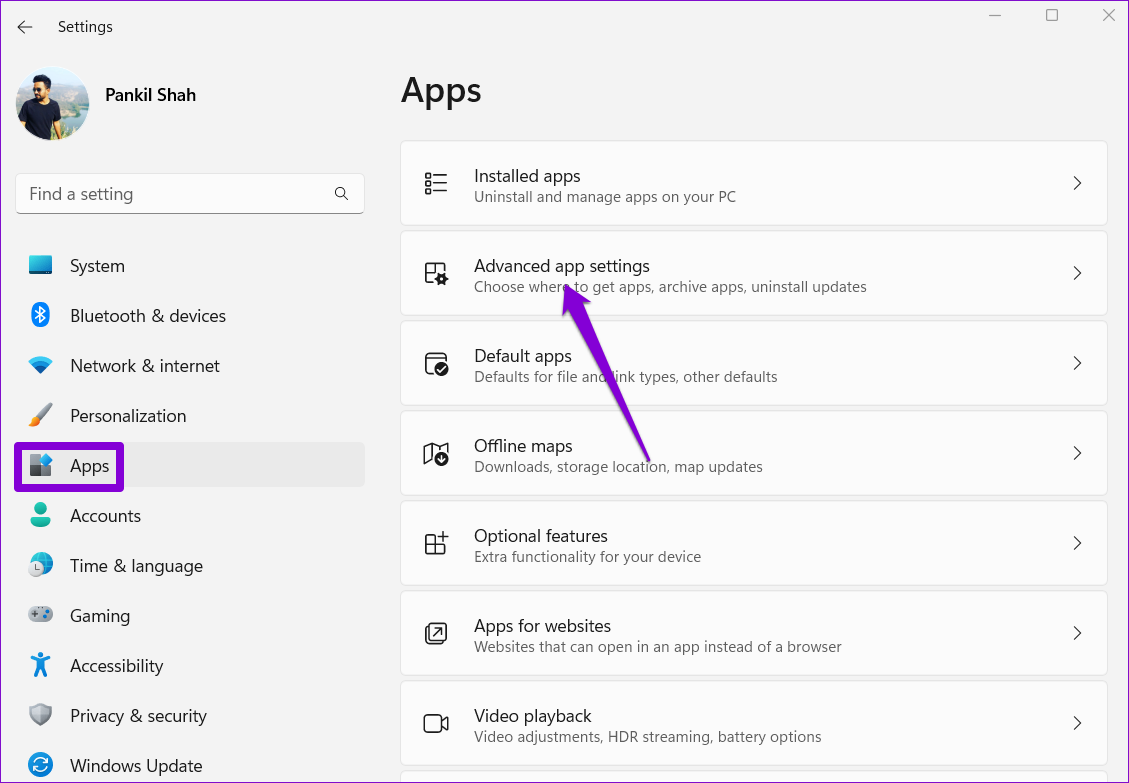
Step 1: Press the Windows key + I to launch the Settings app and head to Apps > Advanced app settings.
Step 2: Click on App execution aliases.
Step 3: Locate and enable the toggle for Terminal. If it is already on, turn it off and back on.
Fix 2: Perform the SFC and DISM scans
Another reason apps may fail to launch on Windows is if some of the system files on your PC are corrupt. If that’s the case, running SFC (or System File Checker) and DISM (Deployment Image Servicing and Management) scans will help detect and repair such damaged system files.
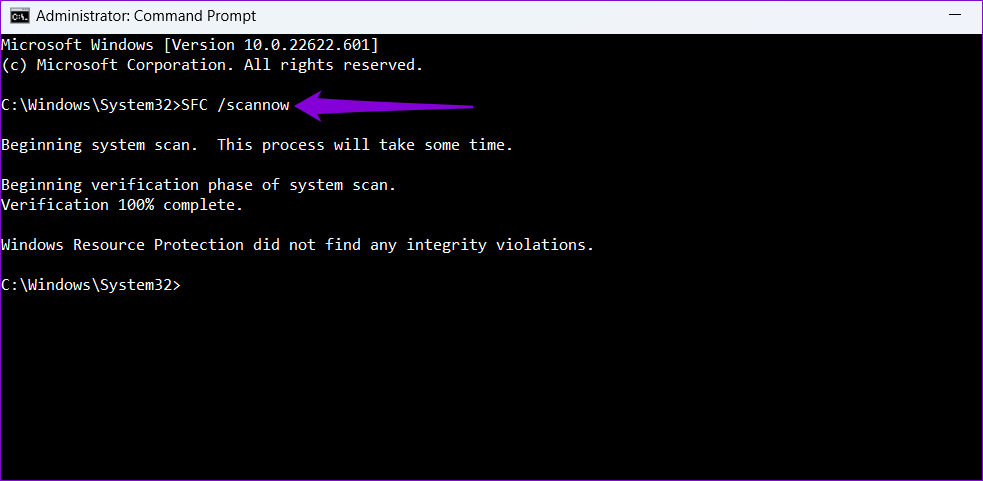
Step 1: Click the search icon on the taskbar, type cmd in the box, and select Run as administrator.
Step 2: Type the following command in the console and press Enter.
SFC /scannow
Step 3: Paste the following commands in the console one by one and press Enter after each:
This process may take some time. After the scan is complete, restart your PC and open the Terminal app again.
Fix 3: Repair or Reset the Windows Terminal App
Windows 11 lets you repair your apps in several ways. So, if the issue remains, repair the Windows Terminal app using these steps:
Step 1: Right-click on the Start icon and select Installed apps from the list.
Step 2: Scroll down or use the search bar to locate the Terminal app. Click the three-dot menu icon next to it and select Advanced options.
Step 3: Scroll to the Reset section and click the Repair button.
Windows will attempt to repair any issues with the app. After that, try opening the Windows Terminal app. If the problem persists, you can try resetting the app from the same menu.
Fix 4: Reinstall the Terminal App
If none of the above solutions work, you may need to resort to the nuclear option of uninstalling and reinstalling Windows Terminal. Here’s how to do it.
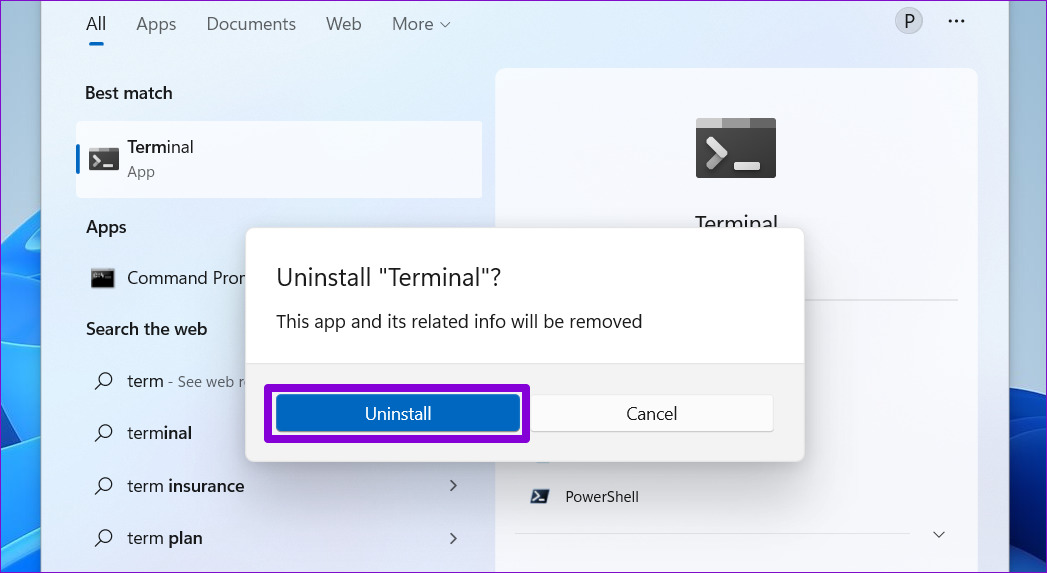
Step 1: Open the Start menu and search for Terminal. Right-click on the first result and select Uninstall.
Step 2: Select Uninstall to confirm.
Step 3: Open the Microsoft Store on your PC and search for Windows Terminal. Then, click the Install button to download the app.