An iPhone is an excellent device for content creators for multiple reasons. The cameras are one of the best on any smartphone for videography, and you can edit videos on the go, thanks to the powerful chipset. Speaking of video editing, the iPhone and iPad come right out of the box with iMovie — Apple’s first-party video editing software. If you plan to edit videos on your iPhone or iPad, knowing how to use iMovie can be helpful.
There are a ton of features and options on iMovie that you can use to edit your videos and make them look professional. We’ll go through all the important features, tips, and tricks in this guide and tell you how to use iMovie on your iPhone and iPad.
Types of Projects on iMovie
With the latest update to iMovie, Apple gives you 3 different project modes to choose from. Each of them serves a different purpose. Here are the 3 types of projects you can create –
- Movie: This is the standard video editing mode. If you want to merge clips, add music, or do any type of basic video editing, this is the project you need to select. Essentially, you’re creating a video from scratch here.
- Storyboard: The storyboard mode uses predefined templates to create a video with your clips. Just choose a template, add clips, and let iMovie curate the final output.
- Magic Movie: In this mode, you can select the clips of your choice and iMovie will merge them to create a compilation of sorts with automatic transitions and effects.
Let’s go over each type of project one by one and tell you how you can use them to edit your videos in the best possible way.
How to Edit iPhone Videos on iMovie Using Movie Mode
If you have a bunch of clips that you want to edit into a single video, this is the mode you should use. This is also a great way to edit videos for YouTube on your iPhone. Here’s how you can use the Movie mode on iMovie.
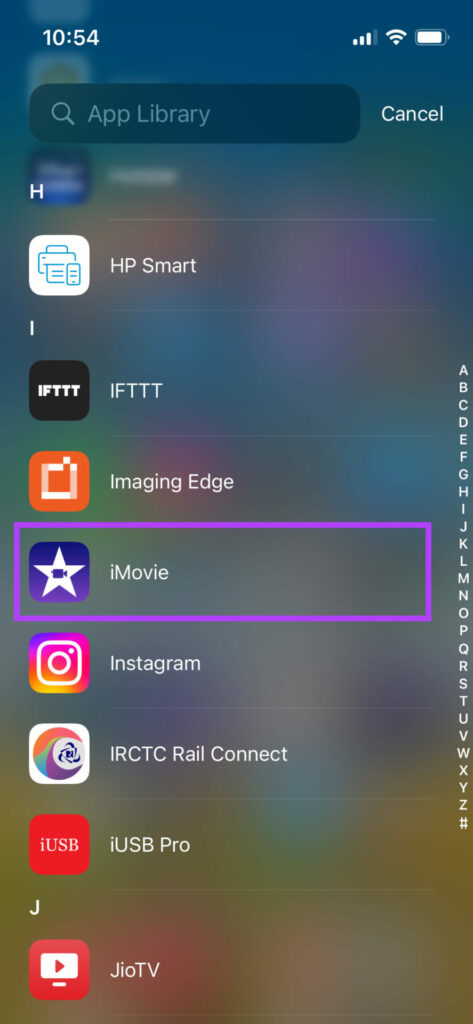
Step 1: Open the iMovie app on your iPhone. Select the Movie option at the bottom.

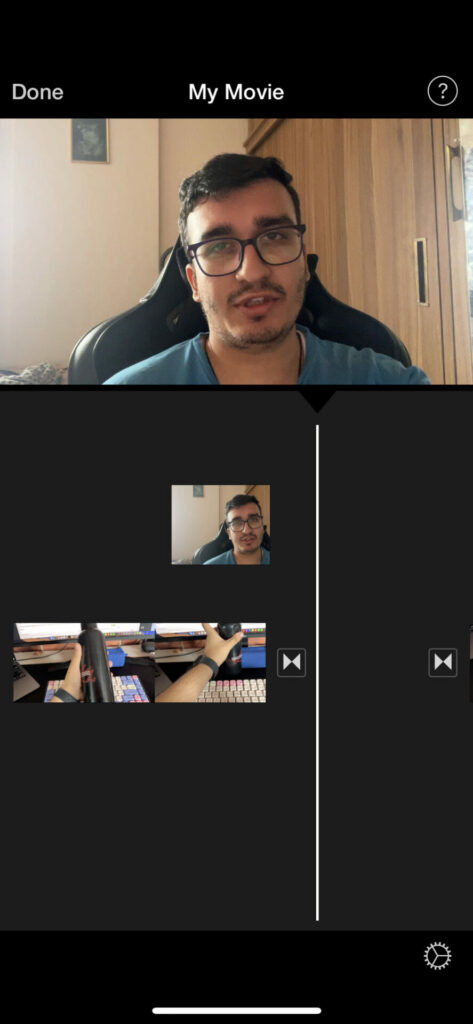
Step 2: Select all the media files you wish to import by tapping on them and ticking the checkbox. Once all files are selected, tap on Create Movie.

You’ll now see that all your selected media files will appear on the timeline. This is where the video editing begins.

If the selected clips don’t appear in the right order, you can press and hold on to a clip and then drag it to whatever position you wish.
How to Trim Videos in iMovie
Step 1: Tap on the video clip you want to trim or edit the length. This will select it.

Step 2: Now, drag the yellow handlebar to the right of the clip till you trim the desired portion.

Your video will now start from the point where you’ve trimmed it.
If you want to trim the end of a clip, just drag the handlebar on the other end to the left.

In case you wish to trim a portion of the video that’s in the middle of a clip, you will have to split it first.
Ensure the icon with a pair of scissors is selected at the bottom before proceeding. This mode is used to cut videos.

Step 3: Move the play head to the starting position of the part you want to trim. Tap on Split
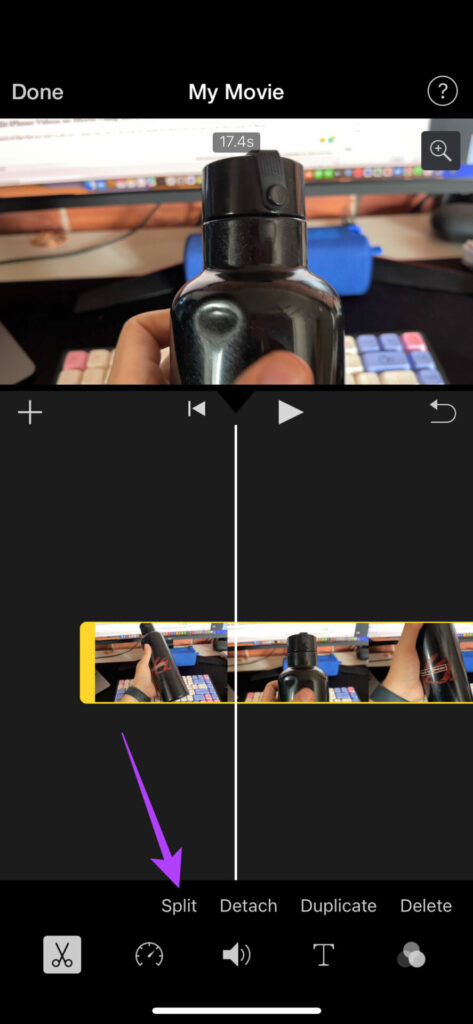
Step 4: Now, move the play head to the ending position of the part you want to trim. Tap on Split once again.

The selected portion will now be split from the original clip.

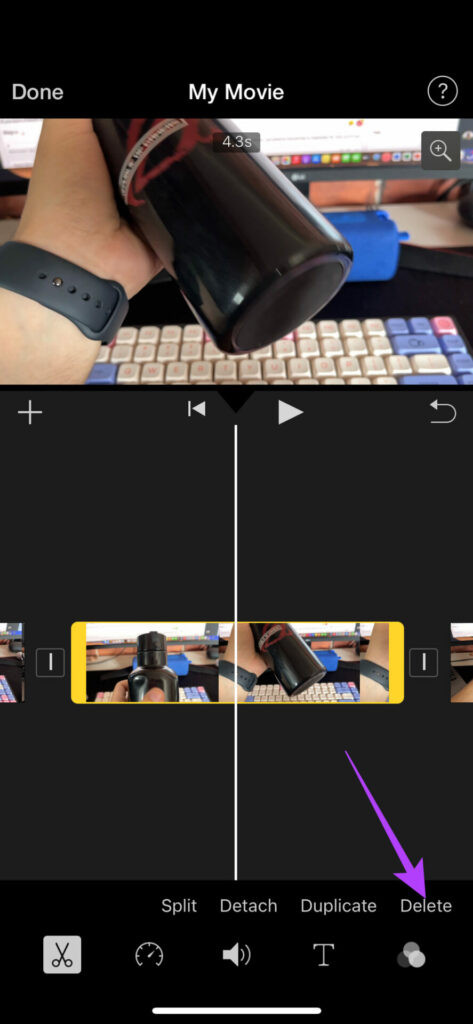
Step 5: In order to remove it, select it and tap on Delete.
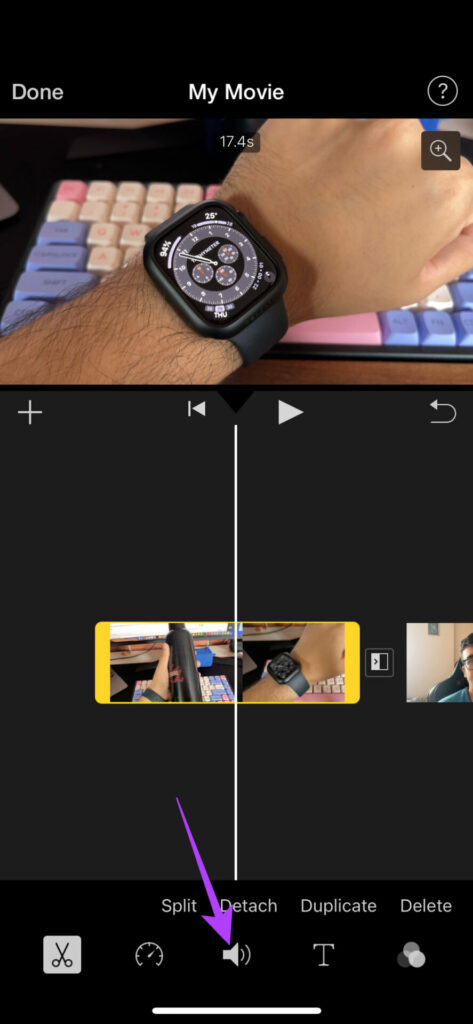
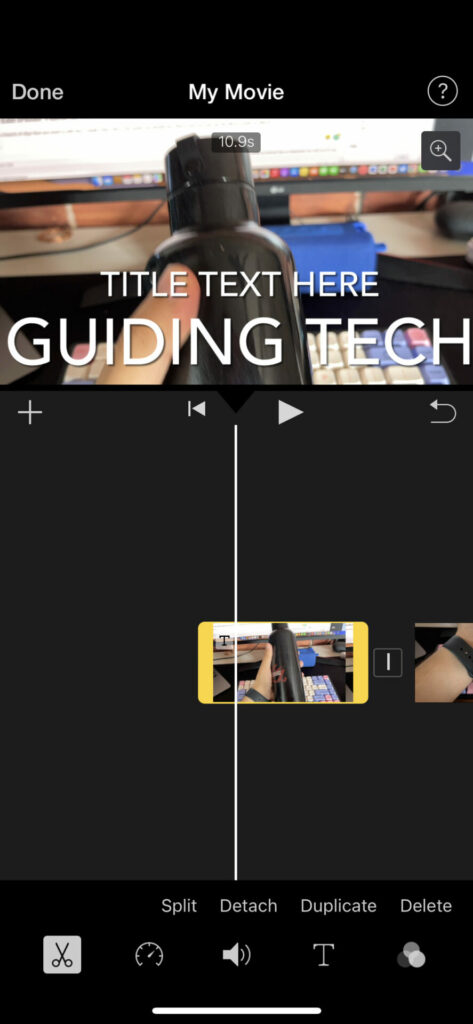
How to Detach Audio From Video in iMovie
Step 1: Tap on the clip for which you want to detach the audio. This will select it.
Step 2: Tap on the Detach option at the bottom.

The video and audio portions of the clip will be detached. You can now edit the audio clip separately or even delete it.
How to Duplicate iPhone Videos
Step 1: Tap on the video clip you want to duplicate. This will select it.
Step 2: Tap on the Duplicate button at the bottom. This will create an exact replica of the selected clip.

How to Add Videos
Apart from the clips you’ve added to the timeline, you can add more at a later stage by tapping on the ‘+’ icon and selecting the videos you wish to add.


How to Add Transitions in iMovie
Step 1: Tap on the transition icon between 2 clips on the timeline.

Step 2: Select the transition of your choice along with other parameters like duration and sound.

How to Change the Speed of an iPhone Video in iMovie
Step 1: Tap on the clip for which you want to change the speed.
Step 2: Navigate to the speed section in the toolbar. You can control the pace of the clip from here.

Step 3: Drag the slider to set the speed. Dragging it to the left will reduce the speed while dragging it to the right will increase it.


Step 4: If you wish to have a frame still for a few seconds in the middle of the clip, move the play head to the relevant portion and tap on the Freeze button.

How to Edit Audio Levels of a Video in iMovie
Step 1: Tap on the clip for which you want to change the audio levels. This will select it.
Step 2: Switch to the Audio tab at the bottom.
Step 3: Drag the slider around to adjust the volume levels.

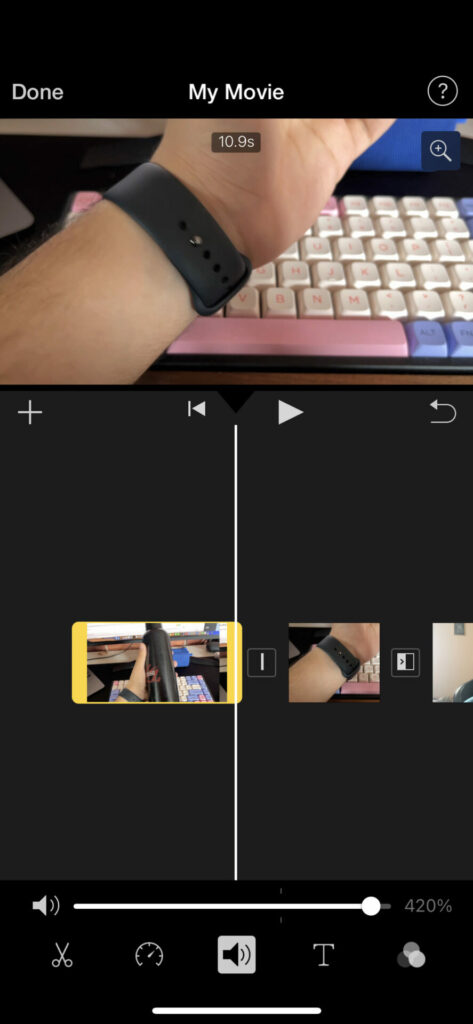
You can also remove the sound from your video entirely using this method.
How to Add Text to Videos in iMovie
Step 1: Tap the clip on which you want to add text. Now, move the play head to the position where you want the text to appear.
Step 2: Select the Text button in the bar at the bottom.

Step 3: Scroll through and find the type of text you want to add. Tap on it to select.


Step 4: Tap on the text that appears on the video. Select Edit.

Step 5: Enter whatever text you want and it will be saved.

Step 6: You can change the font, color, and style of text by choosing the relevant options. Make all the edits to your satisfaction.
Step 7: Hold on to the text and drag it around in the video. This is how you can move the text in iMovie. You can also pinch it to zoom in or out.
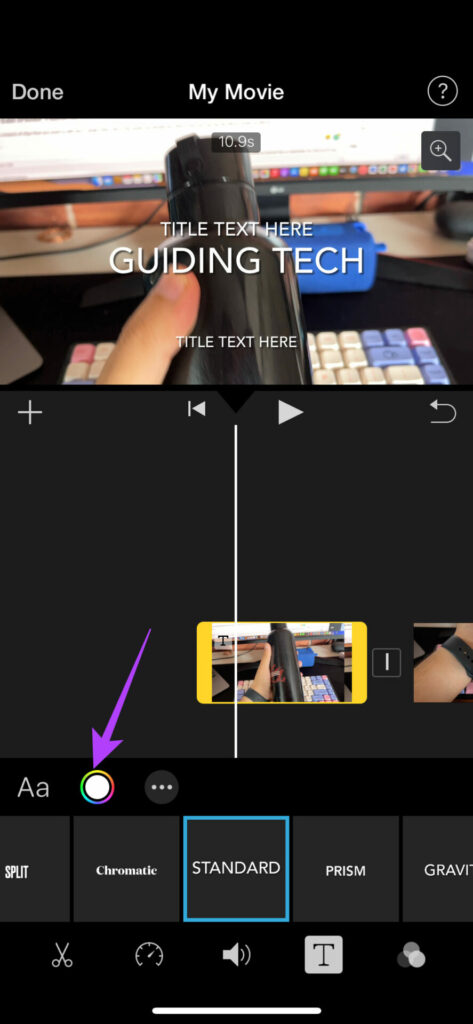
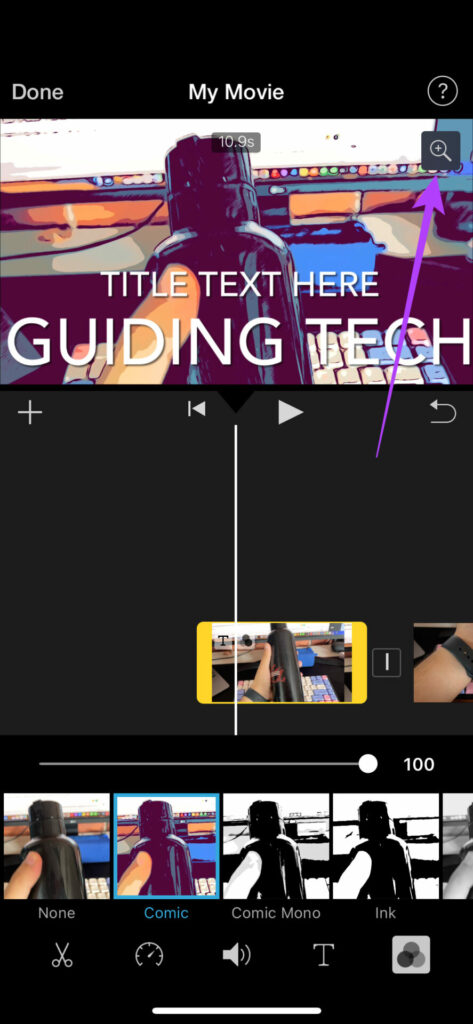
How to Add Filters to Videos in iMovie
Step 1: Tap the clip on which you want to add filters. This will select it.
Step 2: Navigate to the filters section at the bottom.

Step 3: Select the filter you want to add along with its intensity.


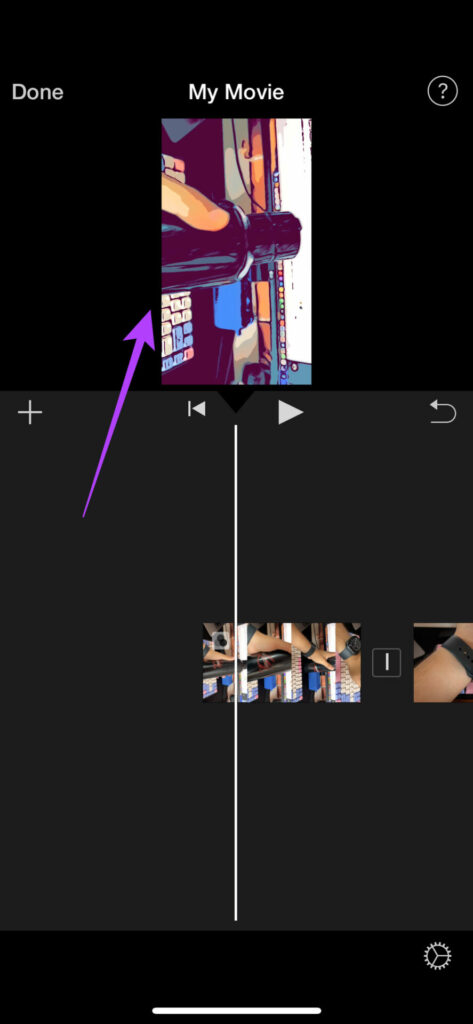
How to Zoom In and Out of a Video in iMovie
Step 1: Tap the clip on which you want to zoom in or out. This will select it.
Step 2: Select the zoom button in the top-right corner of the video.
Step 3: Now, pinch to zoom in or out on the desired portion of the video.

How to Rotate a Video in iMovie
Step 1: Tap on the clip that you want to rotate. This will select it.
Step 2: Place two fingers on the video and rotate them in the direction in which you want to rotate the video.

Your video’s orientation will now be changed.
You can take a look at our detailed guide on how to rotate videos on iPhone if you wish to know other ways of rotating videos including changing the aspect ratio of videos.
How to Add a Theme to Your Video in iMovie
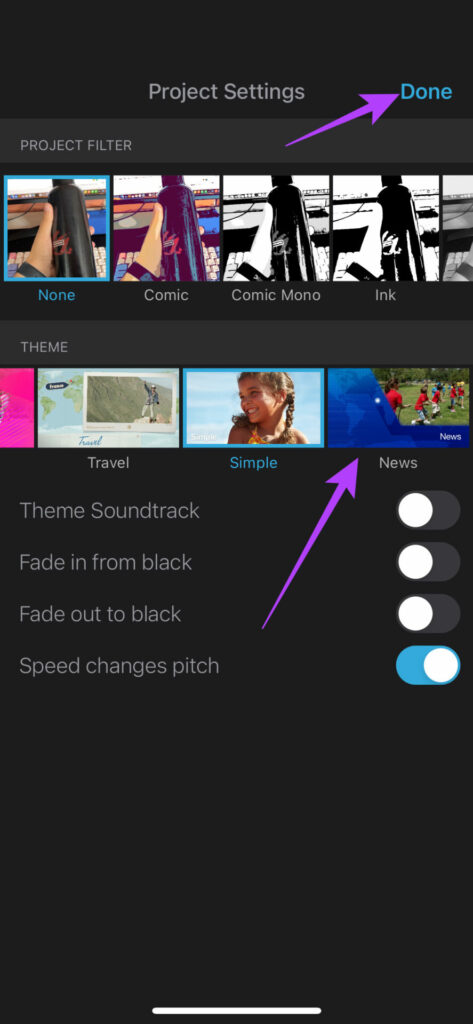
Step 1: Without selecting any clip, tap on the Settings icon in the bottom-right corner of your screen.

Step 2: Now, select a theme of your choice from the available options. You can also select other options relevant to the theme like a soundtrack and transitions. Tap on Done once you’ve made the selection.
How to Add Music to Videos in iMovie
Step 1: Tap on the ‘+’ icon to add new media.
Step 2: Choose Audio. This is where you can select the tracks you want to add.

Step 3: If you wish to add your own music, select My Music. Suppose you want to choose a preset audio track, select Soundtracks.

Step 4: Select the music you want to add to your video. Now, tap on the ‘+’ button.

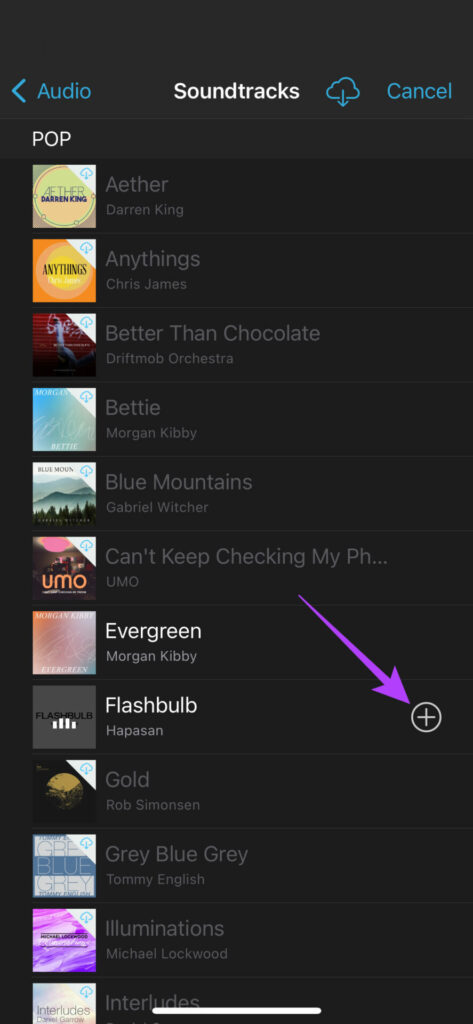
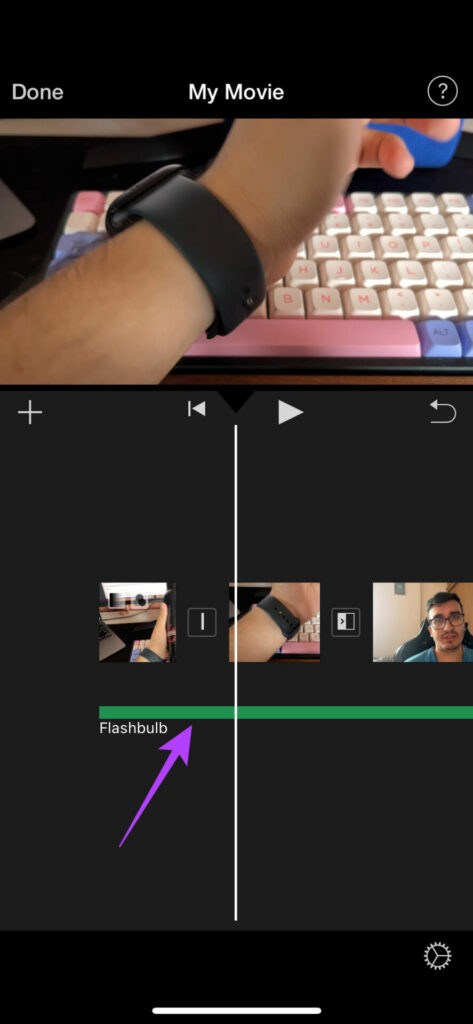
The music track will be added to your video. You can edit it using the instructions mentioned above to edit the audio.
This is pretty much everything you can do with videos on iMovie. While you can edit several aspects of a video, some important features like the ability to reverse a video or add effects are missing. You can’t edit videos to key out a green screen, nor can you remove the background noise from a video.
There are some limitations, but iMovie still does a great job of editing videos on your iPhone. In fact, you can also edit videos that haven’t been shot on your iPhone.
How to Export and Save an Edited Video in iMovie
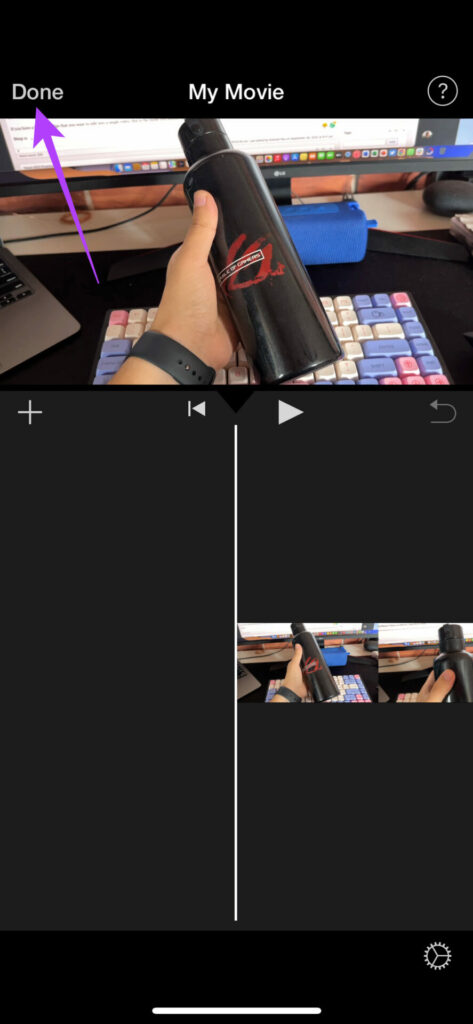
Once you’ve made all the edits, it’s time to render the video and save it so that you can share or upload it on a platform of your choice. Here’s how to do that.
Step 1: When you’re happy with the edits, tap on Done at the top-left corner.
Step 2: The project will now be saved. It’s time to export it. Tap on the Share button at the bottom.

Step 3: Select the Options button. Here, you can select the resolution and frame rate at which you want to export the video. Choose the desired values and tap on Done.


Step 4: Scroll up on the share sheet and select Save Video.
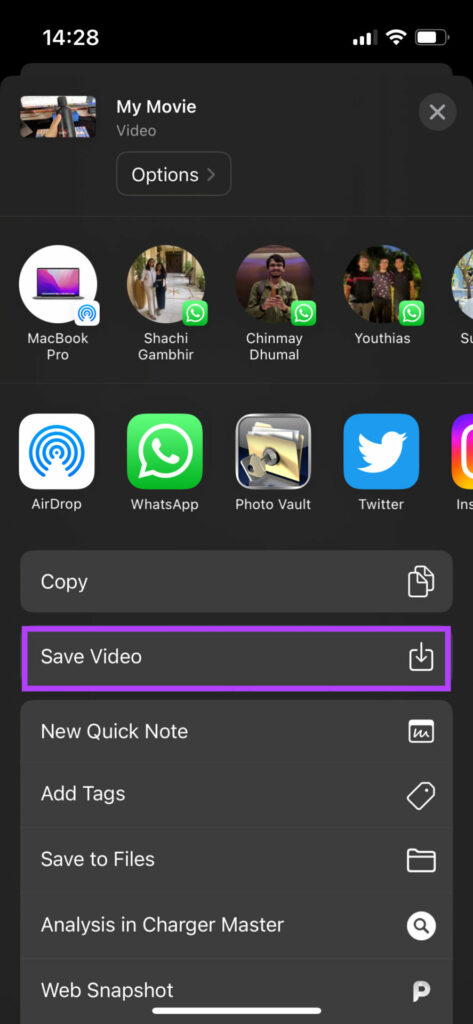
The video will now be exported and saved to the Photos app on your iPhone.
How to Edit Videos on iMovie Using Storyboard Mode
The Storyboard mode is great for people who want to use a fixed template to convey a storyline. This can be a video about yourself or related to a theme like cooking, gaming, a top 5 compilation, etc. Here’s how to use it.
Step 1: Open the iMovie app on your iPhone. Select the Storyboard option.
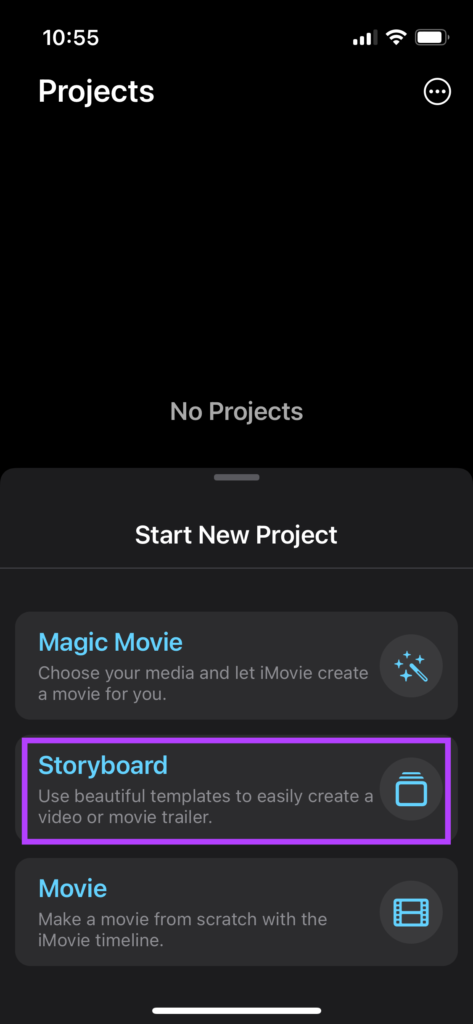
Step 2: Select the type of video you want to create. This will be the basic template of your video.

Step 3: Choose the type of style you like along with other options like music, font for the text, color, and filter. Once done, tap on Create.

Step 4: Now, you will have to select relevant video clips for specific sections of the video.

For example, in the About Me template, you’ll have to select a shot introducing yourself, a wide shot, a close-up shot, and a reference shot. You will see the instructions listed on the screen.
To select the video, just tap on the section and you will get an option to either select a clip from your library or record a video straight from the camera.

Once you’ve added all the clips, iMovie will automatically crop them according to each section and create a video by combining all the clips.

Step 5: When you’re ready to save the video, tap on the Export button in the top right corner of the app. Then, select the Save Video button.

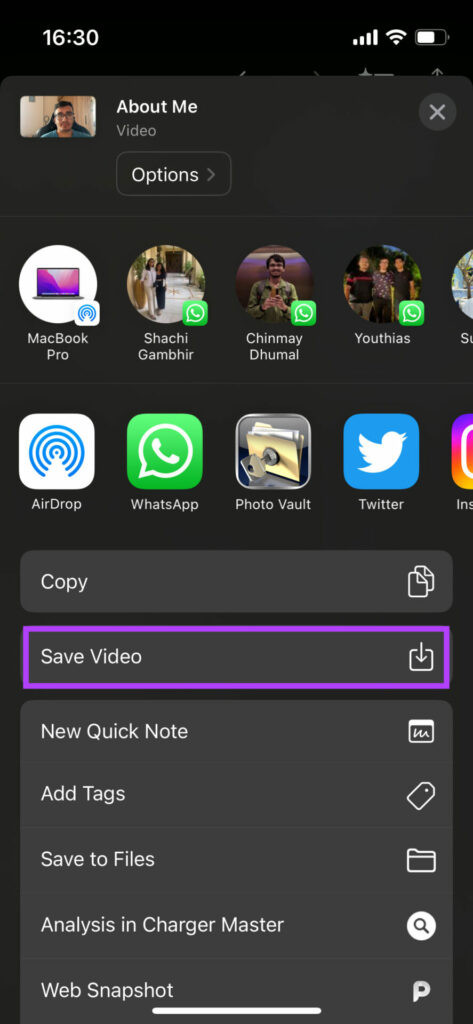
The Storyboard video will now be saved to the Photos app on your iPhone.
How to Edit Videos on iMovie Using Magic Movie Mode
This mode is for when you’re too lazy to edit multiple clips together or if you want iMovie to automatically curate a nice sequence for you with music and effects. You just have to select the clips you want to use and you’re good to go. Here’s how it works.
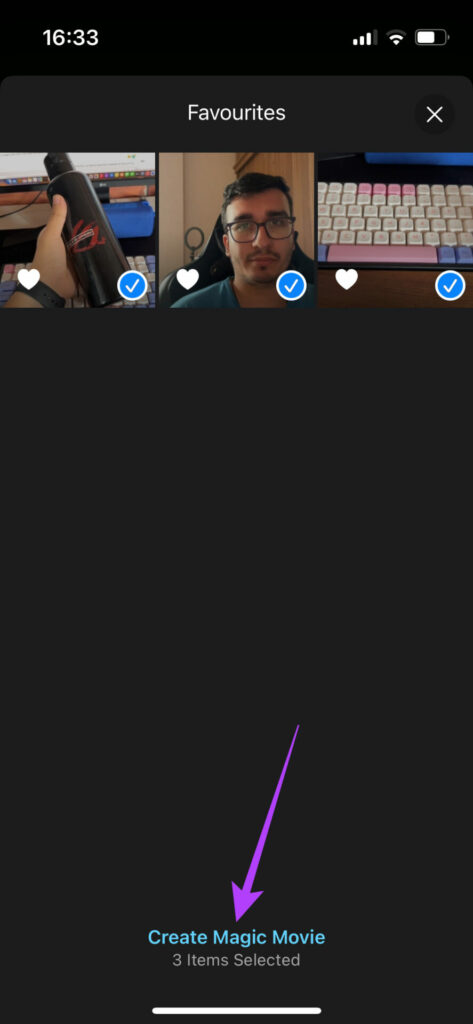
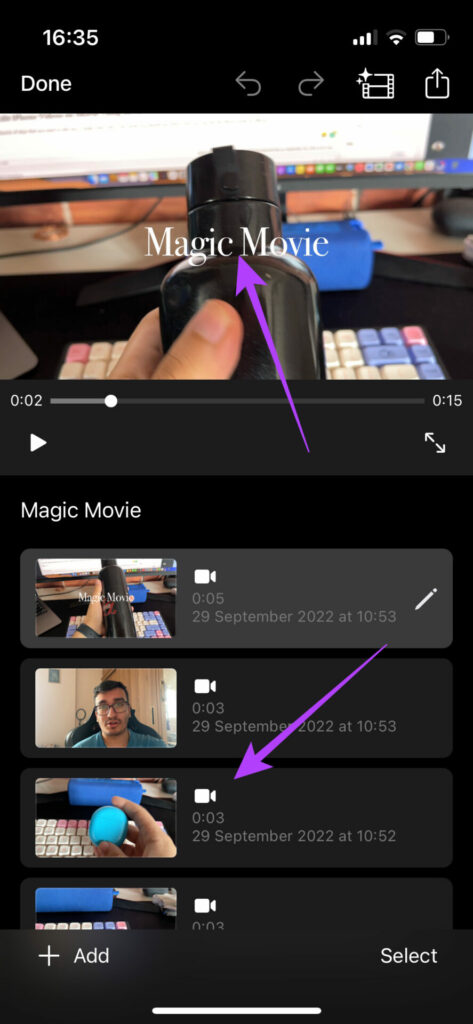
Step 1: Open the iMovie app on your iPhone. Select the Magic Movie option.

Step 2: Select the clips you want to add and tap on Create Magic Movie.
iMovie will now automatically create a video for you. The video will consist of the clips you selected.
Step 3: At the bottom, you can select the clips you want to edit and make changes accordingly. You can change the text, speed, audio, etc. as per your liking.
Step 4: Once you’ve made the changes, tap on the Export button in the top right corner of the app. Then, select the Save Video button.

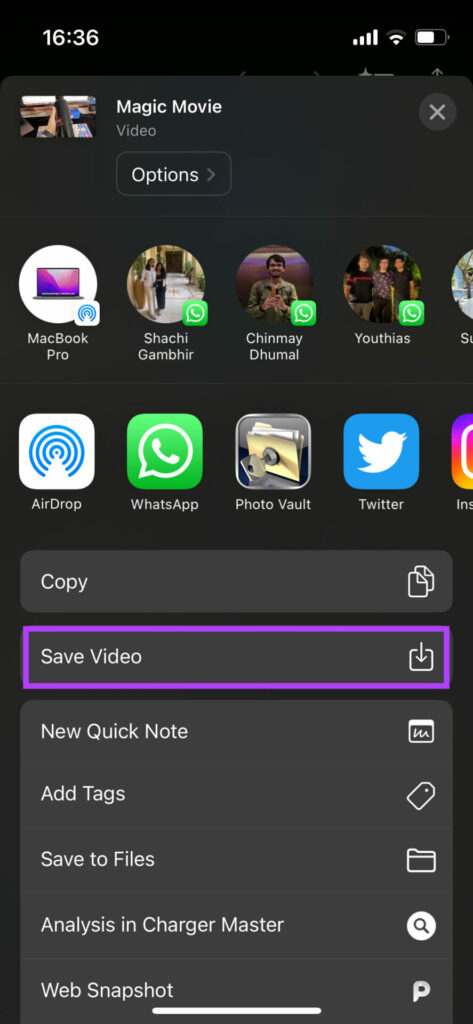
The Magic Movie will now be saved to the Photos app on your iPhone.
Start Creating Content
Your iPhone is a powerful device. You can use it to record videos and edit them on the go which is hugely beneficial for content creators. So, what are you waiting for? Now that you know how to use iMovie on your iPhone or iPad, start right away and show your talent to the world!
Was this helpful?
Last updated on 30 September, 2022
Read Next
 How to Install Windows 11 on VirtualBox: The Ultimate Guide
How to Enable Virtualization on Windows 11 Enabling virtualization on Windows typically involves going into the BIOS or UEFI settings and enabling support, which may vary depending on your PC's
How to Install Windows 11 on VirtualBox: The Ultimate Guide
How to Enable Virtualization on Windows 11 Enabling virtualization on Windows typically involves going into the BIOS or UEFI settings and enabling support, which may vary depending on your PC's
 How to Use Twitter Advanced Search: The Ultimate Guide
How to Use Twitter's Advanced Search Features Effectively Note: You can use multiple filters at once while doing an advanced search on Twitter.
How to Use Twitter Advanced Search: The Ultimate Guide
How to Use Twitter's Advanced Search Features Effectively Note: You can use multiple filters at once while doing an advanced search on Twitter.
 17 Discord Tips and Tricks: The Ultimate Guide
Tip 1: Send Files More Than the Discord File Limit Despite being a popular messaging app, Discord still has a slight limit on sending files.
17 Discord Tips and Tricks: The Ultimate Guide
Tip 1: Send Files More Than the Discord File Limit Despite being a popular messaging app, Discord still has a slight limit on sending files.
 Otterbox Defender vs. Lifeproof Fre: Which is the Ultimate Phone Case?
Otterbox has established a name for itself over the years as the supreme brand of protective iPhone and Android cases.
Otterbox Defender vs. Lifeproof Fre: Which is the Ultimate Phone Case?
Otterbox has established a name for itself over the years as the supreme brand of protective iPhone and Android cases.
 Xiaomi 14 Ultra Review: The Ultimate Photography Smartphone
Remember back in 2012, when Samsung launched the Galaxy Camera smartphone?
Xiaomi 14 Ultra Review: The Ultimate Photography Smartphone
Remember back in 2012, when Samsung launched the Galaxy Camera smartphone?
 A Complete Guide to Using Photos Privacy Options on iPhone
Apple recently unveiled the highly anticipated iOS 14 for iPhones with several privacy features.
A Complete Guide to Using Photos Privacy Options on iPhone
Apple recently unveiled the highly anticipated iOS 14 for iPhones with several privacy features.
 How to Use the Measure App on iPhone: A Detailed Guide
Things at home are never found when needed - this is something that all of us resonate with.
How to Use the Measure App on iPhone: A Detailed Guide
Things at home are never found when needed - this is something that all of us resonate with.
 What to Do if Your iPhone is Stolen/Lost: A Complete Guide
Losing your iPhone and not knowing what to do next is distressing.
What to Do if Your iPhone is Stolen/Lost: A Complete Guide
Losing your iPhone and not knowing what to do next is distressing.
The article above may contain affiliate links which help support Guiding Tech. The content remains unbiased and authentic and will never affect our editorial integrity.