Fix 1: Enable Network Discovery
Your first step is to ensure that your PC’s network discovery feature is enabled for both public and private networks. Here’s how to do it.
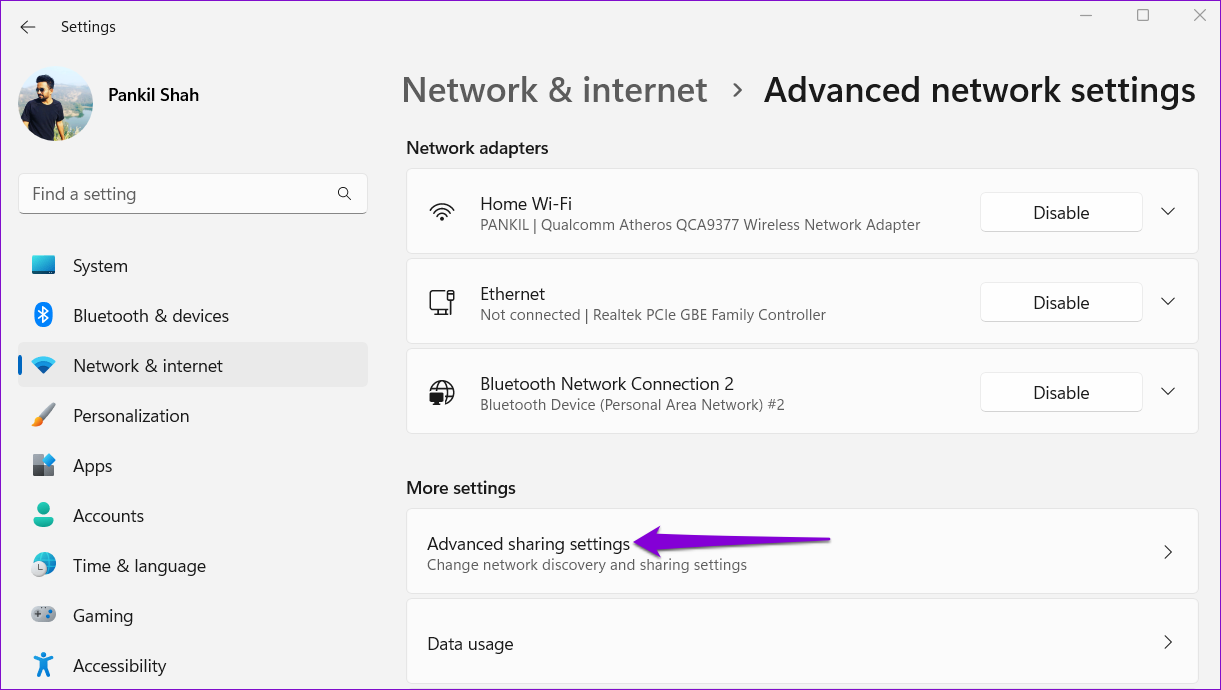
Step 1: Press the Windows key + I to open the Settings app. Then, go to Network & internet > Advanced network settings.

Step 2: Click on Advanced sharing settings.
Step 3: Expand Private networks. Then, enable the toggles for Network discovery and File and printer sharing.

Likewise, enable the toggles for Network discovery and File and printer sharing for Public networks as well.

Fix 2: Configure Services Related to Network Discovery
The Network discovery feature relies on certain Windows services to function. If one of those services is not running, you could experience errors. Here’s what to do to fix it.
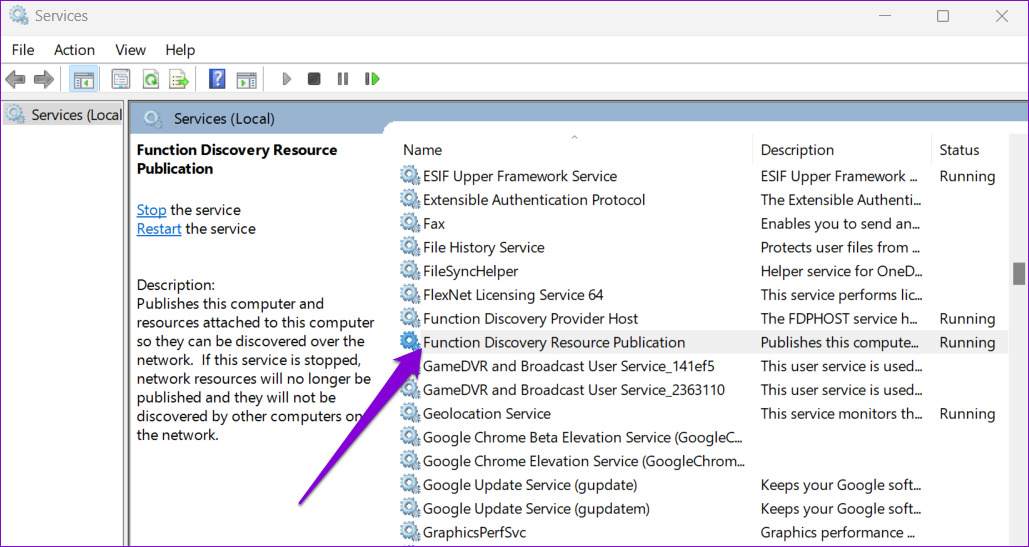
Step 1: Press the Windows key + R to open the Run dialog. Type services.msc in the box and press Enter.
Step 2: Scroll down to locate the Function Discovery Resource Publication service. Double-click on it to open its properties.
Step 3: Use the drop-down menu next to Startup type and select Automatic. Then, hit Apply, followed by OK.

Repeat the above steps to configure DNS Client, SSDP Discovery, UPnP Device Host, and Function Discovery Provider Host services. After that, restart your PC, and the network discovery should work as before.
Fix 3: Check Windows Firewall Settings
If the problem persists after configuring Windows services, the Windows Defender Firewall is likely blocking network discovery. Here’s what to do to allow network discovery through the Windows Defender Firewall.
Step 1: Click on the search icon on the taskbar, type control panel, and press Enter.

Step 2: Use the drop-down menu at the top right corner to change the view type to Large icons and click on Windows Defender Firewall.

Step 3: Click on Allow an app or feature through Windows Defender Firewall in the left pane.

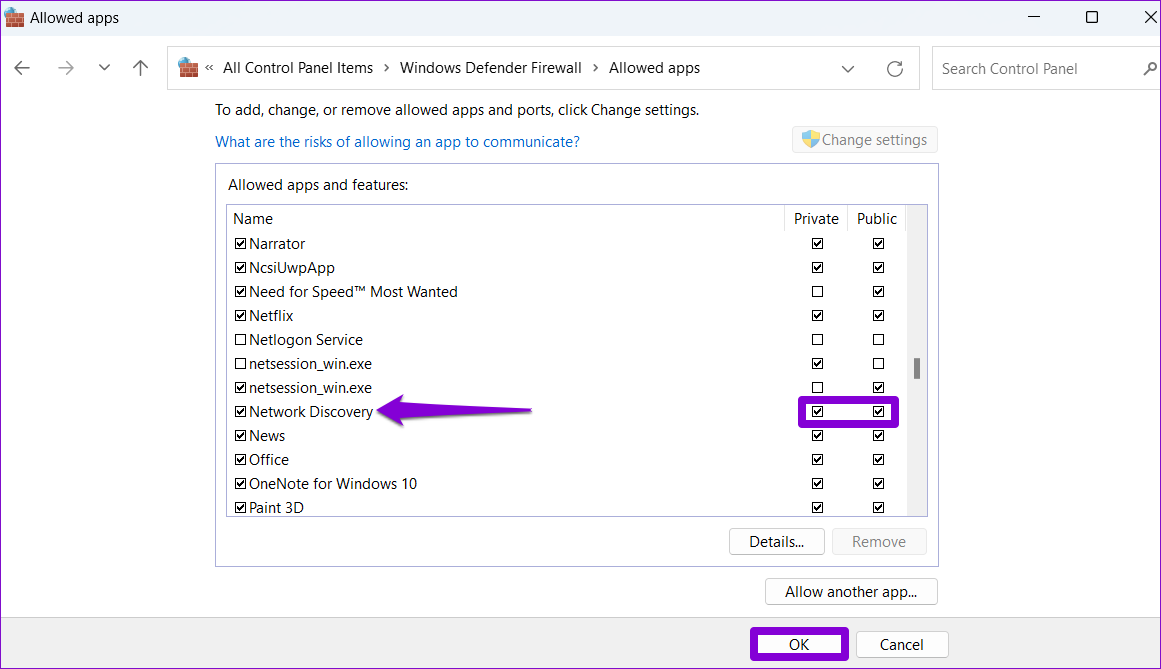
Step 4: Click on Change settings.

Step 5: Locate Network Discovery on the list and check the boxes for Private and Public next to it. Then, click on OK to save changes.
Fix 4: Update the Network Adapter Driver
Such issues with the network discovery can also occur due to a malfunctioning network adapter driver. In that case, try updating the driver by following the steps below.
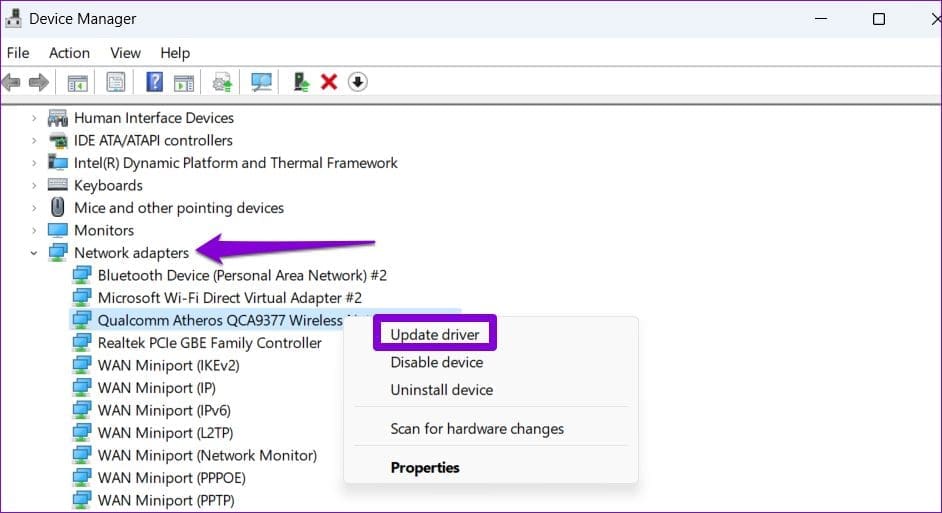
Step 1: Right-click on the Start icon and select Device Manager from the list.

Step 2: Double-click on Network adapters to expand it. Right-click your network adapter and select Update driver.
From there, follow the on-screen instructions to finish updating the network driver.
Fix 5: Reset Network Settings
If none of the above solutions work, reset your PC’s network settings as a last resort. That means you’ll lose all network configurations, such as the IP address and DNS server settings you use to connect your PC to your network.
To reset network settings on Windows 11:
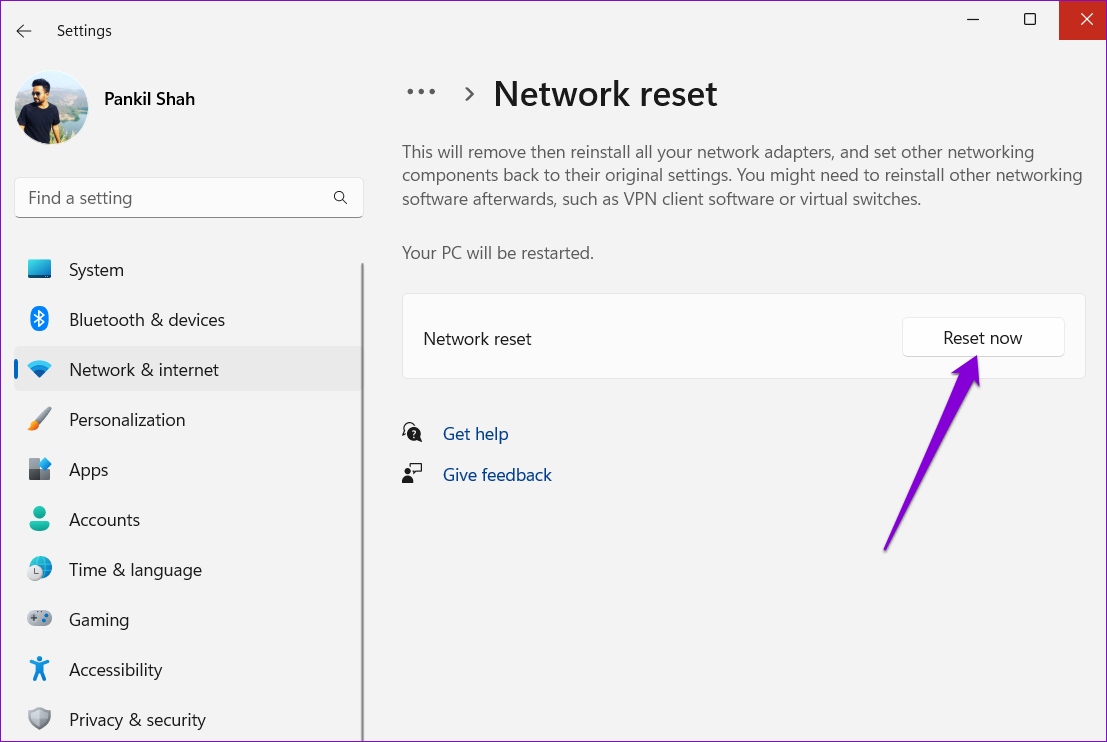
Step 1: Press the Windows key + I to open the Settings app. Then, go to Network & internet > Advanced network settings > Network reset.

Step 2: Click on Reset now next to Network reset.
Your PC will restart and revert to the default network settings. Following this, the issue will no longer bother you.
Was this helpful?
Last updated on 04 July, 2024
4 Comments
Leave a Reply
Read Next
 Top 8 Ways to Fix Windows 10 Network Connection Issues
The internet connection is crucial while working from home or enjoying web-based content.
Top 8 Ways to Fix Windows 10 Network Connection Issues
The internet connection is crucial while working from home or enjoying web-based content.
 4 Ways to Fix “Windows Could Not Find a Driver for Your Network Adapter” Error
Fix 1: Enable Network Adapter Windows may fail to communicate with the network adapter if you've previously disabled it.
4 Ways to Fix “Windows Could Not Find a Driver for Your Network Adapter” Error
Fix 1: Enable Network Adapter Windows may fail to communicate with the network adapter if you've previously disabled it.
 5 Ways to Fix Windows Stuck on “Let’s Connect You to a Network”
Fix 1: Restart the Router and Check the Internet Connectivity Restart your Wi-Fi router, as it essentially refreshes the network connection.
5 Ways to Fix Windows Stuck on “Let’s Connect You to a Network”
Fix 1: Restart the Router and Check the Internet Connectivity Restart your Wi-Fi router, as it essentially refreshes the network connection.
 4 Ways to Open the Network Connections in Windows 11
Basic Ways: Using the Search bar: Click on the Search bar, type Network Connections, and open the app from the search results.
4 Ways to Open the Network Connections in Windows 11
Basic Ways: Using the Search bar: Click on the Search bar, type Network Connections, and open the app from the search results.
 3 Ways to Check Network Adapter Speed on Windows 11
Method 1: Using the Settings App Besides displaying the network adapter speed, the Settings app also provides information about other connection aspects, such as the network band, MAC address, and
3 Ways to Check Network Adapter Speed on Windows 11
Method 1: Using the Settings App Besides displaying the network adapter speed, the Settings app also provides information about other connection aspects, such as the network band, MAC address, and
 How to Fix Windows 10 Won’t Detect Wi-Fi Network
Majority computers today rely on an Internet connection.
How to Fix Windows 10 Won’t Detect Wi-Fi Network
Majority computers today rely on an Internet connection.
 How to Disable Network Adapter (Ethernet) in Windows 11
Method 1: Using Settings Step 1: Press the Windows key on your keyboard, type Settings, and press Open.
How to Disable Network Adapter (Ethernet) in Windows 11
Method 1: Using Settings Step 1: Press the Windows key on your keyboard, type Settings, and press Open.
 6 Fixes for “Can’t Connect to This Network” Error on Windows 11
https://youtu.be/fitOVnXrUqE Basic Fixes: Restart Windows and router: Restarting your Windows 11 device will help fix issues occurring due to any temporary bugs or issues.
6 Fixes for “Can’t Connect to This Network” Error on Windows 11
https://youtu.be/fitOVnXrUqE Basic Fixes: Restart Windows and router: Restarting your Windows 11 device will help fix issues occurring due to any temporary bugs or issues.
The article above may contain affiliate links which help support Guiding Tech. The content remains unbiased and authentic and will never affect our editorial integrity.

There’s a whole lot of fluff on the web that tells how to fix this problem; this is by far the most comprehensive and (Configure System Services) SOLVED MY ISSUE.
Now if there was only some way to eliminate the other (fluff) suggestions it would save all of us a lot of time :).
Thank you SO MUCH!
Thanks so much! I had a Network Discovering working on a laptop for a month, and then it suddenly stopped. I tried restarting (warm and cold) the laptop, but it didn’t fix it. Now I’ve stepped through all the settings and the troubleshooter, as described in Steps 1 to 5, and still no joy – everything is already set as specify. I’ll leave it for a day and hope it goes away, otherwise it’s Step 6 – the Reset.
I appreciate you clear and methodical troubleshooter! Great work!
A follow up. Shortly after I commented here, I restarted the laptop – and the Network Discovery was working again. I didn’t have to go to the Reset! Very happy 🙂
I don’t know what I changed, but I am sure that I had done several restarts before going through your steps, and they didn’t fix the problem. After going through your steps, the Restart worked, without doing the Reset.
I have done all the things listed here. Fascinating that it is so difficult to get this working right in Windows 11. I have 3 Windows 11 computers and 3 Windows 7 computers (running old hardware or software) on the same 2.5GB ethernet network with a new Verizon router. The router sees all the computers, and the Windows 7 computers see all the computers, but the Windows 11 computers only see some of the computers on the network. There seems to be nothing that I can do to get the Win 11 systems to see all the others. I even turned off the firewall completely and the problems remained. Also interesting that it is only other Windows 11 computers that are not seen. The Windows 7 computers are seen by everyone. This problem is very much a Windows 10/11 issue. I wonder if MS is going to fix it.