Basic Fixes:
- Restart Windows and router: Restarting your Windows 11 device will help fix issues occurring due to any temporary bugs or issues. Additionally, restarting your router will help in refreshing your Wi-Fi network. Once done, reconnect to your Wi-Fi network and check again.
- Turn Airplane Mode on and off: Turning on Airplane Mode turns off all wireless communications on your Windows 11 device. Then, once it is disabled, all wireless connections are re-enabled. This can help fix any temporary network issues.
- Check for Windows updates: Software issues can cause problems when connecting to Wi-Fi. In this case, an update might be available to fix it. You can manually check and install the latest Windows updates. Then, try again.
Fix 1: Forget and Reconnect Network
If you’ve been facing issues connecting to any specific network on your Windows 11 device, forgetting and reconnecting to the network might help. This will disconnect the device and establish a fresh pairing connection, resolving any issues that might have occurred during the first pairing attempt. Here’s how.
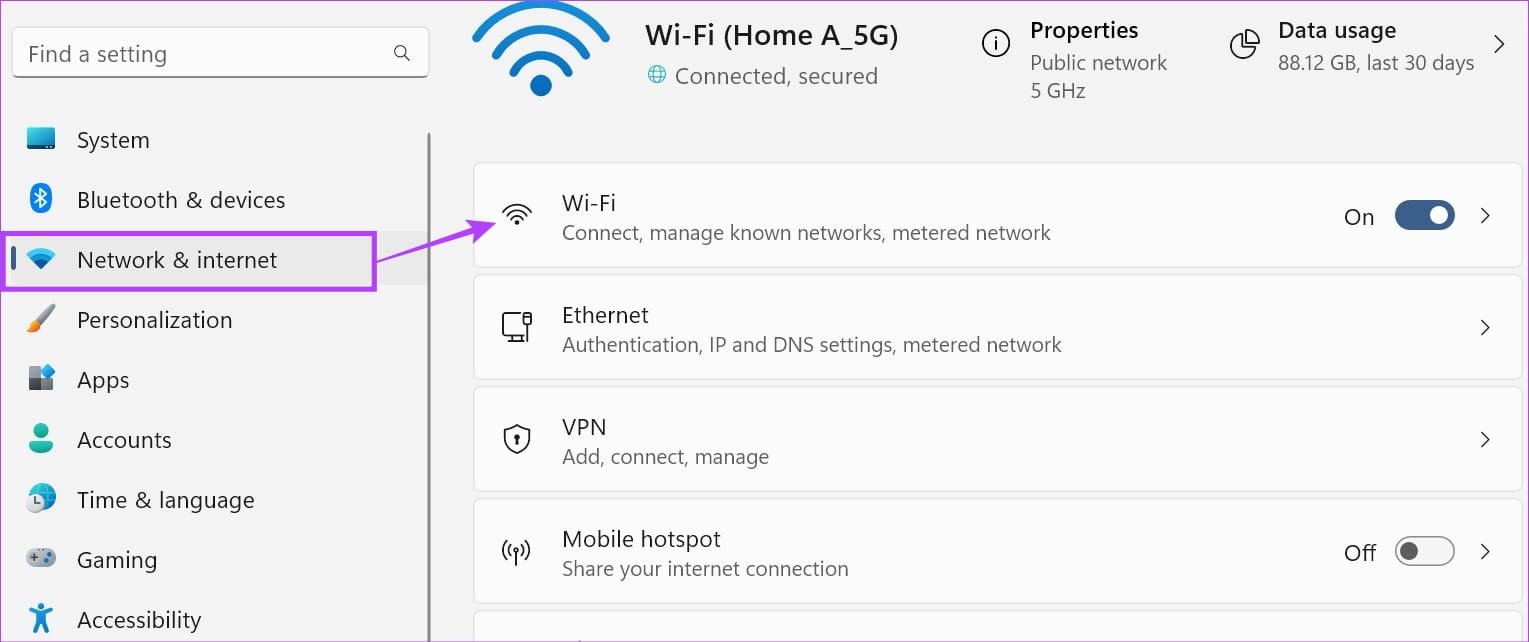
Step 1: Use the Windows + I key to open Settings. Go to Network & internet and click on Wi-Fi.
Step 2: Here, click on Manage known networks.
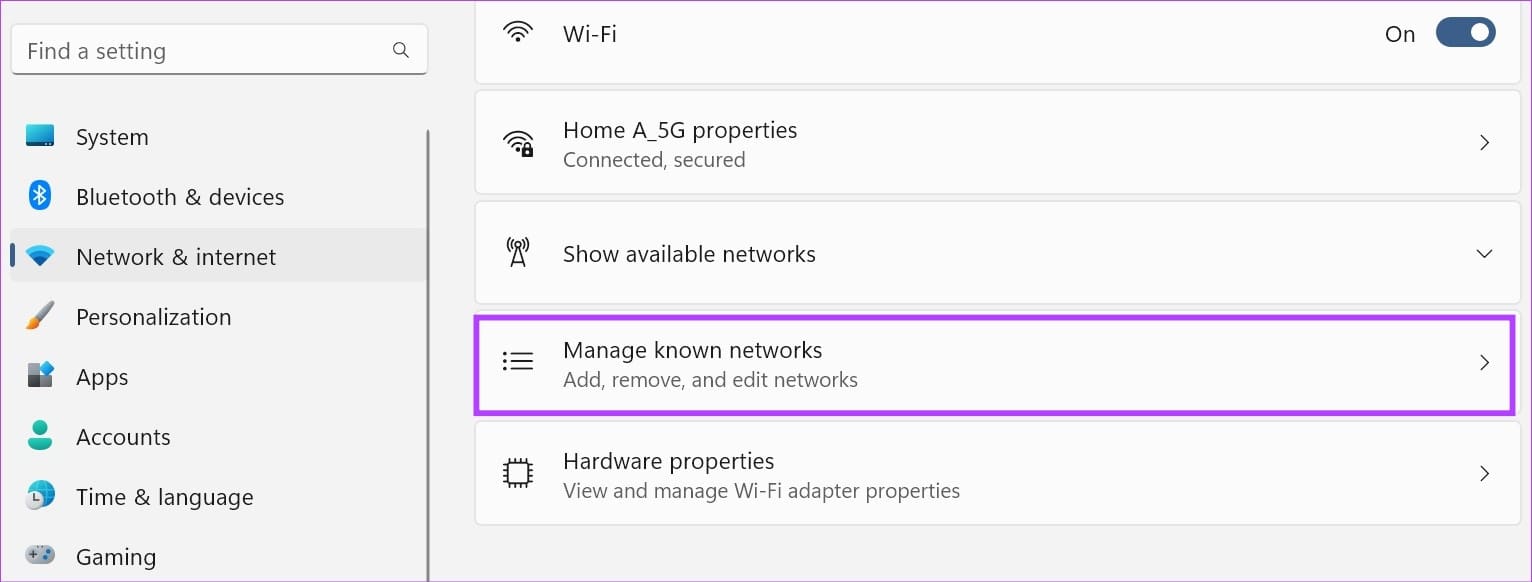
Step 3: Go to the network you wish to forget and click on Forget.

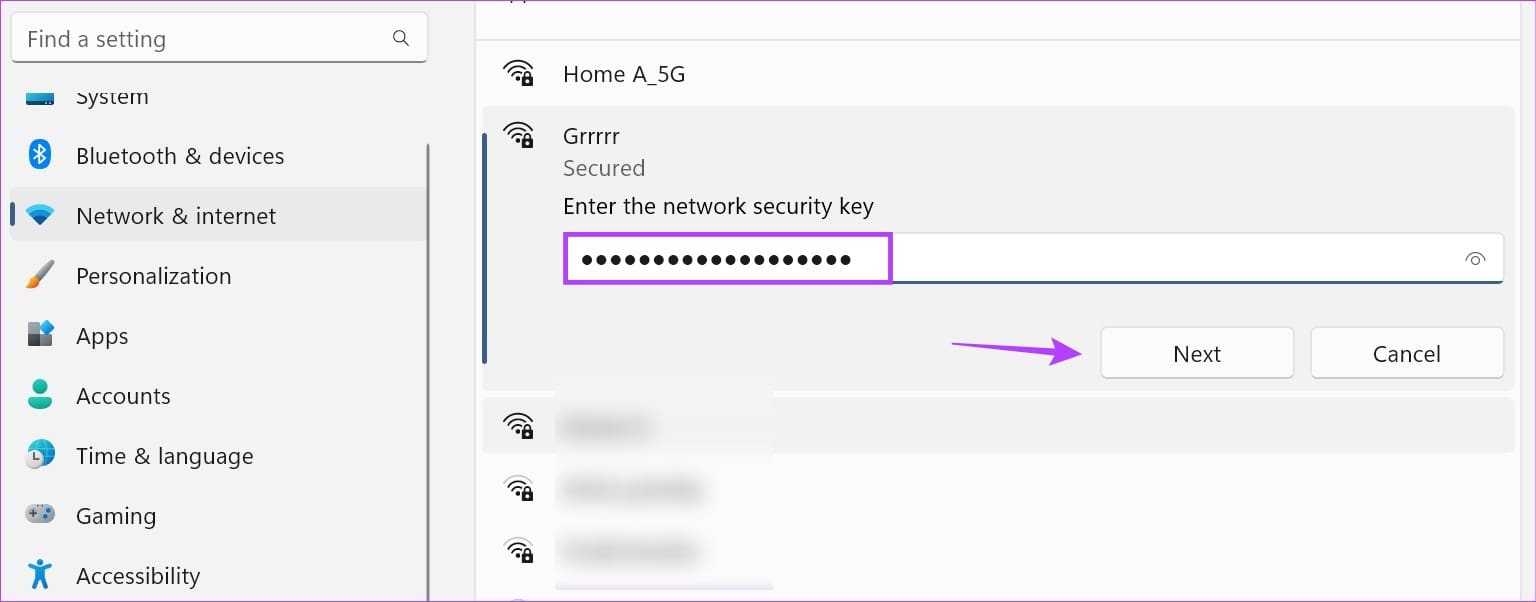
Step 4: Go back to the Wi-Fi page and click on Show available networks. Go to your network and click on Connect.
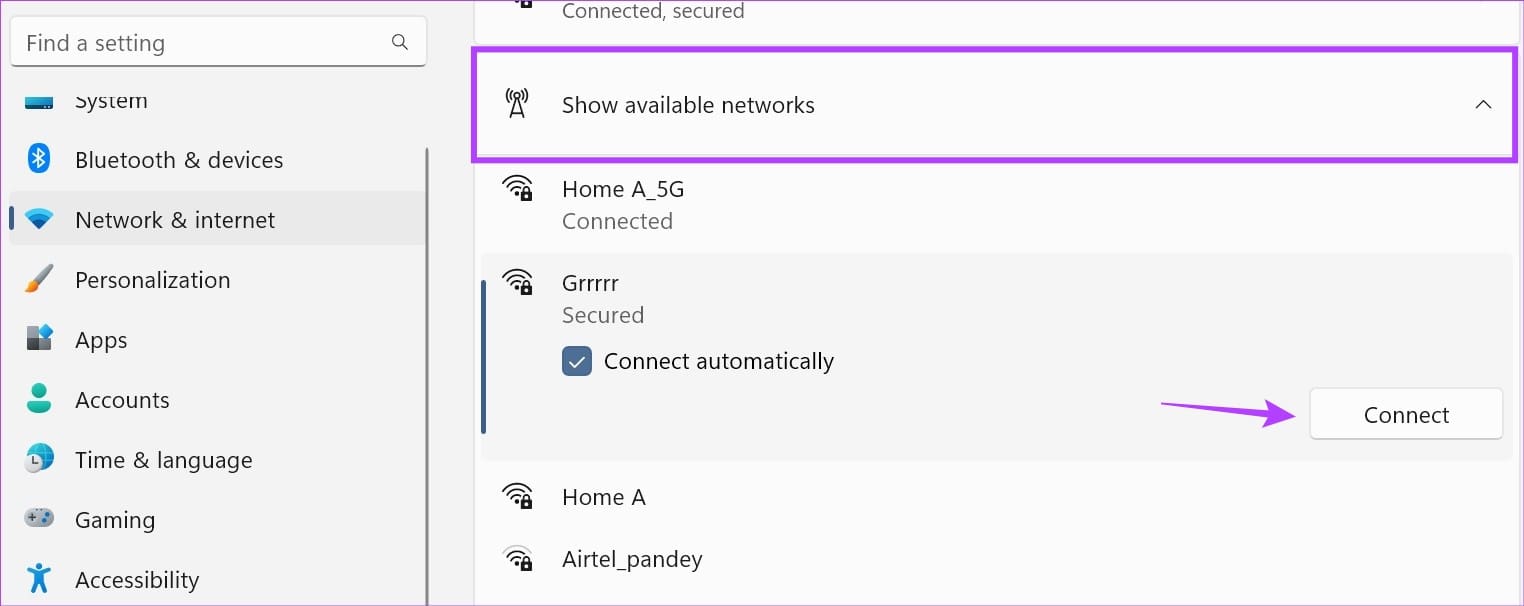
Step 5: When prompted, enter the Wi-Fi password and click on Next. Wait for Wi-Fi to connect.
Also Read: How to fix Windows 11 Wi-Fi networks not showing up
Fix 2: Flush DNS and Reset TCP/IP
TCP/IP helps establish a connection with other network devices and stores information regarding your recently visited websites as a DNS cache. However, it can also prevent a connection from being established. In this case, you can reset TCP/IP and flush the DNS cache using the below steps.
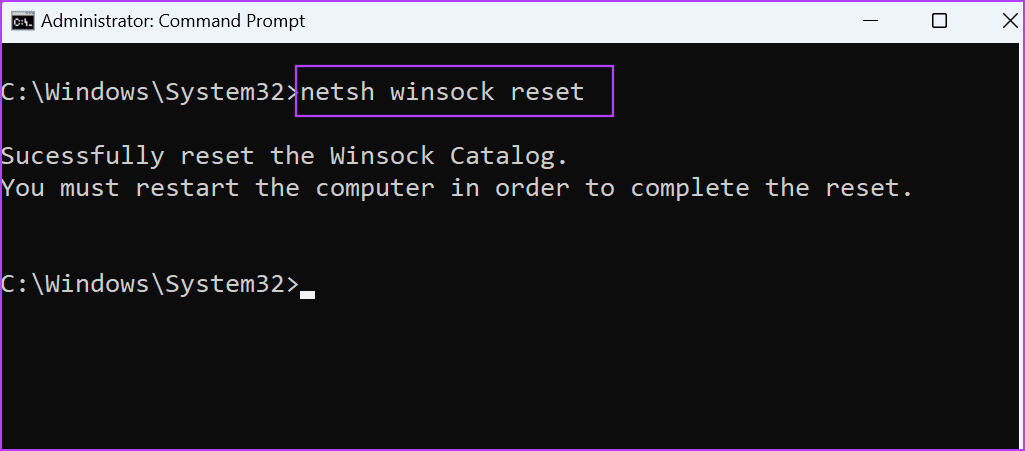
Step 1: Open Command Prompt with administrator privileges and type the below command. Press enter to execute.
netsh winsock reset
Step 2: Now, type the following command and press enter.
netsh int ip reset

Once the command has been executed, restart your Windows 11 device and try connecting to the relevant network to check.
Fix 3: Run Network Troubleshooter
The Windows troubleshooter can scan and detect issues that might be preventing Windows from establishing a connection. Based on that, you might get a list of suggestions that can help rectify it. Here’s how to run it on your Windows 11 device.
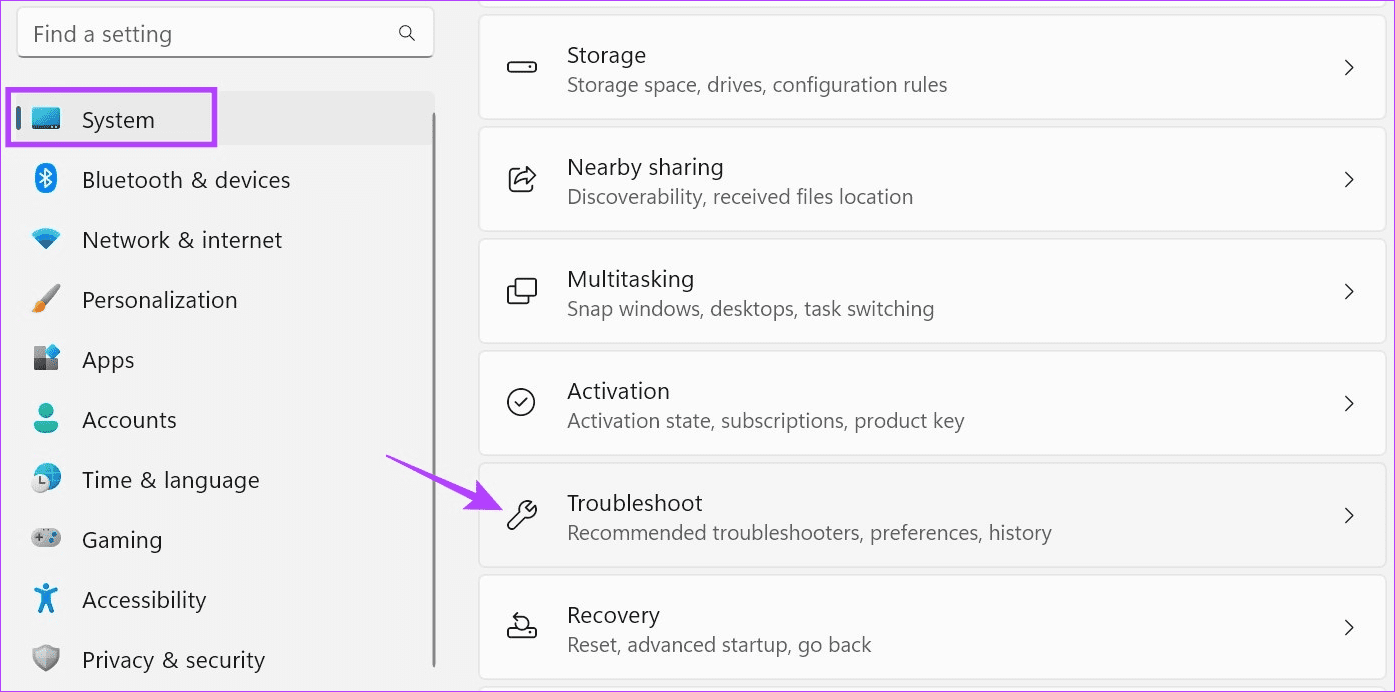
Step 1: Open Settings and click on System. Click on Troubleshoot.
Step 2: Scroll down and click on Other troubleshooters.

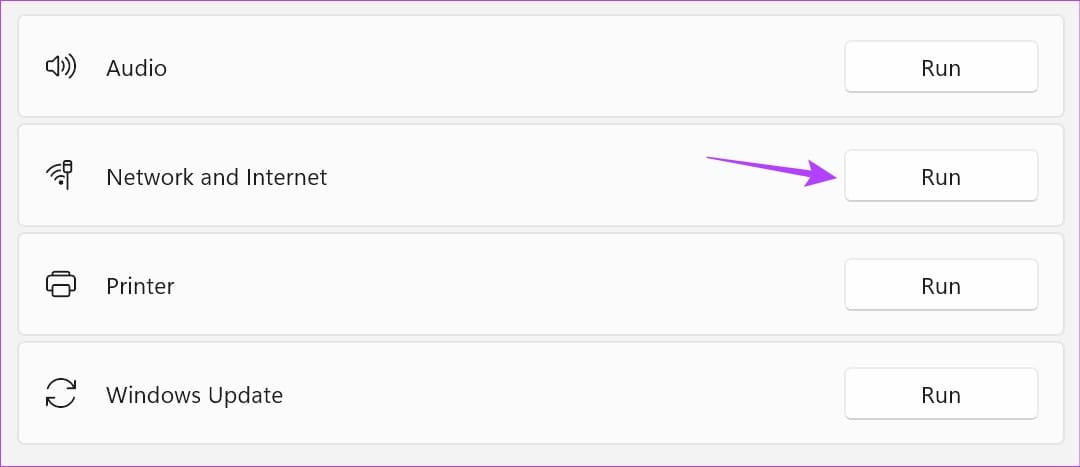
Step 3: In front of Network and Internet, click on Run.
Wait for the troubleshooter to run. Once the suggestions are visible, use them and try connecting to the selected network again.
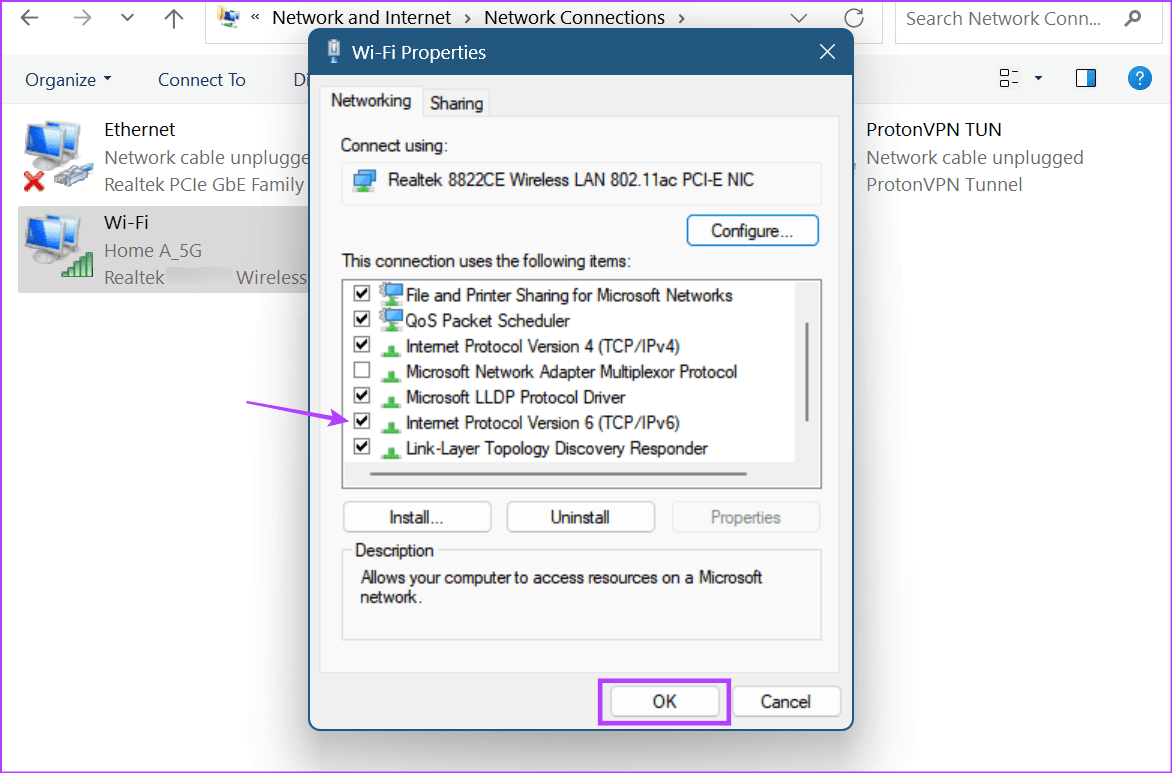
Fix 4: Disable IPv6
Your Windows device doesn’t always need IPv6 to establish a connection. And while it offers better security, there are still some connections that don’t support it. So, to fix any connection issues, manually disable IPv6 on Windows 11 and check again. Here’s how to do it.
Step 1: Open the Network Connections app and right-click on your connection. Select Properties.

Step 2: Uncheck the IPv6 box and ensure the IPv4 box is checked. Once done, click on OK.
Fix 5: Disable and Enable Wi-Fi Adapter
If the network adapter for the selected Wi-Fi network is not working properly on your Windows device, disabling and then re-enabling it can help fix this. Follow the below steps to do it.
Step 2: Open the Network Connections app and right-click your connection. Click on Disable.
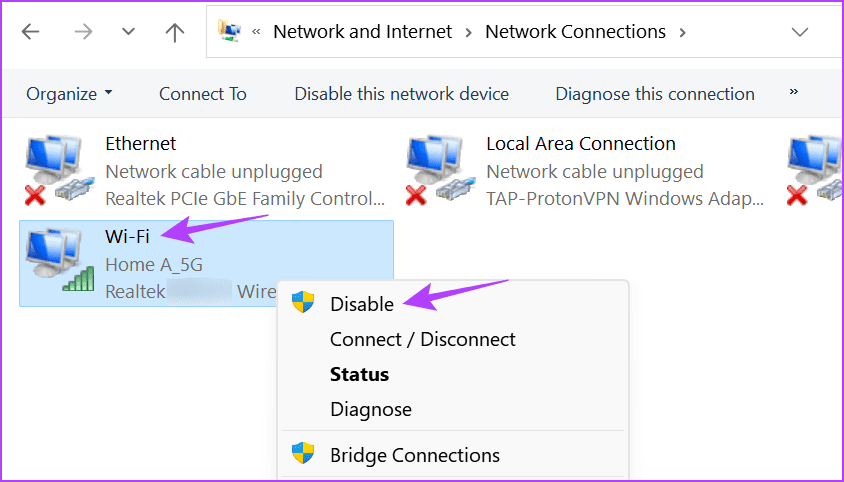
Step 2: Wait a while and right-click the connection again. Click on Enable.

Wait for the connection to enable and reconnect. Then, check and see if the error message is visible or not.
Fix 6: Check for Driver Updates
Out-of-date drivers can disrupt the connection, especially if they become incompatible with your device. To ensure this does not happen, you can manually check and install updates for your network driver using the below steps.
Step 1: Open Device Manager and click on Network adapters. Right-click the Wi-Fi driver and select Update driver.

Step 2: Click on Search automatically for drivers.
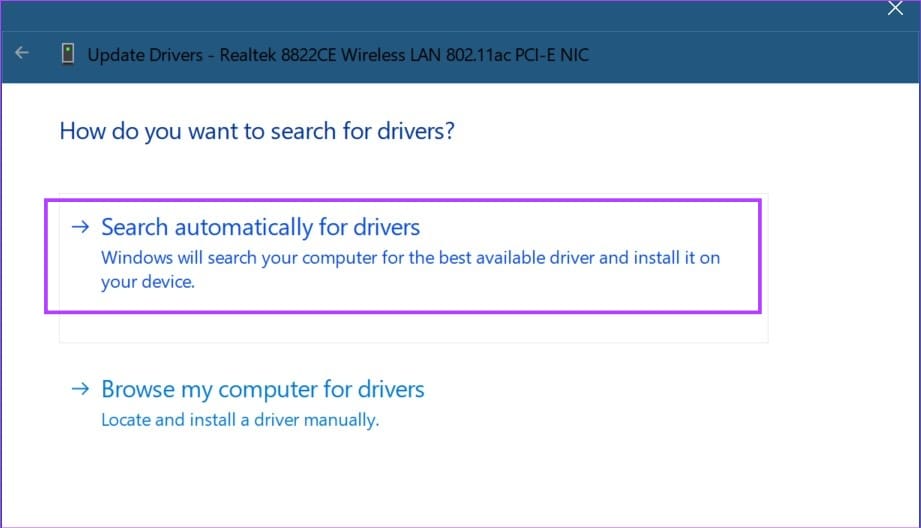
If an update is available, install it and wait for Windows to finish restarting. Then, try connecting to the relevant network again to check.
Was this helpful?
Last updated on 18 July, 2024
Read Next
 5 Ways to Fix Windows Stuck on “Let’s Connect You to a Network”
Fix 1: Restart the Router and Check the Internet Connectivity Restart your Wi-Fi router, as it essentially refreshes the network connection.
5 Ways to Fix Windows Stuck on “Let’s Connect You to a Network”
Fix 1: Restart the Router and Check the Internet Connectivity Restart your Wi-Fi router, as it essentially refreshes the network connection.
 12 Best Fixes for Windows 10 Laptop Won’t Connect to iPhone Hotspot
I usually travel light with my Windows laptop and iPhone.
12 Best Fixes for Windows 10 Laptop Won’t Connect to iPhone Hotspot
I usually travel light with my Windows laptop and iPhone.
 5 Fixes for “Could Not Activate Cellular Data Network” Error on iPhone
Try Basic Fixes Make sure airplane mode is off: A common reason why your iPhone may not be able to activate or use cellular data is if Airplane mode is
5 Fixes for “Could Not Activate Cellular Data Network” Error on iPhone
Try Basic Fixes Make sure airplane mode is off: A common reason why your iPhone may not be able to activate or use cellular data is if Airplane mode is
 4 Ways to Fix “Windows Could Not Find a Driver for Your Network Adapter” Error
Fix 1: Enable Network Adapter Windows may fail to communicate with the network adapter if you've previously disabled it.
4 Ways to Fix “Windows Could Not Find a Driver for Your Network Adapter” Error
Fix 1: Enable Network Adapter Windows may fail to communicate with the network adapter if you've previously disabled it.
 5 Fixes for “Word Experienced an Error Trying to Open the File” Error in Windows
Fix 1: Unblock Your Word File Microsoft Word may fail to open a document if it has been altered by third-party software.
5 Fixes for “Word Experienced an Error Trying to Open the File” Error in Windows
Fix 1: Unblock Your Word File Microsoft Word may fail to open a document if it has been altered by third-party software.
 How to Fix Cannot Connect to Bluetooth Device Issue in Windows 10
Bluetooth changed the way how we connect various devices.
How to Fix Cannot Connect to Bluetooth Device Issue in Windows 10
Bluetooth changed the way how we connect various devices.
 8 Ways to Fix Wi-Fi Doesn’t Connect After Sleep in Windows 10
Typically, when you restart your computer or wake it up from sleep or hibernate, the Wi-Fi connects automatically.
8 Ways to Fix Wi-Fi Doesn’t Connect After Sleep in Windows 10
Typically, when you restart your computer or wake it up from sleep or hibernate, the Wi-Fi connects automatically.
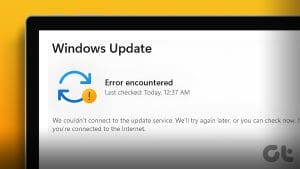 4 Ways to Fix “We Couldn’t Connect to the Update Service” Issue on Windows
Basic Fixes Restart PC: Restart your PC to fix temporary bugs and glitches.
4 Ways to Fix “We Couldn’t Connect to the Update Service” Issue on Windows
Basic Fixes Restart PC: Restart your PC to fix temporary bugs and glitches.
The article above may contain affiliate links which help support Guiding Tech. The content remains unbiased and authentic and will never affect our editorial integrity.