Method 1: Using Settings
Step 1: Press the Windows key on your keyboard, type Settings, and press Open.
Step 2: Click on Network & internet from the sidebar.
Step 3: Scroll down and click on Advanced network settings.

Step 4: In Advanced network settings, under Network adapters, click on Disable for the adapter you want to disable.
Note: You can disable Ethernet, Wi-Fi, or Bluetooth.

Once done, depending on which adapter you have disabled, the connection will go offline. You can click on Enable to establish the connection again. If you don’t want to do it through the Settings app, you can check out the old way in the next method.
Method 2: Using the Control Panel
Here’s how to disable your Windows 11 Ethernet or Wi-Fi network adapter using the network connection option.
Step 1: Press the Windows key on your keyboard > type View network connections > click Open.
Step 2: In the Network Connection window, right-click on the network adapter you want to disable and select Disable.

This will turn off the selected adapter, and the icon will turn grey. In the future, if you wish to enable the adapter you disabled, right-click on the adapter and select Enable.
Method 3: Using the Device Manager
Step 1: Press the Windows key on your keyboard > type Device Manager > click Open.
Step 2: Double-click the Network adapters to expand the section.
Step 3: Find and right-click the adapter you want to disable and select Disable device.
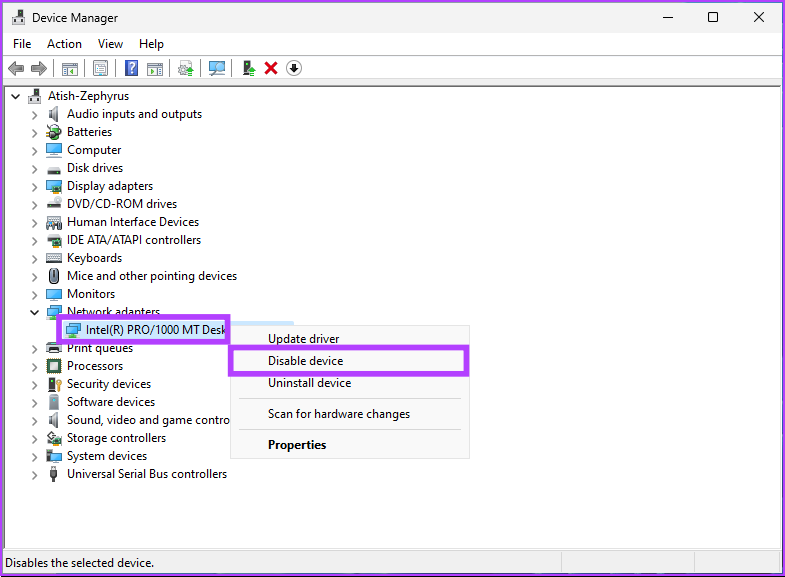
That’s it. You have successfully disabled the selected network adapter on your Windows 11 PC. You can confirm it by checking if the adapter has turned grey. If you want to do the same slightly untraditional way, move to the next method.
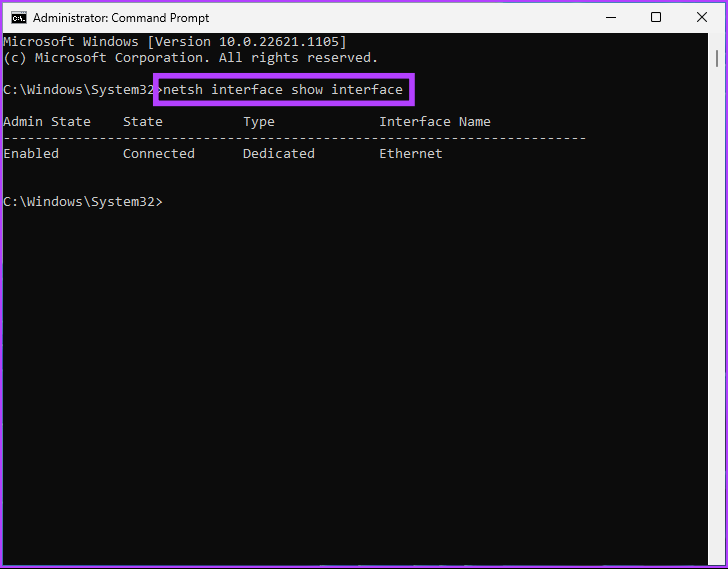
Method 4: Using Command Prompt
Step 1: Press the Windows key on your keyboard > type Command Prompt > click Run as administrator.
Step 2: Type the below command and hit the Enter key.
Netsh interface show interface
Note the Interface Name, which is the network adapter name you wish to disable.
Step 3: To disable the network adapter, type the following command and press Enter.
Note: Replace the Interface Name with the name you noted above.
Netsh interface set interface "Interface Name" disable
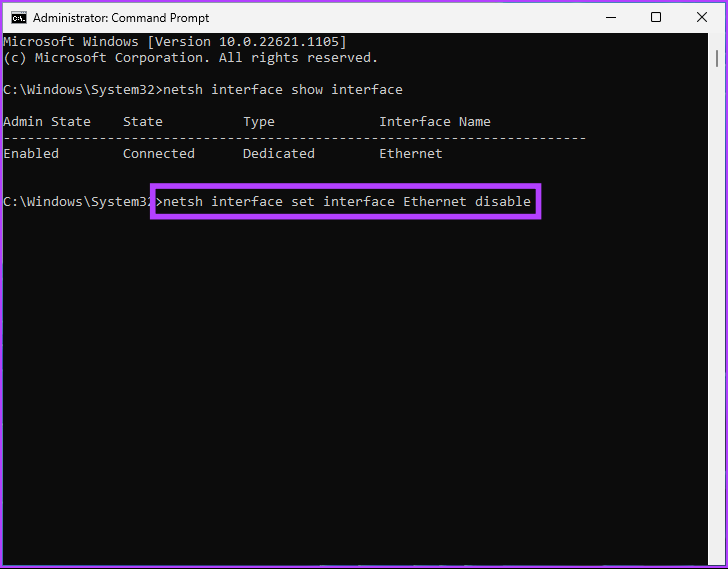
The network adapter you chose is disabled by the above command. If you wish to enable it, type the below command and hit Enter.
Netsh interface set interface "Interface Name" enable
Note: Replace the Interface Name with the appropriate name you noted earlier.
There you go. You have successfully disabled and enabled a network adapter on your Windows 11 PC with Command Prompt. If you don’t want to use Command Prompt, you can run it through PowerShell.
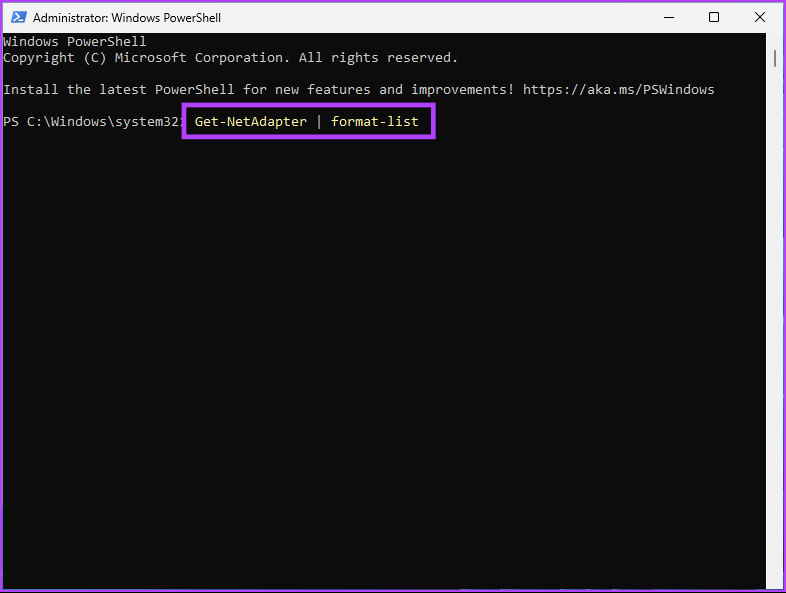
Method 5: Using PowerShell
Step 1: Press the Windows key on your keyboard, type Windows PowerShell, and click on Run as Administrator.
Step 2: Type the below command and hit Enter.
Get-NetAdapter | format-list
Note down the name of the device you want to disable.
Step 3: Type the command below to disable the desired adapter.
Note: Replace the ‘network adapter name’ with the actual network adapter name.
Disable-NetAdapter -Name "network adapter name" -Confirm:$false

There you go. You have successfully disabled the adapter on your Windows 11 PC. If you wish to enable it, type or copy the below command.
Enable-NetAdapter -Name "network adapter name" - Confirm:$false
Note: Replace the network adapter name with the actual network adapter name.
FAQs
Resetting a network adapter can help solve a variety of problems, including connectivity problems, slow network speeds, or conflicts with other network equipment. A reset can also be helpful in case of configuration changes or software updates.
Ethernet is generally faster than Wi-Fi. Ethernet connections, which use cables, can offer faster data transfer speeds and a more stable connection than Wi-Fi, which uses wireless technology. Although the speed of an Ethernet connection varies based on the quality of the cables and their length, the speed of a Wi-Fi connection will vary based on the distance between the devices and the quality of the wireless signal.
Also Read: How to fix the “Windows could not find a driver for your network adapter” error
Was this helpful?
Last updated on 01 August, 2024
1 Comment
Leave a Reply
Read Next
 4 Ways to Fix “Windows Could Not Find a Driver for Your Network Adapter” Error
Fix 1: Enable Network Adapter Windows may fail to communicate with the network adapter if you've previously disabled it.
4 Ways to Fix “Windows Could Not Find a Driver for Your Network Adapter” Error
Fix 1: Enable Network Adapter Windows may fail to communicate with the network adapter if you've previously disabled it.
 3 Ways to Check Network Adapter Speed on Windows 11
Method 1: Using the Settings App Besides displaying the network adapter speed, the Settings app also provides information about other connection aspects, such as the network band, MAC address, and
3 Ways to Check Network Adapter Speed on Windows 11
Method 1: Using the Settings App Besides displaying the network adapter speed, the Settings app also provides information about other connection aspects, such as the network band, MAC address, and
 8 Best Ways to Fix Windows 10 Ethernet Keeps Disconnecting
On Windows 10 computers, both wired and wireless connections come with their respective problems.
8 Best Ways to Fix Windows 10 Ethernet Keeps Disconnecting
On Windows 10 computers, both wired and wireless connections come with their respective problems.
 5 Ways to Fix Ethernet Connection Not Working on Windows 11
Basic Fixes Check the Ethernet port and cable: Inspect the Ethernet plug and cable for wear and tear.
5 Ways to Fix Ethernet Connection Not Working on Windows 11
Basic Fixes Check the Ethernet port and cable: Inspect the Ethernet plug and cable for wear and tear.
 4 Ways to Fix Ethernet Speed Capped at 100Mbps on Windows 11
Basic Fixes: Ensure your router and plan support 100Mbps: Connect to your Wi-Fi network and run a speed test via Fast.
4 Ways to Fix Ethernet Speed Capped at 100Mbps on Windows 11
Basic Fixes: Ensure your router and plan support 100Mbps: Connect to your Wi-Fi network and run a speed test via Fast.
 5 Ways to Fix Intel Wi-Fi 6 AX201 Adapter Driver or Hardware Issues
Fix 1: Update or Reinstall Driver The software drivers for the Intel Wi-Fi 6 AX201 on your Windows PC may be outdated and are due for an update.
5 Ways to Fix Intel Wi-Fi 6 AX201 Adapter Driver or Hardware Issues
Fix 1: Update or Reinstall Driver The software drivers for the Intel Wi-Fi 6 AX201 on your Windows PC may be outdated and are due for an update.
 How to Use Wi-Fi and Ethernet at the Same Time in Windows
How to Configure Wi-Fi and Ethernet to Work at the Same Time in Windows We need to configure the network adapter settings in Windows to use Wi-Fi and ethernet simultaneously.
How to Use Wi-Fi and Ethernet at the Same Time in Windows
How to Configure Wi-Fi and Ethernet to Work at the Same Time in Windows We need to configure the network adapter settings in Windows to use Wi-Fi and ethernet simultaneously.
 5 Best Wi-Fi 6 Adapters for PC: USB Adapter and Cards
A Wi-Fi 6 adapter is an excellent investment if you want to experience faster speeds, improved performance, and better coverage on your PC.
5 Best Wi-Fi 6 Adapters for PC: USB Adapter and Cards
A Wi-Fi 6 adapter is an excellent investment if you want to experience faster speeds, improved performance, and better coverage on your PC.
The article above may contain affiliate links which help support Guiding Tech. The content remains unbiased and authentic and will never affect our editorial integrity.

Can I use task scheduler or task manger to disable my Ethernet? If I can, can I assign it to a keyboard key combo? Now days I only want my Ethernet on when I want to look at the web.
Thanks,
John