Helping millions of people navigate the world of technology.

7 Best Free Calculator Apps for iPhone

The calculator app is something that we use almost daily. However, we can all agree that there is usually little effort when it comes to developing a good calculator app by the device manufacturer – and Apple can be most guilty of it. So, here are some of the best calculator apps for iPhone that we can suggest.

While the iPad does not come with a calculator app at all, the one on iPhone is poorly designed, to say the least. For example, the app does not even display the sign of the operation that you are performing. So, if you share the same opinion, and are looking for a better calculator app, this article has you covered. Let’s get to the apps without further ado.

1. Calculator & Math Solver – Basic iPhone Calculator With Dictation

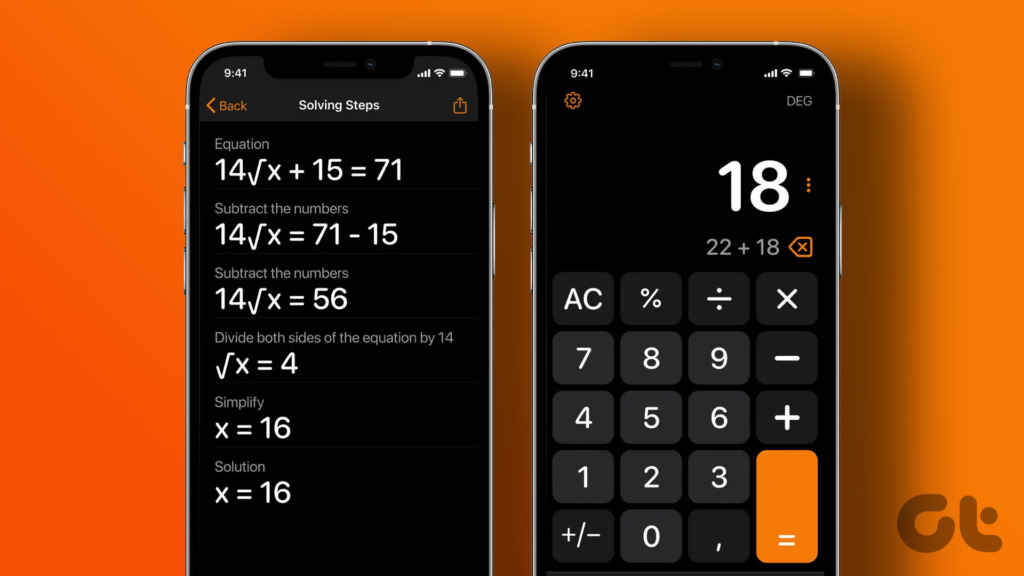
Calculator & Math Solver is a simple and basic alternative to the built-in calculator app for iPhone. It provides you with four tabs, a basic calculator, a scientific calculator, a fraction calculator, and a currency converter. A feature that we liked in this app, is that you can use voice dictation to dictate your equations onto the calculator.

It also shows you the history of your calculations, so that you do not lose track of it at any point. However, only the basic calculator and the scientific calculator are truly free. The rest of them – the currency converter and the fractions calculator offer you three free calculations. For more, you need to purchase the pro version.

The app also has multiple lock screen widgets and includes support for Apple Watch. Having said that, the ads are just a bit too much, and there are also complaints of a few scientific conversions not working correctly on the calculator.

However, the pro version also disables ads and adds a feature to scan math problems and add custom themes to your calculator. Although if you are looking for just a basic alternative to the default calculator app, Calculator & Math Solver app will suffice.

Price: Free; Pro version: $0.99 per month onwards

2. Quick Calculator Vault Plus – Basic Calculator With a Good History View

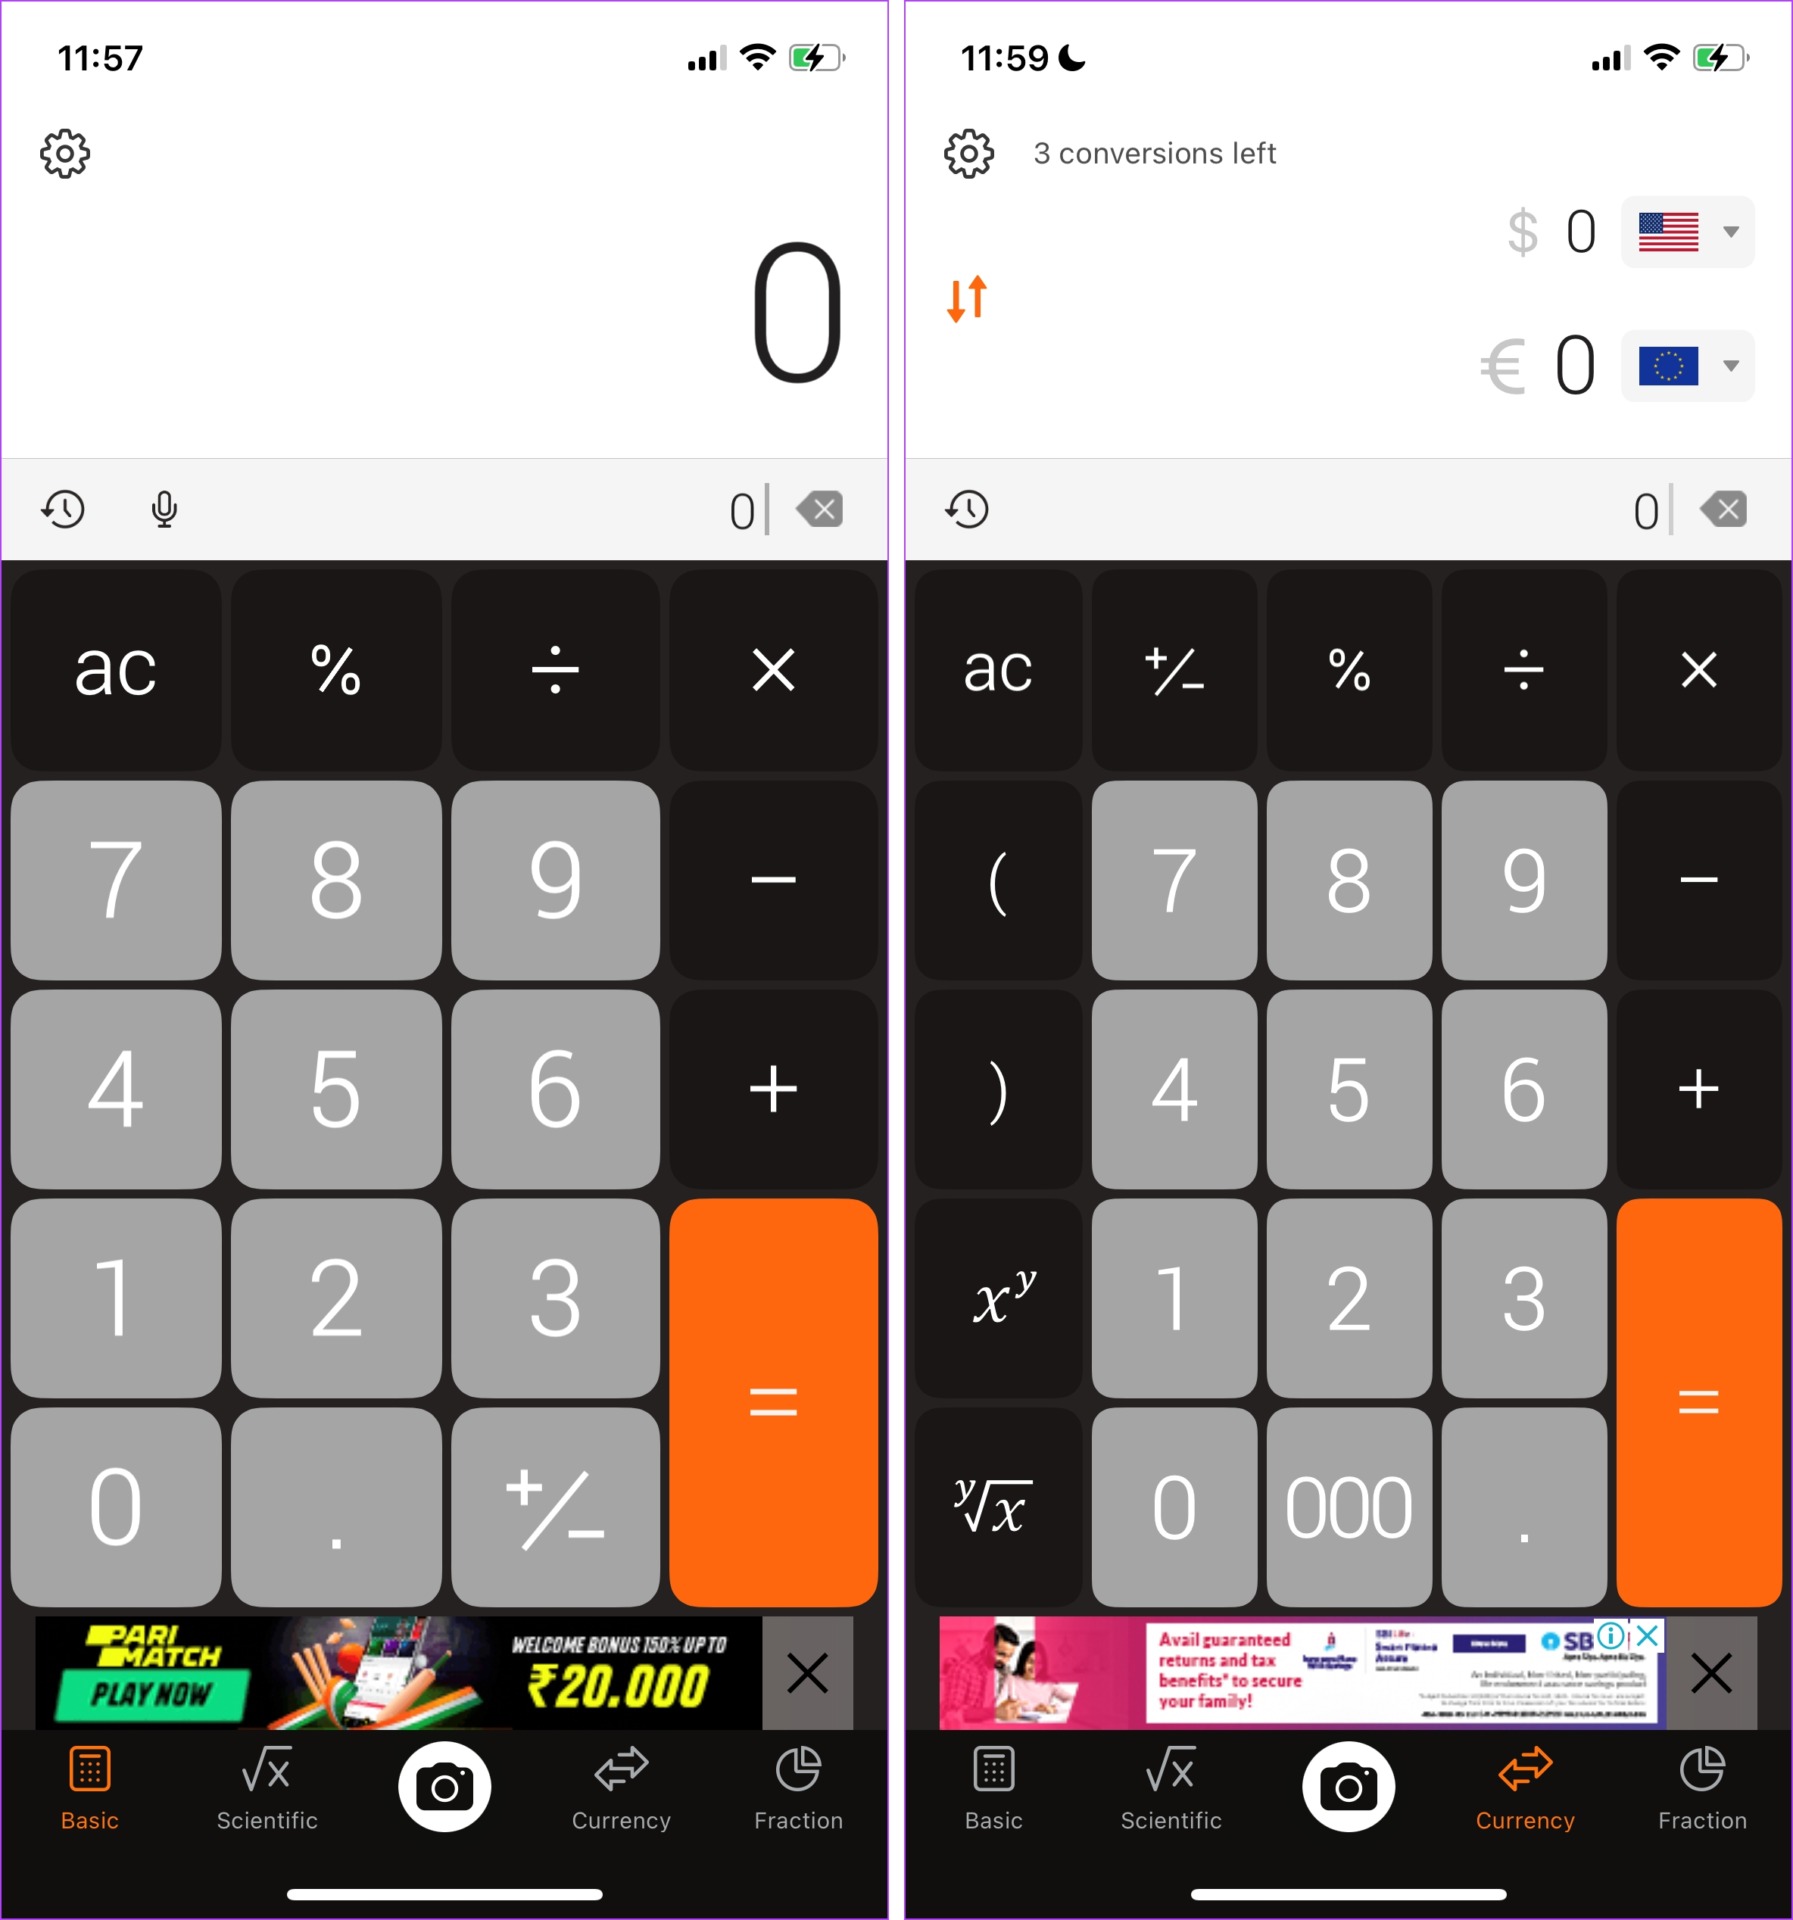
Here’s another alternative for a basic calculator app. What this app is good at is providing a detailed calculation history, in comparison to the default calculator app. Other than that, it has a simple interface that provides you with a basic calculator and a scientific calculator.

It has a basic set of options to help you with converting quantities. It has a currency converter, date and time conversion, and a few converters to help you with geometric dimensions. However, all of these features are not free and require you to purchase the pro version. Further, the pro version also disables advertisements.

Overall, we like this app for what it does. Although if you are looking for a calculator app with more options to compute and convert, you can check out the next few apps on our list.

Price: Free; Pro Version: $19.99

3. ClevCalc – All-In-One iPhone Calculator

ClevCalc is one of our favorite calculator apps for iPhone. It comes in with a neat, good-looking user interface. The best part of this app is that it provides you with a huge number of calculators, apart from just the basic and the scientific calculator.

ClevCalc has calculators like a GPA calculator, a loan calculator, a VAT calculator, an Ovulation calculator, etc. and this ensures you don’t have to search for calculators on your browser when you want to calculate something specific. You can also change themes on this calculator for free, and change the startup calculator as well.

There are ads on this app, but they are non-intrusive. Besides, they are in the form of a banner at the bottom of the app. However, the pro version removes the ads and disables the ‘review this app’ pop-up. But, if you want to try out the pro version before making a purchase, ClevCalc lets you access it by watching an ad video.

However, if you found the list of functions in ClevCalc inadequate (they aren’t, though), take a look at the next iPhone calculator.

Price: Free; Pro Version: $7.99

4. OneCalc – Free iPhone Calculator With Better Functions

OneCalc has an extensive list of calculators that beats the previous app on the list. It has financial calculators, construction calculators, unit converters, health calculators, and beyond. What’s better is that it has minimal advertisements. Besides, they do not pop up often or interfere with your usage.

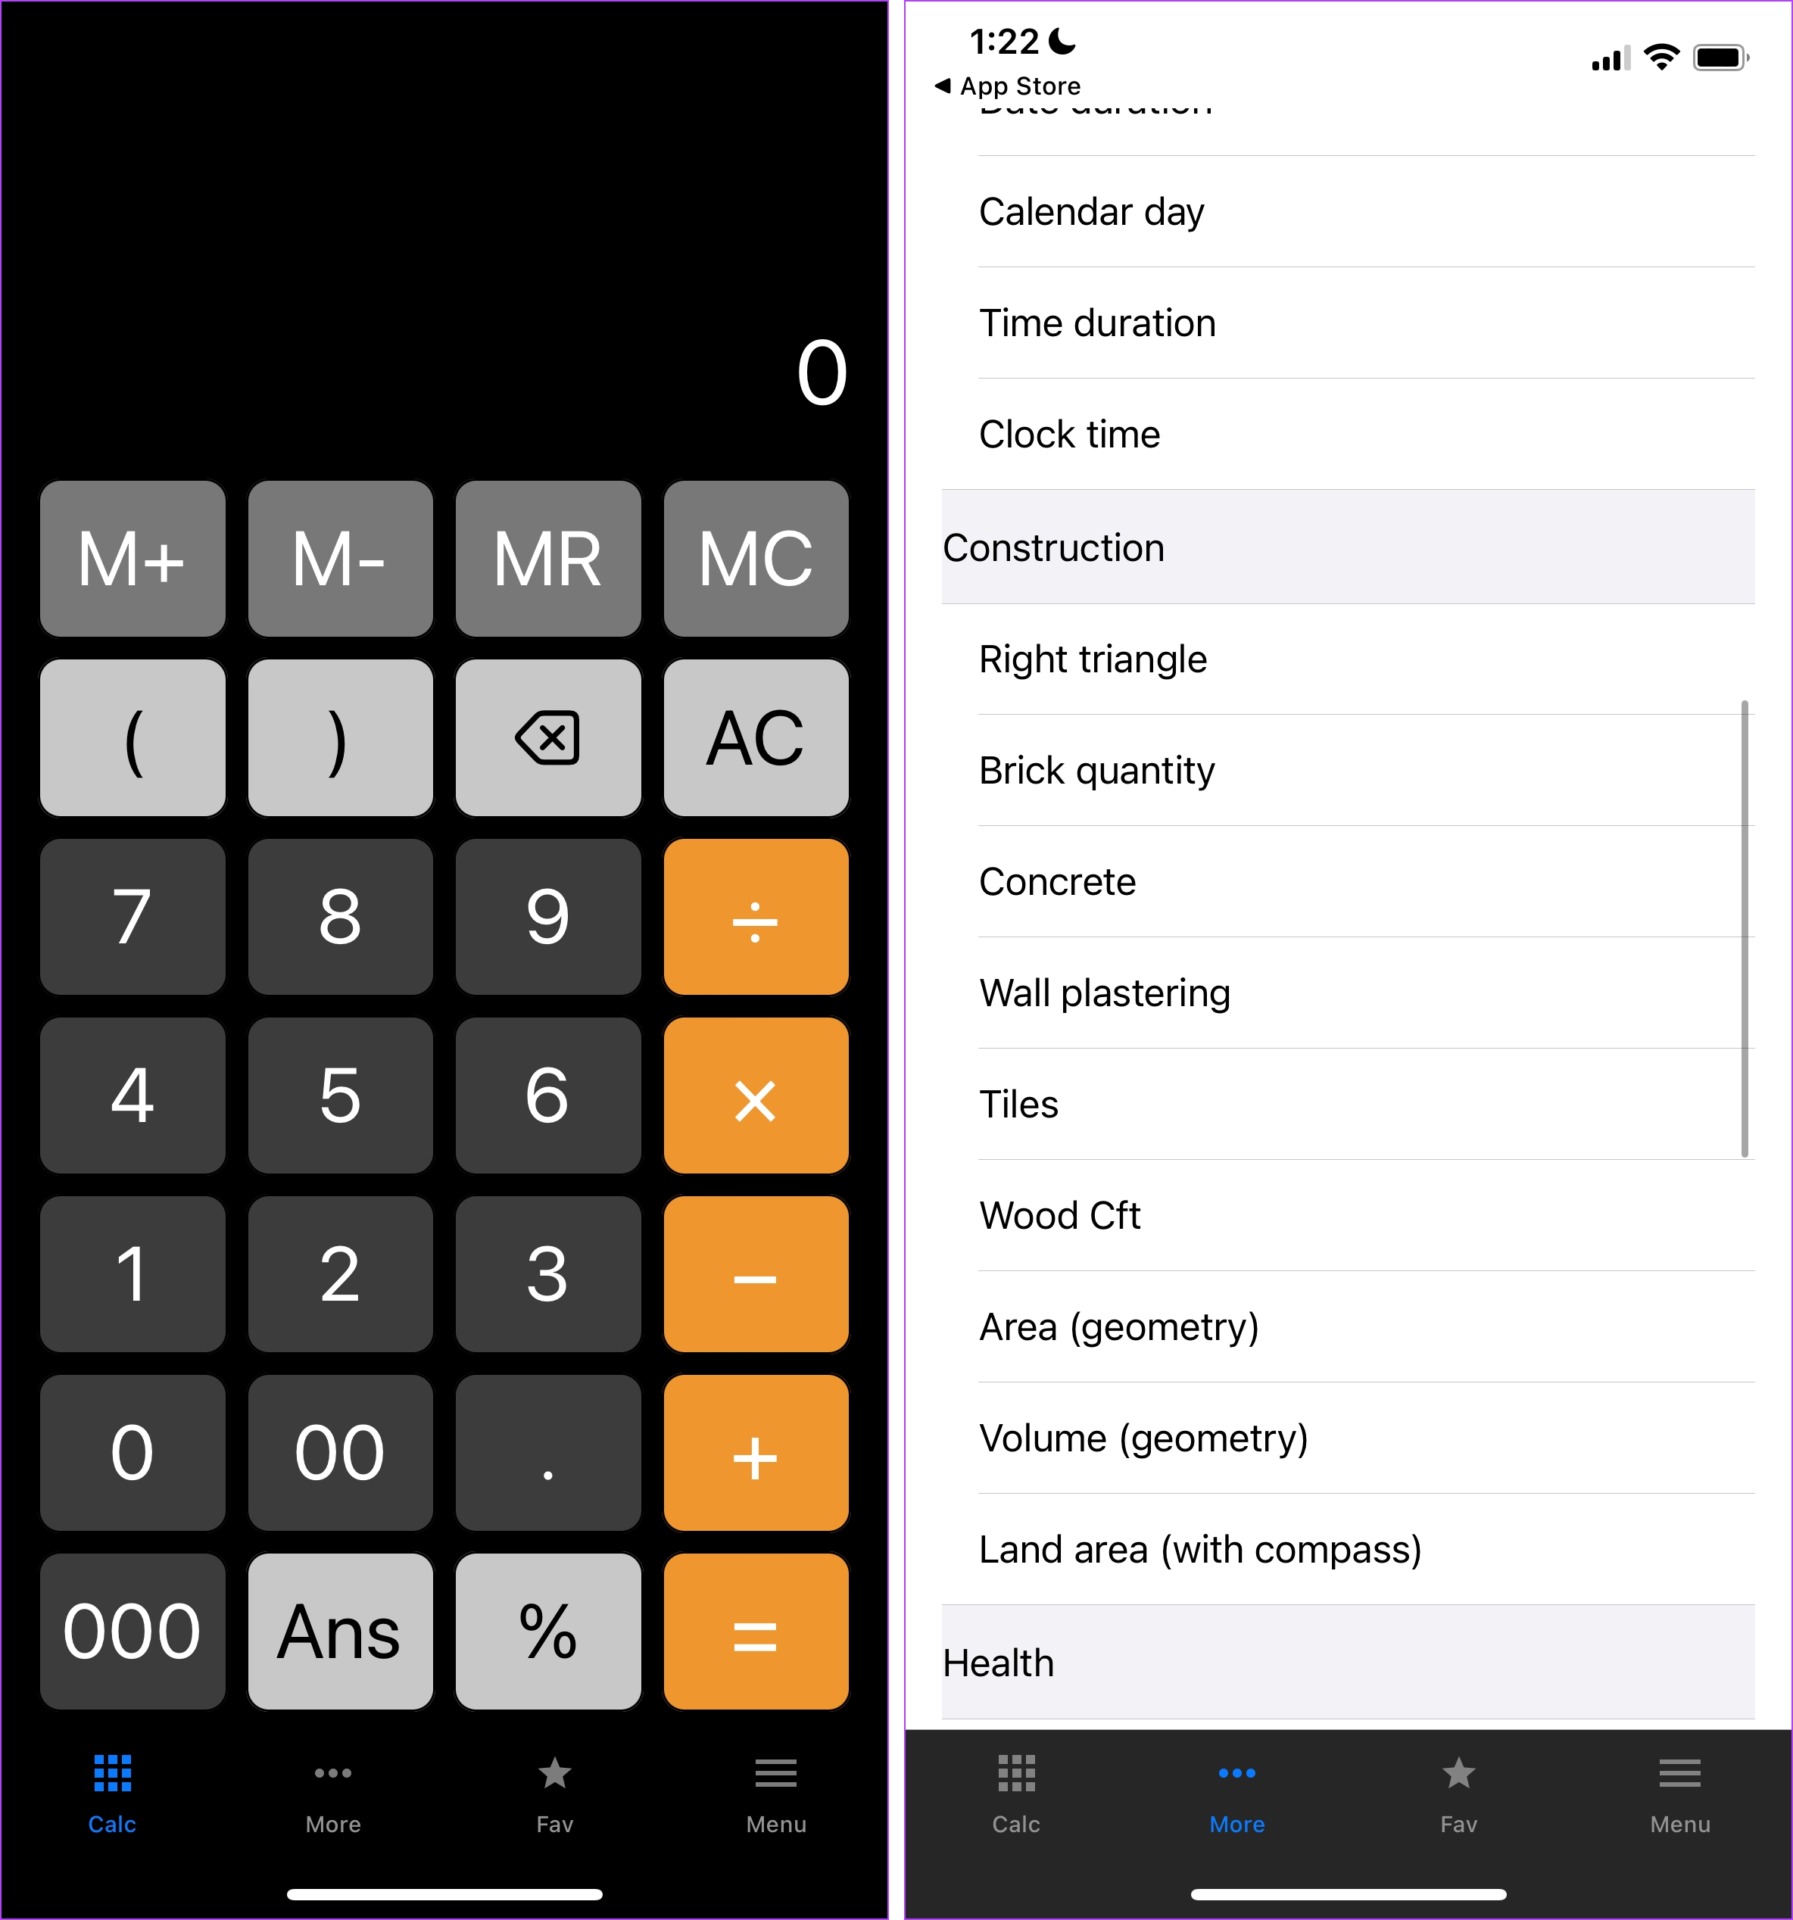
OneCalc also has the option to customize the calculator with a set of free themes. What we also like about this app is that the user interface resembles the default calculator app. Therefore, if you don’t want to move away from familiarity, this app is for you. You can also set a few favorite calculators in the ‘fav’ section of the app.

But, there are a few issues with the memory functions of the calculator, where one function gets automatically cleared as you add another one. There are quite a few intrusive ads, but you can remove them by purchasing the pro version.

However, all the other features are free, and we are huge fans of this app. It’s worth it even if you use the free version.

Price: Free; Pro Version: $3.99

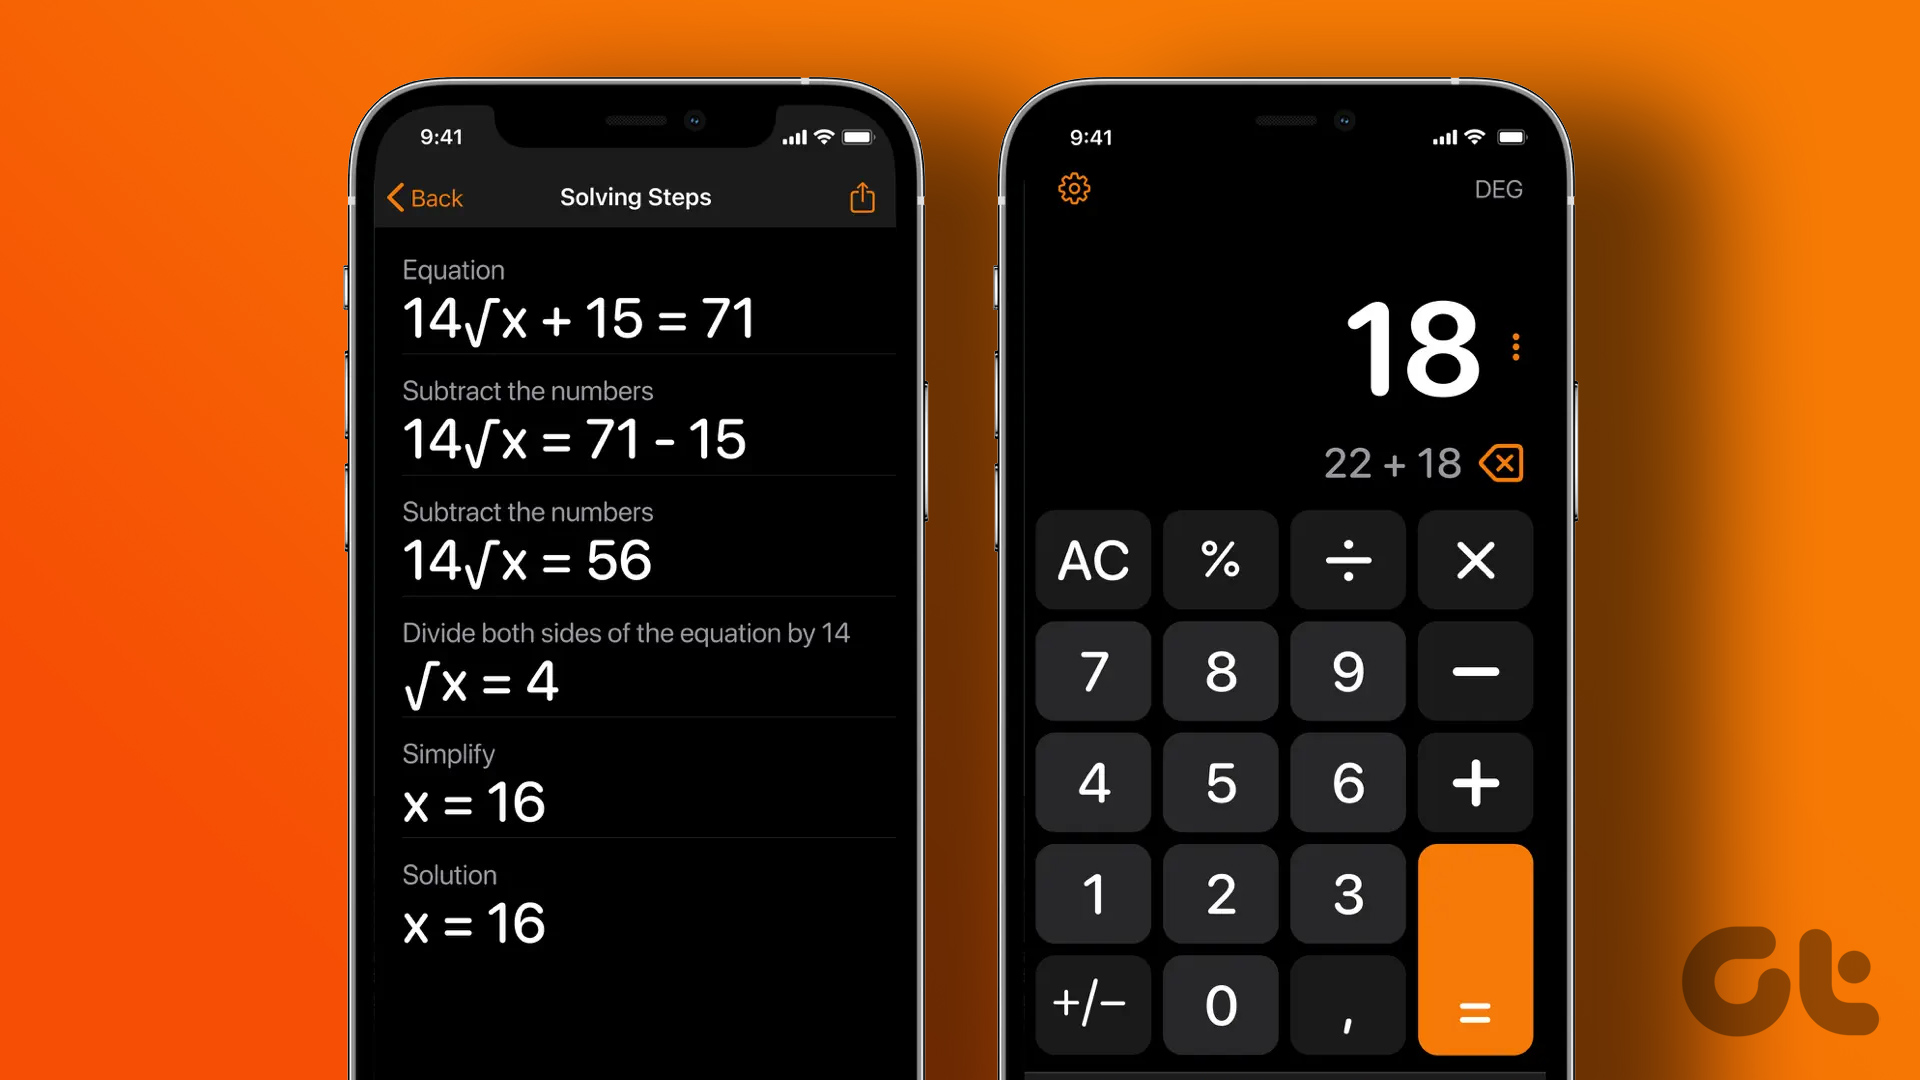
5. Photomath – Best for Algebra and Other Math Problems

Photomath is one of our favorite apps on this list. It lets you easily scan equations, via your camera and get results for the same. Further, it packs in a really good-looking user interface and makes it undoubtedly one of the best calculator apps for iPhone.

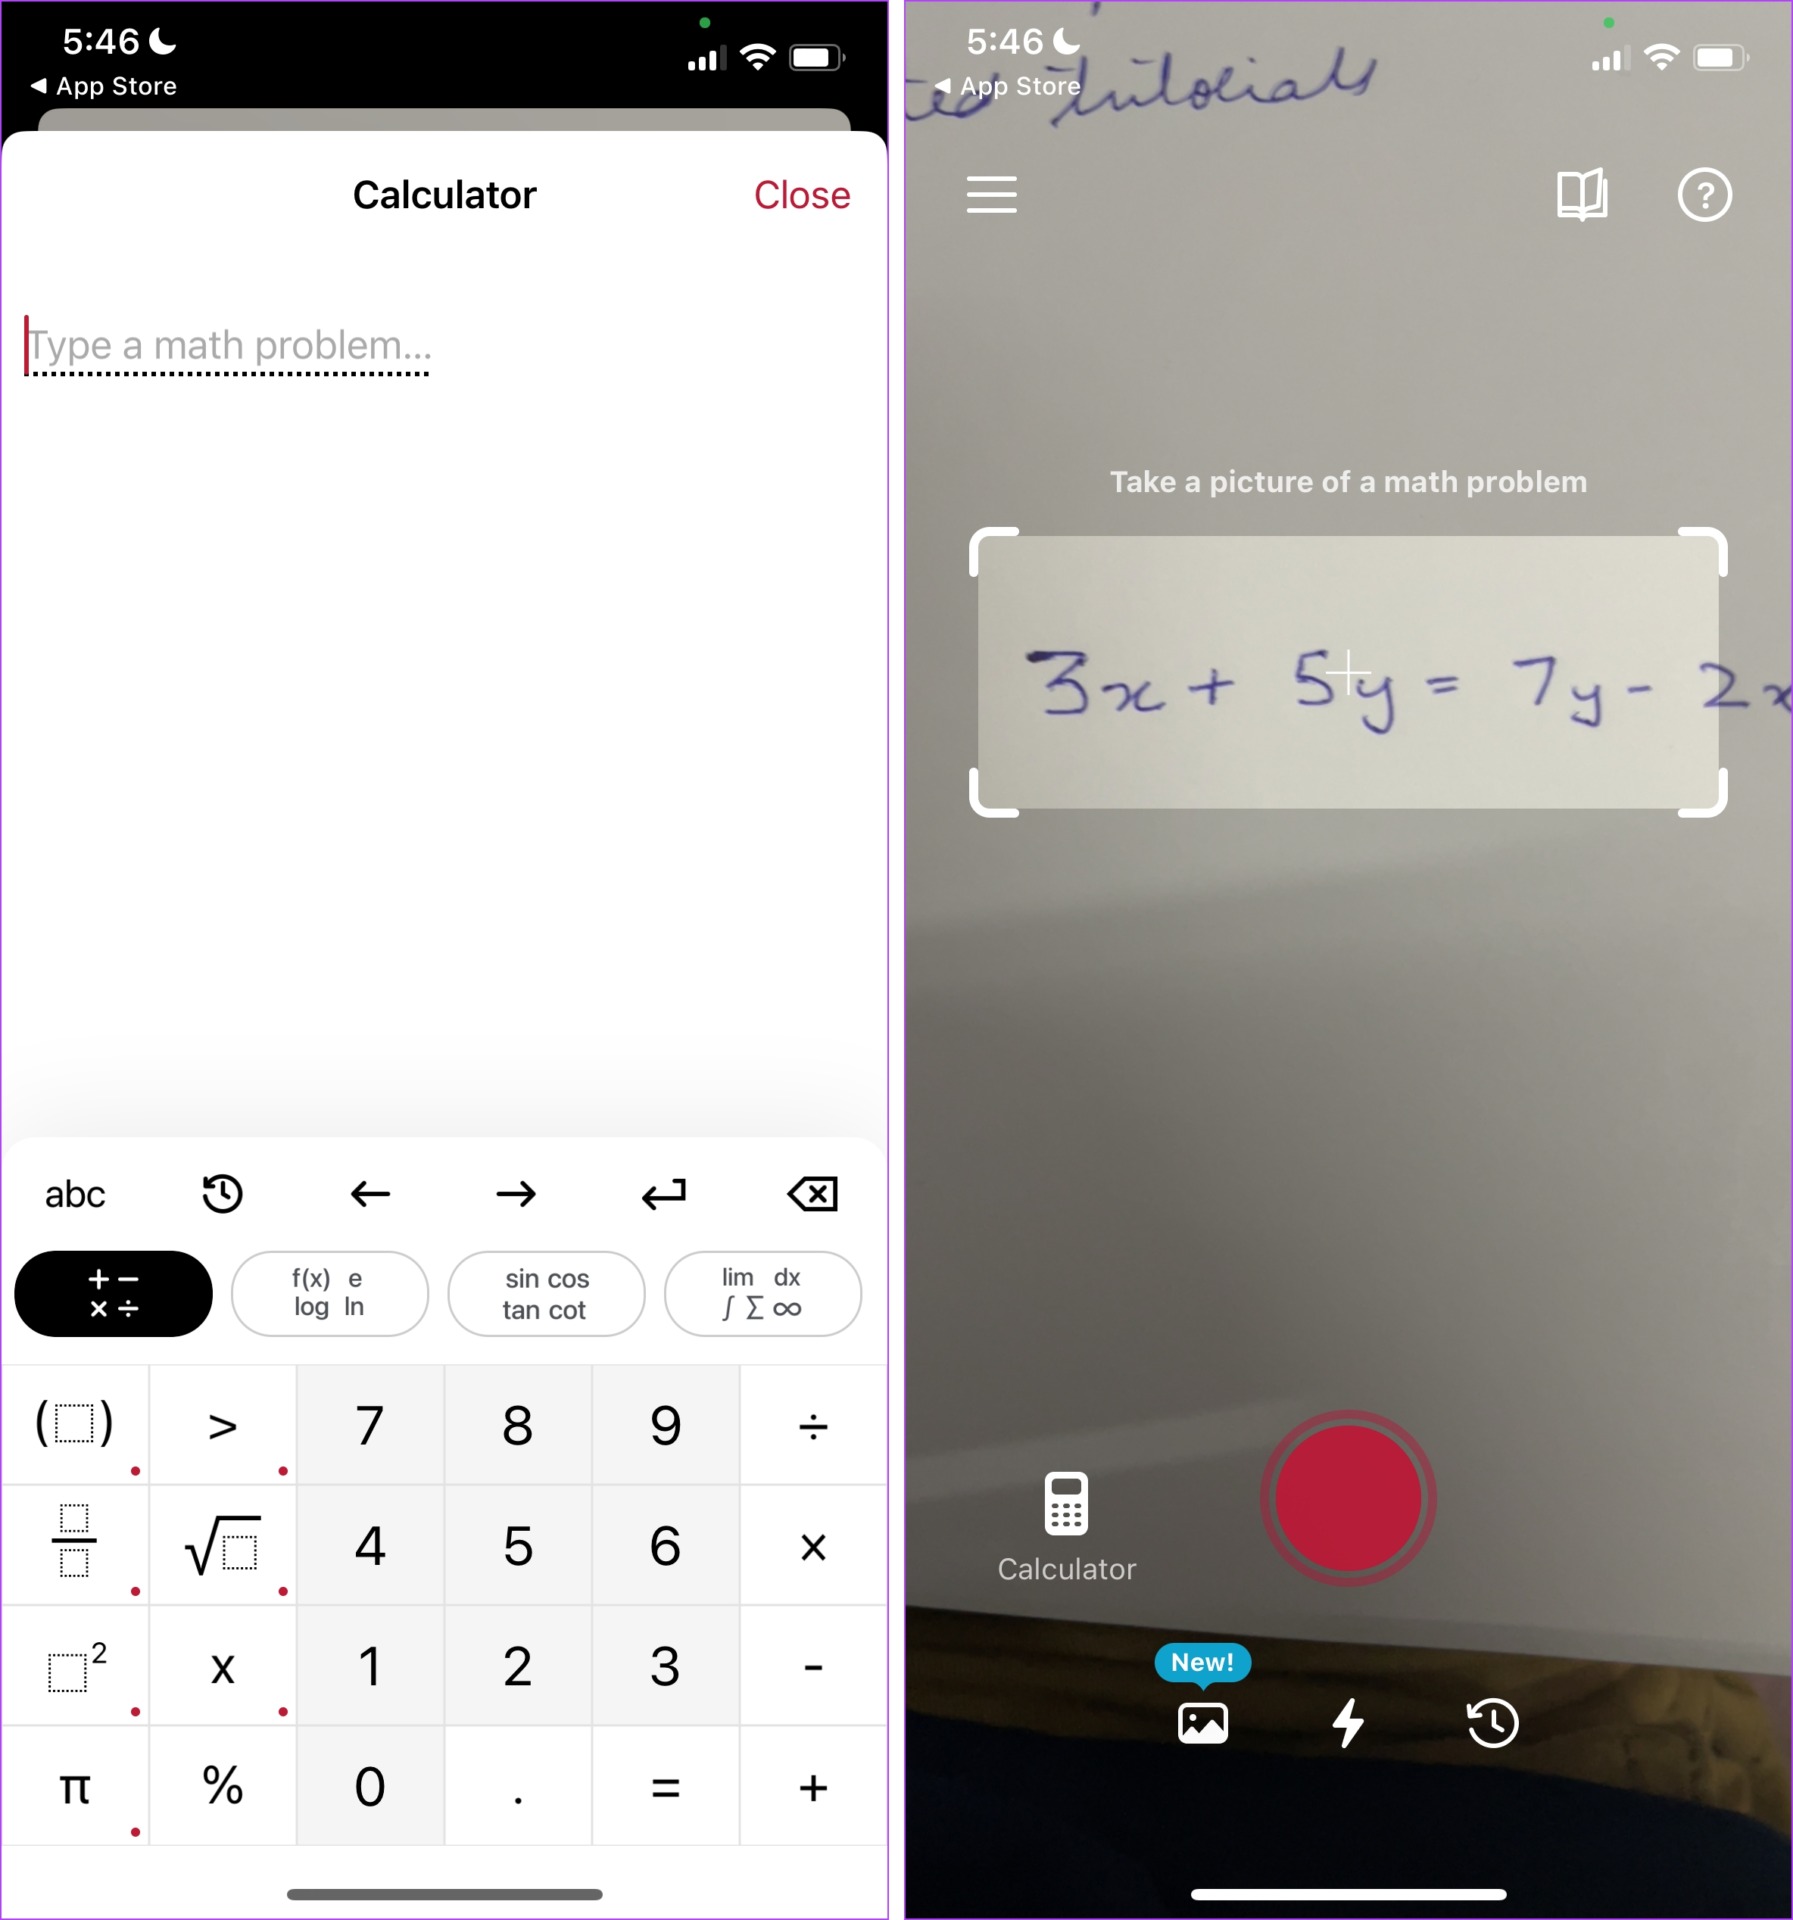
Apart from scanning your equation to solve it, you can also upload an image from your gallery. It also lets you type a math problem to find the solution for it if you do not prefer scanning the written equation.

However, if you are facing an issue understanding the solution for the equation, you get an in-depth explanation and an animated tutorial for the same. However, this feature is available only in the pro version. The pro version also provides you with solutions for all major mathematics textbooks.

But, we slightly wish the scan-to-solve tool worked a bit faster. It does take some to scan and recognize what you have written, so we often ended up typing the equation directly. So, it is more of a novelty feature than a functional one to increase your productivity.

However, the free version provides you with all other important functions and does not come with any intrusive ads. Therefore at this point, we can conclude that this is a must-use app for anyone studying math and wish to use a calculator, especially for Algebra.

Price: Free; Plus Version: $9.99

6. Graphing Calculator X84 – Best iPhone Scientific Calculator App With Graphs

If you are a STEM student, we’re sure most of you carry a Casio or a TI calculator around with you. But what about the day when you forgot to carry it to your class? There are a bunch of scientific calculator apps that have got you covered. Perhaps not with all the features of your physical calculator, but at least for the commonly used scientific functions. Graphing Calculator X84 is one of them.

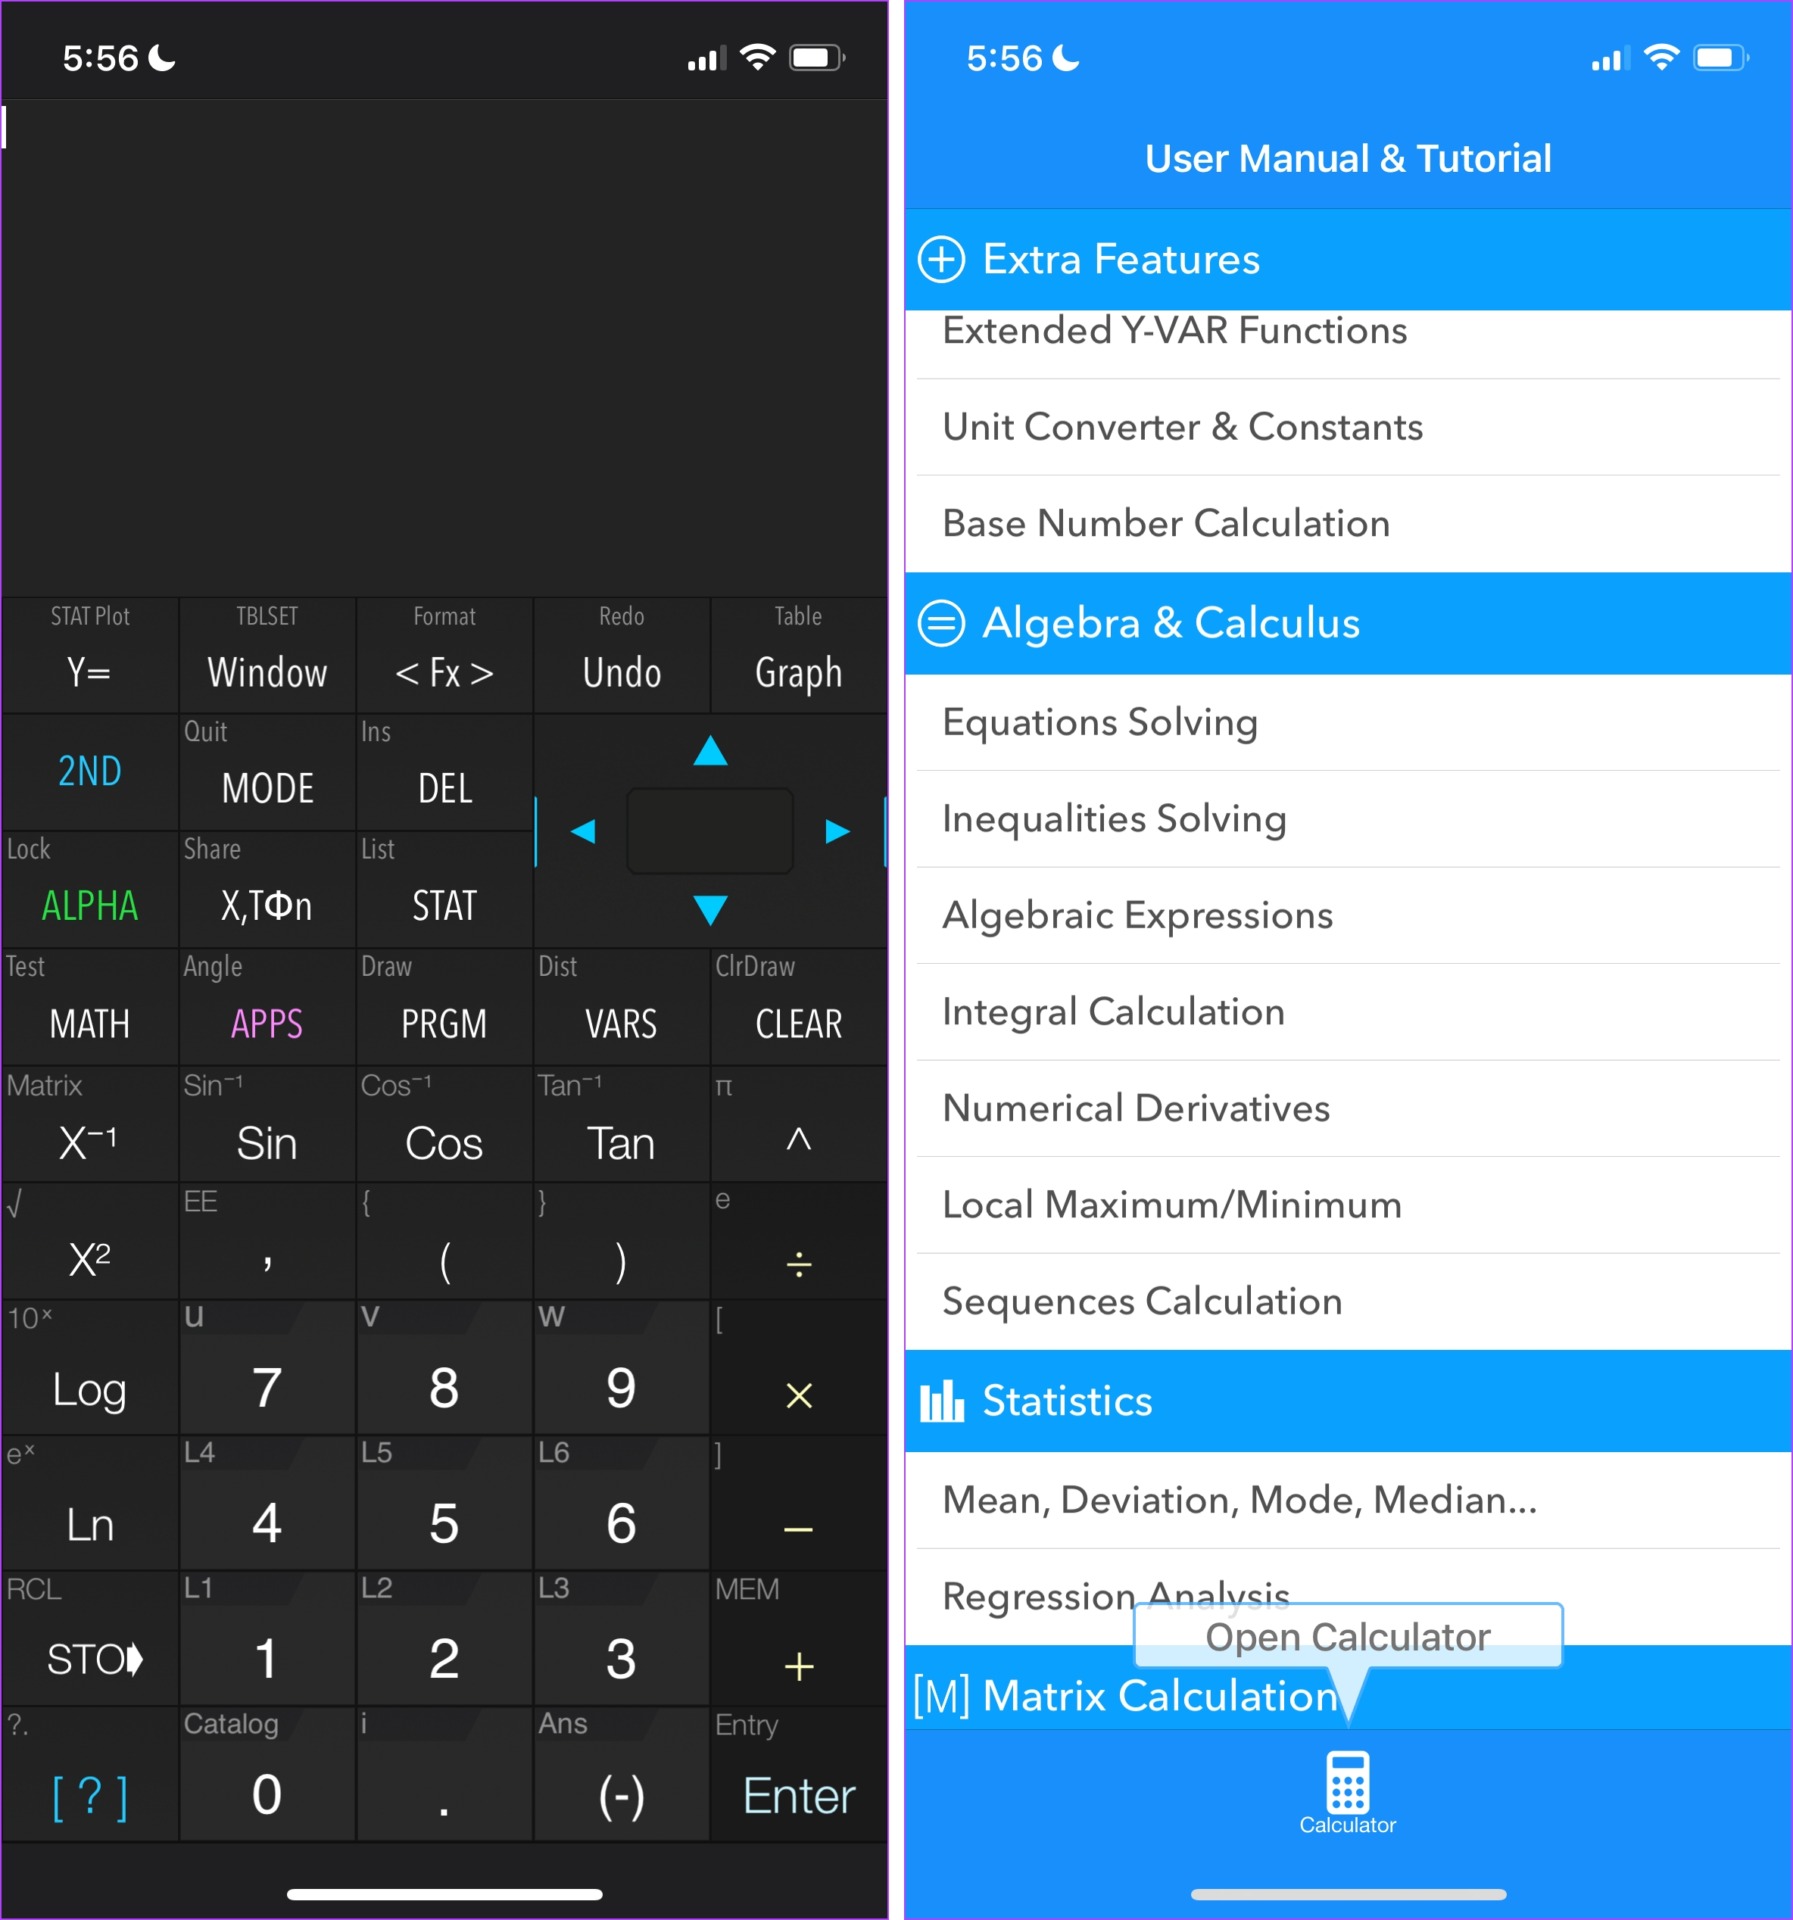
Apart from all the basic functions, you also get a graphing tool. You can easily plot graphs, and share them too. As mentioned earlier, the app layout and buttons largely resemble the physical scientific calculator. And for that reason, if you haven’t used one before, you may not be comfortable using this app.

You can type in up to 200 characters to calculate, and we’re sure this will suffice for most operations. You also get a detailed calculation and function history. There are also options to solve integrals, use statistics and regression functions, and logarithmic functions.

However, there are quite a few intrusive ads in this app. If you wish to get rid of them, you will have to purchase the app’s pro version.

Price: Free; Pro Version: $4.99

7. Panecal Scientific Calculator – A Simpler Scientific Calculator for iPhone

The previous app on this list was designed to be used alongside a TI 84. However, if you wished to see a more generic interface on a scientific calculator, and did not find the app Graphing Calculator X84 appealing, we suggest you take a look at Panecal Scientific Calculator.

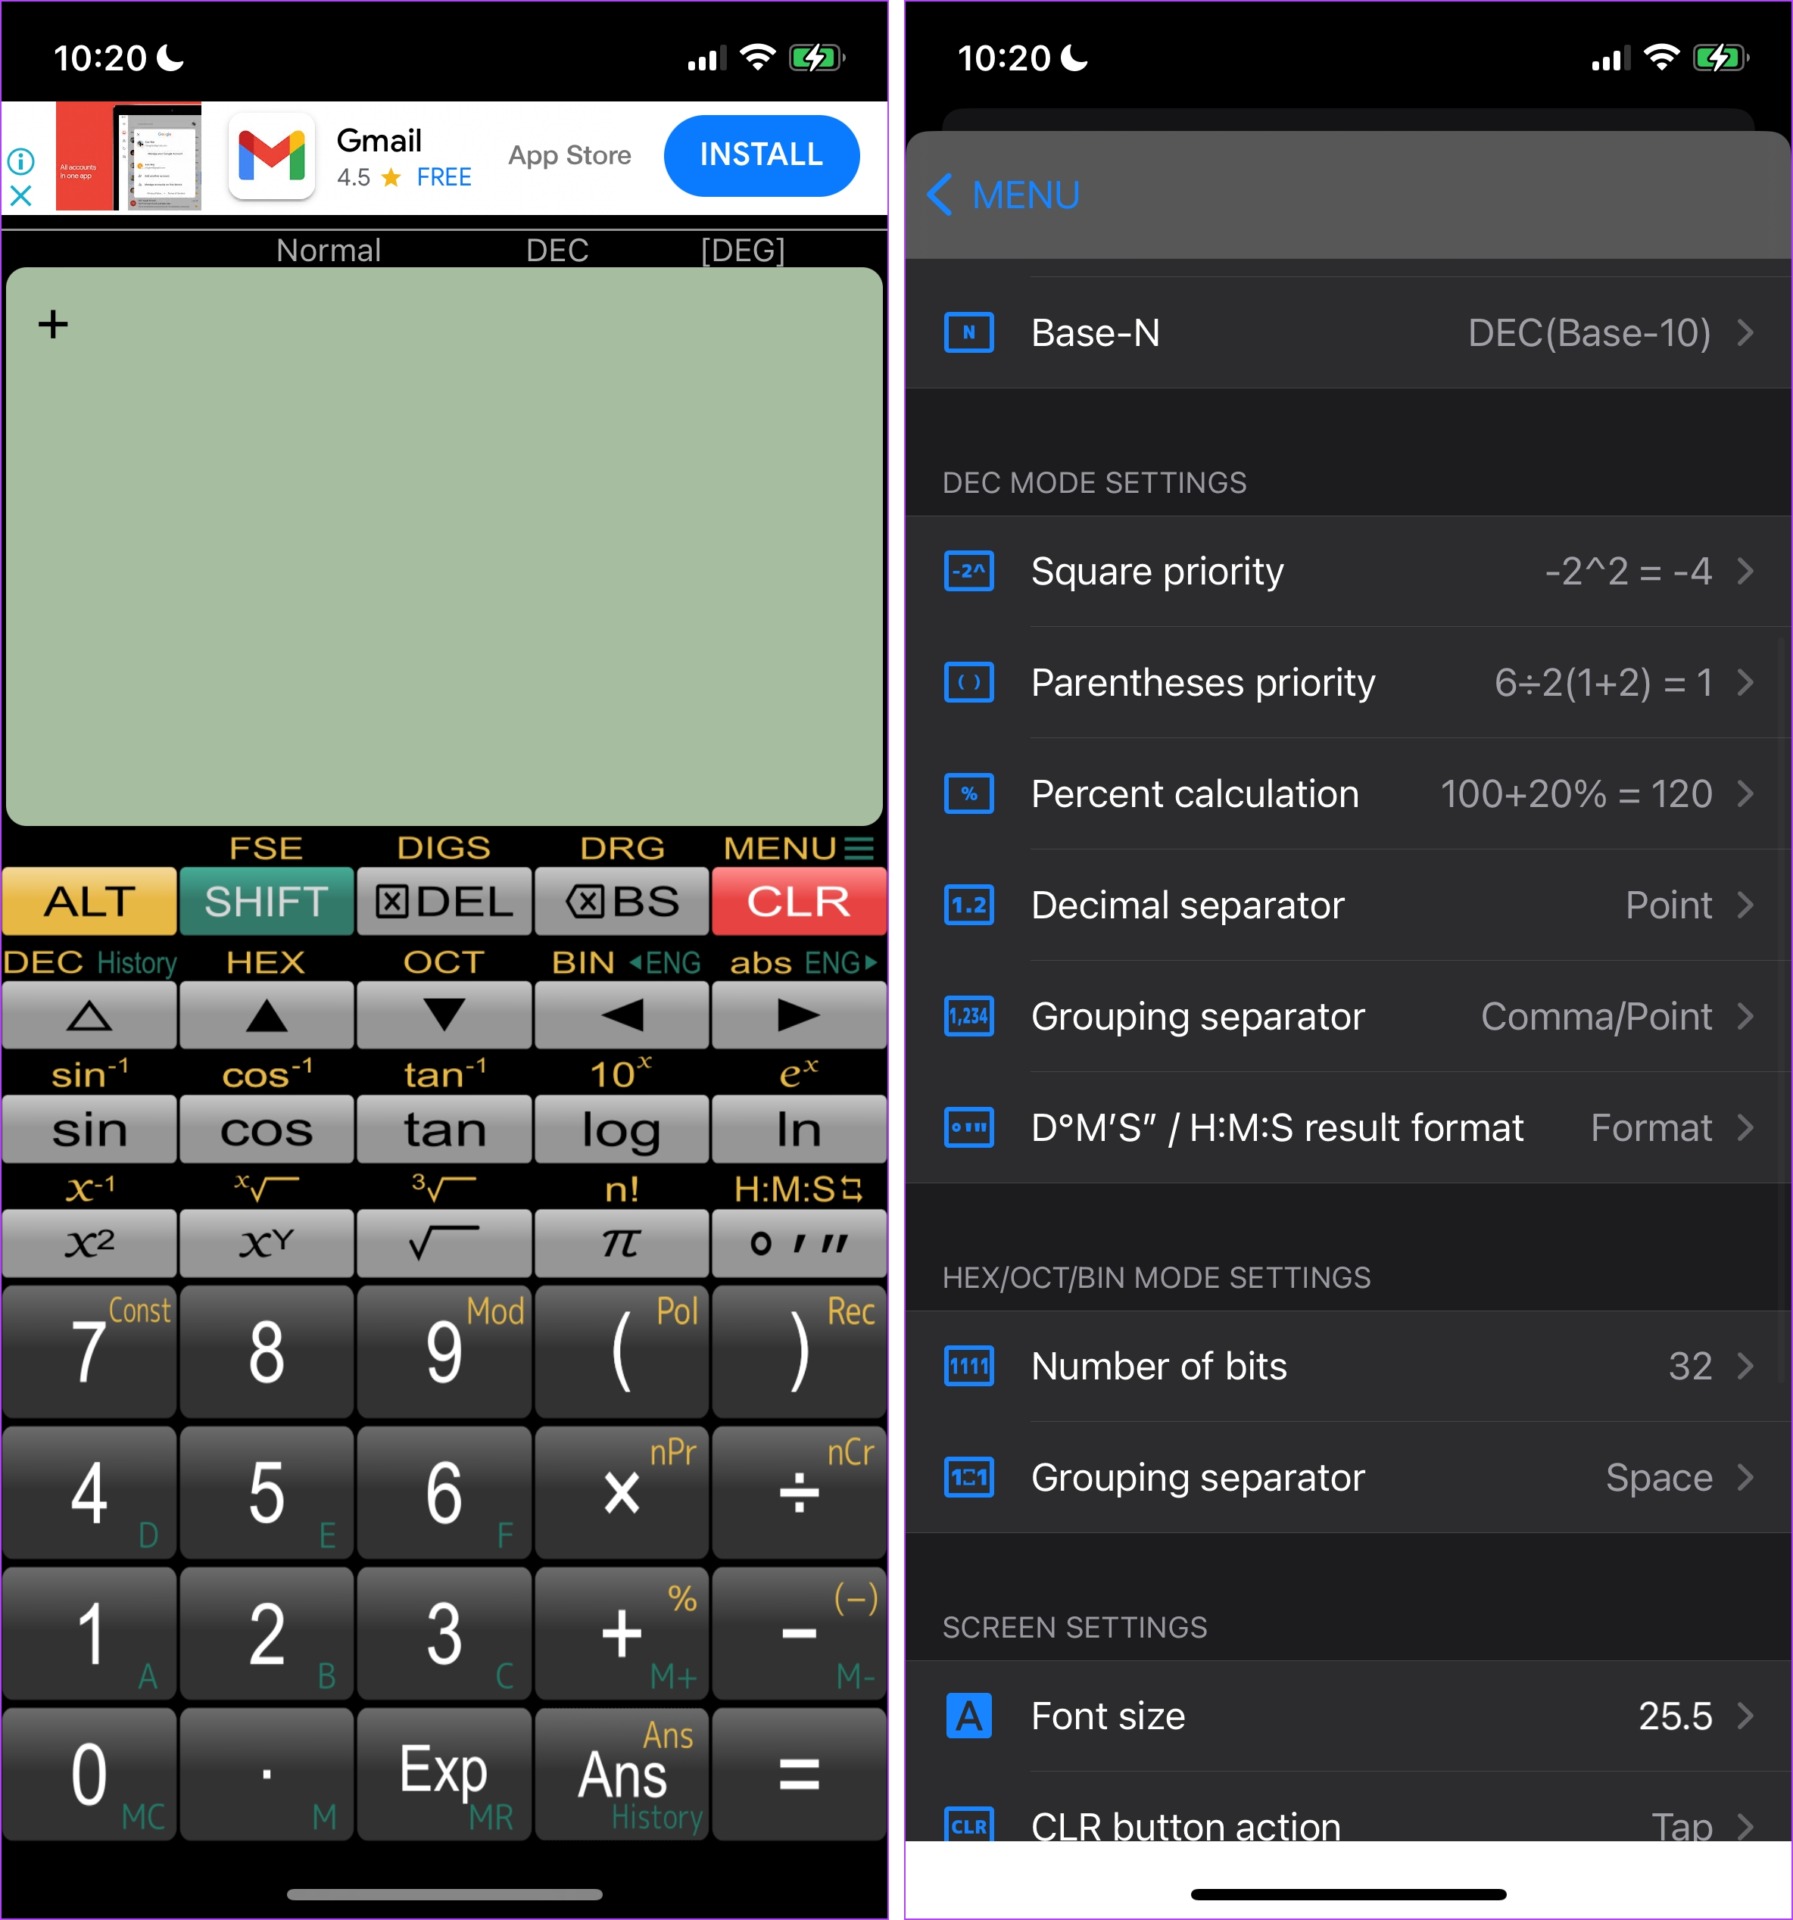
Panecal will match the needs of most users looking to use a calculator with scientific functions on iPhone. It seems to cover most of the mathematical operations and functions present in a physical calculator. You also get to change most of the configurations and modes of computation in the calculator.

However, there are a few issues regarding calculating inverse operations on the calculator, and the performance also seemed a bit slow. Those were the two downsides we could find.

You also get a manual to understand and use the app. This is something we appreciate, especially for first-time users of a scientific calculator. However, this app misses out on a graphing feature. The free version covers all important features, but purchasing the pro version will get rid of the advertisements too.

Price: Free; Pro Version: $2.99

This marks the end of our list. However, if you have any more questions, you can take a look at our FAQ section.

FAQs About iOS Calculator Apps

1. Can you delete the Calculator app on iPhone?

Yes, you can delete a stock app from iPhone and even reinstall it back from the App Store.

2. Do the calculator apps on this list need the internet to function?

No, all of these apps can perform calculations offline.

3. Is the calculator app updated on iOS 16?

No, there have been no major updates to the calculator app on iOS 16.

Calculate Efficiently on Your iPhone

These are some of the best calculator apps for iPhone, from what we’ve seen in the long list of apps. We recommend you download and try all of these apps to see which one suits you best. Hope you find a good one, and calculate everything with a breeze!

Was this helpful?

Thanks for your feedback!

4 Best Screen Protectors for 10.9-Inch iPad (10th Gen)

The latest tablet in town is the 10th Generation iPad from Apple with a major design overhaul. The iPad 10th Gen gets rid of the home button and now looks just like the iPad Air. This also means your old screen protectors can no longer work on the new display. So, if you’re upgrading to the latest iPad, you will have to grab a new screen protector for the iPad 10.9-inch.

best screen protector for iPad 10.9

There are several options to choose from when it comes to a screen protector. With so many parameters to look at including materials, scratch resistance, adhesive, etc., it can get rather confusing. Don’t worry, though, as we have made your job easier by compiling this list of the best iPad 10.9 screen protectors.

Before we get to the screen protector, though, here are some other articles you may be interested in –

Let’s get to the screen protectors now.

1. SPARIN Screen Protector

This is a basic tempered glass screen protector that covers the entire front of the new 10.9-inch iPad. There’s no cutout for the new horizontally placed cameras on the front but that shouldn’t be a problem. You get 2 screen protectors in the back which is always nice to have in case the first one breaks.

The SPARIN screen protector is pretty much what you would expect from any tempered glass screen protector for the iPad. It has a smooth surface on the outside since it’s glass which means you can glide your fingers easily. This screen protector for the iPad 10th gen is just 0.3mm thick, so the touch response of the display remains unaffected.

While the brand claims a hardness of 9H, you’re getting 6H since it’s common glass and not sapphire. So, keys and coins will not do any damage but keep sand away from this screen protector.

Since the iPad has a huge display, we hoped that the brand bundled in an application tray which would make it easier to apply the screen protector. Nonetheless, this is a good option on a tight budget.

2. amFilm 2-Pack Screen Protector

Here’s another screen protector that comes in a pack of 2. The amFilm tempered glass is pretty similar to the previous option with one main difference. The brand has provided a cutout for the front-facing camera so if you’re worried about the clarity with the screen protector covering it, you won’t have to be bothered if you get this one.

Apart from the camera cutout, one standout feature of the amFilm screen protector for the 10.9-inch iPad is that you get plastic installation handles on either side of the screen protector that helps you align it in place. While this isn’t as convenient as an installation tray, it’s at least better than trying to figure out the alignment yourself.

Other than this minute (but helpful) addition, the rest of the package remains the same. You get 2 tempered glass screen protectors with an oleophobic coating which means you can also use it with the Apple Pencil without any issues.

However, it’s slightly more expensive than the first option but we would recommend getting this one solely for the alignment handles if you can afford to spend the extra that is.

3. ESR Screen Protector With Alignment Tray

ESR makes some quality accessories and that’s visible as soon as you look at the fact that they’re providing an installation tray in the package. This tray makes it extremely easy to install the screen protector with precise alignment. If you’re worried about an improper application affecting your OCD, get this screen protector without a second thought.

Applying screen protectors is not everyone’s cup of tea. And that’s exactly why anything that makes the process easier is always welcome. The ESR screen protector includes an alignment tray that helps you apply the tempered glass screen protector in the best possible way. It’s not just about the tray, though. The quality of the screen protector you’re getting is also excellent.

The smooth oleophobic coating on the glass makes it one of the best iPad screen protectors for writing. So, if you have an Apple Pencil, you should consider this option. There’s no cutout for the front-facing camera, though. If you want that, take a look at the next offering from Otterbox.

4. OtterBox Alpha

OtterBox is well-known for its protective accessories and this Alpha series tempered glass from the brand is no different. The brand claims that this screen protector offers 2X better scratch resistance compared to the competition. It is on the pricier side, though, and you only get 1 screen protector in the box. So, get it only if you believe in OtterBox’s assurance of better drop protection.

There’s no doubt that OtterBox makes some high-quality accessories. However, they are also quite a bit more expensive than products from other manufacturers. The Alpha glass screen protector for the iPad 10th gen also takes this same route. It’s priced considerably higher but you can’t dismiss the fact that you’re getting a solid screen protector that can absorb impact well.

OtterBox has also provided a cutout for the front-facing cameras. So, if you want crystal-clear video, this is a good option. The oleophobic coating is also known to be good on Otterbox screen protectors; so it’s another great pick if you write a lot on your iPad using the Apple Pencil.

Further, OtterBox claims that the screen protector works well with all of its cases so it should ideally do well with any case you use.

Protect That Huge Display

The iPad’s large display is one of its biggest USPs so it’s best to keep it free of scratches or cracks. The best way to do that is by getting a screen protector for your 10th-generation iPad. Protect your screen and enjoy watching content on it for years to come.

Was this helpful?


Thanks for your feedback!

6 Ways to Fix Microsoft Word Opens Files in Read-Only Mode in Windows 10 or 11

Fix 1: Modify File Properties

If the issue in question is limited to a select few Word documents, the read-only file attribute may be enabled for those files. Here’s how to fix it.

Step 1: Right-click on the Word file > select Properties.

Open File Properties in Windows

Step 2: Under the General tab, uncheck the Read-only box in the Attributes section. Then, click Apply > OK.

Change File Properties in Windows

Fix 2: Disable Preview Pane in File Explorer

The Preview pane feature in File Explorer lets you preview your files without opening them. For this to work, File Explorer may set your files to read-only mode. To avoid this, disable the Preview pane feature in File Explorer.

Step 1: Press the Windows key + E to open File Explorer.

Step 2: Click the View menu at the top > go to Show > uncheck Preview pane.

Disable Preview Pane in File Explorer

Fix 3: Disable Editing Restrictions for Password-Protected Files

Microsoft Word may open a document in read-only mode if the document owner has imposed editing restrictions. If you have the password for the file, you can easily remove the read-only restriction for that document by following the steps below.

Step 1: Open the password-protected document in Word.

Step 2: On the Review tab, click Restrict Editing in the Protect group.

Restrict Editing in Word

Step 3: On the Restrict Editing pane on the right, click the Stop Protection button.

Stop Protection in Word

Step 4: Enter the password for the file and click OK.

Unprotect Word Document

Fix 4: Turn off Open Email Attachments in Reading View

Another reason Word may open your documents in read-only mode is if you’ve previously configured it to open all your email attachments in reading view. Here’s how to change that.

Step 1: Open Microsoft Word and click the File menu at the top left.

Word File Menu

Step 2: Select Options from the left pane.

Word Options

Step 3: In the General tab, scroll to the Start up options section in the right pane. Uncheck Open e-mail attachments and other uneditable files in reading view and hit OK.

Word Options

Fix 5: Disable Protected View in Word

Protected View is a security feature in Word that keeps your PC safe from malicious files. When enabled, Word will open any suspicious files in read-only mode. However, if you’re confident about the legitimacy of your Word document, you can temporarily disable the Protected View feature.

Step 1: In the Microsoft Word window, click File > Options.

Step 2: In the Word Options window, switch to the Trust Center tab from the left column and click on Trust Center Settings.

Trust Center Settings in Word

Step 3: By default, all three options in the Protected View tab are checked. To disable Protected View, uncheck all three checkboxes and click OK to save changes.

Disable Trust Center Settings in Word

Fix 6: Repair Microsoft Office

Microsoft provides a handy repair tool for the Office suite. It can automatically detect and resolve any problems with your Office programs, including Word. You can run this tool as a last resort if Microsoft Word still opens your files in read-only mode.

Step 1: Right-click on the Start icon and select Installed apps from the list.

Installed Apps on Windows

Step 2: Scroll down to locate the Microsoft Office product on the list. Click the three-dot menu icon next to it > select Modify.

Modify Microsoft Office on Windows 11

Step 3: Select Online Repair and click Repair.

Repair Office Apps

Was this helpful?

Thanks for your feedback!

4 Ways to Reduce Video Size on iPhone

Method 1: Reduce Size Using iMovie

You can reduce the size of a video on the iPhone’s built-in video editor, iMovie. Here’s how.

Step 1: Open iMovie. Tap Movie and select the video you wish to compress. Then, tap Done.

Step 2: Click on the share icon at the bottom of the page and select Share Video.

Step 3: Choose Options. Then, select the resolution based on the size of your video.

Method 2: Compress Videos Using Third-Party Apps

You can use third-party apps such as Video Compressor to compress videos as follows.

Download the Video Compressor app from the App Store. Once done, open the app and select the Video you wish to compress. Then tap Compress. Now, select a desirable size from the Adjust Video Size pop-up.

You can then export it to get a compressed video.

Method 3: Reduce Video File Size Via Google Photos

You can tweak the upload quality setting and save compressed videos easily on Google Photos. Follow the steps below.

Step 1: Download and log into Google Photos.

Step 2: Tap on your profile picture at the top right corner and select the Backup is off option.

Step 3: Then, select Storage Saver > Confirm.

After the upload process is complete, access the compressed video file from all your devices (via Google Photos).

Method 4: Use Video Size in WhatsApp

WhatsApp reduces the resolution and, thereby, the size of videos shared compresses automatically. You can create a WhatsApp group with yourself and share videos in the same group to reduce video size.

Step 1: Open WhatsApp on your iPhone and select your personal group.

Step 2: Tap the + icon at the bottom-left corner and select Photo & Video Library.

Step 3: Select the video you want to compress and send it to yourself. Open the video in WhatsApp conversation. Tap the share button. You can select Save.

Bonus Tip: Make iPhone Record Video in Small Size

You can ensure your iPhone shoots videos in lower resolution to rid yourself of the effort of reducing a video’s size after it is shot. After all, lower resolution means a smaller size of the video.

To do so, open Settings > Camera. Tap Record Video > select 720p HD at 30 fps.

Was this helpful?

Thanks for your feedback!

How to Use the Windows Memory Diagnostic Tool on Windows 11

How to Use the Windows Memory Diagnostic Tool

You can open the diagnostic tool from the search, Command Prompt, Control Panel, and Recovery.

Step 1: Press the Windows + R keys together to access the Run utility.

Step 2: When a Run dialog appears on your screen, type mdsched.exe and press Enter.

Step 3: You should see a Windows Memory Diagnostic Tool window pop up on your screen with two options:

  • Restart now and check for problems (Recommended): Select this if you want to reboot your PC immediately to troubleshoot memory-related issues.
  • Check for problems the next time I start my computer: Select this if you want to schedule the Windows Memory Diagnostic Tool to run the next time your PC starts.
Windows Memory Diagnostic Tool

Step 4: Whichever option you choose, once your PC restarts, the Windows Memory Diagnostic Tool will automatically start scanning your system for memory-related issues in Standard mode.

Windows Memory Diagnostic Tool Standard Scanning.

Step 5: If you want to change the scan options to Basic or Extended and change the number of scan passes, press the F1 key on your keyboard to access more options.

Windows Memory Diagnostic Tool Scanning Modes

Note: You will have to press the Tab key on your keyboard to cycle through the different scan options, F10 to Apply the new changes, or Esc to go back and cancel the changes.

How to Check the Memory Diagnostic Results

After the scan completes, your PC will restart, and a pop-up notification showing the results should appear at the bottom-right corner of the desktop view. However, it’s a hit or miss and doesn’t give you a detailed look at the scan results. In such cases, check the Event Viewer.

Step 1: Press the Windows + S keys to launch Windows Search and type Event Viewer. Then, from the result that appears, click on Open.

Step 2: When an Event Viewer window opens, click on Windows Logs, followed by System. Then click on Find in the right-most pane.

Windows Event viewer System logs

Step 3: When a Find dialog appears on the screen, type MemoryDiagnostics-Results. Then click on Find Next. This will help you find the most recent Memory Diagnostic report.

Step 4: When you find the relevant report, click Cancel. You’ll see the Windows Memory Diagnostic Tool scan result on your screen.

Step 5: Click on the Details tab to find more in-depth results for the scan.

Windows Event viewer Memory Scan logs

If the memory installed on your system has no issues, you will get a message saying, “The Windows Memory Diagnostic tested the computer’s memory and detected no errors.” But if errors are detected, you’ll find details about the problem with the RAM installed on your system.

You may clean and reseat the RAM sticks and rerun the Windows Memory Diagnostic scan to check if the problems are fixed. If that doesn’t help, it might be time to replace the RAM on your system.

To replace or upgrade the RAM on your PC, check our guide to find available RAM slots alongside the best ways to check the RAM size on Windows 11.

FAQs

How Do You Exit the Windows Memory Diagnostic?

To interrupt the ongoing memory diagnostics test, press F1 or Fn + F1. Then, press Esc to restart your computer and boot back into Windows.

How to Stop Memory Diagnostic From Running on Every Restart?

If your PC is stuck in the memory test loop, you can prevent future memory diagnostic tests by opening the Task Scheduler and deleting the Memory Diagnostics task.

Was this helpful?

Thanks for your feedback!

3 Fixes for Android Keyboard Not Working in the YouTube App

Basic Fixes

  • Force quit and relaunch YouTube and Android keyboard: This will give the apps a fresh start on your device.
  • Update or reinstall the apps: Install the latest version of the apps to eliminate bugs or glitches causing the issue.

Fix 1: Log In Again to Your Google Account

You can log out and log in again to your Android phone. This should fix the issue with the Android keyboard.

Step 1: Open Settings > Passwords and accounts.

Step 2: Tap on your Google account and select Remove account.

Step 3: Sign in again and check if the problem is solved.

Fix 2: Clear Android Keyboard and YouTube App Cache

To improve your typing experience and suggestions, the Android keyboard collects your data while you use it for different apps. Try clearing the Android keyboard cache to see if it works in the YouTube app. We also suggest the same for the YouTube app.

Step 1: Open Settings > Apps > All Apps.

Step 2: Select Gboard.

Step 3: Tap on Storage and cache and select Clear cache.

Step 4: Close App Info and go to YouTube App Info.

Step 5: Select Storage and cache. Then, choose Clear cache.

Fix 3: Reset All Settings

This process will remove your current apps and preferences on your Android device. Your device will be wiped clean, and you must set everything up from scratch.

Open Settings > System > Reset options > Reset > Erase all data (factory reset) > Erase all data.

Alternative: Install a Third-Party Keyboard If Nothing Works

If the Android keyboard fails to work properly, try installing third-party keyboards from the Play Store. You can install SwiftKey, which is a reliable third-party keyboard.

Tip: Learn how to change keyboard on your Android phone.

Was this helpful?

Thanks for your feedback!

3 Ways to Fix Android Not Sending Video Messages

Basic Fixes:

  • Check your mobile plan: Most mobile operators charge a certain amount to send MMS to the recipient(s). So, check your mobile plan and ensure your number has MMS facilities.
  • Enable and disable Airplane mode: Turning Airplane mode on and off can refresh your device’s network connection. Once done, try sending the video message again.
  • Close and restart the Messages app: Closing and restarting the Messages app can help eliminate temporary app glitches causing video messages to fail on Android.
  • Check for app updates: Regular app updates can help prevent bugs. So, check and install the latest app updates for the Messages app. Then, try sending the video message again.

Fix 1: Enable Unrestricted Data Usage for Messages

Messages app may fail to send videos if your Android device’s data saver mode is enabled. This will happen as your phone prioritizes data saving over sending the message. In this case, allow unrestricted data usage for the Messages app and check again. Here’s how.

Step 1: Long-press the Messages app and tap on the i icon. Here, tap on Mobile data & Wi-Fi.

Step 2: Enable the toggle for Unrestricted data usage from the following menu.

Fix 2: Enable RCS Chats

When you enable RCS chat features in Messages, the app uses Wi-Fi or data for messaging whenever available. This can be helpful if you frequently face network issues or want to send large video messages. Here’s how to enable it in the Messages app.

Step 1: Open the Messages app and tap your profile icon at the top-right corner. Then, tap on Messages settings.

Step 2: Here, tap on RCS chats. Turn on the toggle for Turn on RCS chats.

Fix 3: Clear Messages App Cache

Due to a corrupt Messages app cache, you might face issues when sending video messages. When this happens, it’s time to clear the Messages app cache and try again. Here’s how.

Step 1: Long-press the Messages app and tap on the i icon. Then, tap on Storage & cache.

Step 2: Here, tap on Clear cache.

Bonus: Send the Video Message Another Way

  • Use third-party messaging apps: Certain third-party messaging apps, like WhatsApp or Telegram, allow you to send video messages. The allowance is relatively bigger than your traditional messaging app and can be convenient for sending multiple videos.
  • Generate a shareable link via Google Photos: If your contact isn’t available on any messaging platforms, generate a shareable link for the relevant video via Google Photos. Then, send that link via email or social media.

Was this helpful?

Thanks for your feedback!

5 Ways to Fix Spotify Keeps Crashing Issue on Windows

Basic Fixes

  • Restart Spotify: Open the Task Manager, right-click on Spotify, and select End Task. Re-launch Spotify to check if the issue is fixed.
  • Close unwanted apps: Close apps you aren’t using to free up memory that may increase Spotify’s performance.
  • Update or reinstall Spotify: If there’s a blue bubble next to your username on Spotify, it means an update is available. Install the update, or try re-installing the Spotify app.
  • Clear storage: Clear the storage space on your Windows PC to prevent bottleneck issues affecting app performance.

Fix 1: Run Spotify as Admin

Whenever you run an application as an admin, you get completely unrestricted access to all of its components, and this method can potentially fix the issue.

Step 1: Search for Spotify in the start menu.

Step 2: Right-click on Spotify and select Run as administrator.

Fix 2: Run Spotify in Compatibility Mode

Running Spotify in a compatibility mode for an older version of Windows can fix the problem if it is randomly crashing.

Step 1: Search for the Spotify app in the Start menu and select Open file location.

Step 2: Right-click on the highlighted Spotify option and select Properties.

Step 3: Select Compatibility.

Step 4: Check the box for Run this program in compatibility mode for:

Step 5: Select an older version of Windows, say Windows 8.

Step 6: Select OK. This will apply the compatibility mode for the selected older version of Windows.

Fix 3: Troubleshoot Spotify

Using the troubleshooter for Spotify can help your PC detect and fix problems.

Step 1: Search for the Spotify app in the Start menu, and select Open File Location.

Step 2: Now, right-click on the highlighted Spotify option and select Show more options.

Step 3: Select Troubleshoot compatibility.

Step 4: Now, select Try recommended settings, and follow the on-screen instructions to complete the process.

If it doesn’t fix the issue, go back to the troubleshooter and select the Troubleshoot program option to provide more information about the problem.

Fix 4: Disable Hardware Acceleration

Many users have reported issues with the Spotify app’s hardware acceleration option in online forums.

Step 1: Open the Spotify app. Click on the username at the top and select Settings.

Step 2: Turn off the toggle for Enable hardware acceleration.

Fix 5: Clear Spotify Data and Cache

Cache and junk files can occupy a lot of storage, and it can slow down Spotify and cause a crash. Here’s how to clear Spotify data and cache on Windows.

Firstly, access hidden files to search and delete the Spotify cache folder.

Step 1: In the start menu, search for File Explorer Options and click on the first result.

File Explorer Options

Step 2: Once opened, click on the View tab. Select the radio button for Show hidden files, folders, and drives. Click on OK to apply the settings.

Step 3: Navigate to the following destination in File Explorer.

C:\Users\[Username]\AppData\Local\Packages

Step 4: Select a folder containing the keyword Spotify.

Step 5: Next, go to LocalCache > Spotify > Data. Select all folders inside and click on Delete.

If none of the above methods work, try using Spotify Web Player on a browser.

Was this helpful?

Thanks for your feedback!

How to Save Live Photo as Video or GIF on Android

On Google Photos

Here’s how you can download the motion photo as a video or GIF.

Step 1: Open the motion photo in Google Photos, and Swipe Up on it.

Step 2: Swipe left in the list of options, and select Export.

Step 3: Select a format of your choice and tap on Export. You can then share it using any social media app.

On Samsung Phones

Samsung Gallery app also offers the functionality of saving motion photos as videos or GIFs.

Step 1: Launch the Samsung Gallery app on your phone.

Step 2: Open the motion photo that you want to export as a video or GIF.

If you aren’t sure whether the photo is a motion photo, look for the ‘View motion photo’ button at the bottom. This indicates that the image is a motion photo.  

Step 3: Tap on the three-dot icon at the bottom of the photo and select Export from the menu.

Step 4: You will get two options to export the motion photo: video or GIF. Choose the desired option to save it. Tapping on the Video option will immediately convert the motion photo and save the video on your phone. You will find it in the Gallery app.

Step 5: Tap on the GIF option to open the GIF customization screen. Here, you can select the length, speed, and playing mode of your GIF.

  • Use the scrollbar at the bottom to trim or adjust the GIF length.
  • Tap on the 1.0x speed option to increase or decrease the GIF speed.
  • Tap on the arrow at the bottom to play the video in the forward direction, backward, or back and forth.

Step 6: Once you have customized the GIF, tap on Save at the top to download the GIF. Besides, tap on the Share button to send the motion photo as a GIF to your friends via any app.

Check out other ways to make a GIF on your Samsung Galaxy phone.

Also Read: How to fix Samsung Gallery not showing all pictures

Was this helpful?

Thanks for your feedback!

Declutter Your Inbox: How to Filter Unread Emails in Gmail

Method 1: Using a Query in the Search Field

Like Google Search, there are various tips and tricks for using Gmail Search to get the desired results. One such trick allows you to search for your unread emails easily. Here’s how:

Step 1: Open Gmail and click on the Search box at the top.

Search in emails

Step 2: Type the following query into the search bar and hit Enter on your keyboard to show all your unread emails.

is:unread
Querry for gmail

Step 3: (Optional) To view only the unread emails in your Primary Inbox, type the following query.

label:unread category:primary
view only the unread emails

Method 2: Update Settings to Show Unread Messages First

By default, Gmail arranges your emails in the order you receive them. So, the most recent emails appear first, while the older ones are further down. However, you can change this setting to showcase your unread emails first while the other emails are at the bottom. Here’s how to do so:

Step 1: Open the Gmail page in a web browser and sign in with your account details.

Step 2: At the top right of your Gmail, click on the Settings (gear) icon.

Gmail settings icon

Step 3: Click on See all settings.

See all settings

Step 4: On the Ribbon, click on the Inbox tab.

Gmail Inbox tab

Step 5: Click on the drop-down beside the Inbox type.

Inbox menu dropdown

Step 6: From the drop-down options, click Unread first.

Unread first emails

Step 7: In the Inbox sections field, click on the drop-down beside Unread.

Unread Gmail setting

Step 8: Select between 5 and 50 for the number of unread items you want to see in your Inbox.

Inbox emmail number selection

Step 9: In the Inbox sections field, click on the drop-down beside Everything else.

Inbox sections everything else setting

Step 10: Select between 5 and 50 for the number of everything else you would like to see in your Inbox.

Everything else number

Step 11: Scroll to the bottom and click Save Changes to enable your new setting.

Save settings cahnges

By following the steps above, the emails in your Gmail Inbox will be split into Unread and Everything Else.

Method 3: Set up Automatic Filters

Labels are one of the best ways to organize your Gmail Inbox. Using Labels, you can sort out your emails into different categories. Here’s how to create a label for your unread emails in Gmail.

Step 1: Open the Gmail page in a web browser and sign in with your account details.

Step 2: Click on the Search box at the top of Gmail.

Search fir emails

Step 3: Type the following query into the search bar and hit Enter on your keyboard to show all your unread emails.

is:unread
Querry for gmail

Step 4: Click on the Show search options filter at the end of the search bar.

Show search options

Step 5: Click Create filter.

Create filter

Step 6: Tick the box for Apply the label.

Apply the label

Step 7: Click on the drop-down beside Apply the label and select New label from the options.

New label option

Step 8: In the New label dialog box, name your new label.

Step 9: Click Create to save your new label name and create your new label.

Save new label

Step 10: On your Inbox, tick any unread email.

Unread email

Step 11: Click the Label icon at the top of the page.

Label icon

Step 12: Tick the box beside the new label created to ensure your Unread emails land there.

Unreads label selection

Step 13: To view your unread emails, click on the label name at the left of your Gmail window.

Viewing unread email

Was this helpful?

Thanks for your feedback!

5 Ways to Fix Telegram Desktop Video Calls Not Working

Basic Fixes

  • Switch to 5GHz Wi-Fi: If you have a dual-band router, try switching to a 5GHz frequency band to get faster internet speeds.
  • Force quit and relaunch Telegram: This will give the app a fresh start on your Mac or Windows PC.
  • Update Telegram app: Install the latest version of the desktop app from the Mac App Store or Microsoft Store.

Fix 1: Check Microphone and Camera Settings

Next, look at the call settings in the Telegram Desktop app on your Mac or Windows PC. If your internet connection is strong and stable, there may be issues with your Mac’s Microphone or Webcam settings. Here’s how to check them.

Step 1: Open Telegram on your Mac or Windows PC.

Step 2: Go to Settings and click on General.

Step 3: Select Call Settings.

Step 4: Under Camera, click on Default and ensure to select default webcam.

Step 5: Under Microphone, click on Default and check your audio source.

Fix 2: Check if Your Contact Has Allowed Video Calls

If you still can’t make Telegram video calls on your Mac, your contact may have restricted video calls from you and other contacts. Telegram allows you to restrict voice calls and voice messages as a part of its privacy settings.

Step 1: Open Telegram on your Mac or Windows PC > go to Settings.

Step 2: Click on Privacy and Security from the Settings menu.

Step 3: Under Privacy, click on Calls. Then, check whether you have allowed video calls from your contact.

Step 4: To remove a contact’s video call restriction, click on Never Allow under Who Can Call Me.

Step 5: Click on Edit > minus icon next to the contact name.

Step 6: Click on Done to confirm.

Fix 3: Run Windows Store App Troubleshooter

Running the Windows Store Apps troubleshooter on Windows 11 effectively solves issues with Telegram Desktop and other installed applications. It is a built-in tool for checking and fixing such issues with apps downloaded from the Microsoft Store.

Step 1: Open Settings > System > select Troubleshoot.

Step 2: Select Other Troubleshooter.

Step 3: Scroll down, click Run beside the Windows Store Apps troubleshooter, and wait a few seconds to let it resolve the problem.

4 run windows store app stroubleshooter

Relaunch Telegram to check if the problem is solved.

Refer to our post if you see an Error Occurred While Loading the Troubleshooter on Windows 11.

Fix 4: Disable Low Data Mode or Metered Connection Over Wi-Fi

On Mac, you can disable the Low Data Mode (Mac) or Metered Connection (Windows 11) for your connected Wi-Fi network.

On Mac

Open Settings > Wi-Fi > click on Details next to your connected Wi-Fi network > disable Low Data Mode > click on OK.

low data mode on wifi mac

On Windows 11

Open Settings > Network and internet > Wi-Fi > turn off Metered connection.

disable metered connection wifi windows

Fix 5: Repair and Reset Telegram App (Windows)

Another built-in tool to repair apps that can be used when such issues occur on your Windows 11 PC.

Step 1: Search Installed apps in the Windows search menu and click the associated system setting.

Step 2: Locate Telegram Desktop > click its three-dot menu > select Advanced options.

Step 3: Scroll down and click Repair. If repairing doesn’t solve the issue, click Reset and follow the on-screen instructions.

9 repair or reset Telegram Desktop app

Note: Resetting the Telegram Desktop app will clear all its data.

Was this helpful?

Thanks for your feedback!

2 Ways to Disable the Show More Options Context Menu in Windows 11

Method 1: Revert to Old Context Menu Using Command Prompt

Command Prompt is a command-line interpreter that lets you perform various complicated tasks on your PC with a few text commands. You can use it to disable the “Show more options” menu and revert to the classic Windows 10 context menu.

Step 1: Click the search icon on the taskbar, type cmd in the box, and select Run as administrator.

Open Command Prompt as Admin

Step 2: In the console, paste the following command and press Enter:

reg add "HKCU\Software\Classes\CLSID\{86ca1aa0-34aa-4e8b-a509-50c905bae2a2}\InprocServer32" /f /ve
Disable Show More Options Using Command Prompt

Once you run the above command, you should see a message that says, “The operation completed successfully.” You’ll have to restart your PC for the changes to take effect. Alternatively, you can also restart the Windows Explorer process to apply changes.

If you ever change your mind and want to return to the “Show more options” menu in Windows 11, run the following command in Command Prompt and restart your PC.

reg delete "HKEY_CURRENT_USER\Software\Classes\CLSID\{86ca1aa0-34aa-4e8b-a509-50c905bae2a2}" /f​
Enable Show More Options Using Command Prompt

Method 2: Revert to Old Context Menu With the Registry Editor

Another way to disable the “Show more options” menu in Windows 11 is to use the Registry Editor. For that, you must create a couple of registry keys.

Step 1: Press the Windows key + R to open the Run dialog box. Type regedit in the Open field and press Enter.

Step 2: In the Registry Editor window, paste the following path in the address bar at the top and press Enter. This will take you to the CLSID key.

HKEY_CURRENT_USER\Software\Classes\CLSID
Registry Editor

Step 3: Right-click on the CLSID key > go to New > select Key > give it the following name.

{86ca1aa0-34aa-4e8b-a509-50c905bae2a2}
Create New Key in Registry Editor

Step 4: Right-click on the newly created key > go to New > select Key. Name it InprocServer32.

Create New Subkey in Registry Editor

Step 5: Within the InprocServer32 key, double-click the Default value on your right. In the Edit String window, leave the value data field blank and click OK.

Edit DWORD

After you complete the above steps, restart your PC. Following that, you should see the old context menu when you right-click on a file or folder on Windows.

If you want to undo the above change at any point, repeat the same steps and expand the CLSID key. Then, right-click on the following key and select Delete.

{86ca1aa0-34aa-4e8b-a509-50c905bae2a2}
Delete Registry Key

Was this helpful?

Thanks for your feedback!

How to Stop Music From Automatically Playing in Apple CarPlay and Android Auto

How to Stop Apple CarPlay From Automatically Playing Music

Unfortunately, there’s no toggle or option by default to stop Apple Music auto-play on iPhone. Instead, you will have to use a workaround.

Step 1: Open the Shortcuts app and navigate to the Automation tab. Select Create Personal Automation.

Step 2: If you connect your iPhone to your car via Bluetooth, select Bluetooth. If you use a cable instead, select CarPlay.

Step 3: If you selected the Bluetooth option, tap on the Choose button next to Device. Select your car’s Bluetooth name from the list of devices and tap on Done.

Use the Next button at the top-right corner to proceed to the next step. If you selected CarPlay, choose Connects and tap on Next.

Step 4: Use the Add Action button and tap on Media. Then, scroll down to Playback and select the Play/Pause button.

Step 5: Tap on the Play/Pause automation that was created and select Pause. Choose Next at the top-right corner and tap on Done to create the automation.

How to Stop Android Auto From Automatically Playing Music

Unlike iOS, Android has a built-in toggle to stop Android Auto from playing music automatically in your car. Here’s how to enable it.

Step 1: Open the Settings app and navigate to the Connected devices menu. Choose Connection preferences.

Step 2: Select Android Auto. Scroll down and turn off the toggle next to Start music automatically.

Was this helpful?

Thanks for your feedback!

Optimize Windows 11 Startup Using System Configuration Tool (MSConfig)

How to Use System Configuration Tool on Windows 11

The System Configuration Tool is divided into five tabs for easy navigation, each with different functions. Here’s what to do under each tab:

1. The General Tab

The General tab offers Startup selection options to configure your system’s startup behavior. The Startup section consists of three options that allow you to choose which services, devices, and drivers start whenever you boot your PC with varying degrees of control.

General tab of msconfig

Those options are Normal Startup, Diagnostic Startup, and Selective Startup. Here’s what they do:

  • Normal startup: As the name suggests, this mode loads up all the usual services and drivers as they normally would when the PC boots up.
  • Diagnostic startup: Similar to Safe Mode, this option only loads up the essential services and devices. However, more advanced services, such as Networking, System Restore, and Windows Error Reporting, are halted to diagnose and fix software issues.
  • Selective startup: This mode offers two other sub-options, which allow you to select whether to load system services, load startup items, or both.

To boot your PC into a certain Startup mode, click on the boot mode under Startup selection, followed by Apply. Next, restart your PC.

2. The Boot Tab

The boot tab of the System Configuration Tool lets you change how your computer boots and offers the ability to choose the default operating system (if you have more than one operating system on your PC), enable Safe mode with different configurations or drivers, and more.

Boot tab of msconfig

The primary function of the Boot tab is to let you customize the different settings that may impact booting your PC. It is also a quick way to boot your PC into safe mode by clicking the Safe Boot check box, followed by Apply.

As for the four sub-options listed below, you can choose any one according to your use case. Here’s what selecting each option does:

  • Minimal: Selecting this option disables networking and allows you to load Windows in safe mode while running critical system services.
  • Alternate shell: This option also disables networking but safely boots to a Command Prompt Window while running critical system services.
  • Active Directory repair: It is only applicable to Windows Server operating systems. Selecting Active Directory repair allows an administrator to repair an Active Directory database.
  • Network: Pretty similar to the Minimal boot mode, except with networking enabled.
Safe boot options

Safe boot and its sub-options aside, four other options are listed under Boot Options. Here’s what selecting each one does:

  • No GUI boot: This option disables the Windows splash screen (manufacturer/Windows logo) when booting. It is helpful in troubleshooting issues related to the graphics/video card.
  • Boot log: Select this option to create a log file with all the technical information about the boot process.
  • Base video: This option Boots Windows in minimal VGA (lower resolution) mode. It is also helpful in troubleshooting issues related to graphics/video cards.
  • OS boot information: Selecting this option lets you reveal the name of every driver and service when loaded during the boot process.
Other options under Boot options

You can also use the Boot tab to limit the processors (CPU processing cores) and the maximum memory (RAM) your system can utilize. Here’s how:

Step 1: Open the System Configuration Tool > go to the Boot tab > select your current operating system > click Advanced Options.

Advanced options

Step 2: When a BOOT Advanced Options dialog appears on your screen, click the Number of processors check box, followed by the drop-down list right below it, to select the number of processors your system can use.

Number of processors

Step 3: To change your system’s maximum memory, click on the Maximum memory checkbox and use the arrow keys on your keyboard to set its value.

Maximum memory check box

Step 4: Once configured, click on OK to save the changes.

You can check the Make all boot settings permanent: Changes made in System Configuration are not tracked. If you want to make changes later, you must do so manually. Selecting Normal startup in the General tab does not work if this feature is selected.

3. The Services Tab

The Services tab lets you manually enable or disable the services that start with your PC. It’s a perfect way to look for and stop rouge services that might interfere with your system’s stability.

Services tab for msconfig

To choose which services launch when you boot your PC, follow the steps below:

Step 1: To prevent affecting an important service, check the box for Hide all Microsoft services. Then, click on Disable All.

Hide all Microsoft services

Step 2: Select the ones you want by clicking on the check boxes before their name. After you’re done, click on Apply.

Your PC will restart and boot only with the selected services. You may repeat the process to add or remove more services to run at startup.

4. The Startup Tab

The Startup tab is where you can configure which apps should launch automatically every time your PC starts, at least on Windows 10 and other older versions.

msconfig startup tab

Microsoft has changed things with the advent of Windows 11’s resigned Task Manager. The Startup tab found in the System Configuration Tool only offers a link that redirects you to the Task Manager’s Startup tab.

5. The Tools Tab

The Tools tab in the System Configuration Tool launches many other useful Windows utilities. It organizes all the important tools and utilities into a handy list for easy access when needed.

System Configuration Tool

If you want to access a utility listed under the Tools tab of the System Configuration Tool, select the tool of your choice and click on Launch.

Selecting a tool

Was this helpful?

Thanks for your feedback!

How to Stop Automatic Backup to Google Photos

Method 1: Stop Automatic Backup on Android and iPhone

Step 1: Open the Google Photos app and tap the profile icon at the top-right corner.

Step 2: You can tap on Manage Storage or Google Photos Settings.

Step 3: Tap on Back up and Sync at the top and disable the toggle for Back up and Sync.

Once you disable this feature, your photos and videos will stop uploading on Google Photos. You can still view them from the Google Photos app, but they will be saved on your smartphone. However, your previously backed-up photos will remain on your drive account.

You can also check our guide to learn how to delete photos from Google Photos but not from your phone.

Method 2: Stop Automatic Backup of Pictures in Photos App to Google Photos

The Google Photos app on your iPhone lets you back up images that you mark as Favorites in the Photos app. While that helps save space on iCloud, it eventually syncs to your Google account. To stop automatic backup to Google Photos, follow the below steps.

Step 1: Open the Google Photos app on your iPhone and tap the profile icon at the top-right corner.

Step 2: Tap on Google Photos Settings.

Step 3: Tap on Apple Photos > turn off the toggle for Sync Favorites.

Check out our guide to delete photos from Google Photos but not from iCloud and better manage your cloud storage and data.

Method 3: Stop Automatic Backup to Google Photos on Desktop

The Google Drive app is also available for Desktop users. Let us show you how to stop the automatic backup of photos and videos from your Mac or Windows PC to Google Drive.

Step 1: On Mac, click on the Google Drive icon on the right side of the top Menu Bar.

On Windows, click the arrow icon at the bottom-right corner of the desktop and click the Google Drive icon.

google photos desktop

Step 2: Click the Settings icon from the popup message.

settings google photos desktop.

Step 3: Click on Pause Syncing from the list of options.

Was this helpful?

Thanks for your feedback!

5 Ways to Fix “No App Found to Open URL” Error on Android

Basic Fixes:

  • Install Android updates: Bugs and glitches within Android on your phone can trigger such errors. Hence, installing any pending software updates on your phone is a good idea.
  • Reinstall the problematic app: If a specific app displays the “No app found to open URL” error, try reinstalling it on your phone. This should help fix issues caused by corrupt data or an outdated app build.

Fix 1: Check Disabled Apps

Errors like “No app found to open link” can appear if you’ve disabled any system apps on your phone. For instance, if you disable your phone’s default browser or an app like Play Store, you may receive such errors when you attempt to open links that require those specific apps.

To avoid this, go through your phone’s app list and ensure all system apps are enabled.

Step 1: Open the Settings app on your phone > navigate to Apps. Scroll through the list to find any disabled apps.

Step 2: Tap the disabled app and select Enable from the following menu.

Another reason an app may show this error is if there’s an issue with its in-app browser. In that case, you can configure the app to use your default browser to open links. Here’s how:

Step 1: Long-press the problematic app’s icon and tap the info icon from the resulting menu.

Step 2: Tap on Set as default and turn off the toggle for Open supported links.

Fix 3: Reset App Preferences

If the error persists, reset app preferences on your phone to fix it. This will reset all the app permissions and remove restrictions that may be triggering the error.

To reset app preferences on Android:

Step 1: Open the Settings app and navigate to Apps.

Step 2: Tap the three-dot menu icon at the top right corner and select Reset app preferences. Then, select Reset to confirm.

Fix 4: Change the Default Browser

Problems with the default browser app can also prevent apps from opening web pages. You can try changing your phone’s default browser to see if that helps.

Step 1: Open the Settings app > go to Apps > Choose default apps.

Step 2: Tap on Browser app and select a different browser.

Fix 5: Turn off Instant Apps

Google Play Instant is a useful feature that allows you to try native Android apps and games without installing them first. However, this feature can occasionally cause problems, resulting in the “No app found to open URL” error. To see if that helps, you can disable link loading through Instant apps.

Step 1: Open Google Play Store on your phone > tap your profile icon at the top-right corner > select Settings.

Step 2: Expand the General menu > tap on Google Play Instant. Then, toggle off Upgrade web links.

Was this helpful?

Thanks for your feedback!

Top 7 Ways to Fix Amazon Echo Sound Keeps Cutting Out

Amazon Echo smart speakers come in several price offerings. That makes them an ideal and affordable catalyst for smart home automation. However, not everything works as expected. Sometimes, the Amazon Echo gets stuck on blue light, Alexa skills stop working, or the music sound keeps cutting out. If you frequently face the latter, here are the best ways to fix the Amazon Echo sound that keeps cutting out errors.

Alexa speaker keeps cutting out can leave you with a bad taste. You can’t enjoy your favorite Spotify or YouTube Music playlists on Echo. You can’t properly hear Alexa commands, either. Let’s fix the problem once and for all.

1. Check the Internet Connection

Amazon Echo requires an active internet connection to play songs without buffering. If the connected Wi-Fi network acts up, it’s time to connect to another Wi-Fi. Here’s what you need to do.

Note: Since you already use Amazon Echo at home or office, you must have set up the device in the Alexa app. If you haven’t set it up, download the Alexa app on your mobile and follow on-screen instructions the complete the process.

Step 1: Download the Alexa app on your Android or iPhone.

Step 2: Set up your Amazon Echo device (if you haven’t already).

Step 3: Head to the ‘Devices’ tab.

Step 4: Select your Echo speaker.

Step 5: Tap on the Settings gear icon in the top-right corner.

Step 6: Ensure it’s connected to a working Wi-Fi network. You can tap ‘Change’ to connect to another Wi-Fi network.

Try connecting to a 5GHz frequency band instead of a 2.4GHz one for more bandwidth and a seamless streaming experience.

2. Stream Music via Bluetooth

On a slow Wi-Fi connection, Alexa may face trouble hearing your commands, leading to music cutting out issues. You can connect your smartphone to your Echo speaker via Bluetooth and play songs.

Step 1: Head to the Devices tab in the Alexa app for Android or iPhone (refer to the steps above).

Step 2: Select your Echo device.

Step 3: Tap the ‘Connect a device’ option.

Connect your phone or tablet via Bluetooth and stream your preferred Apple Music playlists.

3. Tweak Audio Settings

By default, your Amazon Echo speaker comes with a balanced sound signature in Bass, Midrange, and Treble. It may not be suitable for all music types. You can tweak sound settings from the Alexa app.

Step 1: Open the Alexa app and select your Amazon Echo device from the Devices tab (check the steps above).

Step 2: Tap the Settings gear in the top-right corner.

Step 3: Select ‘Audio Settings.’

Step 4: Make relevant changes to Bass, Midrange, and Treble sliders from the following menu.

4. Check Streaming Service on Your Phone

If your preferred music streaming service faces an issue, Amazon Echo sound keeps cutting out. Open your phone and check the network connection. You should also launch Spotify or Amazon Music and check for any issues with streaming songs.

5. Check for Physical and Water Damage

Did your little one recently drop Amazon Echo? Or did someone accidentally spill water on it? Amazon Echo smart speakers aren’t waterproof and don’t carry IP ratings either. Due to physical or water damage, the Alexa-powered speaker might keep cutting out music. It’s time to book an appointment at the nearest service center and get the device inspected by an expert.

6. Register Your Amazon Account

Due to an authentication error, the Alexa sound may keep cutting out. You can deregister your account and add it again.

Step 1: Open the Alexa app and head to the Devices tab to choose your Amazon Echo Dot (check the steps above).

Step 2: Scroll down and select ‘Deregister’ and confirm your decision.

Step 3: Follow the on-screen instructions to register your Amazon account again.

7. Reset Your Amazon Echo

If none of the tricks work, you may reset your Amazon Echo to set it to the factory settings state. The steps to reset an Amazon smart speaker varies from one model to another. For now, here’s how to reset Echo (3rd or 4th generation). You can check detailed instructions for other devices from the Amazon support page.

Step 1: Press and hold the Action button for 20 seconds.

Step 2: Wait for the light ring to turn off and on again.

Step 3: After your device enters setup mode, follow the instructions to set it up again.

Remove Sound Glitches on Your Amazon Echo

Amazon Echo packs a powerful speaker to enjoy your favorite playlists during household chores. The Alexa music keeps cutting out can leave you with an unpleasant experience. Which trick worked for you? Share your findings with us in the comments below.

Was this helpful?


Thanks for your feedback!

How to Stop Discord From Lowering App Volume on Windows

Use Attenuation to Stop Discord from Lowering Volume

Step 1: Open Discord on Windows. Then, click on the gear icon at the bottom left to go to Settings.

Step 2: Select Voice & Video in the sidebar.

Go to Voice & Video

Step 3: Scroll down the main page to find Attenuation and slide it to 0%.

Scroll down to find Attenuation

This should fix Discord lowering the volume of other applications on Windows.

How to Fix Discord Attenuation Not Turning Off

Sometimes, even after turning off the Discord Attenuation setting, the volume of other audio sources keeps lowering. Well, in most cases, it’s not Discord; it’s Windows.

Windows sound settings interfere with other apps to hinder the audio output. Here are three easy fixes.

Fix 1: Disable Windows Communications Activity

Step 1: Open Settings using Windows Search and go to Sound.

Step 2: Scroll down and click on More sound settings.

click on More sound settings

Step 3: In the Sound dialog box, go to the Communications tab.

Step 4: Select Do nothing > click on Apply > hit OK.

Select Do nothing

And there you have it. The lowering of volume in other apps should be resolved. However, if it didn’t, follow the next method.

Fix 2: Turn off Exclusive Control

Discord requires Windows sound access to have exclusive control over the sound output. This can sometimes result in the volume of the app being lowered.

Step 1: Open Settings using Windows Search > go to Sound.

Step 2: Scroll down and click on More sound settings.

click on More sound settings

Step 3: Right-click on the audio device > select Properties.

select Properties

Step 4: Go to the Advanced tab.

Step 6: Now, uncheck Allow applications to take exclusive control of this device.

Step 7: Click on Apply > OK.

Uncheck Allow applications to take exclusive control of this device

Fix 3: Check Sound Mixer/Audio Monitoring Apps

It is common for users to use audio monitoring apps to equalize the sound quality. If you fall into this category and the above two methods didn’t work, your audio mixing or equalizing software must be the culprit.

FAQs

1. How do you test audio on Discord mobile?

Navigate to User Settings > Voice & Video. You’ll find this new mic test feature under the input & output volume sliders. Click on Let’s Check and begin speaking. Your selected output device will then play back the sound.

2. How do I change the audio output on Discord mobile?

Click on the profile picture > scroll to App Settings > tap on Voice > Push to Talk or Voice Activity, depending on the mode you want to use.

Was this helpful?

Thanks for your feedback!

3 Best Ways to Fix SIM Not Supported Error on iPhone

Try Basic Fixes

  • Remove and re-insert the SIM card: If your SIM card won’t work with your new iPhone, eject the SIM tray on your iPhone. Then, remove the SIM card and place it correctly on the tray. Now, insert the SIM tray back into the iPhone and wait for it to latch onto a network.
  • Force restart the iPhone: Press and release the Volume up key, press and release the Volume down key, and then press and hold the Side/Power button till you see the Apple logo on the screen.
  • Install iOS updates: Bugs within iOS can sometimes cause such problems. In most cases, you can fix such issues by installing pending iOS updates. To do so, head to Settings > General > Software Update.

Fix 1: Disable and Re-Enable the eSIM

If you are using an eSIM, you can try disabling and re-enabling it on your iPhone. To do so, open Settings and tap on Mobile Service. Select your eSIM and turn off the toggle next to Turn On This Line. Wait for a few moments, and then turn it back on.

Fix 2: Reset Network Settings

If your SIM card still won’t work on your iPhone even after following the above solutions, resetting the network settings could come in handy. When you reset the network settings, all parameters related to your network are restored to factory settings. So, this might help you get rid of the error.

Step 1: Open the Settings app on your iPhone.

Step 2: Head to Transfer or Reset iPhone. Tap Reset at the bottom and select Reset Network Settings.

Fix 3: Contact Your Carrier’s Customer Support

There’s a good chance that your SIM isn’t functioning the way it should, which is why your iPhone says the SIM is not supported. The best way to deal with any type of issue with your SIM is to contact your carrier. The customer support team can help you resolve any issue with your SIM card, which should ideally get rid of this error.

If your carrier said they couldn’t do anything about it, it’s time to adopt the last resort. Head over to an Apple store and let them have a look at the issue. Ideally, they should help you solve the SIM not supported on iPhone issue by performing a few checks and applying a fix via software.

Was this helpful?

Thanks for your feedback!

6 Best Ways to Access Windows Tools on Windows 11

Windows Tools carries useful utilities like Event Viewer, Task Scheduler, and System Configuration Tool, organized into a folder for easy access. You can use this folder to use important utilities that help configure vital system settings or troubleshoot issues on Windows.

In Window 10, Microsoft labels them as Administrative Tools. However, the same folder name changes to Windows Tools in Windows 11. It packs several useful utilities and programs, but accessing all of them is a bit tricky. To make it easy for you, we have compiled the best ways to access Windows Tools folder on Windows 11.

1. Access Windows Tools Using Run

The Run Tool in Windows comes in handy to quickly access the Registry Editor, the Group Policy Editor, Command Prompt, or run specific commands. Besides that, you can also use it to access Windows Tools on Windows 11.

Here’s how you can do that:

Step 1: Press the Windows + R keys together to access the Run Tool.

Step 2: In the Run dialog that appears, type control admintools. Click OK or press Enter.

Note: Though Microsoft changed the name of Administrative Tools in Windows 10 to Windows Tool in Windows 11, the command to open the latter continues to be the same.

Step 3: When a Windows Tools folder opens, double-click on the tool you want to use.

2. Access Windows Tools Using the File Explorer

File Explorer makes it pretty easy to manage files and folders on your computer. However, its function isn’t only limited to managing files and folders. You can also use it to quickly launch useful utilities such as the Windows Tools on your PC.

Here’s how you can access Windows Tools using File Explorer on your computer:

Step 1: Press the Windows + E keys on your keyboard to open the File Explorer.

Step 2: In the File Explorer window that opens, click on the Address bar, paste the path mentioned below, and press Enter:

Control Panel\All Control Panel Items\Windows Tools

That’ll open the Windows Tools window.

3. Access Windows Tools From the Control Panel

Yet another handy place you can easily find and access the Windows Tools is through the classic Control Panel. Just follow the steps mentioned below to open the Control Panel and easily access the Windows Tools on your Windows 11 computer.

Step 1: Press the Windows + S keys to open Windows Search and type Control Panel. Then, from the results for the Control Panel, click on Open.

Step 2: On the Control Panel window that opens, click on the Category drop-down and select Large icons.

Step 3: Scroll down and click on the Windows Tools option.

Double-click on any tool you want to access from the Window Tools window that appears.

4. Access Windows Tools by Creating a Desktop Shortcut

If you need to access the Windows Tools frequently, you can easily pin it to the desktop as a shortcut.

Here’s how you can create a custom desktop shortcut on Windows 11 that opens the Windows Tools folder:

Step 1: Right-click anywhere on the desktop to open the context menu. Then click on New, followed by Shortcut. 

Step 2: Copy and paste the following path into the text field. Then click on Next.

explorer.exe shell:::{D20EA4E1-3957-11d2-A40B-0C5020524153}

Step 3: Click on the text field and name the shortcut Windows Tools or Admin Tools. Click Finish to create the shortcut.

When that shortcut appears on the desktop, you can double-click it to open the Windows Tools folder directly.

5. Access Windows Tools Using Command Prompt

Whether you need to process batch files, format USB drives, access certain tools and utilities, or perform any other important tasks on your Windows computer, Command Prompt can do it all.

Here’s how you can use the Command Prompt to access Windows Tools on your computer:

Step 1: Press the Windows + S keys to launch Windows Search and type Command Prompt. From the results for the Command Prompt, click on Run as administrator.

Step 2: When a User Account Control (UAC) prompt appears, click on Yes.

Step 3: Type the following command and press Enter to access the Windows Tools:

control admintools

As soon as you press Enter on your keyboard, the Windows Tools window will appear on your computer’s screen.

6. Access Windows Tools Using Windows PowerShell

Apart from Command Prompt, you can also use Windows PowerShell to execute almost all administrative tasks on your PC or launch important system utilities.

Here’s how you can use Windows PowerShell to access the Administrative Tools on your Windows 11 PC:

Step 1: Press the Windows + S keys to open Windows Search and type Windows PowerShell. Then, from the results for the Windows PowerShell, click on Run as administrator.

Step 2: When a User Account Control (UAC) prompt appears, click on Yes.

Step 3: Type the following command and press Enter to access the Windows Tools:

control admintools

That’ll open the Windows Tools window.

Quickly Access Windows Tools on Windows 11

You can easily follow any of the methods listed above to quickly access Windows Tools on any Windows 11 PC and launch other useful utilities using it. Let us know which method you think was the easiest or if there’s any faster and better way to access Windows Tools on Windows 11.

Was this helpful?

Thanks for your feedback!