How to Disable Apps on Android
On Android, you can disable an app from your phone’s Settings menu. Here’s how:
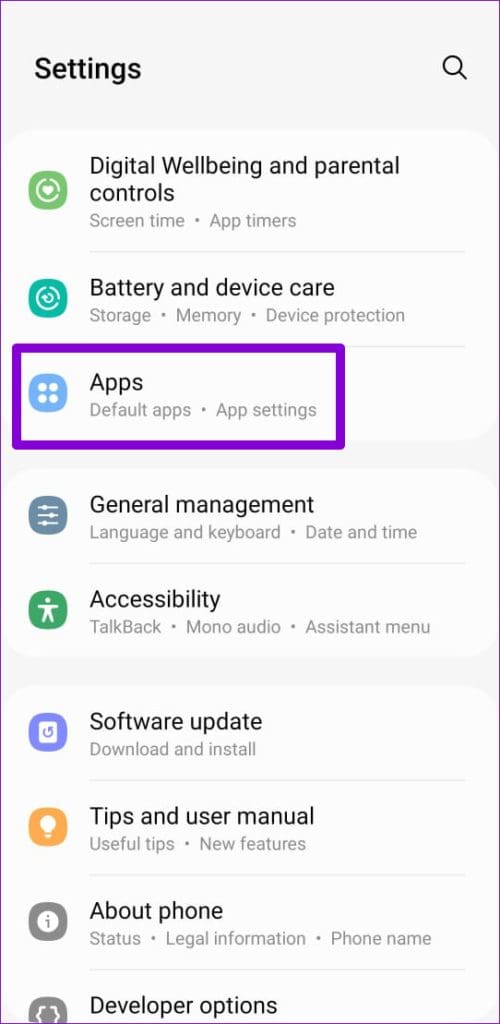
Step 1: Open the Settings app on your phone and scroll down to tap Apps.
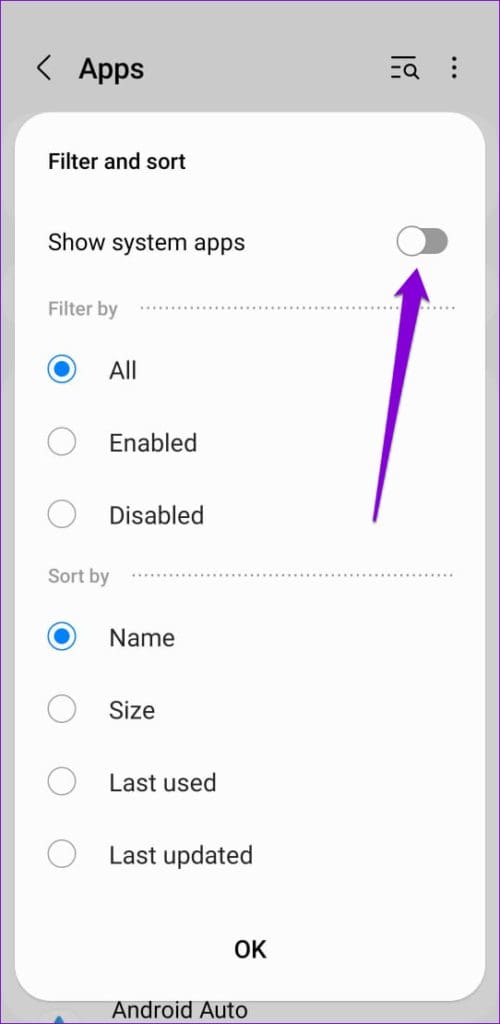
Step 2: Tap the Filter and sort icon and enable the toggle for Show system apps.

Step 3: Scroll through the list or use the search tool at the top to locate and tap the app you want to disable.
Step 4: Tap on Disable at the bottom and select Disable app when prompted.


You can repeat the above steps to disable more apps. Unfortunately, there’s no way to disable multiple apps at once. It’s worth noting that the Disable option will be grayed out for some apps that are critical to the functioning of your phone.
What Happens When You Disable an App on Android
Once you disable an app on Android, its app icon will disappear from your home screen and app drawer. As a result, you can’t open the app or use it anyway. This will also prevent the app from using your phone’s system resources. So, you don’t have to worry about a disabled app using your phone’s internet, battery, RAM, and other resources.
Disabling an app does not remove any of the app’s data from your phone. That way, when you re-enable the app later, you won’t have to go through the trouble of reconfiguring it.
How to Find and Revive Disabled Apps on Android
If you change your mind and decide to re-enable some of your apps, the process is simple. Here’s how to go about it.
Step 1: Open the Settings app on your phone and scroll down to tap Apps.
Step 2: Tap the Filter and sort icon and enable the toggle for Show system apps.
Step 3: Select the app you want to enable. Then, tap on Enable at the bottom.


You can also restore disabled apps on your phone using Play Store. To do so, open the Play Store on your phone and search for the app you want to enable. Open it and tap on Enable.


Was this helpful?
Last updated on 03 July, 2024
Read Next
 What Happens When You Clear Data of an Android App: Popular Apps Explained
What Happens When You Clear Data From an Android App You will be signed out of the account present in the app.
What Happens When You Clear Data of an Android App: Popular Apps Explained
What Happens When You Clear Data From an Android App You will be signed out of the account present in the app.
 What Happens When You Disable and Delete Photos from iCloud
I would be lying if I said cloud photo-storage services are easy to understand.
What Happens When You Disable and Delete Photos from iCloud
I would be lying if I said cloud photo-storage services are easy to understand.
 What Happens When You Update Your Android Phone or iPhone
2 Different Types of Software Updates There are two different types of software updates your device will receive: 1.
What Happens When You Update Your Android Phone or iPhone
2 Different Types of Software Updates There are two different types of software updates your device will receive: 1.
 What Happens When You Force Stop an App on Your Phone
What Does It Mean to Force Stop an App?
What Happens When You Force Stop an App on Your Phone
What Does It Mean to Force Stop an App?
 How to Enable or Disable Autostart for Android Apps
What is Autostart on Android Autostart means that apps will start themselves in the background after they are closed.
How to Enable or Disable Autostart for Android Apps
What is Autostart on Android Autostart means that apps will start themselves in the background after they are closed.
 What Happens When You Block Someone on Facebook
What Happens to Profile and Interactions Like Posts, Comments, Likes, Tags, Stories, Etc.
What Happens When You Block Someone on Facebook
What Happens to Profile and Interactions Like Posts, Comments, Likes, Tags, Stories, Etc.
 What Happens When You Report Someone on Facebook Messenger
Being the largest social media platform worldwide, Facebook comes with several privacy tools to report harassment, restrict the recipient, and prevent others from peeking at your account.
What Happens When You Report Someone on Facebook Messenger
Being the largest social media platform worldwide, Facebook comes with several privacy tools to report harassment, restrict the recipient, and prevent others from peeking at your account.
 What Happens When You Archive a Post on Instagram?
What Happens When You Archive Instagram Post?
What Happens When You Archive a Post on Instagram?
What Happens When You Archive Instagram Post?
The article above may contain affiliate links which help support Guiding Tech. The content remains unbiased and authentic and will never affect our editorial integrity.