Helping millions of people navigate the world of technology.

How to Insert Videos in a Microsoft Word Document

How to Insert an Online Video in Microsoft Word

Microsoft Word for desktop allows you to insert videos from Vimeo, YouTube, and SlideShare. Here are the steps to follow.

Step 1: Open your preferred web browser and go to the site, like YouTube, that hosts the video.

Step 2: Copy the video URL from the address bar at the top.

Copy Video URL

Step 3: Open your Word document > go to the Insert tab > click the Online Videos option from the toolbar.

Insert Videos in Microsoft Word

Step 4: Paste the video URL in the text box and click Insert.

Insert Video in Word

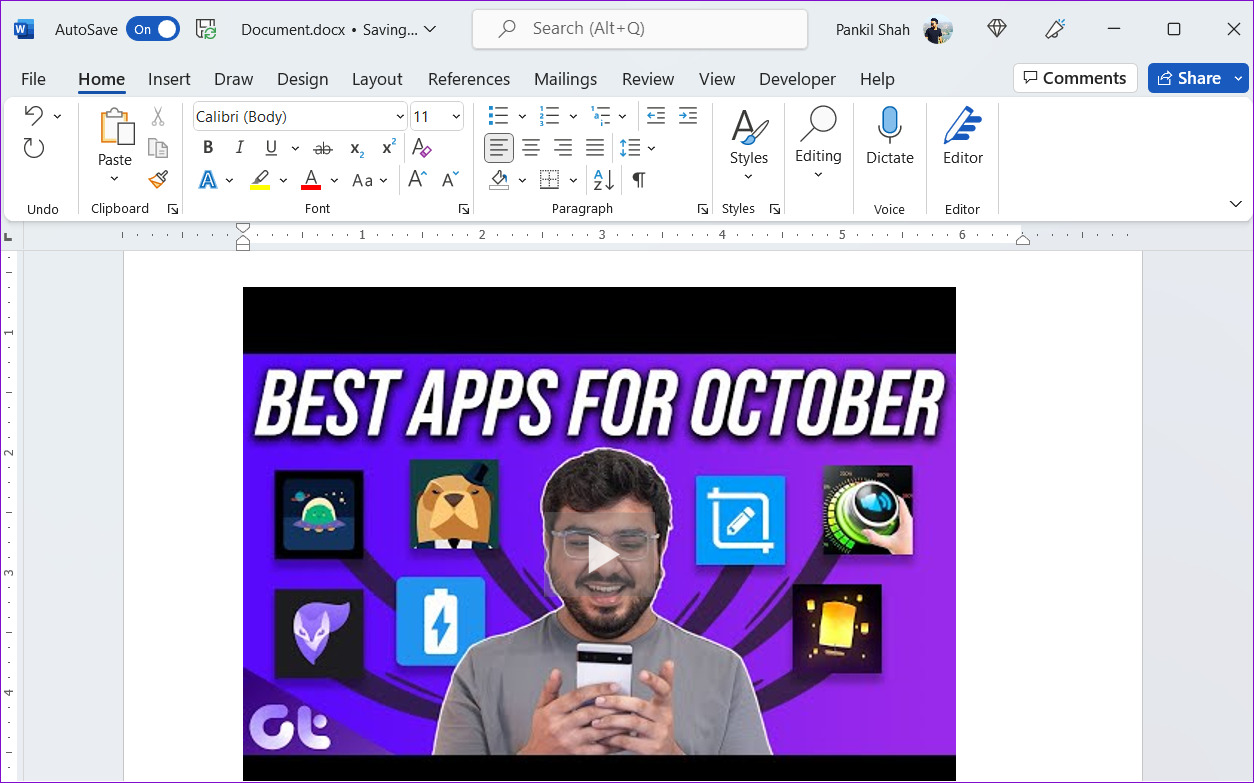
After that, you’ll see the video thumbnail with the play button. You can click the play button to watch the video. Since the video plays directly from the website, you must have an active internet connection to view it.

Play YouTube Video in Word

Also Read: How to enable equation editor in Microsoft Word

How to Insert an Offline Video in Microsoft Word

You can also insert the offline videos or the ones that are on your computer. However, the only catch is that the video will only play when the document is viewed on your computer. Other people won’t see the video if you share the Word document with them.

To insert offline videos in Microsoft Word, you first need to enable the Developer tab in Microsoft Word.

Step 1: Open Microsoft Word and go to File > Options.

Step 2: Switch to the Customize Ribbon tab. Under Main Tabs, tick the Developer checkbox. Then, click OK to save changes.

Enable Developer Tab in Word

After you’ve enabled the Developer tab, you can add offline videos to your Word documents by following the steps below.

Step 3: Open the Word document where you want to insert the video. Click the Developer tab at the top.

Step 4: Click the Legacy Tools icon.

Legacy Tools in Word

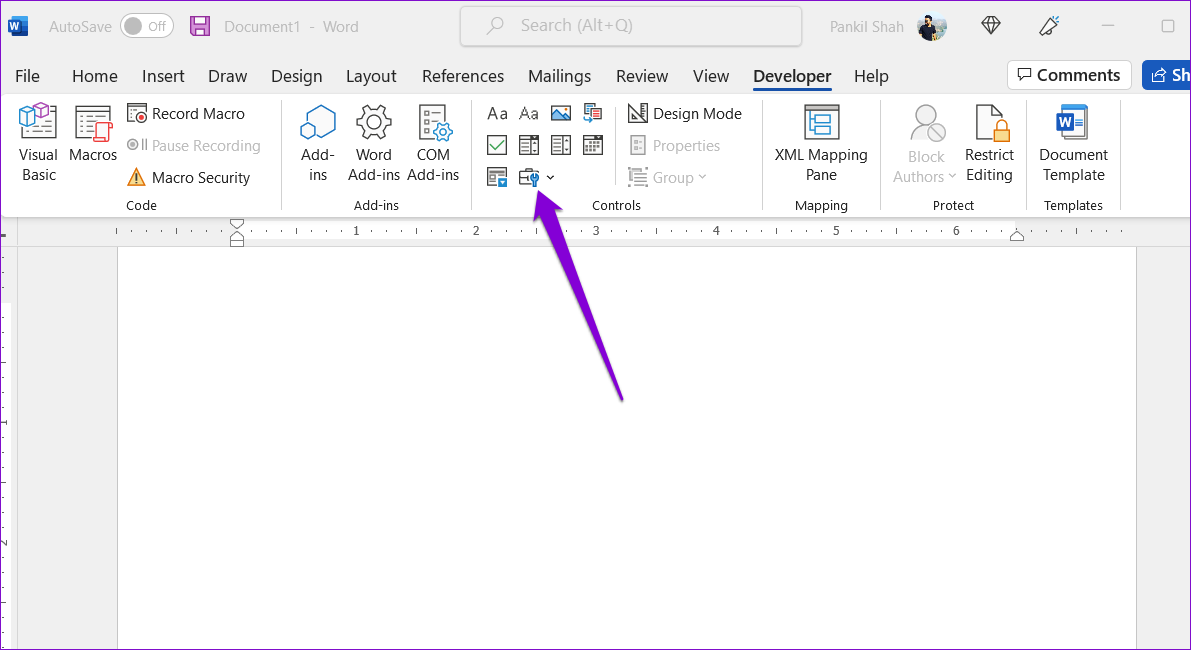
Step 5: Under ActiveX Controls, click the More Controls icon.

More Tools in Word

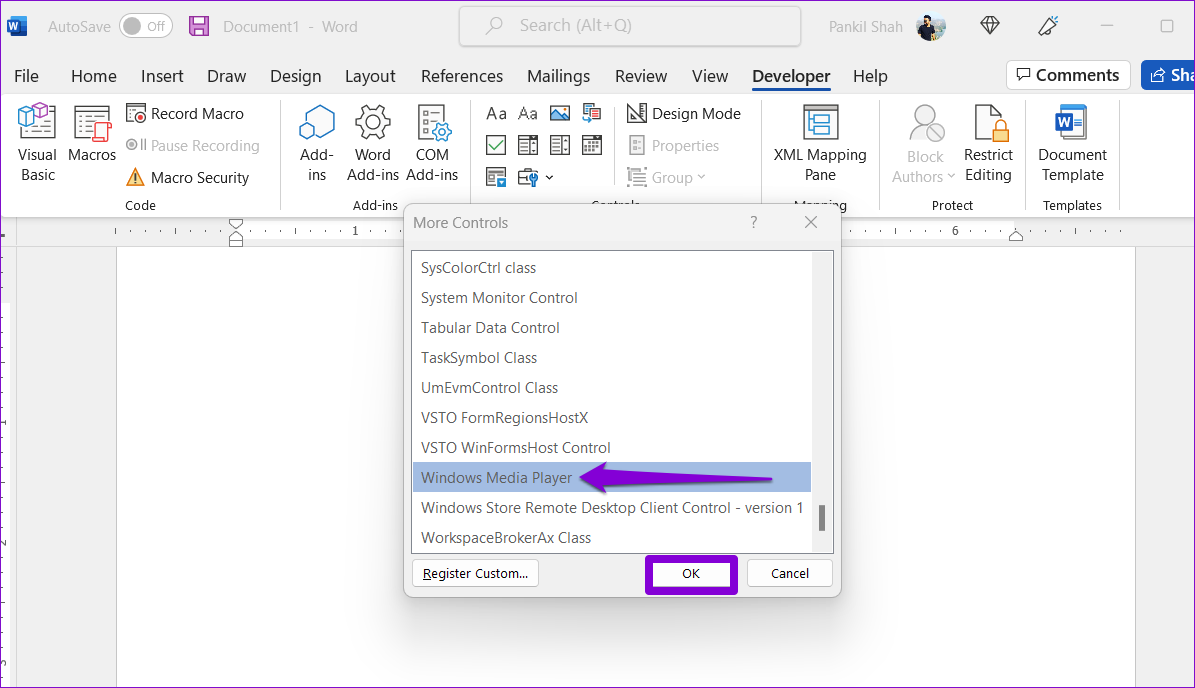
Step 6: In the More Controls window, scroll down to select Windows Media Player from the list > click OK.

Windows Media Player in Word

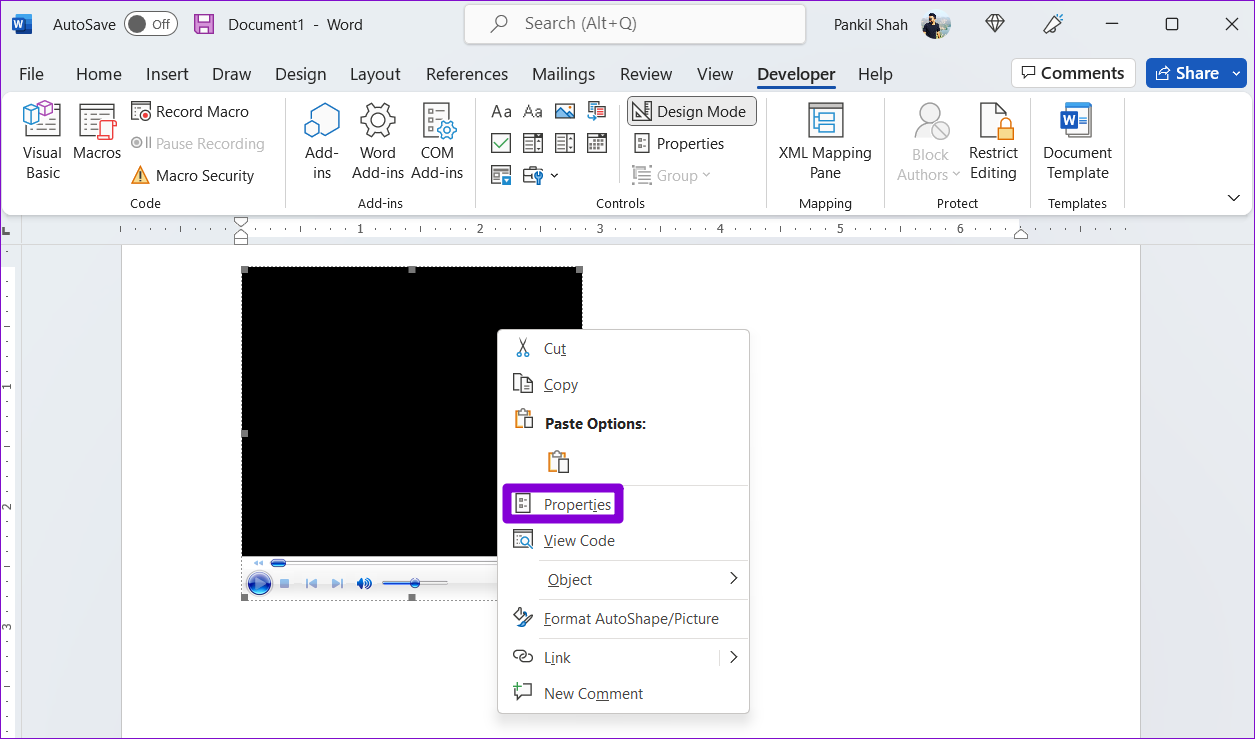
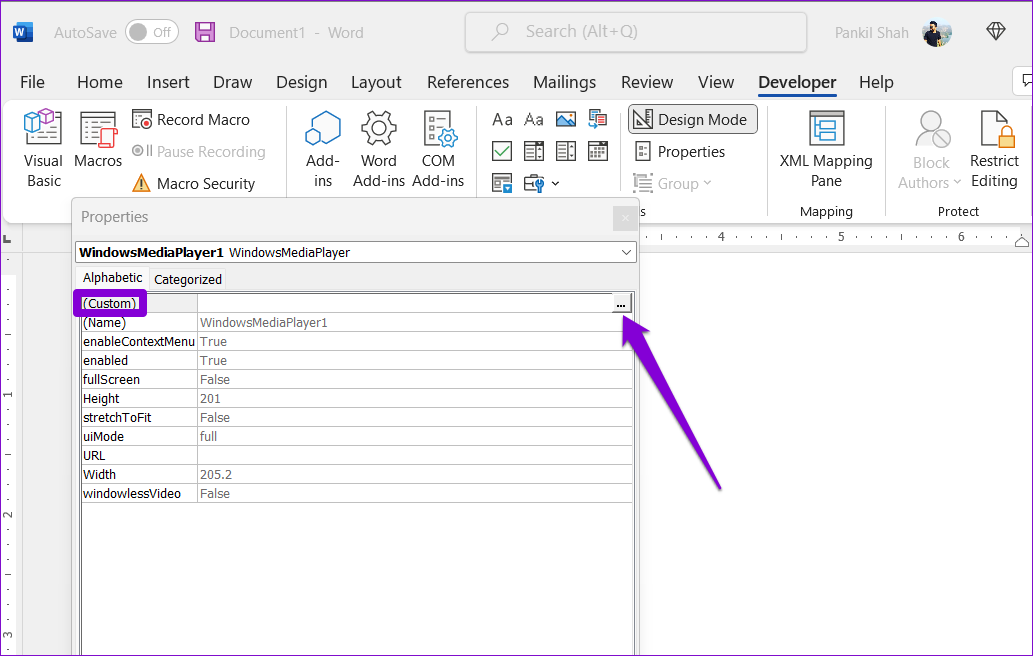
Step 7: A Windows Media Player window should appear in your Word document. Right-click on it and select Properties.

Windows Media Player Properties

Step 8: In the Properties window, click the three-dot icon next to the Custom field.

Add Offline Video to Word

Step 9: Under the General tab, click the Browse button and locate the video file on your PC. Then, click OK.

Add Offline Video to Microsoft Word

Step 10: Head to the Developer tab again and click Design Mode to disable it. Your video will start playing immediately. You can then use the media player controls to play, pause, and skip forward or backward as you see fit.

Disable Design Mode in Word

How to Insert an Online Video in Word Online

Using Word for the Web, you can insert online videos. Word for the Web currently supports embedding content from many popular platforms, including YouTube, Microsoft Stream, Vimeo, and TED Talks.

To insert an online video in Word for the web:

Step 1: In your web browser, navigate to the video you want to insert and copy its URL from the address bar.

Step 2: Visit Microsoft Word for the web and sign in to your account.

Step 3: Open the document where you wish to add the video. Click the Insert menu at the top and then click Online Video.

Insert Video in Word Online

Step 4: Paste the video URL copied earlier and click the Insert button.

Insert Video in Word for the Web

After inserting the video, you can play it or resize and move the video thumbnail as needed.

Was this helpful?

Thanks for your feedback!

What Does Your Location Is Currently in Use Mean on Windows

Why Do Apps Track Your Location on Windows

Weather, Maps, and news widgets frequently use your location to deliver astute results. When you routinely travel from one place to another with your Windows laptop, the location service helps these apps to show accurate information. After all, you won’t want to see New York weather conditions when you are in California.

Windows location services also kick in when you use Google Earth, Amazon (to determine your location for deliveries), and other web services that require your current location to function properly. Using third-party YouTube apps on Windows (such as myTube) requires your location to show local content on the homepage.

However, not every third-party app tracks your location with good intentions. Some apps might track your location all the time for advertising purposes. Windows has a handy Privacy menu to disable location permission for unknown apps on your PC.

Disable Location Permission for Selected Apps

Step 1: Press the Windows + I keys shortcut to open Settings on your Windows PC.

Step 2: Select Privacy & security from the left sidebar. Scroll to App permissions > click Location.

Location section under privacy and security

Step 3: Check which apps have permission to access your location. Now, disable location permission for apps that seem unnecessary.

Turn off location access for apps

You can also see which apps have accessed your location in the last seven days. Click on Recent activity from the same menu to view the app’s name, date, and time for location access.

Check recent activity to find which apps have requested for your PC location

Turn off Location Access Entirely

Step 1: Open the Location menu in Windows Settings (refer to the steps above).

Step 2: Turn off the Location services toggle.

Disable Location services in Windows PC

Delete Location History on Windows

Step 1: Go to Privacy & security in Windows settings and select Location.

Location Privacy and Security

Step 2: Scroll down and select Clear beside Location history, and you are good to go. Once cleared, Windows will display a checkmark beside the Clear button.

Clear Location history

Set Default Location on Windows 11

Step 1: Open the Location menu in Privacy & security (check the steps above).

Step 2: Scroll to the Default location and select Set default.

Set default location in Windows PC

Step 3: It will open the default Maps app on Windows. Use the search bar at the top-left corner to pin your precise location.

Change location using Maps in Windows

Was this helpful?

Thanks for your feedback!

15 Scary Halloween Wallpapers (4K) for iPhone and Android

It’s that time of the year when you dress to imitate supernatural and scary beings. But why leave your smartphone behind? With Halloween just around the corner, check out our latest collection of scary Halloween wallpapers to complement your phone with your attire.

scary and spooky Halloween wallpapers for Android and iPhone

These Halloween wallpapers are compatible with iPhone as well as Android devices. Mind you, almost all wallpapers are contrasty. Therefore, if you use some widgets on iPhone or Android, you might have to tweak the settings a little to go well with the wallpaper.

Note: The image previews are just for presentation and hence, are in low resolution. To get these Halloween wallpapers for free in 4K resolution, tap on the download button below the images.

1. Aesthetic Halloween Background

The wallpaper is a fusion of modern design with a Halloween effect. It could be an excellent fit if you own a black/dark-colored device or are into dark mode.

aesthetic Halloween wallpaper for smoky background

2. Minimal Halloween Wallpaper

The cool Halloween wallpaper for all the minimalists out there. This wallpaper isn’t as scary as others on the list but is minimal and so neat! 

minimal Halloween wallpaper for any phone

3. Scary Halloween Wallpaper

Imagine having this wallpaper on your phone and waking up at midnight to check a notification. Your heart will skip a beat, and so will your friends if you prank them with this horrific wallpaper. This is one of the scariest on this list.

scariest Halloween wallpaper for iPhone or Android phones

4. Trick Or Treat

A scary-looking being with its soul sucked out in blood red, what’s scarier? This could make a great Halloween wallpaper for any phone.

scary looking Trick Or Treat Halloween phone wallpaper

5. Disney Halloween Wallpaper

This free to use wallpaper is a funny take on Halloween. It features Disney characters and would be a more suitable fit for kids’ phones. A must-try this year, what say?

cute Halloween wallpaper featuring Mickey Mouse and other Disney characters

6. Anime Halloween Wallpaper

The wallpaper is exclusively for Anime fans who want to incorporate Halloween mode. The wallpaper depicts the scariness of this Halloween and could be a significant revamp for your device.

Halloween anime wallpaper in 4K

7. Cool Halloween Wallpaper

This free Halloween wallpaper is funky in nature. This makes it a more desirable choice for someone who does not want a scary image as their wallpaper, but an elegant one yet in a Halloween theme. 

cool Halloween wallpaper for your phone

8. Spooky Halloween Wallpaper

If you are old school, you will love this wallpaper. Typical Halloween ghost or spirit that scares you enough to intimidate others and would remind you of the movie Casper.

Spooky Halloween Wallpaper with a ghost

9. Fall Halloween Wallpaper

There’s no doubt that this wallpaper will look great on all phones and quickly gel with your eyes since it’s more orange and yellow. 

Fall Halloween Wallpaper for phone with any screen size

10. Cute Halloween Wallpaper

A classic Halloween pumpkin lit up. This wallpaper gives the perfect Halloween vibes without being as scary. It is sure to be the best Halloween wallpaper on this list. 

Cute Halloween Wallpaper with a large and some small pumpkins

11. Dark Halloween Wallpaper

Pumpkin hung in a dark room with torn clothes and a Marshmallow expression; isn’t it enough to convince you to change your phone’s wallpaper? Well, there’s a high chance that it would remind you of Joker in the movie ‘The Dark Night Rises.’

Dark Halloween Wallpaper with pumpkin on the head

12. Halloween Pumpkin Wallpaper

It is a bright and colorful Halloween pumpkin wallpaper with a touch of scariness. 

free Halloween Pumpkin Wallpaper for your phone

13. Animated Phone Background

This abstract toony pumpkin wallpaper will make your phone stand out. It is spooky and cute in equal measure and can also be a long-term wallpaper for your lockscreen or homescreen.

abstract toony pumpkin wallpaper for Halloween

14. Black Halloween Wallpaper

Watched the movie ‘The Nun’? Well, this free Halloween phone wallpaper resembles that. We won’t describe the specifics of the wallpaper, yes we’re scared. 

Halloween wallpaper showing White scull in the dark Black background

15. Halloween Cat Wallpaper

If you are a cat lover and wanted a collated Halloween aura, this is the Halloween wallpaper you are looking for. It features a cute cat coming out of a Halloween pumpkin. It couldn’t be any better. 

Cute cat sitting on a pumpkin

Happy Halloween 🎃

These were the best free Halloween phone wallpapers that you can use this season. Some wallpapers will stand out, and some might be very scary. However, don’t stop yourself from trying all the wallpapers.

Choose the one that best fits your Halloween costume and your phone. Being yourself is the best way to embody the Halloween vibe. Happy Halloween!

Was this helpful?


Thanks for your feedback!

3 Best Ways to Enable Drag and Drop on Windows 11

Windows 11 introduced a ton of new features along with a design refresh during its release. For example, you can batch rename files and password-protect your folders in Windows 11. But one essential feature seems to be missing – Drag and Drop.

It is difficult drag and drop files to the Taskbar on Windows 11 computers. In this post, we bring you the three best ways to enable Drag and Drop in Windows 11 so that your usage becomes smoother.

1. Update to Windows 11 22H2

After a lot of users expressed their concerns regarding this feature, Microsoft released the Windows 11 22H2 update for everyone. This update brings a lot of new features, including the much-demanded Drag and Drop to the Taskbar. Here’s how you can update your Windows 11 PC to enjoy this feature.

Step 1: Click the Windows icon in the taskbar, type Settings in the Search bar, and press Enter.

Step 2: Click on Windows Update in the top-right corner.

Step 3: If you see the update for Windows 11 22H2, download and install it.

Step 4: After the installation completes, you can drag and drop files to the Taskbar.

In case you don’t wish to install this new update but still enable Drag and Drop, keep reading the next solutions.

2. Use Alt + Tab Shortcut

Alt + Tab is the command for switching between windows of apps and folders on your Windows computer. This feature has been there for quite a long time, and you can use it intelligently to drag and drop files on Windows 11. Here’s how.

Step 1: Open the file location from where you want to drag and drop it.

Step 2: Select, drag and keep pressing the mouse button.

Step 3: Press and hold Alt + Tab on your keyboard to navigate between different windows. Keep pressing the mouse button to hold the selected file.

Step 4: Release Alt + Tab when you are in the desired file location.

Step 5: Release the mouse button to drop the file in that location.

3. Use Registry Editor

Registry Editor is a centralized database on your Windows computer that stores critical information, options, settings, and details of all the applications. You can check and fix many system errors by adjusting a few settings in Registry Editor. You can change the drag-and-drop sensitivity settings if you want to enable the Drag and Drop feature on your Windows 11 computer.

Do note that changing the Registry Editor can cause irreversible damage to your Windows computer. We recommend moving ahead with the steps mentioned below only if you have a thorough knowledge of Registry Editor.

Step 1: Press Windows + R to open the Run dialog box.

Step 2: Type regedit and press Ok.

The Registry Editor window will open on your screen. We strongly suggest following every step carefully.

Step 3: Click on ‘HKEY_LOCAL_MACHINE from the left pane.

Step 4: Select Software from the list of folder options.

Step 5: Under Software, scroll down and click on Microsoft.

Step 6: Scroll down and click on Shell.

Step 7: Click on Update.

Step 8: Under Update, click on Packages.

Ifyou aren’t able to see any folders during the process, type the following file patch in the Search Bar on the top:

HKEY_LOCAL_MACHINE\SOFTWARE\Microsoft\Windows\CurrentVersion\Shell \Update\Packages

Step 9: In the Packages folder, right-click in the empty space on the right side.

Step 10: Click on New. Then click on DWORD (32-bit) Value.

That’ll create a ‘New Value’ key in the Registry Editor.

Step 11: Right-click the new value and select Rename.

Step 12: Rename the new value as UndockingDisabled.

Step 13: Right-click on the renamed value and select Modify.

Step 14: Change the Value Data from 0 to 1. Then click Ok.

Step 15: Close the window and restart your PC by right-clicking the Start icon and selecting Restart.

After your computer restarts, you will notice that the taskbar looks like the one in Windows 10. But do note that Start, Search and Cortana will not open from the Taskbar. Rest everything on the taskbar will open as usual.

You can now drag and drop files to the taskbar easily.

If you want to restore the Windows 11 default taskbar, here’s how to do it.

Step 1: Open Registry Editor again by typing regedit in the Run Command Box.

Step 2: Go to the Packages folder where you have saved the UndockingDisabled value.

Step 3: Right-click on UndockingDisabled and select Delete.

Step 4: Click on Delete again to confirm your choice.

Step 5: Close the window and restart your PC by clicking the Start icon in the Taskbar.

The default Windows 11 taskbar will be restored. You can check our post suggesting solutions for Registry Editor not working in Windows 11 if you face any issues.

Drag and Drop Files

These methods will help you to enable the drag and drop functionality on your Windows 11 PC. While it’s entirely your choice, we suggest updating your computer to the latest Windows 11 22H2 version to enjoy this feature.

Was this helpful?


Thanks for your feedback!

5 Fixes for Unable to Open Attachments in Microsoft Outlook on Windows

Fix 1: Check Attachment Handling Settings

If Outlook is unable to open your email attachments, it may be because the file previewer option is disabled. Here’s how to enable it.

Step 1: In the Outlook app, click the File menu in the top left corner.

Outlook File Menu on Windows

Step 2: Select Options from the left sidebar.

Open Outlook Options

Step 3: Switch to the Trust Center tab and click the Trust Center Settings button.

Open Outlook Trust Center

Step 4: In the Attachment Handling tab and uncheck the Turn off Attachment Preview checkbox.

Enable Attachment Preview in Outlook in Windows

Step 5: Click on Attachment and Document Previewers and make sure all the previewers are active. Then, hit OK.

Enable Previewer in Outlook in Windows

Restart Microsoft Outlook after this and see if you can open attachments.

Fix 2: Open Microsoft Outlook in Safe Mode

When you open Microsoft Outlook in safe mode, the app runs without any add-ins. If a third-party Outlook add-in is causing trouble, using Outlook in safe mode will help you verify that.

To launch Outlook in Safe Mode, hold down the Ctrl key and double-click the Outlook shortcut. Click Yes when the confirmation prompt appears.

Open Outlook in Safe Mode on Windows 11

Now, check if Outlook can open attachments while in safe mode. If it can, one of the third-party add-ins could be to blame for the issue. You will need to disable all Outlook add-ins and then re-enable them one at a time to find the one causing the issue.

Step 1: Click on the File menu at the top and select Options.

Step 2: In the Outlook Options window, switch to the Add-ins tab. Use the drop-down menu next to Manage and select COM Add-ins. Then, click on the Go button.

Disabled Outlook Add ins

Step 3: Uncheck all the boxes to disable add-ins and click on OK.

Disable Outlook Add ins on Windows

Restart Outlook in normal mode and enable your add-ins one by one to isolate the culprit.

Fix 3: Clear Outlook Cache

Corrupt Outlook cache data may also prevent the app from functioning normally. If that’s the case, clearing Outlook’s cache files should help.

Step 1: Press the Windows key + R to open the Run dialog.

Step 2: Type the following path in the Open field and press Enter:

%localappdata%\Microsoft\Outlook\RoamCache

Step 3: Select all the files inside the RoamCache folder and click the trash icon at the top to delete them.

Delete Outlook Cache on Windows

Restart Outlook and inspect the mail attachments again.

Fix 4: Temporarily Disable Antivirus Program

Your antivirus software may prevent Outlook from loading or opening suspicious attachments. However, it can occasionally block legitimate files and cause issues. If you’re confident about the file source, you can disable your antivirus program temporarily and then try to open the attachment again.

Make sure you re-enable the antivirus program after viewing your attachments.

Fix 5: Use Outlook’s Data File Repair Tool

If you are still unable to open your email attachments, the issue could be related to Outlook data files on your PC. You can use Outlook’s Repair tool to fix the issue.

Step 1: Open File Explorer on your PC and navigate to the following folder.

C:\Program Files\Microsoft Office\root\Office16

Step 2: Double-click on the SCANPST.EXE file to open it.

Scan Outlook Inbox in Windows

Step 3: Click on Start to initiate the scan.

Run Outlook Inbox Repair

Step 4: If the tool finds any issues, click on Repair.

Outlook Inbox Repair Tool in Windows

Reopen Outlook on your PC. Following this, you should be able to open attachments without any issues.

Was this helpful?

Thanks for your feedback!

6 Ways to Free Up Space on Windows 11 Without Deleting Apps

Method 1. Remove Temporary Files

You can use the default Storage menu to find and remove temporary files on your PC. Here’s how.

Step 1: Open Windows Settings and navigate to System > Storage.

Windows Storage Temporary Files

Step 2: Click on Temporary files to open the section where you can check the box for Recycle Bin, Windows Update Cleanup, Delivery Optimization Files, Windows upgrade log files, and other suggestions.

Note: Be careful before enabling the checkmark for Downloads. It will delete all your files from the Downloads folder.

Step 4: Click on Remove files at the top.

Windows Storage Remove temp files

Method 2. Check and Remove Other Files

Step 1: Head to the Storage menu in Windows 11 Settings and click on Other.

Windows Storage Others

Step 2: It will list large folders and their storage size next to them. Click on it to open them in the File Explorer app, and you’ll find large folders.

Delete files from large size folders

Step 3: Right-click on them and press the Delete icon from the context menu. After removing large files, head to the Recycle Bin to empty it.

Delete folder from file explorer

Method 3. Manage Your Mail Storage

Step 1: Go to the Storage menu in Windows Settings (check the steps above) and click on Mail.

Ope Mail section in Windows Storage

Step 2: Click Manage mail from the following menu and remove unnecessary emails from the default Mail app.

Manage Mail app

Method 4. Find Large, Unused, and Synced Files

Step 1: Go to the Storage menu in Windows Settings.

Step 2: Select Cleanup recommendations and expand Large and unused files.

Clean up recommendations

Step 3: Select the files you want to remove and click on Clean up.

Delete old files

Step 4: Expand Files synced to the cloud, select files, and click on Clean up.

Delete Recent Files

Method 5. Free Up Space Using OneDrive

Thanks to OneDrive files on-demand, you can upload large files to the cloud storage service and make them available offline only when required.

Step 1: Open the File Explorer app (Windows + E keys).

Step 2: Move large files from your local drive to OneDrive.

Step 3: Right-click on such files or folders and select Free up space from the context menu.

Free up space OneDrive

File Explorer will remove those files and save them to OneDrive only.

Method 6. Enable Storage Sense

Enabling storage sense automatically frees up space, deletes temporary files, and manages locally available cloud content.

Step 1: Open the Storage menu in Windows Settings 

Step 2: Toggle on Storage Sense.

Was this helpful?

Thanks for your feedback!

6 Fixes for Alt + Tab Shortcut Not Working on Windows 11

First, check whether there’s any issue with your keyboard. To check whether it’s a malfunctioning keyboard or a software-related issue, connect the keyboard to another PC and inspect if it works as expected. If the keyboard doesn’t work, refer to our guide on fixing the keyboard not working on Windows 11.

Alternatively, almost all Windows-compatible keyboards come with two sets of Alt keys—one on the right and one on the left. Test both Alt keys to check which one functions to narrow down the faulty one.

Fix 2. Check if Alt + Tab Is Properly Configured in Settings

Step 1: Press the Windows + I Keys on your keyboard to open the Settings app. Then, scroll down and click on Multitasking.

Multitasking settings in Windows System

Step 2: On the Multitasking page, expand Desktops.

Desktops option in Multitasking

Step 3: Under the Desktops section, click on the drop-down beside Show all open windows when I press Aft + Tab and select On all desktops.

Enable Alt + Tab on all desktops

Fix 3. Restart the Windows Explorer or File Explorer

Step 1: Press the Windows + X keys to open the Power User menu and select Task Manager.

Open Task manager from  the Power Menu

Step 2: Head to the Processes tab and select the Windows Explorer process in the Task Manager window. Then, click on Restart task at the top.

If you see multiple processes related to Windows Explorer, select the one with more memory usage.

Find Windows Explorer in Task manager

Fix 4. Enable Peek at Desktop

The Peek feature in Windows lets you hover on the right-hand corner of the Taskbar or use the Ctrl + , (Comma) shortcut to peek at the desktop. Further, the Alt + Tab shortcut also relies on Peek to work correctly. If the peek feature is not on your PC, the Alt + Tab shortcut might not work as expected.

Step 1: Press the Windows + R keys to open the Run tool and type sysdm.cpl. Then, press Enter.

Step 2: In the System Properties window, select the Advanced tab. Then, click on Settings under the Performance section.

Advanced Tab in System Properties

Step 3: When the Performance Options dialog box appears, check the box for Enable Peek if it isn’t already enabled. Then, click Apply.

Check Enable Peek in Performance Options

Fix 5. Check if Windows Hotkeys Are Enabled

Step 1: Type Edit group policy in the Start menu search. When it appears in the search results, click on Open.

Step 2: Navigate to the following path:

User Configuration > Administrative Templates > Windows Components > File Explorer
File Explorer option in Local Group Policy Editor

Step 3: Open the Turn off Windows Key hotkeys policy and double-click on it.

Find Turn off Windows key hotkeys

Step 4: In the Turn off Windows Key hotkeys dialog box window, check whether the policy is not enabled and is set to Not Configured or Disabled.

Choose between Not Configured and Disabled in Policy

Step 5: If this policy is enabled, click Not Configured, followed by Apply. Then, restart your PC and check if it fixes the Alt + Tab shortcut.

Fix 6. Switch to the Legacy Alt + Tab Viewer

Step 1: Press the Windows key + R keys to open the Run dialog. In the text field, type regedit and press Enter.

Step 2: Copy and paste the following location into the Navigation bar:

HKEY_CURRENT_USER\Software\Microsoft\Windows\CurrentVersion\Explorer
Go to Explorer settings in Registry Editor

Step 3: Right-click anywhere in the right pane and select DWORD (32-bit) Value.

Create new DWORD

Step 4: Type AltTabSettings and press Enter to create the DWORD (32-bit) Value.

Create ALTABSETTINGS DWORD

Step 5: Double-click the newly created AltTabSettings entry and set its Value data to 1. Then, click on OK to save the changes.

Set value for ALTABSETTINGS

Step 6: Restart your computer to apply the registry changes and check if pressing the Alt + Tab shortcut opens the app switcher.

Was this helpful?

Thanks for your feedback!

4 Fixes for Amazon Prime Video App Not Working on Windows 11

Basic Fixes:

  • Check device limit: You can use Prime Video to stream content on up to three devices using your account. You can deregister the device from your Prime Video account.
  • Disable VPN: A VPN connection can interrupt content playback for your region. We suggest disabling your VPN connection.
  • Check Prime Video server status: Visit Downdetector to check if Prime Video servers are undergoing downtime in your region.

Fix 1: Check Your Billing Status

First, check the billing status of your Prime Video account. If your Prime Video account does not process the yearly or monthly subscription fee, it will not work properly on any device, including Windows PCs. Here’s how to check it and make changes if necessary.

Step 1: Open Prime Video in your browser and sign in to your account.

Step 2: After logging in, click the profile icon at the top-right corner.

Step 3: Select Accounts and Settings from the options.

You might be asked to enter your Amazon account password again.

Step 4: If the payment was not processed, go to the Account and Settings page and click on Edit on Amazon next to Prime Membership.

Step 5: After the Amazon web page is loaded, click on View your payment Method at the top.

Step 6: Click on Edit Payment Method at the bottom. Now, you can add a new payment method or select a previously added payment method.

Fix 2: Update the Display Drivers

If the app is still not working, try updating the display drivers of your Windows 11 computer. It is possible that the current display driver version on your Windows 11 computer is not compatible enough to run the Prime Video app. Here’s how to update. Do note that Prime Video on Windows does not support 4K HDR content playback.

Step 1: Open Device Manager on your Windows 11 computer.

Step 2: Click on Display Adapters.

Step 3: Right-click on the Display Driver name > select Update driver.

Step 4: Click Search Automatically for Drivers to start the process.

Fix 3: Run Microsoft Store Apps Troubleshooter

You can use the built-in troubleshooter for the Microsoft Store app on your Windows 11 PC to check and fix the problems with the Prime Video app, if there are any. Do note that Windows 11 Insider Build 25169 or higher will show Microsoft Store apps troubleshooter as Windows Store Apps.

Step 1: Open Settings > System > Troubleshoot > Other troubleshooters.

Step 2: Scroll down and click on Run next to Windows Store Apps.

Step 3: Follow the on-screen instructions to finish the troubleshooting process.

Fix 4: Reset the Prime Video App Settings

The next solution is to reset all settings for the Prime Video app on your Windows 11 PC. This process will remove information like login details, watch history, and downloaded content from your computer.

Step 1: Open Settings > Apps > Apps & Features.

Step 2: Under Apps and Features, look for Prime Video for Windows.

Step 3: Click the three dots next to Prime Video for Windows > choose Advanced options.

Step 4: Scroll down and click on Reset. Click on Reset again to confirm your choice.

Tip: Read our post to learn how to change Prime Video account on Firestick, TV, and mobile.

Was this helpful?

Thanks for your feedback!

4 Ways to Fix Depth Effect Wallpaper Not Working on iPhone

Which iPhone Models Support the Depth Effect Feature

The depth effect feature is only available on iPhones with an A12 Bionic chip or later. In other words, you can only use this feature on the following iPhone models:

  • iPhone XR, XS, and XS Max
  • iPhone SE (2nd and 3rd Gen)
  • iPhone 11, 11 Pro, 11 Pro Max
  • iPhone 12, 12 mini, 12 Pro, 12 Pro Max
  • iPhone 13, 13 mini, 13 Pro, 13 Pro Max
  • iPhone 14, 14 Plus, 14 Pro, 14 Pro Max

Try Basic Fixes

  • Force reboot iPhone: Sometimes, temporary glitches with your iPhone can cause the depth effect feature to stop working. To fix this, press and release the Volume Up button, then press and release the Volume Down button. Then, press and hold the Power button until the Apple logo appears.
  • Install iOS updates: If the depth effect not working issue is limited to the iOS build your iPhone is running, installing newer updates should help. Open the Settings app and head to General > Software Update to download and install pending updates.

1. Check If Depth Effect Is Enabled

Although the depth effect feature kicks in automatically when you use a supported wallpaper, you can double-check and ensure that you haven’t disabled the feature by mistake. Here’s how.

Step 1: Unlock your iPhone with Face ID and then long-press on your lock screen to edit it.

Step 2: Tap the Customize button at the bottom.

Step 3: Tap the three-dot menu icon in the bottom-right corner and enable the Depth Effect option if it isn’t already selected.

Fix 2: Remove Lock Screen Widgets

On the iPhone, you cannot use those lock screen widgets and the depth effect feature at the same time. So, to enjoy the depth effect on the lock screen wallpaper, you must remove any widgets from your lock screen.

To remove lock screen widgets, unlock your device and stay on the lock screen. Tap and hold the lock screen and then tap on the Customize button at the bottom. Tap the widget panel and use the minus sign next to a widget to remove it.

Fix 3: Check the Image File Format

The depth effect may not work if your lock screen wallpaper is not in the JPEG format. To check your wallpaper’s format, open it in the Photos app and tap the info icon at the bottom. In the overlay pane, you’ll see the image file format.

If your image is in an unsupported format, you’ll have to convert it to JPEG or use another wallpaper to enjoy the depth screen effect. Note that the depth effect might not work if your iPhone fails to recognize the subject in your photo. Ideally, you should use an image in which the subject is distinguishable from the background.

Fix 4: Reposition or Crop the Wallpaper

If the depth effect is not working despite using a supported wallpaper, you may have to reposition or crop your image. If the subject of your wallpaper happens to cover the majority of your clock area, the depth effect will not work as expected.

Step 1: Unlock your iPhone and stay on the lock screen. Then, long-press on your lock screen and tap the Customize button at the bottom.

Step 2: Use the pinch gesture to zoom in and zoom out. Adjust the wallpaper in a way that the depth effect works. You can preview the depth effect as you reposition the image.

Step 3: Tap on Done in the top right corner to save changes.

Was this helpful?

Thanks for your feedback!

5 Ways to Fix Android Phone Not Making Calls But Can Text

Basic Fixes

  • Eject and re-insert SIM: Eject the SIM card from your phone, and insert it again – doing this can refresh the network connection.
  • Move to a different surrounding: You might be trying to place a call in an area with less network coverage, or the problem is localized due to the presence of network jammers
  • Restart device: Restart your Android device to fix temporary bugs and glitches with the network.
  • Check the caller’s network connection: Sometimes, it may not be the problem with your phone or network.
  • Update device: Update your device to the latest available Android version for a bug-free experience.

Fix 1: Fix Issues With Dialer App

If the Phone app is facing issues on your Android device – it may not let you place phone calls. Here’s how you can fix it.

Tap and hold the Phone app icon, and select app info.

  • You can Force Stop the app, and restart it to resolve temporary glitches.
  • You can also try clearing the cache to remove junk files that may cause issues.
  • A recent update to the app may be causing issues – tap on the three-dots icon, and select Uninstall Updates.

Fix 2: Check Default SIM for Calls

Ensure the preferred SIM selected for making calls has an active plan and supports outgoing calls.

Open Settings, go to Mobile Network > SIM preferences, and check the preferred SIM for Voice Calls.

Fix 3: Change Preffered Network

Try changing the preferred network on your SIM to improve the phone call quality. You may not reciev good 5G signal strength in all areas.

Open Settings > Network and Internet > SIMs > Preferred network type and select LTE or 3G.

Fix 4: Disable and Enable SIM

Re-activating SIM cards can establish a fresh connection, thereby removing any bugs that is prevent you from making phone calls.

Open Settings > Mobile network, select the SIM card, and turn it off and turn it on.

Fix 5: Reset Network Settings

Resetting network settings can help erase any bugs that are affecting phone calls on your Android device. Therefore, doing so can also fix the problem.

Open the Settings app, go to Back up and Reset > Reset Phone > Reset network settings.

Was this helpful?

Thanks for your feedback!

How to Use WhatsApp on Apple Watch

Have you been wondering whether WhatsApp works on Apple Watch? Well, the answer is both yes and no. Basically, WhatsApp doesn’t have an official app for Apple Watch. So, you will have to rely on workarounds to use WhatsApp on Apple Watch.

How_to_Use_WhatsApp_on_Apple_Watch

There are two ways to get WhatsApp on your watch. You can either use the native method of simply receiving WhatsApp notifications on the watch or use a third-party app to use the modified web version of WhatsApp on the Apple Watch. Let’s check both methods in detail.

Method 1: Get WhatsApp Messages on Apple Watch

In this method, you will only be able to receive and view new WhatsApp message notifications on your Apple Watch. You cannot start a new message, view older messages, or view images. However, you can reply to new messages either by voice typing, through suggested replies, or by scribbling the reply.

Follow the steps given below to receive WhatsApp notifications on your Watch.

1. Enable WhatsApp Notifications

Step 1: After pairing your Apple Watch with your iPhone, open Settings on your iPhone.

Step 2: Go to WhatsApp.

Step 3: Select Notifications and enable the toggle next to Allow notifications. Also, make sure the Lock Screen and Notification Center options are checked under the Alerts section.

Tip: Learn how to fix WhatsApp not receiving messages.

2. Enable WhatsApp Notifications on Apple Watch

Step 1: Now, open the Apple Watch app on your iPhone.

Step 2: Tap on Notifications.

Step 3: Scroll down until you see WhatsApp. Enable the toggle next to it.

3. Reply to WhatsApp Notifications

Step 1: Now, you will receive WhatsApp notifications on your watch. Tap on a notification to view and reply to it. You will get two options – Reply and Dismiss. Tap on Reply to reply to a message or hit the Dismiss button.

Note: If you dismiss a notification, you cannot access it again from your Apple Watch.

Step 2: After tapping on Reply, you can either send a reply from the available suggestions like hello, What’s up, ok, etc., or tap on the Reply text box to scribble a reply.

Tip: You can even send an emoji or use the voice-to-text feature to create a reply.

If you aren’t getting WhatsApp notifications, learn how to fix notifications not working on Apple Watch.

Method 2: Using Third-Party WhatsApp Apps for Apple Watch

If you want to use most functions of WhatsApp on your Apple Watch, you can take the help of third-party apps. One of the best third-party apps is the WatchChat 2 app, which is a free app based on the multiple devices feature of WhatsApp. It overcomes all the limitations of the above method and allows you to create new messages, send voice messages, watch videos, see status updates from people, view stickers, type replies, and much more.

Let’s check the steps to get WhatsApp on Apple Watch using the WatchChat 2 app.

Step 1: Install the WatchChat 2 app on your iPhone. After installation, make sure that the WatchChat 2 app shows on your watch.

Note: If WatchChat 2 doesn’t show up on your watch, open the Apple Watch app on your iPhone. Scroll down and tap on WatchChat. Enable the toggle next to the ‘Show app on Apple Watch’.

Step 2: Open WhatsApp on your iPhone.

Step 3: Tap on Settings at the bottom followed by Linked devices.

Step 4: Tap on the ‘Link a Device’ button. The Camera preview screen will show up.

Step 5: Now, open WatchChat 2 app on your Apple Watch. A QR code will show up. Scan this QR code using the camera preview of step 4.

Step 6: Wait for a few seconds until WhatsApp links the WatchChat 2 app. Once that happens, you will see the WhatsApp chats on your Apple Watch. Tap on any chat to view its messages.

Use the Keyboard or the Reply icon to reply or send a new message. You can also tap on the Microphone icon to send a voice message.

Pro Tip: You may also use WatchsApp for WhatsApp or Chatify app to add WhatsApp to your watch.

FAQs About WhatsApp on Apple Watch

1. Can you receive or answer WhatsApp calls on Apple Watch?

Sadly, no. You cannot answer WhatsApp calls on your Apple Watch. You will only receive a simple notification (not in the form of a ringing) on your watch.

2. How to turn off WhatsApp notifications on Apple Watch?

If you don’t want to get WhatsApp notifications on your watch, open the Apple Watch app on your iPhone. Go to Notifications. Scroll down and turn off the toggle next to WhatsApp.

3. Can you get Instagram or Facebook on Apple Watch?

Instagram and Facebook also do not have official apps for Apple Watch. You can, however, use it with a workaround. Send an email to the email ID that you can open on your Apple Watch. Keep https://www.facebook.com or https://www.instagram.com in the email’s body and send it to yourself. Open this email on your Apple Watch and log in with your Facebook or Instagram ID. Hopefully, you should be able to use Instagram and Facebook in their full glory on your watch.

Use Apple Watch Like a Champ

Those were two methods to use WhatsApp on Apple Watch. After you are satisfied with the working of WhatsApp on your watch, learn how to use custom watch faces on Apple Watch. Also, know about the best tips to improve battery life on Apple Watch.

Was this helpful?

Thanks for your feedback!

6 Best Samsung Galaxy Buds 2 Pro Cases and Covers

The Galaxy Buds 2 Pro is one of the newest sets of truly wireless earbuds from Samsung. These wireless earbuds are lighter and come with better noise reduction. However, the outer surface of the charging case is prone to scratches and marks. Plus, you also run the risk of losing the buds of the carry falls.

best Samsung Galaxy Buds 2 Pro Cases and Covers

Samsung Galaxy Buds 2 Pro cases help solve these issues. They wrap around the charging case and prevent any untoward marks. A few of them pack shock absorption features.

So if you want to keep your wireless buds in pristine conditions, here are the best Samsung Galaxy Buds 2 Pro cases and covers you can buy. But first,

1. AIIKO TPU Shockproof Case

The AAIKO TRU case is transparent and will let the cute colors of the Galaxy Buds 2 Pro shine in all its glory. It’s a soft TPU case and is easy to install. It’s affordable and costs less than $10. Since it’s a two-part case, there is no ugly lip at the back of the case.

The soft TPU case does its share in protecting the charging case from scratches and scuff marks. It is true if you keep the Galaxy Buds 2 Pro in your bag with your keys and pens. It doesn’t protect the case from severe falls and drops.

The AAIKO case fits the Galaxy Buds 2 Pro well, and several users have pointed this out in their reviews. However, note that it’s not the best pick if you often drop your earphones often. At the same time, TPU cases tend to yellow over time.

Why should you buy it: Affordable and slim.

2. Alquar Silicone Protective Case

Were you a Hubba Bubba Bubble Tape fan of the 90s? If yes, you will love the new design from Alquar Store. This adorable Galaxy Buds 2 Pro looks like the OG Bubble Tape case. Naturally, you get a little more bulk compared to the above case. But the good news is that you’ll get added protection. On the upside, the textures on the surface ensure you get a better grip.

It’s a 2-piece case (yay, no lip at the back). You will need to install it via adhesive tape. That said, it fits the Galaxy Buds 2 Pro well, and the adhesive strips ensure that it stays glued to the carry case.

There are precise cuts at the back to ensure wired charging. Plus, you can hang a carabiner via the loop at the top. The Alquar silicone protective case is well-liked by its user base for its sturdy design and durable nature. However, you will have to bite the bullet regarding the size.

Why should you buy it: Sturdy and durable. Plus, it adds a funky look.

3. elago Armor Case

If you want an extra layer of protection, you can’t go wrong with the elago Armore case. Like the one above, you will have to compromise on the sleek form factor of the wireless earphones. In return, you will get a robust case to protect your earbuds from the impacts of falls and drops and -from scratches and scuff marks.

It’s a well-designed case and comes with its share of smooth edges and textured surfaces. The latter also plays a key role in providing a better grip. At the same time, the textures add to the aesthetics of the case. And the loop for the carabiner means you can hook your earphones inside your backpack or tote bag. However, we’d advise against hanging it by the side of your purse or backpack, since the case and the cover tend to open easily.

At the end of the day, if you want a rugged case that adds a tough edge to your earphones’ carry case, this should be on your list.

Why should you buy it: Rugged case meant to protect your earphones during falls and drops.

You can also check out the Spigen Rugged Armor case. This one is popular among its user base. Users have praised its durability, sturdy design, and sleek look it brings to the table.

4. Newseego Hard Protective Cover Case

The Newseego protective case brings a splash of color to the table. It’s a hard case and comes with colorful marble prints. And the golden trim at the edges ups the look by several folds. If you like your earphones to stand out from the crowd, you can’t go wrong with this one.

And the golden O-carabiner makes it easy to attach to bags, wallets, keyrings, etc. Again, this cover will prevent any unnecessary scratches and marks. But the same old limitation exists—if you drop it from a height, the case may dislodge from the protective cover.

Nevertheless, it’s a sturdy case and should last a long time. Buy this if you like your earphones to stand out from the crowd and if you love colors.

Why should you buy it: This hard PC case is for you if you love colors.

5. Goton Hard PC Case

The Goton case is not your average rub-of-the-mills clear case. This one boasts lines running along the edges, which gives this case a diamond look. It’s a soft case and translates into an easy installation. Like the ones above, it comes with the usual bells and whistles like a loop for the carabiner, cutouts for the charging cable, and easy access to the charging indicator.

The Goton hard case is a popular case on Amazon and has more than 1,000 reviews. Users love it for its value-for-money proposition and durable design. It’s worth noting that the shape of the Galaxy Buds 2 Pro is the same as its predecessor.

Why should you buy it: Clear transparent case with a unique design.

6. Kryfa Leather Case

The Kryfa Leather Case addresses one of the major limitations of the above cases — the button at the front secures the leather case. So even if you drop the earphone case, you can rest assured that all the content inside won’t go flying around. Plus, the carabiner at the top ensures that the weight distribution is even.

Compared to slim cases, this leather case adds a little bulk. But on the upside, you rest assured that you won’t lose your buds in accidental falls and drops. Secondly, it gives an elegant look.

It fits well. The leather also makes this Galaxy Buds 2 Pro case durable, and several users pointed this out in their reviews.

Why should you buy it: The button at the front ensures that your buds stay safe and secure.

Goodbye, Scratches!

A good case prevents unnecessary scratches and protects the buds inside from the impacts of bumps and falls. More importantly, thanks to the carabiner on each case, you can easily carry the wireless earbuds.

So, which one of these will you buy?

Was this helpful?


Thanks for your feedback!

4 Ways to Uninstall Drivers From Windows 11

Method 1: Uninstall Drivers Using Device Manager

Device Manager is a handy utility for managing various hardware devices installed on your system. It can also be used to easily uninstall a driver from your computer. Here’s how.

Step 1: Right-click on the Start icon > select Device Manager from the list.

Open Device Manager on Windows

Step 2: In the Device Manager window, locate the driver you want to remove. Right-click on it and select Uninstall device.

Uninstall Printer Driver

Step 3: Select Uninstall when prompted.

Uninstall Driver Using Device Manager

Method 2: Uninstall Drivers via Settings

Another option for uninstalling drivers in Windows 11 is to use the Settings app. It’s similar to how you uninstall an app from Windows. Here are the steps you can follow.

Step 1: Press the Windows key + I to open the Settings app and head to Apps > Installed apps.

Installed Apps on Windows 11

Step 2: Scroll down or use the search bar at the top to locate the driver you want to get rid of. Click the three-dot menu icon next to it and select Uninstall.

Uninstall Driver Using Settings App

Step 4: Select Uninstall again to confirm.

Confirm Uninstall Driver Using Settings App

Method 3: Uninstall Drivers With Control Panel

Although Microsoft intends to retire the Control Panel soon, it is still a popular option for making system-level changes on Windows. If you’re a veteran Windows user who prefers the Control Panel, employ the following steps to remove a device driver.

Step 1: Press the Windows + R keys to open the Run dialog > type control in the box > press Enter.

Step 2: Use the drop-down menu at the top right to change the view type to Large icons > click on Programs and Features.

Programs and Features on Windows

Step 3: Locate and select the unwanted driver from the list. Then, click Uninstall at the top > follow the on-screen prompts to remove the driver.

Uninstall Driver Using Control Panel

Method 4: Uninstall Drivers With Command Prompt

If you’re a terminal geek, you may already be using Command Prompt to run batch files, troubleshoot system issues, and perform various other tasks. But did you know you can also use it to uninstall a driver from your Windows PC? We’ll show you how.

Step 1: Click the search icon on the taskbar, type cmd in the search box, and select Run as administrator.

Open Command Prompt as Admin

Step 2: Paste the following command and press Enter to view a list of your PC’s available drivers.

Dism /online /Get-Drivers /Format:Table
Drivers List on Windows 11 in Command Prompt

Step 3: Note down the Published Name of the driver you want to uninstall.

Step 4: Run the following command to remove the driver.

pnputil /delete-driver [Published Name] /uninstall /force

Replace [Published Name] in the above command with the name noted in the last step.

In the following example, we try removing the Samsung Electronics Modem driver. So, this is the command we used:

pnputil /delete-driver oem52.inf /uninstall /force
Uninstall Driver Using Command Prompt

Was this helpful?

Thanks for your feedback!

4 Ways to Fix iPhone Hotspot Not Working With Mac

Basic Fixes

  • Turn on hotspot and mobile data manually: You can check and manually enable the Hotspot and Mobile Data on your iPhone and Mac, which go hand-in-hand.
  • Keep iPhone closer to Mac: Keeping both devices in closer proximity helps connect them quickly.
  • Use the same Apple account on iPhone and Mac: It is important to link both devices to the same Apple account.
  • Disconnect other Bluetooth devices: Your Bluetooth devices should not be connected to your Mac.

Fix 1: Enable Handoff on iPhone and Mac

Handoff lets you pick up something from one Apple device and share it with another Apple device connected to your iCloud. To make iPhone Hotspot work on your Mac, you must enable this feature on your iPhone and Mac.

On iPhone

Go to Settings > General > AirPlay and Handoff and enable Handoff.

On Mac

Step 1: Click the Apple logo at the top-left corner and select System Settings.

Step 2: Select General > go to AirPlay and Handoff.

Step 3: Enable Allow Handoff between this Mac and your iCloud devices.

allow handoff on mac

Fix 2: Disable Low Data Mode on iPhone

Low Data Mode prevents excessive mobile data usage on your iPhone and can prevent you from using the internet on your Mac.

Open Settings > Mobile Service > Mobile Data Options > Data Mode > disable Low Data Mode.

Fix 3: Disable VPN on Mac

VPNs are great for connecting to websites that are inaccessible in your region. But you should try turning it off if you can’t connect your Mac with your iPhone Hotspot.

Step 1: Open System Settings > click on VPN from the left menu.

Step 2: Disable the VPN connection on your Mac.

disable VPN on Mac

Fix 4: Reset Network Settings

If you face network-related issues on your iPhone, the device hotspot won’t work on your Mac. You must reset the network settings on your iPhone.

Step 1: Open the Settings app on your iPhone > scroll down to General.

Step 2: Scroll down and select Transfer or Reset iPhone.

Step 3: Tap Reset > select Reset Network Settings from the following menu.

Note: Resetting network settings won’t touch your personal data.

Was this helpful?

Thanks for your feedback!

4 Ways to Safely Clean Registry on Windows 11/10

1. Nirsoft RegistryChangesView – Simple and Straightforward

Nirsoft RegistryChangesView is a freeware that allows you to capture and compare snapshots of Windows Registry before and after making changes at a particular time. This allows you to safely clean your Windows registry by exporting the Registry state from a time and replacing it with the current one.

How to use Nirsoft RegistryChangesView:

Step 1: Open the software and select Saved Registry Snapshot under Registry Data source 1 in the dialogue box.

Nirsoft Registry Data Source

Step 2: Then, click on Create Registry Snapshot. This step should be completed before making registry changes so you can revert them later.

Create Registry Snapshot

Step 3: Once done, install software, GUI changes, settings, or the registry itself.

Step 4: Once the changes are made, in the Registry Data source 2, select Current Registry and select all options in Hives to compare; click OK.

Compare Registry Changes Windows

Step 5: You will see changes comparing the snapshot and the current registry. Here, you can manage the changes and revert.

Pros

  • Completely free to use.
  • Simple interface.
  • Compatible with all versions of Windows

Cons

  • It can be difficult to use.
  • The interface can seem outdated.

Price: Free for personal use and untampered distribution

2. Windows System Restore – Built-in Feature

Windows System Restore is an inbuilt utility that allows you to restore the system after any substantial change is made to it. This can help you clean the registry after uninstalling.

Create System restore point

How to Use Windows System Restore:

Step 1: Search for system restore in the Windows start menu and open the Create a restore point option.

Step 2: Click on Create and name the system restore point.

Step 3: Once you wish to revert the changes, open the same window again.

Step 4: Click on System Restore and select the Restore point created in the second step.

System Restore Windows PC

Step 5: Click on Finish to start the system restore.

Pros

  • Pre-installed utility on Windows PCs.
  • Easy to use.
  • Non-technical interface.

Cons

  • There is no registry-specific cleaning, only a system rollback.
  • Limited customization of the restore point.

Price: Pre-installed utility/free to use

3. IObit Uninstaller – Modern and Advanced Interface

IObit Uninstaller is free software that lets you completely uninstall software from Windows. When you uninstall any particular software in Windows, some residuals are left in the system. Many of these are stored in the Windows registry. IOBit helps clean all of these.

What I liked about this software is that it is pretty straightforward, has a modern interface, and works well.

IObit Uninstaller Issues

How to Use IOBit uninstaller:

Step 1: Launch the software, go to the Software health tab, and click Scan Now.

Step 2: You can view the logos for uninstallation leftovers, which show unrequired registry entries you can clean up. Click on Fix All to remove them.

Pros

  • Easy-to-use interface.
  • Many free features.
  • All-rounder uninstaller tool.

Cons

  • Comes with bundleware.
  • Spammy notifications.

Price: Free; Subscription $15-$17/year

4. Using Geek Uninstaller – Advanced and Feature-Pack

Geek Uninstaller is a free-to-use powerful software uninstaller that allows you to uninstall and clear uninstallation leftovers. It lets you view the registry entries, installation folder, and other granular details.

What I like about this software is that it is easy to use. There are no unnecessary notifications and no restrictions unless you want more features. The basic version is free, genuinely helpful, and feature-packed.

Geek Uninstaller Windows

How to Use Geek Uninstaller:

Step 1: Launch Geek Uninstaller, which will show all the non-Microsoft store software on your PC.

Step 2: Find the software you wish to uninstall and double-click it.

Step 3: Once the software is uninstalled, Geek uninstaller will automatically check for any residuals and allow you to clean them.

Pros

  • Feature-packed free version.
  • Simple interface.
  • Allows uninstallation of Microsoft Store apps as well.

Cons

  • It doesn’t let you clean the registry alone, as uninstaller is baked into the process.
  • No way to restore the changes.

Price: Free; Subscription: $24.95 for a lifetime.

Was this helpful?

Thanks for your feedback!

7 Best USB-C Cables to Connect a MacBook to a Monitor

A USB Type-C cable is the best way to connect your Apple MacBook Pro to a monitor. Naturally, USB Type-C Power Delivery cables save you from the hassles of connecting separate power cables. If that’s what you’re looking for, here’s a list of the best USB-C cables to connect your MacBook to a monitor.

Belkin Thunderbolt 4 Cable

ASUS ROG Strix G16 2

The Belkin Thunderbolt 4 cable is an Intel-certified Thunderbolt 4 cable and supports all TB4 features, including 40Gbps bandwidth. The advantage of higher bandwidth is that it allows you to connect to dual 4K monitors.

Of course, the monitors have to be Thunderbolt capable. The cable also supports 100W Power Delivery to juice your laptop. That said, it’s a simple cable with no braiding. Nevertheless, it’s robust, and the 1-meter length gives you ample wriggle room to route the cable as per your liking.

What We Like

  • High speed and bandwidth
  • Intel-certified cable

What We Don’t Like

  • Not braided

Baseus 100W USB Type-C Cable

ASUS ROG Strix G16 2

The Baseus USB Type-C cable is a USB Type-C to USB Type-C cable that can power the MacBook Pro up to 100W. It’s nylon braided, which adds to its durability. Braided cables also tangle less, which is an added plus.

The Power Delivery support means you can use this single cable to supply power and video signals. There is no drop in quality when interfacing video signals from the cable to the MacBook Pro, and it’s not expensive either.

What We Like

  • Supports USB-PD
  • Nylon braided

What We Don’t Like

  • N/A

Nimaso USB Type-C to USB Type-C Charging Cable

ASUS ROG Strix G16 2

Nimaso’s contender is a USB Type-C 3.1 Gen 2 cable that offers up to 10Gbps in speed and 100W of power. The high bandwidth also means you can use it for a monitor with up to 4K resolution at 60Hz.

At the same time, it’s built to last, and it comes with a braided exterior. Additionally, the cable has been tested by plugging and bending it 10,000 times. The slim form factor also ensures you can easily slot it into your monitor’s connector.

What We Like

  • Braided exterior
  • Slim connector fits into most monitors

What We Don’t Like

  • Doesn’t work well at higher refresh rates

uni Store USB Type-C to HDMI Cable

ASUS ROG Strix G16 2

The uni HDMI cable is a USB Type-C to HDMI cable. While it does not offer the advantage of connecting a single line for video and power, it can still be connected to a standard 4K monitor and offer a refresh rate of 30Hz.

On non-4K monitors, you can leverage 60Hz refresh rates. Additionally, the uni HDMI cable is lightweight, albeit a braided cable. As noted earlier, the braiding prevents the cable from fraying. The company advertises that this braided USB Type-C cable can survive innumerable bends.

What We Like

  • Durable build
  • Affordable

What We Don’t Like

  • Only supports up to 30Hz at 4K

Warrky USB Type-C to HDMI Cable

ASUS ROG Strix G16 2

You can also try Warrky’s USB Type-C to HDMI cable. It has a long aluminum jacket that makes it easy to hold and grip, especially when plugging or unplugging. Plus, the cable’s space grey color matches well with the space grey MacBooks.

This USB Type-C to HDMI cable is available in multiple lengths of 3ft and 6ft. Additionally, the cable’s braided exterior ensures good longevity. Despite being made of high-quality materials, the Warrky USB-C to HDMI cable is priced quite competitively, making it a good option for those on a budget.

What We Like

  • Gold-plated connectors
  • Priced well

What We Don’t Like

  • Slightly rigid so doesn’t bend easily

uni USB Type-C to DisplayPort Cable

ASUS ROG Strix G16 2

This uni cable is a dependable USB Type-C cable that can output 4K pictures at 60Hz. Like its counterparts on this list, it is a braided cable and is durable and sturdy.

The best part is that the cable’s strain relief has a dotted texture, making it grippy. It works as advertised and offers sharp picture quality. There’s no lag, and the video signal is smooth. The only limitation is that the braided body makes it a tad stiff.

What We Like

  • Dotted strain relief for grip
  • Sharp picture quality

What We Don’t Like

  • Stiff exterior

Apple Thunderbolt 4 USB-C Pro Cable

Apple Thunderbolt 4 Pro cable

While there is no dearth of Thunderbolt 4 cables, the Apple Pro cable is the only one that is three meters long. The cable is also braided and supports data transfer speeds up to 40Gbps.

Making a Thunderbolt 4 USB-C cable that is more than two meters long is an engineering challenge. Apple, though, has made it possible, which is also the reason for the exorbitant price tag. The cable is also quite sturdy and works seamlessly with various monitors. If your Mac is far from your display, the Apple Thunderbolt 4 cable Pro is your only option.

What We Like

  • Extremely long
  • Solid and reliable

What We Don’t Like

  • Pricey

Was this helpful?

Thanks for your feedback!

4 Ways to Fix Display Brightness Not Working on Mac

Fix 1: Check Display Dimming Settings

Step 1: Open Settings > click on Battery from the left menu.

Step 2: Scroll to the bottom on the right side > select Options.

Step 3: Disable Slightly dim the display on battery > click on Done.

slightly dim the display on battery mac

Fix 2: Check Keyboard Function Key Settings

The F1 and F2 Function Keys on your Mac keyboard are meant to change the display brightness manually. But if they have been made to be used as Standard Function Keys, you can’t use them to change the brightness levels. Here’s how to check the same.

Step 1: Open System Settings > click on Keyboard from the left menu.

Step 2: Click on Keyboard Shortcuts.

Step 3: Click on Function Keys in the bottom-left corner and ensure to disable the toggle for Use F1, F2, etc. keys as standard function keys. Then, click on Done at the bottom-right corner.

use function keys on mac

Step 4: Close the window and try changing the display brightness using the F1 and F2 keys.

Fix 3: Reset SMC and NVRAM

Let us discuss some advanced solutions if you still can’t solve the problem. You can try SMC Reset for your Intel-based Mac or iMac. This solution won’t work on Apple M-series chipset-based Macs.

Step 1: Press and hold the Power Button until your Mac shuts down.

Step 2: After your Mac shuts down, wait a few seconds and press Shift + Left Option + Left Control keys. Press and hold the Power Button as well.

Keep pressing the four keys for another 7 seconds. If your Mac turns on, it will play the default startup chime again while you hold down those keys. When you see the Apple logo, the display will turn on normally. After that, check if you can change the display brightness.

After that, proceed with resetting NVRAM. For Mac models with M-series chips, a simple restart is equivalent to an NVRAM reset.

Step 1: Long-press the Power Button on your Mac. After your Mac shuts down, press the Power Button again to restart it.

Step 2: While your Mac is turning on, press Command + Option + P + R for 20 seconds.

Fix 4: Boot Your MacBook in Safe Mode

A third-party app might be interfering with your Mac’s brightness levels. To fix this, we suggest booting your Mac in Safe Mode.

For Macs With M-series Chip

Step 1: Click the Apple logo at the top-left corner > select Shut Down.

Step 2: After your Mac shuts down, press and hold the Power Button until you see the two startup options—Macintosh HD and Options.

Step 3: Select Macintosh HD while holding the Shift key and select Continue in Safe Mode.

continue in safe mode mac 2

For Macs With Intel Chip

Step 1: Click the Apple logo at the top-left corner and select Restart. Then press and hold the Shift key when your Mac restarts. Release the Shift key when you see the login window.

Step 2: Sign in and check if the problem is solved.

Was this helpful?

Thanks for your feedback!

3 Ways to Access MSConfig on Windows 11

Method 1: Access MSConfig Using File Explorer

Step 1: Press the Windows + E keys on your keyboard to open the File Explorer.

Step 2: In the File Explorer window, click on the Address bar > type msconfig > press Enter on your keyboard.

After that, the System Configuration (MSConfig) window will appear on your computer’s screen.

Method 2: Access MSConfig Using Windows Tools

Windows Administrative tools are a list of useful tools and utilities organized into a folder so that system administrators and advanced users can easily access them from one place.

Alongside other advanced tools such as Event Viewer, Task Scheduler, and more, you can use the same folder to access the System Configuration tool (MSConfig) on your computer. Here’s how to do it:

Step 1: Press the Windows + R keys together to access the Run tool.

Step 2: In the Run dialog, type control admintools > click OK.

Step 3: When a File Explorer window opens on the screen, double-click on System Configuration.

Once done, the System Configuration (MSConfig) dialog will appear on the computer screen.

Method 3: Access MSConfig Using Command Prompt or PowerShell

You can also access the system configuration tool (MSConfig) using Command Prompt (CMD) or PowerShell. All you would need to do is execute a simple command as detailed in the steps below:

Step 1: Press the Windows + S keys to access Search and type Command Prompt or PowerShell. When either shows up, click Run as Administrator to open them with administrative privileges.

Step 2: When a User Account Control (UAC) prompt appears, click Yes.

Step 3: In the Command Prompt or PowerShell window, type the following and press Enter.

MSConfig

Also Read: How to manage apps and services that start with your PC

Was this helpful?

Thanks for your feedback!

5 Ways to Fix Phone Link App Not Working on Windows 11

The Phone Link app allows you to enable or disable specific features for your linked devices. So, if you have trouble with specific functionality, such as calls, messages, or notifications, you may have disabled it. Here’s how to enable it again.

Step 1: Open the Phone Link app on your PC and click the gear-shaped icon at the top right corner.

Phone Link Settings

Step 2: Switch to the Features tab to view settings for calls, messages, notifications, photos, and more. Then, use the respective toggles to enable the features you want to use.

Phone Link Features

Fix 2: Allow the App to Run in the Background

The Phone Link app may fail to sync your data or display notifications if it lacks the necessary permissions to run in the background. Here’s how to change that.

Step 1: Press the Windows key + I to open the Settings app, then go to Apps > Installed apps.

Installed Apps on Windows 11

Step 2: Scroll down to locate the Phone Link app. Click the three-dot menu next to it and select Advanced options.

Open Phone Link Advanced Options

Step 3: Use the drop-down menu under Background apps permissions and select Always.

Allow Phone Link to Run in Background

The Phone Link app may not work on Windows 11 if you haven’t set up the companion app properly on your Android phone. You must ensure that the Link to Windows app on your phone has all the permissions it needs.

Step 1: Long-press on the Link to Windows app icon and tap the info icon from the resulting menu.

Step 2: Tap on Permissions. Go through each permission and allow it.

Step 3: Return to the app info page and tap on Battery. Then, select Unrestricted from the following menu.

If you still have problems with the Phone Link app, unlink your phone from the app and re-link it. This should help re-establish the connection between Windows and your phone and fix any minor issues.

Step 1: Open the Phone Link app on your PC and click the cog-shaped icon at the top right corner.

Step 2: In the My Devices tab, click the three-dot menu icon next to your phone and select Remove.

Unlink Phone From Phone Link App

Restart the Phone Link app and follow the on-screen instructions to pair your device with Windows. The app should then work fine.

Fix 5: Repair or Reset the App

If nothing works, repair the Phone Link app on Windows as a last resort. Here’s how:

Step 1: Click the search icon on the taskbar, type phone link, and select App settings.

Phone Link App Settings

Step 2: Scroll to the Reset section and click on Repair.

Repair Phone Link App

If repairing the app does not help, try resetting it from the same menu. This will delete all the app data and reset the app to its default state.

Was this helpful?

Thanks for your feedback!

6 Ways to Fix Spotlight Search Not Working On iPhone and iPad

Before you begin, try restarting your iPhone or updating it to the latest version to get rid of any bugs that are affecting Spotlight Search.

Fix 1: Remove Shortcut Widgets

Some bugs are fixed in mysterious ways – and as per several community forums, removing the Shortcuts widget on your home screen is one way to fix the problem.

Swipe right from the first page of your home screen. Long-press on the Shortcuts widget, tap on Remove Widget and confirm your action.

Also Read: How to fix Spotlight Search not working on Mac.

Fix 2: Disable ‘Show Home Controls’

Here’s another fix that may not be directly related to Spotlight Search, but several community forums suggest that it may help.

Step 1: Open the Settings app. Select Control Centre.

Step 2: Turn off the toggle for Show Home Controls.

Fix 3: Check Storage Space

Spotlight Search has to index every single file or folder and the process might get sluggish, or may not work at all if you are running out of storage space. Go to Settings > General > iPhone Storage and check the remaining storage space.

If your iPhone is running low on storage, you can uninstall apps, delete redundant photos, or clear the ‘Other’ storage.

Fix 4: Change Default Language

At times, Spotlight Search may have some trouble working with the set default language. Therefore, you can try and change the default language.

Step 1: Open the Settings app and select General > Language and Region.

Step 2: Tap on Add Language. Select a language that you are familiar with. If you prefer English, you can always select an alternate version.

Step 3: Now, you can confirm using the selected language as a primary language for your iPhone.

Fix 5: Remove Third-Party Keyboards

I also faced the issue of the keyboard not loading up while we used the search bar. This mainly occurred when using a third-party keyboard.

Step 1: Open the Settings app select General and go to Keyboard.

Step 2: Select Keyboards and open the third-party keyboard. Turn off the toggle for Allow Full Access.

Fix 6: Disable and Enable Search for Apps

When you turn off and turn on Spotlight Search in the Settings app, you refresh the feature which may clear the bug affecting it.

Step 1: Open the Settings app and select Siri & Search.

Step 2: There is no toggle to disable Spotlight Search entirely. However, you can disable it on a per-app basis. Hence, select an app from the list, turn off the toggle for Show App in Search, and turn it back on.

If none of the above methods work, you can try resetting your iPhone.

Was this helpful?

Thanks for your feedback!