Method 1: Modify Program Properties
You can configure a program to run in compatibility mode by modifying its properties. Here’s what you must do.
Step 1: Press Windows + E keys to open File Explorer and navigate to the program you wish to run in compatibility mode.
Step 2: Right-click on the program or app’s executable file and select Properties.

Step 3: Switch to the Compatibility tab and tick the box for Run this program in compatibility mode for.

Step 4: Use the drop-down menu to select the right Windows version from the list. Optionally, if your program isn’t rendering properly on your PC, change DPI settings, screen resolution, and other settings.
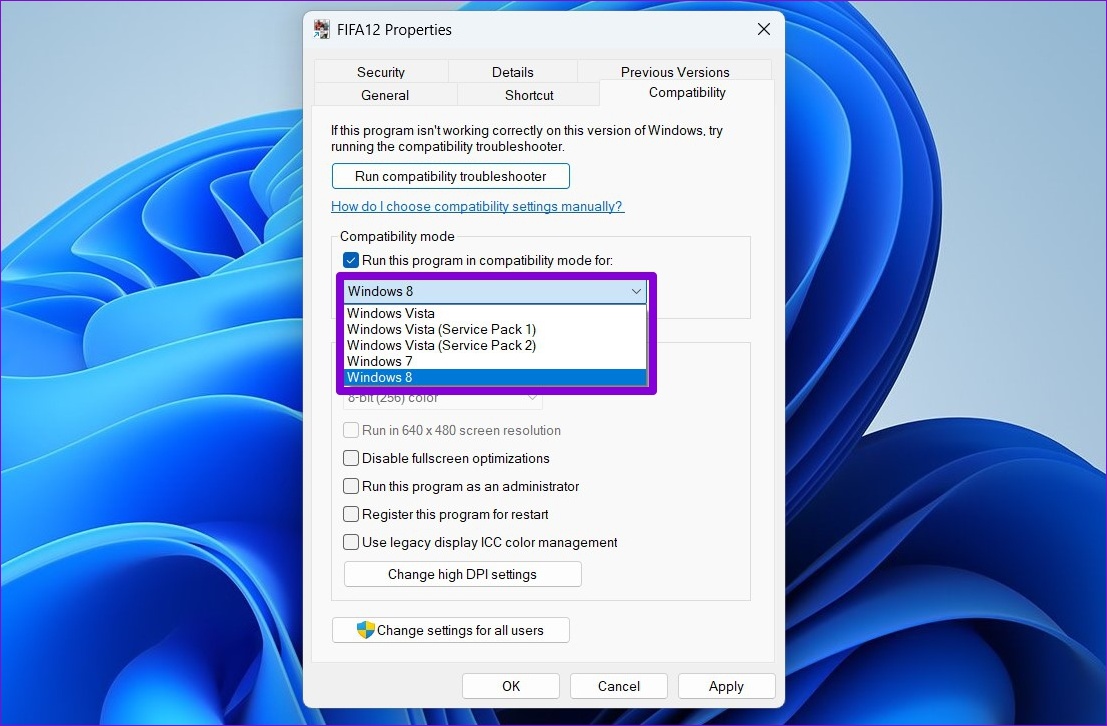
Step 5: After making the preferred changes, click Apply, followed by OK.

Double-click the program file, and Windows will run it with the specified compatibility settings.
Method 2: Run Program Compatibility Troubleshooter
If you don’t know which version of Windows is necessary to run the program correctly, use the Program Compatibility troubleshooter. This will allow Windows 11 to choose the appropriate compatibility settings for the software. Here’s how.
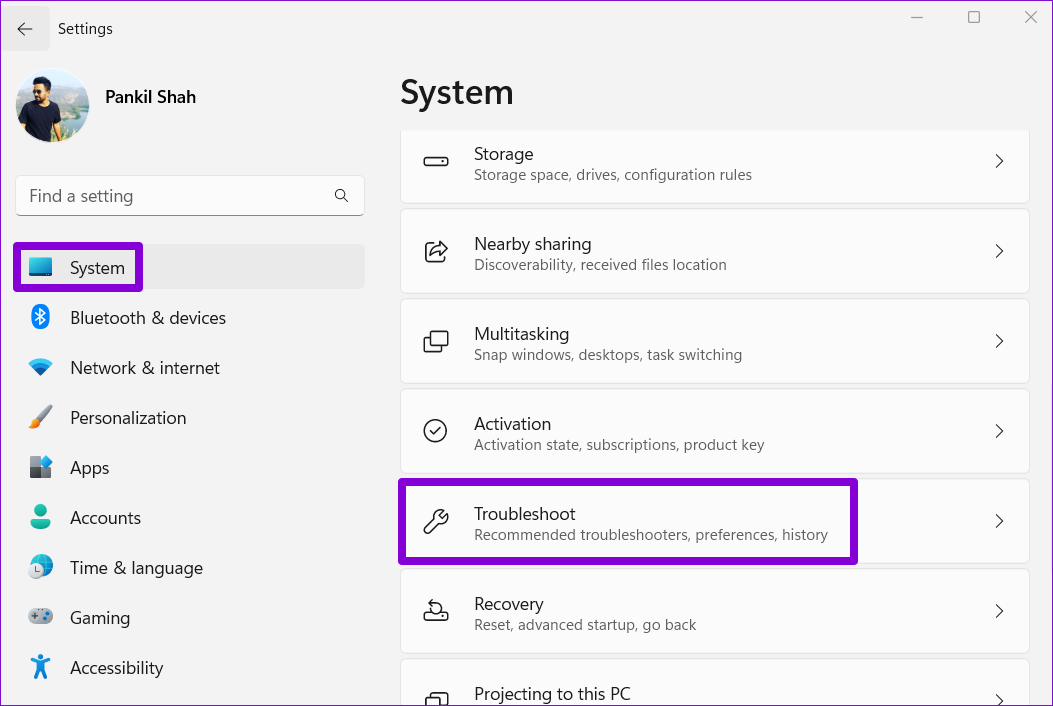
Step 1: Press the Windows key + I to open the Settings app and head to System > Troubleshoot.
Step 2: Go to Other troubleshooters.

Step 3: Scroll down and click the Run button for Program Compatibility Troubleshooter.

Step 4: The tool will show a list of programs. Select your old program and click Next.
Step 5: If you can’t find your program on the list, select Not listed to add your program manually.

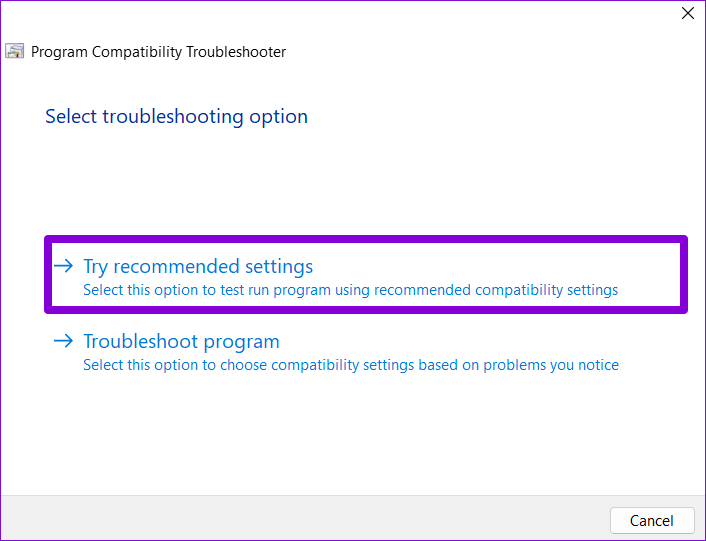
Step 6: The tool will automatically suggest a few compatibility settings for your program. Click Try recommended settings to continue.
Step 7: Click Test the program to launch your program in compatibility mode.
Step 8: After testing the program, click Next.

Step 9: If the program runs without a problem, click Yes, save these settings for this program. If the program fails to load correctly, select No, try again using different settings.

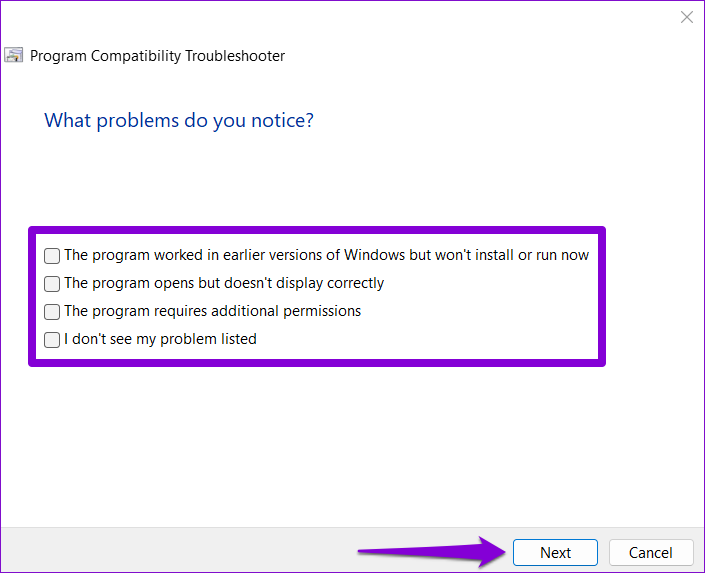
Step 10: Select the problem you’re facing and click on Next.
Step 11: Windows will recommend different compatibility settings based on the problems you’re facing and ask you to test the program again.

Method 3: Use Command Prompt
You can also run an app or program in compatibility mode by executing a single command. To achieve this, you must know the file path of your program.
Step 1: Press Windows + E keys to open the File Explorer and navigate to the program you wish to run in compatibility mode.
Step 2: Right-click on the program file and select Copy as path.

Step 3: Right-click on the Start icon and select Terminal (Admin) from the list.

Step 4: In the Command Prompt window, run the following command:
reg.exe Add "HKLM\Software\Microsoft\Windows NT\CurrentVersion\AppCompatFlags\Layers" /v "FilePath" /d "ValueData"
Replace FilePath in the above command with the actual path of the program copied in Step 2. Replace ValueData with the value associated with the Windows version. Here are the values for different Windows versions:
- Windows 8: WIN8RTM
- Windows 7: WIN7RTM
- Windows Vista SP2: VISTASP2
- Windows Vista SP1: VISTASP1
- Windows Vista: VISTARTM
- Windows XP SP3: WINXPSP3
- Windows XP SP2: WINXPSP2
- Windows 98: WIN98
So, for instance, if you want to run an old game in a Windows 7 environment, enter the following command and press Enter:
reg.exe Add "HKLM\Software\Microsoft\Windows NT\CurrentVersion\AppCompatFlags\Layers" /v "C:\ProgramData\Microsoft\Windows\Start Menu\Programs\FIFA12\FIFA12.lnk" /d "WIN7RTM"

After you run the command, Windows will change the default compatibility settings for your program, and you can run it without any problems.
Was this helpful?
Last updated on 08 May, 2024
Read Next
 4 Ways to Run the Program Compatibility Troubleshooter on Windows 10 and 11
Method 1: Using the Settings App The Settings app has a dedicated Troubleshoot section that contains all types of troubleshooters. To run the Program Compatibility Troubleshooter, you must access the Settings
4 Ways to Run the Program Compatibility Troubleshooter on Windows 10 and 11
Method 1: Using the Settings App The Settings app has a dedicated Troubleshoot section that contains all types of troubleshooters. To run the Program Compatibility Troubleshooter, you must access the Settings
 3 Ways to Change Priority Levels for Programs on Windows 10 and Windows 11
When Should You Change the Priority Level of a Program By default, Windows 11 assigns different priority levels to each process based on its importance.
3 Ways to Change Priority Levels for Programs on Windows 10 and Windows 11
When Should You Change the Priority Level of a Program By default, Windows 11 assigns different priority levels to each process based on its importance.
 Top 9 Ways to Fix Unable to Change Default Programs in Windows 10
The apps offered by Microsoft are great.
Top 9 Ways to Fix Unable to Change Default Programs in Windows 10
The apps offered by Microsoft are great.
 5 Ways to Fix Startup Programs Not Launching on Windows 10 or 11
Try Basic Fixes Install Windows updates: A buggy or outdated Windows build could cause such issues.
5 Ways to Fix Startup Programs Not Launching on Windows 10 or 11
Try Basic Fixes Install Windows updates: A buggy or outdated Windows build could cause such issues.
 4 Ways to Fix Unable to Install Programs or Software on Windows 11
Try Basic Fixes Check program compatibility: Programs and games that worked perfectly on Windows 10 may not necessarily be compatible with Windows 11.
4 Ways to Fix Unable to Install Programs or Software on Windows 11
Try Basic Fixes Check program compatibility: Programs and games that worked perfectly on Windows 10 may not necessarily be compatible with Windows 11.
 3 Ways to Repair Broken Apps and Programs In Windows 11
Method 1: Using Apps and Features in the Settings App The first step for the native or third-party app is to use the Settings app.
3 Ways to Repair Broken Apps and Programs In Windows 11
Method 1: Using Apps and Features in the Settings App The first step for the native or third-party app is to use the Settings app.
 7 Ways to Force Uninstall Programs on Windows 11
Method 1: Uninstall Programs Using the File Explorer Step 1: Firstly, open the Start Menu, type the name of the program you want to uninstall in the search bar, and choose
7 Ways to Force Uninstall Programs on Windows 11
Method 1: Uninstall Programs Using the File Explorer Step 1: Firstly, open the Start Menu, type the name of the program you want to uninstall in the search bar, and choose
 How to Prevent Users From Running Certain Programs on Windows 11
Method 1: Prevent Users From Running Certain Programs via the Group Policy Editor The Local Group Policy Editor on Windows makes it easy to apply system-wide changes on a computer.
How to Prevent Users From Running Certain Programs on Windows 11
Method 1: Prevent Users From Running Certain Programs via the Group Policy Editor The Local Group Policy Editor on Windows makes it easy to apply system-wide changes on a computer.
The article above may contain affiliate links which help support Guiding Tech. The content remains unbiased and authentic and will never affect our editorial integrity.

