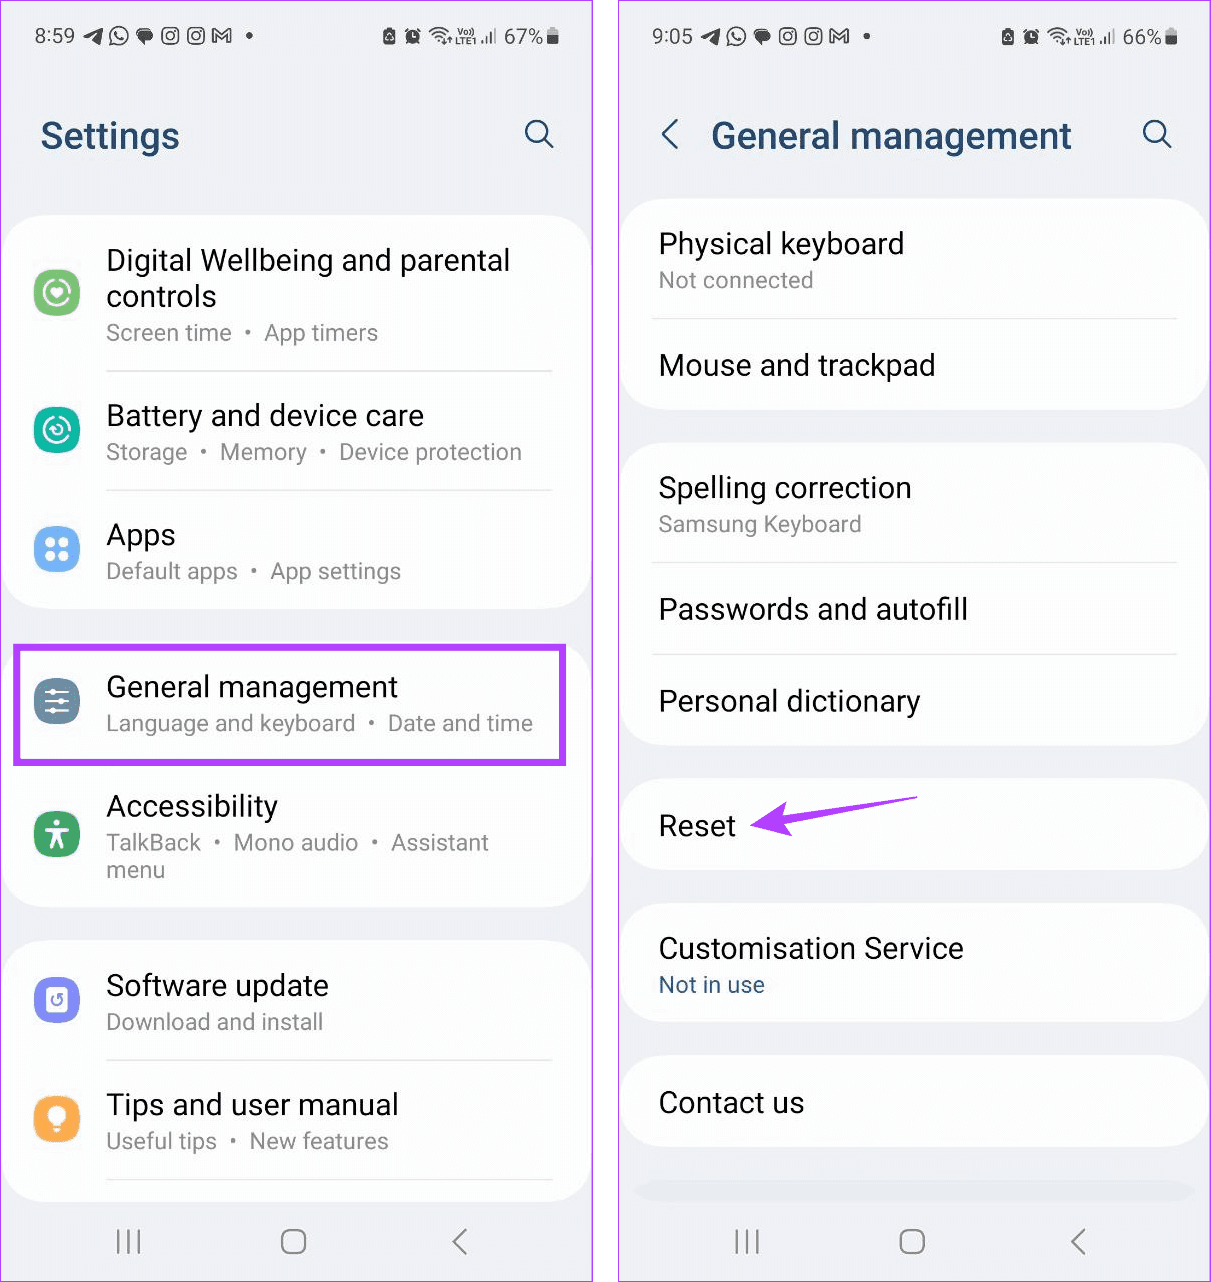
When the Disappearing Messages option is enabled, WhatsApp will disappear new messages from the selected chat after a certain duration. If it is enabled for a chat, you or the other person can disable it.
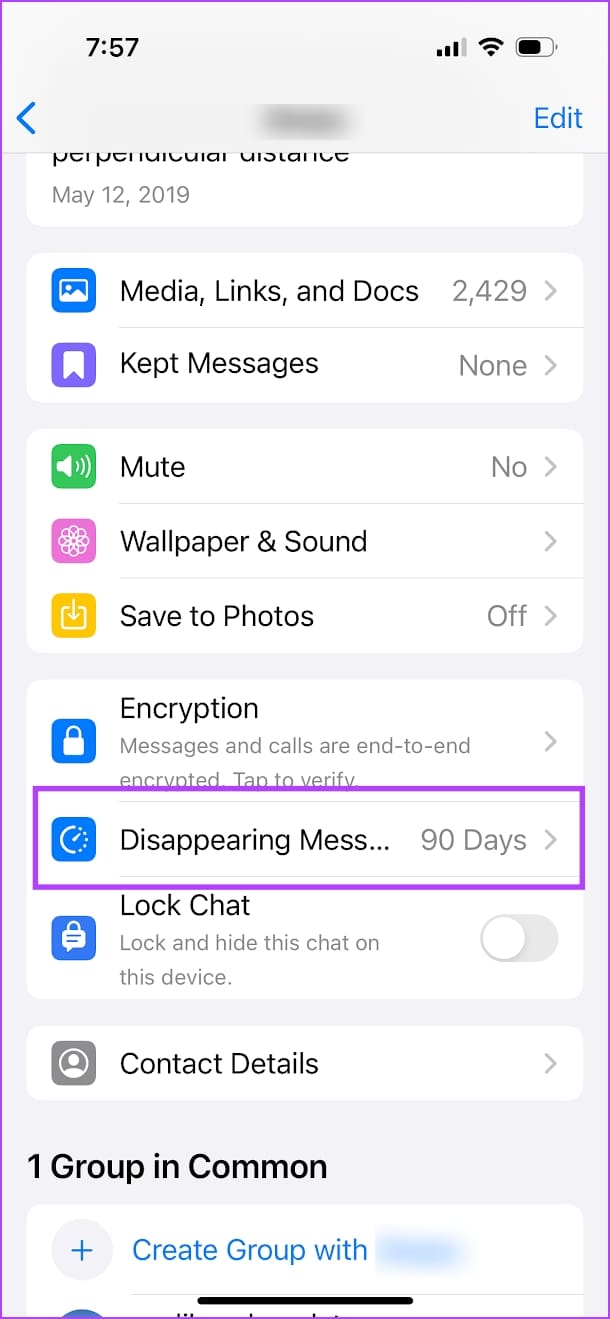
Step 1: Select a conversation from which messages are getting removed automatically. Tap on the contact name.
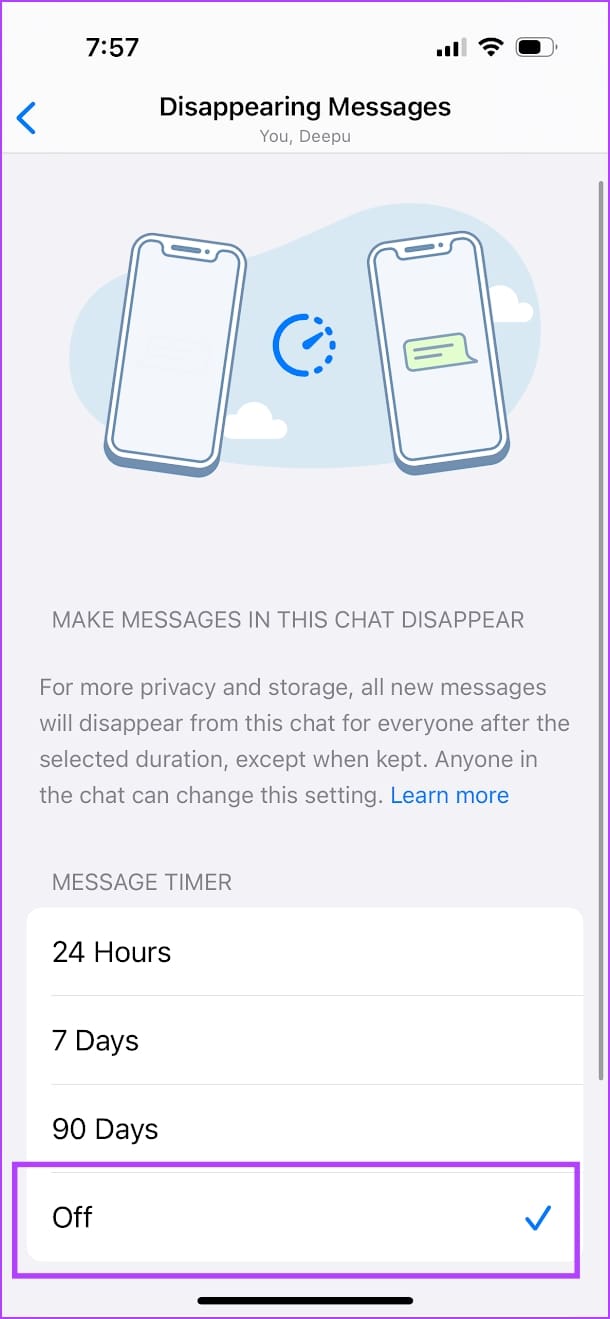
Step 2: From the Contact Info menu, scroll down, select Disappearing Messages, and turn it off.
If messages continue to disappear – there are two possible reasons:
1. The Other Person Is Deleting Messages
WhatsApp allows users to delete messages within an hour. Let’s say you have sent the message in the wrong chat or group or made an embarrassing typo; you can easily delete the message from both sides. Once the message is deleted, you can’t see it in your chat history.
2. Senders Are Using the View Once Option
WhatsApp has implemented an option to send sensitive images as View Once. Users can select View Once before sending an image and it won’t showcase the image preview in chat. Once you view it, the message will say ‘Opened’.
Have you ever typed a work email and wished there was a way to add a touch of personality or convey emotions through your words? Yes, those tiny digital icons that can speak volumes without saying a word. In this article, we will guide you on how to insert emojis in Outlook email on desktop and mobile.
Emojis can enhance clarity, express sentiments, and foster better communication. Imagine trying to convey a friendly tone or emphasize a point without a smiley face or a thumbs-up emoji. In the following sections, we’ll explore the practical reasons behind incorporating emojis into your Outlook emails. Let’s begin.
How Can I Insert Emojis in Outlook Online
It is fairly easy to add emojis to an Outlook email. Follow the below steps.
Note: We are assuming that you have already composed the email to which you want to add the emoji(s).
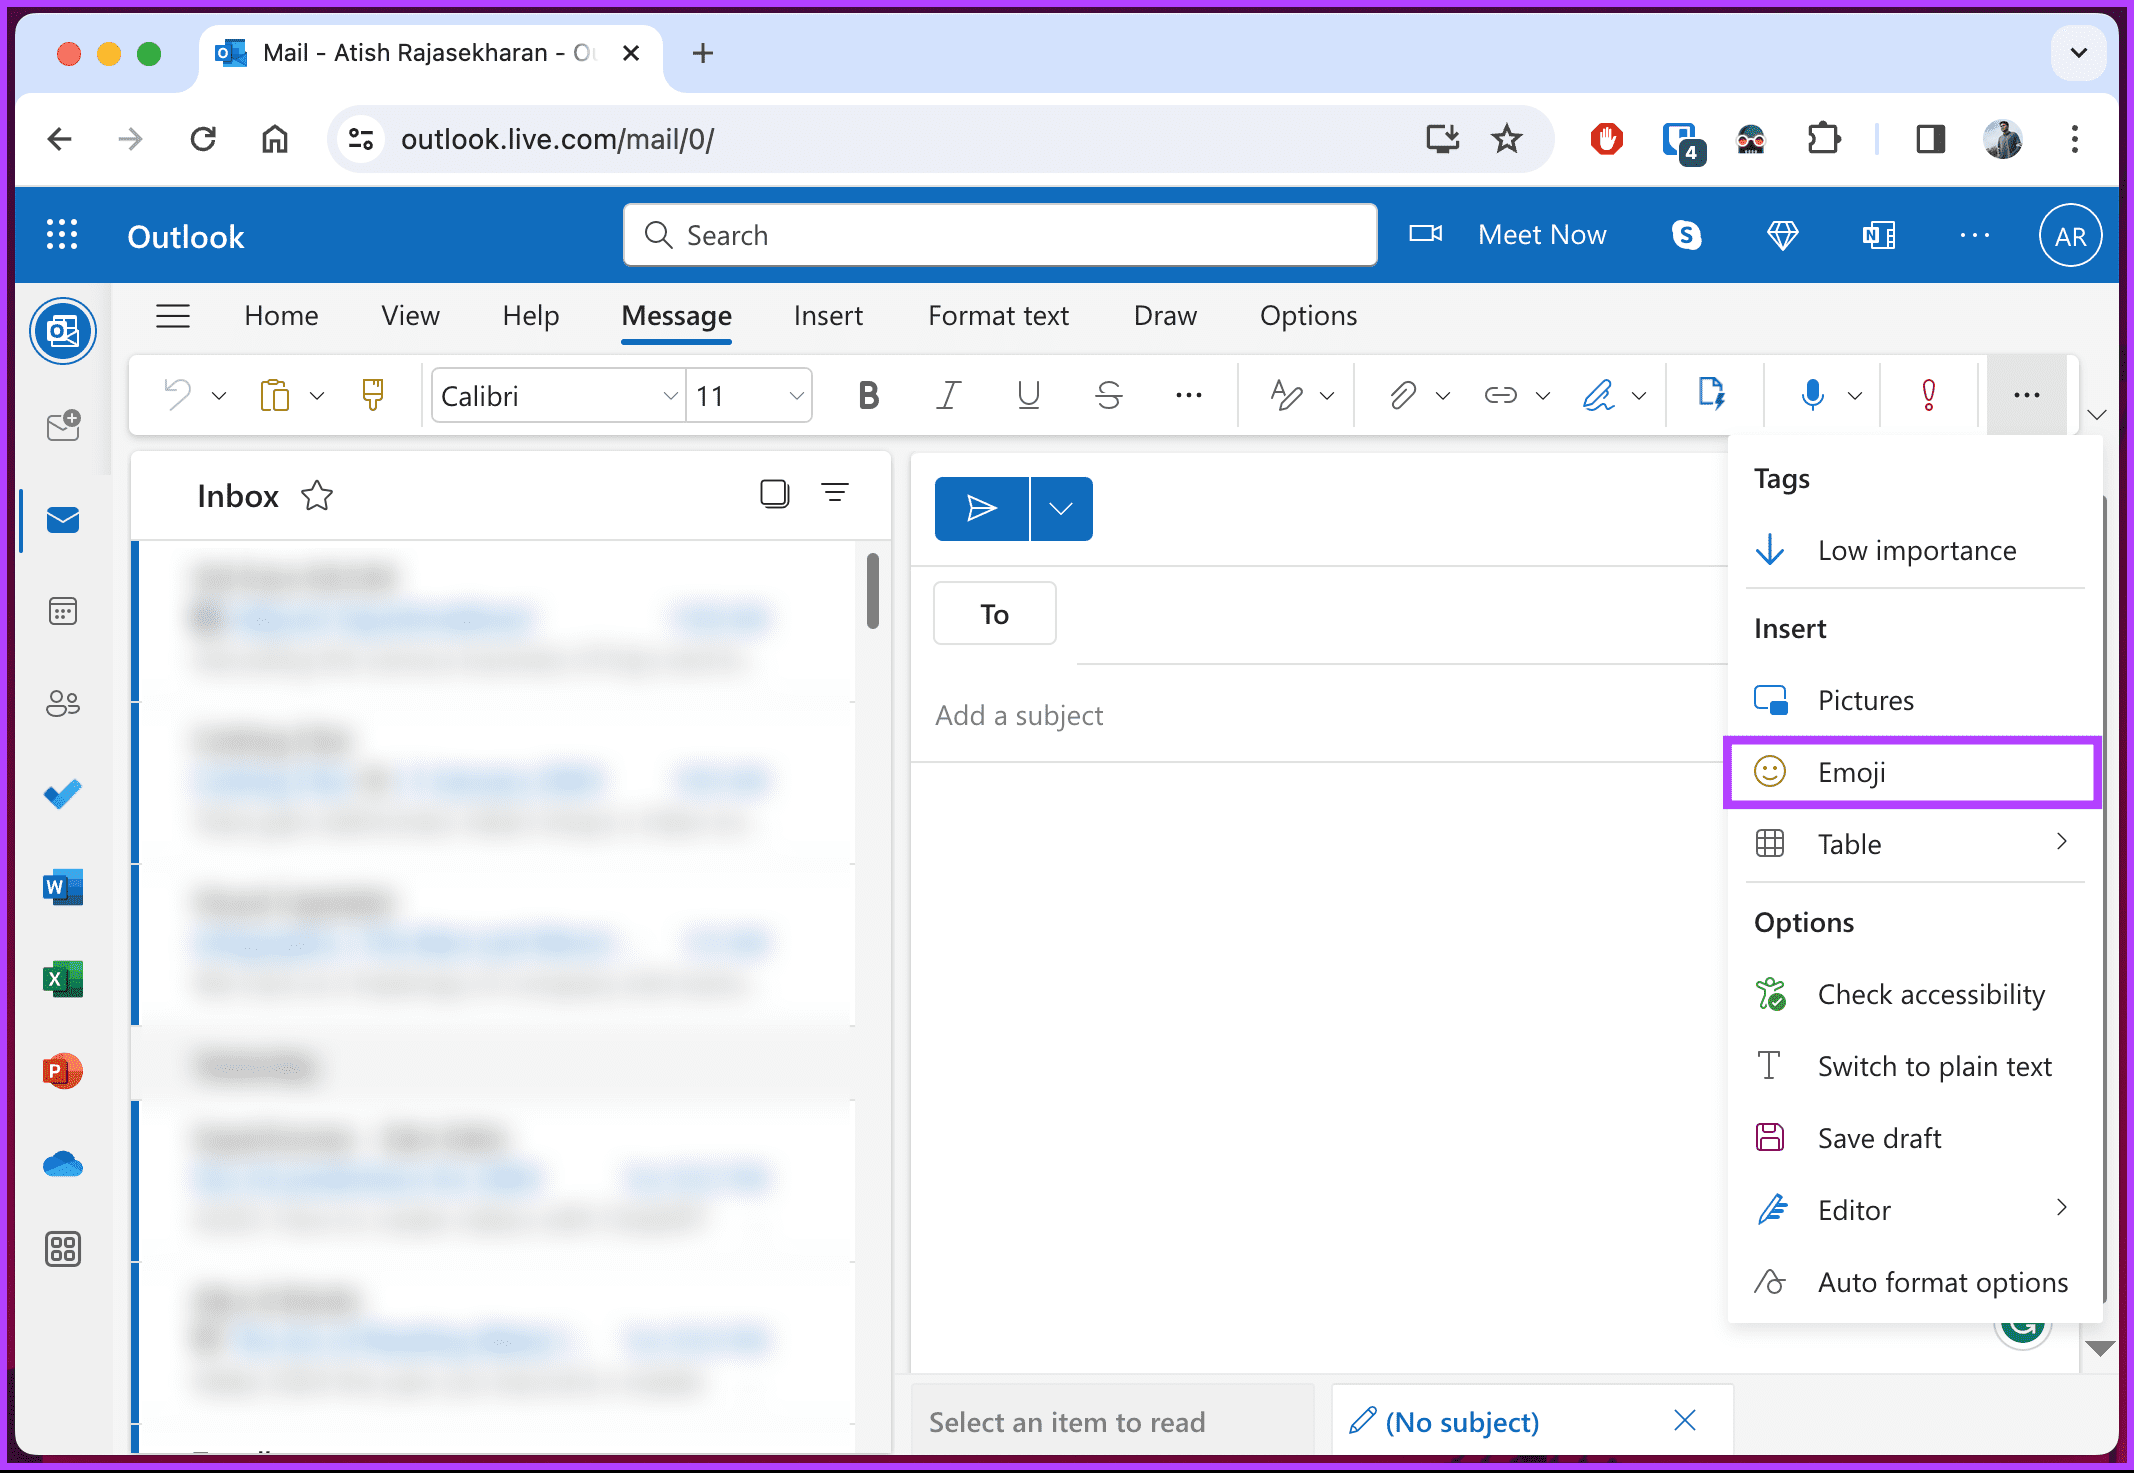
Step 1: Take your cursor to the location where you want to add the emoji(s).
Step 2: Now, click on the three-dot icon in the simplified ribbon layout.
Note: If you are on the classic ribbon layout, directly click on the Emoji option to add the emoji of your choice.
Step 3: Click on the Emoji option.
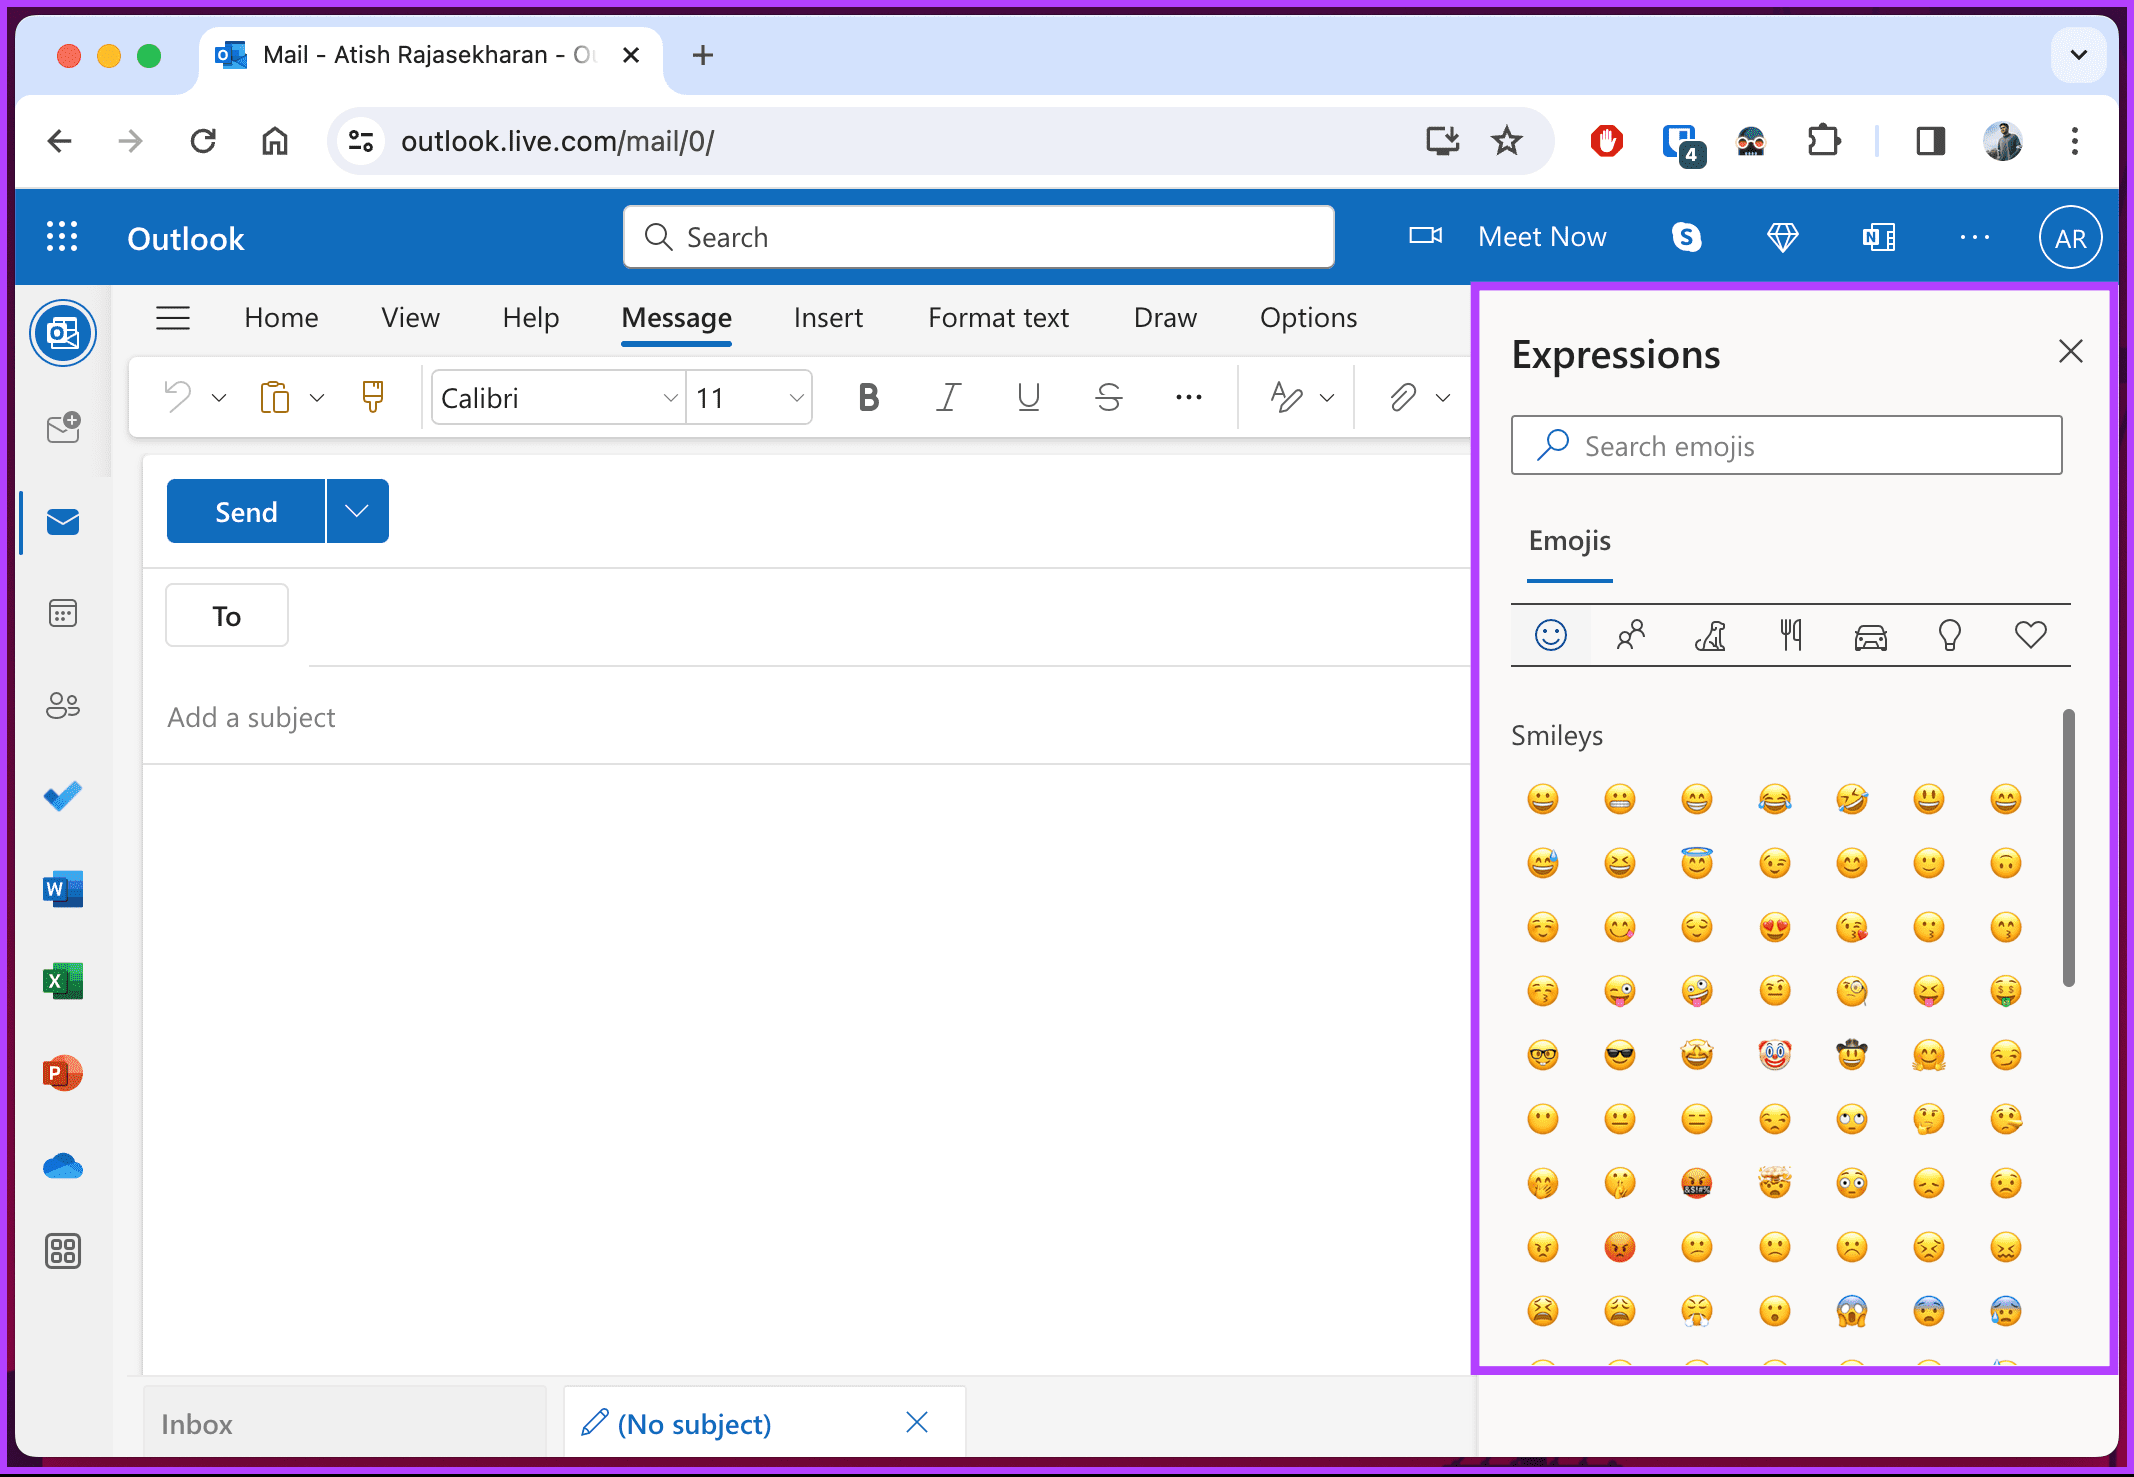
You will see a side panel with emojis sliding in. All you need to do is click the emoji(s) you want to add. The emoji(s) will be automatically added to the cursor’s location.
This is what happened with Outlook Web. What if you’re using the Outlook desktop app? Continue reading.
How to Insert Emojis on Windows
There are multiple ways to insert emojis on Windows. We will explain all the methods in step-by-step form. Let’s begin with the most common method.
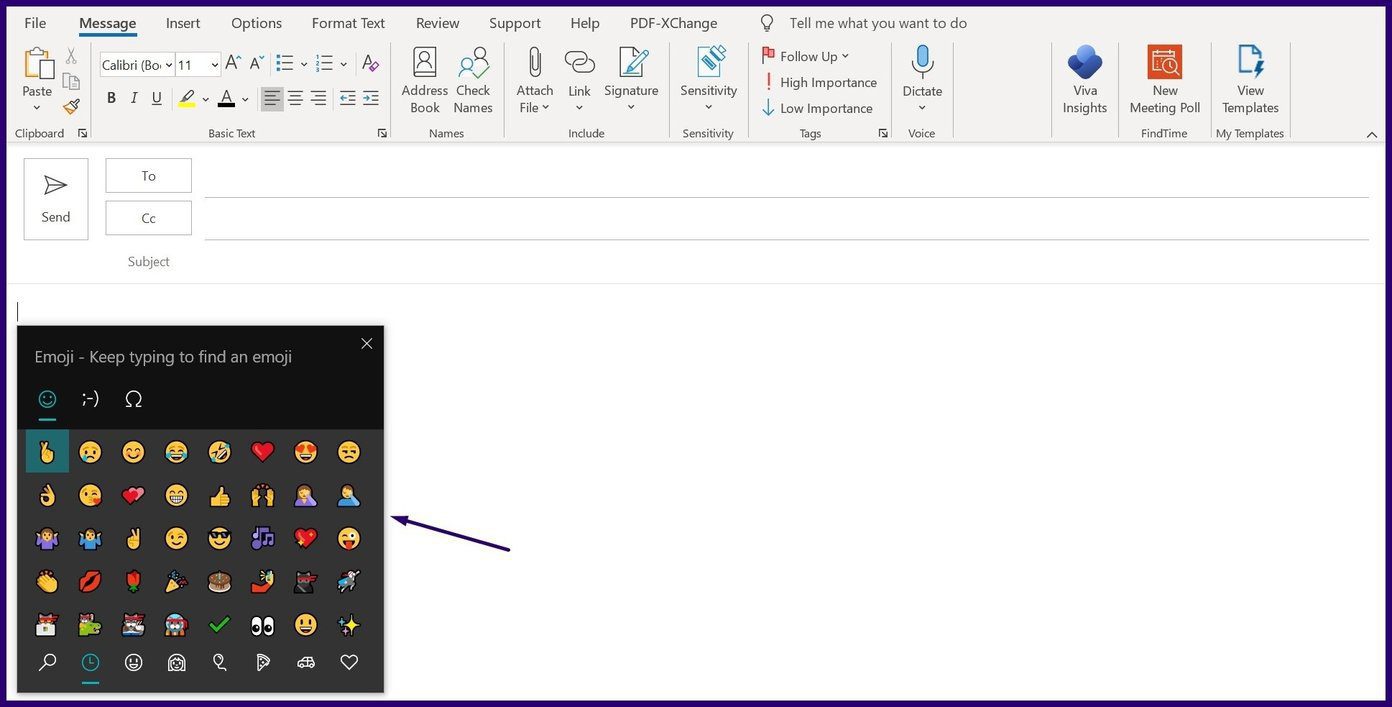
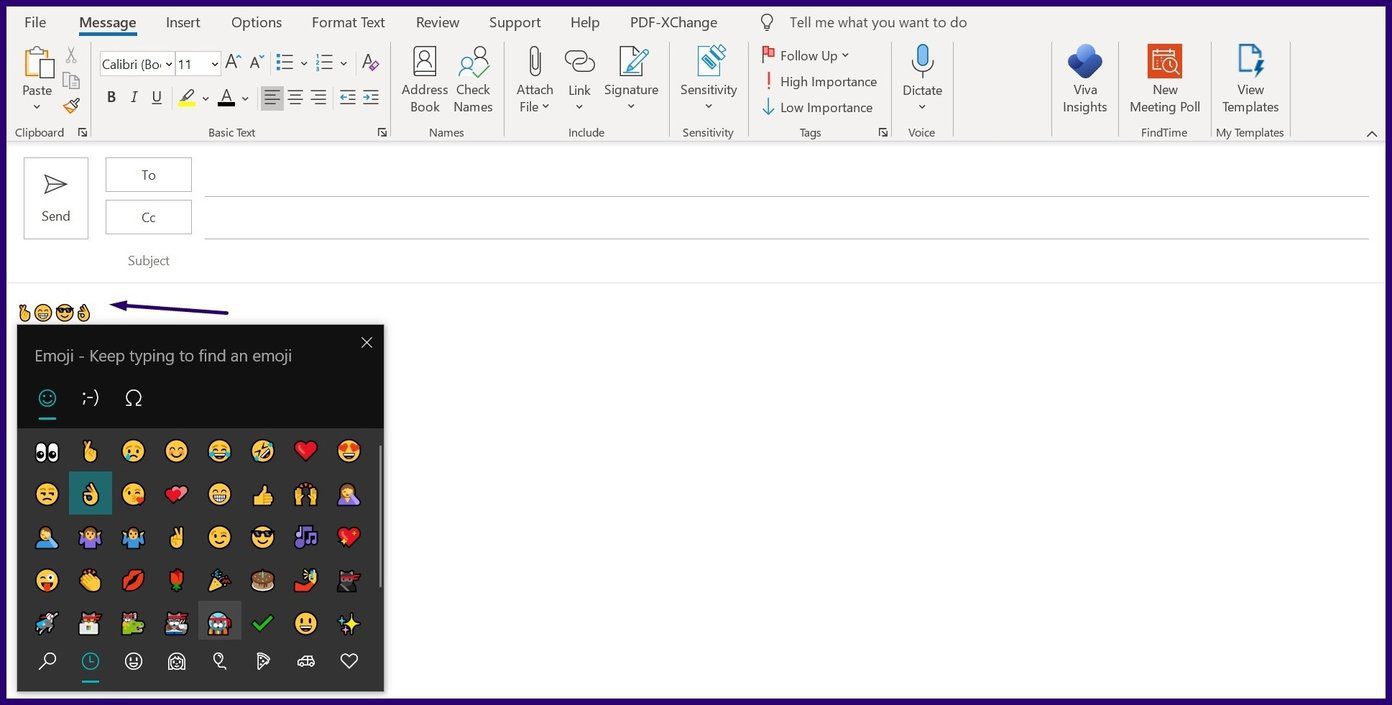
Method 1: Using the Emoji Panel
There are no restrictions on where users can insert an emoji in Microsoft Outlook. You can insert emojis in the subject line or body of an email. In this first method, you will insert the emoji by launching the panel via keyboard shortcuts. Check out the steps below:
Step 1: Launch Microsoft Outlook.
Step 2: On the ribbon, click on New Email or click on Forward or Reply on any email in your inbox, depending on if you’re creating a new email or responding to one in your inbox.
Step 3: Place your cursor on the part of the email where you need to insert the emoji.
Step 4: Press the ‘Windows key + semi-colon (;)’ keys simultaneously on your keyboard to launch the emoji panel. If this option doesn’t work, press the ‘Windows + period (.)’ keys.
Step 5: Scroll through the wide array of emojis available. Click on the one that best suits the emotion you want to transmit and select Enter on your keyboard to insert it in the email.
The emoji panel contains several symbols, including human faces, animals, objects, and road signs, to mention a few. If you want to know another way? continue reading.
The method above works with PCs using the Windows 10 or 11 operating software, so it won’t work if you are using an earlier version of Windows. However, you can still insert emojis into your emails using the symbol command on any Windows computer.
Step 1: Launch Microsoft Outlook.
Step 2: On the ribbon, click on New Email or click on Forward or Reply on any email in your inbox.
Step 3: Place your cursor on the part of the email where you need to insert the emoji.
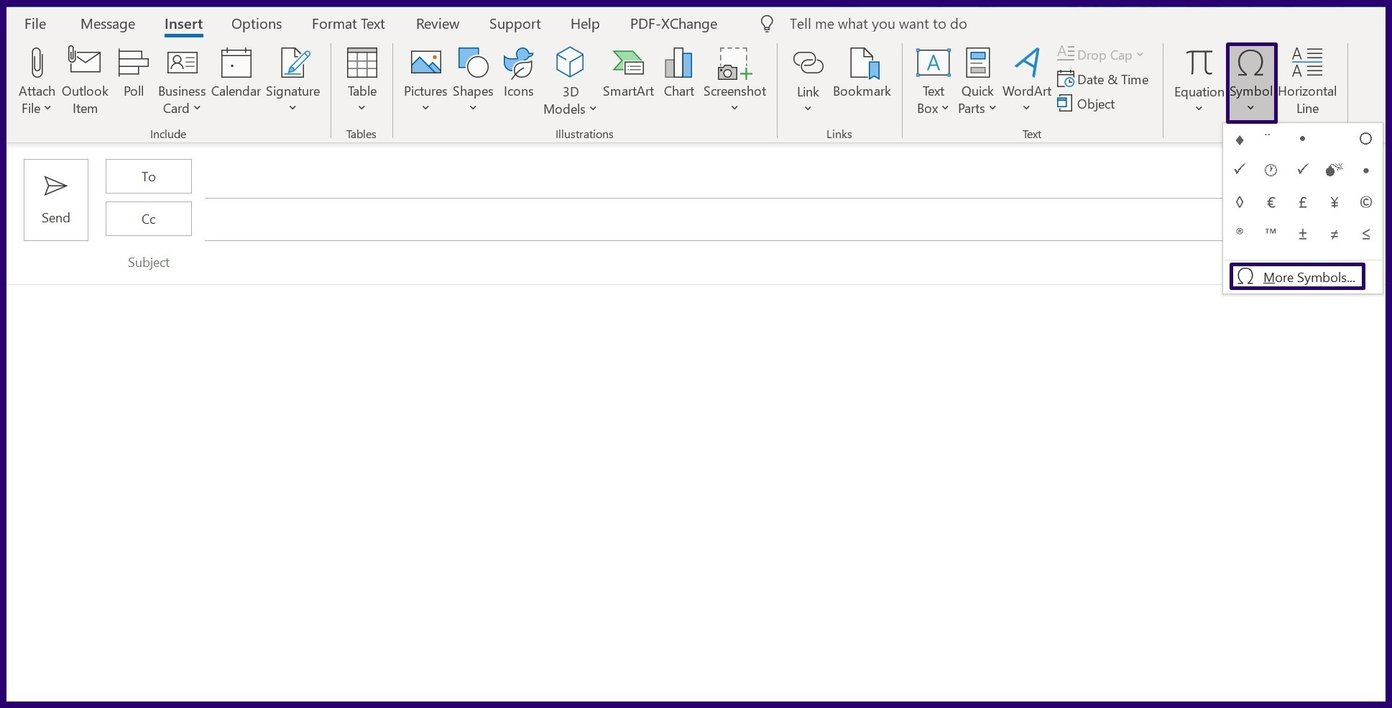
Step 4: On the ribbon, click on Insert.
Note: If you are forwarding or replying to an existing email from the Reading Pane, you need to click on the pop-out button at the upper part of the pan to access the Insert option.
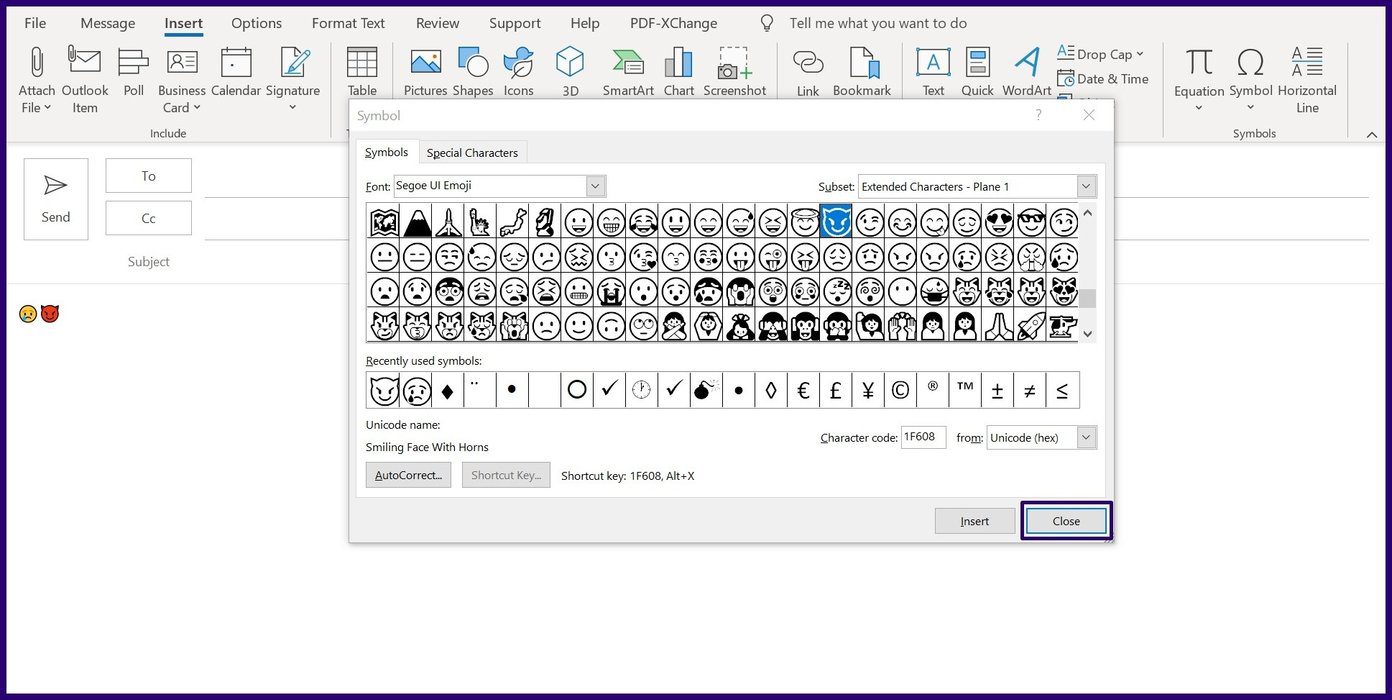
Step 5: At the far top-right, click the Symbol button, and choose More Symbols.
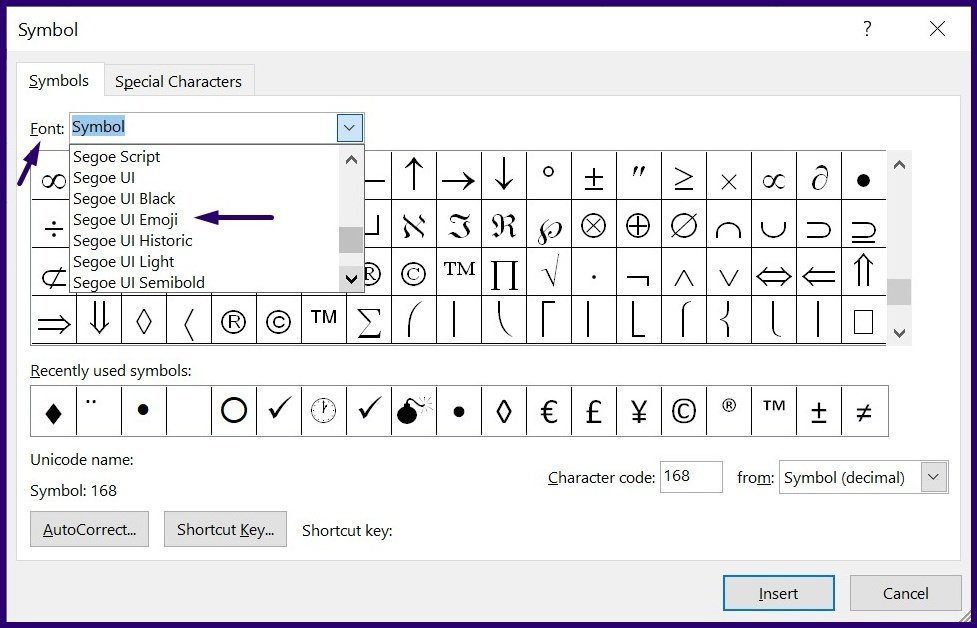
Step 6: From the drop-down menu beside Font, select Segoe UI Emoji as the font.
Note: If you use a Windows 7 PC, you can choose black and white emoji via the Segoe UI Symbol font. The colored emoji version will be shown if the recipient’s computer supports colorful emoji.
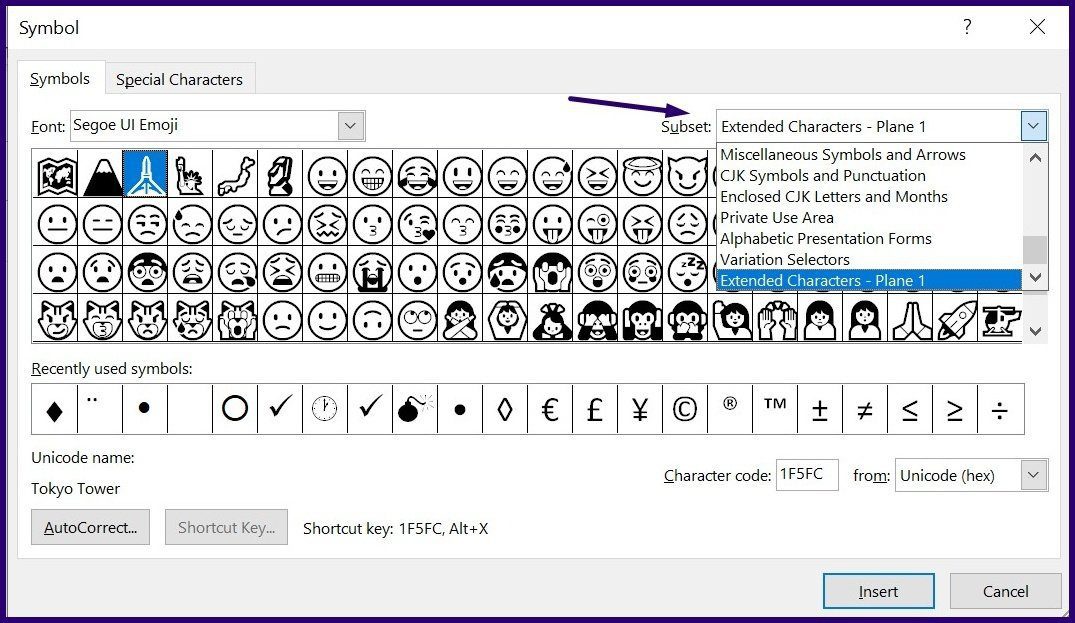
Step 7: You can also use the Subset drop-down list, where you will find the most interesting set of emojis. They include:
Dingbats
Miscellaneous symbols
Miscellaneous technical
Extended characters – plane 1 (this is the largest emoji subset available)
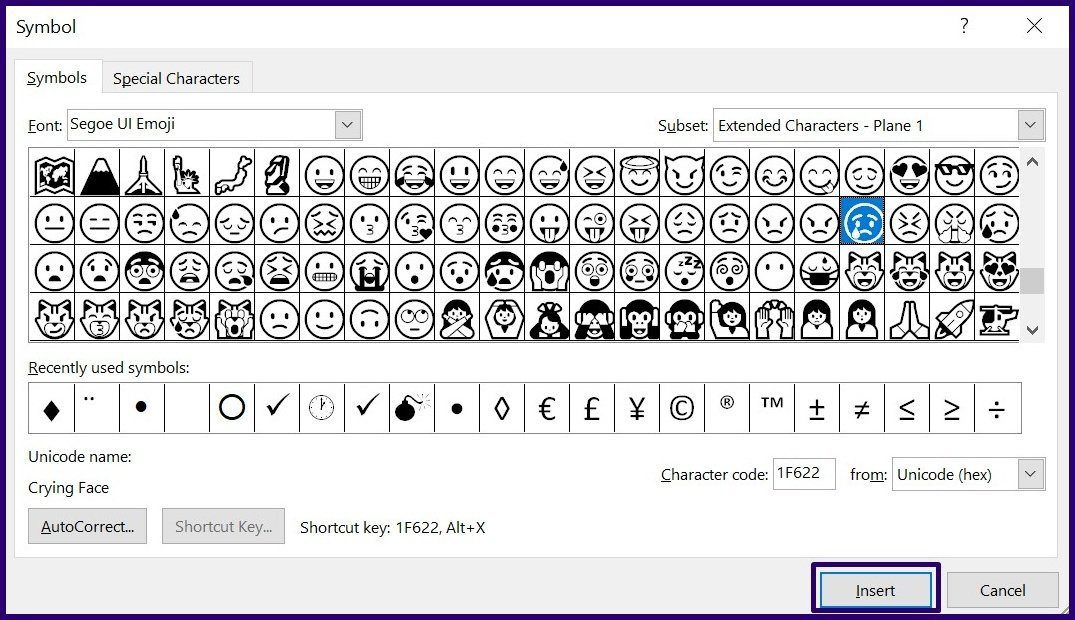
Step 8: Choose the emoji that best communicates your emotions and click the Insert button.
Step 9: After selecting your preferred emojis, close the dialog box by clicking Close.
That’s it. You have successfully added the emoji to your Outlook mail. If your preferred emojis are not available on the emoji panel or symbol list? continue reading.
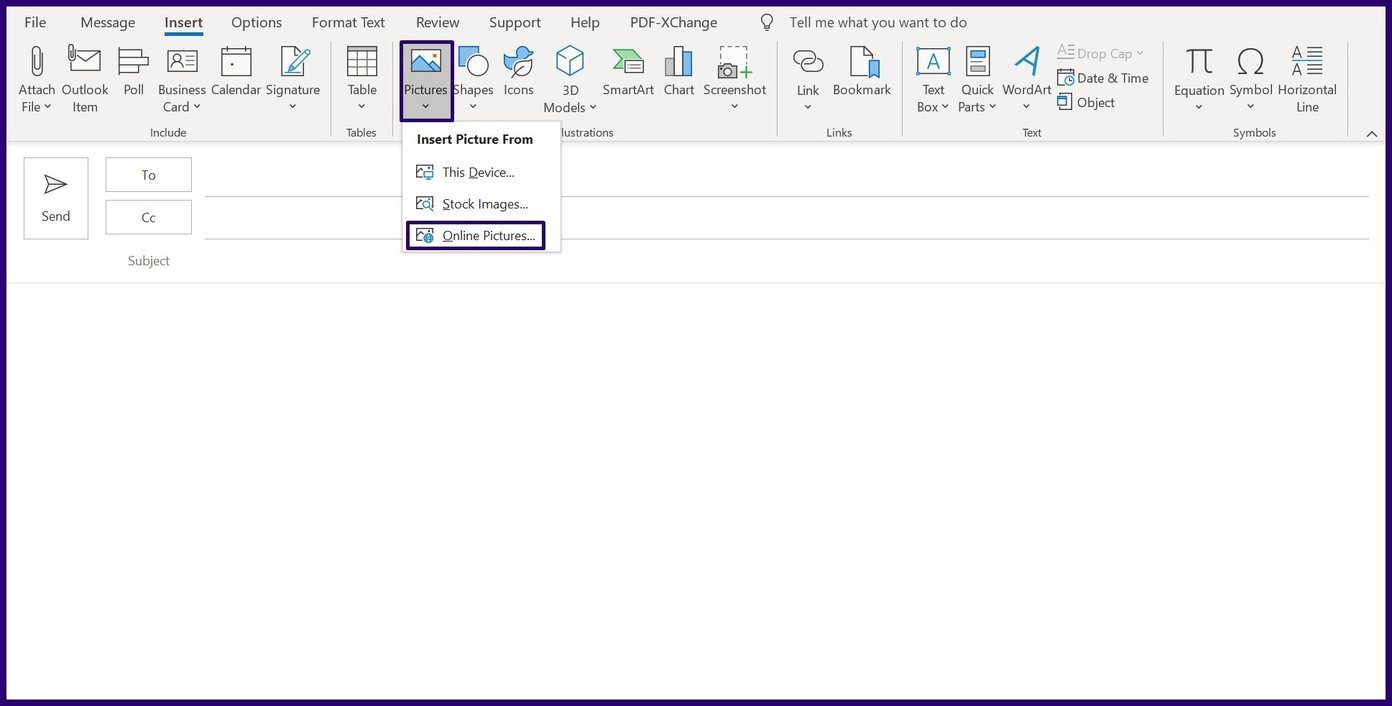
Method 3: By Importing Online Pictures
Step 1: Launch Microsoft Outlook.
Step 2: On the ribbon, click on New Email or click on Forward or Reply on any email in your inbox, depending on if you’re creating a new email or responding to one in your inbox.
Step 3: Place your cursor on the part of the email where you need to insert the emoji.
Step 4: On the ribbon, click on Insert.
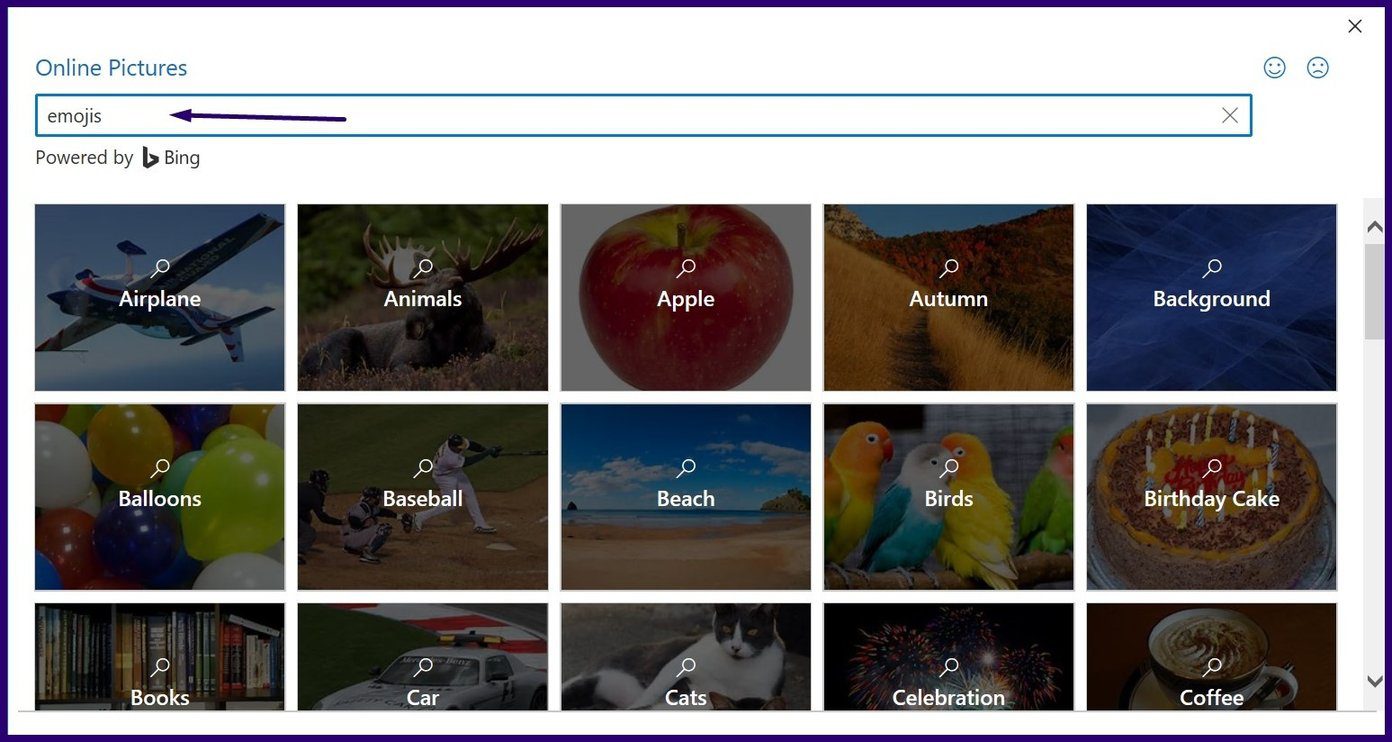
Step 5: Click on Pictures and select Online Pictures from the drop-down menu.
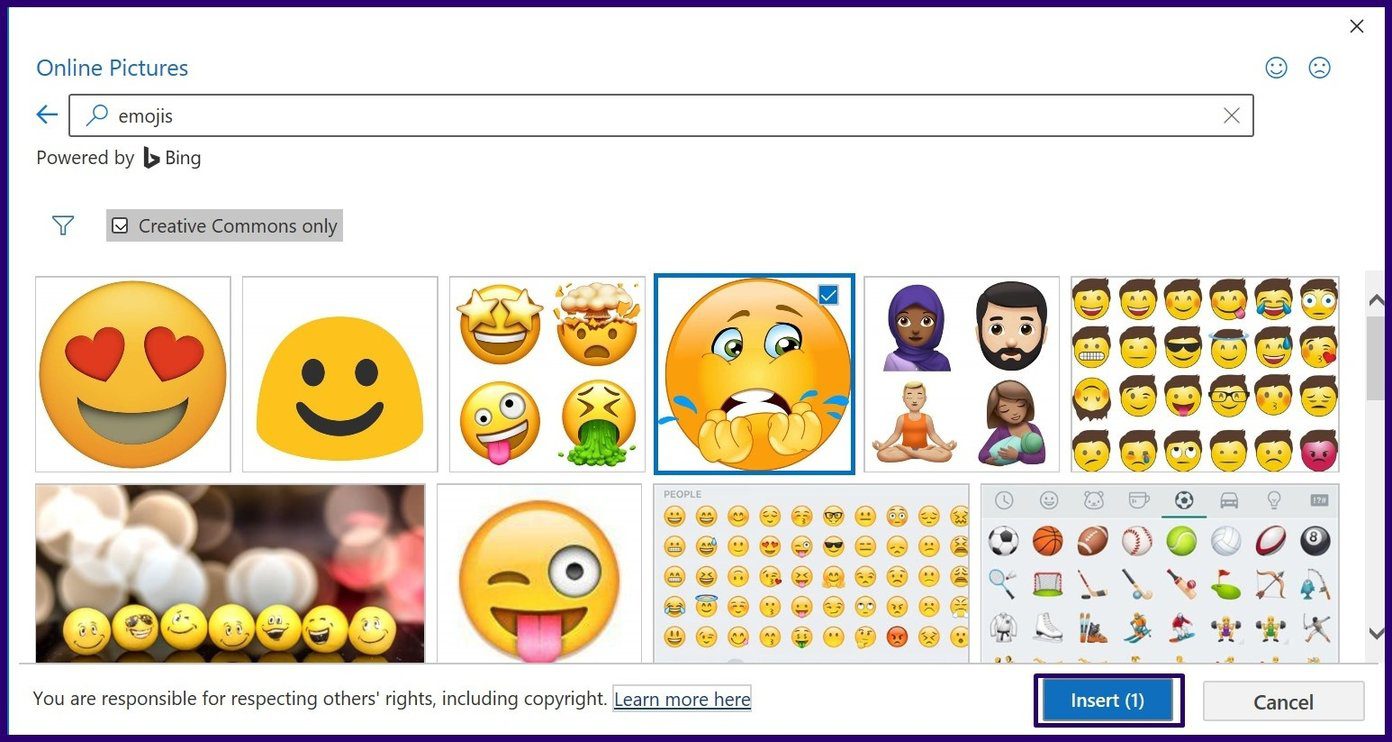
Step 6: Within the Search field, type emojis and hit Enter to fetch results.
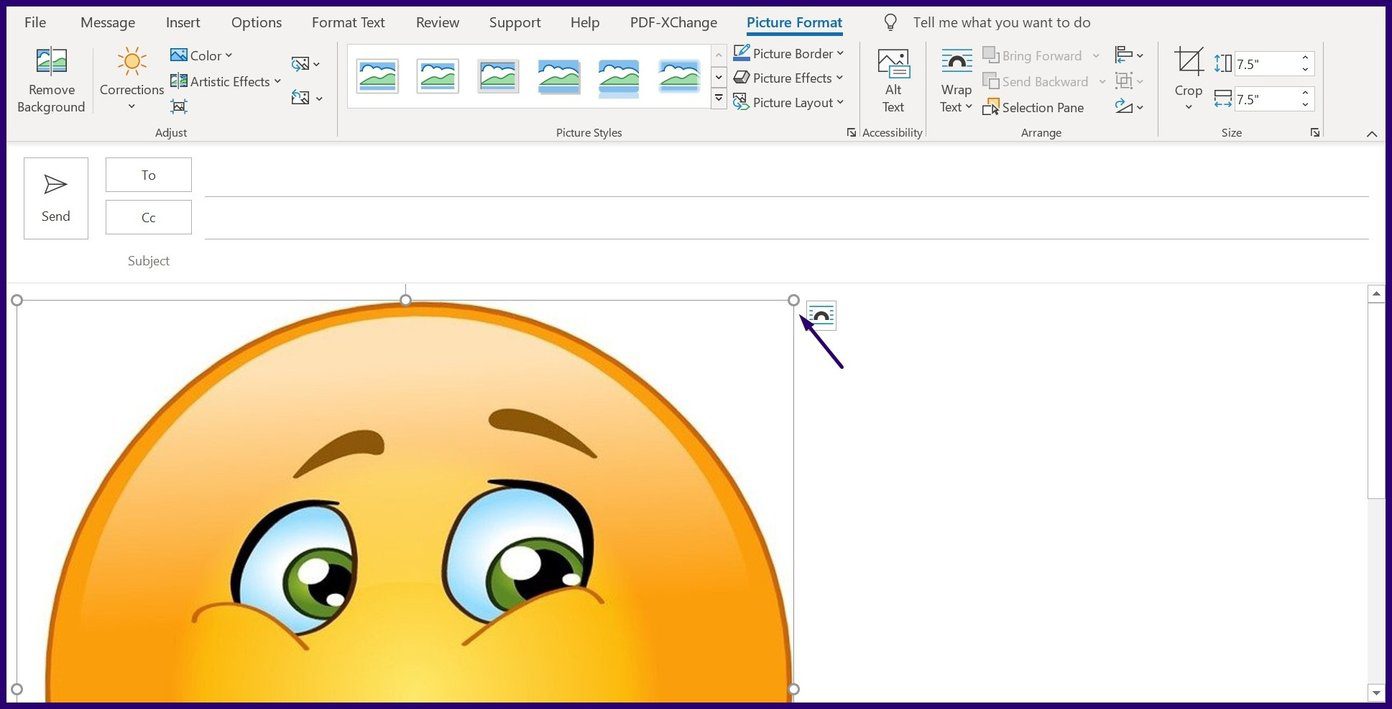
Step 7: Select your preferred emoji and click on Insert.
Step 8: Place your mouse cursor at the edge of the emoji to adjust the size.
There you go. You have successfully imported online pictures. This was the case when you wanted to send emojis or add emojis to an Outlook email on Windows. What if you are on a Mac? keep reading.
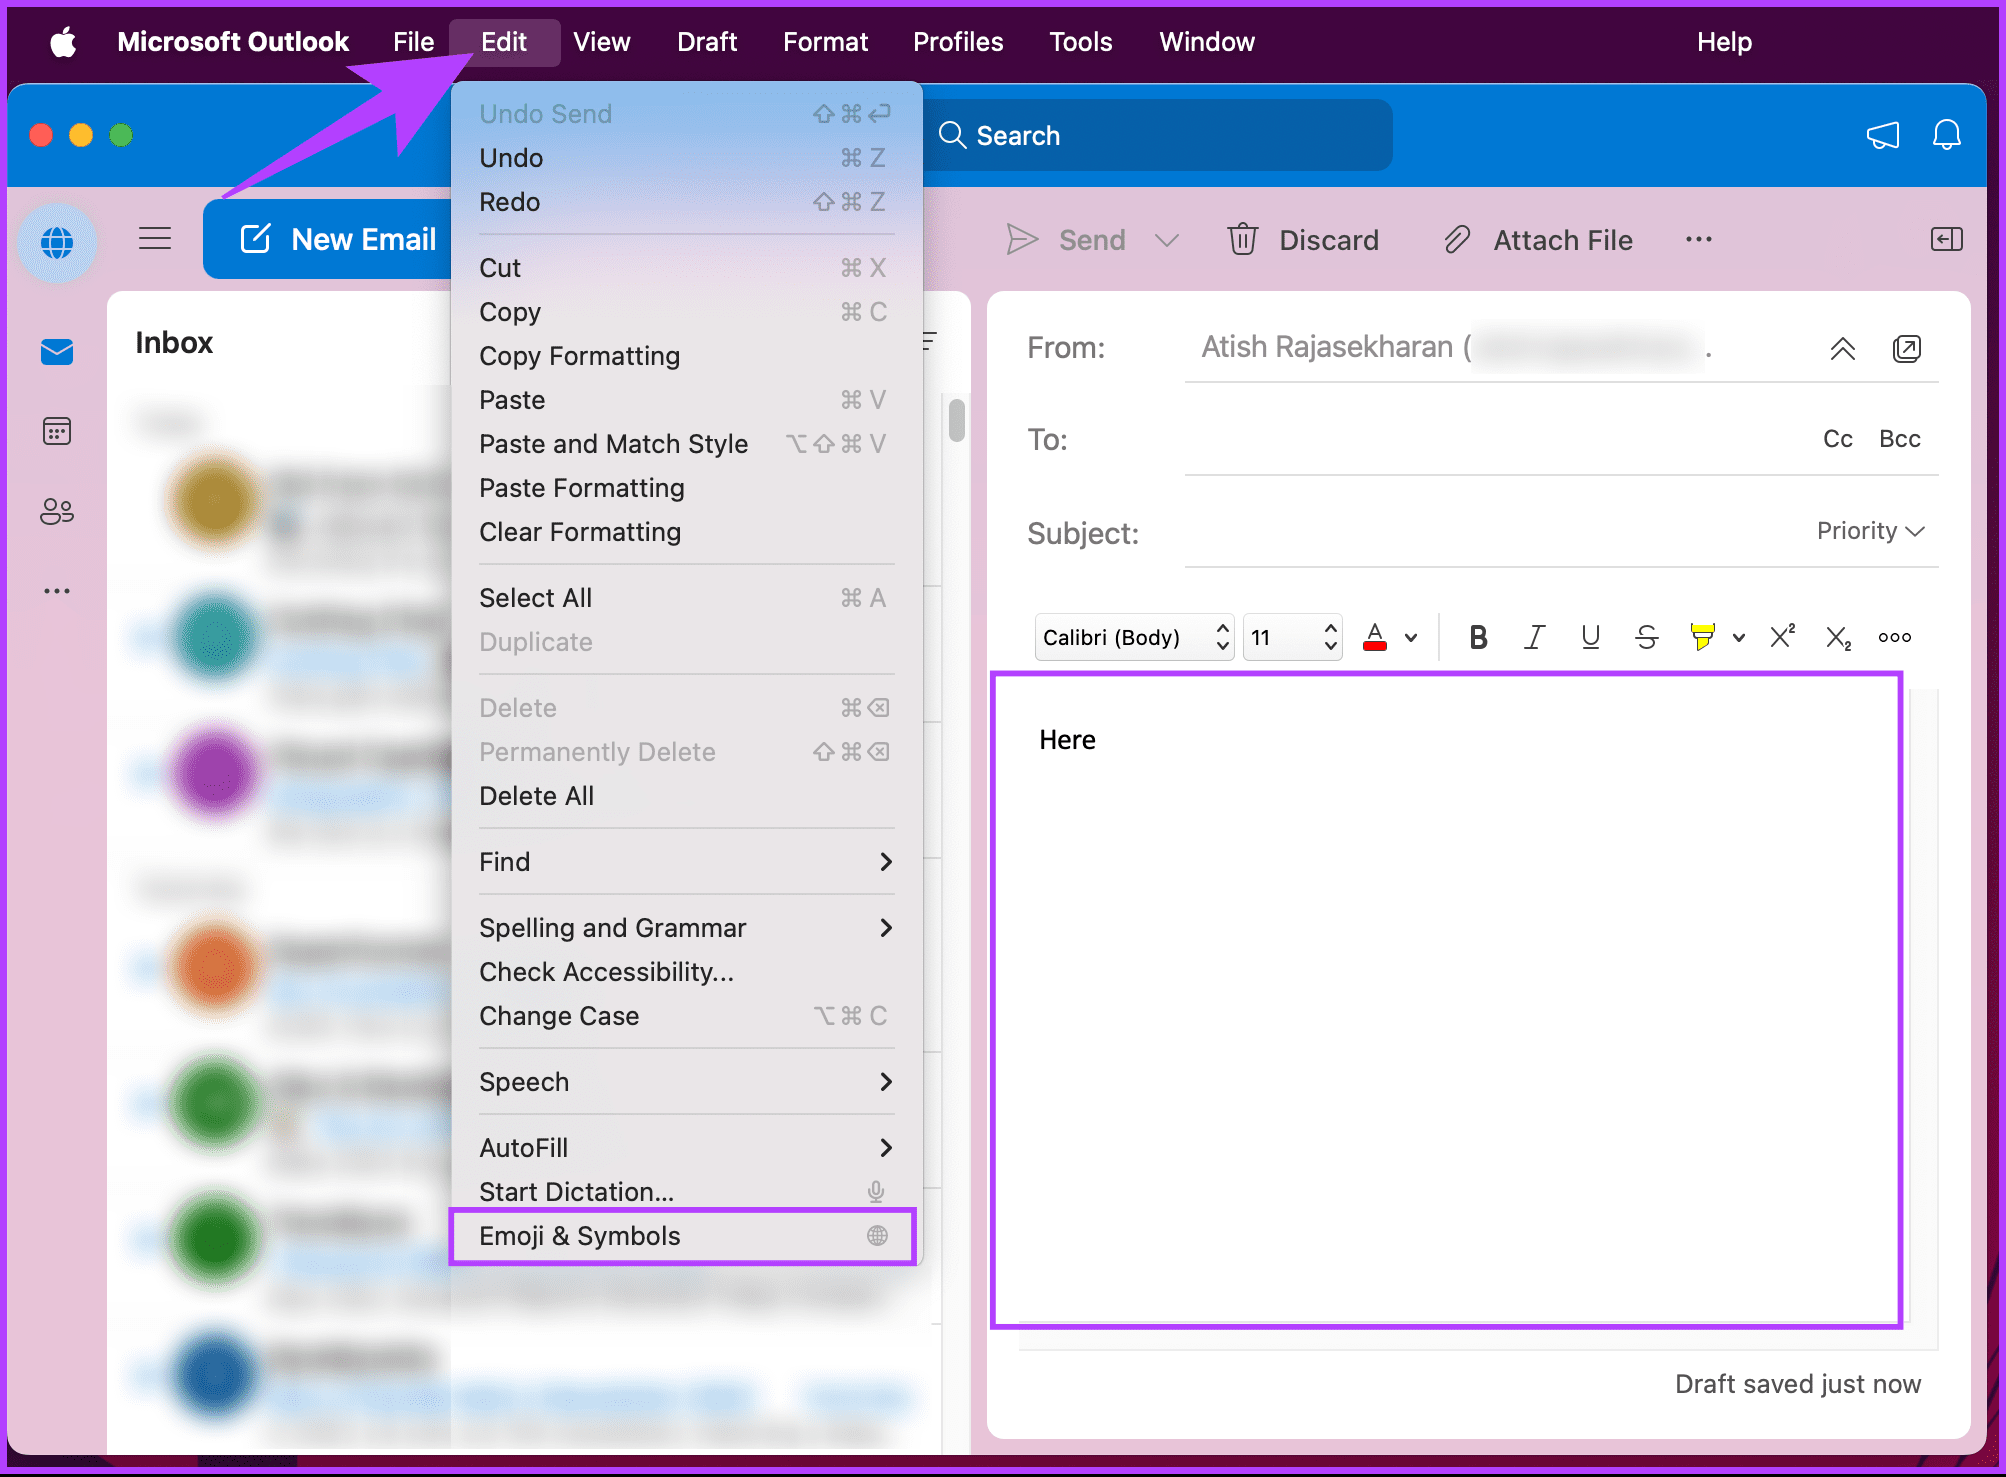
How to Insert Emoji in Microsoft Outlook App on Mac
Step 1: Launch the Outlook app on your Mac. Once launched, click on the New email button or select the email you want to reply to.
Step 2: Once in the compose window, place your cursor where you want to insert the emoji.
Step 3: Now, click on the Edit menu from the toolbar and the drop-down menu, and choose ‘Emoji & Symbols.’
Note: Alternatively, you can press the Function key on your keyboard.
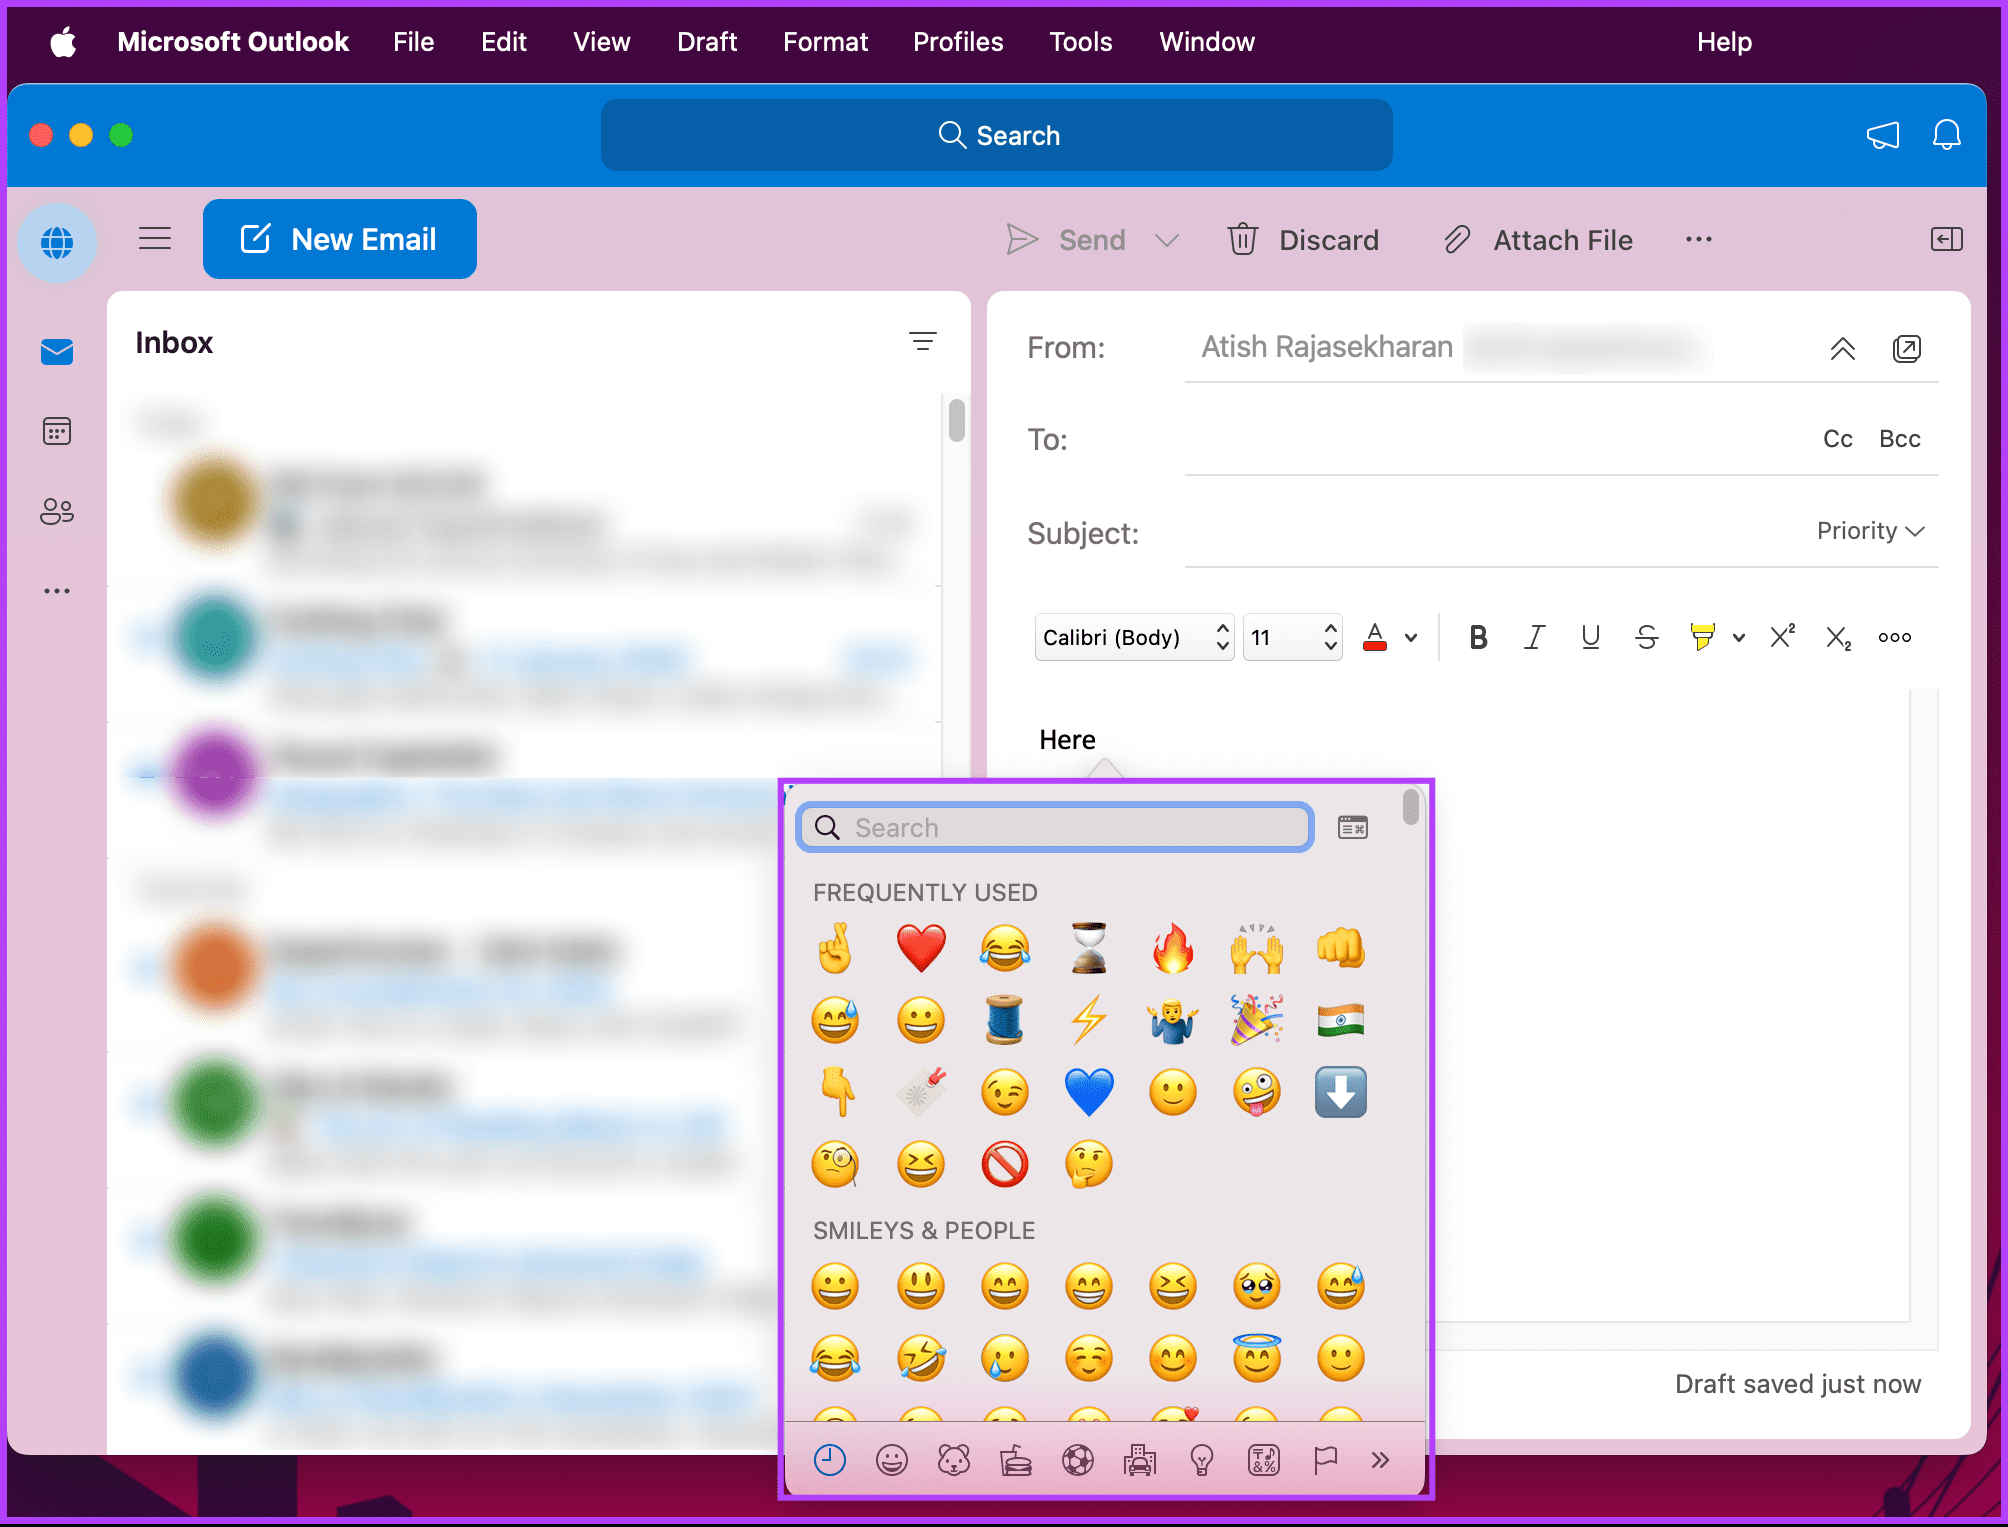
Step 4: You will see a pop-up window where you can search for and select the emoji of your choice.
There you go. The selected emoji will be added to the location of your cursor in the compose window. If you don’t have access to your Windows or Mac computer, keep reading.
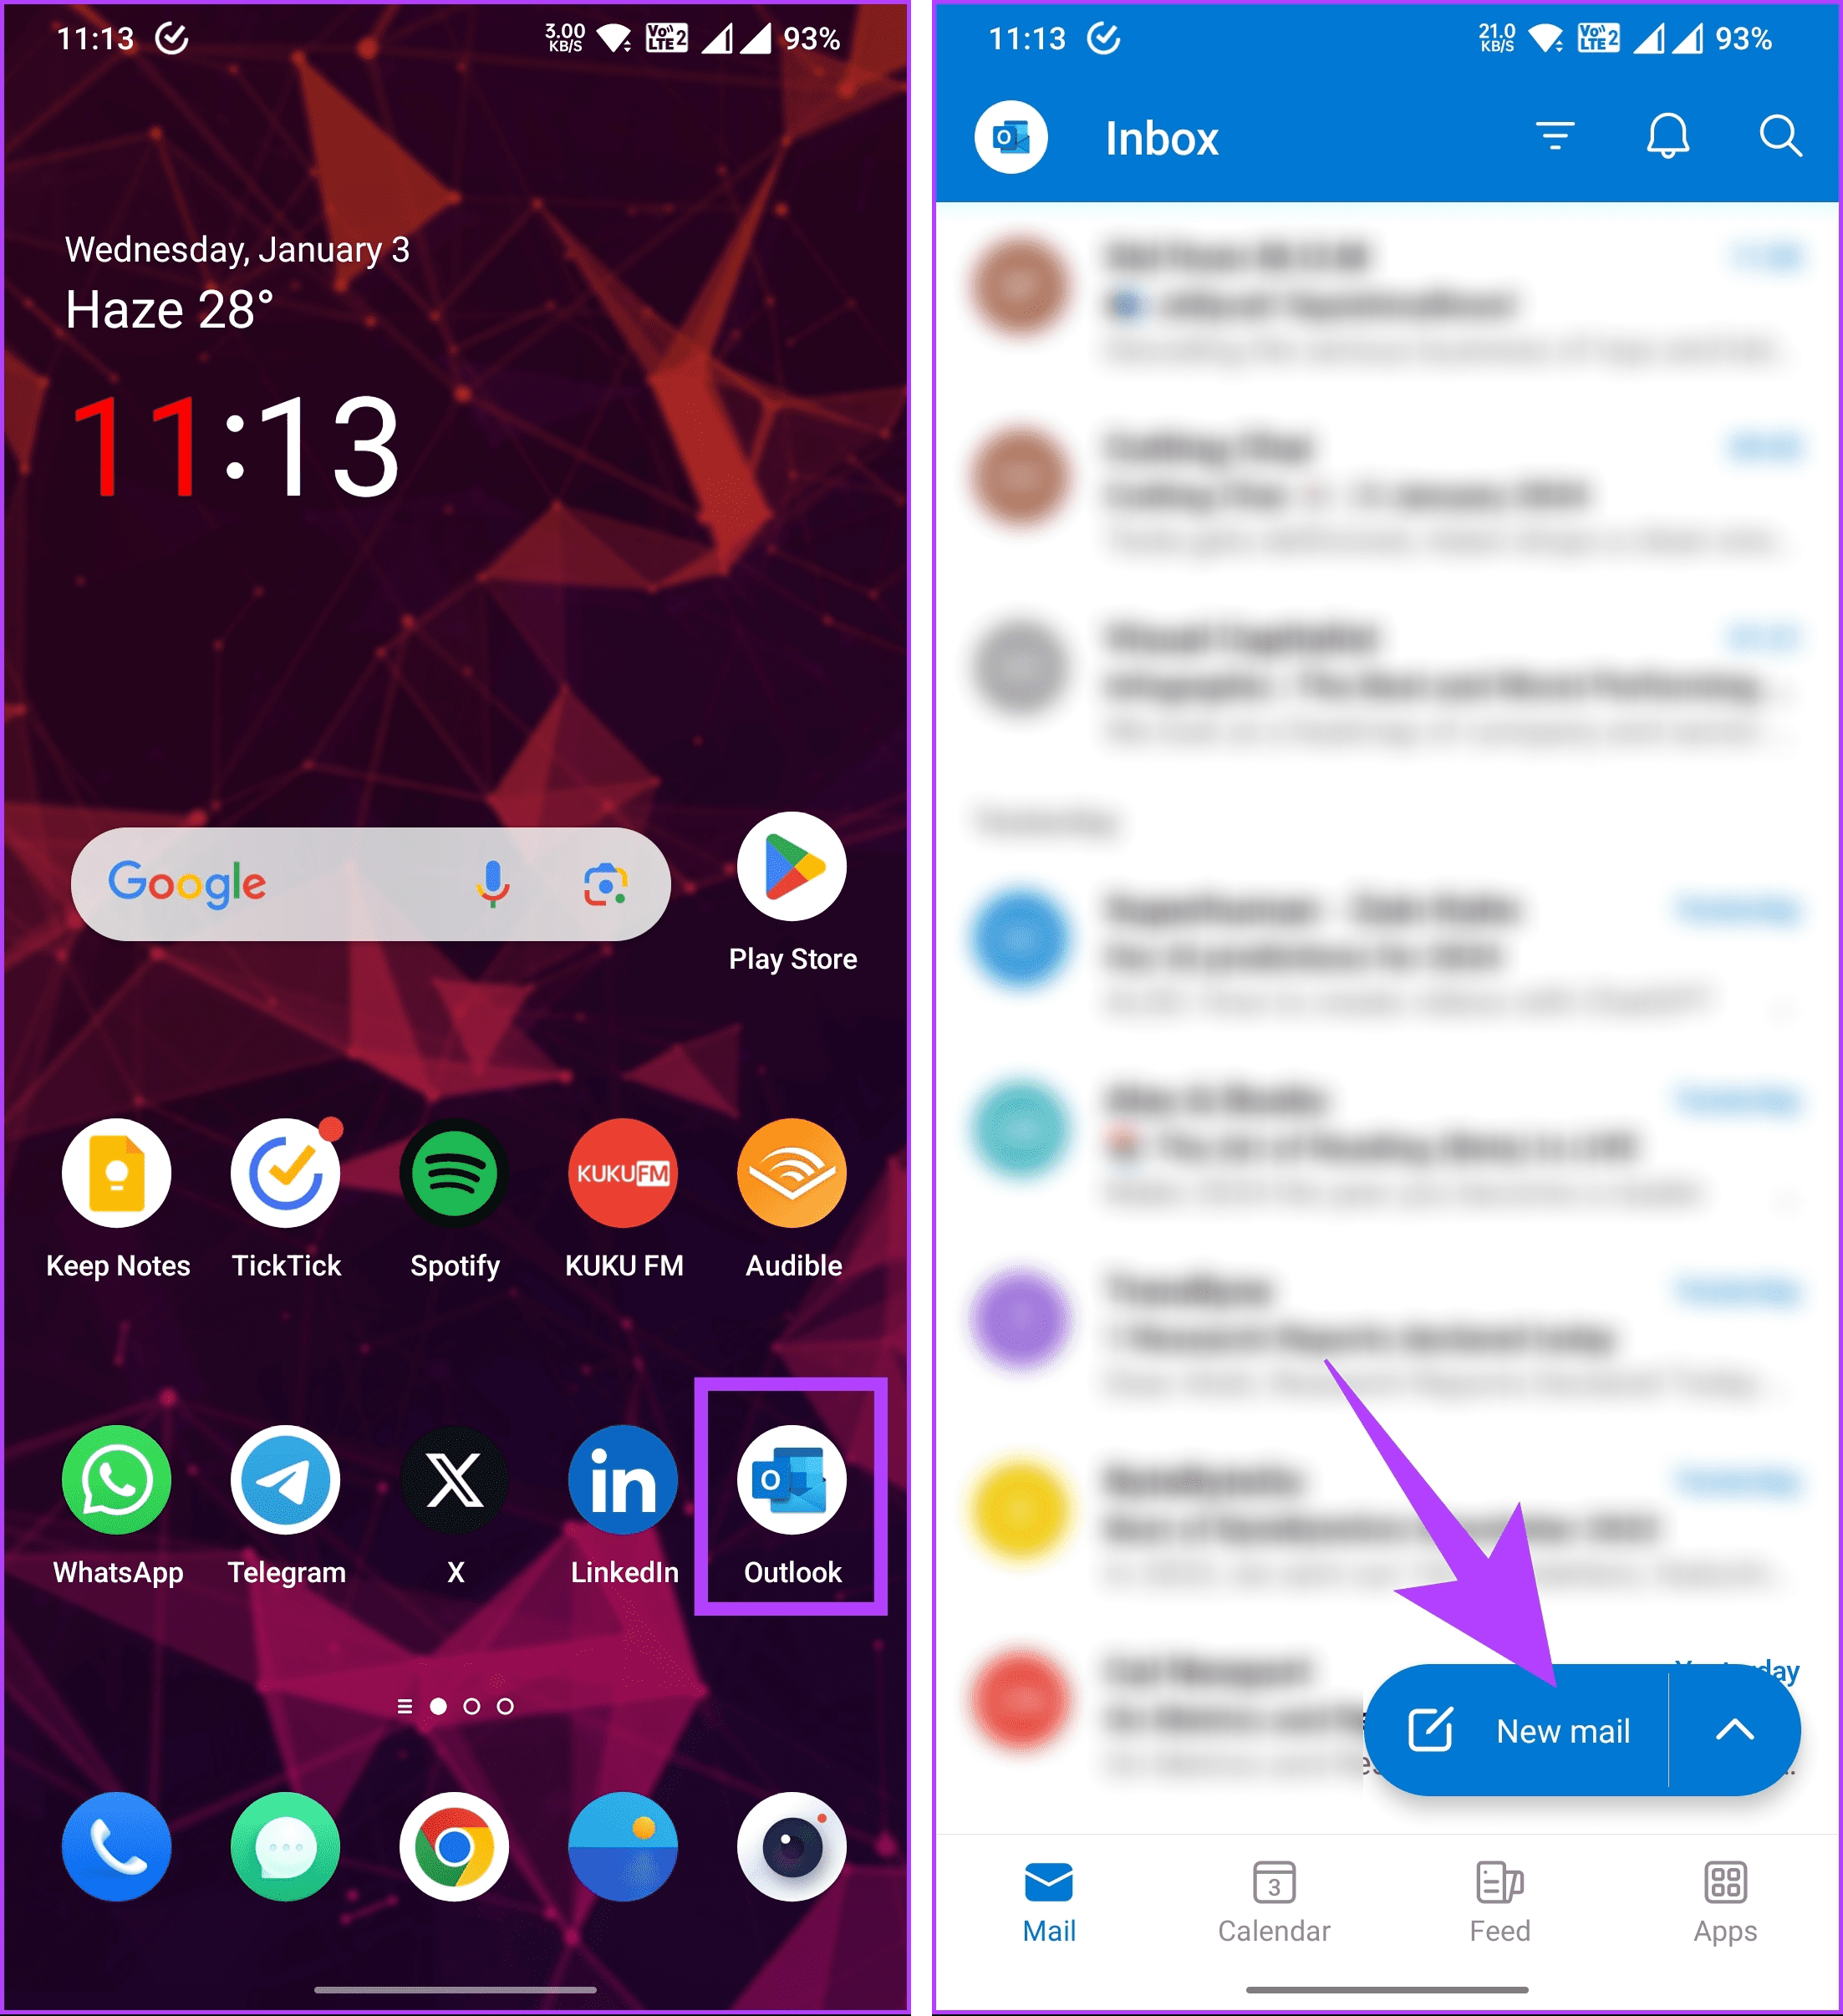
How to Send Emojis in Your Microsoft Outlook Mobile App
Step 1: Launch the Microsoft Outlook mobile app on your Android or iOS device. Once launched, either go and create a new email or tap on the email you want to reply with an emoji.
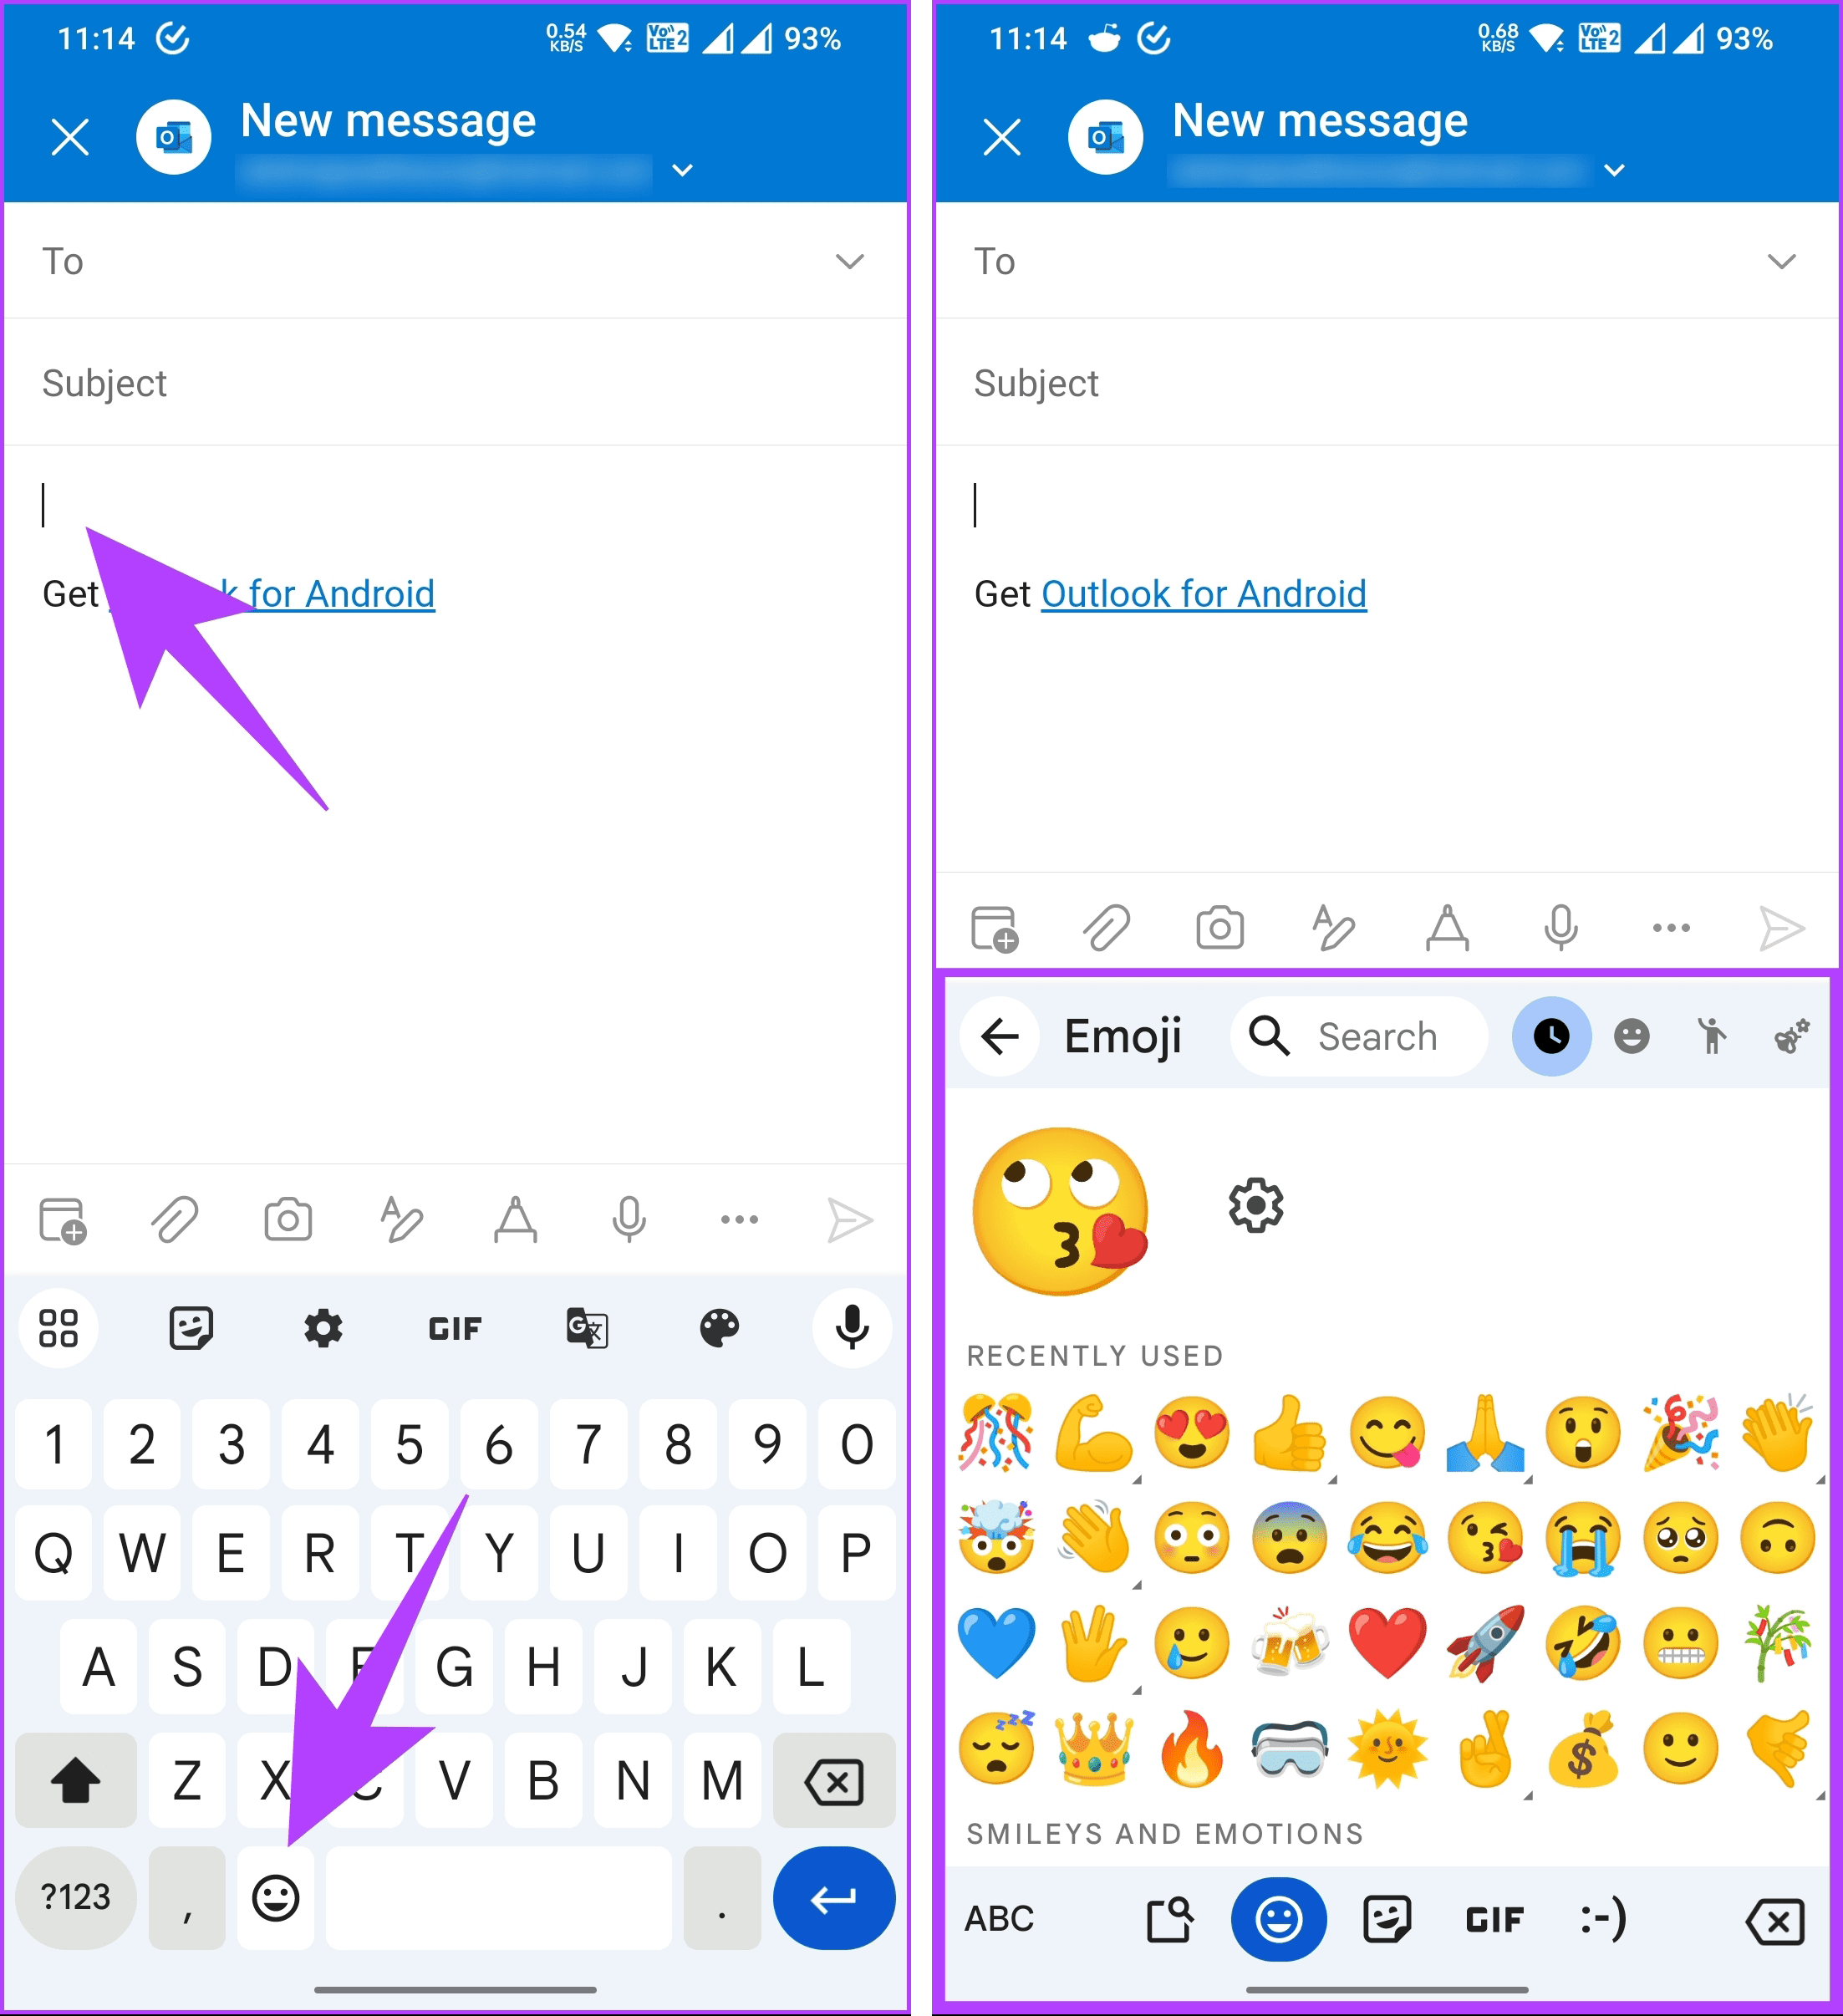
Step 2: Tap in the body where you want to place the emoji. Tap on the comma or emoji key on your keyboard and select Emoji.
This way, you can add or get laughing, thumbs up, heart, and many other emojis in the Outlook mobile app. If you have any queries that we missed addressing, check out the FAQ section below.
FAQs on Insert Emojis in a Microsoft Outlook Email
1. Can I use emojis in the subject line of an Outlook email?
Yes, you can use emojis in the subject line of an Outlook email. Simply place the cursor in the subject line and follow the same steps mentioned above to insert emojis.
2. Can I use custom emojis in Outlook emails?
Microsoft Outlook generally supports standard emojis, but the ability to use custom emojis may depend on the version of Outlook and the email client of the recipient. Stick to standard emojis for the best compatibility.
Best Microsoft Outlook Shortcuts
Using any of the above methods, you should be able to insert emojis into your Outlook emails. The first method involves using a shortcut to access the emoji panel. There are also other easy Outlook shortcuts you can learn to save yourself time when responding to emails.
Check if Snapchat is down:Snapchat may fail to send snaps if its servers are down. To verify this, check Snapchat’s server status by visiting Downdetector.
Turn off VPN:Issues with your VPN connection can also affect Snapchat’s ability to connect to its servers and send snaps. Try turning off your VPN temporarily to see if that helps.
Fix 1: Sign Out and Sign In
Signing out of your Snapchat account and signing back in helps refresh the app’s connection to the server, potentially resolving the issue.
Step 1: Tap the profile icon at the top left corner > tap the gear icon at the top right corner.
Step 2: Scroll to the bottom and tap Log Out > select Log Out again to confirm. Restart the app > sign back in to see if you can send snaps now.
Fix 2: Clear App Cache
Snapchat might misbehave on your phone if its existing cache data has become outdated or corrupted. Thankfully, Snapchat includes an option to clear the cache within its settings menu. Here’s how to access it.
Step 1: In the Snapchat app, go to your profile > tap the gear icon at the top right corner.
Step 2: Scroll down to Account Actions > tap Clear Cache > choose Continue when prompted.
Fix 3: Uninstall and Reinstall Snapchat
If clearing the cache data does not help, try uninstalling and reinstalling the Snapchat app on your phone. This should fix any issues caused by a buggy app build or corrupt data.
Unmute your TV and turn up the volume: Press the Mute button on your TV remote to unmute its volume. Further, increase the volume level using the TV remote and Fire Stick remote.
Check your network connection: Ensure Fire Stick is connected to a good internet connection. I recommend using at least 10Mbps of internet speed to stream videos on the Fire Stick.
Replug the Fire Stick: Unplug the Fire Stick from your TV, clean its connector thoroughly, and re-insert it.
Inspect the AV(Audio/Video) Receiver: Check the AV Receiver light indicator to ensure it is powered on.
Ensure Bluetooth earphones aren’t connected to the Fire Stick: Disconnect all connected Bluetooth earphones/headphones to avoid sound routing to them instead of your TV.
Ensure HDMI port supports audio: Check your TV product manual to verify its HDMI port supports audio. You can also Google the TV model to verify these details.
Fix 1: Check Audio Settings in the Fire Stick
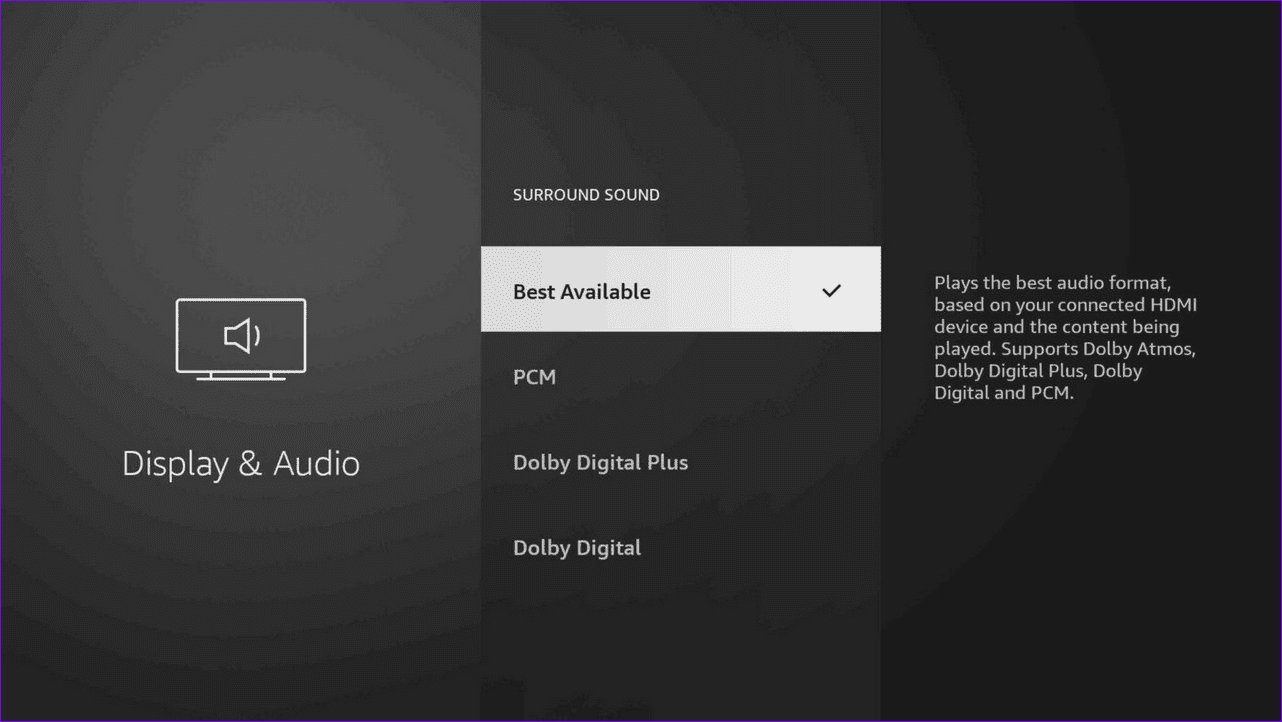
Fire Stick lets you choose the best sound output supported by the playing content (e.g., Dolby Digital, Dolby Atmos). If your TV or connected speaker isn’t compatible, you may not hear any sound. Tweak the Fire Stick audio settings manually to fix it.
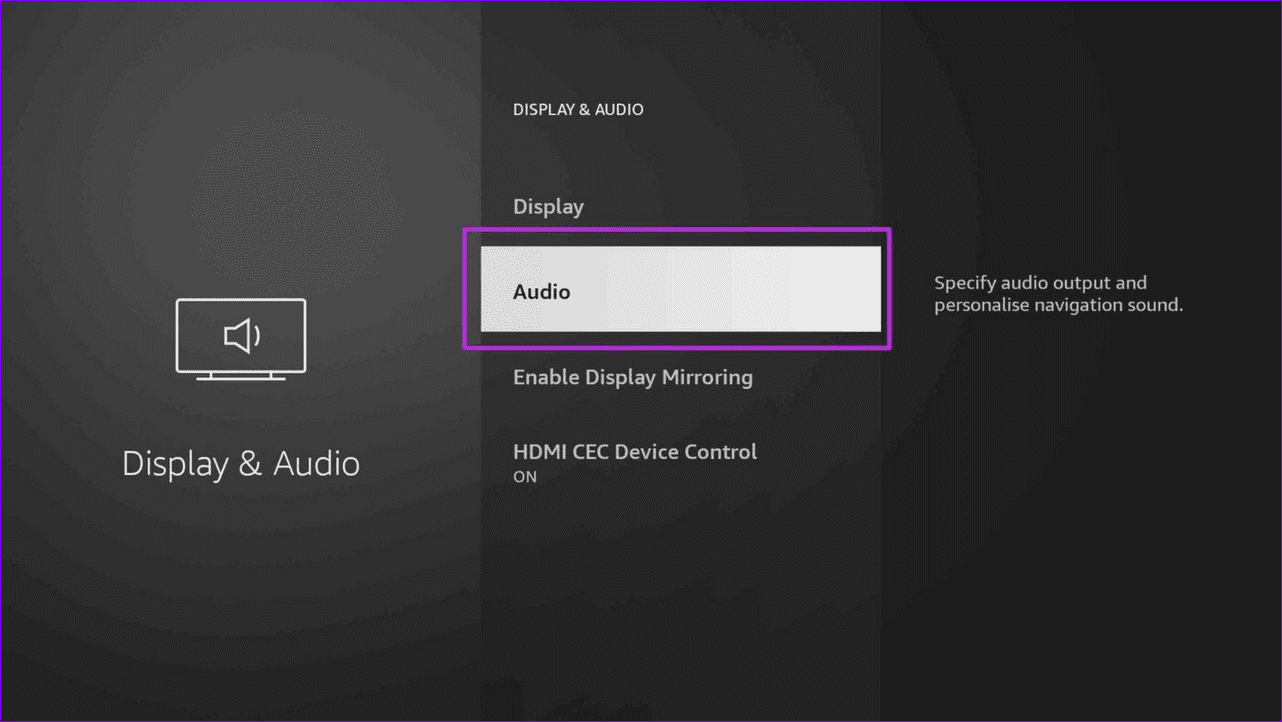
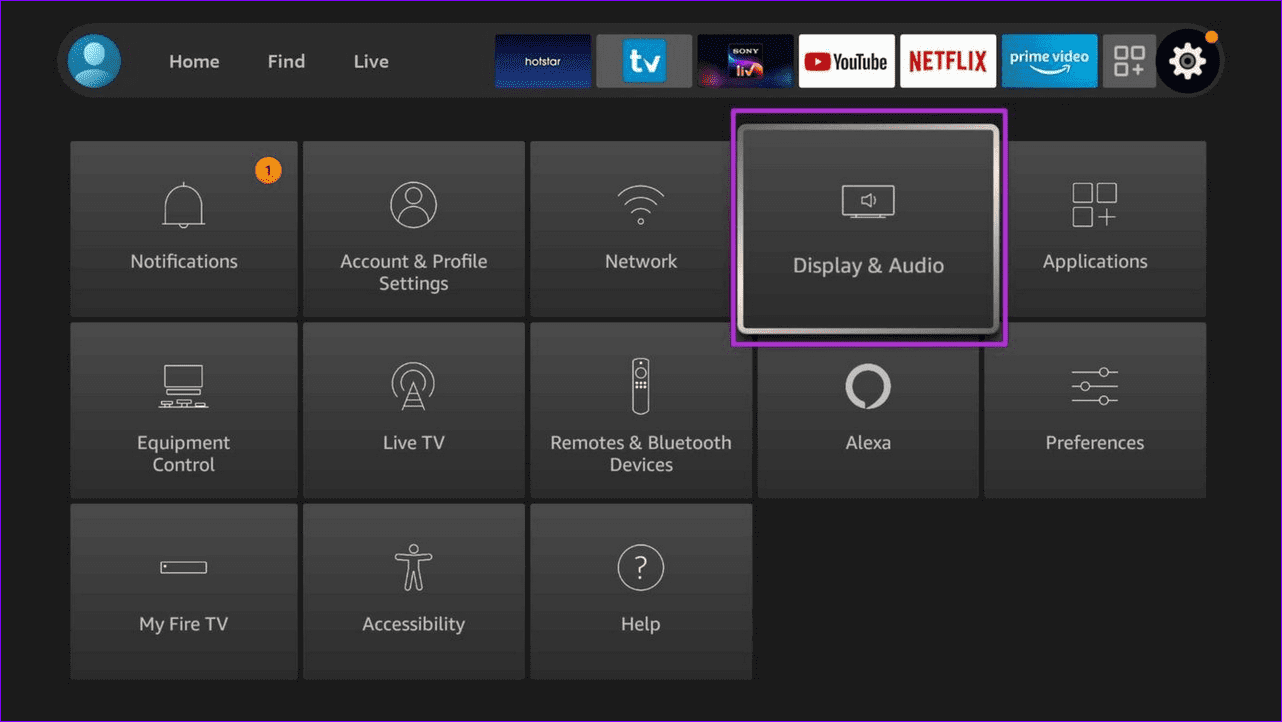
Step 1: Navigate to the Gear icon on the Fire Stick home and select Display & Audio.
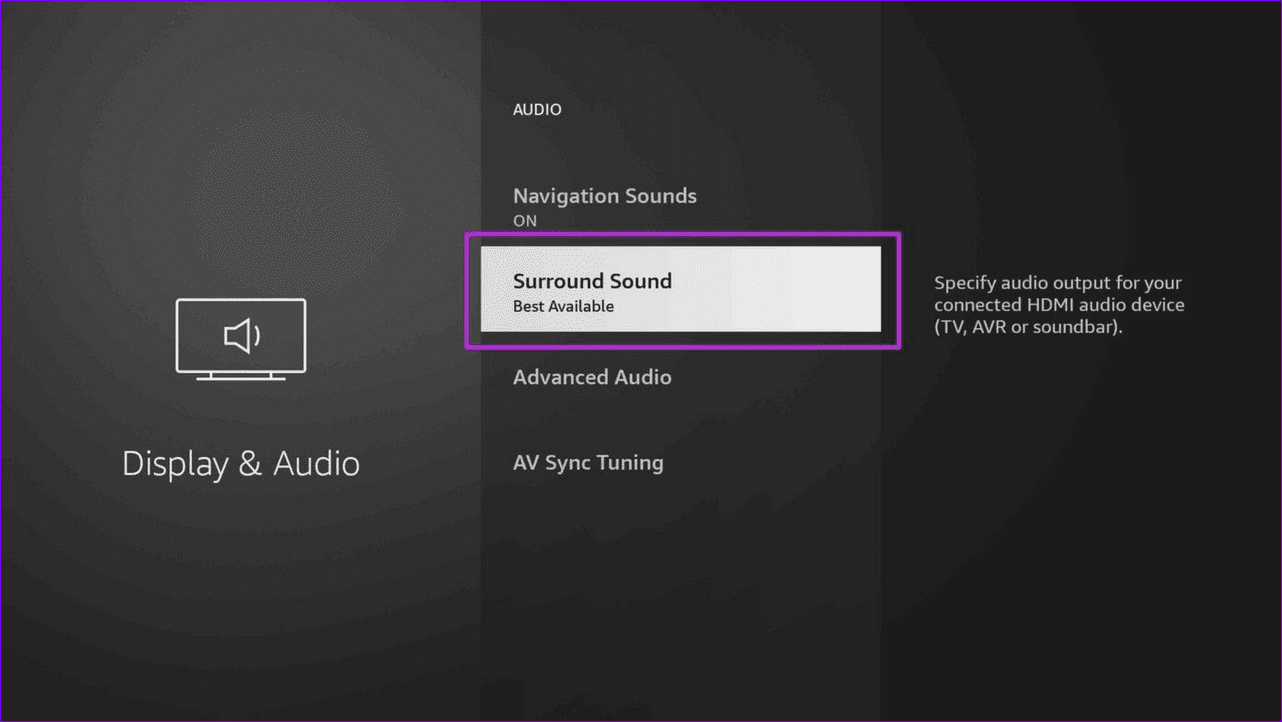
Step 2: Select Audio and open Surround Sound.
Step 3: Switch it to Best Available and check the sound output. If the sound issue persists, set it to PCM.
Fix 2: Run the AV Sync Tuning
Are you noticing an audio delay in the content you’re watching on the Fire Stick? Fret not; run the AV Sync Tuning in the Fire Stick settings to fix it.
Step 1: Open Display & Audio settings from the Fire Stick home menu.
Step 2: Select Audio and scroll down to launch AV Sync Tuning.
Fix 3: Manually Set up the Soundbar
If your Fire Stick doesn’t recognize the connected third-party soundbar, you may encounter the no sound issue. To fix it, set up your soundbar manually under Fire Stick settings.
Step 1: Open Equipment Control from the Fire Stick home menu.
Step 2: Select Manage Equipment.
Step 3: Click Add Equipment, select Soundbar, pick your brand from the list, and follow the on-screen instructions to complete its setup.
Fix 4: Reset the Fire Stick
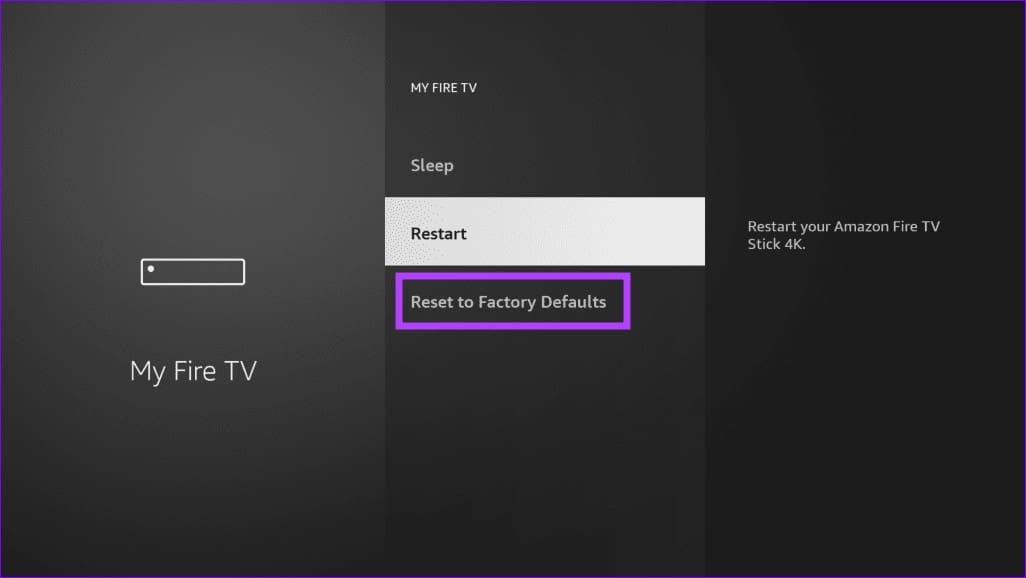
If nothing works, reset the Fire Stick to factory defaults to fix its sound not working issue.
Note: Resetting the Fire Stick removes all downloaded content, including your in-app purchases.
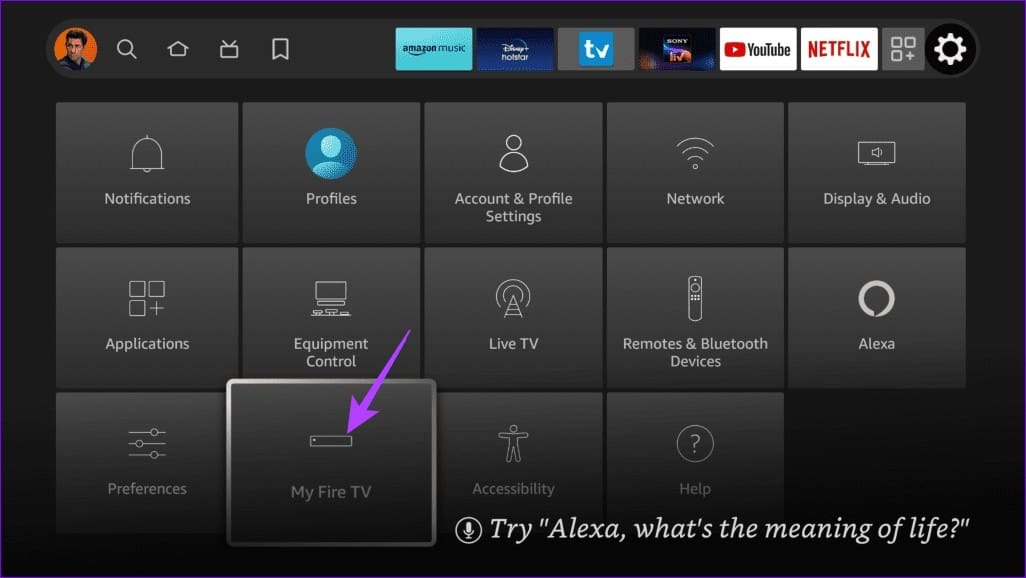
Step 1: Open My Fire TV under Fire Stick settings.
Step 2: Scroll down and select Reset to Factory Defaults.
Install Windows updates: Such issues with Task Manager can also arise due to faulty Windows builds. You can try installing pending Windows updates to see if that fixes the problem.
Scan for malware: If you have difficulty accessing the Task Manager and other Windows programs such as File Explorer, your PC may be infected with a virus. To be sure, scan your PC for malware using Windows Defender.
Fix 1: Run the SFC and DISM Scans
SFC (or System File Checker) scan is a handy tool that can help Windows diagnose your PC for corrupted files and repair them. If the Task Manager is malfunctioning due to corrupted system files, running the SFC scan should help.
Step 1: Right-click on the Start icon > select Terminal (Admin) from the resulting menu.
Step 2: Type the following command and hit Enter.
sfc/scannow
If the issue persists, perform a DISM (or Deployment Image Servicing and Management) scan instead. Similar to the SFC scan, DISM can repair system images and files on your Windows PC.
Open the Terminal app with admin rights again and enter the following commands one by one.
DISM /Online /Cleanup-Image /CheckHealth
DISM /Online /Cleanup-Image /ScanHealth
DISM /Online /Cleanup-Image /RestoreHealth
After the scan is complete, restart your PC and see if the Task Manager is working or opening as expected in Windows 11.
Fix 2: Enable Task Manager via Registry Editor
Are you seeing the “Task Manager has been disabled by your administrator” error on Windows? It’s likely that the Task Manager is disabled via the Registry Editor. In that case, you must edit a few registry files to re-enable the Task Manager.
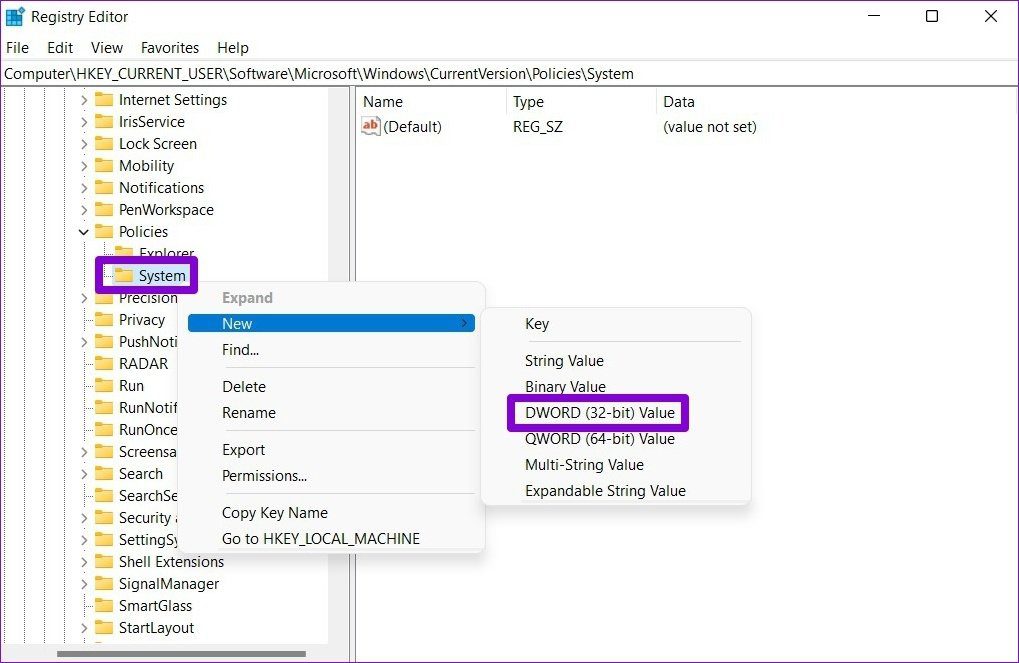
Step 1: Press the Windows key + R to launch the Run dialog box. Type regedit in the box and press Enter.
Step 2: Paste the following path in the address bar at the top and press Enter.
Step 3: Within the Policies key, select the System key. If you can’t find it, right-click on the Policies key, go to New, and choose Key. Name it System.
Step 4: Right-click on the System key, go to New, and choose DWORD (32-bit) Value. Name the new entry as DisableTaskMgr.
Step 5: Double-click the DisableTaskMgr DWORD, change its value to 0, and hit OK.
To apply the changes, restart your PC. After the reboot, you can access the Task Manager as before.
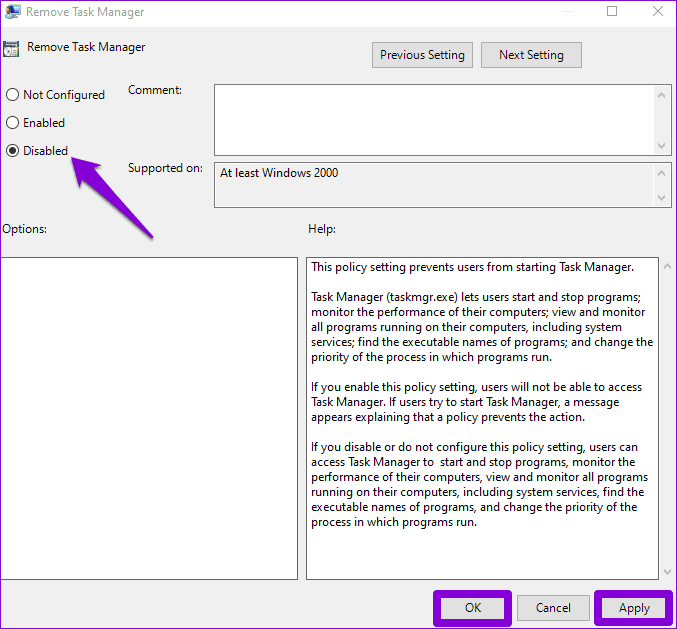
Fix 3: Enable Task Manager via Group Policy Editor
Similar to the Registry Editor, you can also use the Group Policy Editor to re-enable the Task Manager on Windows. Note that this method will only work if you use the Professional, Education, or Enterprise editions of Windows.
Step 1: Press the Windows key + R to open the Run dialog box, type in gpedit.msc, and press Enter.
Step 2: In the Local Group Policy Editor window, use the left pane to navigate to User Configuration > Administrative Templates > System > Ctrl + Alt + Del Options > double-click Remove Task Manager on your right.
Step 3: In the Remove Task Manager window, choose Disabled and click Apply, followed by OK.
Fix 4: Re-Register Task Manager Using PowerShell
If Task Manager won’t open or respond, you can also re-register it on your system. While this may sound difficult, the process only requires you to run a single command in Windows PowerShell.
Step 1: Click the search icon on the taskbar, type Windows PowerShell, and select Run as Administrator.
Step 2: In the PowerShell window, paste the following command and press Enter.
The System Restore feature in Windows periodically takes a backup of the entire system. You can use it to revert to the point when the Task Manager was working fine on your Windows 11 PC. Here’s how.
Step 1: Click the search icon on the taskbar, type create a restore point in the box, and select the first result.
Step 2: Under the System Protection tab, click on System Restore.
Step 3: Select Recommended restore and click Next.
Step 4: Review all the details and click Finish.
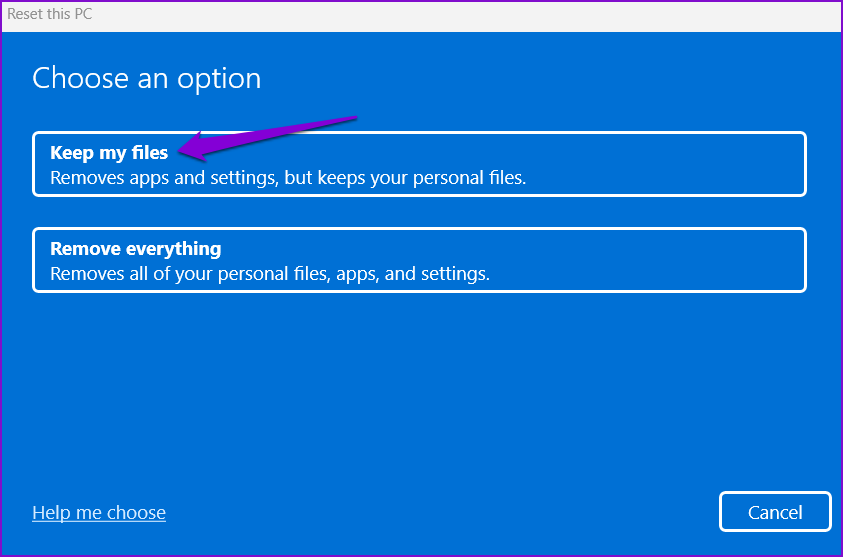
Fix 6: Reset Your Windows PC
Lastly, if all else fails, consider resetting Windows as a last resort. This will restore Windows to its default settings and resolve any issues. Don’t worry. this process won’t erase your personal files.
Step 1: Press the Windows key + I to open the Settings app. In the System tab, click on Recovery.
Step 2: Click on Reset PC.
Step 3: Select the Keep my files option and follow the on-screen prompts to finish resetting Windows 11.
After Windows 11 resets everything, the Windows Security app should work as before.
The Taskbar in Windows 11 has the File Explorer icon pinned to the Taskbar by default. If you have unpinned accidentally, it’s simple to get it back.
Step 1: Open File Explorer (Win + E) and you’ll see the File Explorer icon on the Taskbar
Step 2: Right-click on it and select Pin to taskbar. That’s it.
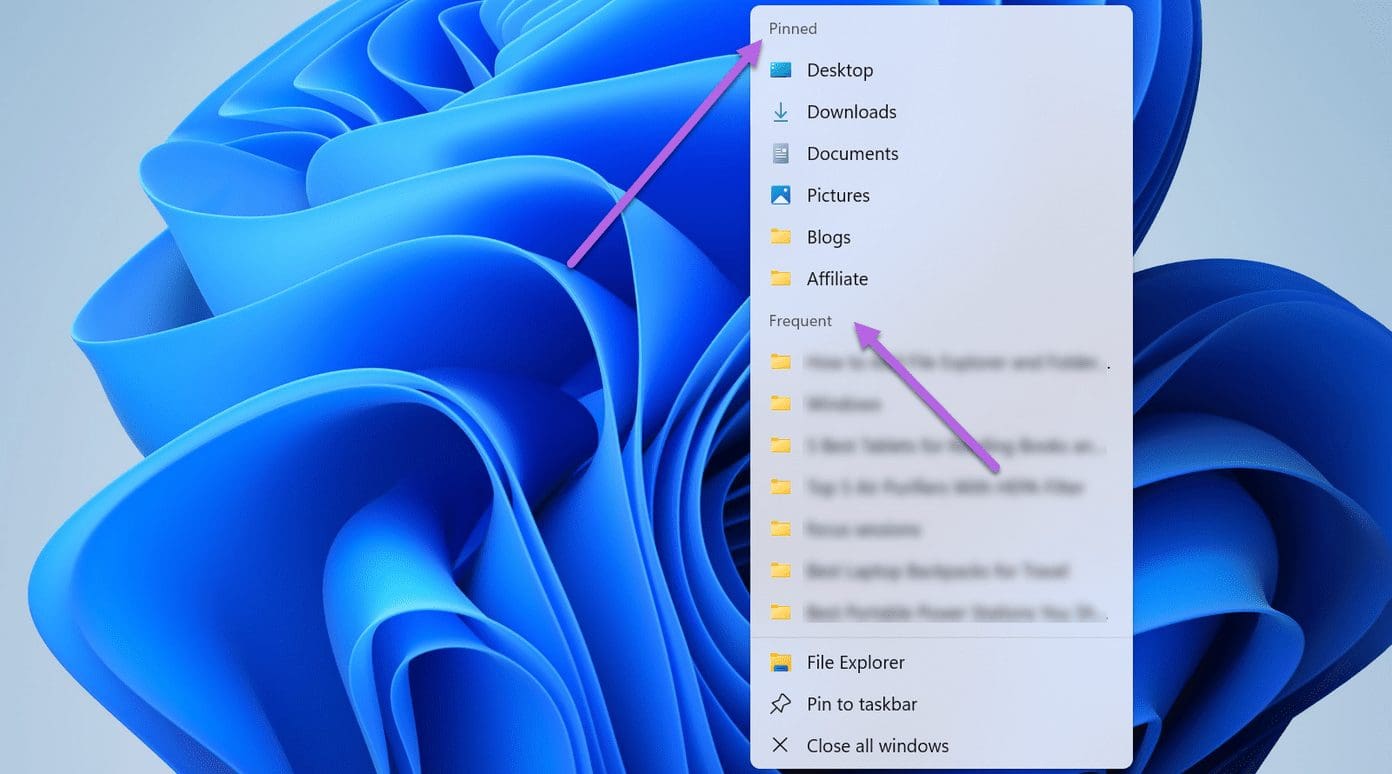
The File Explorer icon will now be pinned to the Taskbar until manually removed. The good thing is that the list also packs all the folders you use frequently.
So, if you open Folder A and Folder C daily, you will see all the folder names under Frequent.
Secondly, all the folders under Quick Access (on File Explorer) will be pinned automatically to this list.
To remove the ones you do not like, unpin a few folders from this list. All you need to do is click on the Unpin icon.
Though a simple right-click on the File Explorer icon lets you access all your favorite folders, the series of clicks may seem a little much. Thankfully, there’s a little workaround that lets you add the folder of your choice to the Taskbar.
How to Add Folders to Taskbar in Windows 11
Step 1: Right-click on the folder that you want to pin, select Show more Options, and then select Send to > Desktop (create shortcut).
As suggested by the name, this action will create a shortcut on the desktop.
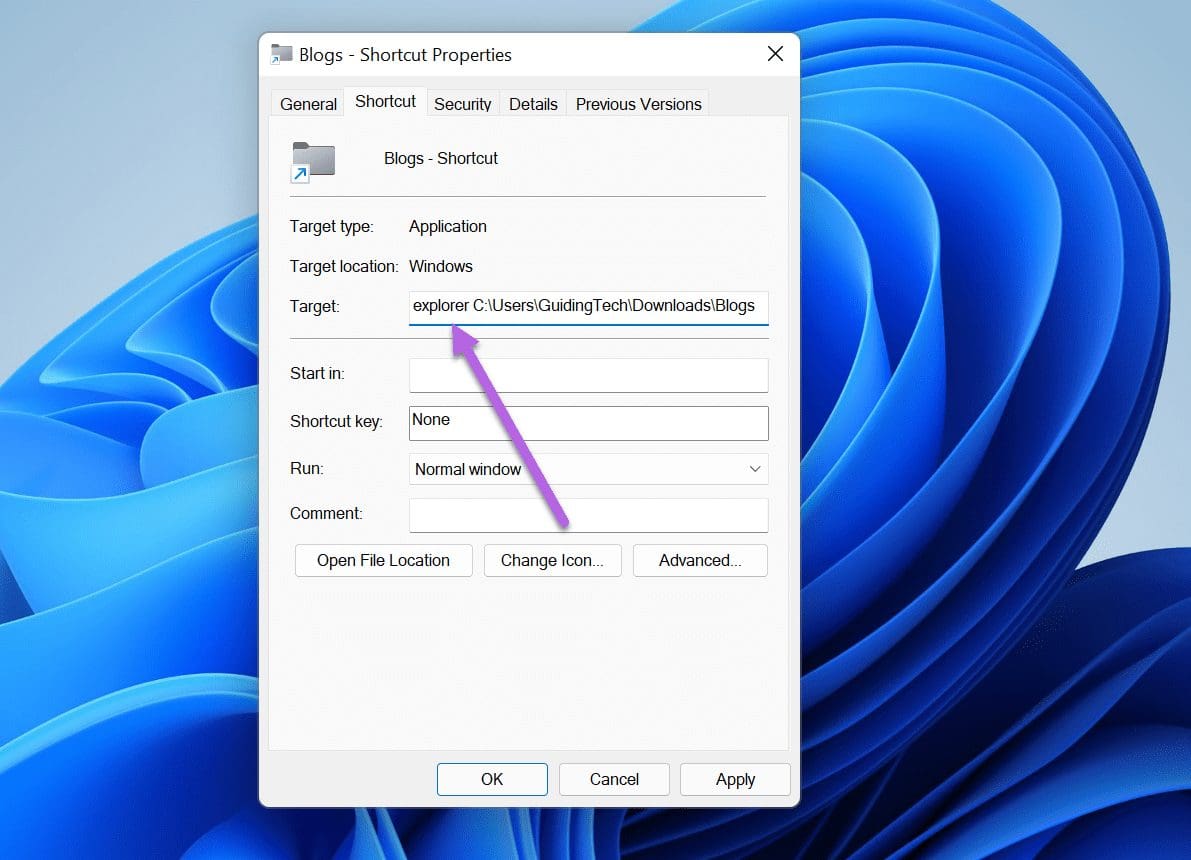
Step 2: Press Win + D to go to Desktop. Now, right-click on the folder you just created and select Properties.
Step 3: Click on Shortcut, and add the word explorer to the Target string.
Make sure to add a space after the explorer, as shown in the screenshot below. This will append the Explorer path automatically once you hit the Apply button.
At the same time, rename the file under the General tab. This is not a mandatory step, and you may skip it.
Now let’s choose an icon.
Step 4: Click on the Change Icon button and choose an icon from the available gallery.
If you are looking for new system icons for Windows 11, you can type imageres.dll on the Search field and hit the Enter button.
Once you have chosen the icon, hit the Apply All and Ok buttons.
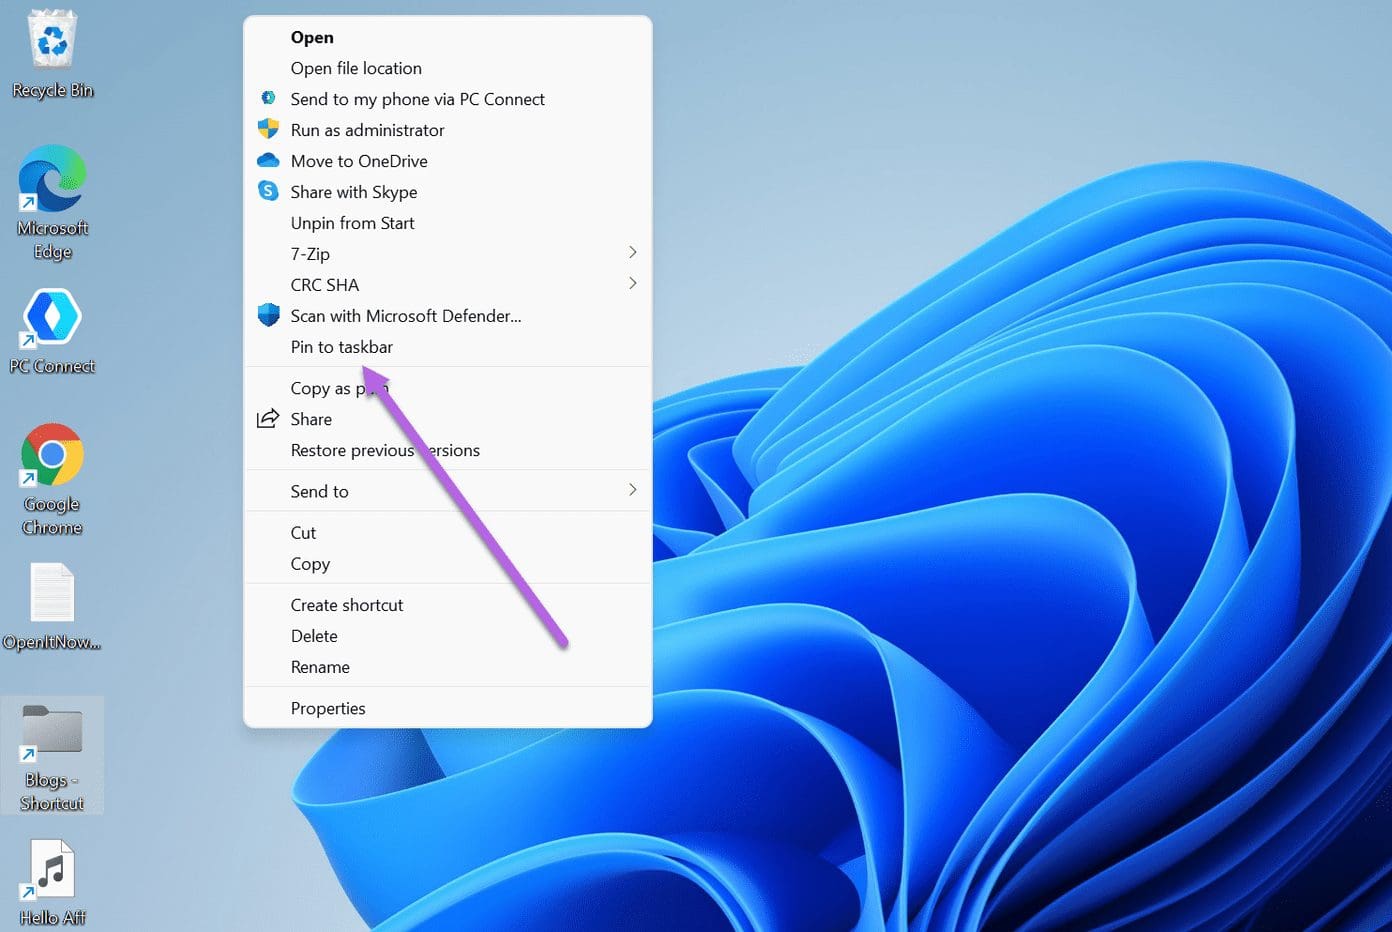
Step 5: Head back to your PC’s desktop and right-click on the new icon. Next, select Show more options and then Pin to Taskbar. That’s it!
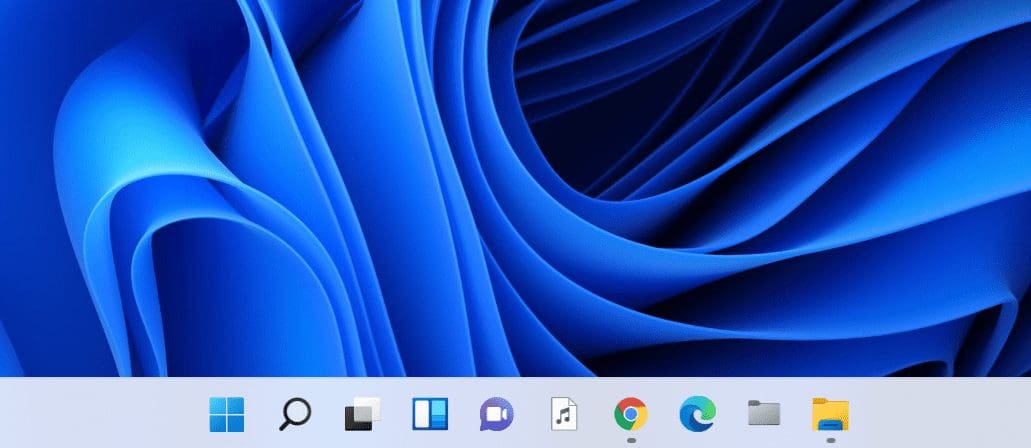
The new icon will be added to the Taskbar. You simply need to click it to land on the folder you want.
You can follow the above steps to add your favorite files to the Taskbar.
If you do not want to mess with the settings, you can go via the native method and add folders to the Start menu (instead of the Taskbar). It’s simple and easy and doesn’t take more than a couple of seconds.
How to Add Folders to the Start Menu
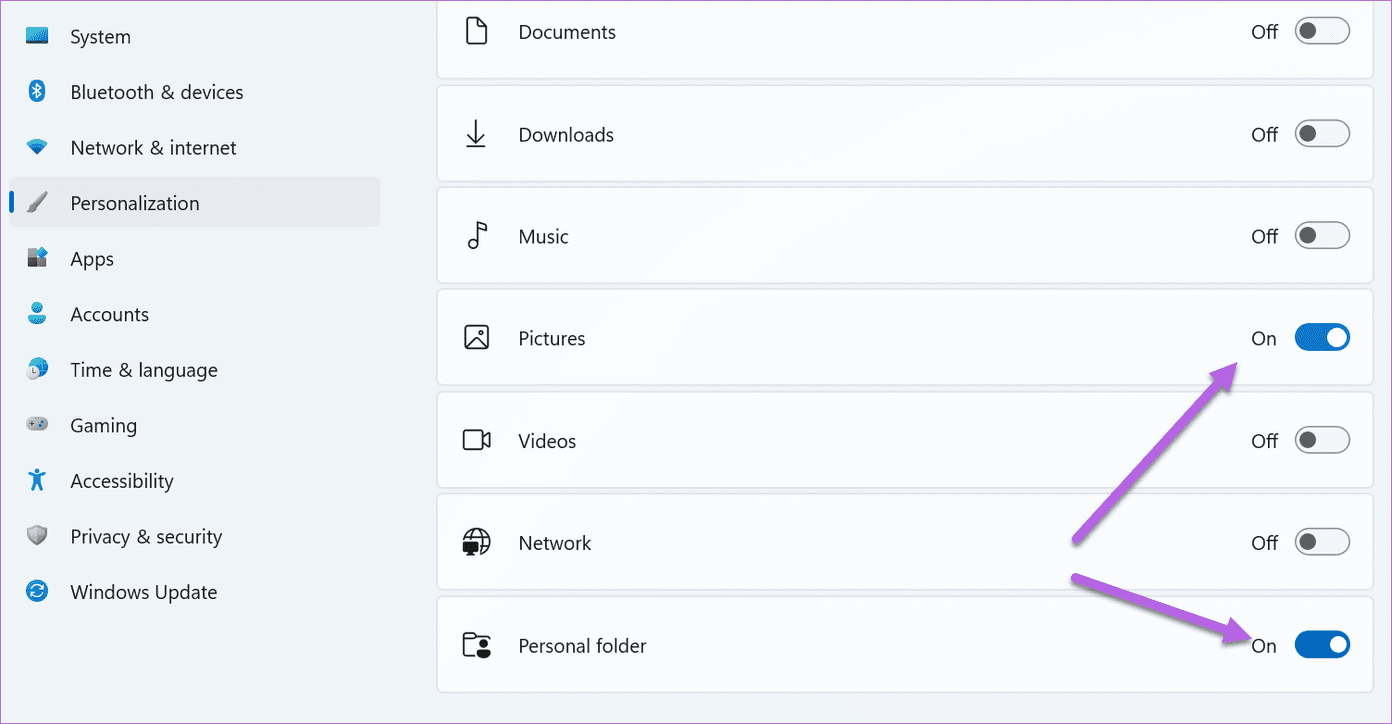
Step 1: Go to Settings (Win + I) and select Personalization from the left panel. Now, select Start and then Folders to see the available options.
Step 2: Toggle the switch next to the Personal folder. It will add a shortcut to the Users’ folders under the Start menu.
Alternatively, if you wish to see other folders on the Start menu, you can toggle the switch next to the folders.
The only limitation of this method is that it doesn’t allow you to add any random folder to the Start menu. Rather, you have to choose from the list of given options.
Relaunch Microsoft Word app: Relaunching the Microsoft Word app can clear temporary glitches or corrupted processes, effectively reset the session, potentially resolve minor software conflicts, and refresh the system’s memory allocation for Word.
Reinstall Microsoft Office: If you still have issues with Office apps on Windows, you should take this extreme step: uninstall the Microsoft Office app and download it again.
Fix 1: Launch Word in Safe Mode
Launching MS Word in safe mode disables Grammarly and other add-ins, eliminating potential conflicts or performance bottlenecks caused by these extensions.
Step 1: Press the Ctrl key and click on the Word icon on the desktop or Taskbar.
Step 2: A pop-up will ask you to open Microsoft Word in safe mode. Hit OK.
Step 3: Go to File from the menu bar > select Options.
Step 4: Now, select Add-ins > click COM Add-ins from the Manage menu > click on Go.
Step 5: Disable add-ins > click OK.
The Word app should work normally by now. If this didn’t help, check out the next fix.
Fix 2: Repair Corrupt Word Files
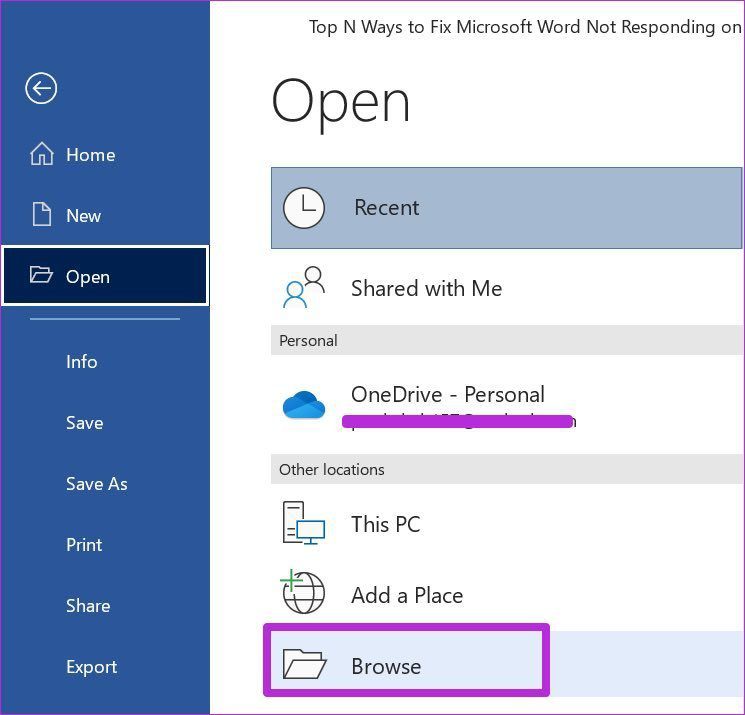
Step 1: Open the Microsoft Word app > click on File > select Open.
Step 2: Select Browse.
Step 3: Find corrupted Word files by selecting the file > choosing the Open and Repair option > clicking on it.
After a successful process, Microsoft Word is ready for normal use. If you still face the same issue, move on to the next fix.
Fix 3: Repair Microsoft Office
Step 1: Open the Settings app on Windows (use the Windows + I keys).
Step 2: Go to the Apps menu > select Apps & features.
Step 3: Scroll down to Microsoft Office > click on the three-dot menu > select Modify.
Step 4: Click on Repair from the Advanced options and let Microsoft fix the issue.
How to Insert a Table of Contents in Microsoft Word (Windows and Mac)
As a part of the Office redesign, Microsoft revamped the Word app on the desktop. Follow the steps below to insert a table of contents in Microsoft Word on your desktop. The steps are similar for Windows and Mac.
Step 1: Open the Microsoft Word app.
Step 2: Select a document to insert a table of contents.
Step 3: Select the References tab at the top.
Step 4: Select Table of Contents from the left corner.
Step 5: Click on Headings style.
You can add a manual table of contents or select an automatic one. The Word software will take headings from your document and create one in the automatic table of contents.
If you want to type headings manually, select the third manual table from the list. We are going ahead with an automatic one, as we have already added headings to the document.
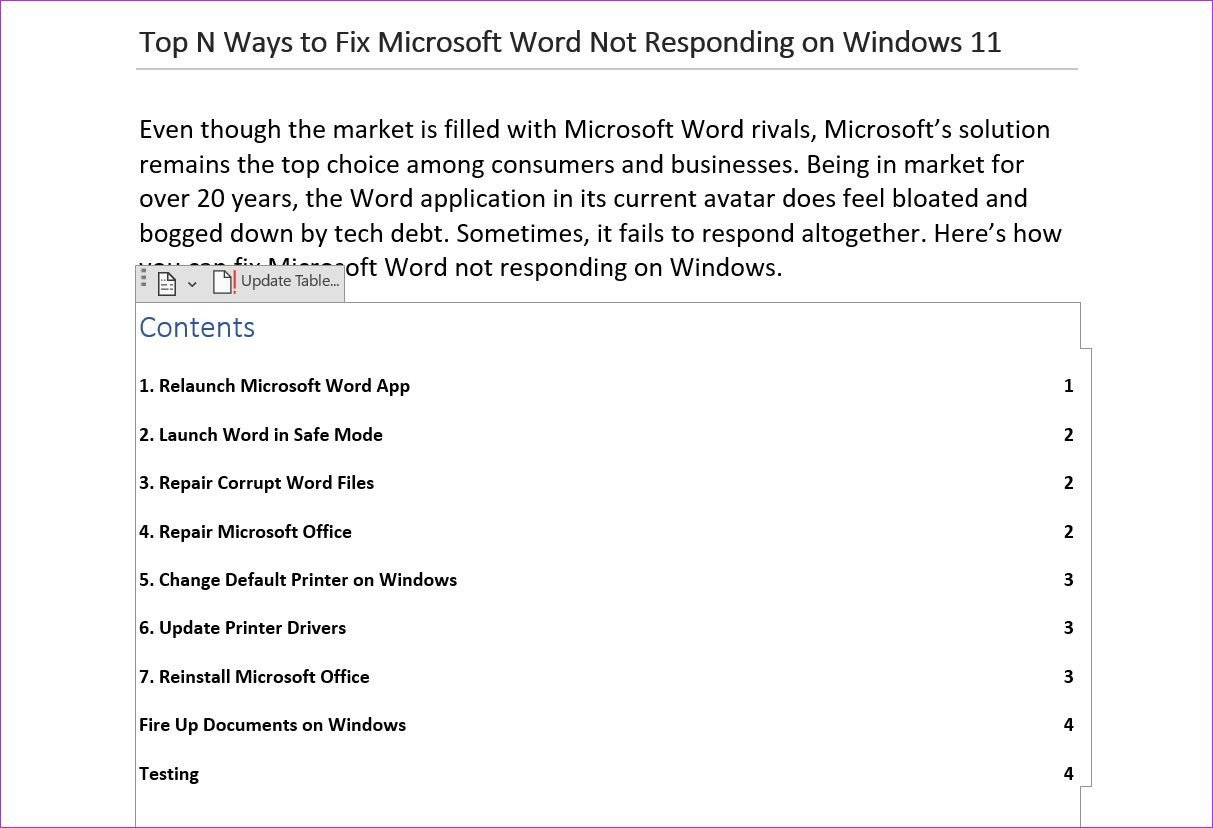
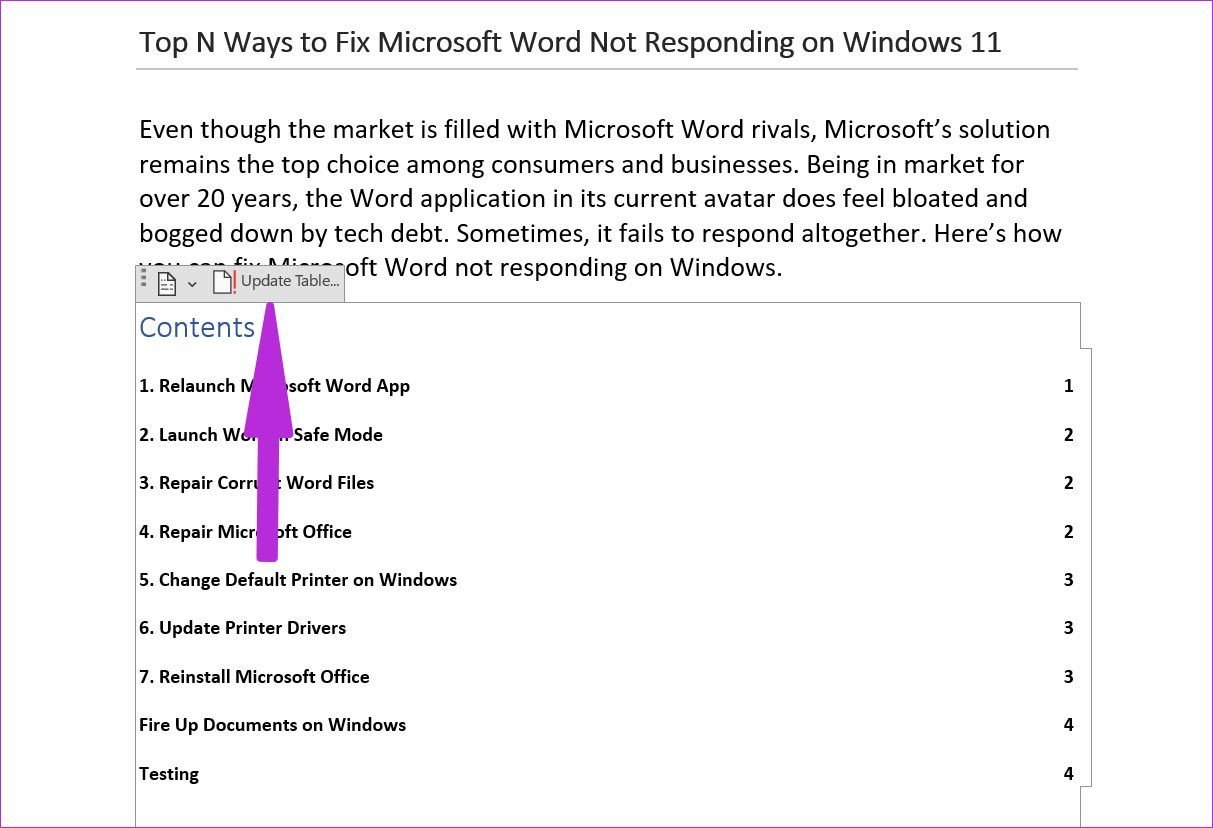
The table of contents appears in the document with page numbers.
As you continue working on the document, you might add new headings. The default table of contents won’t update itself automatically here. You need to hover the mouse over it and select Update Table from a small pop-up menu.
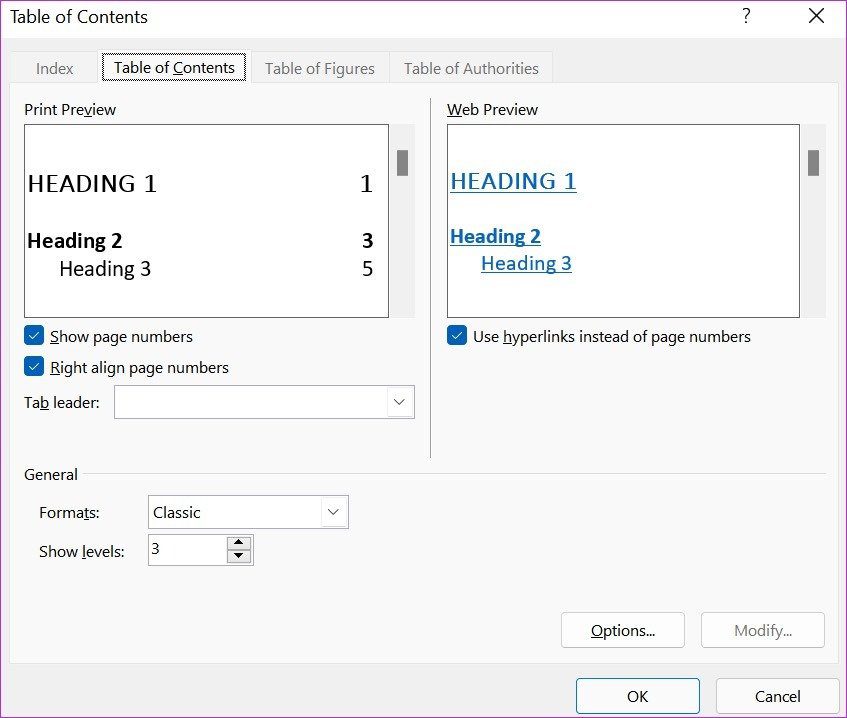
How to Customize Table of Contents in Microsoft Word
If you don’t like the default table of contents style, you can easily customize it based on your preference. Here’s how.
Step 1: From the Word document, select References and expand the table of contents menu.
Step 2: Select Custom Table of Contents from the menu.
Step 3: You can disable page numbers, change tab leader, customize the formats menu, and more.
From the same menu, you can see the live web table of content previews. Users can also disable hyperlinks. Make changes based on your needs and hit OK at the bottom.
You will see an option to update the existing table of contents with a new style. Click Yes to create a new custom table of contents in Microsoft Word.
Restart your phone: Rebooting your Android phone fixes common glitches with the Camera app. Once done, open the Camera app and check.
Close all background apps: Certain background apps can use your device’s camera, which might interfere with the main Camera app on your Android phone. So, close all background apps on your Android phone and check again.
Check device storage: If your device’s storage is full, it might show an error when opening the Camera app. So, check your device’s storage and ensure it still has at least 20-30% space available. If not, delete some items to free up storage.
Check for device updates: Regular software updates can help your device get access to the latest bug fixes. So, if you’ve been facing issues using the Camera app after the last software update, it might be due to a software bug. Download and install the latest software updates to fix it.
Reinstall the relevant app: Certain apps might be unable to use your Android device’s camera despite enabling the permissions. So, uninstall and reinstall the affected app. Then, check again to see if this fixes the issue.
Fix 1: Allow All Camera App Permissions
When you open the Camera app for the first time, it asks permission to access the device storage and phone camera. However, some recent app updates on your phone might have switched the permissions. Follow the steps below to enable relevant permissions for the Camera app.
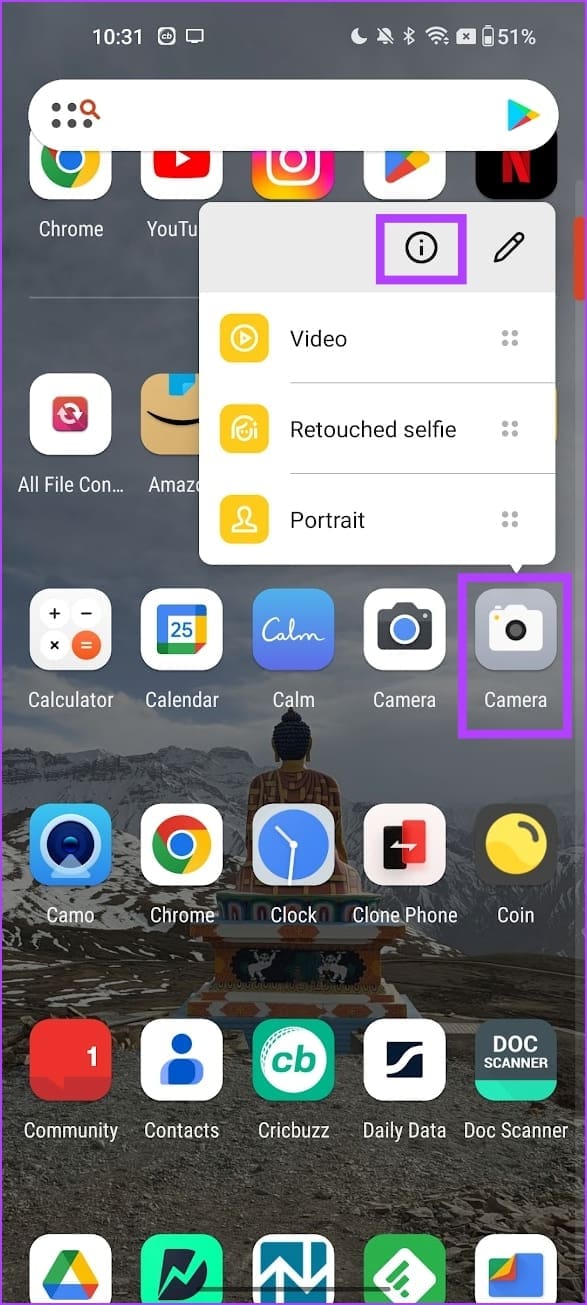
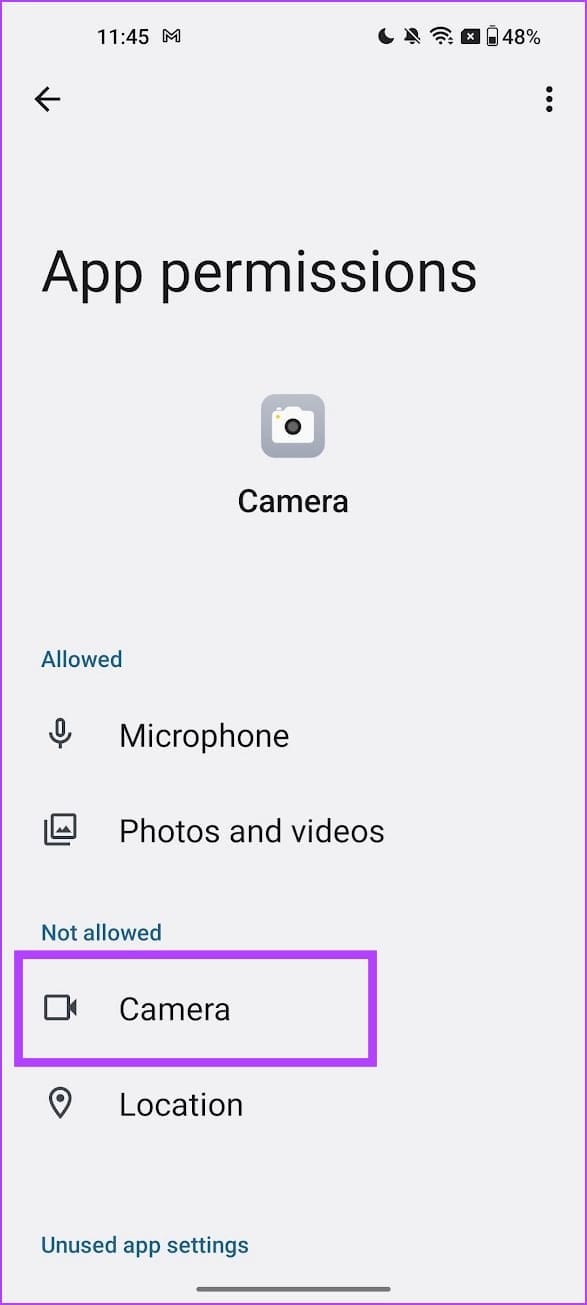
Step 1: Long-press on the Camera app icon and tap on the i button. Here, tap on Permissions.
Step 2: Go to the Not allowed section and tap on the relevant permission. Then, select Allow only while using the app.
Repeat these steps and allow all permission for the Camera app on your Android device. Then, open the app and check again.
After a long period of use, the Camera app may become corrupted and stop working. To see if this fixes the issue, you can force-stop and restart the Camera app and try using it again. Here’s how.
Step 1: Long-press the Camera app > tap on the i button > Force Stop > tap on OK when prompted.
Now, re-open the Camera app and use it to see if it works as expected.
Fix 3: Clear Camera App Cache
The Camera app collects cache in the background to speed up some app processes. However, this may corrupt the app as the size of the cache keeps growing with usage. So, clear the cache for the Camera app on your Android phone. Here’s how.
Step 1: Long-press the Camera app icon > tap on the i button > Storage Usage.
Step 2: Now, tap on Clear cache. Additionally, tap on Clear data to clear the app data > tap on OK to finish the process.
Fix 4: Use Safe Mode
Booting in Safe mode lets you use your Android device without third-party interference. You can use this to check for apps interfering with your device’s camera functions. Here’s how to do it.
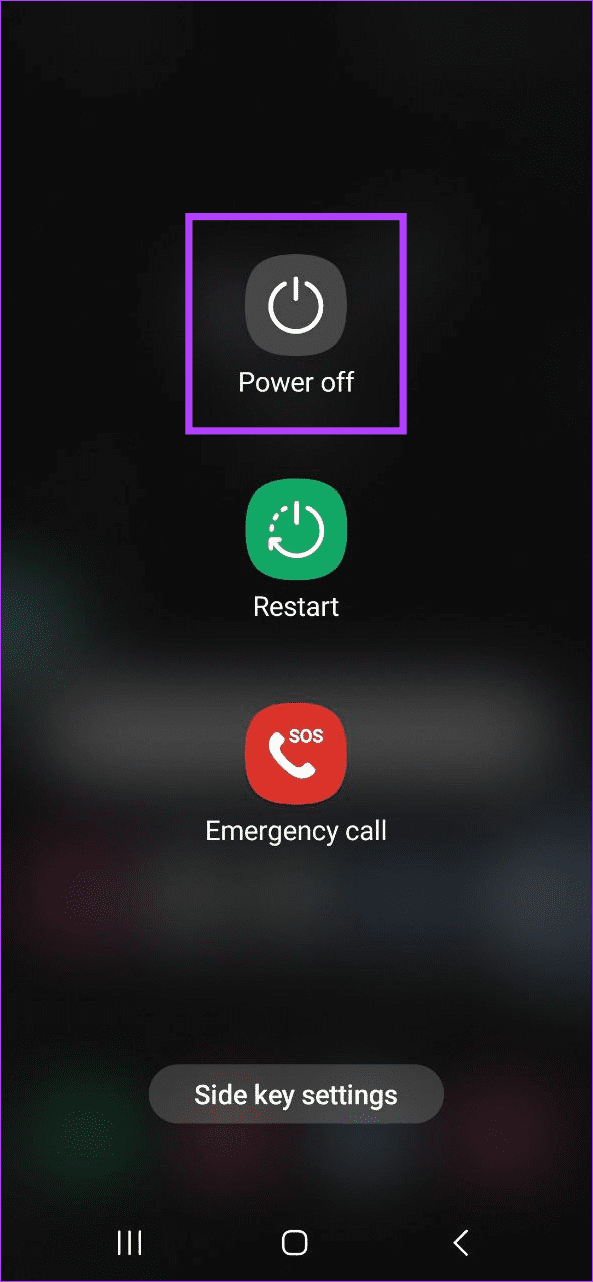
Step 1: Long-press the Power button to open the power menu. Now, press and hold the Power off button.
Step 2: Here, tap on Safe mode.
Once Safe Mode is visible, use the Camera app on your phone. If it works properly, uninstall any recently installed apps on your Android device. Then, reboot your device normally and see if this fixes the issue.
Resetting your Android phone’s settings will remove any phone settings that might be preventing the Camera app from working properly. Note that doing this will not delete your device’s data. Here’s how to do it.
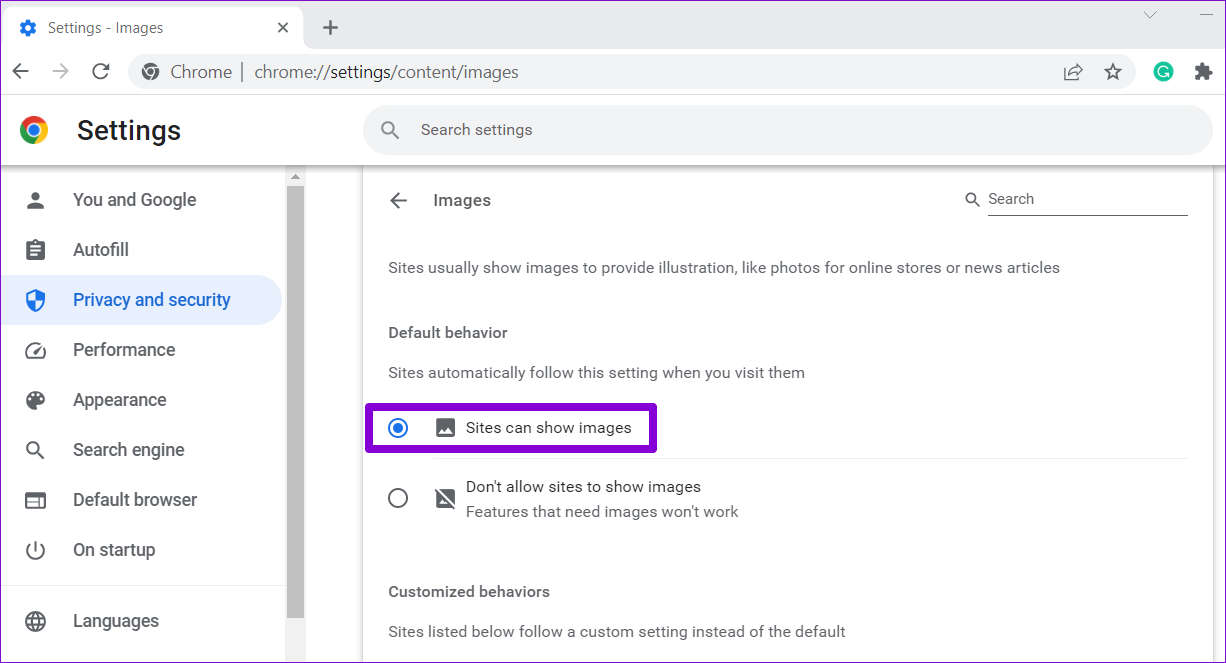
To start, verify the content settings in Chrome and ensure websites are allowed to load images on your computer. Here’s how to do it.
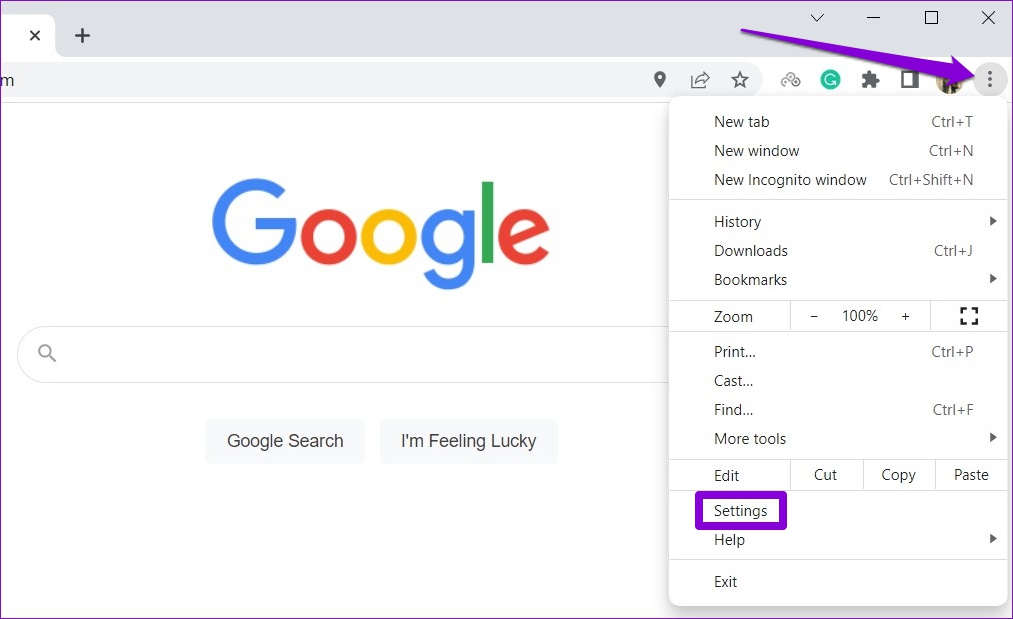
Step 1: In Chrome, click the three-dot menu icon at the top right corner and select Settings.
Step 2: Use the left pane to switch to the Privacy and security tab and go to Site Settings.
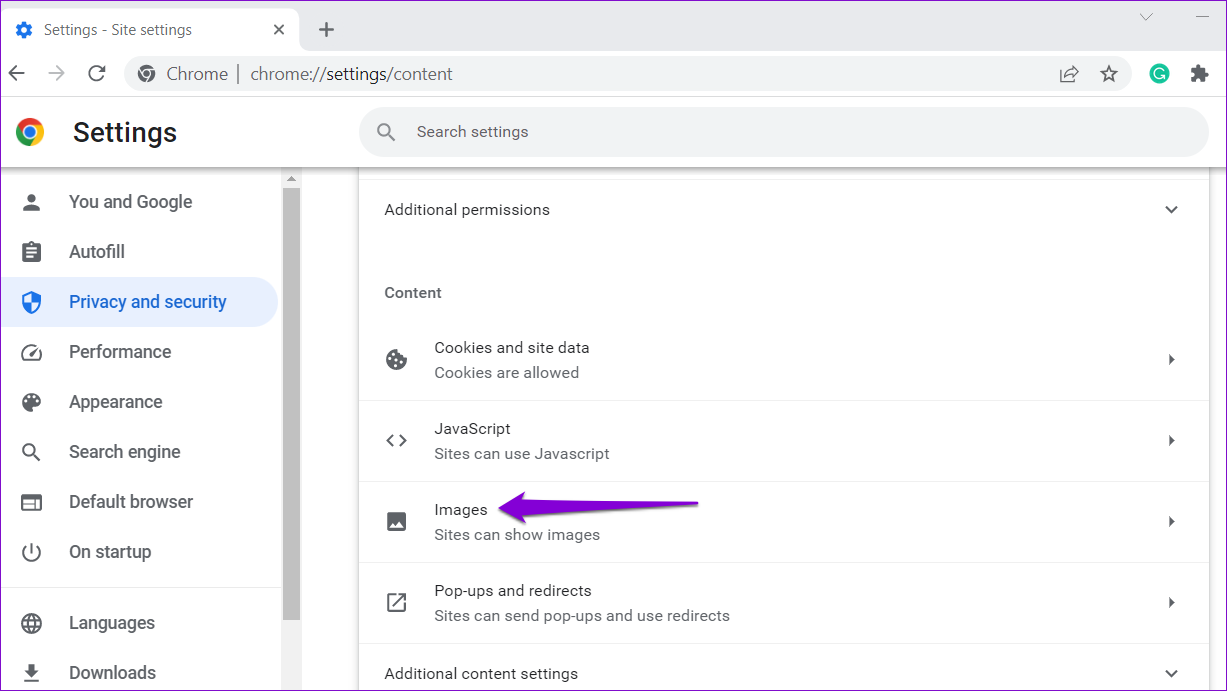
Step 3: Scroll down to the Content section and click on Images.
Step 4: Under Default behavior, select the Sites can show images option.
Fix 2: Turn on JavaScript
JavaScript is a programming language that web developers use to add various features and visual elements to their websites. If you’ve previously blocked websites from using JavaScript in Chrome, they might fail to load images. Here’s how to fix that.
Step 1: In Google Chrome, type chrome://settings/content/javascript in the URL bar at the top and press Enter.
Step 2: Under Default behavior, select the Sites can use Javascript option.
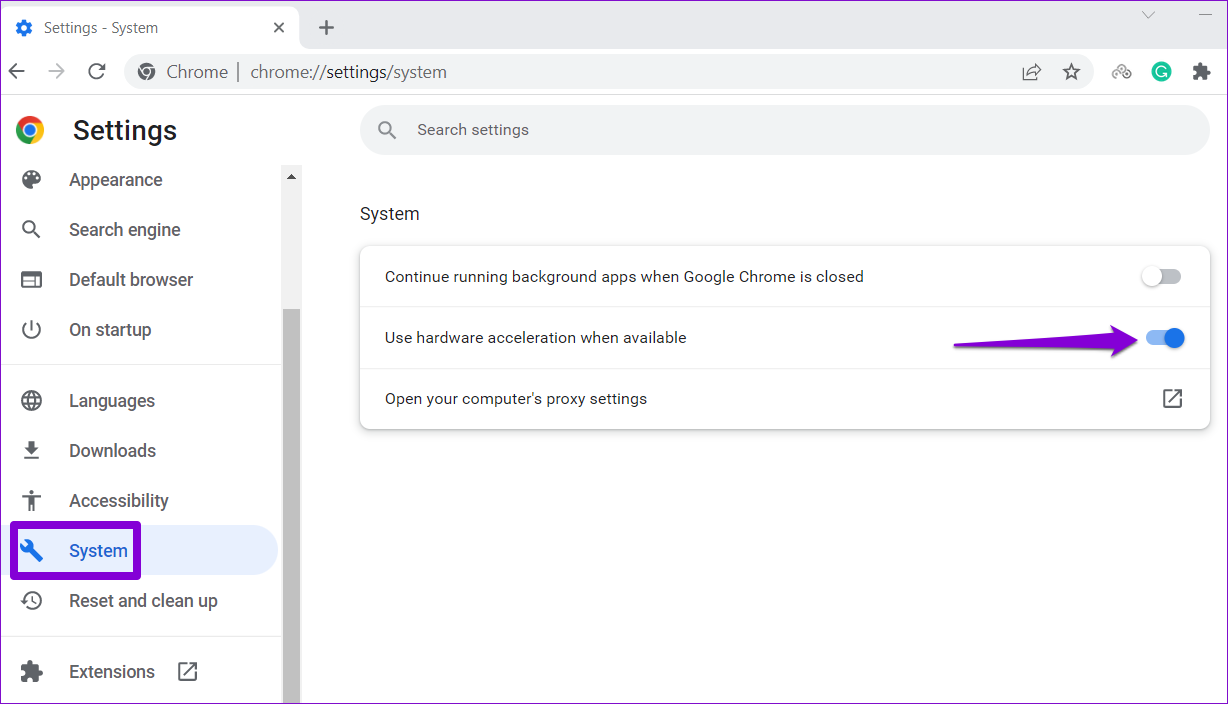
Fix 3: Disable Hardware Acceleration
While enabling hardware acceleration in Chrome enhances your browsing experience visually, there are times when this feature fails to function properly. In such cases, Chrome might have trouble loading images or playing videos. To avoid this, try disabling hardware acceleration in Chrome.
Step 1: In Chrome, click the three-dot menu icon at the top right corner and select Settings from the list.
Step 2: In the System tab, turn off the toggle for Use hardware acceleration when available.
Fix 4: Rename Chrome’s Data Folder
Corrupt or outdated app files in Chrome’s data folder can also lead to such anomalies. To fix this, rename Chrome’s data folder on your PC, forcing the browser to recreate it.
Step 1: Press the Windows key + R to launch the Run command. Type %localappdata% in the Open field and press Enter.
Step 2: In the File Explorer window, navigate to Google > Chrome > User Data folder. Then, rename that Default folder to something else.
Relaunch Chrome after this and check if the issue is still there.
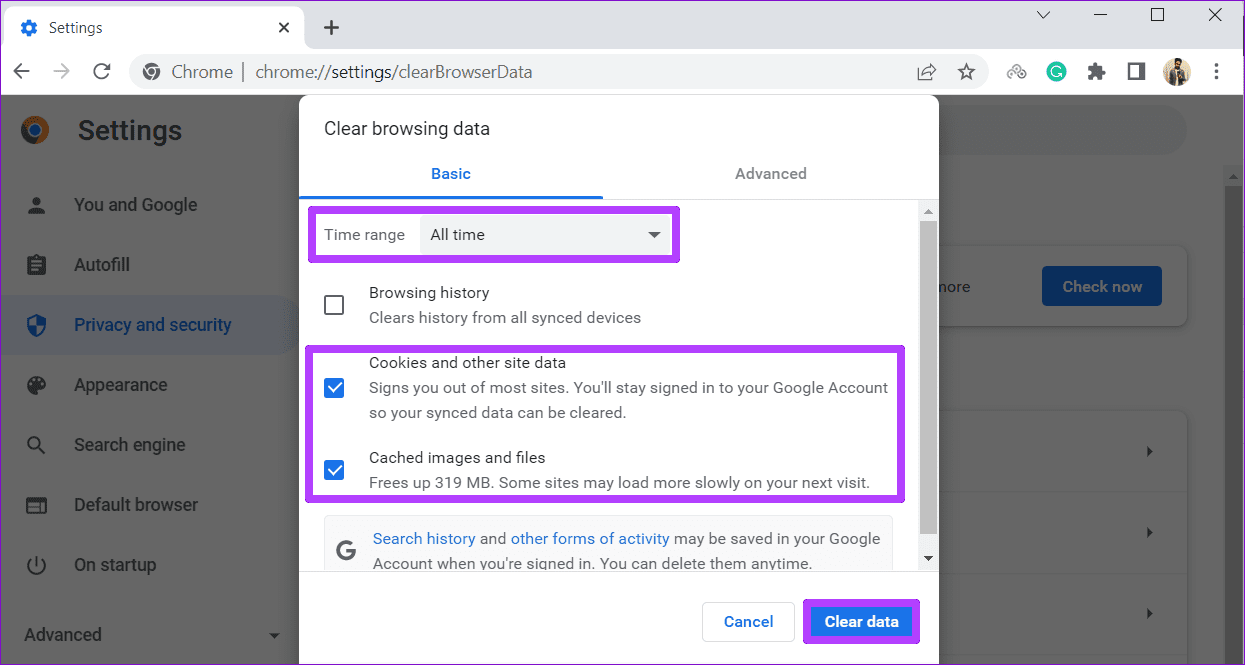
Fix 5: Clear Browsing Data
Just like any other browser, Chrome stores cache data to reduce loading times and improve your experience. However, if this data gets corrupted, Chrome might fail to load web pages as usual. You can try clearing Chrome’s existing browsing data to see if that helps.
Press Ctrl + Shift + Del to open the Clear browsing data panel in Chrome. Use the Time range drop-down menu to select All time. Check the boxes for Cookies and other site data and Cached images and files. Then, click on Clear data.
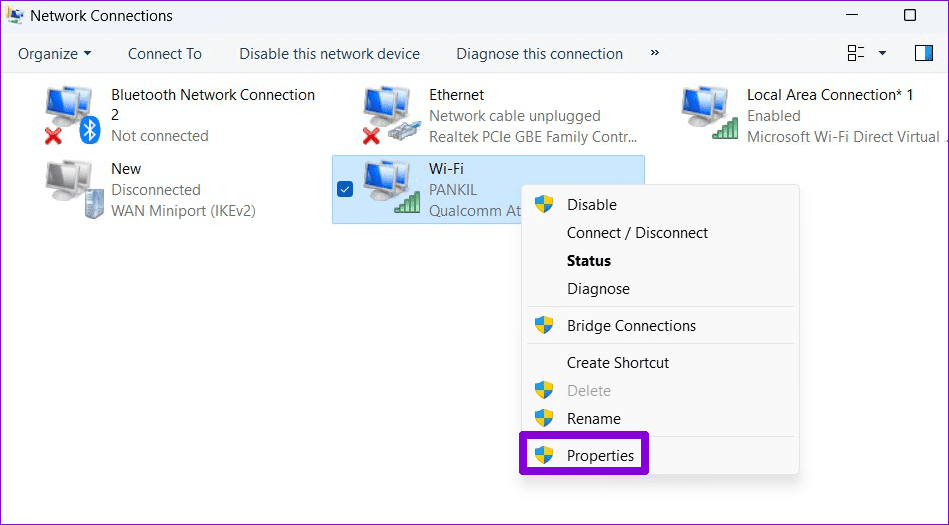
Fix 6: Change DNS Servers
Issues with your current DNS server can also prevent Chrome from loading images on your PC. You can try switching to a more reliable DNS server, such as Google Public DNS, to see if that helps.
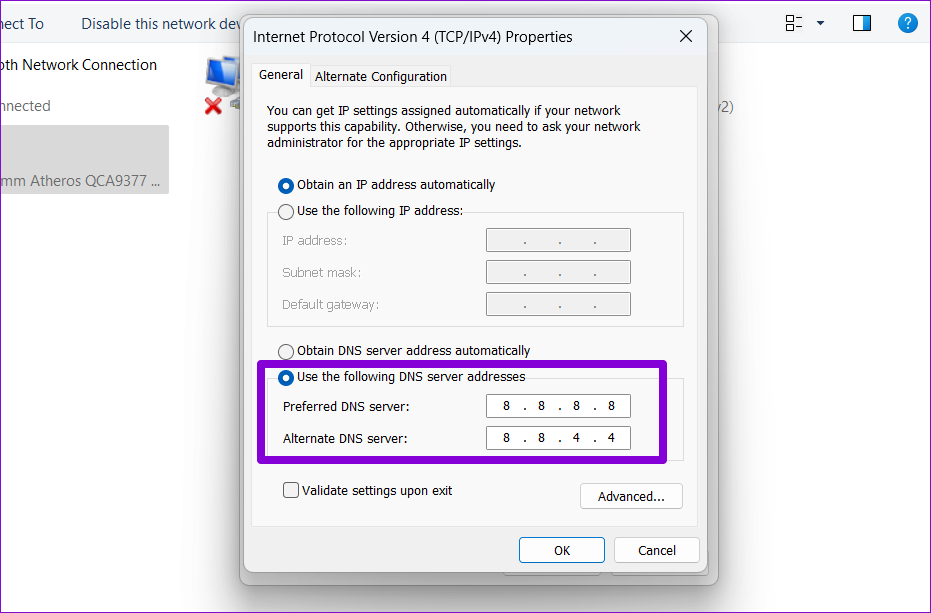
Step 1: Press the Windows key + R to launch the Run dialog box. Type ncpa.cpl in the Open field and press Enter.
Step 2: In the Network Connections window, right-click on your internet connection and select Properties.
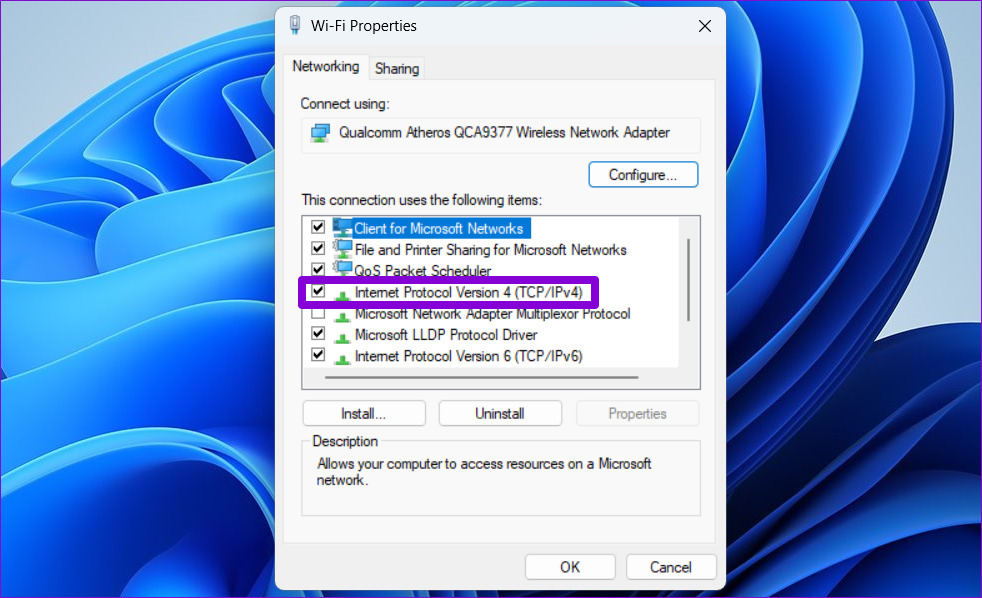
Step 3: Double-click the Internet Protocol Version 4 (TCP/IPv4) option.
Step 4: Select Use the following DNS server addresses. In the text fields next to the Preferred DNS Server and the Alternate DNS Server, enter 8.8.8.8 and 8.8.4.4, respectively. Then, click OK.
Fix 7: Reset Google Chrome
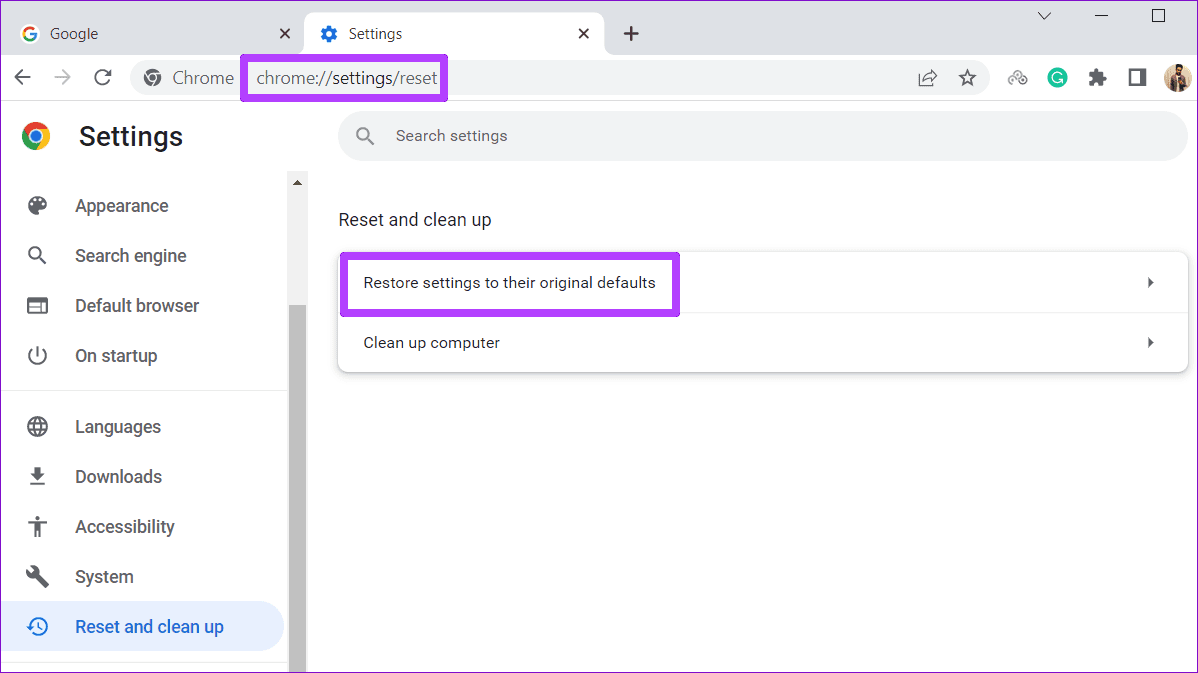
Lastly, if all else fails, you have no option but to reset Google Chrome. To do so, use these steps:
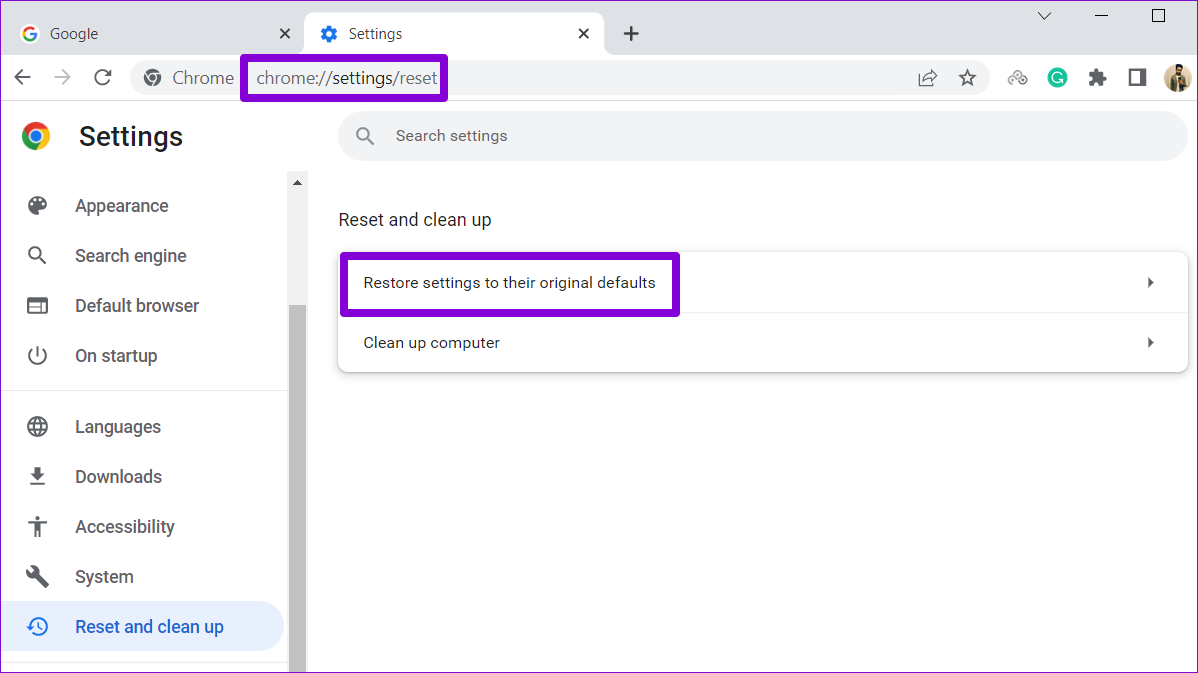
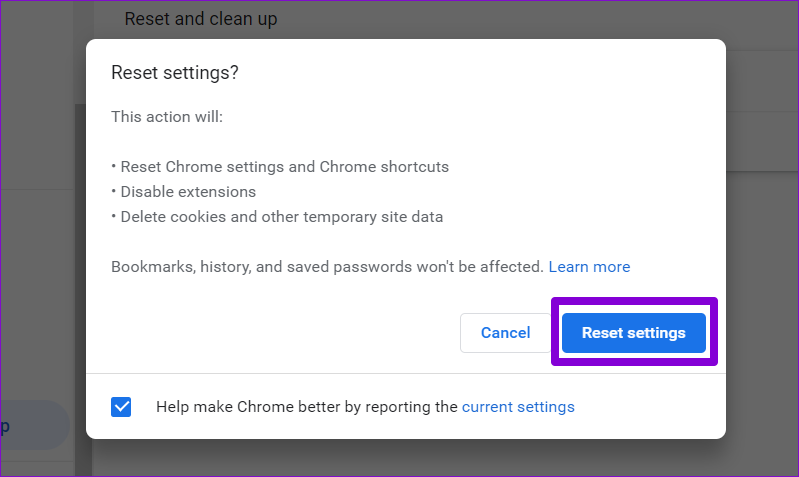
Step 1: In Chrome, type chrome://settings/reset in the address bar and press Enter. Then, click on Restore settings to their original defaults.
Disable antivirus temporarily: When an antivirus finds any threats with the file you’re trying to download, it might block it. Sometimes, it also blocks safe files, such as open-source applications. To allow the download, you might have to temporarily disable the antivirus program on your PC and try downloading the file again.
Disable browser extensions: One of your extensions may be causing Chrome to show the “Virus scan failed” error. Type chrome://extensions in the URL bar and hit Enter. Then, disable all the extensions and see if that helps.
Fix 1: Clear Browsing Data
The “Virus scan failed” error can occur if the existing browsing data has become corrupt and conflicts with Chrome’s scanning operations. If that’s the case, purging the old browsing data will help.
Step 1: Press the Ctrl + Shift + Del shortcut to open the Clear Browsing Data panel.
Step 2: Use the Time range option to select All time from the drop-down menu. Mark the checkboxes that read Cookies and other site data and Cached images and files.
Step 3: Hit the Clear data button.
Fix 2: Modify Registry Files
Apart from the antivirus program, Windows also monitors and scans your downloads from the internet. If Windows encounters a problem while scanning your downloads, you may run into errors. To avoid this, you can bypass the scanning process temporarily by editing a few registry files.
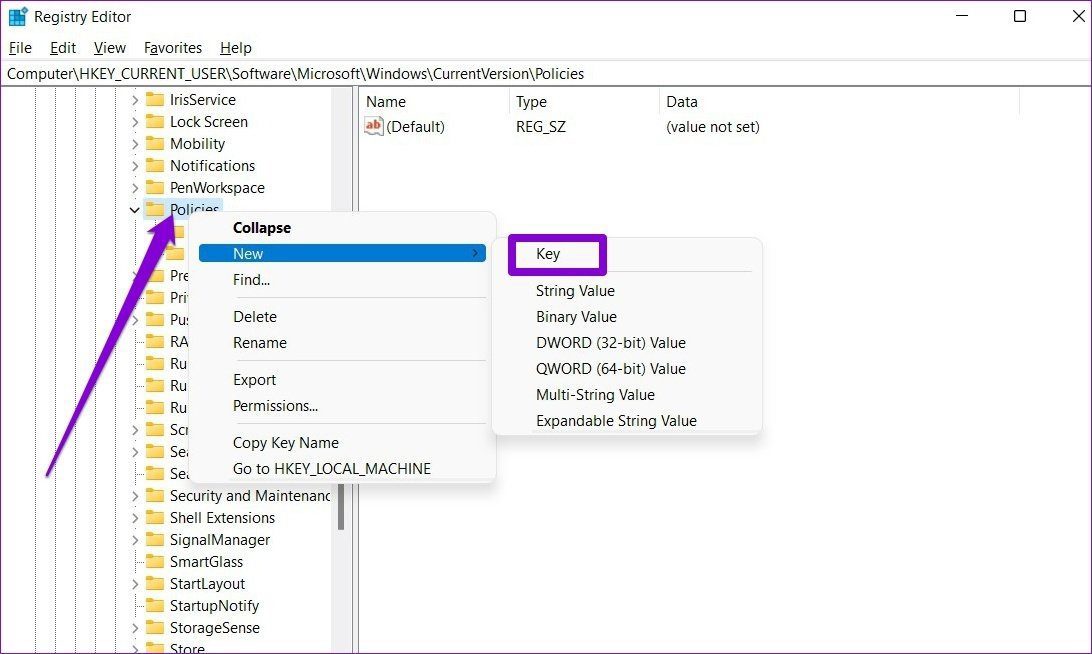
Step 1: Press the Windows key + R to launch the Run dialog box. Type regedit in the Open field and press Enter.
Step 2: Use the address bar at the top to navigate to the following entry.
Step 3: Expand Policies and look for the Attachments key. If you can’t find it, right-click on Policies, go to New > Key. Then, name it Attachments.
Step 4: Right-click on the Attachments entry, go to New, and choose DWORD (32-bit) Value. Name the new entry ScanWithAntiVirus.
Step 5: Double-click on the ScanWithAntiVirus key, change its value to 1, and hit OK.
Close the Registry Editor after this and restart your PC to apply the changes.
Fix 3: Reset Google Chrome
If nothing works, you might have to reset Chrome to its default settings. It’s important to know that resetting Chrome will remove all extensions and your settings preferences. So, make sure to use this as a last resort.
To reset Google Chrome:
Step 1: Type chrome://settings/reset in the address bar up top, and press Enter. Then, click on Restore settings to their original defaults.
Install Windows updates: Windows is usually quick to respond when fixing known bugs and issues. If a faulty update caused the Bluetooth not working issue, it should not take long for Microsoft to fix the problem in subsequent updates. Install any pending Windows updates on your PC and see if that helps.
Turn off airplane mode: Like your smartphone, Windows 11 also has an airplane mode, which effectively prevents the system from communicating with any networks or devices. If you have inadvertently enabled Airplane mode on your PC, Windows will turn off Wi-Fi and Bluetooth.
Ensure your Bluetooth device is discoverable: This may seem basic, but it’s important to ensure that the Bluetooth device you are trying to connect to is discoverable and within range of your computer.
Fix 1: Disconnect Unwanted Bluetooth Devices
If multiple Bluetooth devices are connected to your PC, you may have trouble connecting with newer devices. To avoid this, disconnect unwanted devices by following the steps below.
Step 1: Press the Windows key + A to open the Quick Settings panel. Right-click the Bluetooth icon and select Go to Settings.
Step 2: Click the three-dot menu icon next to your device and select Remove device. Repeat this step to disconnect all the unwanted devices.
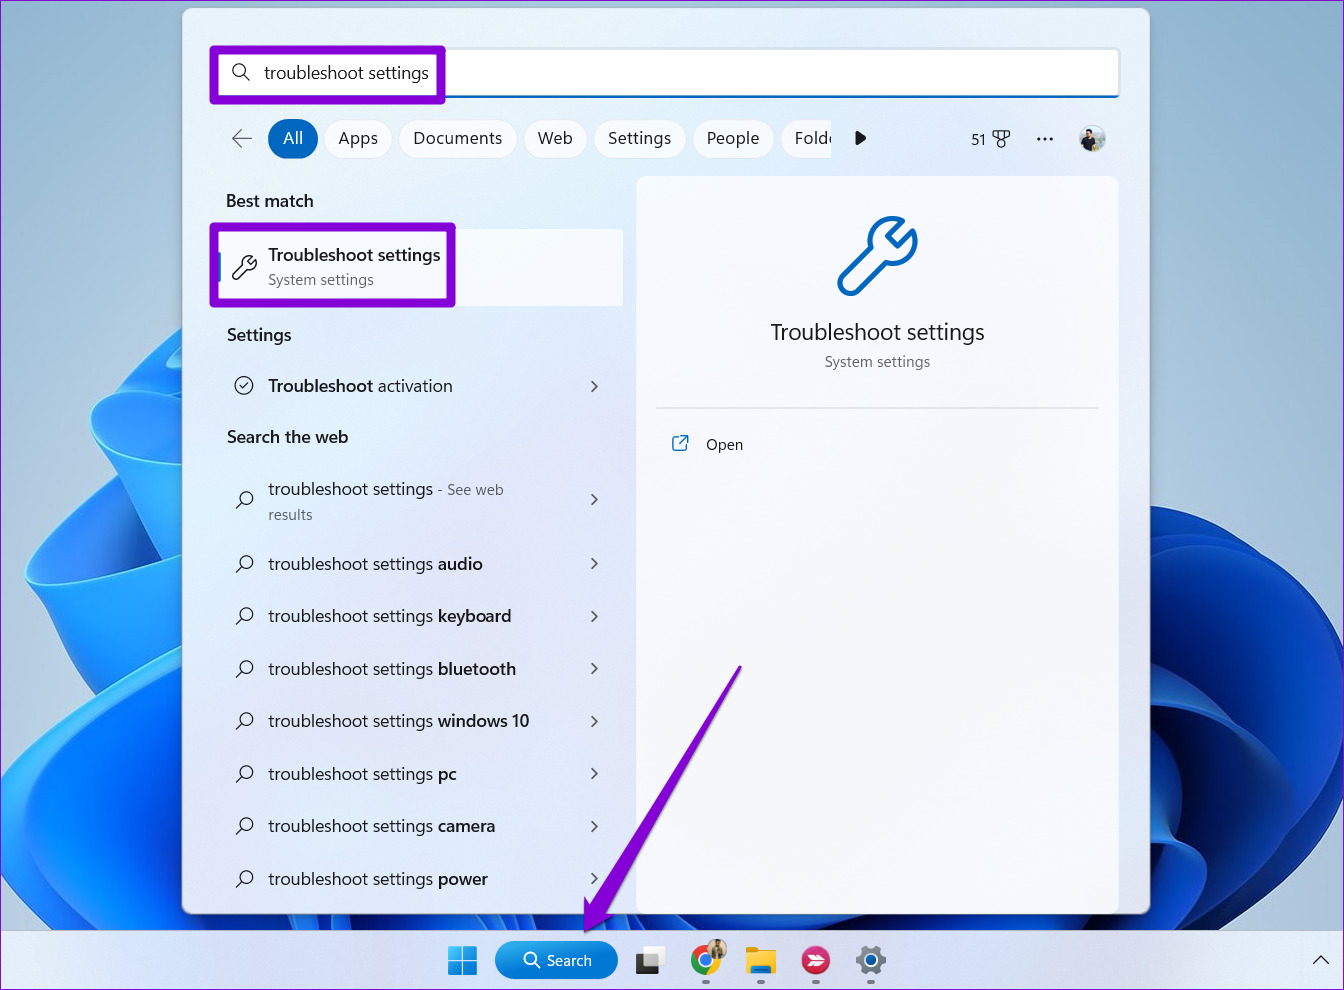
Fix 2: Run Bluetooth Troubleshooter
Your Windows PC comes with a few useful troubleshooters that can help you identify and fix such common issues on Windows. In this case, you can run the Bluetooth troubleshooter on Windows 11 to see if it can find and fix any issues. Here’s how.
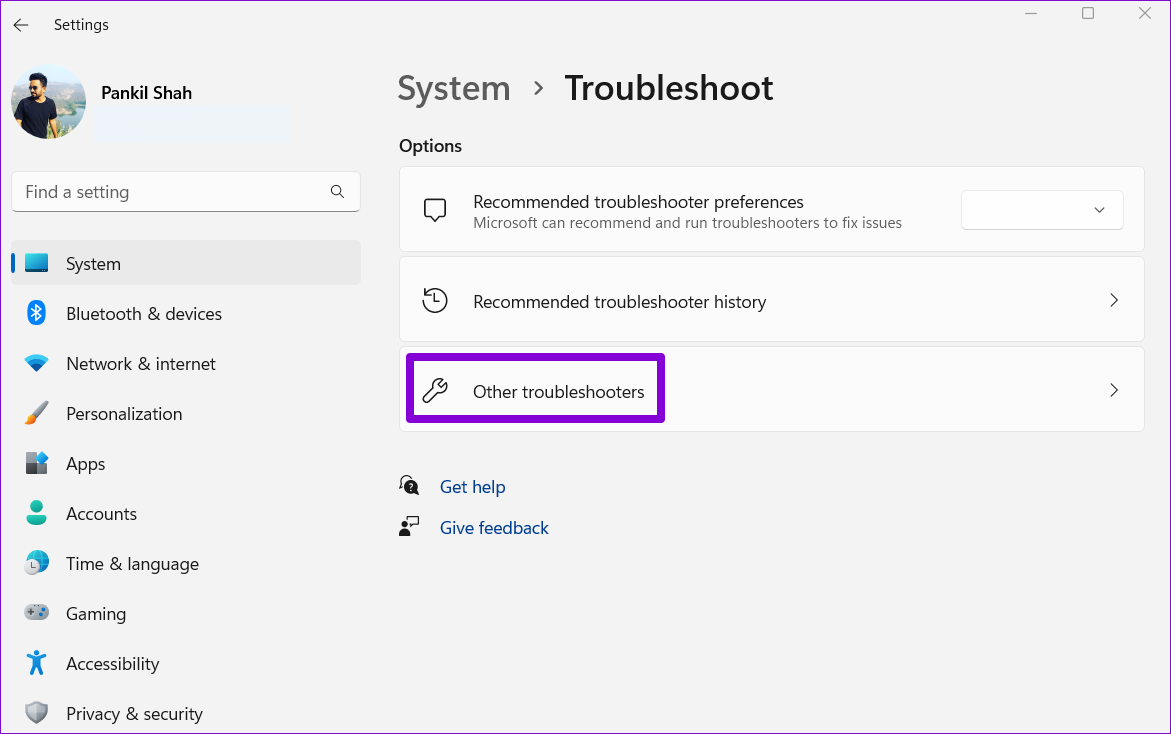
Step 1: Click the search icon on the taskbar, type troubleshoot settings, and press Enter.
Step 2: Go to Other troubleshooters.
Step 3: Click the Run button next to Bluetooth and follow the on-screen instructions to run the troubleshooter.
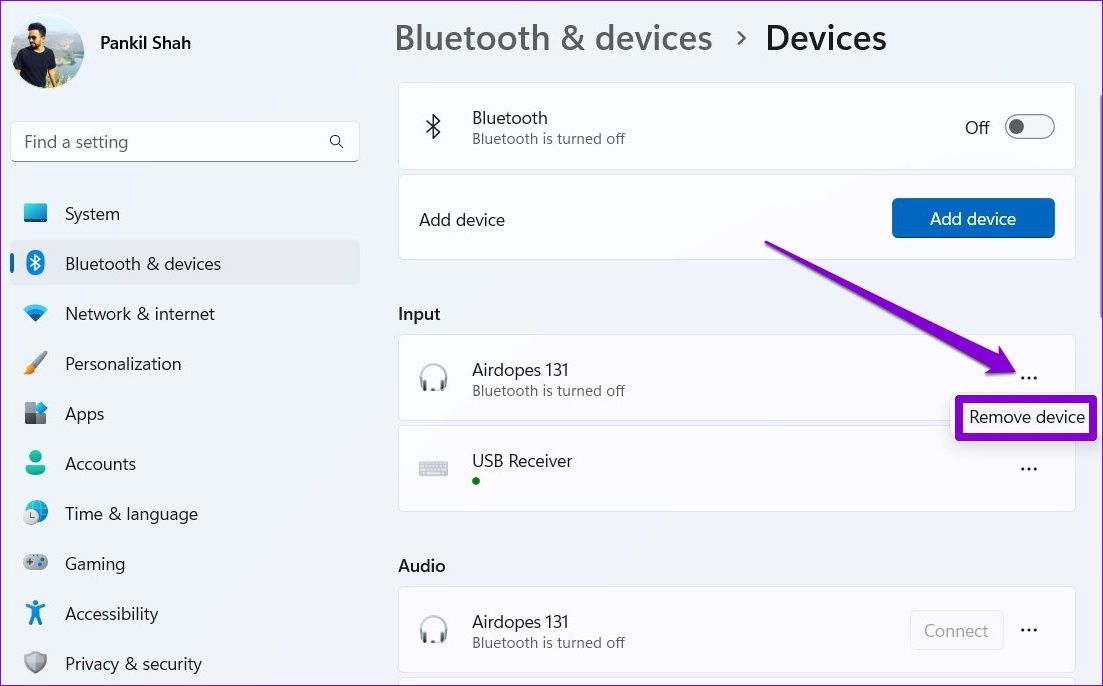
Fix 3: Unpair the Bluetooth Device and Pair It Again
If you are experiencing Bluetooth issues only with a specific device, the device may not have been paired correctly. You can try to remove the device and pair it again to see if that helps.
Step 1: Press the Windows key + I to open the Settings app and head to Bluetooth & devices > Devices.
Step 2: Click the three-dot icon next to your device and select Remove device.
Step 3: Click the Add device button to pair your device again.
Fix 4: Restart Bluetooth Service
If any Bluetooth-related services are encountering problems, it could prevent Bluetooth from functioning properly on your PC. To resolve this, you can attempt to restart the Bluetooth services on your PC by following the steps below.
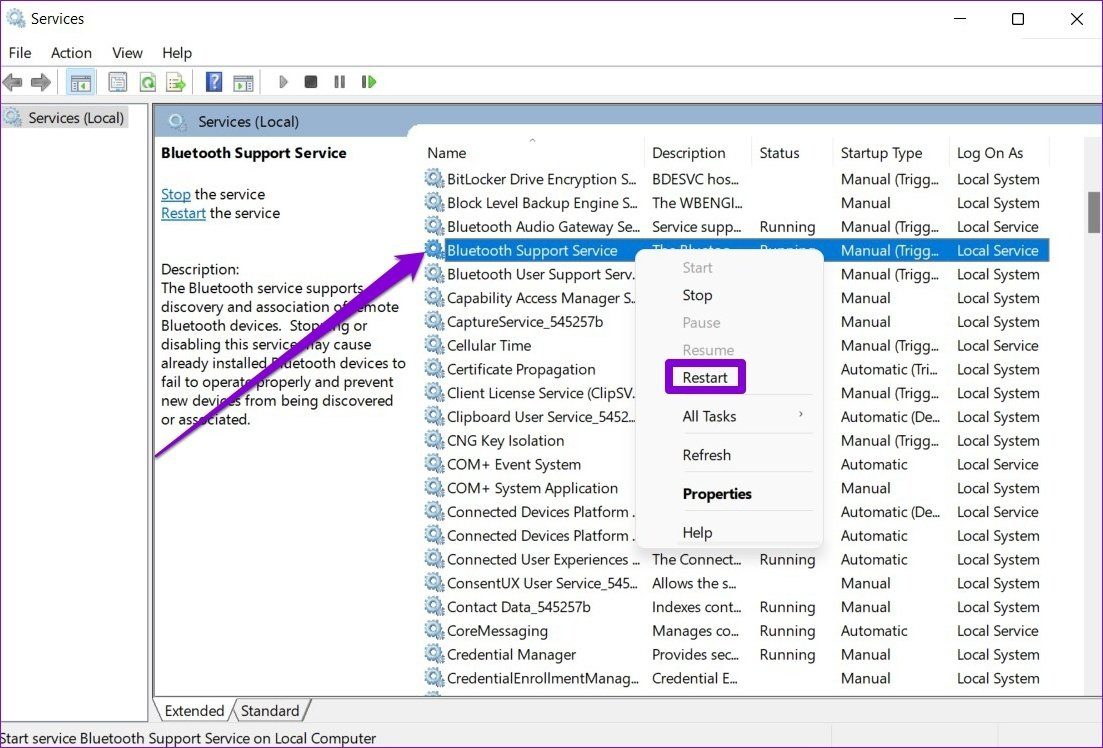
Step 1: Click the search icon on the taskbar, type services, and press Enter.
Step 2: In the Services window, scroll down to find the Bluetooth Support Service. Right-click on it and select Restart from the list.
Similarly, restart the Bluetooth Audio Gateway Service as well. Then, check if the issue is resolved.
Fix 5: Update or Reinstall Bluetooth Drivers
The Bluetooth driver on your PC helps Windows interact and connect with your wireless devices. If the Bluetooth driver on your PC is outdated or incompatible, Bluetooth will not work as expected. In most cases, you can fix issues with the Bluetooth driver by updating it.
Step 1: Press the Windows key + S to open the search menu, type device manager, and select the first result.
Step 2: Find and expand Bluetooth, right-click on your device, and select Update driver from the list.
Follow the on-screen instructions to finish updating the driver.
If no updates are available or if the problem persists, try uninstalling the problematic Bluetooth driver using Device Manager. After this, restart your PC, and Windows will automatically install the missing driver on the boot.
Screenshots can be very helpful when passing certain information over messages or social media. For example, when sending an email requesting technical assistance, a screenshot of the issue would suffice instead of trying to figure out how to communicate the issue in words. Now, when using Microsoft Outlook, users can insert screenshots in a variety of ways.
The screenshots can either be inserted in the body of the email or included as an attachment. It will only make things easier to explain or share with your team or anyone else. Here are three of the best ways to do so:
Using the Screenshot Feature on the Outlook Ribbon
Microsoft Outlook has a screenshot feature that you can find in the Insert tab. With this feature, users can take a screenshot of a particular window on their desktop and insert it in an email. Here’s how it works:
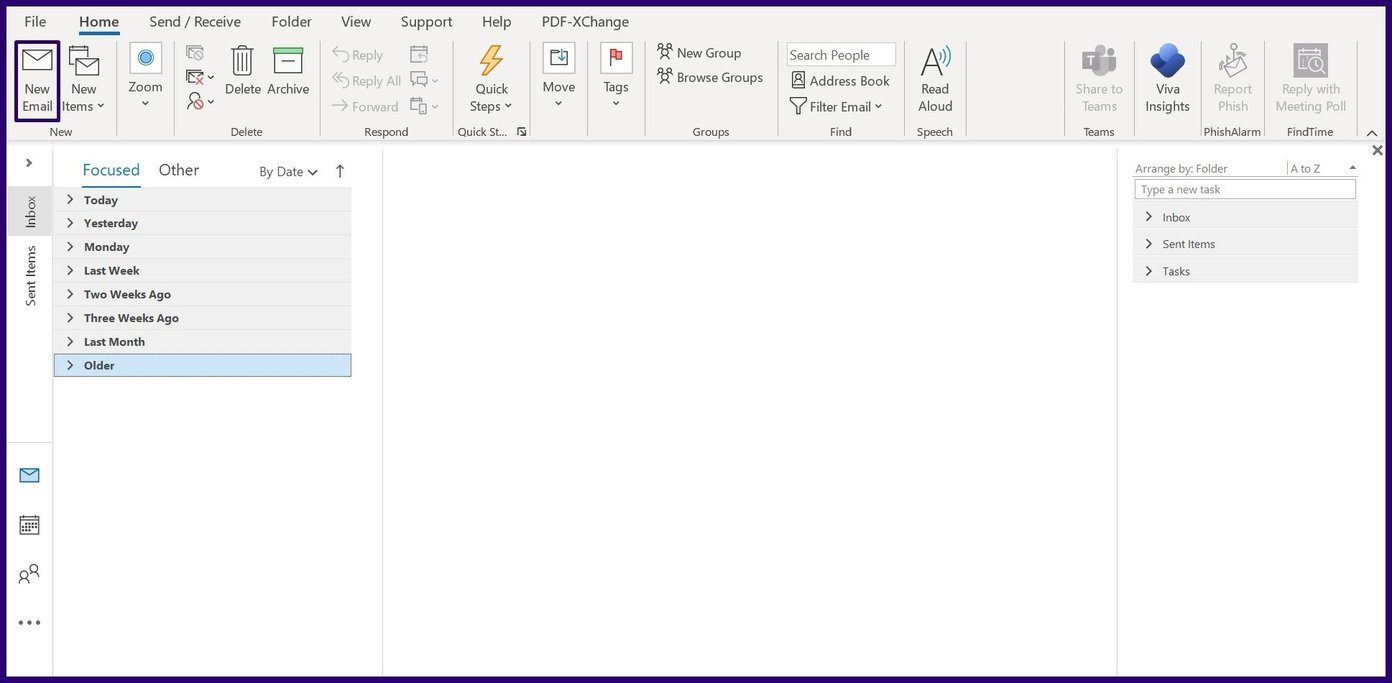
Step 1: Launch Microsoft Outlook.
Step 2: If creating a new mail, select New Email. However, if you are responding to a mail, select the mail and click on Reply.
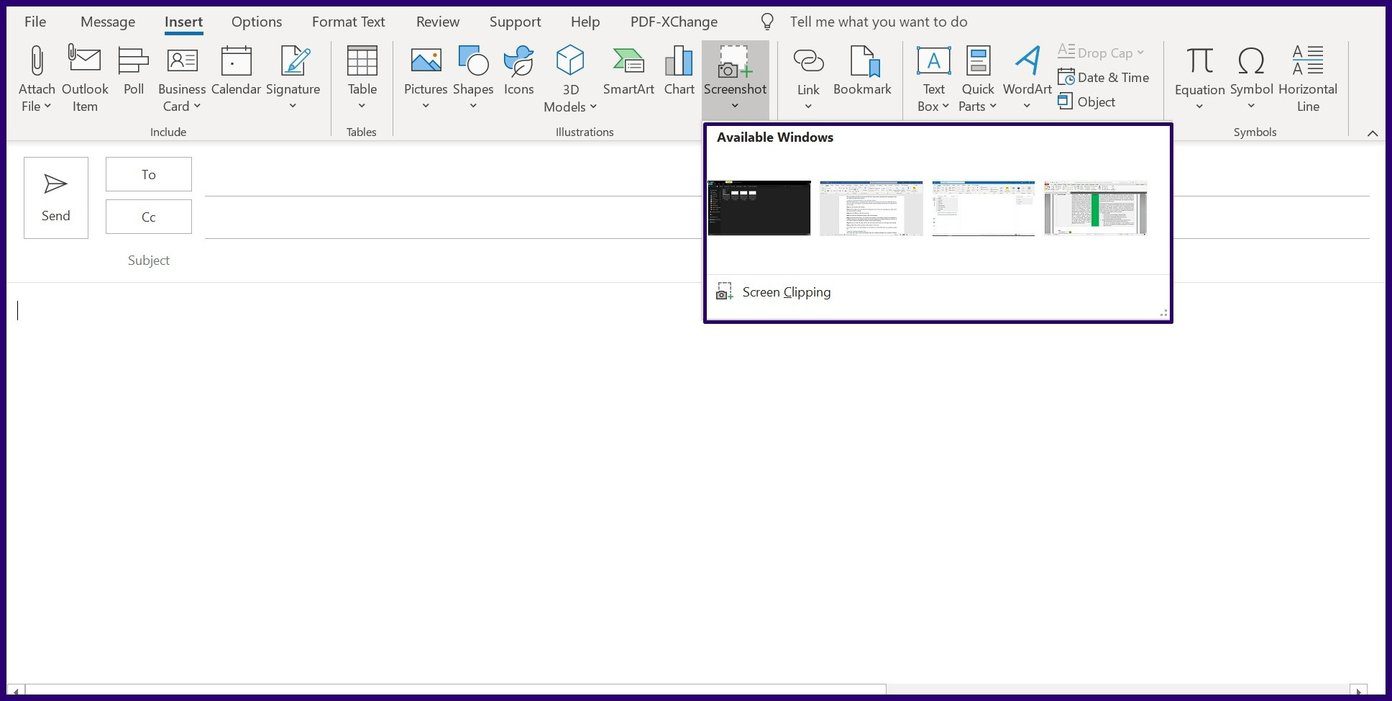
Step 3: On the Ribbon, click the Insert tab.
Step 4: Within the Illustrations group, click on Screenshot.
Step 5: From the drop-down, you would see two options. Select the relevant image from Available Windows if you want to include a screenshot of a window opened on your Desktop. But, if you want to include a clipping of a window, select Screen Clipping.
Step 6: Once you take the action above, the screenshot inserts into your message automatically. Place your cursor on the edge of the image to adjust the size.
Using the Windows Snipping Tool
Another way to insert screenshots into Outlook is through the Window Snipping Tool. This tool was first added to Windows Vista. Here’s how to use the Windows Snipping Tool to insert screenshots into Microsoft Outlook emails:
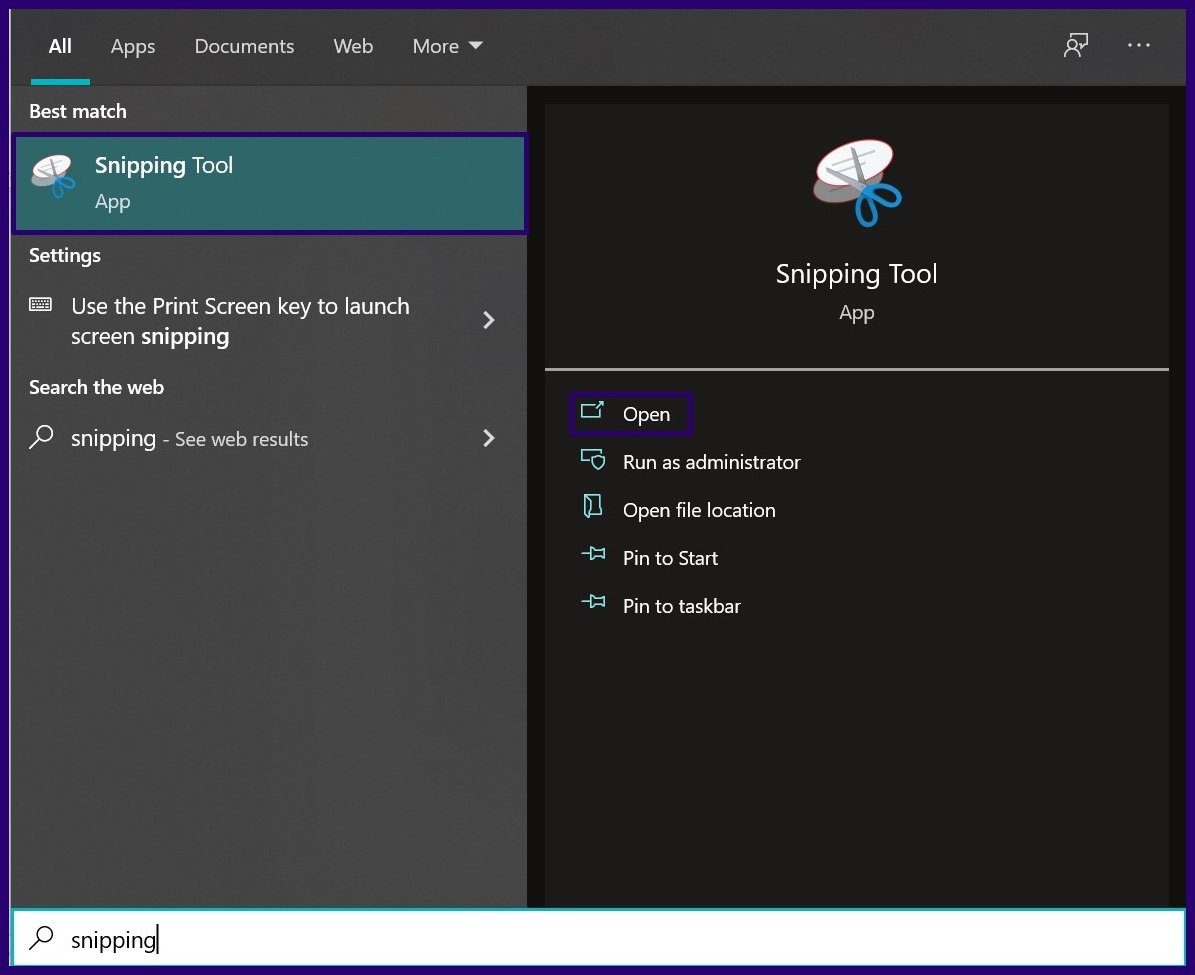
Step 1: Launch the Windows Snipping Tool.
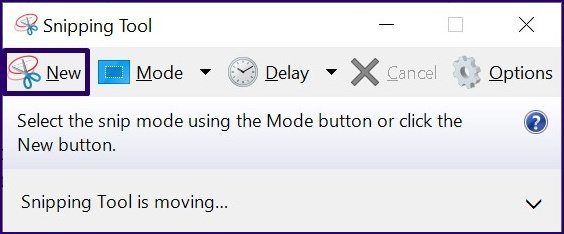
Step 2: On the Snipping Tool Ribbon, click on New.
Step 3: When your mouse pointer changes to a + sign, select the window that you want to screenshot.
Step 4: Once you make your selection, a new window opens showing the screenshot. Click on File on the Ribbon then click Send to.
Step 5: Choose any of the options Email Recipient (body of the email) or Email Recipient (as attachment). You can also decide to save the screenshot and add it to your email manually.
Note: The Windows Snipping Tool has different modes: Free-form, Rectangular, Window, and Full-screen Snip. You can choose any of these options before taking your screenshot depending on your current need.
Using the Windows Snip & Sketch Tool
The Snip & Sketch tool was introduced in Windows 10 as a replacement for the Snipping Tool. So with Windows 11, the Snip & Sketch might continue to exist but will eventually be replaced with the Snipping Tool.
You can use this tool to create screenshots, copy them to your clipboard, and paste them into Microsoft Outlook emails. The steps below will guide you on how to use the Windows Snip & Sketch tool:
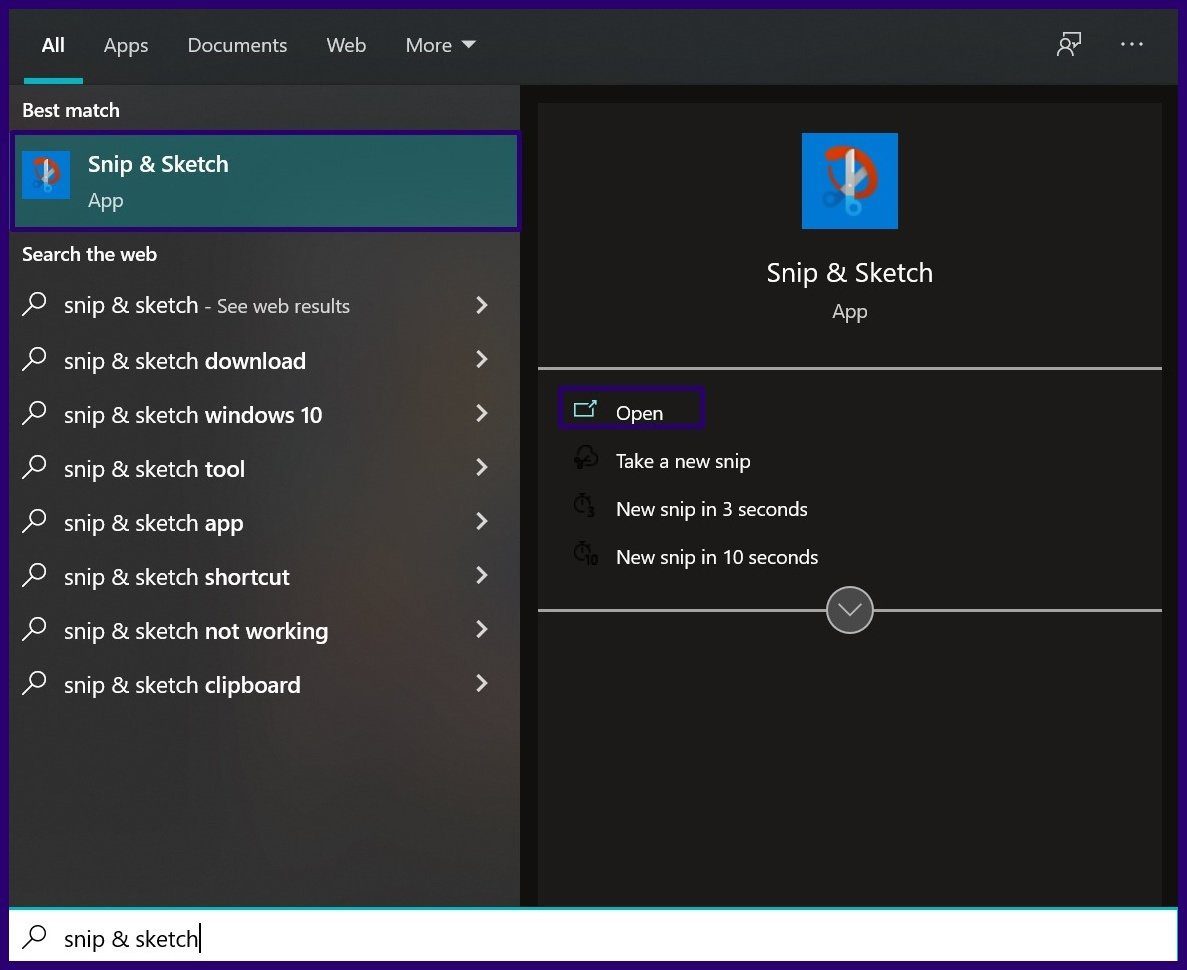
Step 1: Launch the Windows Snip & Sketch tool by either pressing the Windows + SHIFT + S keys simultaneously on your keyboard or searching for the tool on the Start menu.
Step 2: Select the screenshot mode you prefer by clicking on any of the options in the bar. The options include Free-form, Window, Rectangle, and Full-screen.
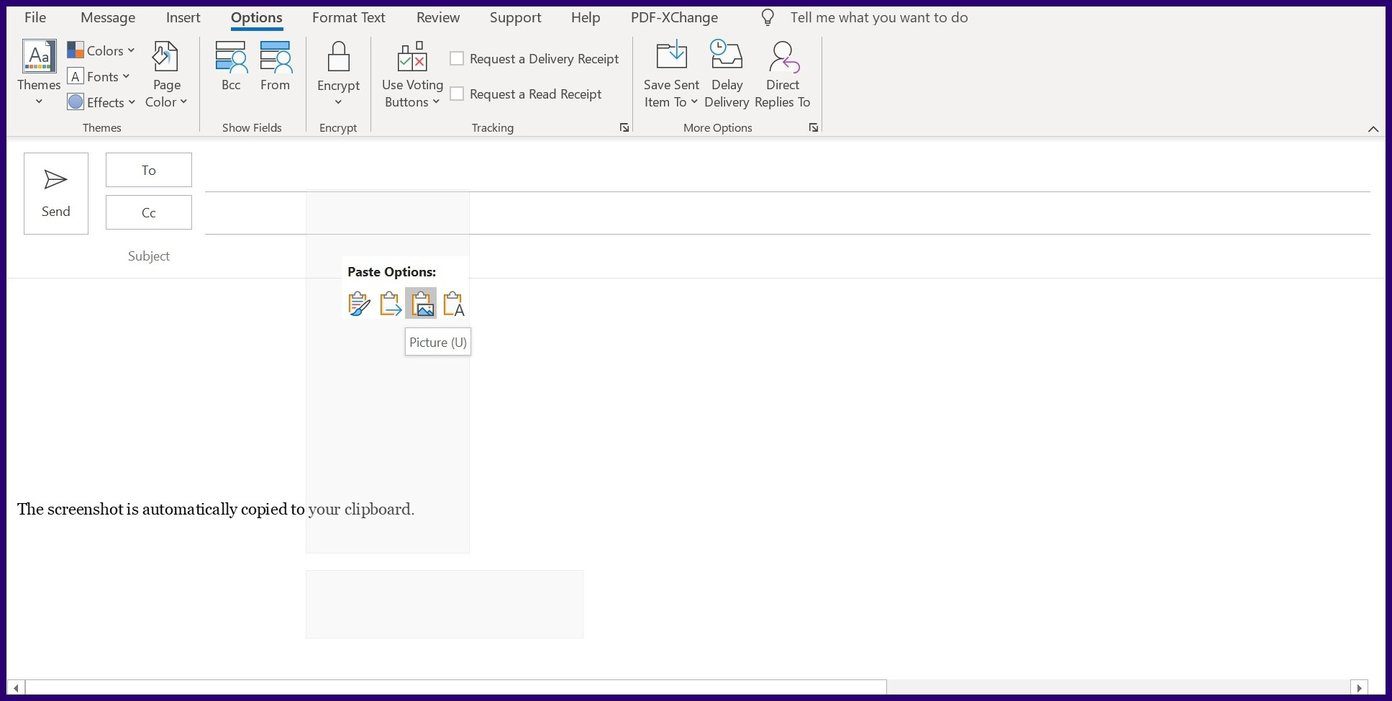
Step 3: Drag the mouse pointer over the part of your screen that you want to screenshot to select it. The screenshot is automatically copied to your clipboard.
Step 4: Paste the screenshot in the Outlook message window by placing your cursor on the window and pressing the CTRL + V keys simultaneously on your keyboard. Alternatively, you can right-click in the message window and select Paste.
Step 5: Once you take the action above, the screenshot inserts into your message automatically. Place your cursor on the edge of the image to adjust the size.
Saving Screenshots as PDF
Using any of the methods above should help in inserting a screenshot into your Outlook email. The screenshots can also be saved as PDF files using default Windows apps.
Restart Android phone: Long-press the power button and tap on Restart. Wait for the phone to restart and check again. This can help you fix any temporary glitches and bugs.
Force stop and restart the File Manager app: You can open all background apps and close them. Then, reopen the File Manager app to see if this fixes the issue.
Check device storage: If your device has less than 30% storage available, it might cause the File Manager app to stop or not open at all. Free up some space by deleting files, like trash files, and then reopen the File Manager app.
Remove SD Card: While SD cards can help extend device storage, certain incompatible SD cards can cause the File Manager app to crash. To check, remove the SD card and try reopening the File Manager app on your Android phone.
Check for software and File Manager app updates: Software updates help introduce new features and bug fixes that can help resolve any software-related issues. Similarly, you can also install the latest File Manager app updates. Then, check again.
Fix 1: Clear File Manager App Cache
Over time, most Android apps collect cache to make the app function faster and efficiently. However, if this cache gets corrupted, it can stop apps from working. If you’re facing this issue with your File Manager app, clear the app cache and then use the app. Here’s how.
Step 1: Open Settings and tap on Apps. Here, tap on My Files.
Note: If you’re using the Google Files app, tap on Files and follow the below steps.
Step 2: Tap on Storage > Clear cache.
Fix 2: Unrestrict File Manager
If your device restricts certain File Manager app functions, the app might stop intermittently. Open the Settings app on your Android phone and ensure the Files Manager app can run unrestricted. Follow the below steps to do it.
Step 1: Go to Settings → Apps → My Files.
Tip: Tap on Files if you’re using the Google Files app and follow the below steps.
Step 2: Here, tap on Battery → select Unrestricted.
Fix 3: Uninstall File Manager App Updates
While regular app updates are usually beneficial for apps, certain buggy updates might do more harm than good. And since you can’t uninstall most system apps, you can instead uninstall the latest app updates for the File Manager app to set it to default. Here’s how to do it.
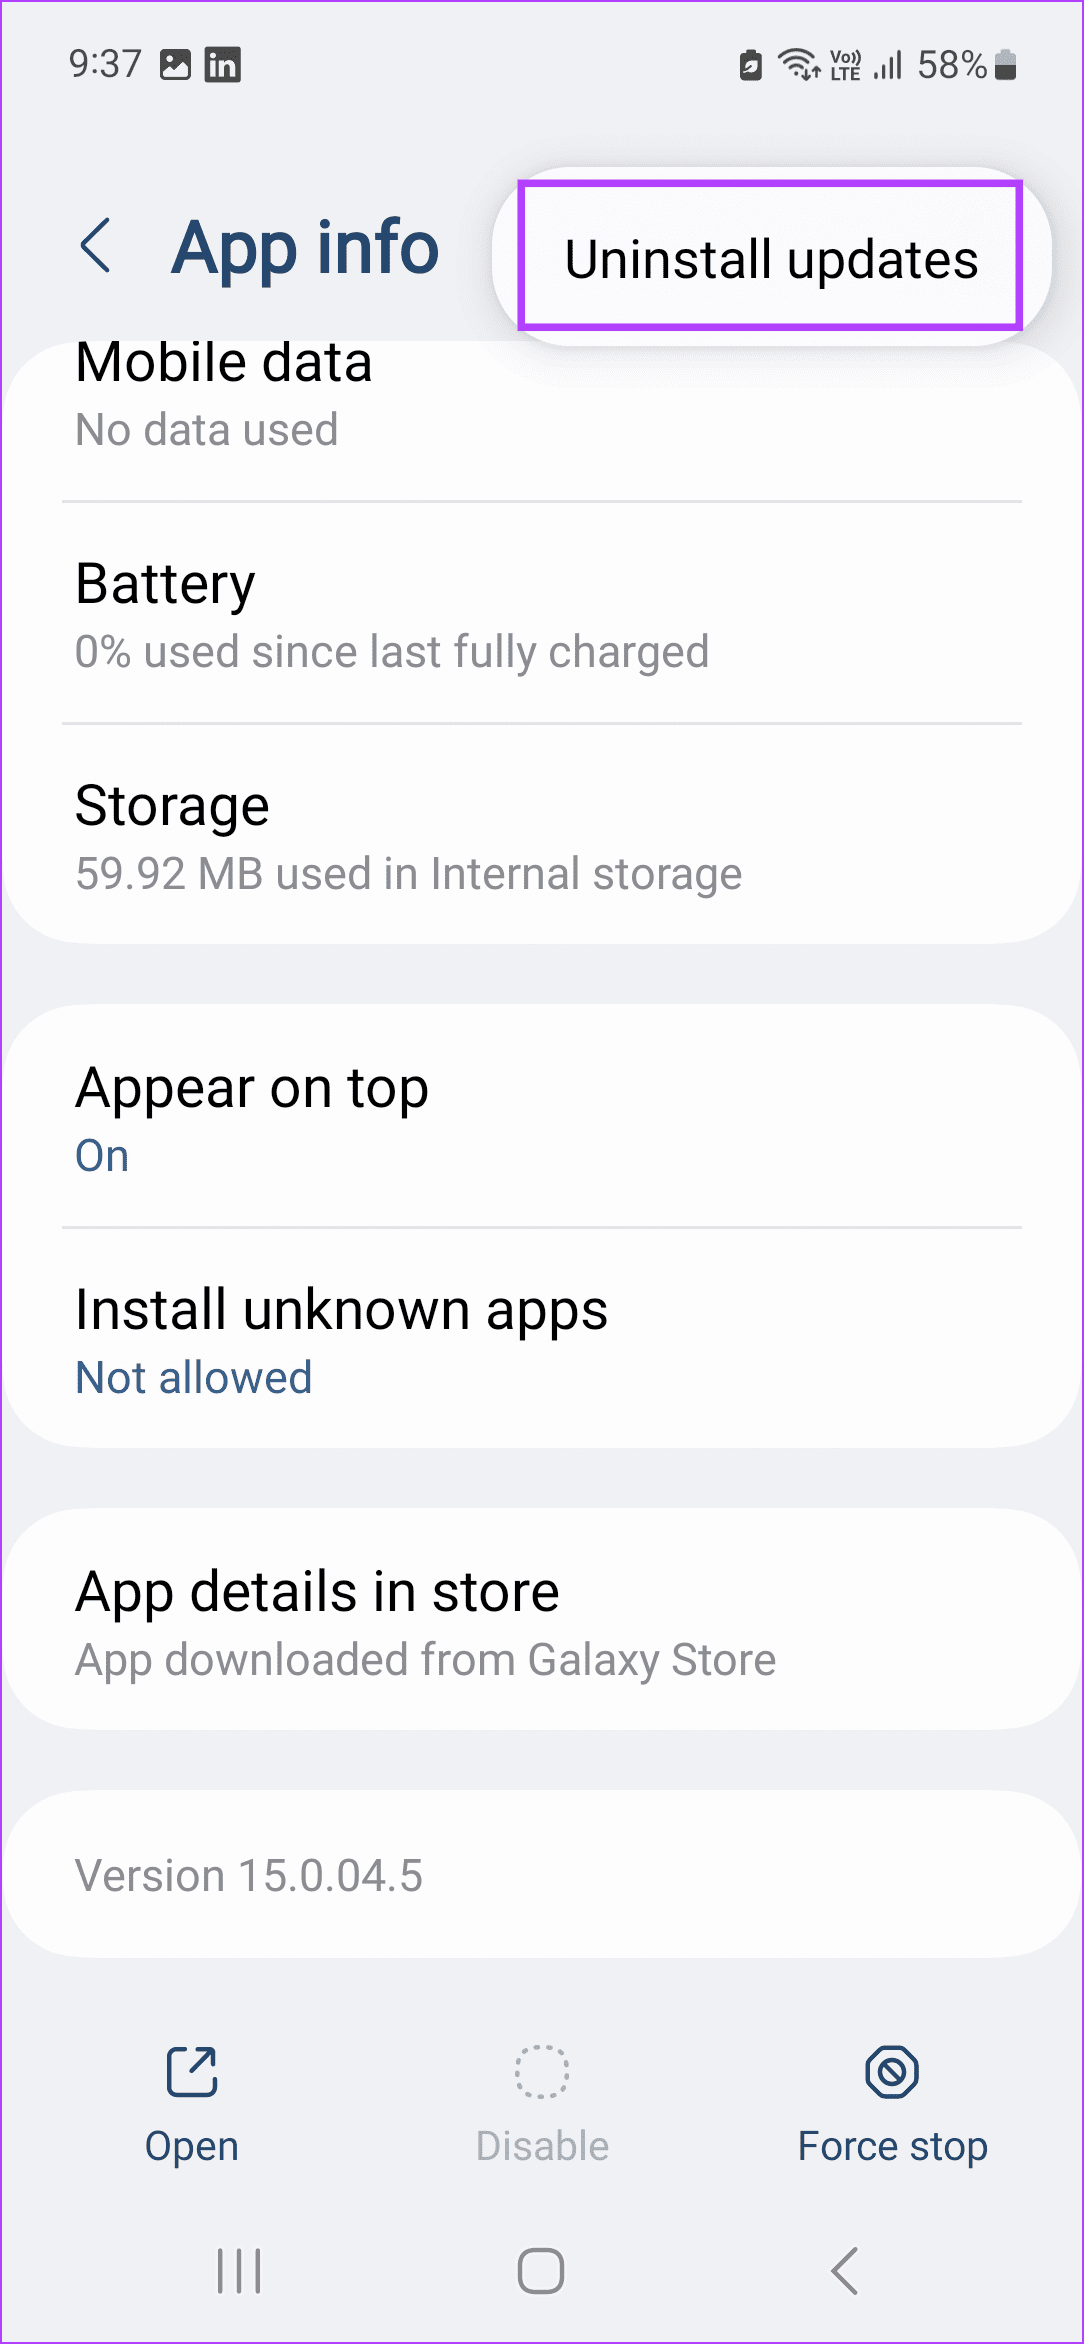
Step 1: Go to Settings → Apps → My Files → tap the three-dot icon at the top-right corner.
Step 2: Tap on Uninstall updates and confirm the same.
You can also follow the steps to uninstall updates for the Google Files app on your Android phone. Then, try opening the relevant File Manager app again to see if the issue has been fixed.
Test your webcam online: It’s a good idea to test the webcam by visiting a website like Webcam Test. This should help you determine whether the camera problem is specific to the app or program you’re using.
Disable the antivirus program: Some antivirus software includes a privacy setting that prevents apps from accessing the camera on Windows. To check for this possibility, disable your antivirus temporarily.
Install Windows updates:Issues with your webcam can also occur if you run an outdated or buggy Windows build. Check and install any pending Windows updates and see if that helps.
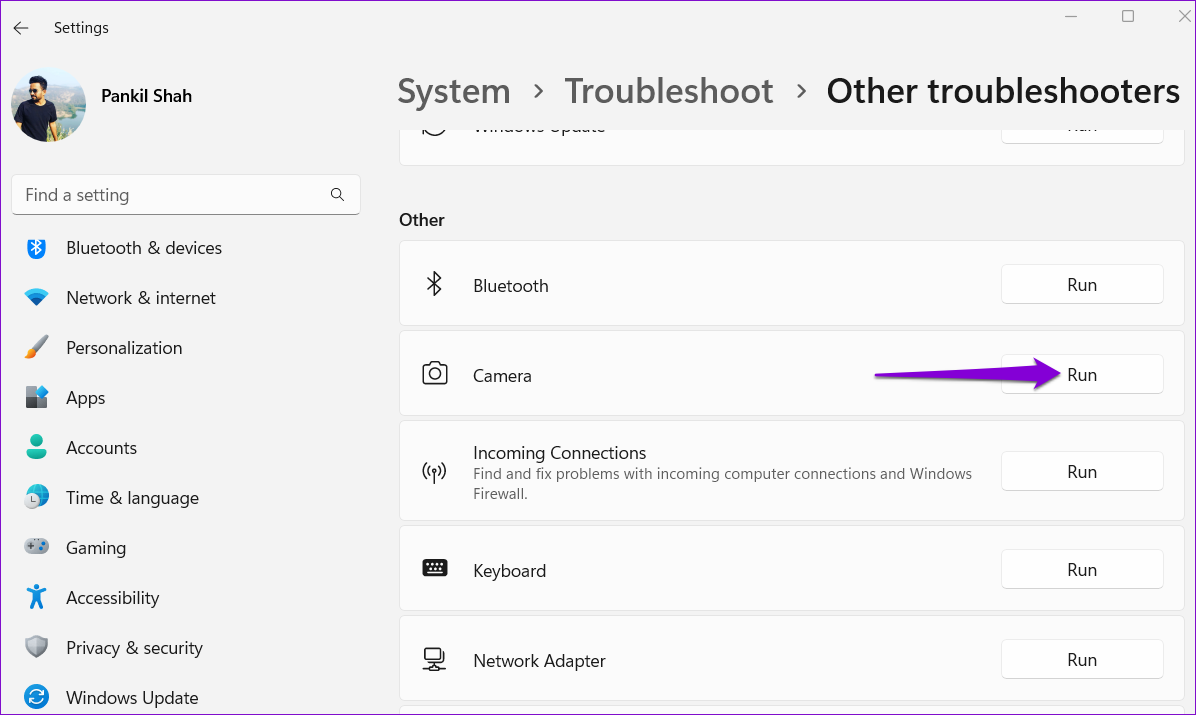
Fix 1: Run the Camera Troubleshooter
Windows offers a range of troubleshooters for diagnosing and fixing system-related issues. In this case, running the camera troubleshooter can help.
Step 1: Press Windows Key + S to open the search menu, type troubleshoot settings, and press Enter.
Step 2: Go to Other troubleshooters.
Step 3: Click the Run button next to the Camera and follow the on-screen instructions to run the tool.
Fix 2: Check the Camera Connection
If you use an external webcam, ensure that it is connected properly. You can also switch to a different USB port to ensure the issue is not related to a malfunctioning port. Additionally, if your PC or external webcam has a physical on/off switch, verify it is in the correct position.
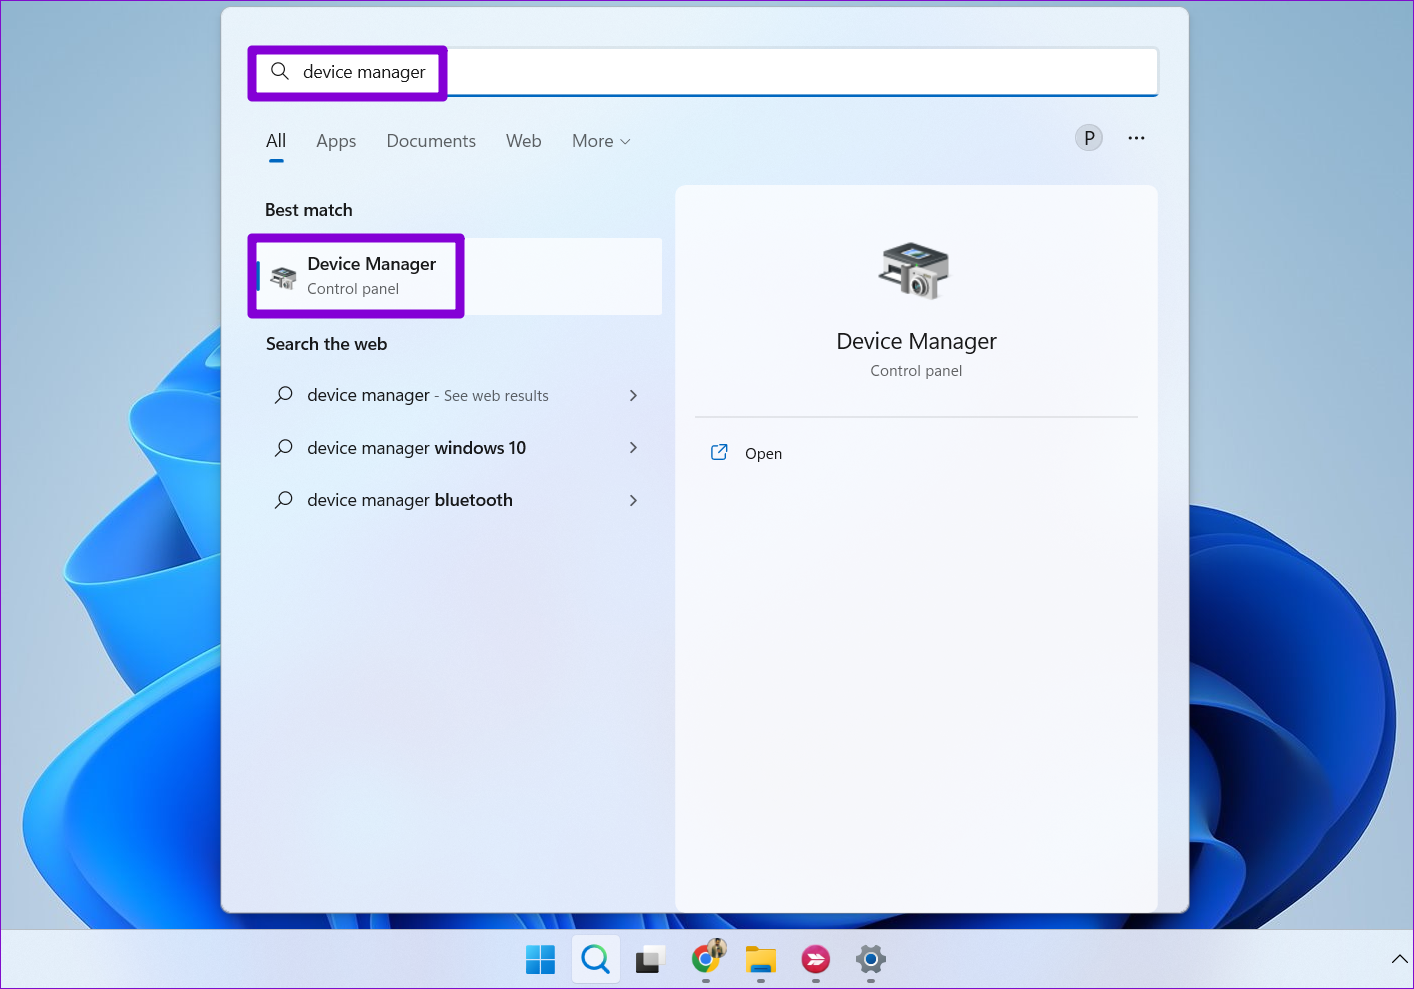
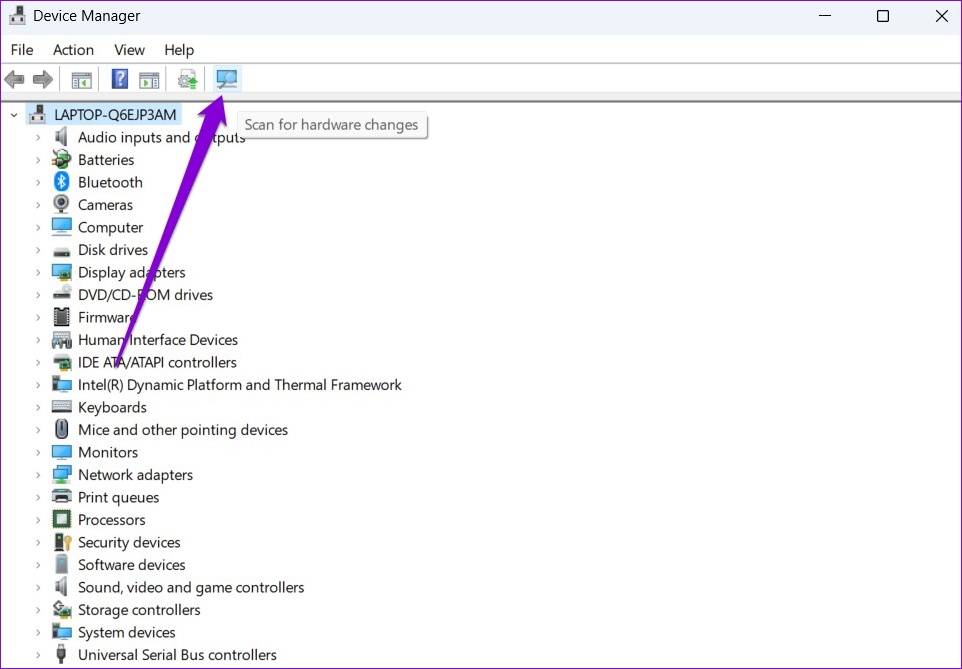
If reconnecting the camera does not help, try scanning your computer for hardware changes. To do so, use these steps:
Step 1: Press the Windows key + S to open the search menu. Type device manager in the box and press Enter.
Step 2: Click the Scan for hardware changes icon at the top.
Fix 3: Allow Apps to Access Camera
Another thing you should do is review app permissions on Windows and ensure that the app you use is allowed to access the camera. Here’s how to go about it.
Step 1: Press the Windows key + I to launch the Settings app and head to Privacy & security > Camera.
Step 2: Enable the toggle next to Camera access.
Step 3: Ensure that the app you’re trying to use has camera access.
Fix 4: Re-Enable the Camera From the Device Manager
Disabling and re-enabling the camera driver can also help resolve any temporary issues preventing Windows from accessing the webcam. Here’s how to do it.
Step 1: Open Device Manager using the search menu.
Step 2: Expand Cameras, right-click on your webcam, and select Disable device.
Step 3: Right-click on the webcam again and choose Enable device.
Fix 5: Update or Reinstall Camera Drivers
Since Windows relies on drivers on your PC to detect and work with the camera, this problem can also occur if those drivers are outdated or incompatible. To resolve this, you can try updating the driver to see if that resolves the issue.
Step 1: Open Device Manager using the search menu.
Step 2: Expand Cameras, right-click on your webcam, and select the Update driver option. Then, follow the on-screen prompts to finish updating the driver.
If the problem persists, the drivers may be corrupted. So, uninstall the drivers via Device Manager and restart your PC. Windows should install the missing drivers automatically when booting.
Check antivirus settings: Third-party antivirus programs can sometimes block downloads from the internet to protect your PC from suspicious files. So, if you can’t download files on Edge, review your antivirus program’s settings and disable any option that might be blocking downloads.
Restart your PC: Restarting your PC should close the Edge browser completely along with your other apps, potentially fixing any temporary issues that may be causing the problem.
Fix 1: Change the Download Path
If you’ve recently changed the downloads folder path in your Edge, or if that path isn’t available anymore, Edge might encounter errors while looking for it. Try changing the download path in Edge to something else to see if that works.
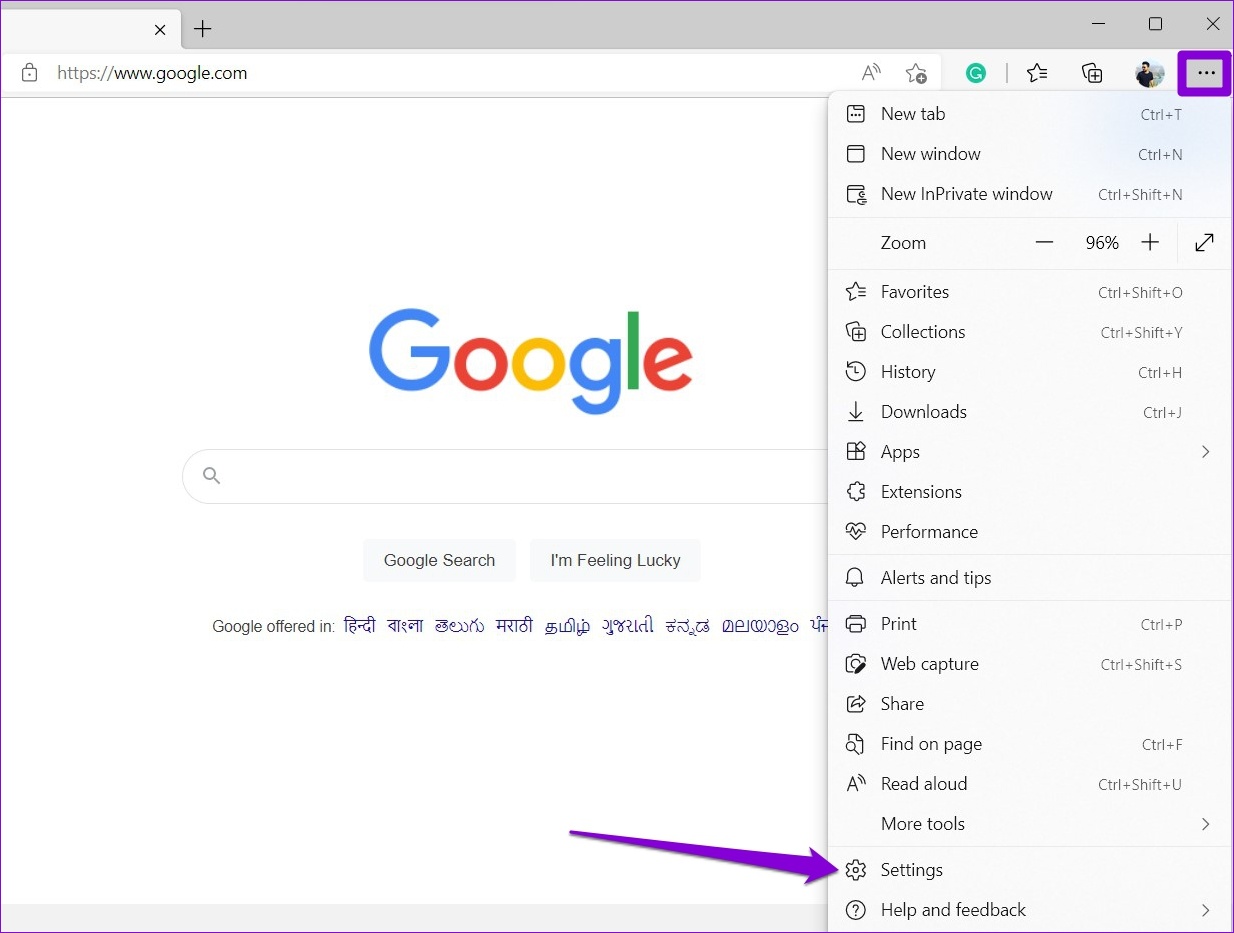
Step 1: Launch Microsoft Edge. Click the three-dot menu icon at the top right and select Settings from the list.
Step 2: Use the left pane to navigate to the Downloads tab > click Change next to Location.
Step 3: Choose a different location to save your downloads and check if the issue occurs after that.
Fix 2: Configure Edge to Download Office Files
Are you having trouble downloading Office files in Microsoft Edge? That could happen if you have configured Edge to open Office files in the browser instead of downloading them.
To change that, open Microsoft Edge, type edge://settings/downloads in the address bar at the top, and press Enter. Then, turn off the toggle for Open Office files in the browser.
Fix 3: Disable Extensions
Another thing to do is try downloading files in an InPrivate window in Edge and see if it works. If it does, it’s likely that one of your extensions is blocking downloads on Microsoft Edge. To identify the culprit, disable all the extensions and re-enable them one at a time.
Step 1: Open Microsoft Edge, type edge://extensions in the address bar, and hit Enter.
Step 2:Toggle off all the extensions.
After this, restart Edge and enable your extensions one at a time. Try downloading a file after enabling each extension until the issue occurs again. Once you find the problematic extension, consider removing it.
Fix 4: Repair Microsoft Edge
Repairing an app on Windows effectively fixes issues that may be affecting its functioning. Also, it’s completely safe, as you won’t lose any data while doing so. To repair Microsoft Edge on Windows:
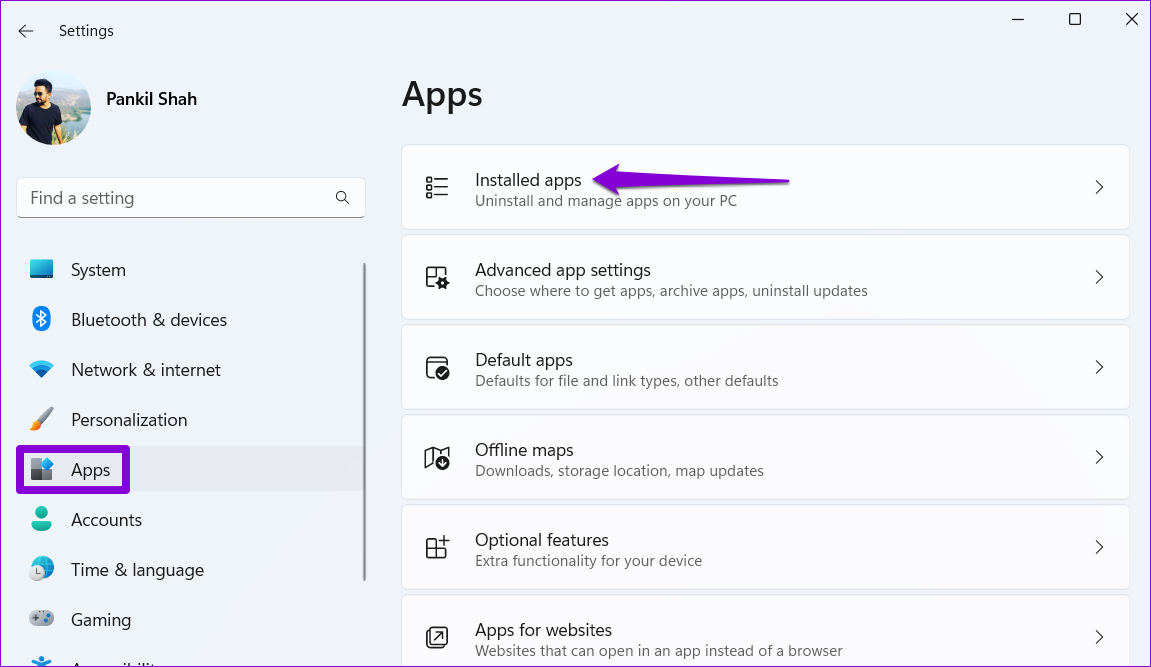
Step 1: Press the Windows key + I to open the Settings app > head to Apps > Installed apps.
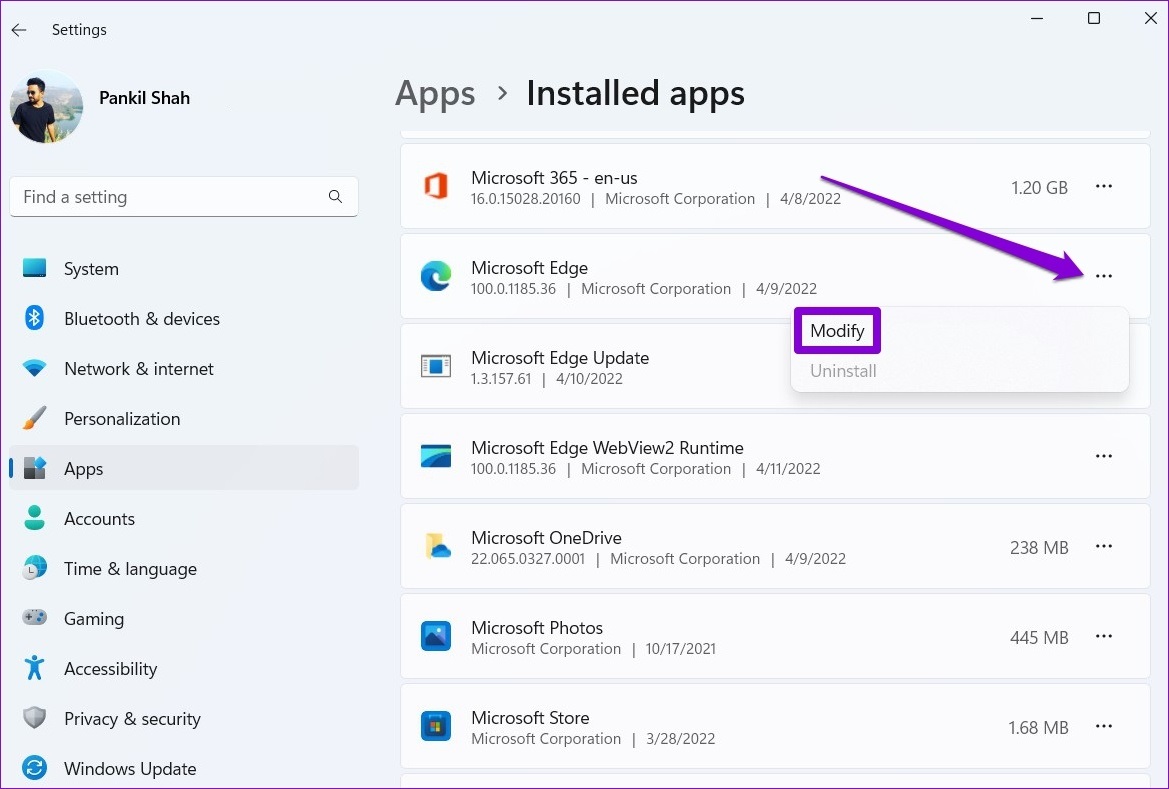
Step 2: Scroll down to locate Microsoft Edge. Click the three-dot menu next to it and select Modify.
Step 3: Click the Repair button to initiate the process.
As this process involves downloading Microsoft Edge again, ensure you are connected to the internet. Once the process is complete, Windows should automatically launch Edge.
Fix 5: Reset Microsoft Edge
If you still can’t download anything on Edge, consider resetting it on your PC. Doing so will revert the browser to its default configuration, resolving any issues.
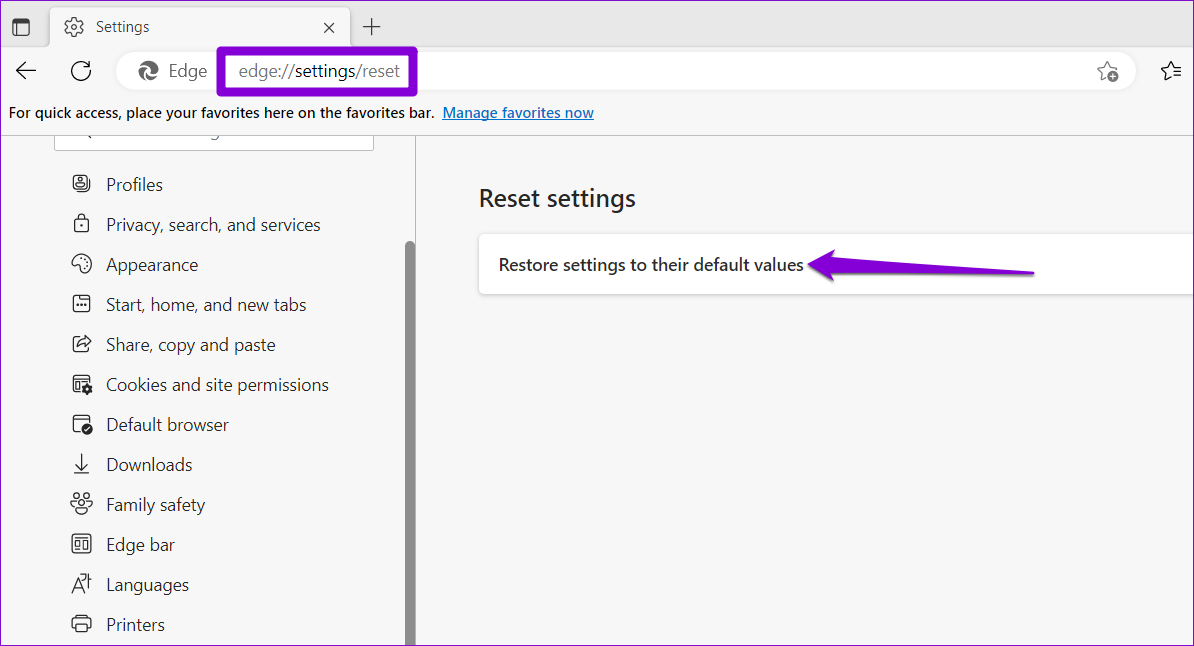
Step 1: Launch Microsoft Edge > type edge://settings/reset in the URL box > press Enter > click on Reset settings to their default values.
Method 1: Resize the Taskbar Icons Using Registry Editor
Since there is no direct option to resize the taskbar icons, you must edit certain registry values to get this effect. It is good practice to back up the registry so you can always revert changes if you miss a step.
Step 1: Open the Start menu and search for Registry Editor.
Tip: Alternatively, you can hit the Win + R key, type regedit, and hit Enter.
Step 2: Paste the following path in the Registry Editor search bar and hit Enter to highlight the Advanced folder on the left panel.
Step 3: Right-click on the Advanced folder > select New > DWORD (32-bit) Value.
Step 4: Rename the folder as TaskbarSi.
Step 5: Right-click on the Value > select Modify. Change the Value Data to 0.
Step 6: Restart your PC or laptop, and a small Taskbar will welcome you with small icons.
Note: If you are unhappy with the new changes, you can always revert to the original look. To do this, follow the steps above, and when you get to Step 5, modify the Value Data to 1. Once done, perform a quick restart of your laptop/PC.
The opposite is also true. You can also increase the size of the Taskbar and its icons. To do so, modify and update the Data Value to 2.
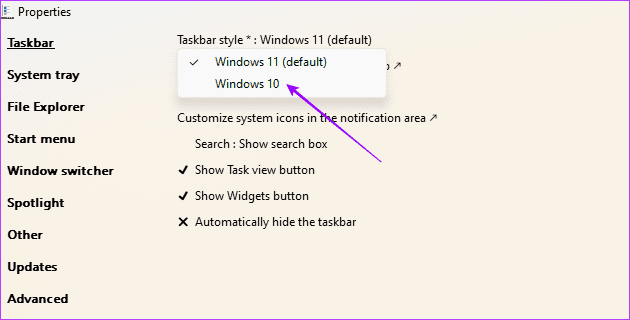
Method 2: Use ExplorerPatcher to Resize the Taskbar Icons
ExplorerPatcher is a free and open-source tool designed for Windows 11. It allows you to customize the operating system’s feel and look. Although it does not provide direct icon resize options, you can set it to use the Windows 10 Taskbar, which has larger icons. Download ExplorerPatcher and follow the steps below.
Step 1: Double-click the downloaded exe file and confirm your choice to install it.
Step 2: Once installed, right-click the Taskbar and select Properties.
Step 3: Click the Taskbar style option > select Windows 10. This will change your Taskbar to the Windows 10 version with bigger icons.
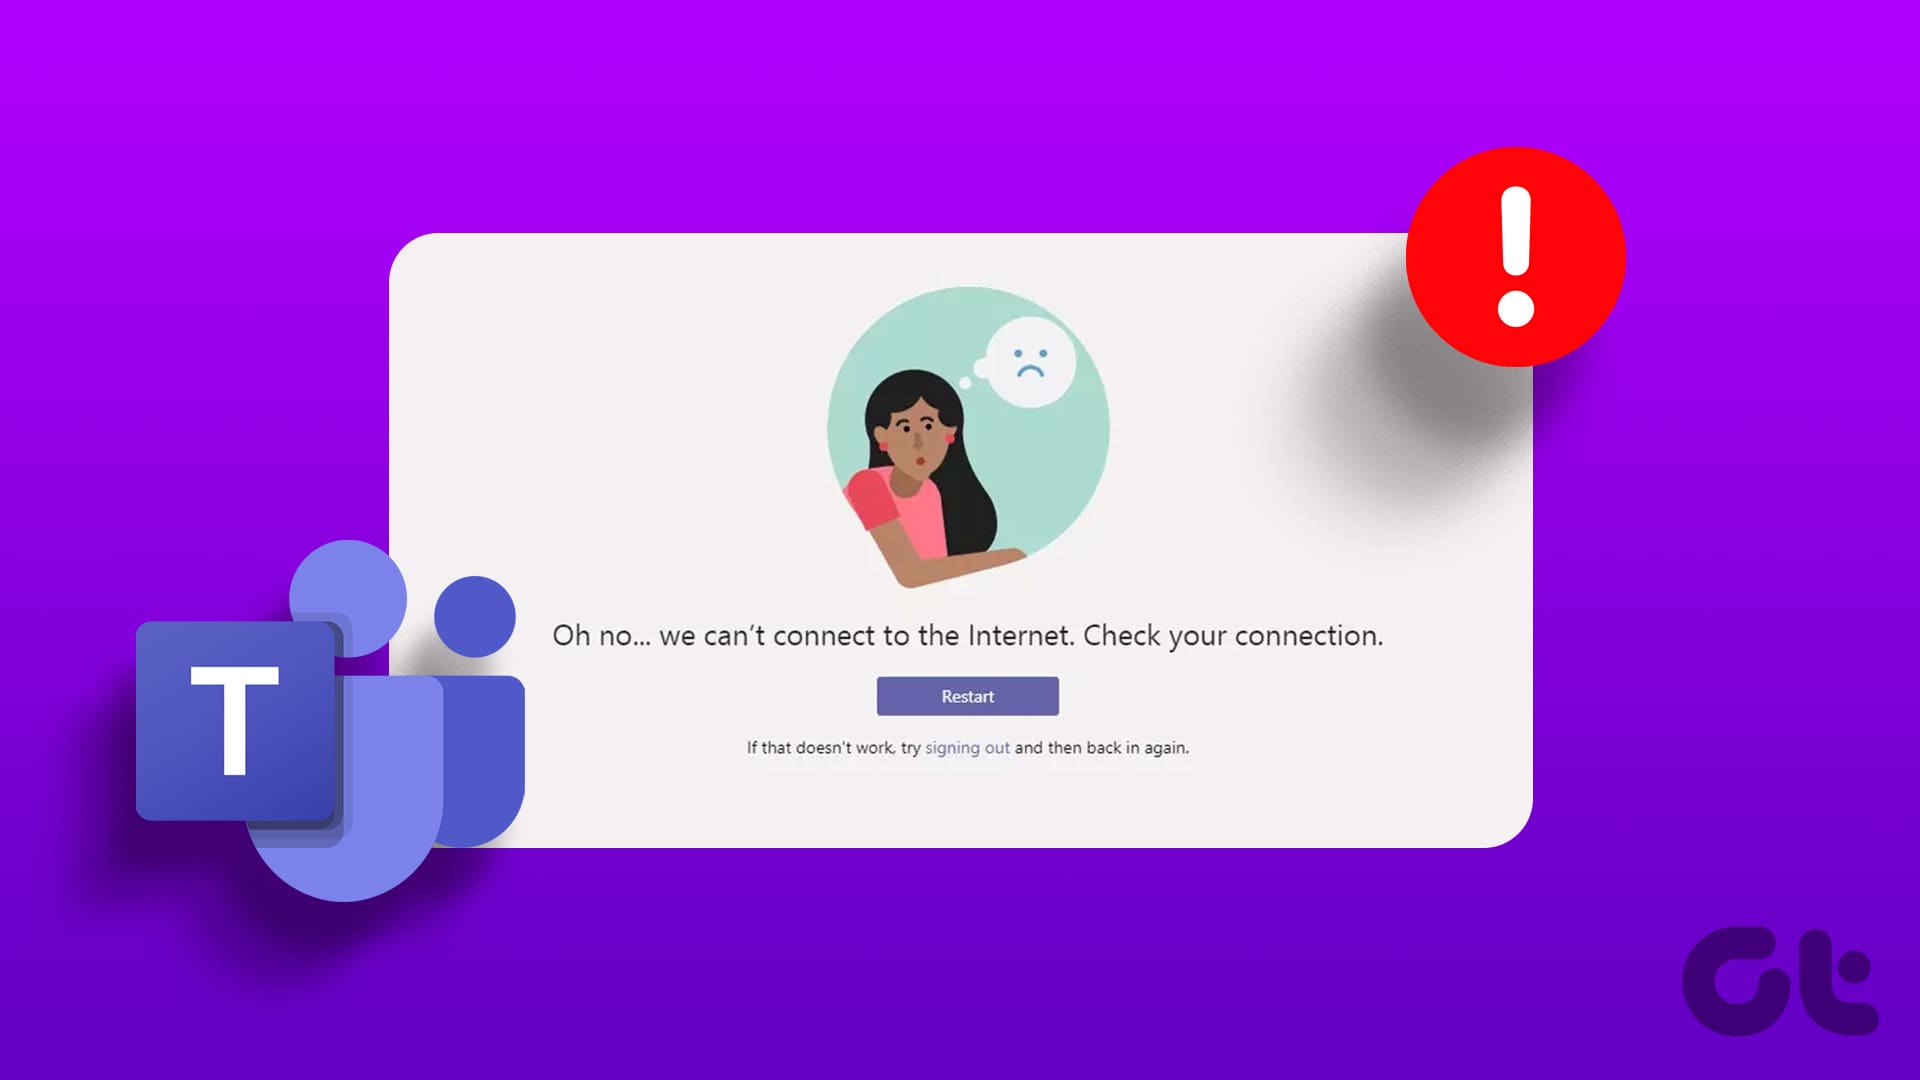
Check internet connection: Ensure that your laptop is connected to the internet. To check, open some tabs in Microsoft Edge or Google Chrome.
Check router: If your Wi-Fi router has an issue, your internet connection will not work with any connected devices, let alone your Windows machine.
Check Microsoft Teams status: Visit Downdetector and search for Microsoft Teams. If there are outage spikes, it confirms the issue from Microsoft’s side.
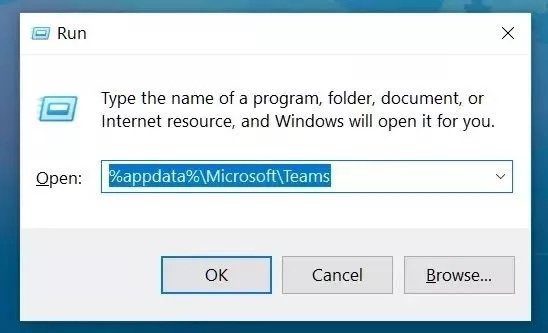
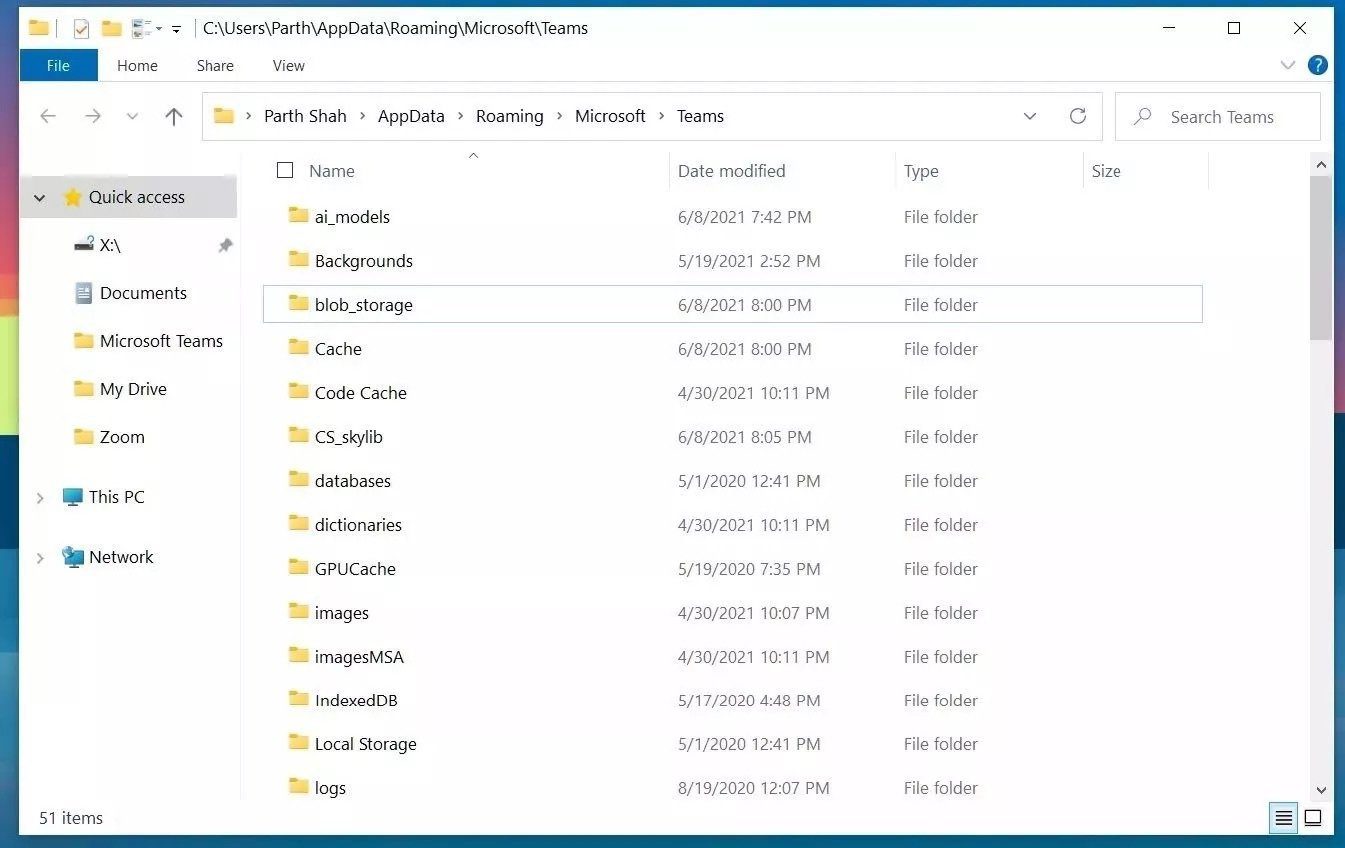
Fix 1: Clear Teams Cache
Teams collect cache data in the background to speed up certain tasks. You can clear the Teams cache and connect to the Teams server again.
Step 1: Press the Windows + R keys and open the Run menu.
Step 2: Type the below command and hit Enter.
%appdata%\Microsoft\Teams
It will open Teams data files from the File Manager menu.
Step 3: Select all files and remove them.
Open Microsoft Teams, and hopefully, you won’t notice Teams connection issues.
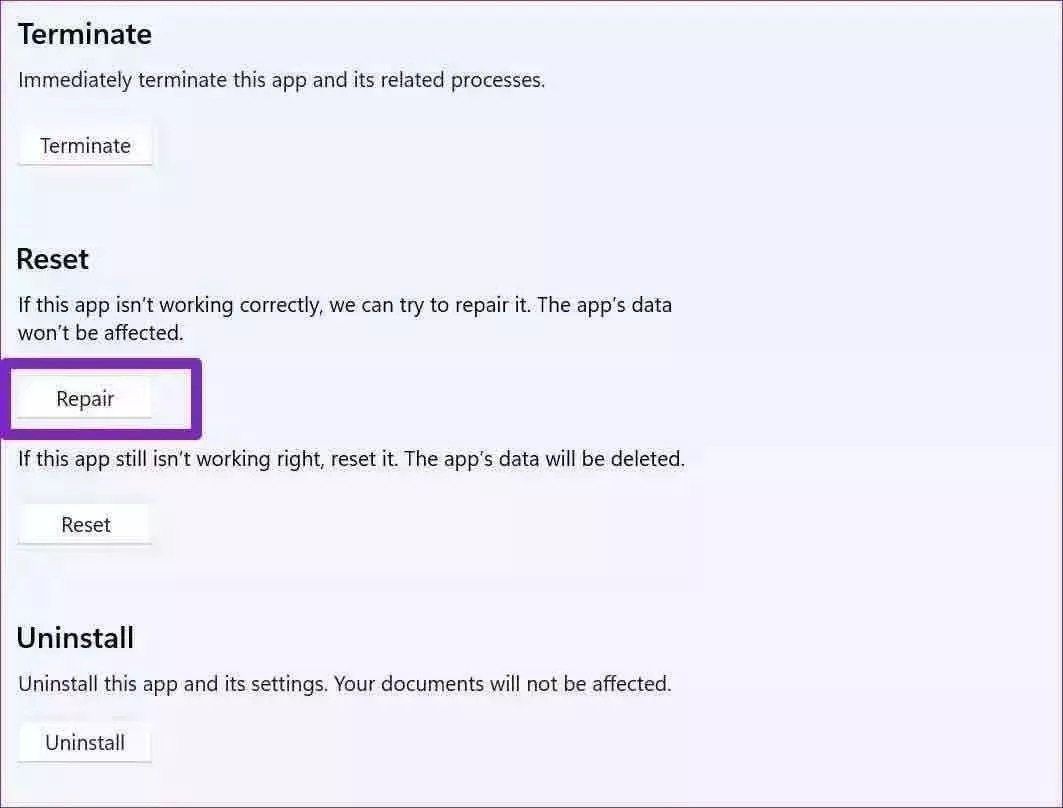
Fix 3: Repair Microsoft Teams
Step 1: Open the Windows Settings app (Use the Windows + I keys).
Step 2: Go to the Apps menu > select Apps & features.
Step 3: Scroll down to Microsoft Teams and select the three-dot menu beside it.
Step 4: Open the Advanced options menu.
Step 5: Run the Repair tool for Microsoft Teams.
Once done, you will be ready to use Teams without connection issues.
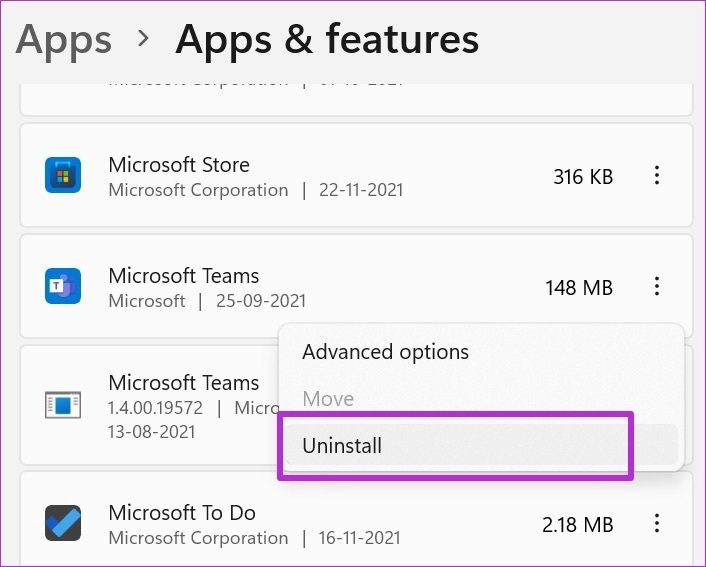
Fix 4: Reinstall Teams
To reinstall Teams on your Windows machine, you must first uninstall it. To do so, go to Windows Settings > select Apps and features > Move to Microsoft Teams > click Uninstall.
Once uninstalled, go to the Microsoft Teams website and download the latest version to your computer. Open the app, sign in with your account details, and check for connection issues.
That’s it. Go through these steps above and troubleshoot Teams connection issue once and for all.
Check your network connection: Ensure your PC has a good internet connection. I recommend an internet speed of at least 5 Mbps to attend a Zoom call without audio delay.
Verify the microphone in the Zoom app: Ensure that you pick the correct microphone and test it under the Zoom app settings. Open the Zoom app, click your profile icon at the top right, and select Settings. Select Audio from the left sidebar and pick your connected microphone on the right. Click the Test mic button to check if it is working accurately.
Ensure listening through headphones/earphones: Connect your headphones/earphones to the PC and try listening to the Zoom call audio instead of the external PC speaker.
Update or reinstall the Zoom app: Open the Zoom Workplace app, click your profile icon at the top right, and select Check for updates to install new updates. Alternatively, uninstall it from Windows Settings > Apps > Installed apps, and download its installer to install it afresh.
Update Windows 11: Press the Windows + I shortcut to open Settings, select Windows Update from the left sidebar, and install available system updates.
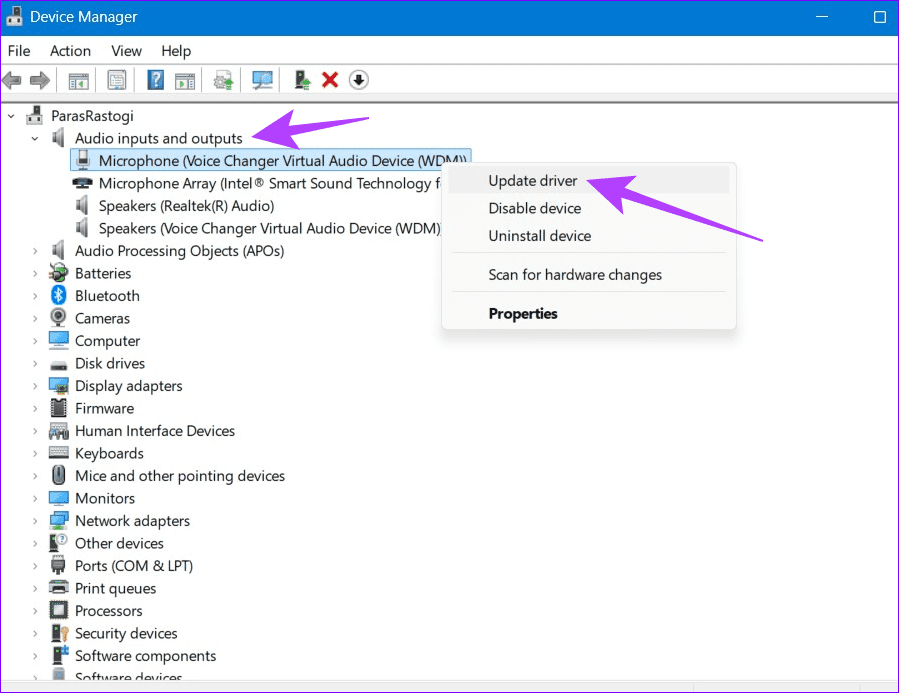
Fix 1: Update the Microphone Drivers
Outdated microphone drivers may interfere with the Zoom audio output causing a delay. Head to the Device Manager app to update them manually.
Step 1: Press the Windows key, search Device Manager, and click to open it.
Step 2: Expand Audio inputs and outputs, right-click your microphone, and select Update driver.
Step 3: Finally, click Search automatically for drivers to update them online.
Fix 2: Change Display Settings to Fix Audio Lag
Windows 11 optimizes the native Camera app to save power by default, which may lead to audio or video delays in Zoom. To fix it, adjust the Camera app’s display settings to get the best performance.
Step 1: Press the Windows + I shortcut to open Settings, select System from the left sidebar, and click Display.
Step 2: Scroll down and click Graphics under Related settings.
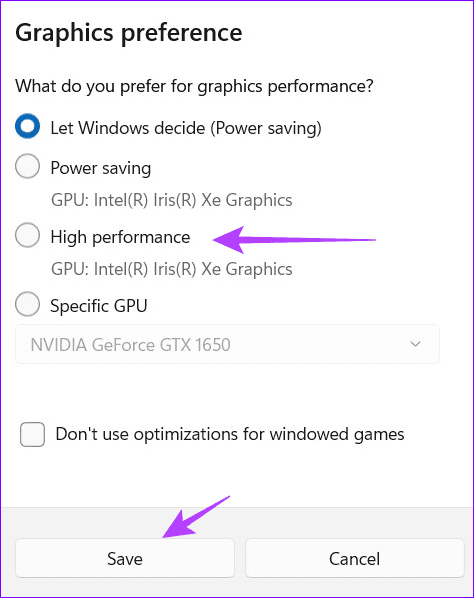
Step 3: Select Camera under the list and click Options.
Step 4: Switch Graphics preference to High performance, and click Save.
Fix 3: Suppress Background Noise
The Zoom Workplace app on Windows offers an in-built option to eliminate background noise. Once enabled, it can filter out distracting sounds such as keyboard typing, paper crunching, etc. to improve the audio quality.
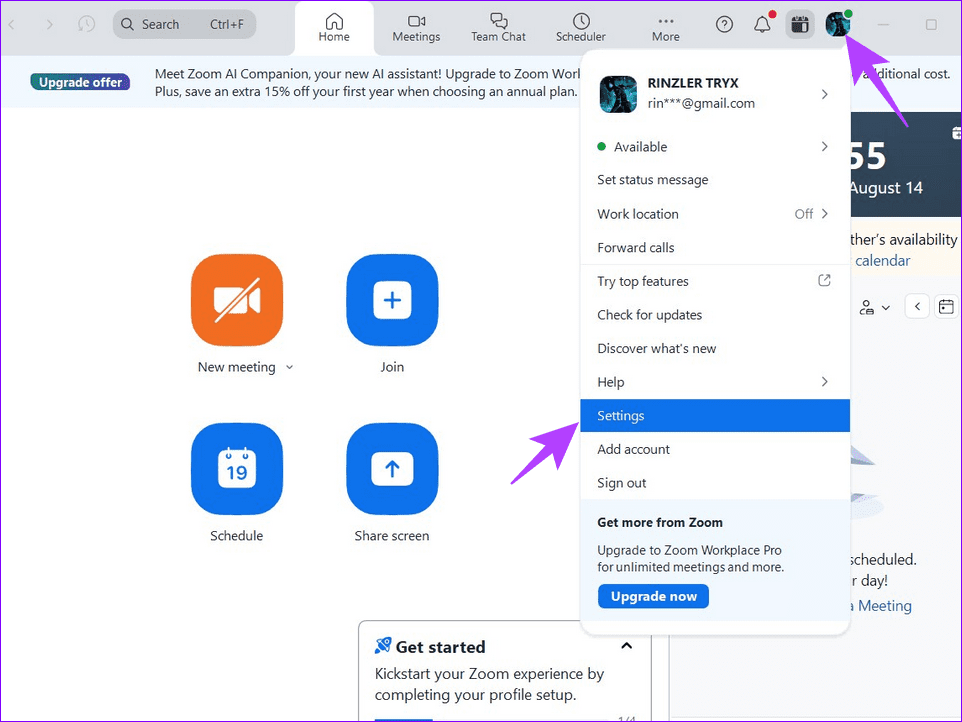
Step 1: Click your profile icon at the top right of the Zoom Workplace app, and select Settings.
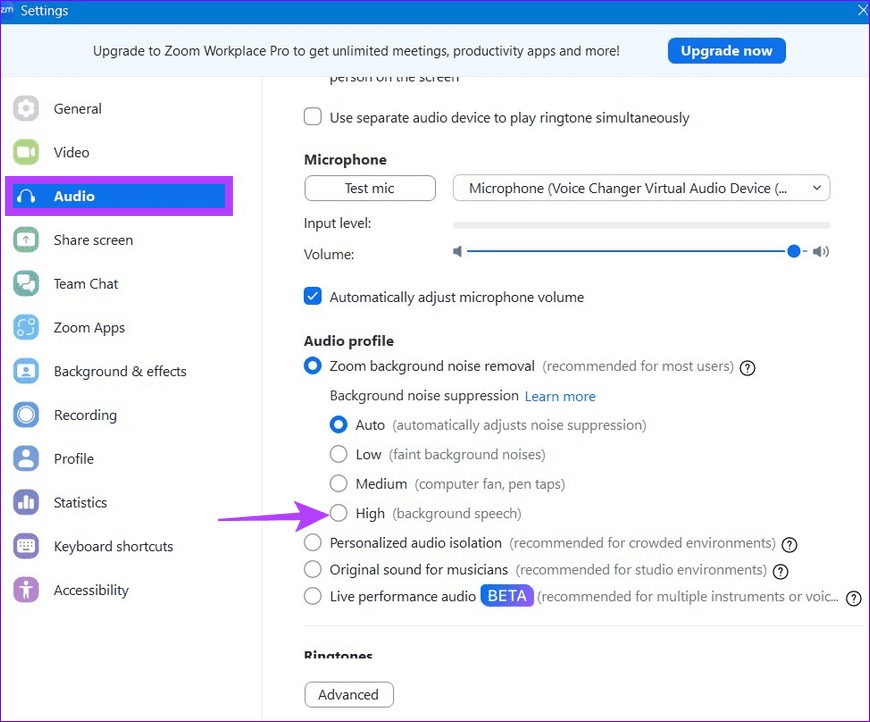
Step 2: Select Audio from the left sidebar, enable Zoom background noise removal, and set Background noise suppression to High.
Fix 4: Disable Audio Enhancement on Windows
The Audio Enhancement feature in Windows improves audio performance but can sometimes cause an audio delay in the Zoom app. Disable it from Windows Settings to restore normalcy.
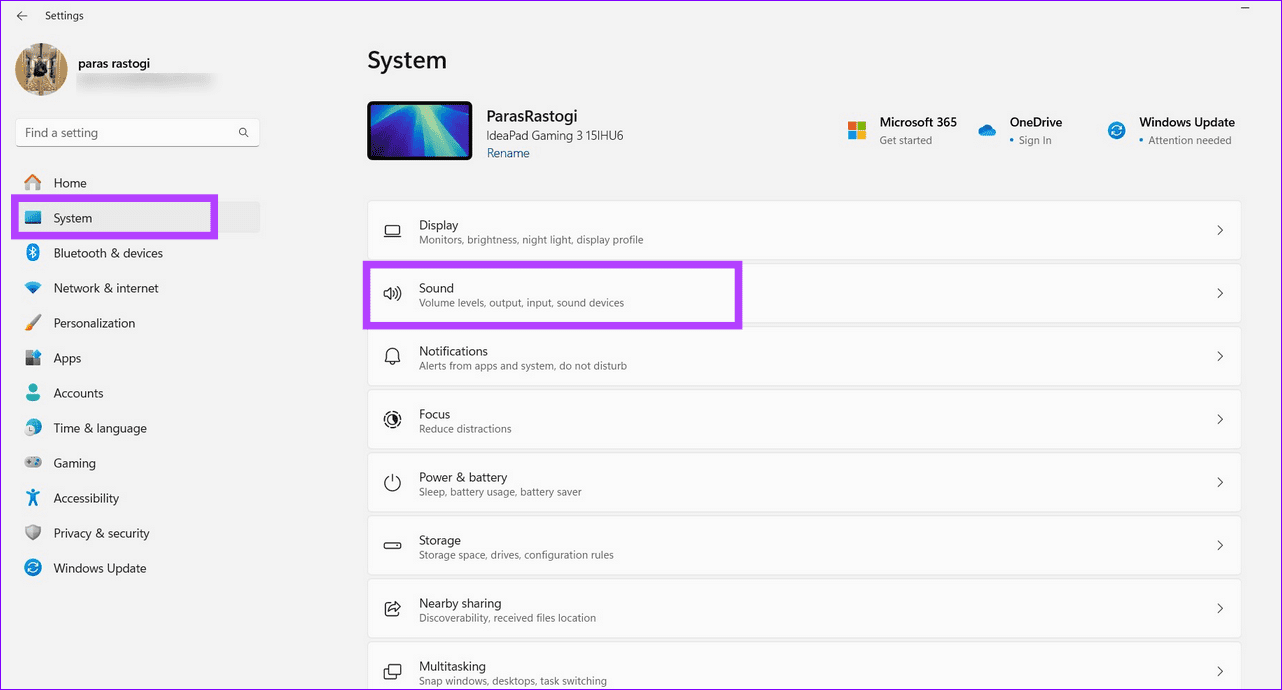
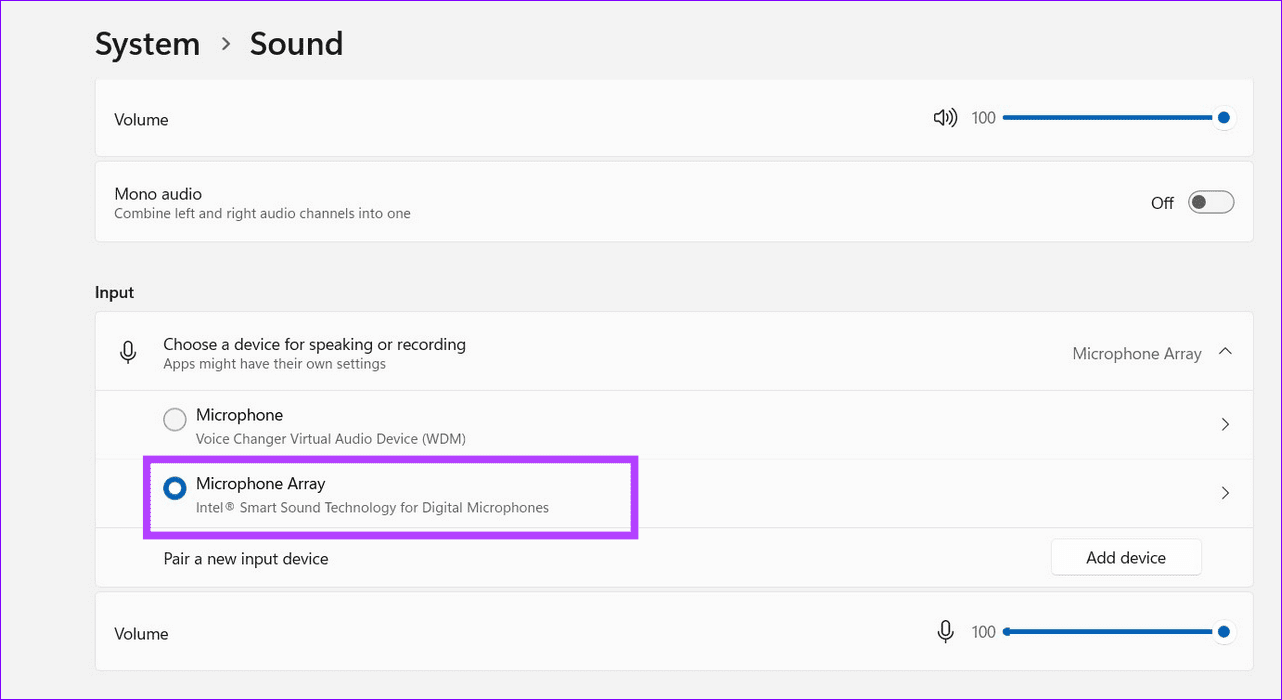
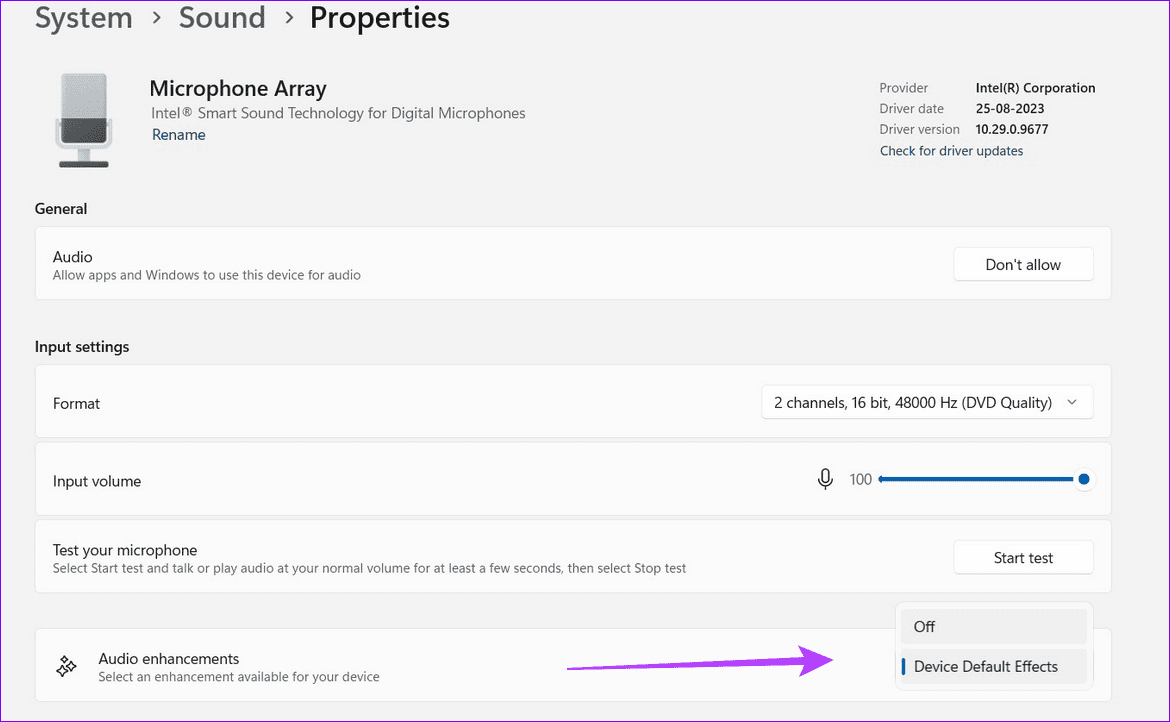
Step 1: Open Windows Settings, select System from the sidebar, and click Sound.
Step 2: Select the connected Microphone under Input.
Step 3: Scroll down, click the Audio enhancements drop-down menu, and set it to Off.
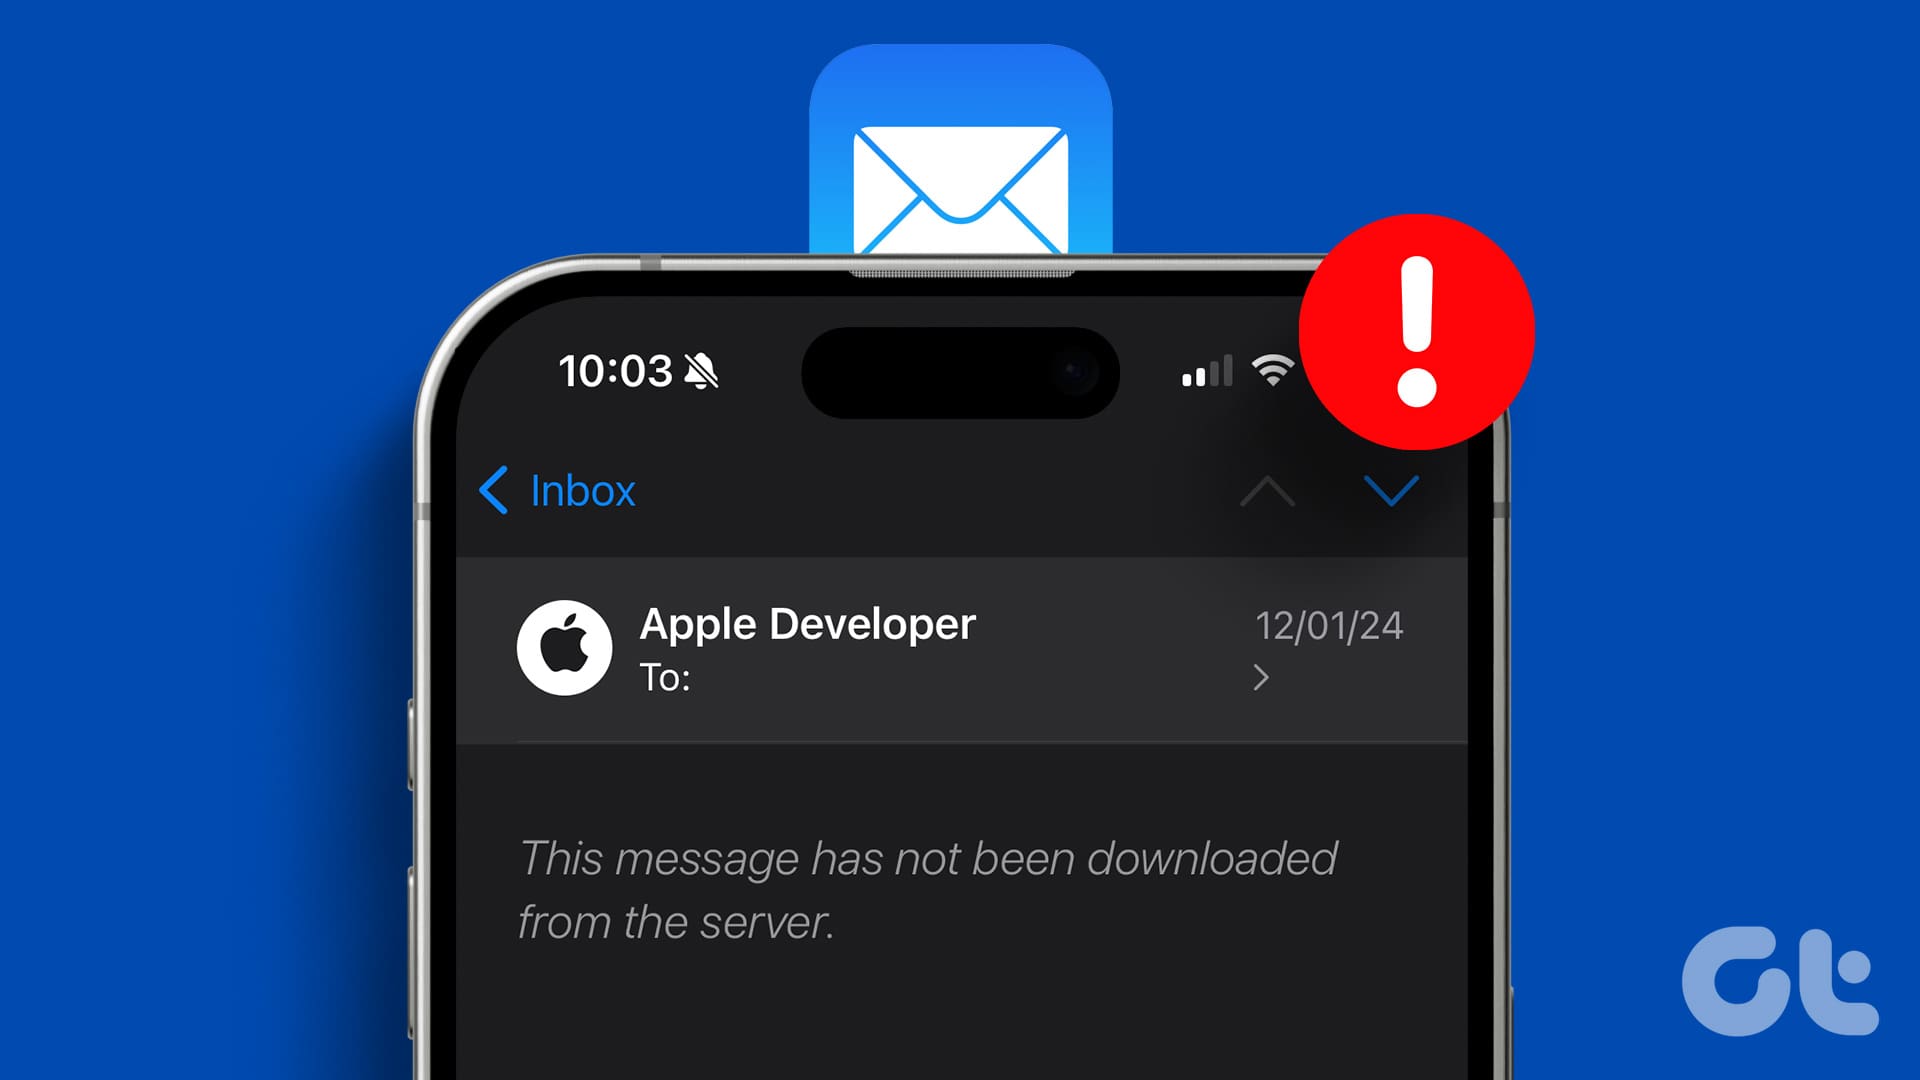
Free up storage space: A common reason the Mail app may not download emails is due to a lack of free storage space. To avoid this, ensure your iPhone has at least 2GB of free storage.
Install iOS updates: Apple regularly releases updates for all built-in apps on your iPhone, including the Mail app, through iOS updates. Since these updates often contain bug fixes and various improvements, it’s best to install them.
Fix 1: Configure the Mail App to Fetch Emails Automatically
You should configure the Fetch New Data setting for the Mail app to ensure it is not turned off. Here’s how to do it.
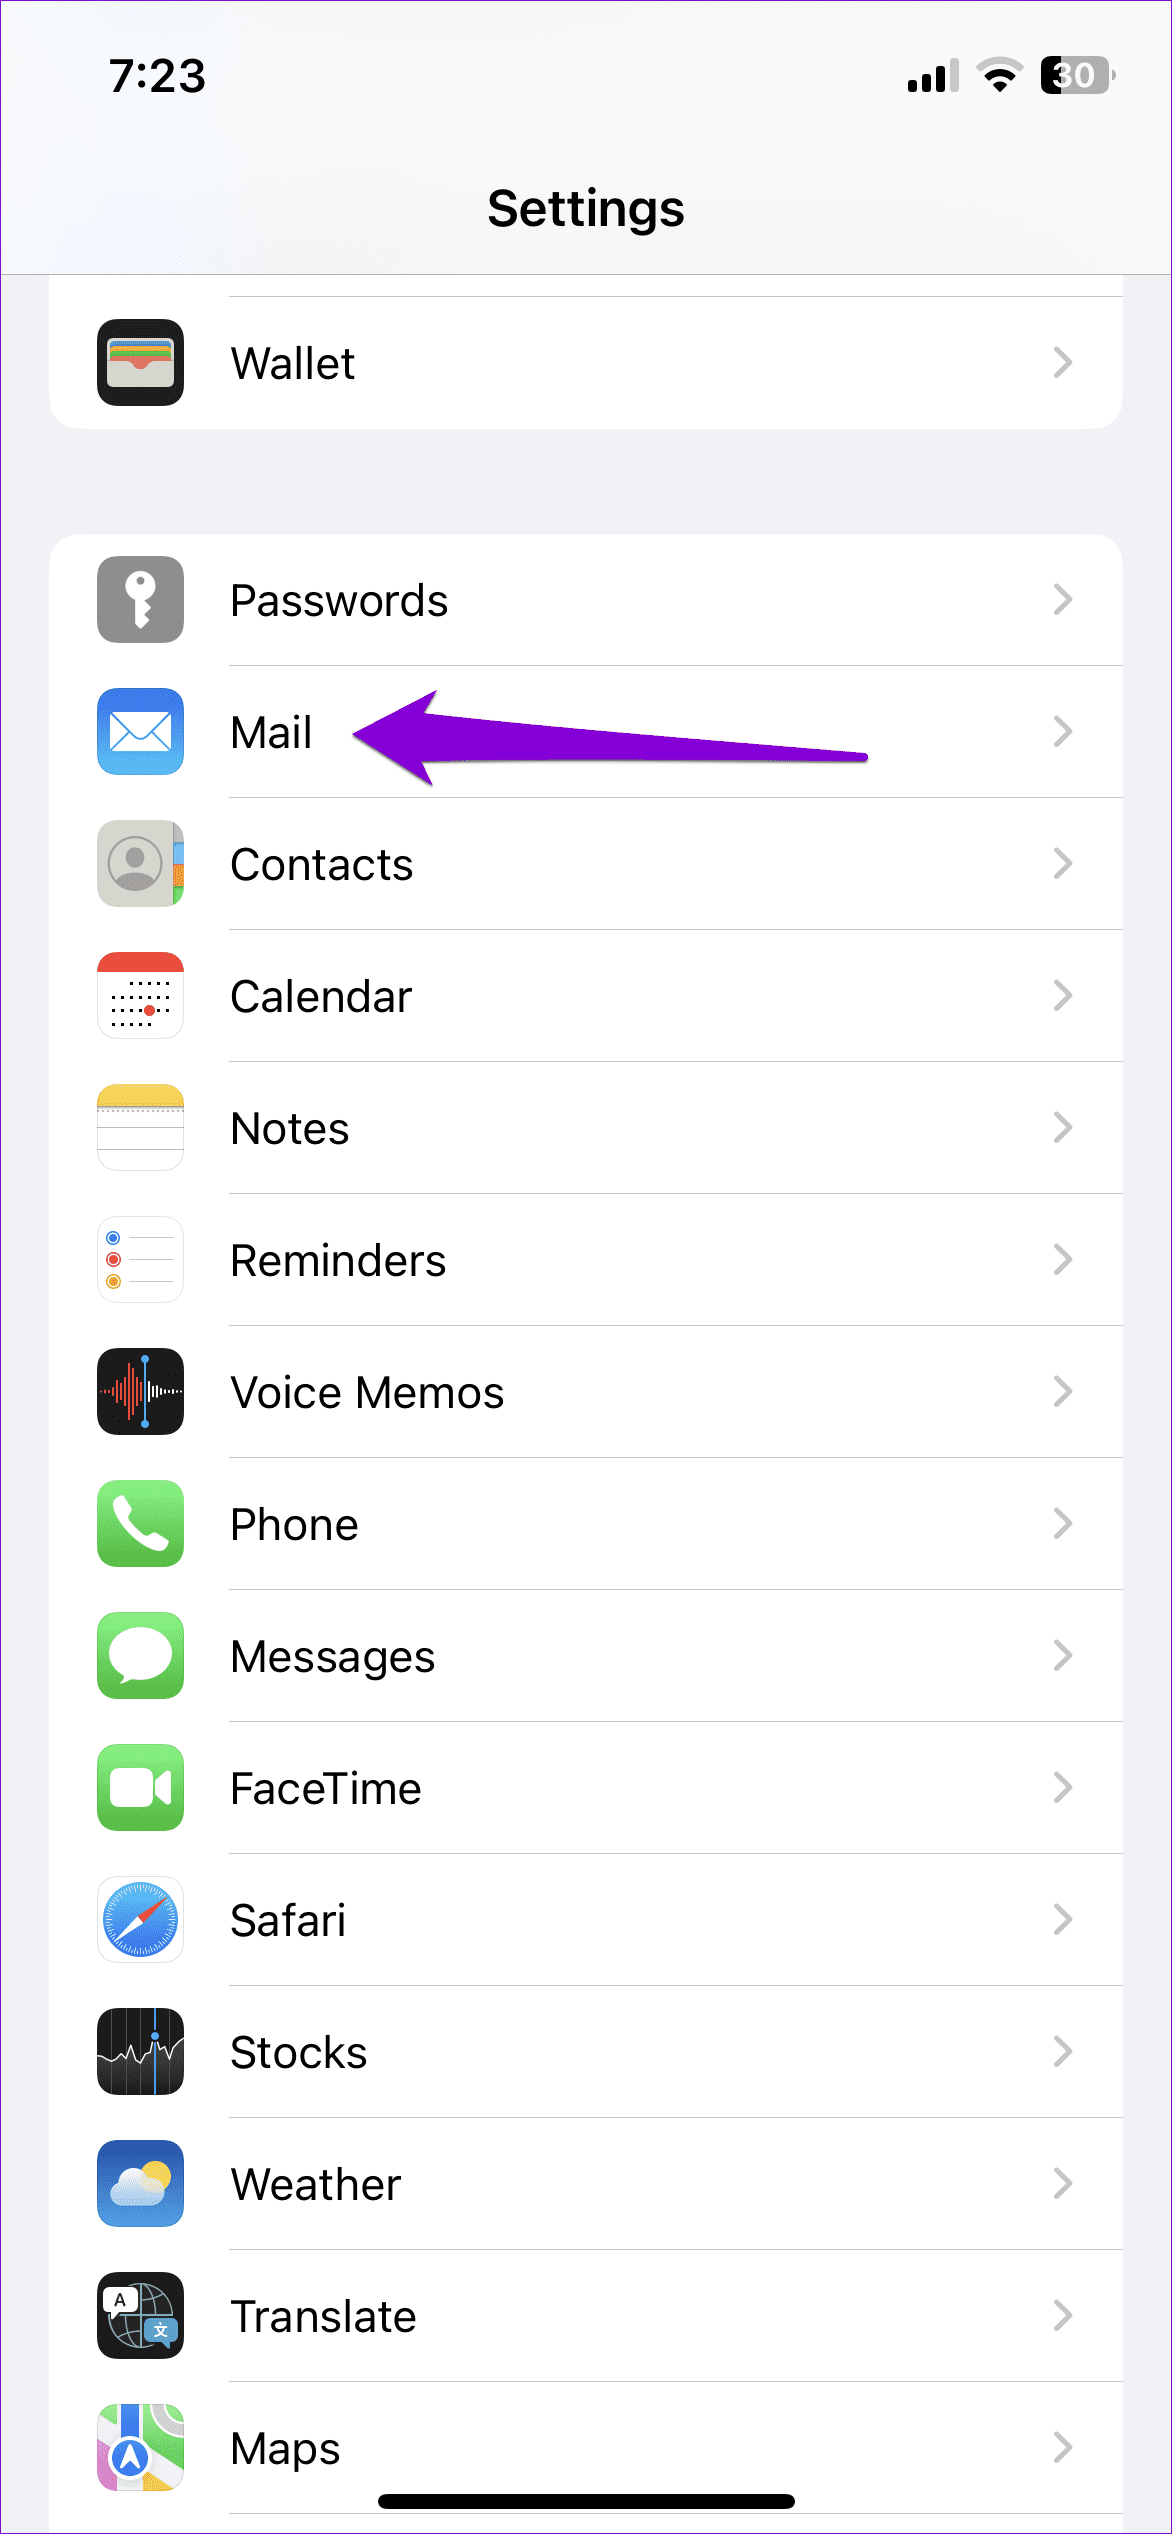
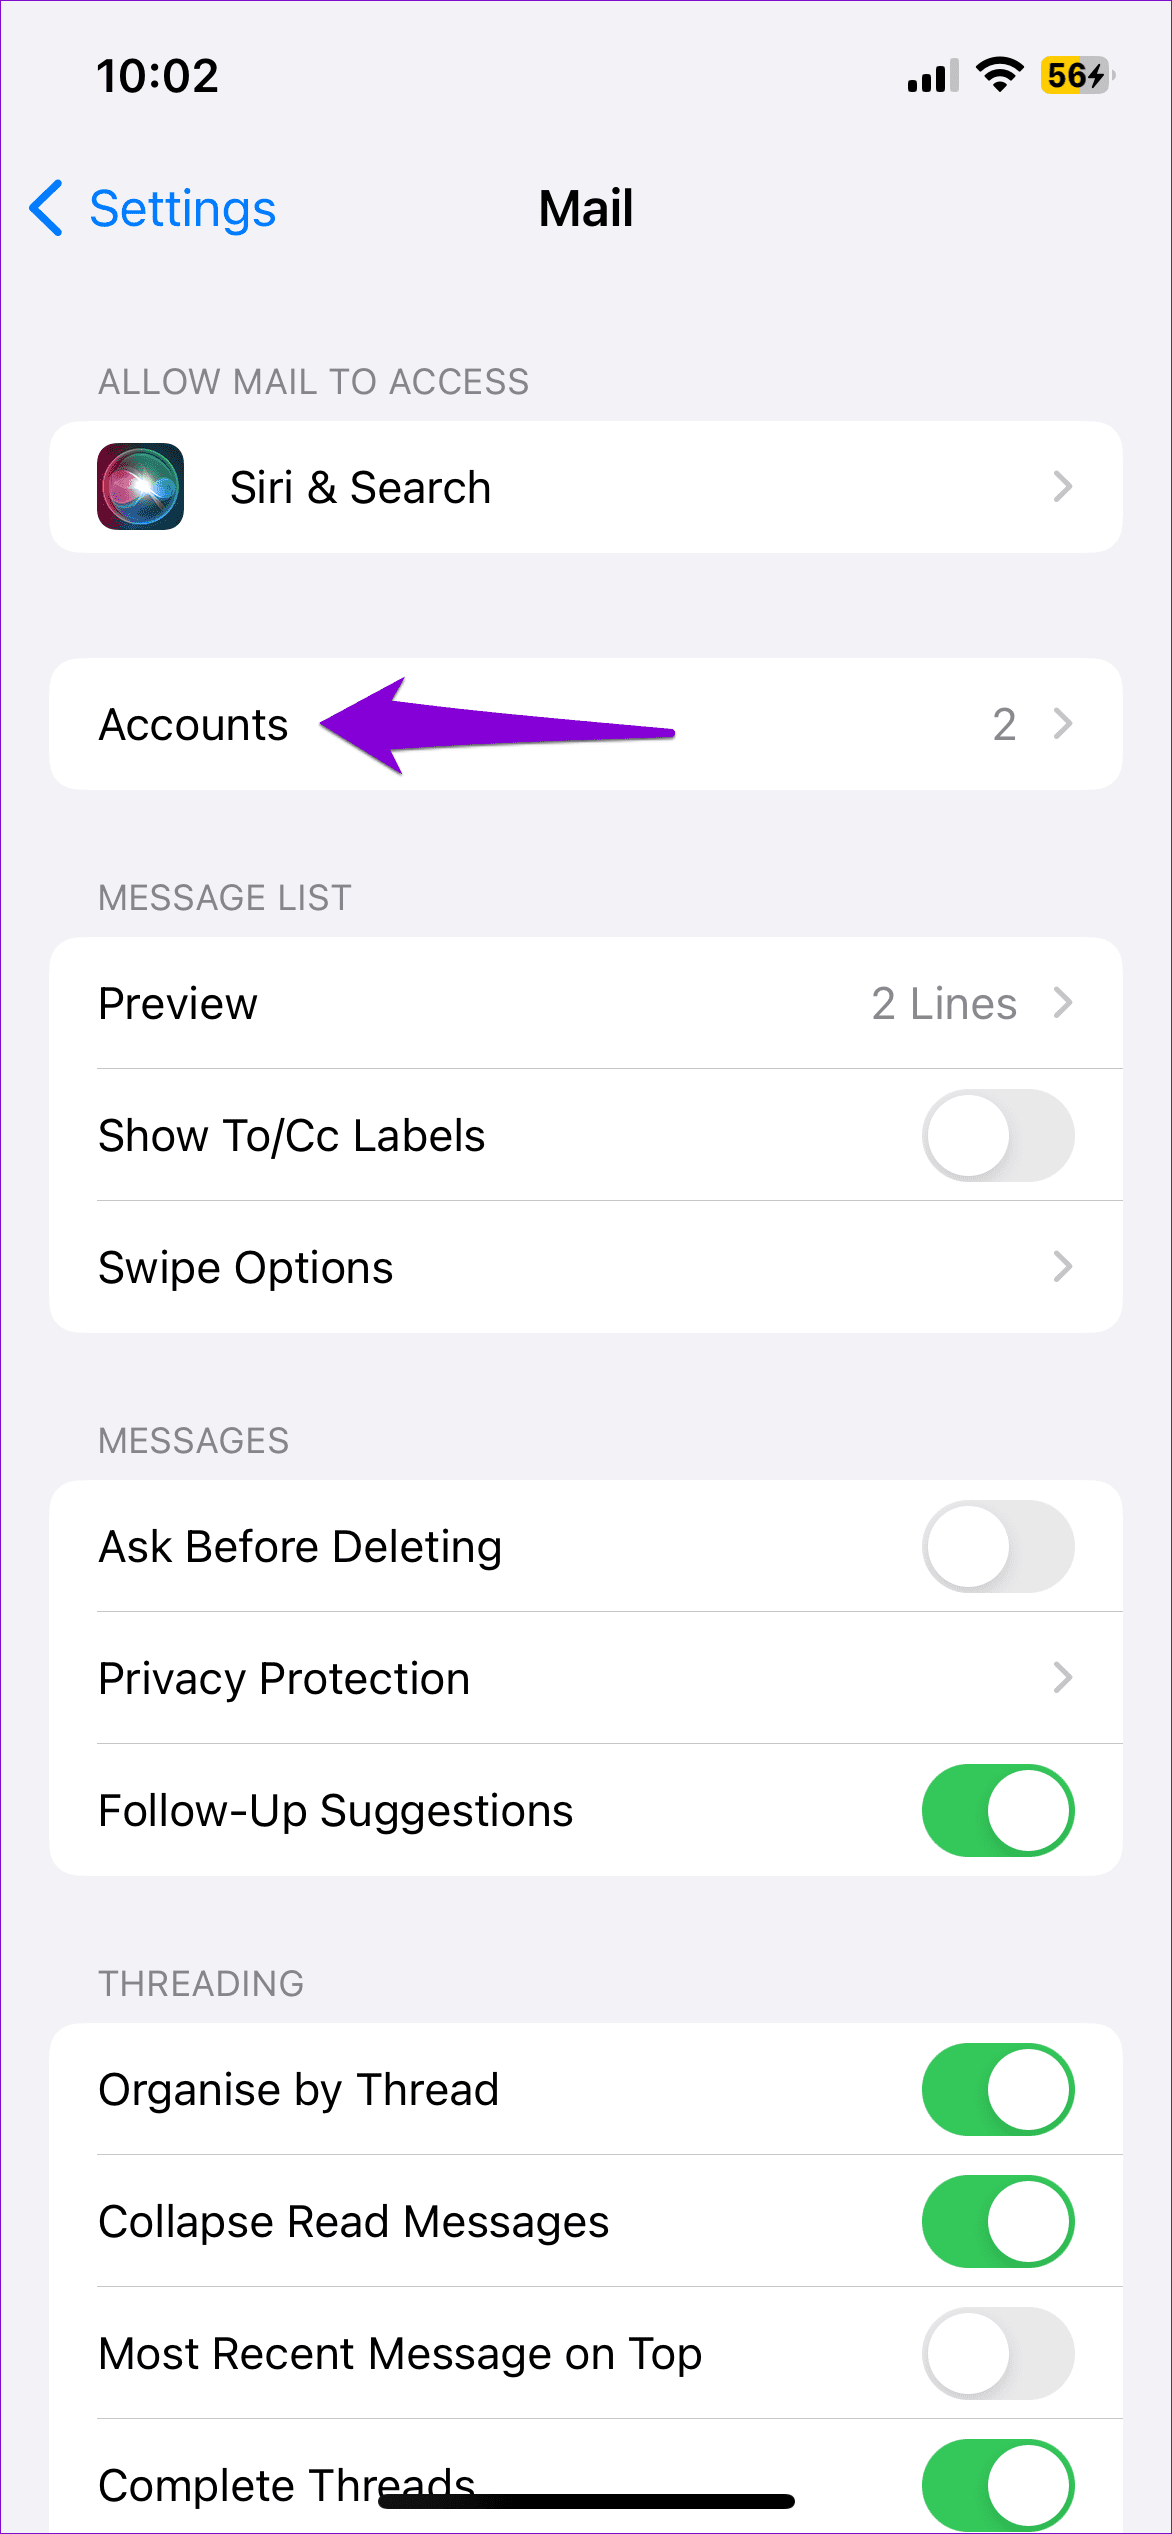
Step 1: Launch Settings on your iPhone > go to Mail > select Accounts.
Step 2: Tap the Fetch New Data option.
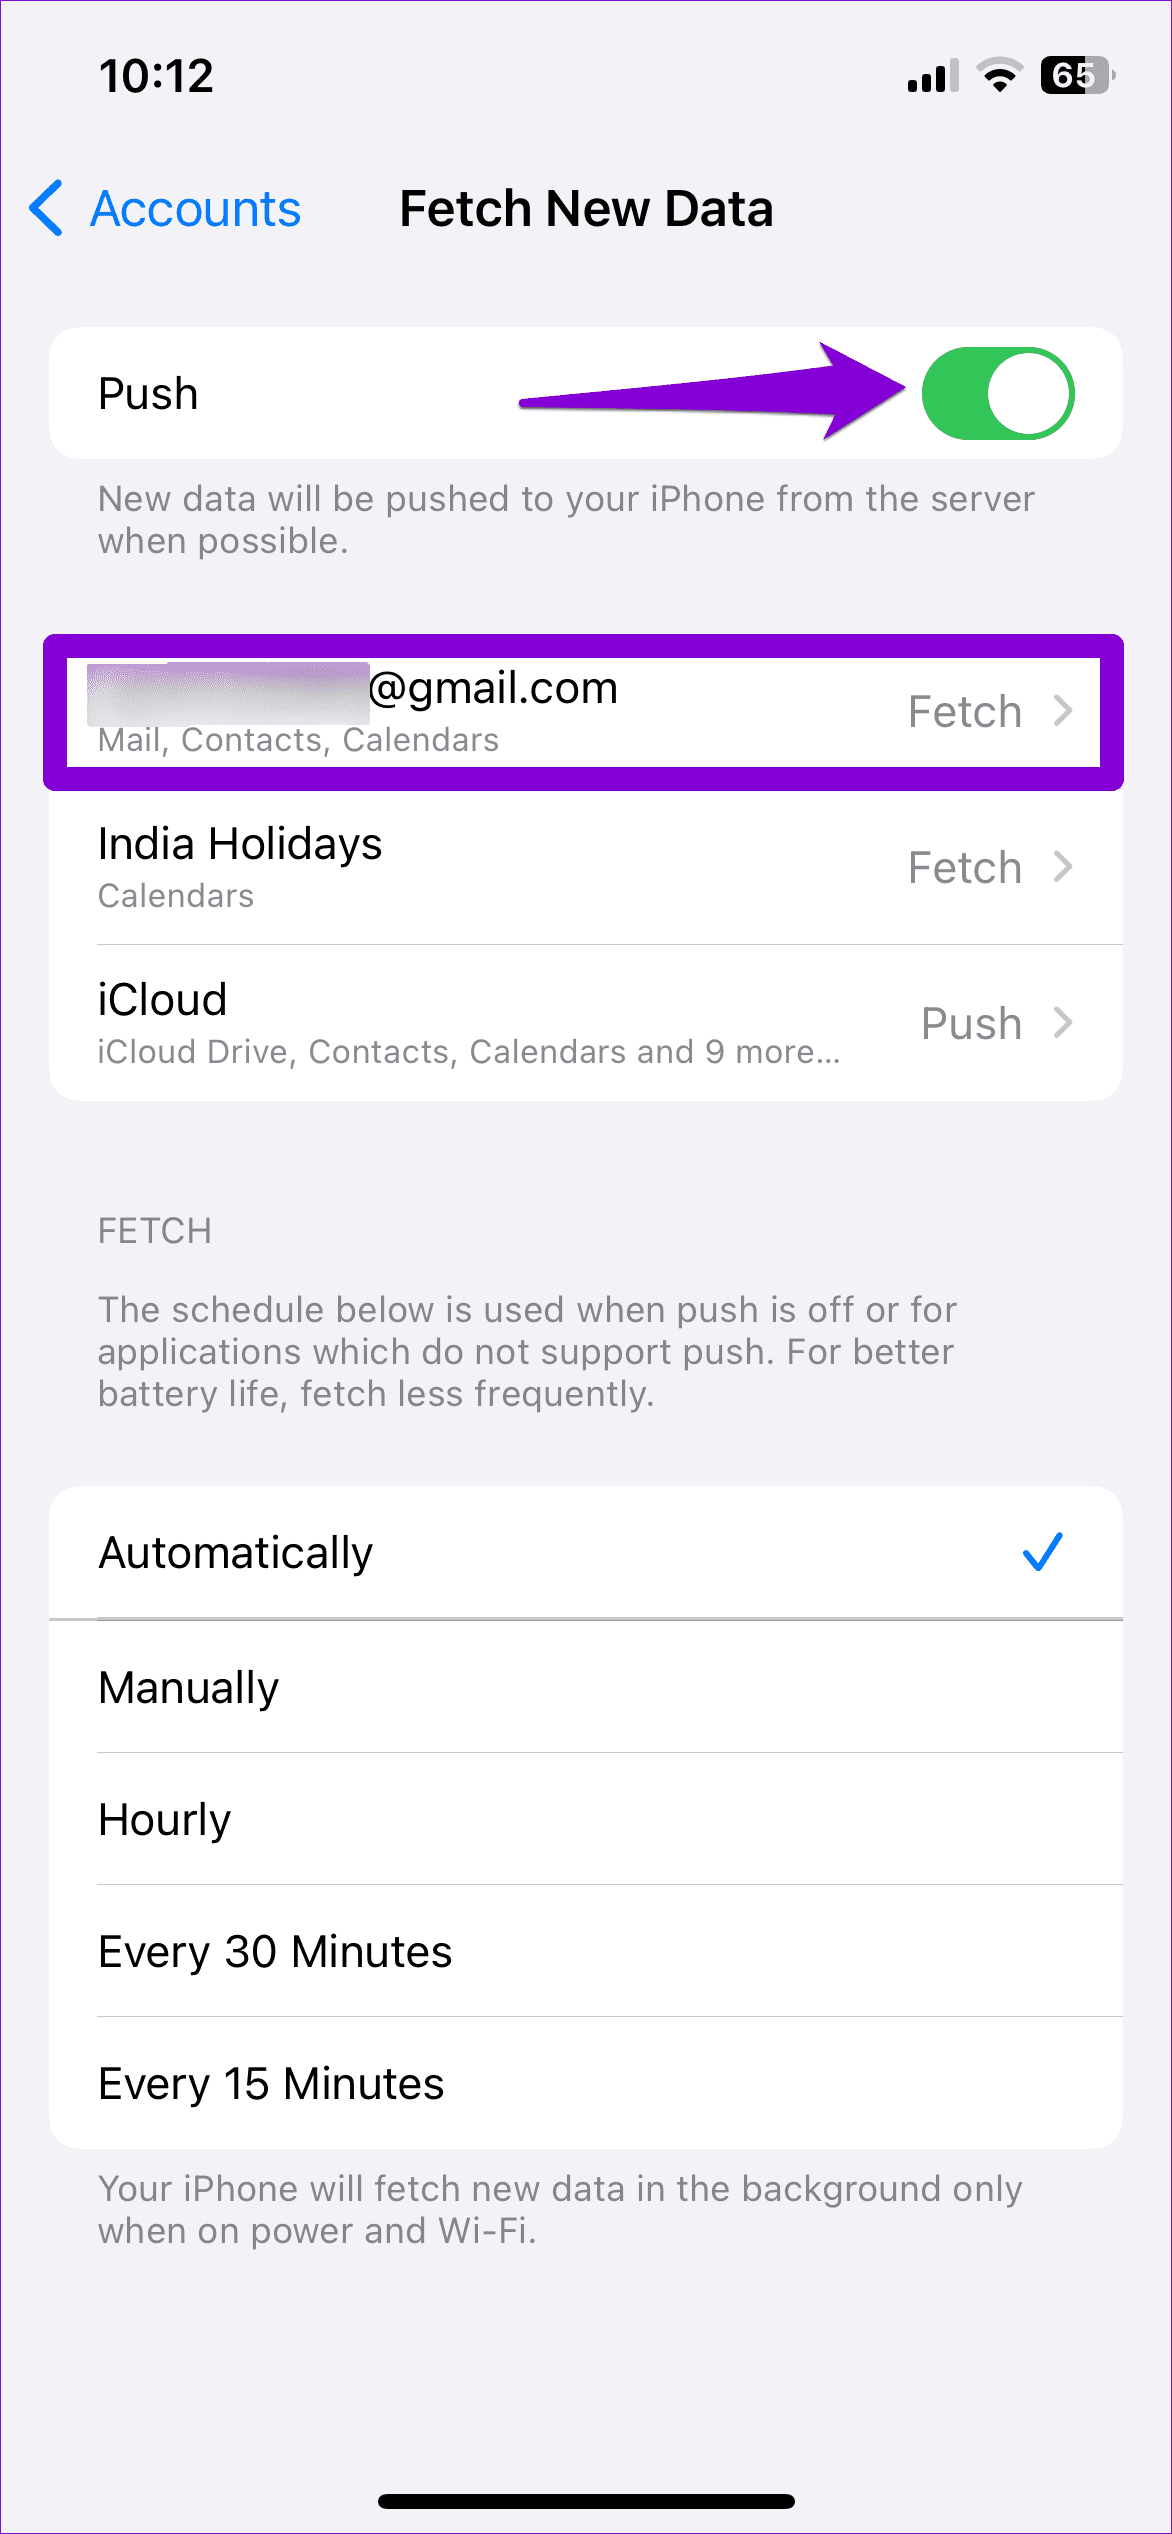
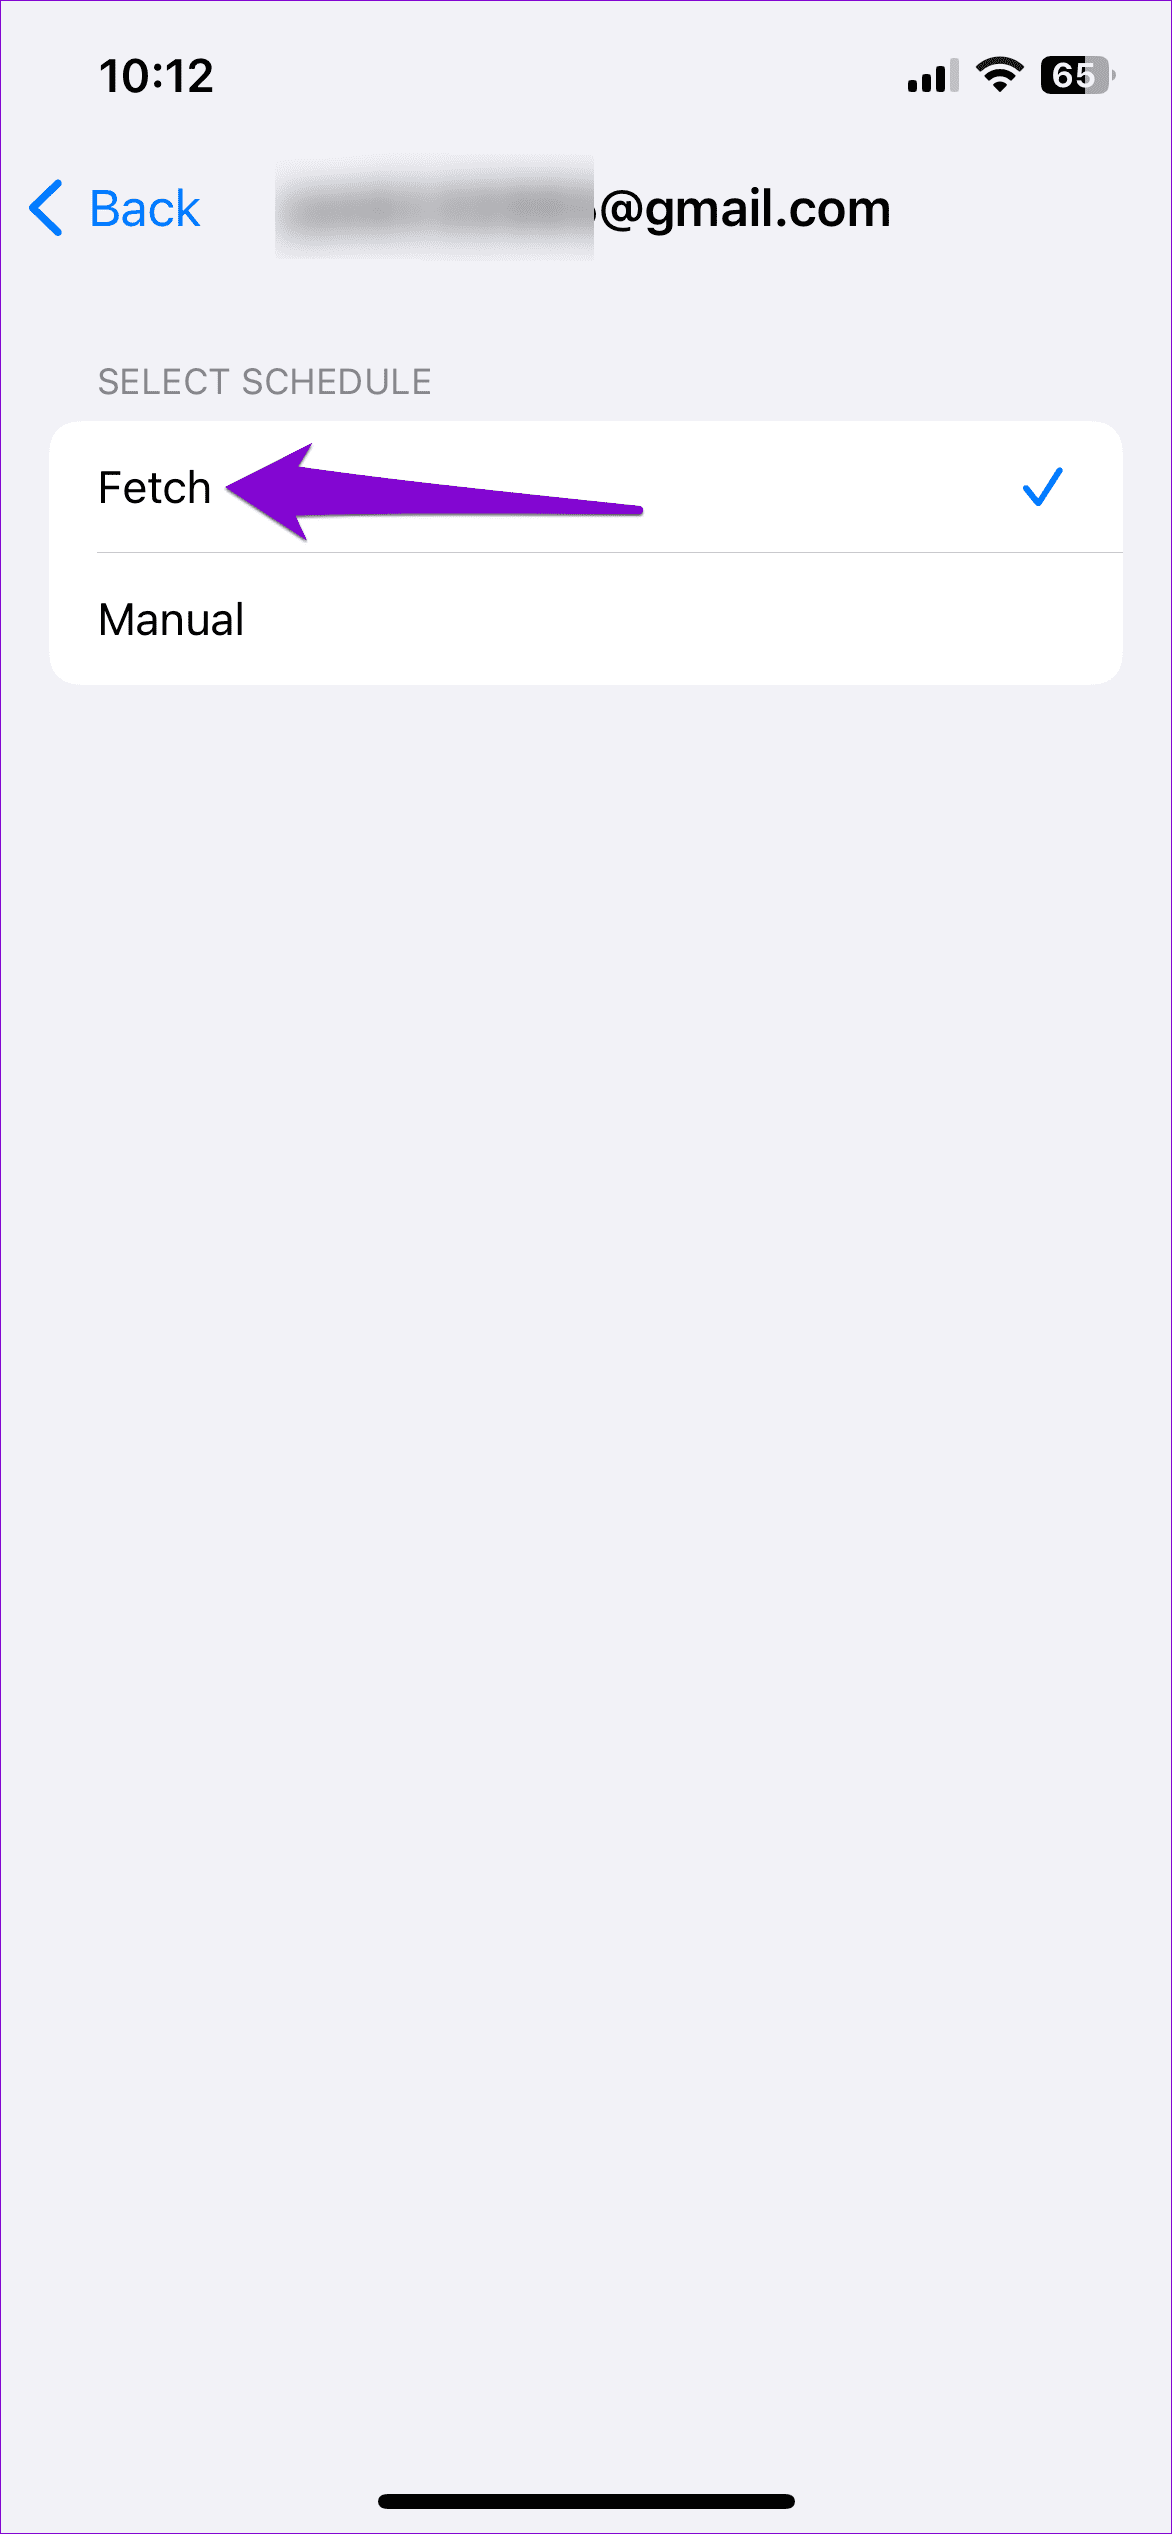
Step 3: Enable the toggle for Push. Tap your email account > select Fetch from the following menu.
Fix 2: Change Mail Preview Settings
If the Mail app still won’t load emails on your iPhone, try modifying message preview settings. You can increase the number of lines the Mail app shows for a message preview and see if that solves the problem.
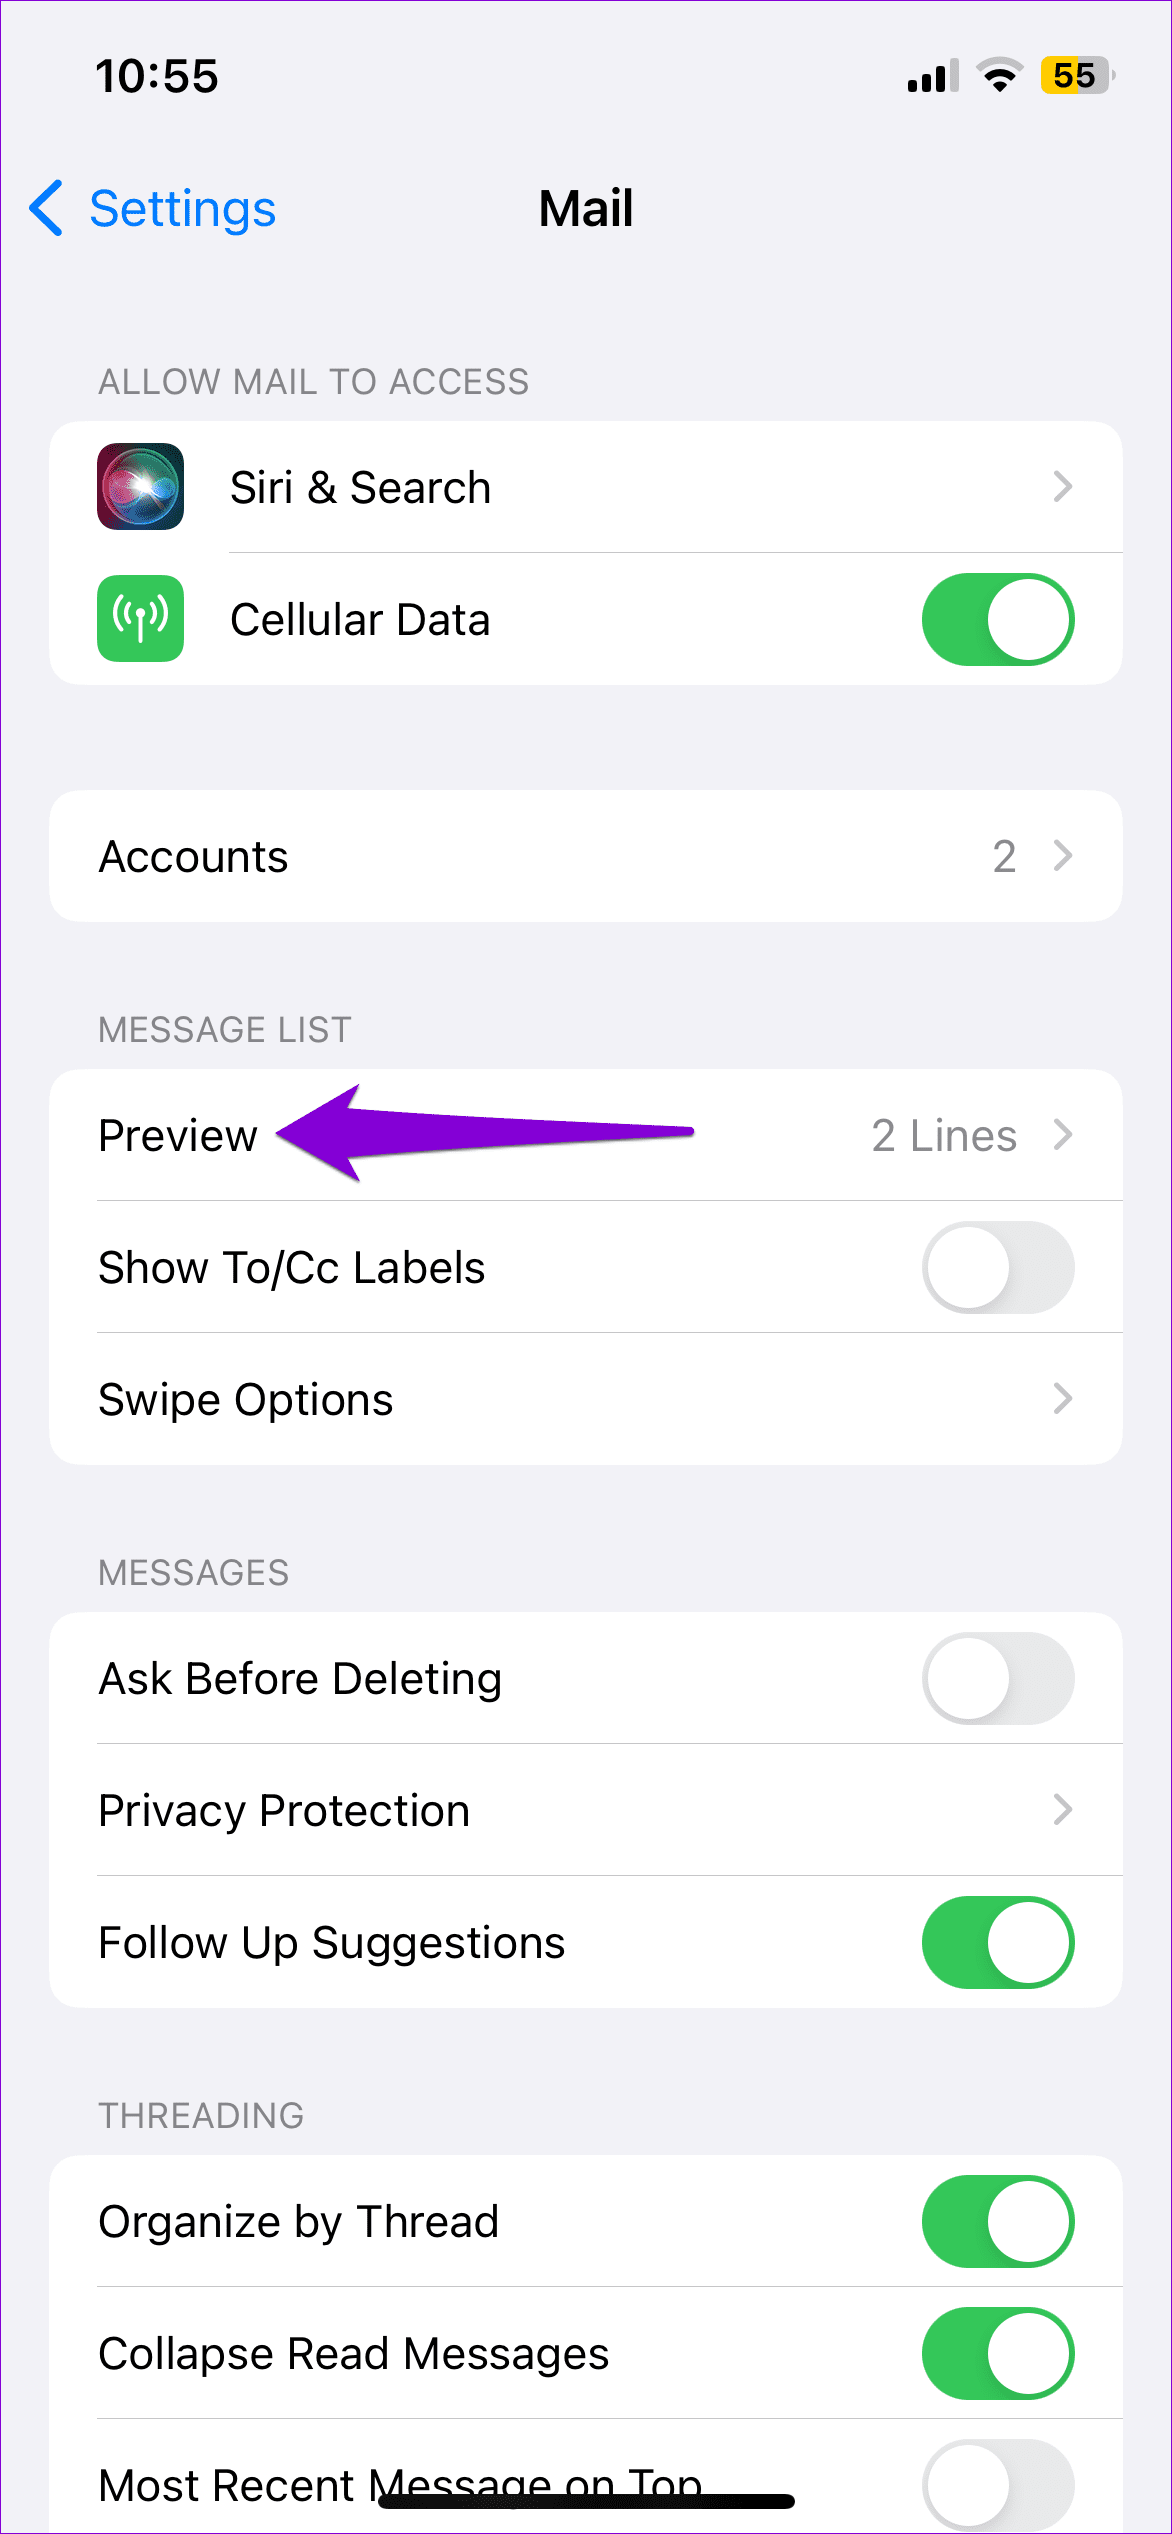
Step 1: Open Settings on your iPhone > scroll down to select Mail.
Step 2: Under Message List, tap Preview > select 5 Lines from the following menu.
Fix 3: Remove and Re-Add Your Account
Removing and re-adding your account in the Mail app can help fix any issues caused by misconfigured settings. You can try doing this to see if it fixes the “This message has not been downloaded from the server” error on your iPhone.
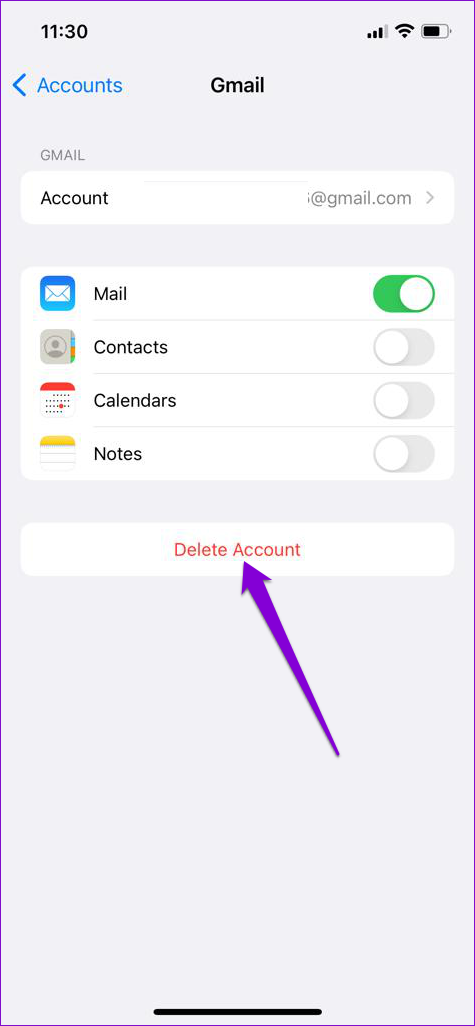
Step 1: Open Settings > navigate to Mail > Accounts. Then, select the problematic account from the list.
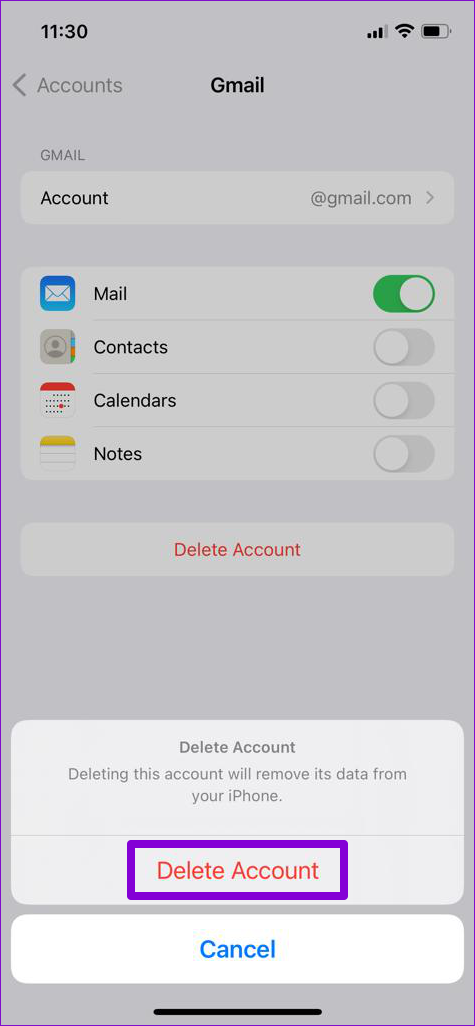
Step 2: Tap Delete Account > select Delete Account again to confirm.
Step 3: Return to the Accounts page > tap the Add Account option > sign back into your account.
Fix 4: Reset Network Settings
Misconfigured network settings can also trigger the “This message has not been downloaded from the server” error. Instead of verifying each network setting individually, it’s easier to reset them all and start over.
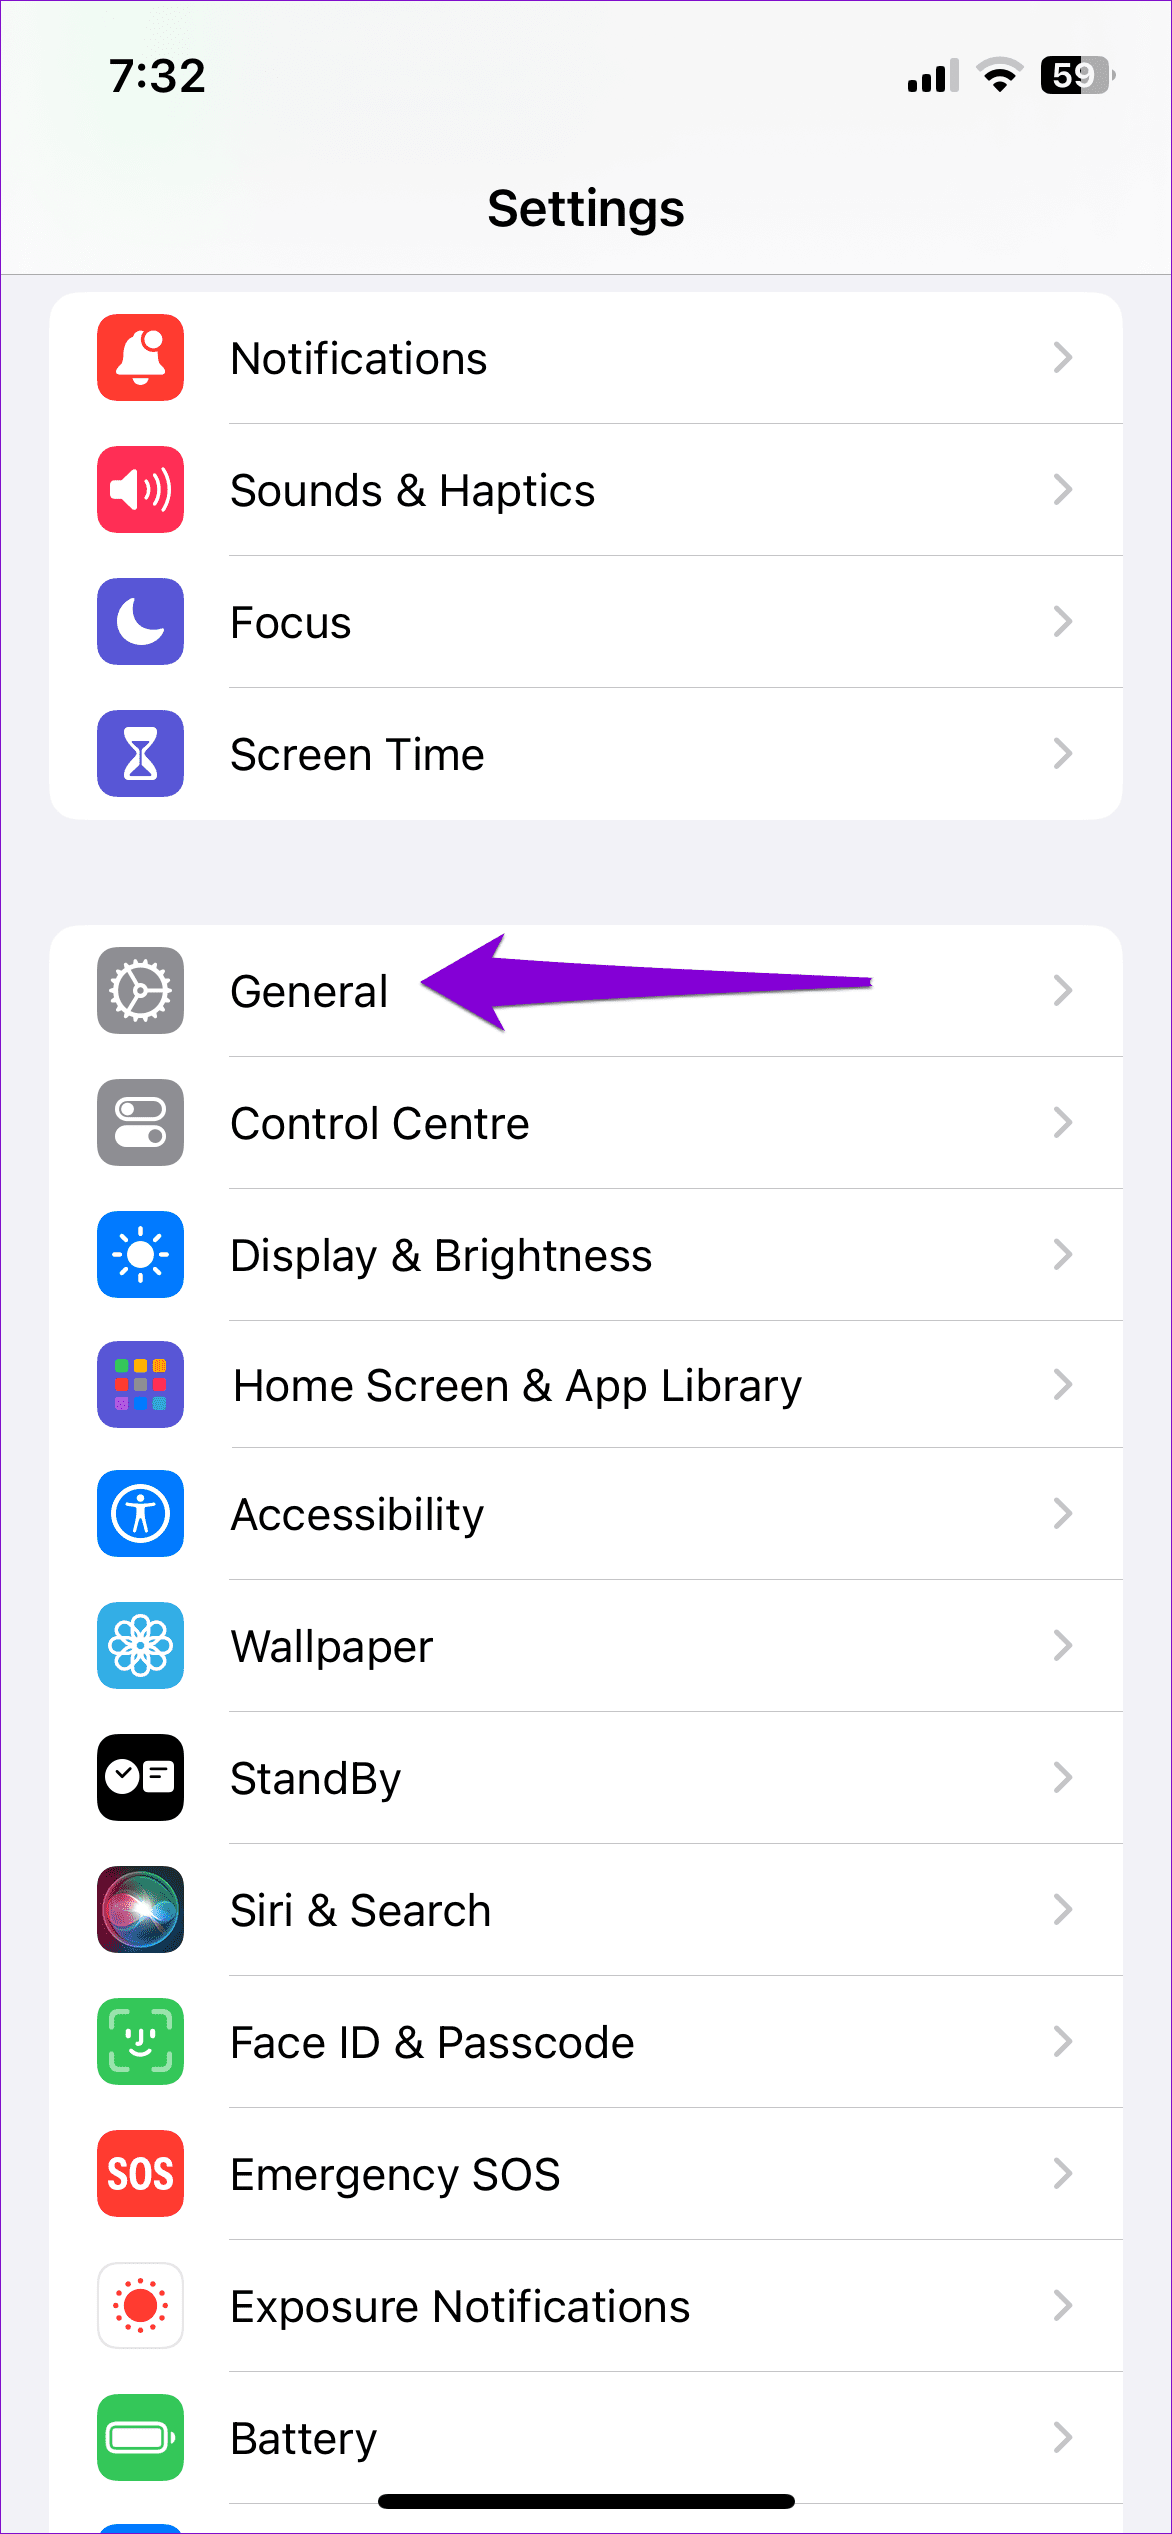
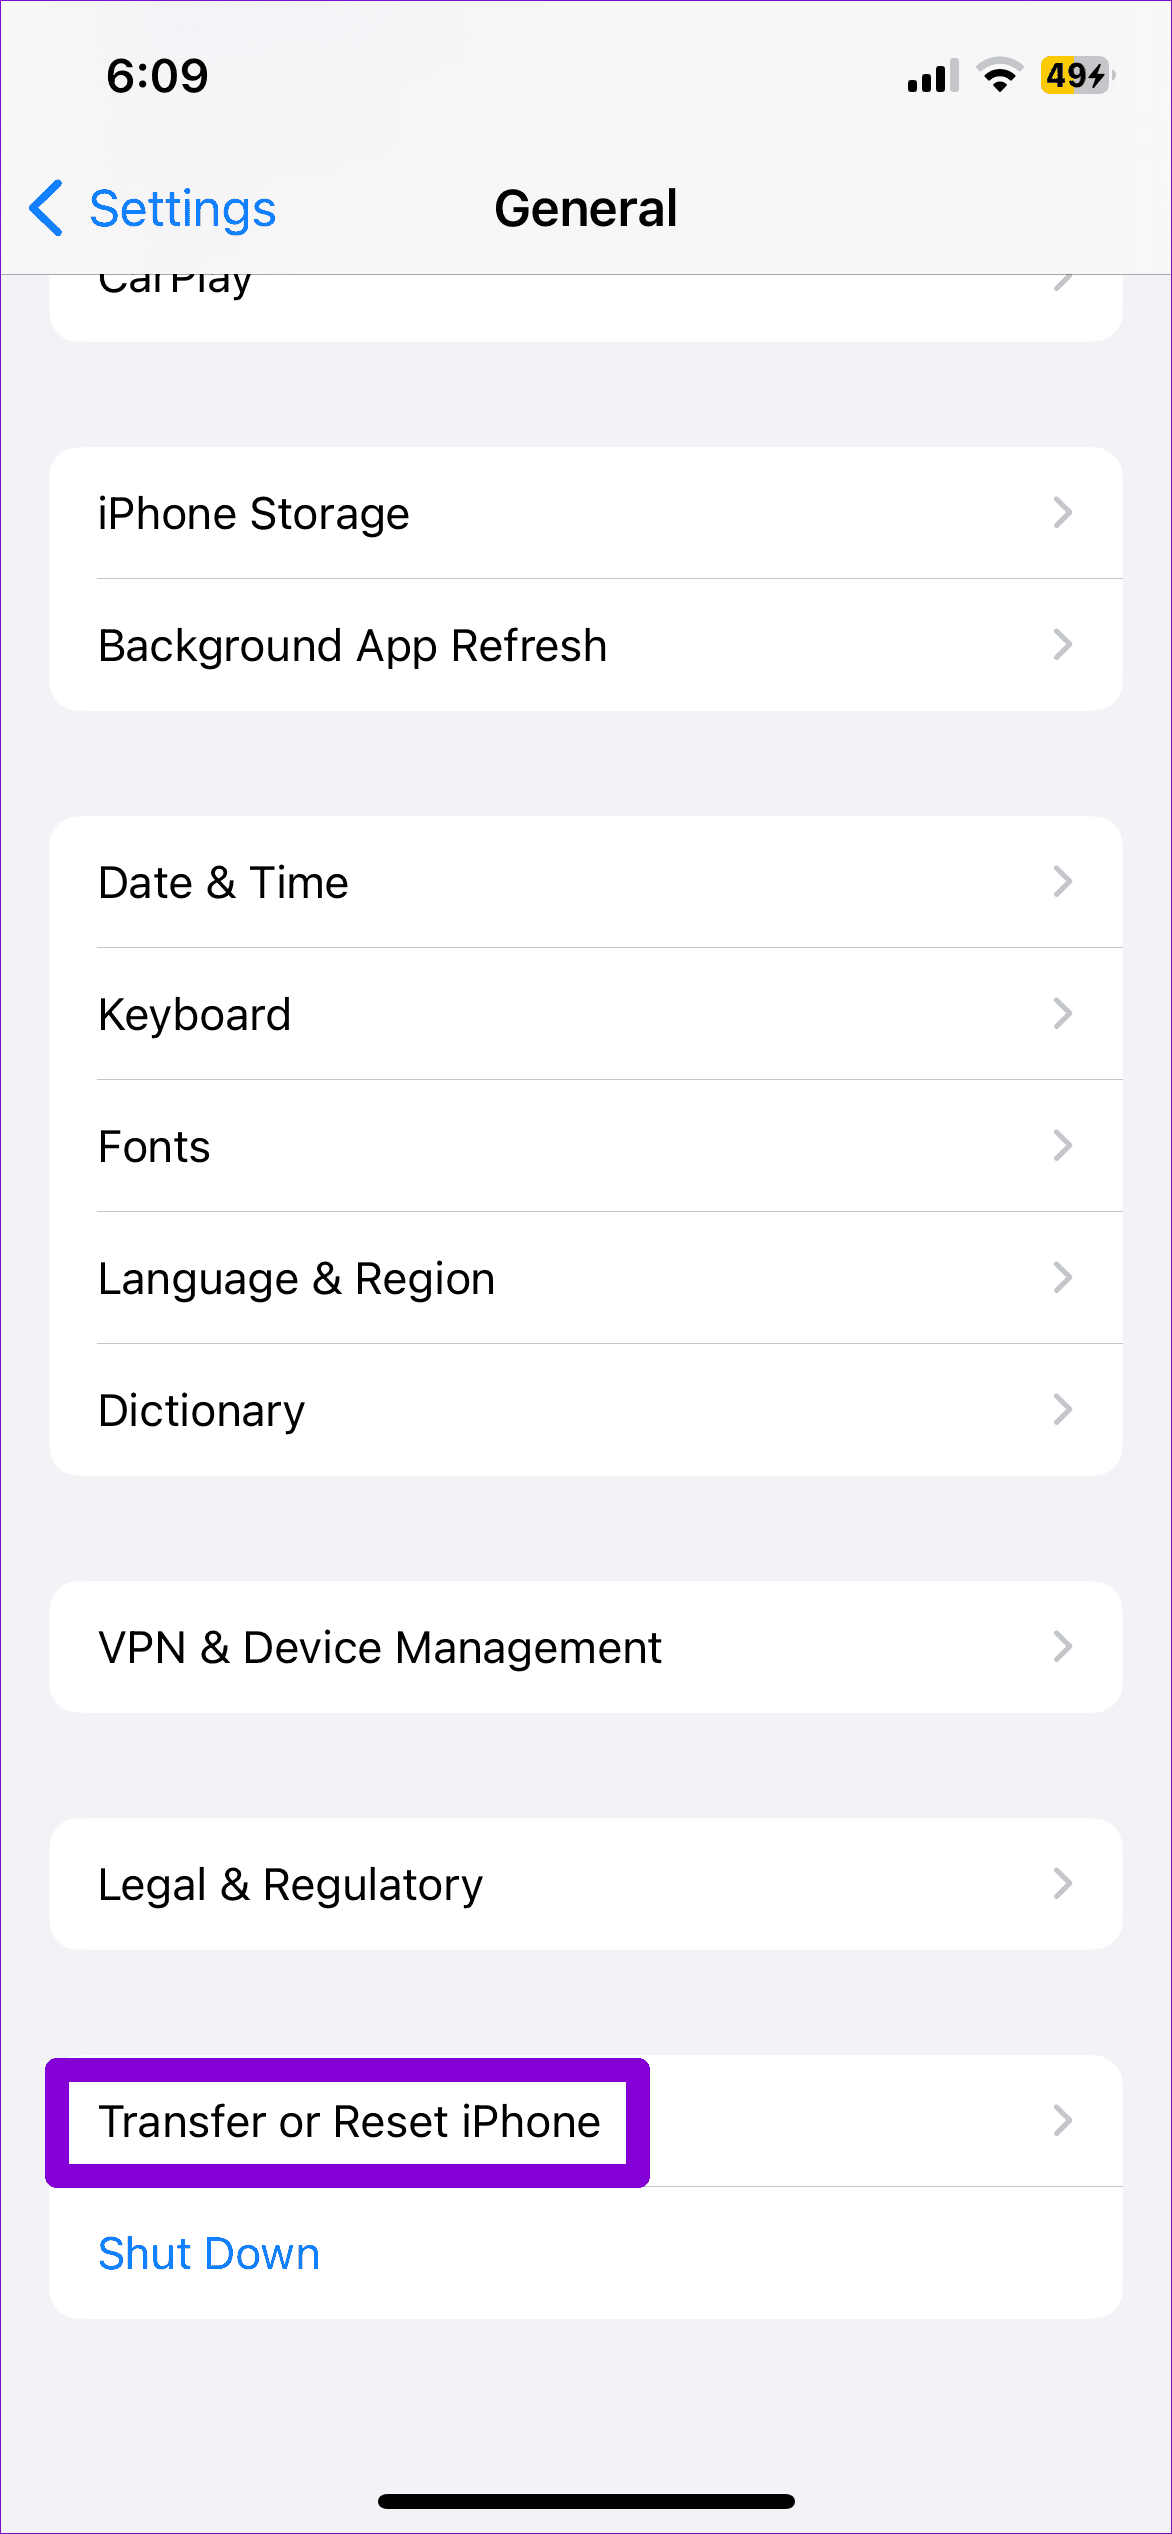
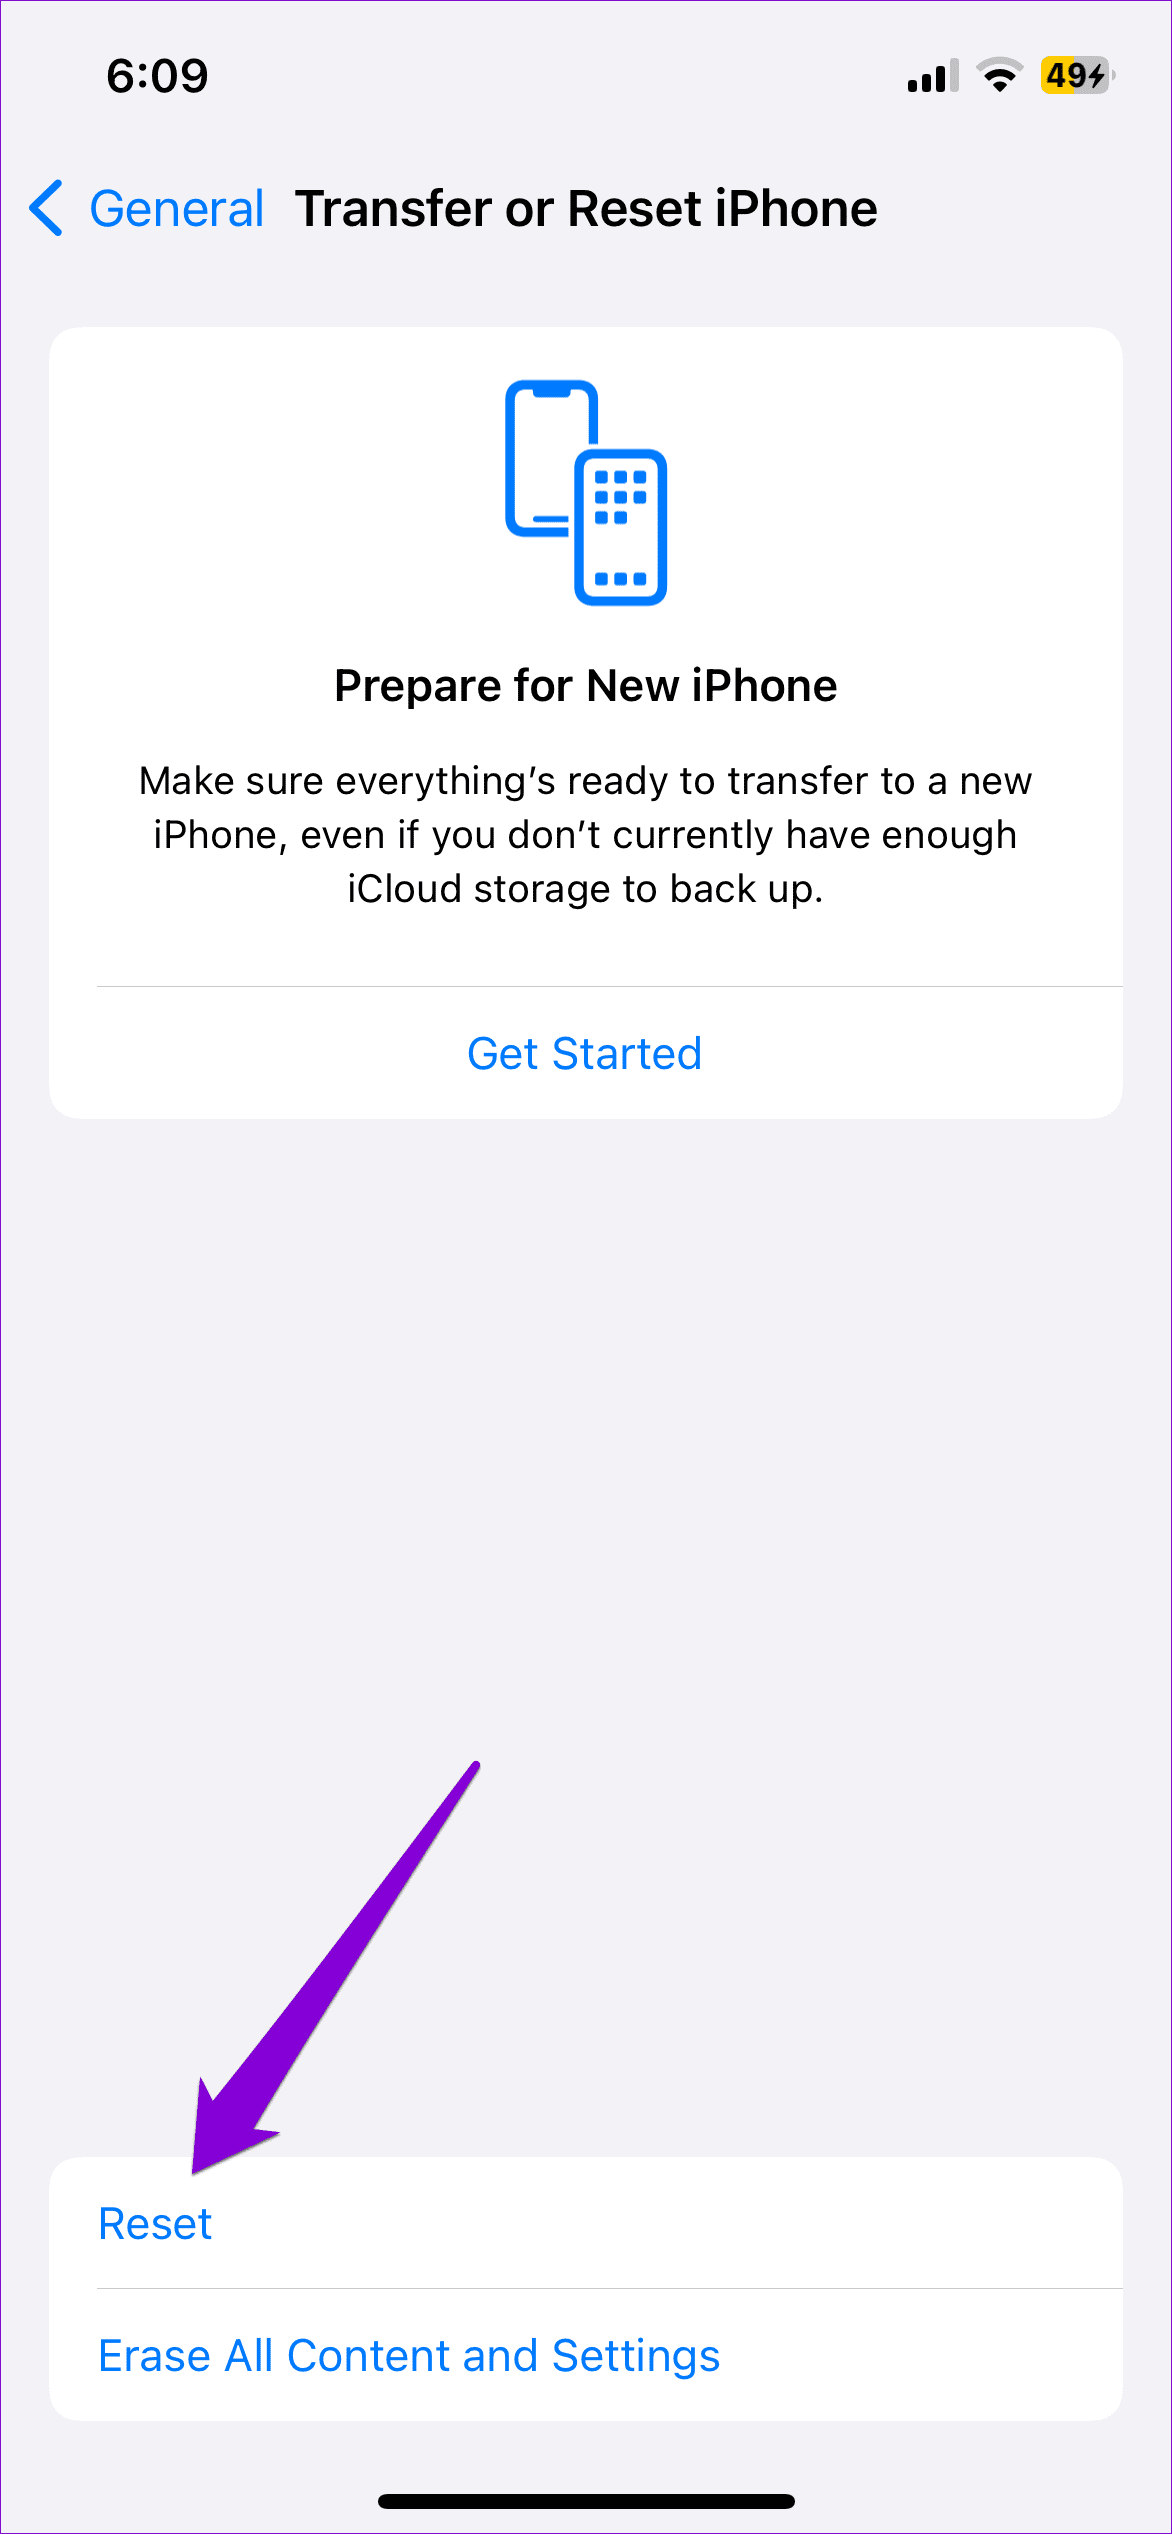
Step 1: Open Settings > tap General > select Transfer or Reset iPhone.
Step 2: Tap the Reset option at the bottom and choose Reset Network Settings.
After resetting the network settings on your iPhone, try loading the Mail app one more time. If not, your only option is to reset your iPhone.