Helping millions of people navigate the world of technology.

How to Add Amazon App Store on Windows 11

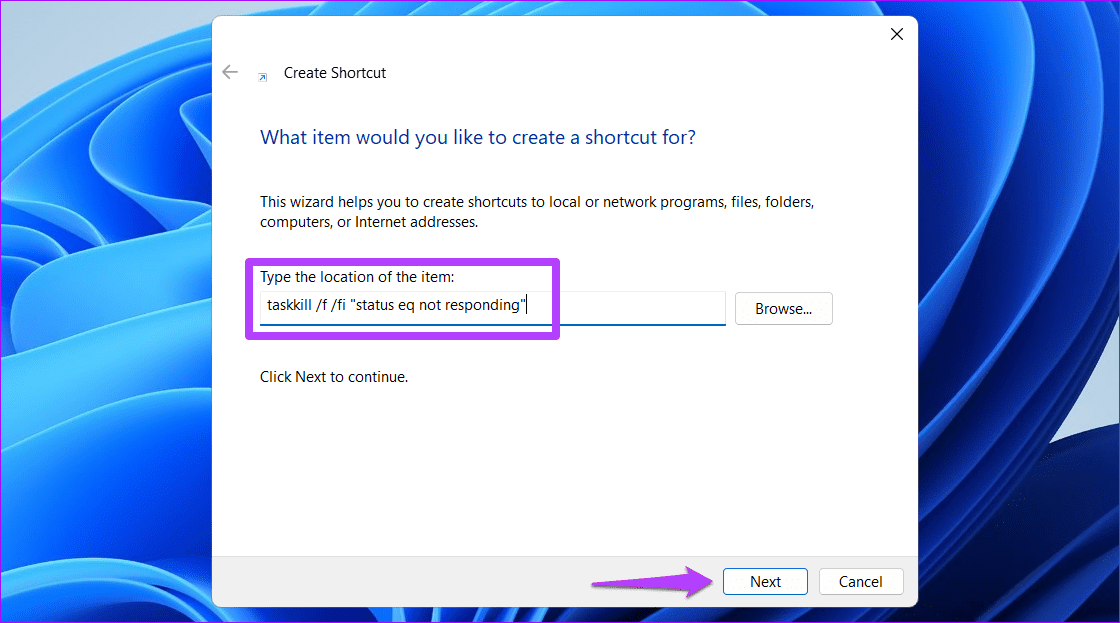
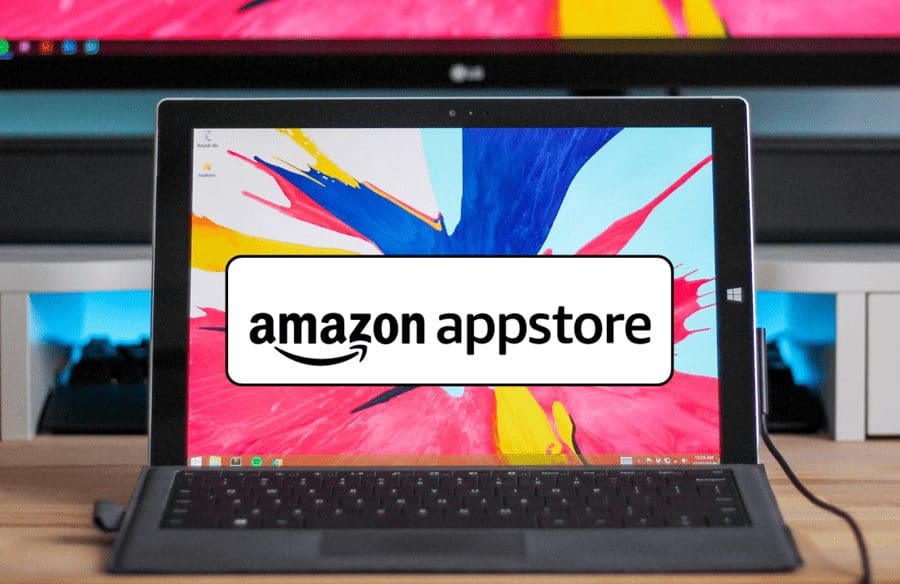
Windows 11 lets you add your favorite apps to the Taskbar, customize the Start Menu, and add the Amazon App Store. Apart from many changes, the latter lets you run Android apps on your desktop or laptop running Windows 11.

How to Add Amazon App Store on Windows 11

However, adding the Amazon App Store and (subsequently running Android apps) is not a straightforward process.

There are a couple of changes that you’d need to make them work. Once that’s done, you will be able to add the store to your Windows 11 system with ease. Thankfully, it’s a one-time process and doesn’t take much time.

This post will outline how to add Amazon App Store on Windows 11.

System Requirements

One of the main reasons for adding the Amazon App Store is to run Android apps. To do so, your PC must meet some requirements as follows.

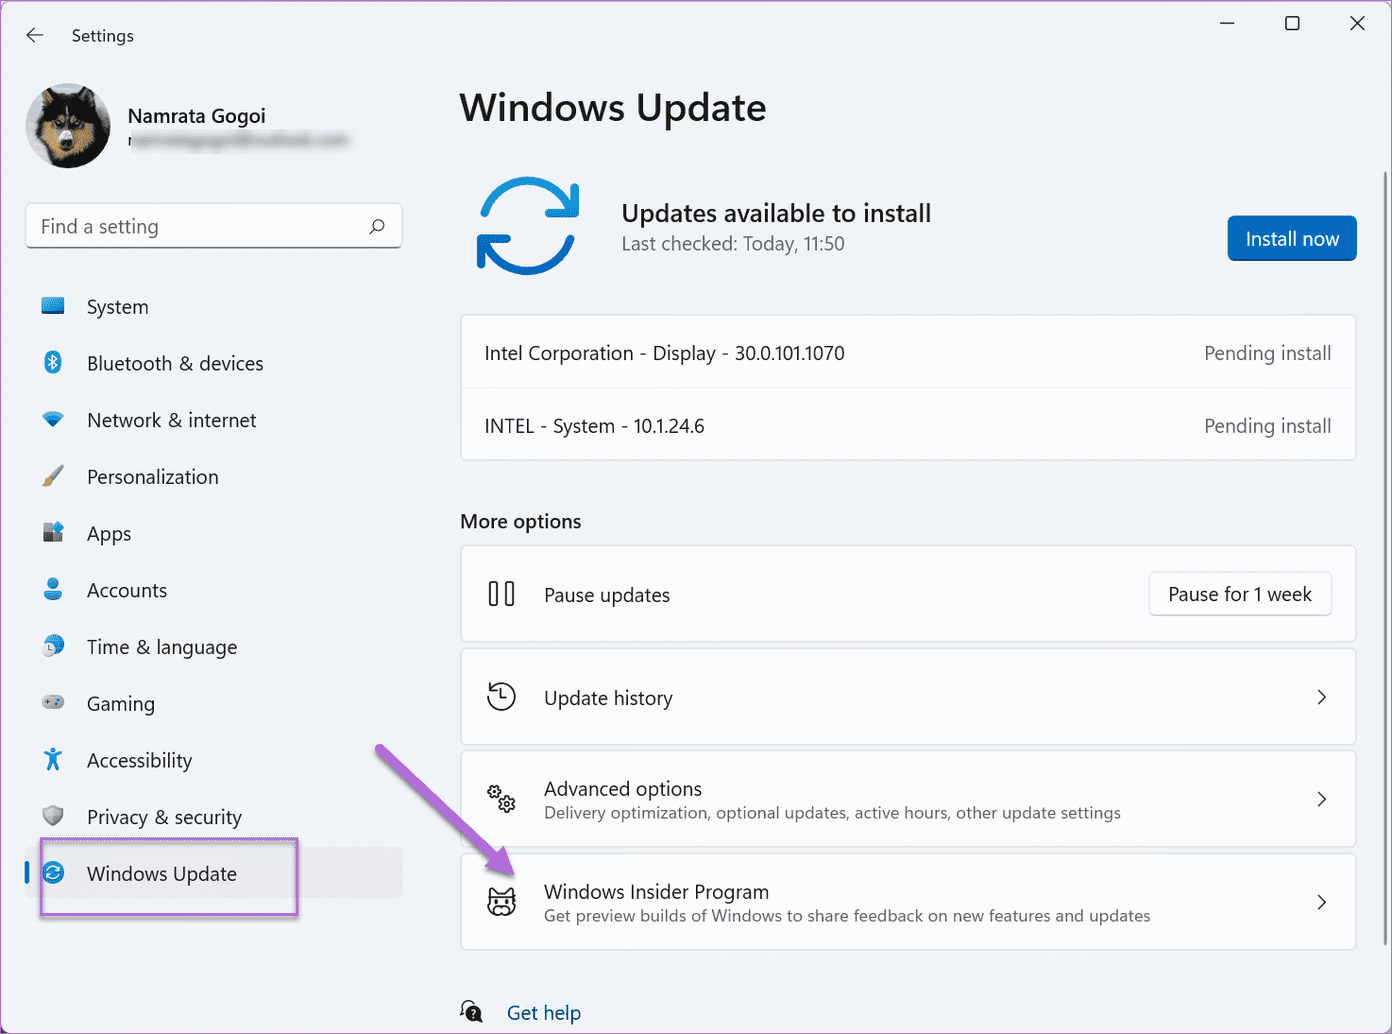
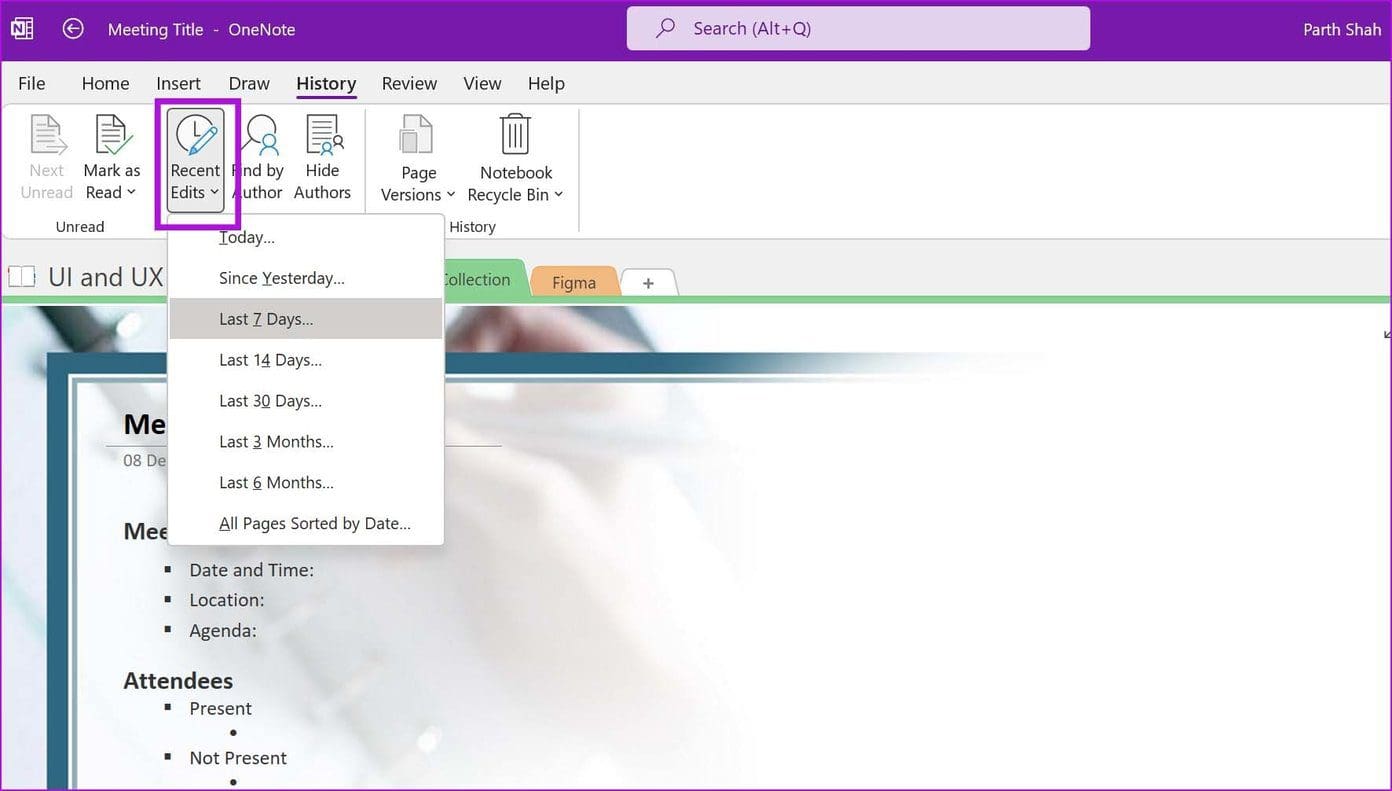
1. Windows Version: You’ll need to enroll your Microsoft account with the Windows Insider and the Beta channel. For those unaware, the Beta Channel brings more polished Windows features that are ready for the public release.

If you have not enrolled before, follow the steps below to do so,

Step 1: Press Windows key+i to open the Settings and select Windows Update from the left panel. To link your account, tap on the Windows Insider Program, and the system will guide you through the next steps.

2021 12 15 16 01 51

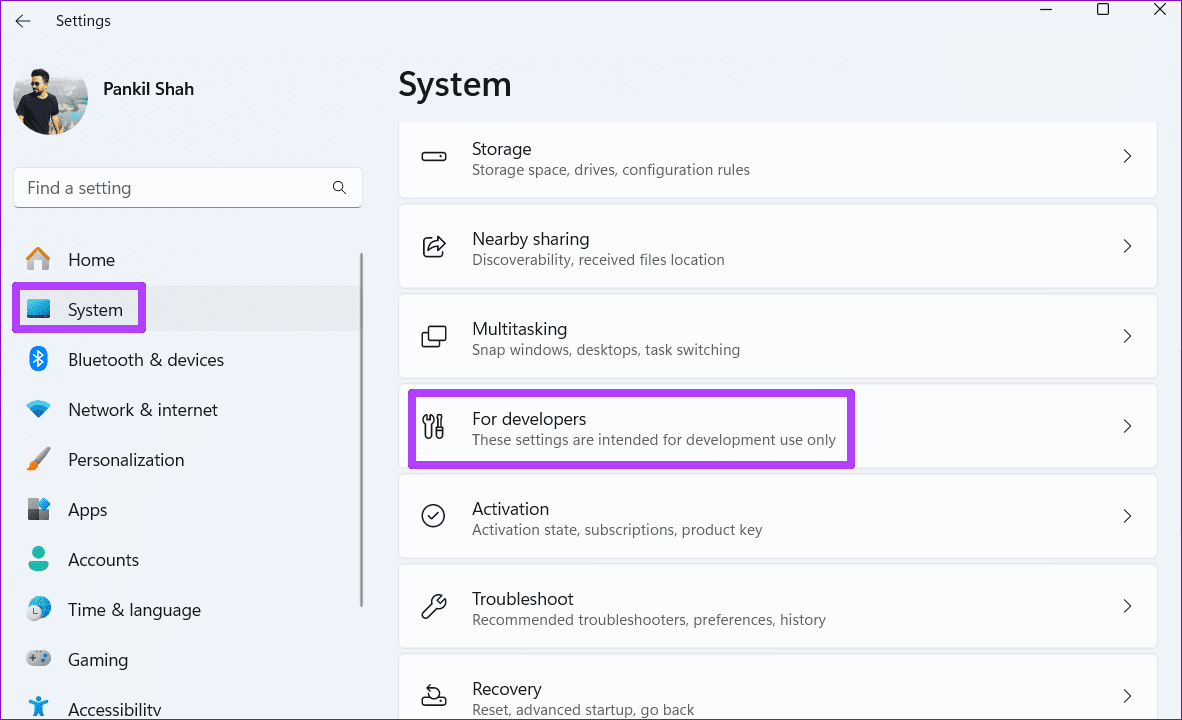
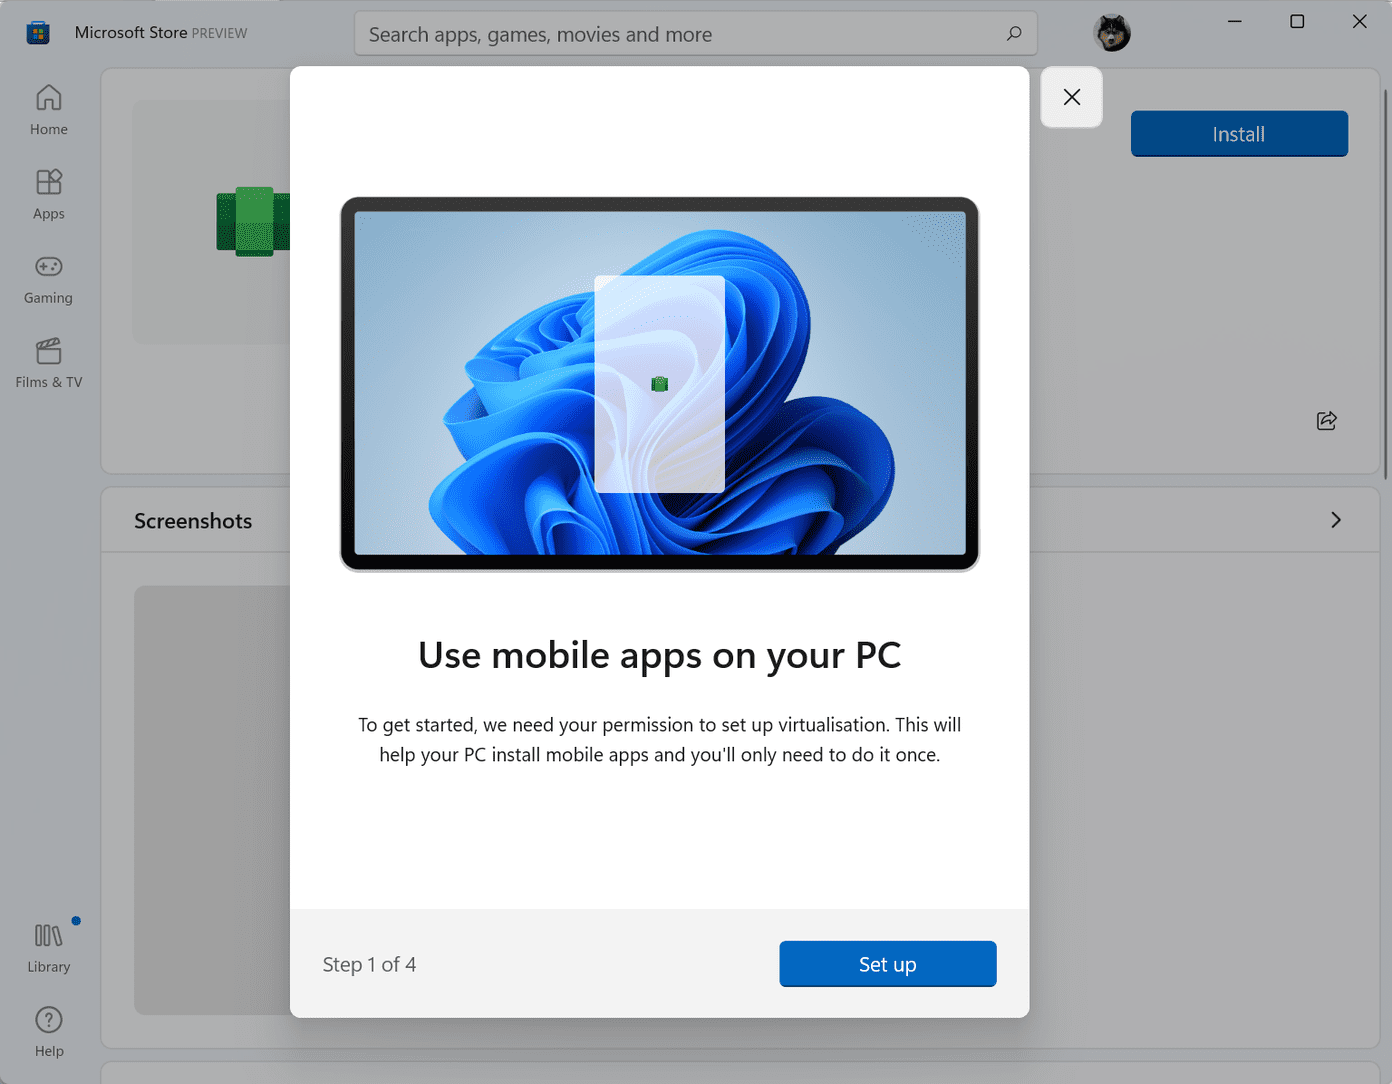
2. Virtualization: Virtualization is a critical hardware-based function required to run Android apps that you’ll download subsequently.

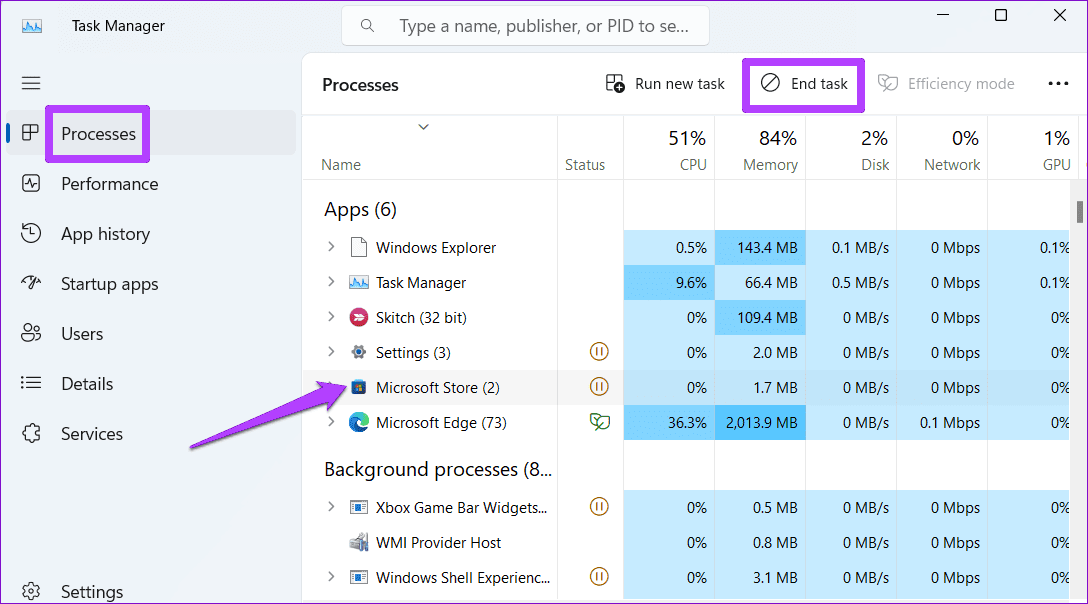
However, virtualization may or may not be enabled on your system. To check the status of your PC, open the Task Manager and select the Performance tab.

To see the status, check the bottom-right corner of the Performance tab. If it’s enabled, you are good to go. But if not, you may have to enable it.

How to Run Android Apps on Windows 11 1

However, enabling Virtualization differs from PC to PC. And you’ll have to check online manuals for your laptop/processor to enable it.

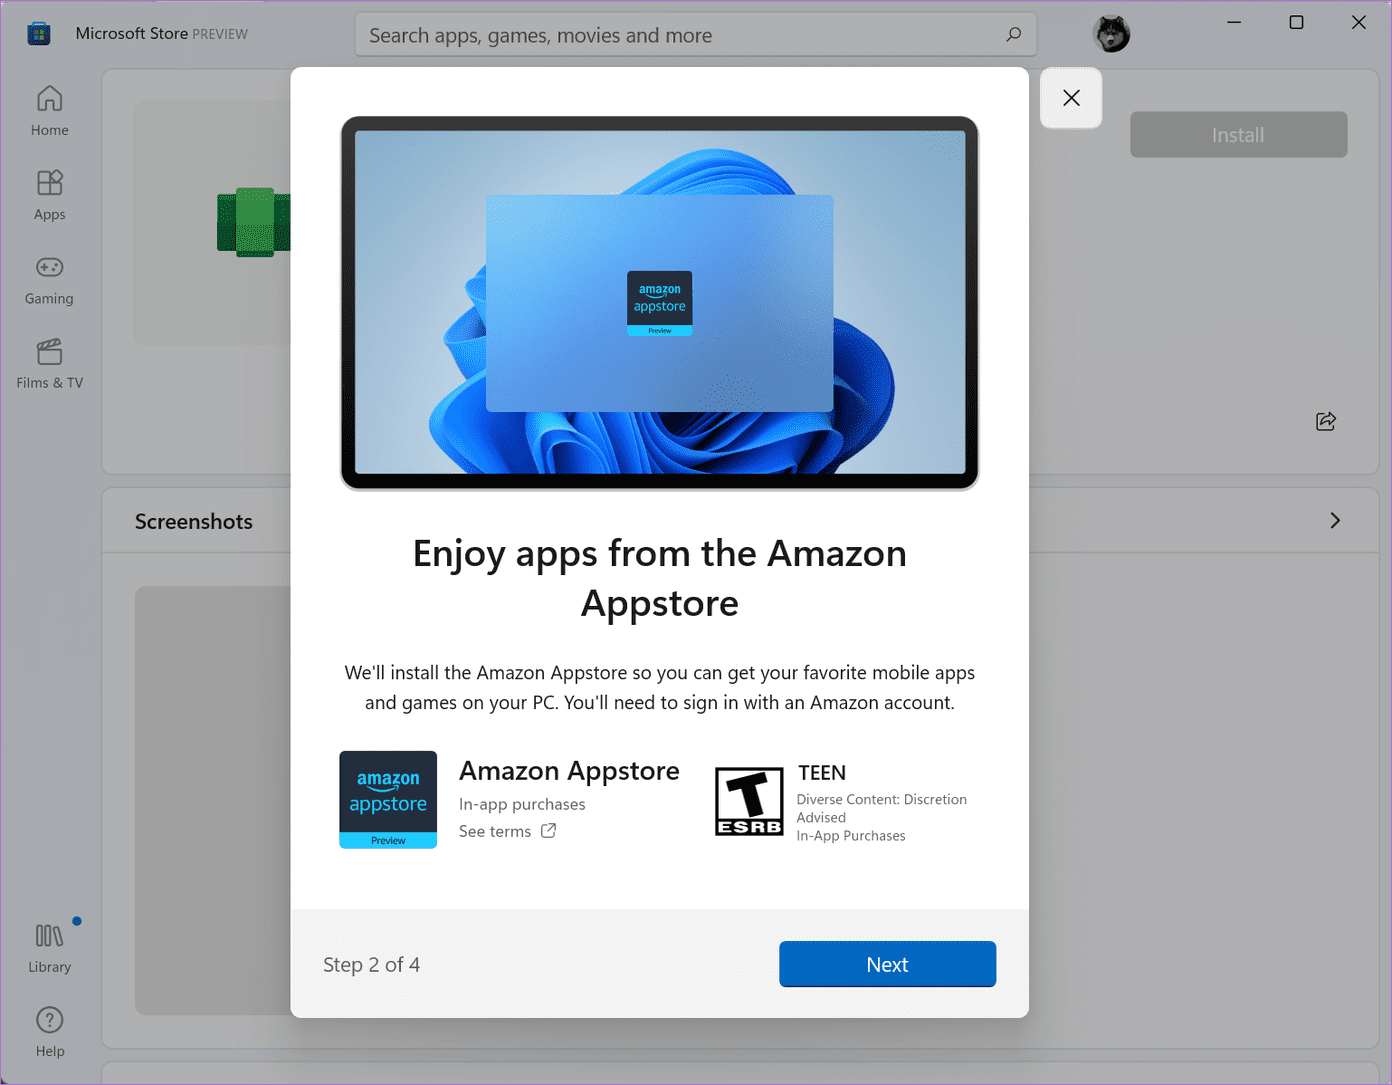
3. Credentials: For now, you’ll need an Amazon US account to access the store. Naturally, if you do not have one, you’ll have to create one.

Let’s see how to add the store.

How to Add Amazon App Store on Windows 11

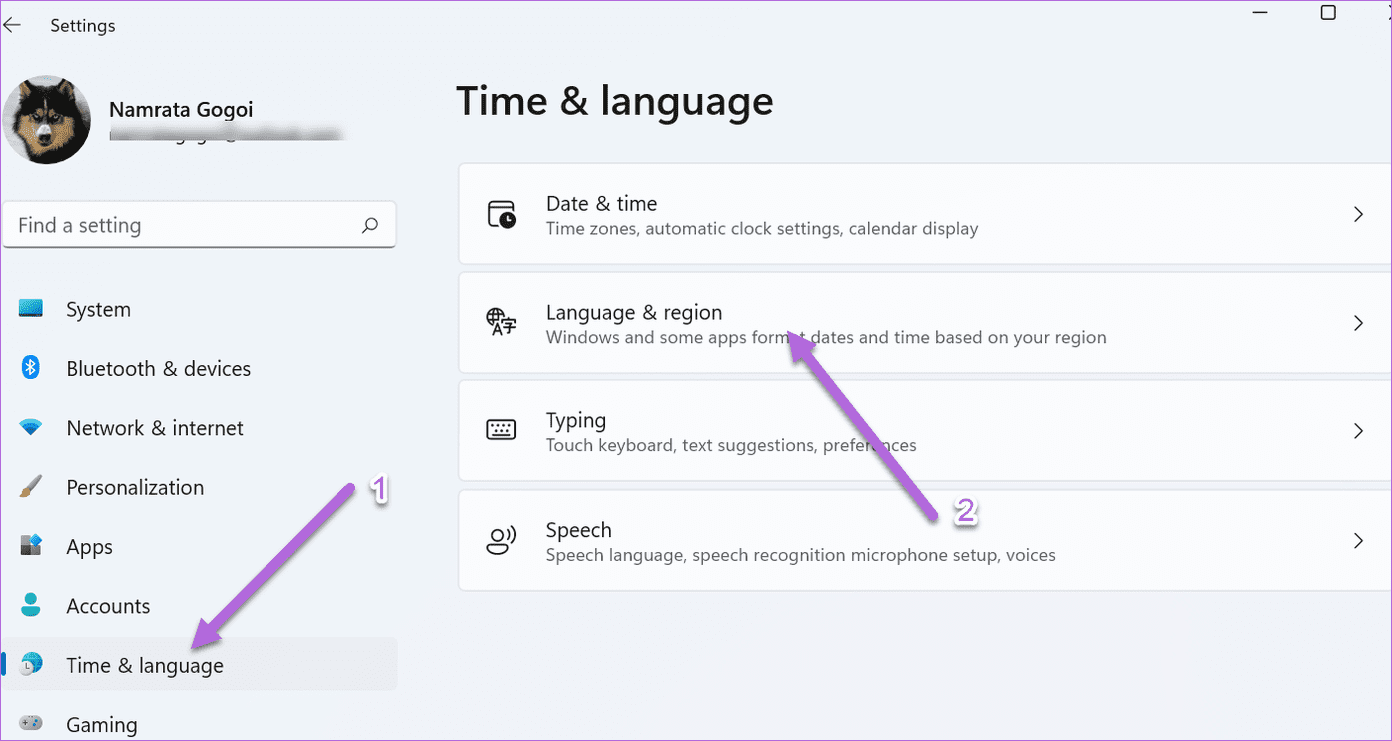
Step 1: Navigate to Settings on your PC, and select Time & language from the left panel.

How to Add Amazon App Store on Windows 11 21

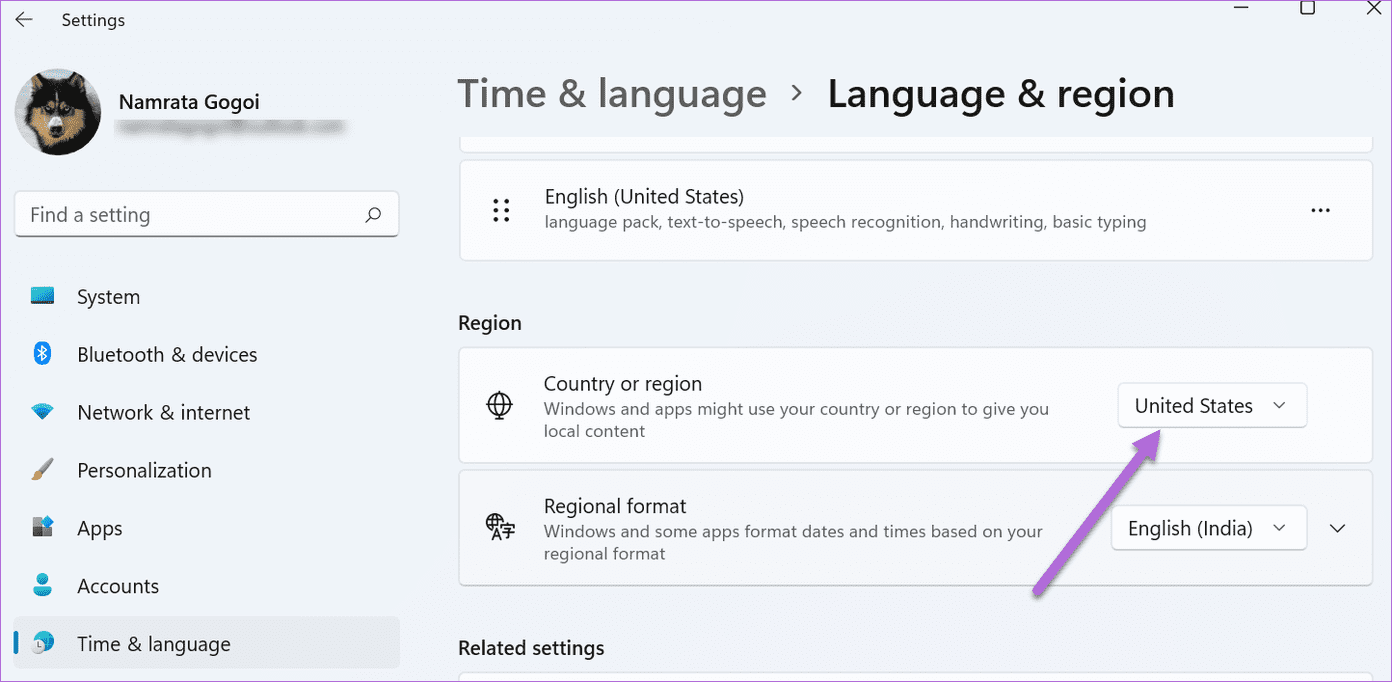
Under Language & region, click on the drop-down next to Country or region and pick the United States from the menu.

How to Add Amazon App Store on Windows 11 22

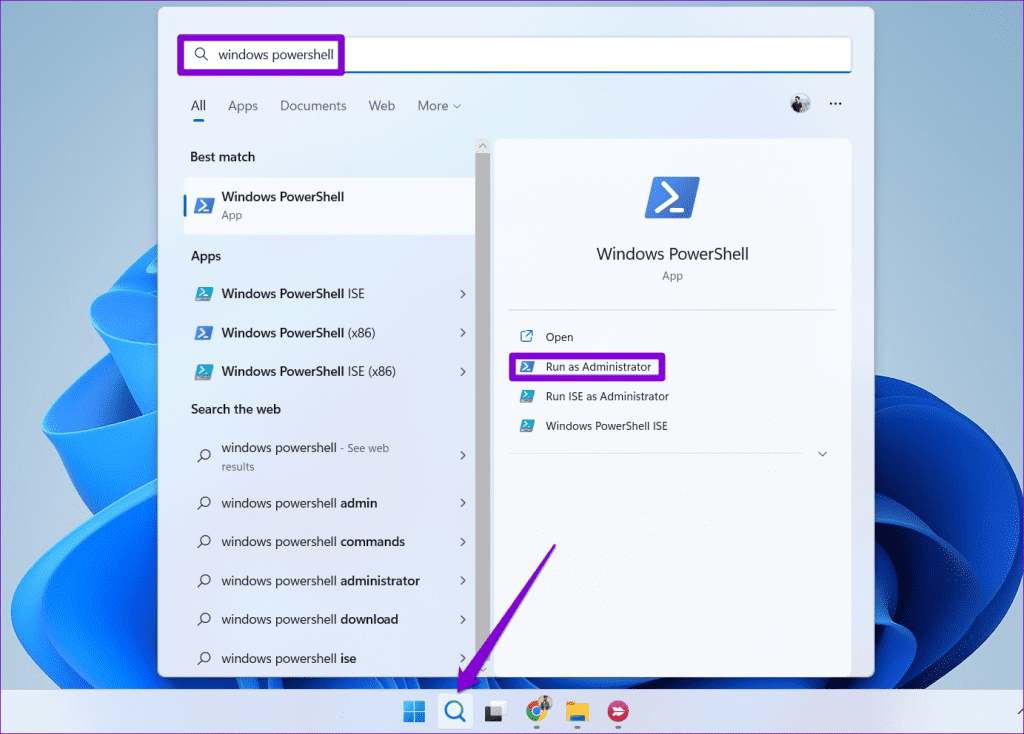
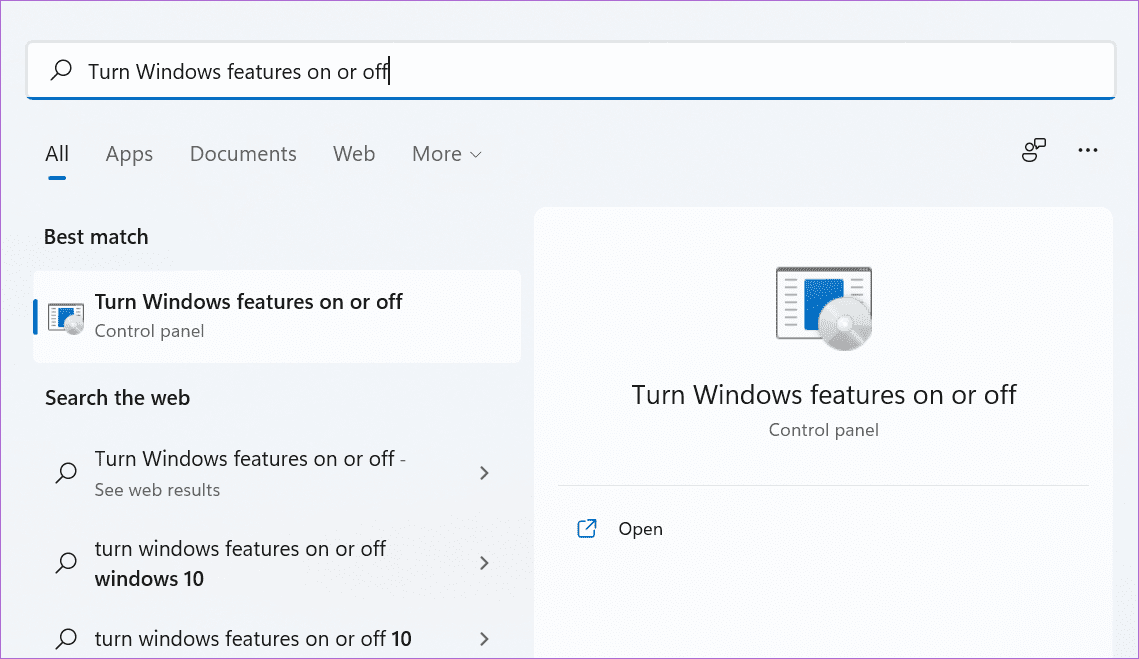
Step 2: Next, search for ‘Turn Windows features on or off’ on the Start menu and click to open it.

How to Add Amazon App Store on Windows 11 5

Once in, check the option for ‘Virtual Machine Platform.’ And at the same time, uncheck the option for ‘Windows Hypervisor Platform.’

How to Add Amazon App Store on Windows 11 6

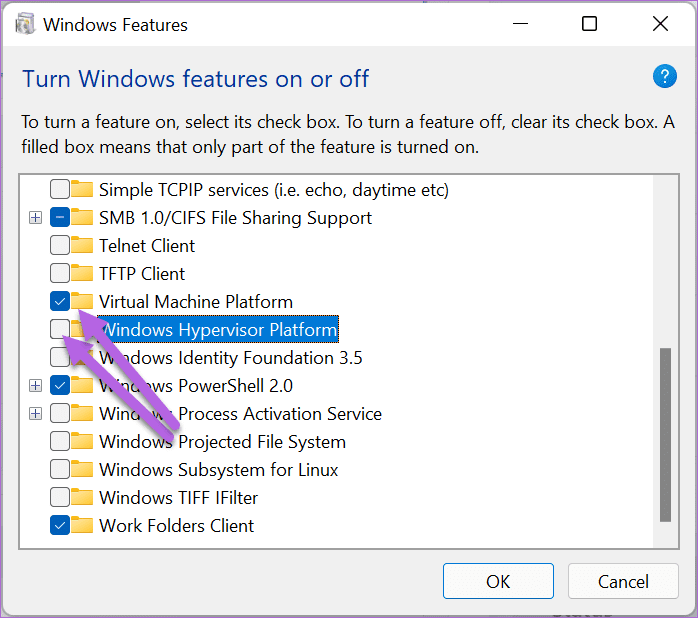
Here, Virtual Machine Platform lets you create or run virtual machines in your Windows OS. On the other hand, the Hypervisor platform may interfere with the running of the virtualization apps. Hence, we have disabled it.

Save the settings and restart your PC.

Step 3: After your PC boots, it’s time to download and install the Windows Subsystem.

How to Run Android Apps on Windows 11 4

The Windows Subsystem will enable your PC to run Android apps in the future. Thankfully, the installation process is easy, and you need to follow the onscreen instructions.

How to Run Android Apps on Windows 11 5

Once done, restart your PC.

Step 5: Now, all you need to do is log in to the Amazon App Store using your Amazon US credentials.

How to Add Amazon App Store on Windows 11 2

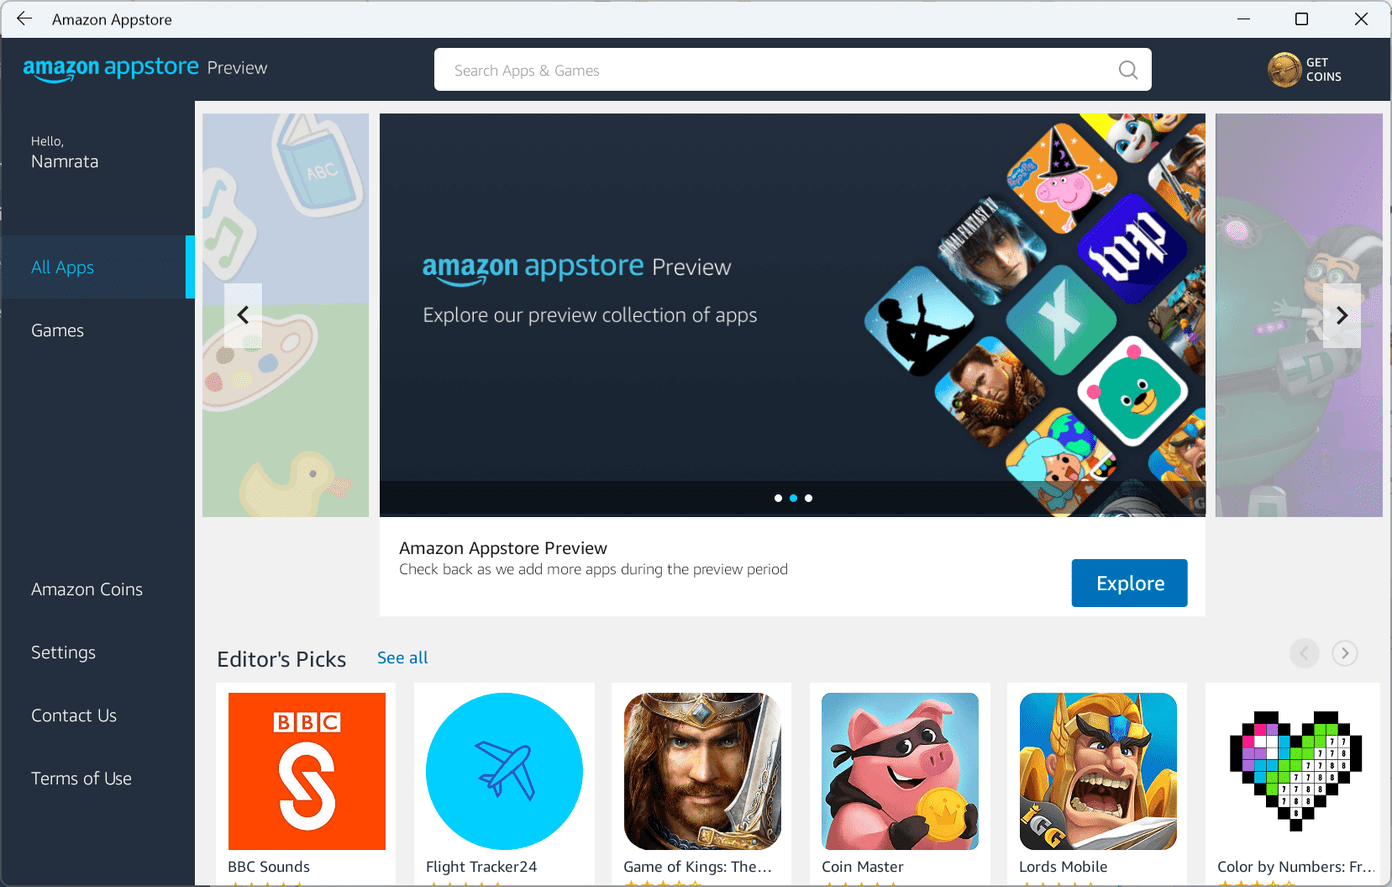
As noted earlier, the process doesn’t end with just adding and installing the Amazon App Store. You can download and install individual Android apps like Kindle, YouTube, and Instagram and run them here.

Yes, no more web versions of these apps!

Amazon App Store Settings

Similar to the Amazon App Store on your phone, the store on your Windows 11 system also gives you the option to tailor it as per your liking.

For example, you can enable Parental Controls when installing the app on your kid’s laptop. However, you’ll need to enter the app’s password to enable/disable it.

How to Add Amazon App Store on Windows 11 3

At the same time, you can choose to disable notifications and other news if you want to remove distracting notifications.

How to Add Amazon App Store on Windows 11 4

All you need to do is click on the Settings option on the left and get going.

Cross-Platform Fun

With the ability to add the Amazon App Store, you can run Android apps on the Windows 11. And the fact that all the Android apps run just like they do your phone is what makes an effort worthwhile.

So which app will you download first?

Was this helpful?

Thanks for your feedback!

3 Ways to Fix Chrome Not Opening on Windows 11

Try Basic Fixes

  • Force close Chrome using Task Manager and try again: Press Ctrl + Shift + Esc to open the Task Manager. In the Processes tab, select Google Chrome and click End task at the top. Then, try to open Chrome again.
  • Turn off your antivirus program: Sometimes, antivirus programs can be too cautious and block Chrome on your PC. To check for this possibility, temporarily disable your antivirus and try to open Chrome again.

Fix 1: Run Compatibility Troubleshooter

Compatibility issues can often prevent apps and programs from launching on your PC. For such occasions, Windows 11 includes a compatibility troubleshooter that can automatically detect and fix these problems. Here’s how to use it:

Step 1: Right-click on Chrome’s icon and select Properties.

Open Chrome Properties on PC

Step 2: In the Properties window, switch to the Compatibility tab > click Run compatibility troubleshooter.

Run Compatibility Troubleshooter for Chrome

From there, follow the on-screen instructions to finish troubleshooting. After finishing it, go ahead and see if you can open Chrome.

Fix 2: Delete User Profile

If your Chrome user profile has become corrupt, Windows might fail to load the program itself. To fix this, try deleting the folder that contains your profile data.

Step 1: Press the Windows key + R to launch the Run dialog box. In the text box, paste the below command and press Enter.

%USERPROFILE%\AppData\Local\Google Chrome\User Data

Step 2: In the File Explorer window, look for the Default folder and create a copy of that folder on your Desktop for backup purposes.

Step 3: Return to the File Explorer window > select the Default folder > click the trash icon at the top.

Delete Chrome Profile From PC

Fix 3: Reinstall Google Chrome

If nothing works, uninstall and reinstall Chrome. This will remove old data associated with Chrome and allow you to start from scratch. Plus, you’ll also update Chrome in the process.

Step 1: Press the Windows key + R to open the Run dialog box. Type appwiz.cpl in the box and hit Enter.

Step 2: Scroll down to find and select Google Chrome > click Uninstall at the top.

Uninstall Chrome

Follow the on-screen prompts to remove the browser. Then, restart your PC and install Google Chrome again.

Was this helpful?

Thanks for your feedback!

Top 4 Ways to Fix Microsoft Teams Notifications Not Working on Mac

Basic Fixes

  • Check Microsoft Teams Status: If Microsoft suffers from an outage, you might want to confirm the issue via Downdetector. If that’s the case, you won’t be able to compose a message, call, or video call.
  • Check If You Are Logged Out: It’s possible that the Teams app automatically logged you out from the software. As such, simply sign in again with the same account credentials and be ready to receive new chit-chats from Teams channels.
  • Disable Focus Mode: Enabling Focus Mode will allow you to focus on work, restricting notifications and calls from apps and contacts. To disable it, simply click on the Control Center in the Mac menu bar and disable Focus.
  • Check Your Status: By default, you are shown as available in the Teams. Maybe you temporarily changed your status to Do Not Disturb in Teams. When DND status is enabled in Teams, you won’t receive any notifications. Just click on your profile picture and change your status.
  • Update Microsoft Teams: You may be running an outdated version of Teams on Mac which might be causing the issue. Inside the Teams app, just click on the three-dot menu, and select Check for updates. Once you have the latest version installed, check if your notifications are working.

Fix 1: Enable Microsoft Teams Notifications

When you start using Teams on Mac, the software asks you to allow notifications. If you have accidentally denied the permission, you’ll need to enable it from the System Preferences menu.

Step 1: Click on the Apple icon at the top, and navigate to System Preferences > Notifications & Focus.

Open mac notifications

Step 2: From the Notifications menu, scroll down to Microsoft Teams.

Step 3: Finally, enable the toggle for Allow Notifications.

Allow notifications for teams

Fix 2: Open Teams on Startup

Microsoft Teams automatically opens on startup when you log into your Windows machine. You are ready to receive notifications right from your morning coffee. However, on Mac, you need to adjust the system preferences to open Microsoft Teams on startup.

Step 1: Head over to System Preferences > Users & Groups. Select Login Items tab from the right side, and click on the + icon.

Open teams at login

Step 2: This should open a list of applications. Select Microsoft Teams from the list, and click on Add.

Add teams to open on startup

And that’s it.

Fix 3: Disable Focus Share Across Devices

If you have enabled Focus on iPhone, then it will sync and switch on your Mac as well. That is possible if you use the same Apple ID on your Mac and iPhone. As such, you need to disable the Share Across Devices toggle from iPhone or iPad.

Step 1: On your iPhone, navigate to Settings > Focus.

Step 2: Here, turn off the toggle next to Share Across Devices.

After this, whenever you use Focus on iPhone, it won’t enable Focus automatically on Mac. That way, it won’t mess up Microsoft Teams notifications.

Fix 4: Customize Channel Notifications

You might have turned off channel notifications to focus more on work. Sometimes, users forget to go back to previous settings leading to notifications not working in Teams. Let’s enable notifications for a specific channel.

Step 1: Open Microsoft Teams on Mac, and go to a channel that is troubling you with notifications. There, click on the three-dot menu at the top, and select Channel notifications.

Customize channel notifications

Step 2: Now, click on All Activity to start receiving annoying pop-ups from Teams.

Fix teams notificaitons not working on mac

Was this helpful?

Thanks for your feedback!

5 Fixes for Facebook Messenger Notifications Not Working on Mobile

Try Basic Fixes

  • Turn Off the battery saver mode: When you enable battery saver mode on your phone, it limits certain background activities to reduce power consumption. This can cause Messenger notifications to stop working. To avoid such issues, disable battery saver mode on your phone.
  • Disable Do Not Disturb mode: If you’ve enabled Do Not Disturb mode on your Android or iPhone, you won’t receive notifications from any apps, including Messenger. Hence, it’s best to ensure that DND is turned off.
  • Update or reinstall the Messenger app: If the notification problem occurs due to a bug within the app, updating the Messenger app from the Play Store (Android) or App Store (iPhone) should help. If the issue persists after updating the app, uninstall the Messenger app and install it again.

Fix 1: Check Phone Notification Settings

It’s a good idea to check the notification settings on your Android or iPhone and ensure that Messenger is allowed to display notifications. Here’s how you can go about it.

Android

Step 1: Press and hold the Messenger app icon and tap the info icon from the menu that pops up.

Step 2: On the app info page, tap on Notifications. Enable the toggle next to Allow notifications.

Step 3: Tap on Notification categories and ensure all the alerts are enabled.

iPhone

Step 1: Open Settings and scroll down to tap on Messenger.

Step 2: Select Notifications and toggle on the switch next to Allow Notifications. Also, tick the checkboxes for Lock Screen, Notification Center, and Banners.

Fix 2: Check In-App Notification Settings

Like most apps, Messenger allows you to enable or disable notifications from its in-app settings menu. You must review these settings and ensure they are configured correctly.

Step 1: Open the Messenger app, tap the menu icon (three horizontal lines) in the top left corner, and tap the gear icon.

Step 2: Tap on Notifications & sounds and enable notifications from the following menu.

Fix 3: Allow Messenger to Run in the Background

Another reason Messenger may fail to display notifications is if you have restricted it from running in the background. Here’s how to change that.

Android

Step 1: Long-press the Messenger app icon and tap the info icon from the menu that pops up.

Step 2: Tap on Mobile data and enable the toggles next to Allow background data usage and Allow data usage while Data saver is on.

iPhone

Step 1: Open the Settings app on your iPhone and navigate to General.

Step 2: Scroll down to tap on Background App Refresh and enable the toggle next to Messenger in the following menu.

Fix 4: Unmute Contacts

Is Messenger not showing notifications for a specific contact or group? It’s worth checking if you have accidentally muted the person or group.

Step 1: Open the Messenger app on your phone and look for conversations with a crossed-out bell icon next to them.

Step 2: Long-press on the conversation and select Unmute from the menu that appears.

Repeat the above steps to unmute all the important contacts and groups on Messenger.

Fix 5: Clear Messenger App Cache (Android)

Overwhelming or corrupt cache data can also cause Messenger to malfunction on your Android. If that’s the case, clearing the Messenger app cache should solve your problem.

Step 1: Long-press the Messenger app icon and tap the info icon from the menu that appears.

Step 2: Go to Storage and tap the Clear cache option at the bottom.

Was this helpful?

Thanks for your feedback!

8 Tricks to Use OneNote for Project Management

1. Utilize OneNote Notebook, Section, and Pages

OneNote uses a unique method to organize notes. Unlike Evernote and Apple Notes, you aren’t limited to using tags to arrange notes. You can rely on Sections and Pages to organize thoughts.

You can create a separate notebook for the upcoming project and create different sections for it. For instance, you can create a new notebook as an application/software name, add sections such as UX, UI, Communication, Software Development, and Testing to it.

Create notebook and sections

Add necessary notes or pages and create the perfect notebook ready for sharing.

2. Take a Helping Hand from OneNote Templates

Creating every OneNote page from scratch is time-consuming. After all, you choose OneNote as a project management tool to save time. Don’t you? You can opt for one of the built-in OneNote templates and quickly start.

Step 1: Open OneNote on your computer.

Step 2: Select the relevant Notebook and Section.

Step 3: Add a new page and click on the Insert menu at the top.

Open insert menu

Step 4: Select Page Templates.

Page templates in OneNote

Step 5: It will open a dedicated Templates menu.

Step 6: Select your preferred template from the list and see the magic.

Templates in OneNote

You only need to make a few modifications here and there. You can even create custom OneNote templates to save more time in the future. Read our dedicated post to learn how to create templates in OneNote.

3. Add Outlook Emails to OneNote

In some situations, you need to send essential client emails to OneNote for reference. Outlook offers direct integration with OneNote. Here’s how you can use it.

Step 1: Open Outlook on Windows.

Step 2: Select an email that you want to send to OneNote.

Send outlook email to onenote

Step 3: Click on the three-dot menu in the upper right corner and select OneNote.

Send email to OneNote

Outlook will ask you where you want to save the email in OneNote. Select the section in a notebook, and you are good to go.

4. Add Relevant Files to OneNote

Before you share a OneNote notebook with others, you need to add relevant files and Spreadsheets to a page. It’s pretty easy to do so.

Insert file and audio to OneNote

From a OneNote page, select Insert. You’ll get an option to integrate Excel file to page. If you want to record audio or video, you can easily do so from the same menu.

5. Share OneNote Notebook

Now that you have created a perfect OneNote notebook with templates, emails, files, and more, it’s time to share the notebook with other team members to manage the project.

Step 1: Click File in the upper left corner of a OneNote notebook.

Step 2: Select Share.

Step 3: Type the email addresses of other members and give them editing permission.

Step 4: Click Share at the bottom and let others join the notebook.

Share OneNote notebook

6. Track Recent Changes

Once your team joins a OneNote notebook, you will want to track changes made by others.

Review edits in OneNote

From a OneNote notebook, go to the History menu at the top. Select Recent Edits and check modifications made by others on a page. You can also search for changes by a specific author from the Find by Author menu.

7. Master Tags to Track Task Status

OneNote comes with dozens of built-in tags to track project progress. From a OneNote page, you can go to Home and check Tags.

Track Task Status in OneNote

You can add different tags such as Project, Discuss with Person X, Client Request, Important, Call back, Send in email, and more.

8. Password Protect OneNote Page

You won’t want every team member to have access to all OneNote pages, do you? Some OneNote pages might contain sensitive information like quarter results, harsh client feedback, final UI design, and more.

Password protect OneNote

To prevent unauthorized access to these pages, you can password-protect them from the Review section. That way, only you and selected team members have access to the page.

Was this helpful?

Thanks for your feedback!

How to Create and Insert a Signature in Microsoft Word

Microsoft Word is so versatile that you can use it for official documentation and creating invoices. Apart from details, you can also add your signature to the document to make it appear e-signed and verified.

How to create and insert signatures in Microsoft Word feature image

By inserting a signature into a Word document, you can authorize its content or show ownership to the document. To insert your signature in a Word document, here’s what you should do:

Create a Handwritten Signature

The first step in inserting a signature in Microsoft Word is to create a handwritten signature. This requires having a scanner, whether a physical scanner or one on your mobile device. Here’s what you need to do:

Step 1: Get a piece of paper and scribble your signature on it.

How to create and insert signatures in Microsoft Word step 1

Step 2: Scan the signature page. You can use a physical scanner or take help of several scanning apps like the Microsoft Lens app.

Step 3: Save the scanned image in any of the common file formats (JPG, PNG, or BMP).

Step 4: Go to the file location where you’ve saved the image and double-click on it to open.

Step 5: You can crop the image to your preference by selecting Crop in the picture app.

How to create and insert signatures in Microsoft Word step 3

Step 6: Save the cropped image as a new file by either clicking Save As or Save a Copy from your picture app.

How to create and insert signatures in Microsoft Word step 4

Insert a Signature Line

After creating a signature, you need to indicate a space where you’ll place the signature with the help of a signature line. This line helps the creator of the document and other individuals that may need to sign the documents. Here’s how to insert a signature line into a Word document:

Step 1: Launch Microsoft Word on your computer.

How to create and insert signatures in Microsoft Word step 5

Step 2: Click on the part of the document where you need to insert the signature line.

How to create and insert signatures in Microsoft Word step 6

Step 3: On the file Ribbon, click on Insert.

How to create and insert signatures in Microsoft Word step 7

Step 4: Select Signature Line from the options.

How to create and insert signatures in Microsoft Word step 8

Step 5: Within the Text group, click on Add a Signature Line.

How to create and insert signatures in Microsoft Word step 8

Step 6: Select Microsoft Office Signature Line.

How to create and insert signatures in Microsoft Word step 9

Step 7: Go to the Signature Setup box and add the person’s name who should sign the document in the Suggested signer box. Also, you can include the signer’s title in the Suggested signer’s title box.

How to create and insert signatures in Microsoft Word step 10

Step 8: Click on OK, and Word should insert the signature line in your document.

How to create and insert signatures in Microsoft Word step 10

Step 9: Save the Word document.

Insert a Handwritten Signature

After creating the signature line, the final step is inserting a handwritten signature that you previously created into the Microsoft Word document. Here are the steps to follow:

Step 1: Launch the Microsoft Word document.

How to create and insert signatures in Microsoft Word step 5

Step 2: Place your mouse cursor on the signature line and double-click to launch a Sign dialog box.

How to create and insert signatures in Microsoft Word step 11

Step 3: On the box, click on Select Image.

How to create and insert signatures in Microsoft Word step 14

Step 4: Select Insert Picture from a File.

How to create and insert signatures in Microsoft Word step 15

Step 5: Navigate to the location with your saved handwritten signature and select Insert.

Step 6: Select Sign and Microsoft Word should insert your signature into the document.

How to create and insert signatures in Microsoft Word step 16

Include Typewritten Text with Your Reusable Signature

If you would like to add other details like your job title, contact details, etc. to the signature, you can use Quick Parts for this. Here’s how it works:

Step 1: Launch the Microsoft Word document.

How to create and insert signatures in Microsoft Word step 5

Step 2: Place your mouse cursor on where you want the Signature and click on Insert from the Ribbon.

How to create and insert signatures in Microsoft Word step 6

Step 3: Select Insert Picture from a File.

How to create and insert signatures in Microsoft Word step 12

Step 4: Type the text you want included with the Picture.

Step 5: Select the signature image along with the text.

How to create and insert signatures in Microsoft Word step 17

Step 6: Click on Insert then select Quick Parts.

How to create and insert signatures in Microsoft Word step 18

Step 7: Click on Save Selection to Quick Part Gallery to launch a dialog box.

How to create and insert signatures in Microsoft Word step 19

Step 8: Provide a name for the signature block and click on OK.

How to create and insert signatures in Microsoft Word step 20

Step 9: Select Quick Parts and click on the newly created Signature to insert it in the document.

How to create and insert signatures in Microsoft Word step 21

Other Uses of Quick Parts

You can either choose to create a signature on Microsoft Word using the Signature Line feature or Quick Parts. You can use Quick Parts create templates that you can use as Word documents or instead into mails.

Was this helpful?

Thanks for your feedback!

5 Best Lightning to HDMI Adapters Money Can Buy

If you often use your iPhone or iPad to mirror your phone’s content to your TV, then a Lightning to HDMI adapter or connector might be just what you are looking for. Here are the best Lightning to HDMI adapters money can buy.

Mixfly Lightning to HDMI Cable (Apple MFi Certified)

Mixfly [Apple MFi Certified] Lightning to HDMI Digital adapter

The Mixfly Lightning to HDMI cable is a good option to keep things simple and inexpensive. This one is a 1.5m long cable and sufficient to act as the bridge between a TV/monitor or projector and your iPhone. It’s an Apple MFi Certified cable, and the odds are that you won’t see any lags and drops.

It’s affordable and can do 2K up to 60Hz. However, it’s a bit flimsy, and you will have to be a tad careful while handling it. Also, you won’t be able to stream movies and TV shows from HDCP-protected content streaming services like Netflix, Amazon Video, and HBO. Instead, you can mirror your phone’s screen to access your iPhone’s Gallery.

What We Like

  • Affordable
  • Can do 2K @60Hz

What We Don’t Like

  • Average build quality

RAVIAD Lightning to HDMI Connector

raviad Lightning to HDMI Adapter 2

Another affordable 1080p Lightning to HDMI adapter is the one by RAVIAD. Like its counterpart, it doesn’t need a separate power line and directly connects your iPhone or iPad to TVs or any supporting entertainment unit with HDMI.

It’s a straightforward plug-and-play connector and works as advertised. It maintains the picture quality and the sound quality. And the easy-to-use nature is the added advantage. Again, it’s a 1080p connector and can do a maximum of 2K @ 60HZ.

What We Like

  • Value for money
  • Easy to use

What We Don’t Like

  • Question marks over long-term performance

FALUBS Lightning to HDMI Adapter

fablubs Lightning to HDMI Adapter

FALUBS’s offering is an HDMI adapter in the truest sense. It needs a power connection. After you set it up, it can mirror the contents of your phone’s screen on the TV. The best part is that the power requirements are minimal, and you can use a power bank with it.

Compared to the ones above, this connecting cable is short. You may have to get a longer HDMI cable to get the ball rolling. On the upside, the small form factor means there’s no hassle of tangling. And you can pack it up and throw it in your bag when traveling. More importantly, it won’t work for HDCP-protected apps like Netflix, Prime Video, or HBO.

What We Like

  • Good performance
  • Compact form factor

What We Don’t Like

  • Short connecting cable

esbeecables Lightning to HDMI Adapter

Another adapter that will let you display your iPhone’s screen on your TV or monitor is the one by esbeecables. It comes in a black and red combination, making it different from the other options on this list. The HDMI end has additional grips built-in for easy unplugging.

It can output up to 2K resolution and the performance standards are high with minimal audio or video delay. It also offers solid build quality, and provided you take good care of it, this Lightning to HDMI adapter will last you a long time.

What We Like

  • Good build quality
  • High-performance

What We Don’t Like

  • Slightly expensive

Apple Lightning to Digital AV Adapter

The Apple Lightning to Digital AV adapter is one of the more expensive adapters on the list. And it comes with several advantages. For one, you do not have to worry about device compatibility with your iPhone. More importantly, it lets you mirror content to a bigger screen from apps like Netflix, Hulu, or HBO Max. You can also mirror offline videos or apps like Instagram or Safari.

It works as advertised and transmits both audio and video without lag. However, it supports resolutions only up to 1080p. On the upside, It doesn’t need a dedicated power line. However, this adapter is also delicate, and you’ll have to be extremely careful handling it, especially if you plan to connect it to a wall-mounted TV.

What We Like

  • Good device compatibility
  • Offers stable performance

What We Don’t Like

  • Delicate

FAQs

1. Do Lightning to HDMI adapters work?

Lightning to HDMI cables work on most occasions. However, maximum cables help you mirror your phone’s screen to your TV or projector. However, if you want to use Netflix or Amazon Prime, you must use an HDCP-compatible cable.

Was this helpful?

Thanks for your feedback!

6 Best Ways to Fix Windows 11 Apps Won’t Connect to the Internet

Computers have a myriad of apps that enhance the performance of certain features. But once in a while, these applications can experience issues when connecting to the internet. Try these fixes if Windows 11 apps suddenly stop connecting to a network.

How to Customize the Right Click Menu in Windows 11

Mostly, the issue occurs after a change of network adapters. It could also happen after a driver update. Whatever the case, you can try changing the network connection to resolve the issue.

If, for instance, you were on a wifi connection, consider shifting to an Ethernet connection. This way, you rule out issues with network adapters that could be causing problems.

In addition, try contacting your internet service provider. Slow connections or interruptions can result in apps not connecting to the internet. If those things don’t help, try out the fixes mentioned below.

1. Switch off the Windows Firewall

If you’re using a third-party firewall app, it could be preventing other apps from connecting to the internet. To resolve firewall issues, switch off that program and use Microsoft Defender (previously, Windows Defender). Here’s how you can do it.

Step 1: Type Windows Defender firewall on the search bar and press Open.

Step 2: On the left-hand side, click Turn Windows defender on or off.

Windows defender on off

Step 3: On the Private and Public network Settings, select Turn off Windows Defender. Complete the process by pressing OK.

Windows defender on off 1

Step 4: Close the windows and restart your PC to update the changes.

2. Run the Windows Store Troubleshooter

At times, running the Windows store troubleshooter can clear common bugs. This will include errors due to recent updates or network adapter changes.

Step 1: Press Windows + I keys to open the Settings app.

Step 2: Locate the System option and click on it.

Windows 11 Troubleshoot 1

Step 3: On the right pane, select Troubleshoot

Step 4: Next, click on Other troubleshooters.

Windows 11 Troubleshoot 2

Step 5: Locate the Windows Store Apps and tap Run.

Windows Troubleshoot 3

Wait for a few minutes for Windows to identify and fix the problems. Restart your computer and confirm if the app connects to the internet.

If the issue persists, you can run the internet troubleshooter to fix the problem. To do this, click on Internet Connections on the Other troubleshooter’s window. Next, run the troubleshooter, which should help diagnose and resolve internet issues.

Windows 11 Troubleshoot

3. Reset Windows Sockets

In some instances, resetting Windows Sockets can help apps connect to the internet. To do this, run these commands.

Step 1: Type cmd on Windows search bar.

Step 2: Select to run command prompt as an administrator.

Run cmd windows 11

Step 3: On the next window, type the following command

netsh winsock reset

Wait for the process to complete then restart your PC.

Netsh winsock reset Windows 11

4. Clear the Store Cache

Clearing the store cache could be the solution you need to connect apps to the internet. To do this, you can run this command.

Step 1: Press the Windows + R keys to open the run dialog.

Step 2: In the dialog box, type wsreset and click Enter.

Windows 11 reset store cache

Wait for the process to end then confirm if the apps open with an internet connection.

5. Set Up a New Connection or Network

Outdated or misconfigured connections can also cause internet issues with applications. To resolve connection problems, set up new statuses. Here’s how you can do it.

Step 1: Open the Control Panel by typing through the Windows search bar.

Windows 11 Control Panel 2

Step 2: Select Network and Internet.

Windows 11 Control Panel 1

Step 3: Click Network and sharing. Then, tap Set up a new connection or network.

Set up new connection w11

Step 4: Select a connection option, then follow prompts to complete the process. Once done, the computer should automatically connect to the new network.

Choose a connection option W11

6. Perform a Network Reset

If all the above fail, perform a network reset to give the connections a fresh start. This will uninstall all network drivers and reinstall them with default settings.

Step 1: Open Settings and select Network and Internet. Next, click on Advanced network settings.

Advanced network settings W11

Step 2: Click Network Reset.

Network reset W11

Step 3: Select to Reset now and complete the process by pressing Yes.

Network reset Windows 11

Connecting Your Apps to the Internet

The six best ways to fix Windows 11 apps when they won’t connect to the internet. To add to this, consider updating your network adapters. There is also the option of uninstalling then reinstalling recently added programs. By applying one of these solutions, you will have your applications connecting to the internet and running in no time.

Was this helpful?

Thanks for your feedback!

12 Efficient Ways to Fix iPhone Sound Not Working

Sound is an important aspect of your iPhone that alerts you of incoming calls and notifications, lets you groove to your favorite music, and do a lot more. Hence, it can be frustrating if your iPhone’s sound stops working all of a sudden. While such sound issues may lead you to believe there are issues with the hardware, in most cases, the software is the culprit.

Top Ways to Fix Sound Not Working on iPhone

If your iPhone suffers from a lack of audio, you’re at the right place. This guide contains some quick and easy fixes that should help fix the sound not working issue on your iPhone. So, let’s take a look.

1. Check Sound Settings

To start, you should check the sound settings on your iPhone and ensure that the volume isn’t set to the lowest level. To do that, open the Settings app and go to Sounds & Haptics. Under Ringtone and Alert Volume, drag the slider back and forth to test your speaker.

Sounds and Haptics on iPhone Increase Alert Volume on iPhone

If you do not hear a sound or if the speaker icon under Ringtone and Alert Volume is dimmed, it’s likely that your iPhone speaker needs some cleaning.

2. Clean Speakers

Dirt and debris stuck on your iPhone’s speaker is often the root cause of the distorted or no sound issue. Hence, it’s a good idea to clean the speakers with a soft-bristled brush and a microfiber cloth. Also, if you’re using a case, consider removing it as well. After that, check if the sound works. 

3. Check the Mute Switch

Next, you need to ensure that the Ring/Silent switch isn’t set to Silent mode. If the color of the side switch is orange, it means your iPhone is set to silent. Move the switch toward the display to set it to Ring mode. As you do that, a message will pop up on your iPhone that reads Ring mode on.

Silent or Ring Mode on iPhone

4. Restart Your iPhone

Sometimes, minor software glitches or background processes can also cause such anomalies. If that’s the case, restarting your iPhone should help.

On iPhone X or newer models, press and hold the Sleep/Wake button with one of the volume buttons and then use the slider to power off your iPhone. On older iPhones, press and hold the Sleep/Wake button until the slider appears, and then use it to shut down your iPhone.

Power Off iPhone

5. Turn Off Focus Mode

Focus Mode is a handy feature that silences all your calls and notifications, allowing you to go about your work in peace. If you have accidentally enabled Focus Mode, you might not hear your calls, text messages, and other app notification alerts.

Swipe down from the top right corner of the screen to bring up the Control Center and tap the crescent moon icon to disable Focus Mode.

Disable Focus Mode on iPhone

6. Turn Off Bluetooth

If you’ve Bluetooth enabled on your iPhone, one of the connected devices that you may have forgotten about might be pumping out audio. To receive sound from your iPhone, turn off Bluetooth by navigating to Settings > Bluetooth. 

Bluetooth on iPhone Turn Off Bluetooth on iPhone

7. Check Notification Settings for Apps

Is your iPhone failing to make any sound when you receive notifications from apps? If so, you should check the notification settings for your apps. For instance, if you have accidentally set the notification sound in WhatsApp to None, your WhatsApp alerts won’t be accompanied by a sound.

This can create the impression that the sound is not working on your iPhone. So, it’s a good idea to check the notification settings for those apps.

8. Restart the Problematic App

If the no-sound issue on your iPhone is limited to a specific app, you can try restarting it. If the problem is only occurring due to a temporary app glitch, this should help resolve the issue.

Swipe up from the bottom of the screen and pause halfway or press the Home Screen button twice to open the app switcher. Swipe upwards on the problematic app to close it.

Force Stop Spotify on iPhone

Reopen the app after this and check if the sound is working.

9. Update iOS and Your Apps

It’s always a good idea to keep your iPhone updated to the latest version. These updates not only give you access to the latest features but also bring crucial bug fixes to your iPhone.

To check for updates on your iPhone, open Settings and navigate to General. Tap on Software Update to download and install any pending updates.

General Settings on iPhone Software Update on iPhone

While you’re at it, you should also consider updating your apps to benefit from the latest improvements. To do so, open the App Store on your iPhone and tap on your profile picture in the top right corner. Then, scroll down to tap the Update All button to install pending app updates.

App Store on iPhone Update All Apps on iPhone

10. Check Your iPhone for Liquid Damage

Another reason why the sound may stop working on your iPhone is if it has been exposed to water or extreme humidity. If your iPhone has suffered water damage, it could have damaged the speaker. At times, this can also cause your iPhone to get stuck in headphone mode. In any case, it’s best to have your iPhone checked at the Apple service center.

11. Reset Your iPhone

Resetting your iPhone is a surefire way to fix most issues with your iPhone, including this one. This will remove all your custom settings and get things back in order.

To reset your iPhone, use these steps:

Step 1: Open the Settings menu and navigate to General.

General Settings on iPhone

Step 2: Go to ‘Transfer or Reset iPhone’.

Transfer or Reset iPhone

Step 3: Tap on Reset and select Reset All Settings from the resulting menu. Then, enter your passcode to initiate the process. 

Reset iPhone Reset All Settings on iPhone

12. Perform a Factory Reset

If none of the above fixes have worked, you can consider factory resetting your iPhone as a last resort. Since this process deletes all your personal data, make sure you back up your iPhone before proceeding.

Step 1: Open the Settings app on your iPhone and tap on General.

General Settings on iPhone

Step 2: Scroll down to select ‘Transfer or Reset iPhone’.

Transfer or Reset iPhone

Step 3: Tap on ‘Erase All Content and Settings’ and follow the on-screen prompts to finish factory resetting your iPhone.

Factory Reset iPhone

FAQs on Sound Not Working on iPhone

1. How do I unmute my iPhone?

Moving the Ring/Silent switch towards your iPhone screen is the easiest way to unmute it.

2. Why can't I hear audio during calls on my iPhone?

If the volume level on your iPhone is too low or if your iPhone is transmitting audio to a Bluetooth device, such as headphones, you will not head any sound during phone calls.

Sound Check

Such sound-related issues should not keep you from receiving important calls and notifications. Unless it’s a hardware issue, one of the above fixes should get the sound to work again on your iPhone. As always, let us know which solution did the trick for you in the comments below.

Was this helpful?

Thanks for your feedback!

5 Fixes if You Can’t Delete Apps on iPhone

Try Basic Fixes

  • Wait for the app download to complete: If the app you’re trying to delete is installing, you might see a grayed-out app icon that says “Waiting.” To uninstall it, terminate the download process by long-pressing the app icon and selecting Cancel Download.
  • Install iOS updates: Apple regularly releases software updates for your iPhone to add new features and fix known bugs. If the issue is caused by a bug within iOS, installing newer updates should help.

Fix 1: Check Restrictions for Deleting Apps

Your iPhone lets you set up various content restrictions so that your notorious child (or anyone else for that matter) cannot make changes against your will. If you’ve modified content restrictions on your iPhone in the past, you might have accidentally disallowed your iPhone from deleting apps. Here’s how to change that.

Step 1: Open the Settings app on your iPhone > navigate to Screen Time > Content & Privacy Restrictions.

Step 2: Go to iTunes & App Store Purchases > Deleting Apps > select Allow from the following menu.

Fix 2: Delete Apps From Settings

If you still have trouble deleting apps from the Home Screen, use the Settings app on your iPhone to do so.

Step 1: Open the Settings app > go to General > iPhone Storage.

Step 2: Scroll down and tap on the app you wish to remove > tap Delete App to remove the app.

Fix 3: Uninstall the App via the App Store

Step 1: Open the App Store on your iPhone > tap the profile icon at the top right corner.

Step 2: Scroll down to locate the app you wish to remove. Swipe left on the app and tap on Delete > select Delete to confirm.

Fix 4: Sign Out of Apple ID and Sign Back In

Authentication issues with your Apple ID can also prevent you from removing apps from your iPhone. A quick way to fix this is to sign out of your Apple ID and sign back in. Here are the steps for the same.

Step 1: Open the Settings app on your iPhone and tap your name at the top.

Step 2: Scroll to the bottom and tap on Sign Out. Then, tap Sign Out at the top right.

Once you’re logged out, sign back in with your Apple ID credentials and check if you can delete apps from your iPhone.

Fix 5: Reset All Settings

If you’re here, it’s safe to assume that the above fixes haven’t worked. So, your best option is to reset all settings on your iPhone. Here’s how to do it.

Step 1: Open the Settings menu > navigate to General > Transfer or Reset iPhone.

Step 2: Tap on Reset at the bottom and select Reset All Settings.

Was this helpful?

Thanks for your feedback!

How to Change the Right-Click Menu in Windows 11

How to Change the Right-Click Menu in Windows 11

Method 1: Using Registry Editor

Step 1: Firstly, press the Windows key, type Registry Editor, and click Run as administrator.

In the prompt, select Yes.

Step 2: In the top address bar, enter the following path:

HKEY_CURRENT_USER\Software\Classes\CLSID

Note: You can manually navigate to the section too.

enter the following path

Step 3: Once the path opens, right-click and select New > Key.

This will create a new key on the left panel.

select New > Key

Step 4: Once done, rename the key with the following:

{86ca1aa0-34aa-4e8b-a509-50c905bae2a2}
rename the key with the following

Step 5: Select the newly-created key. Then, right-click on the right panel and choose New > Key.

Select the newly-created key

Step 6: Now, rename the newly created key to the name below;

InprocServer32
rename the newly created key

Step 7: Select the newly created InprocServer32 folder. On the right pane, double-click on Default.

double-click on Default

Step 8: Finally, keep the Value Data field empty and hit the OK button.

hit the OK button

That’s it. Now, all you need to do is restart your Windows 11 laptop/PC to be welcomed by the old context menu. However, if you want to bring back the new context menu, just delete the InprocServer32 key from the registry editor.

If the steps are too complicated to follow, move on to the next one.

Method 2: Using Command Prompt

Step 1: Press the Windows key, type Command Prompt and click Run as administrator.

Step 2: Now, type or copy-paste the following command and hit Enter:

reg add "HKCU\Software\Classes\CLSID\{86ca1aa0-34aa-4e8b-a509-50c905bae2a2}\InprocServer32" /f /ve
How to Customize the Right Click Menu in Windows 11 5

This simple action will add both keys in the correct sequence. And that’s about it. Reboot your PC to implement the changes. Once it boots back up, you will see the old menu when you right-click on your PC.

Also Read: How to show seconds on Windows 11 clock

How to Add or Remove Menu Options to the Right-Click Menu

Note: You can add only apps and not folders and files. For the latter, you have to take the aid of the Taskbar.

Method 1: Using Registry Editor

Step 1: Firstly, open the Registry Editor and navigate to the path below:

HKEY_CLASSES_ROOT\Directory\Background\shell
navigate to the path below

Step 2: Right-click on the right panel, choose New and select Key.

name it Notepad

Step 3: Name the key as Notepad.

name it Notepad

Step 2: Under the Notepad key on the right pane, double-click on Default.

Step 3: Double-click on Default and add &Notepad under Value data.

add '&Notepad'

Step 4: Select the newly created key and right-click again to add a new key underneath the Notepad folder. Rename it as command.

Step 5: Under the Command key on the right pane, double-click on Default.

click on Default

Step 5: Finally, in the Edit String, under Value data, enter the below command and click OK.

Notepad.exe
click OK

Head back to the desktop and right-click to see the new values in the context menu. If you, however, change your mind and want to remove an app from the right-click menu in Windows 11, follow the above steps and remove the entries under the Shell folder.

How to Customize the Right Click Menu in Windows 11 10

You can also add the apps directly to the right-click menu in Windows 11 without reverting to the old menu. The only limitation is that they will be available only when you click on Show more options.

If the steps are too long for you to follow, check out the next method.

Method 2: Using Third Party Tool

For this demonstration, we will go with the Easy Context Menu tool. Follow the below steps.

Step 1: Firstly, go to the Easy Context Menu’s official site from your preferred browser on Windows 11.

Step 2: Scroll down and click the Download button.

click the Download button

Step 3: Extract the file and double-click on the application to launch.

Note: The app is portable, so you don’t need to install it on your PC.

double-click on the application to launch

The tool will display a list of tools and settings you can add to your right-click context menu.

Step 4: Scroll through the options and check the box next to them if you want to include them in your right-click menu.

Scroll through the options

Step 4: Finally, once you have selected all the options you need, click Apply Changes.

click Apply Changes

There you have it. You have successfully customized the context menu on your Windows 11 PC. If you have any queries we missed addressing, check out the FAQ section below.

FAQs on Customizing the Right-Click Menu in Windows 11

1. Is it possible to rearrange items in the right-click menu?

By default, Windows 11 does not provide a built-in option to rearrange items in the right-click menu. Third-party tools may offer this functionality, or you can explore registry tweaks for more advanced customization.

2. Will customizations persist after Windows updates?

Windows updates may overwrite certain registry changes or settings, potentially reverting customizations. It’s a good practice to check and reapply your customizations after major system updates.

Now that you know how to change the right-click menu in Windows 11, you can customize it as per your requirements and put the frequently used apps and options over there, thus enhancing your Windows experience.

Was this helpful?

Thanks for your feedback!

How to Remove and Replace Background In Canva

While there’re plenty of tools online that can help you remove a background from an image, there’re hardly a few apps that offer a complete image editing experience. Canva is a top name among them. Popularly known for making eye-catching social media posts and logos, Canva also lets you easily remove and replace the background of an image.

How to Remove and Replace Background In Canva

Probably the best part about Canva is that it isn’t web-only. It also has a feature-rich mobile app that offers the same features found in the web version. In this guide, we’ll cover how to use Canva to remove and replace the background of an image on both mobile and PC. So, let’s roll.

How to Remove Background of Image in Canva

While editing images in Cavna is mainly free, you need to be logged in with a Canva Pro account to remove the background from an image. Once you’ve subscribed to Canva Pro, removing background in Canva is quite straightforward. Here’s how.

Step 1: Open up your preferred web browser and navigate to Canva’s website.

Create a Design in Canva

Step 3: Upload the image from your PC and click on the Edit photo option.

Edit Photo in Canva

Step 4: Once uploaded, it’ll appear in a new project window. Select the image and click on the Edit image option from the toolbar.

Edit Image in Canva

Step 5: Click on the Background Remover option from the panel that appears on your left.

Background Remover in Canva

Canva will remove the background from the picture. You can use the Erase and Restore tools on your left to fine-tune the image and remove elements that Canva might have missed. Lastly, click on Apply.

Apply Changes to Image

Finally, click on the Download button in the top right corner and mark the checkbox that reads ‘Transparent background’ to download your image. Lastly, click on the Download button to get your image.

Download Image from Canva

How to Replace Background of Image in Canva

Aside from removing the background, Canva also offers plenty of options to customize the background of an image. Here’s how.

Step 1: Upload your image with a transparent background in Canva’s image editor.

Step 2: Once uploaded, right-click on the image and select the ‘Detach Image from Background’ option.

Detach Image from Background

Step 3: Now switch to the Background tab on your left. Here you can explore Canva’s extensive library of backgrounds. You can either use the search tool or explore them via categories to pick the one you like.

Backgrounds in Canva

Step 4: Click on an image to use it as background.

Replace Background of Image

Once you’re done picking the background, download your image using the button in the top right corner.

Besides downloading, you can also share your photo directly from Canva to your Facebook, Instagram, and Google Drive accounts.

How to Remove Background of Image in Canva App

Canva also offers the background removal tool in its mobile app, available for both Android and iOS. Here’s how to use it.

Step 1: Launch the Canva app on your phone. Tap on the Plus icon in the bottom right corner and select the Edit Photo option to upload your image.

Canva Mobile App
Edit Photo in Canva App

Step 2: Next, select a preferred dimension for your image and tap on Create in the top right corner.

Choose a Size for Image

Step 3: Now select the image, tap on the Effects option from the toolbar and select the BG Remover option.

Effects in Canva
BG Remover in Canva App

Wait for Canva to work its magic and that’s it. It’ll automatically detect and remove the background from your image.

Remove Background In Canva App

To get your image, tap on the download icon up top and choose the ‘Save as’ option. Next, select your preferred file type using the drop-down menu and hit Download. You can also mark the check box to download your image with a transparent background.

Save Image in Canva
Download Image with Transperant Background in Canva

How to Replace Background of Image in Canva App

Once you’ve successfully removed the background of an image, here’s how to customize the Canva app.

Step 1: Open the Canva app and tap on the Plus icon in the bottom right corner to create a blank template. You can pick from the available sizes or enter a custom size.

Canva Mobile App
Custom Size Template in Canva App

Step 2: In your blank template, tap on the Plus icon in the bottom left to reveal more options. Now tap on the Gallery option pick the image with transparent background.

Additional Options in Canva App
Upload Image in Canva

Step 3: Again, tap on the Plus icon and navigate to the Background tab. Now explore the available background and select the one you wish to use.

Editing Options in Canva
Backgrounds in Canva

Step 4: Once applied, resize and position your foreground image using the borders around it.

Change Background in Canva App
Replace Background in Canva App

You can play around with different backgrounds and editing options. Once you’re satisfied, download the image in your preferred format or share it directly to a social media platform from there.

Editing Made Easy

Removing and replacing the background of an image is certainly easy with Canva. Although the background removal tool requires a Canva Pro membership, you can use an app like Paint3D to make the background transparent and then use Canva to customize your image for free.

Was this helpful?

Thanks for your feedback!

4 Fixes for iMessage Not Syncing Between iPhone and Mac

Basic Fixes

  • Plug your Mac into a power source: Sometimes your Mac will start syncing when it is plugged into a power source. You can try the same.
  • Use the same Apple ID: You should ensure that your iPhone and Mac have the same Apple ID. Only then will iCloud be able to sync messages on both devices.
  • Update software version: Install the latest software version on your respective Apple device.
  • Check iMessage servers: Apple also offers a dedicated System Status page to let you check services status in real-time.

Fix 1: Disable and Enable iMessage Again

You need to deregister the iMessage service on your iPhone and after a couple of minutes, enable it again. This trick worked wonders for us and enabled iMessage sync on Mac and iPhone. Here’s what you need to do.

Step 1: Open the Settings app on iPhone.

Step 2: Scroll down to Messages.

Step 3: Disable the iMessage toggle.

Enable it again and then check iMessage sync is working or not.

Fix 2: Enable Messages in iCloud

Apple uses iCloud to sync messages among all your devices. By default, the Messages option is enabled for iCloud. You can temporarily disable Messages in iCloud and enable it again. Go through the steps below to make changes.

Step 1: Open Messages on Mac.

Step 2: Click on Messages in the Menu bar.

Step 3: Select Settings.

Step 4: From the iMessage menu, disable Messages in iCloud.

enable messages in iCloud Mac

Fix 3: Sync Messages Manually on Mac

If you are still having problems getting the latest messages on the Mac, you need to sync it manually. Here’s how.

Step 1: Open the Messages app on Mac.

Step 2: Go to Messages at the top-left corner > Settings.

Step 4: Slide to the iMessage menu.

Step 5: Click on Sync Now button.

Sync messages manually

Enable it again and restart the app.

Tip: Learn how to turn iMessage on or off on Mac.

Fix 4: Reset Network Settings

You might face issues with iMessage sync if your iPhone’s network settings are messed up. You must reset network settings and try the sync process again.

On iPhone, open Settings > General > Transfer or Reset iPhone > Reset > Reset Network Settings.

Was this helpful?

Thanks for your feedback!

5 Ways to Fix Mail App Not Working on iPhone

Basic Fixes

  • Check your network connection: Ensure your iPhone has a good internet connection. Test its speed online.
  • Reinstall the Mail app: Long-tap the Mail app icon and select Remove app. Head to the Apple App Store and search Mail to install it.
  • Disable Low Power Mode: Open the Settings app, select Battery, and toggle off the Low Power Mode.
  • Update iOS: Open iPhone Settings, select General, and tap Software Update. Tap Install to update iOS to the latest version.

Fix 1: Enable Mobile Service for the Mail App

Are you trying to fetch new emails on cellular data? You might not receive new emails if the mobile service toggle is disabled for the Mail app. Head to iPhone settings to enable it.

Open the Settings app, select Mobile Service, and scroll down to enable it for the Mail app.

Fix 2: Adjust Mail Fetch Settings

To avoid missing emails in the Mail app, you must push emails from the server when possible. If Push is unavailable for your email provider (e.g. Gmail), switch to Fetch and increase its frequency.

Step 1: Open iPhone settings, select Mail, and tap Accounts.

Step 2: Select Fetch New Data, enable Push (if unavailable, pick Fetch) for your email account, and set the Fetch frequency to Every 15 Minutes.

Fix 3: Correct Device Date and Time

If your iPhone has an incorrect date and time, the Mail app may fail to communicate with the server to show new emails. Correct your device date and time and reopen the Mail app.

Select General under iPhone Settings, tap Date & Time, and turn on the toggle for Set Automatically.

Fix 4: Disable Mail Privacy Protection

Mail Privacy Protection safeguards your privacy by hiding your IP address so email senders can’t track your online activity. However, an issue with it malfunctions the Mail app and halts fetching new emails. Disable it under Mail settings to restore its normal functioning.

Step 1: Select Mail under iPhone Settings and tap Privacy Protection.

Step 2: Disable the Protect Mail Activity toggle.

Fix 5: Delete and Re-Add Your Account

Lastly, delete and re-add your email account to the Mail app to fix account authentication issues that are preventing you from viewing new emails.

Step 1: Open the Settings app, select Mail, and tap Accounts.

Step 2: Select your configured mail account and tap Delete Account. Tap Delete Account again to confirm.

Step 3: To re-add it, select Add Account on the previous page, pick your desired mail service, and type your credentials to log back in.

Was this helpful?

Thanks for your feedback!

6 Ways to Fix Notifications Not Working on Windows 11

Basic Fixes

  • Restart Your PC: Before trying other things, it’s a good idea to restart your Windows PC. This should help fix any temporary glitches causing problems with the app notifications.
  • Install Windows updates: Such notification issues can also occur due to a buggy Windows build. Microsoft is usually quick to release fixes, so consider installing any pending updates on your Windows 11 PC.

Fix 1: Review Notification Settings

You should also review the system notification settings and ensure you haven’t disabled app alerts from there. Here’s how to do it.

Step 1: Press the Windows key + I to launch the Settings app and go to Notifications.

Notifications on Windows 11

Step 2: Enable the toggle for Notifications. Then, scroll down and ensure you haven’t disabled notifications for specific apps.

Enable Notifications in Windows 11

Fix 2: Turn off Do Not Disturb

Enabling Do Not Disturb can also prevent Windows 11 from showing notifications. Here’s how to turn it off.

Step 1: Press the Windows key + I to open Settings and go to System > Notifications.

Step 2: Turn off the toggle for Do not disturb.

Disable Do Not Disturb on Windows 11

Step 3: Ensure you haven’t configured Windows to enable the do not disturb mode automatically.

Disable Automatic Do Not Disturb on Windows 11

Fix 3: Allow the App to Run in the Background

If notifications are not working for a specific app, ensure you haven’t prevented it from running in the background on your Windows PC. Here’s how to change that.

Step 1: Right-click on the Start icon and select Installed apps.

Installed Apps on Windows

Step 2: Locate the app which is failing to send notifications. Click the three-dot icon and select Advanced options.

Xbox App Advanced Options on Windows

Step 3: Click the drop-down menu under Background apps permissions and select Always.

Allow Xbox to Run in the Background on Windows

Fix 4: Run SFC Scan

Corrupted or missing system files can also cause notifications to stop working on Windows 11. To fix that, try running an SFC (or System File Checker scan) that can automatically detect and replace such files with their cached versions. Here’s how.

Step 1: Right-click the Start icon and select the Terminal (Admin) option.

Open Terminal (Admin) on Windows 11

Step 2: Type the command given below and press Enter.

sfc /scannow
SFC Scan on Windows 11

Fix 5: Re-Register Notification Center

Sometimes, Windows may also fail to display app alerts if there’s an issue with the Notification Center. Here’s what you can do to fix that.

Step 1: Open the search menu, type PowerShell, and click on Run as administrator to open PowerShell with admin rights.

Open Windows PowerShell

Step 2: Paste the command given below and press Enter.

Get-AppxPackage | % { Add-AppxPackage -DisableDevelopmentMode -Register "$($_.InstallLocation)\AppxManifest.xml" -verbose }

Fix 6: Tweak Registry Editor

Registry Editor is a powerful tool for making system-level changes to your PC. Here’s how to modify a few registry files to force-enable notification banners on your PC.

Step 1: Click the search icon on the taskbar, type registry editor, and press Enter.

Open Registry Editor as Admin

Step 2: Paste the following path in the address bar at the top and hit Enter.

HKEY_CURRENT_USER\Software\Microsoft\Windows\CurrentVersion\PushNotifications

Step 3: Right-click on the PushNotifications key, go to New, and click on DWORD (32-bit) Value. Name it ToastEnabled.

Create New DWORD

Step 4: Double-click on the ToastEanbled key and change its value to 1.

Edit DWORD Value

Was this helpful?

Thanks for your feedback!

5 Ways to Fix Firefox Not Responding on Windows 10 and Windows 11

Fix 1: Force Close Firefox Processes

Sometimes, Firefox processes may become unresponsive on your PC due to temporary issues. In most cases, you can fix the problem by closing Firefox processes via the Task Manager on Windows.

Step 1: Press Ctrl + Shift + Esc on your keyboard to open the Task Manager.

Step 2: In the Processes tab, select Firefox and click the End task button at the top.

End Firefox Processes

Fix 2: Try Troubleshoot Mode in Firefox

If you rely on add-ons in Firefox to improve your productivity, they could be causing issues. To verify if this is the case, launch Firefox in Troubleshooting Mode, which disables all add-ons, themes, and custom settings.

To launch Firefox in Troubleshoot Mode, hold down the Shift key and double-click the Firefox app shortcut. Then, click Open.

Open Firefox Troubleshoot Mode

Now, use Firefox for a few minutes. If it works fine, the issue is likely due to one of the add-ons. To identify the culprit, try disabling all add-ons, then re-enable them one by one. Here’s how:

Step 1: Open Firefox in Troubleshoot Mode. Click the menu icon (three horizontal lines) in the top-right corner and select Add-ons and themes from the list.

Firefox Add-ons

Step 2: Use the switches next to the add-ons to turn them off.

Disable Firefox Add-Ons

Once disabled, close Firefox and try opening it again. After that, enable each add-on one by one to find the one causing the issue.

Fix 3: Disable Hardware Acceleration

By default, Firefox comes with hardware acceleration enabled. This feature uses your PC’s GPU instead of the CPU to speed up processes. However, depending on your PC’s graphics card, it can sometimes cause Firefox to freeze. To see if this resolves the issue, try disabling Hardware Acceleration in Firefox. Here’s how:

Step 1: Launch Firefox on your PC, click the menu icon in the upper right corner and select Settings.

Firefox Settings

Step 2: Scroll down to go to the Performance section and uncheck the box that reads Use recommended performance settings.

Step 3: Uncheck the Use hardware acceleration when available option.

Disable Hardware Acceleration in Firefox

Fix 4: Clear Cache and Cookies

Browsers like Firefox use cache and cookies to enhance your browsing experience. However, over time, this old browsing data can accumulate and cause conflicts, leading to Firefox freezing or crashing. To address this, try clearing the cache and cookies from Firefox. Here’s how:

Step 1: Open settings on Firefox.

Step 2: Switch to the Privacy & Security tab on your left and scroll down to Cookies and Site Data. Then, click the Clear Data button.

Clear Firefox Data

Step 3: In the Clear Data panel, mark the boxes that read Cookies and Site Data and Cached Web Content. Then, hit Clear.

Clear Firefox Data

Fix 5: Refresh Firefox

If none of the previous solutions work, resetting Firefox might be your last option. Fortunately, it’s a straightforward process, as Firefox offers a refresh option. This option removes your add-ons and preferences while keeping your bookmarks, saved passwords, and open tabs intact. Here’s how to do it:

Step 1: Hold down the Shift key and double-click on the Firefox app shortcut to open it in Troubleshoot Mode.

Step 2: Click the Refresh Firefox button.

Refresh Firefox

Step 3: Select Refresh Firefox to confirm your action.

Refresh Firefox Confirmation Box

Was this helpful?

Thanks for your feedback!

5 Ways to Fix Command Prompt Not Working on Windows 11

Fix 1: Run SFC and DISM Scans

Corrupted or missing system files can malfunction Command Prompt on Windows. If that’s the case, running the SFC (System File Checker) and DISM (Deployment Image Servicing and Management) scans should help.

Step 1: Right-click the Start icon and select Terminal (Admin) from the list.

Step 2: In the console, type the following command and press Enter.

SFC /scannow
SFC Scan on Windows 11

Step 3: Run the following commands one by one and press Enter after each one to run the DISM scan:

DISM /Online /Cleanup-Image /CheckHealth
DISM /Online /Cleanup-Image /ScanHealth
DISM /Online /Cleanup-Image /RestoreHealth
DISM Scan on Windows 11 PC

Restart your PC after the scan is complete, and check if the issue persists.

Fix 2: Update the System Environment Variables Path

Command Prompt might fail to run commands if there are issues with the environment variables path on your PC. To remedy that, create a new path by following the steps below.

Step 1: Press Windows key + R to launch the Run dialog box. Type sysdm.cpl in the box and press Enter.

Step 2: Switch to the Advanced tab and click Environment Variables.

System Properties window

Step 3: In the following window, select Path and click Edit.

edit environmental variables on Windows

Step 4: Click New and enter this path: C:\Windows\SysWow64\

edit environmental variables on Windows 11

Fix 3: Create a New User Account

If you still can’t use the Command Prompt, there might be an issue with your user account files. So, your best option is to create and switch to a new user account.

Step 1: Press the Windows key + I to launch the Settings app and head to Accounts > Other users.

Accounts on Windows 11

Step 2: Click Add account.

Add Account on Windows 11

Step 3: Click the I don’t have this person’s sign-in information option and follow the on-screen prompts to create a new account.

Create New Account for Windows 11

Switch to the newly created user account and see if the Command Prompt works fine.

Fix 4: Try Clean Boot Mode

Booting your PC in a clean boot state can help you determine whether Command Prompt is malfunctioning due to interference from a third-party app or service.

To boot Windows into a clean boot mode:

Step 1: Press the Windows + R keyboard shortcut to open the Run dialog box, type msconfig in the Open field, and press Enter.

Step 2: Navigate to the Services tab > tick the box for Hide all Microsoft services > click Disable all.

Disable Third-Party Services on Windows

Step 3: Switch to the Startup tab > click on Open Task Manager.

Open Task Manager on Windows

Step 4: Select a third-party app or program and click Disable. Repeat this step to disable all third-party apps and programs.

Disable Third-Party Startup Apps Windows

After completing the above steps, restart your PC and use Command Prompt again. If you don’t encounter any problems, one of your third-party apps or programs may be to blame. In that case, remove any recently installed apps and programs one by one to fix the problem.

Fix 5: Perform System Restore

The System Restore feature in Windows 11 periodically backs up your entire PC. You can use it to revert to the point when the Command Prompt was working fine. Here’s how:

Step 1: Click the search icon on the taskbar, type create a restore point, and press Enter.

Open System Restore on Windows 11

Step 2: Under the System Protection tab, click System Restore.

Open System Restore on Windows 11

Step 3: Select Recommended restore and click Next.

Restore Point Windows 11

Step 4: Review all the details and hit Finish.

Perform a System Restore on Windows 11

Was this helpful?

Thanks for your feedback!

4 Ways to Fix Touchpad Not Working on Windows 11

Fix 1: Run the Hardware and Devices Troubleshooter

Windows offers several troubleshooters for diagnosing and fixing common issues with your system. In this case, you can try running the hardware and devices troubleshooter to get the touchpad to work on Windows 11.

Step 1: Press the Windows key + R to open the Run dialog box. Type msdt.exe -id DeviceDiagnostic in the box and hit Enter.

Step 2: In the Hardware and Devices window that appears, hit Next to allow it to scan for any issues and fix them.

Hardware and Devices Troubleshooter

Fix 2: Repair Touchpad Driver

If the troubleshooter fails to identify any issues with the touchpad, you can try repairing the OEM’s touchpad app on your PC. Here’s how:

Step 1: Press the Windows key + I to launch the Settings app and head to Apps > Installed apps.

Installed Apps on Windows 11

Step 2: Look for your touchpad app, click the three-dot menu next to it, and select Modify.

Modify Touchpad

Step 3: Follow the on-screen instructions to complete the restoration process.

Repair Touchpad on Windows

Fix 3: Update or Reinstall the Touchpad Driver

Windows updates typically handle driver updates automatically. However, if you’ve disabled automatic updates on Windows, the touchpad drivers on your laptop may be outdated. You can try manually updating the drivers by following the steps below.

Step 1: Right-click on the Start icon and select Device Manager from the list.

Open Device Manager on Windows

Step 2: Expand Mice and other pointing devices, right-click on your touchpad, and select the Update driver option.

Update Touchpad Drivers on Windows

If the problem persists, the touchpad drivers may be corrupted. In that case, uninstall the problematic driver and restart your PC. Windows will automatically reinstall the missing driver during boot.

Fix 4: Use System Restore

A recent system-level change may have caused the touchpad to stop working in Windows 11. You can use System Restore to revert your system to a point when the touchpad was working fine.

Step 1: Click the search icon on the taskbar, type in create a restore point, and press Enter.

Open System Restore on Windows 11

Step 2: Under the System Protection tab, click on the System Restore button.

Open System Restore on Windows 11

Step 3: Click Next.

System Restore in Windows 11

Step 4: Select the Recommended restore option and hit Next.

Restore Point Windows 11

Step 5: Review all the details and click Finish.

Perform a System Restore on Windows 11

Was this helpful?

Thanks for your feedback!

Top 10 Ways to Fix iPhone Not Backing Up to iCloud

Most users opt for iCloud backup when switching from an old iPhone to a new one. It’s one of the best backup solutions and works seamlessly among Apple devices. However, there are times when your iPhone fails to back up the device data to iCloud. Here are the top ten ways to fix iPhone not backing up to iCloud.

An iCloud backup takes care of your messages, call history, Safari data, productivity apps, tasks, media, and app data. So, your iPhone not backing up to iCloud can put you at risk of data loss risk. Let’s troubleshoot the problem once and for all.

Why Can’t I Backup My iPhone

Insufficient iCloud storage is one of the biggest factors behind the ‘iCloud backup failed’ error. After all, Apple only offers 5GB of iCloud storage to get started, and not many pay for the iCloud+ or Apple One subscription.

Another reason can be a slow network connection and a low battery on your phone. We will start with the basics and move to advanced tricks to complete the iCloud backup on iPhone. Without further ado, let’s get started.

How to Fix iCloud Not Backing Up

1. Restart iPhone

Rebooting your iPhone is one of the quickest ways to troubleshoot common problems. If you have an iPhone with Face ID, use the steps below.

Step 1: Keep pressing any volume and power buttons simultaneously and use the power off slider to turn off the phone.

Step 2: Wait for around 30 seconds and keep pressing the power button to turn on the phone.

Restart iPhone

If you have an old iPhone model with the home button, keep pressing the side button until the power off slider appears.

2. Authenticate Your Apple Account Again

iCloud not backing up error can appear due to an account authentication issue. You need to sign out from your Apple account and sign back in.

Step 1: Open Settings and select your profile.

Step 2: Scroll down and log out from your account. Sign in with Apple account details and try again.

3. Enable iCloud Backup

You might have disabled iCloud backup on your iPhone before. It’s time to enable it from the Settings menu.

Step 1: Open Settings on your iPhone.

Step 2: Go to your profile.

Step 3: Select iCloud.

Step 4: Tap on iCloud Backup.

Step 5: Enable the ‘Back Up This iPhone’ toggle from the following menu.

4. Ensure Sufficient iCloud Storage

By default, iCloud comes with only 5GB of storage. When you enable photo backup on iCloud, you may run out of free cloud storage.

You need to pay for one of the iCloud plans. The cheapest plan starts at $0.99 for 50GB. You also get other goodies like Hide My Email and iCloud Private Relay.

You can head to Settings and select user profile. Tap on iCloud and check the remaining storage.

Manage iCloud Storage

Apps like WhatsApp take a big chunk of iCloud backup storage. If you use WhatsApp for a long time, it takes around 5GB-6GB in the iCloud backup.

You can exclude such big apps from iCloud backup if not required and try backing up again. Here’s how.

Step 1: Open the iPhone Settings app.

Step 2: Go to your profile and select iCloud.

Step 3: Tap Show All. Scroll down and disable the WhatsApp toggle.

Do you still have low iCloud storage for your Apple account? If you don’t want to pay for an iCloud+ or an Apple One plan, check the steps below to glance over and remove large files from your iCloud account.

Step 1: From the iPhone Settings app, tap on your profile.

Step 2: Go to iCloud and select Manage Storage.

Step 3: You will see a detailed breakdown of iCloud data.

Photos will take a big pie of iCloud storage for most users, followed by previous iPhone backups and apps like WhatsApp. You can remove photos, delete old backups, or make other changes to free up storage in iCloud.

5. Connect to a Faster Wi-Fi Connection

iCloud backups don’t come in small sizes. If you have dozens of app data to back up on your iPhone, you might have an iCloud backup of 5GB-7GB.

In this situation, you need to connect your iPhone to a faster internet connection. You shouldn’t rely on high-speed 4G or 5G mobile connections. iCloud backup won’t start until you connect to a Wi-Fi network. You need to connect to 5GHz Wi-Fi frequency for fewer failure rates and not the 2.4GHz one.

Note: To successfully complete the iCloud backup process, you must keep your iPhone on charge. Connect your iPhone to a power source during the backup process, and you are good to go.

6. Check iCloud Servers

If iCloud servers have an off day, the backup process won’t be complete, no matter what you try.

image 325

Apple offers a dedicated System Status page to check the current iCloud Backup status. Ensure it shows a green indicator beside the iCloud service, and then proceed with the backup option.

7. Reset Network Settings

In one of the Reddit threads, a user fixed the ‘iCloud backup failed’ error by resetting network settings. It’s worth trying. Follow the steps below.

Step 1: Open Settings and go to General > Transfer or Reset iPhone menu.

Step 2: Tap Reset and select Reset Network Settings.

It’s one of the effective ways to fix common network glitches on iPhones. You can check our separate post to learn the implications of resetting network settings.

8. Reset All Settings

If the trick above doesn’t fix the iCloud not backing up issue, it’s time to reset all settings on iPhone. It resets your app preferences, wallpaper, privacy settings, keyboard dictionary, and location settings.

Step 1: Open iPhone Settings and go to General > Transfer or Reset iPhone > Reset menu.

Step 2: Tap Reset All Settings. Enter a six-digit authentication code to confirm your identity.

You can try backing up your iPhone to iCloud again.

9. Update iPhone

iPhone not backing up to iCloud might be due to an outdated iOS build on your phone. You need to keep your iPhone up to date with the latest iOS version.

Step 1: Open Settings on your iPhone.

Step 2: Scroll to General.

Step 3: Tap Software Update and install the latest iOS build from the following menu.

If your iPhone fails to update to the latest version, check our troubleshooting guide to fix the problem.

10. Create Your iPhone Backup on the Desktop or Mac

If none of the tricks work for you, it’s time to use old-fashioned iTunes software to take offline iPhone backup on a PC.

Mac users need to use the Finder menu to take iPhone backups on the device. If you have problems connecting your iPhone to your PC, read our dedicated troubleshooting guide to fix the issue. Let’s take Mac as an example here.

Step 1: Connect your iPhone to your Mac via a cable.

Step 2: Open Finder and select your iPhone from the sidebar.

Step 3: Select ‘Back Up Now’ to start and complete the backup.

iPhone Not Backing Up to iCloud: FAQs

1. How do I force my iPhone to back up to iCloud?

You can head to the iCloud backup menu in iPhone Settings and tap the ‘Back Up Now’ button to start the process.

1. How to dismiss iPhone can’t be backed up notification?

You can successfully back up the iPhone to iCloud and get rid of irritating notifications.

1. What happens if your iPhone isn’t backed up?

If you lose your data due to accidental damage or a software glitch, you can’t restore it without an iCloud backup.

Take Regular iCloud Backups

Following the iOS 15 update, when you transfer from an old iPhone to a new one, Apple temporarily grants you unlimited iCloud storage to make a smooth transfer. You won’t face any iCloud storage vows when upgrading to a new iPhone.

However, it’s always advisable to take regular iCloud backups to keep your data safe and secure. It can help restore data loss from accidental damage or blank screen issues.

Was this helpful?

Thanks for your feedback!

3 Ways to Force Quit a Program on Windows 11

Method 1: Force Close an App or Program From the Taskbar

On computers running Windows 11 version 23H2 or later, you can terminate non-responsive apps and programs from the taskbar. To use this feature, you first need to enable the ‘End Task’ option on the taskbar. Here’s how to do it:

Step 1: Press the Windows + I keys on your keyboard to open the Settings app. Select the System tab from the left pane and click on For developers.

Developer Settings Menu on Windows 11

Step 2: Enable the toggle next to End Task.

End Task Option on Taskbar on Windows 11

After completing the above steps, right-click on the non-responsive app or program icon on the taskbar and select the End task option from the resulting menu.

Close Apps From Taskbar on Windows 11

Method 2: Force Close an App or Program via Task Manager

While the above methods work great for force-quitting programs on Windows, sometimes, you might need a more powerful alternative. That’s where Task Manager comes in. Here’s how you can use it to force-quit a program on Windows 11.

Step 1: Press the Ctrl + Shift + Esc keyboard shortcut to open the Task Manager.

Step 2: In the Processes tab, select the program you wish to close and click the End task button.

Close Unresponsive Apps via Task Manager on Windows 11

Like apps and programs, Task Manager also lets you force-quit background processes or a sub-process of a program running on your PC.

Method 3: Force Close an App or Program With Command Prompt

Using Command Prompt is another way to force-quit a program or a process on your Windows 11 PC. Here’s how.

Step 1: Click the search icon on the taskbar and type in cmd. Select Run as administrator.

Open Command Prompt as Admin on Windows 11

Step 2: In the console, type the following command and press Enter to view a list of programs and processes running on your PC.

tasklist
Tasklist Command in Command Prompt on Windows 11

Step 3: Scroll through the list to note down the name of the program you want to force quit.

Step 4: Type the following command in the console and press Enter.

taskkill /im ProgramName.exe /t /f

Replace ProgramName in the above command with the actual name of the program noted earlier.

Force Close Apps Using Command Prompt on Windows 11

Alternatively, you can also kill a program using its PID (or ProcessID). You can find the ProcessID of a program next to its name on the Tasklist.

Once you have the PID of a program, use the command below to force close it.

taskkill /pid ProcessID /t /f

Replace ProcessID in the above command with the actual PID number noted earlier.

Force Close Programs Using Command Prompt on Windows 11

Bonus: Create a Shortcut to Force-Quit Non-Responding Apps on Windows 11

While the above methods are quite powerful for force-quitting programs on Windows 11, there’s also another option. You can set up a desktop shortcut on Windows to quickly close any non-responding programs. Here’s how.

Step 1: Right-click anywhere on the desktop. Go to New, and select the Shortcut option from the sub-menu.

Step 2: Paste the following command in the text field and hit Next.

taskkill /f /fi "status eq not responding"
Create Shortcut for Closing Non Responding Command on Windows 11

Step 3: Give your shortcut a suitable name and click on Finish.

Name Shortcut on Windows 11

And that’s about it. Now, you can force quit programs that are not responding by double-clicking on this shortcut.

Was this helpful?

Thanks for your feedback!