Helping millions of people navigate the world of technology.

6 Best Apple CarPlay Shortcuts and Automations You Must Try

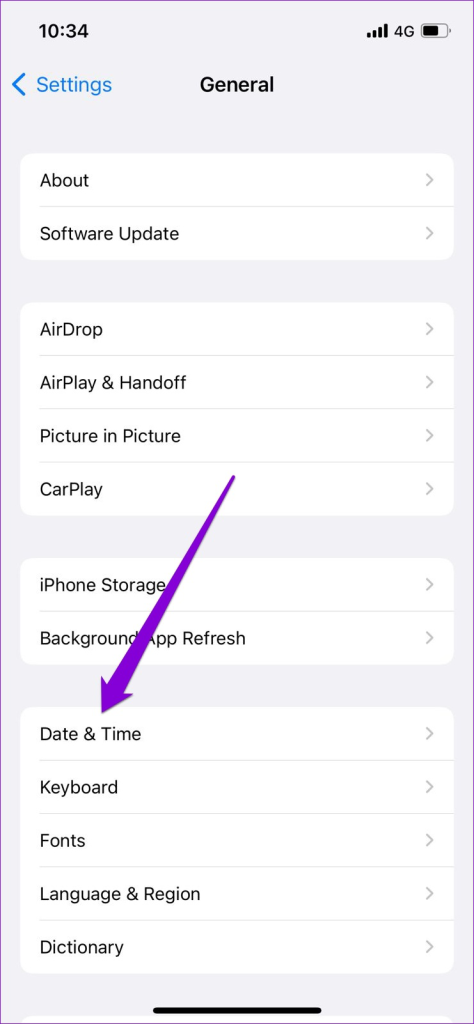
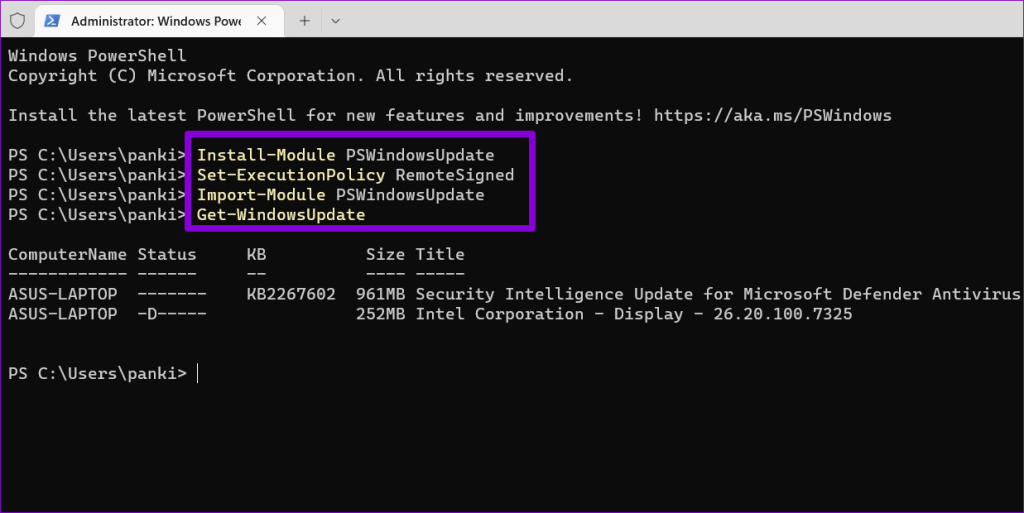
Apple CarPlay is not simply an interface that lets you play songs or dial one of your contacts from your contact list. This system is capable of much more, especially if you know your way around iOS Shortcuts. From playing your favorite podcasts in the morning to showing you the directions to your home, Apple CarPlay can turn out to be quite ‘intelligent.’

6 Best Apple Car Play Shortcuts and Automations You Must Try

Here are the best CarPlay automation and shortcuts that you can try on your car.

What Are Automations

The iOS Shortcuts app makes possible plenty of things and helps to streamline your everyday tasks. The good thing is that you can create your Shortcuts as per your preference. Shortcuts come preinstalled if your phone is running iOS 13 or higher.

Shortcuts and Automations are simple If-and-Else statements and can be used to run basic commands.

However, if you are not familiar with the app, it can be initially daunting. We’ll walk you through the entire exercise and show you how to enable various CarPlay automation on your iPhone.

6 Best Apple CarPlay Automations and Shortcuts

1. Play a Song From Apple Music

How do you like the idea of your car playing your favorite song as soon as you plug in your phone?

With Automations, you can program the phone to play your favorite music when you connect your phone to your car’s infotainment system.

Step 1: Open the Shortcuts app and tap on the Automation tab. Select Personal Automation from the menu to see all the ‘When’ conditions.

6 Best Apple Car Play Shortcuts and Automations You Must Try 1
6 Best Apple Car Play Shortcuts and Automations You Must Try 22

Scroll the list until you see the option for CarPlay, and tap to select it.

Once done, select Connect and hit the Next button.

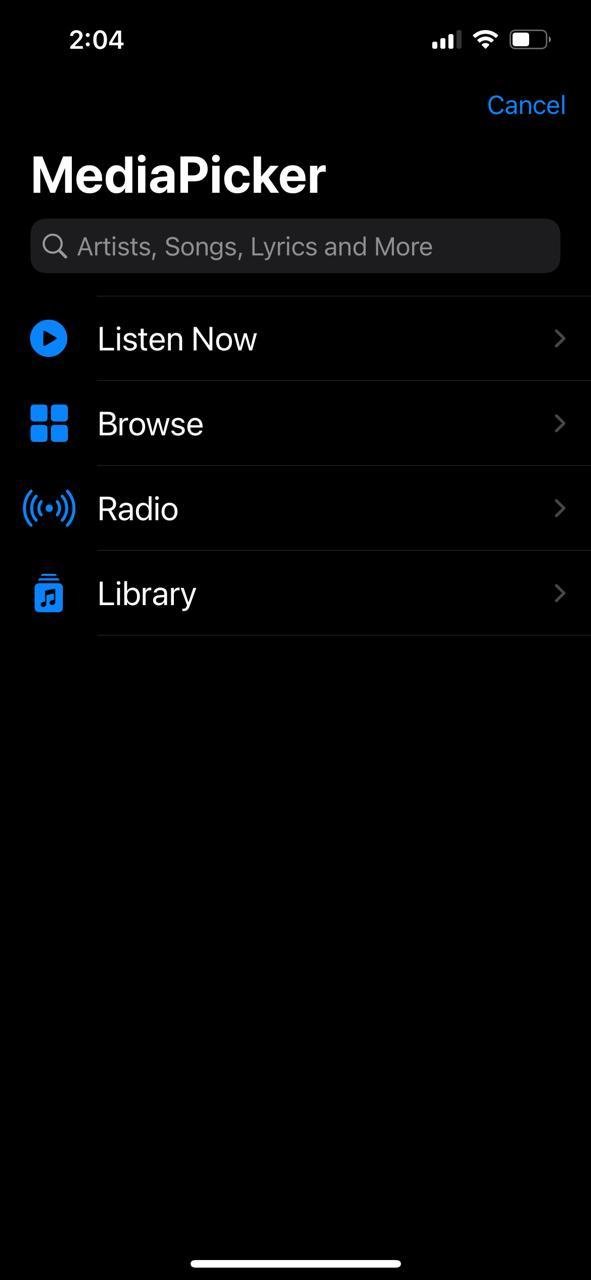
Step 2: Select Play Music from the list. Now, tap on the little Arrow button, and select Shuffle.

6 Best Apple Car Play Shortcuts and Automations You Must Try 21
6 Best Apple Car Play Shortcuts and Automations You Must Try 20

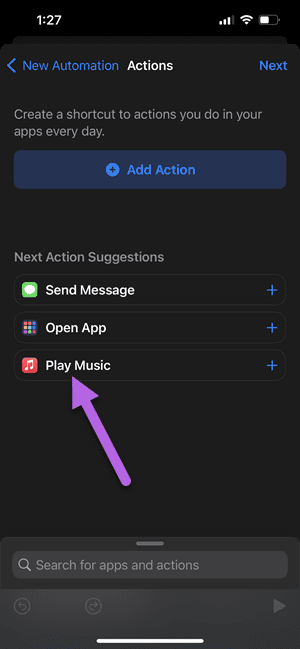
Step 3: Tap on the text that says Music to bring up the Media Picker. Here, pick an option from the list like Listen Now or Radio.

6 Best Apple Car Play Shortcuts and Automations You Must Try 2 2
6 Best Apple Car Play Shortcuts and Automations You Must Try 2 1

Once done, hit the Done button to save the Automation. That’s it!

And yes, do remember to disable the Ask before Run toggle.

2. Enable DND

Do you get annoyed by the continuous pings and messages when you drive? If yes, you may want to enable DND mode on your phone when driving.

Like the automation above, enabling DND is simple and easy. The best part is that it kicks into action each time you plug in the phone to your car.

Step 1: Once you have picked CarPlay from the list, swipe up on the screen and tap on the Search bar.

Type DND, and select Focus Mode from the list, as shown in the screenshot below.

6 Best Apple Car Play Shortcuts and Automations You Must Try 18

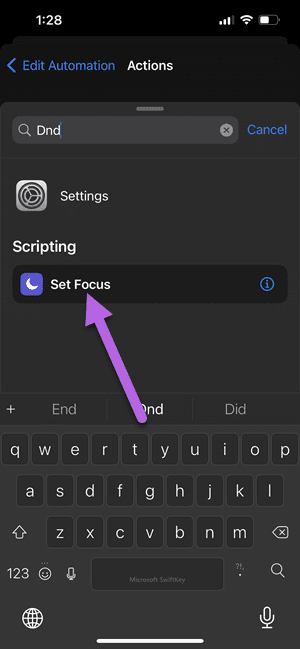
Step 2: Next, tap on the Off text to change it to On.

6 Best Apple Car Play Shortcuts and Automations You Must Try 16

The next step is not mandatory. However, if you wish to turn off the DND mode at a particular time, you can set the time by clicking on the Turned Off option.

Having done that, save the settings. Simple, see.

At the same time, you can program Automations to turn off the DND mode when CarPlay disconnects. The process will be same like the one above. The only difference is that you will have to select Disconnect when creating the Automation.

3. Play Songs From Playlist

Yes, you read that right. You can play songs from your favorite playlists as soon as you get into your car. Cool, right? The best thing is that setting it up is as easy as pie.

The drill is as usual. You’ll have to open Automations and head over to the Actions Page.

Step 1: Swipe up on the Actions screen and select Media.

Step 2: Next, scroll down until you see the option for Get Playlist. Select it, and tap on Playlist to well, choose the playlist of your choice.

6 Best Apple Car Play Shortcuts and Automations You Must Try 15
6 Best Apple Car Play Shortcuts and Automations You Must Try 14

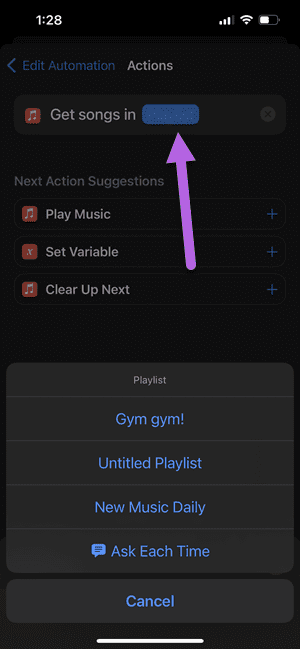
Step 3: Under Next Action, select the Play Music option, and that’s about it.

4. Ask What Apps to Enable

Apple CarPlay capable of showing more than just songs and maps. You can enable three screens at a given time.

If you want CarPlay to open the app of your choice, you can now do so.

Step 1: On the Actions screen, select the Open app option and tap on the App text.

6 Best Apple Car Play Shortcuts and Automations You Must Try 91

Step 2: Choose the app of your choice, and save the settings.

5. Get Automatic Directions as per Time

Do you often check the directions to your home before you start driving? If yes, you may want to try this automation, which automatically shows the directions to the destination.

For now, iOS Shortcuts let you choose either Apple Maps or Google Maps (see best Google Maps tips and tricks).

Step 1: On the Actions page, select Apps on the swipe-up screen and pick Maps from the list.

On the next page, select Show Directions.

6 Best Apple Car Play Shortcuts and Automations You Must Try 8

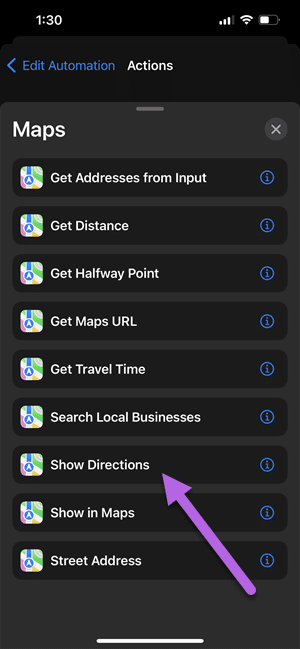
Step 2: Tap on the Destination and enter your home address.

Once done, tap on Maps and select Google Maps from the list.

6 Best Apple Car Play Shortcuts and Automations You Must Try 7

The next step is to figure out how to fire this automation at a particular time.

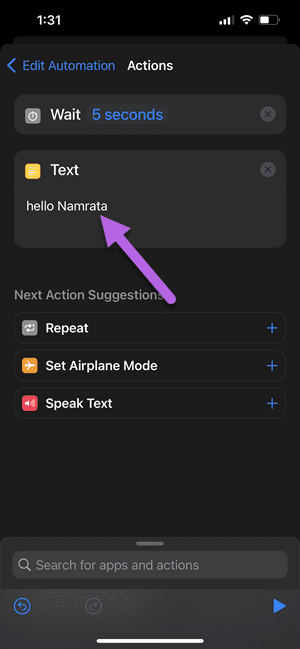
6. Set a Welcome Message

You can also program CarPlay to welcome you with the text of your choice, so if you want to feel motivated when you start your day, plug in your phone and let the magic take over.

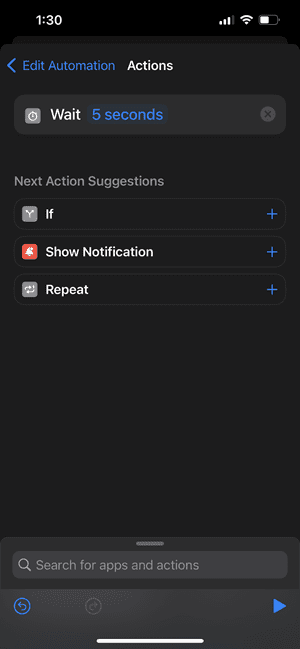
Setting a welcome message is easy and simple. However, you will need to add a customized script. At the same time, you may want to add a slight delay since CarPlay in itself requires time to boot.

Step 1: Swipe up on the Actions page and search for Wait. Once done, change the timing to 5 seconds.

6 Best Apple Car Play Shortcuts and Automations You Must Try 5

Step 2: Swipe up on the screen again to bring up the Actions list, and search for Text. Once in, add the Text below the variable.

6 Best Apple Car Play Shortcuts and Automations You Must Try 2

Now, bring up the menu again and search for Speak Text. The text that you just added will be automatically chosen.

6 Best Apple Car Play Shortcuts and Automations You Must Try 3

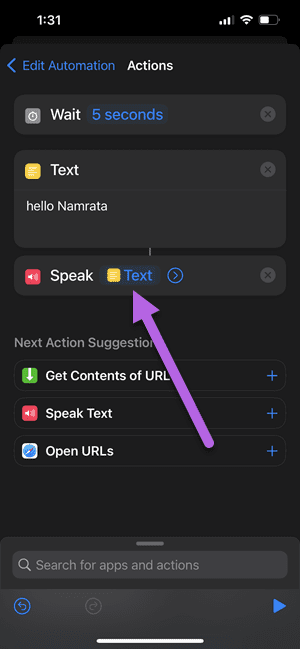
Hit the Play icon to test out this feature. And once done, save the settings and be ready to be welcomed in style.

Smarts for the Car

iOS Shortcuts and Automations have many scopes to automate even the most basic things. So, all you need to do is potter around the app to find the best possible matches for you.

Was this helpful?

Thanks for your feedback!

How to Stop Teams From Opening on Startup (or Uninstall It)

Method 1: Disable Microsoft Teams From Its Settings

If you want to keep Teams installed on your PC but prefer to launch it manually when necessary, follow the steps below.

Step 1: Press the Windows key on your keyboard. Then, type Microsoft Teams and click Open.

Step 2: Once launched, click on the three-dot icon at the top bar next to your profile icon. From the drop-down, choose Settings.

Step 3: In Settings, under System, uncheck the box for Auto-start Teams.

uncheck the box next to the 'Auto-start Teams' option

Microsoft Teams should no longer auto-start each time you turn on your PC.

Method 2: Stop Microsoft Teams From Opening on Startup Using Task Manager

You can use the Task Manager to adjust the startup status of Microsoft Teams if you want to stop the app from launching automatically. Here’s how.

Step 1: Press the Windows key on your keyboard, type Task Manager, and click Run as administrator.

Note: Alternatively, press the Windows key + Shift + Esc to open Task Manager.

Step 2: From the side pane, go to Startup Apps > choose Microsoft Teams > click Disable at the top.

click Disable

You can also use this method to stop any other app on your Windows computer from starting automatically.

Method 3: Disable Microsoft Teams Using Registry Editor

This method is more complex than the one above. We also recommend backing up the Windows Registry before proceeding with the steps below. 

Step 1: Press the Windows key on your keyboard, type Registry Editor, and click Run as administrator.

Note: Alternatively, press the Windows + R keys to open the Run dialog box, type regedit.exe, and click OK to open Registry Editor.

Step 2: In the top address bar, enter the following path:

HKEY_CURRENT_USER\Software\Microsoft\Windows\CurrentVersion\Run

Note: You can manually navigate to the section too.

enter the following path

Step 3: Find and right-click on the com.squirrel.Teams.Teams key. Then, click Delete.

click Delete

Step 4: In the confirmation window, click Yes.

Finally, reboot the system to implement the changes.

FAQs

1. Will disabling Teams affect other Microsoft applications?

No, disabling Teams should not impact other Microsoft apps unless they directly integrate with Teams for functionalities.

2. Will disabling teams save system resources?

Yes, disabling teams can minimize background processes and potentially improve system performance, especially on resource-constrained devices.

Was this helpful?

Thanks for your feedback!

4 Ways to Fix WhatsApp Not Receiving Messages

Basic Fixes to Try

  • Check for WhatsApp app update: Keeping apps updated helps ensure they receive critical security or bug updates as soon as possible. This helps eliminate most app issues.
  • Check WhatsApp server status: Problems in the backend can affect app performance, preventing them from working properly. Visit Downdetector to see if users have reported any issues.
  • Check internet connection: WhatsApp requires an active internet connection to send or receive messages. So, ensure your internet is working properly.
  • Restart your phone: It’s recommended that you restart your device, especially if it hasn’t been done in a while. This should remove any temporary bug affecting the device’s performance.
  • Ensure you’re not blocked: Messaging capabilities are severely restricted when someone blocks you on WhatsApp. So, before proceeding, ensure the other person hasn’t blocked you on WhatsApp.
  • Uninstall and reinstall WhatsApp: Uninstalling the app can help eliminate any settings that prevent WhatsApp from receiving messages. So, uninstall WhatsApp and reinstall it. Sign in and check again. Ensure to back up the data.

If the issue persists, continue to the below-mentioned troubleshooting fixes.

Fix 1: Unarchive the Relevant Chat

If you have previously archived a chat, it will not appear in the main chat window. This makes it easy to miss messages and, in some cases, not receive them. So, unarchive the chat and check again. Here’s how.

Step 1: Open WhatsApp on your mobile device. Tap on Archived at the top.

Step 2: Here, long-press on the chat you wish to unarchive. Once available, tap on the Unarchive icon.

This should unarchive the selected chat and make it available in the main chat window.

Fix 2: Enable Background Refresh for WhatsApp

If WhatsApp doesn’t have permission to run in the background, it might delay the messages as WhatsApp will need to sync the messages when you open the app. This can cause certain newer messages not to appear. So, allow WhatsApp to refresh in the background on your Android and iOS devices.

On iPhone

Step 1: Open Settings and tap on General.

Step 2: Tap on Background App Refresh. Scroll down and enable the toggle for WhatsApp.

On Android

Step 1: Long-press the WhatsApp app icon and tap on the App info icon.

Step 2: Here, tap on Mobile data & Wi-Fi. Then, turn on the toggle for Unrestricted data usage.

Fix 3: Turn off Focus Mode on iPhone

iPhone users running iOS 15 or higher can use Focus Mode to block certain distractions. However, this will also stop WhatsApp messages from appearing. To stop this, disable Focus mode on your iPhone. Here’s how:

Tip: You can also create a custom Focus Mode and add WhatsApp as an exception to still receive messages when Focus Mode is enabled.

Step 1: Pull down from the top-left corner of the screen or bottom of the screen (if your iPhone has a Home button) to open Control Center.

Step 2: Here, long-press on Focus. Now, tap on any focus option to turn it off.

Turn off Focus mode 1

Fix 4: Disable Data Saver Mode

When running low on battery power, enabling Low Data Mode or Battery Saver seems to be the way to go. However, doing so also restricts app functions, potentially stopping WhatsApp from receiving new messages. Follow the below steps to turn it off.

On iPhone

Step 1: Open the Settings app and tap on Battery.

Step 2: Here, enable the toggle for Low Power Mode.

Disable Low Power Mode 10

On Android

Step 1: Pull down from the top of the screen to open the Quick Settings menu.

Step 2: Here, tap on the Power saving icon.

While the above fixes should help you receive new WhatsApp messages, they might cause increased battery drain or data usage. So, once the issue is fixed, enable the relevant setting.

Was this helpful?

Thanks for your feedback!

2 Ways to Fix Snap Layouts Not Working on Windows 11

Try Basic Fixes

  • Use keyboard shortcuts to snap app windows: If you can’t access the snap layout by hovering your mouse over the maximize icon, you can use keyboard shortcuts instead. Press the Windows key + Z to quickly reveal the snap layout options. Alternatively, you can press the Windows key in combination with one of the arrow keys to snap the active window in the direction of the arrow key you press.
  • Ensure the app is compatible: While most built-in Microsoft apps and programs support snap layouts, some third-party apps might not be compatible by design. If your snap layout issues are limited to a few specific apps, it’s likely that those apps do not support the feature.
  • Remove apps with similar functionality: Third-party apps like PowerToys, MaxTo, AquaSnap, Divvy, and others offer similar window management features to the snap layout in Windows 11. If you’ve been using any of these apps to manage window layouts, remove them and see if that helps.
  • Install Windows updates: Using an older version of Windows can also cause such problems. Install pending Windows 11 updates on your PC and then try using snap layouts again.

Fix 1: Make Sure Snap Layouts are Enabled

Next, you need to go through the Settings app on Windows 11 to ensure snap layouts are enabled on your PC. Here’s how.

Step 1: Press the Windows key + I to open the Settings app and head to System > Multitasking.

Multitasking Settings on Windows 11

Step 2: Toggle on the switch next to Snap windows. Once enabled, use the checkboxes to set your preferences.

Enable Snap Layouts

Fix 2: Enable Snap Layouts via Registry

If enabling snap layouts from the Settings app doesn’t work, you can try using the Registry Editor to enable them.

Step 1: Press the Windows key + R to open the Run dialog. In the Open field, type regedit and press Enter.

Step 2: Use the address bar at the top to navigate to the following key.

Computer\HKEY_CURRENT_USER\Software\Microsoft\Windows\CurrentVersion\Explorer\Advanced

Step 3: Right-click on an empty spot in the right pane, go to New, and select DWORD (32-bit) Value. Name it EnableSnapAssistFlyout.

Create New DWORD

Step 4: Double-click the newly created DWORD and change its value data to 1. Then, click OK.

Edit DWORD on Windows

Exit the Registry Editor and reboot your PC for changes to take effect. This should enable the snap layout on your PC.

Was this helpful?

Thanks for your feedback!

5 Best Wireless CarPlay Adapters for Your Car

Apple’s CarPlay interface is a nifty feature that brings your phone’s apps to your car’s infotainment screen. You can carry out everything with ease, from making phone calls to navigating using Maps. But, if your car doesn’t have wireless CarPlay, it can be a hassle to fiddle with all the cables. You may even face connectivity issues. So what’s the solution, you ask? Wireless CarPlay adapters.

CarlinKit 3.0 Wireless CarPlay Adapter

The CarlinKit 3.0 Wireless CarPlay Adapter is one of the popular adapters. It’s small and compact and plugs directly into the car. At the same time, it’s a well-built device and establishes the connection via Bluetooth and Wi-Fi.

The setup process is simple. It pairs with your phone via Bluetooth first. After that, it will stay connected to your phone via Wi-Fi. The only catch is that you need to ensure that the device has the latest firmware.

It bundles an LED light on top and glows green when working. But the green glow can sometimes be distracting, especially when driving at night. The company sells two variants of the adapter. The older model works on cars made between 2018 and 2019. And this variant works for cars made between 2019 and 2020.

What We Like

  • Easy to setup
  • Affordable

What We Don’t Like

  • Limited support

Loadkey 2021 Wireless CarPlay Adapter

Another wireless adapter you can try is the one by Loadkey. It has a similar construction, but a more premium design — all thanks to the carbon fiber material at the top. The key highlight of the Loadkey adapter is its minimum loading and boot time.

Again, the load time may differ from car to car. Plus, Siri voice commands work as expected. It utilizes Bluetooth and Wi-Fi for connection and shares a similar setup process with the one above. One clear advantage is that it offers a clear set of instructions.

What We Like

  • Looks premium
  • Easy to setup

What We Don’t Like

  • Slow load times

Drimfly Wired to Wireless Carplay Adapter

The Drimfly wireless adapter brings the best of both worlds. It’s not expensive, and at the same time, brings decent performance compared to the ones above. The boot-up time is around 10 seconds, which is decent considering the price and the competition.

Though most CarPlay adapters work on most cars, Drimfly has a list of compatible cars that you should check before buying this product. The best part is that it also supports Siri voice commands and an additional USB port lets you charge your phone.

What We Like

  • Affordable price
  • Fast boot-up time

What We Don’t Like

  • Limited compatibility

Carliet Wireless CarPlay Adapter

carliet carplay adapter

Carliet’s implementation of a CarPlay adapter is slightly boxier and more plastic-y than others. However, it’s also inexpensive so the design and build quality doesn’t matter. It functions well and is compatible with many cars.

If your car has wired CarPlay by default — regardless of the make — the Carliet adapter will convert it into the wireless version. Under the hood, a capable processor works smoothly while running apps and switching between them. Another thing to note is that Carliet uses the 5GHz Wi-Fi network to connect to your phone, so you’re getting a faster connection.

What We Like

  • Good build quality
  • Fast performance

What We Don’t Like

  • N/A

Riousv Wireless CarPlay Dongle

riousv carplay adapter

The highlight of the Riousv CarPlay dongle is its small size. You can tuck it into a small compartment in your car and forget about it. What’s more, you also get a USB-A to USB-C adapter in the box – handy for a newer car.

On the front of the dongle is an LED that indicates the connection status of your phone. As per the brand, the Riousv adapter works well with all cars from 2015, and onwards. Your iPhone needs to run iOS 10 and above as well. Just like the Carliet product, this one also uses the 5GHz Wi-Fi band to communicate with your phone. Unless you want that small form factor, the CarlinKit wireless adapter offers better value.

What We Like

  • Good compatibility
  • Compact form factor

What We Don’t Like

  • Expensive

Was this helpful?

Thanks for your feedback!

6 Ways to Fix Thumbnails Not Showing Windows 11

Basic Fixes

Fix 1: Ensure Thumbnails Are Enabled

To start, review the File Explorer Options and ensure your PC is configured to show thumbnails instead of icons. Here’s how to check.

Step 1: Press the Windows key + S to open the search menu. Type file explorer options in the box and press Enter.

Open File Explorer Options

Step 2: Switch to the View tab and uncheck the Always show icons, never thumbnails box. Then, click Apply, followed by OK.

Enable Thumbnails on Windows 11

Fix 2: Clear Thumbnail Data

Another reason Windows may not display file and folder thumbnails is if the existing thumbnail database has become corrupt. In that case, you must delete it and force Windows to recreate it from scratch.

Step 1: Press the Windows key + I to open the Settings app and head to System > Storage.

Storage Settings on Windows

Step 2: Click on Temporary files.

Temporary Files on Windows 11

Step 3: Select Thumbnails and uncheck all the other boxes. Then, click the Remove files button at the top.

Remove Thumbnails on Windows 11

Fix 3: Uninstall and Reinstall Microsoft OneDrive

At times, Windows 11 may not display thumbnails for pictures, videos, and folders backed up to OneDrive. Several users on a Microsoft Community post reported fixing the issue almost instantly by uninstalling Microsoft OneDrive and installing it back. You can also give this a shot.

Step 1: Press the Windows key + R to open the Run dialog box. Type appwiz.cpl and press Enter.

Step 2: Select Microsoft OneDrive on the list and click Uninstall.

Uninstall OneDrive From Windows 1

Follow the on-screen prompts to finish removing OneDrive from your PC. After that, use the following link to download and install Microsoft OneDrive again.

Fix 4: Change the Default App Type

If you can’t see thumbnails for a specific file type on Windows, it might be due to the default app set for that file type. Try changing the default app and see if that solves the issue.

Step 1: Right-click on the problematic file type, go to Open with, and select Choose another app.

Open With Menu on Windows

Step 2: Select an appropriate app from the list and tick the Always use this app to open files checkbox. Then, click OK to save changes.

Change the Default App for File Type

Fix 5: Modify Advanced System Settings

Did you recently tweak any performance options on Windows? If so, you might have disabled thumbnail previews from there. Here’s how to enable them.

Step 1: Press the Windows key + S to access the search menu. Type view advanced system settings in the box and press Enter.

View Advanced System Settings on Windows

Step 2: In the System Properties window, switch to the Advanced tab and click the Settings button under Performance.

Advanced System Settings on Windows

Step 3: Select the Custom option and check the boxes for Save taskbar thumbnail previews and Show thumbnails instead of icons. Then, hit Apply.

Modify Advanced System Settings on Windows

Fix 6: Restore File Explorer Options

If Windows 11 still doesn’t show thumbnails, restore the File Explorer Options to default settings. Here are the steps.

Step 1: Press the Windows key + S to open the search menu. Type file explorer options in the box and press Enter.

Open File Explorer Options

Step 2: Switch to the View tab and click the Restore Defaults button.

Reset File Explorer View Options

Was this helpful?

Thanks for your feedback!

How to Track Location of Family Members on iPhone

Method 1: Enable Location Sharing in Family Sharing

Step 1: Open the Settings app > tap on your name (the first option in the list). Tap on Find My and enable the toggle for Share My Location.

This will ensure you can share your location with your family members.

Step 2: Go back to the Apple ID menu. Tap on Family Sharing. Invite members, and set up a family on your iPhone if you haven’t already.

Step 3: Then, tap on Location Sharing and turn on the toggles for the people you want to share your location with.

Tip: You can enable the Automatically Share Location toggle, which lets you automatically share your location with any new family member.

To view someone’s location, open the Find My app and go to the People tab. Here, you will find all the people sharing their location with you.

Also Read: How to leave Family Sharing on iPhone, iPad, and Mac

Method 2: Share Location Without Setting Up Family

If you don’t want to set up a family on your iPhone or want to share your location with someone who isn’t a part of it, here’s how to do it.

Step 1: Open the Find My app > go to the People tab > tap on the + icon > select Share My Location.

Step 2: Now, search for the contact with whom you want to share the location. They must use an Apple device with Find My enabled.

Step 3: Select the duration to share the location.

Your contact can then open the Find My app and see your location in the People tab.

To stop sharing your location, go to the People tab in Find My, select the contact, and tap on Stop Sharing My Location.

Note: The above methods work only if you or the other person uses an Apple device. You can read our article to share location with an Android user and vice versa.

Was this helpful?

Thanks for your feedback!

5 Ways to Fix “Unable to Load Photo” Error on iPhone

Try Basic Fixes

  • Free up storage space: A lack of storage space could prevent your iPhone from loading photos from the cloud. Go to Settings > General > iPhone Storage to check if your iPhone storage is full.
  • Install iOS updates: You may see the “Unable to Load Photo” error due to a buggy or outdated iOS build. Try installing pending updates on your iPhone and see if that fixes the error.

Fix 1: Disable Low Data Mode

Enabling Low Data Mode on your iPhone can hinder an app’s ability to use the internet and fetch new content. Hence, it’s best to disable it if you keep getting the “Unable to Load Photo” error on your iPhone.

To disable Low Data Mode on Wi-Fi:

Step 1: Open the Settings app and tap on Wi-Fi.

Step 2: Tap the info icon next to your Wi-Fi network and toggle off Low Data Mode.

Likewise, if you are using mobile data, use the steps below to disable Low Data Mode.

Step 1: Open up the Settings app > navigate to Mobile Data.

Step 2: Tap on Mobile Data Options and disable Low Data Mode from the following menu.

Fix 2: Disable Low Power Mode

Similarly, Low Power Mode can also restrict an app’s ability to work at its full potential. To turn it off, head to Settings > Battery > turn off the toggle for Low Power Mode.

Fix 3: Remove and Re-Add Your Apple ID

If the issue remains, try signing out of your Apple ID and signing back in. For that, open the Settings app and tap on your name at the top. Scroll down and tap Sign Out. Then, enter your Apple ID password and hit Sign Out again.

Sign back into your Apple ID and load your photos again.

Fix 4: Delete and Recover Photo

If you experience this error only while loading a specific photo, delete it and recover it. Simply, long-press a photo and choose Delete. Once removed, navigate to Albums > Recently Deleted. Select your photo > tap the three-dot menu icon at the bottom right corner > select Recover.

Fix 5: Turn off Storage Optimization

Storage optimization allows users to take photos and videos without worrying about their iPhone storage getting full. It achieves this by uploading your photos and videos directly to iCloud instead of saving them locally. However, if your iPhone frequently fails to load photos, it’s best to disable this feature.

Step 1: Open the Settings app and scroll down to tap on Photos.

Step 2: Scroll down and uncheck Optimize iPhone Storage > check Download and Keep Originals.

Was this helpful?

Thanks for your feedback!

5 Ways to Turn off OneDrive Memories Notifications on Windows and Mobile

Method 1. Make Changes From OneDrive Settings on the Desktop

Step 1: Click on the OneDrive icon on the system tray, click the Settings icon, and then click on the Settings menu.

OneDrive Settings Windows

Step 2: In the OneDrive Settings window, switch to the Notifications section and toggle off the option—Notify me when “On this day” memories are available.

Turn off Memory Notifcation Windows

Method 2. Turn off Email Notifcation From OneDrive Web

Email notifications are also part of On This Day memories; if it’s too much for you, you can turn it off from the web.

Step 1: Go to OneDrive web, click on the Settings gear at the top, and click Options.

Step 2: Locate Notifications, and turn off the On this day memories are available option.

Email OenDrive Memory Online

Method 3. Disable OneDrive at Startup

if you seldom use OneDrive, you can disable it from launching as the computer starts. Since OneDrive services automatically start in the background when you sign in to your Windows PC it keeps sending you memory notifications even when you are not actively using the service.

Step 1: Open the Settings app on Windows (use the Windows + I keys).

Step 2: Go to the Apps > Startup.

Startup apps Windows

Step 4: Toggle off OneDrive from the list of apps. From now on, OneDrive won’t start services in the background (until you open it) and won’t show memory notifications on your PC.

Toggle off OneDrive Startup Windows

Method 4. Disable OneDrive Notifications on Desktop

Microsoft allows you to disable notifications from installed apps on Windows. If you no longer need OneDrive to send irrelevant notifications, you can disable the service’s notifications from the Settings menu.

Step 1: Open Windows Settings, and navigate to System > Notifications.

Open notifications in Windows Settings

Step 3: Scroll down to Microsoft OneDrive and toggle it off. It will no longer send memory notifications.

Disable One Drive notificaiton on Windows

Method 5. OneDrive Mobile Apps

You have successfully disabled the OneDrive memories notification on Windows. But what about OneDrive mobile apps? Disabling OneDrive notifications on Windows will not affect mobile apps.

Step 1: Open the OneDrive app on your phone and tap on the Me icon at the bottom right.

Step 2: In the Me screen, tap on Settings and then on Notifications.

Step 3: Under the Photos section, turn off On this day and memories from last month.

Was this helpful?

Thanks for your feedback!

5 Ways to Fix Voicemail Not Working on Android

Try Basic Fixes

  • Check voicemail manually: Open the Phone app on your device, then press and hold 1 to dial your voicemail. If there are no issues, you should hear the voicemail.
  • Update the voicemail app or switch to a different one: The voicemail app on your phone may be buggy or outdated. You can try updating the app to its most recent version to see if that helps. If the issue remains even after updating the app, you can consider switching to a third-party visual voicemail app on your Android.

Fix 1: Make Sure Voicemail Is Enabled

Another thing you should do is ensure that voicemail is enabled on your Android phone, especially if you’ve recently switched carriers or applied any software updates. Here’s how to check.

Step 1: Launch the Phone app. Tap the three-dot menu icon in the top right corner and select Settings.

Step 2: Scroll down to tap on Voicemail and make sure the voicemail service provider and number are set correctly in the following menu.

Fix 2: Make Sure Call Forwarding Is Disabled

Another reason why you might not receive voicemail is if you’ve enabled call forwarding on your Android. Since all your calls are getting redirected, the caller will not have an option to record a voicemail.

To disable call forwarding on Android:

Step 1: Launch the Phone app. Tap the three-dot menu icon in the top right corner and select Settings.

Step 2: Tap on Supplementary services and select Call forwarding.

Step 3: Tap on Voice calls and make sure all the call forwarding scenarios are off.

Fix 3: Enable Necessary Permissions for the Voicemail App

Are you using a carrier-provided app to manage your voicemails? If so, you need to review the permissions for the visual voicemail app and allow them. Here’s how you can go about it.

Step 1: Long press on the voicemail app and tap the info icon from the resulting menu. Then, tap on Permissions.

Step 2: Go through each permission one by one and set them to Allow.

Step 3: Return to the app info page, tap on Notifications, and enable the toggle next to Allow notifications.

Fix 4: Clear Cache for Voicemail App

Old or corrupt cache data can also interfere with the visual voicemail app and cause it to stop working on your Android. You can try clearing the existing cache data to see if that solves the problem.

Step 1: Long press on the voicemail app and tap the info icon from the resulting menu.

Step 2: Go to Storage and tap the Clear cache option at the bottom.

Fix 5: Reset Network Settings

If voicemails are still not working on your Android, then you can consider resetting the network settings on your Android as a last resort. Doing that will erase all of your saved Wi-Fi networks and Bluetooth devices and reset all network preferences to their default values.

Step 1: Open the Settings app and tap on General management.

Step 2: Tap on Reset and select Reset network settings from the following menu.

Was this helpful?

Thanks for your feedback!

3 Ways to Fix Blurry Text in Google Chrome

Fix 1: Disable Hardware Acceleration

When you disable hardware acceleration, you offload graphics processing tasks from the computer’s graphics card to the central processing unit, which is helpful if the problem is triggered by GPU issues. Follow the steps below.

Step 1: Launch Google Chrome.

Step 2: Type the address below into the address bar and hit Enter.

chrome://settings/system

Step 3: Toggle off the option for Use hardware acceleration when available.

Enable hardware acceleration

Step 4: Restart Google Chrome, and you won’t notice blurry font in the browser.

Fix 2: Use ClearType Text Tuner

Windows has a built-in ClearType text tuner tool to help users adjust the font style and appearance on a laptop or PC.

Step 1: Click the Magnifying lens in the taskbar, type cleartype, and click the ClearType option.

Adjust cleartype text

Step 2: Click the Next button > click on Next again in the subsequent Windows.

Starting ClearType settings

Step 3: Follow the on-screen commands to complete the survey. The OS will then adjust the font style throughout the system to make the text easier to read.

Fix 3: Update Font Settings From Google Chrome

Google Chrome offers a default font customization menu from Settings. Here’s how to use and customize the font to your liking.

Step 1: Launch Google Chrome.

Step 2: Type the address below into the address bar and hit Enter.

chrome://settings/fonts

Step 3: From the same menu, check font size and select different font styles. Pick one that suits your eyes better and close the Settings menu.

Customize chrome fonts

Was this helpful?

Thanks for your feedback!

4 Ways to Fix Microsoft Teams Notifications Not Working on Android

Basic Fixes

  • Check the Microsoft Teams server: Open the Microsoft Service Health page and click on Teams in the left sidebar to check its service status.
  • Disable Do Not Disturb: Open the Settings app > search Do Not Disturb in the search bar > tap on the feature to toggle it off.
  • Change your status in Microsoft Teams: Open the Teams app > select your profile icon at the top left > tap on status below your account name to set it to Available.
  • Unmute the conversation: Long-tap a conversation in the Microsoft Teams app and select Unmute chat.
  • Disable Data Saver mode: Open Android settings > select Network & internet > tap Data Saver > turn off its toggle.
  • Clear the Teams app cache: Long-tap the Teams app icon to open App info > select Storage and cache > tap Clear cache.
  • Update or reinstall Microsoft Teams: Open Google Play Store > search Microsoft Teams > tap Update (if available). Alternatively, uninstall the app and install it afresh.

Fix 1: Check Notifications for Microsoft Teams

Missing permissions are a common reason Microsoft Teams notifications don’t work on Android. To fix this, go to the Teams app settings.

Step 1: Tap your profile icon at the top left in the Teams app and select Notifications.

Step 2: Select General activity and enable the toggle for All Teams notifications, if not already.

Fix 2: Ensure Block Notifications Is Disabled

The Teams app can automatically block notifications on your phone during meetings, quiet hours, or when using its desktop app. If you’ve set this up before and are missing notifications, tweak app settings to resolve it.

Step 1: Open the Teams app sidebar (tap your profile icon at the top-left) and select Notifications.

Step 2: Review the Block notifications section and ensure During quiet hours, When active on desktop, and When in meetings are Allowed to receive new notifications.

Fix 3: Log Out and Re-Authenticate Account

Besides missing permissions, incorrect Microsoft account configuration in the Teams app can cause notifications to not work on Android. Sign out and log back into the Teams app to restore normalcy.

Open the Teams app Settings from the left sidebar > scroll to the bottom > tap on Sign out. Re-enter your Microsoft account credentials to sign in.

Fix 4: Allow Unrestricted Data Usage for Microsoft Teams

If you have a limited cellular data plan and enable the Data Saver mode, the Teams app might freeze internet access once you exceed the data limit. Set unrestricted data usage for the Teams app to resume getting notifications.

Long-tap the Teams app icon > open App info > select Mobile data and Wi-Fi > enable the toggle for Unrestricted data usage.

Was this helpful?

Thanks for your feedback!

6 Ways to Fix Voicemail Not Working on iPhone

Try Basic Fixes

  • Check if voicemail is enabled: The first thing to do is ensure that voicemail is enabled on your iPhone, especially if you’ve switched carriers or cell plans recently. To determine if the voicemail service is active, head to Settings > Phone. If you see the Change Voicemail Password option at the bottom, it means your voicemail is active.
  • Check your voicemail manually: Issues with your carrier’s server can sometimes cause visual voicemail to stop working. To avoid any confusion, try calling your voicemail directly by holding 1 on the dial pad.
  • Empty your voicemail box: In some cases, the voicemail service may become unavailable on your iPhone if your mailbox is already full. You can try deleting a few of your voicemails to see if that helps.
  • Install iOS updates: It is possible that the voicemail not working issue is due to a bug within iOS. So, installing pending software updates should help.

Fix 1: Enable Wi-Fi Calling

Poor network reception in your area could prevent your iPhone from downloading your voicemails. To get around this, enable Wi-Fi calling on your iPhone by following the steps below.

Step 1: Open the Settings app on your iPhone and tap on Mobile Data.

Step 2: Select Wi-Fi Calling and enable the toggle for Wi-Fi Calling on This iPhone.

Fix 2: Check the Voicemail Greeting

Another thing to do is check the set voicemail greeting on your iPhone. If you haven’t set your custom greeting properly, callers may fail to recognize it and won’t leave a message.

Step 1: Open the Phone app on your iPhone, switch to the Voicemail tab, and tap Greeting at the top left corner.

Step 2: Tap the Play button to preview your custom voicemail greeting. If you are not satisfied with it, tap the Record button to set a new voicemail greeting and hit Save.

Fix 3: Disable Call Forwarding

Have you enabled call forwarding on your iPhone? If so, you won’t get any voicemails, as your iPhone will divert all your incoming calls to the specified phone number.

To disable call forwarding on iPhone:

Step 1: Open the Settings app > scroll down to tap on Phone.

Step 2: Tap on Call Forwarding > turn off the toggle in the following menu.

Fix 4: Avoid Using Custom Adblock DNS Profile

Using a custom ad-blocking DNS server on your iPhone can potentially cause issues with services like voicemail and lead to voicemail delay. If you have any AdBlock DNS profiles active on your iPhone, use these steps to delete them and see if that helps.

Step 1: Open the Settings app and head over to General > VPN, DNS & Device Management.

Step 2: Tap on your DNS profile > select Remove Profile.

Fix 5: Install Carrier Updates

Cellular carriers tend to update their settings from time to time. Ideally, these updates are installed automatically in the background. But if for some reason, the update didn’t go through, install it manually using these steps:

Step 1: Launch the Settings app on your iPhone > tap on General > About.

Step 2: If there are any pending updates, you’ll see a pop-up. Tap on Update to proceed.

Fix 6: Reset Network Settings

If installing pending updates does not help, consider resetting network settings on your iPhone. This will reinstate all the network configurations to their default values, and the voicemail should work again on your iPhone.

Step 1: Open Settings on your iPhone and navigate to General. Scroll down to tap on Transfer or Reset iPhone.

Step 2: Tap on Reset at the bottom and choose Reset Network Settings from the resulting menu.

Step 3: It’ll ask you for the lock screen password. Once verified, select the Reset Network Settings confirmation option to begin the restoration process.

Was this helpful?

Thanks for your feedback!

How to Send Disappearing Messages in Facebook Messenger

Send Disappearing Messages in Facebook Messenger Mobile App

The process of sending disappearing messages on the mobile app is the same for Android and iOS devices. Follow the steps below.

Step 1: Launch your Messenger application.

Step 2: Tap the chat to set disappearing messages > tap on the name.

Step 3: Scroll down and tap on Disappearing Messages > 24 hours.

Step 4: Now, return to the chat and send messages, which will be deleted automatically after 24 hours.

Send Disappearing Messages in Facebook Messenger Web Service

If you use the Web Messenger service, you may also enable disappearing messages. However, the steps are slightly different.

Step 1: Open your Messenger web service.

Step 2: Click the chat you need to enable disappearing messages on > expand Privacy and support > select Disappearing Messages.

Web messenger disapearing message

Step 3: Select 24 hours > click Done.

Selecting 24 hours messages

Now, return and send disappearing messages to the contact. However, you may also opt to enable secret conversations rather than using disappearing messages.

FAQs

Does Messenger Notify When Someone Screenshots or Screen Records Disappearing Messages?

Yes, Facebook will notify you if someone screenshots or screen records disappearing messages.

Can I Send One-Time View Photos Using Disappearing Messages in Messenger?

No, you can’t send view once photos on Messenger.

Does Disappearing Messages Delete the Chat on Both Messenger Accounts?

Yes, messages on a chat set to disappearing messages will be deleted from your account and the second party’s account.

Can I Recover Disappeared Messages in Messenger?

Disappearing messages are temporary. After 24 hours, you can not recover those messages.

Was this helpful?

Thanks for your feedback!

5 Ways to Fix YouTube Search Not Working

Try Basic Fixes

  • Update or Reinstall the YouTube app: Apps like YouTube regularly receive updates that include bug fixes and performance improvements. If the issue is occurring due to a bug, updating the YouTube app from the Play Store (Android) or App Store (iPhone) should help. Alternatively, you can also uninstall and reinstall the YouTube app on your phone.
  • Check if YouTube is down: It’s not uncommon for services like YouTube to experience server outages from time to time. To overrule this possibility, you can visit a website like Downdetector, which tracks outages for several services, including YouTube.

Fix 1: Correct Date and Time on Your Phone

The YouTube app may have trouble communicating with its servers if your Android or iPhone is set to an incorrect date or time. To fix this, you need to configure your phone to use the network-provided date and time.

Android

Step 1: Open the Settings app and navigate to General management.

Step 2: Tap on Date and time and enable the toggle for Automatic date and time.

iPhone

Step 1: Open the Settings app on your iPhone and tap on General.

Step 2: Tap on Date & Time and toggle on the switch next to Set Automatically.

Fix 2: Clear App Cache (Android)

YouTube, like any other streaming service, collects cache data on your phone to reduce loading times and improve app performance. The problem occurs when this data gets corrupted and conflicts with the app. You can try clearing the existing cache data for the YouTube app and see if that solves the issue.

Step 1: Long-press on the YouTube app icon and tap the info icon from the menu that appears.

Step 2: Go to Storage and tap the Clear cache option.

Fix 3: Allow Unrestricted Data Usage to the YouTube App(Android)

Have you enabled the data saver mode on your Android? If so, YouTube might have trouble using the internet and fetching search results. To avoid this, you need to allow unrestricted data usage to the YouTube app.

Step 1: Long press the YouTube app icon and tap the info icon from the menu that appears.

Step 2: Tap on Mobile data and enable the toggles for Allow background data usage and Allow data usage while Data saver is on.

Fix 4: Sign Out and Sign Back In

Temporary issues with your Google account can also cause the YouTube search function to stop working. You can try signing out of the YouTube app and then signing back in to see if that helps. Here’s how you can go about it.

Android

Step 1: Open the YouTube app on your Android, tap the profile icon in the top-right corner, and tap on your username.

Step 2: Select the Manage accounts option.

Step 3: Select your account from the list and click the Remove account option.

Step 4: Restart the YouTube app, tap the profile icon, and select Add account. Then, follow the on-screen prompts to sign in with your account.

iPhone

Step 1: Open the YouTube app and tap the profile icon in the top right corner.

Step 2: Tap on your account name and select the Use YouTube signed out option.

Step 3: Tap the profile icon again, select the Sign in option, and then add your account.

Fix 5: Clear Browser Cache

Outdated or inaccessible browser caches can also result in such issues. If that’s the case, you will need to clear the existing browser cache to fix the issue.

If you are using Chrome or Edge, press Ctrl + Shift + Delete on your keyboard to open the “Clear browsing data” panel. Select All time in the Time Range option. Mark the box that reads Cached images and files and hit the Clear data button.

Clear Chrome Cache Data

If clearing the cache does not resolve the problem, you can try using YouTube in another browser. If YouTube search works in another browser, you can try resetting the browser you were using earlier to fix the problem.

Was this helpful?

Thanks for your feedback!

6 Best Apple Mac Mini M1 Docks That You Can Buy

The Apple Mac Mini with M1 chip shares a similar look with the older Mac Minis. However, it offers fewer connectivity options. Compared to the 2018 Mini (which had 4 Thunderbolt ports), the new variant has only 2 Thunderbolt ports, and you can’t swap the SSD or add more RAM. That’s where the best docking stations for the Apple Mac Mini M1 can be helpful.

Hagibis Type-C Docking Station

The Hagibis USB Type-C docking station is an affordable dock for the Mac Mini M1 if you are looking for a couple of extra ports. The highlight of this device is its compact shape and the front-facing ports, making it easy to connect peripherals and accessories.

The Hagibis docking station includes a 2.5-inch SATA interface, two USB 3.0 and USB 2.0 ports each, and slots for Micro SD and SD cards. The SATA interface supports up to 5TB drives. The file transfer speeds are decent. The dock works if you plan to transfer stuff occasionally and don’t care much about the speeds.

What We Like

  • Compact design
  • Offers front-facing ports

What We Don’t Like

  • Average file transfer speeds

Agptek USB-C Docking Station & Stand for Mac Mini

The Agptek USB-C docking station is a small and affordable dock that lets you extend the use of the Mac Mini. One of the advantages of this dock is that the USB Type-C port supports secondary monitors, and you can run up to 4K displays on this one. However, it would be best to use the Thunderbolt or the HDMI ports on the Mac Mini.

While the company claims that the dock can support up to 5GB, check the size and dimensions of your drive before hitting the buy button. Another thing to note before buying is that the dock has a slippery and shiny surface. While it’s great to look at, it does increase the chance of slippage.

What We Like

  • Small and affordable
  • Supports secondary monitors

What We Don’t Like

  • Slippery and shiny surface

Satechi USB Type-C Aluminum Stand & Hub

Satechi is known for its quality accessories, and the dock for the Mac Mini M1 is no different. It packs a few important features. For one, the dock has a slight indentation that allows your Mini and the dock to stack up properly. At the same time, the Satechi dock packs an audio jack, which is missing in all the docks above.

The best part of this dock is the design. Apart from the indentation, the air vents keep the Mini cool. Plus, the LED indicator aligns with the light of the Mac Mini and helps to give it a uniform look. Apart from the audio jack, there are three USB Type-A ports, a single USB Type-C port, and slots for a Micro SD card and an SD card. There’s a dedicated cavity for a hard drive. However, if you have high-speed cards like CF and XQD cards, you may want to use a USB Type-C card reader to make the most of them.

What We Like

  • Packs an audio jack
  • Impressive design

What We Don’t Like

  • Slightly expensive

READYXIO Mac Mini Docking Stand

The READYXIO docking station is unlike any other mentioned on this list. Instead of resting flat on the table, you get a vertical stand that can save you some precious desk space. Despite having a unique design, there’s no compromise in terms of ports.

This vertical docking station from READXIO has three USB-A ports, a headphone jack, a USB-C port, a micro SD card slot, and a standard SD card slot. Additionally, you’re also getting a phone holder, which you can use to rest your phone in the horizontal orientation. Good for consuming media on your desk. It is slightly more expensive compared to some other run-of-the-mill docks. But you’re paying for the design and unique form factor.

What We Like

  • Vertical stand
  • Houses a phone holder

What We Don’t Like

  • Expensive

OWC Thunderbolt 3 Mini Dock

The OWC Thunderbolt 3 Mini Dock is a good pick because it brings the Thunderbolt advantage. The OWC Thunderbolt 3 Mini makes for a good buy if you switch between using the Thunderbolt port on the dock and the Mac Mini.

While the dock already has two HDMI ports. You will not find much use for them if you use the dock primarily for your Mac Mini. However, if you can’t compromise on speed and want a third Thunderbolt port (apart from the usual USB ports), then the OWC Thunderbolt dock is worth buying. Alternatively, you can also check out the Belkin Thunderbolt Mini dock. It shares a similar design with the OWC dock, although the build quality is better in this one.

What We Like

  • Offers a Thunderbolt port
  • Sturdy design

What We Don’t Like

  • Does compromise on speed

FAQs for Apple Mac Mini M1 Docks

1. How many monitors can I connect to my M1 Mac Mini?

You can connect up to two external displays to your M1 Mac Mini. You can use the built-in HDMI port to connect one display and a dock to connect the other one.

2. Does a dock require additional power to run?

All the docks mentioned on this list obtain power from the Mac Mini and don’t need any external power source.

Was this helpful?

Thanks for your feedback!

3 Ways to Fix Spotify Not Downloading Songs on Android and iPhone

Try Basic Fixes

  • Free up storage space: If your phone is running low on storage, you might have a hard time downloading new content. Spotify recommends that you keep at least 1 GB of free storage on your Android or iPhone. You can dig into the Settings on your phone to check how much free space you have.
  • Check if Spotify is down: It’s a good idea to ensure that Spotify servers are not facing an outage. For that, you can visit a website like Downdetector. If others are reporting similar issues, simply wait for Spotify to fix the issue on its end.
  • Update the app: Using an outdated version of the Spotify app can also cause such problems. Head over to the Play Store or App Store to update the Spotify app and try using it again.

Fix 1: Clear Spotify Cache

Spotify collects cache data on your phone to improve your experience. However, if this data becomes old or corrupt, Spotify might malfunction on your Android or iPhone and prevent you from downloading new songs.

For such instances, Spotify allows you to clear cache data from its settings menu. The following steps will work for Android and iPhone.

Step 1: Open the Spotify app on your phone and tap the gear-shaped icon at the top right corner.

Step 2: Scroll down to tap the Clear cache option. Select Clear cache again when the confirmation prompt appears.

Fix 2: Correct the Date and Time on Your Phone

Spotify may fail to connect to its servers if your phone clock is set to an incorrect date or time. To avoid this, it’s best to enable the automatic date and time feature on your phone.

Android

Step 1: Open the Settings app on your phone and go to General management.

Step 2: Tap on Date and time and enable the toggle for Automatic date and time.

iPhone

Step 1: Launch the Settings app on your iPhone and navigate to General.

Step 2: Tap on Date & Time and toggle on the switch next to Set Automatically.

Fix 3: Reinstall the Spotify App

If you’re still having issues downloading songs from Spotify, you can try uninstalling the app and installing it again. This will remove all the existing app data, fixing issues caused by corrupt or inaccessible files.

Was this helpful?

Thanks for your feedback!

3 Ways to Fix Discord Messages Failed to Load Error

Basic Fixes

  • Force Restart Discord: You can force quit Discord on your PC or Mac using Task Manager or Activity Monitor. Once done, try relaunching the app to see if it works.
  • Change Platforms: Alternatively, you can always move to Discord mobile apps or the web to fetch new messages and continue the conversation.
  • Select a Specific Channel: When you join a specific server on Discord, the app tries to load all the messages at once. When working with a slow internet connection, it might lead to a failure to load messages error. Click on one of the text channels marked by # on the sidebar and load the latest messages.
  • Check Discord Servers: If Discord servers are having a rough day, you can’t send or receive any new messages. You can check their status from Discord’s official site, or via DownDetector.
  • Update Discord: Discord is available on the Microsoft Store on Windows and the Mac App Store. If you are dealing with an outdated Discord app, update it to the latest version and try again.

Fix 1: Use VPN

Discord might have blocked your IP address due to a temporary ban or excessive usage. Interestingly, some users on Reddit managed to resolve Discord’s failed-to-load messages error by using a VPN (Virtual Private Network).

You can use any popular VPN service, such as ExpressVPN or NordVPN, and set it up on your PC or Mac. You can connect to a server in another region and load Discord messages again.

Fix 2: Mark Discord Messages as Read

Using this trick, a Redditor managed to fix Discord’s failed-to-load messages error. You can right-click on the channel name and select the ‘Mark as Read’ option. After a minute or two, you should see new messages loading on the channel.

Mark read messages in discord channel

Fix 3: Wait for Your Temporary Ban to Lift

This is one of the prime factors for Discord’s failed to load messages error. Some users spam the reactions to a message or continuously copy-paste the messages in several channels. Discord detects it as spam and bans your account temporarily. You should avoid following activities on Discord.

  • Spamming a reaction to a message
  • Copy-pasting too many messages
  • Sending automatic replies or spam messages

You need to wait it out, and Discord should restore your account within a few days.

FAQs

1. Why is Discord showing a black screen?

When you open Discord on a slow internet connection, the app may not load all the servers properly and show a black screen.

2. How long does your first Discord ban last?

The first Discord ban lasts for around three days.

Was this helpful?

Thanks for your feedback!

9 Ways to Fix Settings App Not Opening or Working on Windows 11

Fix 1: Reset the Settings App

Step 1: Right-click the Start icon and select Terminal (Admin) from the list.

Open Terminal (Admin) on Windows 11

Step 2: Execute the following command to reset Windows settings.

Get-AppxPackage *windows.immersivecontrolpanel* | Reset-AppxPackage

Step 3: Check if the issue is resolved by opening Windows Settings using Win + I.

Fix 2: Run the SFC and DISM Scans

Corrupt or missing system files on your PC can sometimes make it difficult to open the Settings app. To replace or repair the corrupt files, use the SFC (System File Checker) and DISM (Deployment Image Servicing and Management) scans on your PC.

Step 1: Open Terminal (admin), type the below command, and press Enter.

sfc /scannow
Run SFC Scan

Step 2: Run the following commands individually, pressing Enter after each to run the DISM scan.

DISM /Online /Cleanup-Image /CheckHealth
DISM /Online /Cleanup-Image /ScanHealth
DISM /Online /Cleanup-Image /RestoreHealth
DISM Scan

After running the above scans, restart your PC and see if you can access the Settings app.

Fix 3: Re-Register the Settings App

If the problem persists, try re-registering the Settings app on your system by following the steps below:

Step 1: Press Win + S, type powershell, and select Run as administrator.

Open Windows PowerShell

Step 2: Paste the command given below and press Enter.

powershell -ExecutionPolicy Unrestricted Add-AppxPackage -DisableDevelopmentMode -Register $Env:SystemRootImmersiveControlPanelAppxManifest.xml
Reinstall the Settings App

Restart your PC after this and see if you can open the Settings app.

Fix 4: Check Group Policy Settings

Another reason you might be unable to access the Settings app in Windows 11 is if it has been disabled through Group Policy settings. Fortunately, it’s easy to re-enable the Settings app using the Group Policy Editor.

Step 1: Press the Windows key + R to open the Run dialog box. Type gpedit.msc in the box and press Enter to open the Group Policy editor.

Step 2: Use the left pane to navigate to the following Group Policy folder:

User Configuration > Administrative Templates > Control Panel

Step 3: Double-click the Prohibit access to Control Panel and PC settings policy in the right pane.

Group Policy Editor

Step 4: Select the Disabled option. Then, click on the Apply button, followed by OK.

Enable Settings App Policy on Windows 11

Fix 5: Create a New User Account

Problems with your current user account can also cause the Settings app to misbehave on Windows. If so, you can create and switch to a new user account.

Step 1: Open Windows Terminal with admin permission.

Step 2: Type the command given below and press Enter.

net user /add Username and Password

Replace Username and Password in the above command with the actual username and password you want to use.

Create New User Account Using Command Prompt

Step 3: Give your account admin privileges by entering the command given below:

net localgroup administrators Username /add

Again, replace the Username in the above command with the username specified in the last step.

Create New Admin Account with Command Prompt

Switch to your newly created user account and try using the Settings app again.

Fix 6: Install Windows Updates

Windows updates can sometimes go wrong, leading to issues like this one. The good news is that the Microsoft Windows team is quick to detect and fix such issues in subsequent updates.

Since you can’t access the Settings app, you must use PowerShell to download and install pending updates.

Step 1: Open PowerShell and execute the following commands:

Install-Module PSWindowsUpdate
Set-ExecutionPolicy RemoteSigned
Import-Module PSWindowsUpdate
Get-WindowsUpdate
Windows Updates Using PowerShell

Step 2: Run the command given below to download and install the update. Then, type A and press Enter to confirm.

Install-WindowsUpdate -KBArticleID KBNumber

Replace KBNumber in the above command with the KB number associated with the update you want to install.

Install Windows Updates based on KB number

Fix 7: Check in Safe Mode

Occasionally, conflicts between third-party apps and Windows 11 processes can cause issues like the one you are experiencing. You can try booting your PC into Safe Mode to check for this possibility.

Step 1: Press the Windows key + R to open the Run dialog box. Type msconfig in the box and press Enter.

Step 2: In the System Configuration window, navigate to the Boot tab. Under Boot options, select Safe boot and press OK.

Step 3: Click on Apply and then OK.

Safe Boot option in System configuration.

Step 4: Click on Restart to enter Safe Mode.

Restart Windows into Safe Mode

If the Settings app works fine while your PC is in Safe Mode, consider removing some recently installed apps and programs to resolve the issue.

Fix 8: Use System Restore

System Restore is a handy feature in Windows that periodically takes a backup of your entire system. You can utilize this feature to restore your PC to a previous time when the Settings app was functioning correctly.

Step 1: Press Win + S, type create a restore point, and click the Create a restore point app from the search results.

Find System Restore using Start Menu

Step 2: In the System Properties window, switch to the System Protection tab and click the System Restore button.

Open System Restore on Windows 11

Step 3: Select Recommended restore and click Next.

Select Restore Point Windows 11

Step 4: Follow the wizard until the end to complete the process. Your PC will restart automatically. Once done, check if the settings app is working as expected.

Fix 9: Reset Windows

Lastly, if all else fails, consider resetting all the settings on your PC to fix the issue. Since you cannot access the Settings app, you must access Advanced Startup Options to reset Windows.

Step 1: Open the Start menu and click the power icon. Then, hold down the Shift key and select Restart.

Startup Settings in Windows Recovery

Step 2: Wait for your PC to reboot into Advanced Recovery. Select the Troubleshoot option.

Troubleshoot Windows 11

Step 3: Click on Reset this PC.

Reset Windows 11 via Advanced Options

Step 4: Select Keep my files and follow the on-screen instructions to finish resetting your Windows 11 PC.

Confirm Reset Windows 11 via Advanced Options

Once complete, log in with the same account and check if the settings app works. If it does, reinstall apps individually, as the reset would have removed them.

FAQs

Can I use the Control Panel instead of the Settings app?

Yes, you can use the Control Panel to adjust most, if not all, of your Windows 11 PC settings.

How do I show the Settings icon on the Start menu?

Open the Settings app and navigate to Personalization > Start > Folders. Then, enable the toggle next to Settings.

Was this helpful?

Thanks for your feedback!

4 Fixes if Facebook Messenger Keeps Crashing on Android and iPhone

Basic Fixes

  • Update the Messenger app: Using an outdated version of an app can cause it to behave strangely. Hence, it’s a good idea to update the Messenger app from the Play Store (Android) or App Store (iPhone).
  • Free up storage space: Apps like Messenger may freeze or crash due to a lack of sufficient storage space, particularly on low-end devices. To avoid this, ensure your Android or iPhone has ample free storage space.

Fix 1: Allow the Necessary App Permissions

Just like any other app, Messenger requires permission to access your phone’s camera, data, storage, and more. If denied, the app may fail to perform basic operations and even crash. Here’s what you can do to fix it.

Android

Step 1: Tap and hold the Messenger app icon and tap the info icon from the resulting menu. Then, tap on Permissions.

Step 2: Go through each permission one by one and allow it.

iPhone

Step 1: Launch the Settings app on your iPhone.

Step 2: Scroll down and tap on Messenger. Then, use the toggles to enable all the necessary permissions.

Fix 2: Clear App Cache (Android)

Cache data refers to the temporary files Messenger stores on your phone to reduce loading times and improve its performance. Clearing the cache is an effective solution for any app that struggles to function properly on Android.

Step 1: Long-press on the Messenger app icon > tap the info icon from the resulting menu.

Step 2: Go to Storage > tap Clear cache at the bottom.

Fix 3: Disable Battery Restrictions for App (Android)

Applying battery restrictions to the Messenger app can also cause such problems. To fix this, allow unrestricted battery usage for Messenger by following the steps below.

Step 1: Long-press the Messenger app icon and tap the info icon from the menu.

Step 2: Go to Battery > select Unrestricted from the following menu.

Fix 4: Reset Google Play Services (Android)

Google Play Services works behind the scenes to connect all your apps, Google services, and Android. If there is an issue with Google Play Services on your phone, it can cause apps on your phone to freeze or crash. You can try resetting Google Play Services on your Android to see if that helps.

Step 1: Open the Settings app > navigate to Apps. Scroll through the list to find and tap on Google Play services.

Step 2: Go to Storage and tap on Manage storage at the bottom. Then, tap on Clear All Data.

If Messenger continues to crash after trying everything, consider reinstalling the app on your iPhone or Android. Doing so will delete all the app data and resolve any issues caused by corrupted files.

Was this helpful?

Thanks for your feedback!