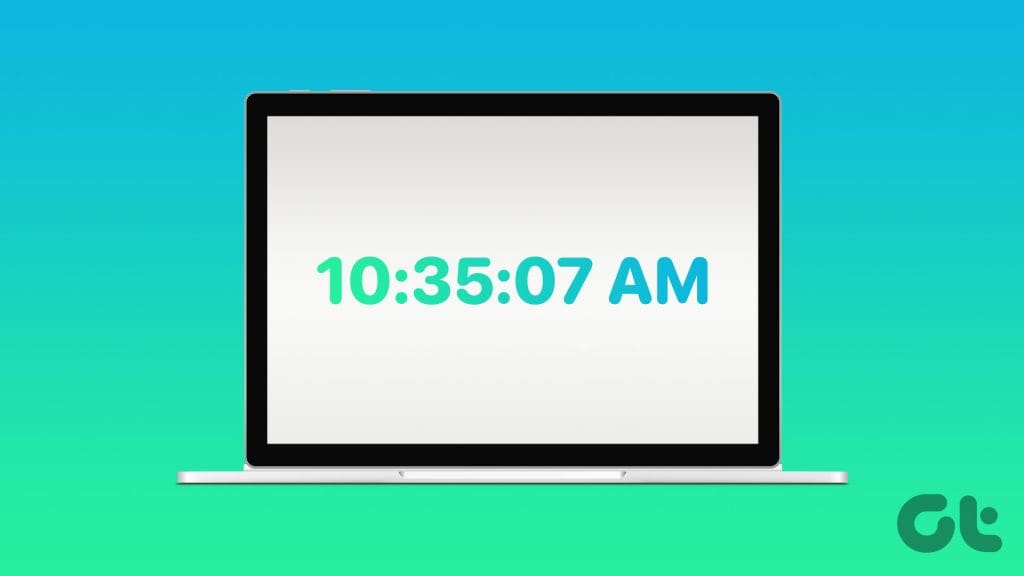
Ever find yourself glancing at your computer clock, craving that extra level of precision? Well, Microsoft has finally added the ability to display seconds on the taskbar clock, a notably absent feature in the initial release. This article will guide you on how to show seconds on the Windows 11 clock quickly and effectively.
Whether you’re coordinating time-sensitive tasks, syncing precise recordings, or prefer a more granular view of time, having seconds at your fingertips can be surprisingly beneficial. It’s the little things that add up to a smoother, more efficient computing experience. With this understanding, let’s begin with the steps.
1. Using Taskbar Settings
This is one of the most common and easiest ways to add seconds to a Windows 11 clock. Follow the below steps.
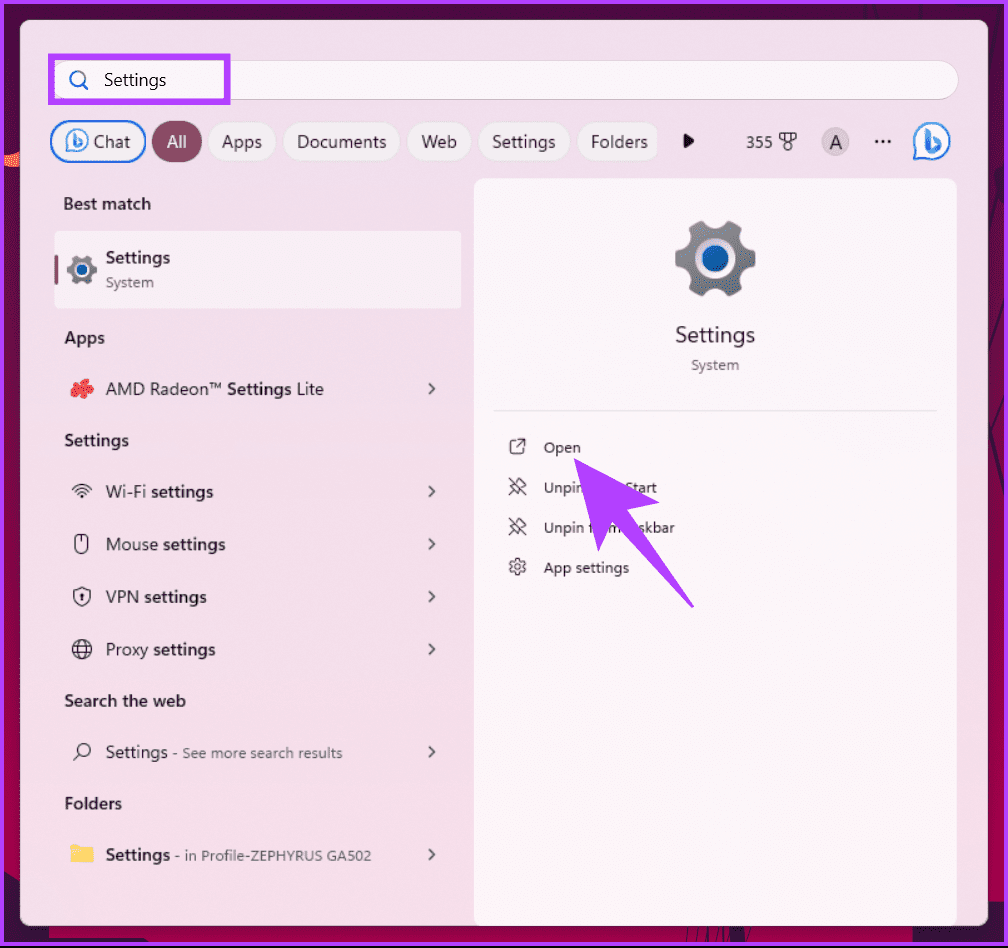
Step 1: Press the Windows key on your keyboard, type Settings, and click Open.
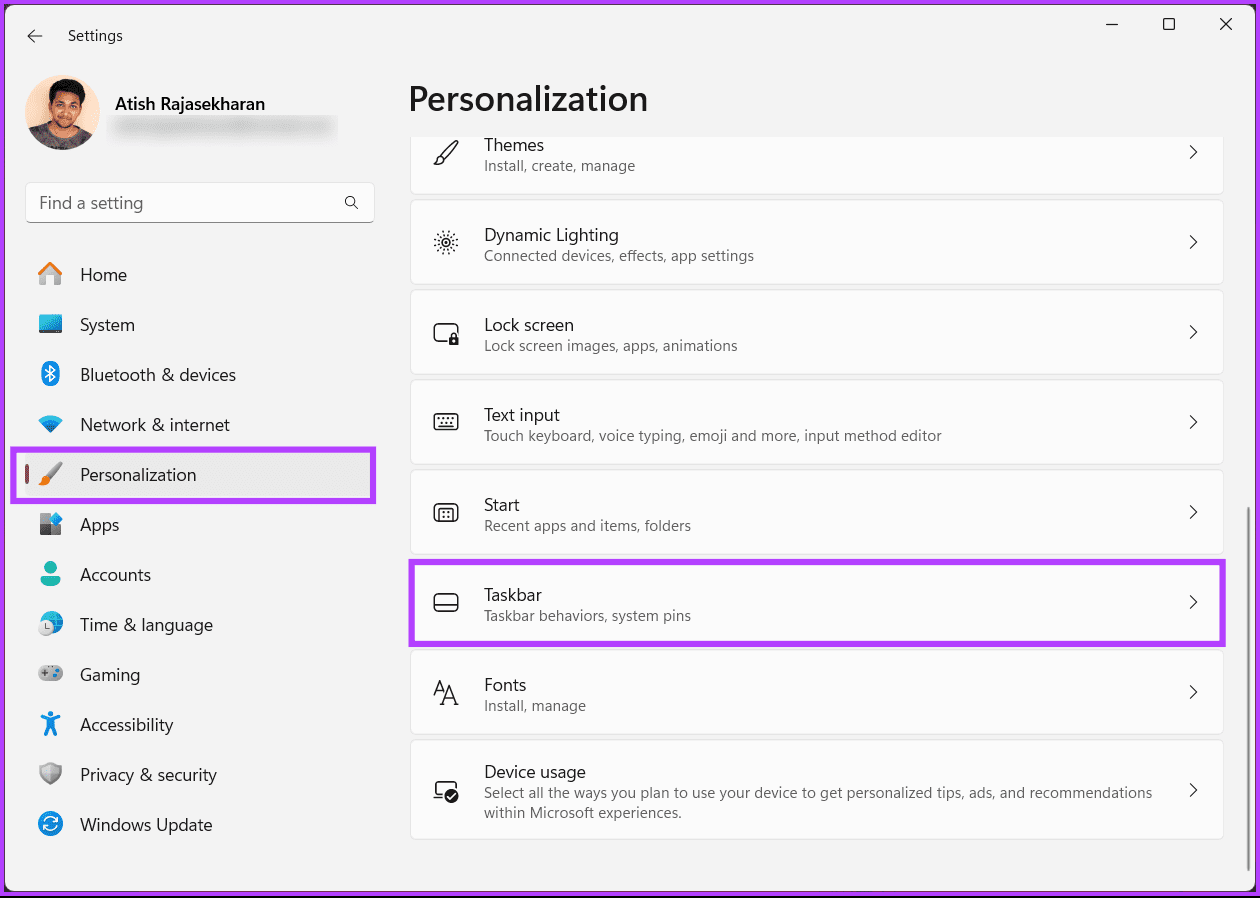
Step 2: Navigate to Personalization and choose the Taskbar option.
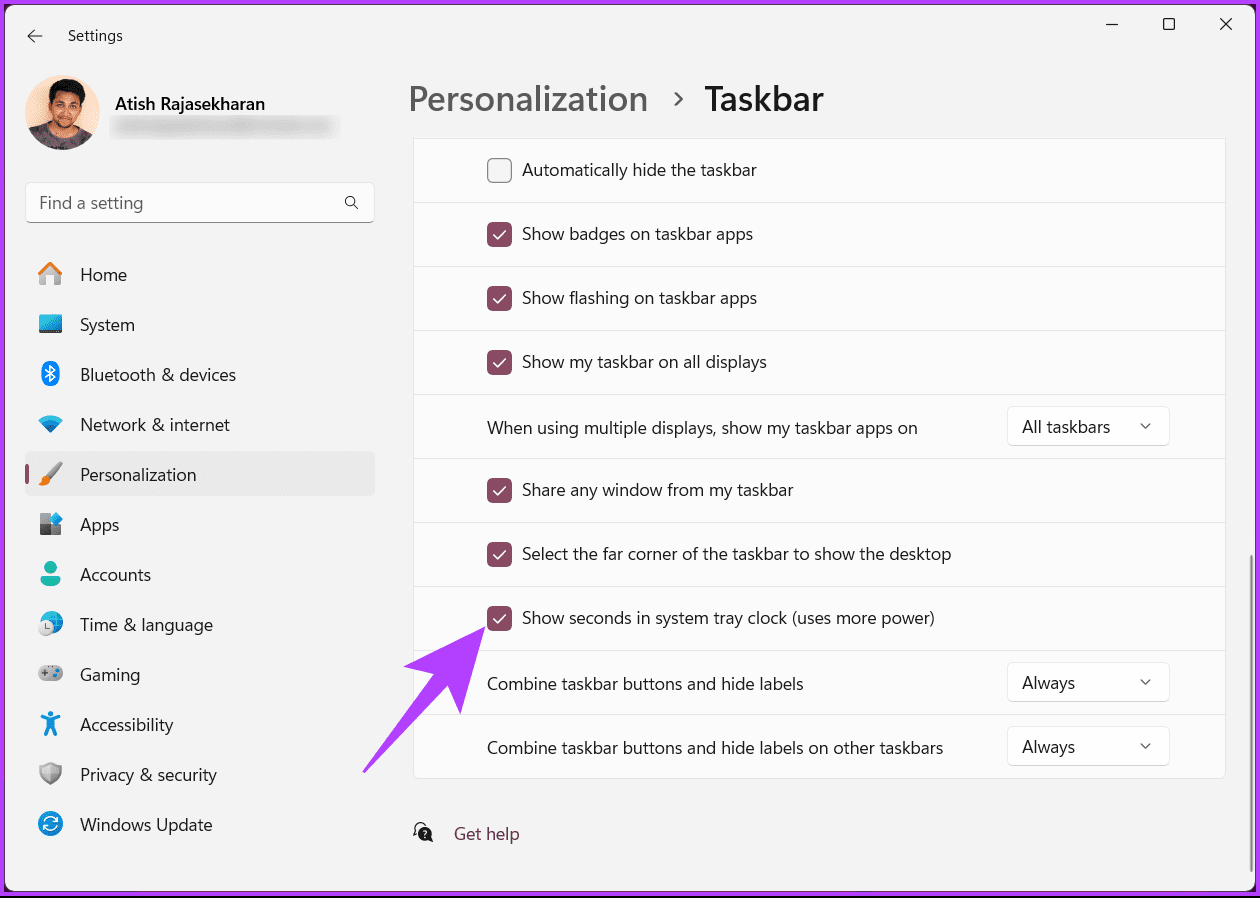
Step 3: Under Taskbar settings, click on Taskbar behaviors.

Step 4: Finally, check the box next to ‘Show seconds in system tray clock’ in the expanded menu.
Once the option is enabled, the seconds appear on the clock in the bottom right corner of your taskbar. Another way to add seconds to the Windows 11 clock is by using the command-line tool; continue reading.
2. Using Windows Terminal
You can also use Windows Terminal to add a clock with seconds in the system tray. Follow the instructions below.
Step 1: Press the Windows key on your keyboard, type Terminal, and click Open or ‘Run as administrator.’

Step 2: Now, type the below command and hit Enter.
Set-ItemProperty -Path HKCU:\Software\Microsoft\Windows\CurrentVersion\Explorer\Advanced -Name ShowSecondsInSystemClock -Value 1 -Force
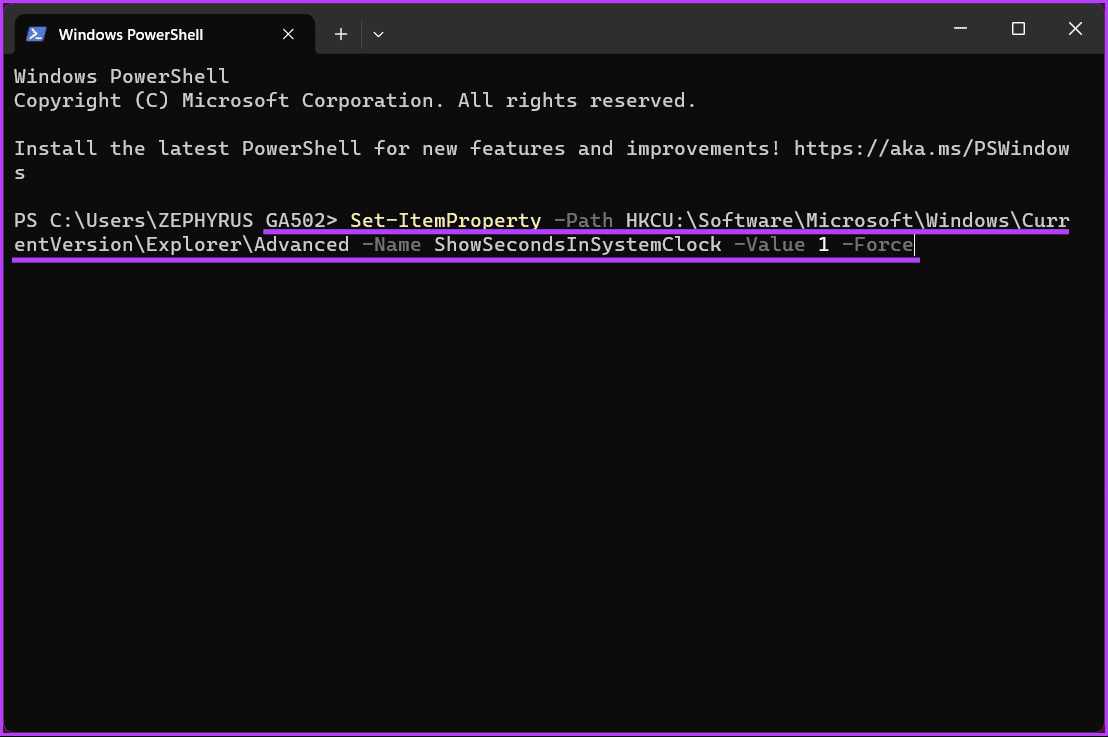
Once the command is executed, you should see a clock with seconds displayed in the taskbar.
Also Read: How to add multiple clocks on your Windows PC
3. Using the Run Command Box
This is an alternative way to show seconds in the system tray icon if you don’t want to do it through Terminal. Follow the below-mentioned steps.
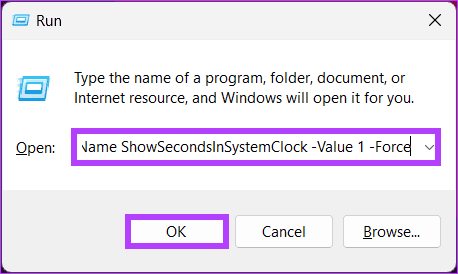
Step 1: Press the Windows key on your keyboard, type Run, and click Open.

Step 2: Type the below command in the text box and click OK.
cmd /c powershell.exe Set-ItemProperty -Path HKCU:\Software\Microsoft\Windows\CurrentVersion\Explorer\Advanced -Name ShowSecondsInSystemClock -Value 1 -Force
That’s about it. Once this command gets executed, it will enable Windows to show seconds in the system tray clock. There’s another way to allow the clock with seconds on Windows 11; continue reading.
4: Using Registry Editor
This method is more complex than the above one, but the steps are simple to follow and execute. However, because we will use Registry Editor, we recommend you back up the Windows Registry before proceeding with the steps below.
Step 1: Press the Windows key on your keyboard, type Registry Editor, and click ‘Run as administrator.’
Note: Alternatively, press the Windows key + R to open the Run dialog box, type regedit.exe, and click OK to open Registry Editor.
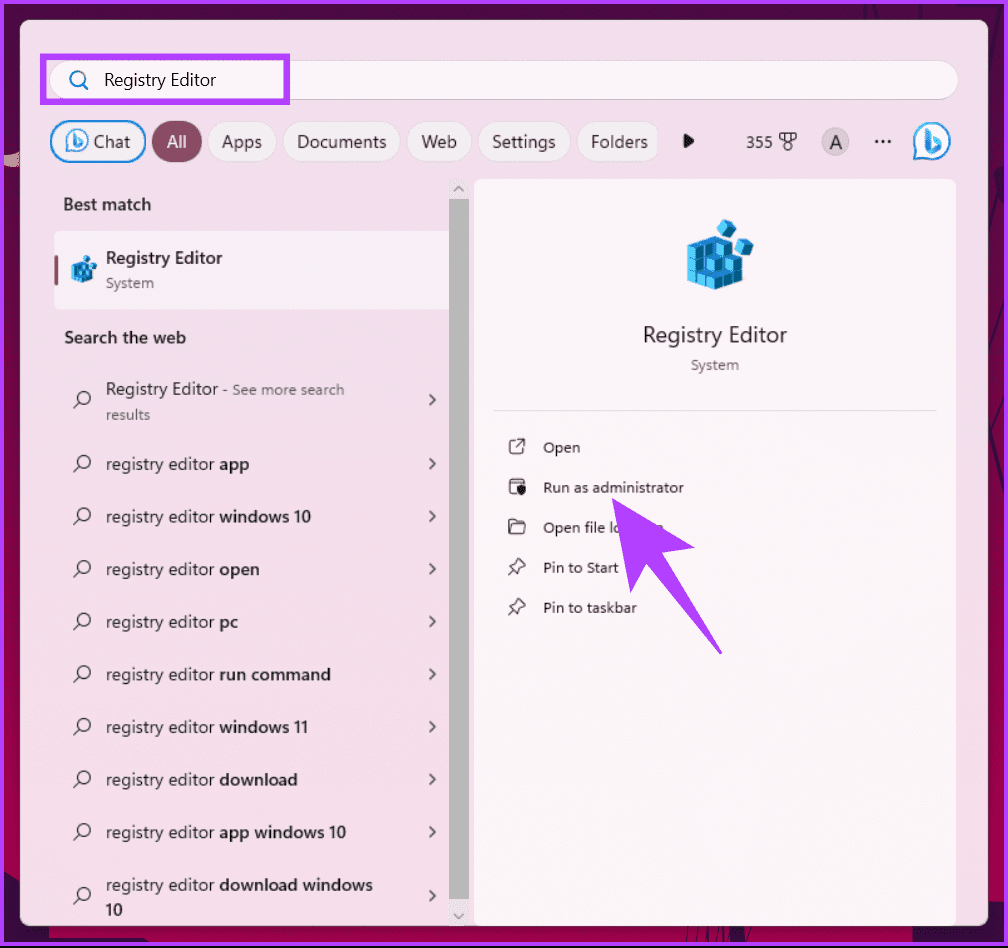
In the prompt, select Yes.
Step 2: In the top address bar, enter the following path.
HKEY_CURRENT_USER\Software\Microsoft\Windows\CurrentVersion\Explorer\Advanced
Note: You can manually navigate to the section too.
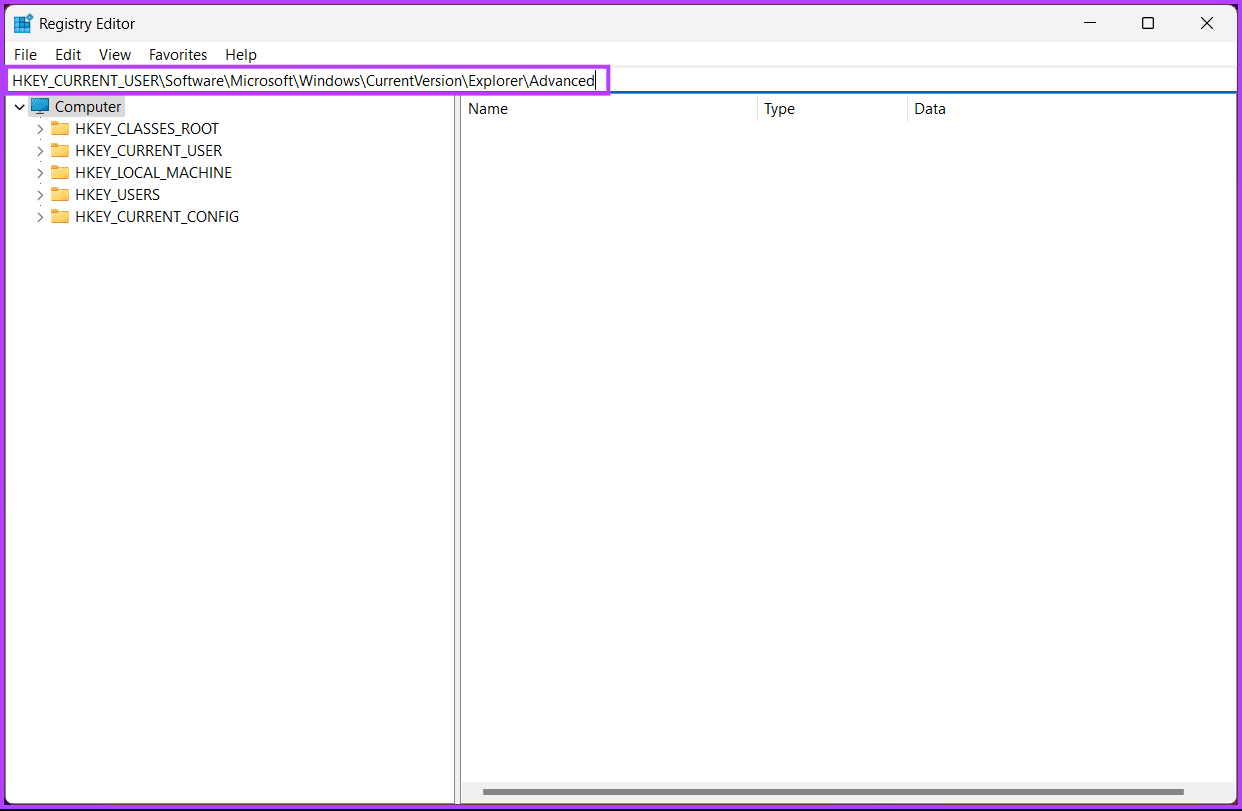
Step 3: Find and double-click on the ShowSecondInSystemClock key.
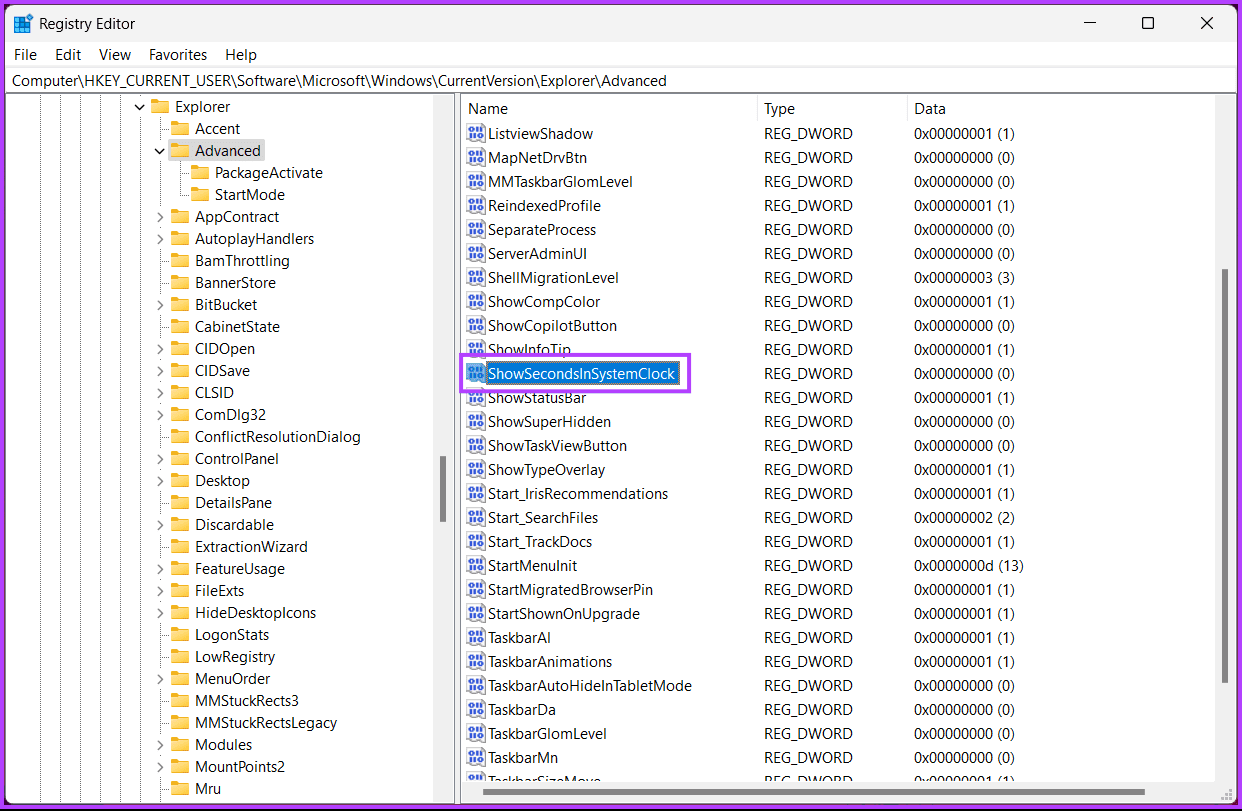
Step 4: Now, type 1 in the Value Data field and press OK.
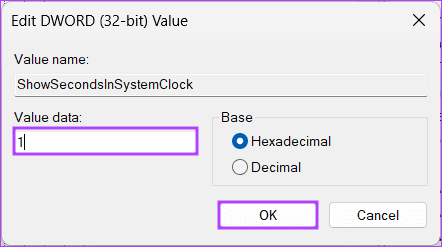
Finally, reboot the system to implement the changes. And that’s it! After booting your PC again, you will have turned on a clock with seconds on the taskbar.
If this method is too much to follow, you can use available third-party applications to get the seconds clock in the system tray; keep reading.
Also Read: How to set, edit, and delete an alarm in Windows 11
5. Using Third-Party Tools
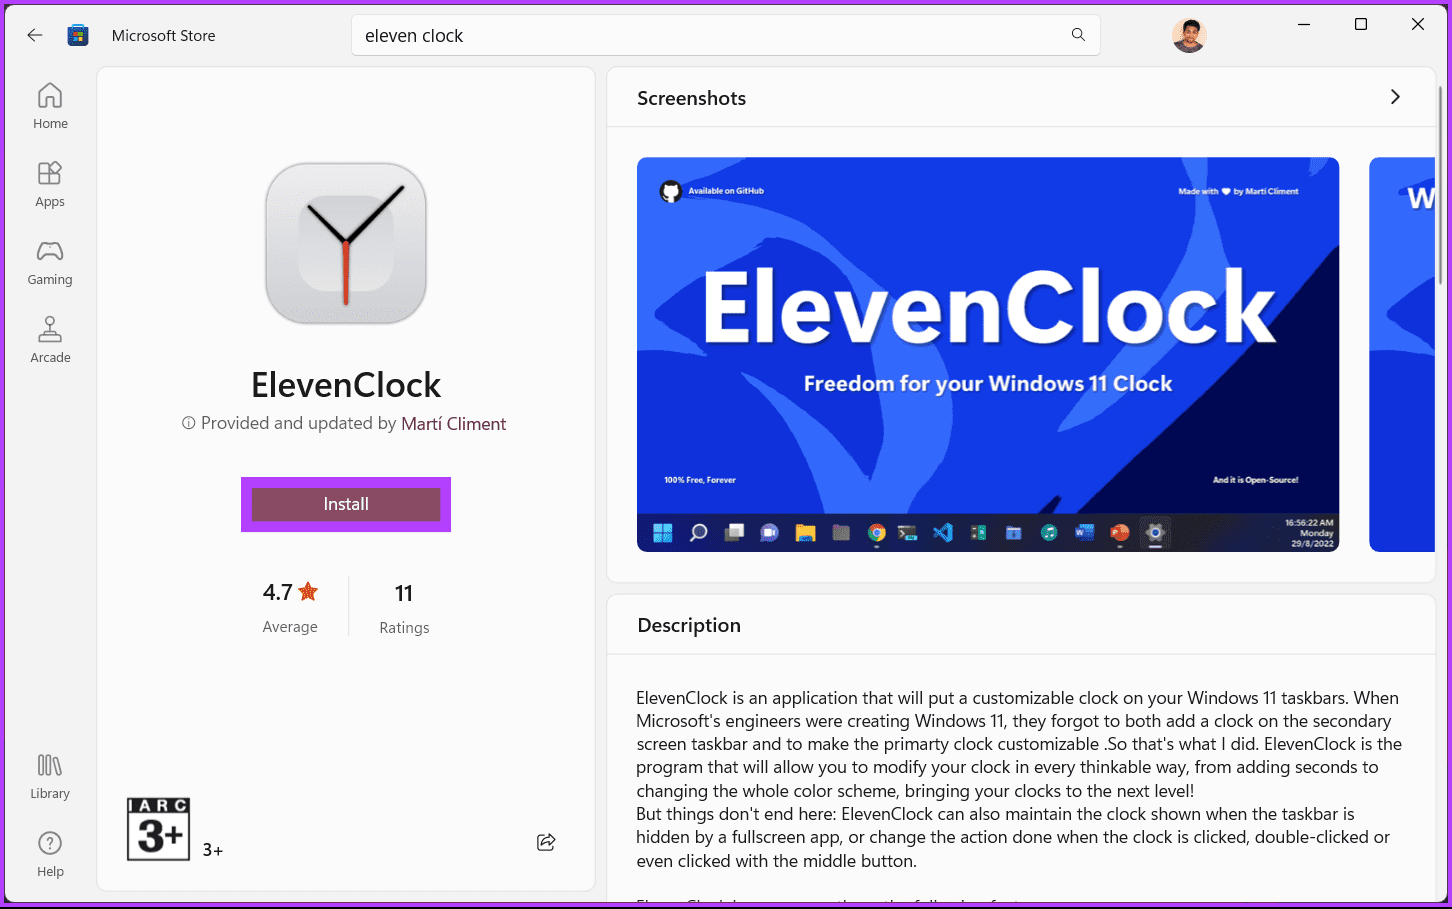
Multiple third-party applications are available that add seconds to the Windows 11 clock; some popular ones are ElevenClock and T-Clock Redux. We will use ElevenClock for the demonstration; let’s begin with the steps.
Step 1: Go to the Microsoft Store, search ElevenClock, and click the Install button. Or you can click on the below link and navigate to the download page directly.
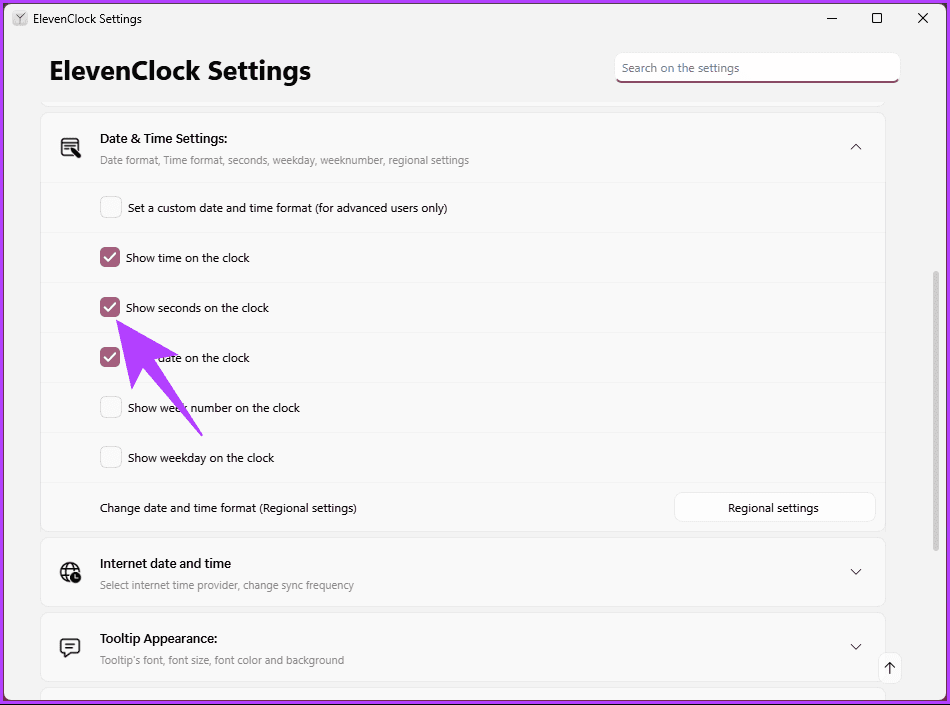
Step 2: Once installed, launch the application and go to ‘Date & Time Settings.’
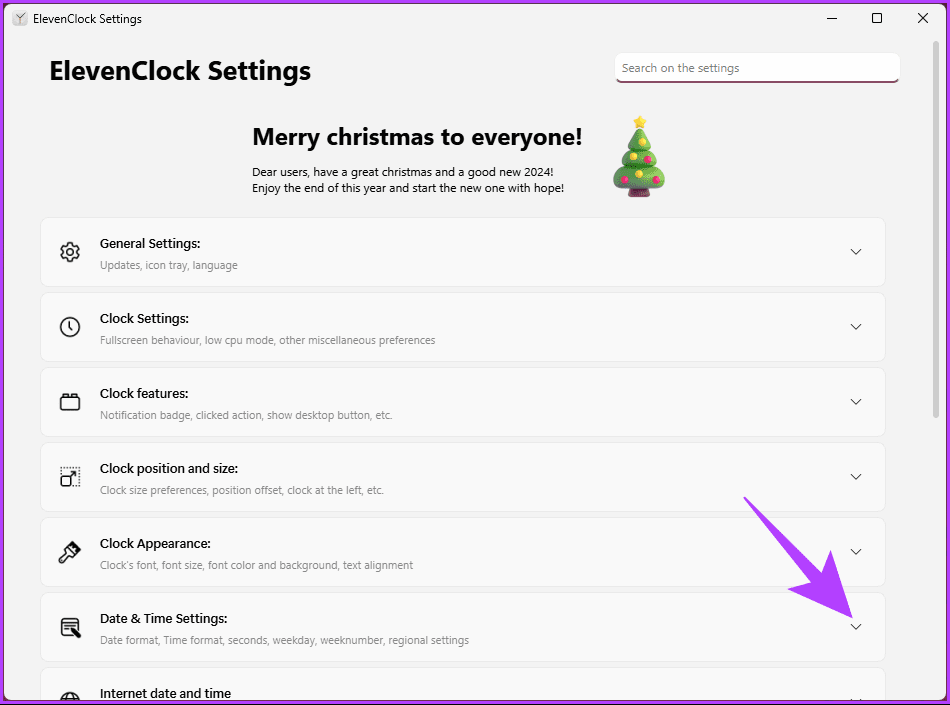
Step 3: From the drop-down menu, find ‘Show seconds on the clock,’ and check the box next to it.
Note: You may have additional customization options, such as fading in the seconds or adjusting the font size.
Once you’ve completed these steps, you should see the seconds displayed in the system tray clock, providing more precise timekeeping for your Windows 11 experience.
FAQs on Showing Seconds on Windows 11 Clock
While third-party tools can provide additional customization options, they may have limitations or compatibility issues with future Windows updates.
Yes, you can use screensavers or desktop widgets that display the time with seconds.
Keep a Close Watch
The ability to show seconds on your Windows 11 clock might seem like a minor adjustment, but it can significantly impact your day-to-day activities. Now that you know how to show seconds on the Windows 11 clock, you can have that extra precision. You may also want to read how to synchronize Windows clock with Internet Time Server.
Was this helpful?
Last updated on 17 January, 2024
Read Next
 How to Upload WhatsApp Status Videos of More Than 30 Seconds
How to Upload WhatsApp Status of More Than 30 seconds WhatsApp now allows you to upload video status for up to 60 seconds for your contacts.
How to Upload WhatsApp Status Videos of More Than 30 Seconds
How to Upload WhatsApp Status of More Than 30 seconds WhatsApp now allows you to upload video status for up to 60 seconds for your contacts.
 8 Best Online Alarm Clock Websites for Free
Online alarm clocks are an ideal option for people who travel frequently or need multiple alarms or reminders throughout the day.
8 Best Online Alarm Clock Websites for Free
Online alarm clocks are an ideal option for people who travel frequently or need multiple alarms or reminders throughout the day.
 Top 3 Ways to Fix Your Clock Is Ahead/Behind Error in Google Chrome
https://youtu.be/YigbNABjAaw Preliminary Fixes Restart Chrome: A simple restart can sometimes resolve the issue if it's related to temporary glitches.
Top 3 Ways to Fix Your Clock Is Ahead/Behind Error in Google Chrome
https://youtu.be/YigbNABjAaw Preliminary Fixes Restart Chrome: A simple restart can sometimes resolve the issue if it's related to temporary glitches.
 3 Ways to Fix iPhone Clock Widget Showing Wrong Time
Basic Troubleshooting Restart iPhone: If the iPhone clock widget used to show the correct time but suddenly stopped working, restart your iPhone.
3 Ways to Fix iPhone Clock Widget Showing Wrong Time
Basic Troubleshooting Restart iPhone: If the iPhone clock widget used to show the correct time but suddenly stopped working, restart your iPhone.
 4 Ways to Add and Customize Clock on iPhone Lock Screen
Whether working across the ocean or having a partner living abroad, your iPhone lock screen can help you easily manage across different time zones.
4 Ways to Add and Customize Clock on iPhone Lock Screen
Whether working across the ocean or having a partner living abroad, your iPhone lock screen can help you easily manage across different time zones.
 How to Change Status Bar Clock Position or Remove It on Samsung Phone
Change or Remove Status Bar Clock Position on Samsung Phone Currently, the clock is at the top-left corner of the Samsung Galaxy phone.
How to Change Status Bar Clock Position or Remove It on Samsung Phone
Change or Remove Status Bar Clock Position on Samsung Phone Currently, the clock is at the top-left corner of the Samsung Galaxy phone.
 5 Quick Ways to Show FPS Counter in Windows 11
Method 1: Using the Xbox Game Bar Xbox Game Bar is baked into Windows 10 and Windows 11.
5 Quick Ways to Show FPS Counter in Windows 11
Method 1: Using the Xbox Game Bar Xbox Game Bar is baked into Windows 10 and Windows 11.
 How to Show Hidden Files and Folders in Windows 11
Have you ever been in a situation where you hid some files on your Windows device while sharing them with friends or family and couldn't find them later?
How to Show Hidden Files and Folders in Windows 11
Have you ever been in a situation where you hid some files on your Windows device while sharing them with friends or family and couldn't find them later?
The article above may contain affiliate links which help support Guiding Tech. The content remains unbiased and authentic and will never affect our editorial integrity.