Helping millions of people navigate the world of technology.

4 Ways to Fix Notifications Not Showing on Mac

Preliminary Fixes

  • Keep apps open in the background: Unlike the iPhone, you must keep the apps open in the background to receive instant push notifications on Mac.
  • Check app settings: This applies to IM (Instant Messaging) apps and work services like Slack and Teams. You won’t receive a notification if you muted a specific WhatsApp or Telegram conversation.
  • Disable Share Across Devices: When you enable Focus on your iPhone, the system automatically enables it for your iPad or Mac using the same account. You must disable your iPhone’s ‘Share Across Devices’ toggle, and iOS won’t share Focus status with other devices.
  • Update Mac apps: Unlike the iPhone, apps on the Mac cannot be updated automatically. You must open the App Store and install the new updates.
  • Update macOS: Apple regularly releases new software versions to add new features and fix bugs. Mac notifications that don’t work can be due to outdated system software. Try updating the macOS.

Fix 1: When Mirroring or Sharing the Display

If you’re mirroring your Mac’s screen to another display or sharing your screen with another device, there’s a setting that can prevent notifications from appearing on your Mac itself.

Step 1: Click on the Apple logo > open System Settings.

Step 2: Click on Notifications in the left sidebar. Scroll down to the bottom of the window.

Step 3: Find the option that says, Allow notifications when mirroring or sharing the display and checkmark it.

With this setting enabled, notifications will still appear on your Mac’s screen even while you’re mirroring or sharing your display. If this didn’t help, move on to the next fix.

Also Read: Best ways to record audio on Mac

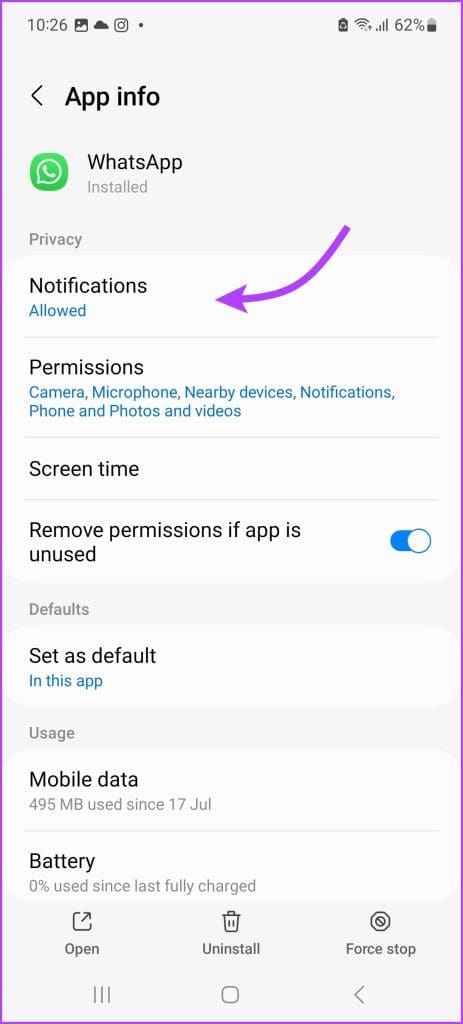
Fix 2: Enable Notification Permission for Installed Apps

If you have denied notification permission during startup, you must enable it from System Preferences or Settings.

On macOS Ventura (macOS 13) and Later

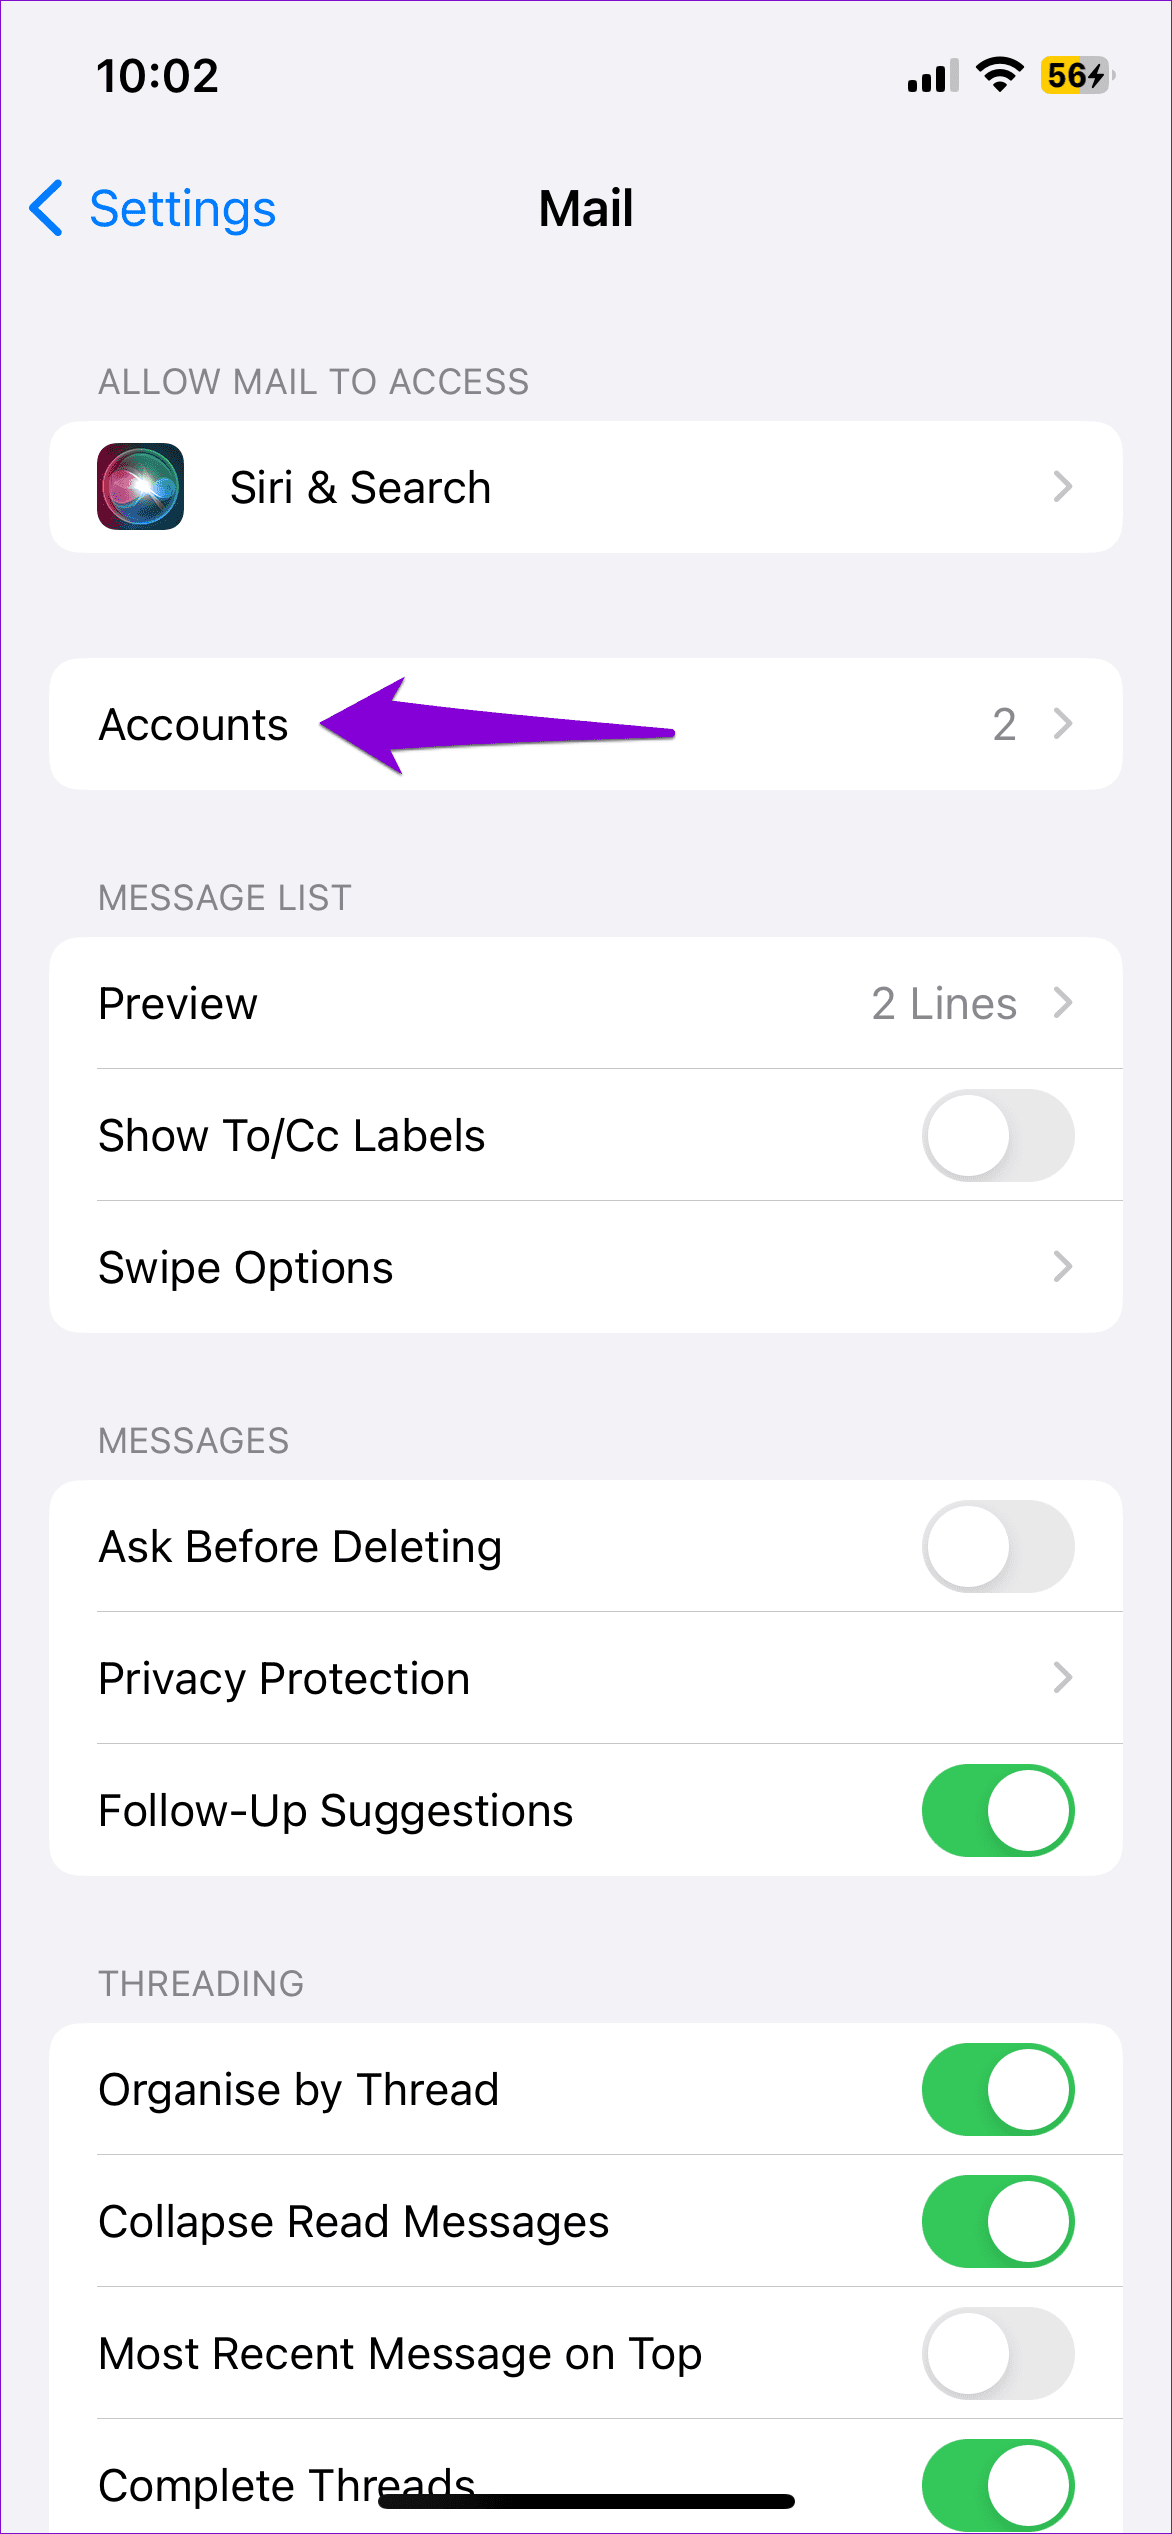
Step 1: Click on the Apple logo and open System Settings.

Step 2: Select Notifications from the sidebar. Open an app from which you are not receiving alerts.

Step 3: Enable the Allow notifications toggle and make the necessary changes.

On macOS Monterey and Earlier

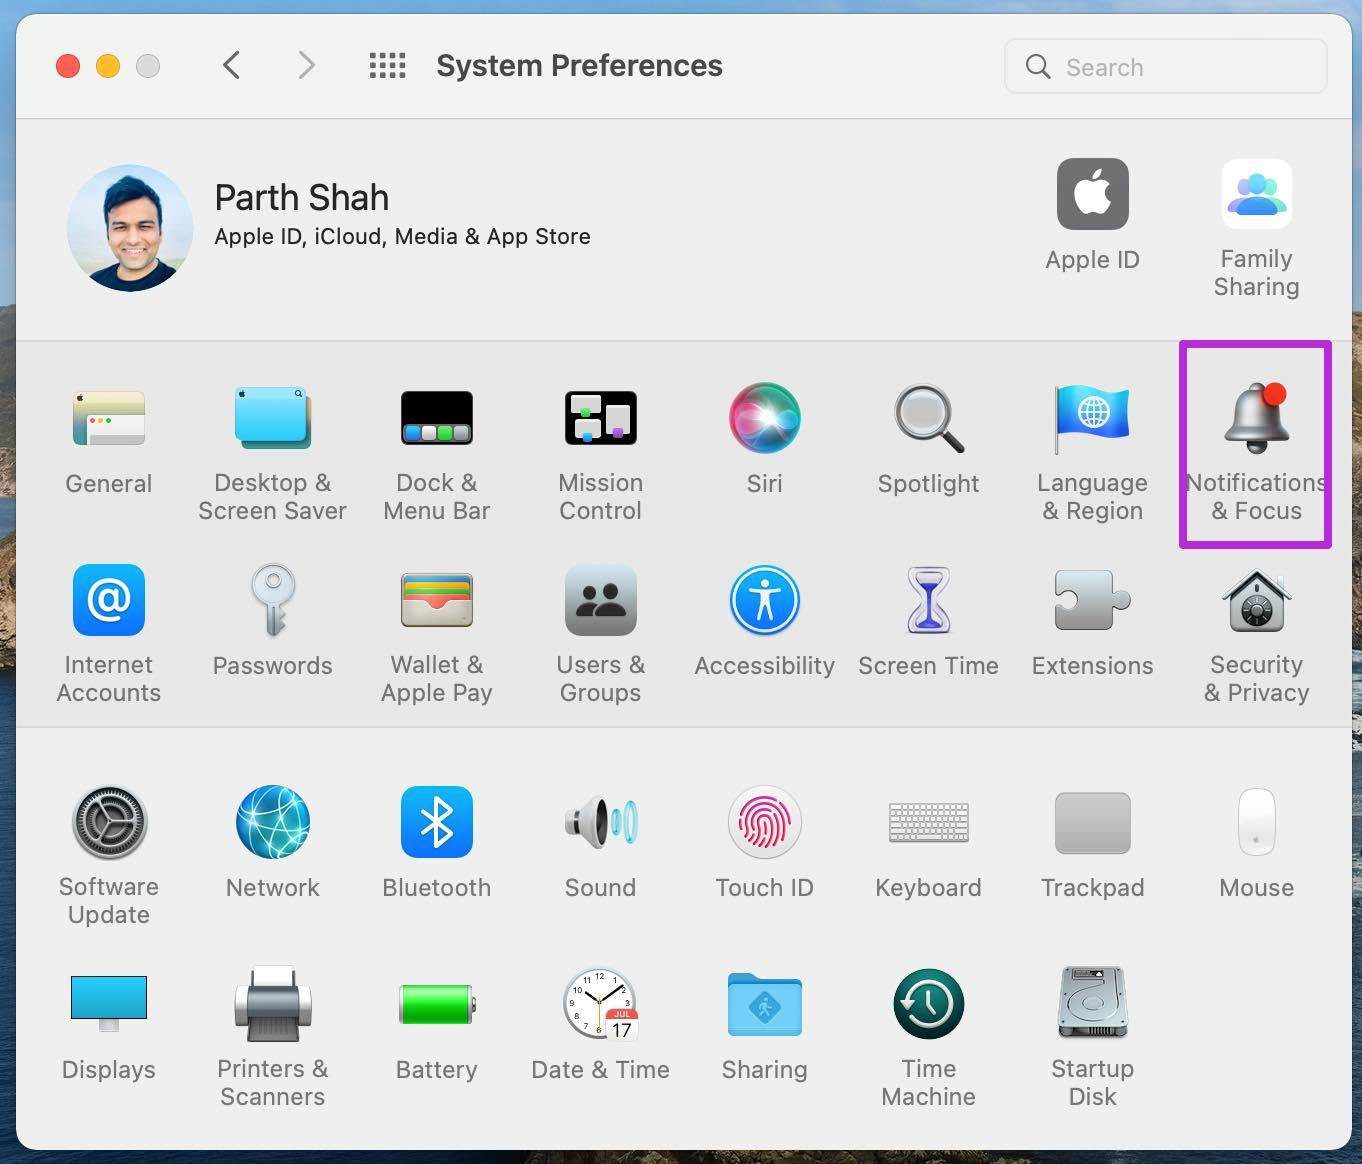
Step 1: Click on the Apple logo > choose System Preferences.

Step 2: Go to the Notifications & Focus menu.

Open notificaitons and focus

Step 3: Select an app that’s troubling you with notifications. Enable Allow Notifications toggle and close the menu.

Allow notifications for mac

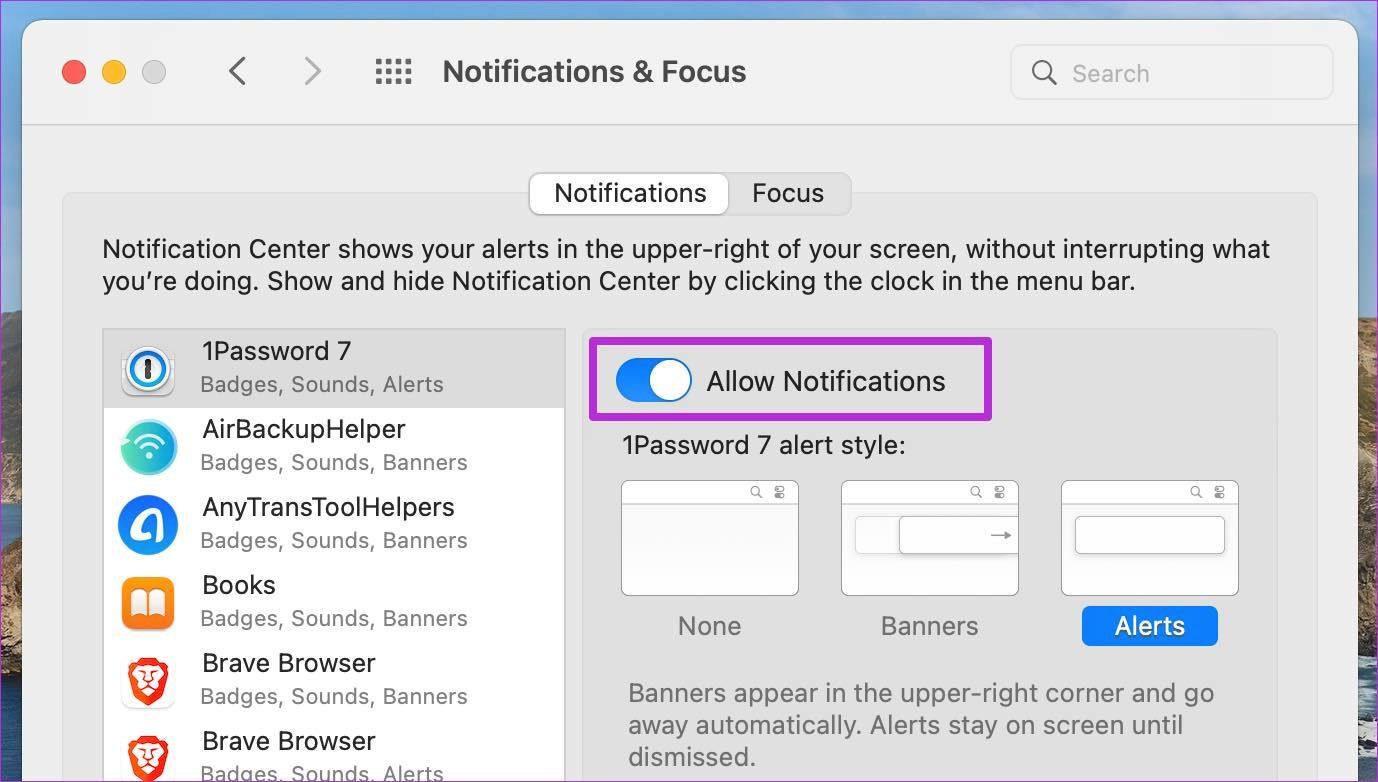
You are all set to receive notifications from the app. From the same menu, customize the notification experience as well.

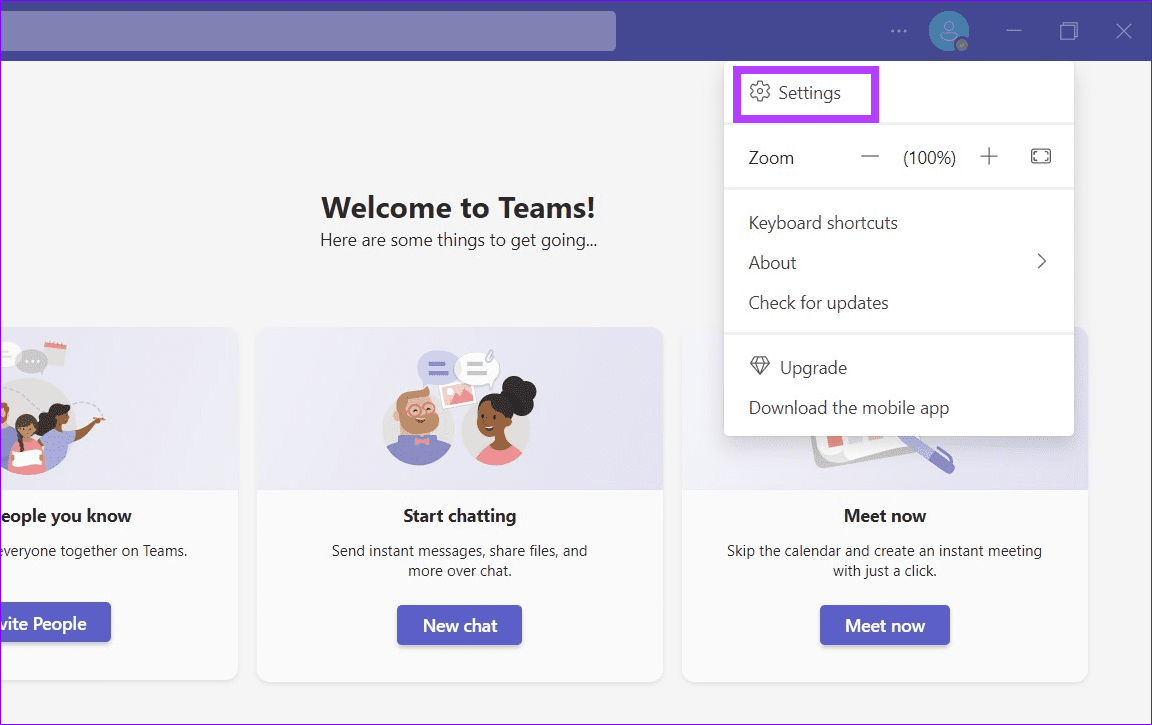
Fix 3: Disable Focus Mode on Mac

Since the macOS Monterey update, Apple has integrated the Do Not Disturb mode inside Focus on the Mac. Enabling Focus mode on your Mac disables all notifications and calls on the device. Here’s how to disable it.

On macOS Ventura and Later

Step 1: Go to System Settings > select Focus.

Step 2: Open a Focus mode > select Allowed Apps.

Step 3: Click + Add > search for apps > add them to the list.

On macOS Monterey and Earlier

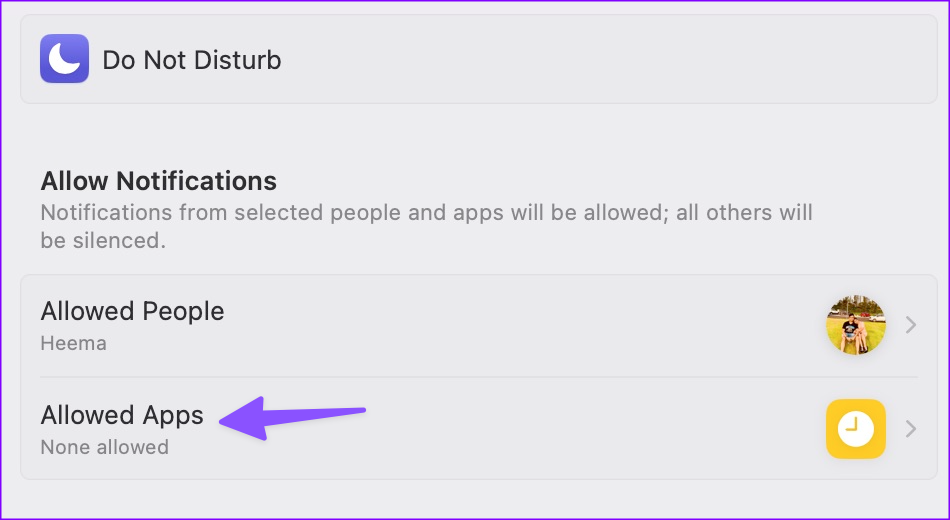
Step 1: Open the System Preferences menu and go to Notifications & Focus.

Open notificaitons and focus

Step 2: Select the Focus profile that you use frequently on Mac.

Step 3: Select Apps and click on the + icon.

Add apps as exception

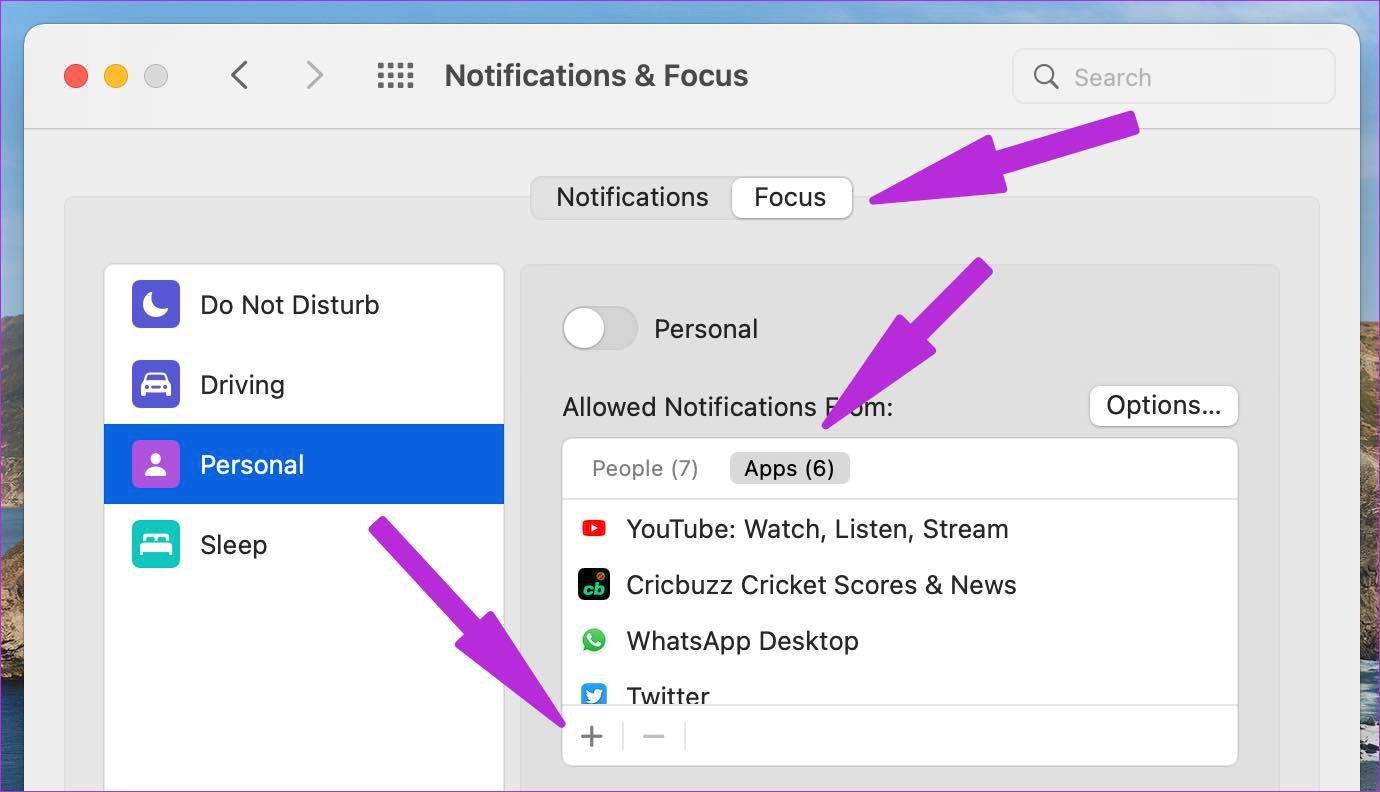
Step 4: Select an app from which you want to receive notifications during Focus mode and close the menu.

Now, you are all set to receive notifications from your favorite apps. If this didn’t help, check out the next fix.

Also Read: How to set environment variable

Fix 4: Check Mac Volume and Sound Output

By default, your Mac notifications are set to appear as banners at the top-right corner. Meaning they show up for some time and go away automatically. If your Mac is on mute, you may miss several notifications.

Step 1: Open the Control Center from the top-right corner. Use the slider to adjust the volume.

Step 2: Click the streaming icon to ensure your MacBook or external speakers are set as sound output.

When notifications stop working on a Mac, things can get confusing. Before reinstalling apps and starting from scratch, use the above methods to fix the issue and receive notifications.

Was this helpful?

Thanks for your feedback!

4 Fixes for “This Message Has Not Been Downloaded From the Server” on iPhone

Try These Basic Fixes

  • Free up storage space: A common reason the Mail app may not download emails is due to a lack of free storage space. To avoid this, ensure your iPhone has at least 2GB of free storage.
  • Install iOS updates: Apple regularly releases updates for all built-in apps on your iPhone, including the Mail app, through iOS updates. Since these updates often contain bug fixes and various improvements, it’s best to install them.

Fix 1: Configure the Mail App to Fetch Emails Automatically

You should configure the Fetch New Data setting for the Mail app to ensure it is not turned off. Here’s how to do it.

Step 1: Launch Settings on your iPhone > go to Mail > select Accounts.

Step 2: Tap the Fetch New Data option.

Step 3: Enable the toggle for Push. Tap your email account > select Fetch from the following menu.

Fix 2: Change Mail Preview Settings

If the Mail app still won’t load emails on your iPhone, try modifying message preview settings. You can increase the number of lines the Mail app shows for a message preview and see if that solves the problem.

Step 1: Open Settings on your iPhone > scroll down to select Mail.

Step 2: Under Message List, tap Preview > select 5 Lines from the following menu.

Fix 3: Remove and Re-Add Your Account

Removing and re-adding your account in the Mail app can help fix any issues caused by misconfigured settings. You can try doing this to see if it fixes the “This message has not been downloaded from the server” error on your iPhone.

Step 1: Open Settings > navigate to Mail > Accounts. Then, select the problematic account from the list.

Step 2: Tap Delete Account > select Delete Account again to confirm.

Step 3: Return to the Accounts page > tap the Add Account option > sign back into your account.

Fix 4: Reset Network Settings

Misconfigured network settings can also trigger the “This message has not been downloaded from the server” error. Instead of verifying each network setting individually, it’s easier to reset them all and start over.

Step 1: Open Settings > tap General > select Transfer or Reset iPhone.

Step 2: Tap the Reset option at the bottom and choose Reset Network Settings.

After resetting the network settings on your iPhone, try loading the Mail app one more time. If not, your only option is to reset your iPhone.

Was this helpful?

Thanks for your feedback!

How to Fix WhatsApp Notification Sound Not Working

Basic Fixes

  • Ensure silent mode is turned off – The first thing you should do is to check and turn off Vibrate/Silent mode on your iPhone or Android.
  • Unmute conversations – If the issue is with some chats, you might have muted some conversations or specific groups. So, check the setting and correct it.
  • Close WhatsApp on other devices – If WhatsApp is open on the desktop or other linked devices, you might receive notifications on those devices. Getting no or delayed WhatsApp notifications on this one.
  • Disable Focus or Do Not Disturb mode – If you have DND (Android) or Focus (iPhone) enabled, you won’t receive any notifications from WhatsApp, let alone hear the sound of it. Check and disable the settings.
  • Disconnect Bluetooth devices – You can’t hear the sound of WhatsApp notifications because it’s directed to your Bluetooth device. Disconnect all devices for some time and see if notifications ping.
  • Update or reinstall the app – WhatsApp notification sound not working on Android and iPhone might be related to an outdated app or some error. Try updating or reinstalling the app to fix the issue.

Fix 1. Allow WhatsApp to Show Notifications

Maybe you mistakenly did so while setting up WhatsApp or it accidentally happened due to a system error. Whatever the reason may be, if you’re not receiving WhatsApp notifications, check if the app is allowed to send you notifications.

On iPhone – Go to Settings > WhatsApp > Notifications. Here, ensure that the toggle next to Allow Notifications is on.

On Android – Go to Settings > Apps > WhatsApp > Notifications. Here, ensure that the toggle next to Allow notifications is on.

Fix 2. Check for Notification Summary or Notification grouping

Both iPhone and Android have built-in features that stop notifications from popping and disturbing you during working/studying time. If you often use Notification Summary (iPhone) or Notification grouping (Android), remove WhatsApp from their list.

On iPhone – Go to Settings > Notifications > Scheduled Summary. You can either toggle off the switch next to WhatsApp or disable the summary option completely.

On Android – Go to Settings > Notifications > Do not disturb > App Notification → Add WhatsApp (to allow the app to send notifications). Or you can simply toggle off Do not disturb all together.

Fix 3. Check WhatsApp In-App Notification Setting

Maybe you intended to turn off notifications for message reactions or accidentally changed the notification setting while setting a custom ringtone for someone. Whatever, the reason, it wiser to check WhatsApp’s notification settings.

On iPhone – Open WhatsApp and go to Settings (tap the gear icon for iPhone and three-dot icon > Settings for Android.) Tap Notifications and check that notifications for messages and calls are enabled. Plus, there is a ringtone selected in front of the Sound section and not none.

You might miss some important messages when the WhatsApp notification sound fails to work. So select a loud and clear notification tone for your WhatsApp.

Was this helpful?

Thanks for your feedback!

2 Ways to Fix Google Chrome Profile Error

Basic Fixes:

  • Restart Chrome from the Task Manager: To open the Task Manager, press Ctrl + Shift + Esc > right-click Google Chrome > select Restart.
  • Turn off sync and re-add the Chrome profile: Once you turn off sync and re-add the Chrome profile, you will give the profile a soft reset, which should fix the problem.
  • Update the Chrome browser: Updating the browser will fix the error, especially when it’s triggered by outdated components. To start an update, navigate to chrome://settings/help.

Fix 1: Enter the Google Chrome Passphrase

You will get the Chrome profile error when you have not logged into your browser profile correctly. So, you should see a Passphrase option. Follow the steps below.

Step 1: Launch the Chrome browser.

Step 2: Click on the Error > Passphrase or Verify it’s you. This should tell you to sign in.

verify its you

Step 3: Input your credentials and sign in; the problem should be resolved.

Fix 2: Reset Your Chrome Sync Settings

Resetting the sync data effectively fixes Chrome profile errors. It enables your data to be uniform across all platforms, allowing you to log into the profile without error.

Step 1: Launch the Chrome browser.

Step 2: Type the path below in the address bar and hit Enter.

chrome://settings/syncSetup

Step 3: Click Review your synced data.

review synced data

Step 4: scroll down to the bottom and click on Clear data.

clear data in Chrome

Now, log into Chrom again, and the error should disappear. In extreme cases, consider changing the default Google account on your Chrome.

Was this helpful?

Thanks for your feedback!

2 Ways to Fix the Telegram App Crashing on Windows 11

Basic Fixes

  • Check the Telegram server status: Visit Downdetector to check for an active Telegram server outage.
  • Quit the Telegram Desktop app and reopen it: Press the Ctrl + Shift + Esc shortcut to open the Task Manager, right-click Telegram Desktop, and select End task. Reopen the Telegram Desktop app.
  • Disconnect VPN: Open your VPN app and click Disconnect to disable the active connection. Retry opening the Telegram app.
  • Update Windows 11: Press the Windows + I shortcut to open Settings, select Windows Update from the left sidebar, and install available system updates.

Fix 1: Repair or Reset the Telegram Desktop App

The Telegram Desktop app may crash abruptly on Windows 11 if its component got corrupt due to a buggy update. Repair or reset it from Windows Settings to restore its normal functioning.

Step 1: Press the Windows key, search Telegram Desktop, and right-click it to open its App settings.

1 open Telegram app settings

Step 2: Select Repair to repair the app. If the issue persists, click Reset to restore the app to its default values.

2 reset or repair telegram desktop

Fix 2: Update or Reinstall Telegram Desktop

If you haven’t updated the Telegram Desktop app for a long time, it may crash due to an obsolete version. Head to the Microsoft Store to update it. Alternatively, you can reinstall it to start afresh.

Step 1: Open the Microsoft Store, search Telegram Desktop, and click Update.

3 update Telegram Desktop

Step 2: To reinstall the app, open Windows Settings using the Windows + I shortcut, select Apps from the sidebar, and click Installed apps.

4 open Installed Apps

Step 3: Search Telegram Desktop, click its three-dot menu, and select Uninstall. Head to the Microsoft Store to install and configure it again.

5 uninstall Telegram Desktop

Was this helpful?

Thanks for your feedback!

6 Ways to Fix Microsoft Teams Crashing on Windows 11

Common Fixes

  • Check service outage – Access Microsoft Service health and click Teams in the left sidebar to check service status.
  • Update the Display adapters driver – Search and open the Device Manager app in the Windows search menu, expand Display adapters, and right-click the installed driver to update it.
  • Update the Teams app – Open the Microsoft Store, search Microsoft Teams, and update the app. Alternatively, you can download the updated version from the Microsoft website.

Fix 1: Clear Microsoft Teams Cache

Corrupt cache data is a common underlying cause of Microsoft Teams crashing on Windows. Clearing it manually should resolve the issue.

Tip: If you’re using Microsoft Teams on Firefox, ensure clearing its cache.

Step 1: Press Windows + R simultaneously to open the Run dialog, type %appdata%MicrosoftTeams, and hit enter.

1 run window

Step 2: Select all the cache data displayed in the file explorer window and right-click to delete them.

2 delete teams app cache

Fix 2: Run the Windows App Store Troubleshooter

Besides clearing cache, Microsoft offers its in-built troubleshooter to fix issues with Windows Store apps. Follow these steps to troubleshoot the Microsoft Teams crash issue with it:

Step 1: Open the Windows Settings app (press the Windows + I keys simultaneously), click System in the sidebar, and press Troubleshoot.

3 troubleshoot Windows menu

Step 2: Click Other troubleshooters, scroll down to find Windows Store Apps, and click Run next to it. Wait a few seconds to let the troubleshooter resolve issues with the Teams app.

4 run windows store app stroubleshooter

Fix 3: Repair or Reset Microsoft Teams

If the Windows Store Apps troubleshooter didn’t help, repairing or resetting the Microsoft Teams app should fix its crashing issue.

Step 1: Open Windows Settings > click Apps in the left sidebar > select Installed apps.

Step 2: Locate Microsoft Teams and click the three vertical dot menu next to it for Advanced options.

5 Microsoft teams app settings

Step 3: Scroll down and click Repair. Alternatively, click Reset if repairing the app didn’t fix its random crashing issue on Windows 11.

6 repair or reset the Teams app

Fix 4: Reduce Refresh Rate on Laptop or Monitor

Reducing the screen refresh rate is another effective technique to resolve abrupt crash issues in the Microsoft Teams app.

Note: You can only decrease the refresh rate on monitors and laptops that offer high refresh rates.

Step 1: Right-click on your desktop > open Display Settings > click Advanced Display at the bottom.

1 Advanced display settings

Step 2: Reduce the current refresh rate from Choose a refresh rate. You can also do it from your dedicated GPU app settings.

2 switch refresh rate

Fix 5: Disable GPU Hardware Acceleration in Teams

By default, the Teams app uses GPU hardware acceleration to offer better performance, but it may cause crashes and lags on certain Windows systems. Disabling it should fix the issue quickly.

Note: This setting is exclusive to Microsoft Teams installed from the Windows App Store.

Step 1: Open Microsoft Teams, click the three horizontal dot menu at the top-right, and select Settings.

3 teams app settings

Step 2: Click General in the left sidebar > check Disable GPU hardware acceleration. Further, close and restart the Teams app.

4 disable GPU acceleration

Fix 6: Disable Teams Animations and App Add-ons

Lastly, disabling animation in the Teams app and turning off app add-ons for teams will eliminate random crash issues.

Step 1: Open Microsoft Teams app settings from the three horizontal dots menu at the top-right.

Step 2: Click General and scroll to the bottom to enable Turn off animations.

5 turn off teams app animation

Further, you can disable adding apps for Teams by going to Manage Team > Settings > Member permissions > uncheck Allow members to add or remove apps.

Was this helpful?

Thanks for your feedback!

How to Add Contacts in Microsoft Teams

Microsoft Teams has been a part of Office 365 since 2016. This office communication app and service offers several features such as video calling, messaging, and team channels. To use all those features, you’ll need to add contacts to the Microsoft Teams.

How to add contacts on microsoft teams feature image

Your contacts are typically individuals you want to interact with, add to a team channel, or assign a task. For organizations, adding contacts to Microsoft Teams might not be a necessity as this is automatically updated from the organization’s directory. However, for personal Teams accounts, adding contacts can be done using the methods explained below.

Adding a New Contact for a Personal Microsoft Teams Account

If your Microsoft Teams account is a personal one, it is not assigned by an organization, any of the methods below can be used to add a contact.

By Syncing Mobile Device Contacts on the Mobile App

One way to add contacts on Microsoft Teams is by syncing the contacts on your address book with Microsoft Teams. Check the steps below to understand how to do so:

Step 1: Launch Microsoft Teams on your mobile device.

How to add a contact on microsoft teams step 20

Step 2: Tap on your profile image.

How to add contacts on microsoft teams step 12

Step 3: Tap on Settings.

How to add contacts on microsoft teams step 17

Step 4: Tap on People.

How to add contacts on microsoft teams step 18

Step 5: If the toggle beside Sync my device contacts shows a grey fill, tap on it to enable contact sync. Once this is done, contacts with Microsoft Teams accounts on your phone book will be synced to your Microsoft Teams contacts.

How to add contacts on microsoft teams step 19

By Syncing Mobile Device Contacts on PC

Microsoft Teams users can also sync the contacts on their mobile device with their PC. Here’s how it works.

Step 1: Launch Microsoft Teams on your PC.

How to add contacts on microsoft teams step 1

Step 2: At the bottom of the left pane, click on Find and invite people.

How to add contacts on microsoft teams step 2

Step 3: On the new dialog box, click on Sync mobile device contacts.

How to add contacts on microsoft teams step 6

Step 4: Scan the QR code on the PC with your mobile device.

How to add contacts on microsoft teams step 7

Step 5: Once the app has been downloaded on your phone, and follow the prompt to sync your device contacts.

Add a New Contact on Teams via Chat

By searching for the email address linked to the personal Microsoft Teams account of a user, you can also add them. Here’s how it works.

Step 1: Launch Microsoft Teams.

How to add contacts on microsoft teams step 1

Step 2: At the top of the left pane of the app window, select New Chat and this should launch a new chat window.

How to add contacts on microsoft teams step 4

Step 3: At the top of the window within the To field, type out the name, email, or phone number linked to the Microsoft Teams account of the desired contact.

How to add contacts on microsoft teams step 5

Once the contact accepts your chat request, they should be automatically added to your Contacts.

Add a New Contact on Teams by Sharing a Link

Another way to add a contact on Microsoft Teams is by sharing an invite link. The link can be sent via SMS, email, social media platforms, or instant messaging. Here’s how:

Step 1: Launch Microsoft Teams.

How to add contacts on microsoft teams step 1

Step 2: At the bottom of the left pane, click on Find and invite people.

How to add contacts on microsoft teams step 2

Step 3: On the new dialog box, click on Share an invite link and this copies the link to your clipboard.

How to add contacts on microsoft teams step 3

Step 4: Launch a preferred platform e.g., email and paste the link to share it with a contact. Once the contact selects the link, they are automatically added to your address book.

Adding a New Contact for an Organization Microsoft Teams Account

If your Microsoft Teams account is linked to your organization or school, you can add contacts from your directory using the steps below:

Step 1: Launch Microsoft Teams on your PC.

How to add contacts on microsoft teams step 1

Step 2: On the pane on the left, click on Calls.

How to add contacts on microsoft teams step 8

Step 3: On the new window, click on Contacts.

How to add contacts on microsoft teams step 9

Step 4: Click on Add Contact.

How to add contacts on microsoft teams step 10

Step 5: Type the name of the contact that you need to add and Microsoft Teams will check for it in the directory.

How to add contacts on microsoft teams step 11

Step 6: Click on the Add button.

Blocking a Contact on Microsoft Teams

You can add a contact to your contact book on Microsoft Teams using any method mentioned above. That way, you can always stay connected with the people in your organization, school or university. You can also block any of the contacts if you do not wish to interact with them.

Was this helpful?

Thanks for your feedback!

How to Personalize the Windows 11 Lock Screen

Update Lock Screen Images

While Windows 11 lets you customize the Lock screen, Microsoft has revealed a few things. For starters, Windows 11 no longer supports multiple lock screen widgets, but you can use widgets otherwise on your computer. That said, you can use a widget that will appear at the bottom. Here’s how to update Lock screen images:

Step 1: Right-click an empty space on your desktop to open the contextual menu > select Personalize.

Personalize desktop option

Step 2: Click the Lock screen option from the personalization settings menu.

Windows Lock Screen option

Step 3: Select the drop-down next to Personalize your lock screen to choose between Windows Spotlight, Picture, or Slideshow.

Personalize your lock screen

Remember that for Windows Spotlight to work, your computer must be connected to the internet since it automatically downloads new backgrounds daily.

The Slideshow option allows you to choose a folder containing photos and automatically rotate them occasionally. Lastly, Picture allows you to choose an image file from your computer and set it as your lock screen background.

Change Lock Screen Status

You may select an application to show its detailed status on your Lock screen. Follow the steps below.

Step 1: Right-click an empty space on your desktop to open the contextual menu and select Personalize.

Step 2: Click the Lock screen option from the personalization settings menu.

Windows Lock Screen option

Step 3: From the Lock screen status, click on the drop-down menu to choose the widget you want displayed at the bottom.

Lock screen status

Step 4: Enable the Show lock screen background picture on the sign-in screen option. That will allow Windows to display your lock screen wallpaper on the sign-in screen.

Show lock screen background picture on the sign in screen

You will only see the PIN security screen if you have set a password for your user account. The themes you install and apply will not impact your lock screen.

The widgets you see in the list depend on what applications you have installed. If you’ve just updated, the only widget options will be the stock ones, like Mail to show your emails and Calendar to display your appointments.

Productivity, financial, or shopping apps offered through the Microsoft Store are likelier to contain lock screen widgets. Currently, manually installed software using executable files does not appear in the widget list.

Was this helpful?

Thanks for your feedback!

How to Get Windows 11-Like Taskbar in Windows 10

Method 1: Use Stardock Start11

As Windows doesn’t have a setting to make the taskbar look like Windows 11, you can only rely on third-party apps like Stardock Start11. This premium software allows you to customize your start menu, taskbar, search, etc., by adding or removing sections. The software offers a 30-day trial, and you can install it from the install Stardock Start11 from its official website.

Step 1: Open Stardock Start11, select the Start Menu from the sidebar, select and toggle it on, and select Windows 11 style.

Windows 11 Style Stardock Start Menu

Step 2: Next, click on the Start Button from the sidebar and enable Position the Start button in the center of the taskbar. This will make your taskbar look like Windows 11.

Position The Start Button In The Center Startdock Start

Step 3: Additionally, you can use other options like Taskbar, Taskbar pins, Search, and Control to tweak the settings until you find the best one.

Taskbar Settings Startdock Start

Step 4: If something goes wrong with the Settings app, go to the Settings backup > click on Reset settings to restore all the settings to their defaults. 

Reset Settings for Startdock Start

Method 2: Setup Features Manually

Step 1: Open File Explorer and create two empty folders. The name and location of the folders don’t matter much.

In our case, we have named our folders F1 and F2.

Create Two folders to add to taskbar

Step 2: Next, right-click on the Taskbar and select Toolbars > New Toolbar. The system will now ask you for a location. Pick one of the empty folders you created.

Create new toolbar

Do the same for the second folder as well.

Once down, you will see two toolbars on the taskbar with the names of the folders you created.

Set toolbar address to these folders

Step 3: Right-click the Taskbar and uncheck Lock all Toolbars. You will notice vertical markers next to the toolbars you created. These markers are draggable.

Drag and customize Windows 10 taskbar

You can drag one of the toolbars to the left, next to the Start button, while leaving the toolbar on the right.

Step 4: Drag the icons folder to the right and align it in the center.

By now, you will see a rough structure forming. For the final touches, right-click on the toolbars and uncheck Show title and Show text for both toolbars.

Hide show text and show title option

This will remove the name and text, leaving an empty space on either side of the icons folder, like in Windows 11.

Step 5: Right-click on the taskbar and select Lock Taskbar to lock it into place. After that, you can’t change its height or location.

That is how you can change the location of the Taskbar and make it resemble Windows 11.

Centre all icons on the taskbar

While this process seems tedious, you must set it up once.

Taskbar Customizations

In Windows 11, Microsoft collapsed the entire taskbar onto the center. The Start and Search buttons are, by default, next to the center’s app icons and folder options.

As we noted earlier, you can’t move the Start button to the center. Nevertheless, you can still customize it in a few ways.

1. Remove News and Weather

If you want a complete experience, remove or disable the News and Weather widget from the Taskbar.

To do so, right-click the taskbar and select News and Interest > Turn off. That’s it.

Turn off weather

The widget will disappear from the Taskbar.

2. De-Clutter System Tray

At the same time, removing some icons from the System Tray can declutter it. By default, Windows 10 displays the Wi-Fi status, volume, and battery, among other things.

However, it may overflow with icons if you do not check it regularly. For example, one of our Windows PCs had icons for Meet Now, Windows Update Status, and Dropbox, making it look cluttered.

Step 1: Right-click on the Taskbar and select Taskbar settings. Next, scroll down until you see the Notification Area. Click on Select which icons appear on the taskbar.

Hide system tray icons

Step 2: Toggle off the icons you want to remove. That’s about it.

Toggle off icons from System tray

You will have a clean System Tray like Windows 11, although the user experience and icons will remain the same as Windows 10.

FAQs

Why Does My Windows 11 Have a Windows 10 Taskbar?

If you were using a third-party app on Windows 10 that customized the look and feel, it could be why the Windows 11-like taskbar is missing. It’s best to uninstall or reset the taskbar to configure it again.

How to Unlock the Windows 11 Taskbar?

Unlike Windows 10, unlocking the Windows 11 taskbar is impossible. You can go to settings and customize it further, arrange icons, pins, and so on, but there is more unlock.

Was this helpful?

Thanks for your feedback!

4 Ways to Fix Snapchat Notifications Not Working on iPhone

Basic Fixes

  • Enable Background App Refresh for Snapchat: It allows Snapchat to refresh its feed in the background, providing you with real-time notifications. Head to iPhone Settings > General > Background App Refresh, and enable the Snapchat toggle.
  • Disable Focus mode: An active Focus mode suppresses device notifications (including Snapchat). Swipe down from the top right screen corner to open the Control Centre, and tap the Focus toggle to turn it off.
  • Update or reinstall Snapchat: Open the Apple App Store, search Snapchat, and tap Update (if available). Alternatively, long-tap the Snapchat icon, select Remove App, and install it afresh from the App Store.

Fix 1: Check iPhone Notification Settings for Snapchat

Snapchat notifications won’t work on your iPhone when it doesn’t have the necessary system permissions. Head to iPhone settings and review Snapchat notification permissions to resume getting new alerts.

Step 1: Open the Settings app, tap Notifications, and select Snapchat.

Step 2: Ensure Allow Notifications and Time-Sensitive Notifications toggles are enabled and turn on Sounds under Alerts.

Fix 2: Check Snapchat In-App Notification Settings

Besides system settings, iOS may struggle to show new Snapchat notifications if you’ve unknowingly disabled them from its in-app settings. Access Snapchat’s in-app settings to review and fix them.

Step 1: Open Snapchat, select your profile avatar at the top left, and tap the Gear icon to access Snapchat settings.

Step 2: Select Notifications, and ensure all notification toggles are enabled.

Fix 3: Clear the Snapchat App Cache

A corrupt app cache is a common reason behind Snapchat notifications not working on your iPhone. Clear the cache files manually from its in-app settings to restore normalcy.

Step 1: Open your profile page in the Snapchat app and tap the Gear icon at the top right corner.

Step 2: Select Clear Data and tap Clear Cache. Tap Clear when prompted to confirm it.

Fix 4: Reset Network Settings

Lastly, if the error persists, reset all network settings on your iPhone, fixing network misconfigurations that are suppressing Snapchat notifications.

Step 1: Select General under iPhone Settings and tap Transfer or Reset iPhone.

Step 2: Tap Reset and select Reset Network Settings. Enter your device passcode when prompted to confirm it.

Was this helpful?

Thanks for your feedback!

4 Ways to Fix Fire TV Stick Not Loading Apps

Basic Fixes:

  • Check internet connection: If you try opening apps on a Fire TV Stick on a slow network connection, they may not open on the first try. Ensure you are dealing with at least double-digit Wi-Fi speed and then access apps. Additionally, ensure to clear any interface between your TV and router.
  • Restart the Fire TV Stick: If your Fire TV Stick is not loading apps, the issue might be due to a glitch on your device. A simple reboot should help you load apps. Use the settings to reboot your device and check again.
  • Check device storage: With hundreds of apps and games available from the Amazon App Store, filling the default storage is easy. However, this can also prevent apps from loading. So, check and ensure your Fire TV Stick has ample storage space.
  • Disable VPN: When you set up a VPN network on your Fire TV Stick, some region-specific apps may not work. Disable the VPN and try again.
  • Update Fire OS: An outdated Fire OS software version could prevent apps from loading on the Fire TV Stick. Manually check for updates and install a new Fire OS build on the Fire TV Stick.

Fix 1: Clear Application Cache

All the installed apps on the Fire TV Stick collect cache data in the background to load the content quickly. An app collecting lots of cache data may lead to the app not opening on the device. You must clear cache data for the troubling app on the Fire TV Stick. Here’s how.

Step 1: Scroll down to the Settings menu and open Applications.

Open applications menu

Step 2: Scroll down to Manage Installed Applications.

Manage installed applications

Step 3: Select the app that’s not loading on Fire TV Stick.

Open app

Step 4: Scroll down and select Clear cache.

Clear app cache

Also Read: How to fix lag on Amazon Fire TV Stick

Fix 2: Ensure the App Is Still Available on Fire TV Stick

If you haven’t used a specific app for a long time, Fire OS might delete it without your consent to free up device storage space. When you open the Applications menu, you may see a little cloud icon above the app icon. So, download the app again for it to work on your Fire TV Stick.

Fix 3: Reinstall App

If a specific app isn’t opening on your Fire TV Stick, delete and reinstall it. This will remove any app settings that might be causing it not to open. Here’s how to do it.

Step 1: Go to Settings → Applications.

Open applications menu

Step 2: Here, select Manage Installed Applications.

Firestick not Loading Apps 7

Step 3: From the list, select the relevant app.

Firestick not Loading Apps 8

Step 4: Select Uninstall and confirm the same.

Firestick not Loading Apps 9

Now, go to the Amazon App Store and reinstall the app. Try setting up and using the app again on your Fire TV Stick.

Fix 4: Factory Reset Fire TV Stick

If you still can’t load apps, reset your Fire TV Stick. Doing this will delete all device data, apps, settings, etc., and fix any related issues. Follow the below steps to do it.

Step 1: Go to Settings and select My Fire TV.

Open Settings menu 7

Step 2: Select Reset to Factory Defaults and confirm the same.

Select Reset on Fire TV Stick 5

Wait for the reset process to finish. Once done, set up your Fire TV Stick device and install the relevant apps. Then, try using them to see if the issue has been fixed.

Was this helpful?

Thanks for your feedback!

5 Ways to Fix Telegram Not Showing Notifications on iPhone

Basic Yet Essential Methods to Try

  • Check Telegram servers: It’s possible that Telegram servers are down. Wait till the issue is fixed.
  • Update Telegram: Bugs could hinder notifications. So, update your Telegram app.
  • Force close app: Close Telegram. After a few seconds, re-open the application to check if notifications are up and working.

Fix 1: Enable Notifications for Telegram

For some reason, if you have disabled notifications for Telegram, you must enable them from the Settings menu. Here’s how.

Step 1: Open Settings. Scroll down and tap Telegram > Notifications > Allow Notifications.

Further, if you’ve set in-app notification exceptions for chats, groups, and channels — you may have to remove these exceptions from the Telegram app.

Step 2: Open Telegram on your iPhone. Go to Settings > Notifications > Delete All Exceptions.

You are all set to receive notifications from Telegram now.

Fix 2: Disable Focus Modes on iOS Devices

Focus on iPhone hinder receiving notifications from apps and contacts. If you can’t receive Telegram notifications, disable Focus modes on iPhone. Additionally, you must also disallow Mac from sharing Focus modes with your iPhone. Follow the below steps.

On iPhone

Pull down the Control Center > tap on the Focus mode to disable it. Alternatively, you can make Telegram an exception for receiving notifications when a focus mode is triggered. Here’s how:

Step 1: Open Settings > Focus.

Step 2: Select a Focus profile in which you want to add the Telegram app as an exception.

Step 3: Tap Apps and choose Telegram as an Allowed App.

Disable Mac’s Sharing Across Devices

Mac allows you to share focus modes across devices, which might be why Telegram does not provide notifications. Here’s how to disable this feature.

Open System Settings > Head to Focus > Disable Share across devices.

Disable share across devices

Fix 3: Enable Background App Refresh

If the Telegram background app refresh is disabled, you won’t receive any new updates from the app. To enable this, go to Settings. Scroll down to locate and tap on Telegram. Enable the toggle for Background App Refresh.

Fix 4: Unmute Conversations

Telegram allows you to mute conversations for a few hours. If you have muted Telegram conversations or groups, you must unmute them—tap on the contact name > select Unmute.

Fix 5: Disable VPN Connection

Telegram is blocked from use in certain regions around the world. If your VPN location falls into these countries, it may be the cause for your notification delay. So, I advise disabling the VPN.

Was this helpful?

Thanks for your feedback!

4 Ways to Fix Facebook Keeps Logging You Out

Fix 1: Clear Cache and Cookies

Cache and cookies data stored by your browser can sometimes cause problems, such as Facebook logging you out randomly. In such cases, clearing the existing browsing data can help.

Step 1: Press the Ctrl + Shift + Delete keys on your keyboard to bring up the Clear browsing data panel in Chrome or Edge.

Step 2: Use the drop-down menu next to Time range to select All time. Tick the Cookies and other site data and Cached images and files checkboxes. Then, click the Clear data button.

Clear Cache and Cookies in Chrome Desktop

Fix 2: Change Facebook Password

Facebook may log you out of your account if it detects suspicious activity or if your password is compromised. If you suspect either of these scenarios, it’s best to change your account password.

Head to Facebook’s password reset page and set up a new password. Then, click the Change password button.

Reset Facebook Password

Fix 3: Remove Third-Party Access

If Facebook keeps logging you out even after you reset the password, third-party apps linked to your account might be the culprit. It’s a good idea to review the apps connected to your Facebook account and remove any that you no longer use or trust.

Step 1: Open Facebook in your preferred web browser. Click the profile icon at the top right corner and select Settings & privacy > Settings.

Facebook Settings and Privacy

Step 2: Switch to the Apps and websites tab. In the right pane, use the Remove button next to third-party services that you no longer use.

Remove Third Party Website Access for Facebook Account

Fix 4: Disable Extensions

It’s possible that one of your third-party extensions is responsible for unexpected Facebook logouts. To check for this possibility, you should consider disabling all the extensions temporarily.

Type chrome://extensions/ (Chrome) or edge://extensions/ (Edge) in the address bar at the top and press Enter. Use the toggles to disable all the extensions one by one.

Enable or Disable Extensions in Google Chrome

Was this helpful?

Thanks for your feedback!

Top 6 Wireless Earbuds With Wireless Charging

While wireless earbuds support support wired charging, it never hurts to drop them and let them charge overnight or over a long period. With this, you do not have to go through the hassle of taking out the charging cable and plugging them in unless you are looking for faster charging speed. Here are the best wireless earbuds with wireless charging.

Nothing Ear (2)

  • USB-C charging: Yes | Bluetooth codec: SBC, AAC, and LHDC
  • IP rating: Earbuds – IP54, Case – IP55
Nothing Ear (2) earbuds with wireless charging

The first wireless earphones on this list are the all-new Nothing Ear (2). Thanks to their transparent design and skeletonized stems, these earphones stand out starkly and are bound to attract their share of compliments. These wireless earphones come with ANC, have decent battery life, and are backed by an 11.6mm dynamic driver. And yes, they support wireless charging.

The best part is that these Nothing earphones deliver dynamic music. During our time with these earphones, we found the music had bountiful details, and the songs sounded energetic. For the record, these earphones support AAC, SBC, and LHDC Bluetooth codecs.

What We Like

  • Delivers detailed sound
  • Affordable price

What We Don’t Like

  • Average build quality

OnePlus Buds Pro 2

  • USB-C charging: Yes | Bluetooth codec: SBC, AAC, LC3, and LHDC
  • IP rating: Earbuds – IP55, Case – IPX4
OnePlus Buds Pro 2

Another pair of earbuds that support wireless charging and are in the same price range as the option above, are the OnePlus Buds Pro 2. However, they offer significantly better audio output, and that’s a huge plus. At the same time, these earphones also pack a stylish look and bring several cool features to the table, such as ANC, support for Bluetooth codecs, and an IP55 rating.

While they are comfortable to wear, they are not the ideal earphones to wear during your time out or in the gym. They do bite slightly in your ear, especially if you wear them to bed. Secondly, they tend to slip out during strenuous exercise routines and HIIT routines.

What We Like

  • Punchy sound
  • Good design

What We Don’t Like

  • Sound isn’t very balanced

Sennheiser MOMENTUM TWS 3

  • USB-C charging: Yes | Bluetooth codec: aptX, AAC, SBC, and aptX Adaptive
  • IP rating: Earbuds – IPX4, Case – N/A
Sennheiser MOMENTUM True Wireless 3 Earbuds 2

If you are looking for good audio quality at a good price, then the Sennheiser MOMENTUM TWS 3 wireless earphones will be a good pick. Sennheiser audio accessories are known for their quality audio output, and this one is no different. They offer excellent audio with crisp and detailed audio output.

Like most modern TWS earphones, you can play with the companion app. The one for the Sennheiser MOMENTUM TWS 3 lets you tweak the audio through the EQ presets as per your preference. At the same time, the noise cancellation — both passive and active — is impressive and easily blocks out environmental sounds and regular sounds. The battery life is also satisfactory.

What We Like

  • Good ANC
  • Detailed sound

What We Don’t Like

  • N/A

Apple AirPods Pro 2

  • USB-C charging: No, Lightning | Bluetooth codec: SBC and AAC
  • IP rating: Earbuds – IPX4, Case –IPX4
AirPods Pro 2

If you have an iPhone and are heavily invested in the Apple ecosystem, then the Apple AirPods Pro 2 is the one for you. They connect seamlessly to your iPhone and MacBook, and the automatic device switching is one of the biggest advantages. While the audio output is satisfactory, they only support SBC and AAC Bluetooth codecs. That said, they are comfortable to wear, and charging them wirelessly is a walk in the park.

When it comes to the design, they are sleek and slim. And the lack of touch-sensitive controls ensures you can change songs or switch between ANC and Sound Transparency effortlessly. I have been using these Apple earphones since they came out and are bowled over by their comfort. They stay anchored to your ears, even during exercise sessions.

What We Like

  • Balanced sound
  • Fast pairing with Apple products

What We Don’t Like

  • Not very bass heavy

Also Read: AirPods Pro 2 vs OnePlus Buds Pro 2: Which Is the Right TWS for You?

Samsung Galaxy Buds Pro 2

  • USB-C charging: Yes | Bluetooth codec: SBC, AAC, and Samsung Scalable Codec
  • IP rating: IPX7
SAMSUNG Galaxy Buds 2 Pro 2

The Samsung Galaxy Buds Pro 2 earphones are for you if you use a Samsung phone. These earphones in adorable pastel shades are sleek, lightweight, and comfortable to wear. The AKG-tuned earphones are in the same leagues as the Sony WF-1000XM4 and the Sennheiser MOMENTUM TWS 3. These earphones support Samsung’s seamless codec, which can transmit 24-bit audio on Samsung phones. And the head-tracking spatial audio is the cherry on top.

The latter means that the earphones will shift the soundstage as you rotate your head. As noted earlier, the audio output is exceptional. And the noise cancellation is not bad either. When enabled, you should be able to cut out any distractions. It also offers good battery life. With ANC, it can last up to 5 hours, with the charging case delivering around 28 hours more (without ANC).

What We Like

  • Good battery life
  • AKG-tuned

What We Don’t Like

  • Slightly expensive

Sony WF-1000XM4

  • USB-C charging: Yes | Bluetooth codec: SBC, AAC, and LDAC
  • IP rating: IPX4

The Sony WF-1000XM4 is one of the premium wireless earbuds that also supports wireless charging. These also support Active Noise Cancellation and offer top-notch ANC and audio performance. These buds are small and sleek and offer a comfortable fit.

The battery life is decent, and you get around 8 hours of playback with ANC. And the charging case provides around 2 additional cycles. The ANC delivers one of the best experiences. They seal outside noise both actively and passively. From train noises to regular distracting noises in homes, you can mute them out.

What We Like

  • Powerful and detailed sound
  • Good ANC

What We Don’t Like

  • Expensive

Was this helpful?

Thanks for your feedback!

How to Fix iPhone Hotspot Keeps Disconnecting on Windows and Mac

Why Does My iPhone Hotspot Keeps Disconnecting

Before we show you step-by-step instructions to fix the hotspot issue on your iPhone, let’s quickly go over some of the possible reasons behind such behavior.

  • Network connection – An unstable speed or incorrect network settings can impact hotspot functionality. And while not often, an active data saver mode can also lead to hotspot disconnecting issues.
  • Physical barriers – Your iPhone is far away, or there is a barrier between the phone and the device you are trying to connect. There could also be an issue when the iPhone is near Electromagnetic devices like a microwave.
  • Inactivity – Your iPhone disconnects the hotspot after 90 seconds of inactivity on the connected device.
  • Carrier issues – You may run out of mobile data on your active carrier plan.

Basic Fixes To iPhone Hotspot Keeps Disconnecting

  • Check Data Usage – Check the personal hotspot data usage from the Settings > Mobile Data / Cellular Data menu. If it exceeds your monthly data limit, purchase another data plan. You can read our dedicated post to limit cellular data usage on an iPhone.
  • Disable low data mode – To reduce mobile data usage, iOS can disable background tasks such as automatic updates, background tasks, hotspots, and more. Disable the setting and see if the connection stays stable.
  • Disable power saver mode – The setting may suspend background activities like downloads, mail fetch, hotspot connection, etc. until you can fully charge your phone.
  • Keep iPhone plugged in – Similar to the above situation, the idea is to avoid low battery and disruption in your hotspot connection.
  • Update iOS – An outdated iOS version can be the main culprit behind the iPhone hotspot keeps disconnecting issue. Try updating to fix it.

Fix 1. Change the Hotspot Name and Password

The idea is to re-establish the hotspot connection between your devices. So, change your iPhone hotspot and password and try again.

Step 1: Open Settings on your iPhone. Head to General → About → Name menu.

Step 2: Tap the x mark beside the name and rename the phone (that reflects in the hotspot name).

Change phone name

Step 3: Head back to Settings. This time open Personal Hotspot.

Step 4: Select Wi-Fi Password and enter a new one.

Change personal hotspot password

Fix 2. Temporary Disable Auto Lock

When your iPhone auto-locks after a set time, the system may disconnect the hotspot on the device. You should extend or disable auto-lock time from Settings.

Step 1: Launch Settings and navigate to Display & Brightness.

Step 2: Select Auto-Lock and increase screen time out.

Extend auto-lock on iPhone

Fix 3. Disable Maximize Compatibility

The maximize compatibility option reduces internet performance for devices connected to your iPhone hotspot.

Step 1: Head to iPhone Settings and open Personal Hotspot.

Step 2: Disable the Maximize Compatibility toggle.

Disable maximize compatibility

Fix 4. Reconnect iPhone Hotspot

You can remove the current saved network on your Mac or Windows and try connecting your iPhone hotspot again.

Mac

Step 1: Click the Apple icon from the menu bar and select System Settings.

Step 2: Select Wi-Fi and find your iPhone hotspot under the Known Networks menu. Click the three-dot menu beside it and select ‘Forget This Network‘.

Forget network on Mac

Windows

Step 1: Head to Windows Settings by pressing the Windows + I keys. Select Network & internet from the sidebar.

Step 2: Open Wi-Fi and head to Manage known networks.

Manage known networks on Windows

Step 3: Click Forget beside your iPhone hotspot and try connecting it again.

Forget network on Windows

Fix 5. Update Carrier Settings

Your local carrier regularly releases new updates to improve network connection and data speeds. These updates are automatically installed over the air. But in some cases, you might need to update carrier settings manually.

Step 1: Open the Settings app. Go to the General → About.

Step 2: Here, scroll down to SIM details.

Step 3: Check the Network Provider version. Tap it to fetch the latest version.

Fix 6. Disable Limit IP Address Tracking

While iCloud Private Relay is designed to keep your browsing private from prying eyes, it may sometimes interfere with hotspot capabilities. So if your iPhone hotspot keeps disconnecting, temporarily disable iCloud Private Relay for the Wi-Fi network.

To do so, go to Settings → Wi-Fi → Tap i next to your Wi-Fi → toggle off Limit IP Address Tracking.

Fix 7. Reset Network Settings

Incorrect network settings on your iPhone lead to frequent hotspot disconnection on a Windows laptop.

Step 1: Go to the Settings app on your iPhone.

Step 2: Open the General menu. Scroll down to Transfer or Reset at the bottom.

Reset settings on iPhone

Step 3: Select Reset and tap Reset Network Settings.

Reset network settings

You can check our dedicated post to learn the implications of resetting network settings on iPhone and Android. If the trick doesn’t work, reset all settings from the same menu.

Was this helpful?

Thanks for your feedback!

How to Share Screen in Telegram on Mobile and PC

How to Share Screen in Telegram for Android or iPhone

Step 1: Launch the Telegram app on your phone and open the chat of the person with whom you wish to share the screen.

Step 2: Tap the call button at the top to start a call. Once connected, tap on the Start Video button at the bottom.

Step 3: Telegram will ask you to choose from a Back Camera, a Front Camera, and a Phone Screen. Select the Phone Screen option and tap on the Share Video button.

Step 4: Hit Start now when prompted. After a while, you’ll see a message that reads “You are sharing your screen.” You can hit the Stop Video button to end the screen sharing.

Similarly, you can share your screen with up to 1000 people at once while on a group video call on Telegram. To do this, start a group video call in Telegram, tap the three-dot menu in the top right corner, and select Share screen.

How to Share Screen in Telegram for Desktop

If you’re using the Telegram app on your PC, here’s how you can share your PC screen on a Telegram video call.

Step 1: Open the Telegram app on your PC. Then, call the person with whom you wish to share the screen.

Step 2: After the call connects, click the Screencast button at the bottom.

Share Screen on Telegram

Step 3: Pick one of the active windows or choose to share the entire screen itself. Then, hit the Share Screen button.

Share Screen on Telegram for PC

Similarly, you can share the screen during group video calls as well. For that, click the three-dot menu in the top left corner during a video call and select the Share Screen option.

Share Screen on Telegram Video Call

Was this helpful?

Thanks for your feedback!

11 Ways to Fix Sound Not Working on Windows 11

While Windows 11 is Microsoft’s most stable release to date, it’s not without its flaws. One such issue that often brings major discomfort to any user is when the sound stops working on Windows 11. If you are lucky, a simple restart should help fix the issue. If not, you may have to get your hands dirty and dig deep.

Best Ways to Fix Sound Not Working on Windows 11

There is no need to panic, as sound issues on Windows usually occur due to misconfigured settings or malfunctioning drivers rather than defective hardware. Whatever the reason, this guide will help you fix sound issues in Windows 11 with ease. Let’s begin.

1. Check Speakers or Headphones Connection

The first thing is to ensure that your speakers or headphones are connected properly. If you are using a wired connection, try unplugging the audio device and plugging it back in. For Bluetooth devices, try removing and re-adding the device.

Additionally, if your speaker or headphones have a physical on/off switch, make sure it is turned on.

2. Check the Volume Level

Next, you need to check the set volume level on your Windows 11. To do so, click the speaker on the taskbar and move the slider to your right to increase volume. If you’re using headphones or speakers that have built-in volume controls, check them too.

Check Volume

3. Change Playback Device

If your PC has multiple audio devices connected, the audio may be playing from the wrong device. To ensure your preferred device is set as the playback device, use these steps:

Step 1: Right-click on the speaker icon on the taskbar and select Open volume mixer.

Open Volume Mixer in Windows 11

Step 2: Select your preferred audio device as the input and output device.

Change Output Device

4. Disable Audio Enhancements

Your Windows 11 PC ships with a few audio enhancement packages that can improve sound quality. However, if you’re facing sound issues, it’s best to turn off these audio enhancements entirely. Here’s how to do it.

Step 1: Press the Windows key + I to open the Settings app and select Sound.

Sound Settings on Windows

Step 2: Scroll down to the Advanced section and click on All sound devices.

Sound Devices on Windows

Step 3: Select the Output device that you’re facing issues with.

Output Audio Device on Windows

Step 4: Click the drop-down menu next to Audio enhancements and select Off.

Disable Audio Enhancements on Windows

5. Run the Playing Audio Troubleshooter

If the issue persists, you can turn to the Windows Troubleshooter for help. Windows 11 includes a dedicated audio troubleshooter that can detect and resolve any minor audio problems. Here’s how to run it.

Step 1: Open the Start menu, type in troubleshoot settings and select the first result that appears.

Troubleshoot Settings on Windows

Step 2: Go to Other troubleshooters.

Other Troubleshooters on Windows 11

Step 3: Click the Run button next to Playing Audio and follow the on-screen instructions to finish the troubleshooting process.

Run Audio Troubleshooter on Windows

6. Restart Audio Services

Windows has a service for just about every function that runs every time you start your PC. It’s possible that the audio service didn’t start correctly and led to the sound problem you’re facing. You can try restarting the audio services on your PC to see if it helps.

Step 1: Open the search menu, type services, and press Enter.

Open Services on Windows

Step 2: In the Services window, scroll down to find Windows Audio. Right-click on it and select Restart from the list.

Restart Windows Audio Service

Repeat the above process to restart the ‘Windows Audio Endpoint Builder’ and ‘Remote Procedure Call’ services as well.

7. Try Different Audio Formats

Another thing you can do is test your audio output device with different formats. This will help you determine if the issue is caused by incompatible audio drivers or software.

Step 1: Right-click the speaker icon on the taskbar and select Sound settings.

Sound Settings in Windows 11

Step 2: Select the audio output device you’re using.

Output Audio Device on Windows

Step 3: Under Output settings, use the drop-down next to Format and select a different format.

Change Audio Format on Windows

Step 4: Click on the Test button to hear the sample sound.

Test Audio on Windows

You may have to try out different formats until you find one that works with your audio device.

8. Update or Reinstall Audio Driver

The audio driver on your PC helps Windows identify and interact with your PC’s hardware. It’s not uncommon for these audio drivers to become outdated or corrupted over time. You can try fixing the audio driver by updating it. Here’s how.

Step 1: Press the Windows key + S to access the search menu. Type device manager and select the first result that appears.

Open Device Manager on Windows

Step 2: Find and expand ‘Sound, video and game controllers.’ Then, right-click on the audio device, and select Update driver from the list.

Update Sound Drivers

Now follow the on-screen instructions to finish updating the driver. If updating the driver doesn’t help, then uninstall the problematic audio driver and restart your PC to allow Windows to reinstall it.

9. Reset Sound Settings

It’s possible that a recent change made to sound settings has caused the audio to stop working in Windows 11. If that’s the case, resetting audio settings should help restore normalcy.

Step 1: Right-click on the speaker icon in the taskbar and select Open volume mixer from the menu.

Open Volume Mixer in Windows 11

Step 2: Click the Reset button.

Reset Volume Settings in Windows 11

Step 3: Return to the Sound settings page and click on More sound settings.

More Sound Settings

Step 4: Double-click on your audio device to open its properties.

Open Speaker Properties in Windows

Step 5: Under the Advanced tab, click the Restore Defaults button.

Reset Speaker Settings in Windows 11

Step 6: Switch to the Spatial sound tab and click the Restore Defaults button. Then, hit Apply, followed by OK.

Reset Spatial Sound Settings in Windows

10. Install Windows Updates

Microsoft is usually quick to respond when it comes to fixing known bugs and errors. It’s possible that an update has already been released to address the sound issue you’re facing.

Press the Windows key + I to open the Settings app. Head to the Windows Update tab and click the Check for updates button. Download and install all the pending updates and see if that fixes the issue.

Check for Windows Updates

11. Reset Windows 11

Lastly, if all else fails, you may have to consider resetting Windows as a last resort. Doing so will reset all your custom settings to their default values and get the sound to work as before.

Step 1: Press Windows key + I to launch the Settings app. Navigate to the Windows Update tab in the sidebar and click on Advanced Options.

Advanced Options in Windows

Step 2: Scroll down and click on Recovery.

Windows Settings App Recovery Section

Step 3: Under Recovery options, click the Reset PC button and follow the on-screen prompts to finish resetting your PC.

Reset Windows 11

You can choose to keep or remove your personal files while resetting your PC.

FAQs on Sound Not Working in Windows 11

1. How do I enable HDMI Sound on Windows 11?

To hear the computer audio through your HDMI device, open the Settings app and navigate to System > Sound. Select your HDMI device under the ‘Choose where to play sound’ section.

2. How do I fix the ‘No audio device is installed’ error in Windows 11?

You can fix the ‘No audio device is installed’ error in Windows 11 by ensuring your audio device is enabled. If that does not help, you may have to run the audio troubleshooter and restart the audio services.

Sounds Good

Sound is an important part of any computer device. While such sound issues can effectively ruin your Windows 11 experience, fixing them shouldn’t take that long with the solutions outlined above.

Was this helpful?

Thanks for your feedback!

4 Ways to Fix Widgets Not Working on Windows 11

1. Enable Widgets

If you can’t locate the widgets panel on the taskbar, it’s likely that you have disabled it. Here’s how to enable it.

Step 1: Right-click on the Taskbar > select Taskbar settings.

Open Taskbar Settings on Windows 11

Step 2: Under Taskbar items, turn on the Widgets button.

Enable Widgets in Windows 11

Once you see the widgets icon on the taskbar, click it or press the Windows key + W to open the widgets panel.

Fix 2: Restart Widgets

If the widgets panel on Windows 11 is showing blank or not loading properly, try restarting the “Windows Widgets” process using Task Manager. Here’s how.

Step 1: Press Ctrl + Shift + Esc to launch the Task Manager.

Step 2: In the Processes tab, find and select Windows Widgets. Then, click the End task button to close it.

Disable Windows Widgets

Try opening the Widgets panel after this and see if they work.

Fix 3: Login With a Microsoft Account

Since the widgets panel uses your Microsoft account to display your calendar, weather, relevant news, and more, it will not work if you’re logged in with a local account on your PC.

To switch to a Microsoft account, follow these steps:

Step 1: Press the Windows key + I to launch the Settings app and go to Accounts > Your info.

Step 2: Under Account settings, click Sign in with a Microsoft account instead and enter your login credentials to proceed.

Use Microsoft Account Instead

Fix 4: Install Microsoft Edge WebView2

Microsoft Edge WebView2 is a component on Windows 11 that is responsible for embedding web content in native apps on your PC, including widgets. So, go ahead and install Microsoft Edge WebView2 on your PC. Once installed, reboot your PC and try using widgets again.

Was this helpful?

Thanks for your feedback!

7 Ways to Fix Microsoft Edge Running Slow on Windows 11

Basic Fixes

  • Update or reinstall Microsoft Edge: Open the Microsoft Store, search Microsoft Edge browser, and click Update. Alternatively, uninstall it from Windows Settings > Apps > Installed apps > reinstall it from the Microsoft Store.
  • Remove unnecessary Edge extensions: Select the three-dot menu at the top right of Microsoft Edge and click Extensions > Manage extensions. Under the unnecessary extension, click Remove to delete it.
  • Update Windows 11: Press the Windows + I shortcut to open the Settings app, select Windows Update from the left sidebar, and install available system updates.

Fix 1: Disable Preloading Your New Tab Page

Edge’s preloading tab feature loads your favorite wallpaper and other home screen components when opening a new tab, which can be resource-intensive. Disable it to boost the browser speed.

Step 1: Click on the horizontal three-dot menu at the top right of Microsoft Edge and select Settings.

1 open Edge settings 2

Step 2: Select Start, home, and new tabs from the sidebar and toggle off Preload your new tab page for a faster experience.

2 disable new tab preloading

Fix 2: Disable Graphics Acceleration

Graphics acceleration is designed to improve the browser’s performance but demands significant system and GPU resources, slowing down Microsoft Edge. To turn it off, go to the Edge settings.

Step 1: Open Microsoft Edge settings from the three-dot menu > Settings.

3 open Edge settings

Step 2: Select System and Performance from the sidebar and toggle off Use graphics acceleration when available.

4 disable graphics acceleration

Fix 3: Enable Efficiency Mode in Edge

If Microsoft Edge is consistently running slow on your PC, enable its built-in efficiency mode that reduces system resource consumption and enhances your device battery life.

Open Edge settings > select System and performance from the sidebar > toggle on Efficiency mode.

Tip: To define the efficiency mode intensity, choose between Balanced savings and Maximum savings.

5 enable efficiency mode

Fix 4: Remove All Cookies and Site Data

Excessive cookies and site data accumulation often slow down the Edge browser speed. Clear them manually to restore normalcy.

Step 1: Open Microsoft Edge settings from the three-dot menu > select Privacy, search, and services from the sidebar > click Choose what to clear next to Clear browsing data now.

6 clear browsing data

Step 2: Check the boxes for Cookies and other site data and Cached images and files > select Clear now.

7 select Clear now

Fix 5: Switch to Basic Tracking Prevention

Microsoft Edge’s strict tracking prevention blocks most website trackers, causing long loading times and occasional glitches. Switch to Basic tracking prevention to improve browsing speed.

Open Edge settings, select Privacy, search, and services from the sidebar, and select Basic under Tracking prevention to switch it.

8 select basic tracking prevention

Fix 6: Flush the Edge DNS

Flushing the DNS cache in Microsoft Edge clears recorded IP addresses and DNS records from your cache, improving the browser speed significantly.

Step 1: Open a new tab in Microsoft Edge, paste the following path in the URL, and press Enter.

edge://net-internals/#dns

Step 2: Click Clear host cache to flush the Edge DNS and restart the Microsoft Edge browser.

9 clear hots cache in Edge

Fix 7: Reset Edge Settings 

Lastly, if nothing works, reset Microsoft Edge to its factory defaults, fixing its slow speed on Windows 11.

Step 1: Click the three-dot menu at the top right of Microsoft Edge and select Settings.

10 open Egde settings

Step 2: Select Reset settings from the sidebar and click Restore settings to their default values.

11 restore edge

Step 3: Click Reset to confirm resetting Microsoft Edge settings.

12 select Reset

Was this helpful?

Thanks for your feedback!

How to Change WhatsApp Audio Speed on Mobile and Desktop

Change Playback Speed for Audio Messages on WhatsApp

WhatsApp allows you to change the playback speed of audio messages in three levels :

  • 1x – 1x means WhatsApp will play the voice message at normal speed.
  • 1.5x – 1.5x indicates that the message will be played at 1.5x speed.
  • 2x – 2x signals that WhatsApp will play the message at double speed.

On iPhone and Android

Open a conversation from which you want to listen to the voice message. Hit the play button and tap on the current speed to increase or decrease the audio speed.

Also Read: How to set WhatsApp audio as ringtone on iPhone.

On the Web, Windows, or Mac

Step 1: Open a conversation from which you want to listen or send an audio message. Click on the play button next to the audio message.

image 566

Step 2: Click on the speed icon to change the playback speed of the audio message.

image 567

Also Read: How to save WhatsApp audio on iPhone, Android, and Web.

Was this helpful?

Thanks for your feedback!