While Windows 11 is Microsoft’s most stable release to date, it’s not without its flaws. One such issue that often brings major discomfort to any user is when the sound stops working on Windows 11. If you are lucky, a simple restart should help fix the issue. If not, you may have to get your hands dirty and dig deep.
There is no need to panic, as sound issues on Windows usually occur due to misconfigured settings or malfunctioning drivers rather than defective hardware. Whatever the reason, this guide will help you fix sound issues in Windows 11 with ease. Let’s begin.
1. Check Speakers or Headphones Connection
The first thing is to ensure that your speakers or headphones are connected properly. If you are using a wired connection, try unplugging the audio device and plugging it back in. For Bluetooth devices, try removing and re-adding the device.
Additionally, if your speaker or headphones have a physical on/off switch, make sure it is turned on.
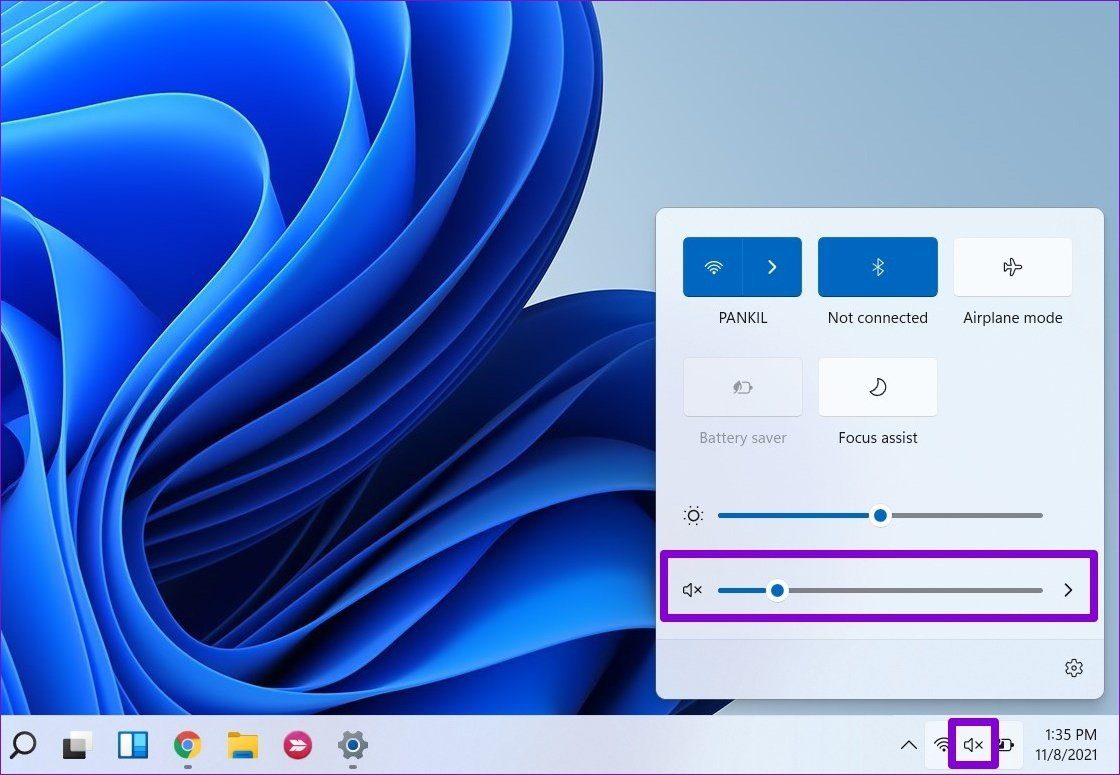
2. Check the Volume Level
Next, you need to check the set volume level on your Windows 11. To do so, click the speaker on the taskbar and move the slider to your right to increase volume. If you’re using headphones or speakers that have built-in volume controls, check them too.
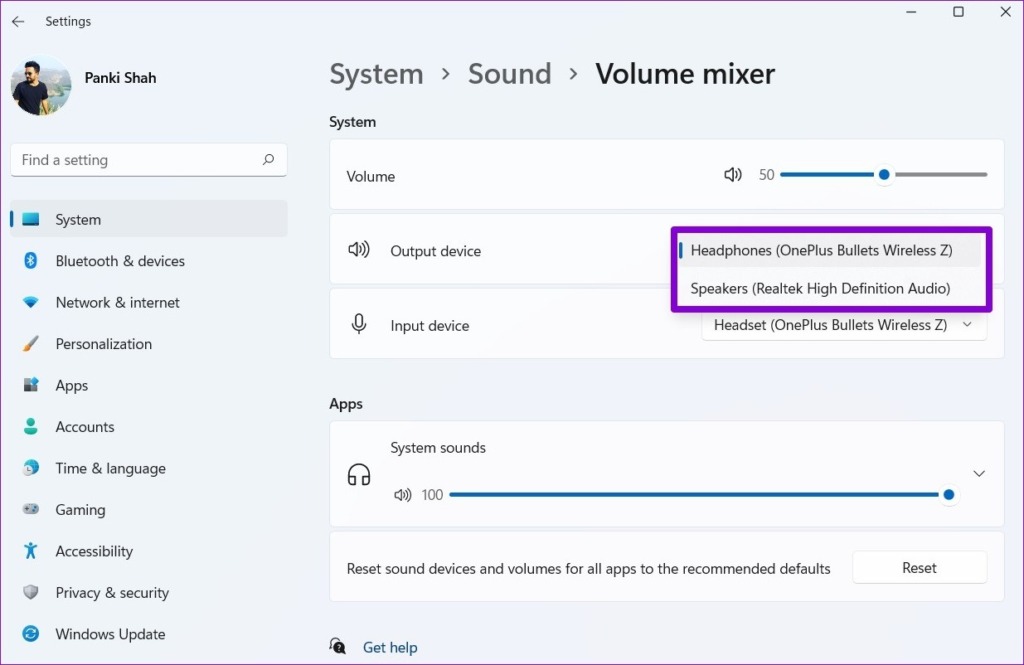
3. Change Playback Device
If your PC has multiple audio devices connected, the audio may be playing from the wrong device. To ensure your preferred device is set as the playback device, use these steps:
Step 1: Right-click on the speaker icon on the taskbar and select Open volume mixer.

Step 2: Select your preferred audio device as the input and output device.
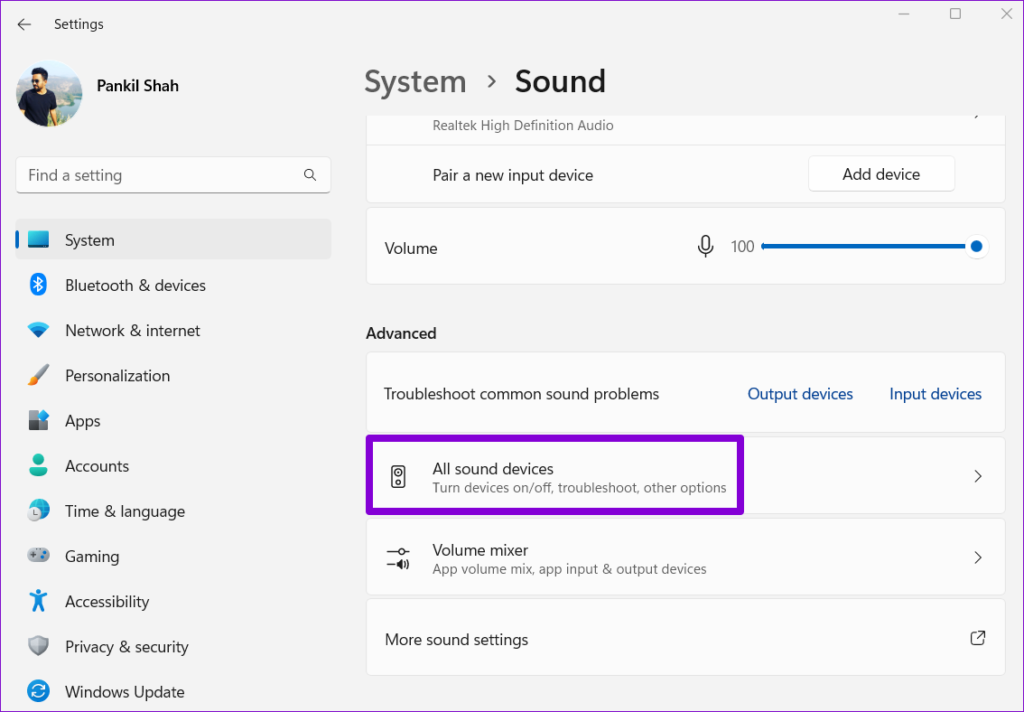
4. Disable Audio Enhancements
Your Windows 11 PC ships with a few audio enhancement packages that can improve sound quality. However, if you’re facing sound issues, it’s best to turn off these audio enhancements entirely. Here’s how to do it.
Step 1: Press the Windows key + I to open the Settings app and select Sound.

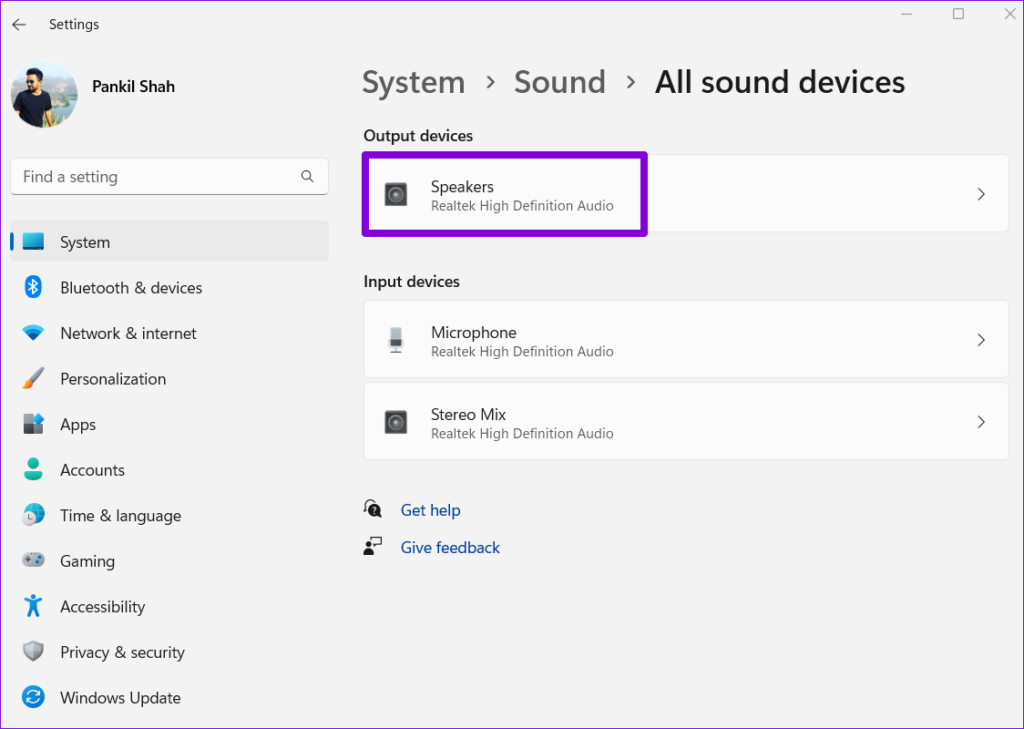
Step 2: Scroll down to the Advanced section and click on All sound devices.
Step 3: Select the Output device that you’re facing issues with.
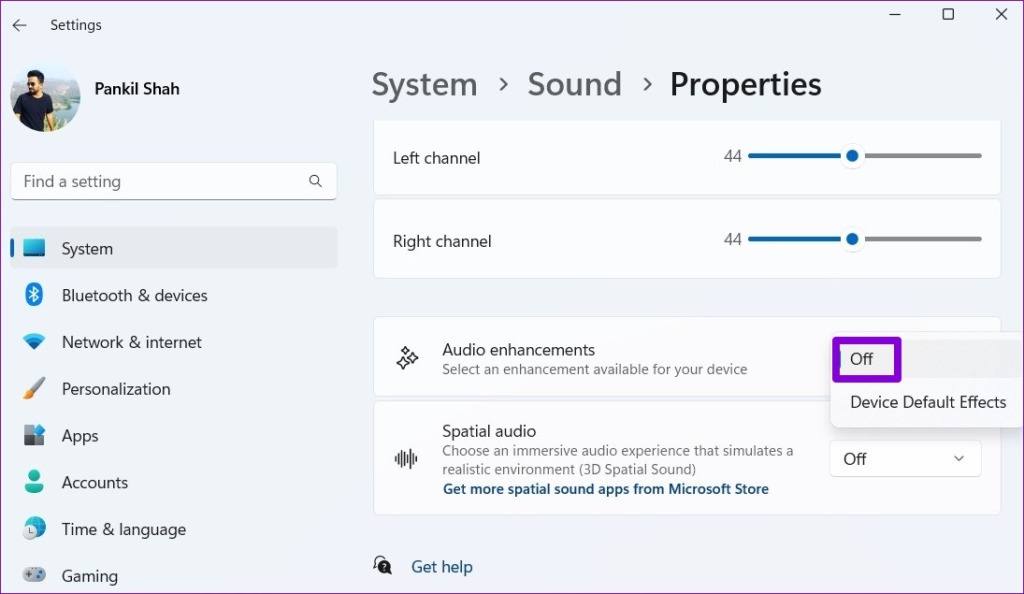
Step 4: Click the drop-down menu next to Audio enhancements and select Off.
5. Run the Playing Audio Troubleshooter
If the issue persists, you can turn to the Windows Troubleshooter for help. Windows 11 includes a dedicated audio troubleshooter that can detect and resolve any minor audio problems. Here’s how to run it.
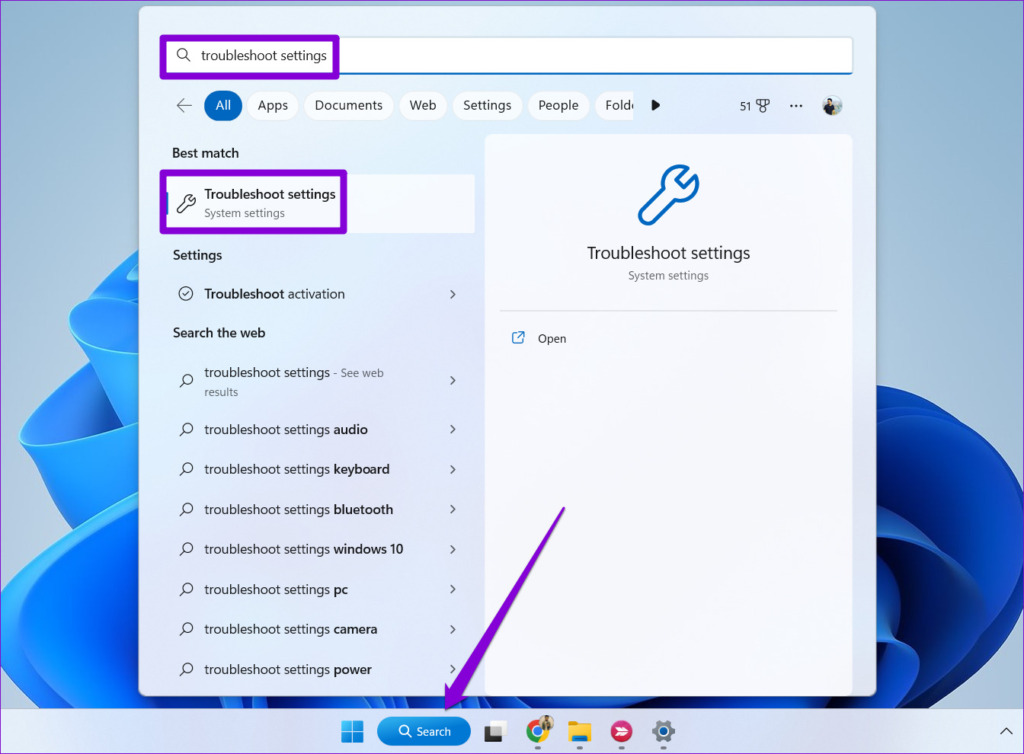
Step 1: Open the Start menu, type in troubleshoot settings and select the first result that appears.
Step 2: Go to Other troubleshooters.

Step 3: Click the Run button next to Playing Audio and follow the on-screen instructions to finish the troubleshooting process.

6. Restart Audio Services
Windows has a service for just about every function that runs every time you start your PC. It’s possible that the audio service didn’t start correctly and led to the sound problem you’re facing. You can try restarting the audio services on your PC to see if it helps.
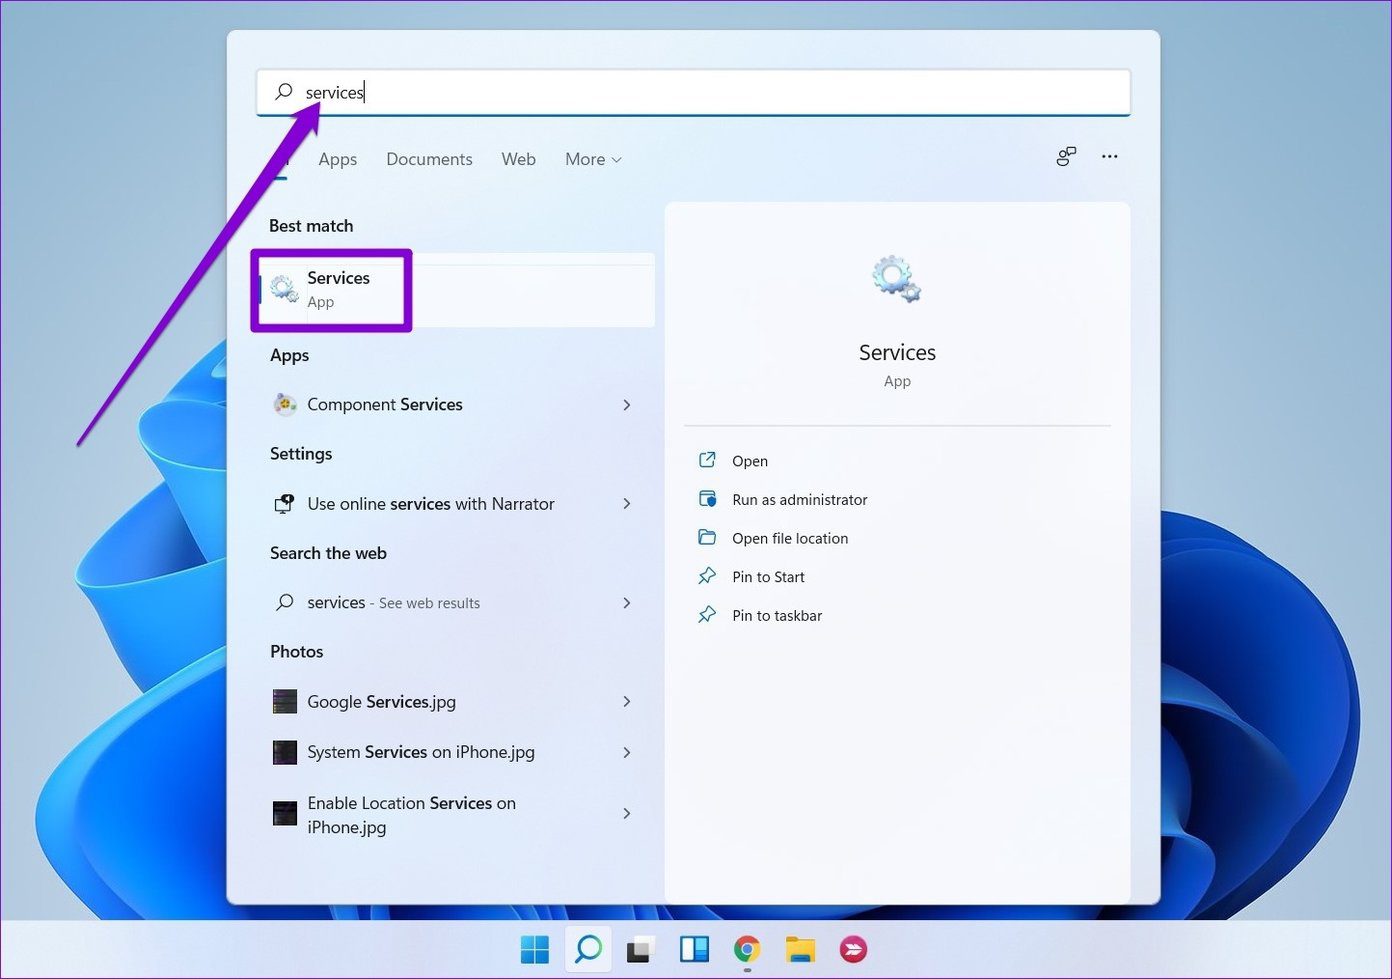
Step 1: Open the search menu, type services, and press Enter.
Step 2: In the Services window, scroll down to find Windows Audio. Right-click on it and select Restart from the list.
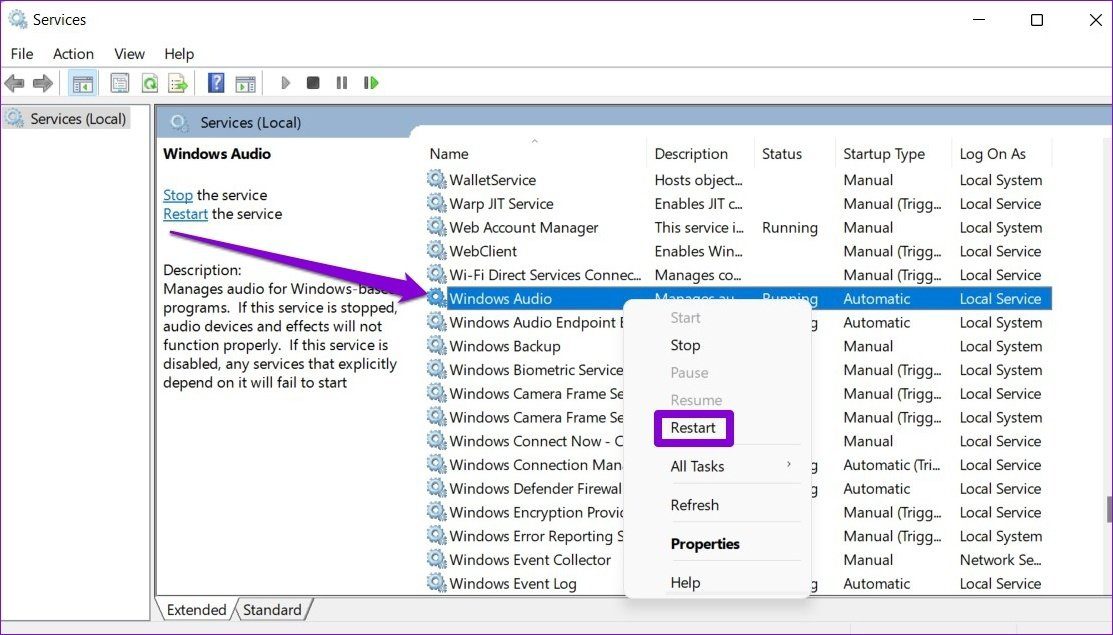
Repeat the above process to restart the ‘Windows Audio Endpoint Builder’ and ‘Remote Procedure Call’ services as well.
7. Try Different Audio Formats
Another thing you can do is test your audio output device with different formats. This will help you determine if the issue is caused by incompatible audio drivers or software.
Step 1: Right-click the speaker icon on the taskbar and select Sound settings.
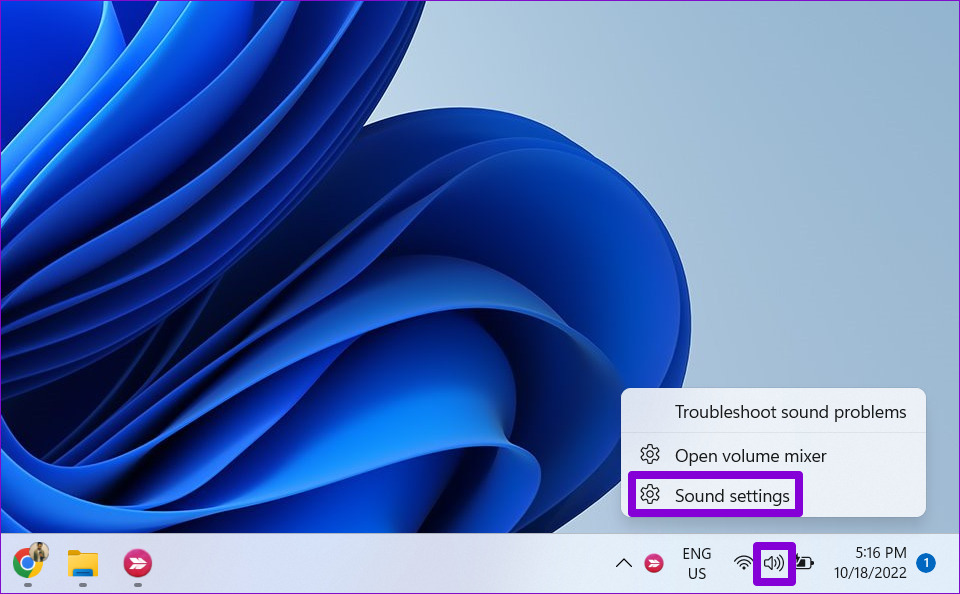
Step 2: Select the audio output device you’re using.
Step 3: Under Output settings, use the drop-down next to Format and select a different format.

Step 4: Click on the Test button to hear the sample sound.

You may have to try out different formats until you find one that works with your audio device.
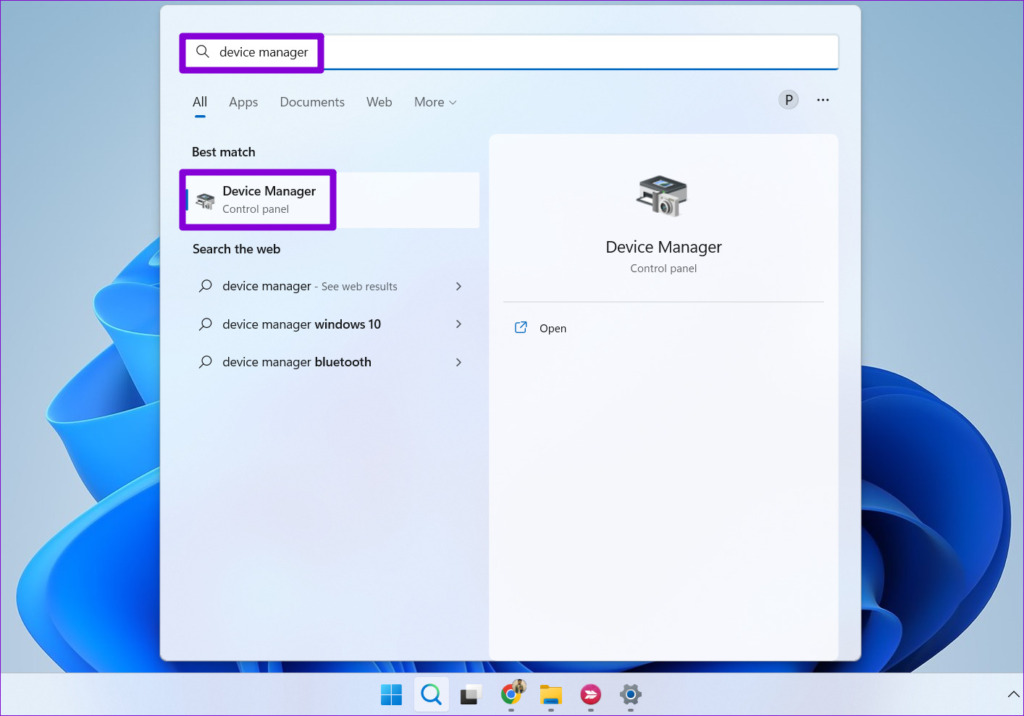
8. Update or Reinstall Audio Driver
The audio driver on your PC helps Windows identify and interact with your PC’s hardware. It’s not uncommon for these audio drivers to become outdated or corrupted over time. You can try fixing the audio driver by updating it. Here’s how.
Step 1: Press the Windows key + S to access the search menu. Type device manager and select the first result that appears.
Step 2: Find and expand ‘Sound, video and game controllers.’ Then, right-click on the audio device, and select Update driver from the list.
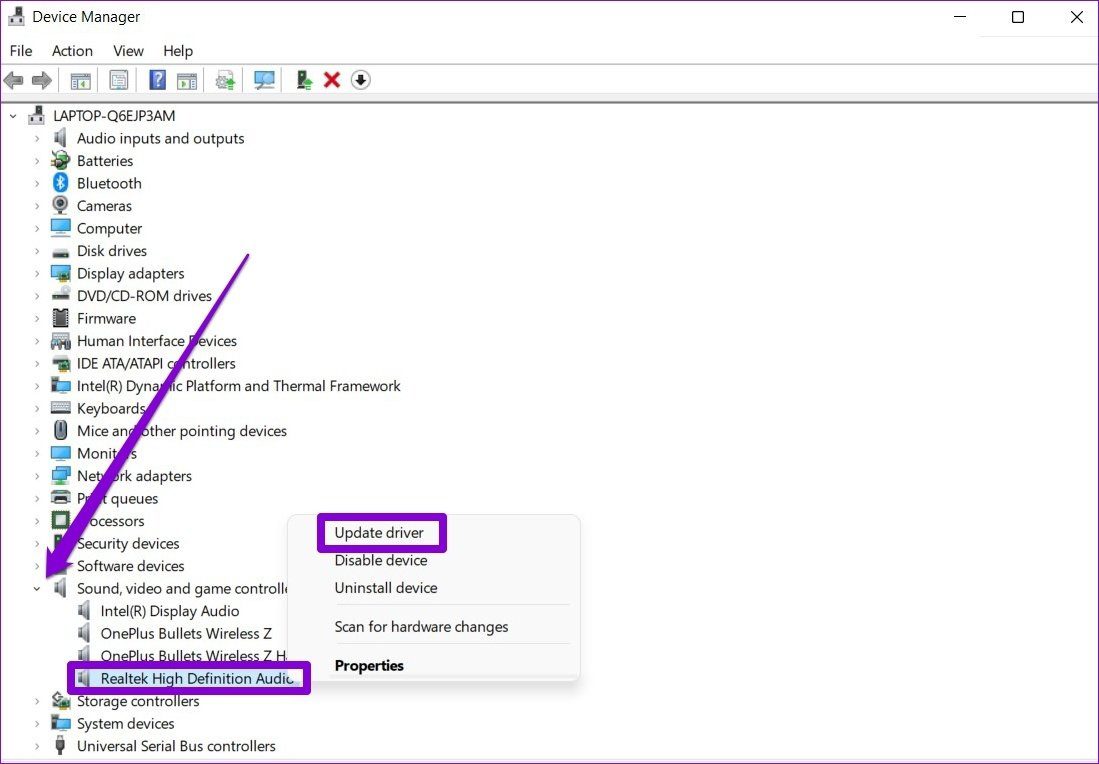
Now follow the on-screen instructions to finish updating the driver. If updating the driver doesn’t help, then uninstall the problematic audio driver and restart your PC to allow Windows to reinstall it.
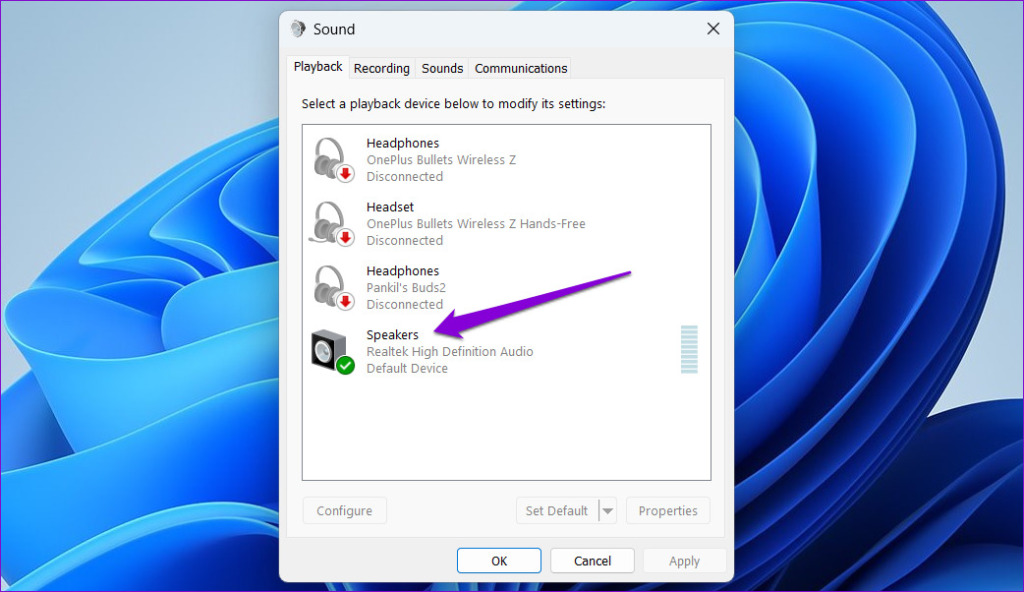
9. Reset Sound Settings
It’s possible that a recent change made to sound settings has caused the audio to stop working in Windows 11. If that’s the case, resetting audio settings should help restore normalcy.
Step 1: Right-click on the speaker icon in the taskbar and select Open volume mixer from the menu.
Step 2: Click the Reset button.

Step 3: Return to the Sound settings page and click on More sound settings.
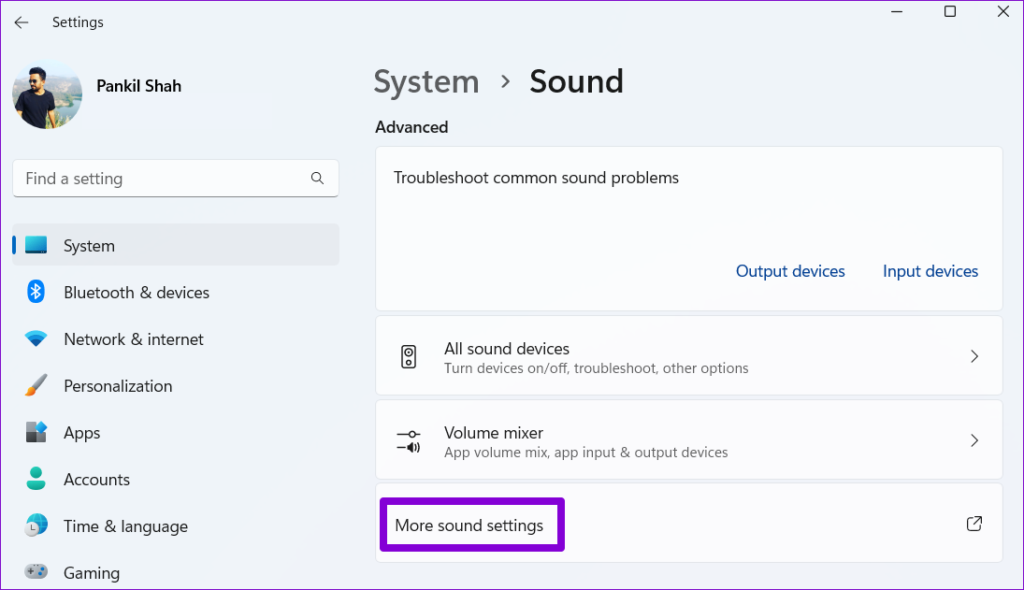
Step 4: Double-click on your audio device to open its properties.
Step 5: Under the Advanced tab, click the Restore Defaults button.

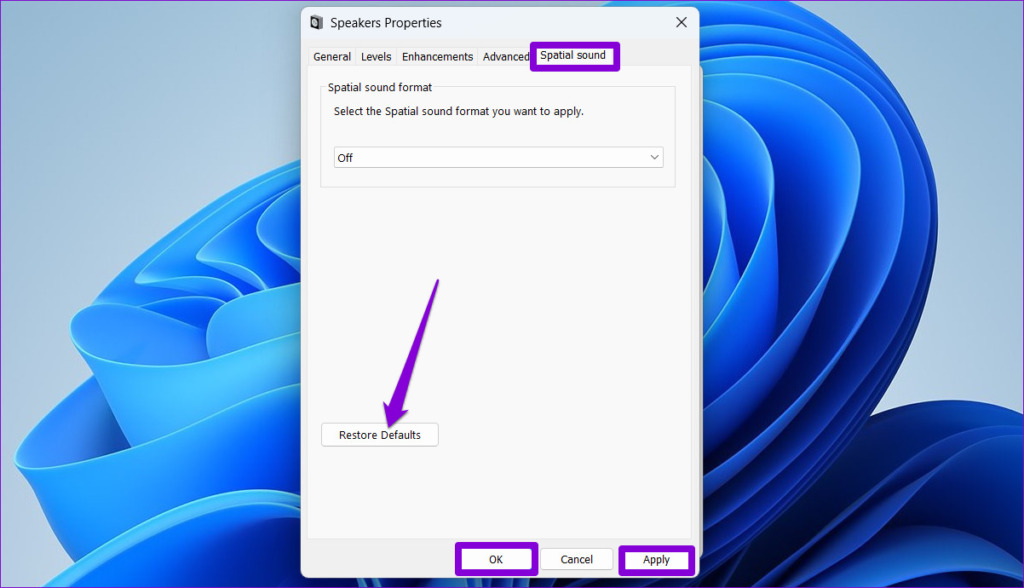
Step 6: Switch to the Spatial sound tab and click the Restore Defaults button. Then, hit Apply, followed by OK.
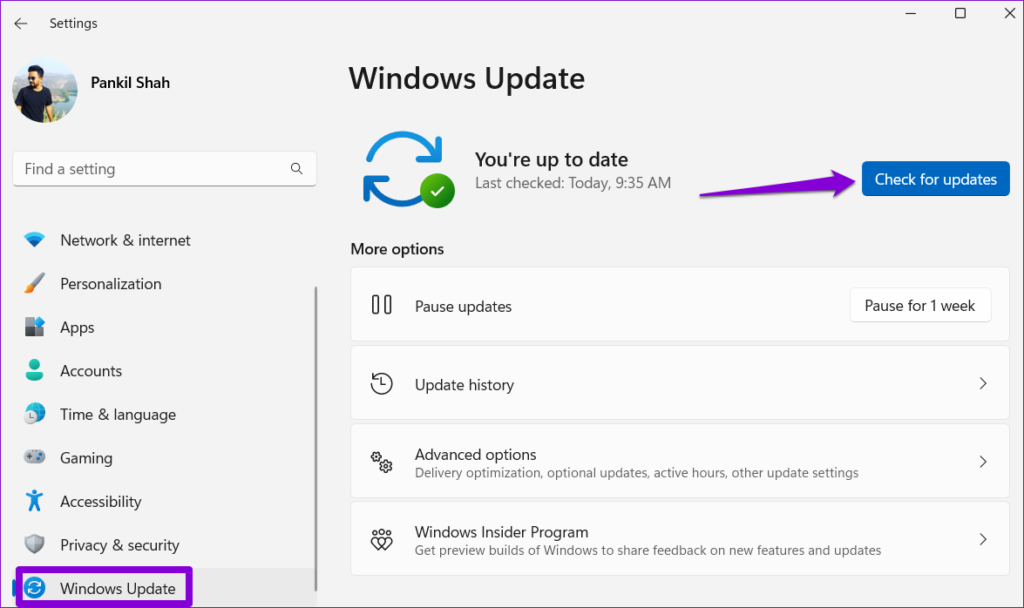
10. Install Windows Updates
Microsoft is usually quick to respond when it comes to fixing known bugs and errors. It’s possible that an update has already been released to address the sound issue you’re facing.
Press the Windows key + I to open the Settings app. Head to the Windows Update tab and click the Check for updates button. Download and install all the pending updates and see if that fixes the issue.
11. Reset Windows 11
Lastly, if all else fails, you may have to consider resetting Windows as a last resort. Doing so will reset all your custom settings to their default values and get the sound to work as before.
Step 1: Press Windows key + I to launch the Settings app. Navigate to the Windows Update tab in the sidebar and click on Advanced Options.

Step 2: Scroll down and click on Recovery.

Step 3: Under Recovery options, click the Reset PC button and follow the on-screen prompts to finish resetting your PC.

You can choose to keep or remove your personal files while resetting your PC.
FAQs on Sound Not Working in Windows 11
To hear the computer audio through your HDMI device, open the Settings app and navigate to System > Sound. Select your HDMI device under the ‘Choose where to play sound’ section.
You can fix the ‘No audio device is installed’ error in Windows 11 by ensuring your audio device is enabled. If that does not help, you may have to run the audio troubleshooter and restart the audio services.
Sounds Good
Sound is an important part of any computer device. While such sound issues can effectively ruin your Windows 11 experience, fixing them shouldn’t take that long with the solutions outlined above.
Was this helpful?
Last updated on 14 July, 2024
1 Comment
Leave a Reply
Read Next
 3 Ways to Fix the Notification Sound Not Working on Windows 11
Basic Fixes: Unmute your Windows PC: You might have muted your Windows PC and forgotten to unmute it after an important meeting or work hours.
3 Ways to Fix the Notification Sound Not Working on Windows 11
Basic Fixes: Unmute your Windows PC: You might have muted your Windows PC and forgotten to unmute it after an important meeting or work hours.
 4 Ways to Fix Video Sound Not Working on Windows 11
Basic Fixes: Ensure the video is not muted and has sound: Click the speaker icon in the player window or the taskbar and increase the volume using the slider.
4 Ways to Fix Video Sound Not Working on Windows 11
Basic Fixes: Ensure the video is not muted and has sound: Click the speaker icon in the player window or the taskbar and increase the volume using the slider.
 5 Ways to Fix Sound Recorder App Not Working on Windows 11
Common Fixes Reboot Windows: Press the Windows key, click the Power button at the bottom right of the Windows search menu, and select Restart.
5 Ways to Fix Sound Recorder App Not Working on Windows 11
Common Fixes Reboot Windows: Press the Windows key, click the Power button at the bottom right of the Windows search menu, and select Restart.
 7 Ways to Fix Google Chrome Sound Not Working on Headphones
Basic Fixes Restart Chrome: Restart Chrome, reload the tab, and restart your PC to eliminate temporary bugs and glitches.
7 Ways to Fix Google Chrome Sound Not Working on Headphones
Basic Fixes Restart Chrome: Restart Chrome, reload the tab, and restart your PC to eliminate temporary bugs and glitches.
 Top 5 Ways to Fix Bluetooth Headphones Connected but No Sound on Windows 10
On a usual day, you'd hook your wireless Bluetooth headphones to your PC to listen to a song.
Top 5 Ways to Fix Bluetooth Headphones Connected but No Sound on Windows 10
On a usual day, you'd hook your wireless Bluetooth headphones to your PC to listen to a song.
 6 Ways to Fix No Sound in Microsoft Edge on Windows 11
Common Fixes Unmute the Edge tab: If you've unknowingly muted a tab, unmute it by right-clicking the tab > Unmute tab.
6 Ways to Fix No Sound in Microsoft Edge on Windows 11
Common Fixes Unmute the Edge tab: If you've unknowingly muted a tab, unmute it by right-clicking the tab > Unmute tab.
 3 Ways to Fix No Sound on Roblox for Windows
Try Basic Fixes Check the default audio device and its volume level: If there are multiple audio devices connected to your computer, ensure your preferred audio device is set as
3 Ways to Fix No Sound on Roblox for Windows
Try Basic Fixes Check the default audio device and its volume level: If there are multiple audio devices connected to your computer, ensure your preferred audio device is set as
 How to Fix Microsoft Teams Notification Sound Not Working
On Windows Method 1: Check Notifications Options in the Settings App Step 1: Press the Windows + I keys shortcut to open the Settings app.
How to Fix Microsoft Teams Notification Sound Not Working
On Windows Method 1: Check Notifications Options in the Settings App Step 1: Press the Windows + I keys shortcut to open the Settings app.
The article above may contain affiliate links which help support Guiding Tech. The content remains unbiased and authentic and will never affect our editorial integrity.

Speakers stopped working. Switching to headset, that’s fine. back to speakers, no go. Reboot fixed it.