Screen Time on your iPhone measures how much time you spend on your iPhone. You can use its App Limit feature to lock the Messages app. Here’s how.
Step 1: Open the Settings app on your iPhone or iPad. Scroll down and select Screen Time.
Step 2: Tap on App Limits and select Add Limit.
Step 3: Choose the Messages app and tap on Next at the top-right corner.
Step 4: Use the time sliders to set the usage limit, after which the Messages app will get locked. Then, tap on Add at the top-right corner to confirm.
Once the Messages app gets locked after being used for the specified time, you must enter the Screen Time passcode to unlock it.
Method 2: Lock Messages App Using Face ID and Passcode
You can use Face ID and Passcode to password-protect your text messages on your iPhone and iPad. You can implement this for nearly every app, but depending on your iPhone/iPad model, some might not support it.
Step 1: Open the Settings app on your iPhone or iPad. Scroll down and tap on Face ID & Passcode.
Step 3: Tap on Set Up Face ID. Follow the on-screen instructions to finish the setup process.
You can hide the Notification Previews for the Messages app. This will also let you hide messages on the lock screen of your iPhone and iPad. Here’s how.
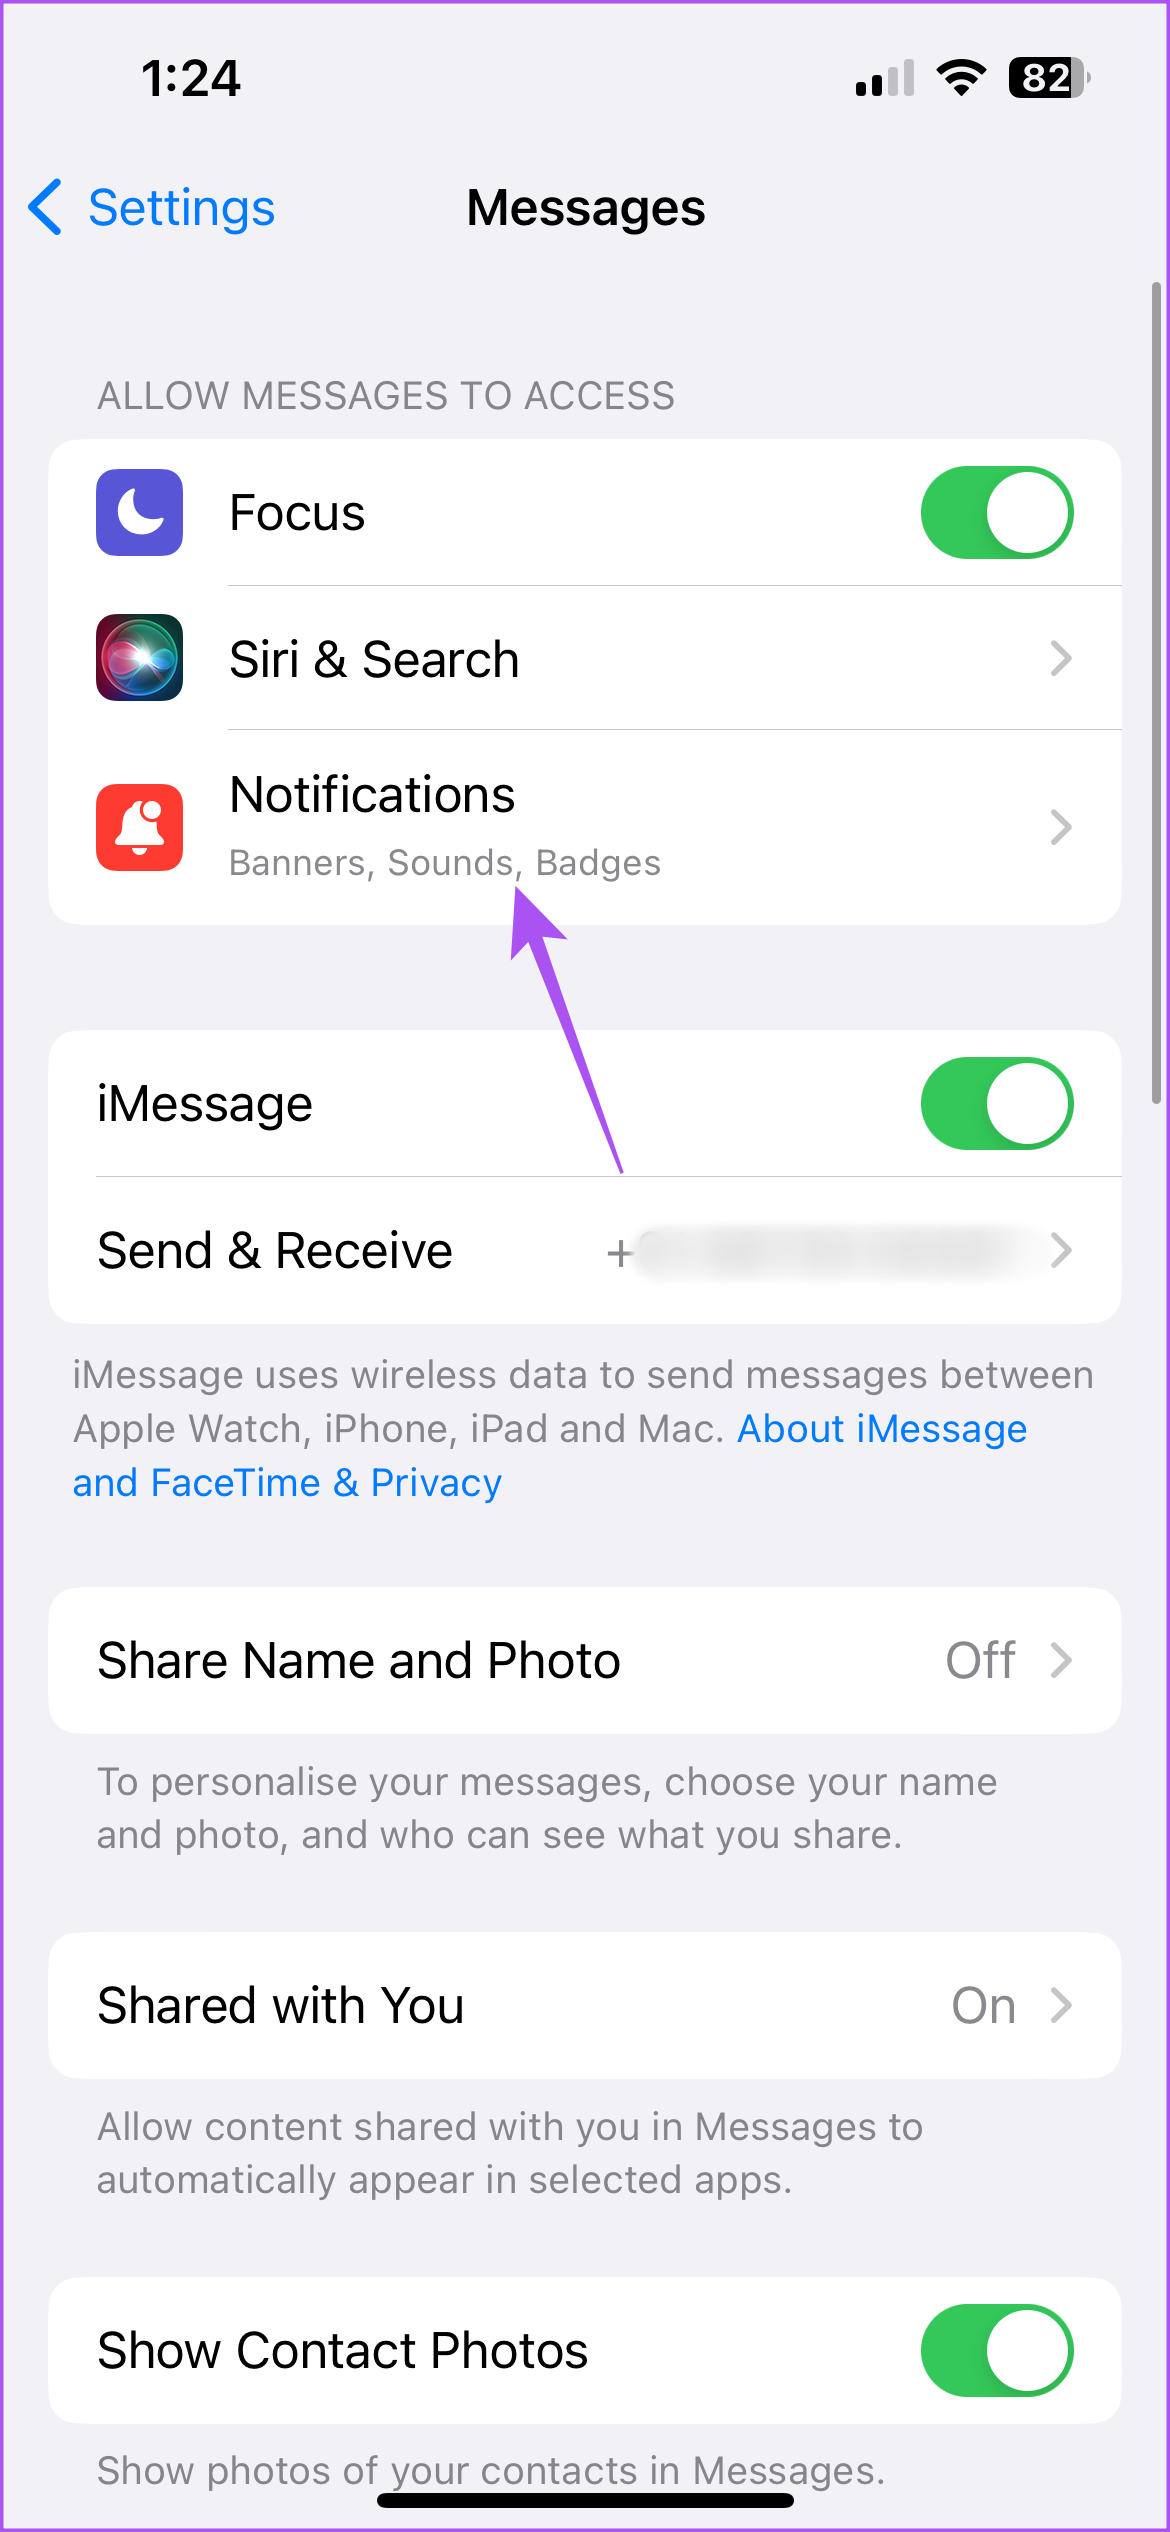
Step 1: Open the Settings app on your iPhone. Scroll down and tap on Messages.
Step 2: Tap on Notifications. Then, scroll down and tap on Show Previews.
Step 3: Tap on Never.
Step 4: Return to the previous screen to choose to hide notifications from the Lock Screen, Notification Center, or Banners.
Method 4: Use Shortcuts to Lock the Messages App
You can use the Shortcuts app on your iPhone to set up an automation to lock the Messages app on your iPhone. These steps are also applicable to iPad users.
Step 1: Open the Clock app on your iPhone or iPad. Tap on Timer at the bottom-right corner.
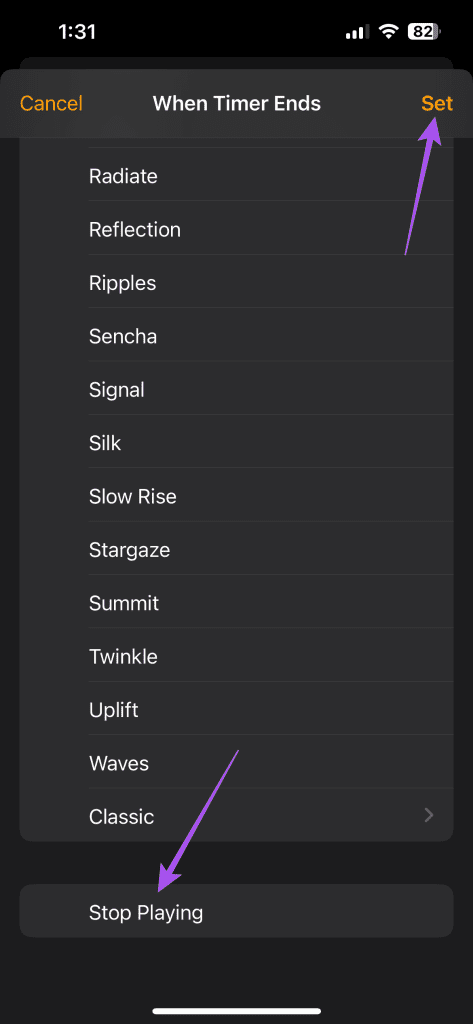
Step 2: Tap on When Timer Ends. Scroll down and select Stop Playing. Then, tap on Done at the top-right corner.
Step 3: Scroll down and select Stop Playing. Then, tap on Done at the top-right corner.
Step 4: Close the Clock app and open Shortcuts. Tap on Automation at the bottom.
Step 5: Select the Plus icon at the top-right corner and select Create Personal Automation.
Step 6: Scroll down and select App.
Step 7: Tap on Choose and select Messages.
Step 8: Tap on Next and select Add Action. Select Start Timer from the list of actions. Set the Timer for 1 second and select Next.
Step 9: Tap the toggle to disable Ask Before Running. Then, select Don’t Ask from the prompt.
Step 10: Tap on Done at the top-right corner to confirm.
Now, when someone tries to open the Messages app, your iPhone will lock automatically and only unlock using your Face ID or passcode.
Method 5: Restrict Messages Using Two-Factor Authentication
Enabling Two-Factor Authentication on your Apple ID prevents anyone from accessing your Messages on the web. Here’s how to enable it using your iPhone or iPad.
Step 1: Open the Settings app on your iPhone or iPad.
Step 2: Tap on your profile name. Then, select Password and Security.
Step 3: Enable Two-Factor Authentication.
When you set up two-factor authentication, you’ll need your device’s password and a 6-digit code sent to your phone number or other Apple devices using the same Apple ID. Alternatively, you can use the security key that you can generate after enabling two-factor authentication.
Let’s look at three ways to hide the people or accounts you follow on Instagram.
Method 1: Make Your Instagram Profile Private
An easy solution to all your Instagram woes is to switch to a private Instagram account instead of a Business account. This will not only hide who you follow on Instagram but also ensure that those who are not your followers don’t access your other account information. Follow the below steps to do it.
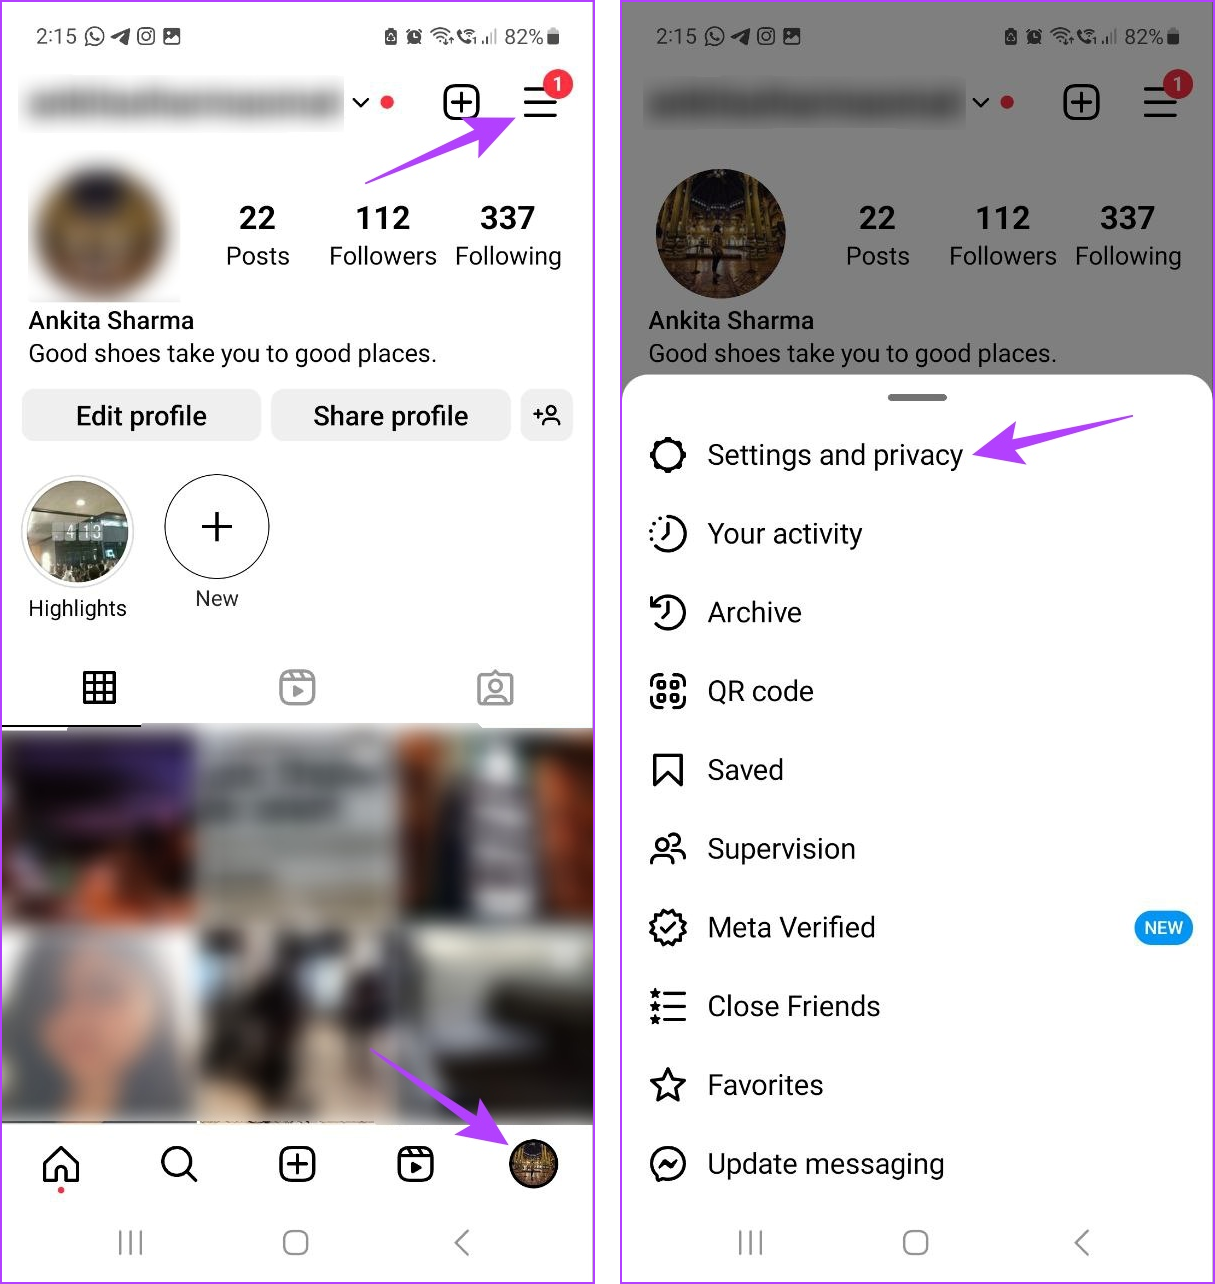
Step 1: Open Instagram and tap on your profile icon at the bottom right corner. Then, tap on the hamburger menu.
Step 2: Tap on Settings and privacy.
Step 3: Scroll down and tap on Account privacy. Turn on the toggle for Private account.
Once you have set your Instagram account to private, it is time to ensure the relevant user or account is not in your followers list to restrict their access to your Instagram profile. If the user is indeed your follower, remove them on Instagram. Here’s how.
Step 1: Open the Instagram app on your phone > tap on your profile icon at the bottom > tap on Followers.
Step 2: Scroll through the list and tap on Remove in front of the user or account you wish to remove.
Step 3: Again, tap on Remove to confirm.
Repeat these steps to remove other unwanted followers on Instagram. Please note Instagram will not notify the users that they have been removed from your Follower list.
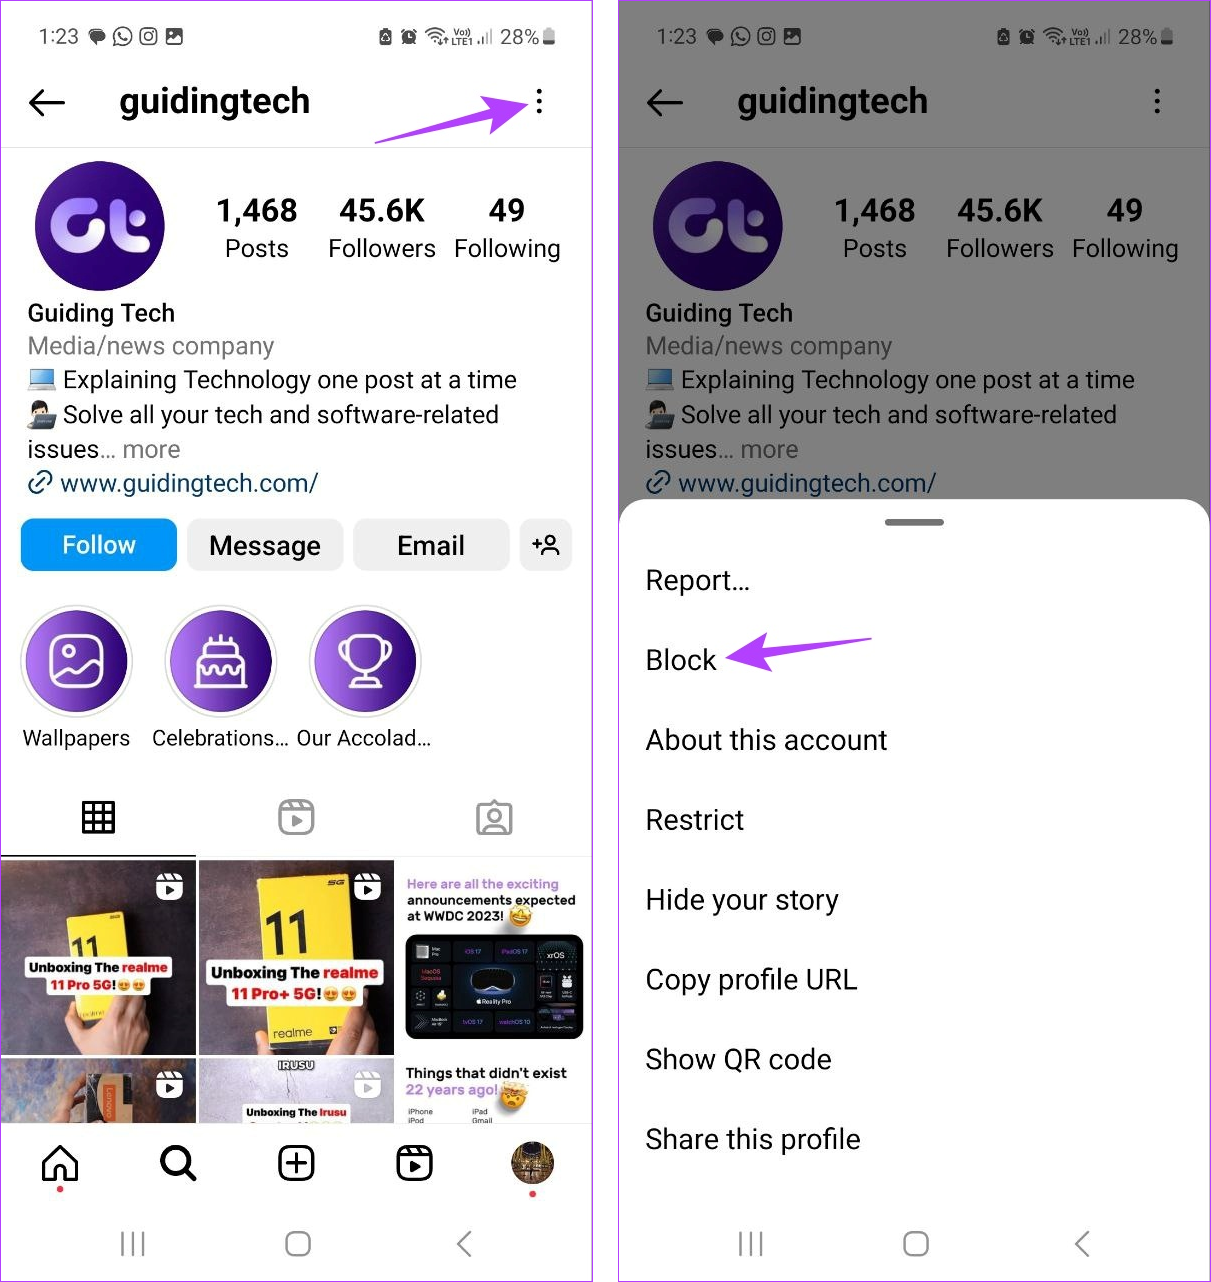
Blocking users effectively hides who you follow on Instagram. Once done, the blocked Instagram users can no longer access your account. Instagram will also block any other account that they might create. This can help hide the details of your Instagram, even if it is a public account. Here’s how.
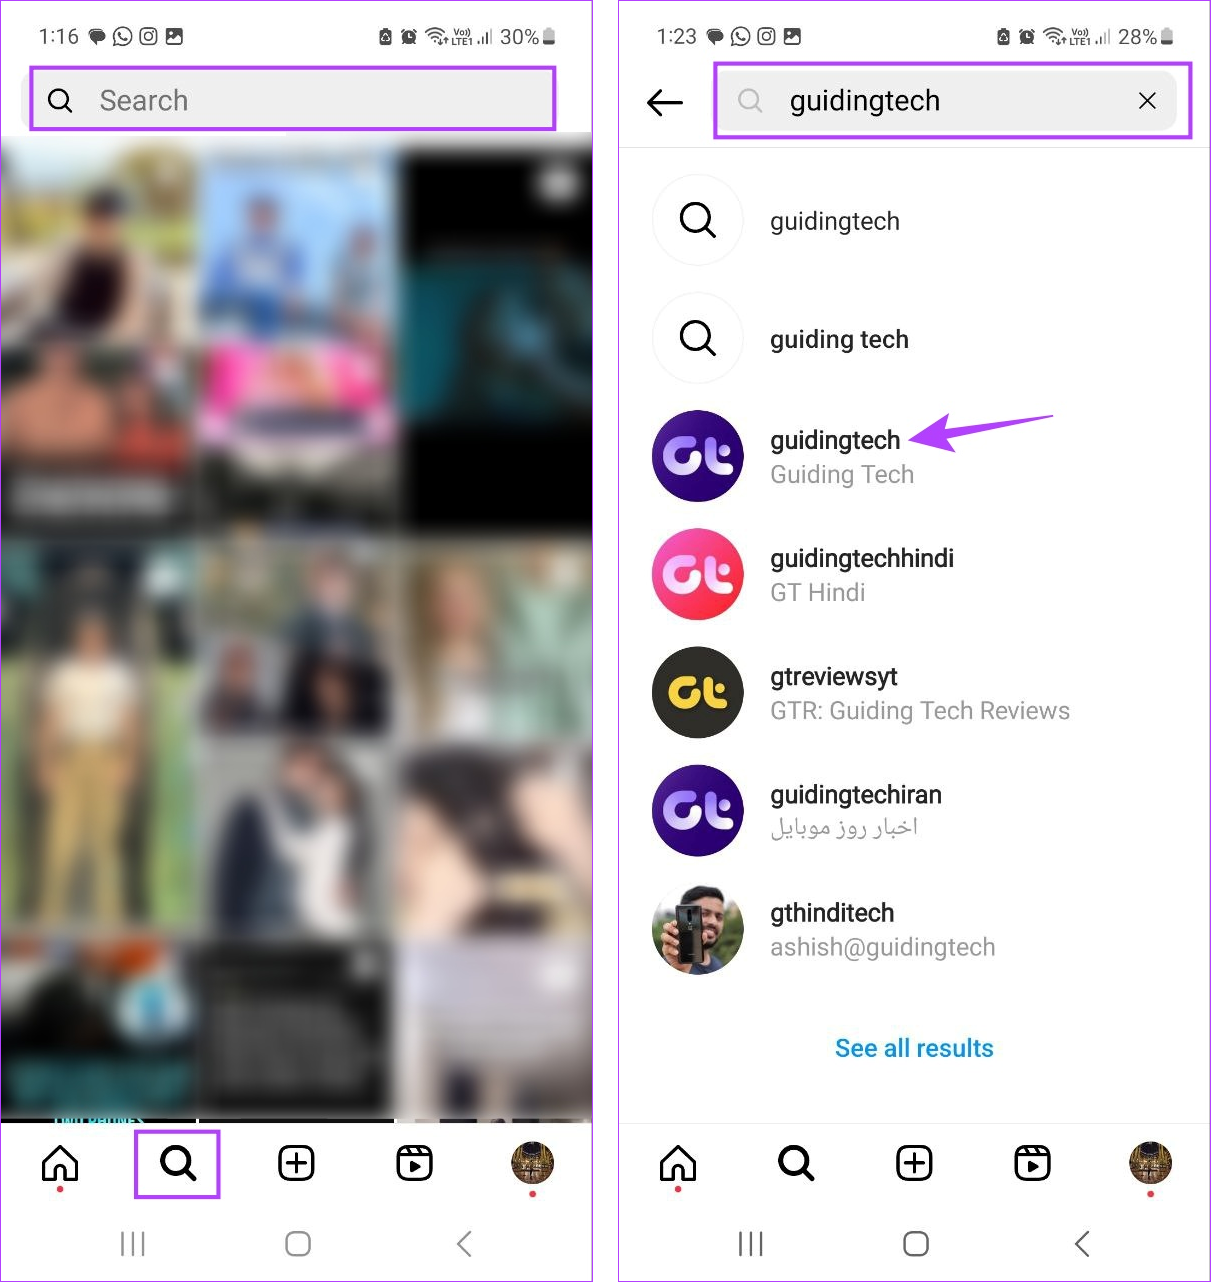
Step 1: Open Instagram > tap on the search icon > search bar.
Step 2: Type the name of the account or user you want to block and tap on the relevant search result.
Step 3: Here, tap on the three-dot icon > select Block. Confirm when prompted.
1. Can you hide your post from someone on Instagram?
By turning your Public account into a Private one, you can restrict who has access to your account posts. To do this, turn your Instagram account Private and remove the relevant user from your list of followers.
2. Can my Instagram followers still send me private messages?
Yes, as long as you haven’t blocked the user, they can still send you private messages on Instagram.
Do you want to spice up your Discord community or bring a touch of creativity and visual appeal to your Discord server? Well, adding emojis to your channel names can do just that! In this article, we will guide you on how to put emojis in Discord names, making them more engaging and expressive.
Before we get into the steps of adding emojis to Discord channel names, consider the following points;
Emojis may not be supported or displayed consistently across all devices and platforms. While Discord generally supports a wide range of emojis, remember that some users may not see them as intended if they use an older device.
Use emojis in a manner that aligns with the guidelines and rules set by the Discord server or community. Ensure you avoid using emojis that may be considered offensive, inappropriate, or against the community’s standards.
You can add emojis to the server name if you have administrative or moderator roles within the server. Regular members without the required permissions cannot add or modify emojis in the server name.
Note: For demonstration, we will use the Discord app on both Windows and Android platforms. Nevertheless, if you happen to be using the Discord app on Mac or iOS, you can still follow the same steps.
How to Add Emojis to Discord Channel Names
Adding emojis to channel names on Discord can help make your server more visually appealing and add a touch of personalization. While not all emojis are supported in channel names, many common ones are available. Here’s how to add them using a desktop or mobile device.
On Desktop
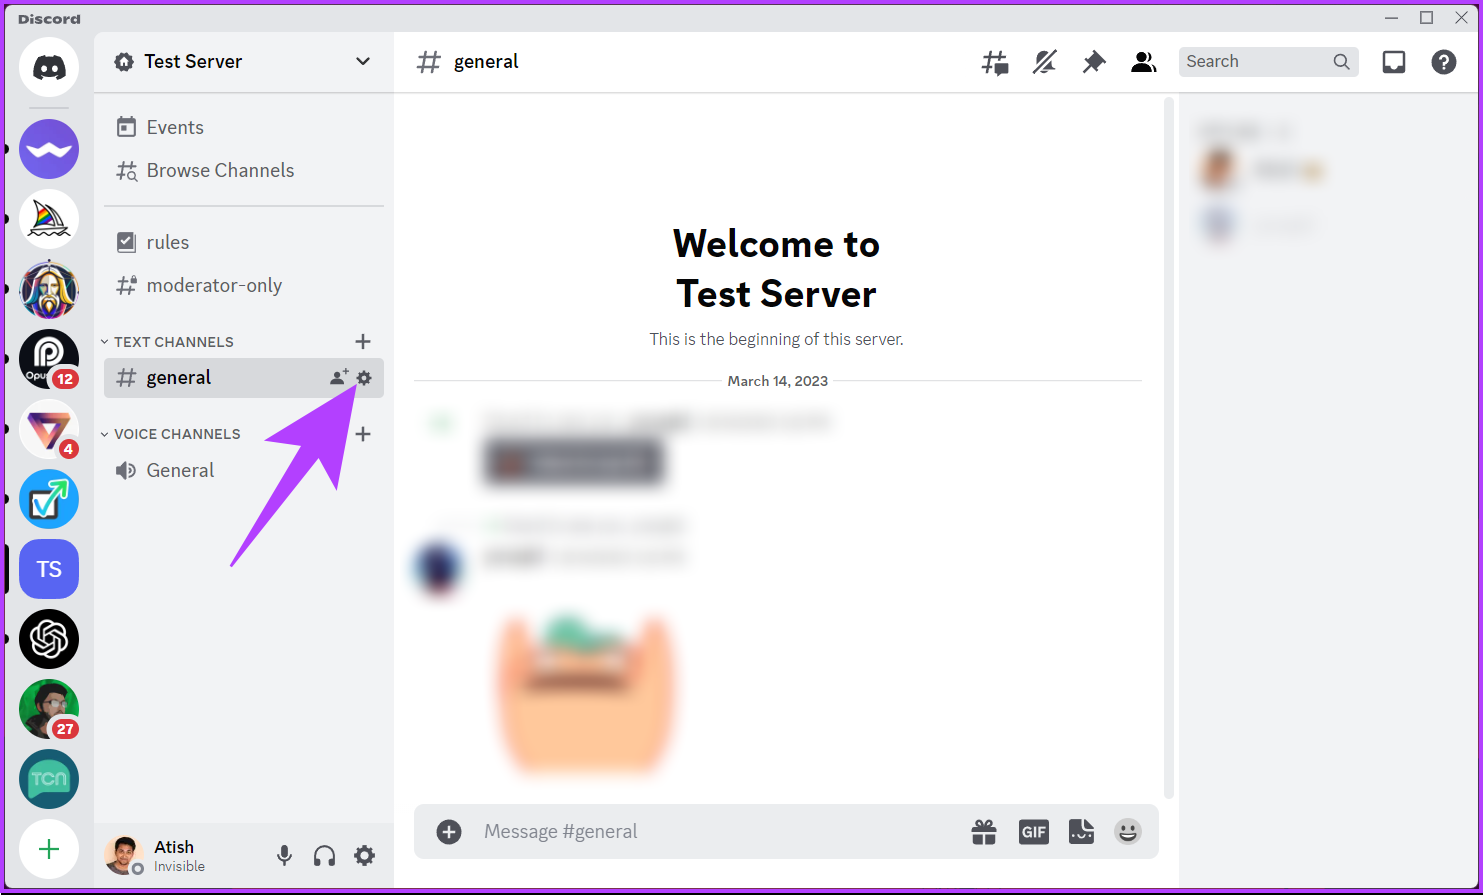
Step 1: Open the Discord app or website and navigate to the channel you want to add emojis.
Step 2: Click the Edit Channel (gear) icon next to the channel name.
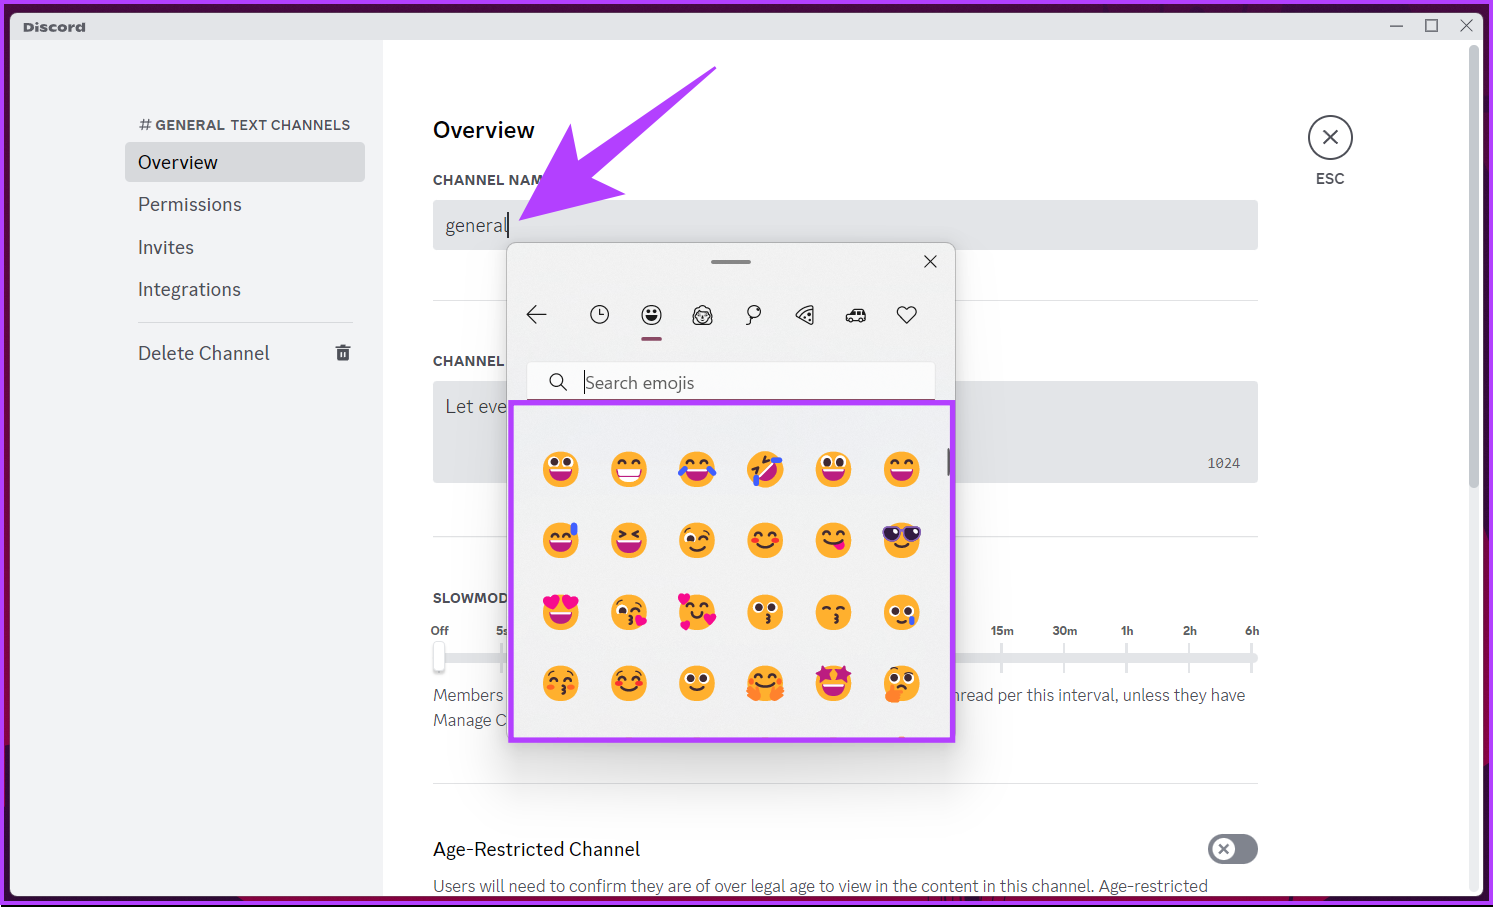
You will be taken to the channel overview.
Step 3: Now, under the channel name, add the emoji you want by pressing ‘Control + Command + Space’ on Mac or ‘Windows key + ;’ to bring up the emoji modal where you can search and any available emoji.
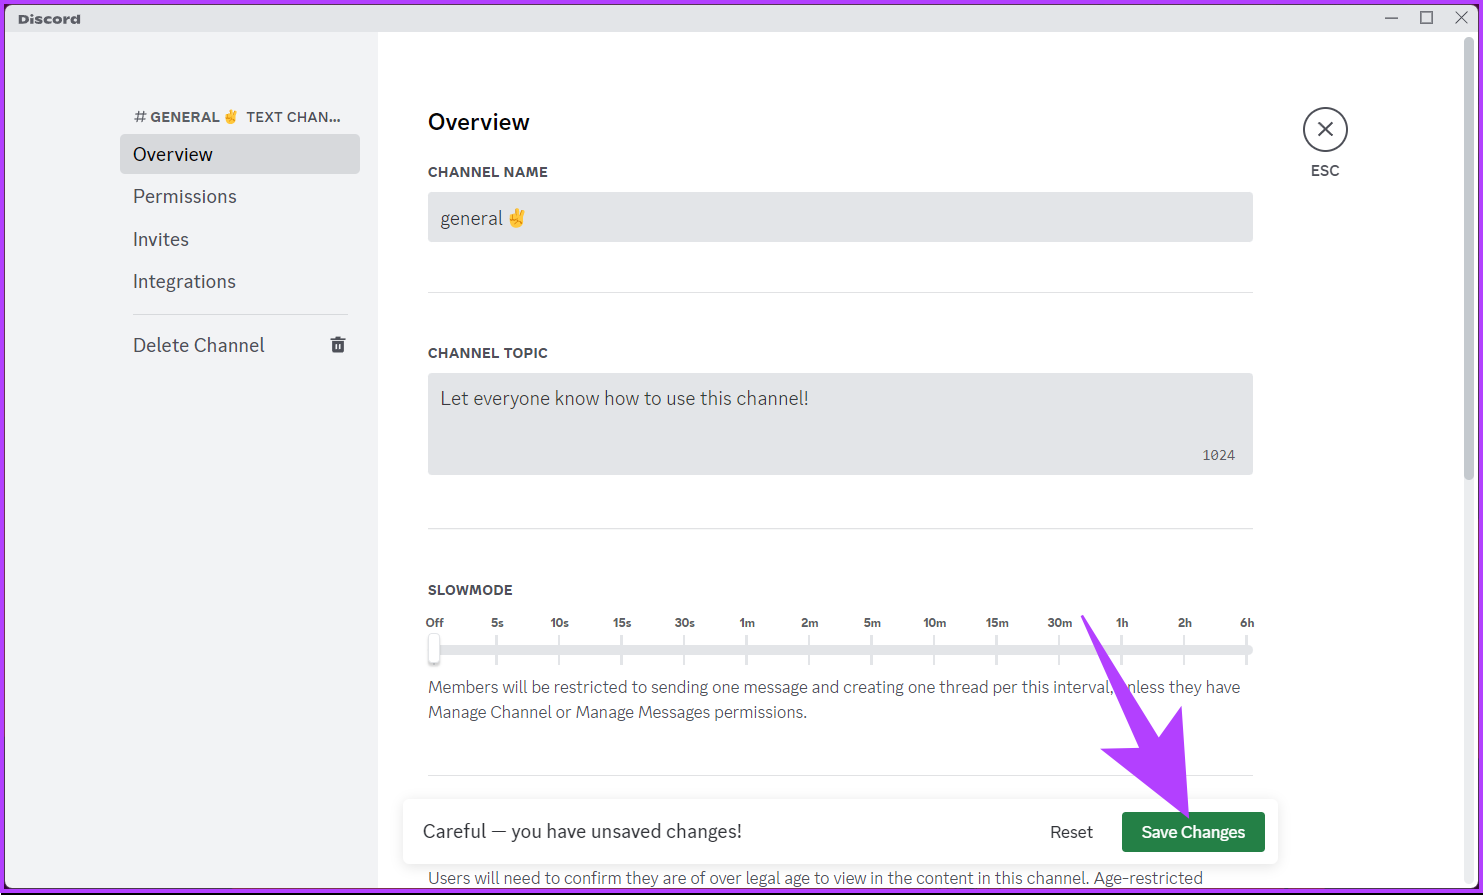
Step 4: Once the emoji is added, click Save Changes.
That’s it. You have added emoji to your Discord channel name. If, for some reason, the emoji you are looking for is unavailable, look for emojis online, select the one you want, and press ‘Control + C’ on Windows or ‘Command + C’ on Mac on the keyboard to copy and ‘Control + V’ or ‘Command + V’ to paste.
On Mobile
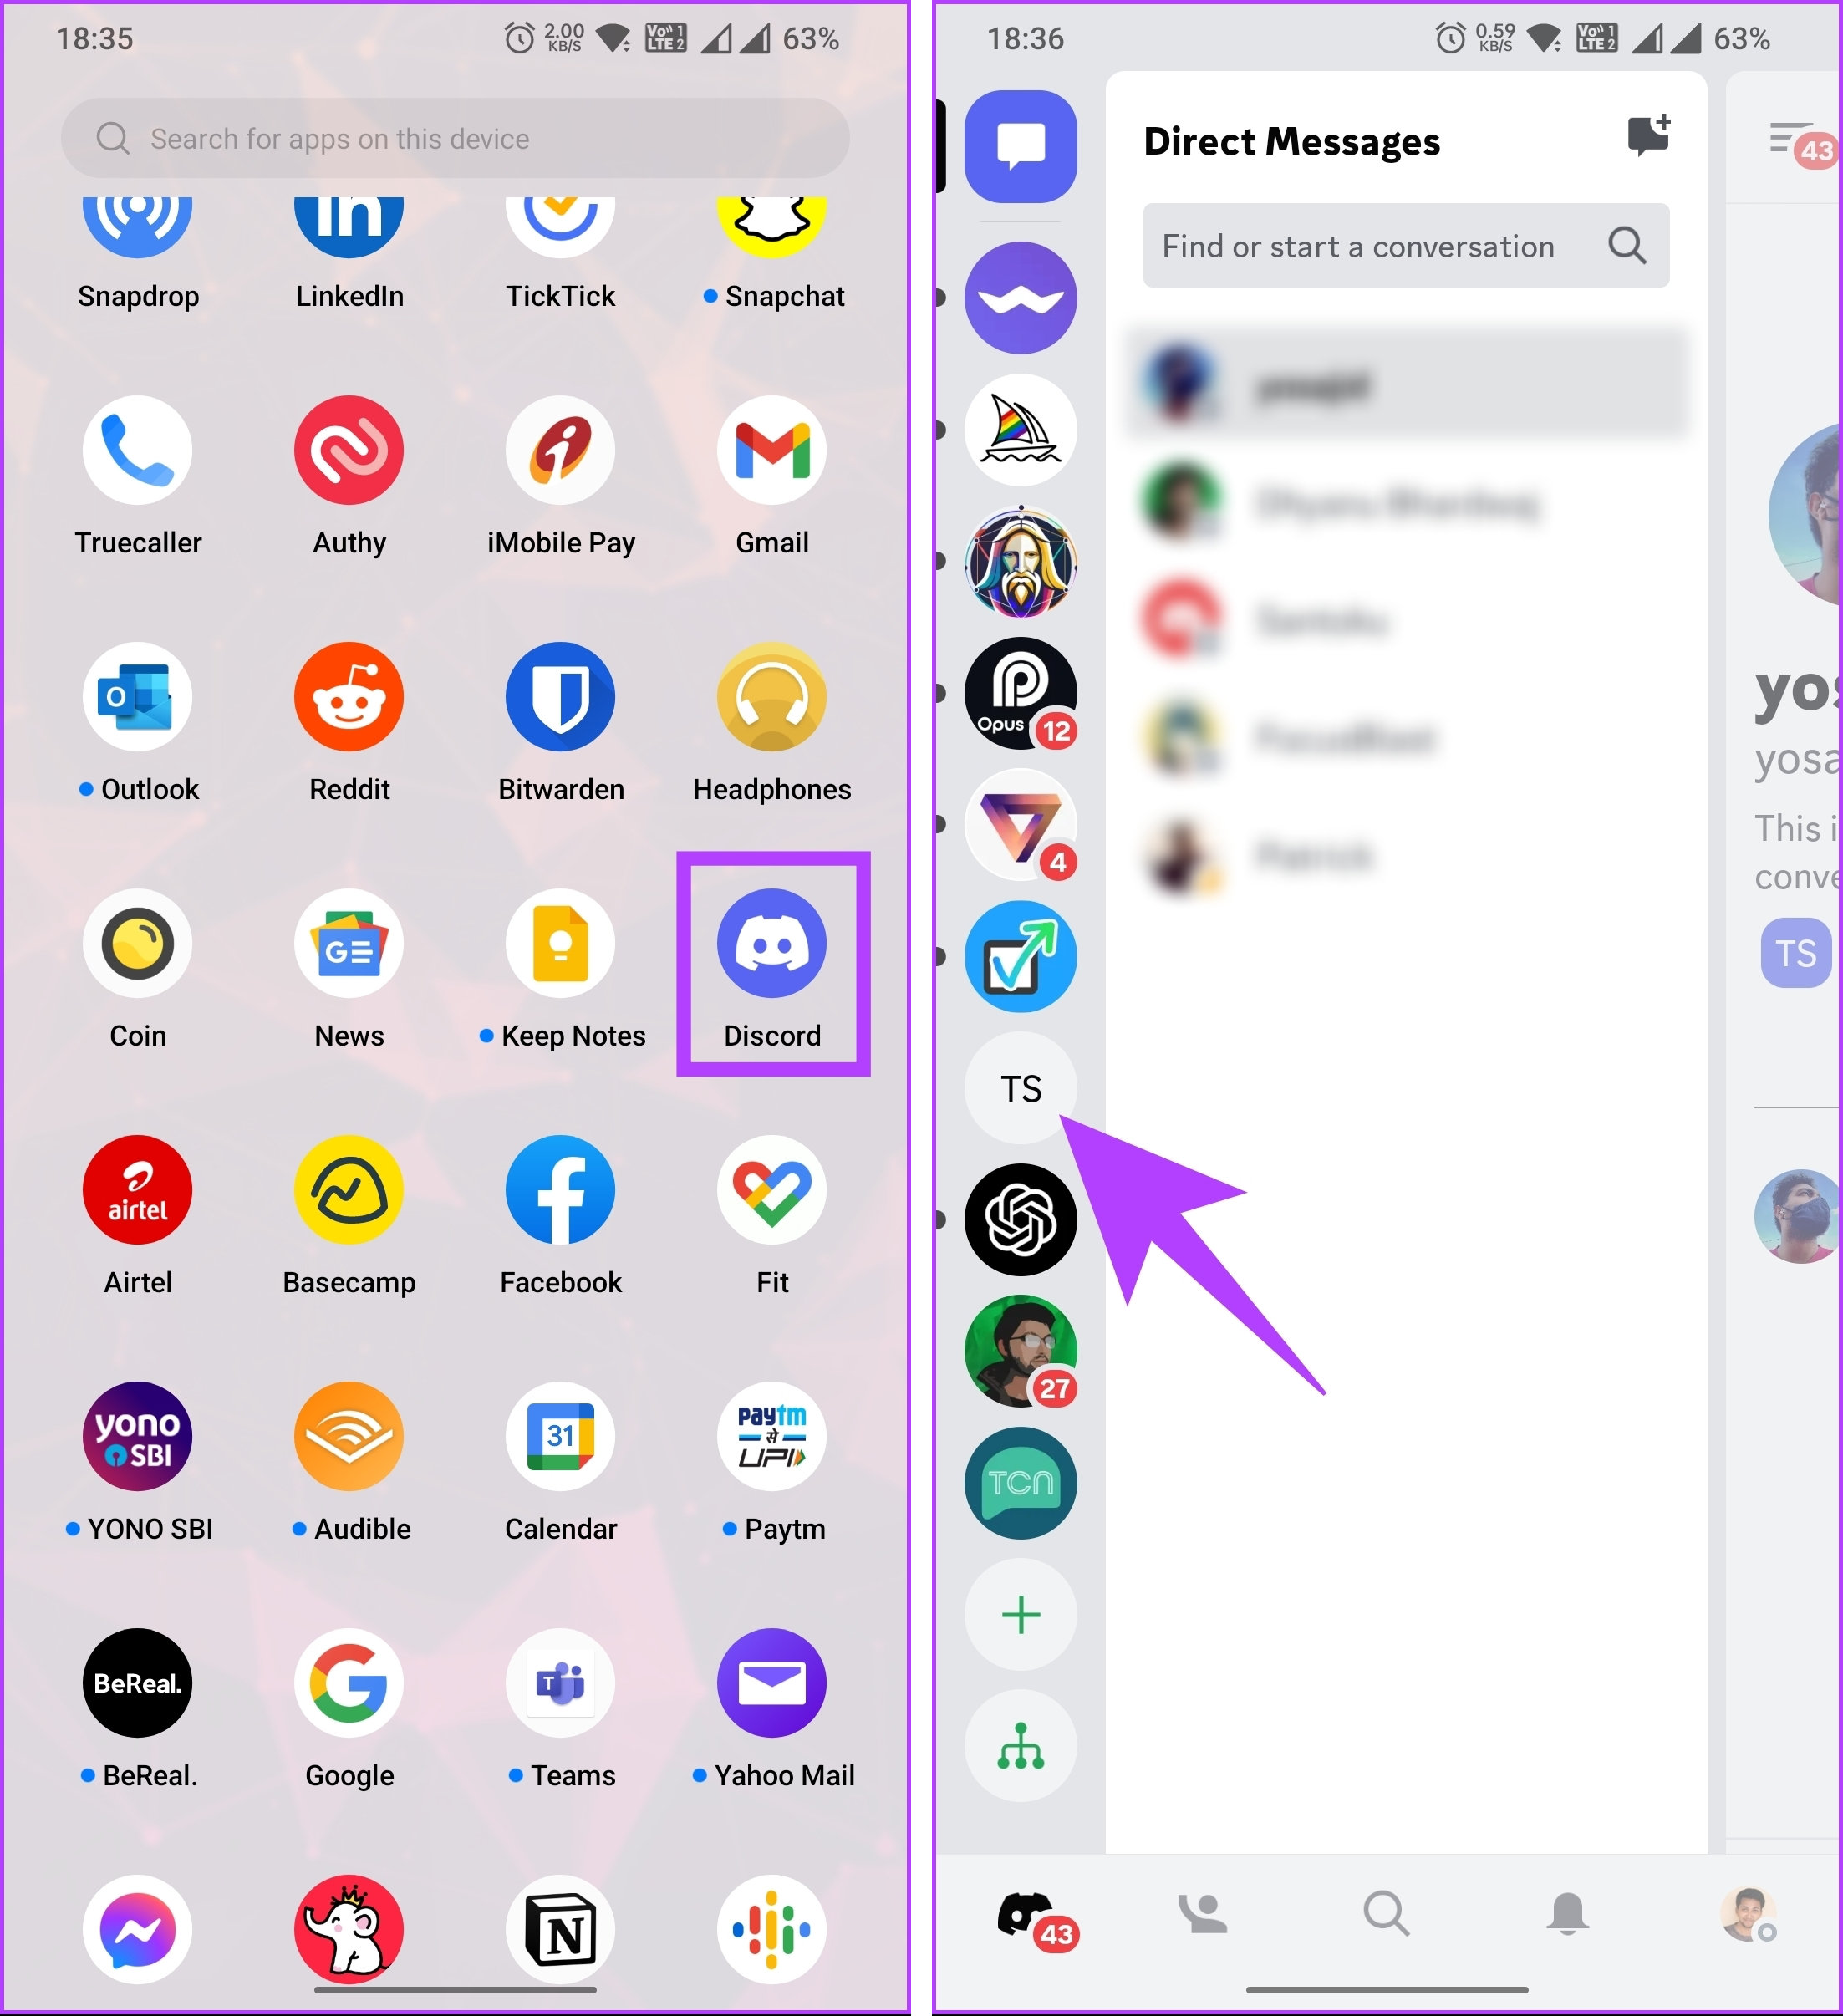
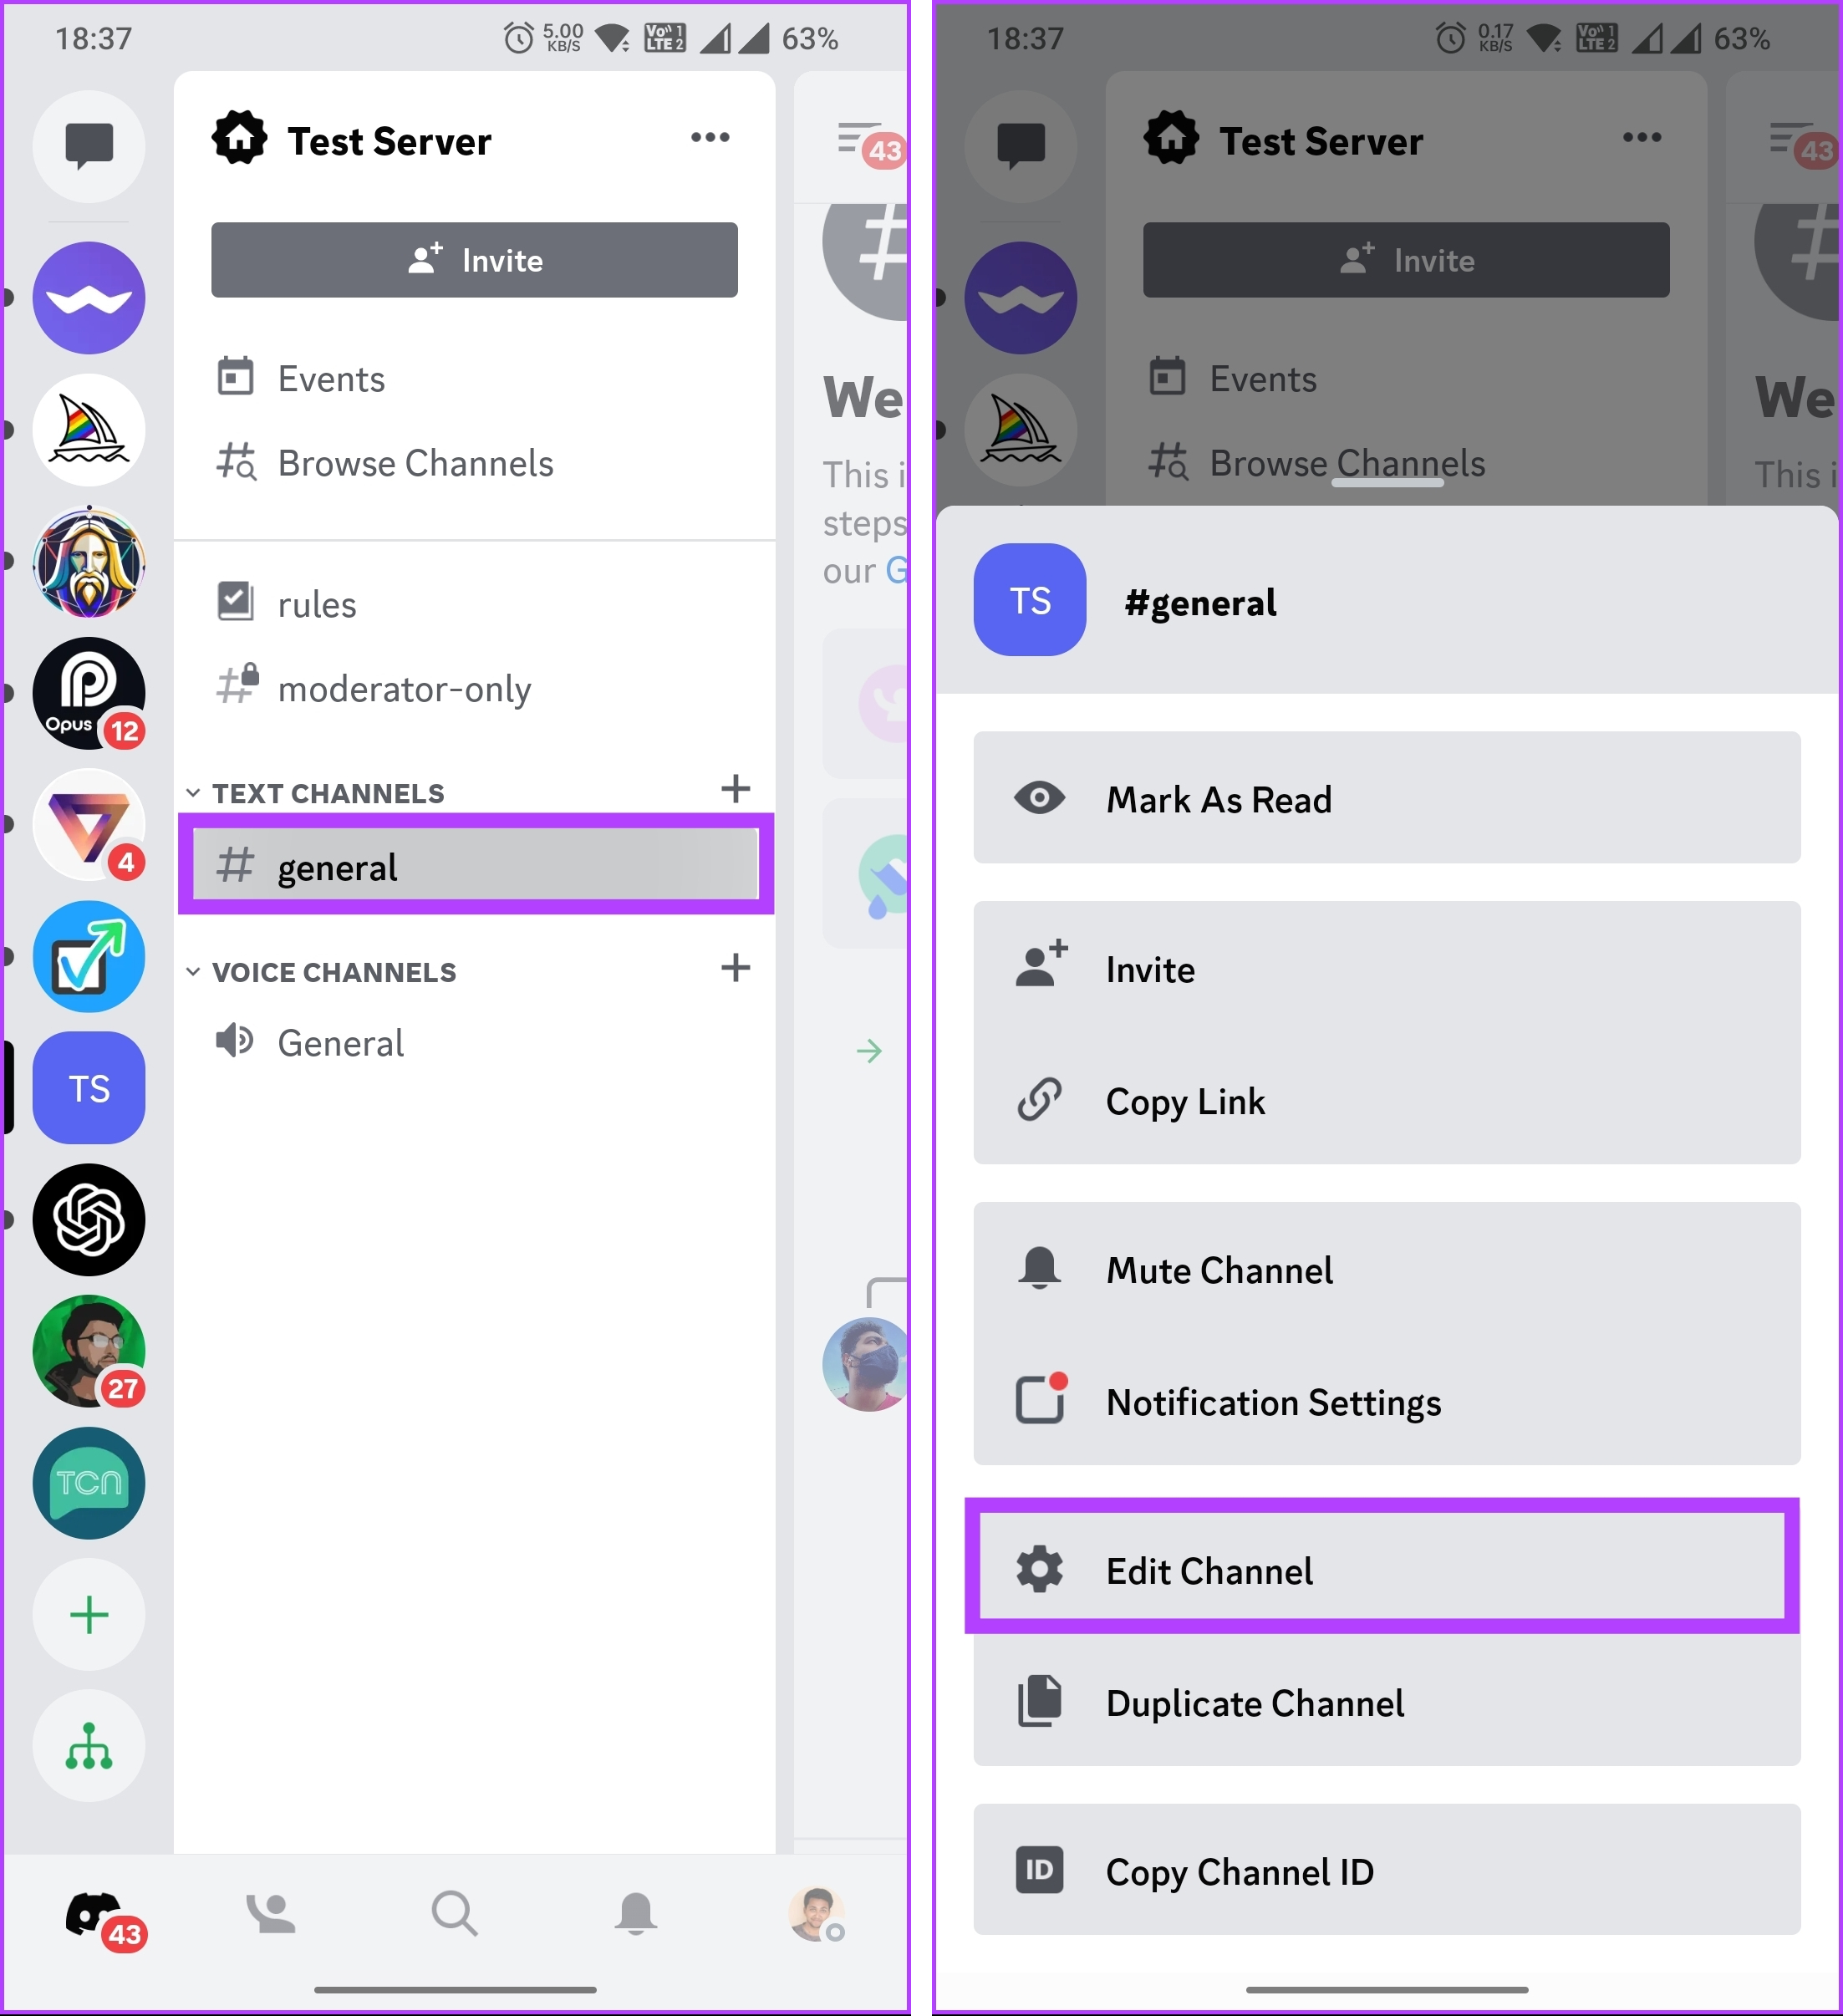
Step 1: Launch the Discord app and go to the channel you want to add emojis.
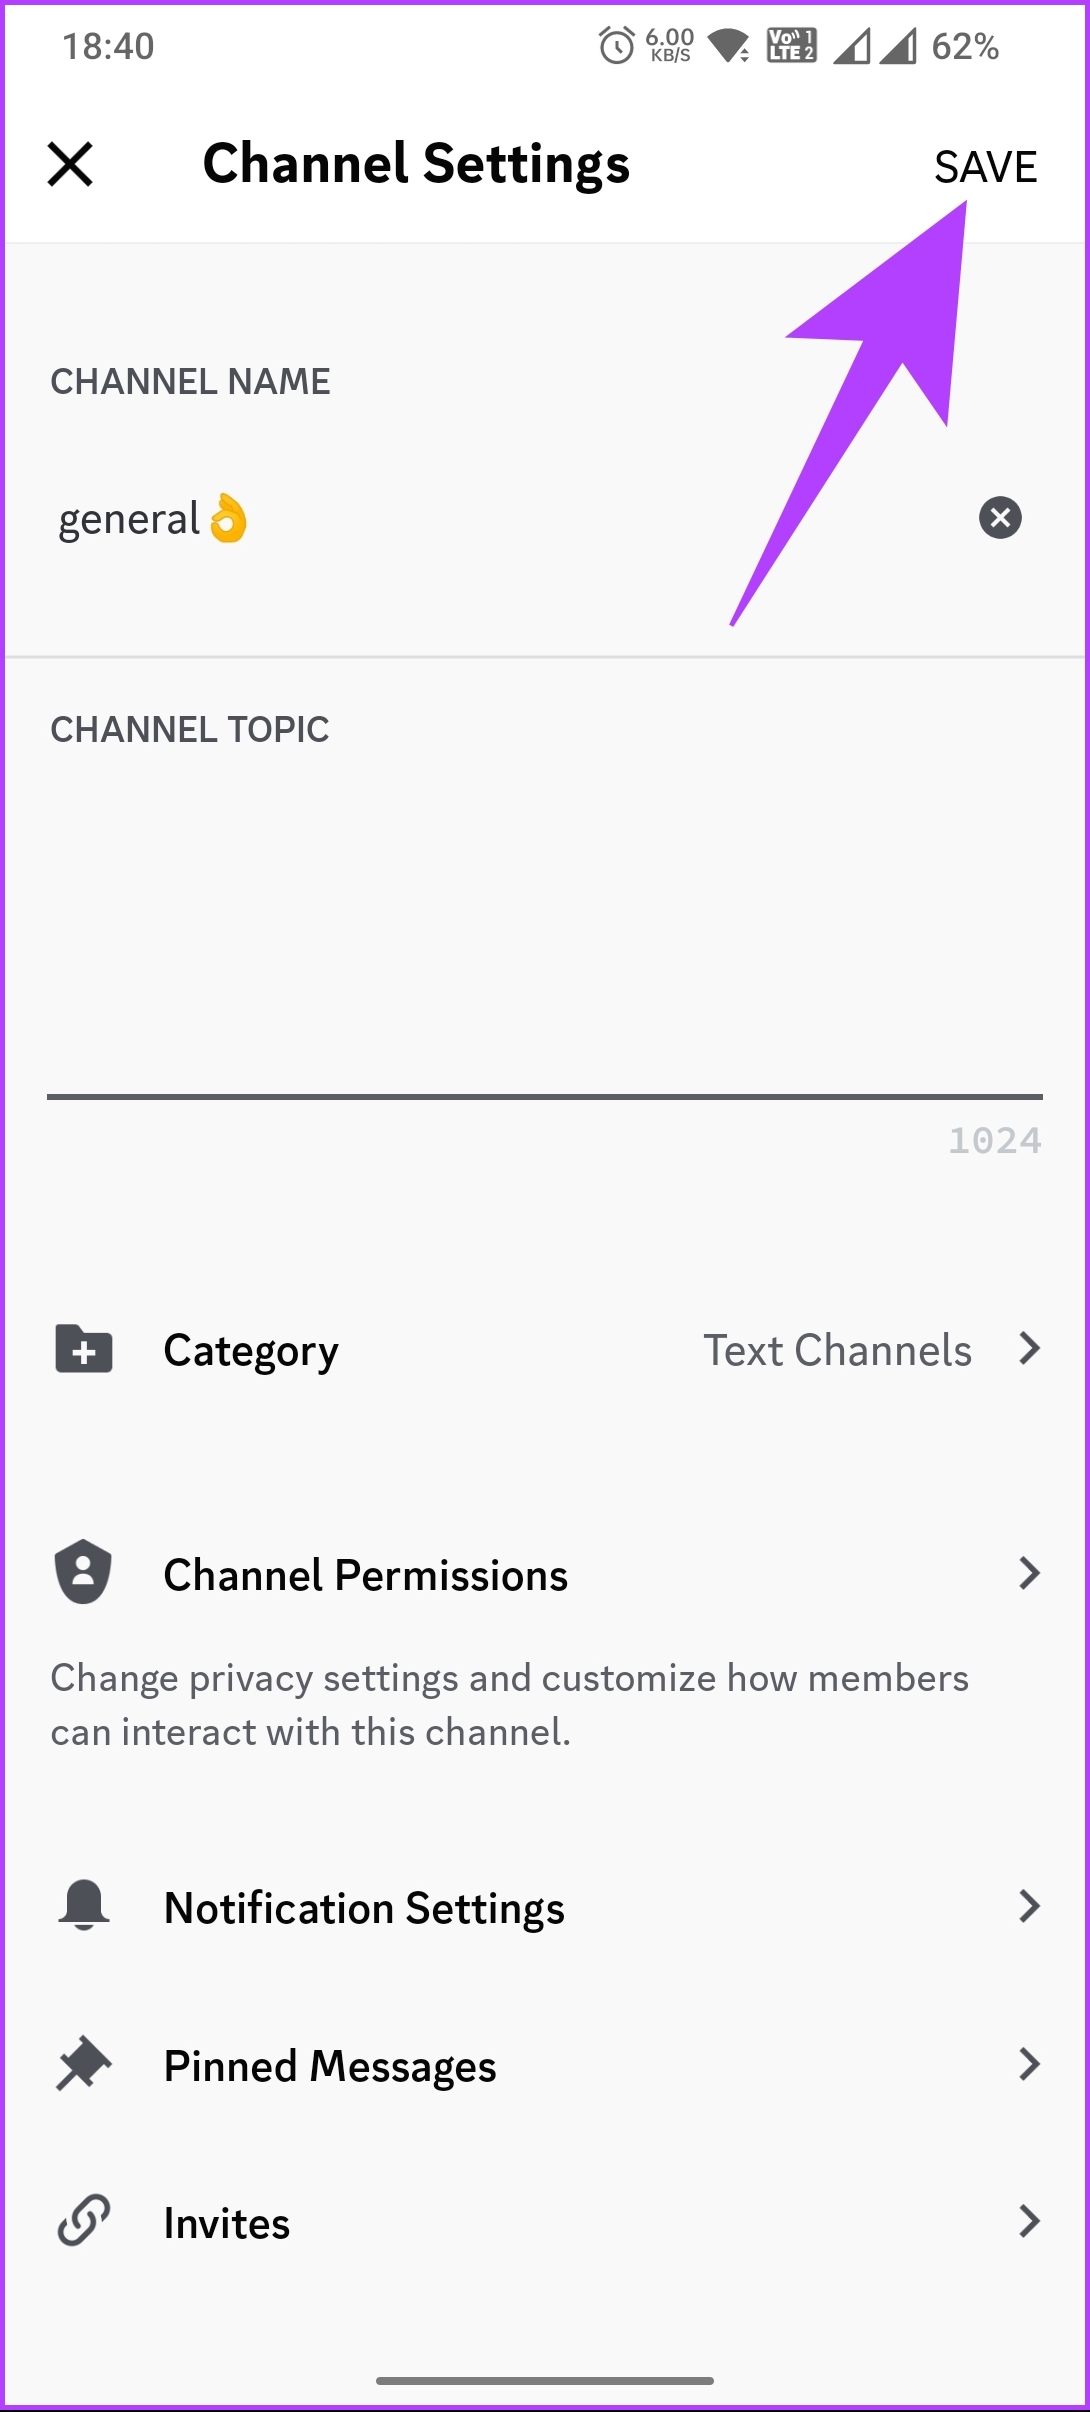
Step 2: Long-press the Channel name until you see the bottom sheet. From the options, select Edit Channel.
You will be taken to the Channel overview.
Step 3: Now, under the Channel name, search or scroll through the emojis and tap the one you want to add.
Step 4: Once you have added the emoji of your choice, tap Save in the top right corner.
There you go. You have successfully added emoji to your Channel name. If you have multiple channels to tweak, repeat these steps to enhance your server’s visual appeal and personalization.
If you don’t want to add emoji to your Discord channel name but want to add emoji to the Discord server nickname, keep reading.
Adding emoji to your Discord server nickname is straightforward to execute. Let’s begin with the desktop version.
On Desktop
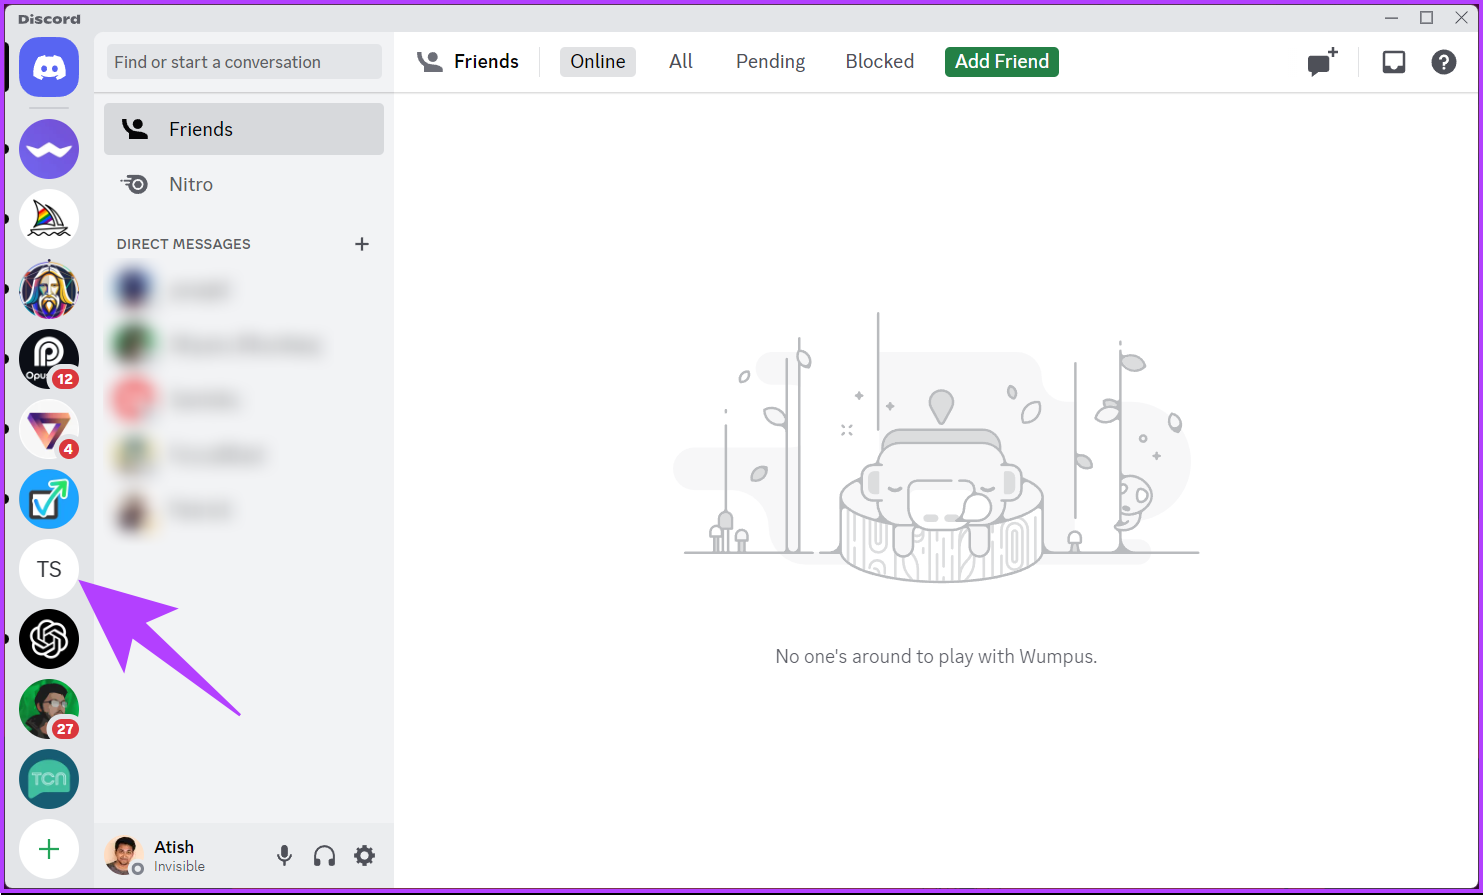
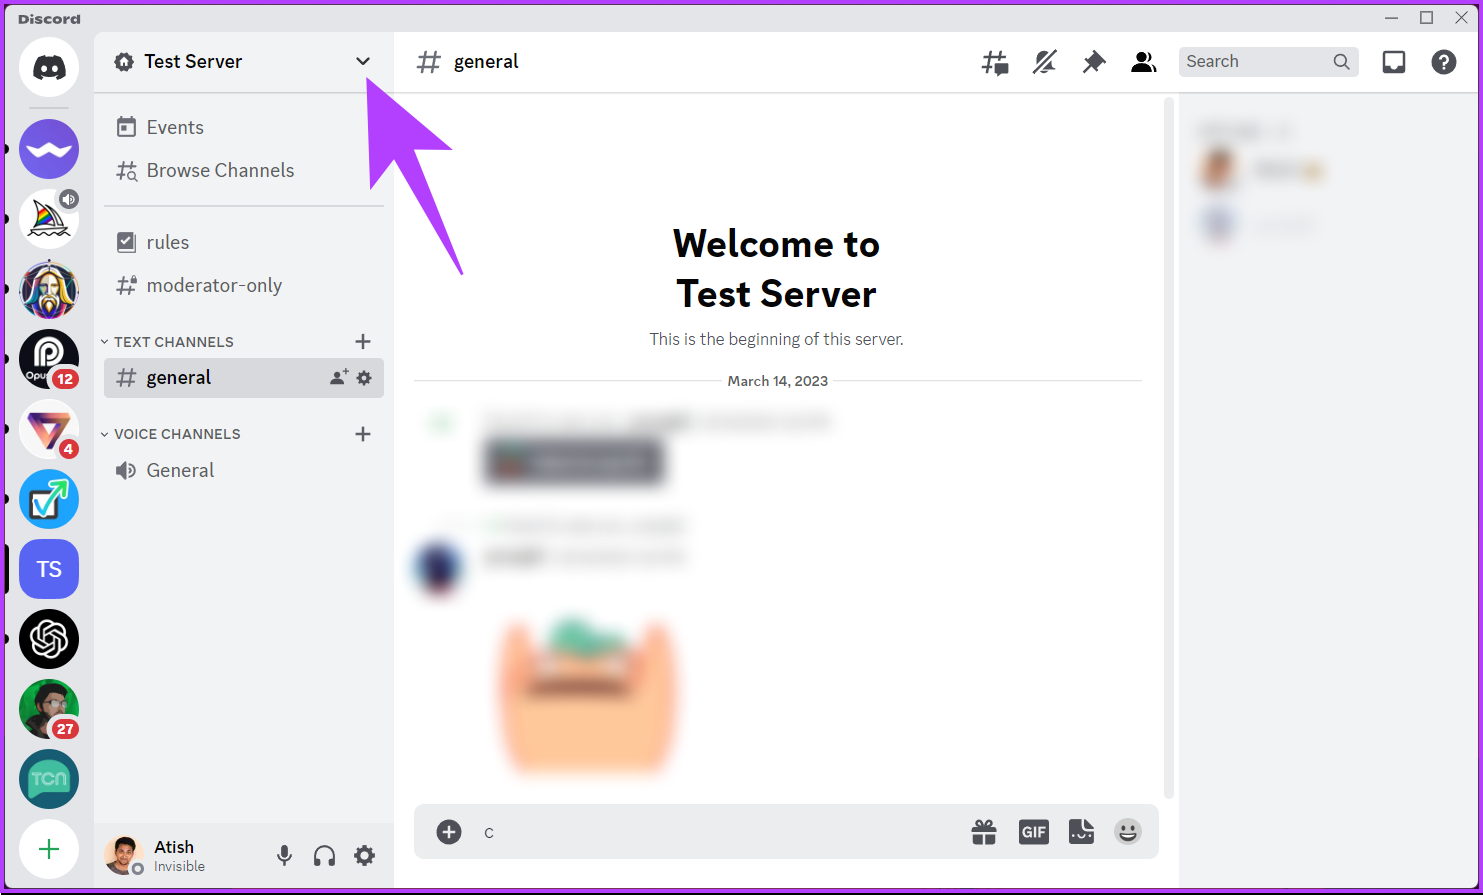
Step 1: Open the Discord app or website on any browser and navigate to the Discord Server you want to change your nickname.
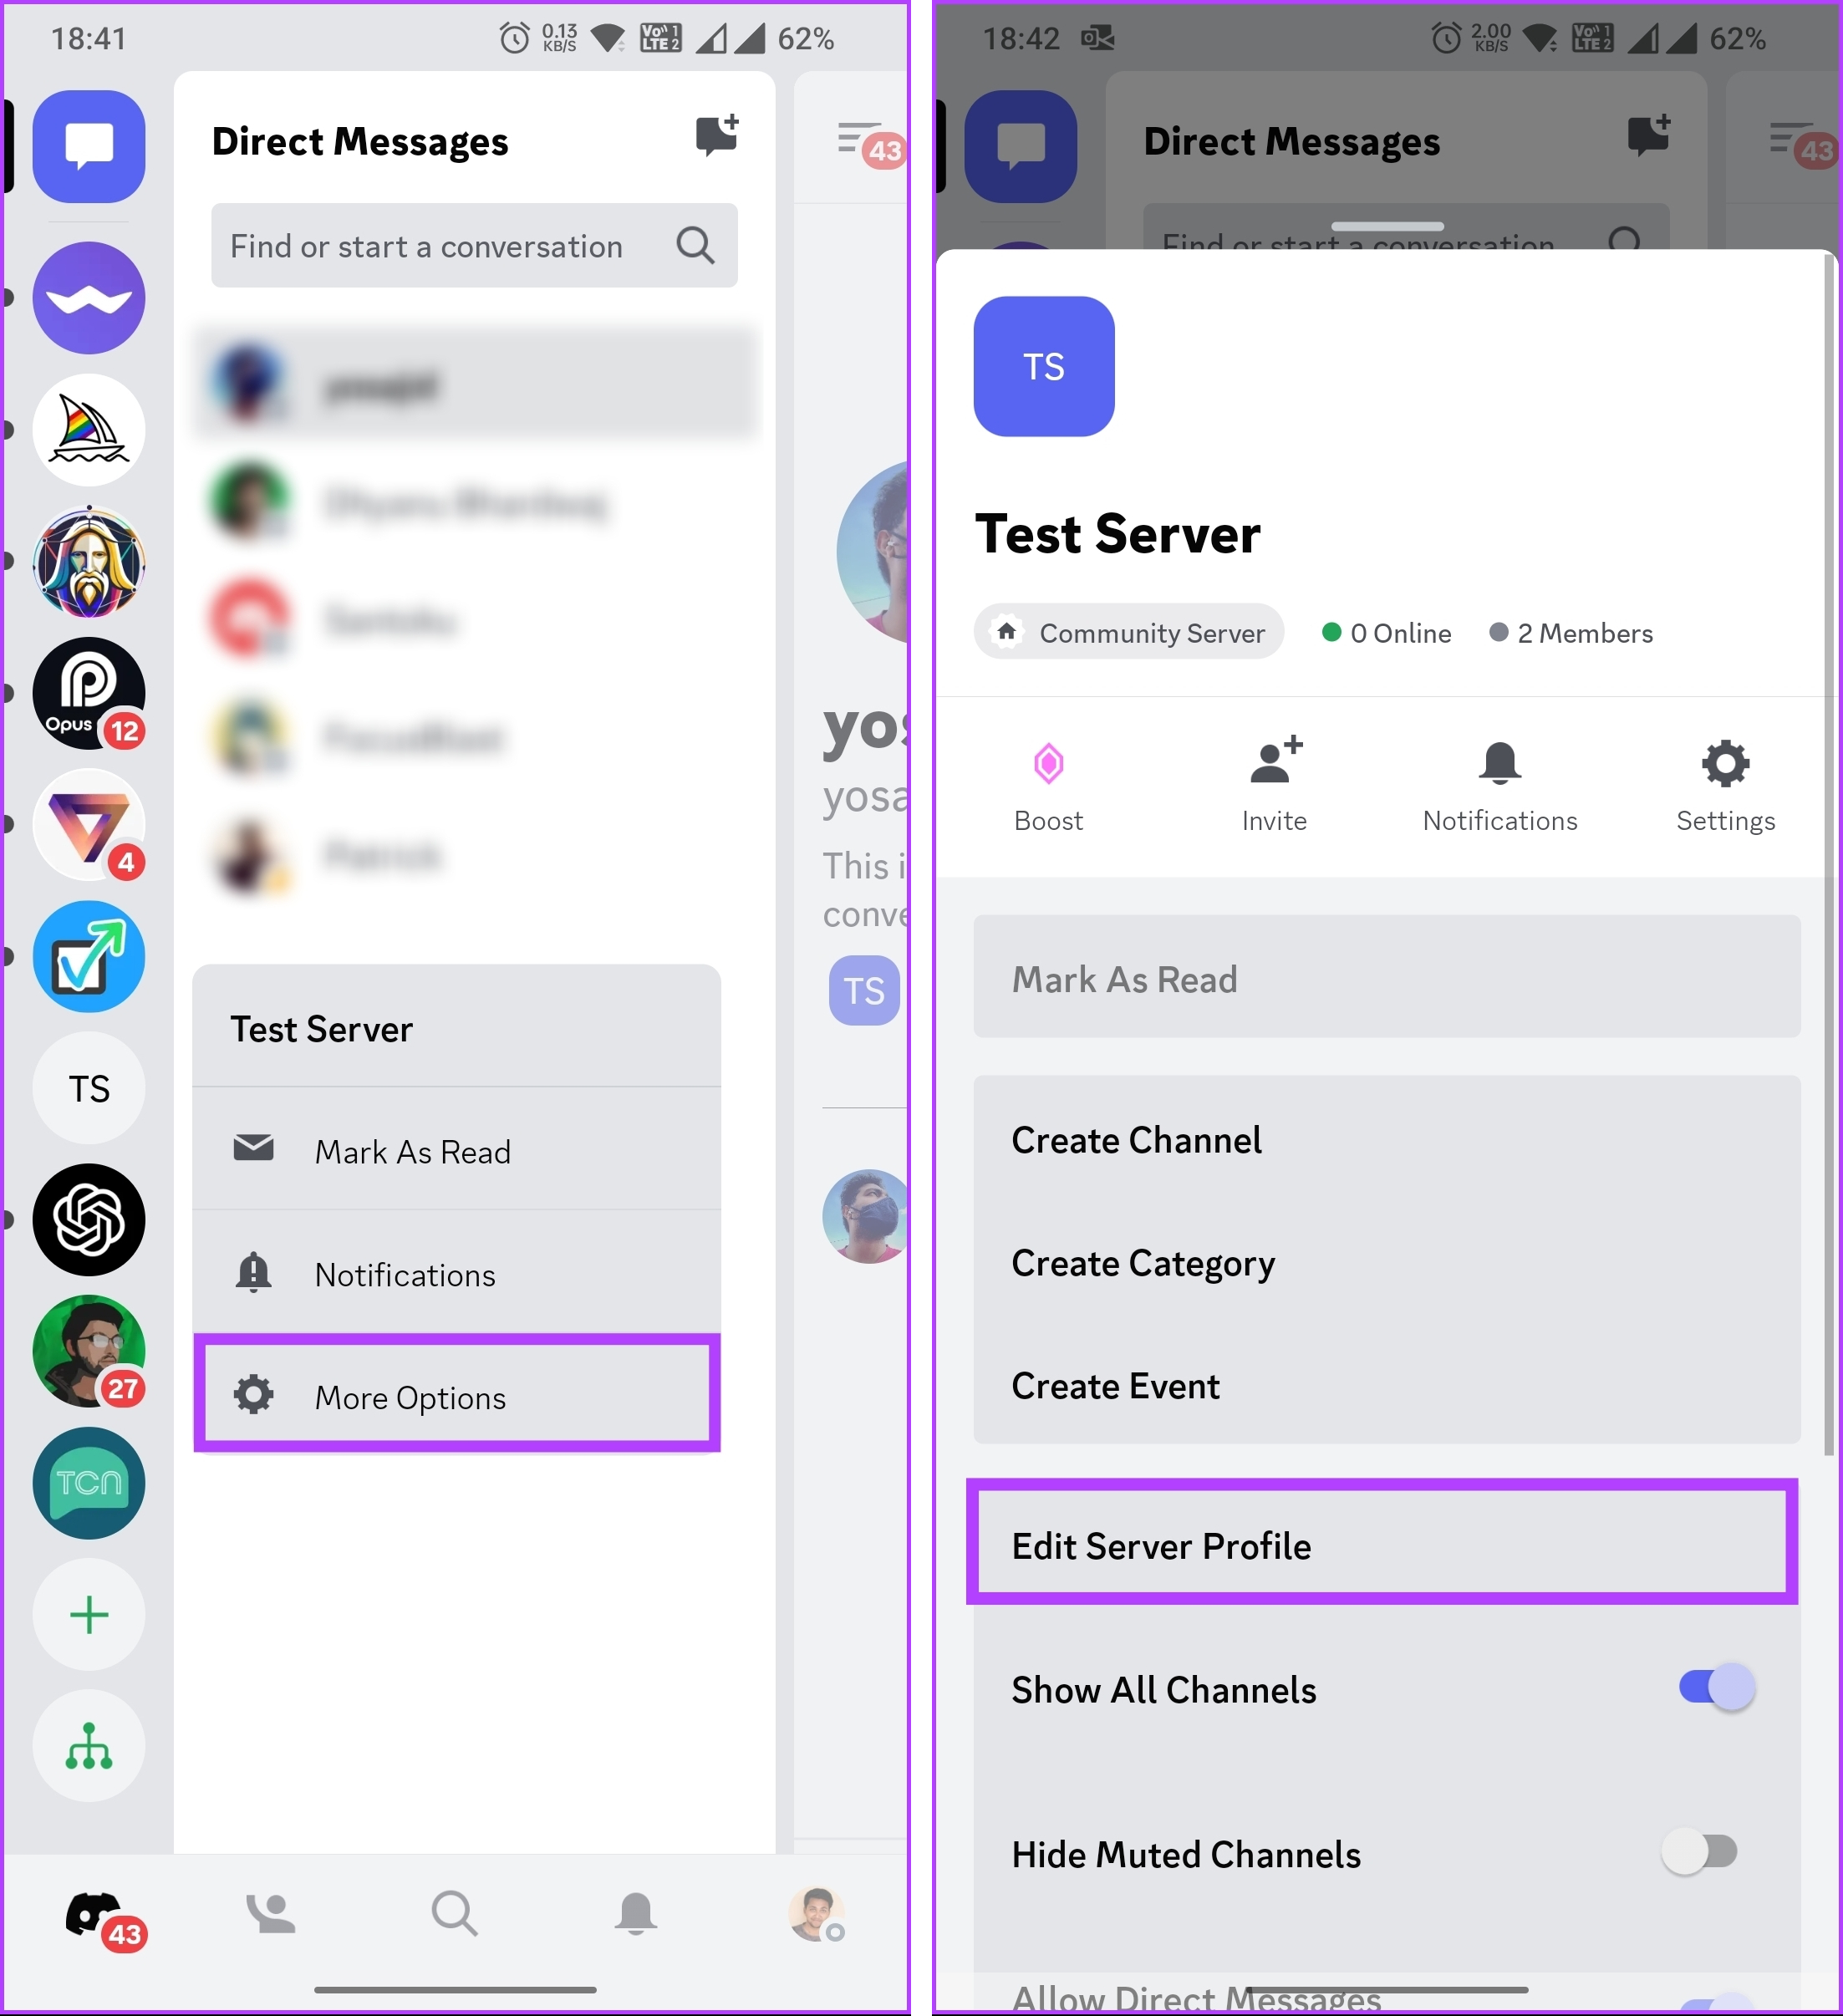
Step 2: Click the chevron (arrow) icon next to your Server name.
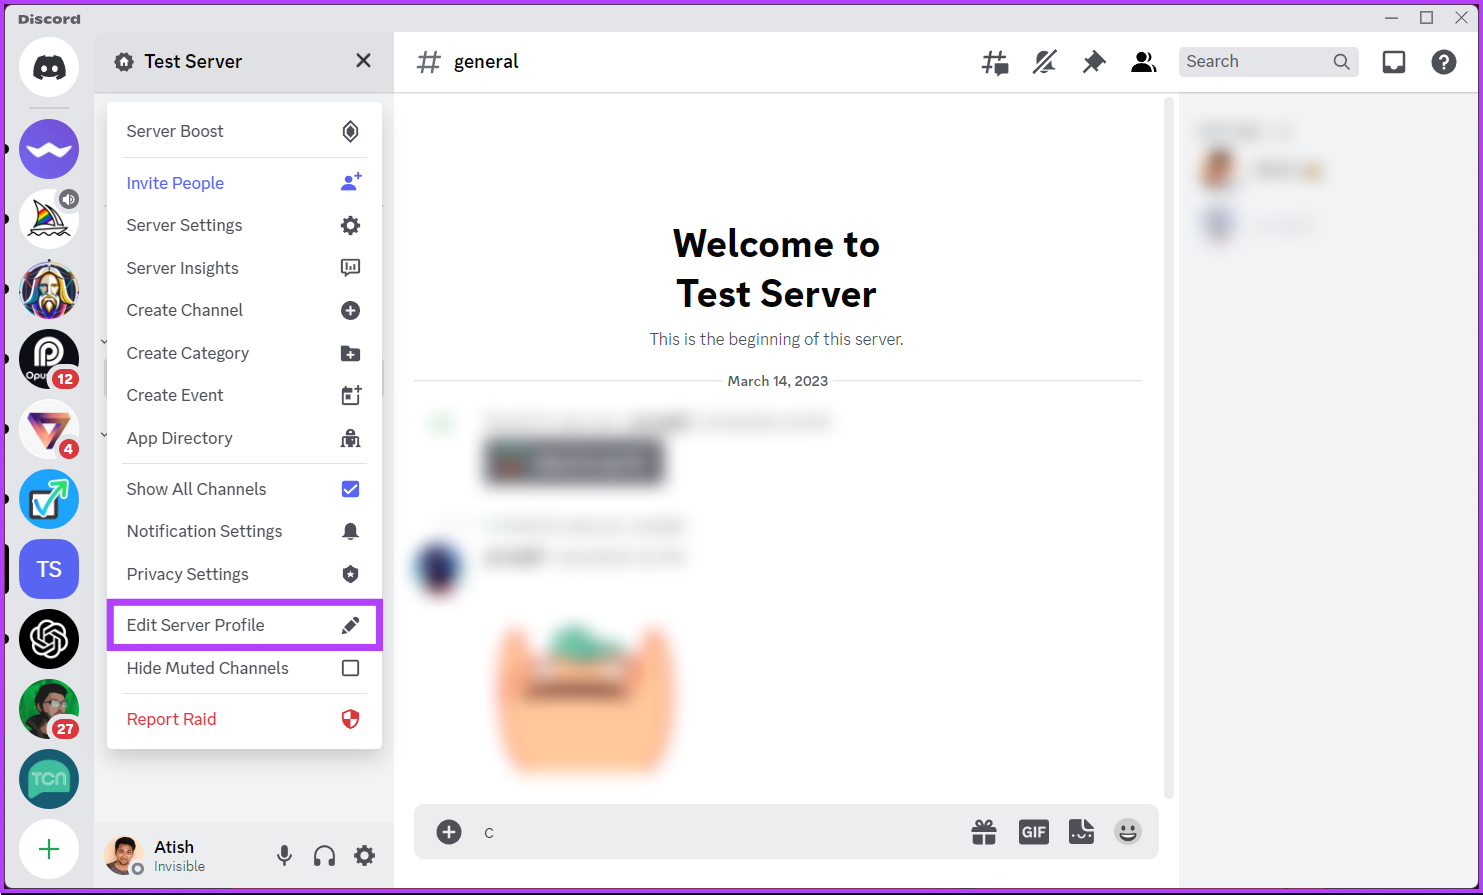
Step 3: From the menu, select ‘Edit Server Profile.’
The prompt will direct you to the Profile section, where you will select the Server Profile.
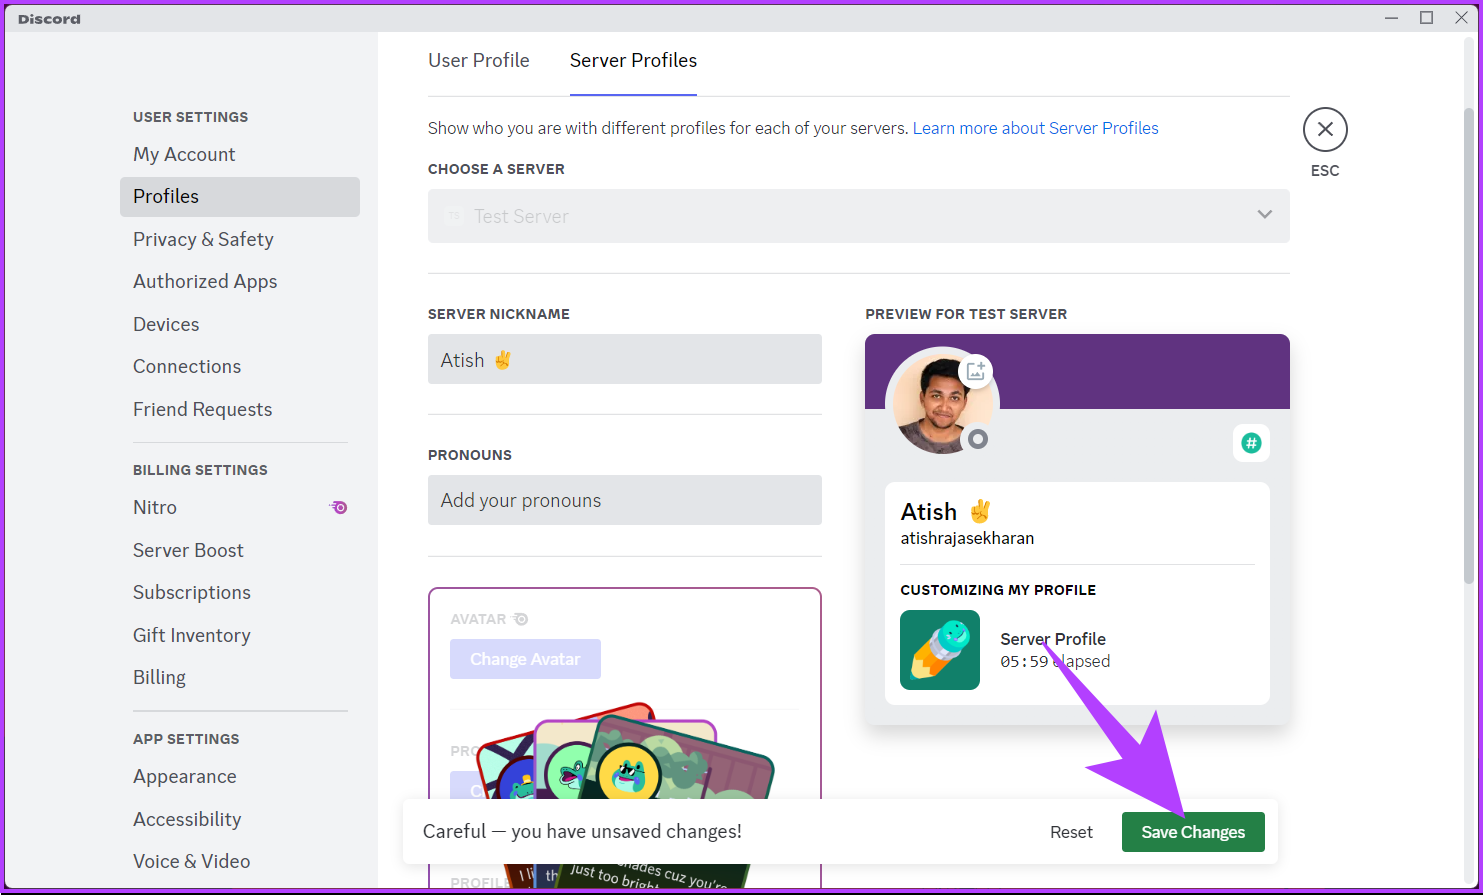
Step 4: Scroll down to the Nickname section and add the emoji you prefer using a keyboard shortcut depending on your operating system.
Note: If on Mac, press ‘Control + Command + Space’ or ‘Windows key + ;’ on Windows to bring up the emoji modal. You can also search and add emoji of your choice.
Step 5: Finally, click Save Changes to implement the changes you made.
There you have it. The emoji will now appear next to your Discord server’s nickname, allowing you to express your creativity and enhance the overall visual appeal of your server.
On Discord’s Mobile App
Step 1: Launch the Discord app, go to the server you want to change your nickname, and long-press the name.
Step 2: From the menu, select More Options. In the bottom sheet, choose ‘Edit Server Profile.’
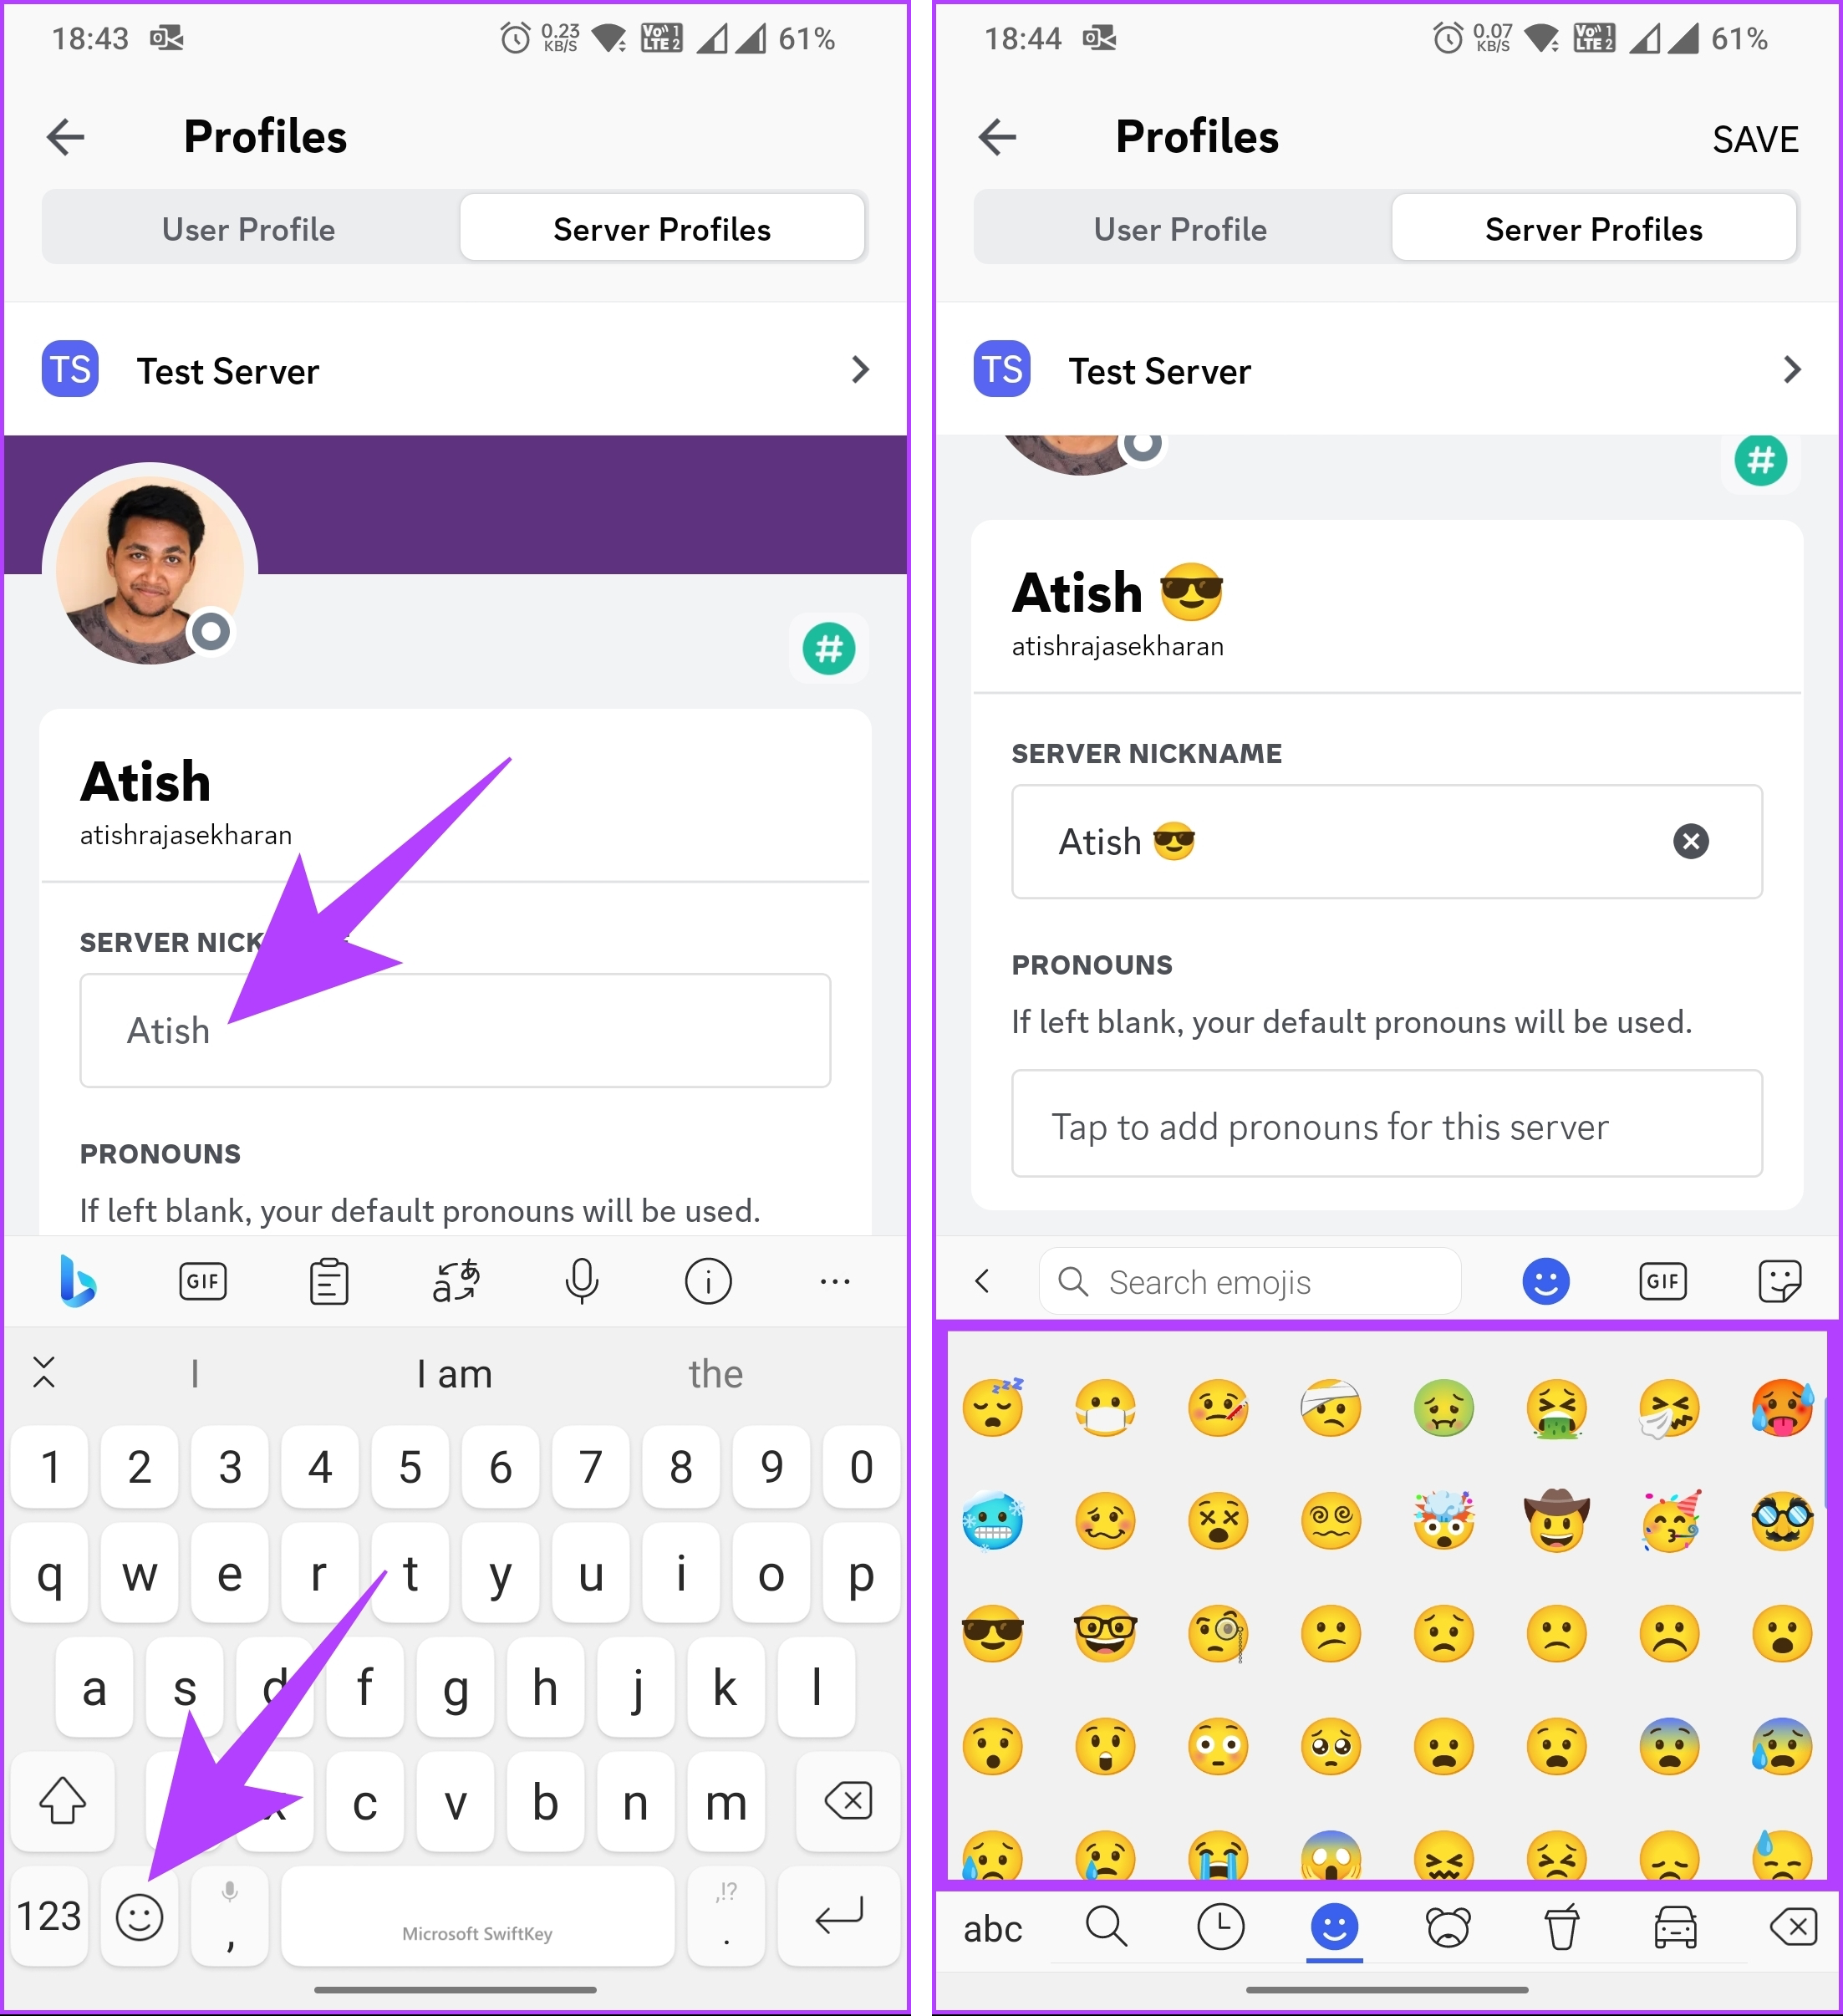
The prompt will direct you to the Profile section, where you will select the Server Profile.
Step 3: Under Server Nickname, add the emoji you want by tapping the emoji icon on your keyboard.
Step 4: Once you have added the emoji of your choice, tap Save in the top right corner.
There you go. You have added a visual flair to your username and made your presence on Discord more engaging and expressive. But what if you want to add a custom emoji to your Discord server? Keep reading.
Can You Use Custom Emojis in Your Discord Server or Channel’s Name
You can use custom emojis in your Discord server’s text channels or voice channel names but not in the server name itself. Moreover, the custom emojis added to the channel will not display as the actual image; instead, they’ll appear as the emoji code (i.e., <:emoji_name:emoji_id>).
At the time of writing this article, you can only use emojis you got from Unicode sites. This is because Discord does not parse emojis in channel or server names like it does in messages or statuses. If you still want to add custom emojis, move to the next section.
Use Custom Emojis on a Discord Server
You can easily add custom emojis to a Discord server, provided you have the necessary permissions. If you want to add animated emojis to your Discord server, you must have a Discord Nitro subscription.
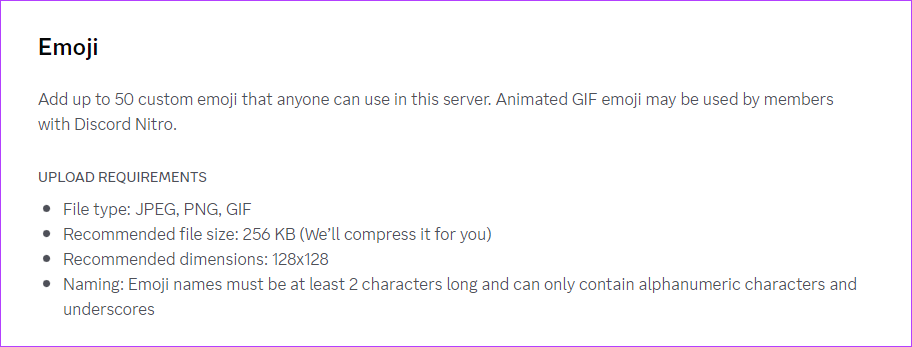
Requirements for creating custom emojis for a Discord server;
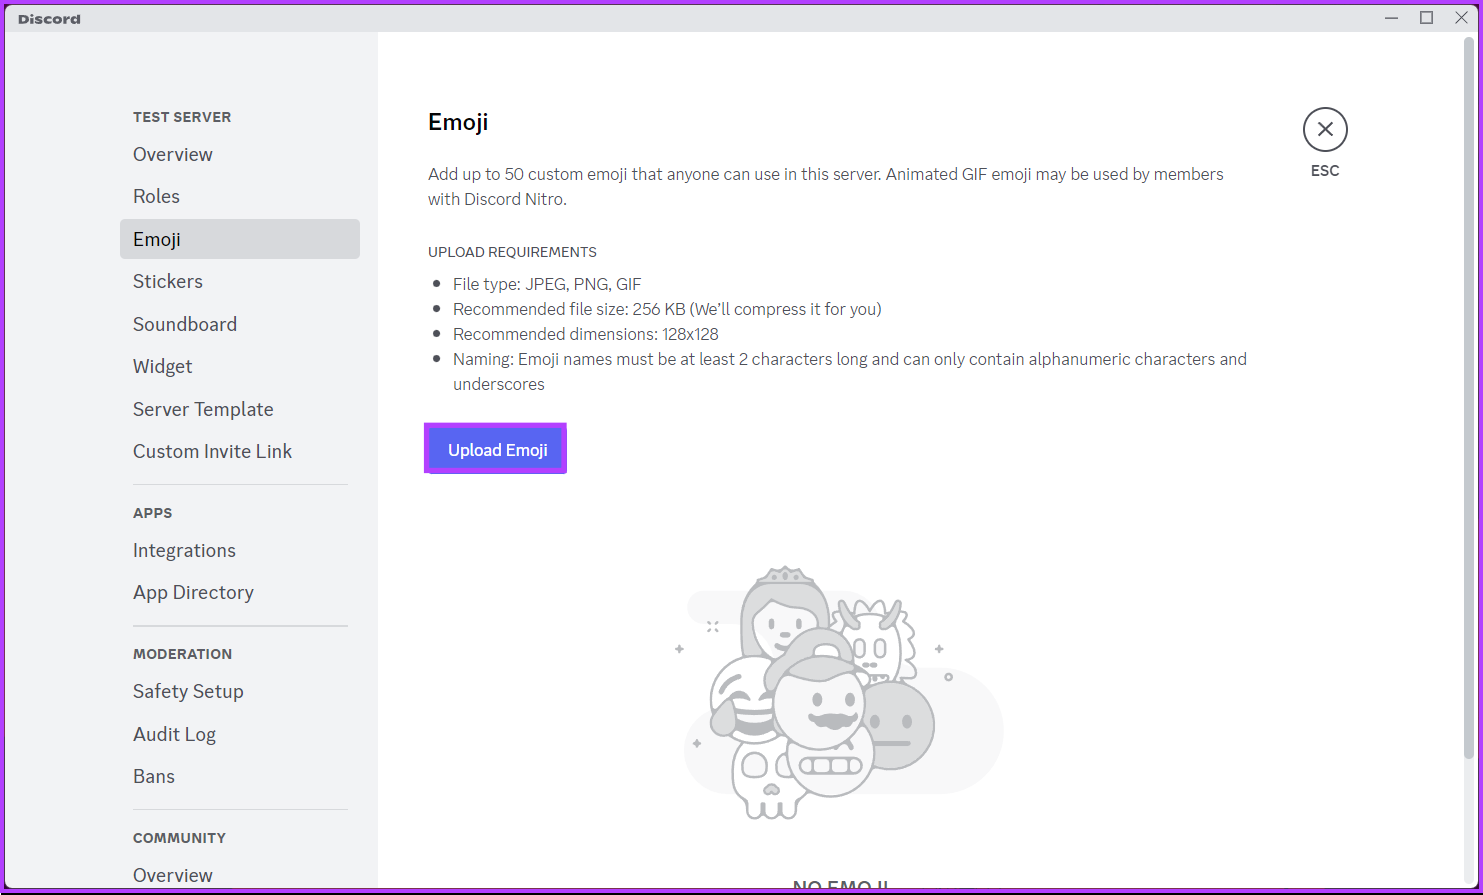
Custom emojis can be uploaded as .jpg, .png, or .gif files. The Discord emoji size must be under 256KB. For optimal results, the image should be 128×128 pixels, but Discord will resize images that are larger down to this size.
The number of custom emojis you can have on a server depends on the server level. At level 0, you can have up to 50 custom emojis. This limit increases with server boosts, up to 250 custom emojis at level 3.
Emoji names must be at least 2 characters long and can only contain alphanumeric characters and underscores. Emoji names are also case-sensitive in Discord.
Let’s begin with the steps.
On Desktop
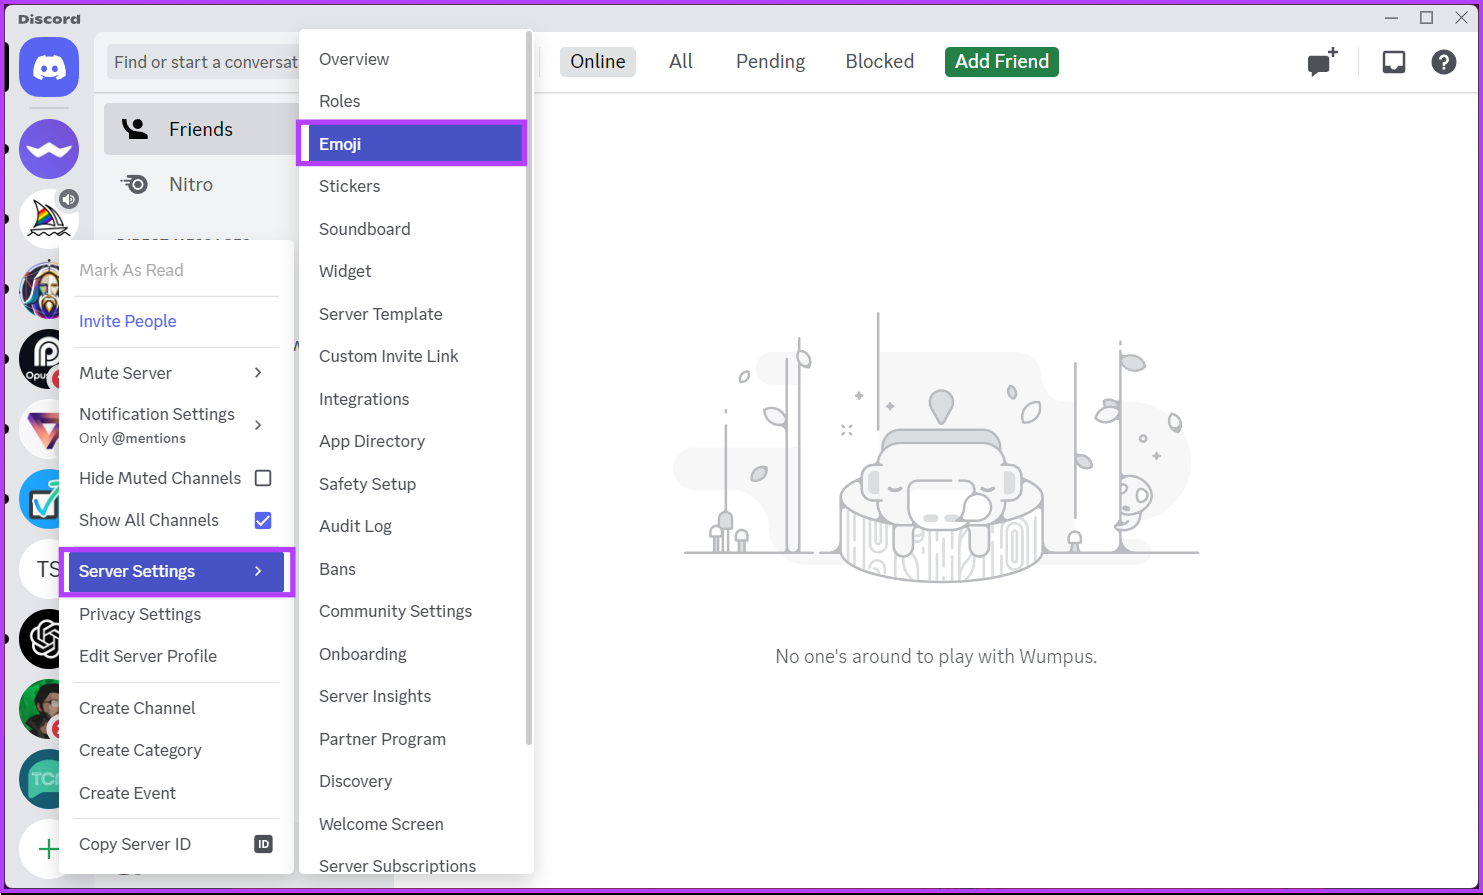
Step 1: Open the Discord app or website and navigate to the Discord server you want to add custom emoji and right-click on it.
Step 2: From the drop-down menu, click on Server Settings and choose Emoji.
You will be taken to a page where you can upload emoji to Discord.
Step 3: Now, click the Upload Emoji button, locate and double-click on the emoji on your PC to upload it to your Discord server.
With this, you have successfully added emojis to your Discord server. If you want to do the same using mobile, continue reading.
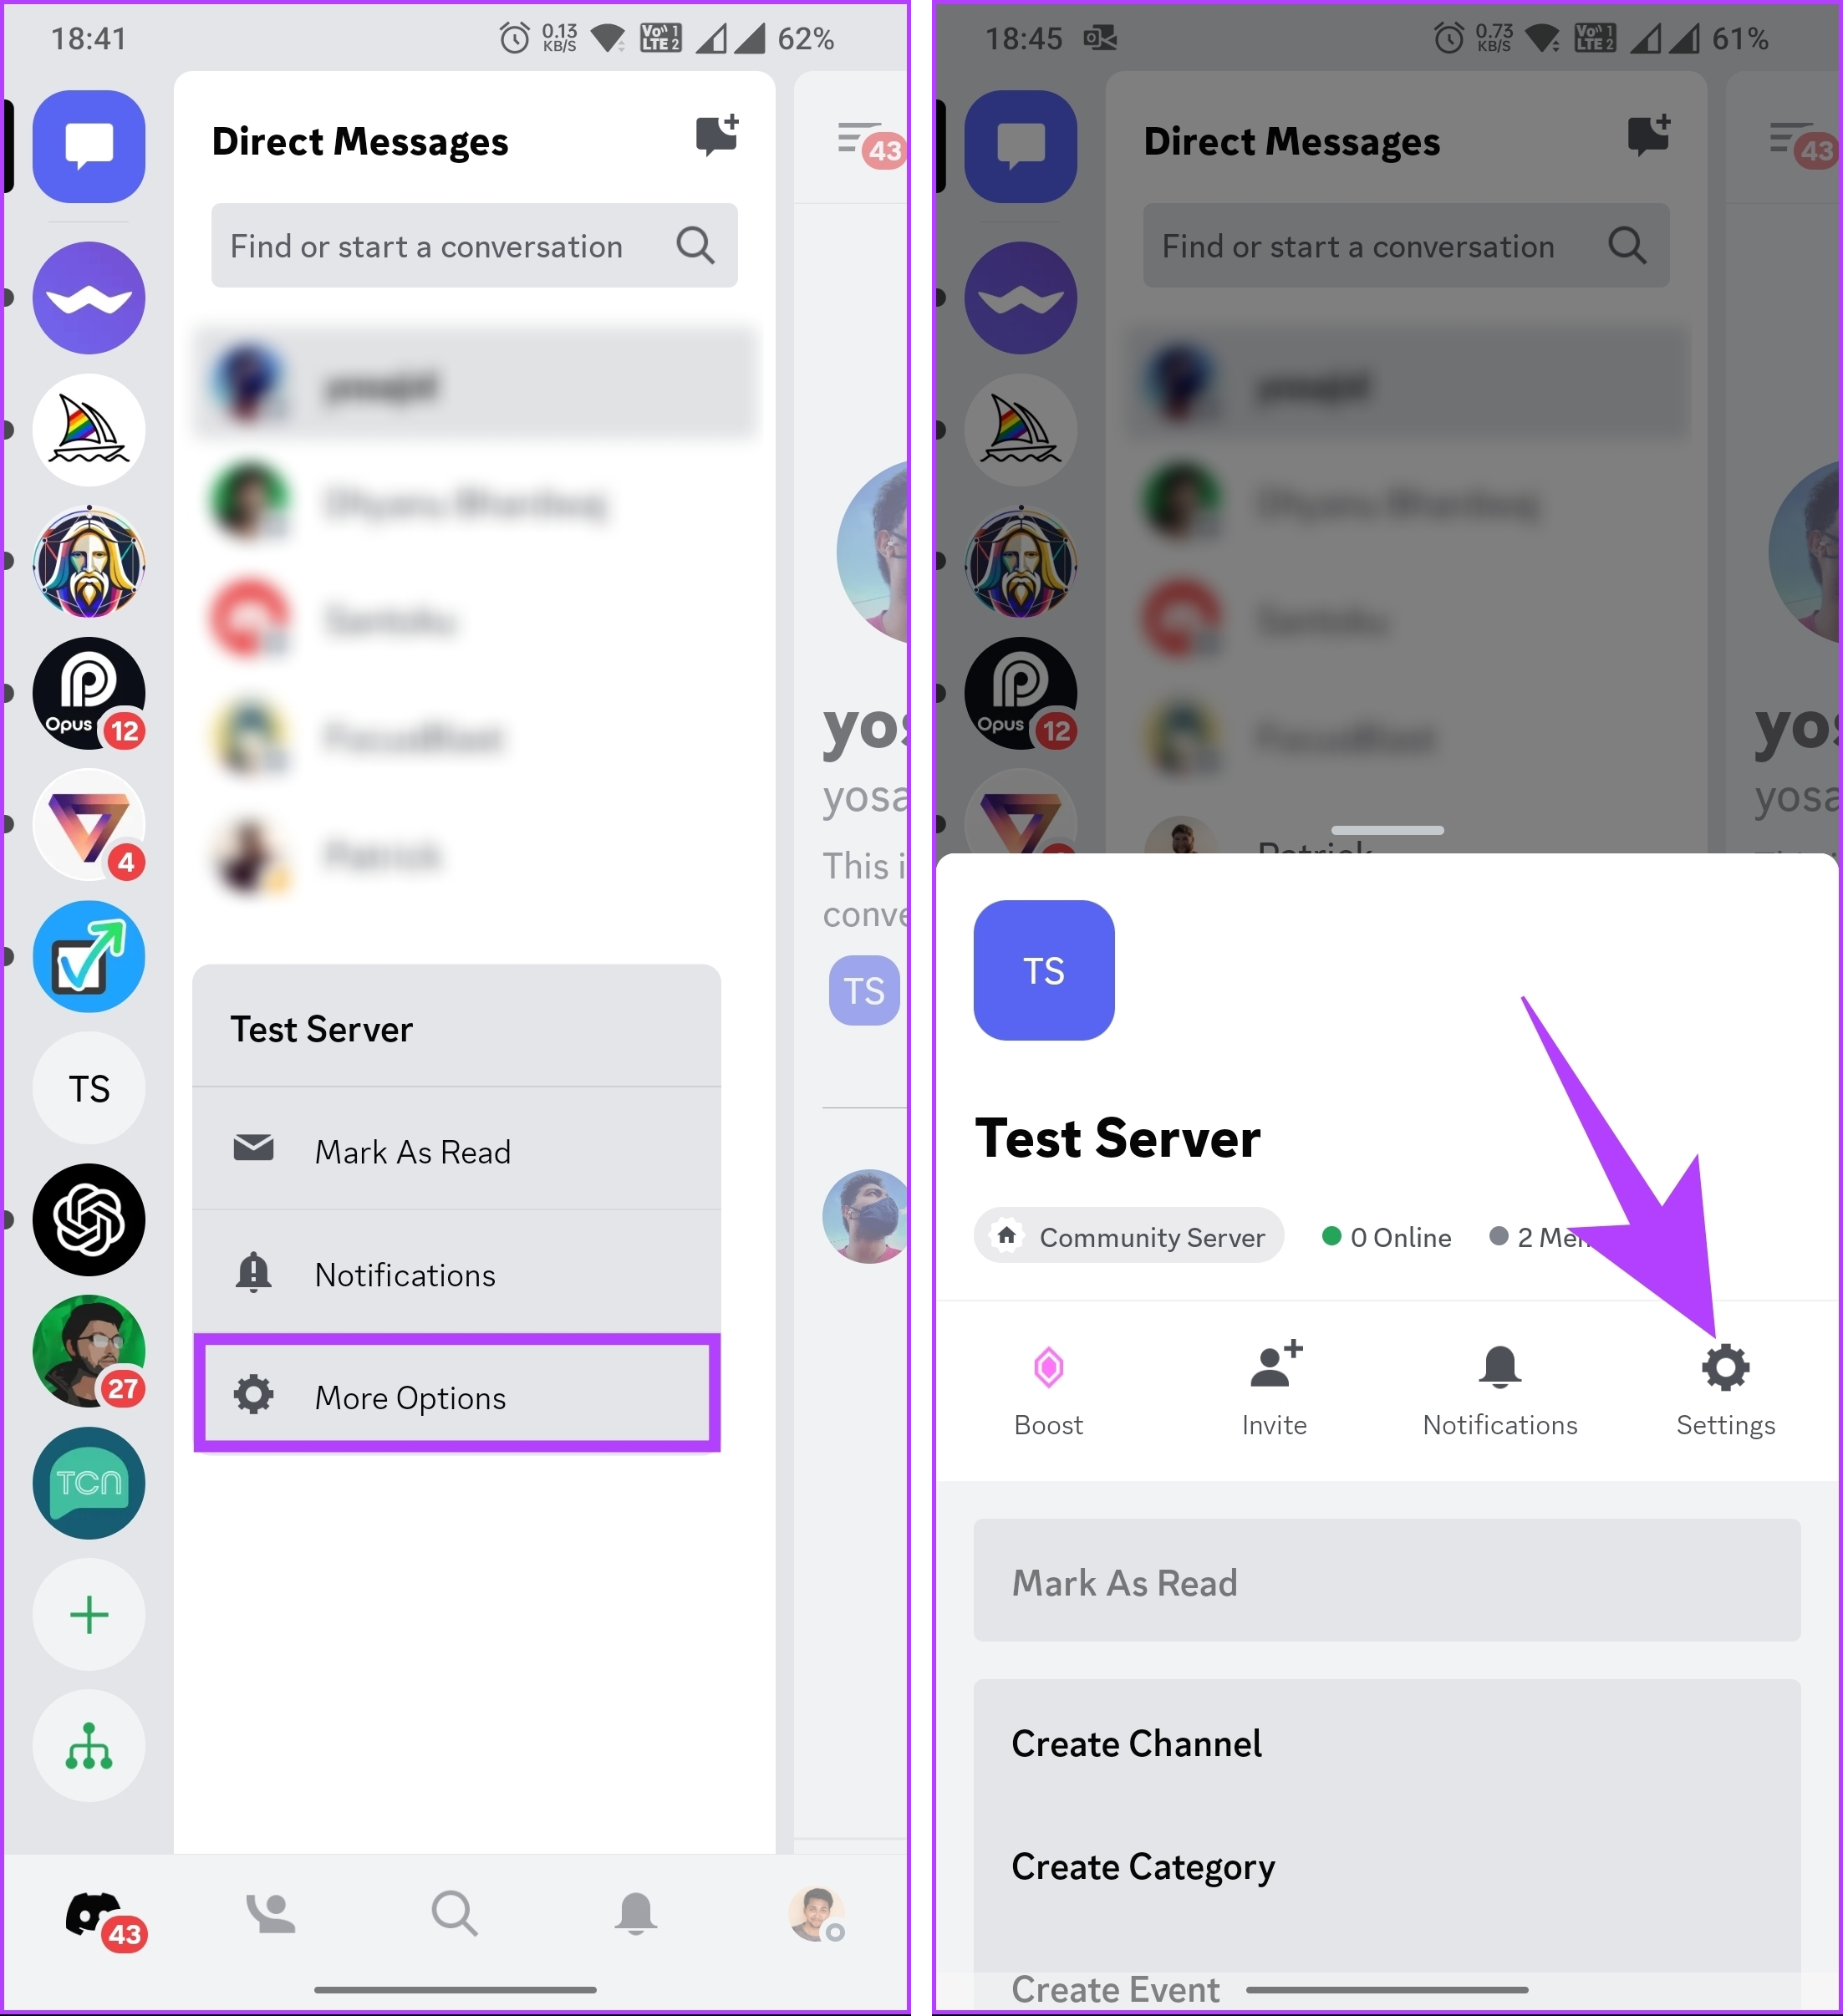
Step 1: Launch the Discord app, go to the server you want to add emojis, and long-press it.
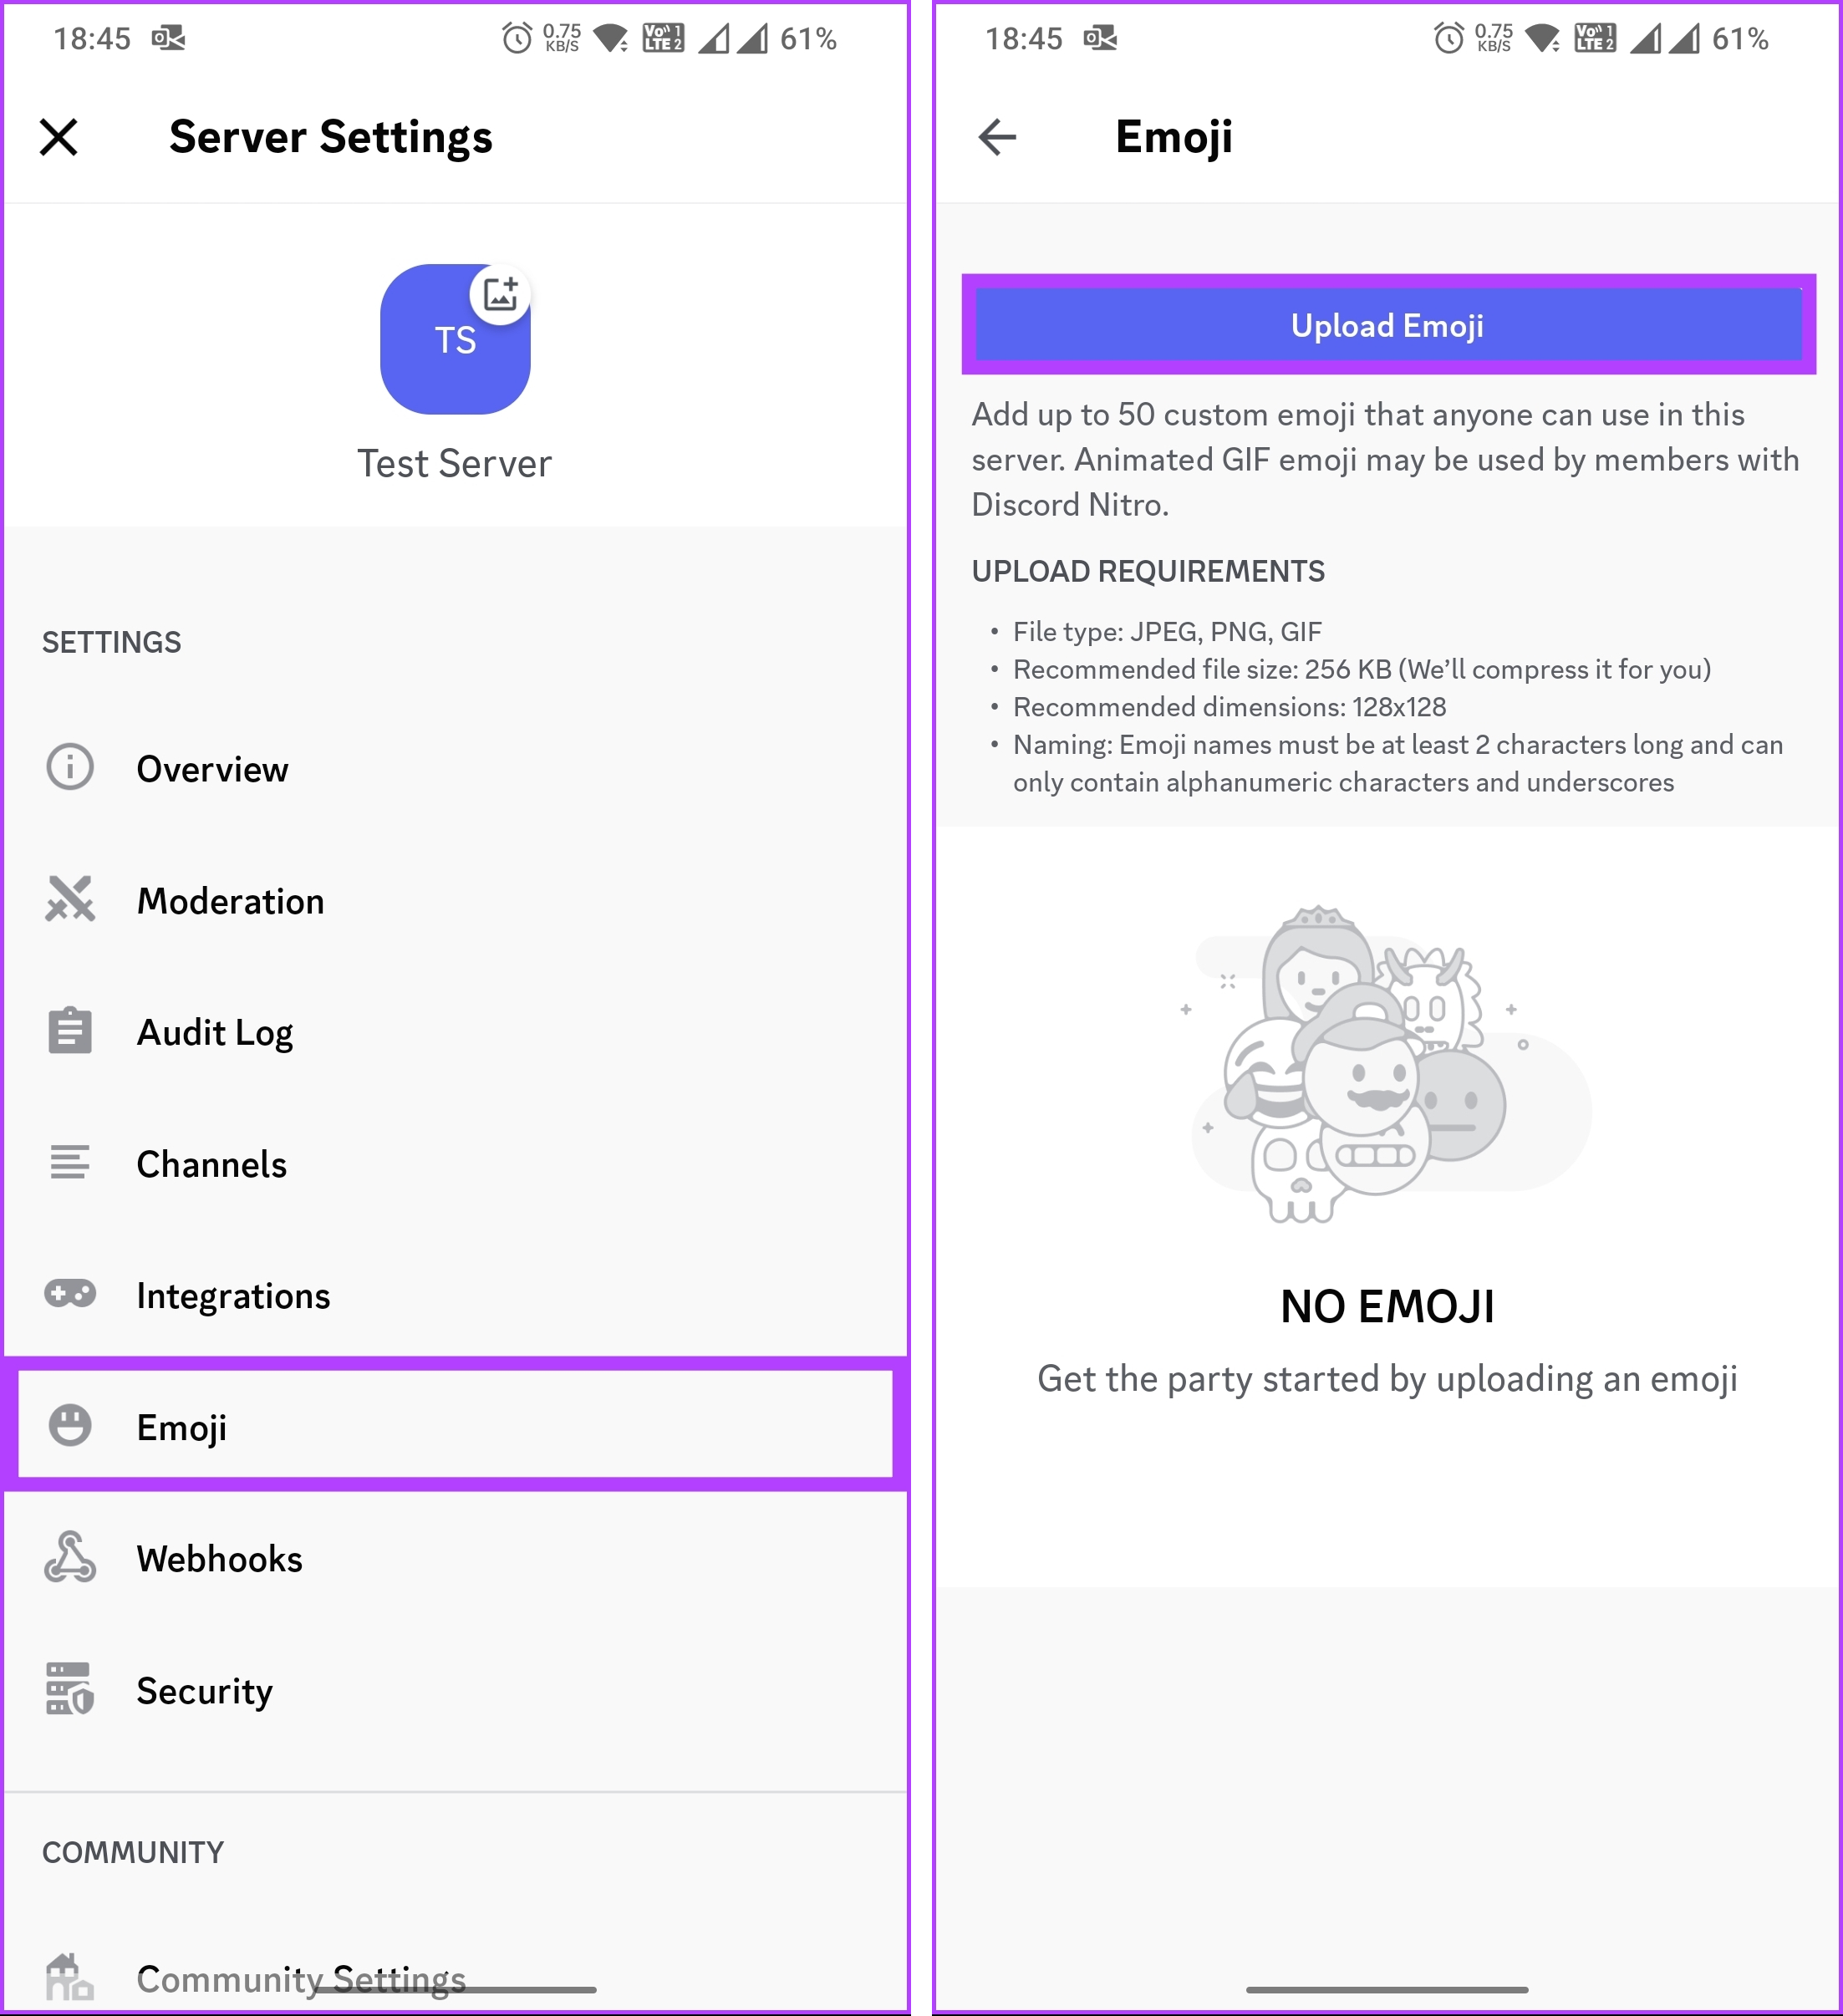
Step 2: From the menu, choose More Options. On the next screen, tap on Settings.
Step 3: In the Server Settings, go to the Emoji menu and choose Upload Emoji to bring up the gallery and add custom emoji.
That’s about it. You have successfully added a custom emoji to your Discord server without hassle. If you have any query we missed addressing in this article, check out the FAQ section below.
FAQs on Adding Emojis to Discord Channel Names
1. Can I use external emojis or only Discord’s built-in emojis?
You can add up to 50 regular and 50 animated custom emojis to a Discord server. This limit ensures that there is a reasonable number of emojis available for use while maintaining server performance and usability. However, if your server is boosted, raising your Boost Level raises the emoji limits.
2. Is there a time limit on Discord emojis?
Once you have uploaded an emoji to a Discord server, there is no specific time limit for how long the emoji will remain available. As long as the emoji is not deleted by a server administrator, it will continue to be accessible to all server members.
Customize Your Channels
Whether you want to set a theme, convey emotions, or simply inject some fun, emojis are a fantastic tool to enhance your Discord community. You now know how to put emojis in Discord channel names and elevate your server’s visual appeal and communication.
Step 2: Tap the hamburger menu at the top-left corner and open Settings.
Step 3: Select Privacy and Security.
Step 4: Tap Phone Number under Privacy.
Step 5: Select Nobody under the Who can see my phone number? menu.
Telegram also offers an option to add exceptions for selected contacts. This will ensure they can still see your number even if you hide it.
Step 1: Head to Privacy and Security in Telegram settings (check the steps above).
Step 2: Select the Phone Number, and under Add Exceptions, tap Always Allow.
After you hide your phone number on Telegram, you can share your username with others to let them find you on the platform.
Use Telegram Anonymously Without Sharing Phone Number on iPhone
Telegram’s excellent privacy options are available on iPhone too. Here’s how to access them.
Step 1: Open Telegram on your iPhone. Go to your account from the bottom right corner.
Step 2: Select Privacy and Security.
Step 3: Tap Phone Number.
Step 4: Select Nobody under the Who Can See My Phone Number menu.
Step 5: Select My Contacts under the Who Can Find Me By My Number menu.
Step 6: As with Android smartphones, you can tap Always Share With to add an exception for select users you’d still like to share your number with when using the Telegram app on iPhone.
Hide Your Phone Number on Telegram for Desktop
Telegram offers native apps on Windows and Mac. You can also tweak your account’s privacy settings from the comfort of your desktop.
Step 1: Open Telegram on Mac.
Step 2: Select the Settings gear.
Step 3: Click Privacy and Security > open Phone Number.
Step 4: Select Nobody under the Who can see my phone number menu.
Restart your computer: The Issue can occur due to a temporary bug or glitch on your computer. In this case you can simply restart your device to fix the problem.
Check for physical damage: Physical damage to your keyboard can affect the proper functioning of the Tab key. To confirm whether this is the case, visit a keyboard test website and press the Tab key to see if it registers on the website. If the website fails to register the Tab key, it is likely damaged. In such situations, the only solution is to take your keyboard to a repair shop.
Another potential reason for the Tab key not working is the TeamViewer application. It may seem peculiar, but certain applications, like TeamViewer, can impact the functionality of keyboard keys. To resolve this issue, you will need to close TeamViewer from the background. Here’s how to do that:
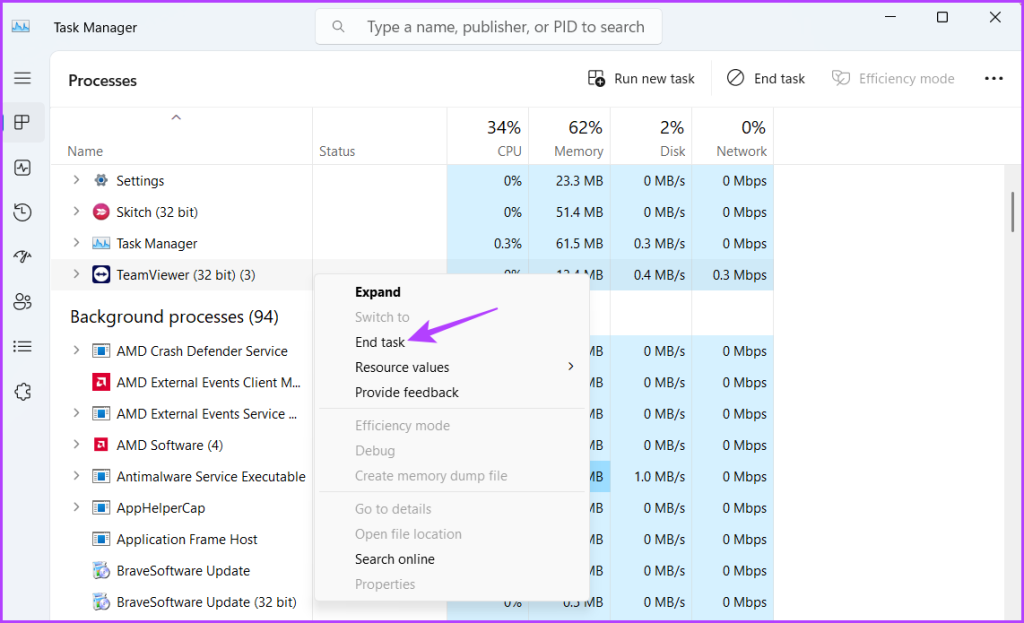
Step 1: Press the Windows + X keyboard shortcut and choose Task Manager from the menu that crops up.
Step 2: Right-click on the TeamViewer and choose End task.
After that, check if you’re still facing the problem. If not, you can uninstall TeamViewer if you don’t actively use it.
Fix 2: Run Hardware and Device Troubleshooter
The Hardware and Device Troubleshooter is a Windows utility you can use to eliminate hardware issues on your computer. You can run this troubleshooter to fix the Tab key not working on Windows 11. Here’s how to run it:
Step 1: Press the Windows + R keyboard shortcut to open the Run tool.
Step 2: Type the following command in the search bar and click the OK button.
msdt.exe -id DeviceDiagnostic
Step 3: Click the Advanced button.
Step 4: Check the Apply repairs automatically box and click Next.
The Hardware and Device Troubleshooter will now look for any available issues. It’ll automatically fix it without much user input if it finds any.
Fix 3: Disable Sticky and Filter Keys
Sticky and Filter Keys are accessibility features that can affect the normal working of keyboard keys. The Sticky Keys feature allows you to use keyboard shortcuts by pressing one key at a time. However, if you’ve mistakenly pressed the Tab key multiple times quickly, the Stick Keys feature can get active and make the Tab key unresponsive.
On the other hand, the Filter Keys feature prevents the keyboard from responding to brief and repeated keystrokes. However, if you mistakenly press the Tab key multiple times quickly, Filter Keys can consider it as false input and make the Tab key unresponsive.
If either of these situations contributes to the issue, you will need to disable Sticky Keys and Filter Keys to resolve the problem of the Tab key not working on Windows 11. Here’s how to do that:
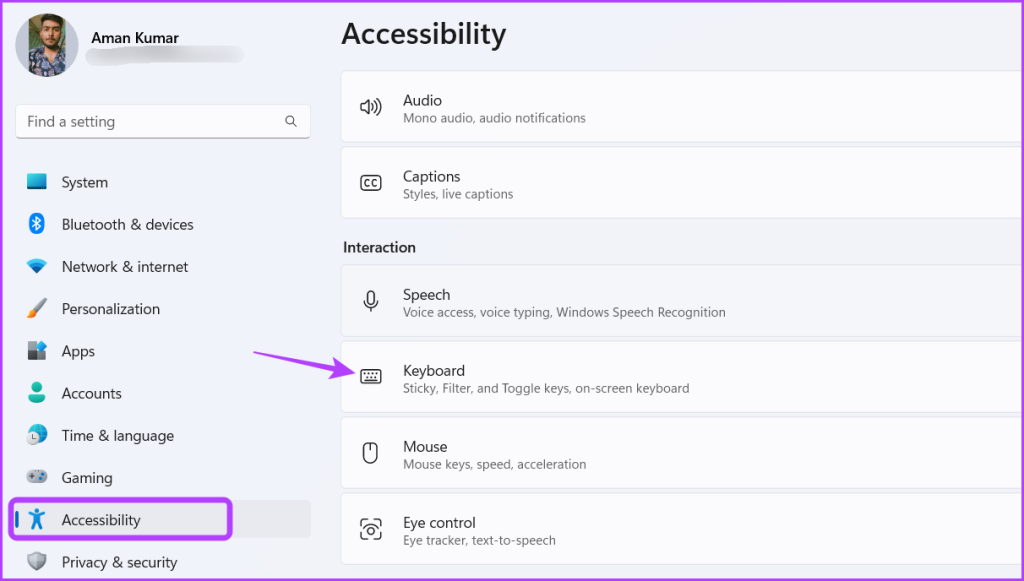
Step 1: Press the Windows + I keyboard shortcut to open the Settings app.
Step 2: Select Accessibility from the left sidebar and choose the Keyboard option from the right pane.
Step 3: Disable the toggle next to the Sticky and FilterKeys.
After that, restart your computer and check for the issue.
Fix 4: Update the Keyboard Driver
Is the Tab button still not working? There may be corruption in the keyboard driver, which could cause the issue. The best way to remove the corruption is to update the keyboard driver. You can do that by following the below instructions:
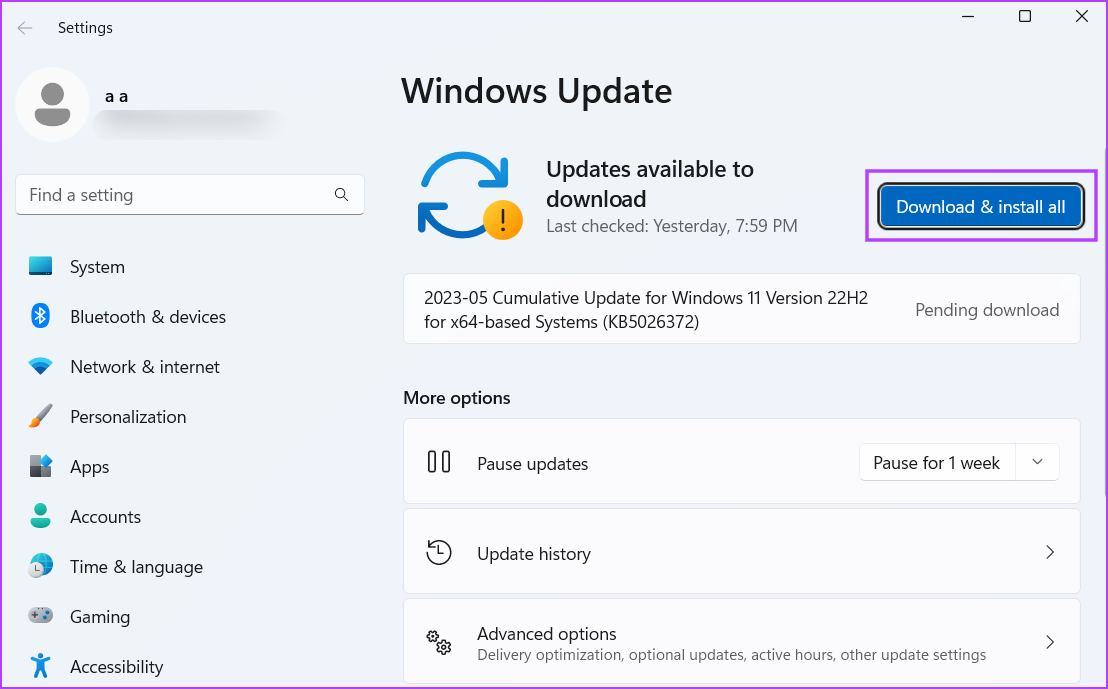
Step 1: Open the Settingsapp, choose Windows Update from the left sidebar and choose Advancedoptions on the right.
Step 2: Select Optional updates. In the following window, you will see available updates for different drivers installed on your computer. If an update is available for your keyboard driver, select it and click Download & install option to update the driver.
Disable Low Power Mode: Is the Auto-Lock setting grayed out on your iPhone? That could happen if you have enabled Low Power Mode on your iPhone. To turn it off, open the Settings app and tap on Battery. Then, turn off the toggle next to Low Power Mode.
Install iOS updates: It’s always a good idea to keep your iPhone updated to the latest iOS version. If the problem you encounter is due to a bug, installing the latest iOS updates will help.
Fix 1: Check Auto-Lock Settings
Another thing you should do is ensure that the Auto-Lock feature is enabled on your iPhone. Here’s how to do it.
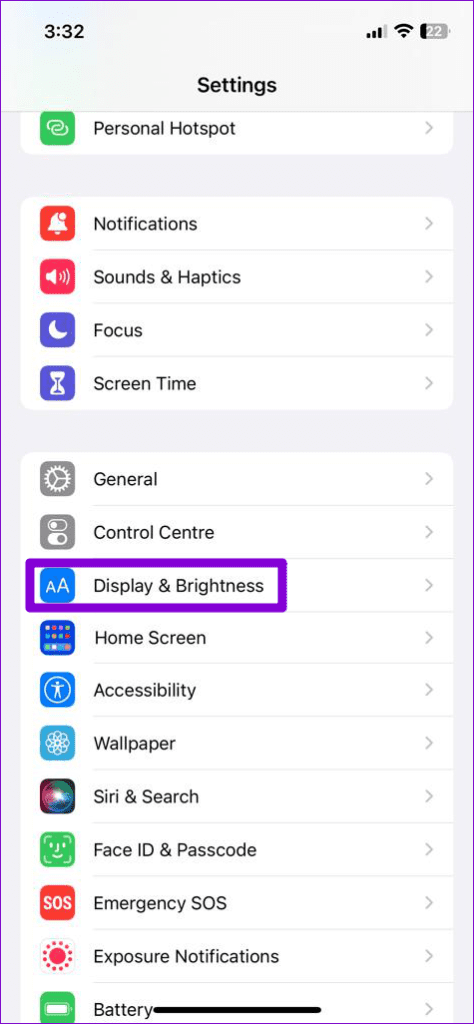
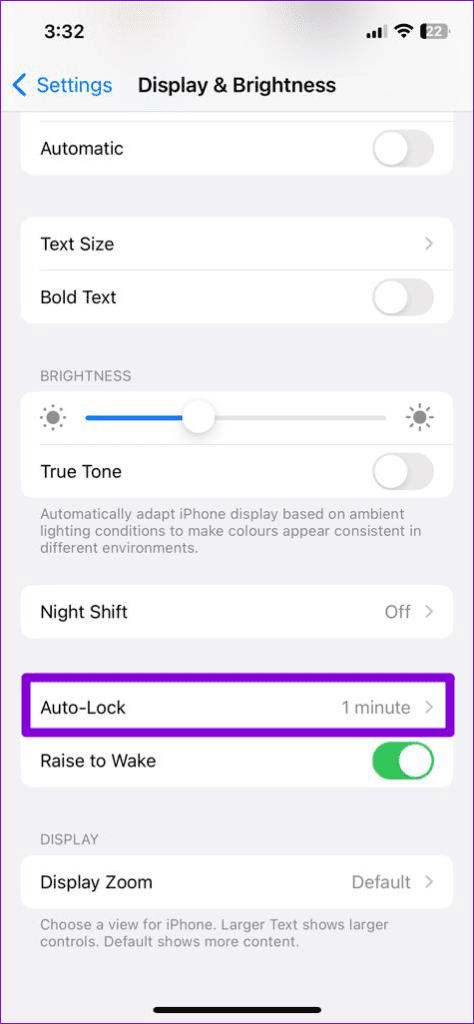
Step 1: Open the Settings app and scroll down to tap on Display & Brightness.
Step 2: Tap on Auto-Lock and select your preferred duration from the following menu.
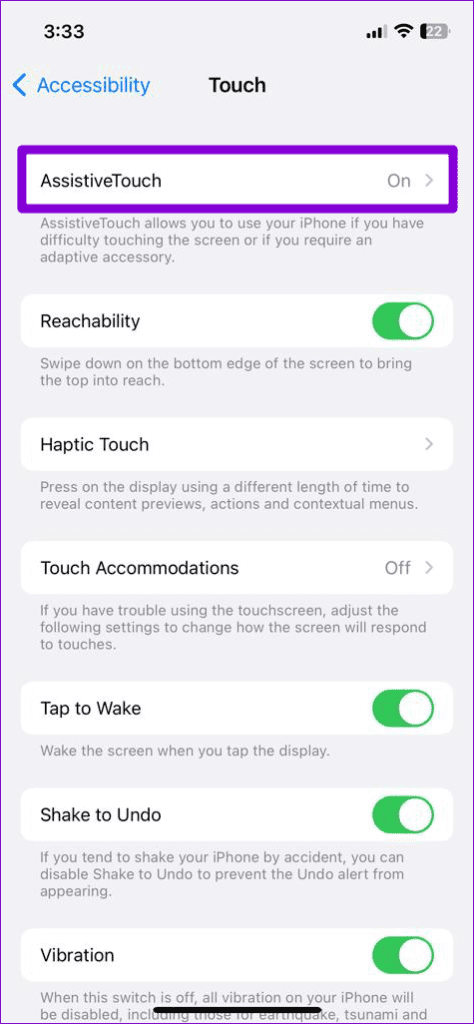
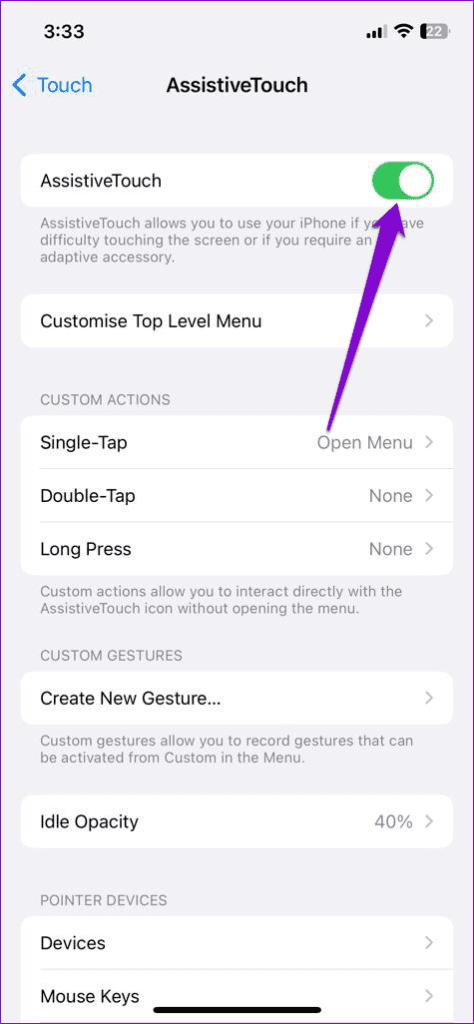
Fix 2: Turn Off AssistiveTouch
AssistiveTouch is a useful accessibility feature on your iPhone that lets you perform several potent tasks quickly. However, this feature can sometimes interfere with your iPhone’s ability to automatically lock the screen after inactivity. You can try turning this feature off to see if that helps.
Step 1: Open the Settings app on your iPhone.
Step 2: Tap on Accessibility and select Touch from the following screen.
Step 3: Tap on AssistiveTouch and turn the toggle off in the following menu.
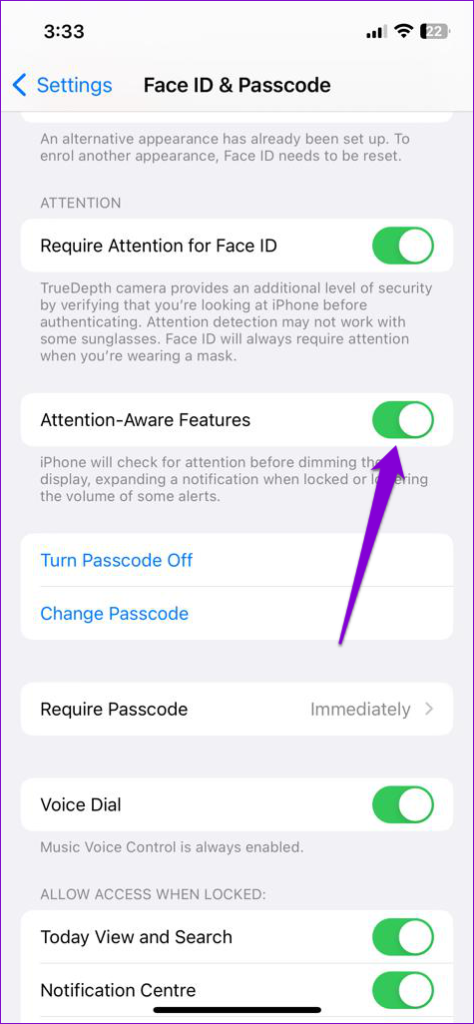
Fix 3: Turn off Attention-Aware Features
Attention-Aware features on your iPhone use your front camera and sensors to detect when you are looking at the device. When enabled, these features can prevent the screen from dimming or the device from auto-locking when you are looking at the screen. This can give the impression that the Auto-Lock feature is not working on your iPhone.
To avoid any confusion, disable Attention Aware features on your iPhone using these steps:
Step 1: Open the Settings app and scroll down to tap on Face ID & Passcode.
Step 2: Turn off the toggle for Attention-Aware Features.
Fix 4: Set Up the Passcode Again
If the problem persists, try disabling the passcode feature and setting it up again. Several users on the Apple forums reported fixing the issue with this trick, so you can give this method a shot.
Step 1: Open the Settings app on your iPhone.
Step 2: Scroll down to tap on Face ID & Passcode and enter your device passcode.
Step 3: Choose the Turn Passcode Off option and enter your passcode to confirm.
Step 4:Restart your iPhone, open the Settings app again, and head to Face ID & Passcode. Select Turn Passcode On and set up your passcode again.
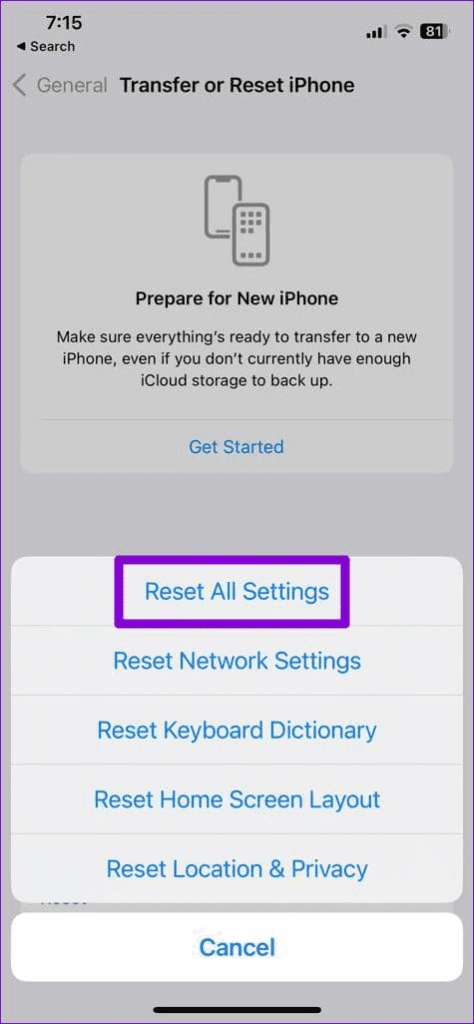
Fix 5: Reset All Settings
Finally, if none of the above tips help, try resetting all the settings on your iPhone. This won’t affect your personal data, but it will restore all custom settings back to their default values.
Step 1: Open the Settings app and go to General > Transfer or Reset iPhone.
Step 2: Tap on Reset and select Reset All Settings from the resulting menu.
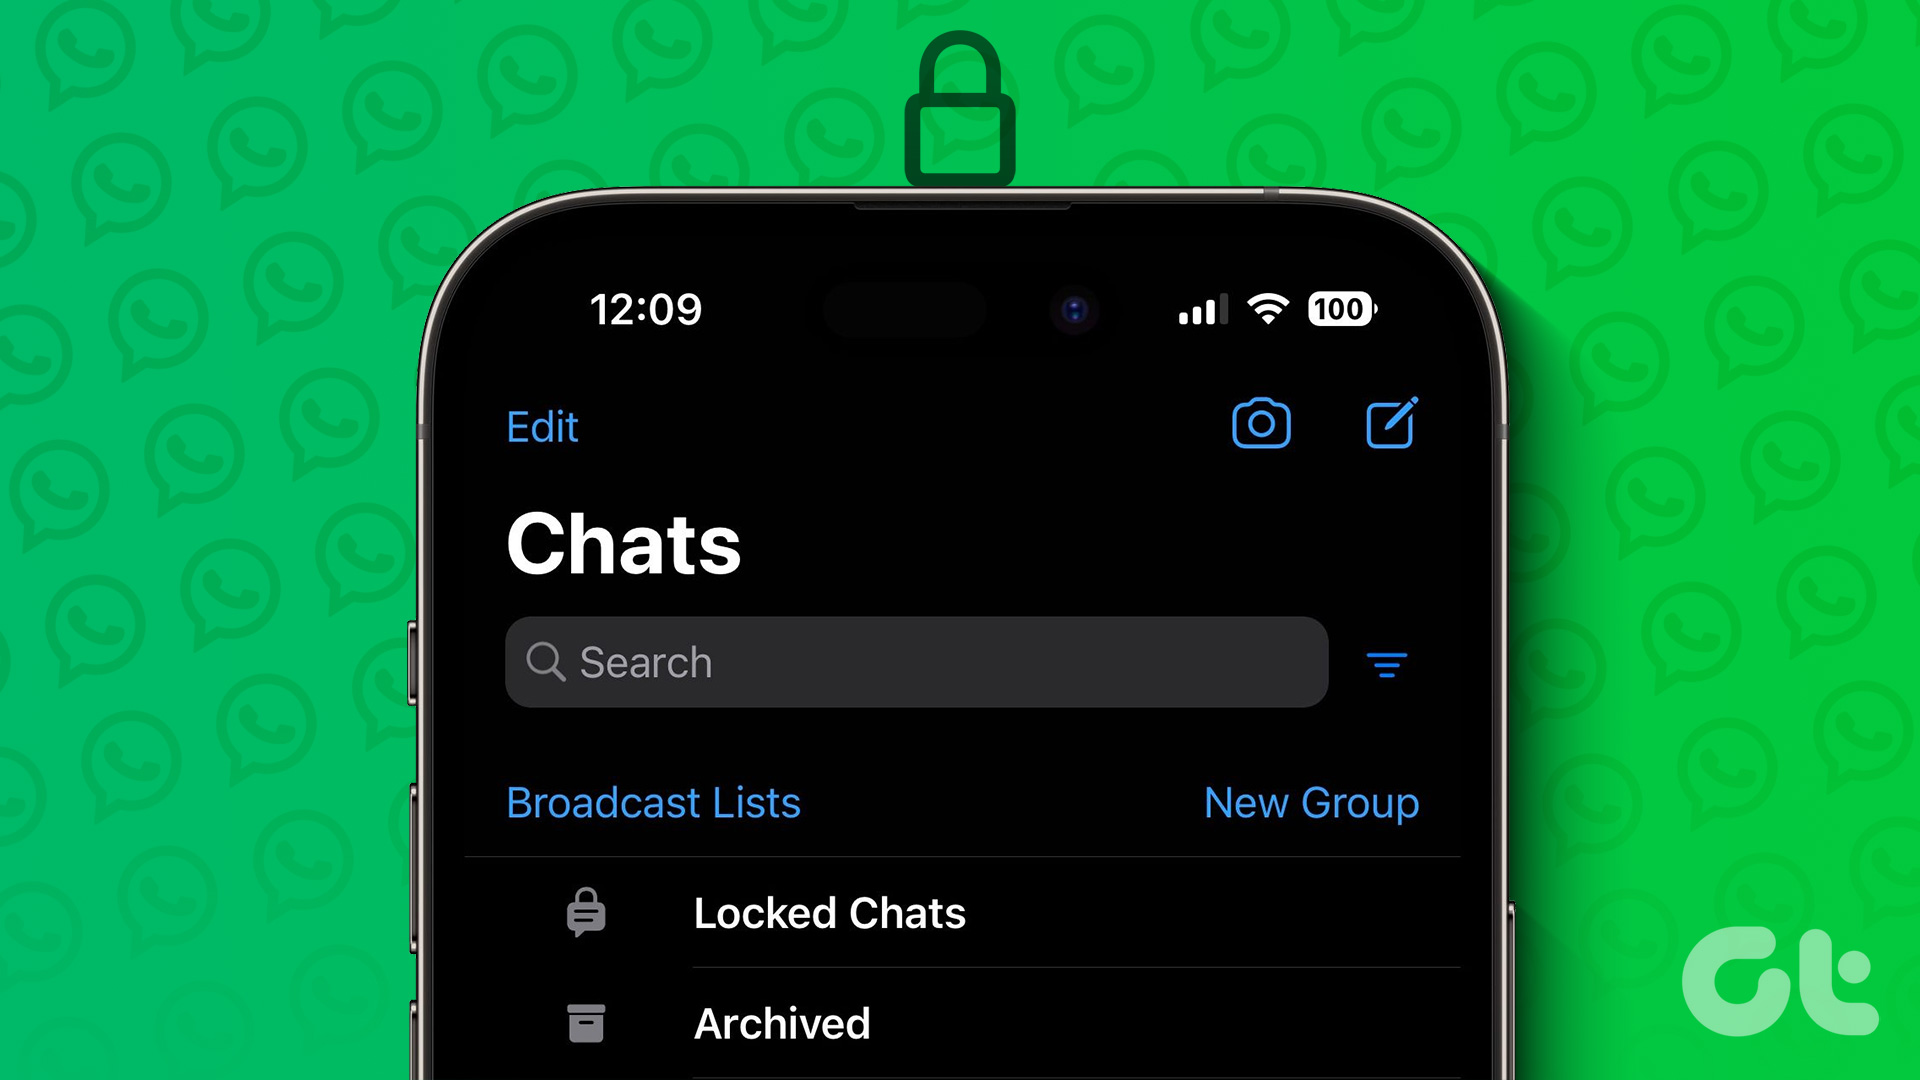
Before proceeding with the steps, we want to highlight some important aspects. To lock your WhatsApp chats on your iPhone, you need to ensure the following
You are using the latest version of WhatsApp on your iPhone. You don’t need to sign up for the WhatsApp Beta program to use this feature.
You need to enable Face ID or Passcode on your iPhone to lock a personal chat in WhatsApp. If you can’t follow the steps below because you don’t see the feature, ensure that you have enabled Face ID for WhatsApp.
How to Lock Individual Chat in WhatsApp on iPhone
Let us start with the steps to show you how to lock Individual chats in WhatsApp. If there’s an individual conversation that you want to remain private, you can use this feature in WhatsApp on your iPhone. Here’s how to use it.
Open WhatsApp > Tap the contact name > Tap on Lock Chat > Authenticate using Face ID or Passcode.
Just so you know, WhatsApp won’t lock the chat on your Linked Devices.
How to Lock WhatsApp Group Chats on iPhone
Like individual chats, you can also enable Group Chat Lock in WhatsApp on your iPhone. This is also applicable if you create a WhatsApp Group with yourself. Here’s how to enable it.
Open WhatsApp > Tap the group name > Tap on Lock Chat > Authenticate using Face ID or Passcode.
Step 1: In the second toolbar above the spreadsheet, click on the clock icon at the top right section.
Alternatively, go to File in the menu bar > select Version History > See Version History to reach the next step.
A sidebar will open, showing all the different versions of the spreadsheet, as well as when and by whom it was saved.
Step 3: If you click on a version, the spreadsheet will open, highlighting all the additions and changes made to the spreadsheet.
You can also expand the version and view each activity in the document before it was saved. Further, you can also see the date and time when the activity or version was saved.
Tip: In addition to the above method, you can also use the keyboard shortcut ‘Ctrl + Alt + Shift + H’ on Windows or ‘Command + Option + Shift + H’ on Mac to access the edit history feature in Google Sheets.
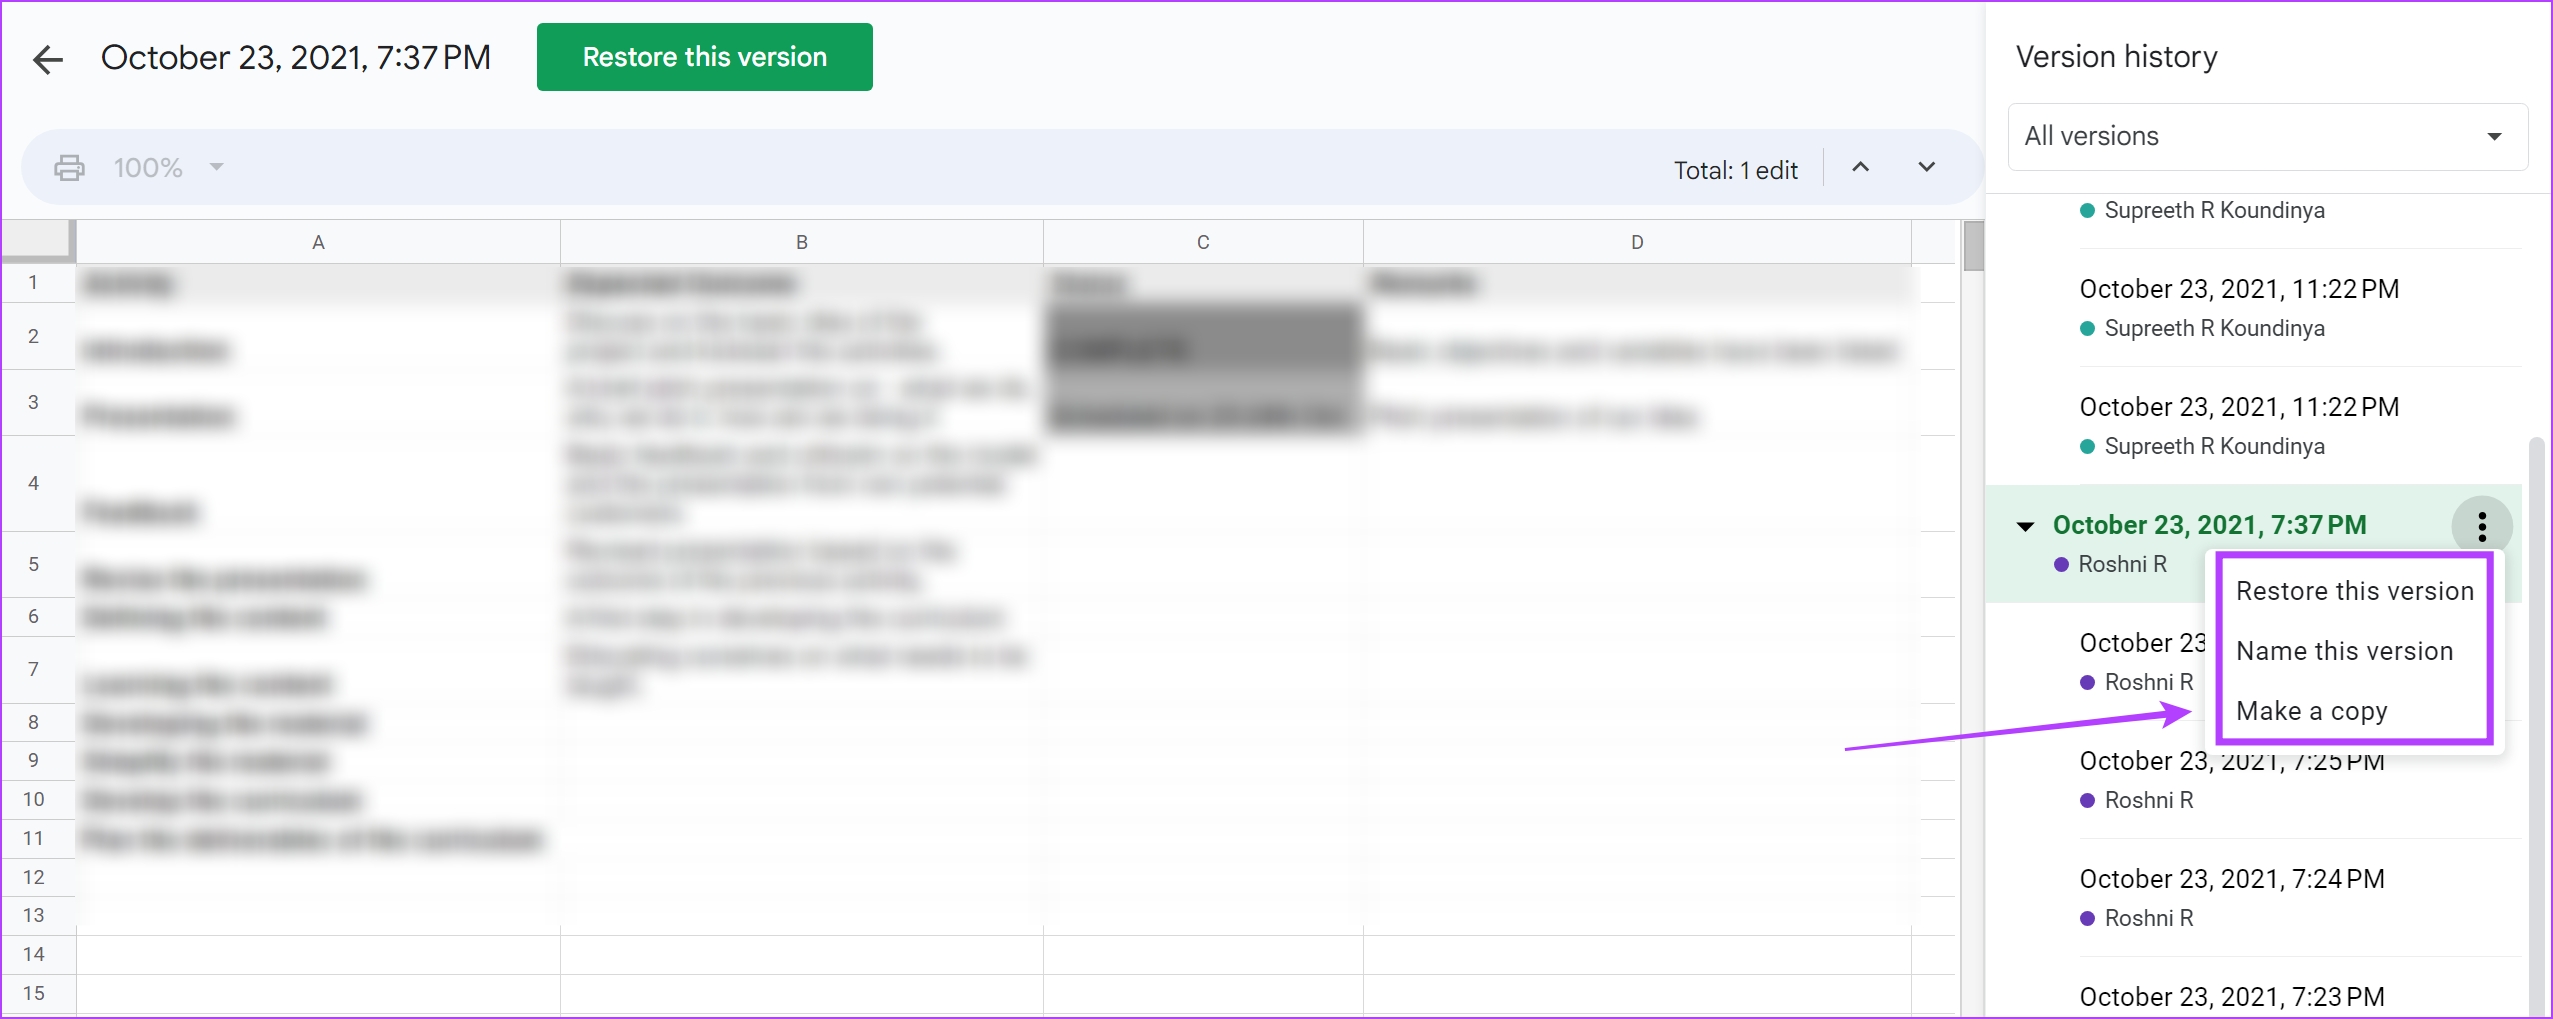
Restore to a Previous Version in Google Sheets
To restore your spreadsheet on Google Sheets to a previous version, click the three-dot icon next to a version and select Restore this version.
The latest version of the document will be changed with the data and content from the previous version.
However, you can undo this action by returning to the last version before restoring the document with an earlier version. You can do it in the same version history tab.
If you want to generate a separate spreadsheet from a version, you can use the Make a Copy option. A new spreadsheet with the contents of that particular version will then appear.
We recommend naming each version in Google Sheets to track the version history. This can help you collaborate and communicate better in a Google Sheets document.
Step 1: Click on File at the top of the spreadsheet.
Step 2: Select Version history, followed by Name Current Version. Add a name to the current version of your Google Sheets document.
However, if you want to name an older version of the document :
Step 1: Click on Version history > See version history.
Step 2: In the version history sidebar, click on the three-dot icon next to the version you wish to rename and select Name this version.
Check Individual Cell History on Google Sheets
If you want to check the changes made over time for an individual cell in a Google Sheets document, here’s how to view the individual cell history in Google Sheets.
Step 1: Right-click on a cell in Google Sheets.
Step 2: Click on Show edit history.
You can now see the edit history of a specific cell. Navigate using the buttons in the box to view all the previous edits.
Delete Version History on Google Sheets
While Google Sheets does not allow you to delete the version history, you can create a new duplicate of a spreadsheet document, which will erase the history. However, the version history will remain on the source document unless you delete the document itself.
Step 1: Click on File.
Step 2: Click on Make a copy.
The duplicate copy version of the spreadsheet without the version history will pop up in the new tab.
View Google Sheets Activity on iPhone and Android
The Google Sheets app on iPhone and Android does not display the version history in detail. However, you can still see the activity and who made the changes when on the document.
Step 1: Open the Google Drive app on your iPhone or Android phone.
Step 2: Find and click on the three dots icon next to the document you wish to access.
Step 3: Click on Details and Activity. You can see all the activities in the Google Sheets document.
Unable to View Version History? Here’s What You Can Do
Always ensure to enable the Show Changes option before creating the Google Sheets document to see the edit history and activity. Here’s how to do that.
Step 1: In the Google Sheets document, click on File > Version history > See version history.
Step 2: Ensure you have checked the box for Show Changes.
Further, ensure that you have access to the Google Sheets document as an Editor – only then can you track the version history.
By default, an English dictionary will be downloaded onto your Kindle. If you want to explore more dictionaries of different languages, here’s how to download and add dictionaries on your Kindle reader.
Furthermore, doing this helps you use the dictionary even when you are reading a book offline.
Step 1: Connect your Kindle to the internet and open the library. Scroll down to find the Dictionaries section.
Step 2: You will see a collection of dictionaries. Select the one you want to use and tap on the three dots icon.
Step 4: Tap on Download. The dictionary will now be downloaded on your Kindle reader.
Select and Add Default Dictionary on Kindle
Once you download the new dictionary, you can use it if you make it the default dictionary for that particular language. Here’s how:
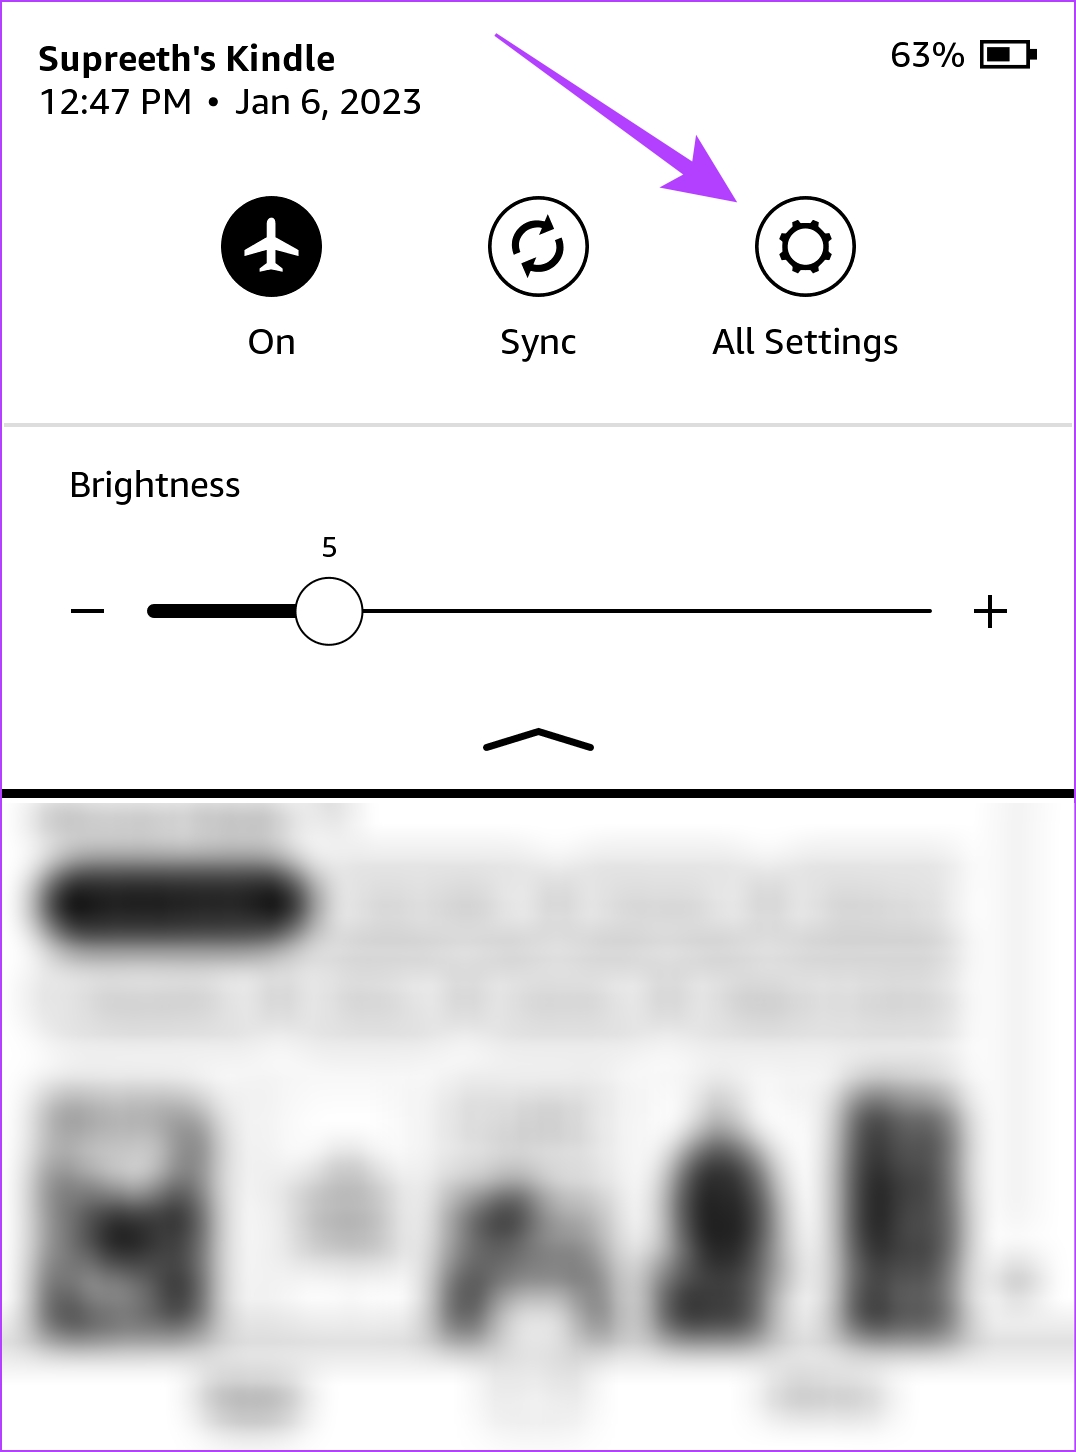
Step 1: Tap anywhere on the screen and select the downward-facing arrow on the topmost section of the screen.
Step 2: Tap on All Settings.
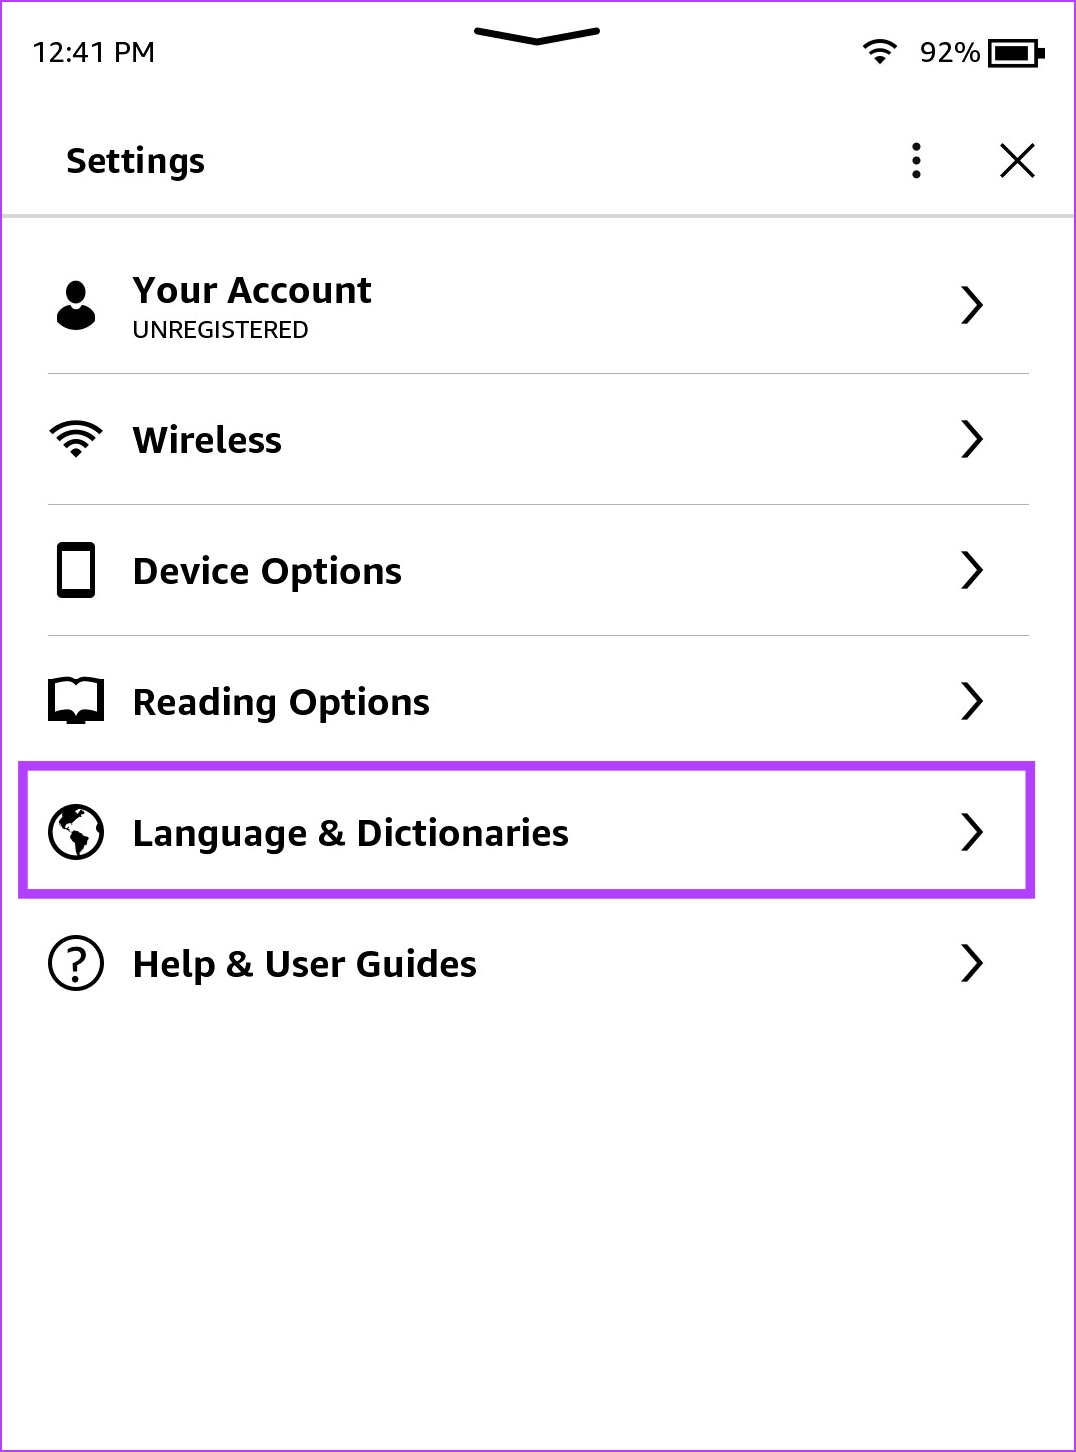
Step 3: Select Language & Dictionaries > Dictionaries.
Step 4: Tap on the language you downloaded. Select the dictionary you want to set as default.
Now, you can use the selected dictionary while reading a book on your Kindle ebook reader.
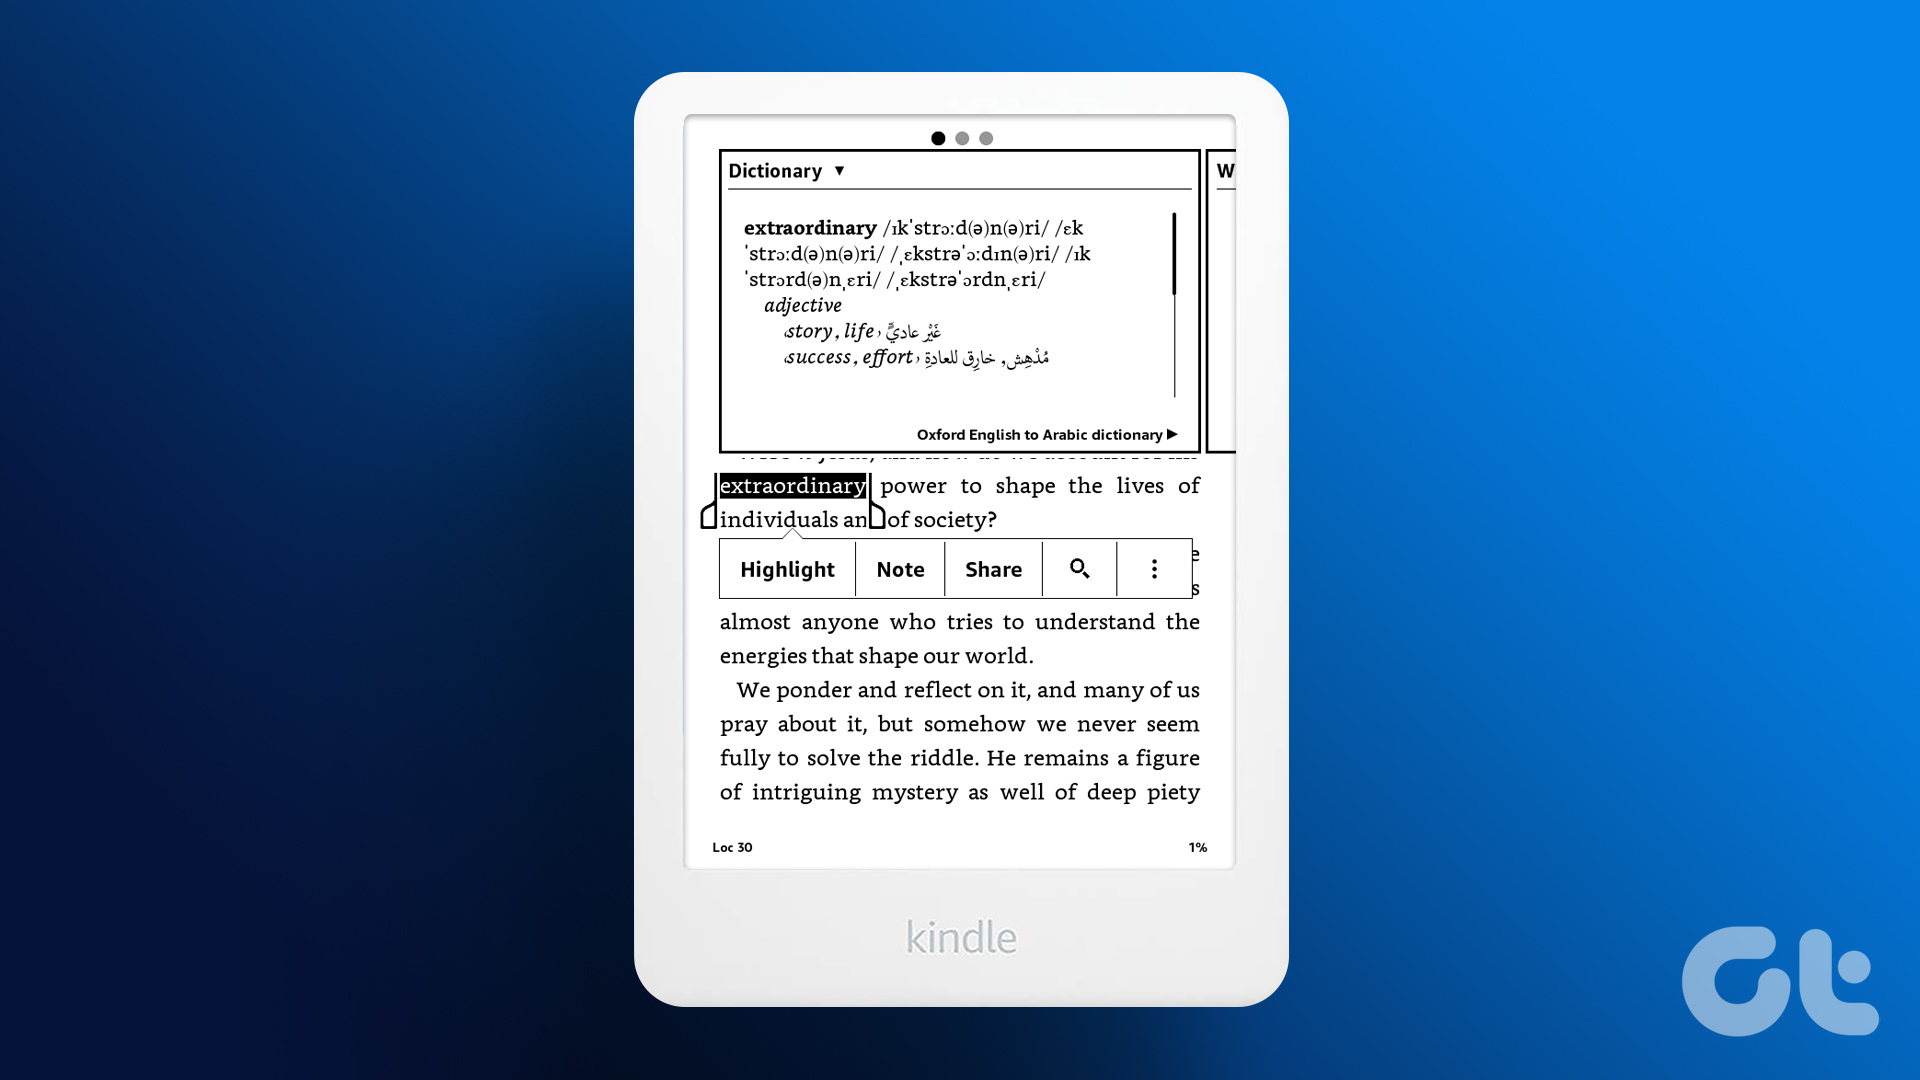
Look Up the Meaning of Words Using a Dictionary on Kindle
Now that we know how to download dictionaries on our Kindle reader, long-tap on the word, and the dictionary will pop up. It is as easy as that. However, if you are facing any issues, refer to our guide to fix the Kindle dictionary if it isn’t working.
How to Change the Dictionary on Kindle
If you want to switch to a different dictionary within the same language, here’s how to do that.
Step 1: Tap on the name of the dictionary under the meaning of the word.
Step 2: Select the dictionary you want to switch to. However, you must ensure that the dictionary you plan to switch to has already been downloaded onto your Kindle reader.
How to Use Wikipedia on Kindle
A dictionary will not have meanings for proper nouns and other words that may require more context. Therefore, Kindle provides you an option to look up the meaning of the word on Wikipedia. Here’s how to use the feature.
Step 1: Connect your Kindle to the internet. Long-tap on the word you want information for.
Step 2: You will see the dictionary meaning, if present. Swipe left to the second tab.
You will see the explanation for the word on Wikipedia.
How to Use Translate on Kindle
If you want to translate a word on your Kindle to another language, there’s an inbuilt translation feature too. Here’s how to use it.
Step 1: Connect your Kindle to the internet. Long-tap on the word you want to translate.
Step 2: The first tab will be the dictionary tab. Swipe left twice and go to the third tab – which is the translation tab.
Step 3: Select the language you want to translate the word to from the drop-down menu.
You will see the translation result.
How to Use Word Wise on Kindle
Word Wise is a feature in books purchased on the Amazon Kindle Library. It automatically detects complex words and adds meaning on top of them. Therefore, you do not need to manually long tap on the word to find out its meaning. Here’s how to enable Word Wise on your book.
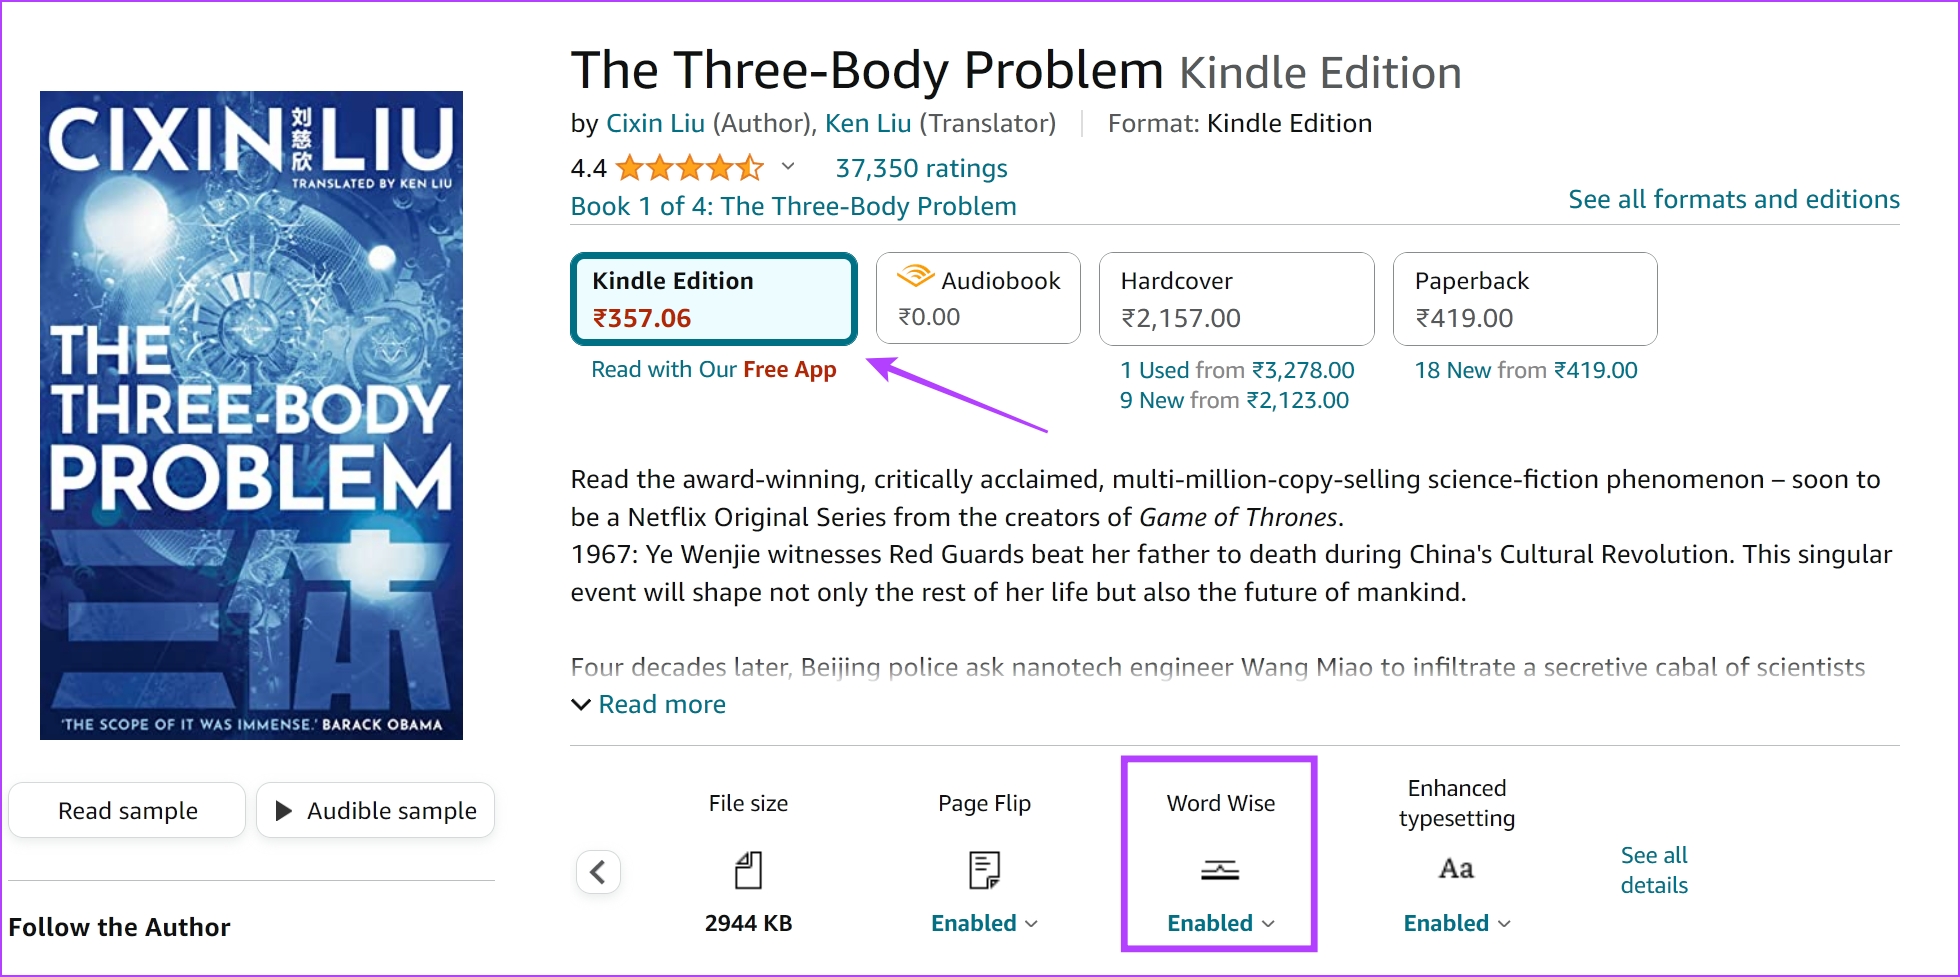
Make sure the purchased book has the Word Wise feature. You can check if the Kindle edition of the book has Word Wise or not from the purchase page on Amazon.
Step 1: Open the book, and if your book supports Word Wise, you will see the option at the bottom left corner. Tap on it.
Step 2: Tap on Show. Adjust the slider for the number of words you want to see meanings for.
Fewer Hints mean less number of complex words will have meanings attached. More Hints mean more complex words will have meaning attached.
Once Word Wise is enabled, here’s what a page looks like. You can tap on the word if you want the meaning to be elaborated.
A smartwatch can help you avoid phone addiction and stay on top of your fitness game. However, most smartwatches need to be charged every night. That is partly why we have compiled a list of the best smartwatches with long battery life.
Amazfit Bip 3 Pro is a superb entry-level smartwatch. To its credit, the device uses a 1.69-inch color display that can get reasonably bright. Plus, the wearable also comes with a slew of enticing features.
These include a SpO2 monitor and support for continuous HR tracking. The smartwatch can also track myriad activities, so you should get clear insights into the calories burned while swimming, running, walking, and more. Speaking of which, the watch is also water-resistant to up to 5 ATM.
What We Like
Affordable
Beefy battery backup
Comes with SpO2 Monitor
What We Don’t Like
Some users have reported syncing issues with the wearable
If you’re looking for an affordable, rugged smartwatch that can go days off on a single charge, then you should check out the Amazfit T-Rex 2. The wearable in question comes with a 1.39-inch AMOLED display and supports Always-on functionality.
This wearable is super rugged and comes with MIL-STD-810G certification. Additionally, the watch is water resistant, so you can go swimming or kayaking with the device strapped to your wrist. That’s not all, as the T-Rex 2 can also track up to 150 different sports. It even allows buyers with a penchant for trekking to import routes.
Garmin is a household name in the wearable industry, and the company’s Vivoactive 4 is a fantastic smartwatch for the masses. For starters, you can download a slew of third-party apps on the wearable, including music streaming services like Spotify and Amazon Music. The device even comes with built-in storage.
As a result, you can download your favorite workout playlists, pair the watch to your Bluetooth headphones and leave your smartphone behind when you’re out for a run. It even ships with built-in GPS functionality. Add to that, the watch can track your sleep cycle, as well as your blood oxygen saturation levels.
Right off the bat, you should know that the Garmin Instinct 2 Solar costs a pretty penny. That said, the device more than makes up for it with its impressive features. Most notably, the watch supports solar charging, so you don’t ever have to plug in the wearable.
Apart from this, Instinct 2 Solar comes with a transflective, monochrome display that offers a resolution of 176 x 176 pixels. For the uninitiated, a transflective screen is legible with and without backlighting. Consequently, you should be able to see the content on the screen even under harsh lighting. On the downside, the wearable doesn’t have a touchscreen display.
What We Like
Unlimited battery life, thanks to solar charging
Features an Altimeter and Barometer for precise tracking
Rugged
What We Don’t Like
Expensive
No touchscreen
Polar Grit X Pro: Best Overall
GPS: Yes | Display: 1.2-inch MIP Display
Weight: 0.11 lbs | Water Resistant: Yes, Upto 10 ATM
If you’re looking for the ultimate fitness wearable, you’ll find plenty to like about the Polar Grit X Pro. The wearable comes with a plethora of features and sensors, including an altimeter, barometer, and magnetometer compass. Needless to say, the watch is a godsend for outdoorsy folks.
Speaking of the outdoors, you should know that the Grit X Pro is extremely rugged too. In fact, the wearable comes with sapphire glass layered over the display. The unit even comes with MIL-STD-810G accreditation. As such, it can hold its own in extreme weather conditions. As for the battery backup, the wearable can go up to seven days on a single charge.
There are two types of restrictions on Facebook. The company limits your account temporarily or permanently blocks you. A temporary restriction usually lasts 48 hours or one week in specific cases. During such a restriction, you can’t perform certain actions, post comments, share videos, or like existing posts. Overall, your account turns into a read-only mode.
Reasons for Facebook Account Restriction
Sending Many Friend Requests to Unknown People: If you send dozens of friend requests (especially to unknown people), Facebook may detect it as unusual activity and restrict your account.
Spamming on Anyone’s Profile: If you like too many posts or write several comments, Facebook may flag your account for misusing the platform.
Connecting Your Facebook Account With Third-Party Services: Several third-party services let you automate your Facebook account. However, be careful before connecting your Facebook account to unknown apps.
Posting Hateful or Inappropriate Content: Facebook comes with strict community guidelines for a healthy conversation on the platform. If Facebook moderators find your content violating the company terms and conditions, you are looking at a temporary restriction. If you continue to post bogus content on the platform (once the restriction is lifted), Facebook may permanently ban your account.
Using Fake Name or Impersonating to be Someone: Avoid impersonating someone on Facebook. It bans your account and lands you in legal trouble. It’s one of the infamous ways to scam people on the platform.
Breaking Facebook’s Commerce Policies: Facebook’s e-commerce platform, the Marketplace, doesn’t let you sell certain products and services on the platform. If Facebook catches you selling illegal items, medicines, alcohol, and other banned items on Marketplace, the company will permanently ban your account. It’s also one of the reasons why Facebook Marketplace isn’t working for you.
How Long Will My Facebook Account Be Restricted
Facebook doesn’t directly restrict your account. It first warns you of strikes. Here’s what these strikes mean:
One strike: It’s a warning from Facebook to stop misusing the platform.
Two to six strikes: Limits you from posting in groups for some time.
Seven strikes: Limits your account for 24 hours. You can’t share comments, post pictures, or like other content.
Eight strikes: You can’t create new content for 72 hours.
Nine strikes: You get a 7-day restriction from creating new content.
Ten or more strikes: You can’t create new content for 30 days.
How to Unrestrict on Facebook
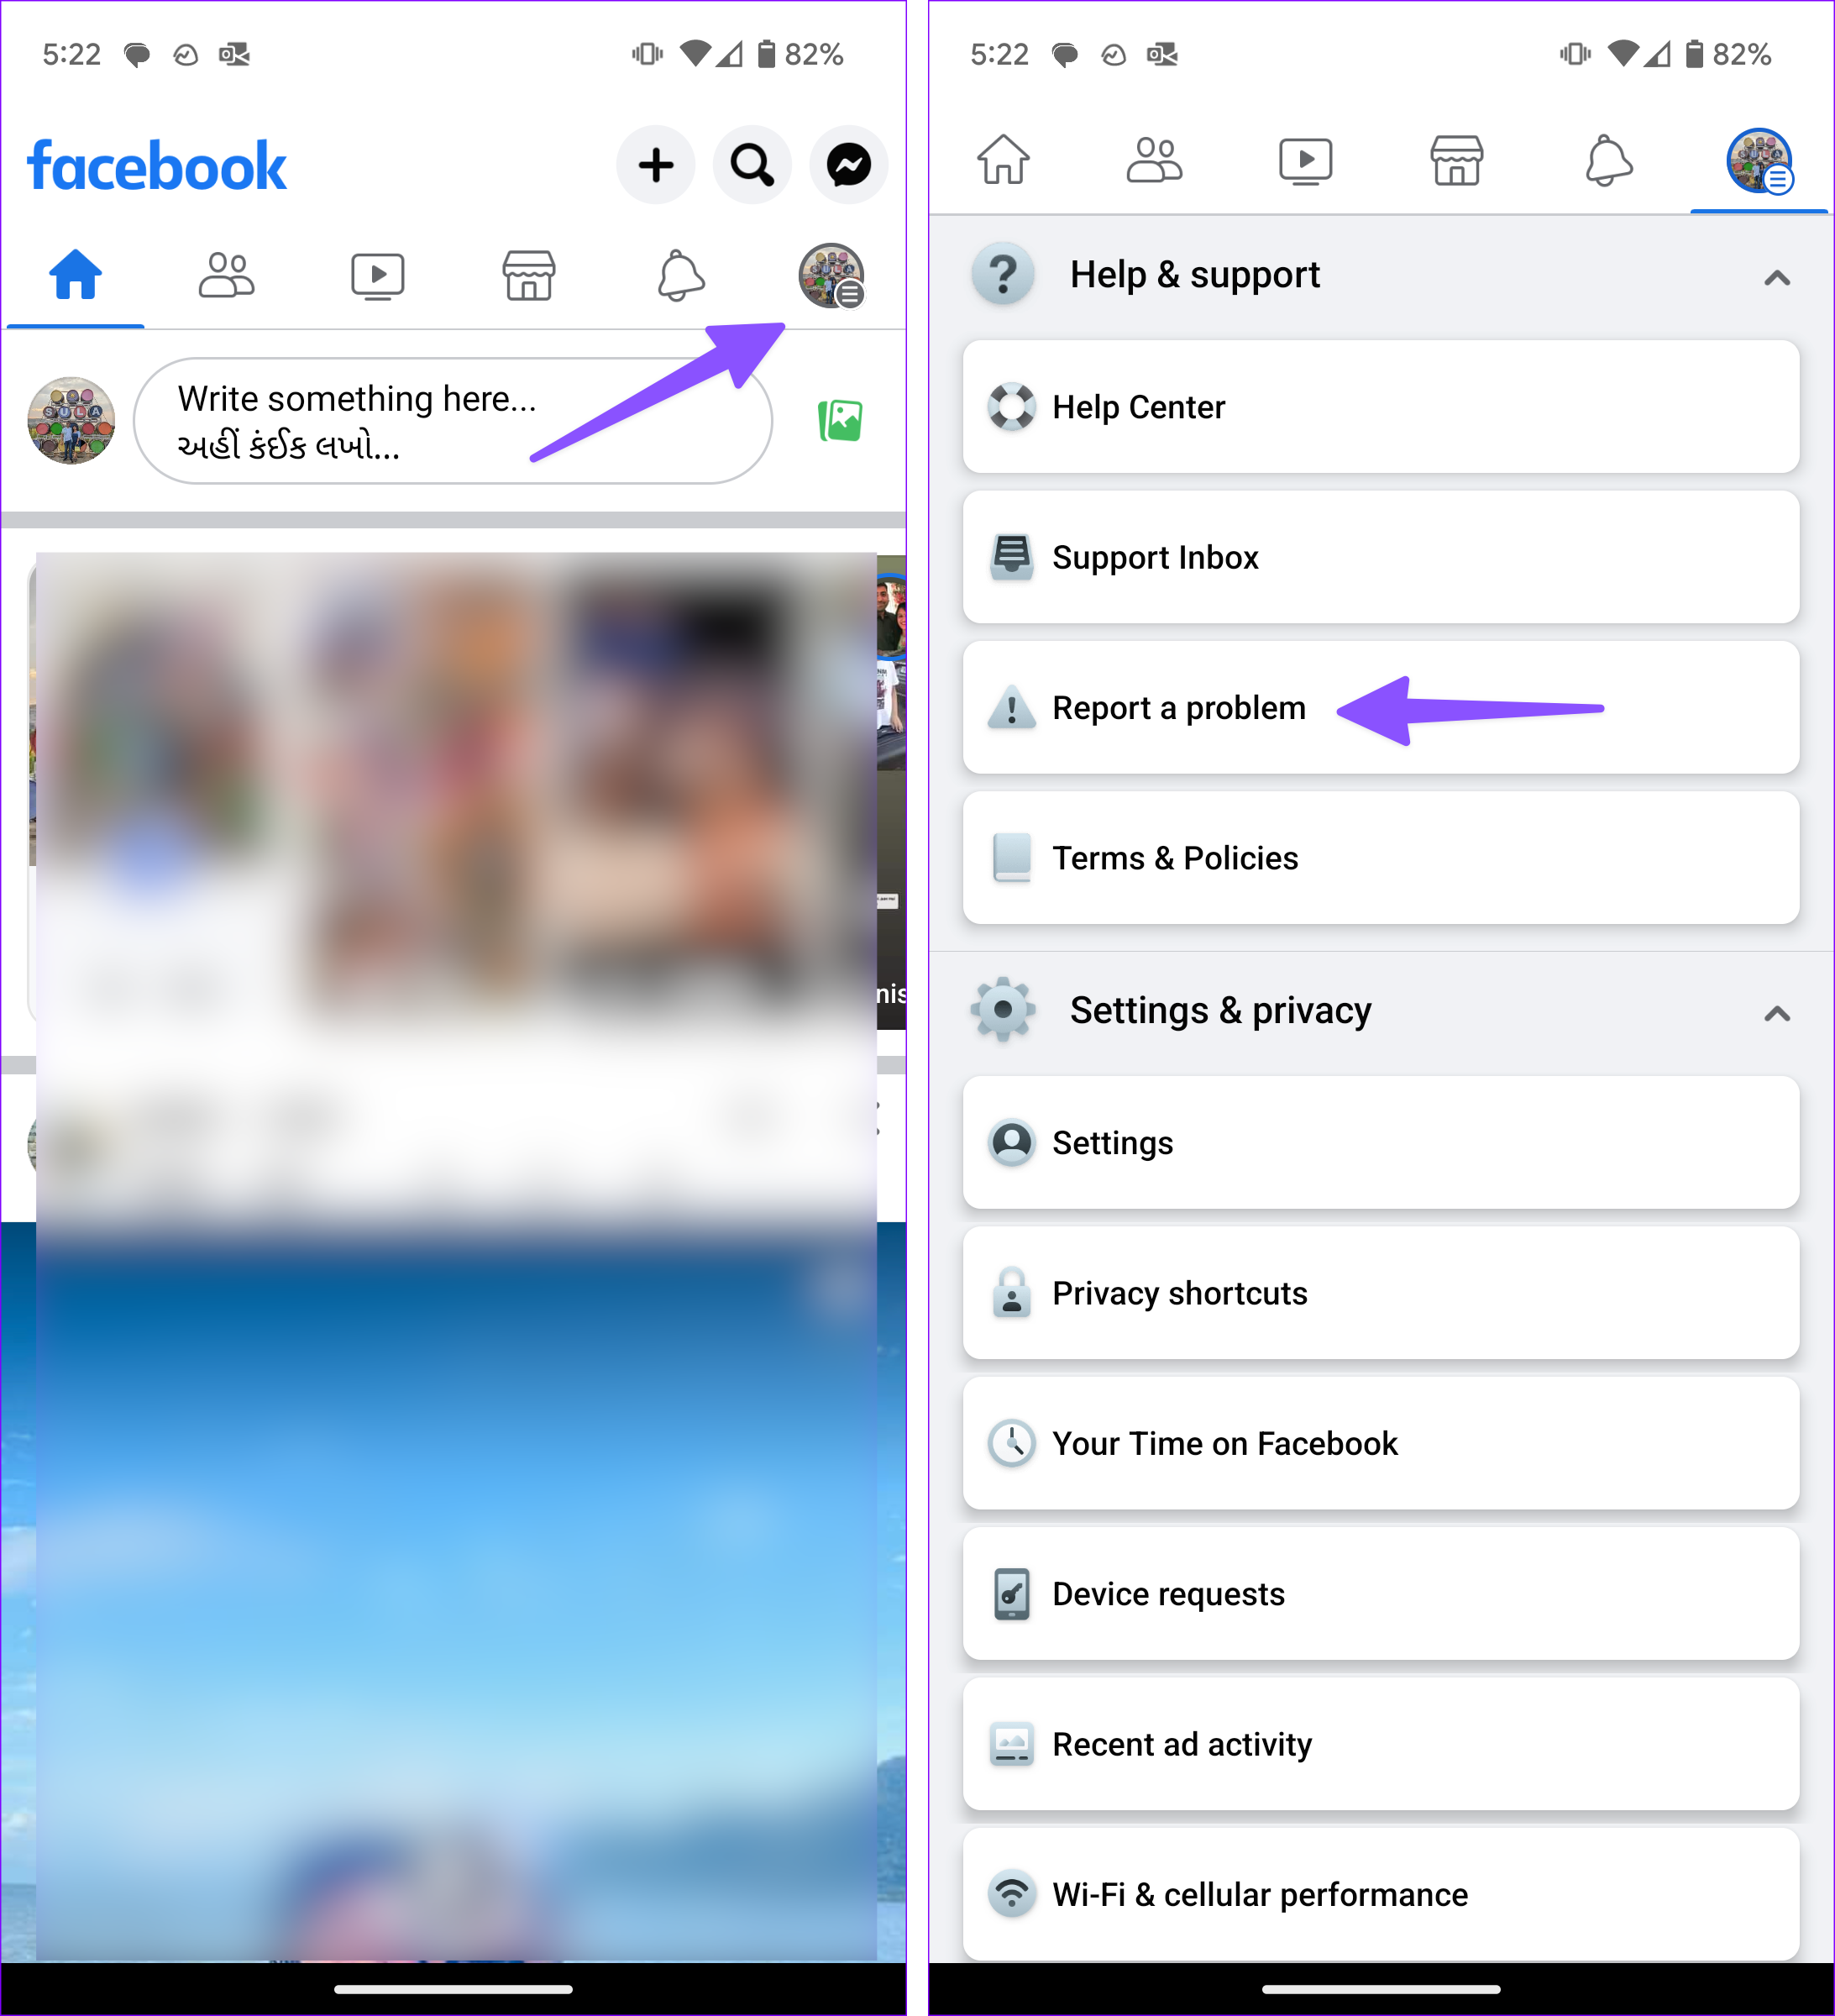
Step 1: Open Facebook and go to your account.
Step 2: Expand Help & support > Report a problem.
Step 3: Include complete logs and diagnostics in your report.
Step 4: Select the problem type, attach a screenshot, and write down the issue.
It may take a day or two for Facebook to investigate and lift restrictions from your account.
Facebook restricting your account can give a significant blow to your social strategy. Once the situation settles to normal conditions, the company lifts the restriction for everyone.
Configure File Explorer to show hidden items: If some of your files and folders are missing from the USB drive but the storage space is still being used, they are likely hidden. To reveal them, configure File Explorer to show hidden items.
Search for the missing file or folder: Manually locating a specific file or folder on your USB drive can be challenging if your storage drive contains many files and folders. You can try using File Explorer’s search bar to locate the missing file or folder and see if it works.
Fix 1: Run the Check Disk Utility
CHKDSK (short for Check Disk) is a handy utility on Windows that can automatically detect and fix issues with your storage drives. You can run this tool to resolve any issues with your drive and recover missing files and folders.
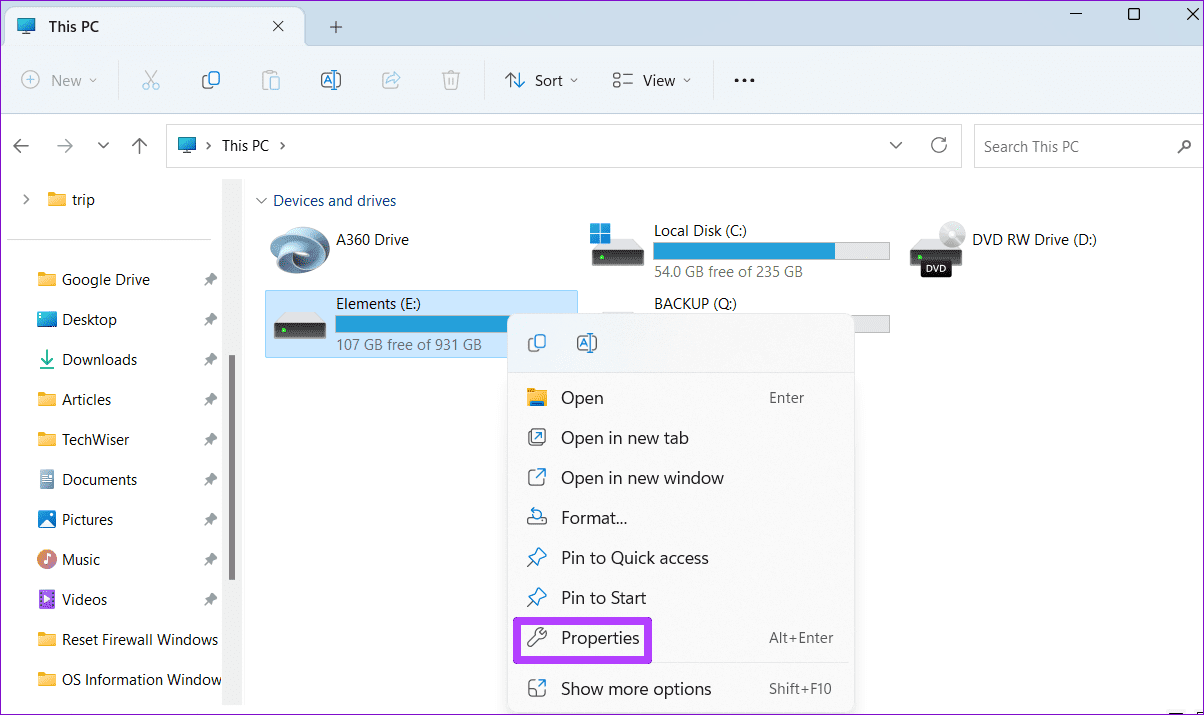
Step 1: Press the Windows key + E to open File Explorer and navigate to This PC.
Step 2: Right-click on your USB drive and select Properties.
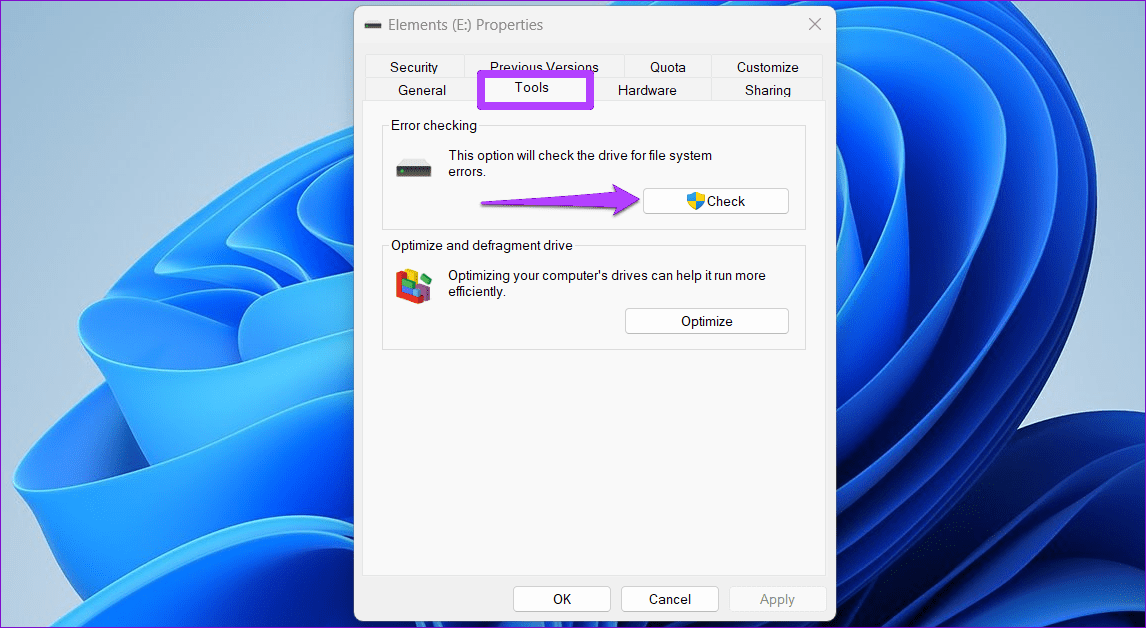
Step 3: Switch to the Tools tab and click on the Check button.
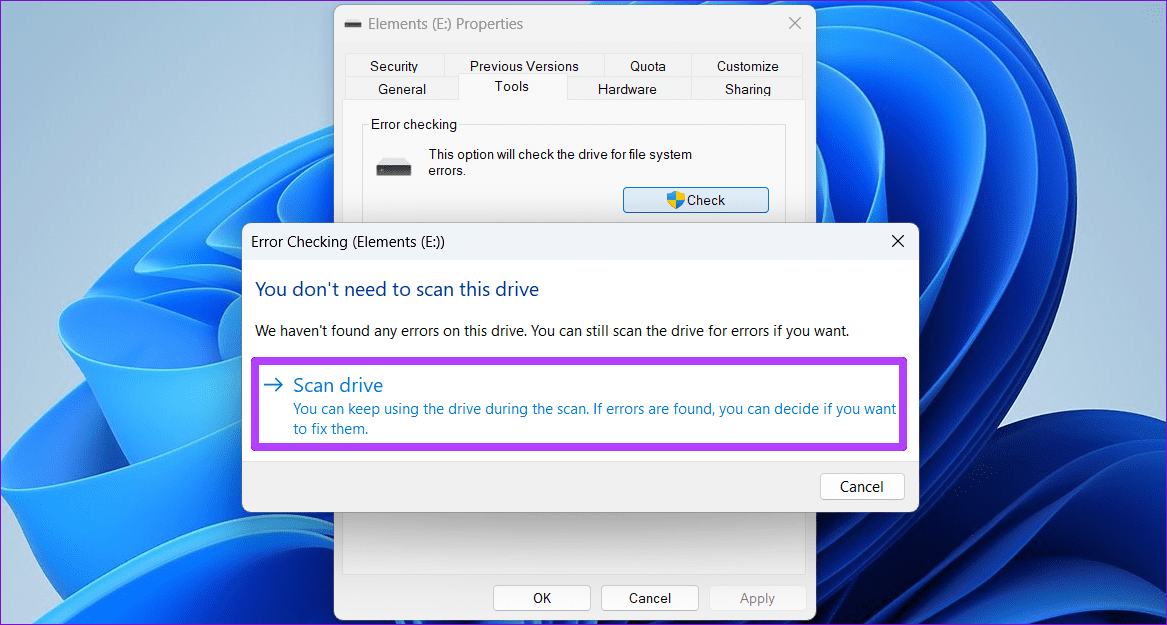
Step 4: Click Scan drive to initiate the scan.
Fix 2: Run the Hardware and Devices Troubleshooter
Your Windows 11 PC includes a Hardware and Devices troubleshooter that can resolve common issues with all your external devices, including USB storage drives. Here’s how to run it.
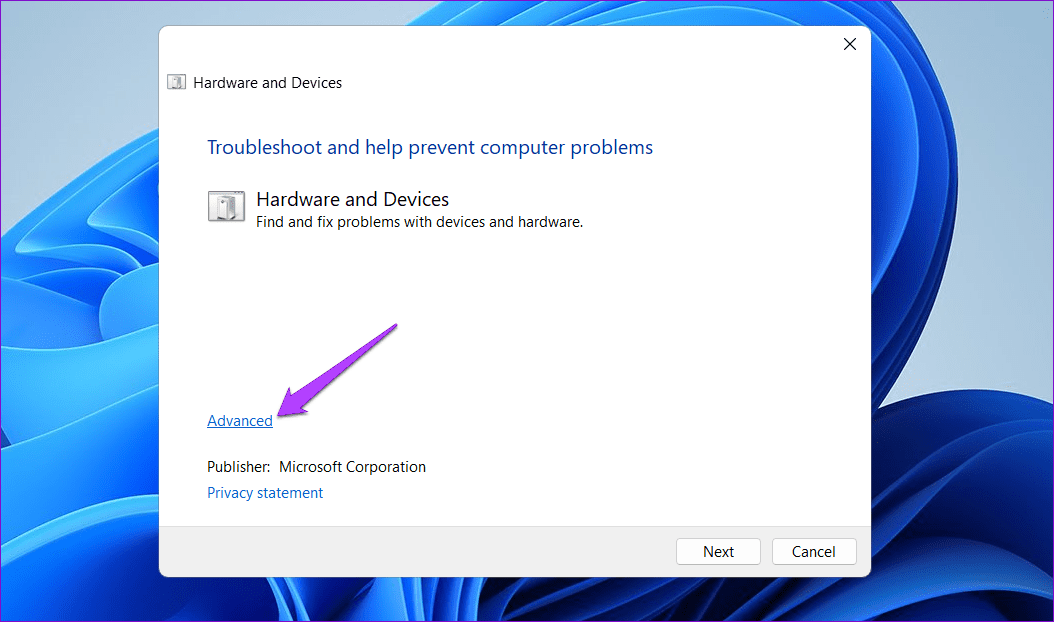
Step 1: Press the Windows key + R to open the Run dialog. Type msdt.exe -id DeviceDiagnostic in the box and press Enter.
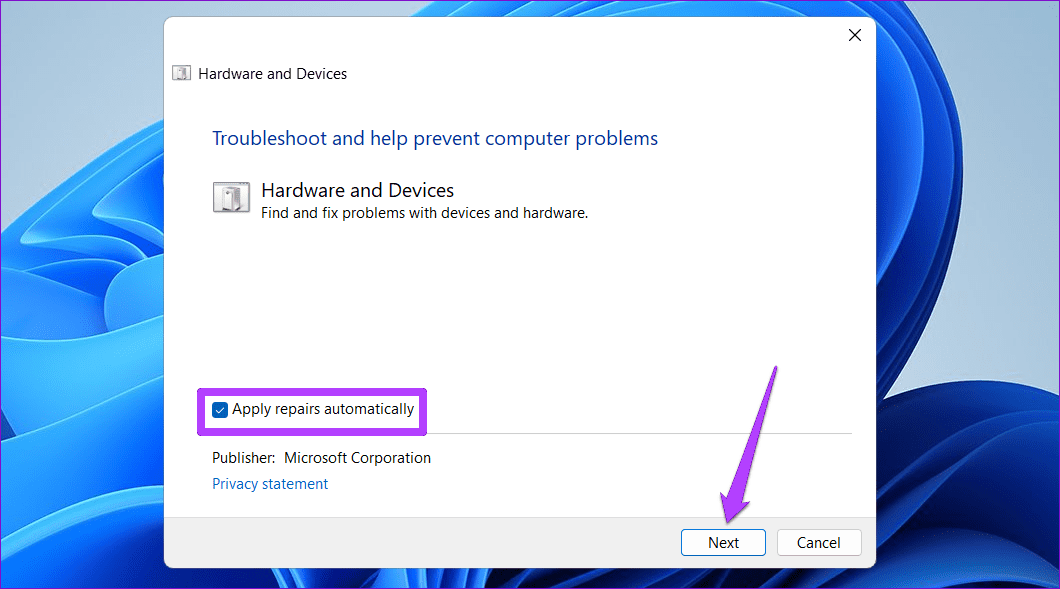
Step 2: In the Hardware and Devices window, click on Advanced.
Step 3: Select the Apply repairs automatically checkbox and hit Next.
After running the troubleshooter, check if your USB drive shows missing files and folders.
Fix 3: Update or Reinstall USB Drivers
At times, outdated or faulty USB drivers on your PC can interfere with Windows’ ability to show the contents of your USB drive. You can try updating the problematic driver using Device Manager to see if that solves the problem.
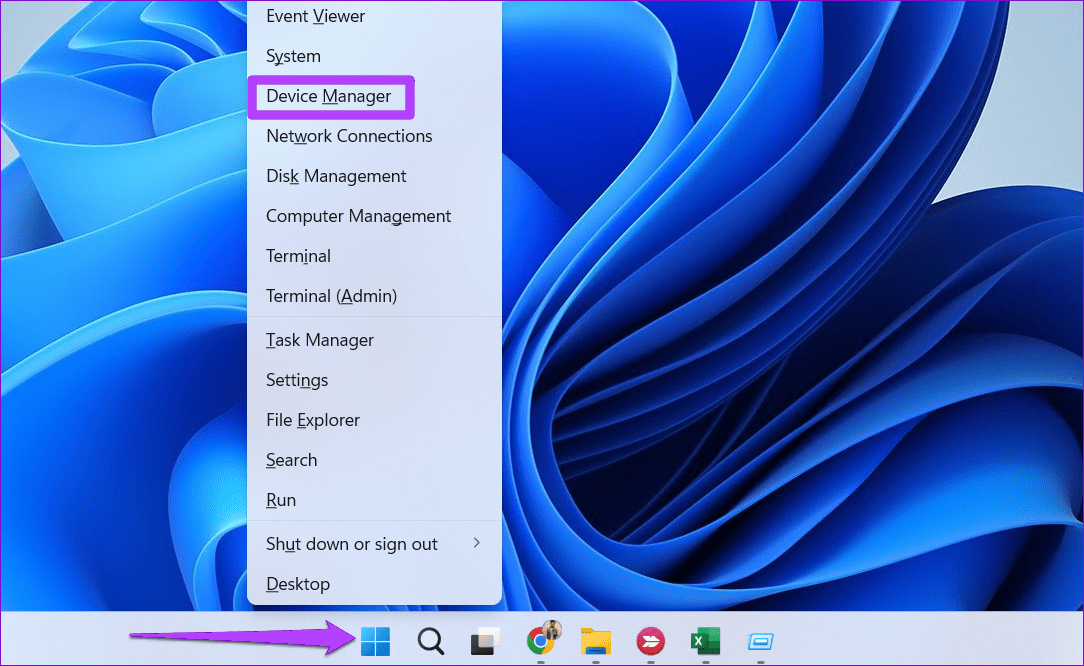
Step 1: Right-click on the Start icon and select Device Manager from the list.
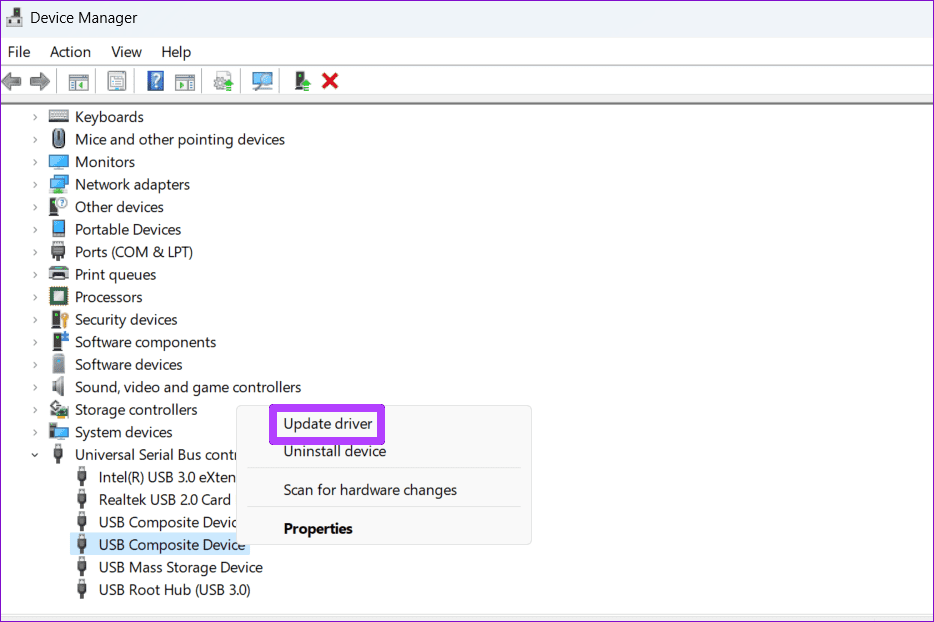
Step 2: Double-click on the Universal Serial Bus controllers to expand it.
Step 3: Right-click on the relevant USB drive and select Update driver.
Follow the on-screen prompts to finish updating the driver.
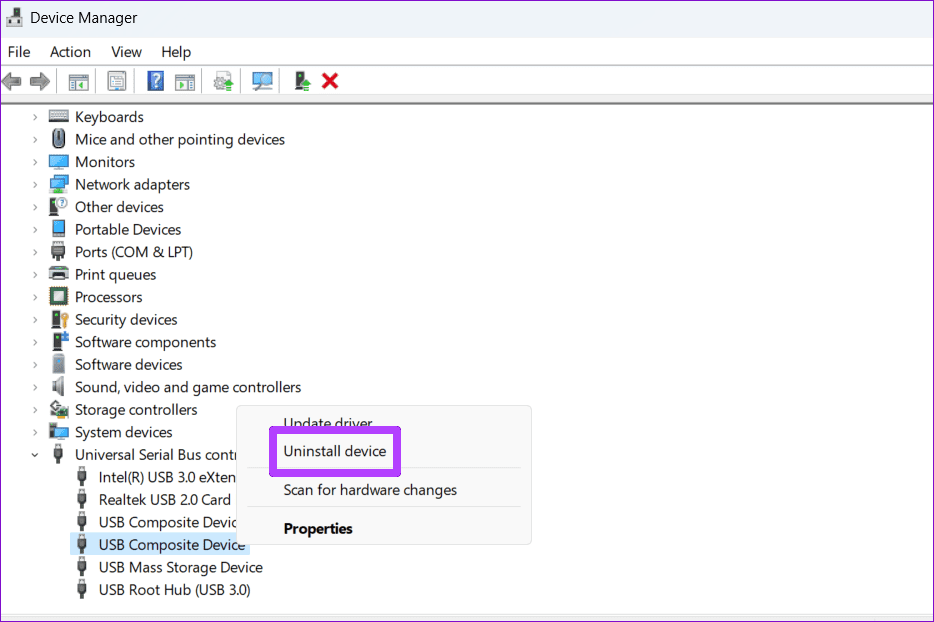
If your hard drive or pen drive is not showing data even after updating the drivers, it’s likely that those drivers are corrupt. In that case, your best option is to uninstall the problematic driver via Device Manager and then restart your PC.
Windows will reinstall the drivers automatically during boot. Following this, your USB drive should display all files and folders.
Audio-Technica makes terrific headphones and the company’s M50x and M50BT can still hold their own and sound superb, to say the least. That said, the earpads enveloping the headphones are quite susceptible to wear and tear. As such, if you’ve been using the ATH-M range of headphones for a bit, you might be looking for the best replacement pads for the Audio-Technica ATH-M50x. Here are some good options to consider.
The Krone Kalpasmos Replacement Earpads earpads employ bird-eye mesh fabric, which is equal parts sturdy and breathable. So much so, the company claims that the earpads can be used for at least 12 months without incurring any wear and tear. Add to that, the earpads can fend off damage from sweat, oil as well as cosmetics.
The earpads also make use of memory foam padding. Consequently, the unit should warp around a user’s ears seamlessly. Additionally, you can use the earpads with a myriad of headphones, including the ATH-M50x and the ATH-M50BT. The earpads are also compliant with select gaming headphones from SteelSeries and Turtle Beach’s stables.
If you want to replace the ATH-M50x’s earpads with ones that offer better cushioning, you should check out SOULWIT’s offering. To that end, the company’s earpads use protein leather and high-density memory foam for their construction.
As such, the earpads are quite thick and can conform to a user’s ears. Moreover, the earpads ship with stitched seams. The company even bundles a detailed user guide with the retail packaging, so you can seamlessly swap out your M50x’s old earpads. The earpad can be snagged in two attractive colors: Black and Coffee.
BRAINWAVZ makes high-quality gaming and headphone accessories, and the company’s Velour Earpads are no exception to the rule. As its moniker suggests, the earpads have been constructed in parts using soft velour material.
The earpads are suitable for buyers who like to listen to music for hours on end. Add to that, the pair ships with memory foam cushioning too. Per the brand, the cushioning doesn’t just improve a user’s listening comfort, but it also offers superior isolation. So, if you want to cut through the noise and simply listen to your favorite tunes, you should give BRAINWAVZ’s offering a go.
The BRAINWAVZ’s ProStock Earpads are comfier than the ATH-M50x’s original earpads. At the same time, the brand claims that the earpads don’t alter the headphone’s sound signature.
This coupled with the unit’s memory foam padding and tapered design, the earpads shouldn’t add unnecessary pressure on your ears all while not impacting your music listening experience. Apart from this, the earpads are compatible with a variety of headphones, including the ATH-M20x, ATH-M30x, ATH-M40x, ATH-M50x, and M50xBT.
Listening to music for extended periods can make your ears sweaty. The solution? WC’s Freeze Cooling Gel Earpads, which feature two layers of cooling gel to keep your ears frosty. Moreover, the earpads employ a mix of breathable sports fabric and leather for added comfort, which is great.
We should point out that the WC Freeze Cooling Gel Earpads are available in several attractive hues. To that end, you can snag the earpads with a camo or a Speedracer decal. Add to that, you can further finetune the design by choosing different color earpads, the likes of which includes Cyan, Red, Black, and Purple. The earpads support a wide range of headphones too.
Besides displaying the network adapter speed, the Settings app also provides information about other connection aspects, such as the network band, MAC address, and more.
Step 1: Press the Windows + I key to open the Settings app.
Step 2: Choose the Network & Internet option from the left sidebar > click Properties in the right pane.
Step 3: You can see the network speed next to the Aggregated link speed (Receive/ Transmit) option.
Method 2: Use Control Panel
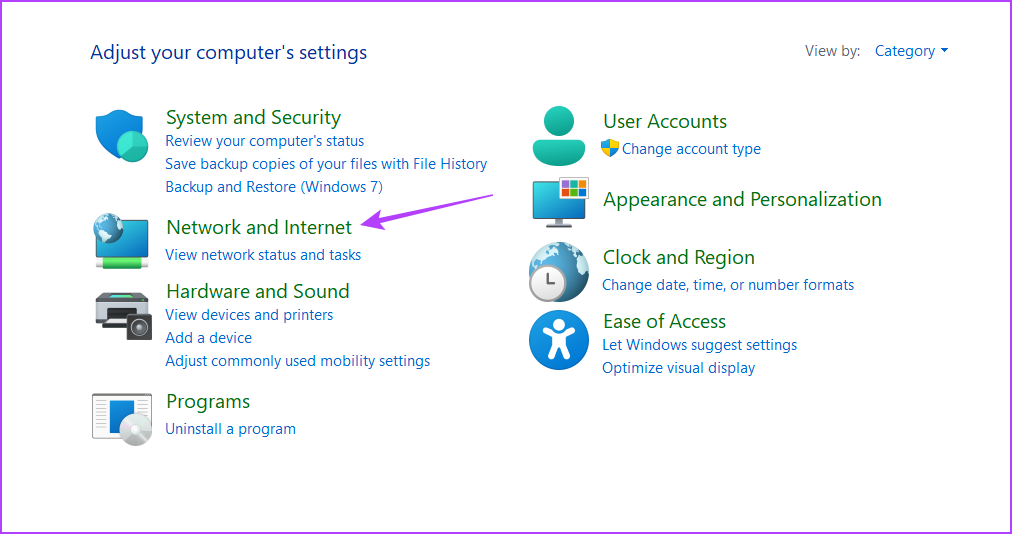
Step 1: In the Start Menu search bar, type Control Panel, and press Enter.
Step 2: Click on Network and Internet.
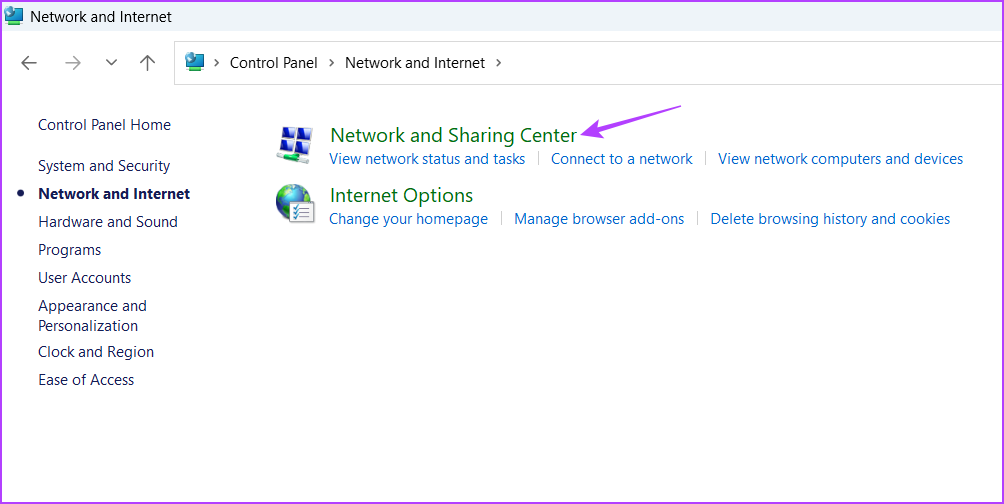
Step 3: Choose Network and Sharing Center.
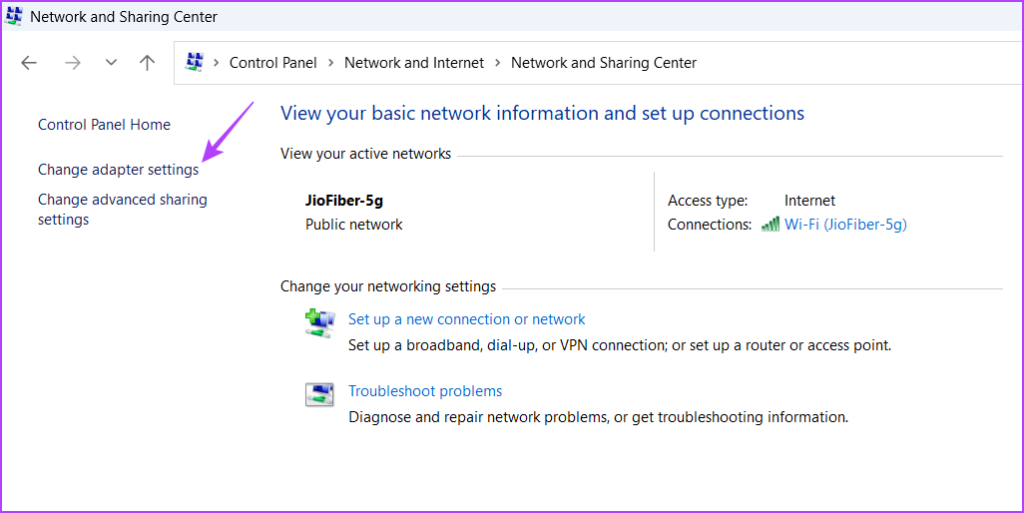
Step 4: Click the Change adapter settings in the left sidebar.
Step 5: Right-click on your Ethernet or Wi-Fi connection and choose Status from the context menu.
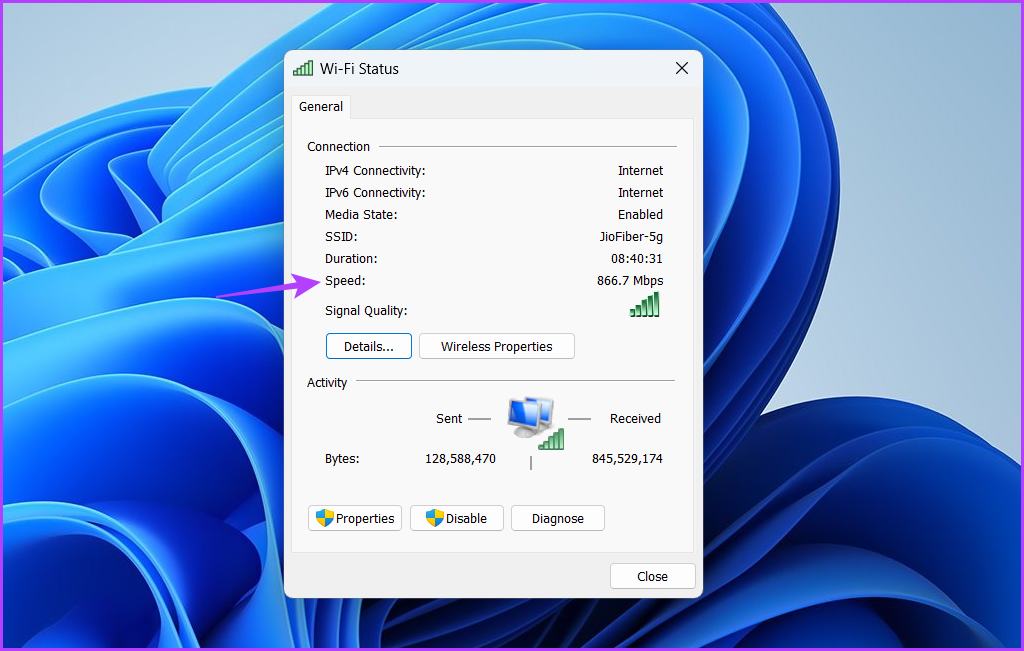
You can check your network adapter speed next to the Speed field.
Method 3: Using the Command-Line Tools
To check the speed of your Ethernet or Wi-Fi interface using Command Prompt, follow these instructions:
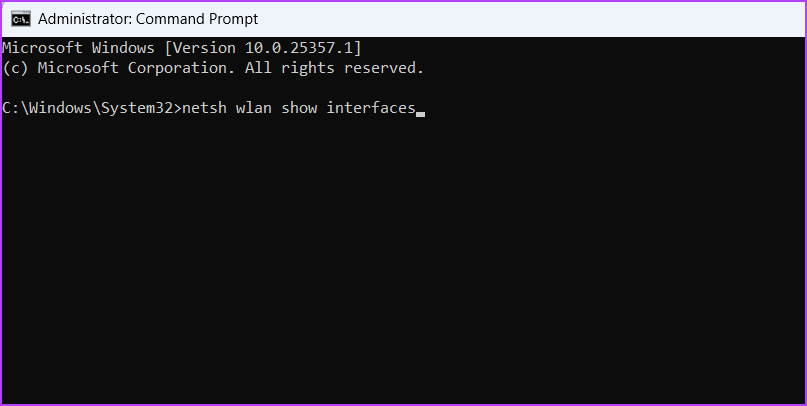
Step 1: Open the Start Menu, type Command Prompt in the search bar, and click the Run as administrator option in the right pane.
Step 2: In the elevated Command Prompt window, type the following command and press Enter.
netsh wlan show interfaces
Step 3: Check the Receive rate (Mbps) and Transmit rate (Mbps) fields to know the connection speed of your network adapter.
Like Command Prompt, you can use Windows PowerShell to get information about your network adapter speed. Here’s how:
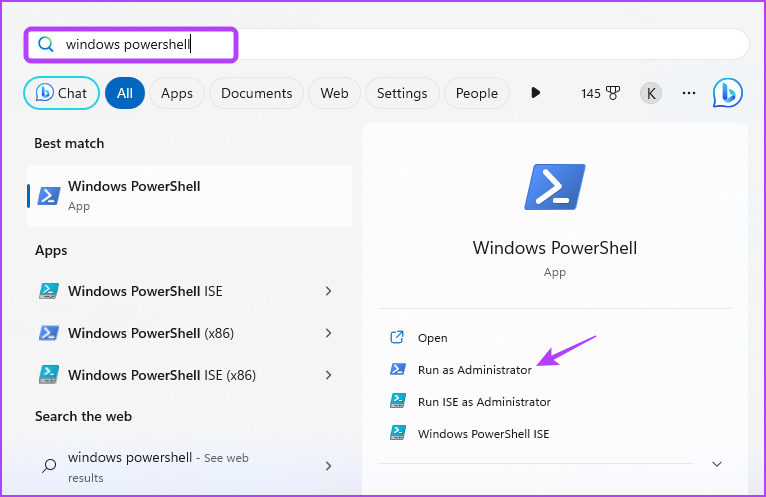
Step 1: Launch the Start Menu, type Windows PowerShellin the search bar, and choose Run as administrator from the right pane.
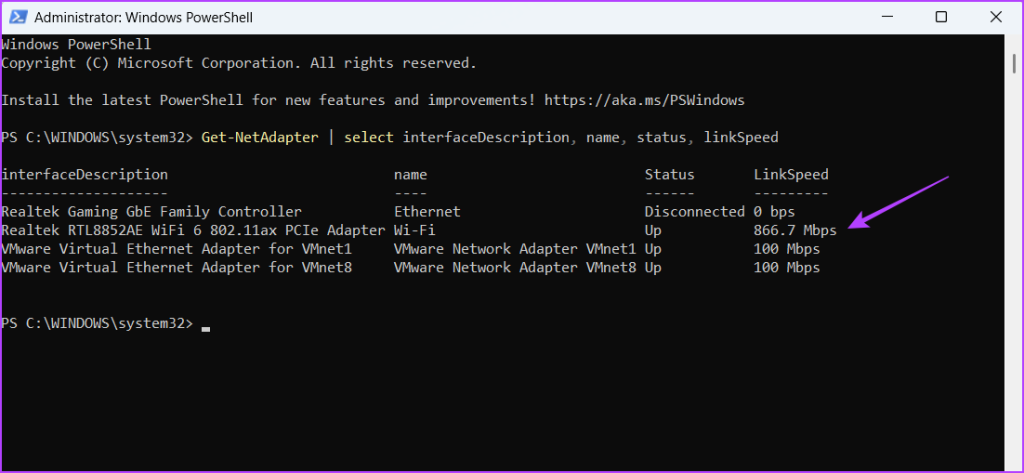
Step 2: In the elevated PowerShell window, type the following command and press Enter.
After the command is executed, you’ll see your computer’s Ethernet and Wi-Fi adapters. Check the connection speed of your network adapter in the LinkSpeed column.
By default, Microsoft Edge opens all PDF files in its PDF viewer, allowing you to start editing them immediately. However, if a PDF is already saved on your computer, use these steps to open it in Edge.
Step 1: Press the Windows + E keyboard shortcut to open File Explorer and locate the PDF file you want to edit.
Step 2: Right-click on your file, go to Open with, and select Microsoft Edge from the submenu.
How to Edit a PDF in Microsoft Edge
After opening your file in Edge, you can edit it using the built-in tools. Here’s how:
How to Add Text or Drawing to a PDF
If your document does not contain editable fields, you can use Edge’s PDF editor to insert text boxes and manually input any missing information. Here are the steps for the same.
Step 1: In the PDF editor, click the Add Text icon in the toolbar at the top.
Step 2: Move your cursor to an area where you want to write text and click to create a text box. You can adjust the text size, spacing, or color as you see fit.
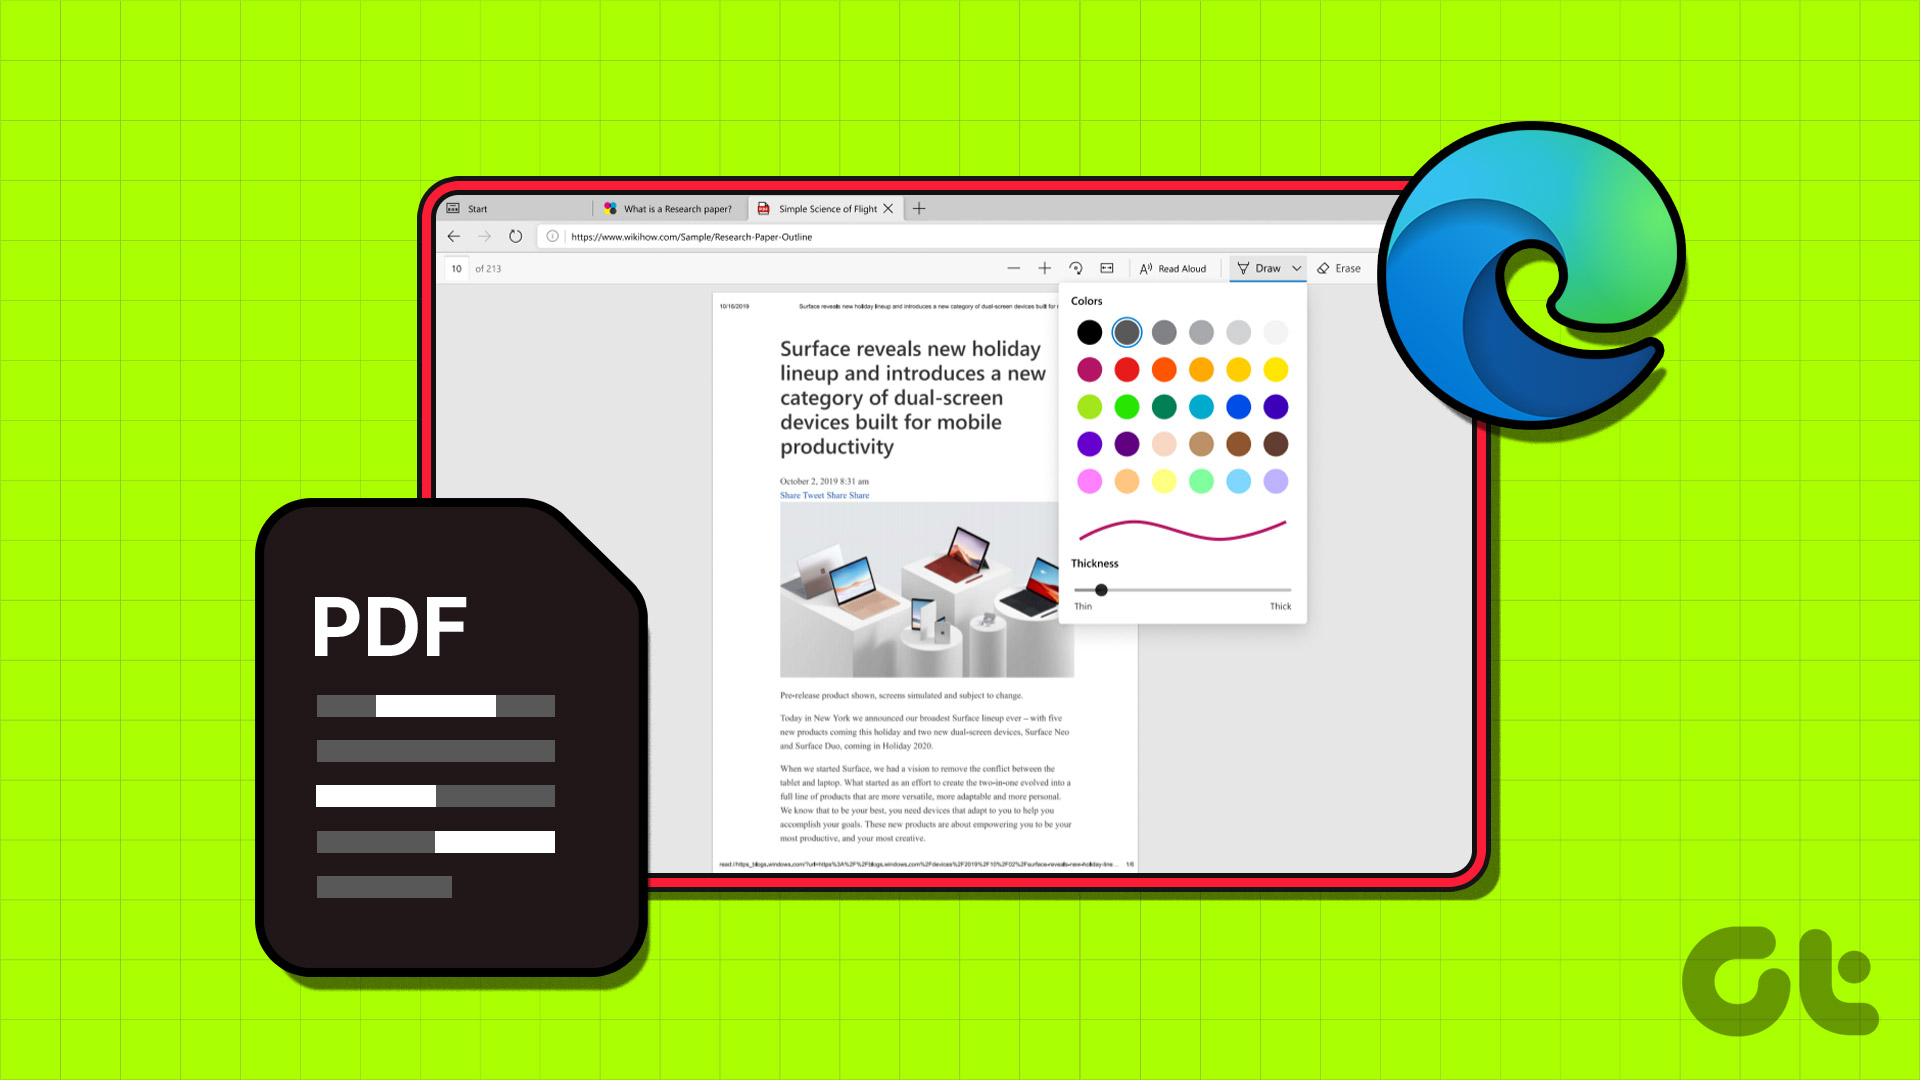
Similarly, you can use the freehand drawing tool in Edge’s PDF editor to annotate, add shapes, and even sign your PDF. To do so, click the Draw option in the toolbar.
Click the arrow next to the Draw option to change the line color and thickness to your liking. If you want to remove a stroke, use the Erase tool next to it.
How to Highlight Text in a PDF
The PDF editor in Edge also features a highlighter tool that allows you to mark specific texts and paragraphs within a document. Here’s how to use it.
Step 1: Open your document in Edge and click the highlighter tool in the toolbar. Then, click and drag your cursor over the text or section to highlight it.
Step 2: Click the arrow next to the highlighter tool to adjust its color and thickness. If you use this tool to only highlight text, enable the toggle next to Text only highlight.
How to Add Comments to a PDF
With Edge’s PDF editor, you can also add comments to make notes about specific sections in a PDF. Use your cursor to select the text or section to which you want to add a comment. Right-click on your selection and select Add comment from the context menu.
Type in your comment and click the right checkmark to add it.
Once added, you can click the tiny comment icon to view the comment. You can click the three-dot menu icon to edit or delete the comment.
How to Save or Print Your Edited PDF in Microsoft Edge’s Built-In PDF Editor
After you are done editing your PDF, you can choose to save or print it directly from Edge’s built-in PDF editor. To save the edited PDF, click the Save icon at the top-right corner. Specify where you want to store the document and click Save.
Alternatively, if you want to print the PDF, click the Print icon at the top-right corner. Select your printer using the drop-down menu and click the Print button.
Check for Netflix app support: Newer versions of the Netflix app don’t run properly on older Android TV models that have stopped receiving software updates.
Log in again to your account: You can sign in again to your account to reload all the app contents.
Force stop and relaunch the Play Store: Long-press the Netflix app icon > App Info > Force Stop.
Update Android TV OS version: Open Settings > System > About > Software Update.
Sideload app: You can choose to sideload the Netflix app on your Android TV to enjoy a similar viewing experience.
Fix 1: Clear Play Store Cache
The Google Play Store Cache saves all of your information and preferences on your Android TV. If you can’t find Netflix in Play Store on your Android TV, you can try clearing the Play Store Cache. This will remove all the Play Store data from your Android TV, and you will have to log in again to your Google account.
Open Settings > Apps > Show all apps > Google Play Store > Clear cache.
Fix 2: Reset Android TV
Like your other devices, you can reset your Android TV if you face any software or app-related issues. The only caveat is that you will have to log in again to your Google account and reinstall all the apps. But this is an effective solution if the Netflix app has disappeared from Play Store on your Android TV.
Open Settings > System > Reset.
Fix 3: Install Netflix Using Your Phone or PC
Another hack if resetting did not help is installing the app using Google Play Store on your phone or PC. Simply head to Play Store > Sign in > Apps > Netflix > Install on more devices > Choose your Android TV.
Are you looking to revamp your Twitch presence and get a fresh online identity? Changing your Twitch username and display name can redefine your brand and help you connect with your audience more efficiently. In this article, we will guide you on how to change your Twitch username and display name quickly and easily.
Well, maybe your current username has outgrown you, or you’re rebranding yourselves and need a better name to reflect your brand. Whatever the reason, let’s delve right in and help change your name on Twitch.
Things to Know Before Changing Twitch Username
Before changing your Twitch username, there are a few important things to consider;
Changing your Twitch username does not automatically update your channel URL or any external links you’ve shared. Ensure to inform your followers and update any links you’ve shared on other platforms to reflect your new username.
If you have a verified badge on your Twitch account, changing your username may result in losing that verification status. Check with Twitch support whether the verification badge can be transferred to your new username or if you need to reapply.
If you have integrated Twitch with other services or platforms (e.g., streaming software, extensions), you may need to update the settings and configurations to reflect your new username and display name.
You can only change your Twitch username once every 60 days. Moreover, you cannot revert to your old username after 60 days, as it will be available only once it is released back into the pool of available usernames after 6 months.
Before deciding, consider all the above impacts and implications of changing your Twitch username and display name. With that in mind, let’s begin the steps.
How to Change Your Twitch Username
Changing your Twitch username is relatively straightforward to execute. With a few clicks/taps, you can update your username and continue building your online presence on Twitch.
Before we begin with the steps, we want to reiterate that you can change your username once every 60 days. Now, let’s get to the steps.
On a Desktop Browser
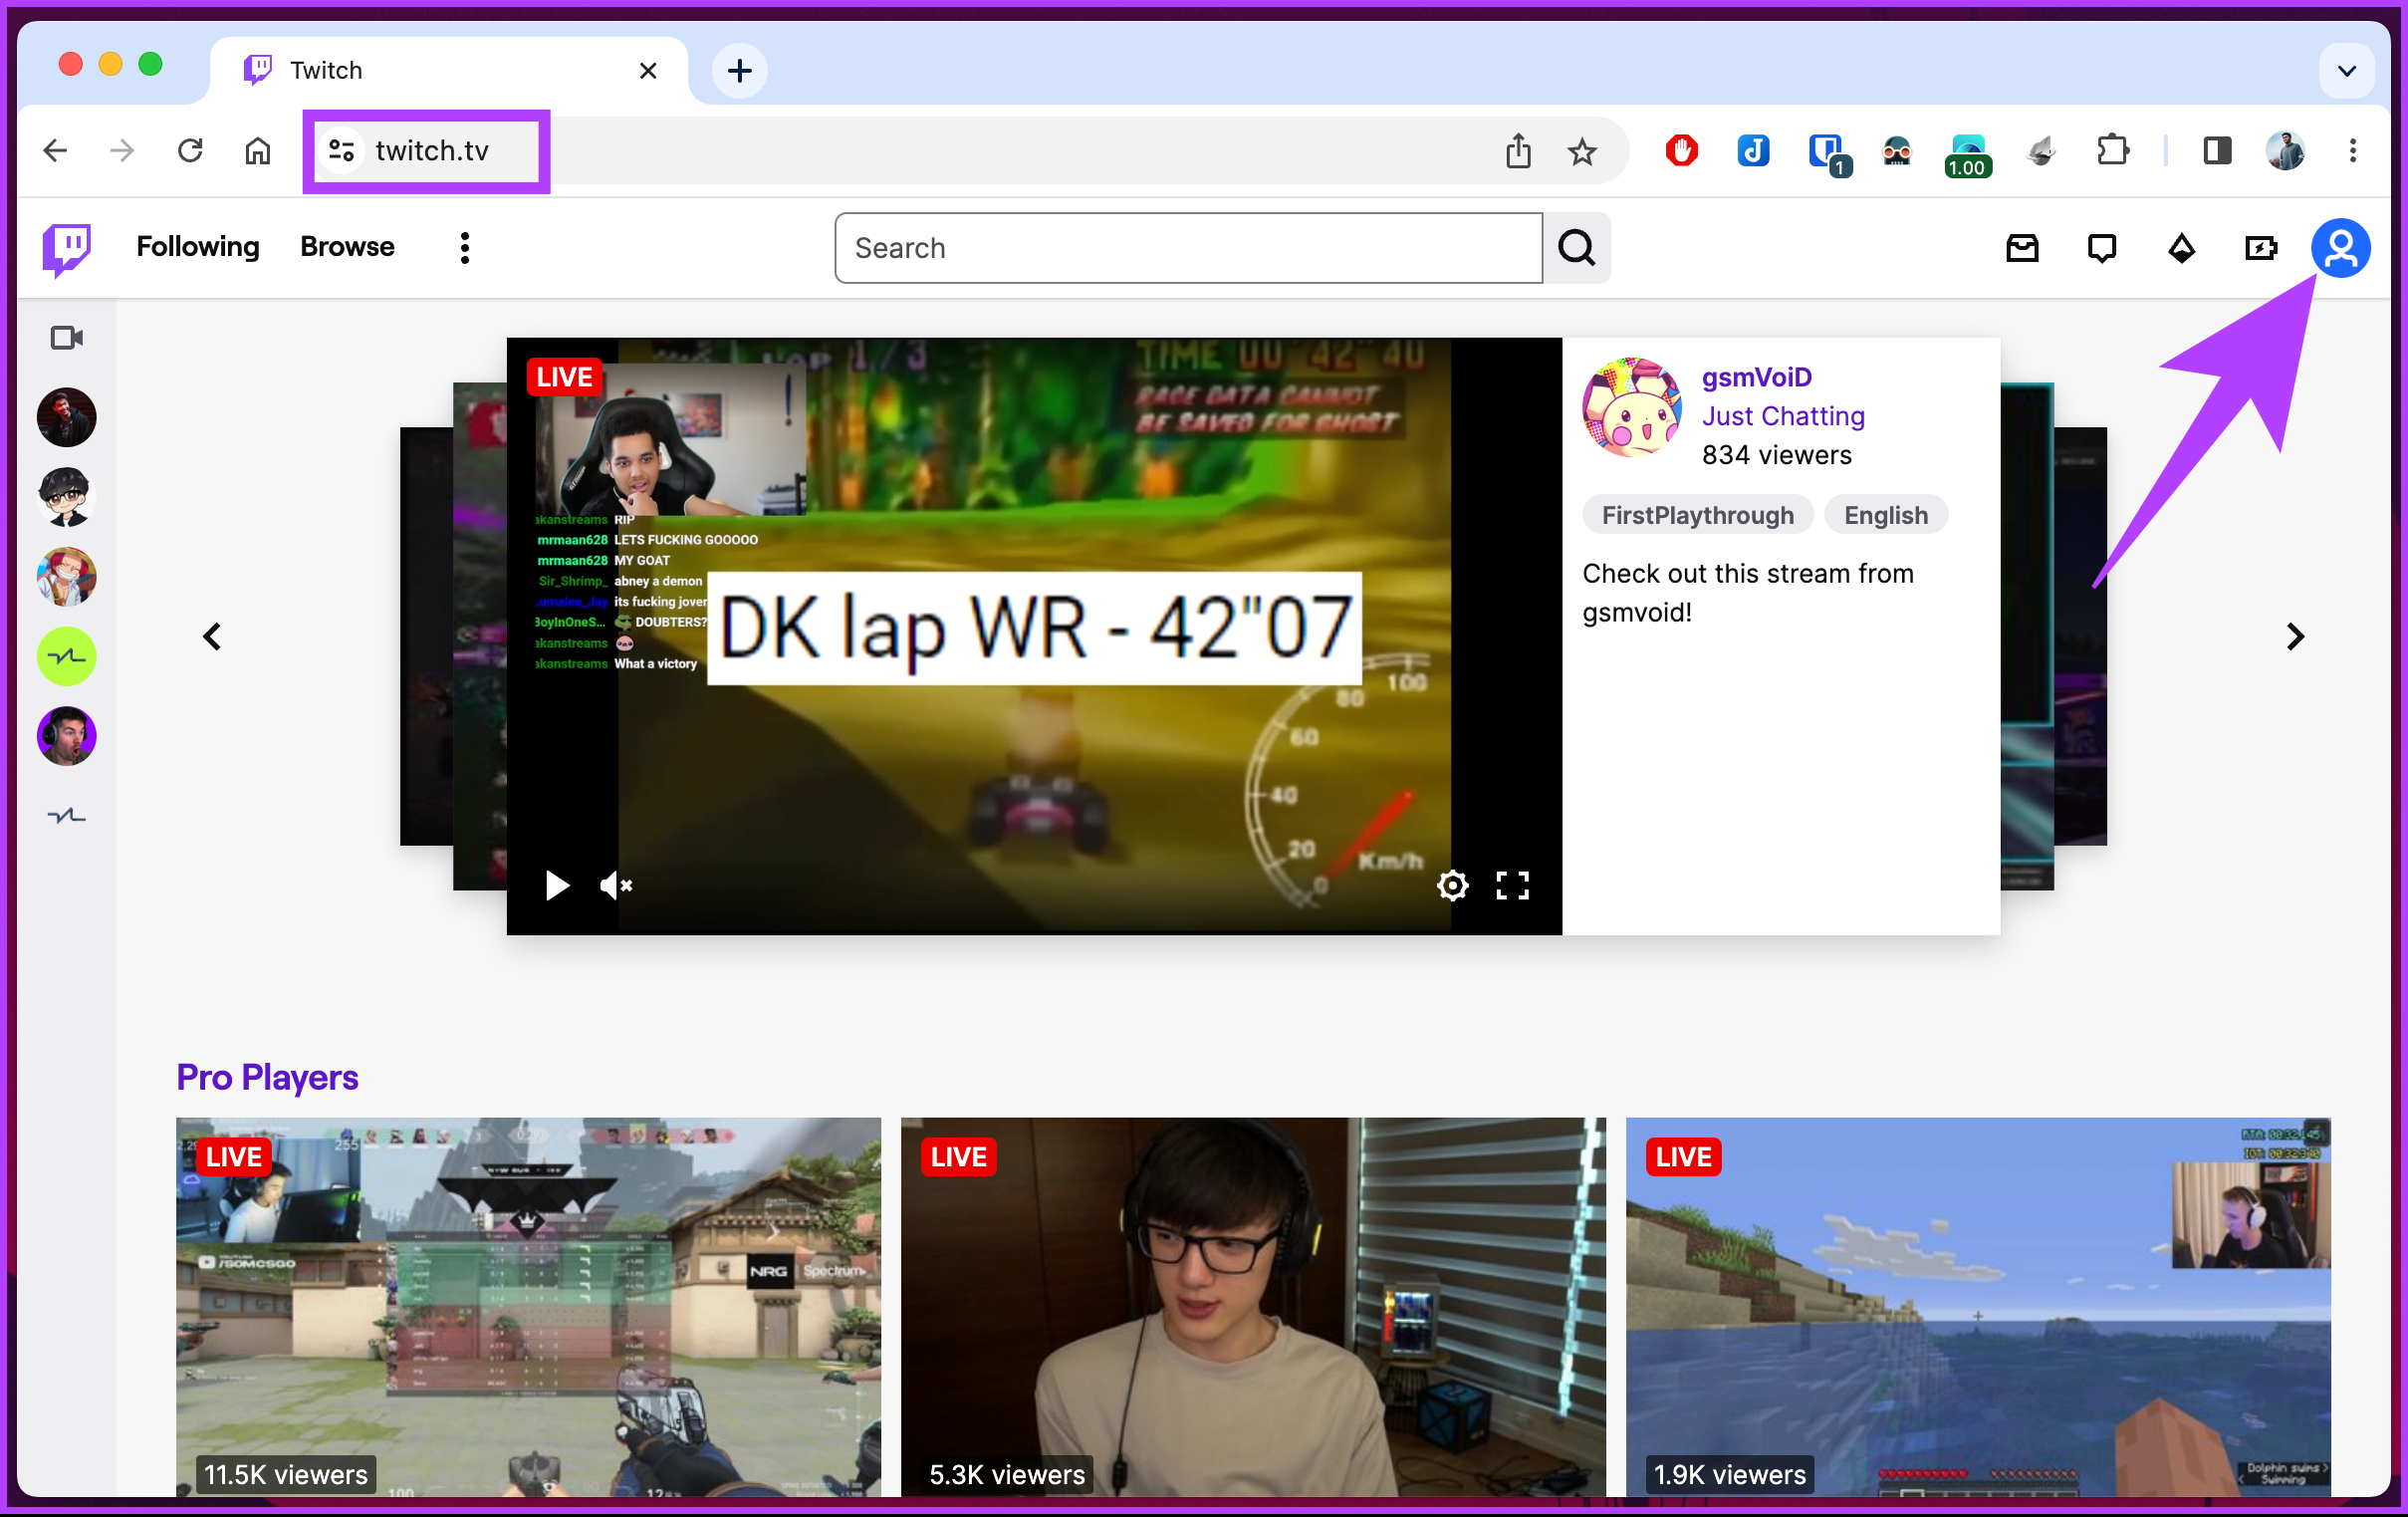
Step 1: Open the Twitch website on your preferred browser and log in with your account credentials.
Step 2: Once logged in, click the profile icon in the top right corner.
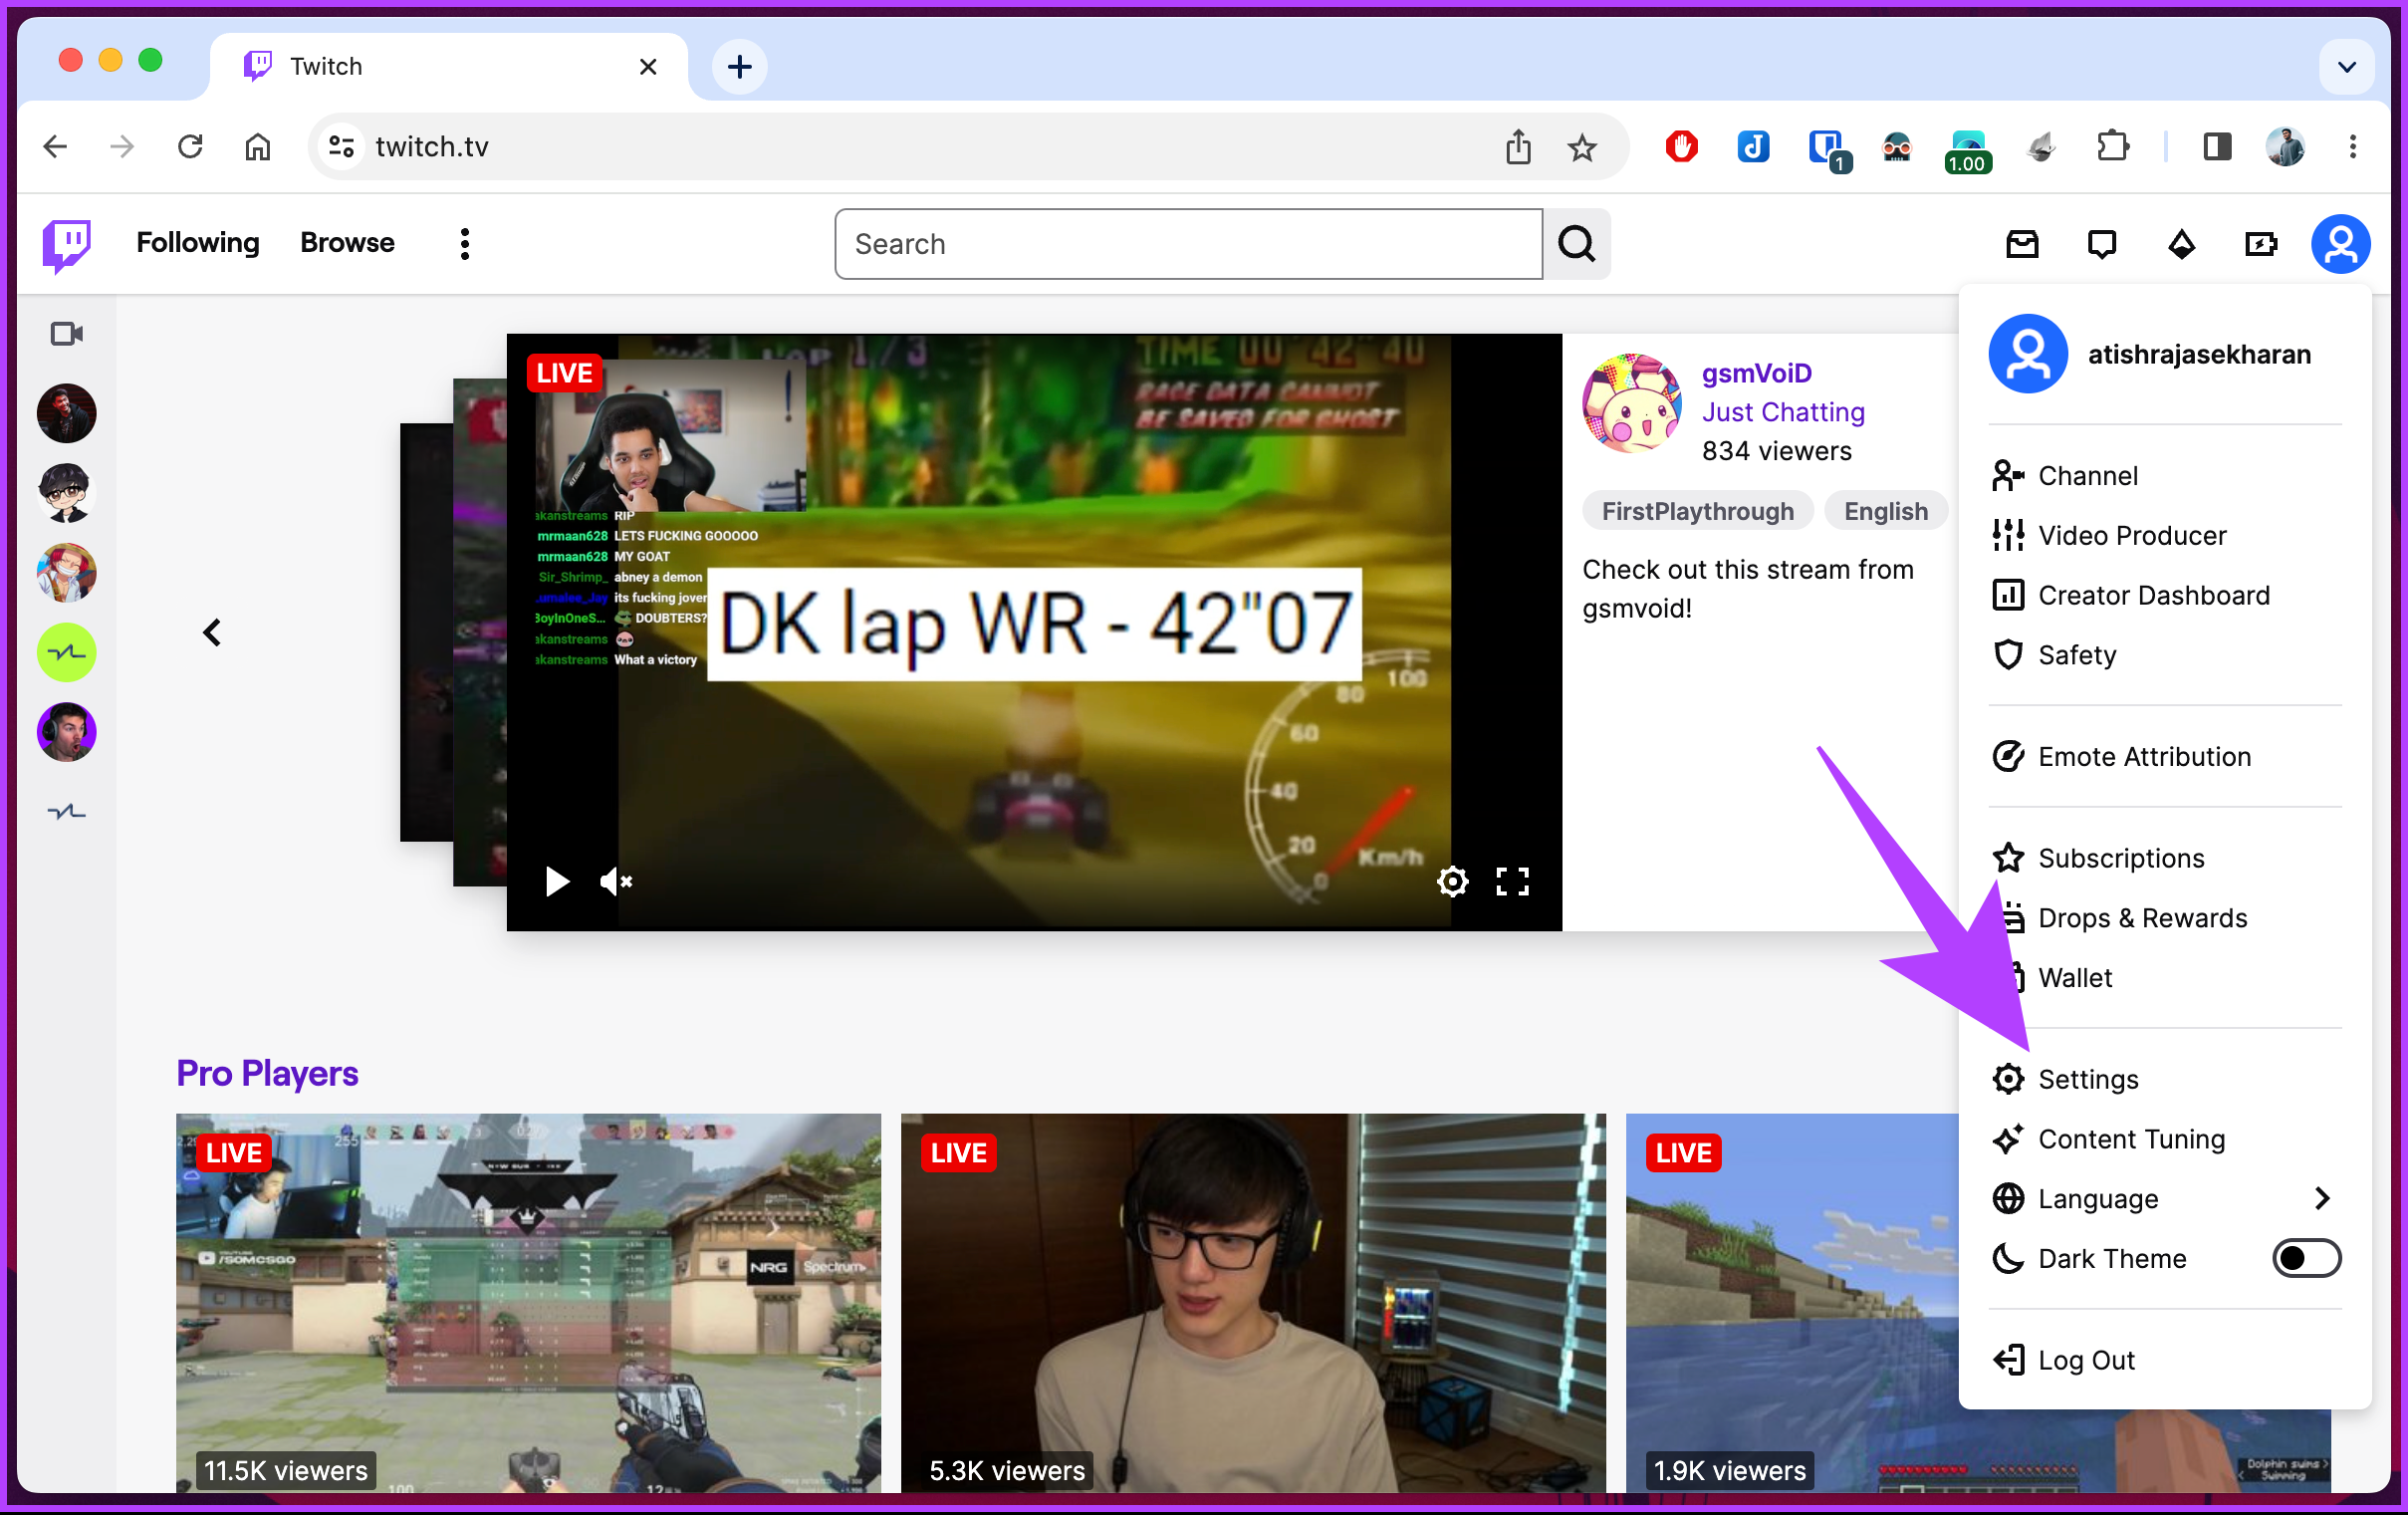
Step 3: From the drop-down menu, select Settings.
You will be taken to the account settings page.
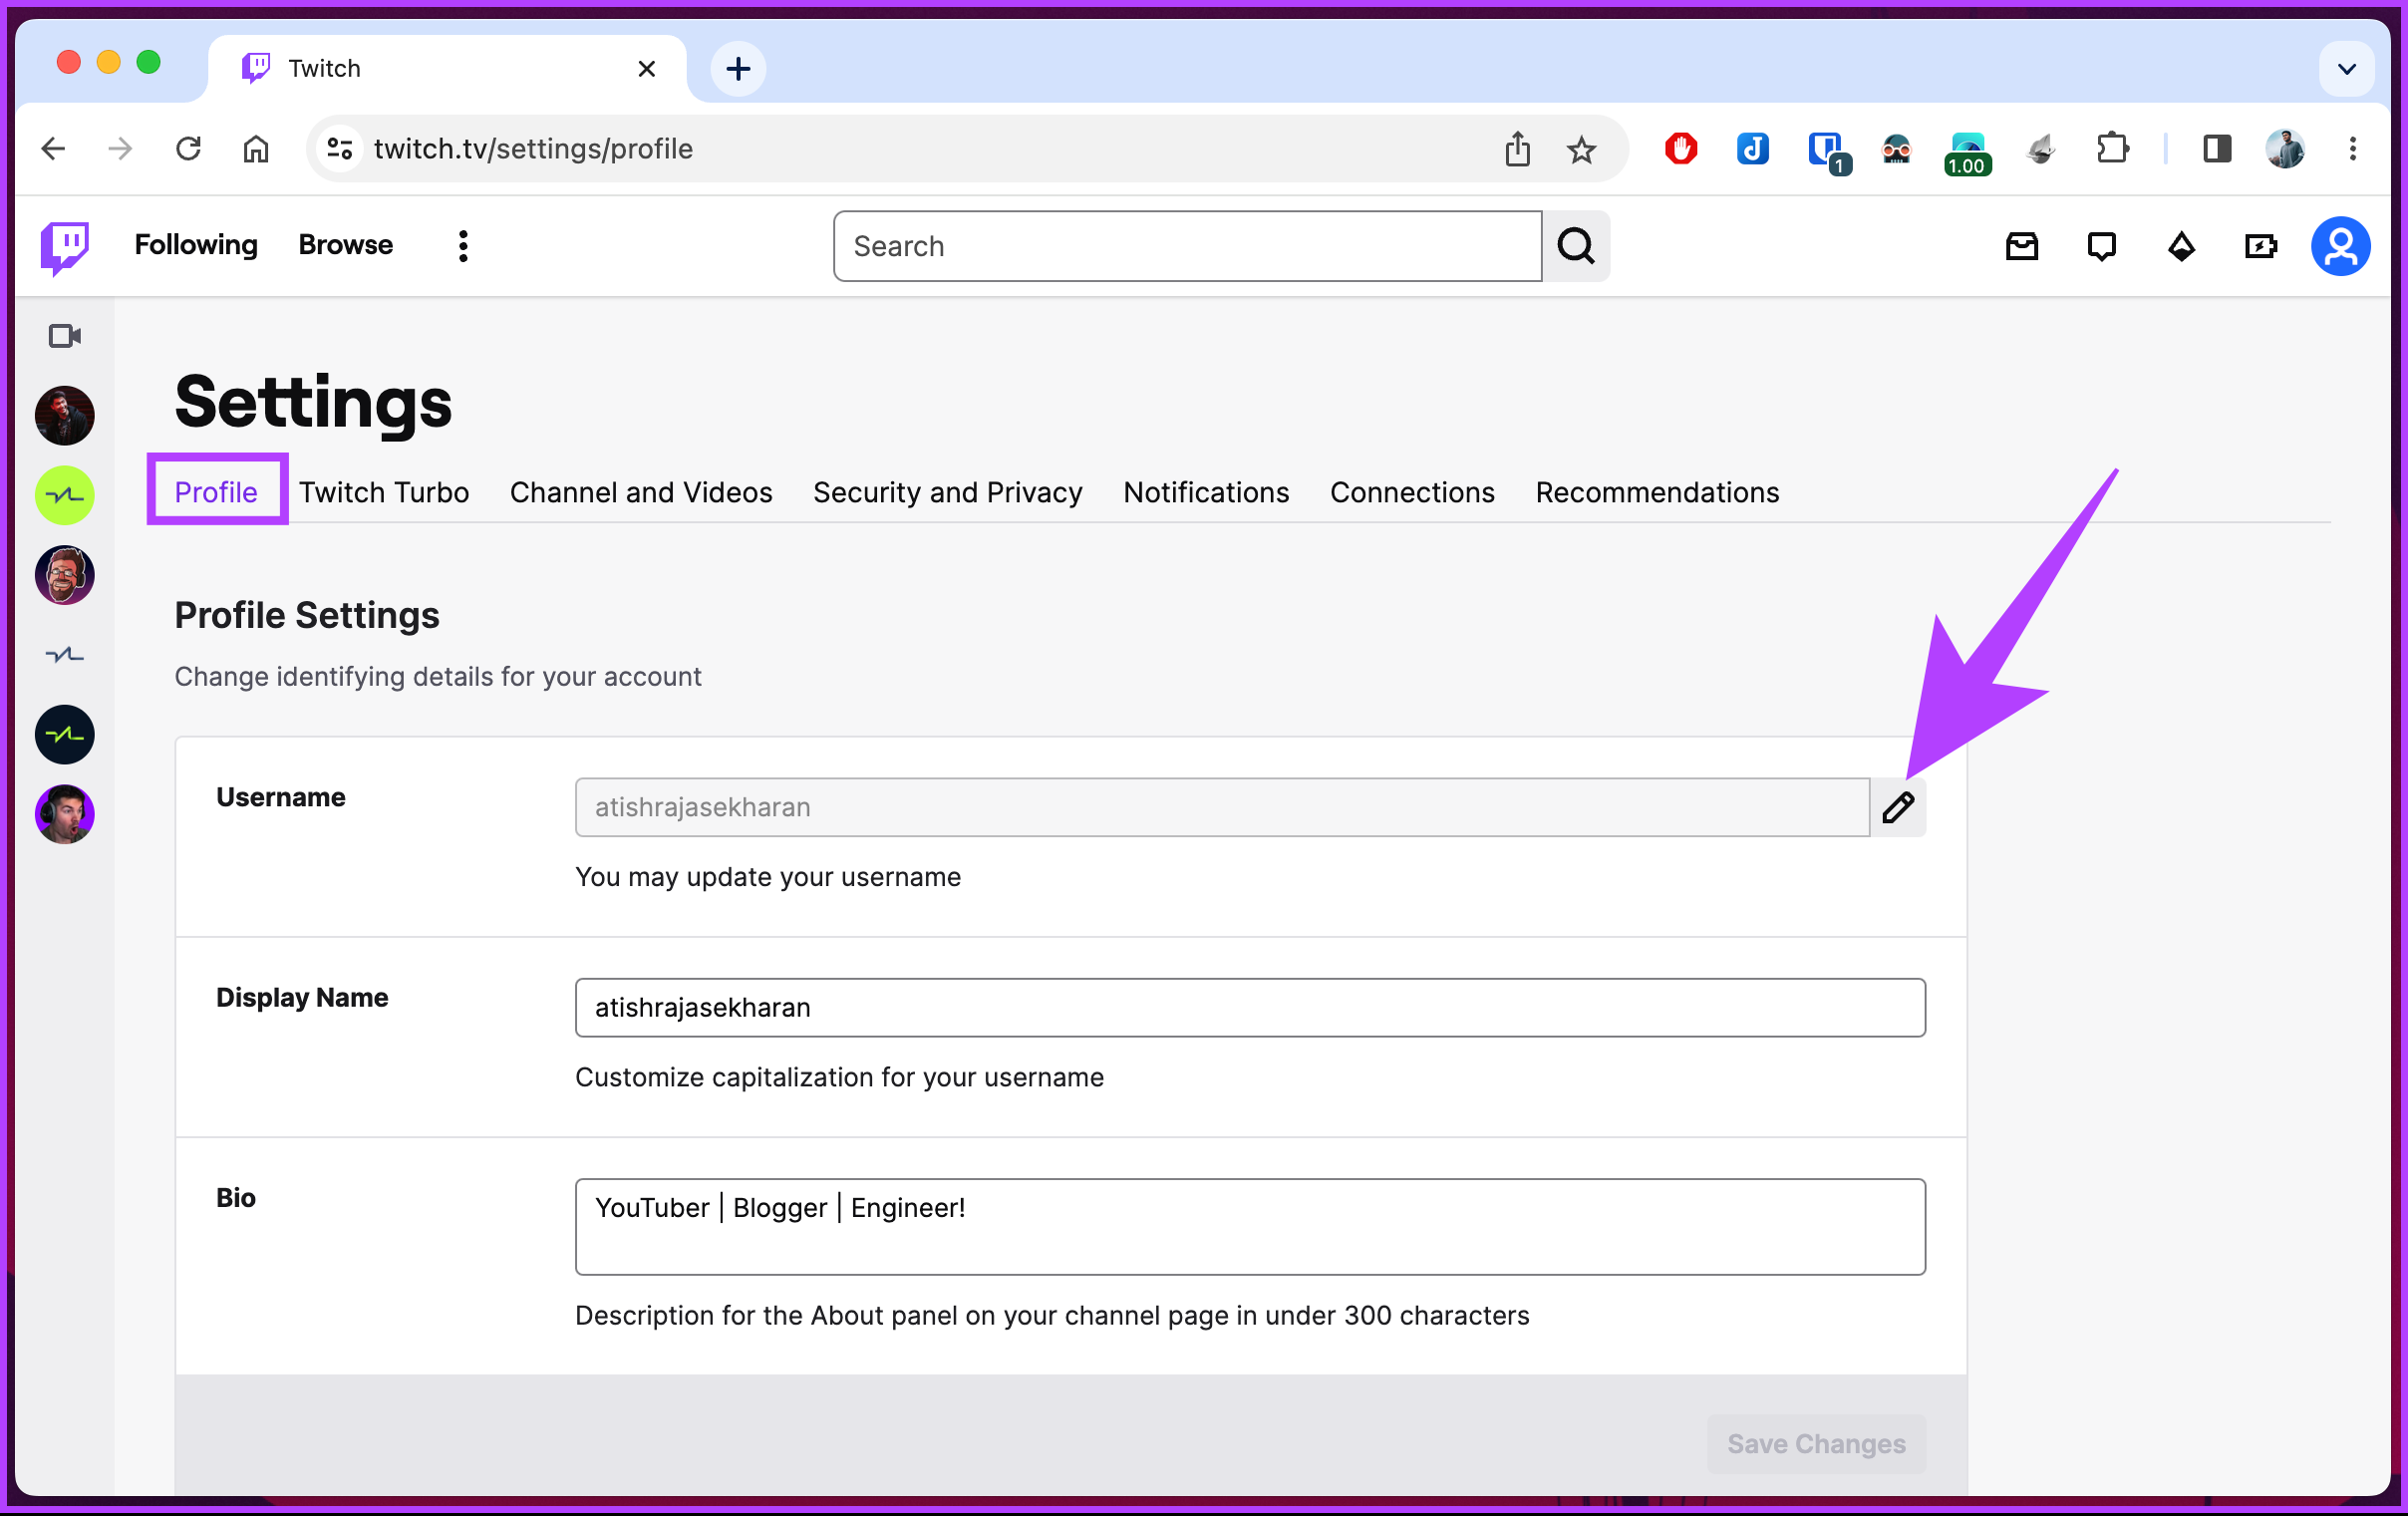
Step 4: Scroll to the Profile Settings section under the Profile tab and click on the pencil icon next to the Username.
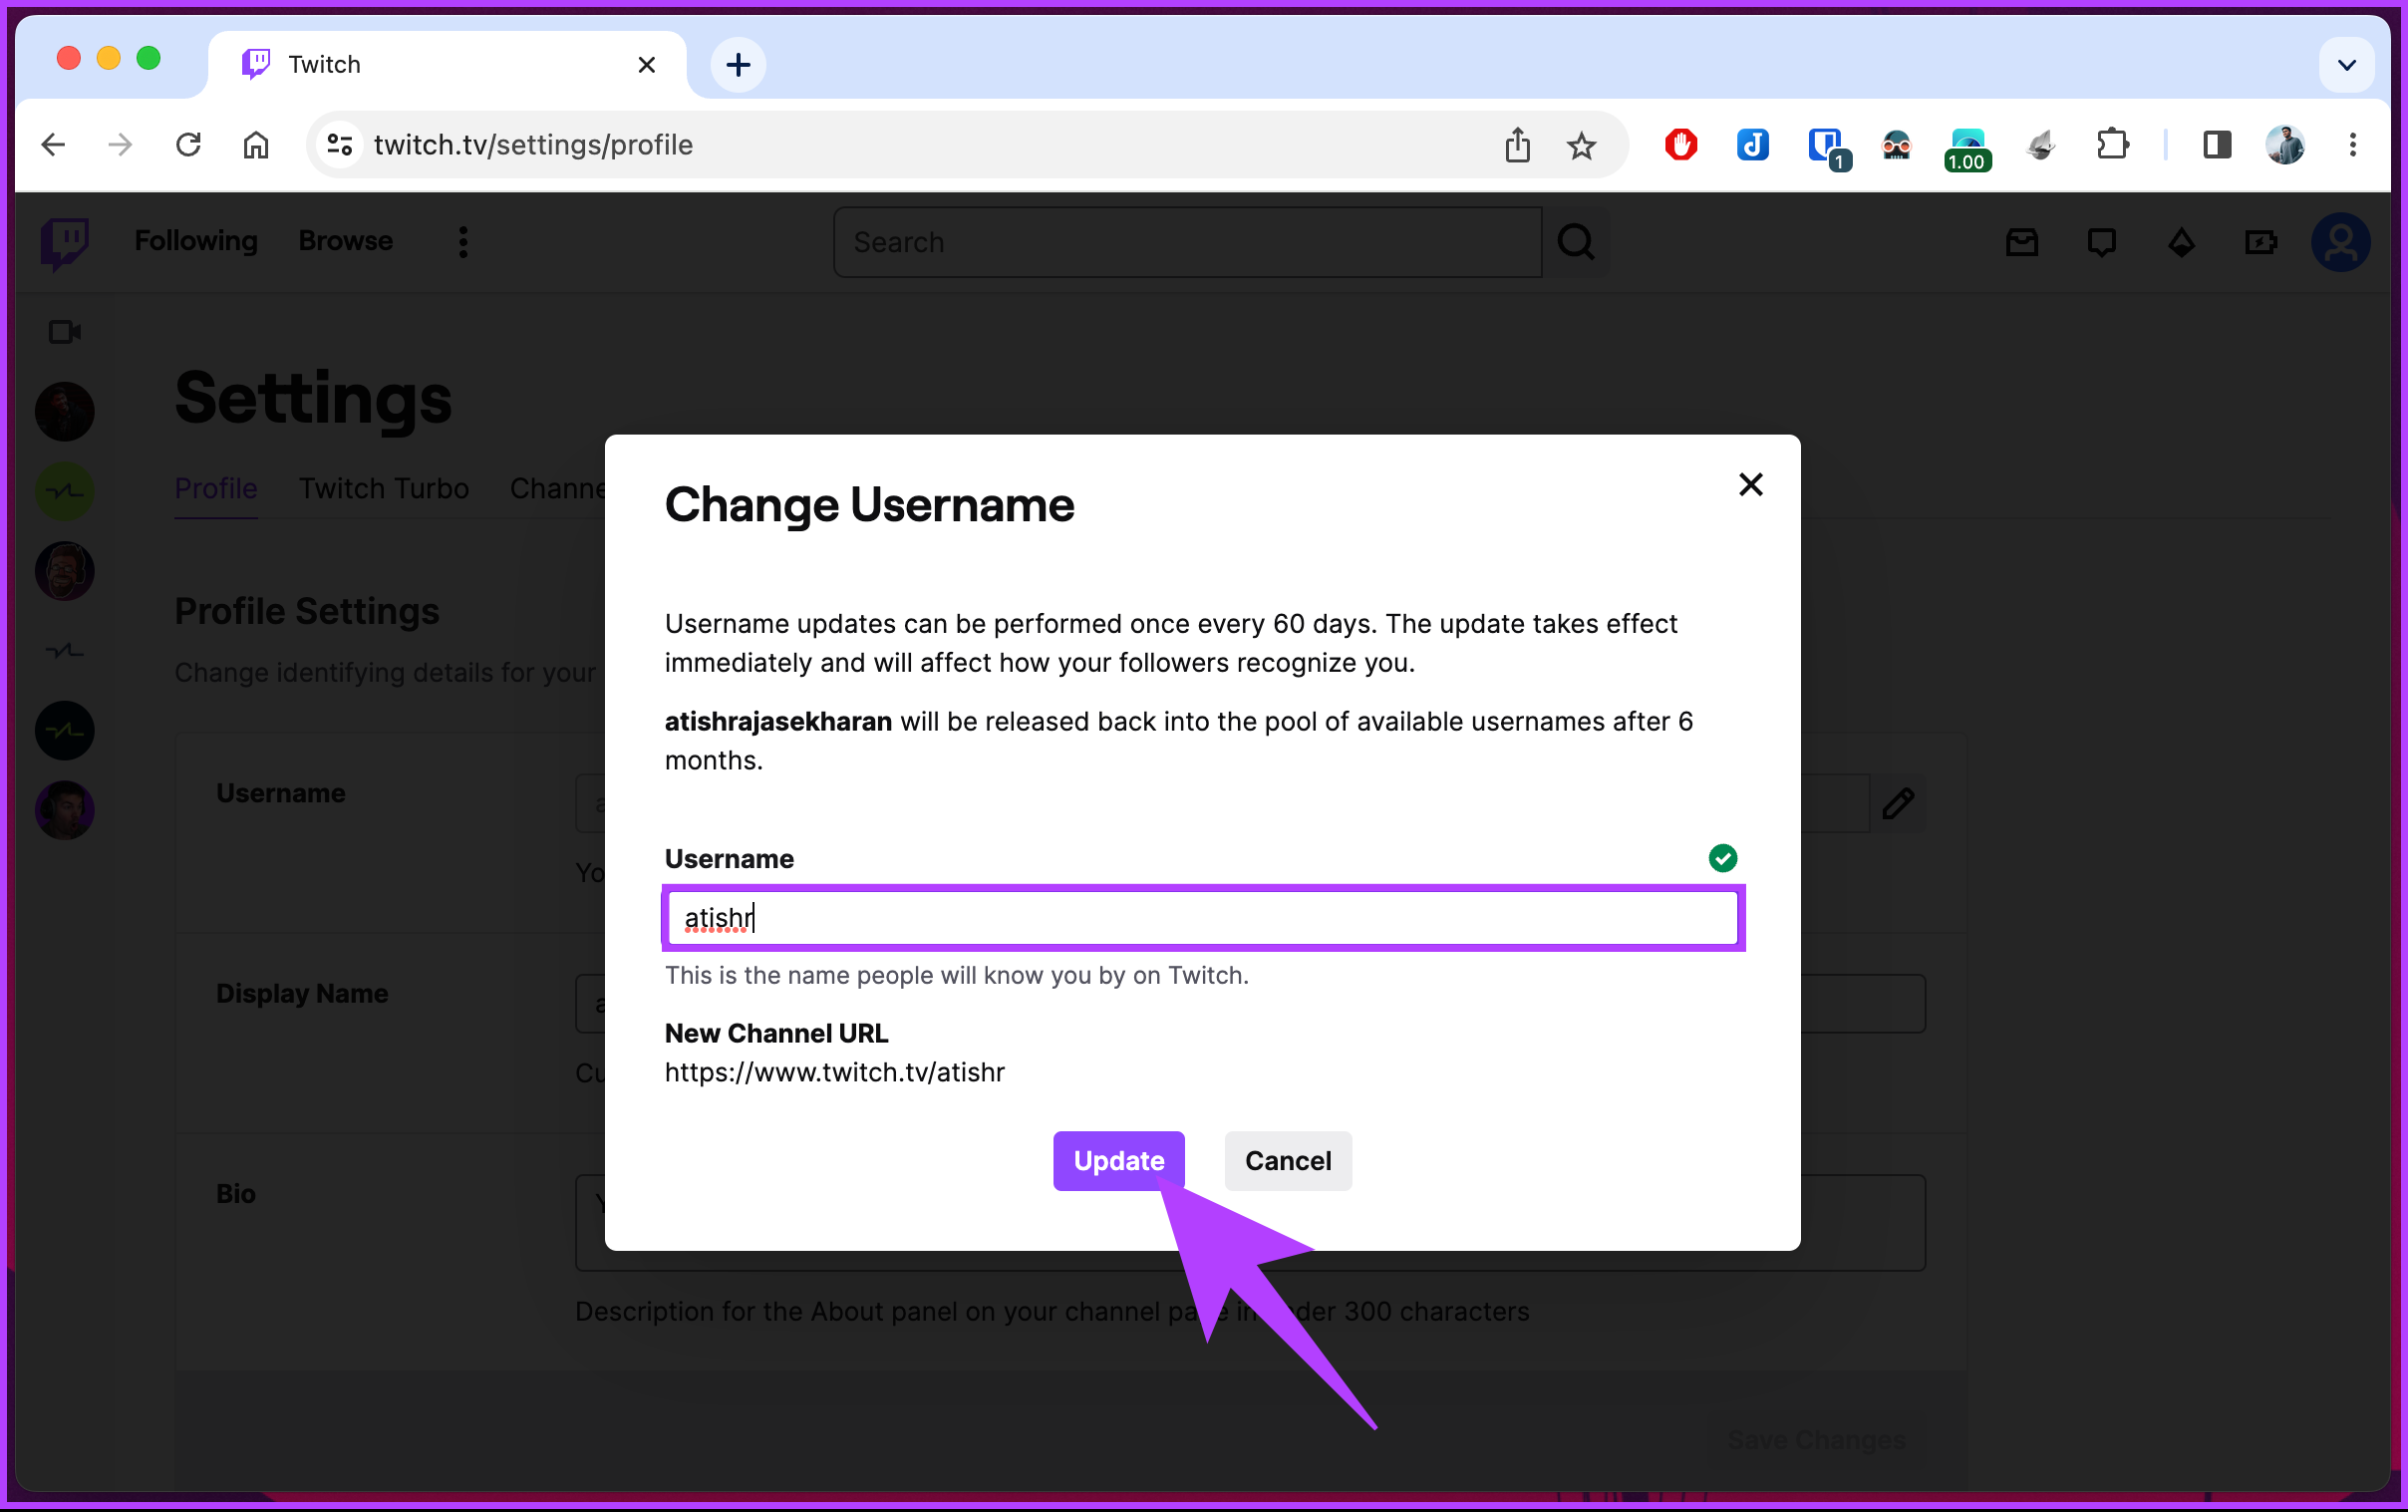
Step 5: In the Change Username pop-up, type your new username, and if it is available, click Update.
Note: If the username is shown as unavailable, you have no choice but to make tweaks to the typed new name and check its availability.
That’s it. The username update will take effect immediately with no redirection from your previously shared Twitch links on social media. You will have to spread the word about your new Twitch username.
If you are not a Twitch desktop user but want to change your username on mobile, you can use the Twitch app; continue reading.
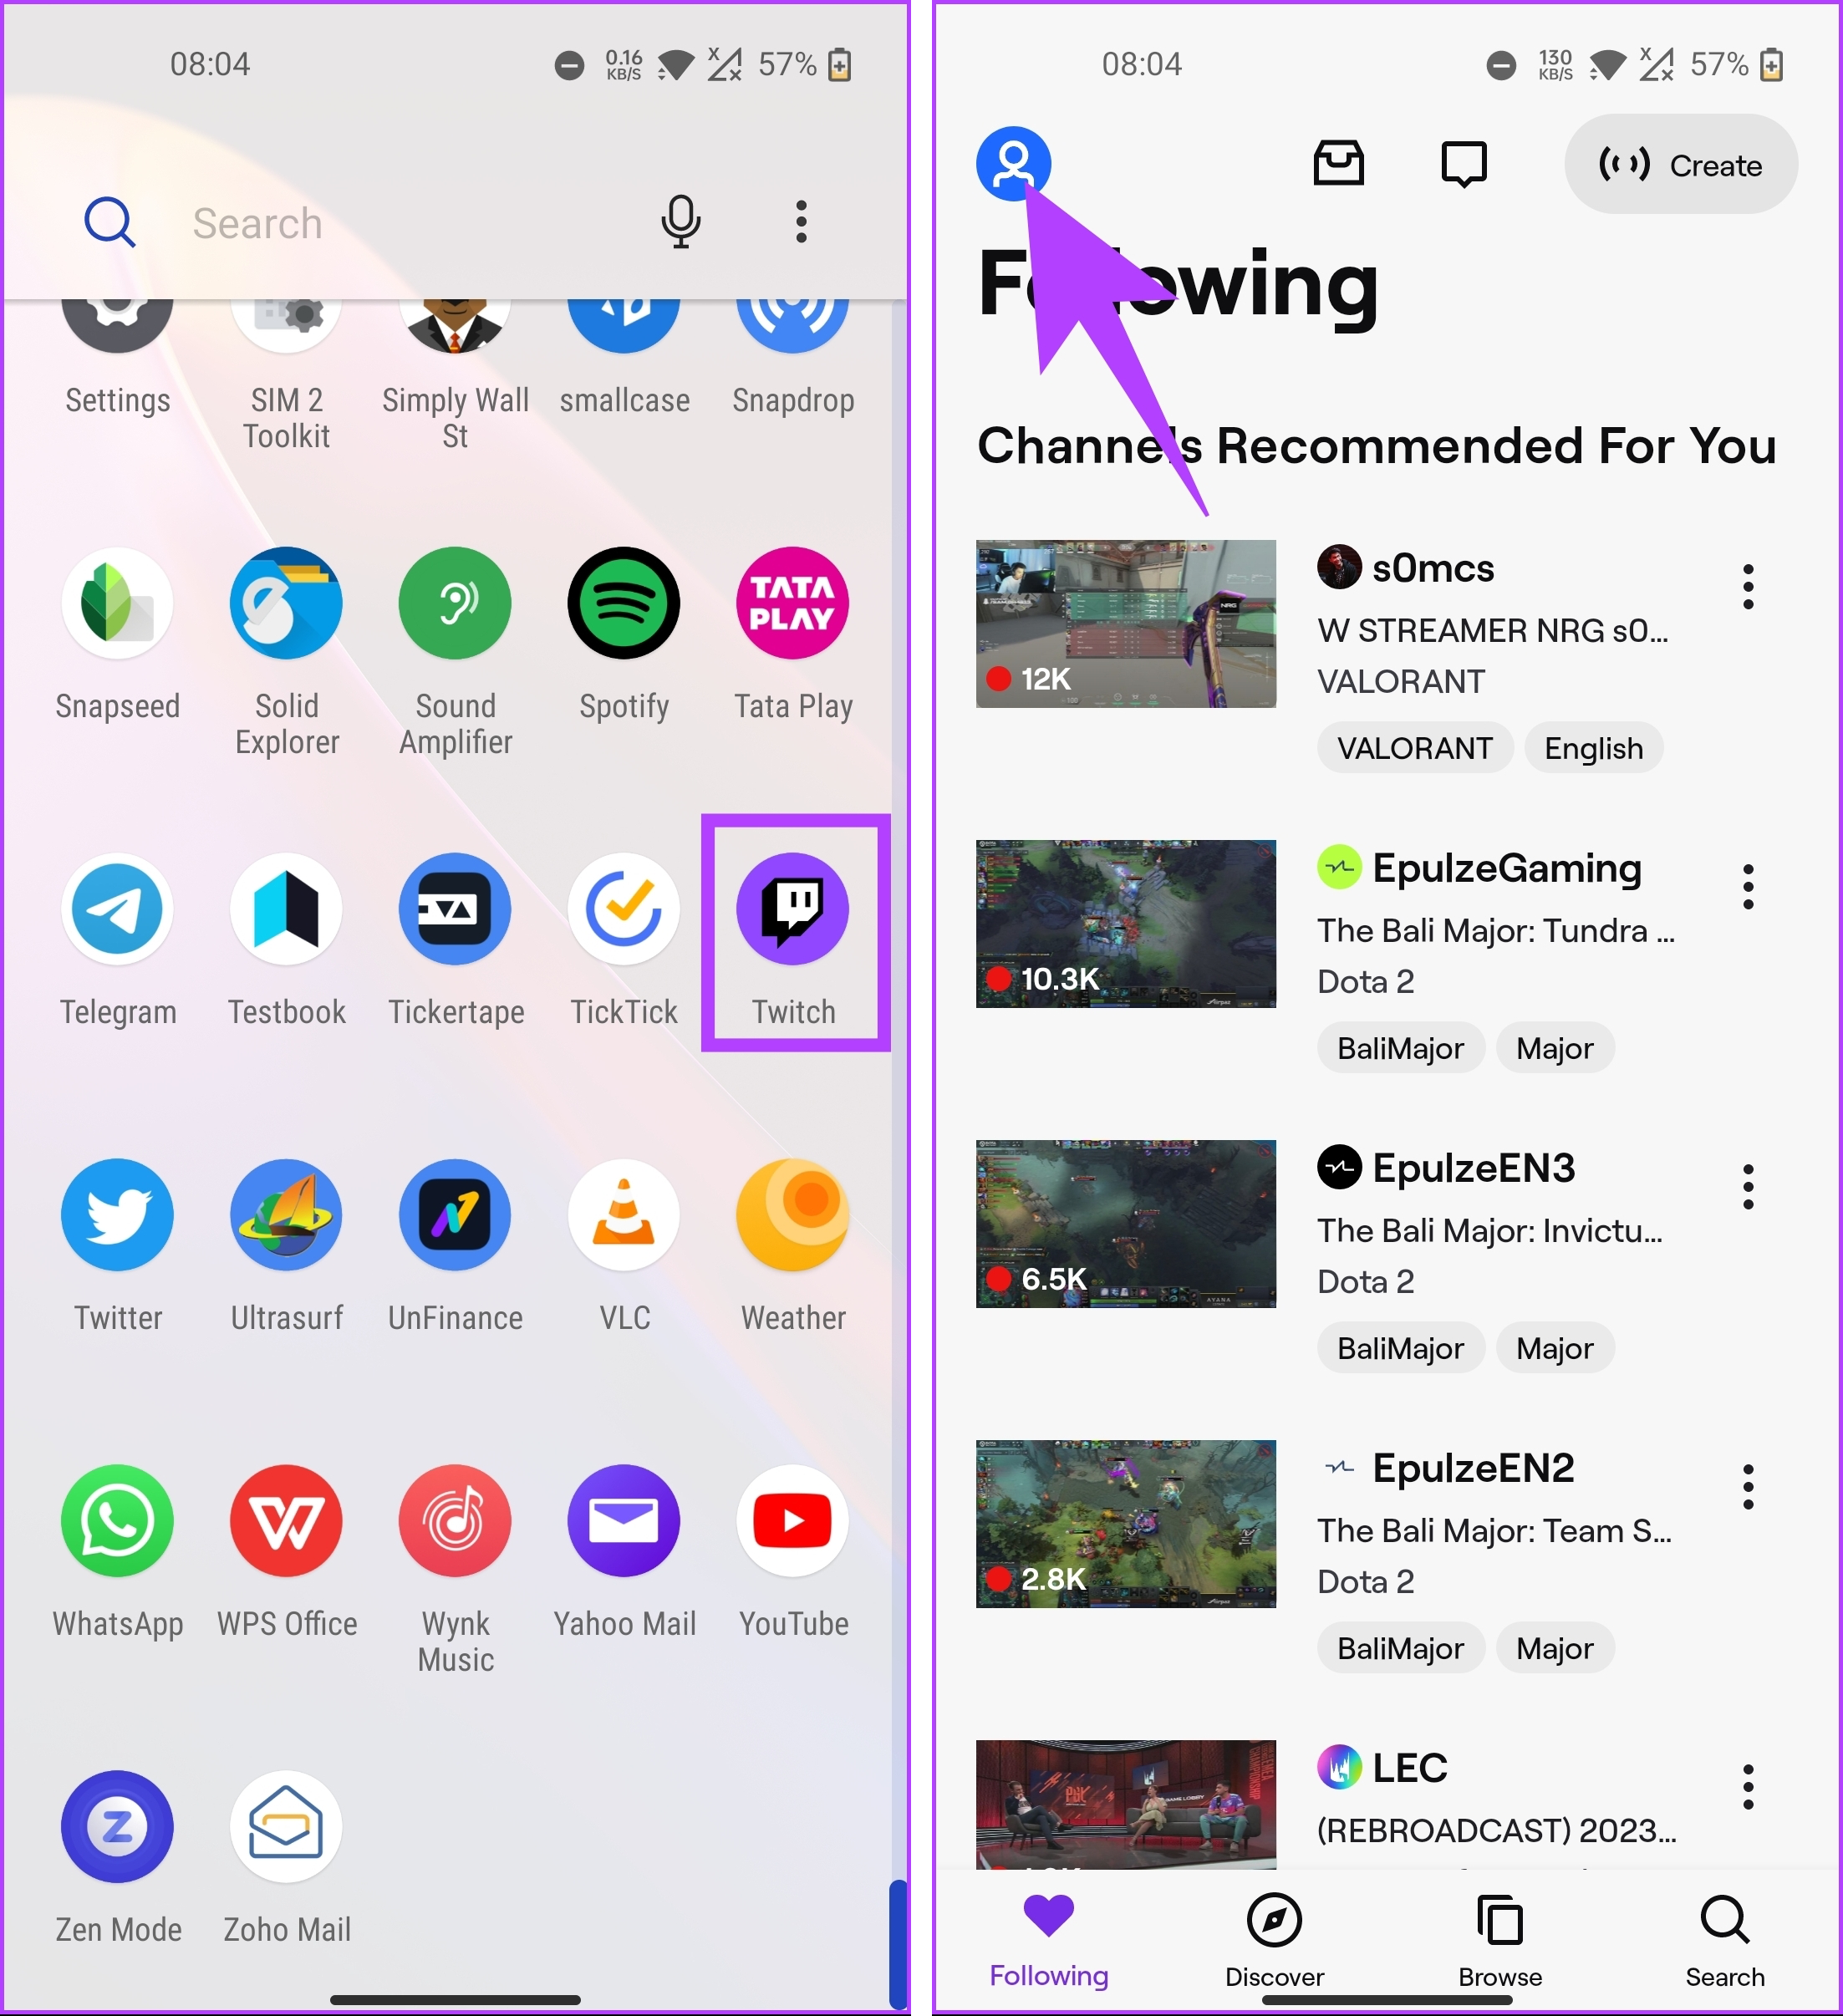
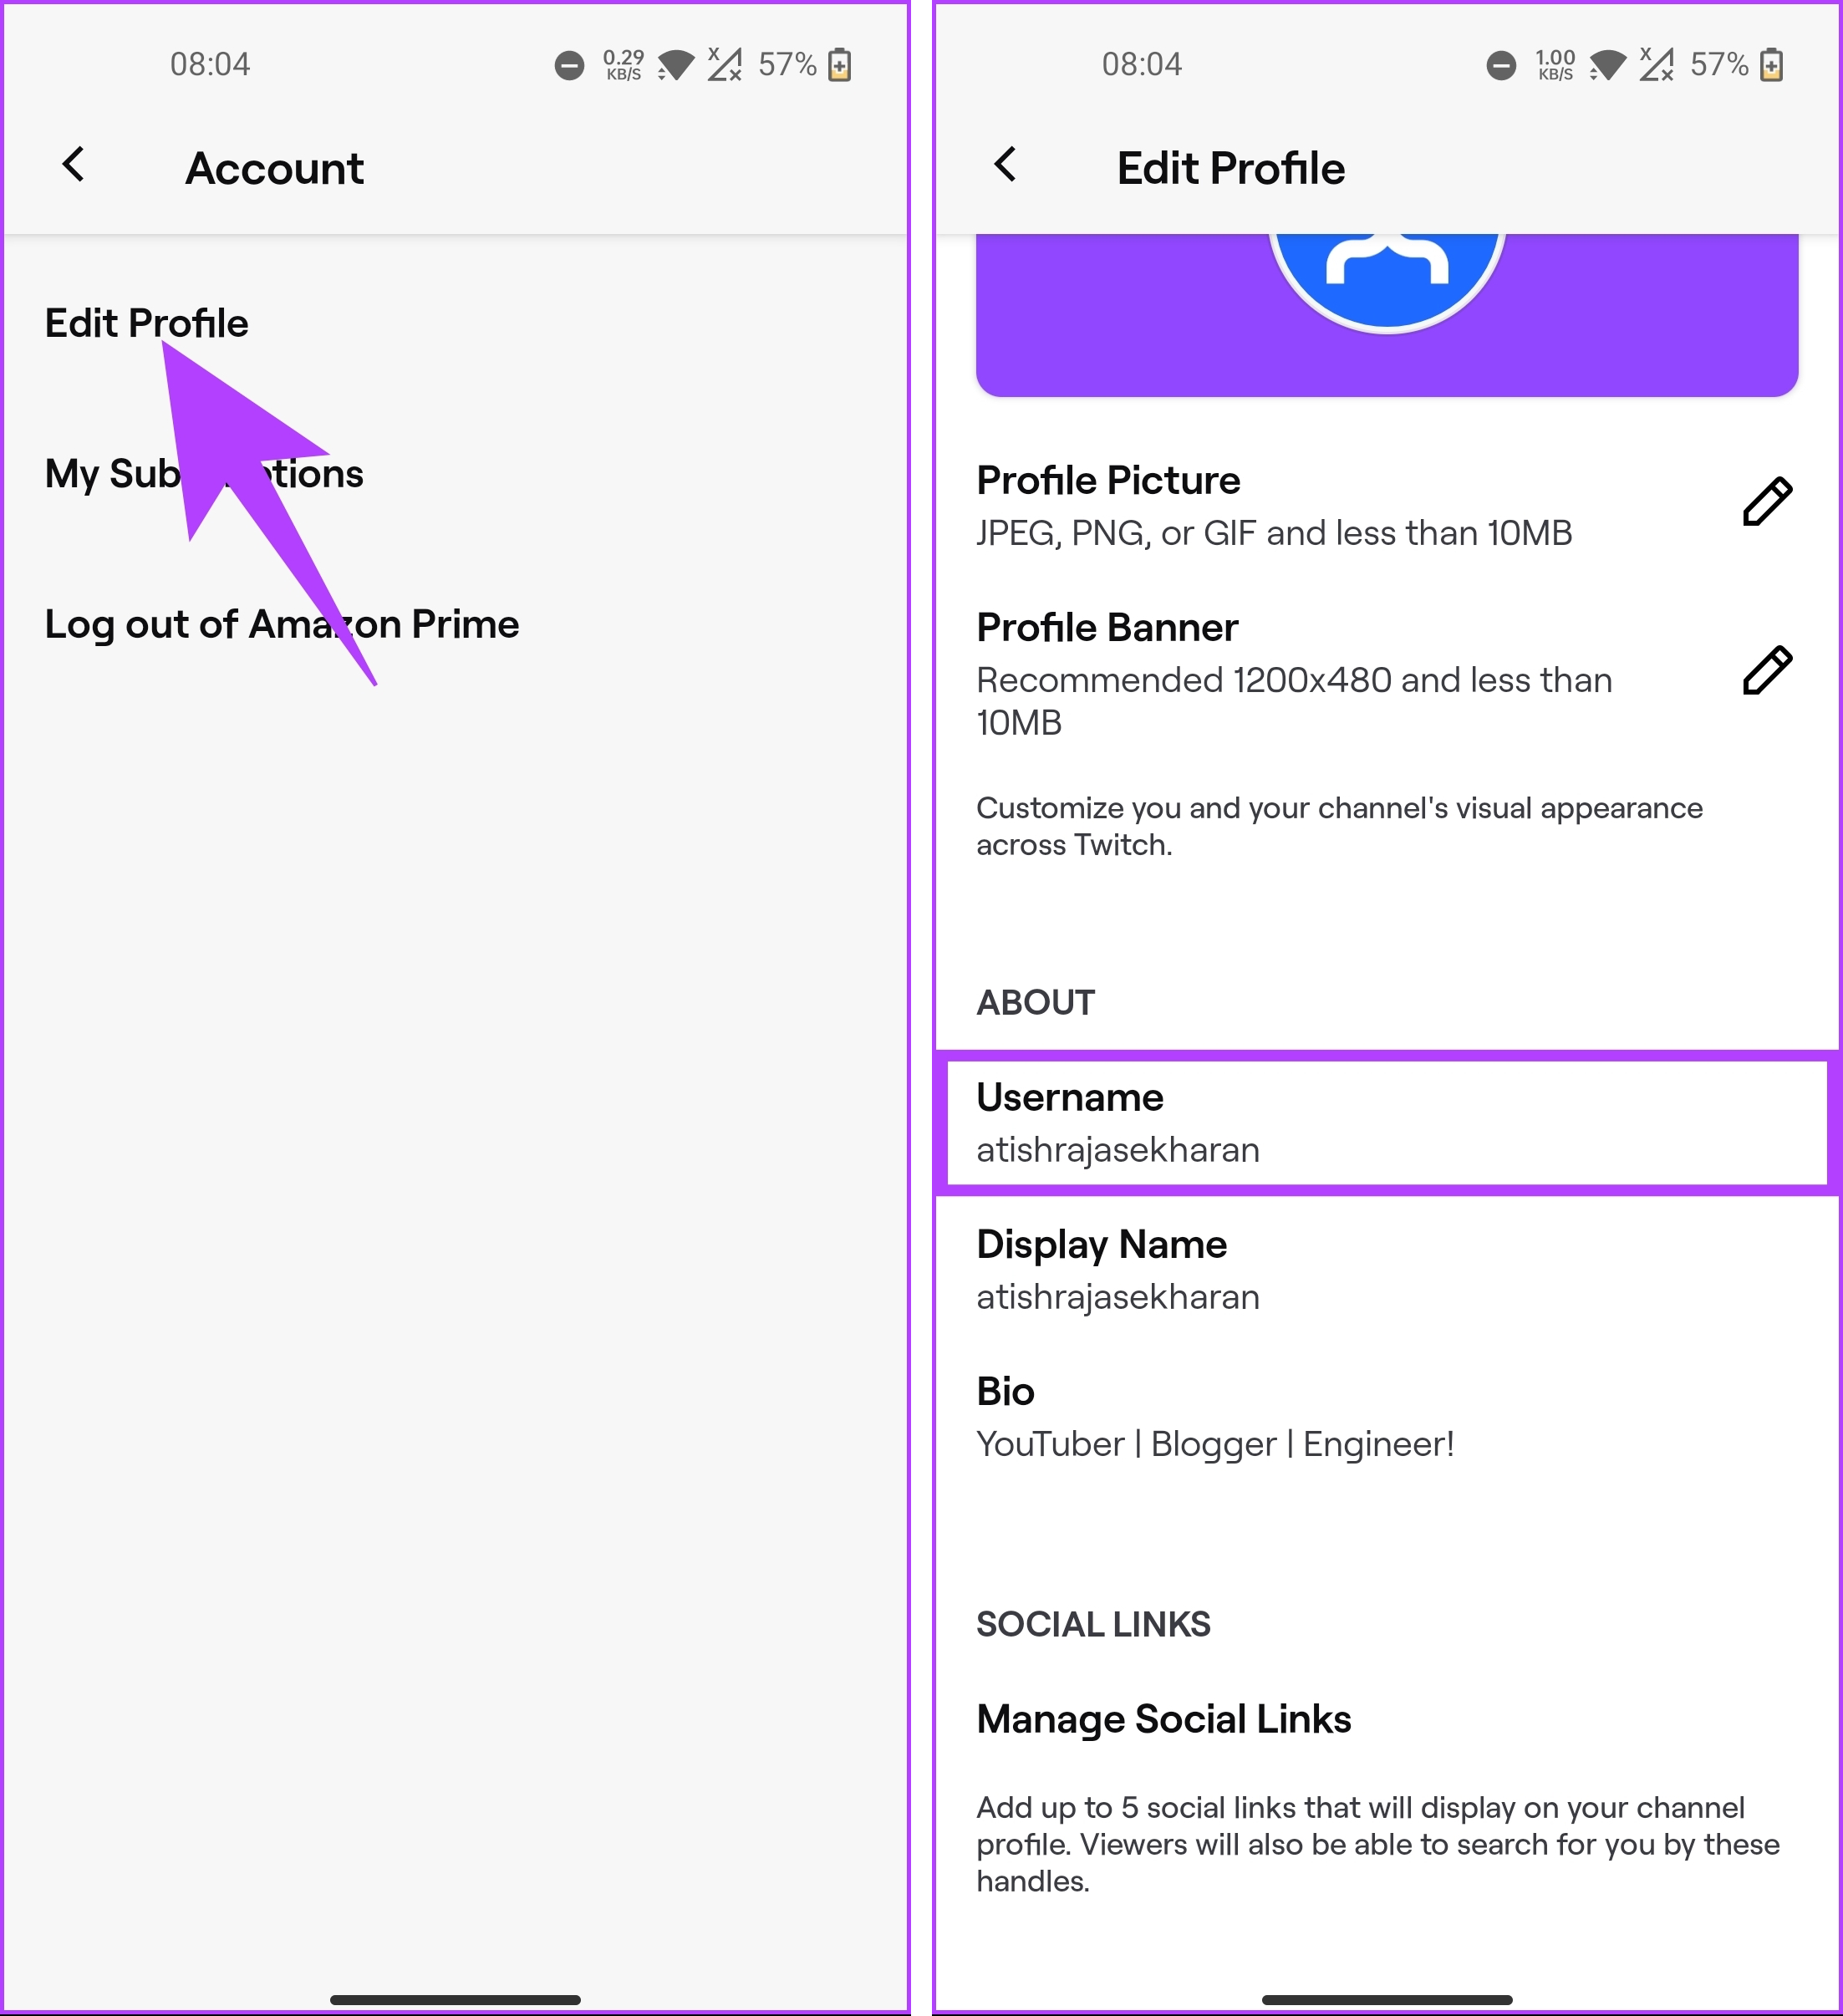
Step 1: Launch the Twitch app and tap the profile icon in the top left corner.
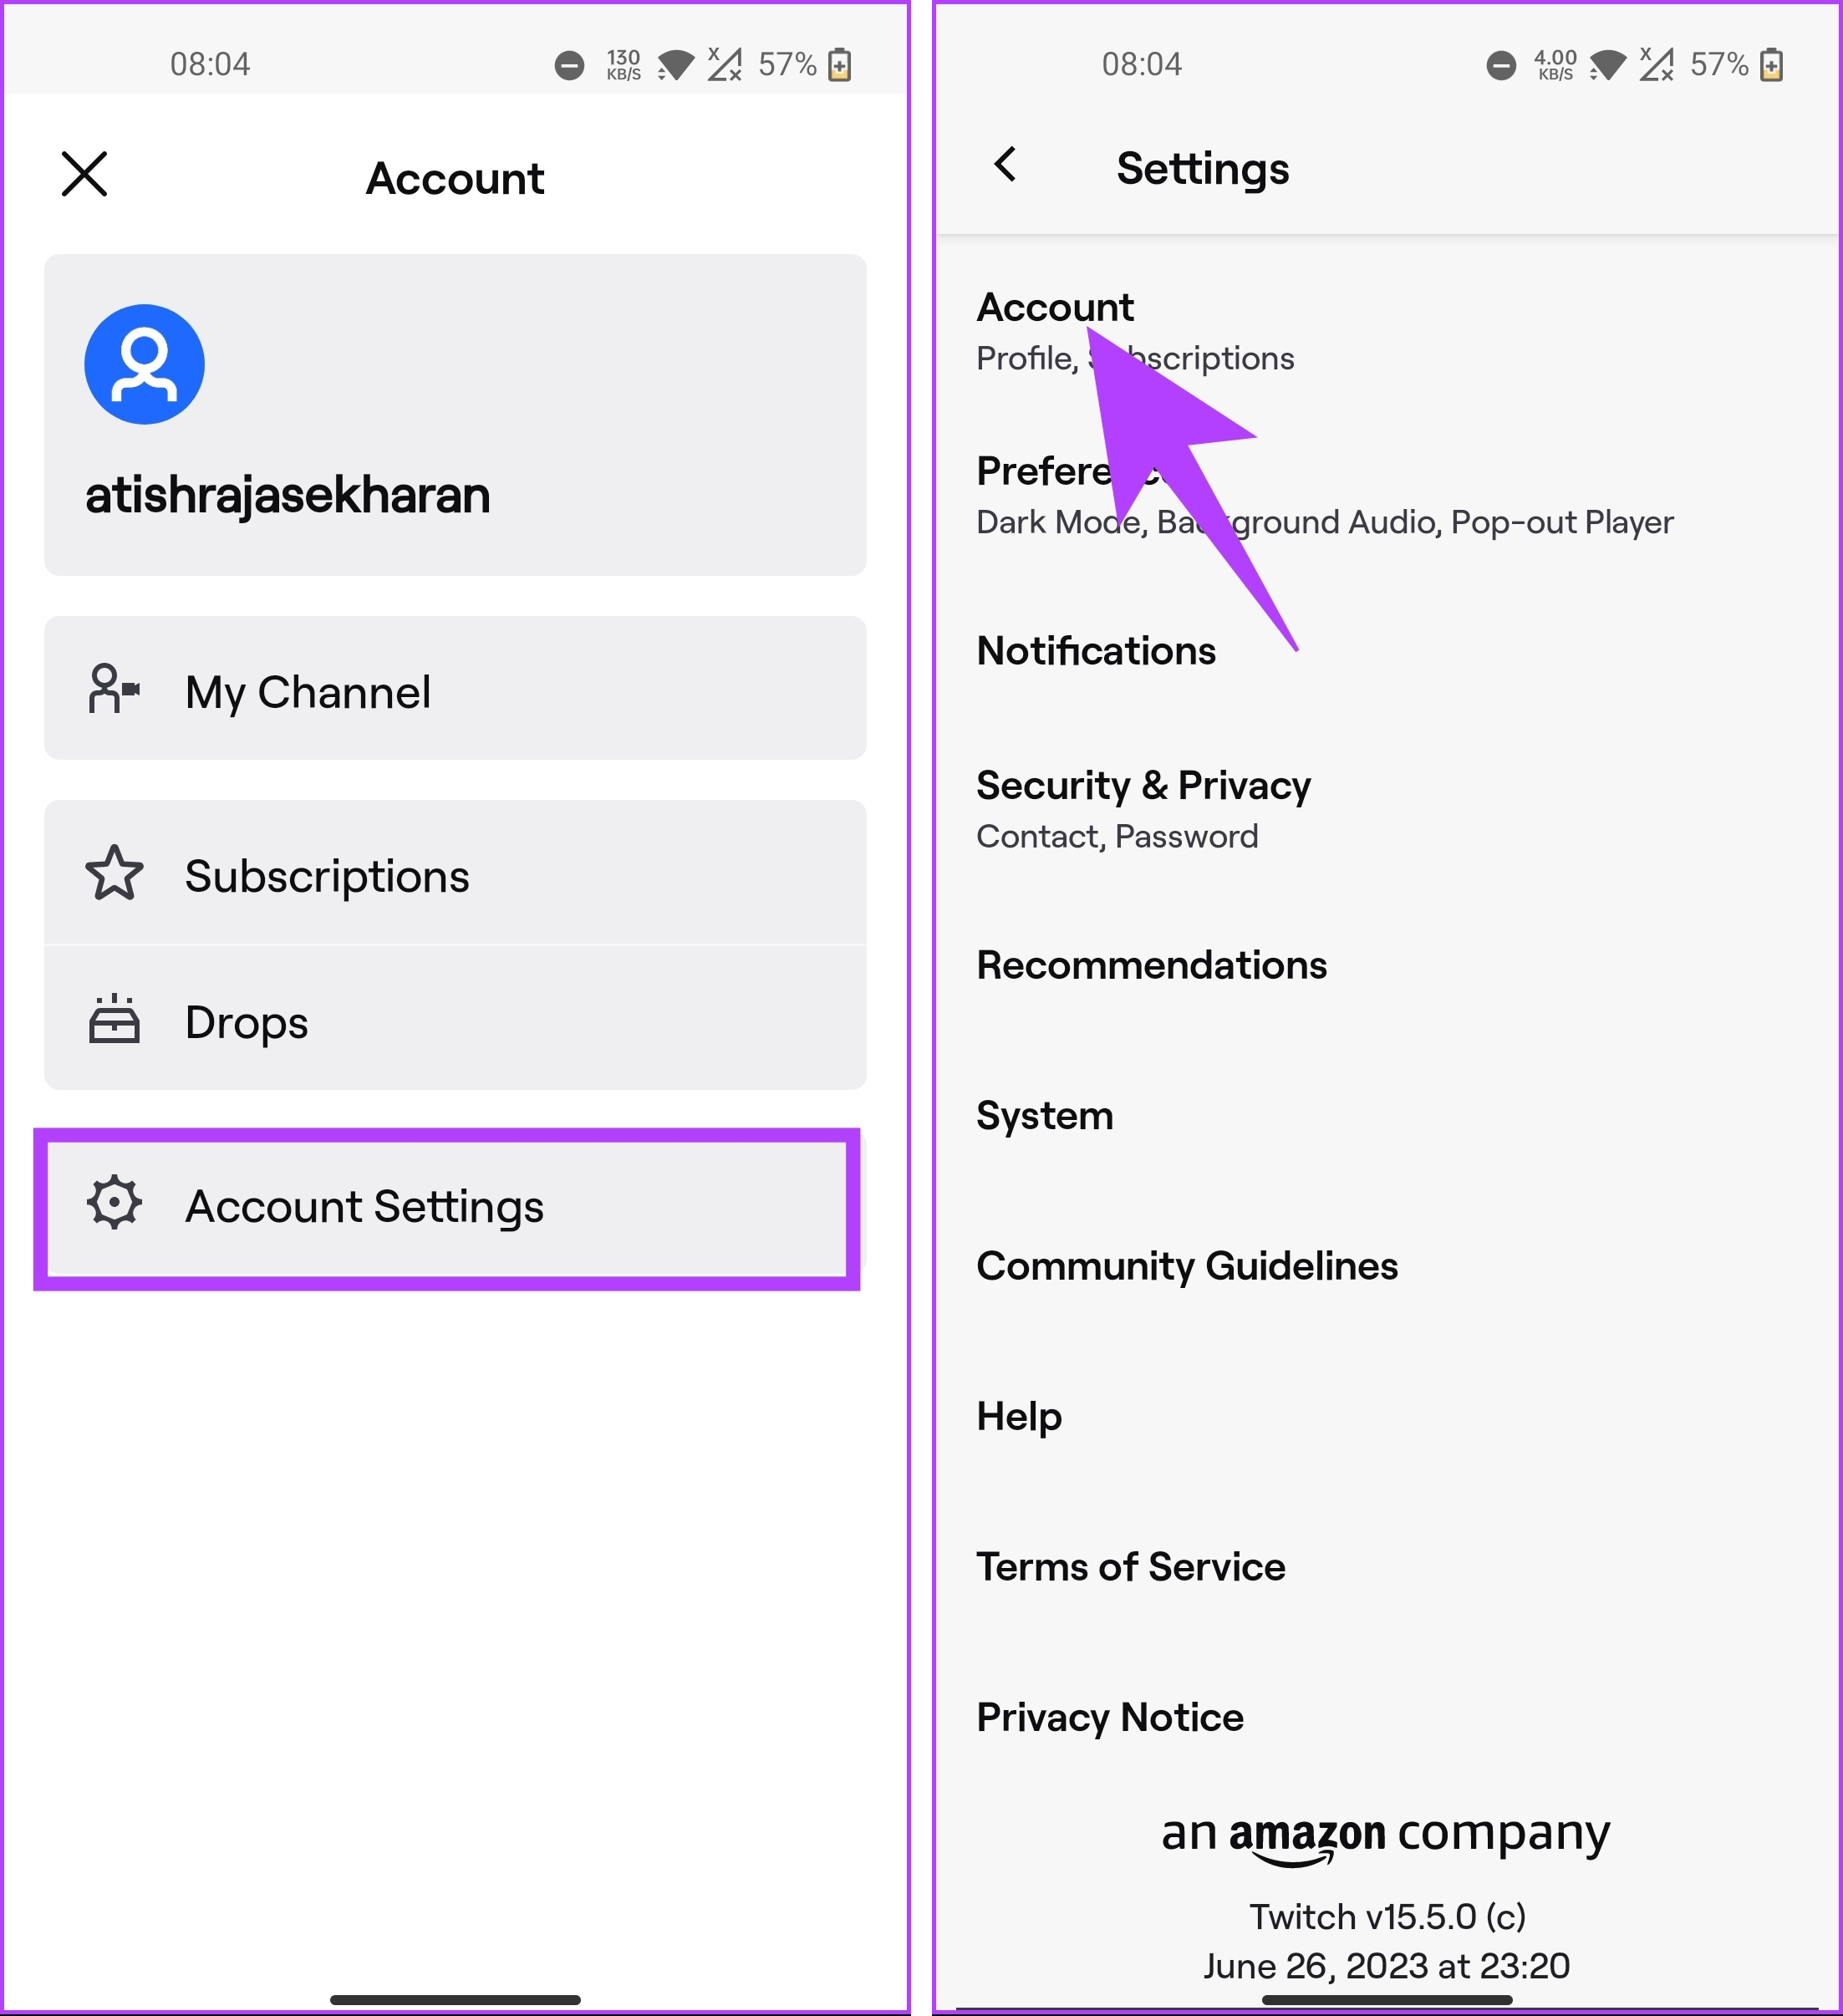
Step 2: From the Account screen, choose Account Settings. On the next screen, tap on Account.
Step 3: On the Account page, select the Edit Profile option. Now, scroll down to the About section and tap on Username.
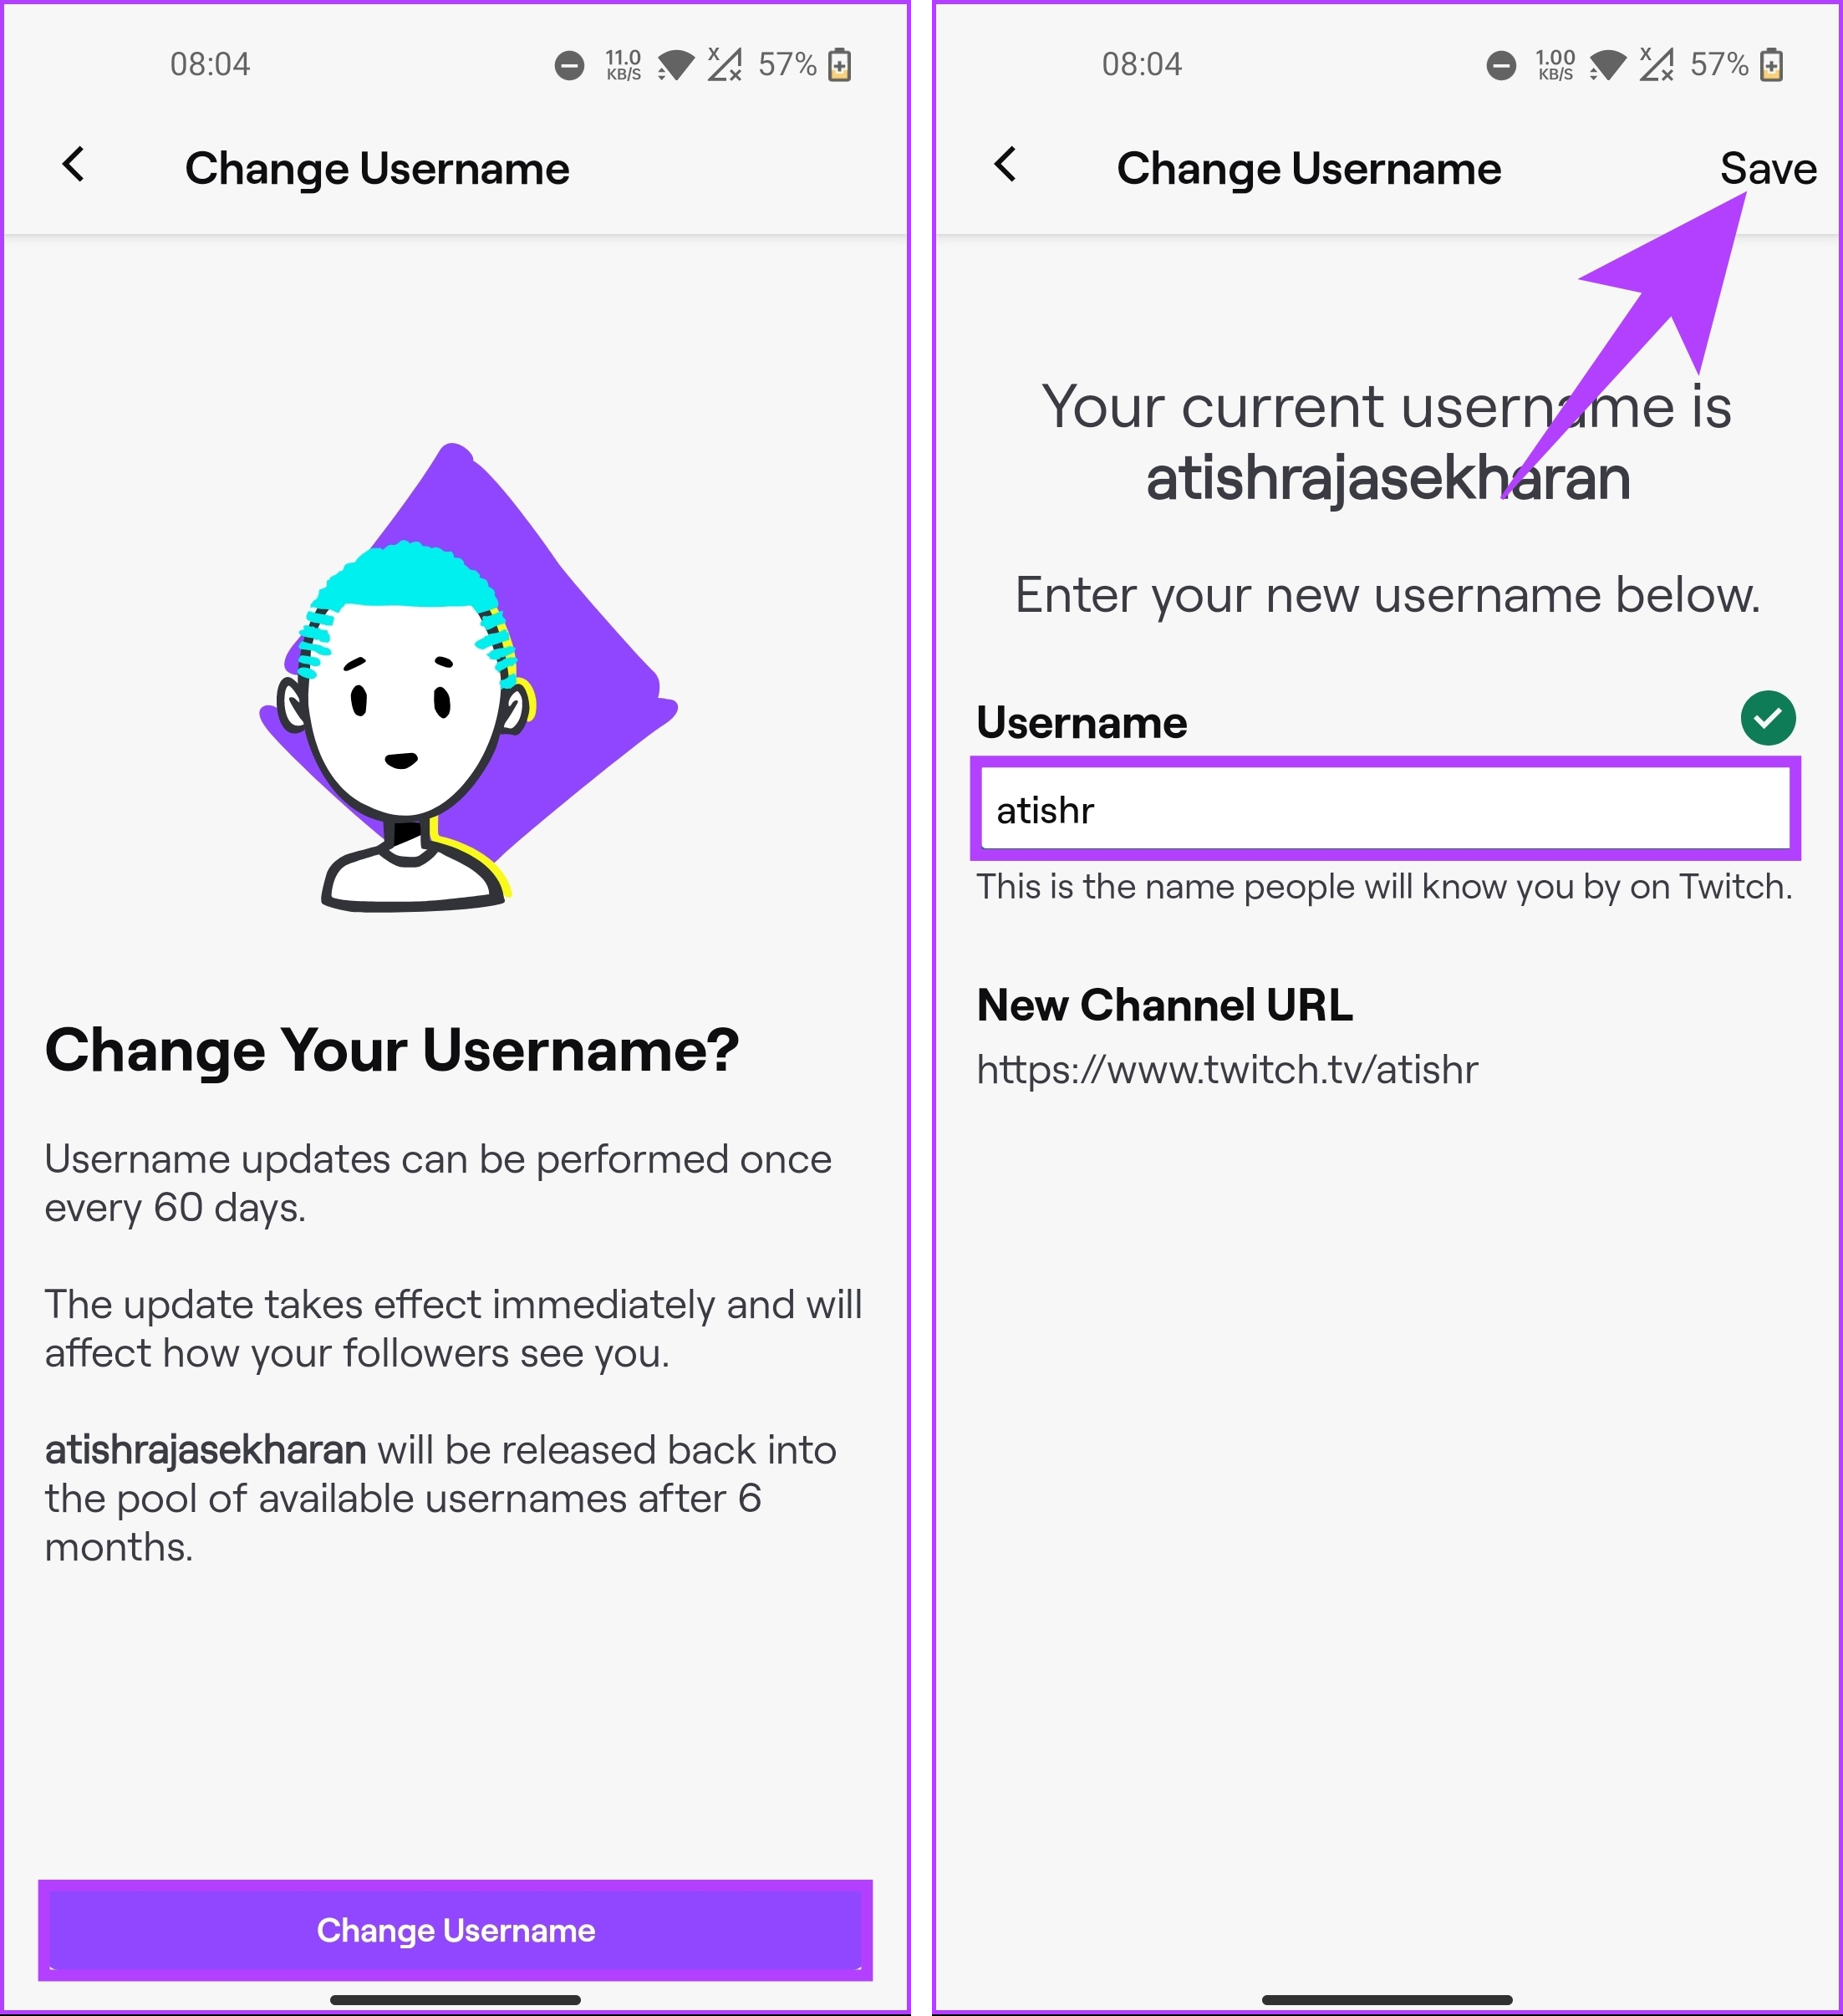
Step 4: Tap on Change Username, and on the next screen, type your new username, and tap on Save in the top right corner to make the changes.
Note: If the username is shown as unavailable, you have to tweak your typed username and check its availability.
There you go. You have successfully moved to a new username on Twitch. That said, if it is not the username you want to change or maybe, along with changing the username, you want to change your display name, keep reading.
Technically, you can tweak your Twitch display name. However, it can’t be different than your username. Confused? Well, you can only change the capitalization of letters in the display name of Twitch. You can’t change the name.
If you still want to go ahead, let’s begin with the steps for the desktop.
On a Desktop Browser
Step 1: Open Twitch on your preferred browser and log in with your account credentials.
Step 2: Once logged in, click the profile icon in the top right corner.
Step 3: From the drop-down menu, select Settings.
You will be taken to the account settings page.
Step 4: Scroll to the Profile Settings section under the Profile tab, click on the Display name, and make the changes.
Step 5: Once done, click on Save Changes.
There you go. You have changed the display name on Twitch. If you don’t have access to your desktop and want to do the same on mobile, continue reading.
On Twitch Android or iOS App
Step 1: Launch the Twitch app and tap on the profile icon in the top left corner.
Step 2: From the Account screen, choose Account Settings. On the next screen, tap on Account.
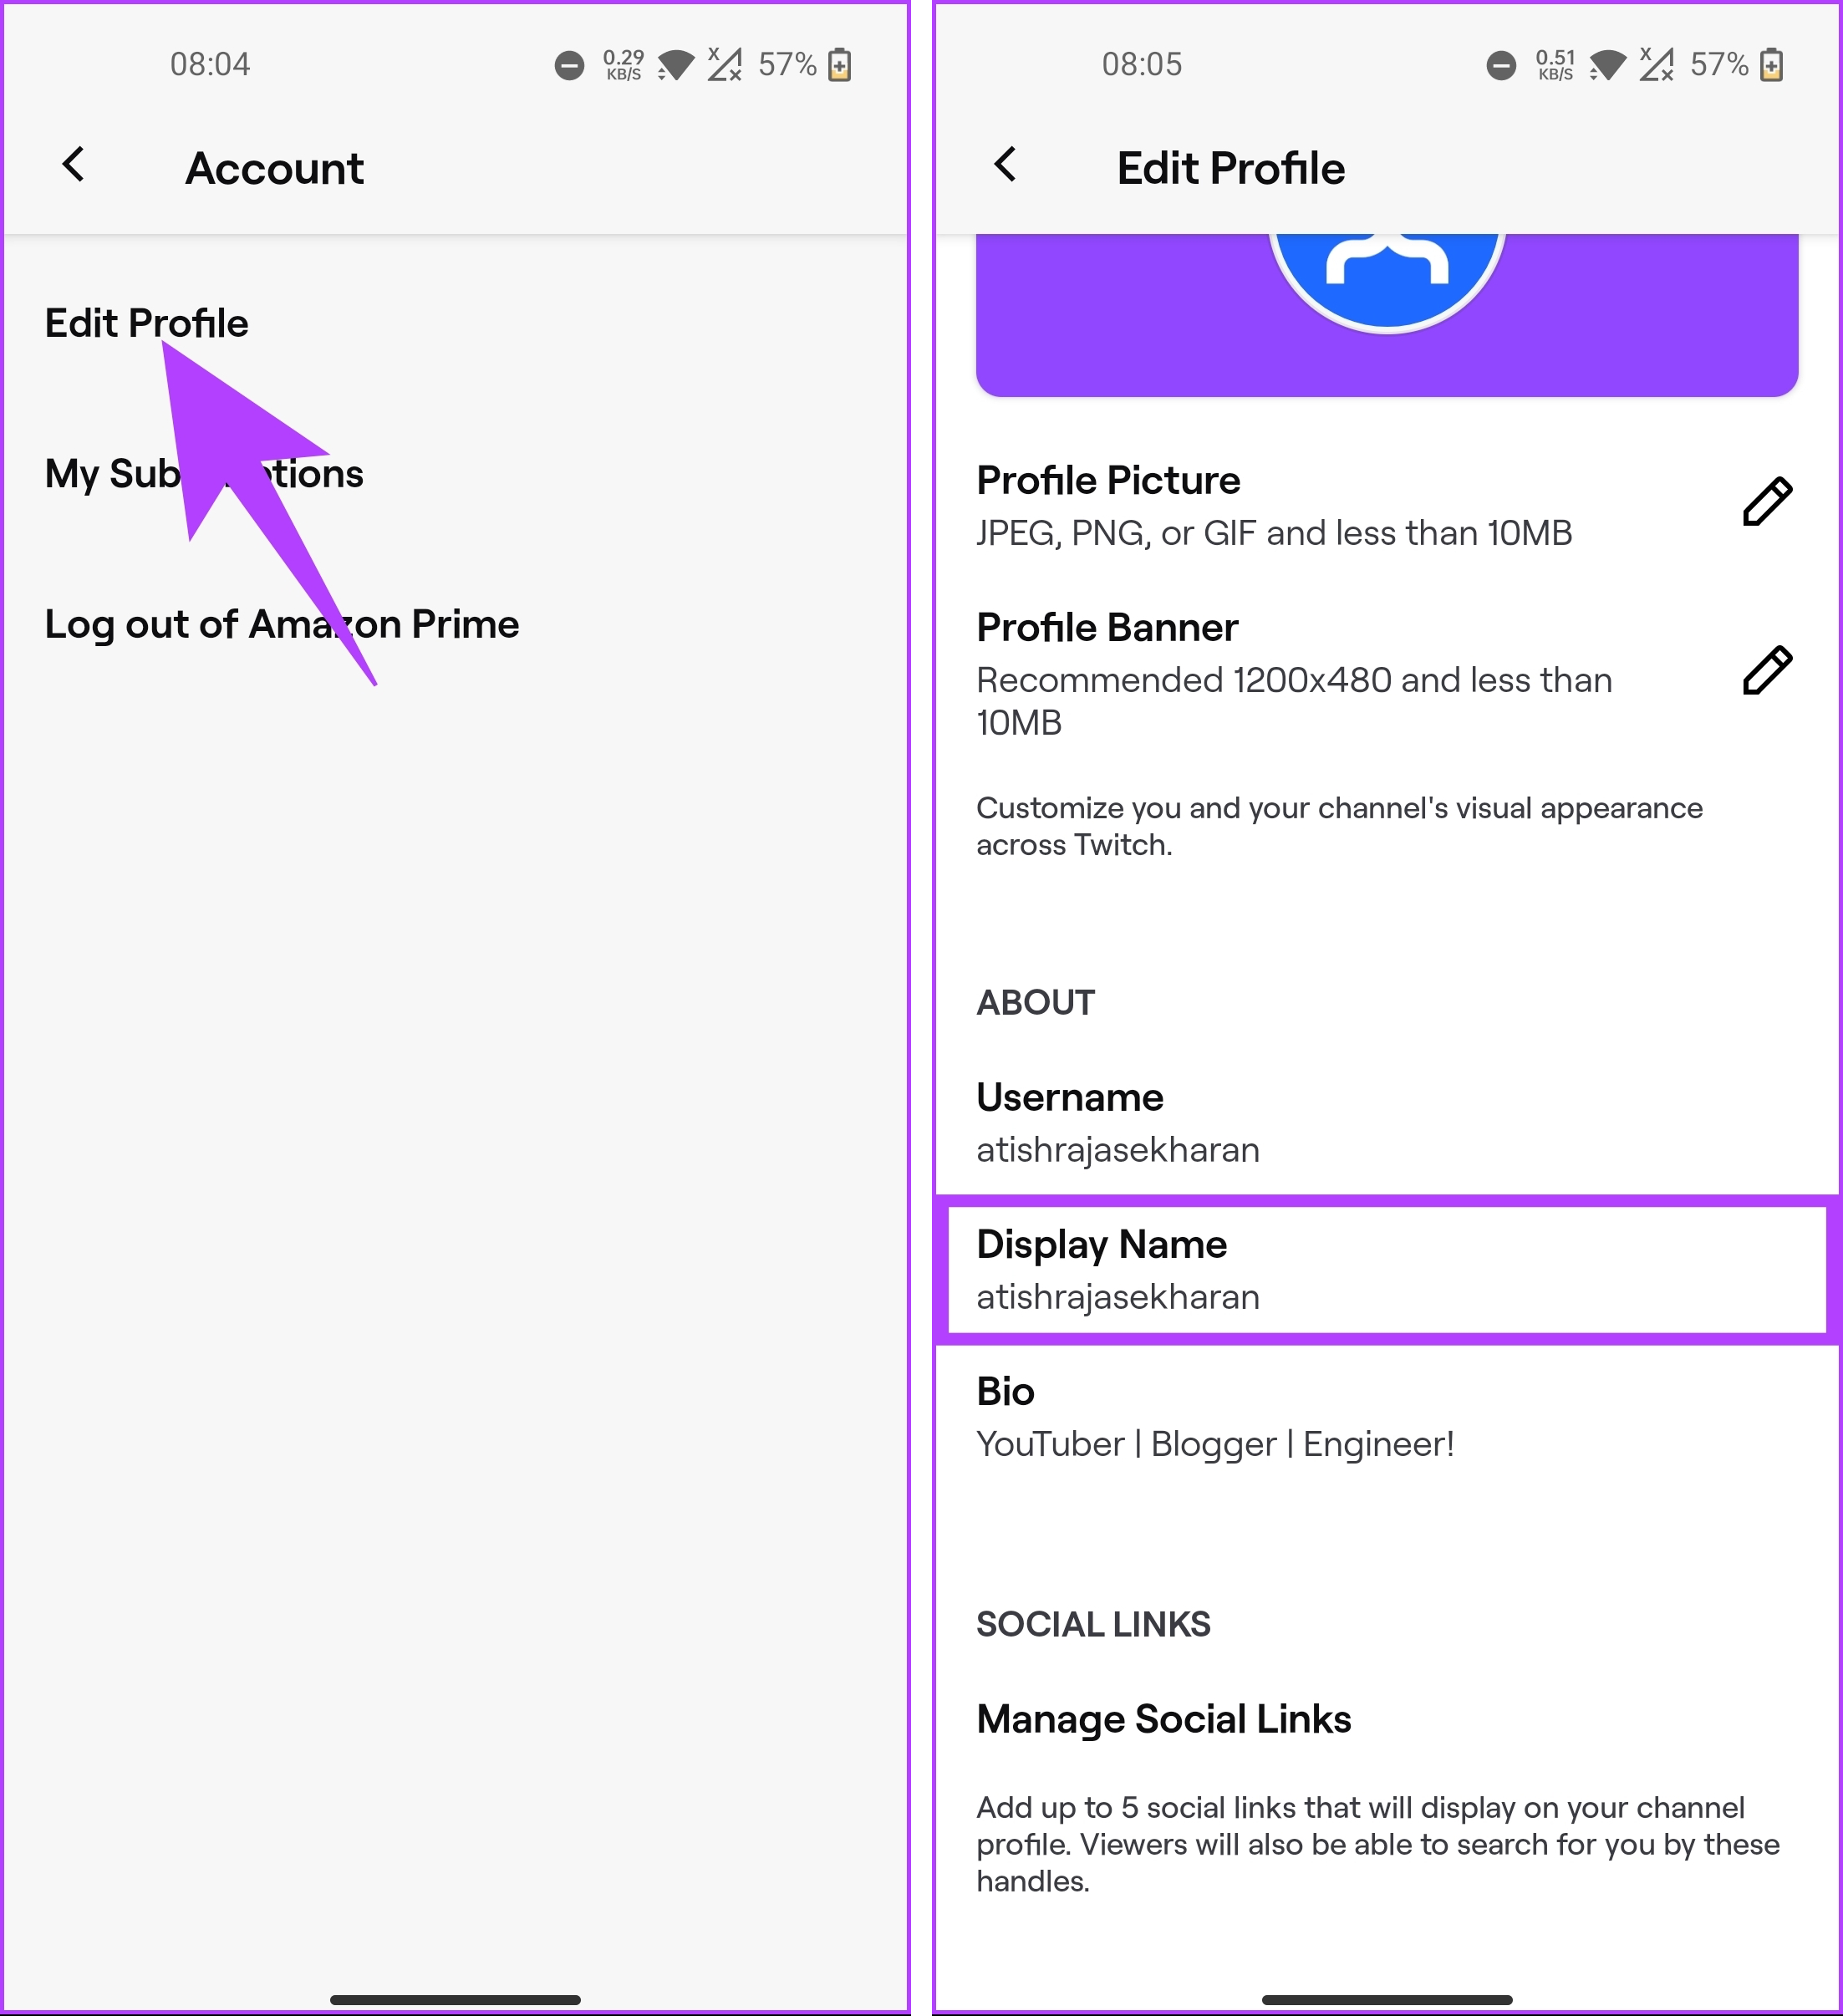
Step 3: On the Account page, select the Edit Profile option. Now, scroll down to the About section and tap Display Name.
Step 4: Now, type your preferred display name and tap Save in the top right corner to implement the changes.
There you go. You have successfully changed your display name in the Twitch app. Check out the FAQ section below if you have any queries we missed addressing.
FAQs on Changing Twitch Name
1. Can your Twitch username and display name be different?
No. Your username and display name can’t be different on Twitch. As mentioned earlier, the only change that you can make to your display name is the capitalization of letters.
2. Can you change the color of your name on Twitch?
Changing your Twitch username and display name can bring some life into your streaming journey and help you establish a stronger connection with your community. With the step-by-step instructions in this article, you can easily update your name. However, if you notice someone misusing your or someone’s identity, you can report them on Twitch.
You are up for a below-average experience when your Windows laptop reaches an abnormal high You notice app crashes, glitchy gaming, and a major slowdown in basic tasks. Before things get out of hand and permanently damage your laptop internals, use the tricks below to stop overheating on a Windows laptop.
High temperatures on your Windows laptop impact the battery life too. You can’t work long hours due to a warm laptop base. Before we go through the tricks to prevent your laptop from overheating, let’s first understand the possible reasons behind such an issue.
Why Is My Laptop Overheating
Besides running Windows 11 on a dated hardware, here’s why your laptop gets so hot in specific situations:
Playing demanding games on a low-end GPU and CPU.
Low storage on your Windows laptop.
Lack of physical memory on your Windows laptop.
High CPU usage during certain tasks.
Lack of thermal paste.
Corrupt apps on your Windows PC.
Low network connection.
Outdated drivers.
A high amount of dust in the laptop’s internals.
1. Clean Your Laptop
Over time, your laptop internals (especially the fan) get filled with dust and debris. Most Windows laptops come with a removable base. You need to carefully remove the base and clean the internals.
You can also take help from a professional to clean your laptop.
2. Fix High CPU Usage
Some of your active apps may cause high CPU usage, often leading to overheating on your laptop. You need to identify and close such apps.
Step 1: Right-click on the Windows key and select Task Manager from the Power User menu.
Step 2: Check which apps and services are consuming high CPU usage. Select it and click End task at the top-right corner.
3. Pause the Streaming Process in the Background
Are you downloading a large game or file on a slow network connection on Windows? It may lead to a long estimated time and cause high temperatures on your laptop. You’ll need to either connect to a high-speed Wi-Fi network or pause such downloads in the background.
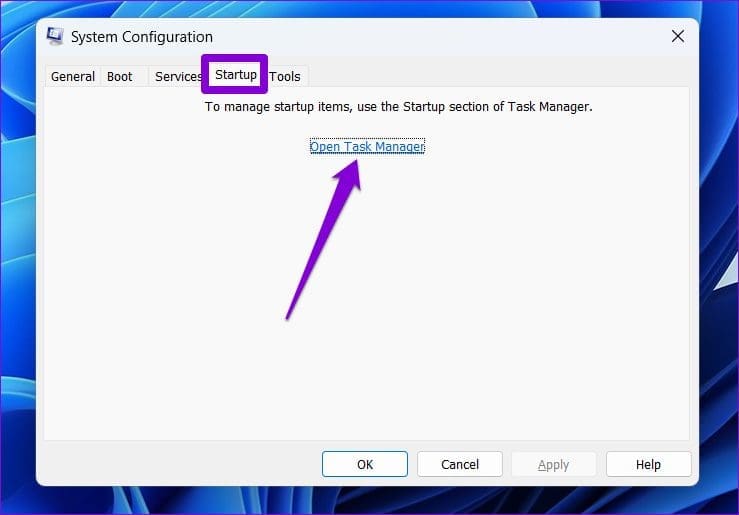
4. Disable Startup Apps
If you have several apps and services launching at system startup, it leads to overheating. It’s time to review such apps and disable irrelevant ones.
Step 1: Press the Windows + I keyboard shortcut to open the Settings app.
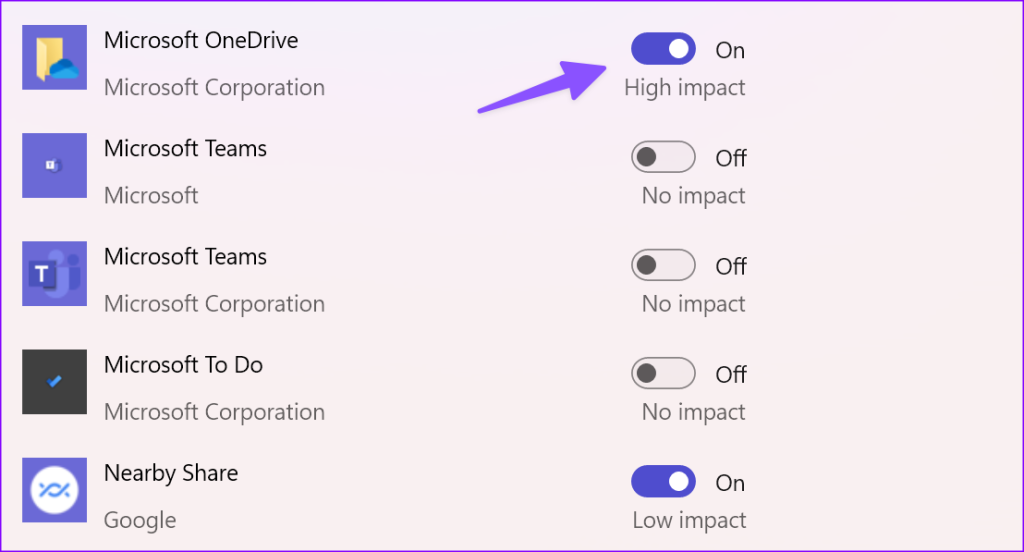
Step 2: Select Apps from the left sidebar and choose Startup from the right pane.
Step 3: Disable unnecessary apps and services launching at device startup.
5. Delete Recently Installed Apps
Do you notice overheating after installing some new apps on your Windows laptop? Such buggy apps may cause your laptop to overheat. You’ll need to reinstall such apps and find their alternatives.
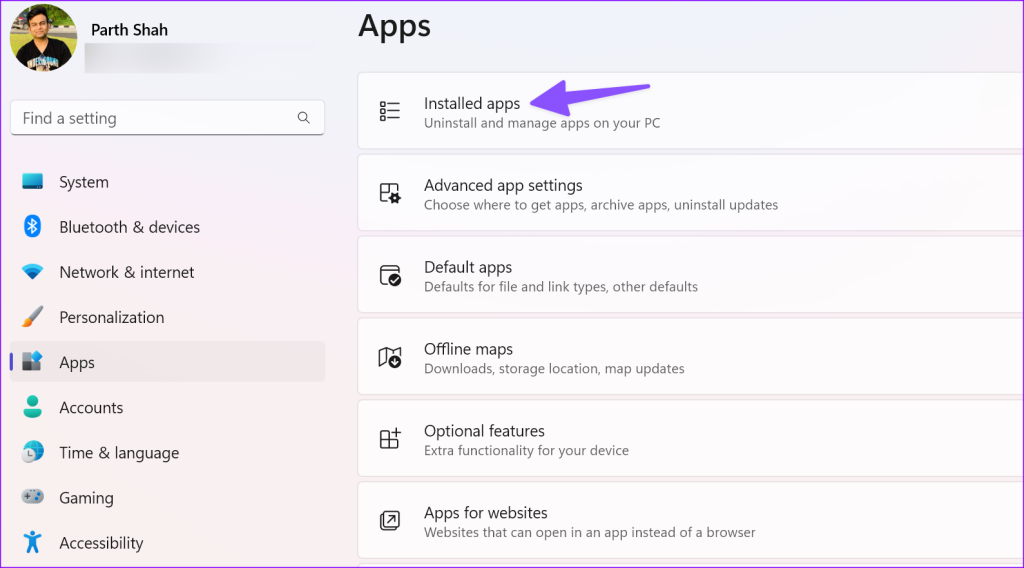
Step 1: Press the Windows + I keyboard shortcut to open the Settings app.
Step 2: Choose Apps from the left sidebar and choose Installed apps from the right pane.
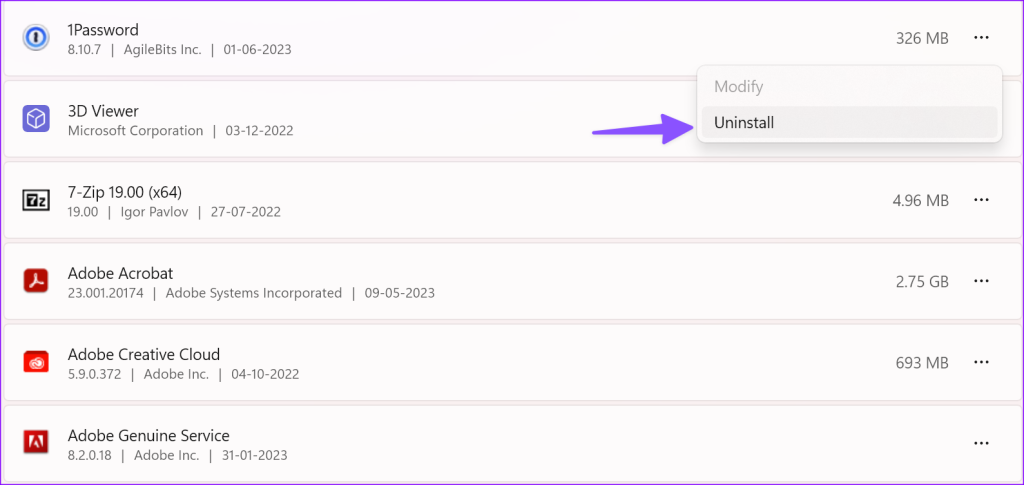
Step 3: Click the three horizontal dots menu beside an app and select Uninstall.
Repeat the same for all the troubling apps and wait for some time to get the temperature down.
6. Run Power Troubleshooter
Windows comes with a power troubleshooter to fix such glaring issues on the go. It’s time to run it.
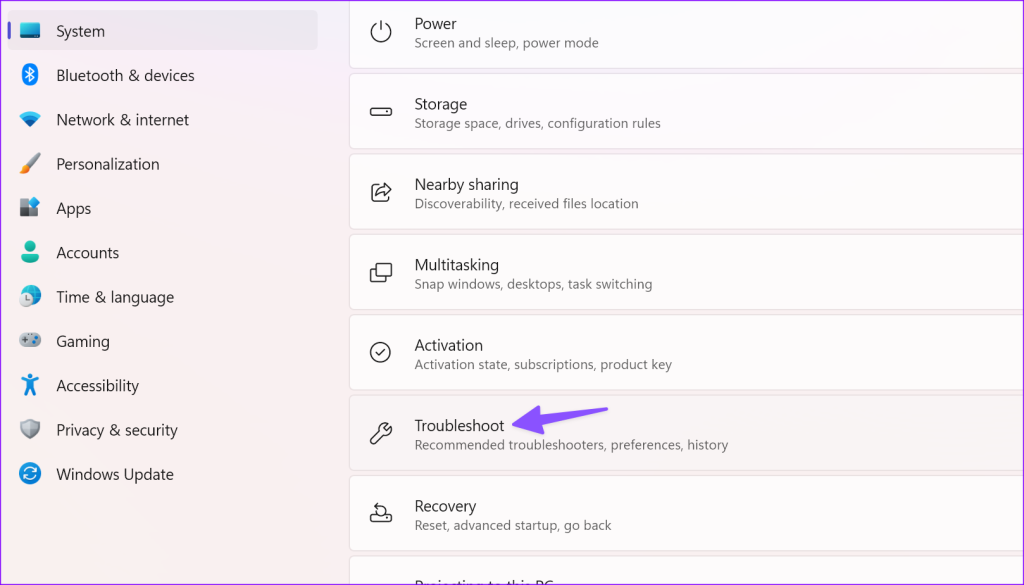
Step 1: Press the Windows + I keyboard shortcut to open the Settings app. Choose System from the left sidebar and select Troubleshoot from the right pane.
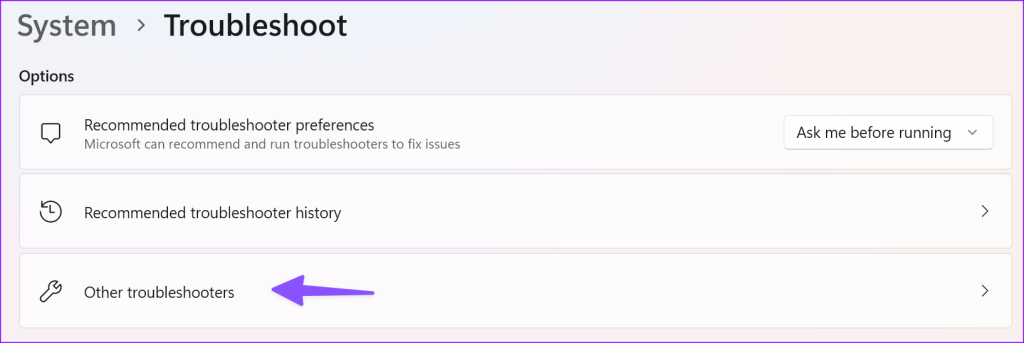
Step 2: Select Other troubleshooters.
Step 3: Run the Power troubleshooter and follow the on-screen instructions.
7. Apply Thermal Paste
Your laptop CPU’s thermal paste evaporates after a couple of years. You need to apply thermal paste to keep the CPU temperatures in check. You can read our buying guide to get the top thermal paste for your Windows laptop. We recommend getting help from a professional to apply the thermal paste.
8. Tweak Game Settings
Are you playing demanding games on high settings? If your laptop has a low-end GPU, it may overheat. You’ll need to lower down gameplay FPS (frames per second) and display resolution and try again.
9. Free Up Storage
If your Windows laptop runs low on system storage, it may overheat. Windows 11 comes with neat tricks to free up space. You can read our dedicated post to free up storage without deleting apps on Windows.
10. Install Drivers and System Updates
Your Windows laptop may overheat due to outdated drivers and system build. You’ll need to install the latest Windows update, and it will take care of outdated drivers too.
Step 1: Hit Windows + I keyboard shortcut to launch the Settings app and select Windows Update from the left sidebar.
Step 2: Download and install the latest system update on your laptop.
You will notice low temperatures on your Windows laptop now.
11. Invest in External Fans
If your laptop temperature remains high, it’s time to invest in a dedicated fan to exhaust hot air quickly. You can check our guide to pick the best cooling pad for your laptop.
Keep the Temperatures in Check
Using your Windows laptop at a high temperature is never a good idea. You may even permanently damage the laptop’s internals. Before you trade-in or sell the laptop, use the tricks above to improve its lifespan.
Install Windows updates: The driver installation issue may be limited to your Windows build. If that’s the case, installing pending Windows updates should help.
Scan for malware: Malware or viruses on your PC can also interfere with Windows operations and hinder the installation of drivers. To check for this, scan your system with Windows Defender.
Fix 1: Use the Driver Installation Package
Device Manager and the Settings app are two of the most preferred utilities for installing drivers on Windows. However, if you are having trouble with both, download the relevant driver package from the manufacturer’s website and install it manually.
For instance, if you can’t install display drivers on Windows 11, visit the manufacturer’s website (such as NVIDIA, AMD, or Intel), and fill in details like your PC’s model number and other relevant information to download the latest compatible driver.
Once downloaded, run the installer file and follow the on-screen instructions to install the drivers. If you encounter errors like “Cannot Complete the Device Driver Installation Wizard” during installation, continue with the fixes below.
Fix 2: Install Drivers in Clean Boot Mode
When you boot Windows in a clean boot state, it only runs essential programs and services. If the issue is caused by interference from a background app or service, installing the driver in a clean boot state should work.
Step 1: Press Windows + R to open the Run dialog box, type msconfig.msc, and press Enter.
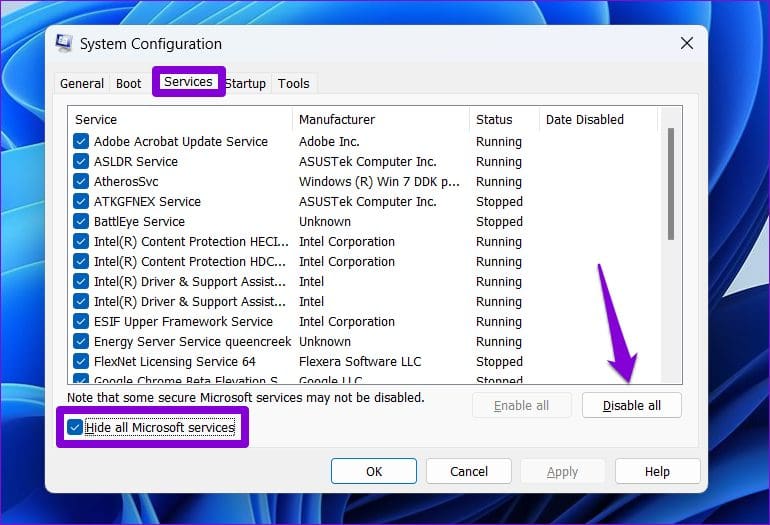
Step 2: Go to the Services tab, check the box for Hide all Microsoft services, and click Disable all.
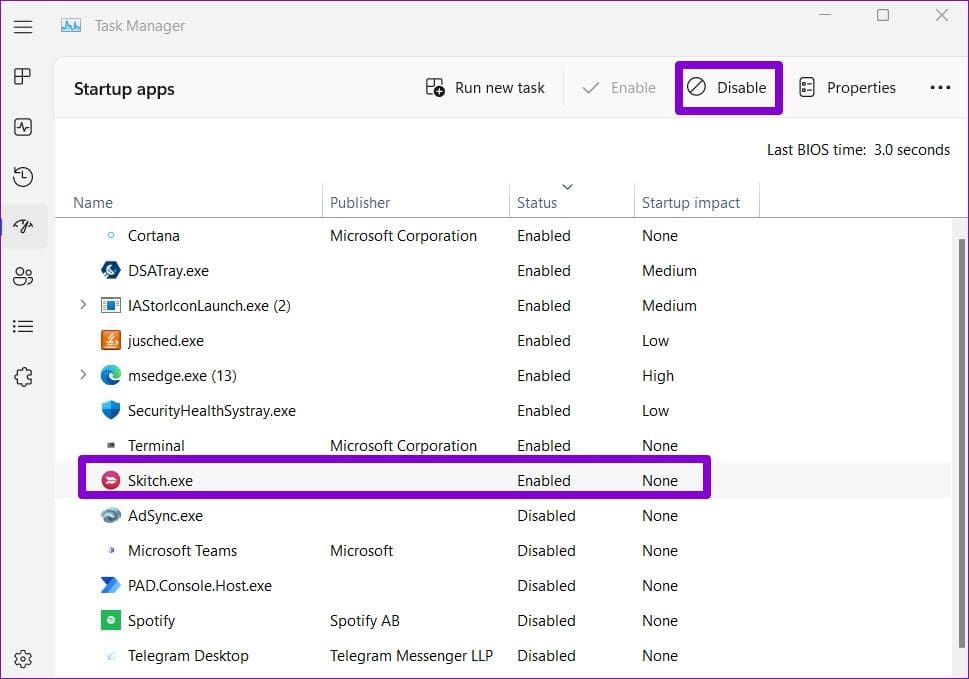
Step 3: Switch to the Startup tab and click on Open Task Manager.
Step 4: In the Task Manager window, select a third-party app or program and click Disable at the top. Repeat this step to disable all startup apps and programs one by one.
Restart your PC to enter a clean boot state, and try to install the driver again. If this method works, it means one of the apps or programs you disabled was responsible for the problem. Hence, review the recently installed apps and programs to uninstall the troublesome ones.
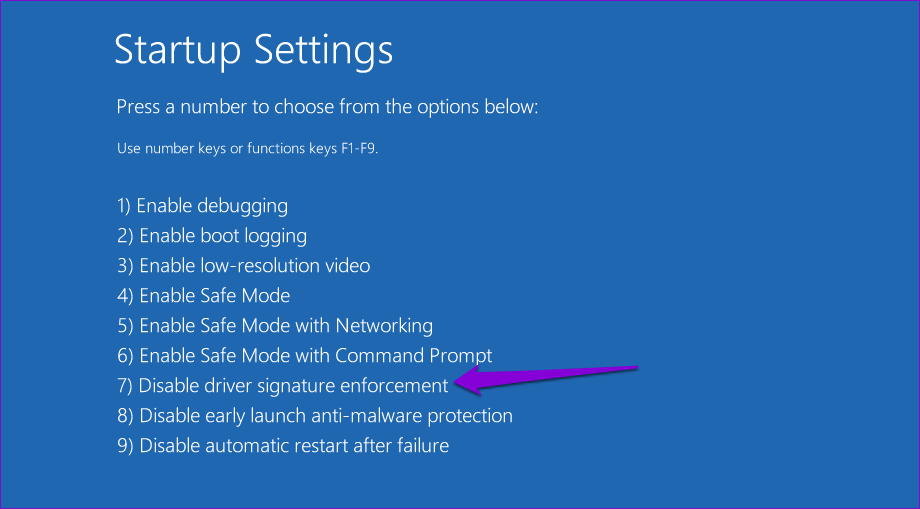
Fix 3: Turn Off Driver Signature Enforcement
Driver Signature Enforcement is a security feature that allows Windows to verify the digital signature of drivers before installation. However, if you try to install drivers for specialized hardware that does not have a digital signature, turn off the driver signature enforcement feature.
Note: Turning this feature off can put your system at risk. Hence, you should only do so if you trust the source of the driver.
Step 1: Open the Start menu and click the power icon at the bottom. Then, hold the Shift key and select Restart.
Step 2: After your PC restarts, click on Troubleshoot to continue.
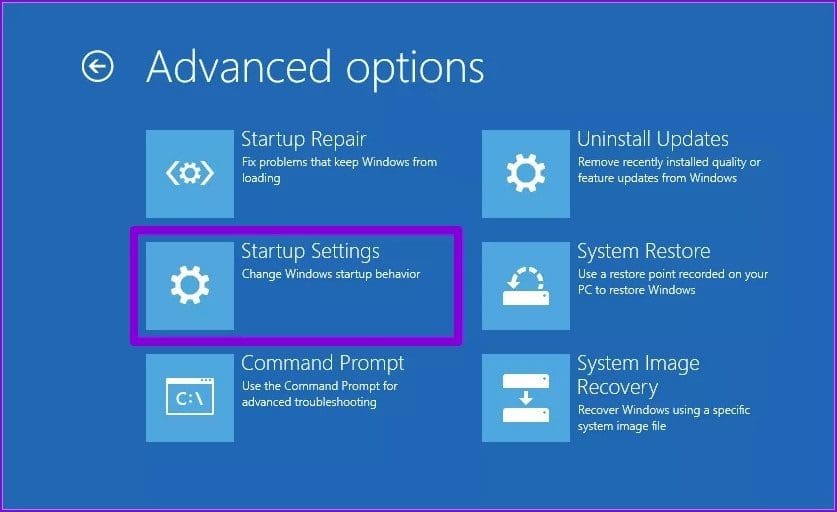
Step 3: Click on Advanced options.
Step 4: Select Startup Settings.
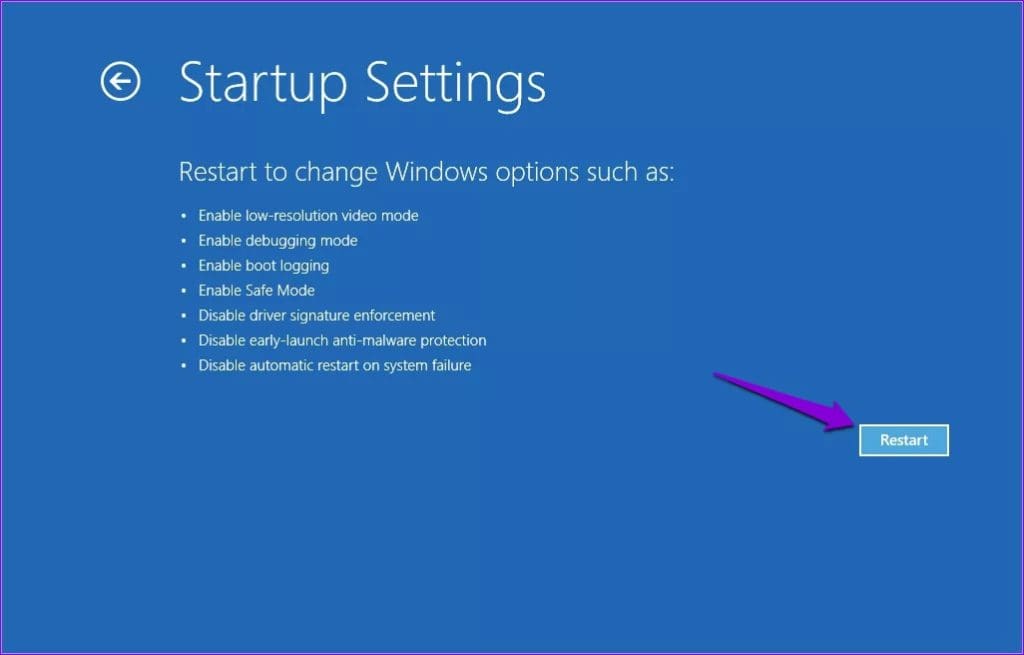
Step 5: Click the Restart button to visit the Startup Settings menu.
Step 6: Press 7 or F7 on your keyboard to boot your PC with the driver signature enforcement feature disabled.
Try installing your driver again to check if it works. The driver signature enforcement feature will automatically be re-enabled the next time you restart the PC.
Fix 4: Perform a System Restore
If you still can’t install drivers, recent modifications made to your Windows 11 PC are causing the issue. You can try performing a system restore to undo those changes and restore your computer to its normal state.
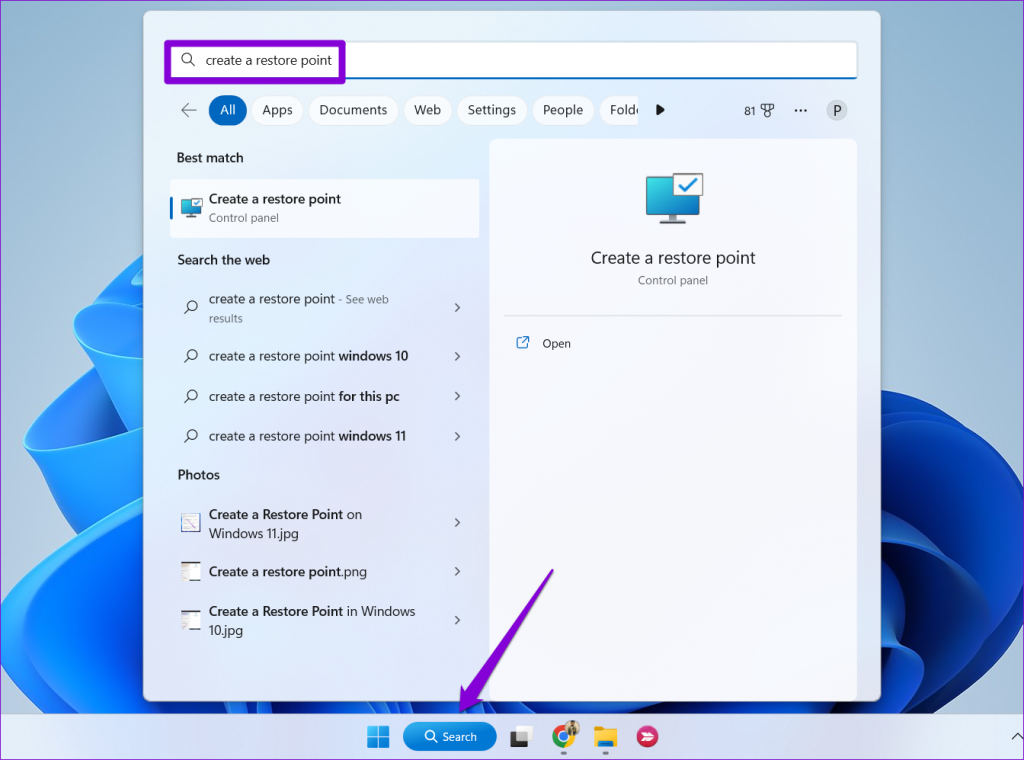
Step 1: Click the search icon on the taskbar, type create a restore point, and press Enter.
Step 2: Under the System Protection tab, click the System Restore button.
Step 3: Click Next to continue.
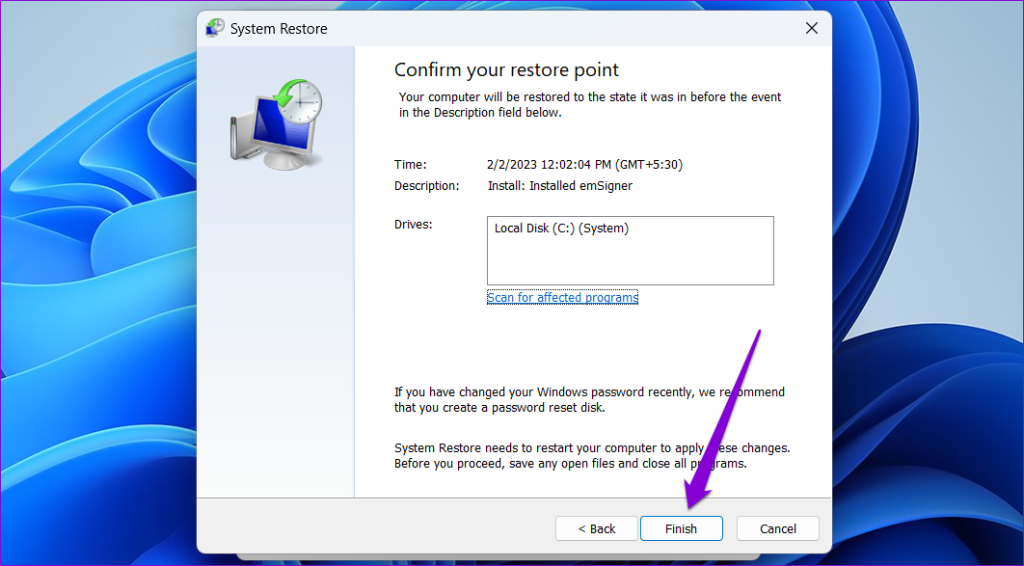
Step 4: Select a recent restore point and click Next.
Step 5: Click Finish to proceed.
After Windows restores your system to the specified state, you can install drivers as before.
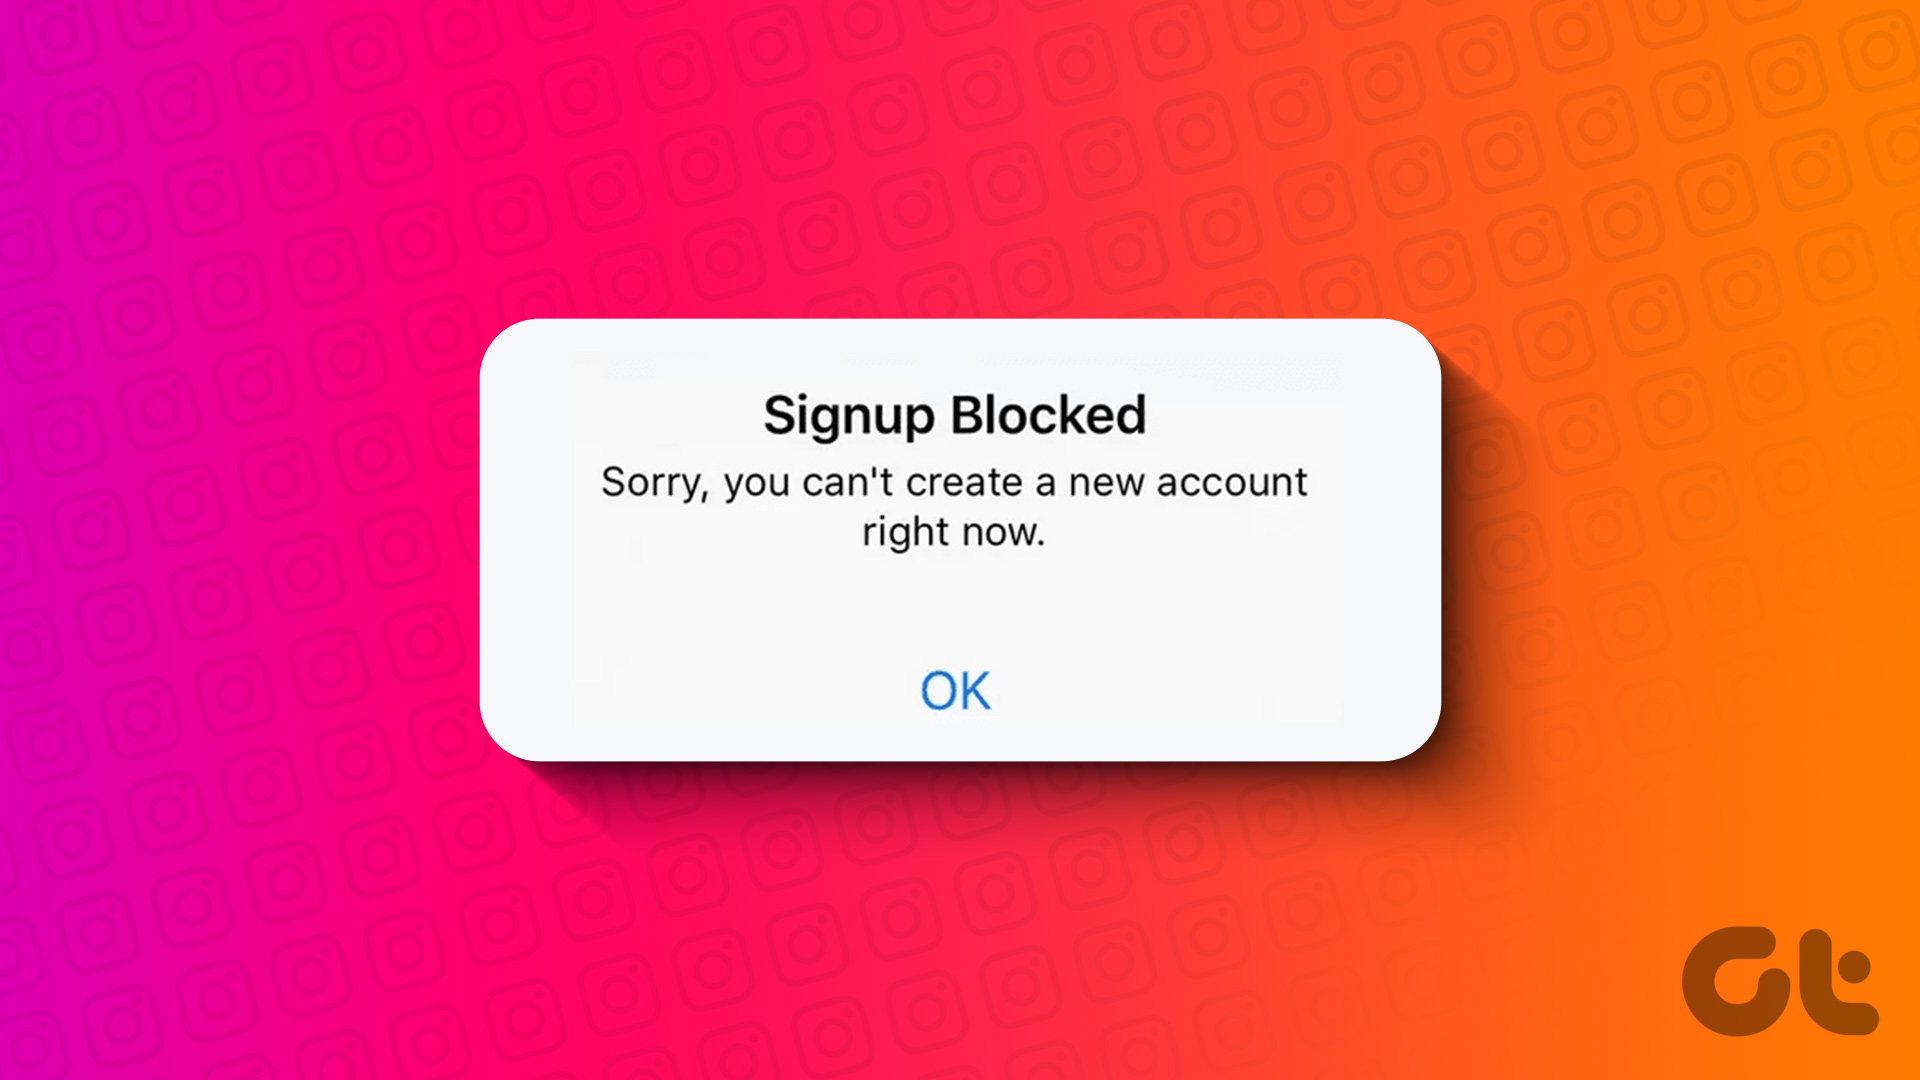
Here are some reasons why you’re unable to create a new Instagram account:
Instagram’s servers are down.
You’ve exceeded the sign-up limit on your email ID or phone number.
App or software bugs.
A bad internet connection.
A blocked IP address.
Basic Fixes:
Check Instagram server status: If the Instagram servers are down, they might not register your request and show an error when creating a new account. When this happens, check Instagram’s Server page. If there are outage reports, wait before trying again.
Close and restart the Instagram app: If you’ve been using the Instagram app and it won’t let you make a new account, there might be issues with the Instagram app itself. To fix this, close and reopen the Instagram app and try again.
Use a VPN: Instagram has blocked certain IP addresses in some cases. If this happens to you, use a VPN app to change your IP address and resume signing up to Instagram.
Try using the Instagram website or app: If you’re having issues creating a new account on the Instagram app, switch to a browser on your Windows or Mac device. Similarly, if you face an issue on a web browser, use the Instagram app to create a new account.
Use a different device: If you’ve been facing Instagram sign-up issues on a particular device, use another device to see if this fixes the problem.
Check for app updates: If you’ve had the Instagram app installed on your device for a while but didn’t keep up with regular updates, it might be why Instagram won’t let you make a new account. So, check and install the latest app updates before trying again.
Fix 1: Use a Different Email ID or Mobile Number
While Instagram usually has no restrictions on how many accounts you want to create, certain restrictions apply when you’re using the same email ID or mobile number to create multiple accounts. So, try using a different or new email address or mobile number when signing up for Instagram and see if it works.
Fix 2: Add a New Account to an Existing Instagram Account
You can add a new account even if you already have an existing account on Instagram. Using this feature, you can create a new account on Instagram and immediately add it to your accounts list on the Instagram app. Although, at a time, you can only add 5 accounts. Follow the below steps to do it.
Note: Unless updated, the mobile number and email ID for your new account will be automatically fetched from your current signed-in details.
Step 1: Open the Instagram app and tap on your profile icon.
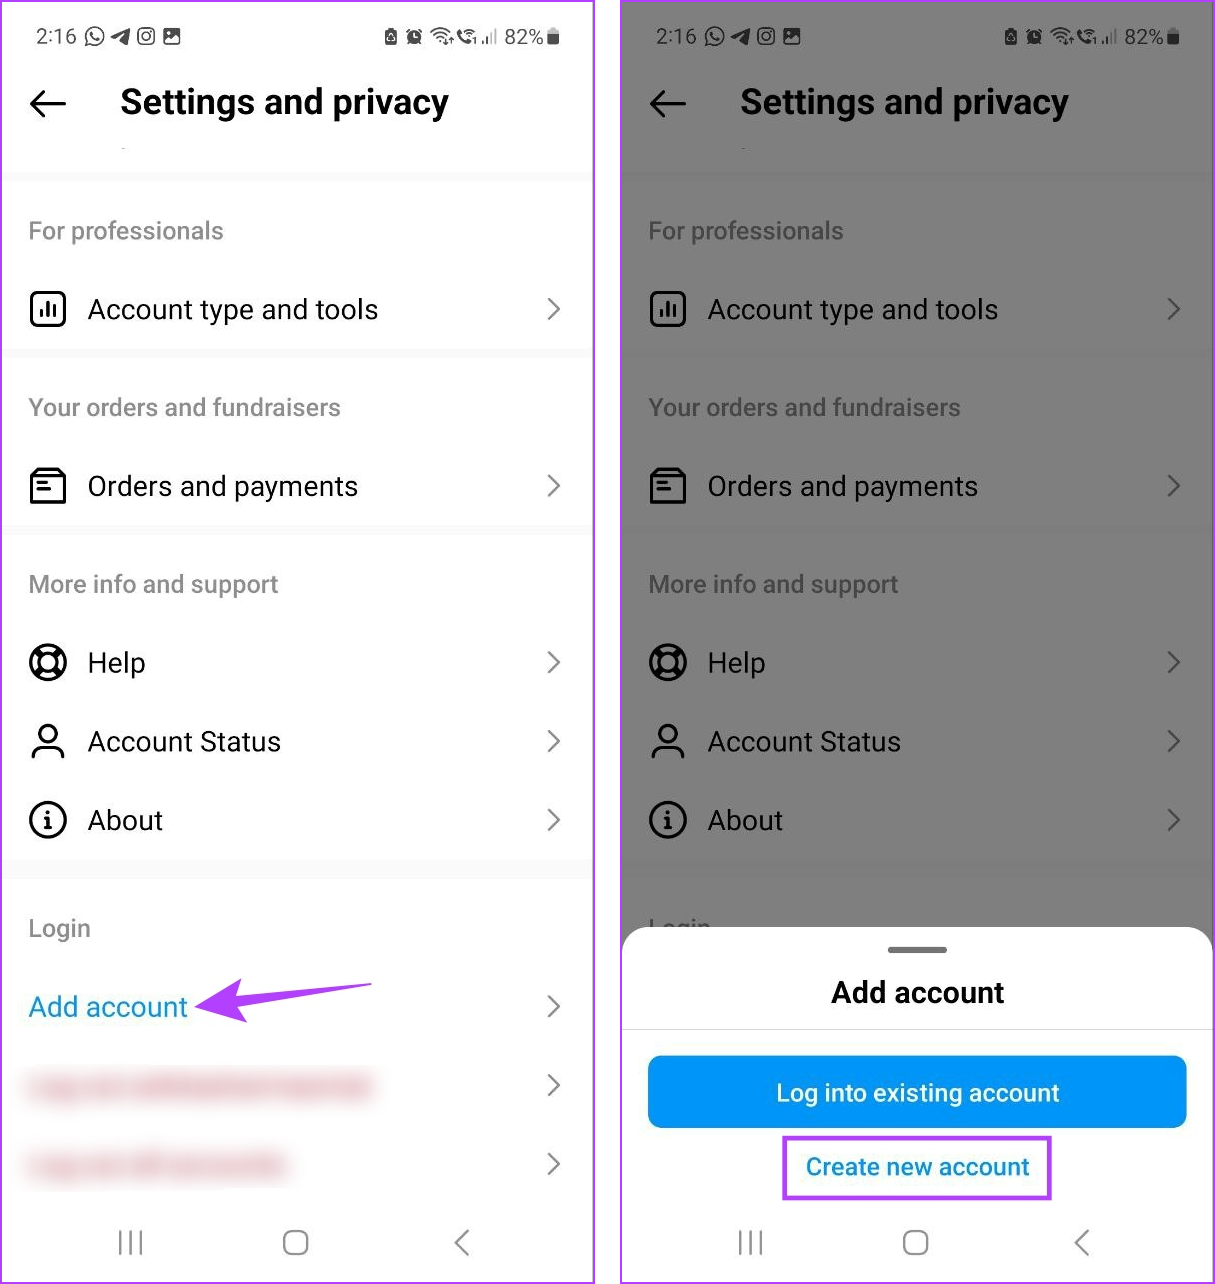
Step 2: Then, tap the hamburger icon. Tap on Settings and privacy.
Step 3: Scroll down and tap on Add account. Select Create new account.
Step 4: Type the desired username and tap on Next. Enter the password and tap on Next.
Step 5: Tap on Complete sign up to finish sign-up.
Once your new account has been created, go into the account settings and update your mobile number and email ID as you want.
Fix 3: Sign up Using Your Facebook Account
Since Instagram and Facebook are owned by Meta, you can use your existing Facebook account to create a new Instagram account. This can help you bypass certain restrictions, causing your Instagram sign-ups to fail. Here’s how.
Step 1: Open Instagram and tap on Continue as.
Step 2: When prompted, enter your new Instagram username and tap on Next.
Follow the on-screen instructions and sign up for Instagram using your Facebook account. If you still cannot sign up, contact Instagram support for further assistance.
FAQ
1. How many Instagram accounts can you create per phone number?
As mentioned above, you can create up to 5 Instagram accounts per phone number. You can also add up to 5 accounts to the same device and switch between them as required.