Try Basic Fixes
- Install Windows updates: The driver installation issue may be limited to your Windows build. If that’s the case, installing pending Windows updates should help.
- Scan for malware: Malware or viruses on your PC can also interfere with Windows operations and hinder the installation of drivers. To check for this, scan your system with Windows Defender.
Fix 1: Use the Driver Installation Package
Device Manager and the Settings app are two of the most preferred utilities for installing drivers on Windows. However, if you are having trouble with both, download the relevant driver package from the manufacturer’s website and install it manually.
For instance, if you can’t install display drivers on Windows 11, visit the manufacturer’s website (such as NVIDIA, AMD, or Intel), and fill in details like your PC’s model number and other relevant information to download the latest compatible driver.
Once downloaded, run the installer file and follow the on-screen instructions to install the drivers. If you encounter errors like “Cannot Complete the Device Driver Installation Wizard” during installation, continue with the fixes below.
Fix 2: Install Drivers in Clean Boot Mode
When you boot Windows in a clean boot state, it only runs essential programs and services. If the issue is caused by interference from a background app or service, installing the driver in a clean boot state should work.
Step 1: Press Windows + R to open the Run dialog box, type msconfig.msc, and press Enter.

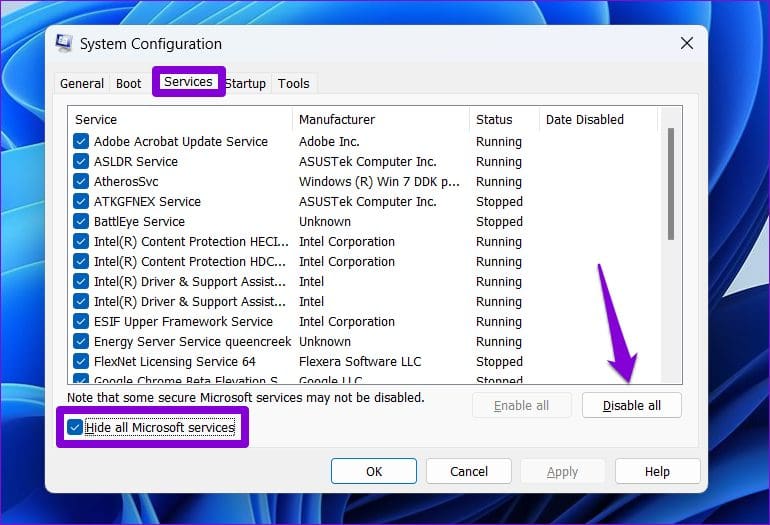
Step 2: Go to the Services tab, check the box for Hide all Microsoft services, and click Disable all.
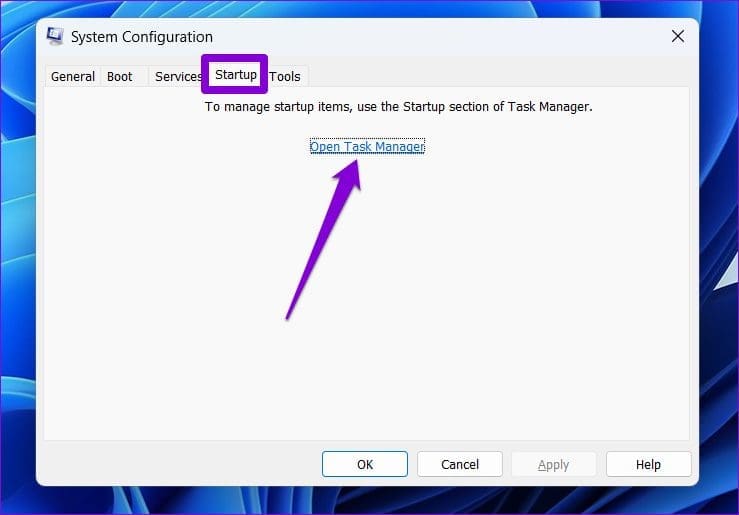
Step 3: Switch to the Startup tab and click on Open Task Manager.
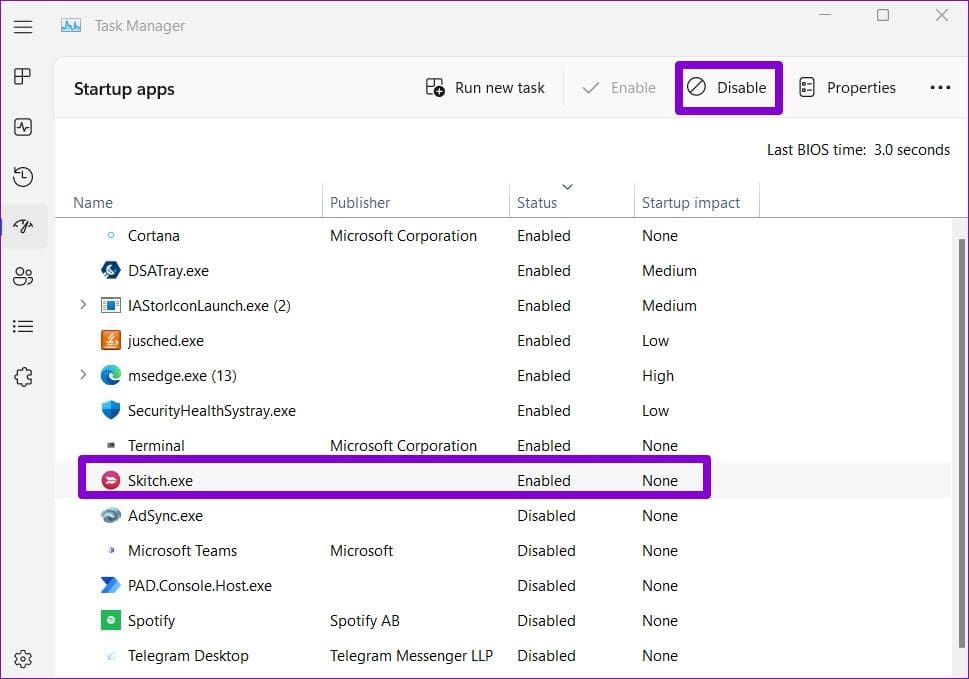
Step 4: In the Task Manager window, select a third-party app or program and click Disable at the top. Repeat this step to disable all startup apps and programs one by one.
Restart your PC to enter a clean boot state, and try to install the driver again. If this method works, it means one of the apps or programs you disabled was responsible for the problem. Hence, review the recently installed apps and programs to uninstall the troublesome ones.
Fix 3: Turn Off Driver Signature Enforcement
Driver Signature Enforcement is a security feature that allows Windows to verify the digital signature of drivers before installation. However, if you try to install drivers for specialized hardware that does not have a digital signature, turn off the driver signature enforcement feature.
Note: Turning this feature off can put your system at risk. Hence, you should only do so if you trust the source of the driver.
Step 1: Open the Start menu and click the power icon at the bottom. Then, hold the Shift key and select Restart.

Step 2: After your PC restarts, click on Troubleshoot to continue.

Step 3: Click on Advanced options.
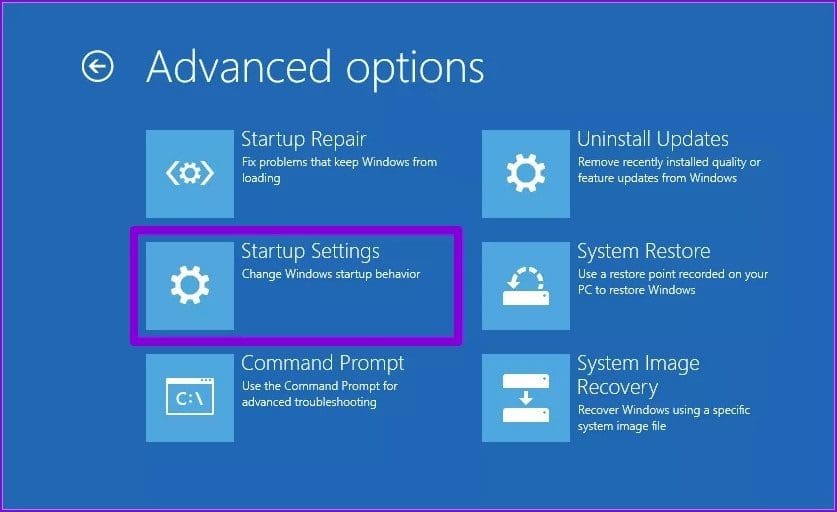
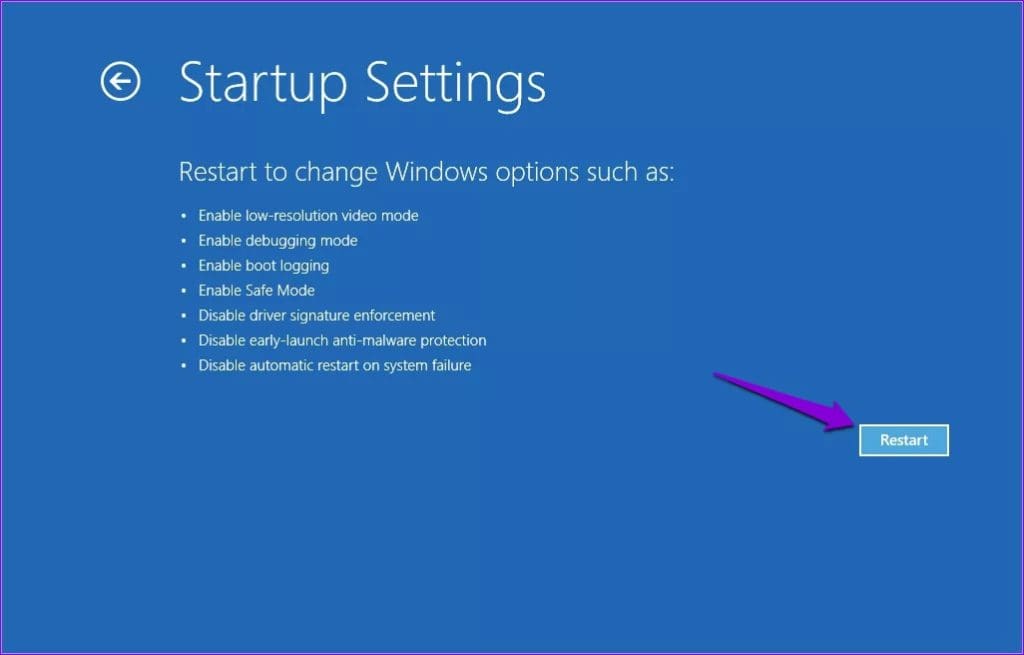
Step 4: Select Startup Settings.
Step 5: Click the Restart button to visit the Startup Settings menu.
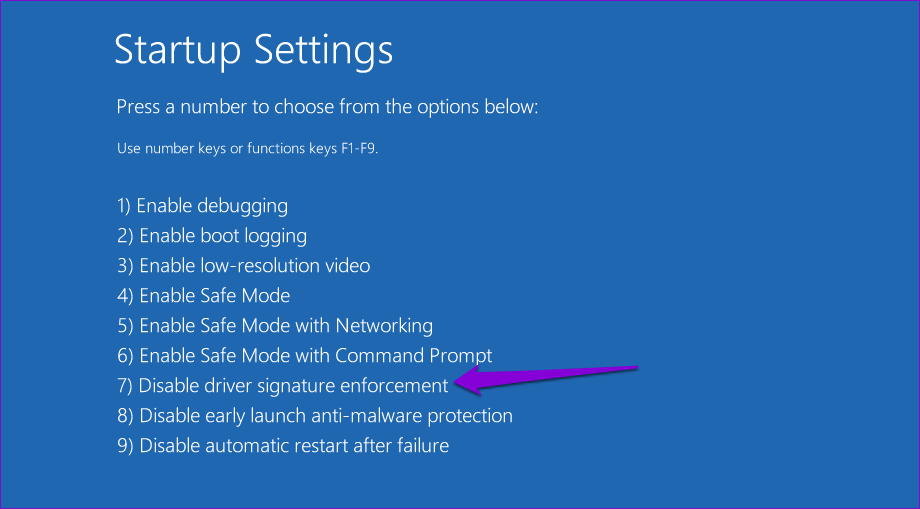
Step 6: Press 7 or F7 on your keyboard to boot your PC with the driver signature enforcement feature disabled.
Try installing your driver again to check if it works. The driver signature enforcement feature will automatically be re-enabled the next time you restart the PC.
Fix 4: Perform a System Restore
If you still can’t install drivers, recent modifications made to your Windows 11 PC are causing the issue. You can try performing a system restore to undo those changes and restore your computer to its normal state.
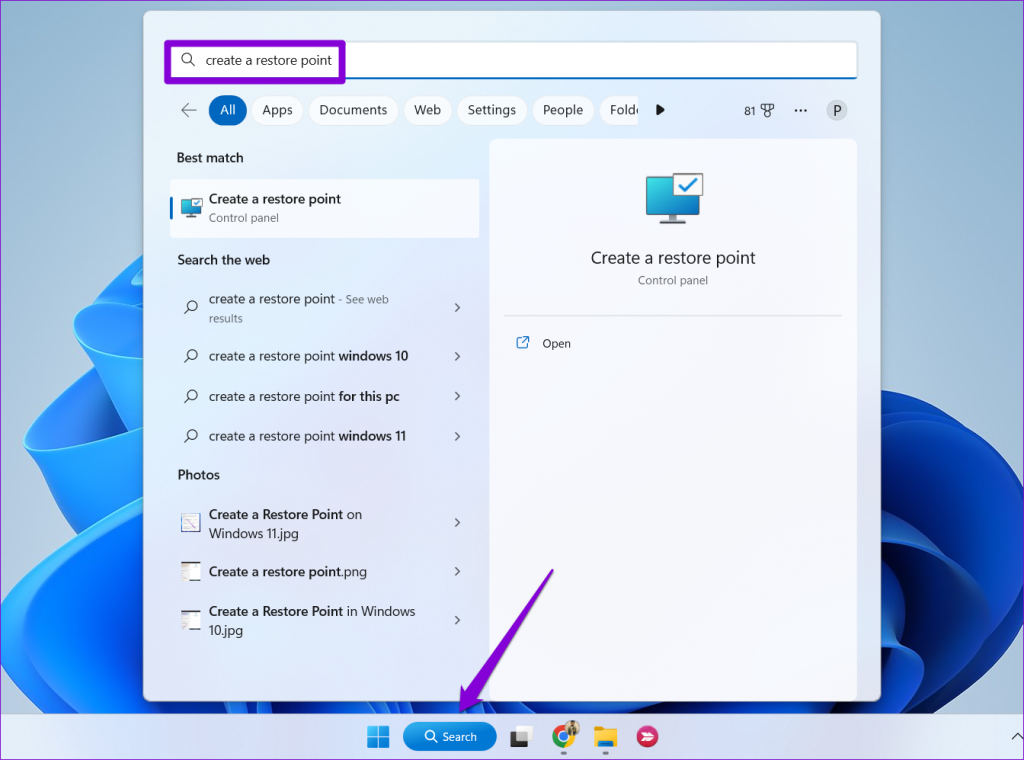
Step 1: Click the search icon on the taskbar, type create a restore point, and press Enter.
Step 2: Under the System Protection tab, click the System Restore button.

Step 3: Click Next to continue.

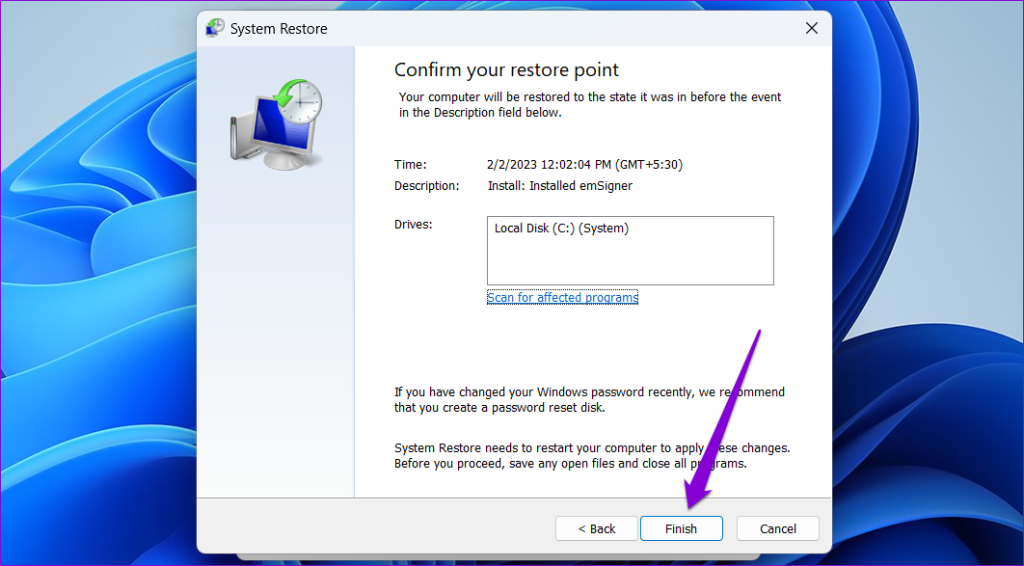
Step 4: Select a recent restore point and click Next.

Step 5: Click Finish to proceed.
After Windows restores your system to the specified state, you can install drivers as before.
Was this helpful?
Last updated on 08 April, 2024
Read Next
 4 Ways to Fix Unable to Install Programs or Software on Windows 11
Try Basic Fixes Check program compatibility: Programs and games that worked perfectly on Windows 10 may not necessarily be compatible with Windows 11.
4 Ways to Fix Unable to Install Programs or Software on Windows 11
Try Basic Fixes Check program compatibility: Programs and games that worked perfectly on Windows 10 may not necessarily be compatible with Windows 11.
 How to Download and Install NVIDIA Drivers Without GeForce Experience
Prerequisite 1: Check Which NVIDIA GPU You Have First, you need to check which NVIDIA graphics card you have installed on your system.
How to Download and Install NVIDIA Drivers Without GeForce Experience
Prerequisite 1: Check Which NVIDIA GPU You Have First, you need to check which NVIDIA graphics card you have installed on your system.
 3 Ways to Fix Corrupt Drivers in Windows 11/10
Fix 1: Restore to the Previous Working State If this happened recently, you could also use System Restore to return to the date when the drivers worked well.
3 Ways to Fix Corrupt Drivers in Windows 11/10
Fix 1: Restore to the Previous Working State If this happened recently, you could also use System Restore to return to the date when the drivers worked well.
 4 Ways to Uninstall Drivers From Windows 11
Method 1: Uninstall Drivers Using Device Manager Device Manager is a handy utility for managing various hardware devices installed on your system.
4 Ways to Uninstall Drivers From Windows 11
Method 1: Uninstall Drivers Using Device Manager Device Manager is a handy utility for managing various hardware devices installed on your system.
 What Happens When You Uninstall Graphics Drivers on Windows
Consequence of Uninstalling Graphics Drivers on Windows Uninstalling graphics drivers can result in washed-out colors and incorrect resolution if the system relies on native graphics drivers.
What Happens When You Uninstall Graphics Drivers on Windows
Consequence of Uninstalling Graphics Drivers on Windows Uninstalling graphics drivers can result in washed-out colors and incorrect resolution if the system relies on native graphics drivers.
 Top 5 Fixes For ‘No Device Drivers Were Found’ While Installing Windows 11/10
Preliminary Fixes Check/Switch the USB Ports: One common cause of this error is the USB port being used.
Top 5 Fixes For ‘No Device Drivers Were Found’ While Installing Windows 11/10
Preliminary Fixes Check/Switch the USB Ports: One common cause of this error is the USB port being used.
 Top 9 Ways to Fix Unable to Change Default Programs in Windows 10
The apps offered by Microsoft are great.
Top 9 Ways to Fix Unable to Change Default Programs in Windows 10
The apps offered by Microsoft are great.
 3 Ways to Fix Unable to Sign in to Microsoft OneNote on Windows
Fix 1: Remove OneNote Credentials From Credential Manager The Credential Manager in Windows stores login details for all your apps.
3 Ways to Fix Unable to Sign in to Microsoft OneNote on Windows
Fix 1: Remove OneNote Credentials From Credential Manager The Credential Manager in Windows stores login details for all your apps.
The article above may contain affiliate links which help support Guiding Tech. The content remains unbiased and authentic and will never affect our editorial integrity.

