Fix 1: Rule Out Issues With Your Account
To start, you need to check if your EA Play membership has expired by signing into your EA account online.
Another reason why you may be unable to connect to EA servers is if your account is already being used on another device. To avoid conflicts, try logging out of your account on other devices and see if that helps.
Lastly, you need to verify if EA has suspended or banned your account for violating the rules in the EA User Agreement. You can review your ban history by visiting EA’s website and signing into your account.

Fix 2: Check the Server Status
Occasionally, EA servers may undergo periods of downtime or encounter temporary issues. When this happens, you could experience problems connecting to your EA games.
Different EA games run on different servers. So, if you’re encountering connection errors in a specific game, such as FIFA, Apex Legends, or Battlefield, you should visit that game’s page to see its server status. Here’s how.
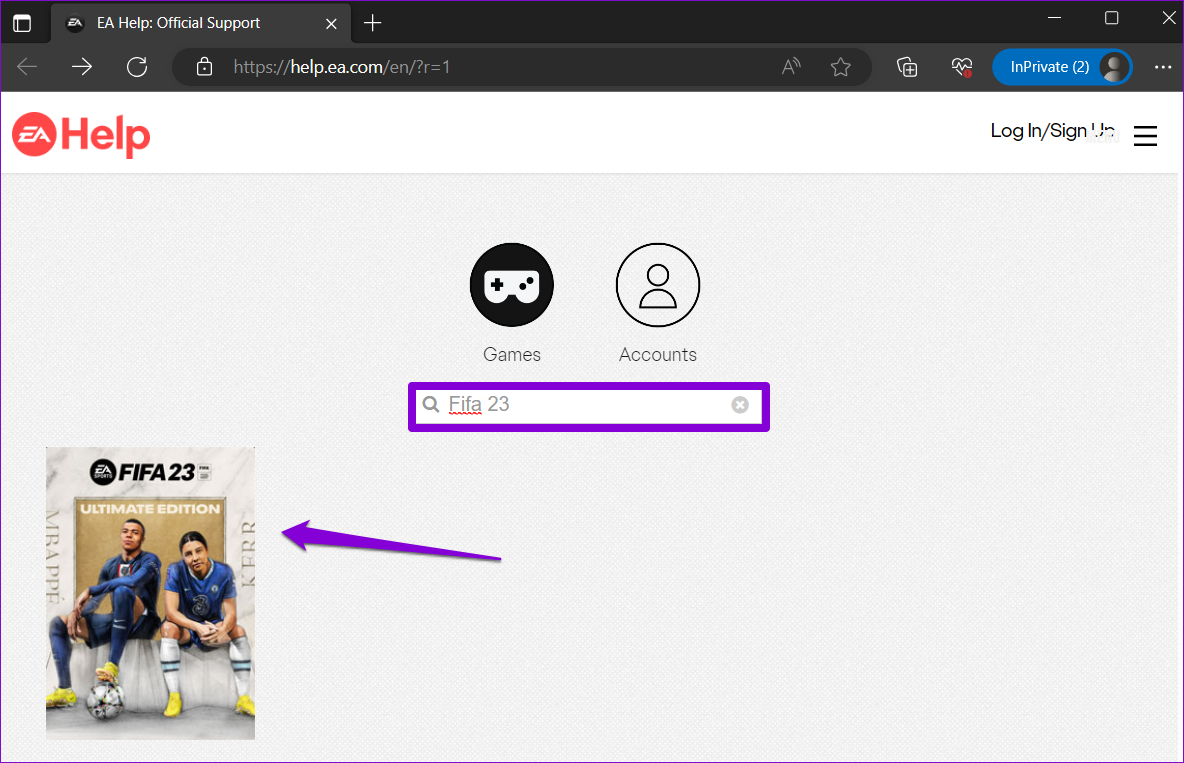
Step 1: Open the EA help page in a web browser on your computer.
Step 2: Select the Help with a Game option.

Step 3: Type in the name of your game in the search box and select it.
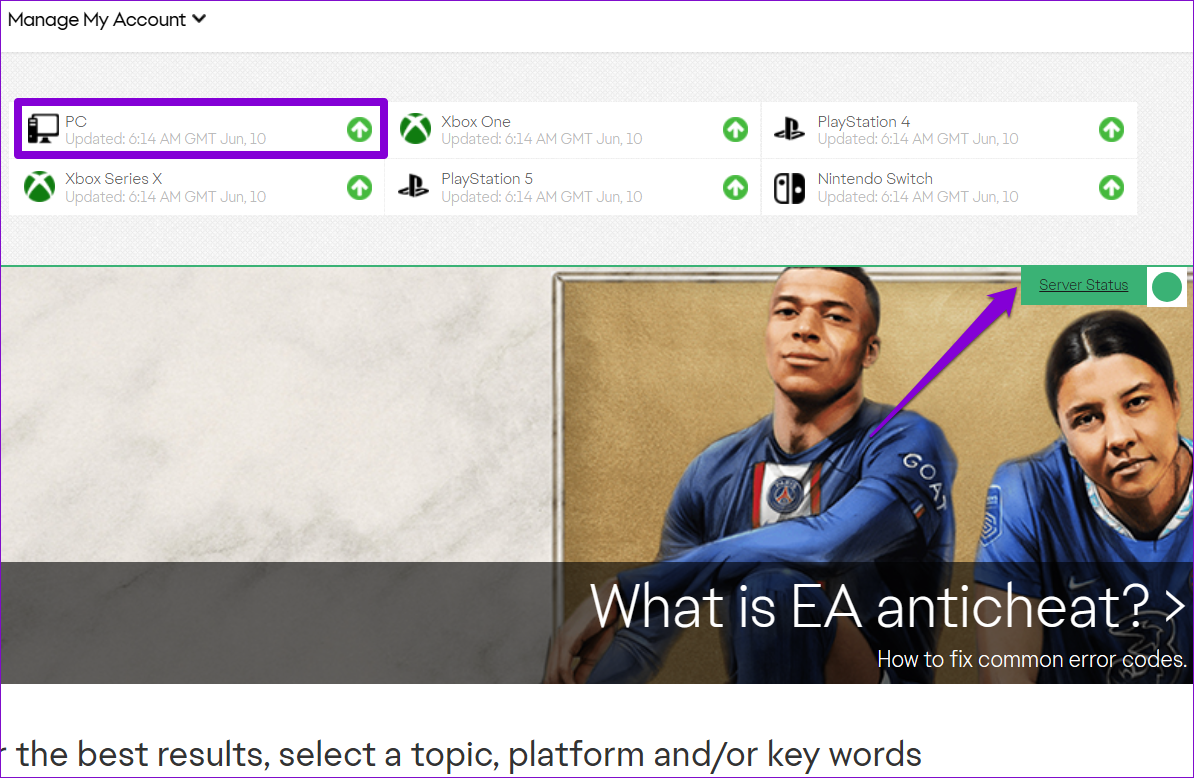
Step 4: Click the Server Status option in the top right corner to check the server status for the PC. If the servers are functioning properly, the arrow will be pointing upward. Conversely, if the servers are offline, the arrow will point downward.
Fix 3: Enable Automatic Date and Time
Having your Windows PC set to an incorrect date or time can result in losing connection to EA servers. This can happen if you disable the automatic date and time feature on Windows. Here’s how to enable it.
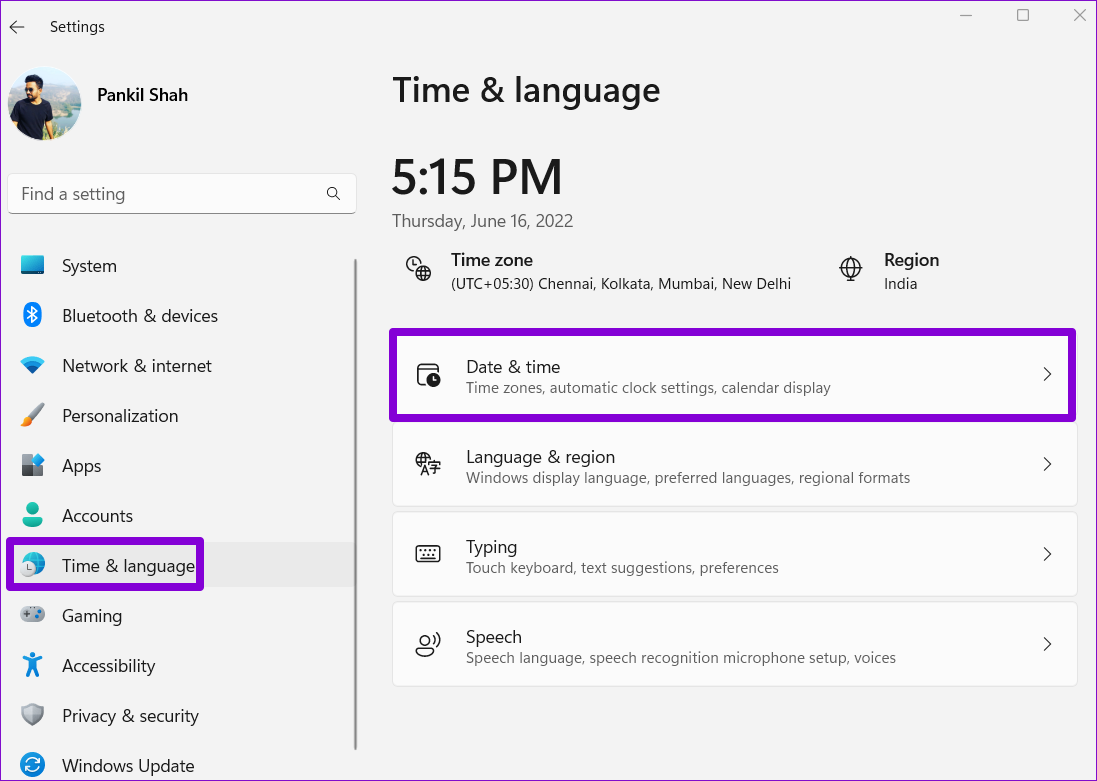
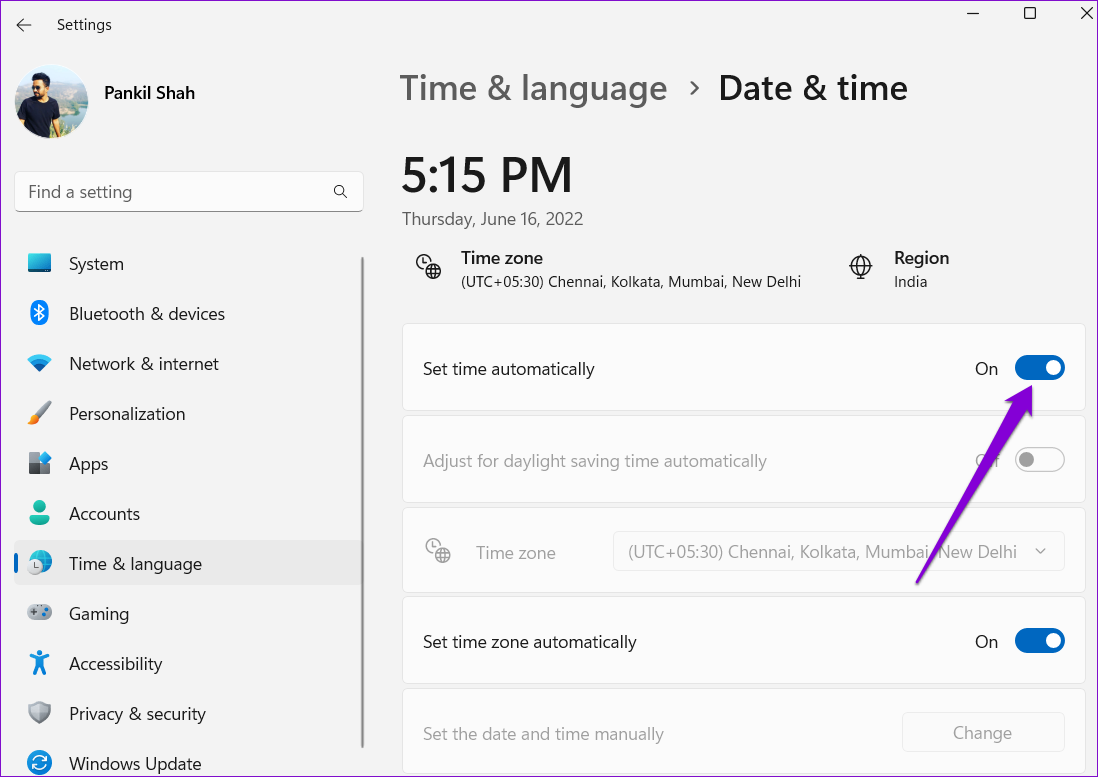
Step 1: Press the Windows + I keyboard shortcut to open the Settings app. In the Time & language tab, click on Date & time.
Step 2: Enable the toggle next to Set time automatically.
Fix 4: Use a Different DNS Server
Issues with the current DNS server can also trigger the “EA.com unable to connect” error on Windows. You can try switching to a different DNS server to see if that improves the situation.
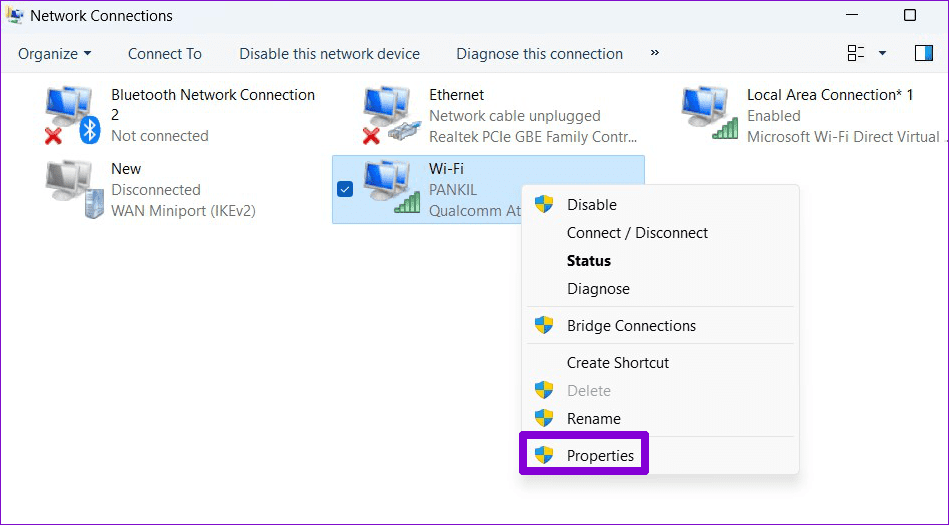
Step 1: Press the Windows + R keyboard shortcut to launch the Run dialog box. In the Open field, type ncpa.cpl, and press Enter.
Step 2: In the Network Connections window, right-click on your internet connection and select Properties.
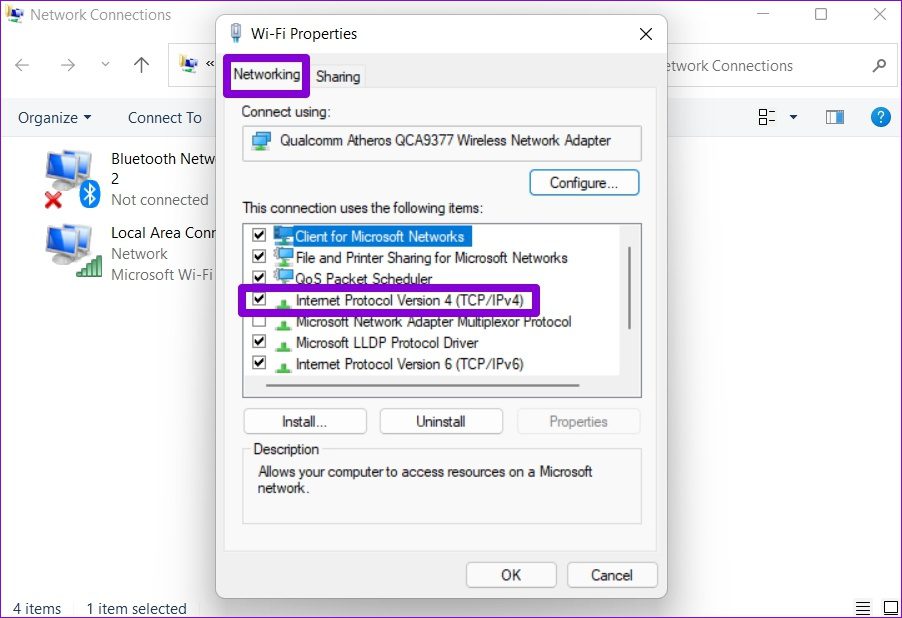
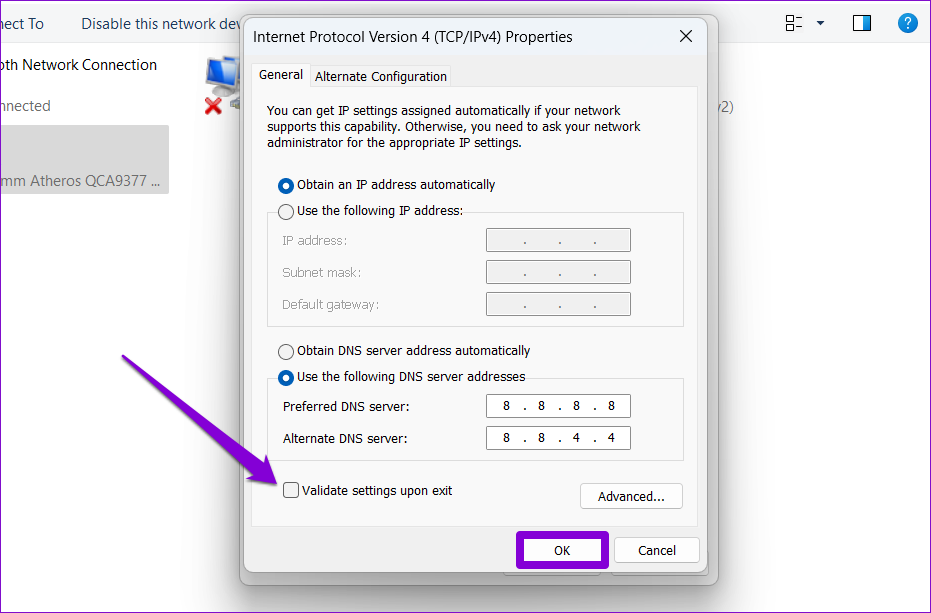
Step 3: Under Networking, double-click the Internet Protocol Version 4 (TCP/IPv4) option.
Step 4: Select Use the following DNS server addresses. In the text fields next to the Preferred DNS Server and the Alternate DNS Server, enter 8.8.8.8 and 8.8.4.4, respectively.
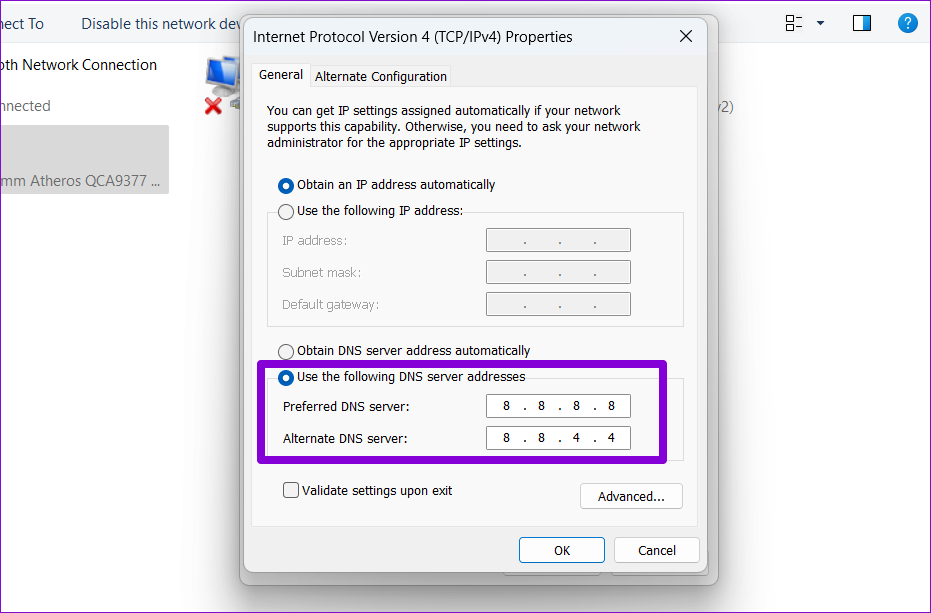
Step 5: Tick the Validate settings upon exit checkbox and hit OK.
Fix 5: Reset TCP/IP
Your Windows PC relies on Transmission Control Protocol and Internet Protocol (or TCP/IP) to establish an internet connection and transmit digital data. However, issues with the TCP/IP stack can prevent your EA games from connecting to the servers, resulting in various errors. You can try resetting the TCP/IP stack using the command prompt to see if that helps.
Step 1: Right-click on the Start icon and select Terminal (Admin) from the Power User menu.

Step 2: Run the following commands in the console and press Enter after each one:
netsh winsock reset
netsh int ip reset

Restart your PC and check if the issue is still there.
Was this helpful?
Last updated on 25 July, 2024
Read Next
 5 Best DNS Servers for Gaming for Low Ping in 2024
In the heat of battle, especially in competitive online gaming, every millisecond counts.
5 Best DNS Servers for Gaming for Low Ping in 2024
In the heat of battle, especially in competitive online gaming, every millisecond counts.
 How to Hide Mutual Servers in Discord on Desktop and Mobile
Method 1: Hide Discord Mutual Servers Using Hidden Folders Categorizing mutual servers into folders on Discord is one of the easiest ways to hide them from mutual friends.
How to Hide Mutual Servers in Discord on Desktop and Mobile
Method 1: Hide Discord Mutual Servers Using Hidden Folders Categorizing mutual servers into folders on Discord is one of the easiest ways to hide them from mutual friends.
 4 Ways to Fix Unable to Contact Your DHCP Server Error on Windows 11
Fix 1: Restart Your DHCP Client service The DHCP Client service registers and updates the PC's IP address and DNS record.
4 Ways to Fix Unable to Contact Your DHCP Server Error on Windows 11
Fix 1: Restart Your DHCP Client service The DHCP Client service registers and updates the PC's IP address and DNS record.
 6 Ways to Fix Unable to Change Sign-in PIN on Windows
Fix 1: Disconnect Work or School Account One of the most common reasons Windows may prevent you from changing your sign-in PIN is if you've linked your work or school
6 Ways to Fix Unable to Change Sign-in PIN on Windows
Fix 1: Disconnect Work or School Account One of the most common reasons Windows may prevent you from changing your sign-in PIN is if you've linked your work or school
 6 Ways to Fix Unable to Remove Printer on Windows 11
Fix 1: Run the Printer Troubleshooter Start by running Windows' built-in printer troubleshooter to see if it can detect and resolve any pending printing errors.
6 Ways to Fix Unable to Remove Printer on Windows 11
Fix 1: Run the Printer Troubleshooter Start by running Windows' built-in printer troubleshooter to see if it can detect and resolve any pending printing errors.
 4 Ways to Fix Unable to Switch Out of S Mode on Windows 11
Try Basic Fixes Switch out of S mode using the Microsoft Store page link: If you don't see an option to exit S mode in the Settings app, visit the
4 Ways to Fix Unable to Switch Out of S Mode on Windows 11
Try Basic Fixes Switch out of S mode using the Microsoft Store page link: If you don't see an option to exit S mode in the Settings app, visit the
 6 Ways to Fix NVIDIA’s ‘Unable to Change Display Mode’ Error on Windows 11
Method 1: Terminate and Restart the NVIDIA Control Panel It is common for apps and their associated processes to encounter glitches and stop working properly.
6 Ways to Fix NVIDIA’s ‘Unable to Change Display Mode’ Error on Windows 11
Method 1: Terminate and Restart the NVIDIA Control Panel It is common for apps and their associated processes to encounter glitches and stop working properly.
 6 Ways to Fix Unable to Run EXE Files on Windows 11
Fix 1: Scan for Malware Malware infections can often disrupt Windows operations and prevent EXE files from running on your PC.
6 Ways to Fix Unable to Run EXE Files on Windows 11
Fix 1: Scan for Malware Malware infections can often disrupt Windows operations and prevent EXE files from running on your PC.
The article above may contain affiliate links which help support Guiding Tech. The content remains unbiased and authentic and will never affect our editorial integrity.