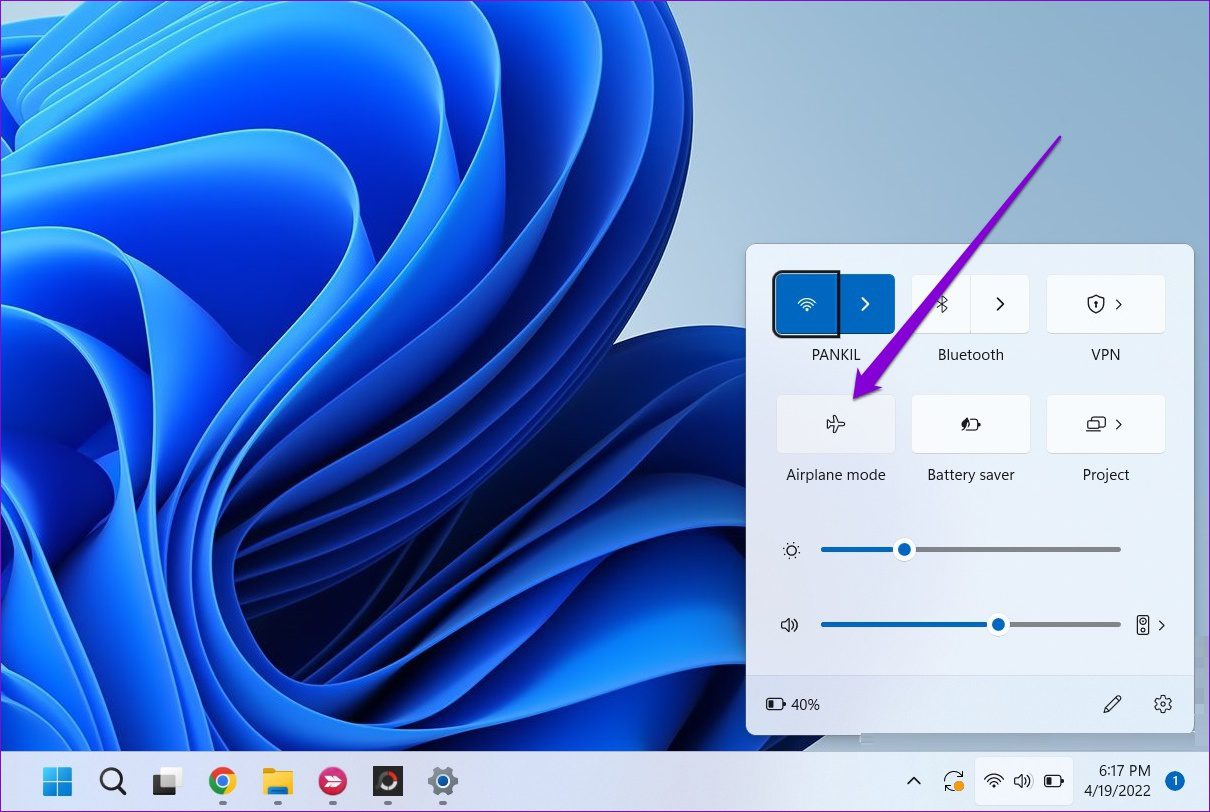
Fix 1: Try Removing Device in Airplane Mode
To start, enable Airplane mode and remove the Bluetooth device again. This will disable all wireless services on your PC, such as Bluetooth and Wi-Fi, and prevent them from interfering with the removal process.
Step 1: Press the Windows key + A to open Action Center and click the Airplane mode button to enable it.
Step 2: Right-click on the Bluetooth icon and select Go to Settings.

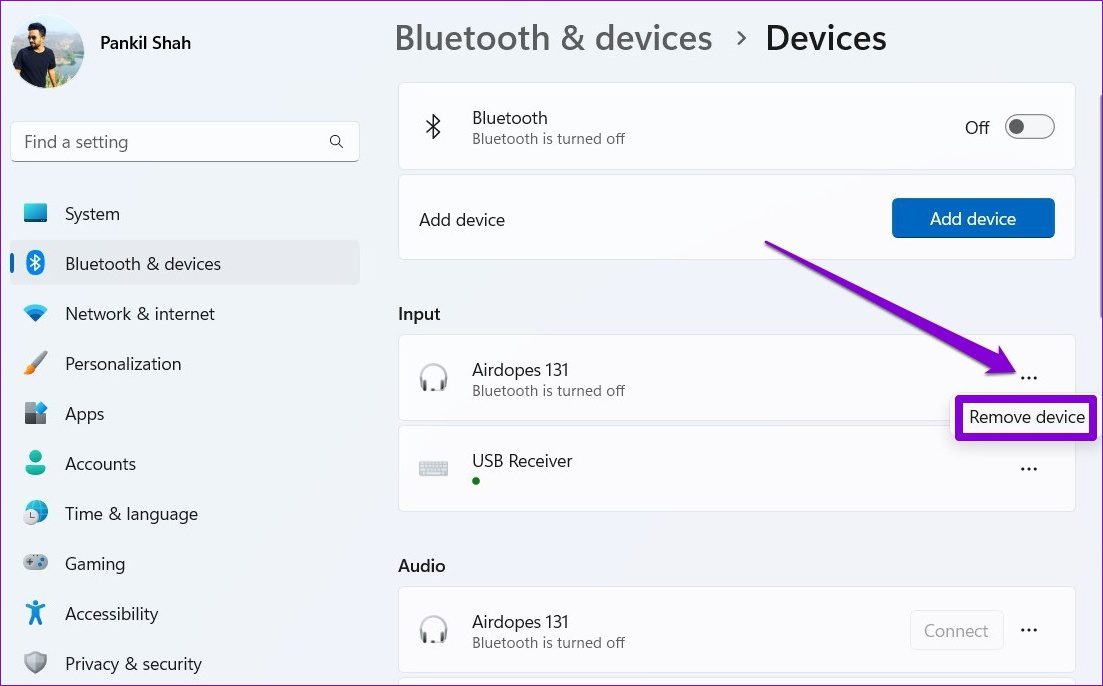
Step 3: Go to Devices.

Step 4: Click the three-dot menu icon next to your Bluetooth device and select Remove device.
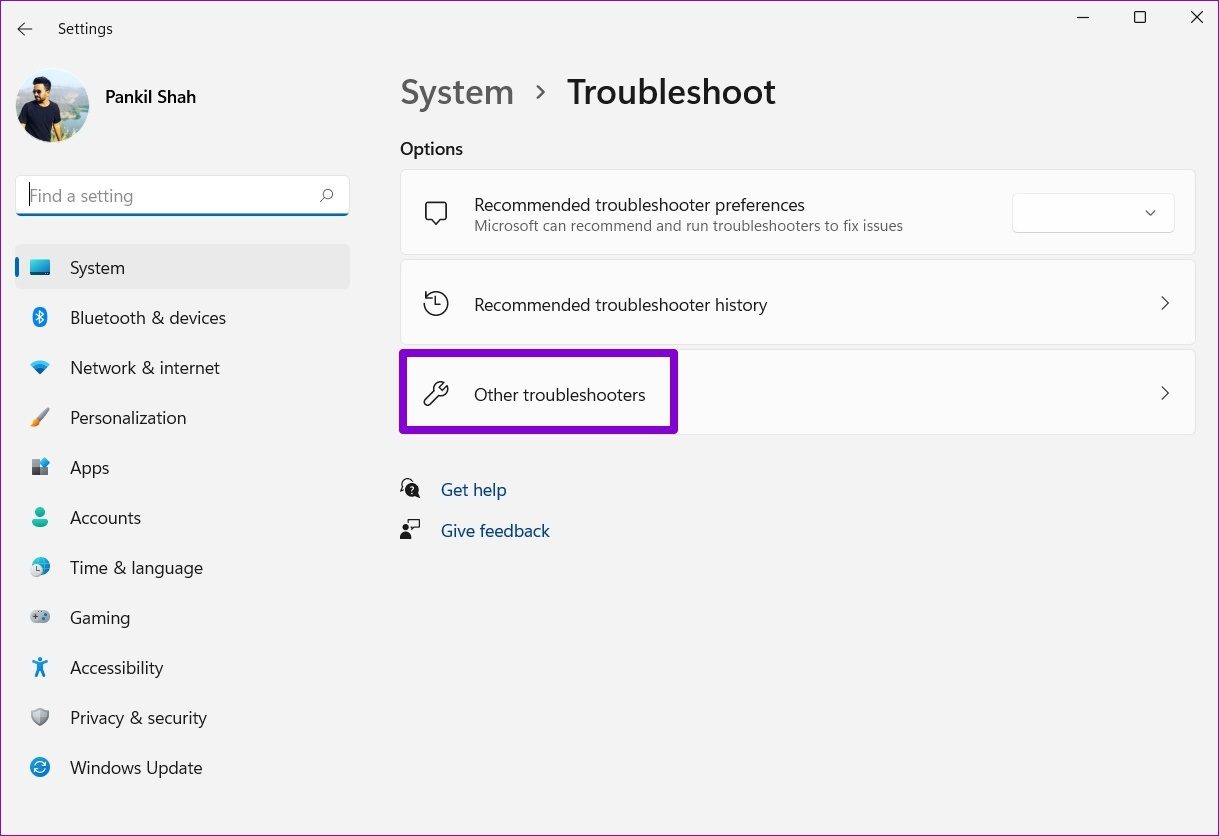
Fix 2: Run Bluetooth Troubleshooter
Windows 11 includes various troubleshooters for fixing system-level issues. You can try running the Bluetooth troubleshooter to see if that improves the situation.
Step 1: Click the search icon on the taskbar, type troubleshoot settings, and select the first result.

Step 2: Go to Other troubleshooters.
Step 3: Click the Run button next to Bluetooth and follow the on-screen instructions to complete the troubleshooting process.

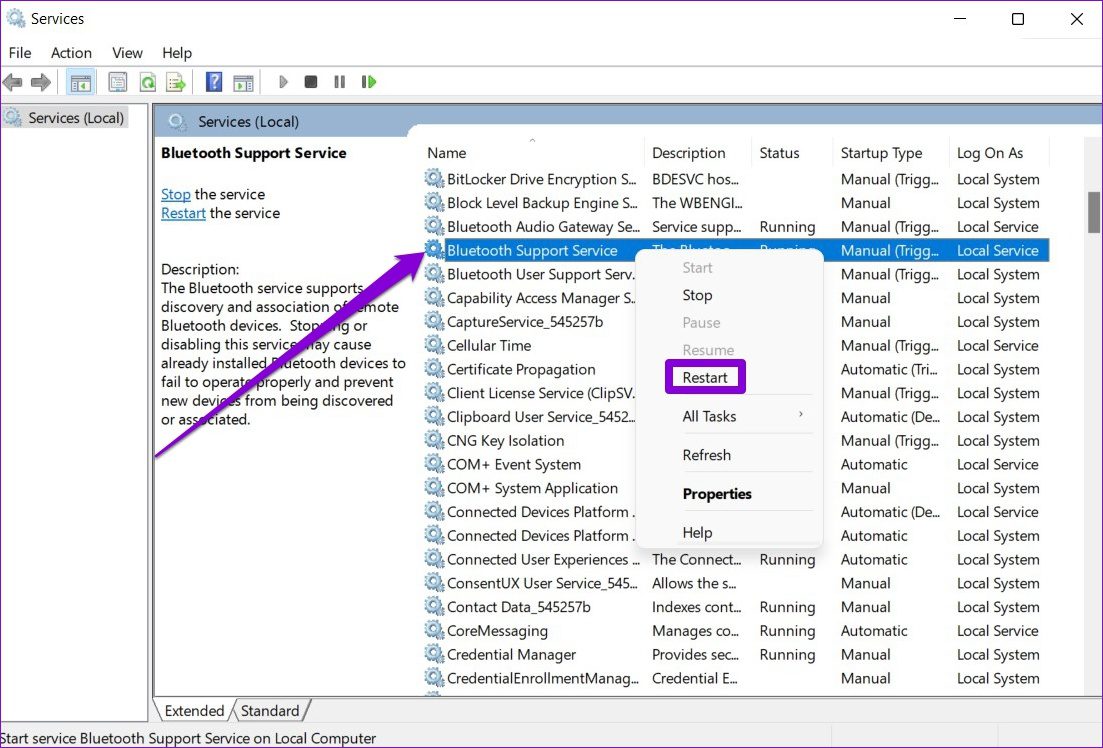
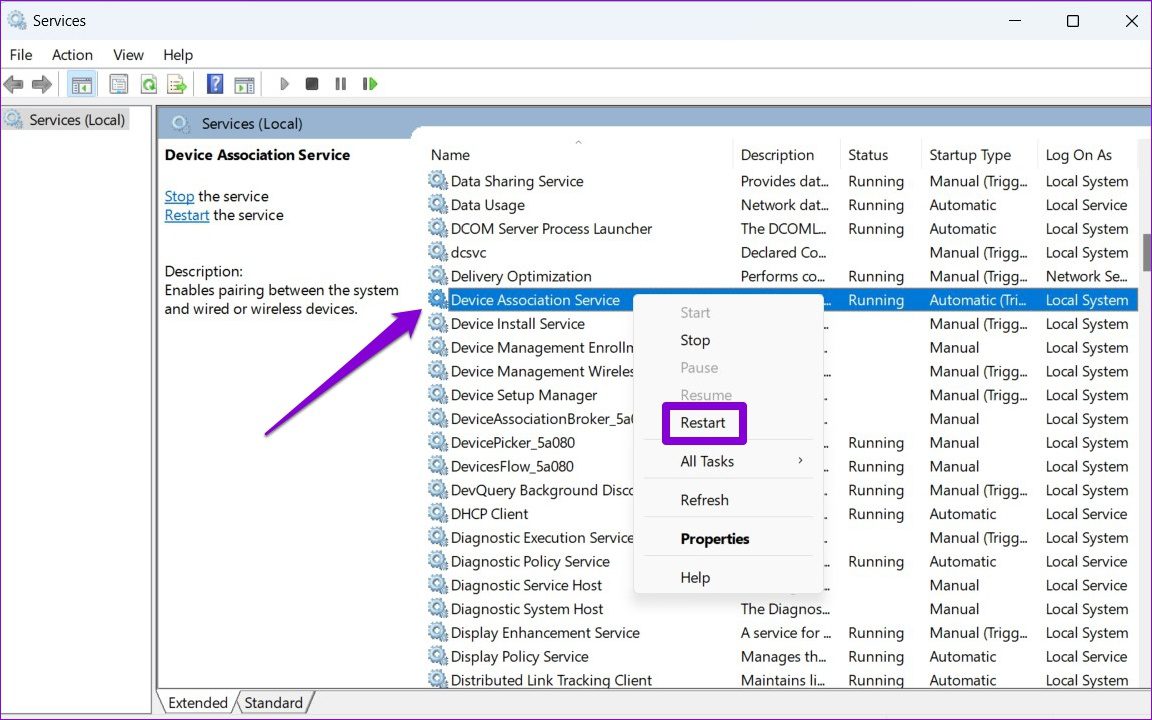
Fix 3: Check Windows Services
Bluetooth Support Service is an essential program that facilitates the discovery and association of remote Bluetooth devices. Ideally, this service should start every time Windows boots. However, restarting it will help if the service is not working correctly.
Step 1: Press the Windows key + R to open the Run dialog box, type services.msc, and press Enter.
Step 2: In the Services window, scroll to the bottom to find and right-click on Bluetooth Support Service. Select Restart from the list.
You’ll also need to restart the Device Association Service, which handles the pairing between the Windows and your Bluetooth devices.
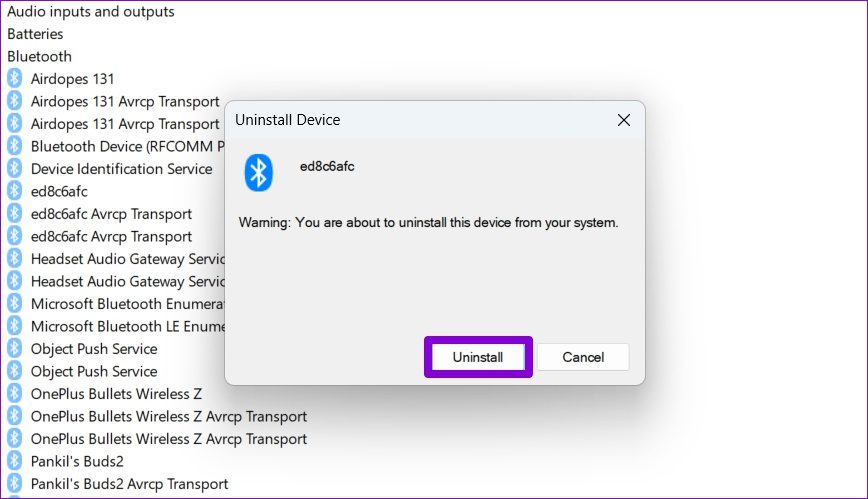
Fix 4: Use Device Manager
You can also remove a Bluetooth device from your PC via the Device Manager if have trouble removing it via the Settings app.
Step 1: Press the Windows key + X and select Device Manager from the list.

Step 2: Click on the View menu at the top and select Show hidden devices.
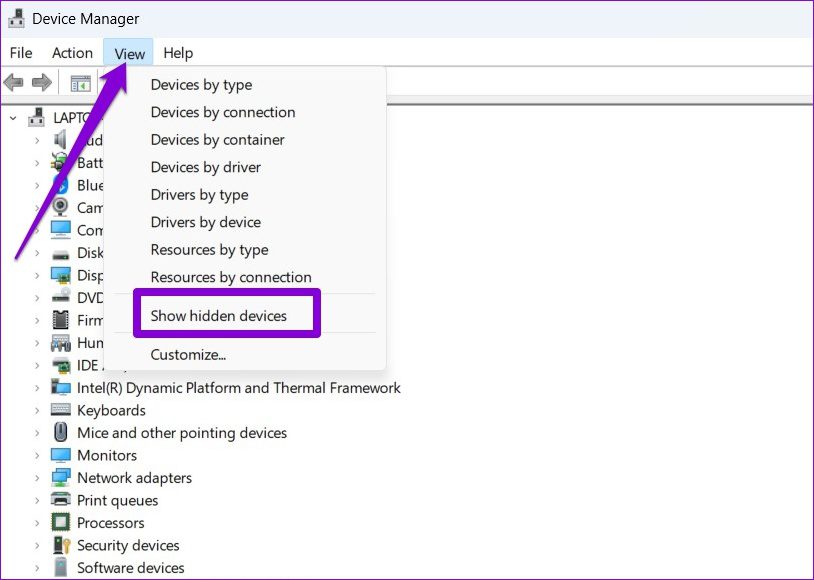
Step 3: Double-click on Bluetooth to expand it. Right-click on the device you wish to remove and select Uninstall device.

Step 4: Hit Uninstall when prompted.
Fix 5: Remove Device in Safe Mode
If you still can’t remove a Bluetooth device, try booting your PC in Safe Mode. This will disable all non-essential drivers, services, and third-party programs, so the removal process won’t be interrupted.
To boot Windows in Safe Mode:
Step 1: Open the Start menu and click the power icon. Then, hold down the Shift key and select Restart.

Step 2: After your computer restarts, you’ll see three options. Click on Troubleshoot to continue.

Step 3: Go to Advanced options > Startup Settings.
Step 4: Click the Restart button to visit the Startup Settings menu.

Step 5: Press 4 or F4 on your keyboard to restart your PC in Safe Mode.

After booting your PC in Safe Mode, try removing the Bluetooth device. Once removed, restart your PC to exit the Safe Mode.
Was this helpful?
Last updated on 03 September, 2024
3 Comments
Leave a Reply
Read Next
 6 Ways to Fix Unable to Remove Printer on Windows 11
Fix 1: Run the Printer Troubleshooter Start by running Windows' built-in printer troubleshooter to see if it can detect and resolve any pending printing errors.
6 Ways to Fix Unable to Remove Printer on Windows 11
Fix 1: Run the Printer Troubleshooter Start by running Windows' built-in printer troubleshooter to see if it can detect and resolve any pending printing errors.
 4 Ways to Fix Bluetooth Device Is Paired but Not Connected on Windows 11
Try Basic Fixes Toggle the airplane mode: Enabling and disabling the airplane mode is a quick way to refresh all wireless radios on your computer and resolve minor Wi-Fi, Bluetooth,
4 Ways to Fix Bluetooth Device Is Paired but Not Connected on Windows 11
Try Basic Fixes Toggle the airplane mode: Enabling and disabling the airplane mode is a quick way to refresh all wireless radios on your computer and resolve minor Wi-Fi, Bluetooth,
 How to Fix Cannot Connect to Bluetooth Device Issue in Windows 10
Bluetooth changed the way how we connect various devices.
How to Fix Cannot Connect to Bluetooth Device Issue in Windows 10
Bluetooth changed the way how we connect various devices.
 How to Fix Bluetooth Missing From Device Manager in Windows 11
Basic Fix: Replug your Bluetooth adapter: This applies to those using Bluetooth adapter on Windows 11 PCs.
How to Fix Bluetooth Missing From Device Manager in Windows 11
Basic Fix: Replug your Bluetooth adapter: This applies to those using Bluetooth adapter on Windows 11 PCs.
 How to Fix “Try Connecting Your Device” Bluetooth Error on Windows 11
Using Bluetooth to connect any device to your Windows PC frees you from the constraints of wires.
How to Fix “Try Connecting Your Device” Bluetooth Error on Windows 11
Using Bluetooth to connect any device to your Windows PC frees you from the constraints of wires.
 5 Ways to Fix Unable to Print From Microsoft Excel on Windows 11
Fix 1: Save Your Excel File in XPS Format and Try Again If Excel can't respond to print requests, save your file in the XPS format and try again.
5 Ways to Fix Unable to Print From Microsoft Excel on Windows 11
Fix 1: Save Your Excel File in XPS Format and Try Again If Excel can't respond to print requests, save your file in the XPS format and try again.
 6 Ways to Fix Unable to Run EXE Files on Windows 11
Fix 1: Scan for Malware Malware infections can often disrupt Windows operations and prevent EXE files from running on your PC.
6 Ways to Fix Unable to Run EXE Files on Windows 11
Fix 1: Scan for Malware Malware infections can often disrupt Windows operations and prevent EXE files from running on your PC.
The article above may contain affiliate links which help support Guiding Tech. The content remains unbiased and authentic and will never affect our editorial integrity.


I tried the fifth way and it successfully. Many thanks for helpful instruction.
Yes I agree, the 5th way helped me too. I’d tried so many other troubleshooter articles that did the first 4 and others but none mentioned showing the hidden items in Device Manager. And the fact that you went so far as to include safe mode in the next option shows that you know what you’re doing. I’m sure if the 5th way hadn’t worked then the 6th would have. Thanks so much, Pankil.
3. CHECK WINDOWS SERVICES is worked for me well.
Thanks for documenting it well.