Basic Ways:
- Using the keyboard shortcut: You can use the Windows + Ctrl + O keys to open the On-Screen Keyboard in Windows 11.
- Using Windows Search: Using the Search bar on Windows 11, you can look up the On-Screen Keyboard. Once visible, click on it to launch the app.
- Using the Run command: Use the Windows + R key to open the Run window. Type osk and press enter to launch the On-Screen Keyboard app.
Method 1: Using the Sign-in Screen
Apart from the sign-in options, you can also access power options and enable certain accessibility features using the Windows sign-in screen. One of these is the On-Screen Keyboard. Follow the below steps to access the accessibility menu and open the virtual keyboard from the Windows sign-in screen.
Step 1: Boot your device. On the sign-in screen, click the Accessibility icon and turn the On-screen keyboard toggle on.
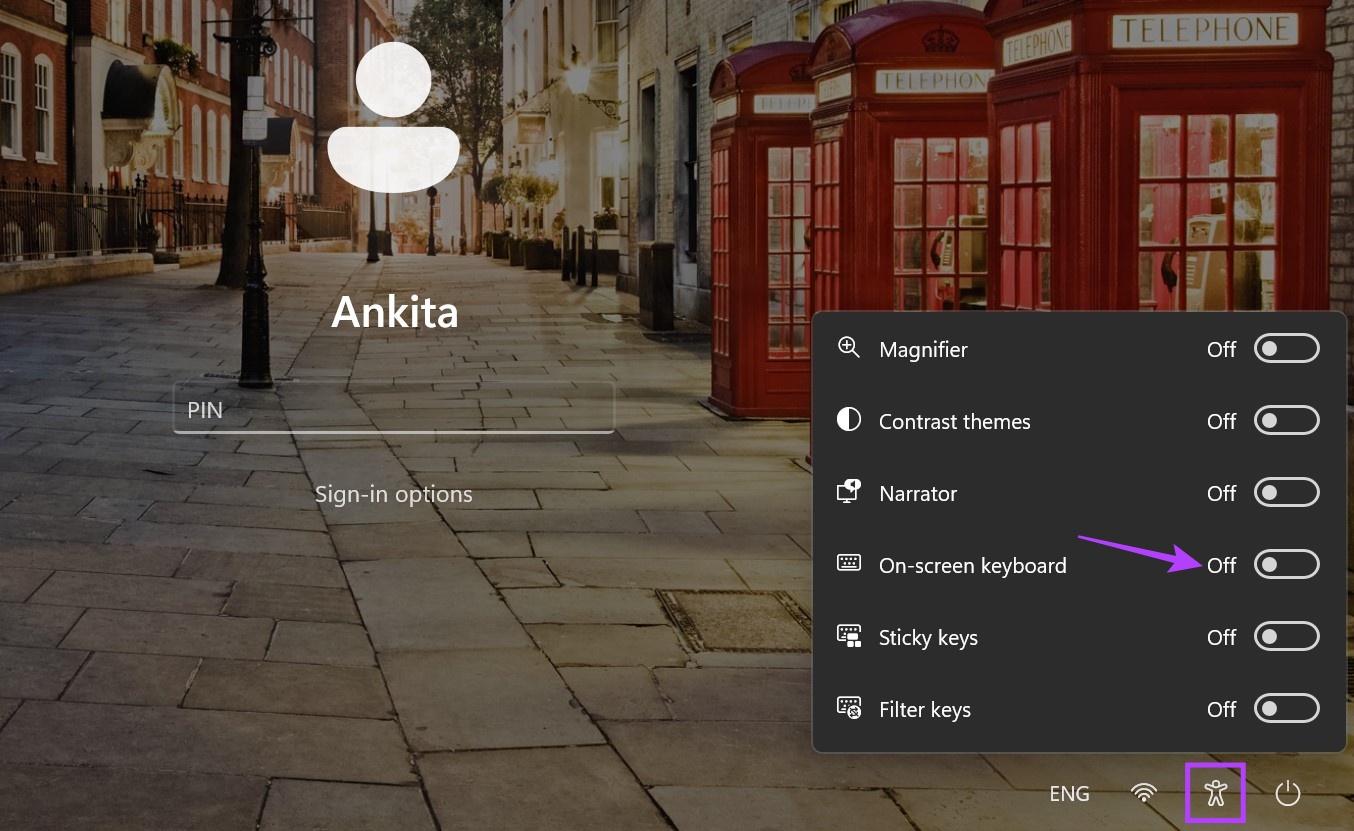
Once the virtual keyboard appears, you can proceed to enter your PIN/password and sign in. The On-Screen Keyboard will be visible even after signing in.
Method 2: Using the Settings Menu
Just like any other Windows setting or feature, the On-Screen Keyboard also has a place in the Windows Settings menu. Using this, you can toggle on the virtual keyboard with ease. Here’s how.
Tip: Check out all the ways to open the Settings app on Windows 11.
Step 1: Open Settings and click on Accessibility. Click on Keyboard.
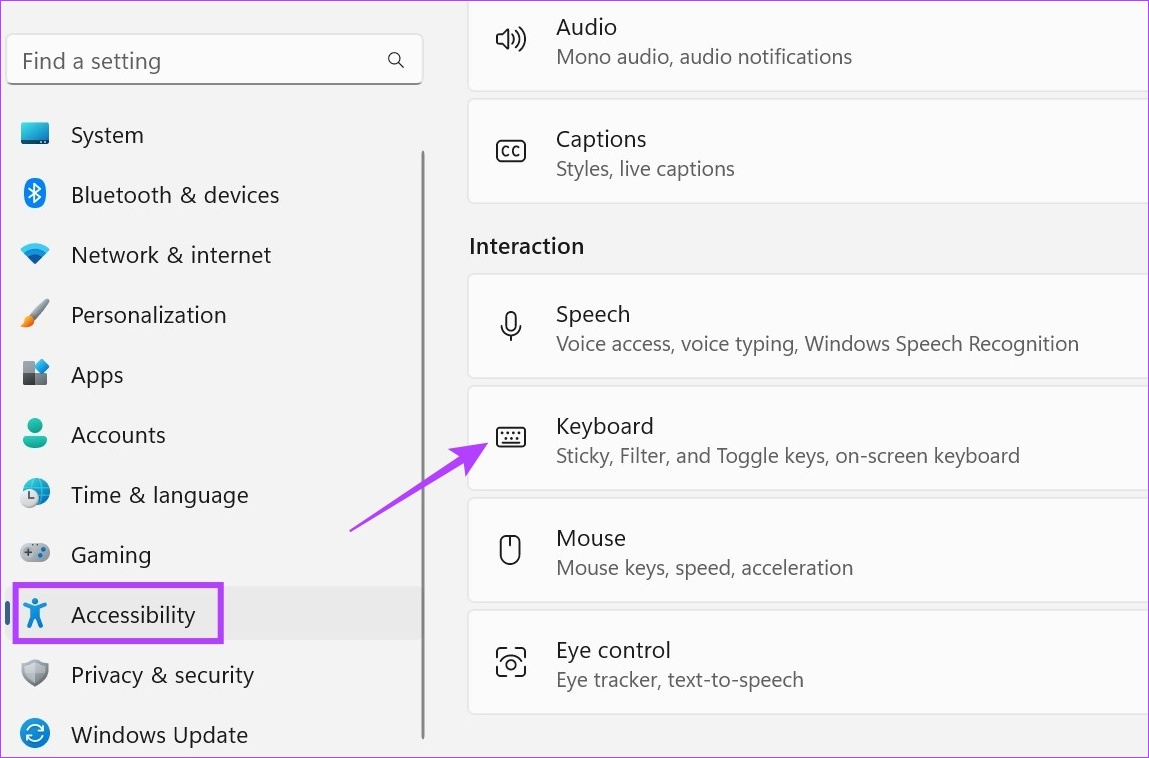
Step 2: Turn on the toggle for On-screen keyboard.

Also Read: How to fix On-Screen Keyboard not working on Windows 11
Method 3: Using Ease of Access Center
Using the Ease of Access Center in the Control Panel, you can adjust and access settings relevant to the visual, auditory, and mobility configuration of your device. This also means that for your ease of typing, you can open the On-Screen Keyboard using the Control Panel options. Here’s how.
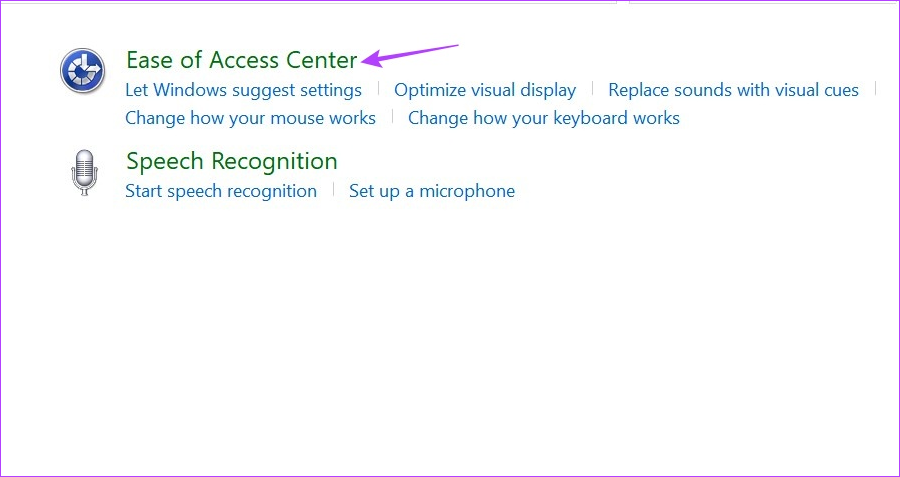
Step 1: Open the Control Panel and click on Ease of Access.

Step 2: Click on Ease of Access Center.
Step 3: Go to the Quick access to common tools section and click on Start On-Screen Keyboard.

Now, use this virtual keyboard and type without a physical keyboard on Windows 11.
Pro Tip: Pin On-Screen Keyboard to Start
If you constantly use the On-Screen Keyboard, you can pin the keyboard shortcut to the Start menu. This will add the app in between all your other pinned apps, making it easier to access. Follow the below steps to do it.
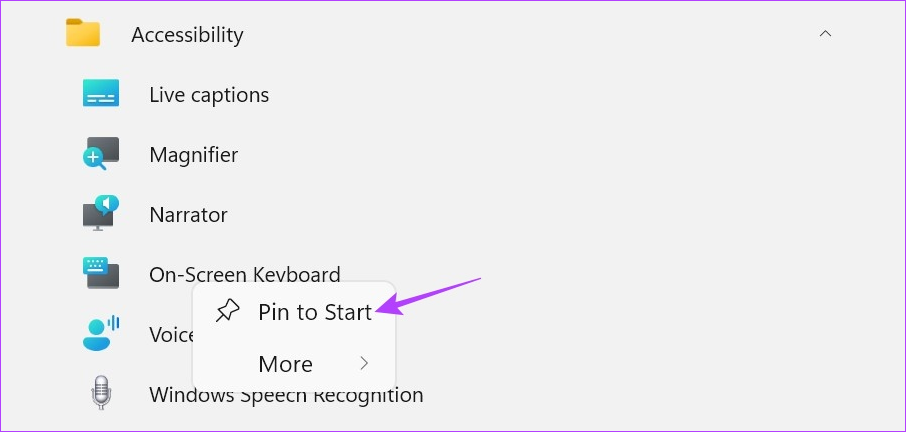
Step 1: Go to Start and click on All apps.

Step 2: Click on Accessibility. Once the list of apps opens, right-click on On-Screen Keyboard.

Step 3: Click on Pin to Start.
This will pin the On-Screen Keyboard app to the Start menu. Now, you will be able to instantly access the visual keyboard from the Pinned apps menu.
Was this helpful?
Last updated on 21 August, 2024
Read Next
 How to Hide Android On-Screen Keyboard When Using External Keyboard
Google understands that multiple users connect physical keyboards to their Android devices.
How to Hide Android On-Screen Keyboard When Using External Keyboard
Google understands that multiple users connect physical keyboards to their Android devices.
 4 Ways to Fix On-Screen Keyboard Not Working on Windows 11
Fix 1: Enable On-Screen Keyboard The on-screen keyboard may fail to open on Windows if you have previously disabled it from the Settings app.
4 Ways to Fix On-Screen Keyboard Not Working on Windows 11
Fix 1: Enable On-Screen Keyboard The on-screen keyboard may fail to open on Windows if you have previously disabled it from the Settings app.
 6 Ways to Get an Off-Screen Window Back on Screen on Windows
While using Microsoft Windows, I had a window that had somehow fallen completely off of my screen.
6 Ways to Get an Off-Screen Window Back on Screen on Windows
While using Microsoft Windows, I had a window that had somehow fallen completely off of my screen.
 3 Best Ways to Fix Keyboard Backlight Not Working on Windows 10 and Windows 11
Try Basic Fixes Toggle the keyboard backlight using the hotkey: You can use a key combination to quickly enable or disable the keyboard backlight on your Windows 11 PC.
3 Best Ways to Fix Keyboard Backlight Not Working on Windows 10 and Windows 11
Try Basic Fixes Toggle the keyboard backlight using the hotkey: You can use a key combination to quickly enable or disable the keyboard backlight on your Windows 11 PC.
 Top 3 Ways to Change Windows 10 Keyboard to US
When you unbox a new Windows computer, you can choose and add your preferred keyboard layout and language during set up.
Top 3 Ways to Change Windows 10 Keyboard to US
When you unbox a new Windows computer, you can choose and add your preferred keyboard layout and language during set up.
 3 Ways to Fix Mouse and Keyboard Not Working in Windows
Basic Fixes Restart PC: A simple restart can refresh the system memory, clear temporary glitches, and reload device drivers, fixing issues caused by outdated or corrupted files.
3 Ways to Fix Mouse and Keyboard Not Working in Windows
Basic Fixes Restart PC: A simple restart can refresh the system memory, clear temporary glitches, and reload device drivers, fixing issues caused by outdated or corrupted files.
 5 Ways to Fix Keyboard Not Working on Windows 11
Basic Fixes Check the keyboard connection: Ensure the keyboard connection wire isn't loose.
5 Ways to Fix Keyboard Not Working on Windows 11
Basic Fixes Check the keyboard connection: Ensure the keyboard connection wire isn't loose.
 3 Ways to Remap Keyboard Keys in Windows 11
Method 1: Using Microsoft PowerToys Microsoft PowerToys is a native utility tool that helps users boost their productivity on Windows.
3 Ways to Remap Keyboard Keys in Windows 11
Method 1: Using Microsoft PowerToys Microsoft PowerToys is a native utility tool that helps users boost their productivity on Windows.
The article above may contain affiliate links which help support Guiding Tech. The content remains unbiased and authentic and will never affect our editorial integrity.

