Google Chrome has an experimental, hidden feature menu called Flags, and some of these help enhance the user experience. One such option enables smooth scrolling.
Note: This method works on Google Chrome on Android and iPhone, too.
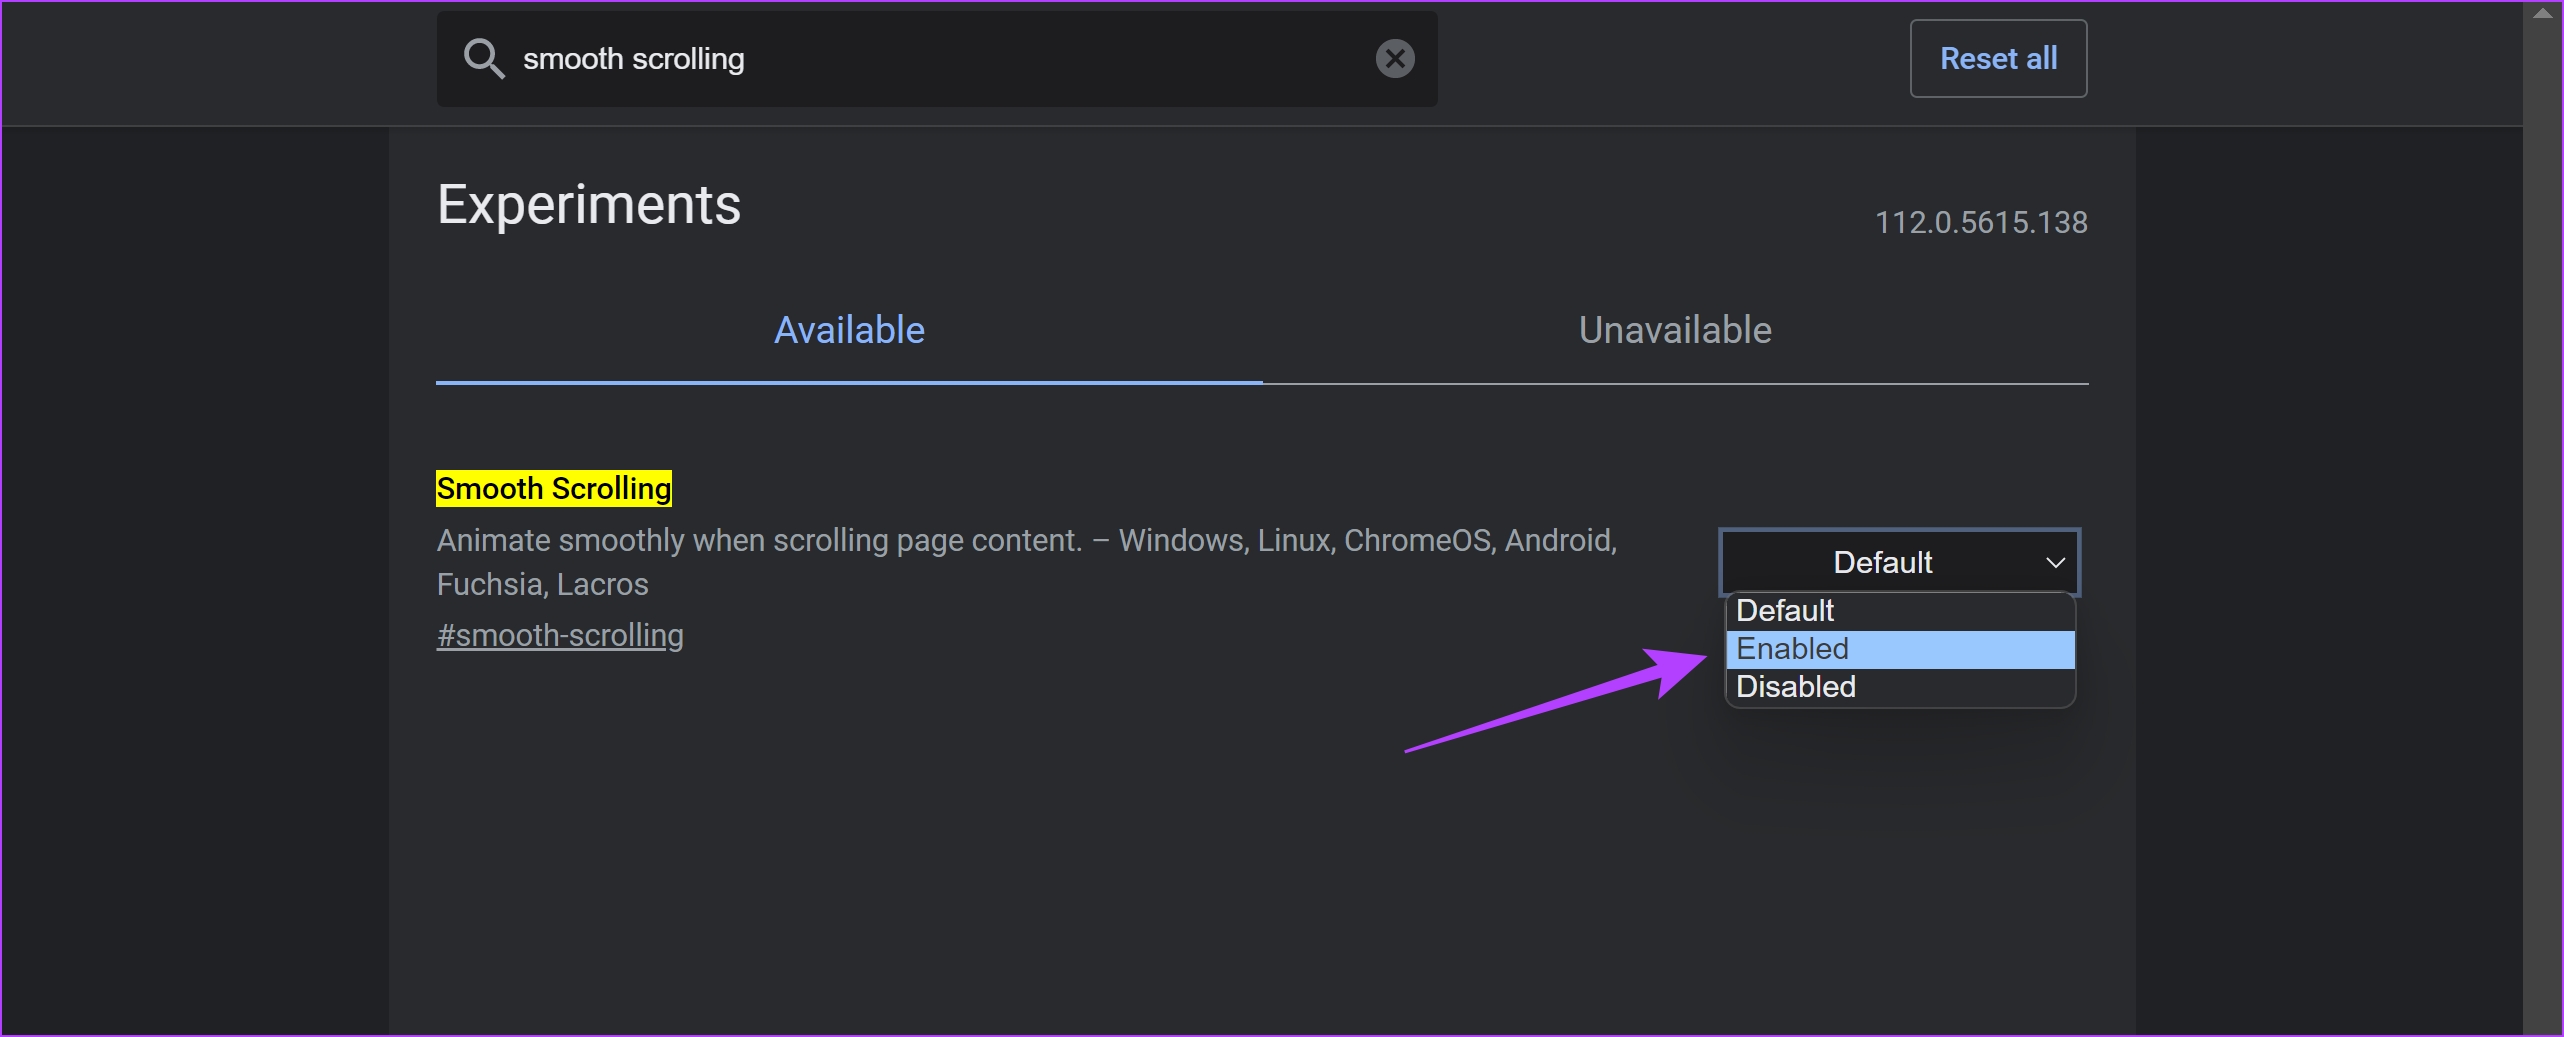
Step 1: Open Chrome and type chrome://flagsin the address bar.
Step 2: Search for Smooth Scrolling in the search bar.
Step 3: Click on the drop-down menu for Smooth Scrolling.
Step 4: Choose Enabled.
Step 5: Now, relaunch Google Chrome. Once you do this, the smooth scrolling feature will be activated.
Note: To turn off smooth scrolling in Chrome, follow the above steps and select Disabled.
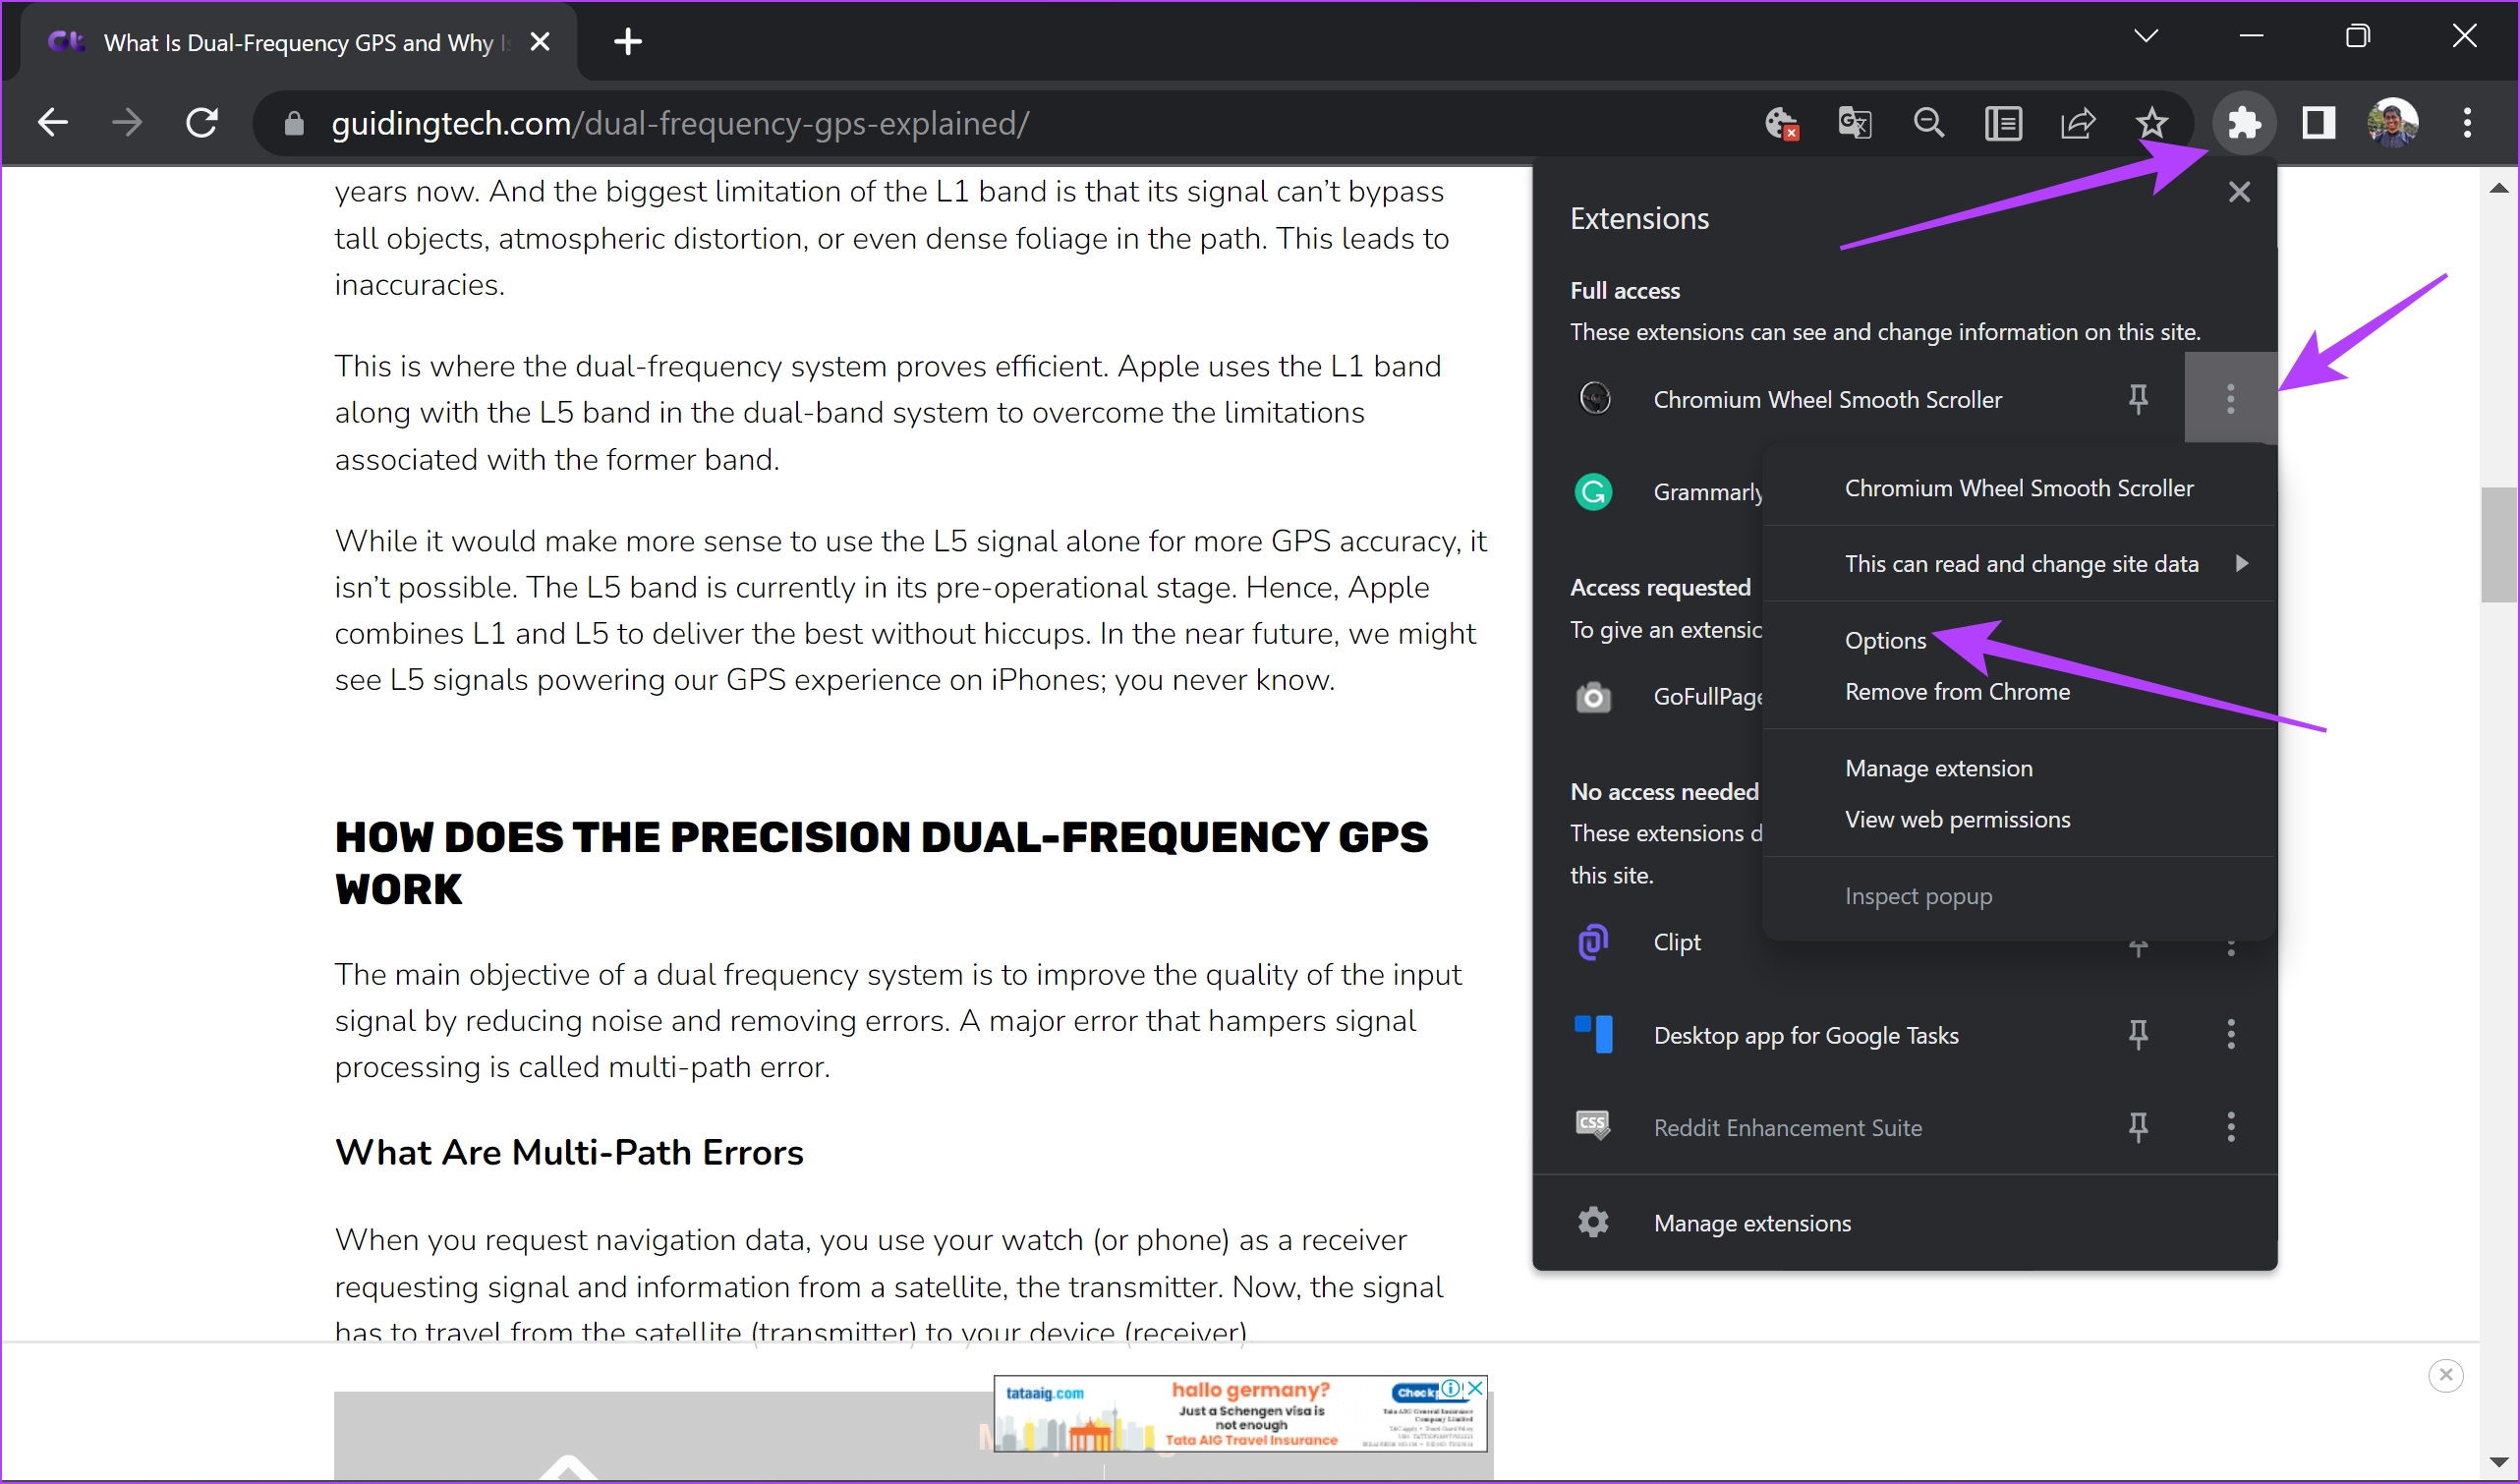
Step 2: The extension is now installed and activated. However, you can also tweak the settings. Click on the extensions menu > select three dots next to the extension.
Step 3: Click on Options.
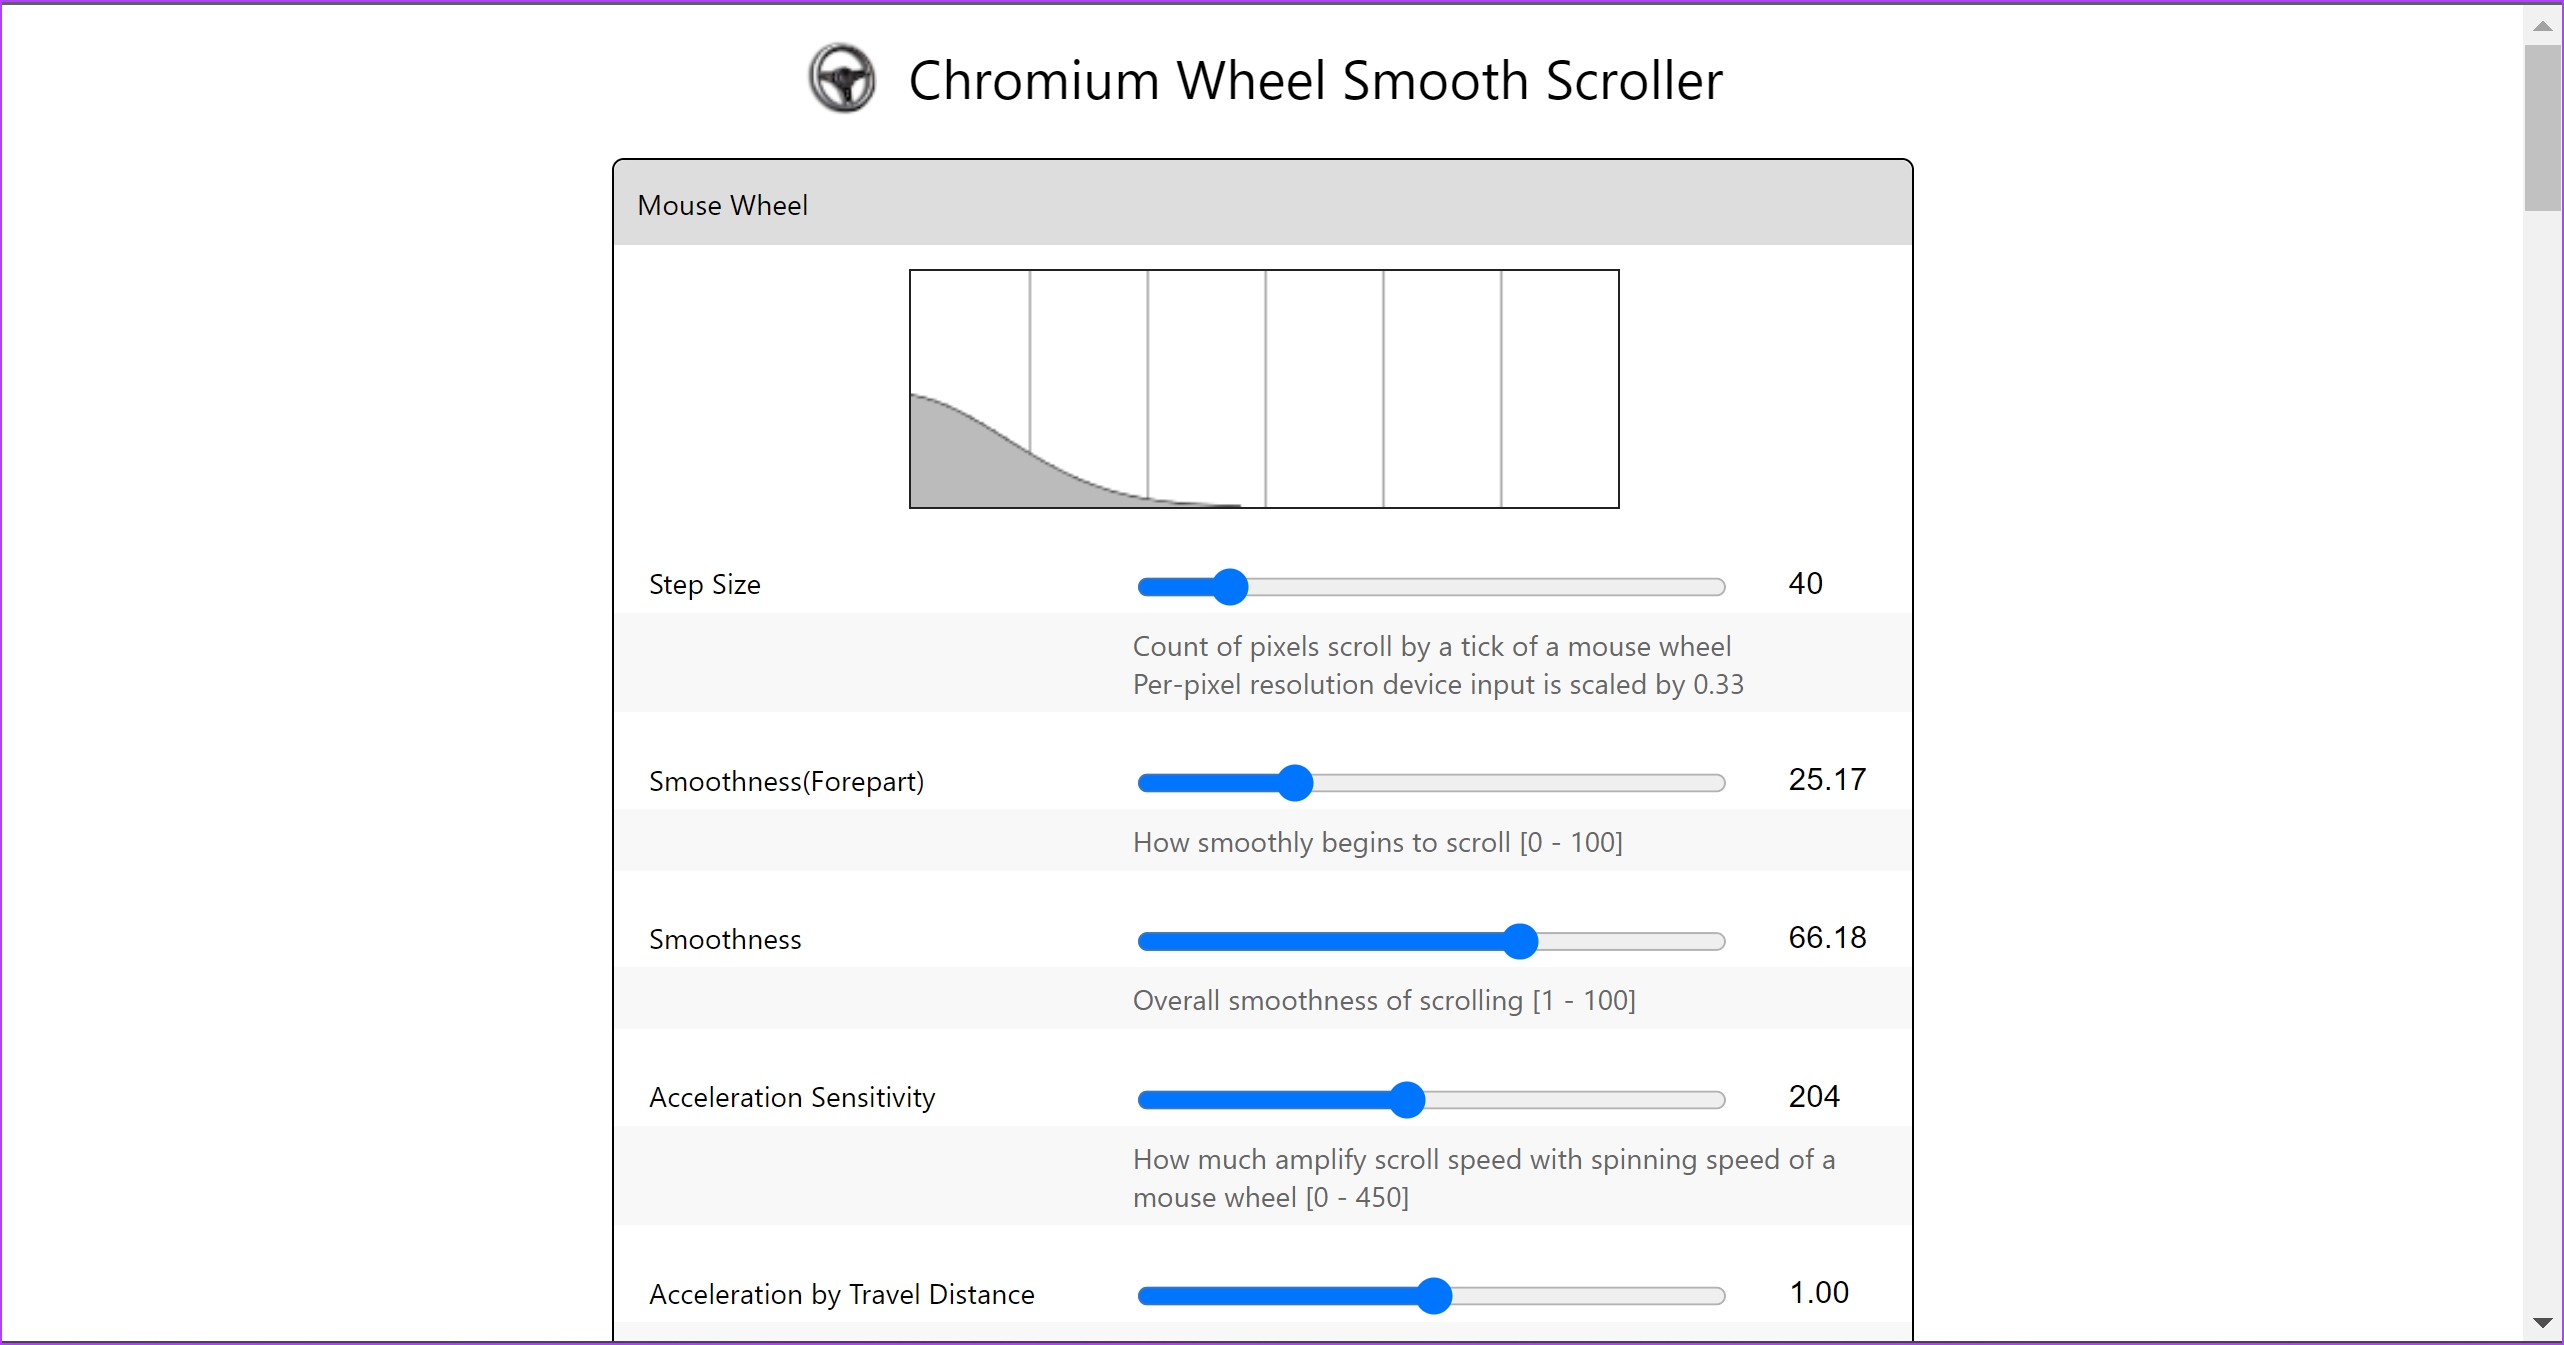
Step 4: You can customize the smoothness, step size, and other scrolling variables.
How to Hide Your Year of Birth (And Your Age) on Facebook
Step 1: Go to your Facebook.com Profile (This will open your profile page) and click on Edit profile.
Step 2: Scroll to the bottom and click Edit Your About Info.
Step 3: Click on Contact and basic info from the sidebar. Scroll down to basic info. Next to the pencil icon, you should see a Globe, Group, or Friend icon. Click on it.
Step 4: It will open the Select audience window, which offers choices to control who can see your birthday. Select Only Me to hide your birthday on Facebook.
Why Should I Hide My Real Age on Facebook? 5 Reasons…
The year of birth and, thus, the age is data. The data could be a potential target of identity theft by online stalkers, scamsters, and hackers.
It is a filter on many people’s search engines. For online anonymity, you would want to remove it from Facebook.
Creating an excellent virtual identity separate from your real one requires hiding as many details as possible. Your age is one of them.
Headhunters use social media like Facebook to scan for profiles. If age is a barrier to earning a place on the interviewee’s chair, hide it.
Age is just a number, but you want to keep it to yourself. Thank you, please!
FAQs
How Do I Hide Facebook Birthday Posts From Certain People?
You can hide your Facebook birthday posts from certain people by changing your birthday privacy settings. Change the privacy setting to custom and then add the people you want to share your birthday with or those with whom you don’t want to share your birthday.
How Do I Hide Myself on Facebook?
You cannot hide yourself on Facebook, but you can configure privacy settings to ensure you are challenging to find and that your data is secure. Keep most of the stuff visible to you or only to your close friends.
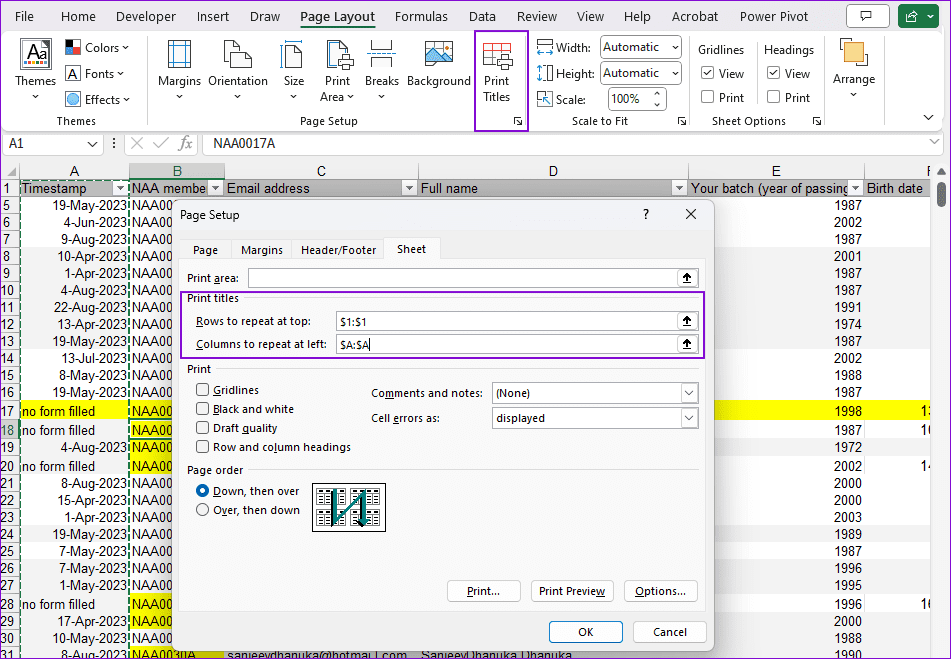
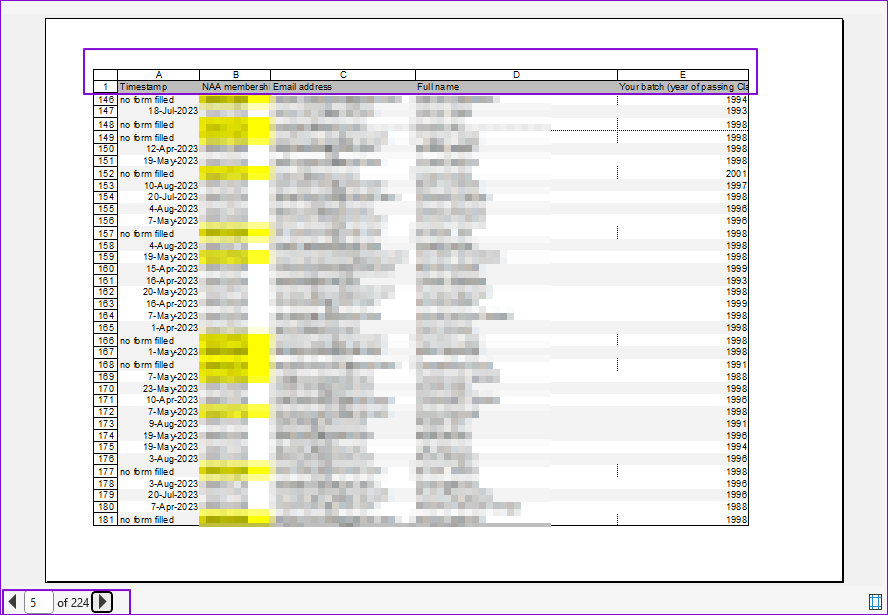
Step 1: On your workbook, select the desired sheet and navigate to the Page Layout tab on the ribbon.
Step 2: Then, click on the icon for Page Titles under the Page Setupsection.
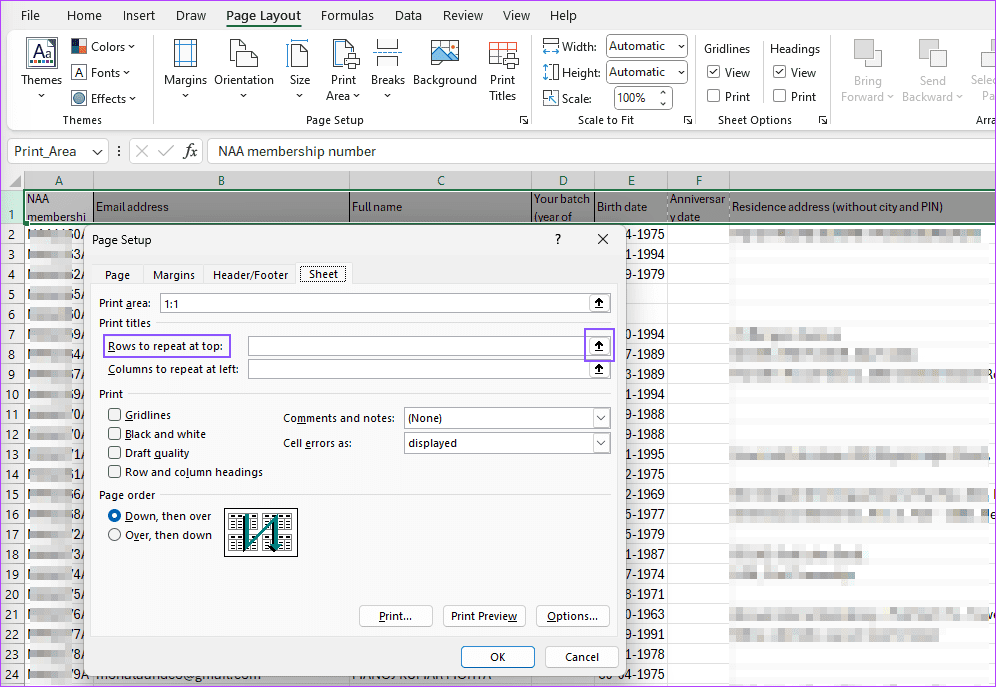
Step 3: In the Page Setupmodal window, switch to the Sheet tab and spot the section for Print titles. It includes row and column options.
Note: Though we focus on the header row, the setting can also be applied to columns.
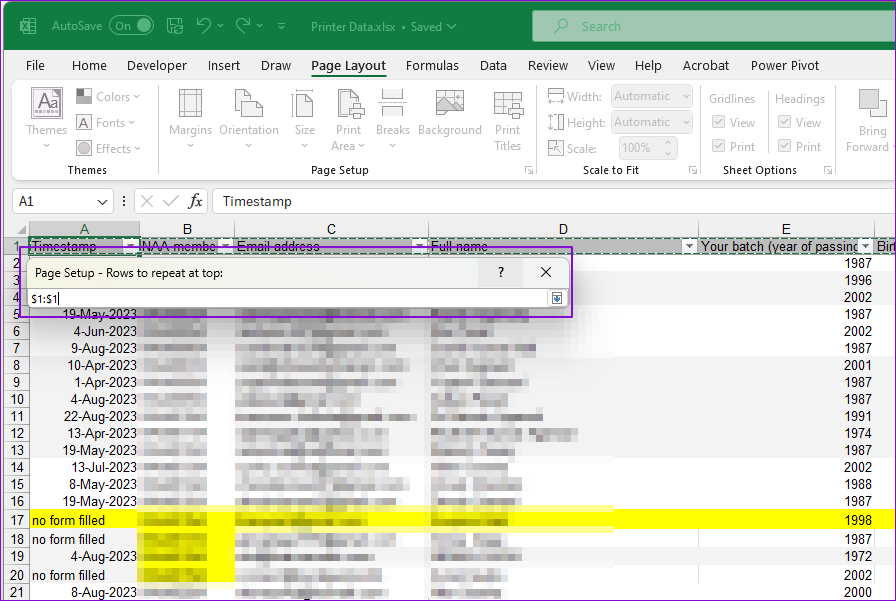
Step 4: To set up printing of the top row on each page, click on the Arrow up button in front of ‘Rows to repeat at top’text box. For columns, take the second one.
Step 5: That will take you to the Excel sheet along with a dialog box. Click row number 1 (on the sheet) and press the arrow-down button in front of it.
Here, you can select multiple rows on each page if you wish to repeat them. Generally, you would want the top row and, in rare circumstances, the leftmost column.
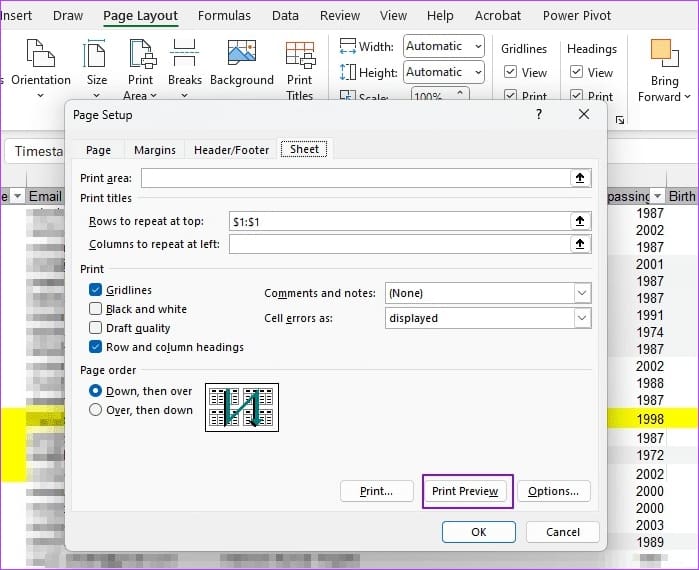
Step 6: Back in the Page Setup modal window, you will see the text boxes populated with the row/column values to repeat on each page. You can choose Print Preview to ensure the print includes a header or columns on all pages.
In the print preview, check whether the settings work. Note that the settings are sheet-specific and do not apply to the workbook.
How Do You Print Row and Column Numbers When Printing in Excel?
Sometimes, you also want to print row headings 1, 2, . . . and column headings A, B, . . . To achieve this, navigate to Page Layout > Sheet Options and check the Row and column headings box in the Printsection.
Why Is Print Titles Button Greyed Out?
If you cannot access the Print Titles button, it might be because you are editing a cell or have a chart selected. Similarly, if you cannot use the Rows to repeat at the top spreadsheet icon, it could be because you have selected multiple worksheets within your workbook.
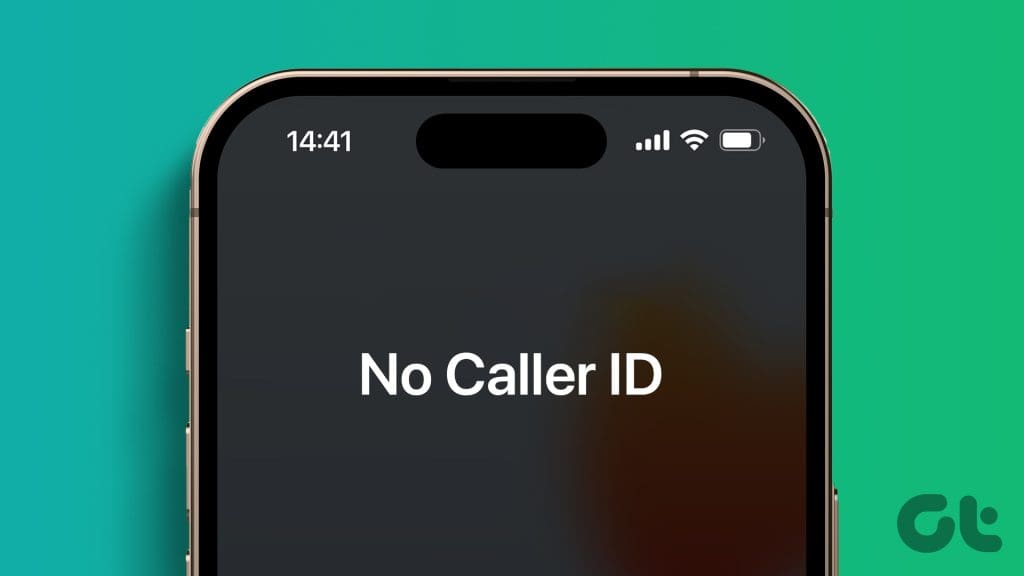
In the era where contact posters boldly show who’s calling, some people like to hide their phone numbers for privacy reasons. And if you don’t wish your number to pop up on someone’s caller ID display, here’s how you can disable or block your caller ID on your iPhone.
And not just for maintaining privacy, you can also hide your number to surprise someone or stop them from calling back. What’s great is that you can disable or enable iPhone caller ID settings anytime to make your phone number private or public. This guide will walk you through both the processes.
Things to Know About Blocking Caller ID on an iPhone
Before we show you how to turn on ‘No Caller ID’ on your iPhone, let’s first understand the concept in a bit more detail. Caller IDs are a telecommunications service that shows who’s calling you.
Depending on whether you have the number saved or use a third-party app to recognize the number, the Caller ID may show a number, the person’s photo, and some profiling details.
What Does Show My Caller ID Mean
Show My Caller ID is Apple’s built-in feature that lets you control whether your phone number is displayed when you make a call. However, the feature only works when the service provider allows the ‘block caller ID on iPhone’ feature.
Also, note that this feature can’t hide your mobile number or email address when using FaceTime or other video calling apps like WhatsApp, Zoom, etc.
What Happens When You Turn Off Show My Caller ID on iPhone
When you hide your caller ID, it will show Private or No Caller ID, Blocked, or something along these lines on the receiver’s device. While giving someone a heads-up that you’re calling is good, there are several reasons for you to disable or block your called ID, including the following,
Protecting personal privacy.
Preserving the element of surprise for surprise calls or pranks.
Keeping business calls professional.
Maintaining anonymity while making important calls.
Avoiding unwanted calls or spam.
Preventing telemarketers from calling back.
Preventing harassment or stalking.
The interesting part is that you can prevent your phone number from being shown on the recipient’s Caller ID display, either on a temporary or permanent basis, and it’s free of charge.
How to Disable Show My Caller ID
Follow these steps to turn off caller ID on iPhone using the built-in functionality. Notably, it will be applicable for all calls made after disabling. To show your Caller ID again, you can enable Show My Caller ID anytime using the same method.
Step 1: Open the Settings app, scroll and select Phone.
Step 2: Here, scroll down and select ‘Show My Caller ID’ under the Calls section.
Step 3: Toggle off the switch next to ‘Show my Caller ID’ to disable the setting.
Notably, not all carriers support blocking your caller ID setting. So, if you observe that the toggle is grey and you can’t disable it, that means your mobile carrier company doesn’t allow this functionality.
Block Caller ID on iPhone Using a Shortcode
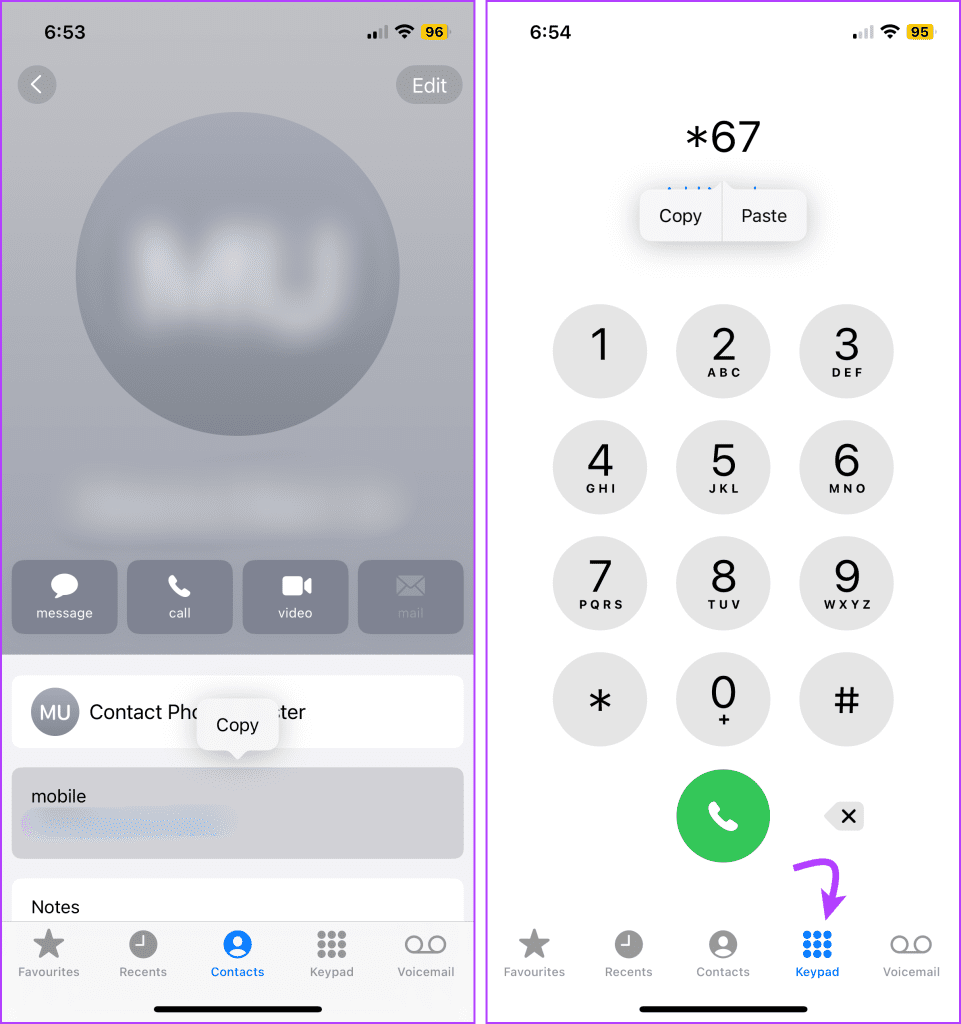
Unlike the above method, this one disables your caller ID on your iPhone temporarily, i.e., just for the call. You’ll have to use the shortcode before dialing the number whenever you want to hide your caller ID from the receiver.
Step 1: Open your Contacts app and copy the number of the contact you want to call.
Step 2: Now open the keypad tab → dial *67 and paste the number after it.
Step 3: Finally, tap the dial button to call the number.
This shortcode preceding the actual mobile number activates caller ID blocking.
Note: The code for the UK and Ireland is different. You must dial *141 before the phone number to hide your caller ID.
Block Your iPhone’s Caller ID Permanently Through Carrier
For security reasons, most carriers do not instantly or directly accept changes in caller ID settings from a device. And while the shortcode method is reliable, dialing *67 before every call can be a headache.
The best alternative is to connect with your carrier and ask them to manually activate the caller ID block on your iPhone. However, do note that this will be a permanent setting. You’ll have to call the carrier again to unlock the caller ID block.
So, think carefully before you take that action. Once the permanent block is set in place, you can use another shortcode to temporarily disable the block. Just add *82 to the beginning of the number and dial.
FAQs on Blocking Your Caller ID
1. Is it legal to hide your caller ID?
Yes, hiding your caller ID is generally legal as long as it is not used for unlawful or malicious purposes. However, you should check your local laws before taking any permanent action.
2. Is hiding caller ID available in all countries and with all carriers?
No, the availability and extent of caller ID blocking can vary as per country laws and carrier settings. It’s important to check with your carrier to grasp more details.
3. Can I call emergency numbers by hiding my caller ID?
While it may vary from country to country, it doesn’t work in most countries. Moreover, it is highly recommended that you don’t hide your caller ID, as they need to know your location and contact information to assist you.
4. Why can’t I make calls after disabling when caller ID
If you’re having trouble making calls with caller ID disabled, ensure that you have a strong cellular signal and that your carrier supports caller ID blocking. If the issue persists, contact your carrier for assistance.
5. I have hidden my caller ID, but my phone number still shows when I call someone; why?
If your caller ID remains visible despite your settings, contact your carrier for support. Some carriers may have restrictions or limitations on caller ID blocking.
Hide your Caller ID for Privacy
Disabling or blocking your caller ID on an iPhone is a valuable tool. It helps protect your privacy and control the information you share with others. Now, whether you opt for a temporary or permanent solution that’s up to you.
But if you’re not able to disable caller ID due to law- or carrier-related restrictions, don’t be disheartened. You can use a different SIM and a burner phone and keep your personal number private for as long as possible.
An automatic screen lock safeguards your privacy and prevents your device from unauthorized access or accidental changes. However, a very short screen lock duration can be frustrating, requiring frequent unlocks when you’re using your phone.
Thankfully, you can configure the screen timeout settings to extend the automatic screen lock time, typically up to 10 minutes on most devices, and up to 30 minutes on some brands like OnePlus.
Delay the Screen Lock Time on Pixel, Vivo, Nothing, and iQOO Smartphones
Step 1: Open the Settings app and select Display and brightness.
Step 2: Select Screen timeout and pick the extended duration to delay the screen lock time.
Delay Screen Lock Time on Samsung Phones
Step 1: Select Display under the Android Settings app and tap Screen timeout.
Step 2: Pick a longer duration to delay the screen lock time. Additionally, enable ‘Keep screen on while viewing‘ to prevent the automatic screen lock while you’re looking at your phone.
Delay Screen Lock Time on Xiaomi Devices
Step 1: Open the Settings app, select Display & brightness, scroll down, and tap the Lock screen.
Step 2: Select Sleep and pick an extended time limit to delay the screen lock.
Delay Screen Lock Time on OnePlus, Oppo, and Realme Smartphones
Step 1: Open the Settings app, select Display & brightness, and tap Auto screen off.
Step 2: Select a longer duration than default to delay the screen lock time.
Delay Screen Lock Time on Honor Devices
Step 1: Select Display & brightness in the Android Settings app and tap Sleep.
Step 2: Pick a longer duration to delay the phone’s screen lock.
The Snap Assist feature allows you to arrange multiple windows on your computer, such as to tile your windows vertically. It offers predetermined layouts, and there are two ways to call this feature. Let’s look at both.
Snap Layouts From the Maximize Button
Step 1: Open your primary window or application.
Step 2: Hover on the windows’ Maximize button and select any of the Snap layouts that tile the windows vertically.
Step 3: Select the second window you need to be displayed.
Snap Layouts by Dragging Windows
Step 1: Launch the different apps or windows you need.
Step 2: Click and drag your primary window from its title bar to the extreme left or right. Release it when you see the snap-in the outline, then click on the second window or app you want to arrange vertically.
Method 2: Manually Arranging and Adjusting Windows
This is a less seamless way of tiling windows vertically, but it is also effective. Follow the steps below.
Step 1: Open all the apps or windows you need.
Step 2: If the Mazimmize icon has the outline of two squares, click on it to ensure the window is not covering the entire screen.
Step 3: Place the cursor on any edge of the window. When you see a bi-directional arrow, drag the edge to your desired size or position. Then, repeat along all corners of this initial window.
Step 4: Repeat step three for the second window; click and hold the title bar, then drag them to vertical positions.
Method 3: Using Keyboard Shortcuts
Keyboard shortcuts are an efficient way of accomplishing certain Windows tasks. They can also help you arrange or tilt windows so they are stacked side by side. To use keyboard shortcuts, follow the steps below.
Step 1: Open the windows or apps you must tile vertically.
Step 2: Press the Windows + Left or Right arrow key. This will take your primary window to the left or right.
Step 3: Use the arrow keys to select the second window to tile and hit Enter.
We often become part of email threads or conversations because our name appears on the CC or To list. And, on many occasions, the conversation turns out to be irrelevant, annoying, or unimportant. It just ends up adding to the burden and clutter of our inboxes.
However, Gmail users are blessed with a feature called Mute—you may simply do a Mute on any message and push the entire conversation to the archive. Besides, all future conversations (Reply, Forward, Reply All) on that thread will bypass your inbox and move to the archive automatically. Thus, you will no longer have to view or pay attention to such messages.
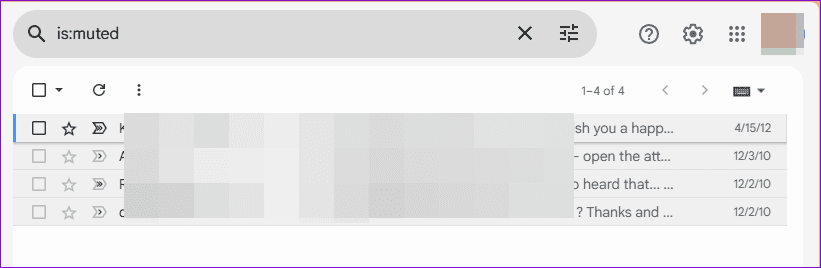
Method 1: Mute a Conversation in Gmail Web
Having understood what Mute means and does, we will now see how to mute/unmute conversations in Gmail. Before proceeding, it is also important to know that the entire conversation will reappear in your inbox if your name is explicitly specified in the To/CC field (in any future message).
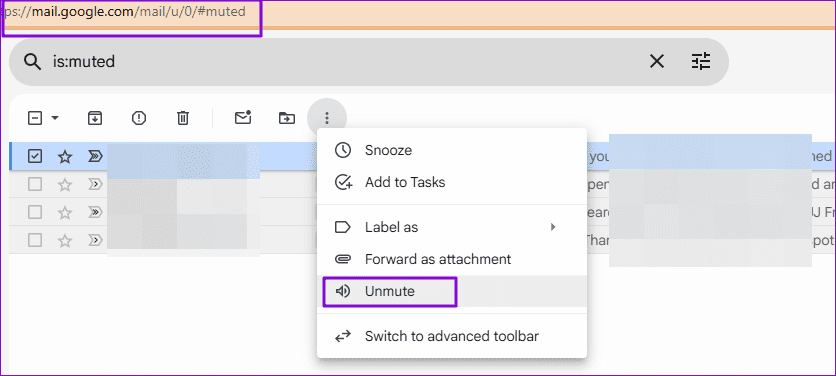
Step 1: Go to Gmail the inbox and select one or more messages.
Step 2: Click on the More menu and choose theMute option.
Step 3: If you are already reading a message, click on the More menu and click on Mute.
How to Change the Default App to Open a File in Android
While Android allows you to switch default apps to something else, other similar apps may prompt you to change them. So you will need to choose apps to be default as always carefully or one time when the prompt shows up.
Step 1: Open Android Settings. Navigate to Apps, and then select Default Apps.
Different versions of Android or OEM Skins may show different labels. So, if you can’t find this exact location, search for default apps, and it should appear.
Step 2: Now, search for the app you want to change the default settings, tap on it, and select an alternative app from the list. You can change the browser, call app, phone, and so on.
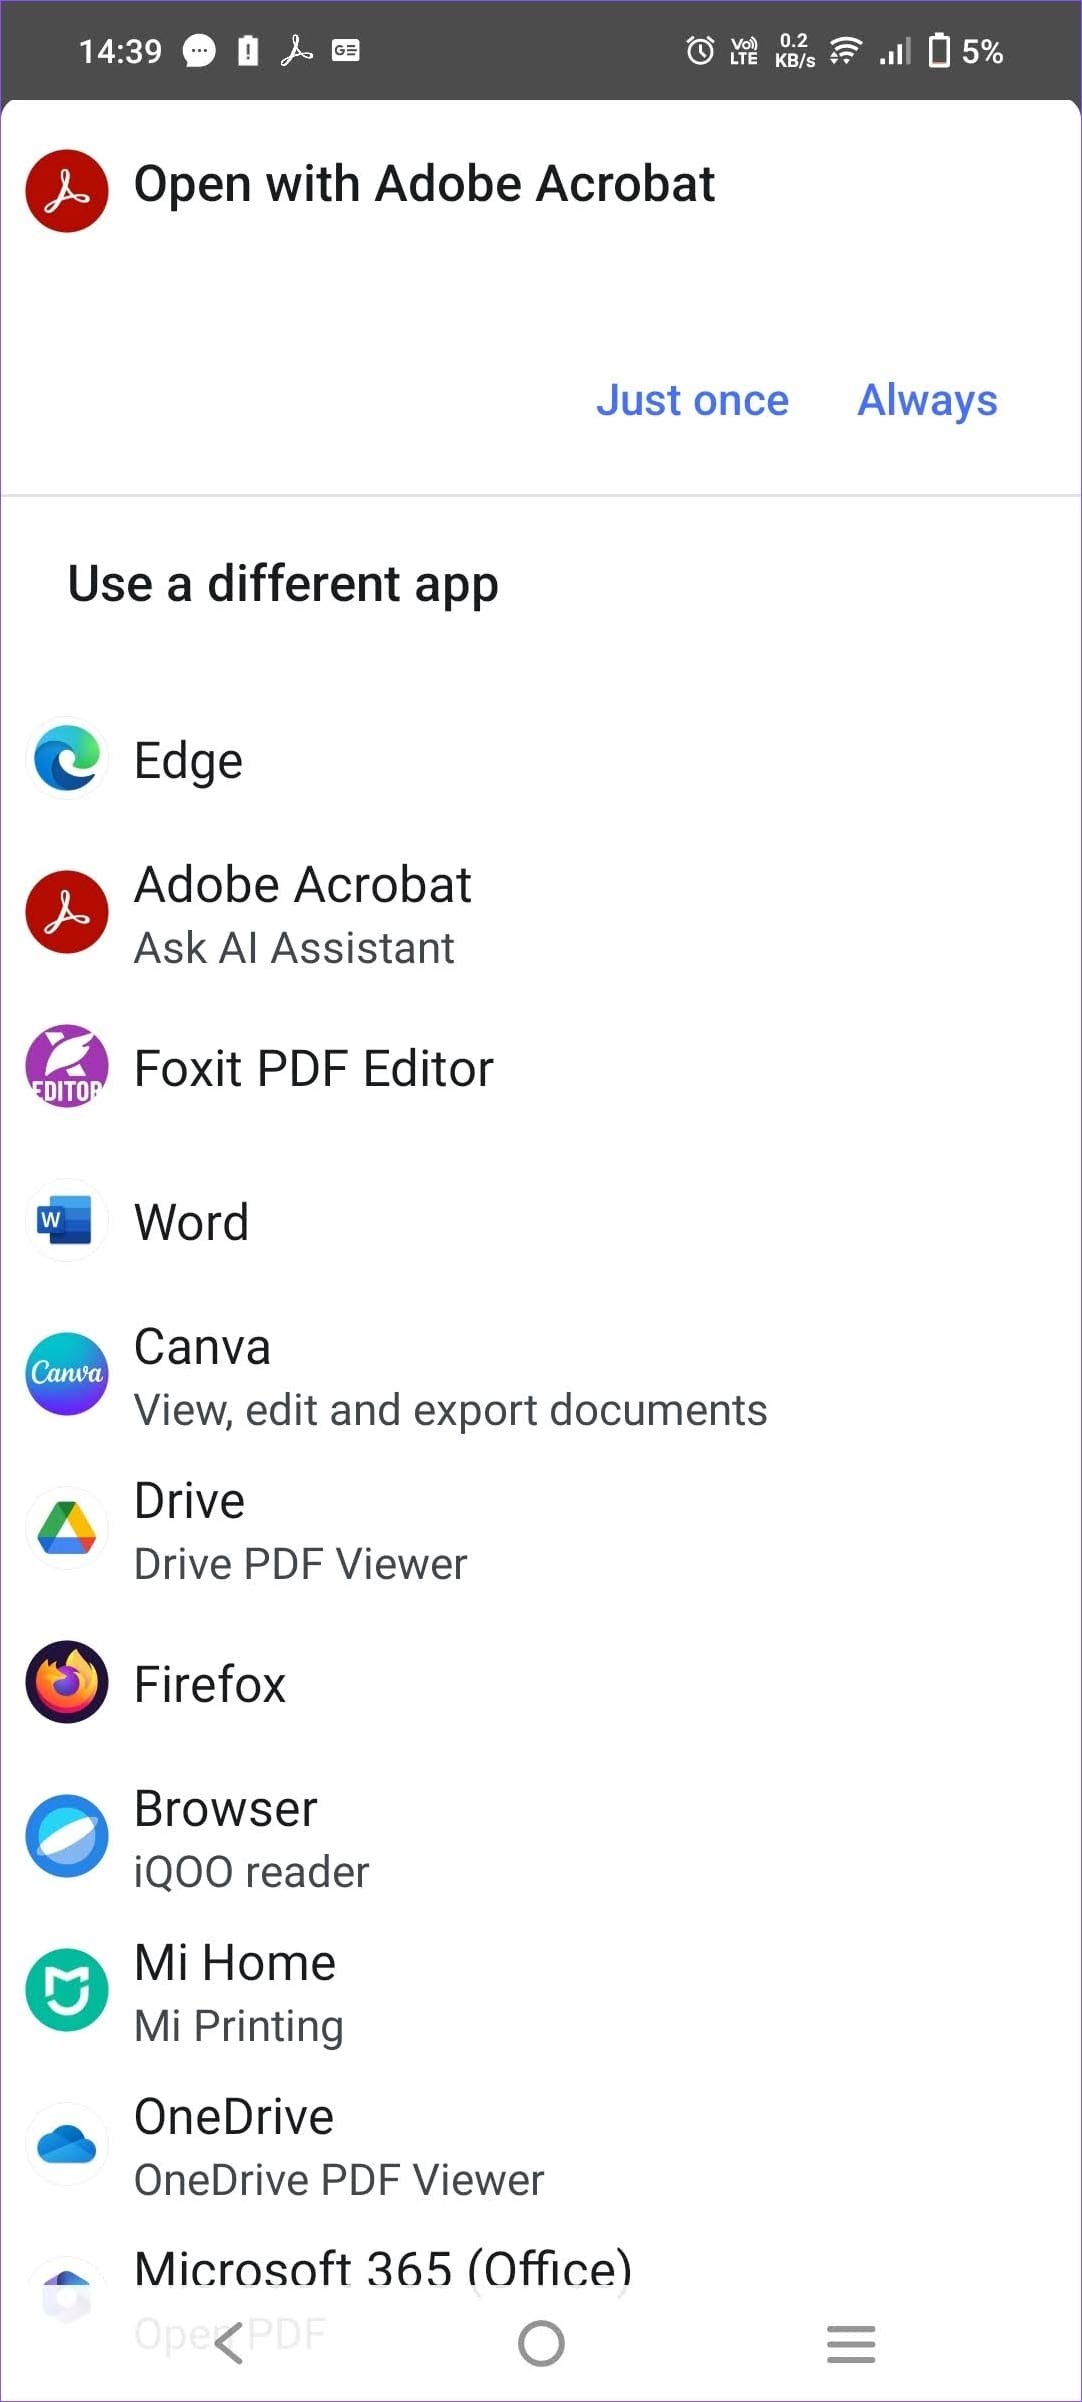
Step 3: If your file type is not in the list and you cannot change it, you can trick Android here. For example, if you have a PDF file opening in, let’s say, Foxit PDF editor, and you want to change it to Adobe, uninstall the Acrobat app and then reinstall it.
Then open a file, and you will get the Android prompt to use a different app. You can choose Android here. Next, open the PDF file again; this time, the default will be Adobe Acrobat. However, to ensure the app chooser doesn’t appear again, tap on Always.
If you prefer KMPlayer over VLC Media Player and want to play multiple videos at once, you can adjust its settings to run multiple instances. Once enabled, you can play different media files simultaneously, making it easier to multitask or save time when opening individual KMPlayer instances.
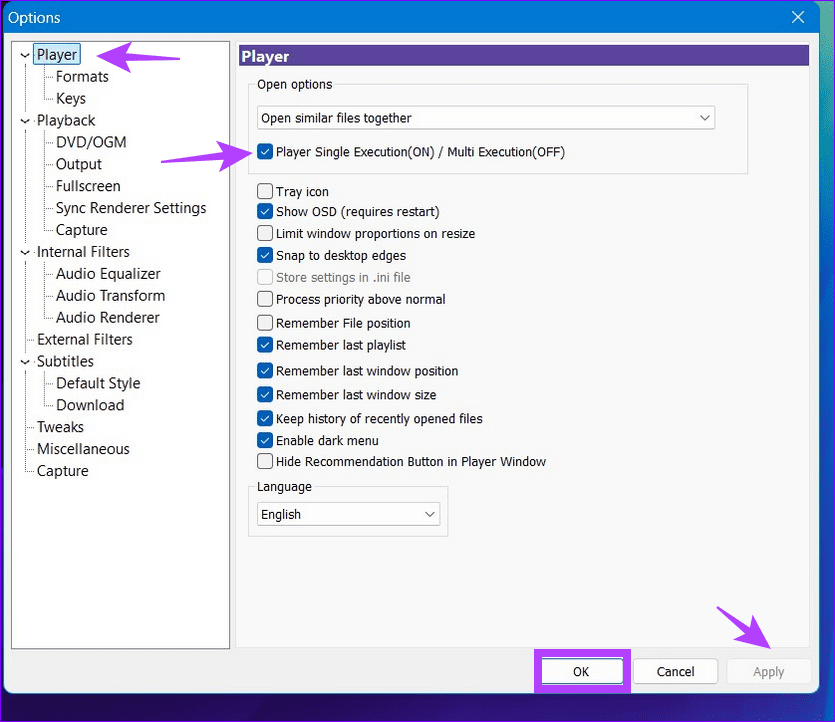
Step 1: Open KMPlayer, click its menu at the top left, and select Options.
Step 2: Select Player from the left sidebar, and uncheck ‘Player Single Execution (ON)/Multi Execution (OFF) ‘. Click Apply followed by OK to save changes.
Launch the KMPlayer Instance in Full Screen Mode
By default, KMPlayer opens videos in a small window. If you wish to play it in fullscreen, tweak its settings manually to adjust the instance size.
Step 1: Press F2 in the KMPlayer app to open its Settings, select Fullscreen from the left sidebar, and enable ‘Launch files in fullscreen‘.
Step 2: Click Apply followed by OK to save changes and reopen your desired video to play it in the full-screen mode.
Change Audio Language in the KMPlayer Instance
If your video file has multiple audio tracks, you can switch its language in KMPlayer with these easy steps:
Step 1: Play your desired video file in KMPlayer and right-click anywhere to view more options.
Step 2: Select Audio Track from the right-click context menu and pick your desired audio language.
Step 3: If the audio lags, select Options > Audio Transform, and enable Audio time shift (ms). Type your desired value and click Apply to sync the audio.
I believe this is one of the most required proponents for any media player. Now, depending on the required forward and rewind length, you can use the following combinations:
Right arrow/Left Arrow: 5 Seconds.
Ctrl + [Right Arrow, Left Arrow]: 30 Seconds.
Alt + [Right Arrow, Left Arrow]: 1 Minute.
Ctrl + Alt + [Right Arrow, Left Arrow]: 10 Minutes.
2. Volume Up and Down
Scrolling the volume bar to adjust the volume takes some time. Using the Up and Down arrows to raise or lower the volume is better. M puts the media to mute.
3. Change Video Frame Size
You mostly want to switch to the full-screen mode when playing a video. Pressing Enter toggles between the full-screen and window modes. Ctrl + Enter and Ctrl + Alt + Enter are the Stretch and Overscan full-screen modes.
Other screen controls include Alt + [1, 2, 3, 4], which stand for half size, standard size, one and a half size, and double size, respectively. You can also press Alt + 5 to reset the frame to its original size.
4. Adjust Contrast, Saturation, and Brightness
We sometimes need to adjust these properties depending on the video quality we are watching. On KMPlayer, we can adjust the hardware or software profiles as follows:
H/W Contrast: Z, X, C.
S/W Contrast: V, B, N.
H/W Saturation: A, S, D.
S/W Saturation: G, H, J.
H/W Brightness: Q, W, E.
S/W Brightness: T, Y, U.
5. Windows Size and Position
To quickly move the window around the screen, use the following keyboard shortcuts and gestures to gain more control.
Ctrl + Alt + 2: Move bottom
Ctrl + Alt + 4: Move left
Ctrl + Alt + 6: Move right
Ctrl + Alt + 8: Move top
In addition, you have a combination of Alt + 1 to Alt + 8, which you can find under Pan & Scan > Windows Size & Position.
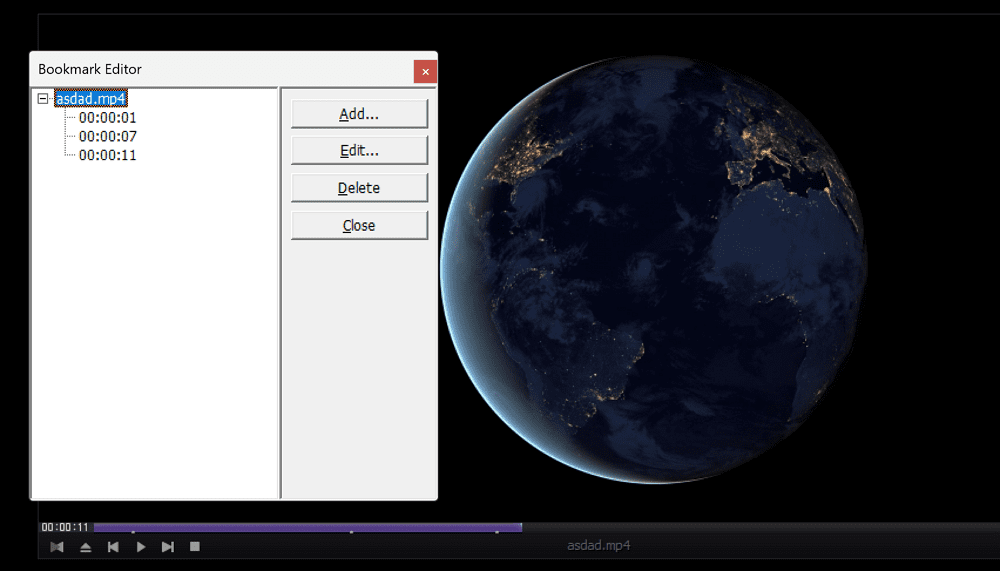
6. Bookmark Media
Sometimes, it can be fun to bookmark media positions to return to the exact frame without wasting time. Press P to bookmark any position. Use Alt + [Page Up, Page Down] to start playing in the next/previous bookmarked position.
7. Activate Album Art
If you feel that album art is missing on KMPlayer, it will likely be deactivated. Use the Ctrl + Alt + L combination to activate and/or change the player’s skin.
8. Subtitle Shortcuts
I generally watch a movie with the subtitles. If you are of the same kind, you must know these controls:
Alt + [F1, F2, F3]: Increase, decrease or reset font size
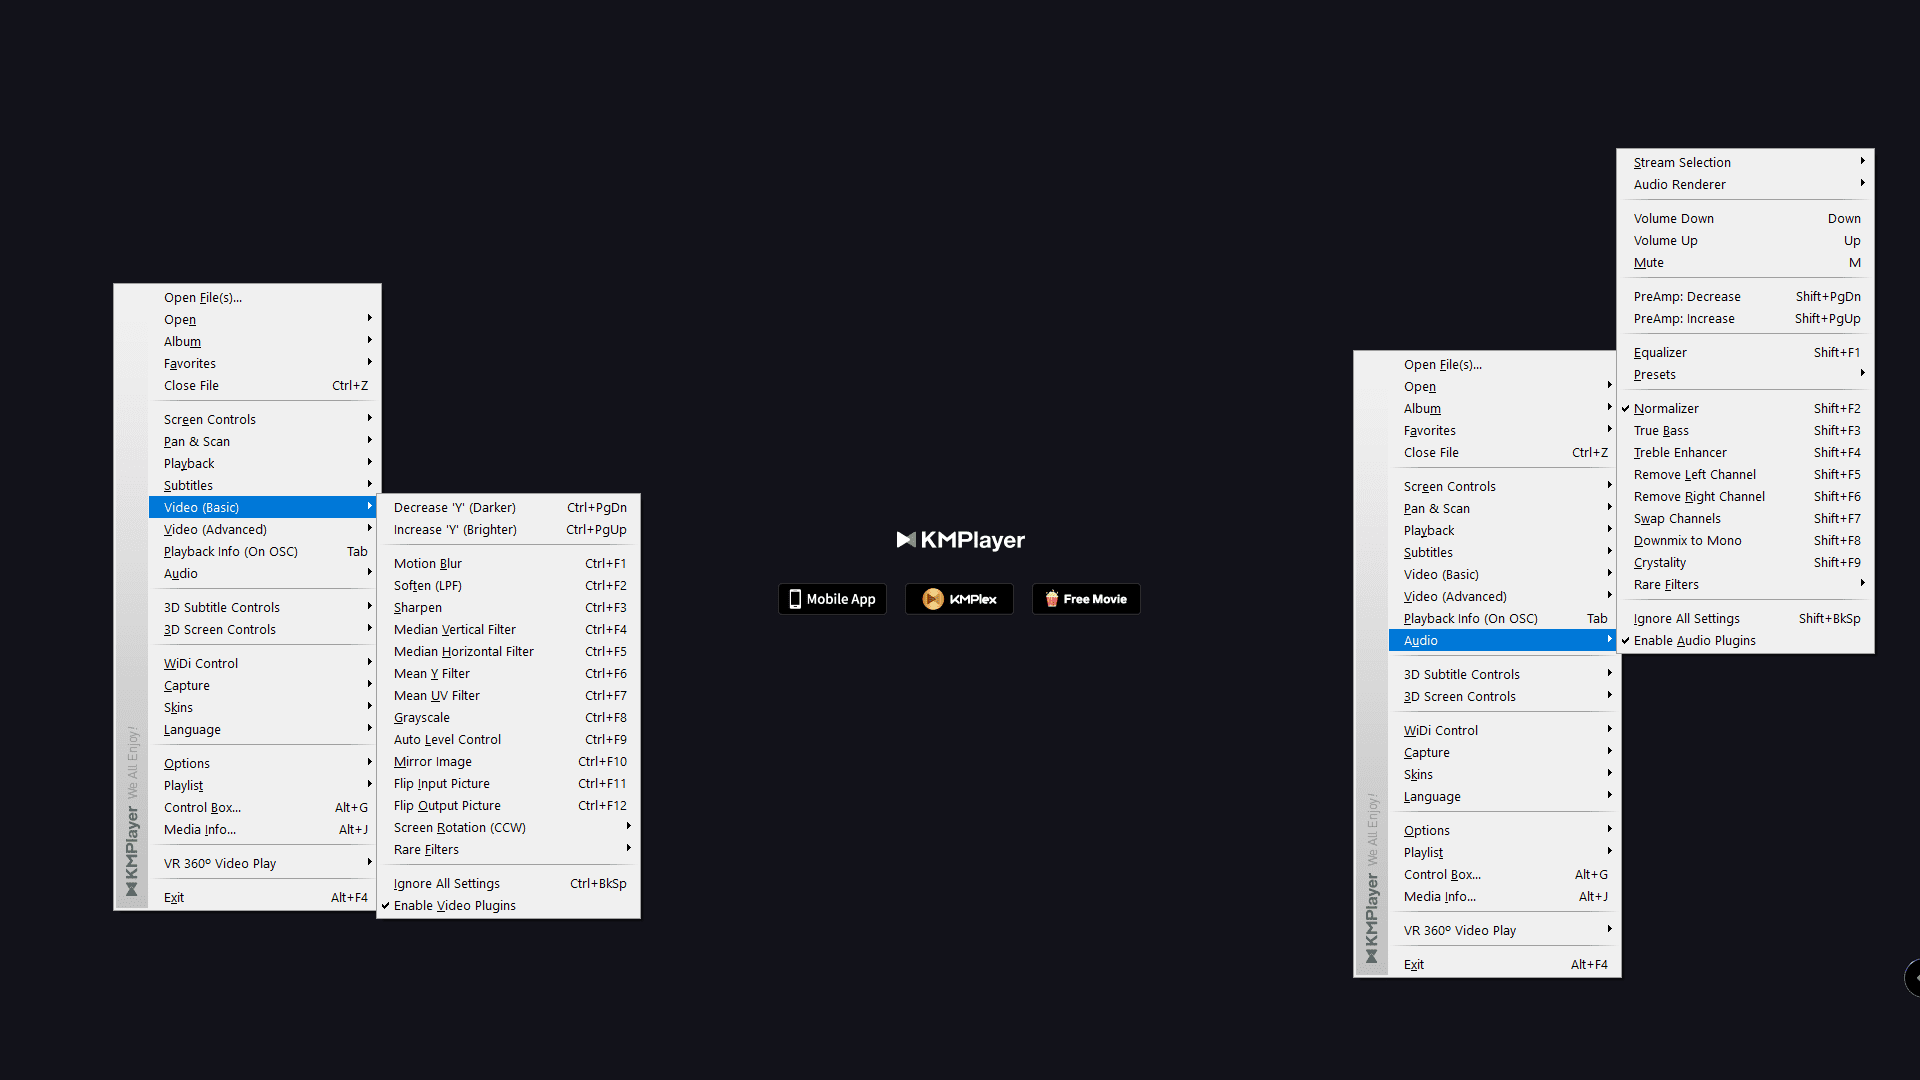
9. Audio Video Settings
This list is very long, and I do not want to state each line by line. Instead, check the image below and try all combinations from Shift + [F1, F2…F9] to Ctrl + [F1, F2….F12].
10. Miscellaneous
Some keys did not make it to any of the above sets. Here they are for your quick reference:
Before we get started, here are a few things you need to keep in mind.
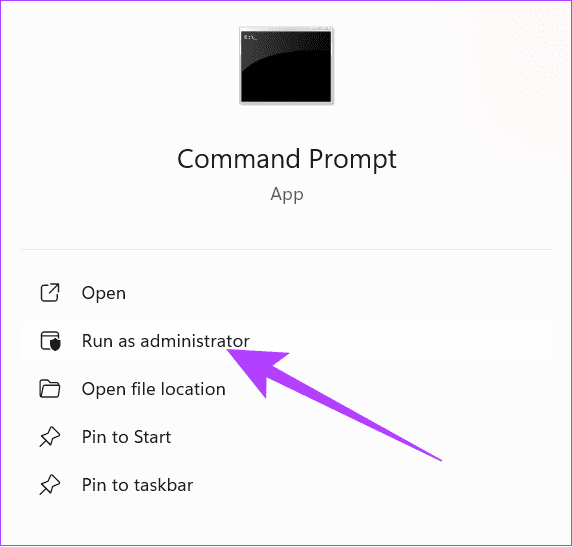
While executing any of the commands below, make sure to open Command Prompt as an administrator. Right-click on the app, and select Run as administrator.
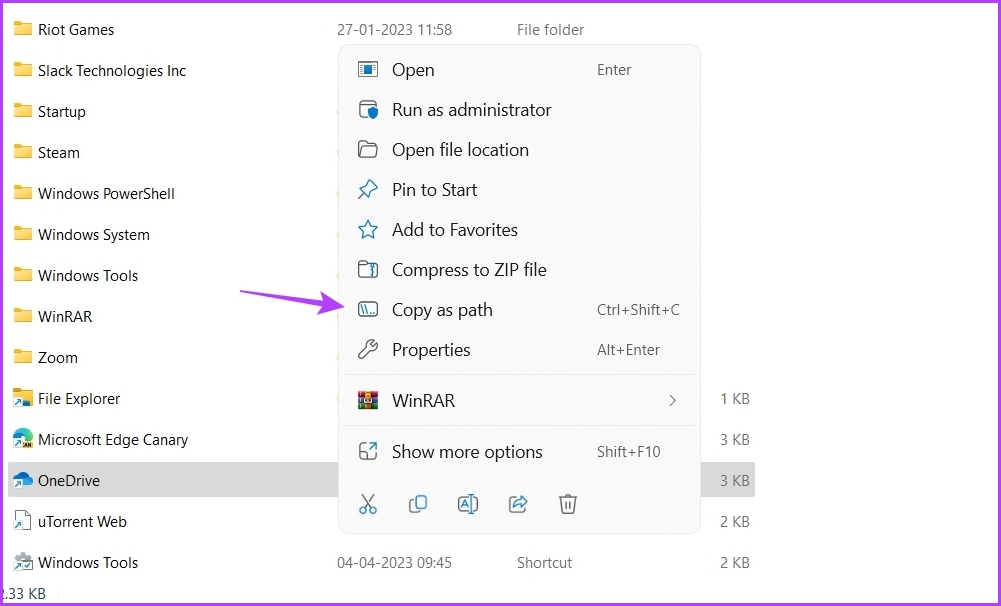
There will be several instances where you need to enter the path of the file or folder into a command (file_path, or folder_path). Make sure to right-click on a file or a folder and select Copy as Path to derive the path.
Please proceed at your own risk, and execute these commands carefully. If not, you may affect the functionality of your Windows PC.
With that in mind, here are some useful command prompt commands that we want to show you!
1. Check Wi-Fi Password Using CMD
Did you forget the password of a previously connected Wi-Fi network on your Windows PC? Here’s how you can use Command Prompt to check the Wi-Fi password.
Step 1: Enter the following command on CMD.
netsh wlan show profiles
Step 2: You will see a list of Wi-Fi networks that are connected. Now, enter the below command, and replace NETWORK_NAME, with the name of the network you are searching the password for.
netsh wlan show profile name="NETWORK_NAME" key=clear
The ‘key component’ is the password for the Wi-Fi network.
2. Check System Uptime
System uptime refers to the duration for which a computer has been continuously running without a restart. Enter the below command to find the system uptime using CMD on your Windows PC. Wait for the information to load, and you will be able to see the system boot time.
systeminfo | find "System Boot Time"
3. Empty Recycle Bin
You can also easily empty your recycle bin on your Windows PC using CMD. Enter the command below to instantly delete all the files in the recycle bin!
rd /s /q C:\$Recycle.Bin
4. Check the Network Ping
The ping command in CMD is a network utility that sends a small packet of data to a specific IP address or domain name to test the connection and measure the time it takes for the data to travel to the target and return. It measures the round-trip time for data packets to travel to a destination and back, indicating network latency or responsiveness.
Enter the following command on CMD while your PC is connected to the internet,
ping www.google.com
5. Hide a File or Folder
You can also hide a file or a folder using Command Prompt on your Windows PC.
To hide a file, enter the following command.
attrib +h file_path
Replace file_path with the path of the file.
To hide a folder, use the following command. Replace folder_path with the destination path of the folder.
attrib +h folder_path
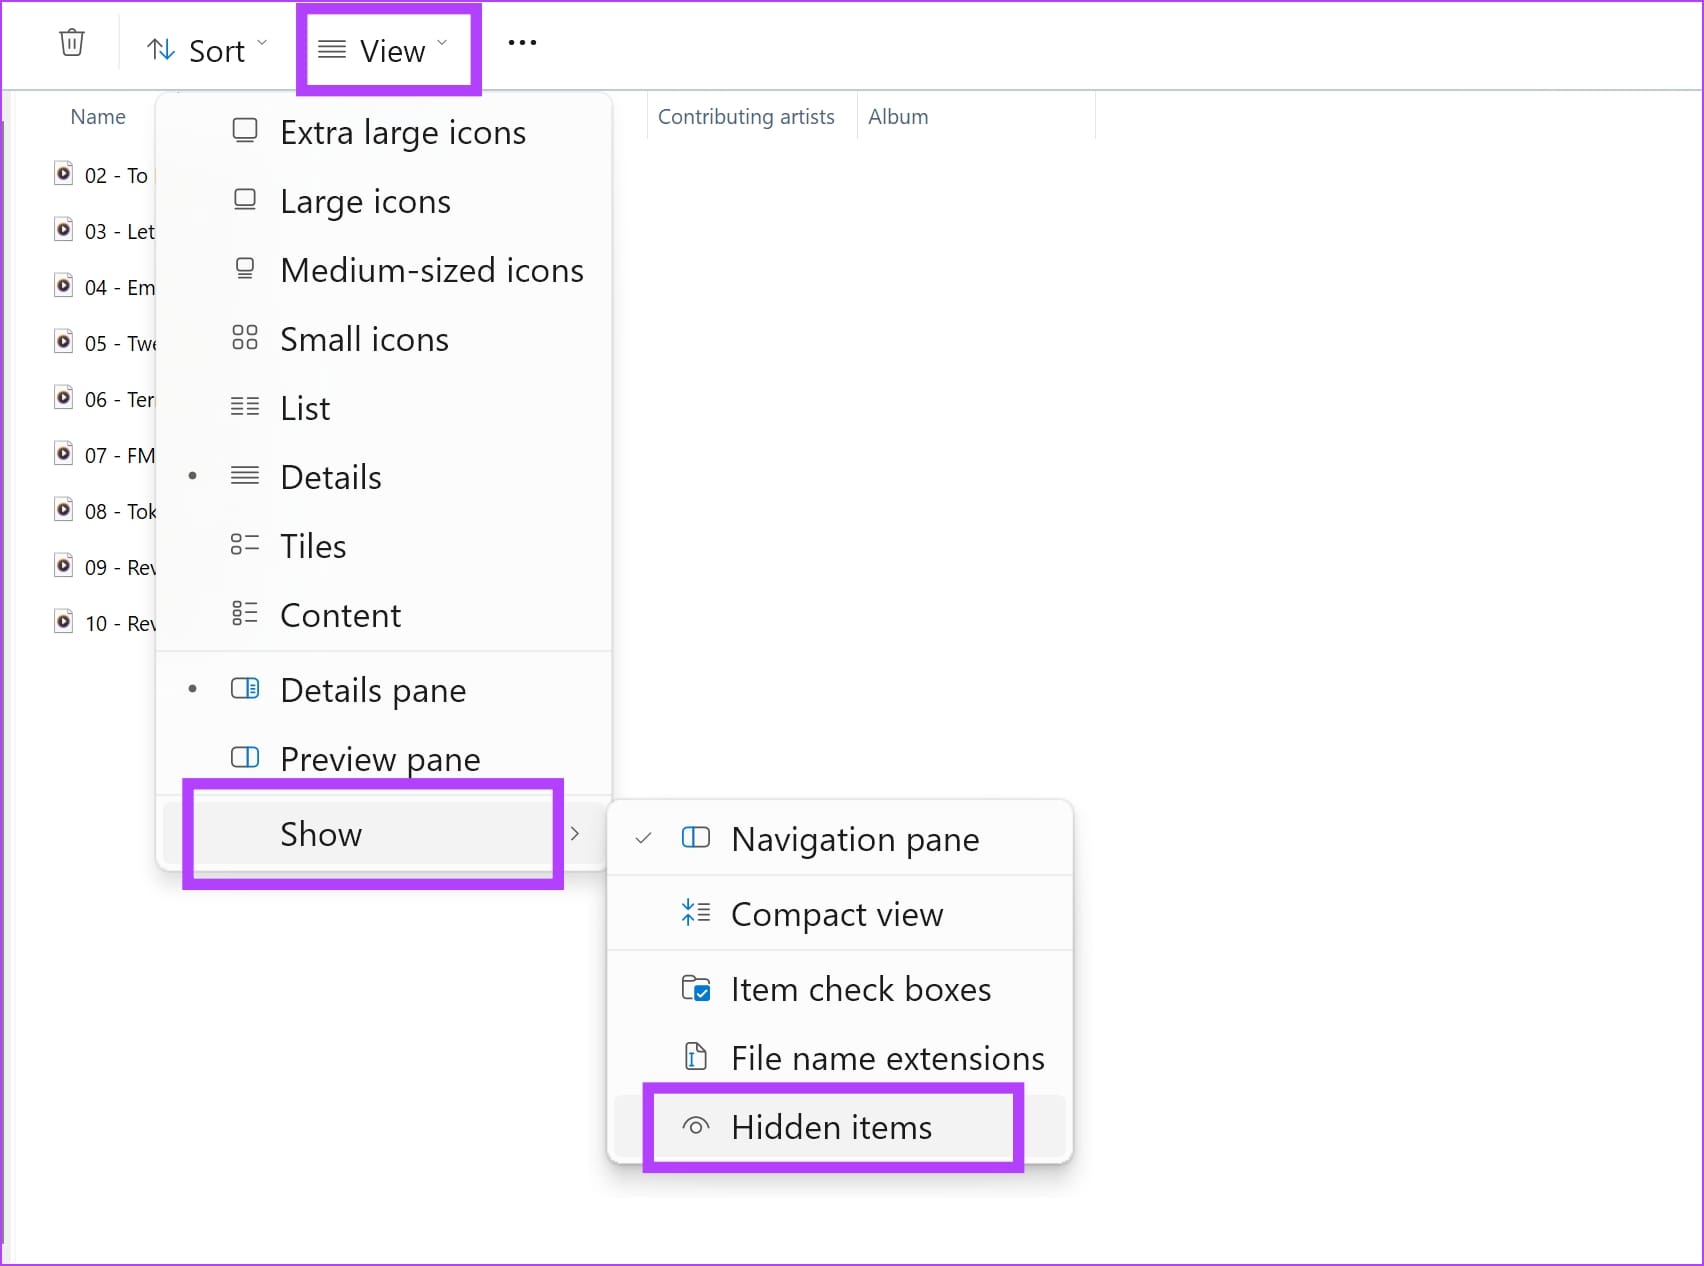
Find Hidden Files
Hidden files or folders won’t be visible in File Explorer unless you’ve enabled the option to view hidden items. Go to the View tab in File Explorer in the destination where the file was initially present, and check the Hidden items box. However, do note that the hidden file/folder will be present in the same destination – except that it won’t be visible.
Unhide Files
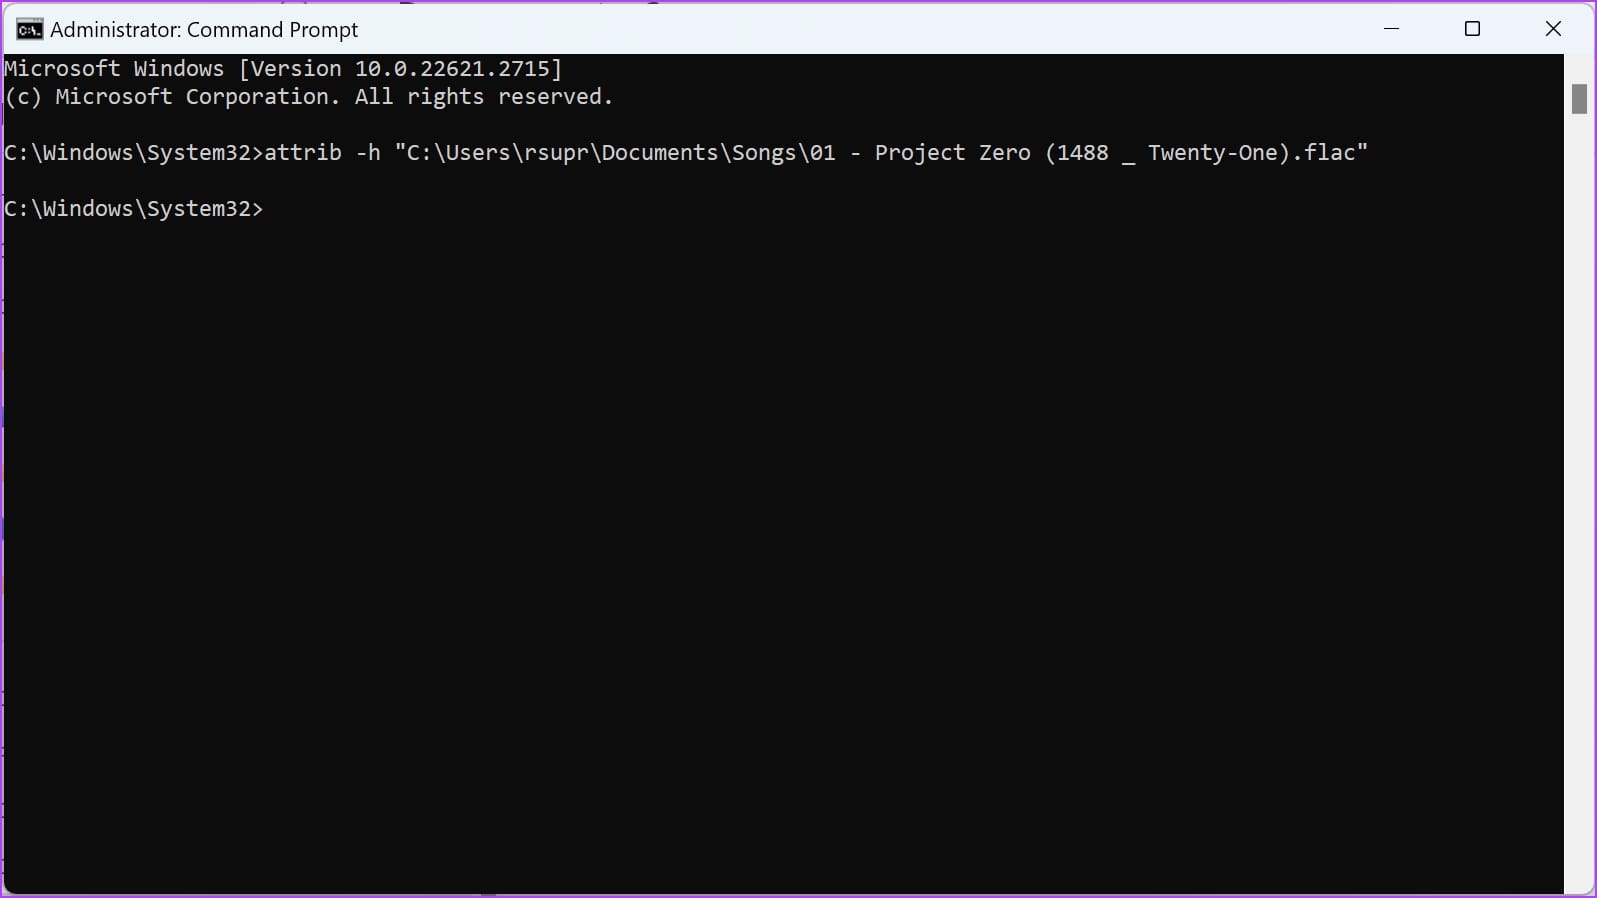
To unhide a file, enter the following command.
attrib +h file_path
Replace file_path with the path of the file.
To unhide a folder, use the following command. Replace folder_path with the destination path of the folder.
attrib -h folder_path
Alternatively, you can also right-click on the hidden file or folder, and select Properties. Uncheck the hidden option to unhide the file/folder.
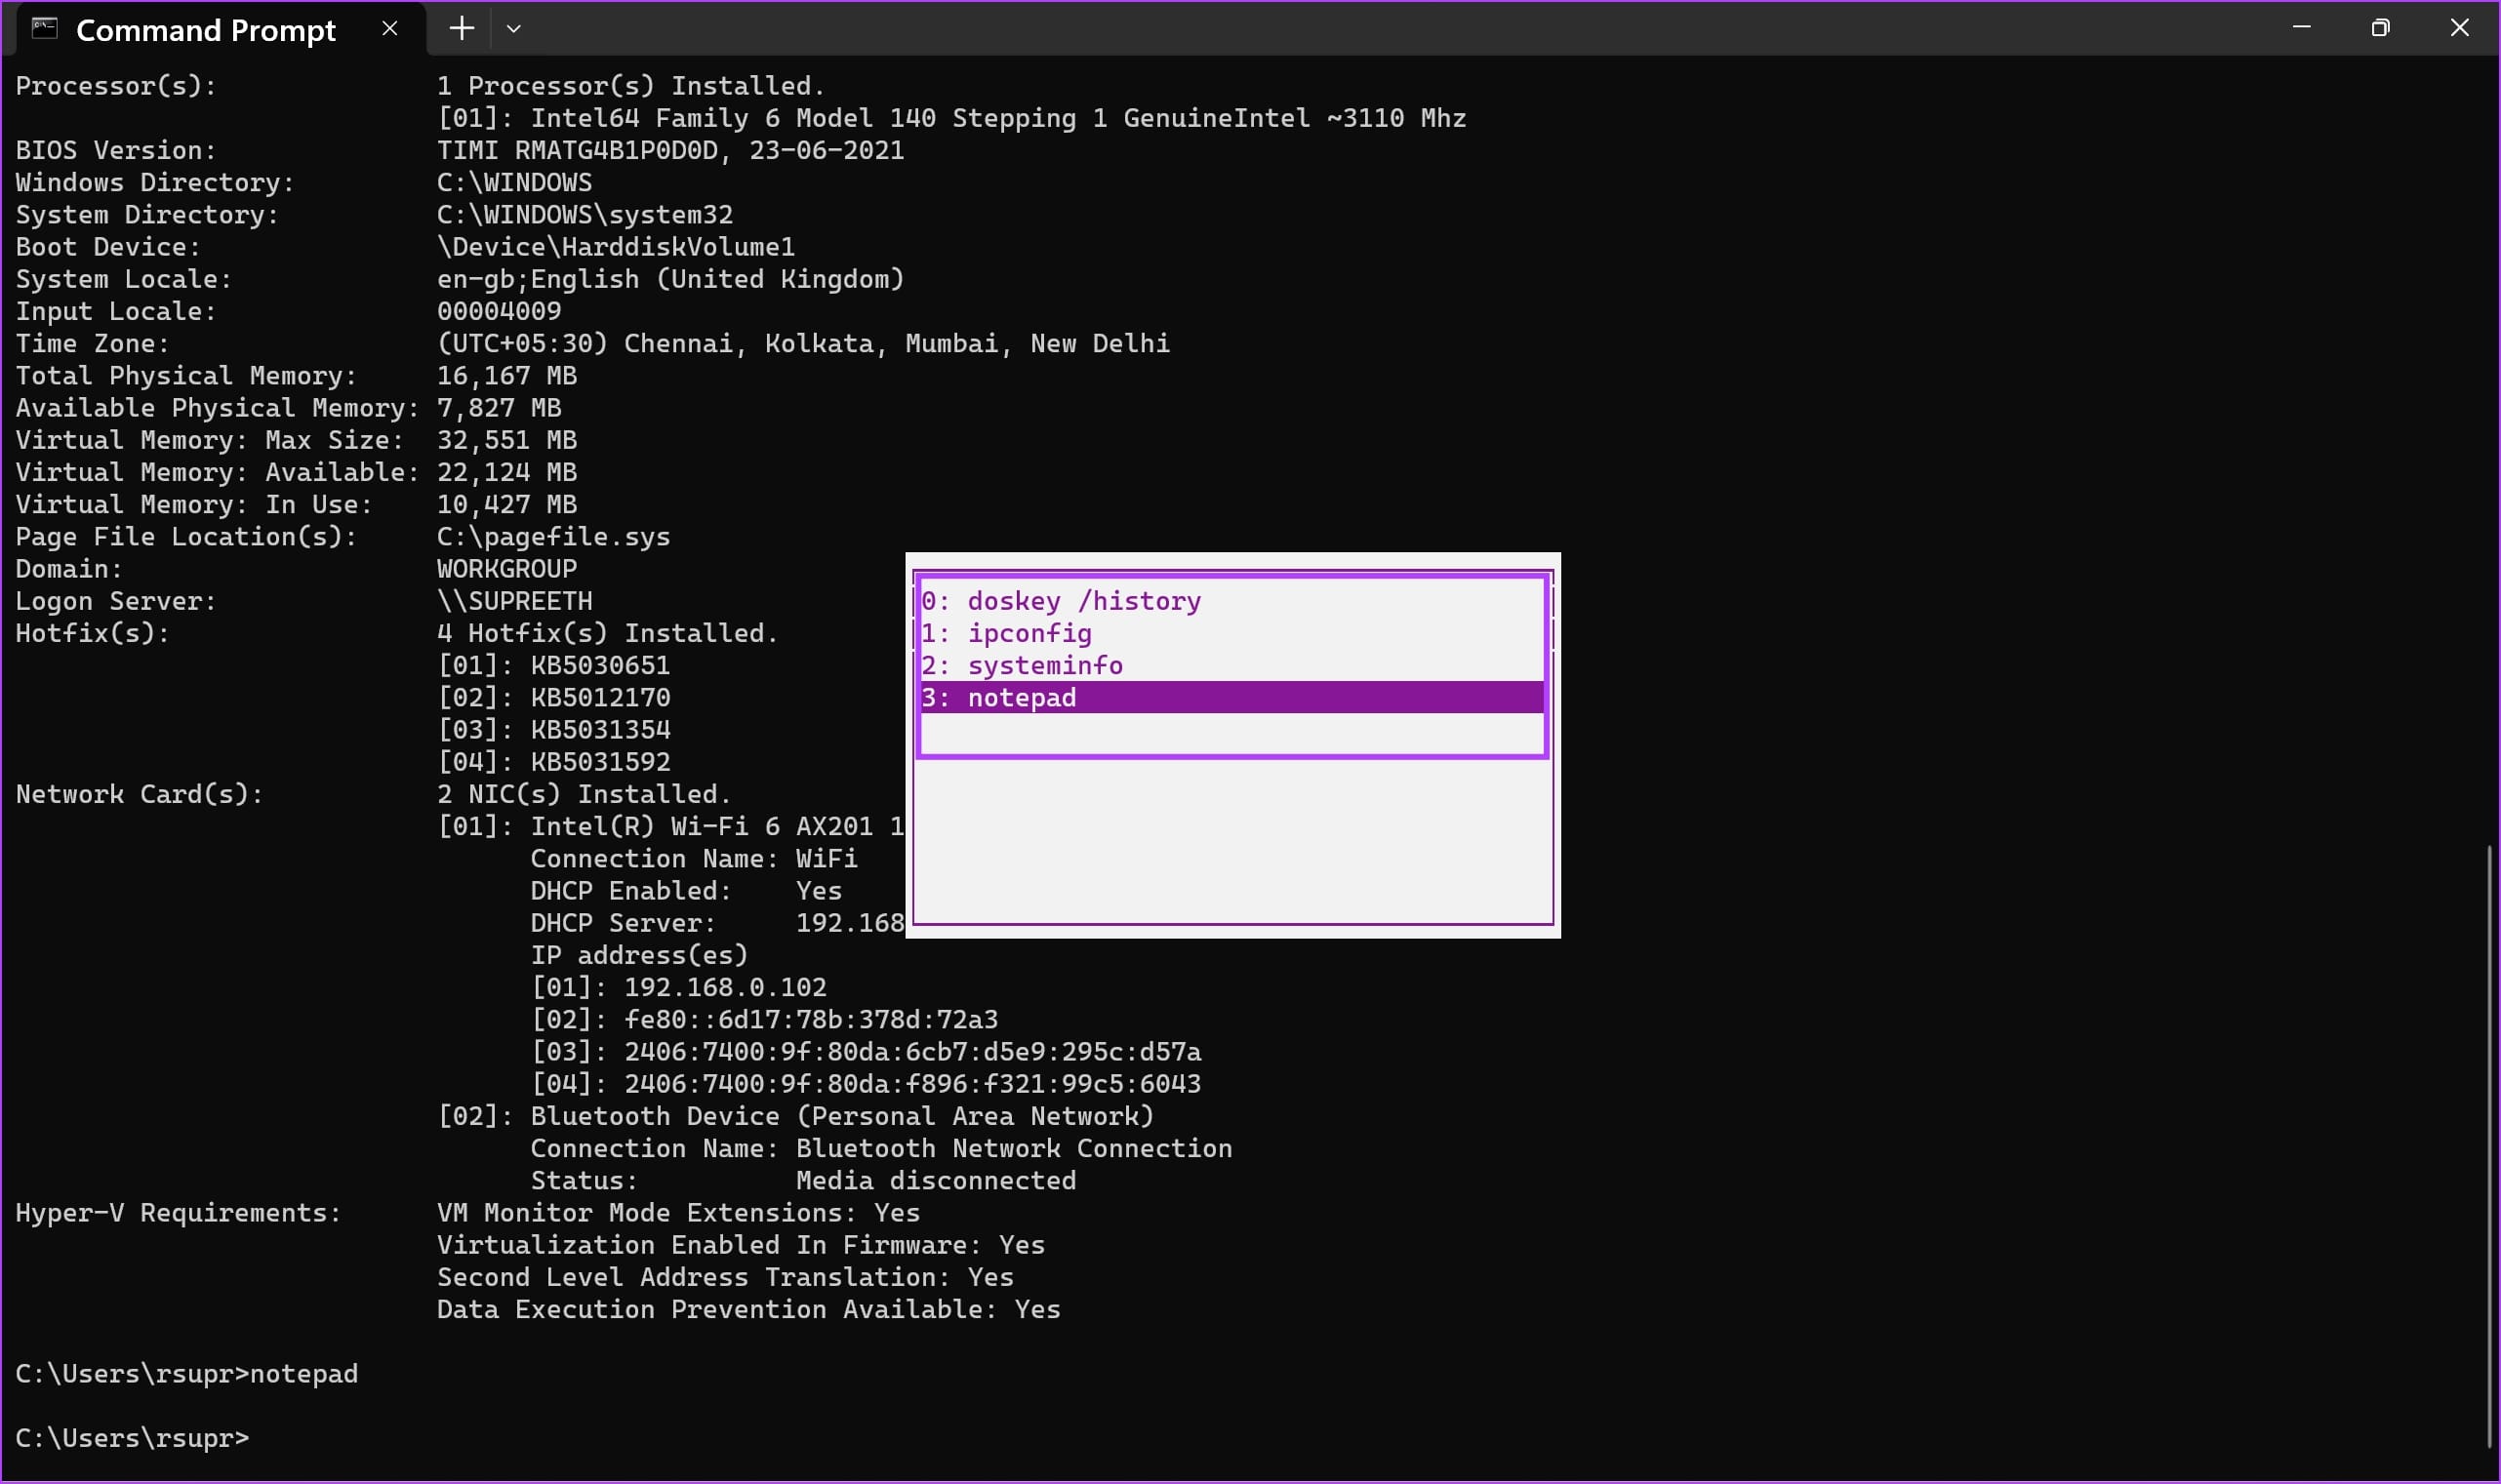
6. Check Command Prompt History
It is easy to get lost between the commands you’ve entered and the responses and output from the CMD tool. Here’s how you can easily access the history on Command Prompt.
There is a keyboard shortcut to view the history on CMD quickly. You can hold the F7 key or hold the ‘Fn’ key with F7 to access the history of your commands. It will appear in the form of a dialog box.
You can use the up and down arrow keys to navigate through your commands. Hit the enter key to execute the highlighted command.
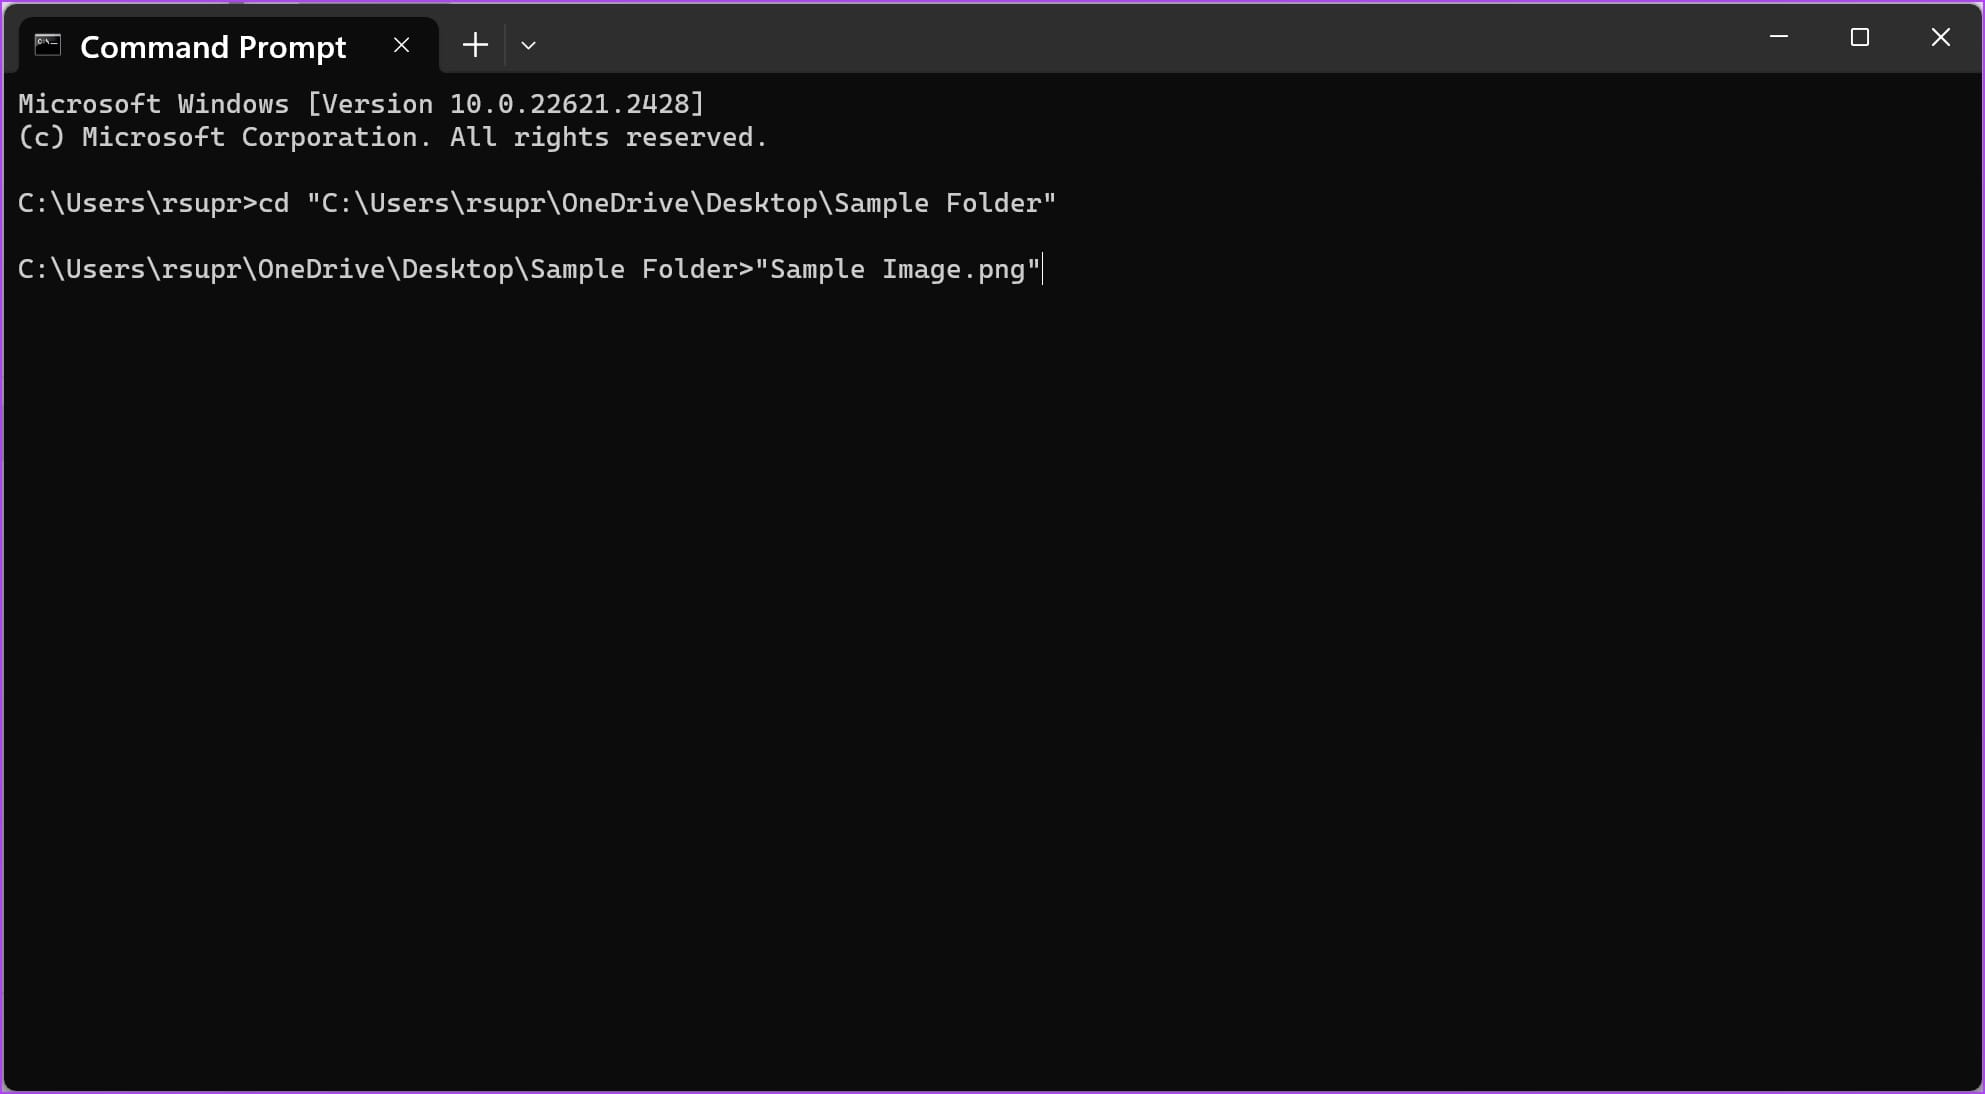
7. Open a File Using CMD
Here’s how you can easily open a file using Command Prompt on your Windows PC.
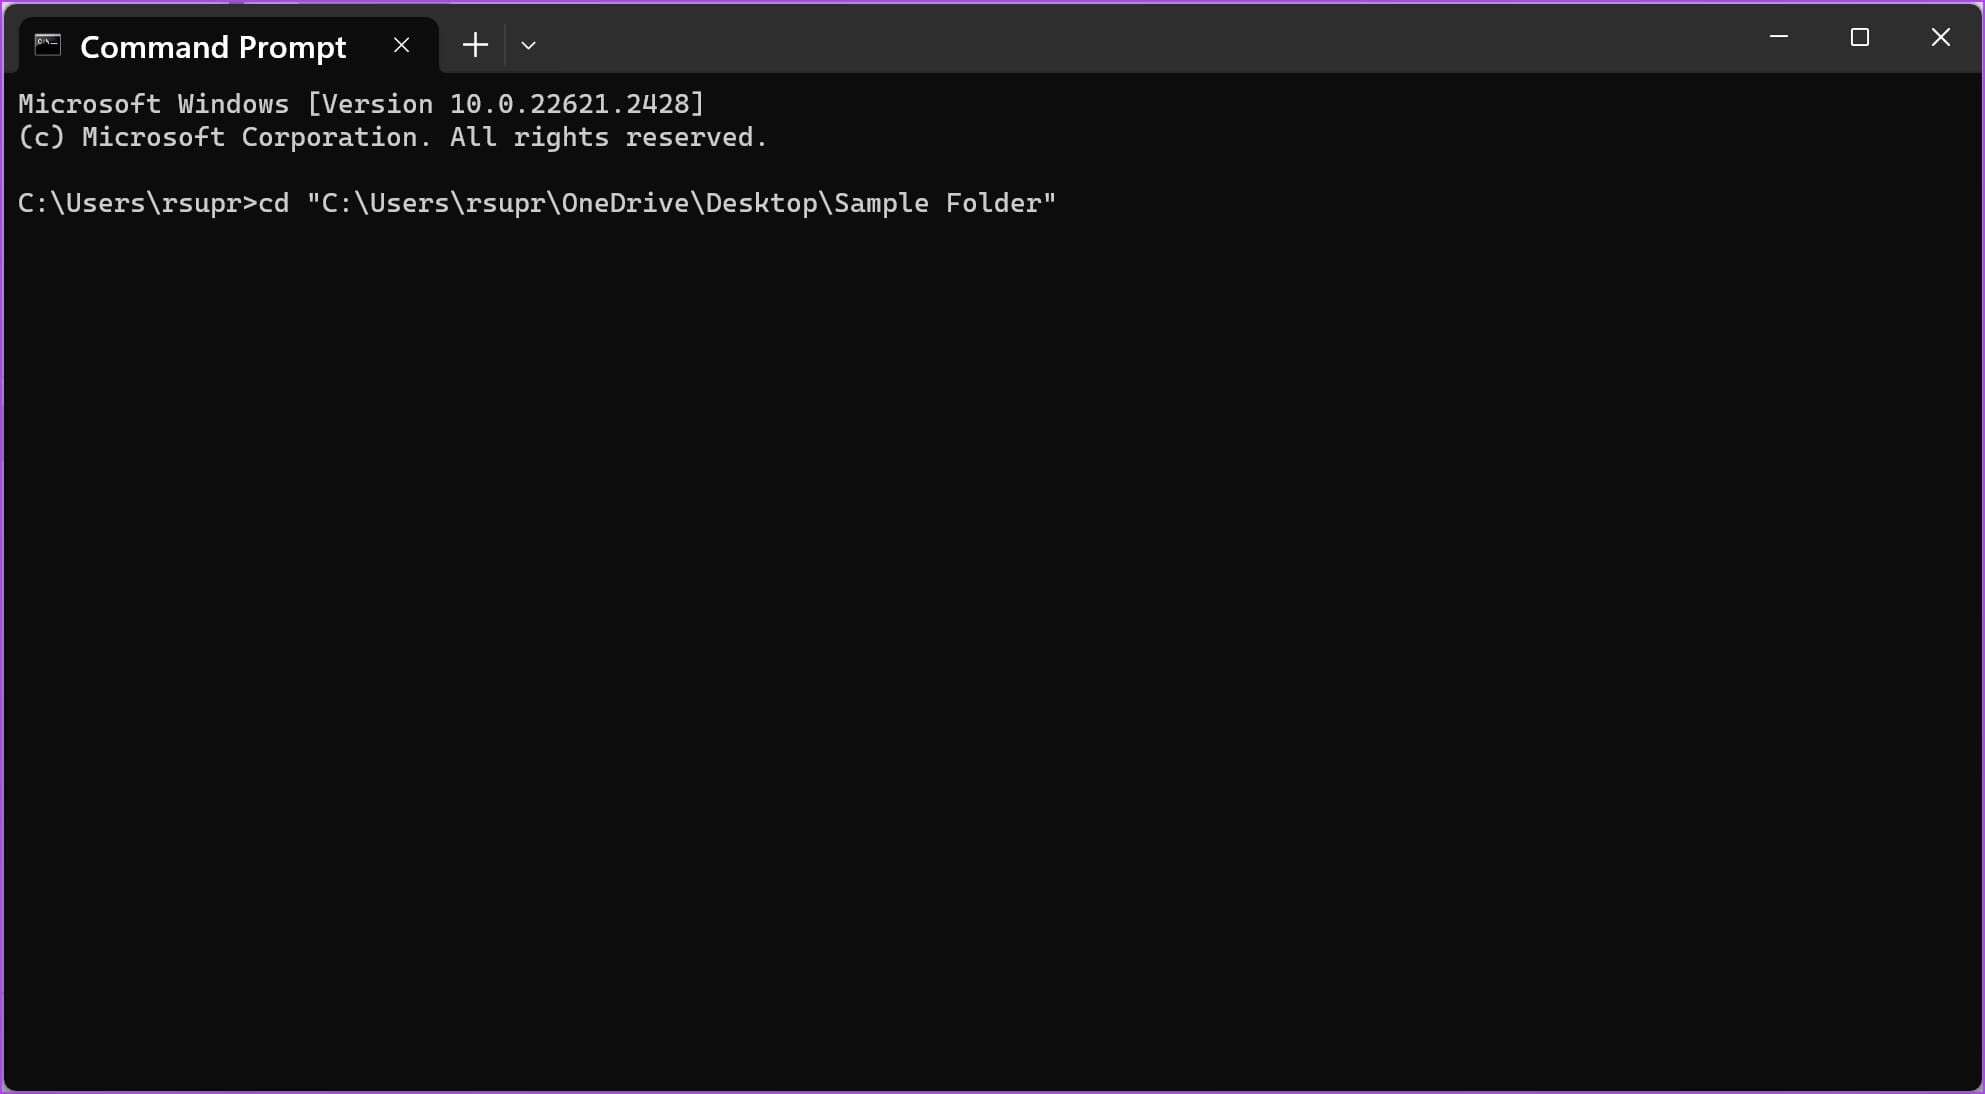
Step 1: Type cd, followed by file path, and hit enter.
cd "folder_path"
To copy the path of any folder, right-click on the folder and click on Copy as Path. Our folder path here is “C:\Users\rsupr\OneDrive\Desktop\Sample Folder”.
Note: Ensure to enter all the paths within double quotes.
Step 3: Next, enter the file name and its extension in double-quotes.
The name of the file we are using is “Sample Image” and its extension is “.png”.
Step 4: Hit the enter key, and the file will open.
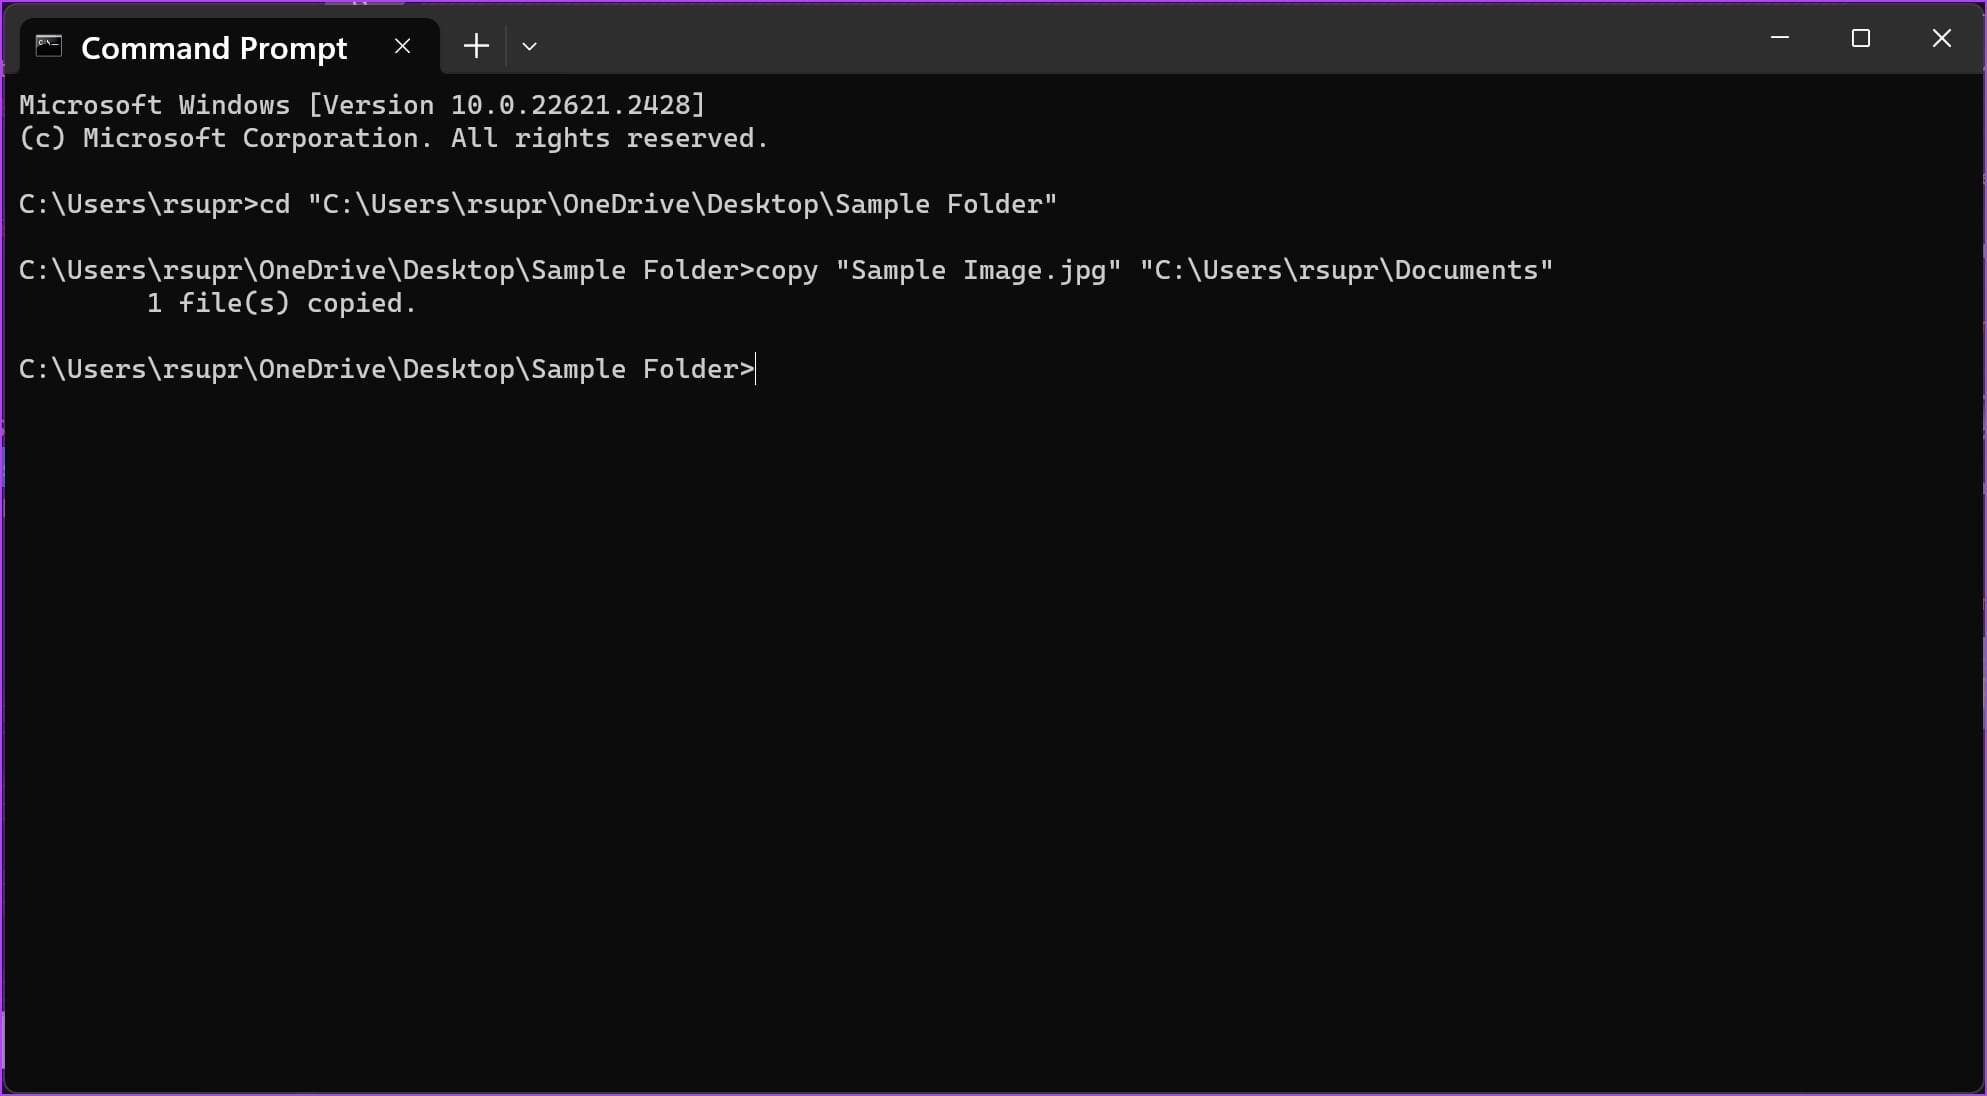
8. Move or Copy Files or Folder Using CMD
You can easily move a file or a folder from one location, or copy them to another using CMD. Here are some of the CMD tricks that help you do so!
Type cd and paste the path of the file you want to copy or move. Hit the enter key.
cd "folder_path"
To copy the path of any folder, right-click on the folder and click on Copy as Path. Our folder path here is “C:\Users\rsupr\OneDrive\Desktop\Sample Folder”.
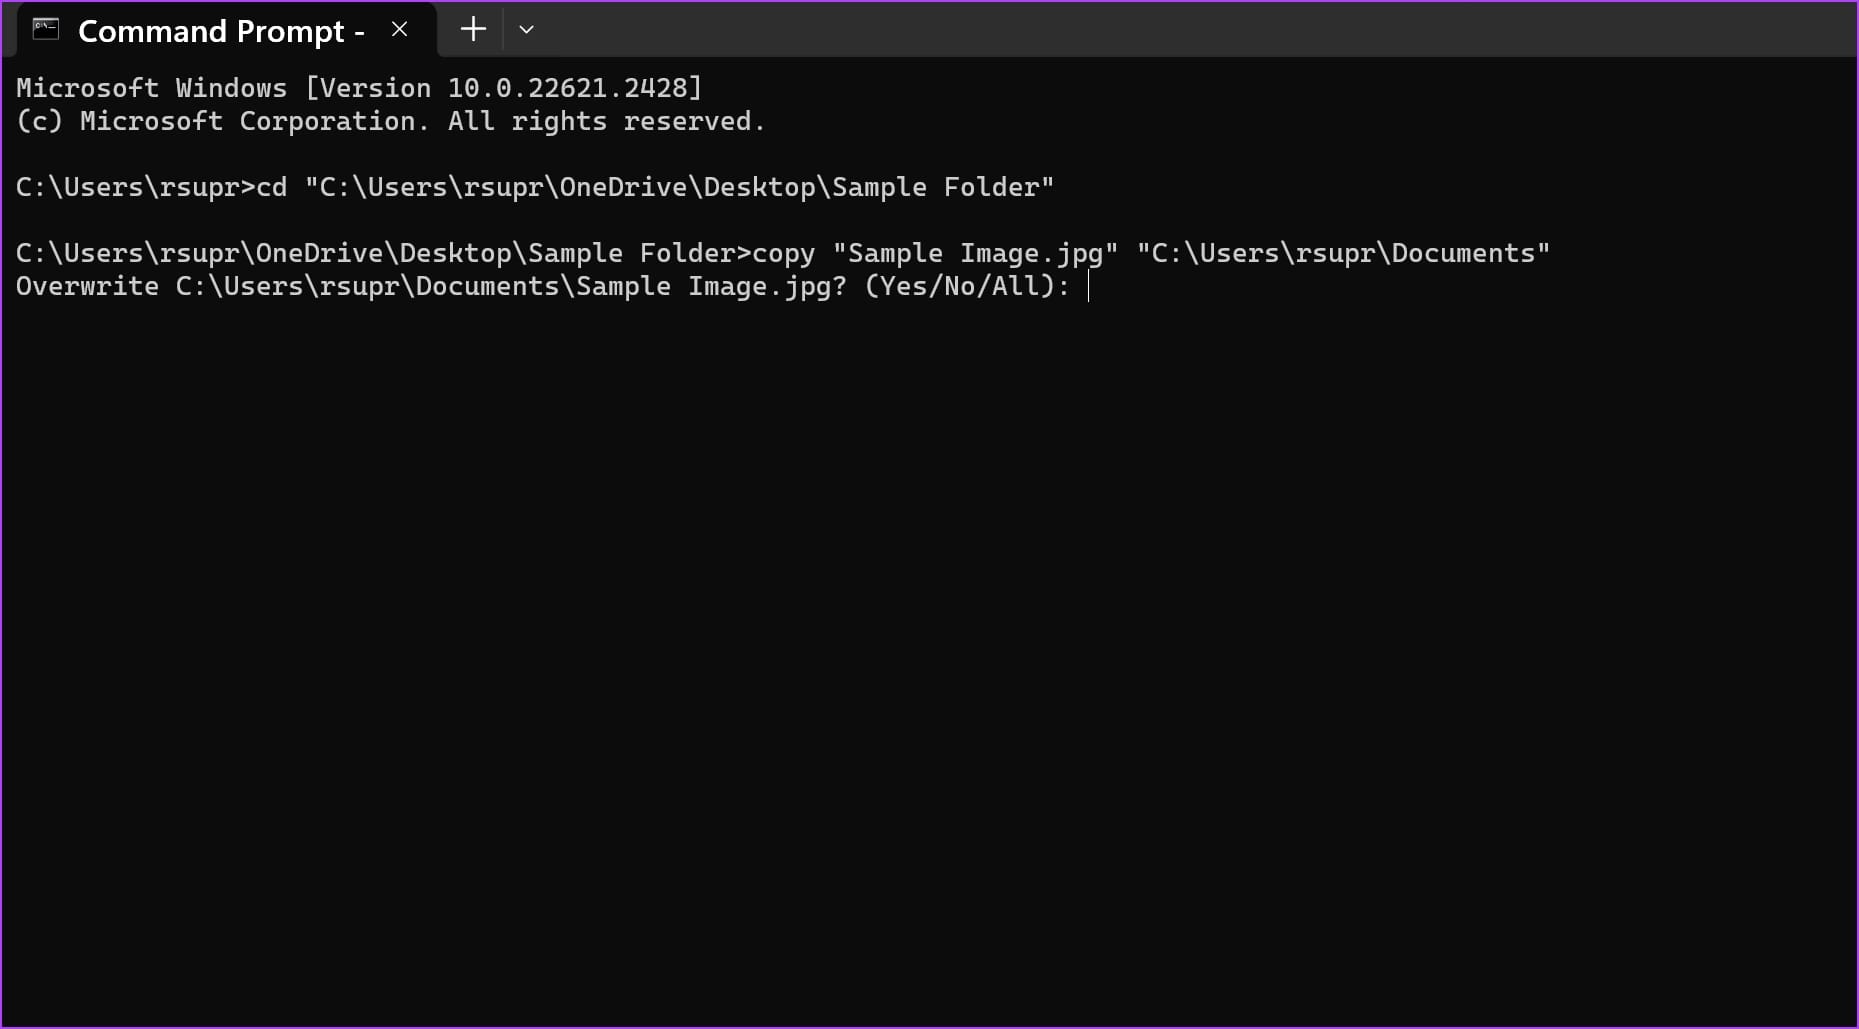
To copy a file to a different location, type copy and the source file’s name and the destination folder’s path. Once done, press enter.
copy "filename.extension" "destination_path"
Our file is “Sample Image.png” and the destination path is “C:\Users\rsupr\OneDrive\Documents”.
Note: Ensure to enter all the paths, the filename, and its extension within double quotes.
Note: If a file of the same name exists in the destination folder, you will receive a prompt whether you want to overwrite the file or abort the process. Type Y (yes) to overwrite or N (no) to abort, and hit enter.
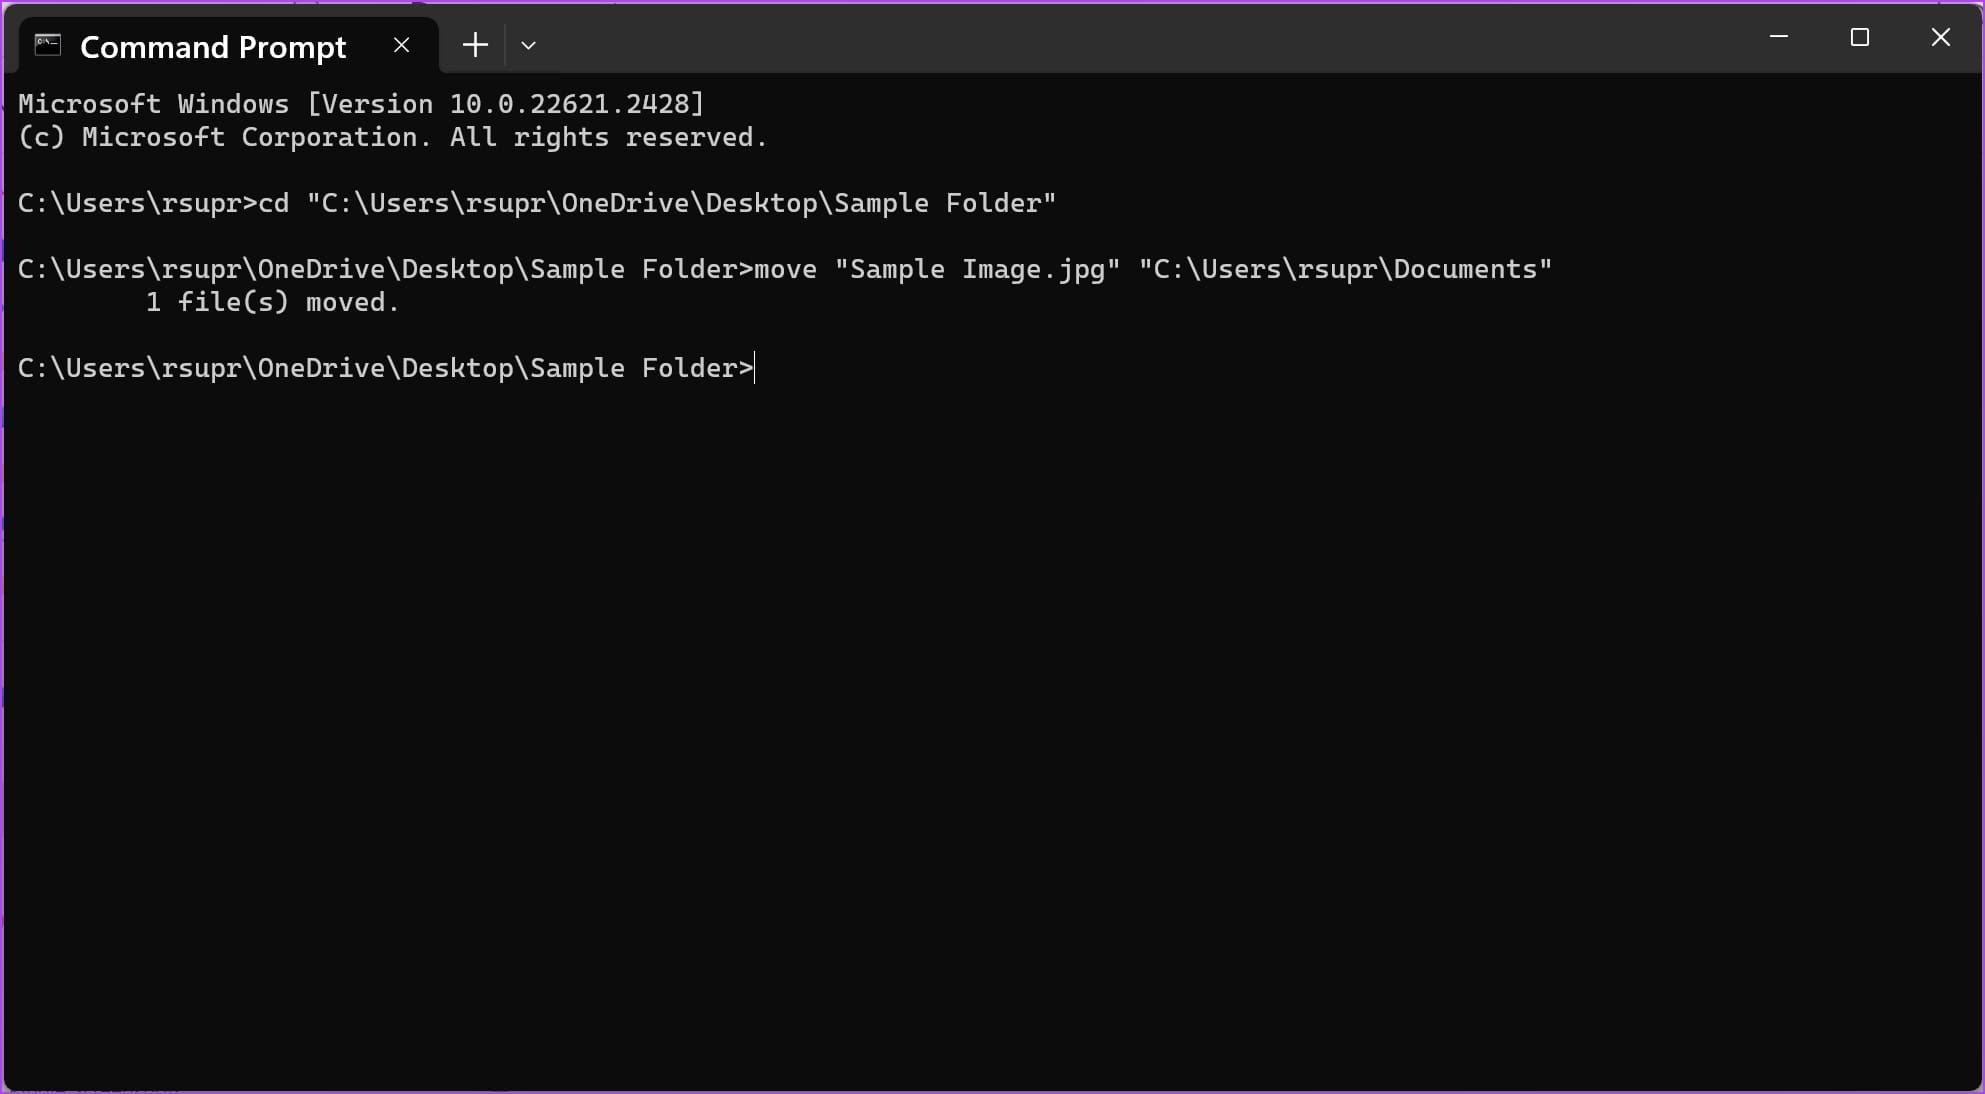
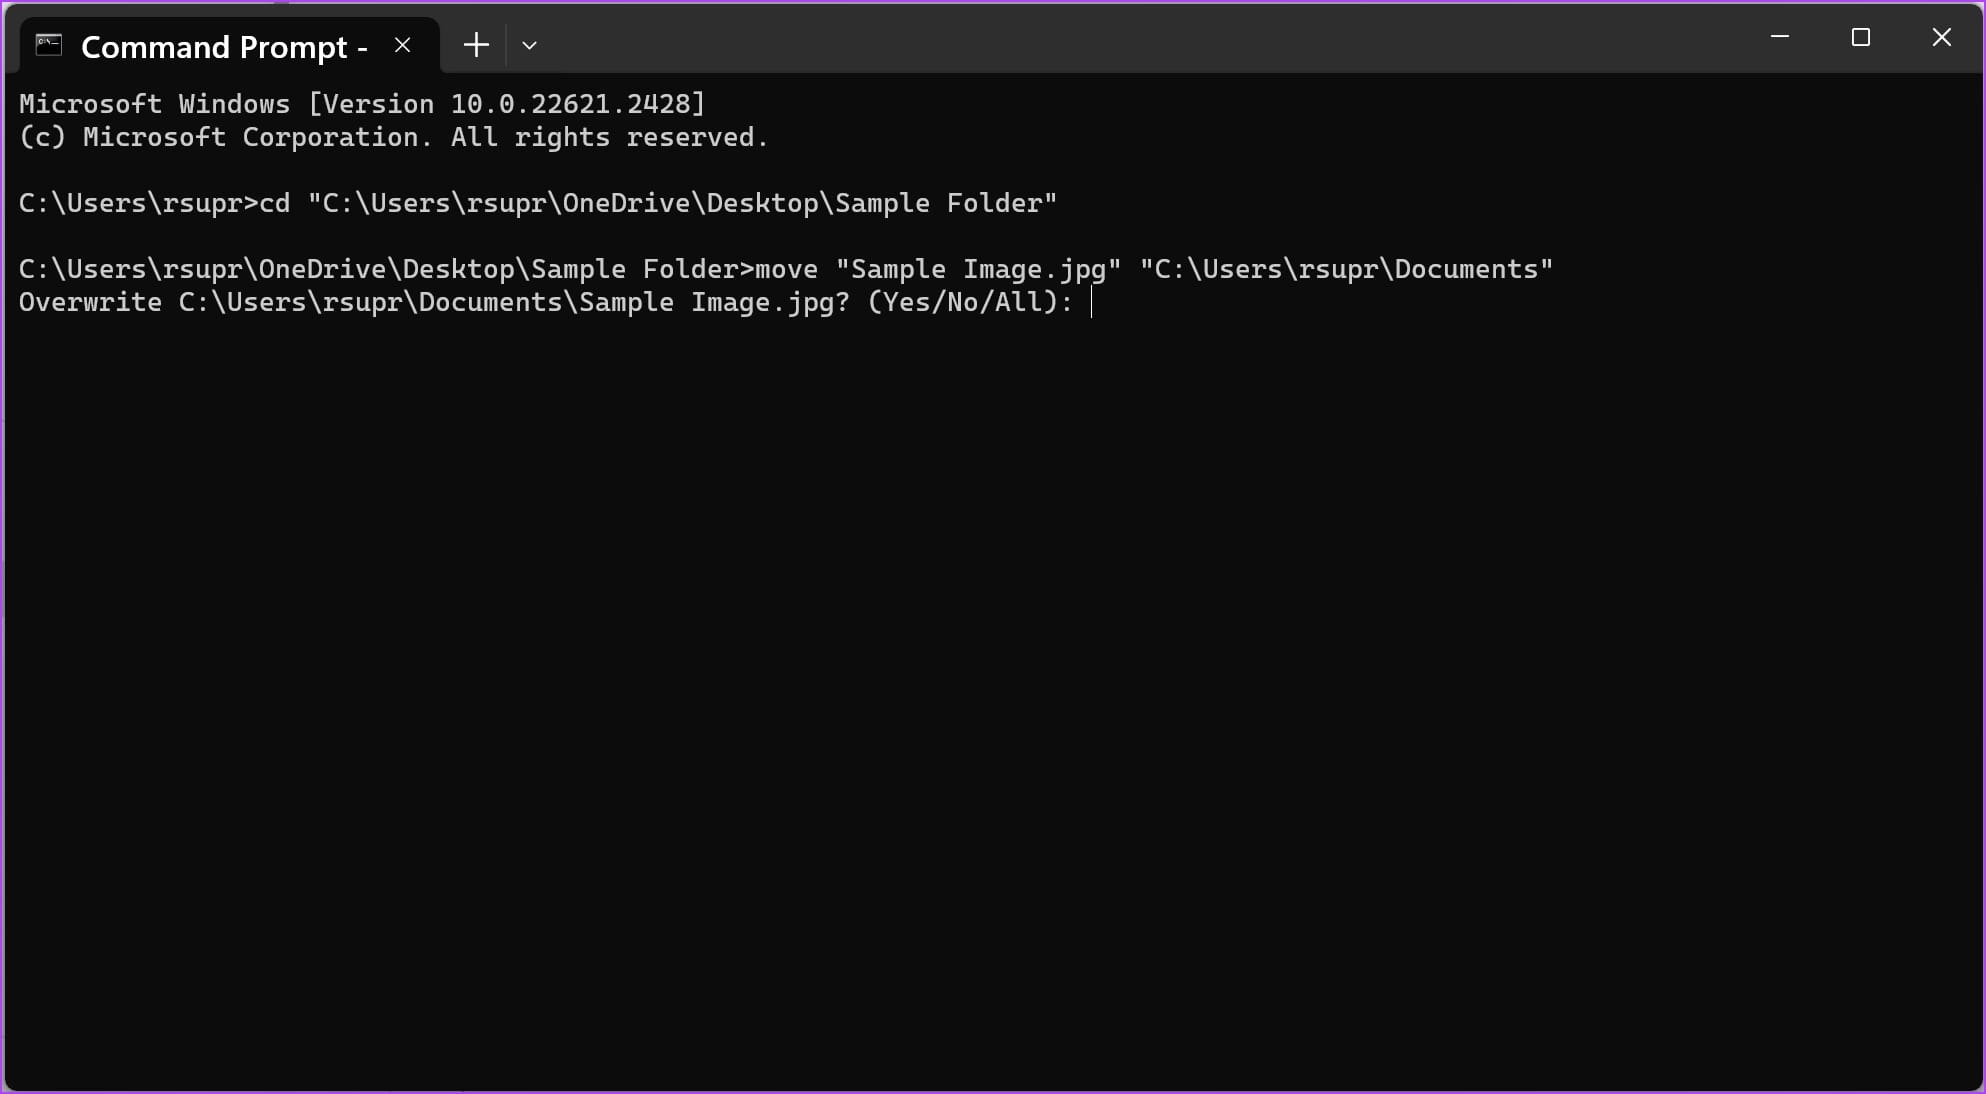
To move a file to a different location, type move, followed by the source file’s name and the destination folder’s path. Now, hit enter.
move "filename.extension" "destination_path"
Our file is “Sample Image.png” and the destination path is “C:\Users\rsupr\OneDrive\Documents”.
Note: Ensure to enter all the paths, the filename, and its extension within double quotes
Note: If a file of the same name exists in the destination folder, you will receive a prompt whether you want to overwrite the file or abort the process. Type Y (yes) to overwrite or N (no) to abort and hit enter.
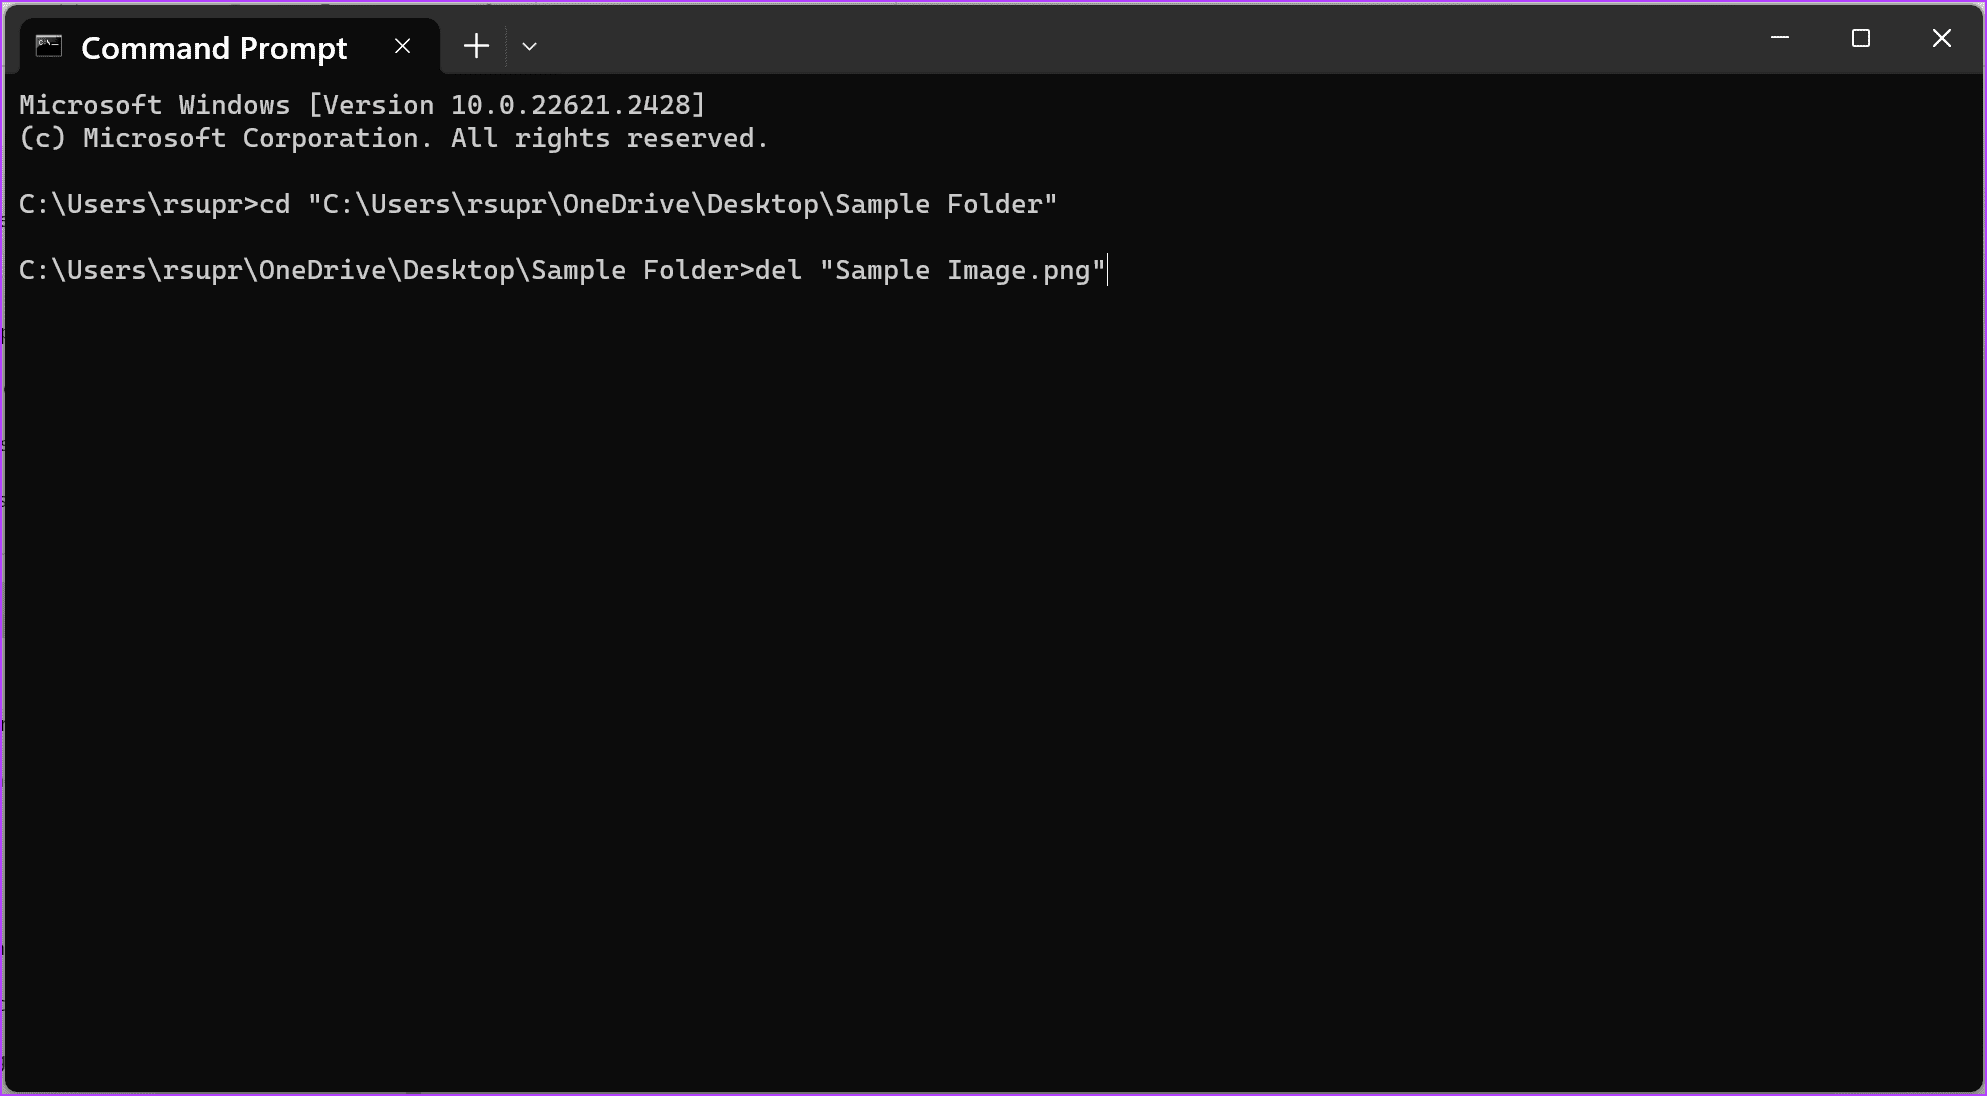
9. Delete a File Using CMD
Here’s how you can delete a file using CMD on your Windows PC.
Step 1: Type cd, followed by the file’s path you want to delete. Hit the enter key.
cd "folder_path"
To copy the path of any folder, right-click on the folder and click on Copy as Path. Our folder path here is “C:\Users\rsupr\OneDrive\Desktop\Sample Folder”.
Note: Ensure to enter all the paths within double quotes.
Step 2: Type del followed by the name of the file you want to delete. Hit the enter key.
Ensure to enter the filename and its extension within double quotes. The name and extension of the file we are using are “Sample Image” and “.png”.
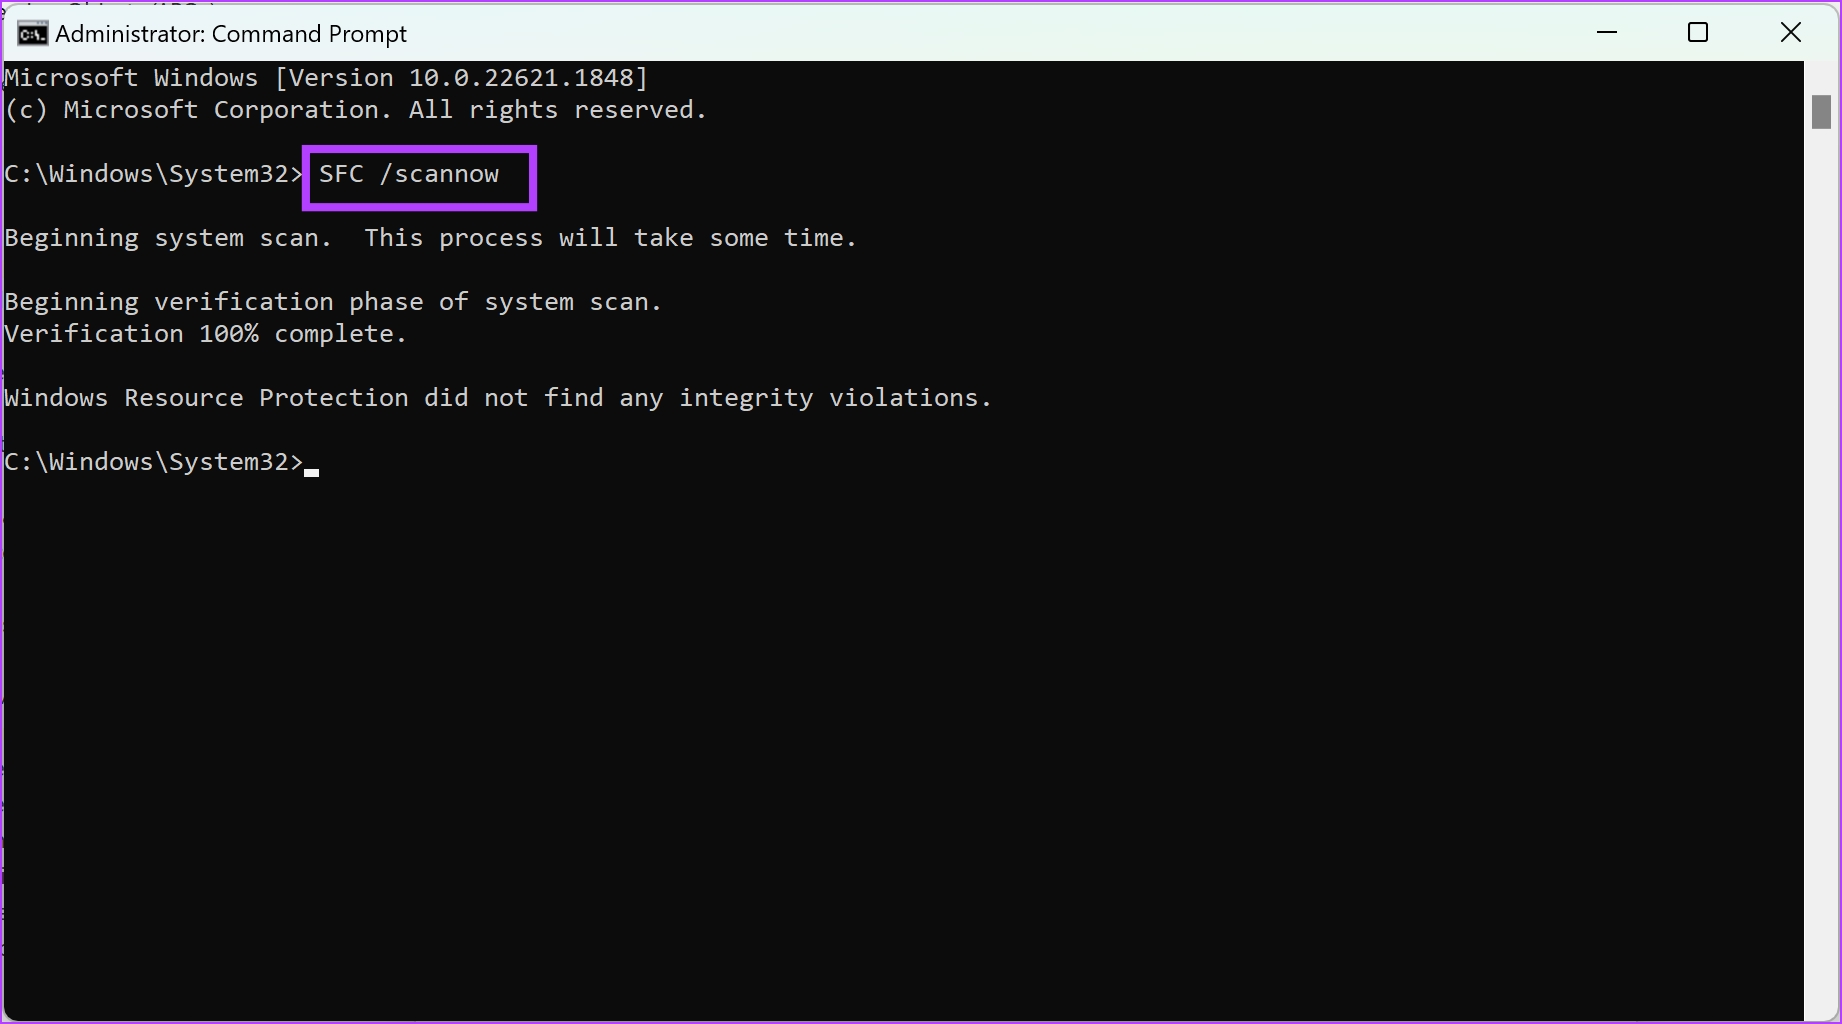
10. Run a System File Checker
The Windows System File Checker – SFC scan is a tool you can use on Command Prompt that detects any corrupted files on your PC. Once detected, it attempts to repair and restore the file. This is a tool that you can use if you are encountering any problems while using your Windows PC.
Type the following command :
SFC /scannow
As the system scan begins, you can see its progress. Once the system scan is complete, you will see whether it is successful or not.
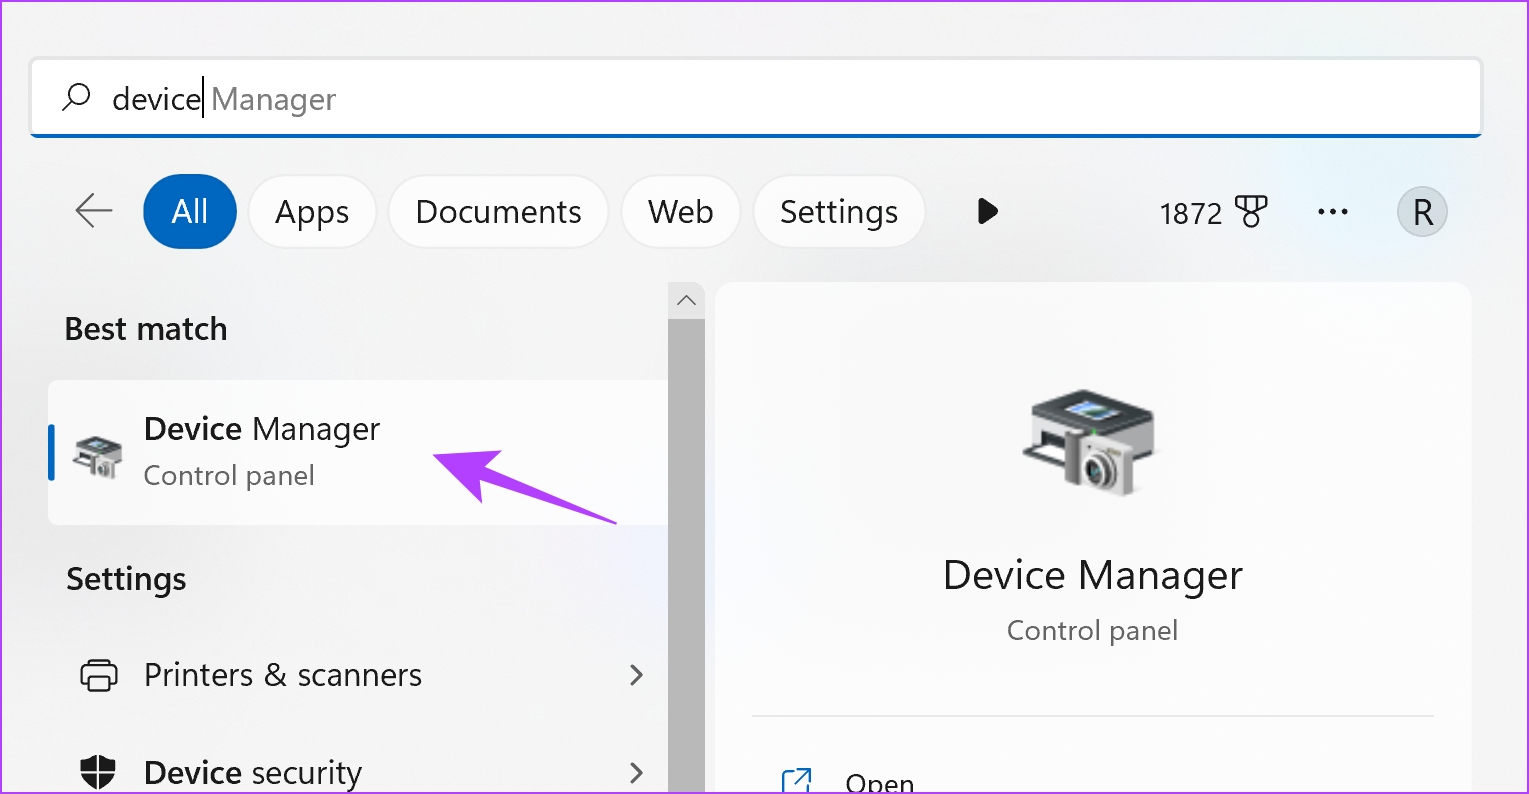
11. Remove Bluetooth Devices Using CMD
If you’re unable to remove a Bluetooth device from your Windows PC, CMD can help you get rid of such stubborn devices. Here’s how :
First, we need to find a parameter called ‘Device instance path’ that helps Command Prompt identify your Bluetooth device.
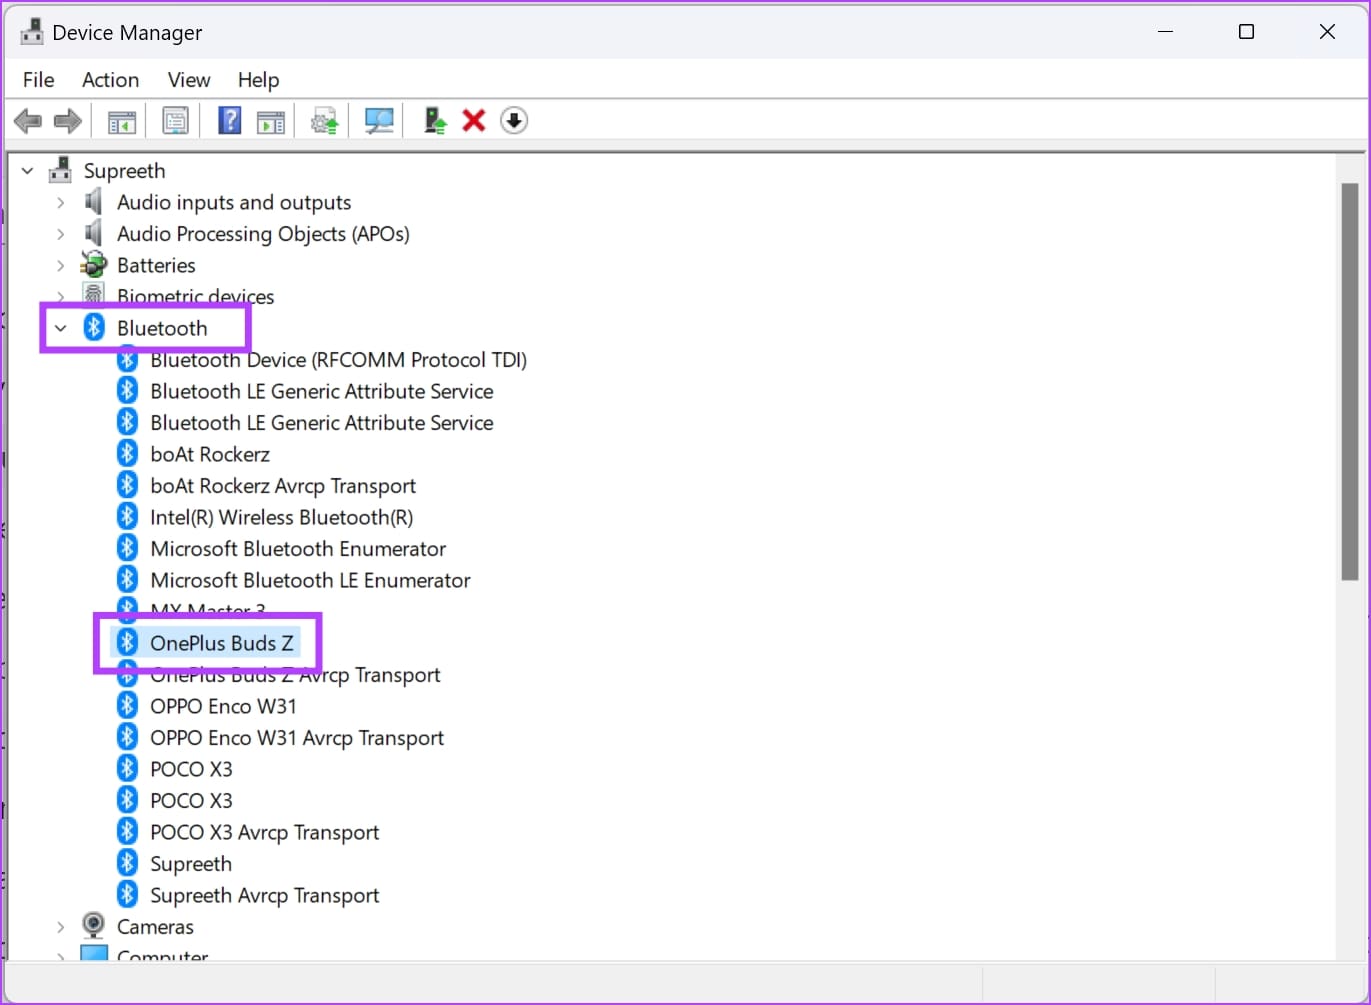
Step 1: Open Device Manager from the Start menu on your Windows PC.
Step 2: You will see a list of device categories. Click on Bluetooth.
Step 3: Find the device that you want to remove.
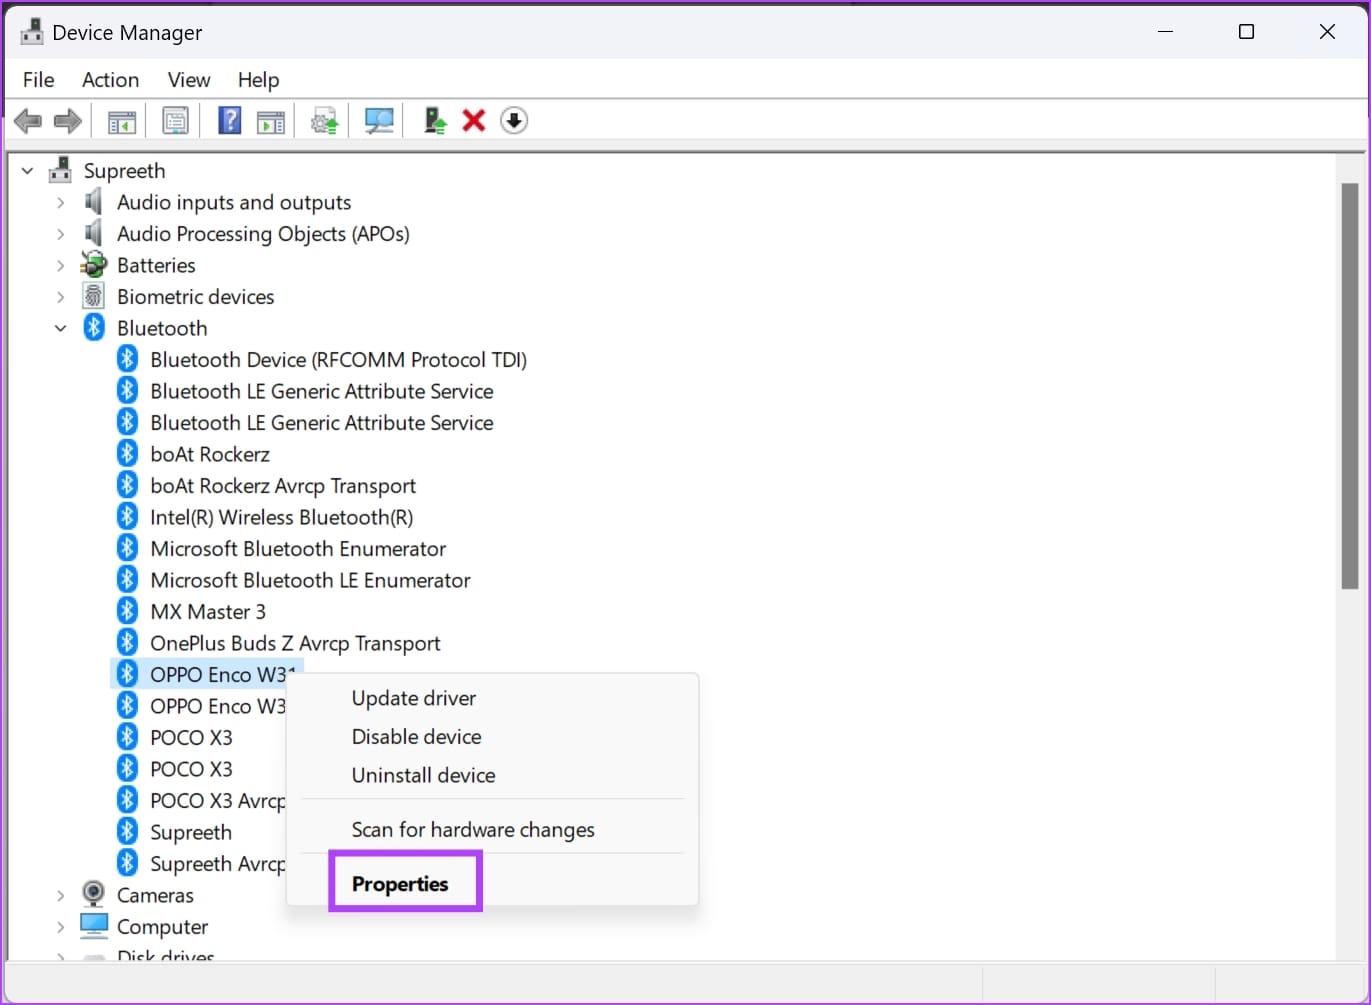
Step 4: Right-click on the device. Click on Properties.
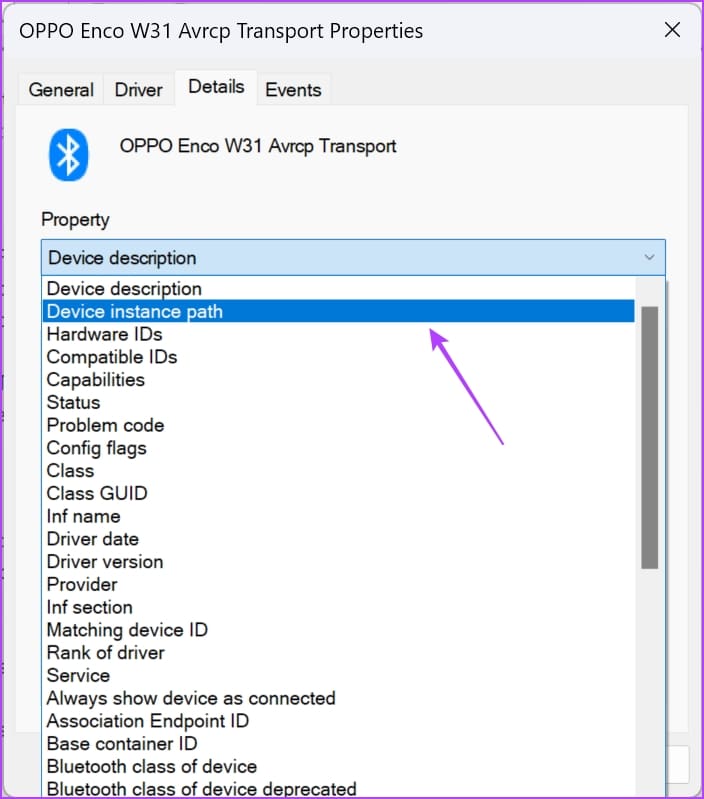
Step 5: Go to the Details tab. Select the dropdown menu of Property and select Device Instance path.
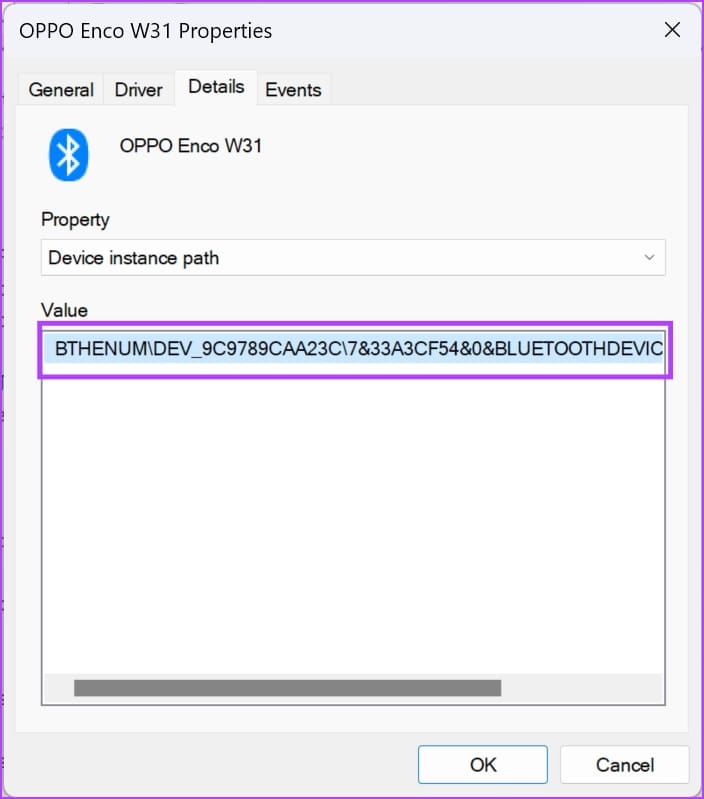
Step 6: Select and copy the value of the Device instance path.
Step 7: Now, open Command Prompt as an Administrator.
Step 8: Enter the following command:
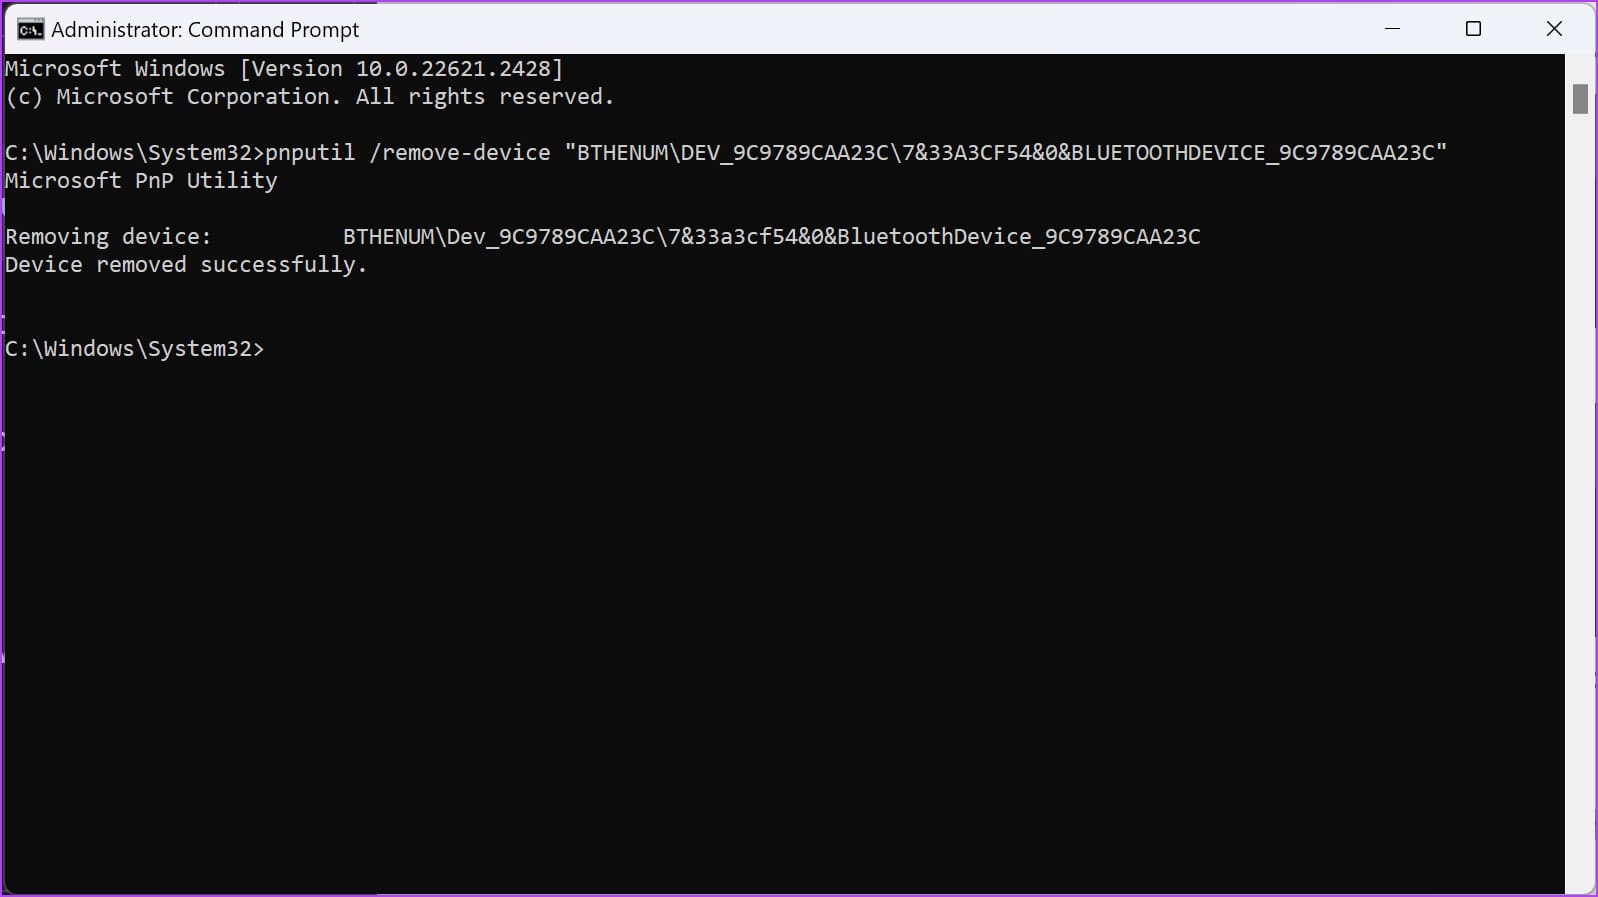
pnputil /remove-device "Device_Instance_path"
Replace Device_Instance_path with the value you just copied to your clipboard. Make sure you paste it within the double quotes.
Step 8: Hit the enter key once you add the command. Windows will remove the Bluetooth device.
12. Copy CMD Output to Clipboard
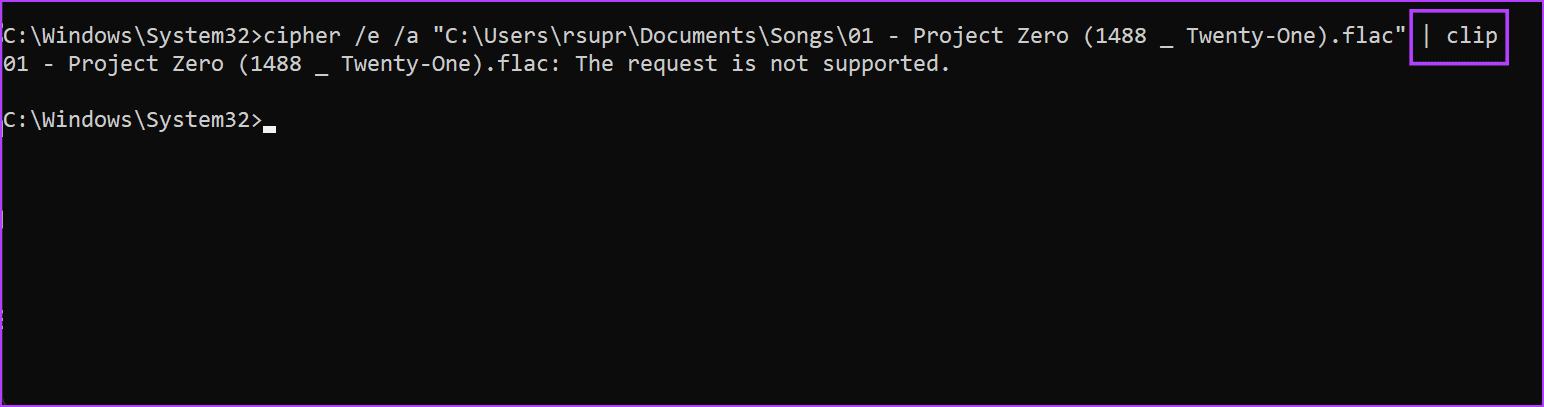
Depending on your command, CMD might give out an output with a large number of characters. Copying these characters can be difficult with the selection tool. Therefore, you can make use of this simple command to copy CMD output to the clipboard.
Run your desired command in the Command Prompt window whose output you want to copy. Then, use the pipe (|) character followed by clipto copy the output. Take a look at the example below.
13. Terminate Processes Using CMD
If you want to fully shut down an app or a process, here’s how you can terminate a process using the taskkill command in CMD.
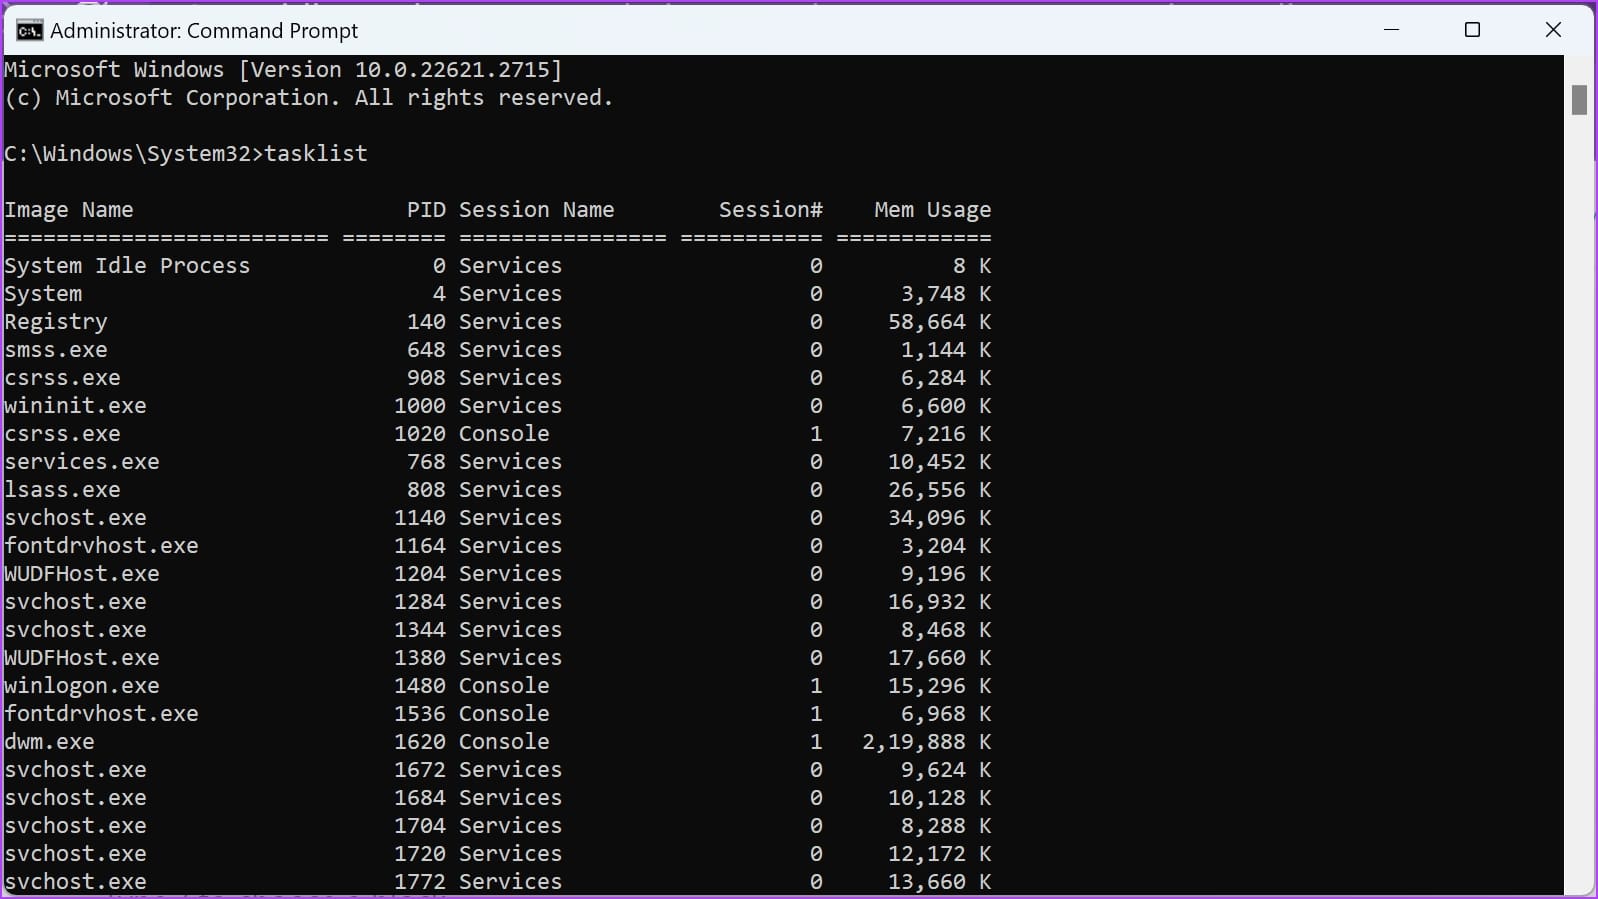
Step 1: Use the tasklist command to list all running processes and note down the name of the process you want to terminate.
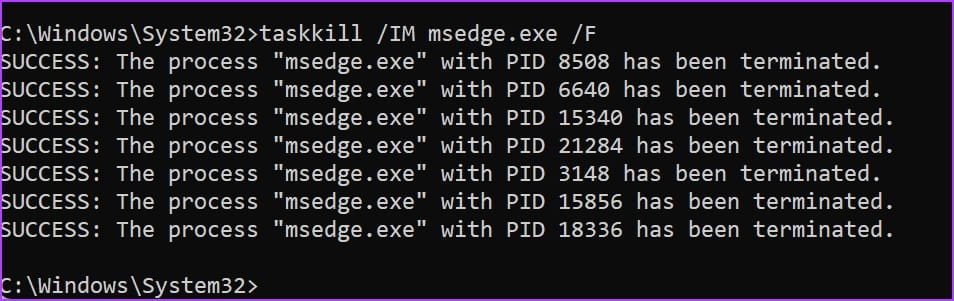
Step 2: Use the taskkill command followed by /IM (Image Name) and the process name to terminate it. At the end, add the /F command to force the process to terminate.
taskkill /IM process_name.exe /F
14. Delete Temporary Files
It’s necessary to delete temporary files on Windows to free up disk space, enhance system performance, and prevent potential issues caused by accumulated junk files.
Enter the following command to delete the local temporary (%temp% folder) files in Windows.
del /q /s %TEMP%\*
15. Delete Internet Cache Files
Depending on your web browser, enter the following command to delete the junk files created by websites and online data that is stored on your PC.
For Microsoft Edge :
del /q /s /f %LOCALAPPDATA%\Packages\Microsoft.MicrosoftEdge_8wekyb3d8bbwe\AC\INetCache\*
While the above commands help you execute several tasks with ease in CMD, you also need to know a few shortcuts to use the tool itself efficiently. Here are ten keyboard shortcuts in CMD that can help you use the tool with ease!
Ctrl + C: Terminate the current command or process.
Ctrl + V: Paste the text into the Command Prompt.
Ctrl + A: Select all text in the Command Prompt window.
Ctrl + Shift + Arrow Keys: Highlight text in the Command Prompt window.
Ctrl + F: Open the “Find” dialog to search for text.
Ctrl + Up Arrow: Scroll through previously entered commands.
Ctrl + Down Arrow: Scroll forward through previously entered commands.
Tab: Auto-complete file or folder names.
F7: Display a list of previously executed commands for selection.
Alt + Enter: Toggle between full-screen and windowed mode.
The FFmpeg for Audacity plugin is a powerful extension that significantly enhances Audacity’s capabilities. If you are looking to extract audio from your video file, you may need this extension to increase the range of formats Audacity accepts. Follow these steps to install it.
Step 1: Download the FFmpeg for Audacity plugin.
Step 2: Double-click the downloaded file and follow the wizard to complete the installation.
Step 3: At the end of the installation, launch Audacity, click the Edit menu, and click Preferences.
Step 4: On the left pane click Libraries, then click Locate on the right.
Step 5: Browse for your downloaded file and click OK.
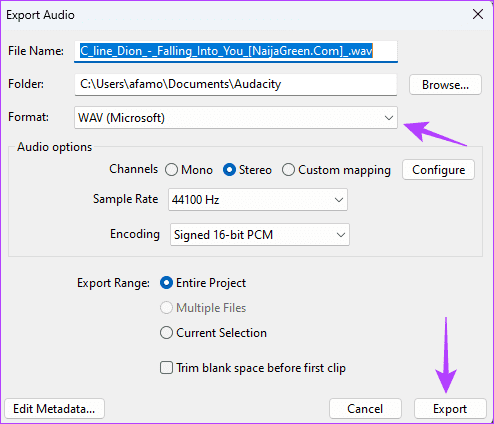
Extract Audio From Video With Audacity
Step 1:Open a video file by going to File > Open.
Step 2: Again, navigate to File, but this time, choose Export Audio.
Step 3: Choose the desired audio format and click Export.
If you’re having issues using drag-and-drop on your Windows 11 laptop, you can activate ClickLock. Once done, it will lock your selection on the initial click. Then, move the item to the desired location and click again to release it, saving you from moving it via drag and drop. Here’s how to enable it.
Step 1: Use the Windows + I key to Settings and click on Bluetooth & devices. Click on Mouse.
Step 2: Scroll down and click on Additional mouse settings.
Step 3: Check the Turn on ClickLock option and click on Settings.
Step 4: Use the slider to adjust the ClickLock duration and click on OK to set.
Step 5: Click on Apply and OK.
This will close the window and enable ClickLock on your Windows 11 device. You can now use it to stop mouse drag issues.
While activating ClickLock can help you fix the mouse drag issues, you can also adjust the pointer speed so that it is faster. This can help reduce drag. Furthermore, you can also enable mouse trails so that your cursor is visible to you as it moves. Here’s how to do it.
Step 1: Open Settings and click on Bluetooth & devices. Click on Mouse.
Step 2: First, use the Mouse pointer speed bar to adjust the current pointer speed.
Step 3: Then, scroll down and click on Additional mouse settings.
Step 4: From the menu options, click on Pointer Options and check the Display pointer trails option.
Step 5: Use the slider to adjust the pointer trail visibility. Click on Apply and OK to save the settings.
This will adjust the pointer speed and ensure you’re able to see the mouse pointer using pointer trails. Check out our other article to learn more about adjusting the mouse sensitivity on Windows 11.
How to Password Protect Files on Android Using Google Files
Keeping confidential documents, photos, or videos safe on your Android device is essential. Thankfully, the Google Files app offers a built-in feature called “Safe folder” that lets you password-protect your sensitive files using a PIN. Here’s how to use it.
Step 1: The Files app is pre-installed on most Android devices. If not, you can downloadit from the Google Play Store.
Step 2: Once installed, openthe Files app on your Android device. Scroll down to the Collections section, and tap on Safe Folder.
Step 3: Choose your preferred lock method: PIN or Pattern. Based on your selection, set up password protection.
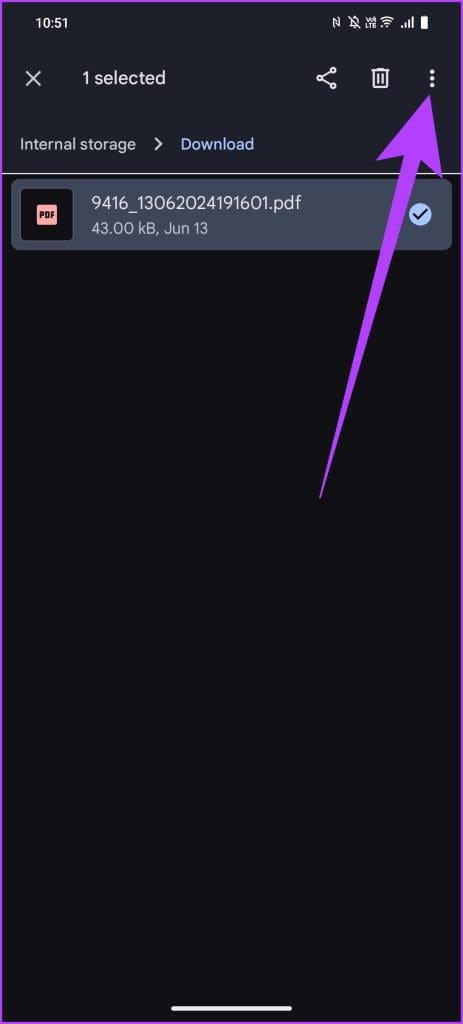
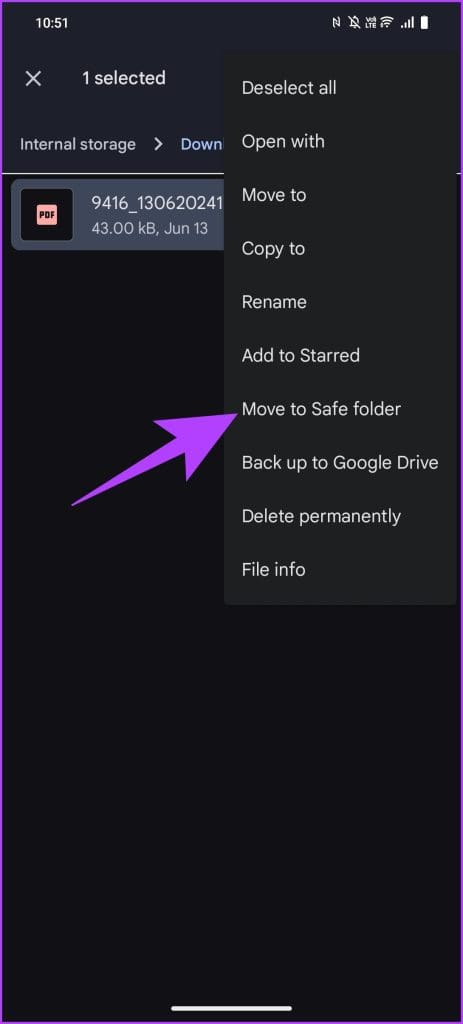
Step 4: Once you’ve set up your Safe folder, go back to the main screen of Google Files. Browse to the files you want to protect. Long press to select the files, then tap on the three-dot menu and select Move to Safe Folder.
Step 5: You’ll be prompted to enter the PIN or pattern you set up earlier.
And that’s it. After entering it, your files will be moved to the Safe Folder.
FAQs
1. Can I change my PIN or pattern for the Safe Folder?
Yes, you can change your PIN or pattern by going to the Safe Folder settings within the Google Files app. Tap on the three-dot menu, select “Change PIN” or “Change Pattern,” and follow the instructions.
2. What happens if I forget my PIN or pattern?
Unfortunately, no. There’s no built-in method to recover forgotten credentials. As such, it’s important to ensure you choose a memorable PIN or pattern.
3. Does moving files to the Safe Folder affect their quality?
No, moving files to the Safe Folder does not affect their quality. The files remain in their original format and quality, just protected by a PIN or pattern lock.
Applying the Parchment Background Effect in Microsoft Word
Step 1. Choose the Design tab on the Ribbon.
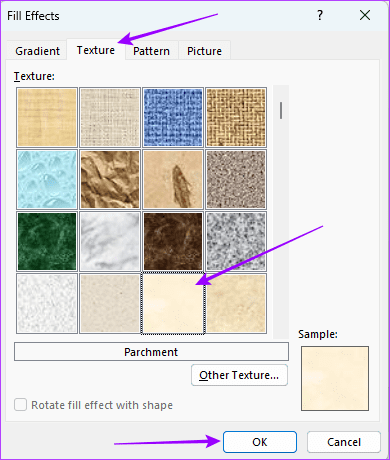
Step 2: Click the tiny arrow for Page Color on the right of the interface and select Fill Effects.
Step 3. In the Fill Effects box, click on the Texture tab > Parchment texture > click OK.
Note that to use this feature, you may have to click through the texture swatches on display (the names appear just below) and select the swatch for Parchment since you can’t search by name.
Mapping a drive in Windows means putting a computer’s files on a network and making it available as a local drive on another computer.
The mapped drive will appear the same as any other local drive on your computer, such as the C: drive, and you are free to access the files and make changes to them. However, the files will remain on the remote device unless you delete them or move them to your local storage.
How to Map a Drive in Windows?
Step 1: Press Windows Key + E to launch File Explorer and select This PC.
Step 2: Click on the three-dots icon and select Map network drive.
Step 3: Select a drive letter and click the browse button to select a folder you want to share. The folder will then be shared over the network.
Benefits of Mapping a Drive
Mapping a Windows drive offers several benefits that enhance user experience and productivity. Some of the key advantages are:
Easy Access
By mapping a drive, you can create a shared folder easily accessible over the network. As a result, you can access its files like you would access a local drive. So, navigating through complex network paths to access shared resources is unnecessary.
Consistency and Reliability
Mapped drives automatically get reconnected when you boot up your PC. As a result, you enjoy consistent connectivity to your shared files. Also, once your mapped drive is configured and set up, you don’t need to configure it repeatedly, which is familiar with other file-sharing solutions.
Organizational Benefits
Mapping a drive is particularly beneficial if multiple computers are on the same network. It allows you to organize and make the most required files available across your computers, especially in an organizational setting. This structured approach to file management and access is essential for effective collaboration.
Limitations of Mapping a Drive
While mapping a drive in Windows offers many benefits, there are also some limitations to consider:
Dependency on Network Connectivity
You will lose access to your mapped drive if your network is down or unstable. Also, the ability to transfer files between two devices depends on network speed.
Security Concerns
Mapped drives can expose sensitive data if proper security measures are not followed. Set up the correct permissions for your files so only authorized users can access sensitive files.
Performance Issues
Accessing files over a network can introduce latency, making file operations slower than local drives. Also, frequently accessing large files on a mapped drive will consume much more bandwidth, affecting overall network performance.
You must have at one time or the other used the Shapes tool in MS Word to draw objects, diagrams, etc. You would know then that it takes quite some effort and a number of shapes (lines, arrows, boxes, circles, text…) to complete one whole diagram.
Now, God help you if you have to do some document formatting which counts on you moving your diagram to a new page or new location. Will you start selecting each element to move it and rearrange your diagram? For once it may be ok, but it becomes really irritating if you end doing it often.
I have seen people taking screenshots of their own diagram to later insert it back to the document as an image. Intelligent, isn’t it? Surely, you do that because you have missed a wonderful feature that MS Word offers. Let us tell you about it. Let us tell you how you could group all the shapes elements (that make your picture/diagram) and make it a single object so that you could move them all at once.
Steps to Group Shapes Elements to Make an Object
The process may seem time consuming but it really helps in the long run. You would realize the pain of moving it otherwise.
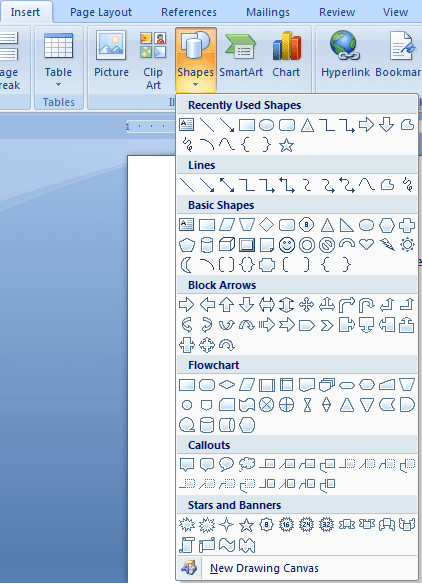
Step 1: Navigate to Insert > Shapes and select a shape that you wish to insert or make part of the picture that you want to draw.
Step 2: Repeat Step 1 for other shapes, arrange all of them to make a meaning full diagram. Add text to boxes if required.
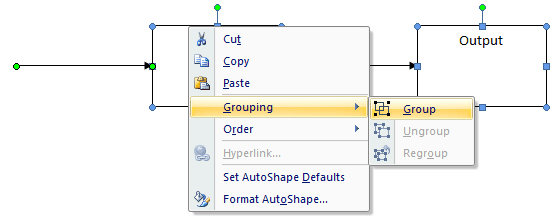
Step 3: Hold Ctrl key and select all the individual elements that you want to make a group of. Hover and click on an element (to select it) when a + mark appears.
Step 4: After selecting all elements release the Ctrl key and hover on any element till your cursor changes to a four handed arrowed cross.
Step 5: At this point make a mouse right click and, navigate to Grouping and choose the Group option.
All the elements will be combined to make a single object viz. the diagram will now be treated as a single element which you can easily move, rotate, format or any other such task. Try and select it, you will be able to note the difference.
Note: Follow the above steps exactly like we mentioned, very carefully. If you miss a step you will lose the selection and you might have to start again.
If you wish to Ungroup or Regroup the elements, select it, right-click and follow Grouping options. Rest is easy to do.
Conclusion
In my school and college days I had a lot of trouble with such diagrams. I did not know of this feature until very late and I could only suffer till then. I also took help of screenshots as I mentioned earlier. Now that I know this method, I can’t help but wonder about the time I wasted not using this trick while moving the diagrams. What about you?
Whether you already have a video downloaded on your smartphone or want to use a YouTube video, the first step would be to convert it into an audio file. You can then set the converted audio as the phone’s ringtone.
Step 1: Head to the Freeconvert website and click on Choose Files. You can select a video from your phone’s storage or use a cloud service.
Tip: If you wish to use a YouTube video, select the From URL option and paste the YouTube video’s link.
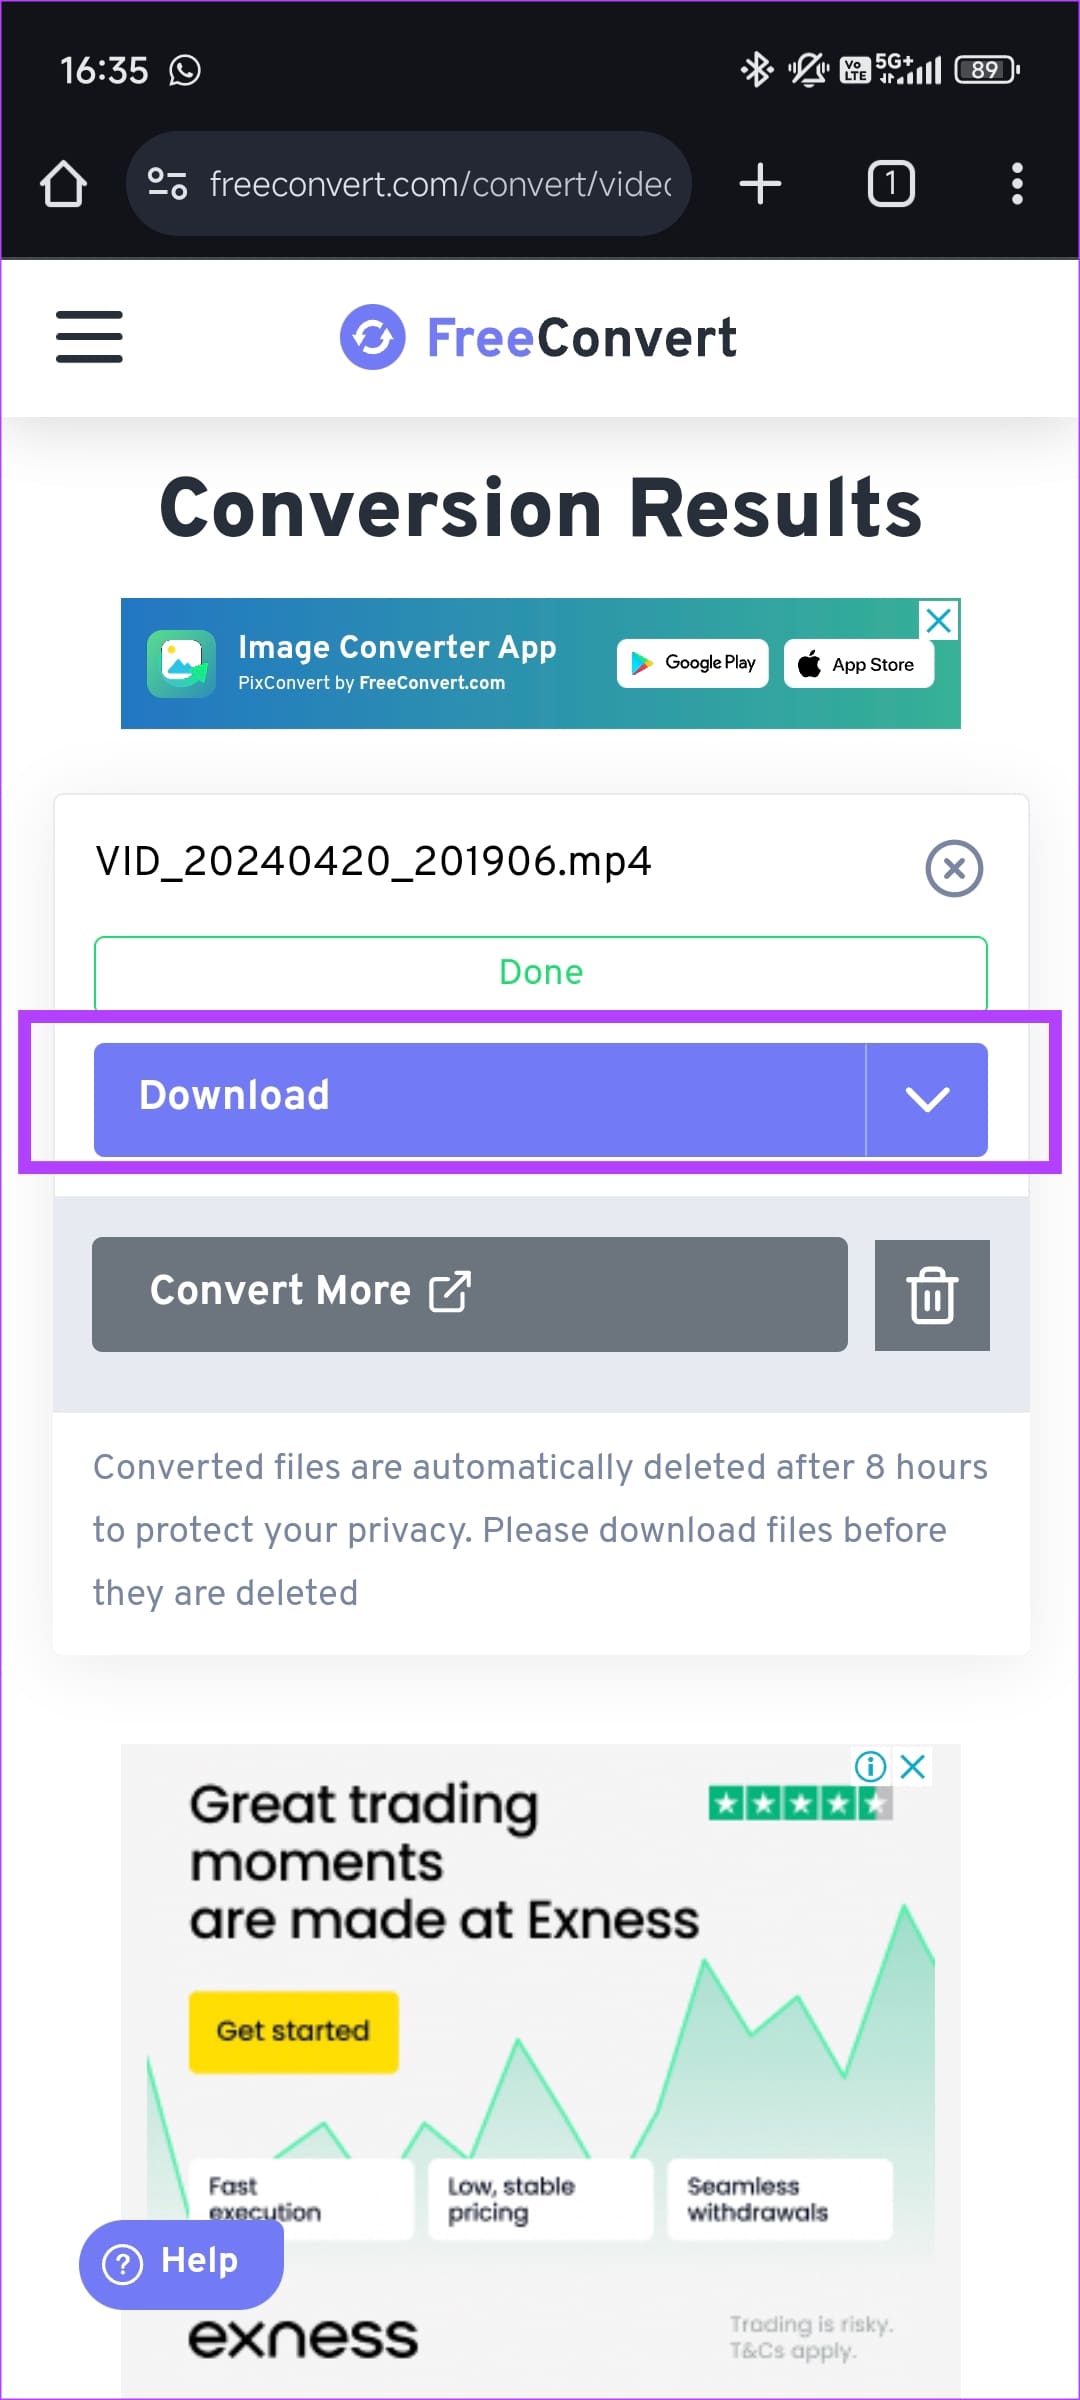
Step 2: Tap on Convert. Once done, hit the Download button to get the MP3 file.
Setting the Downloaded Audio as a Ringtone
Now that you have the MP3 file, here’s how to set it as the preferred ringtone.
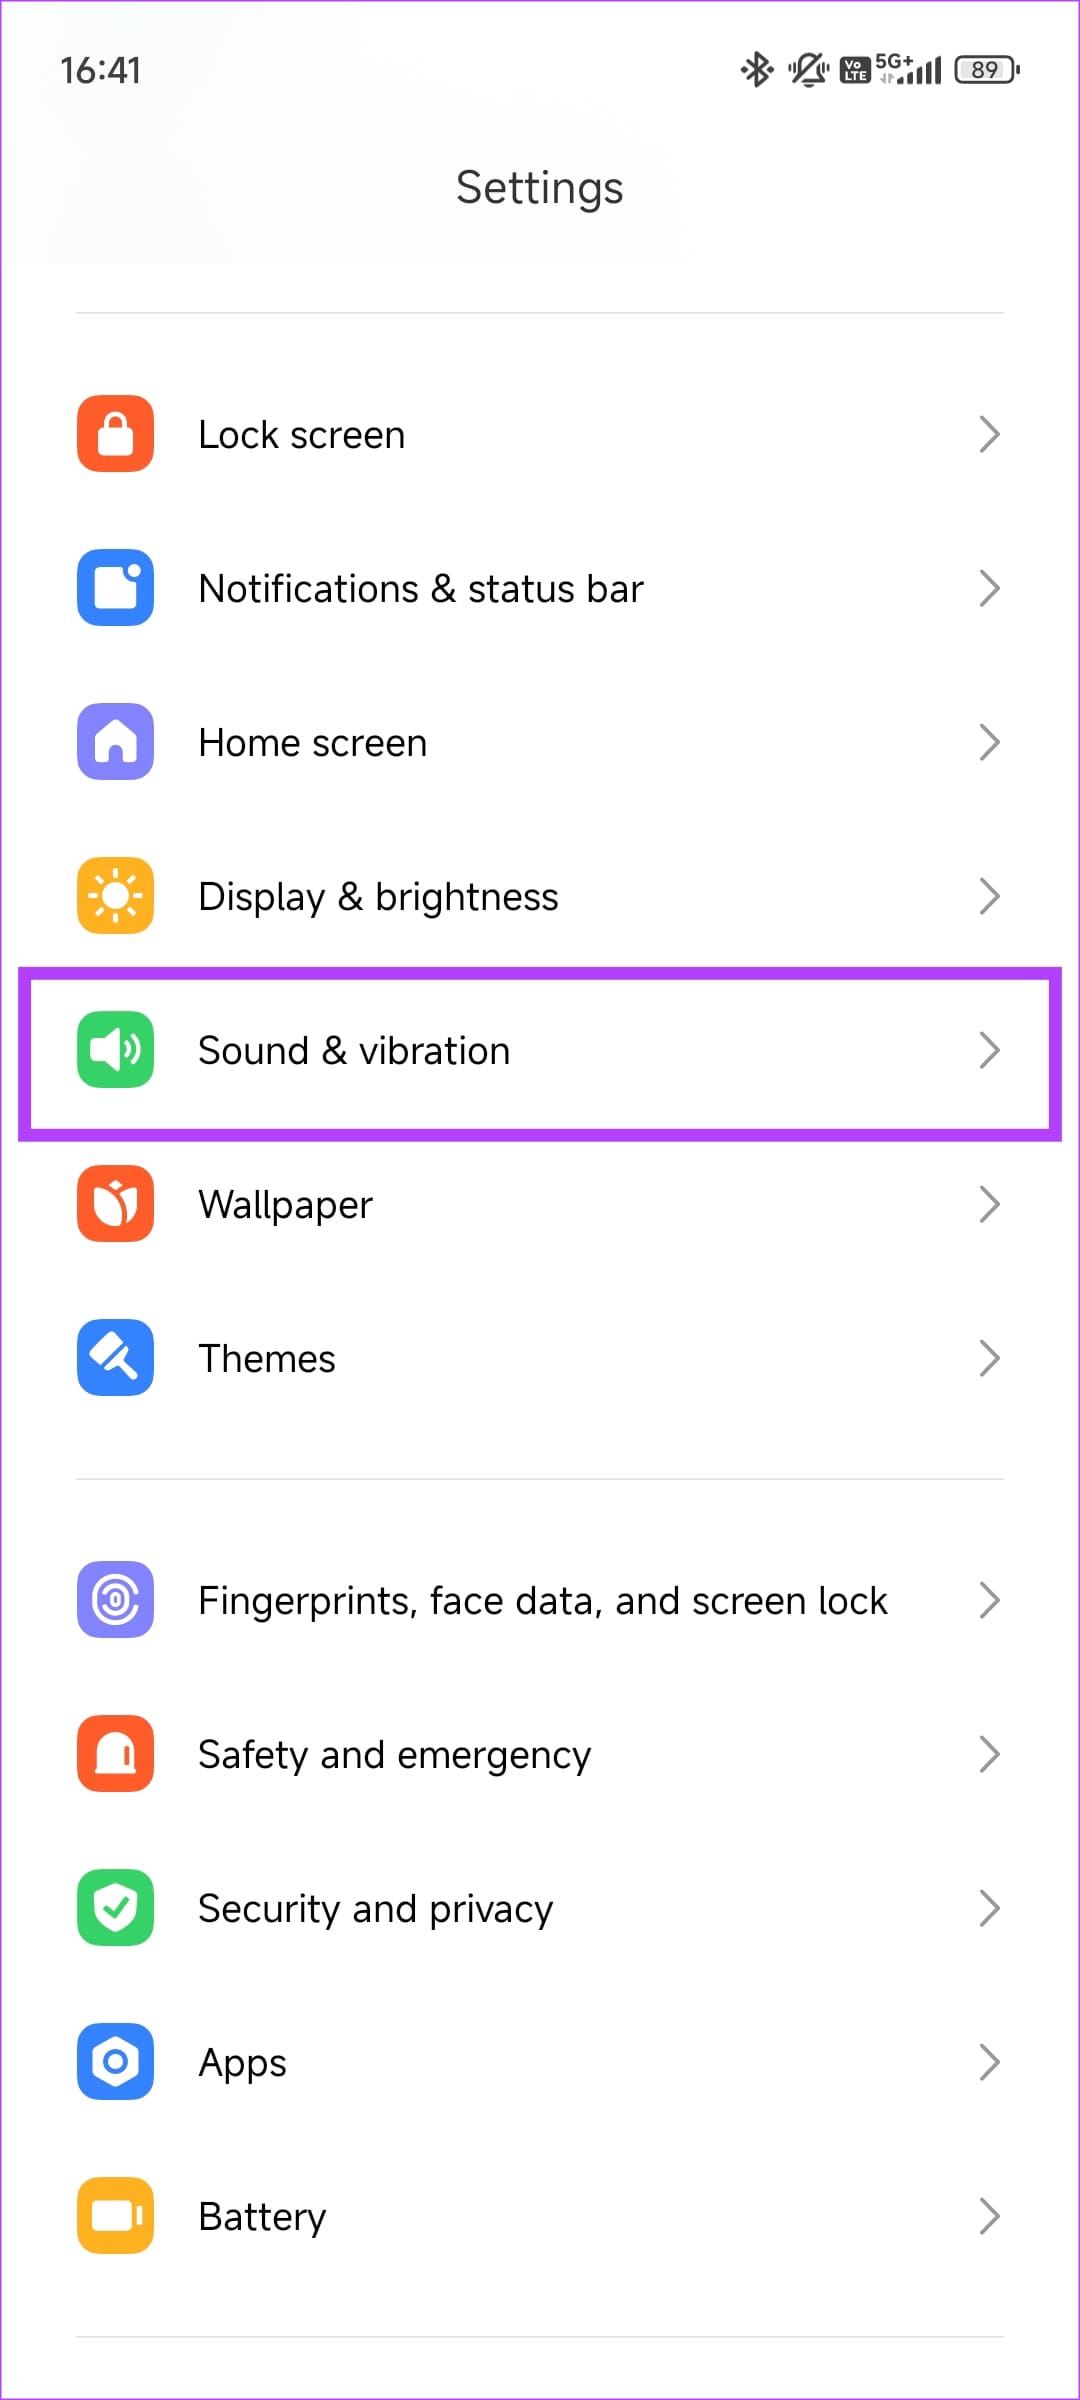
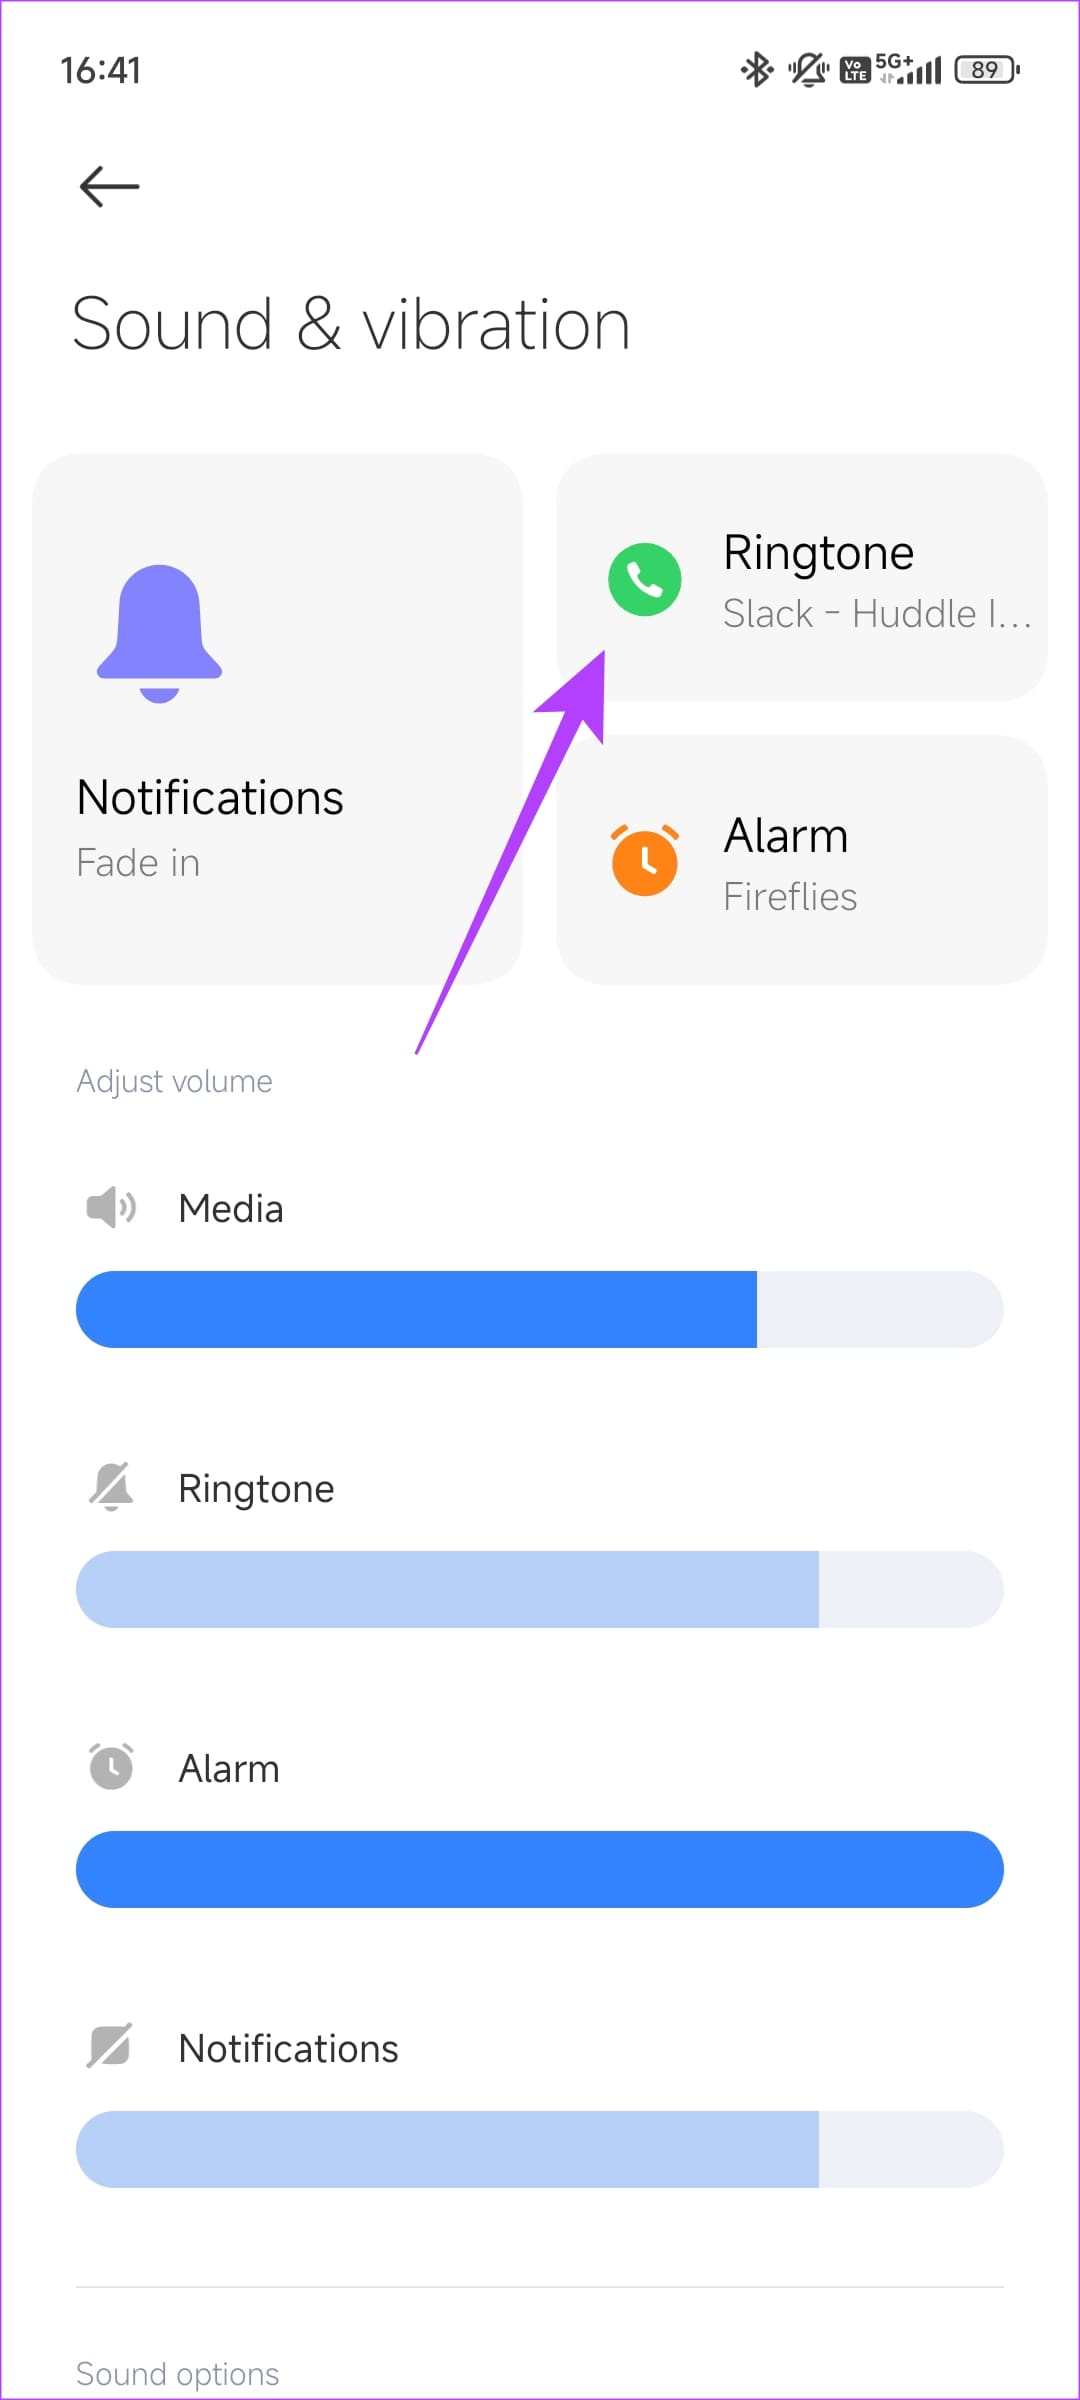
Step 1: Open the Settings app on your phone and navigate to Sound & vibration. Then, go to Ringtone.
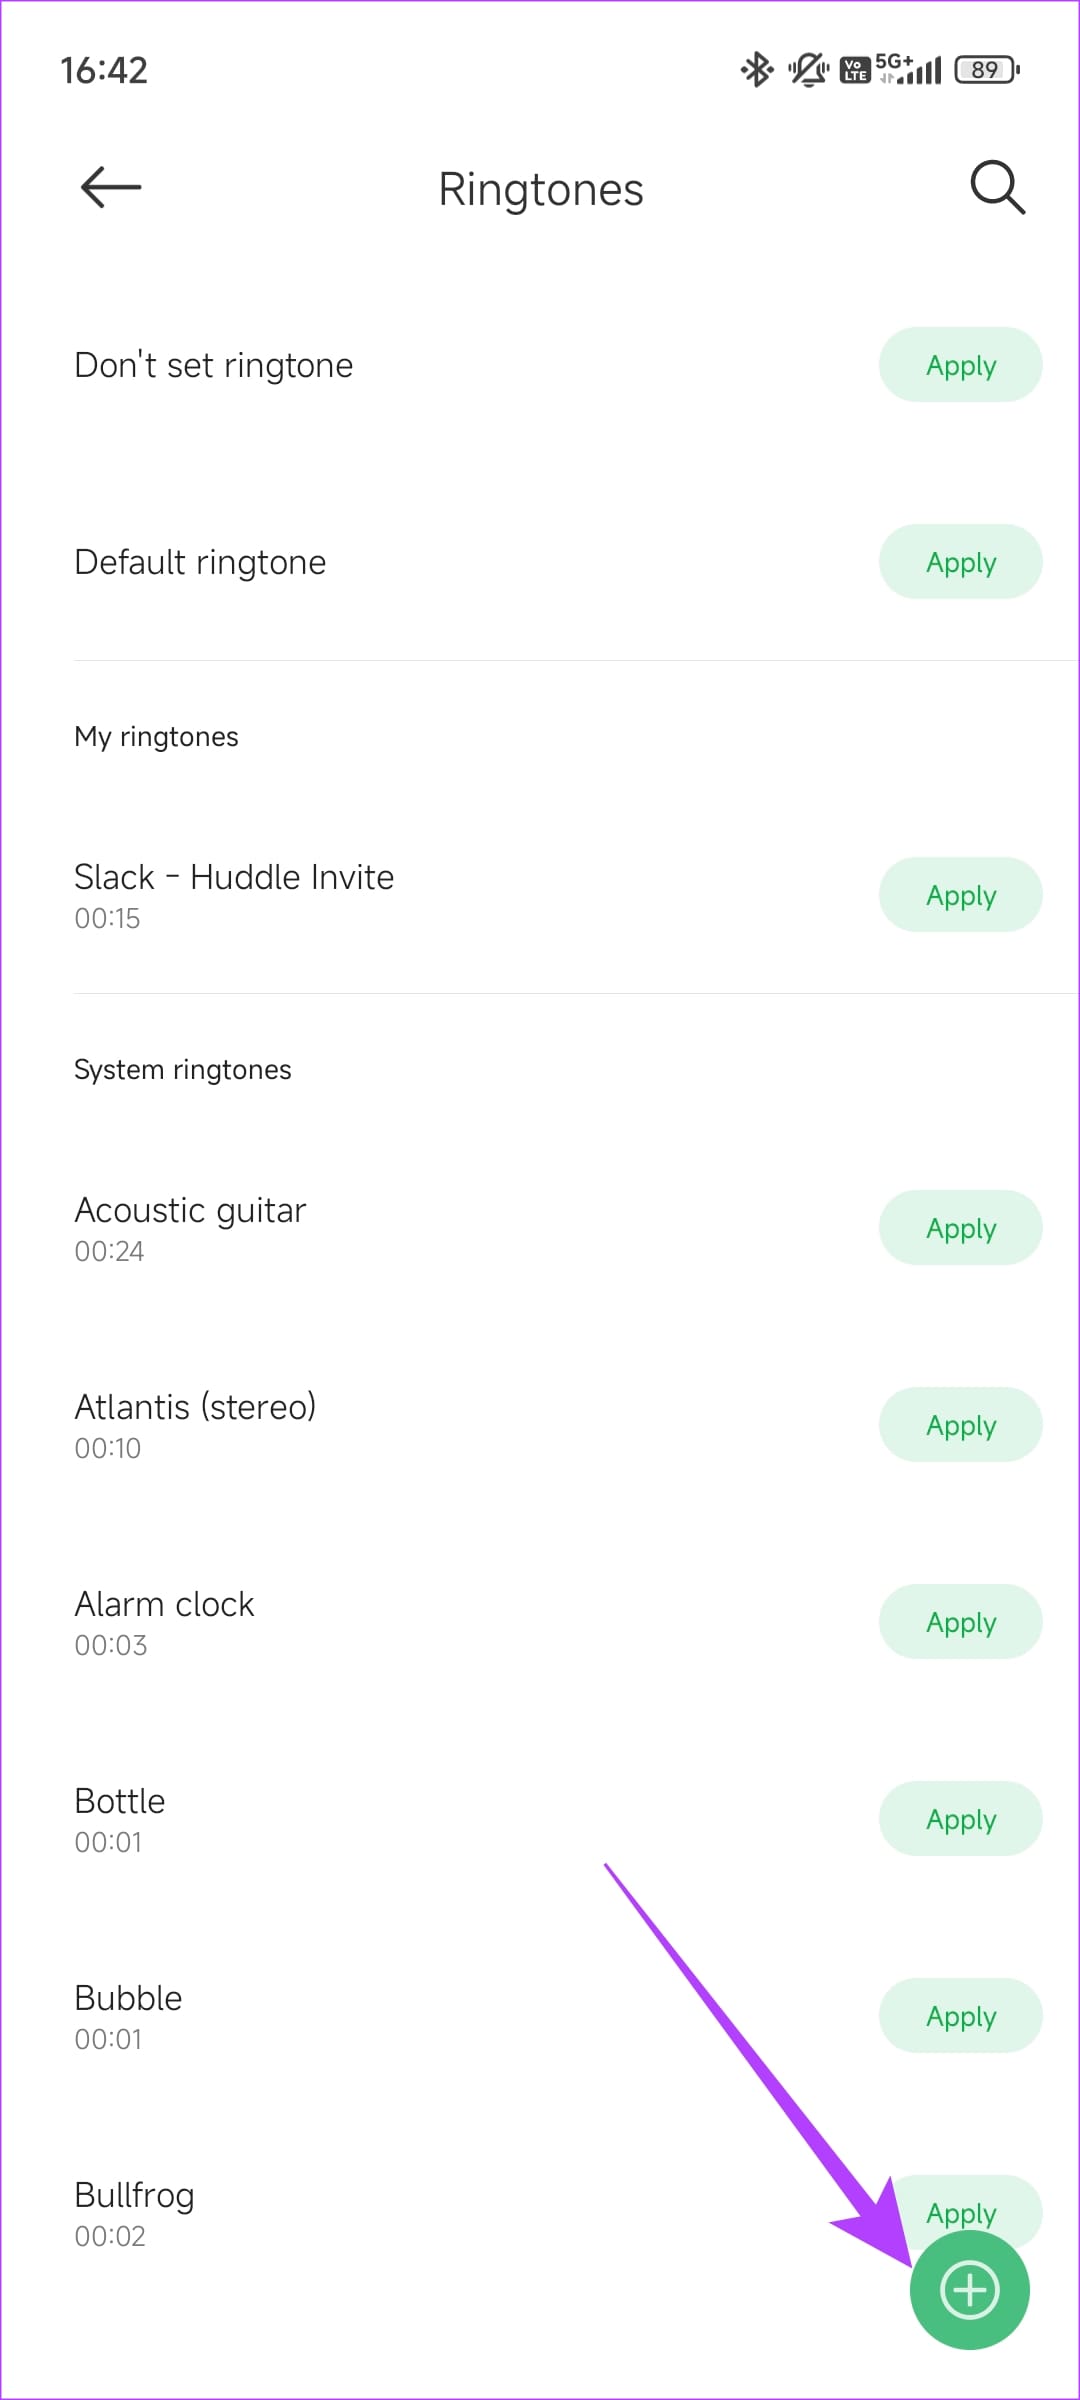
Step 2: Select the Add button and choose the app you wish to use to pick the audio. Usually, it’s Audio Files or Music.
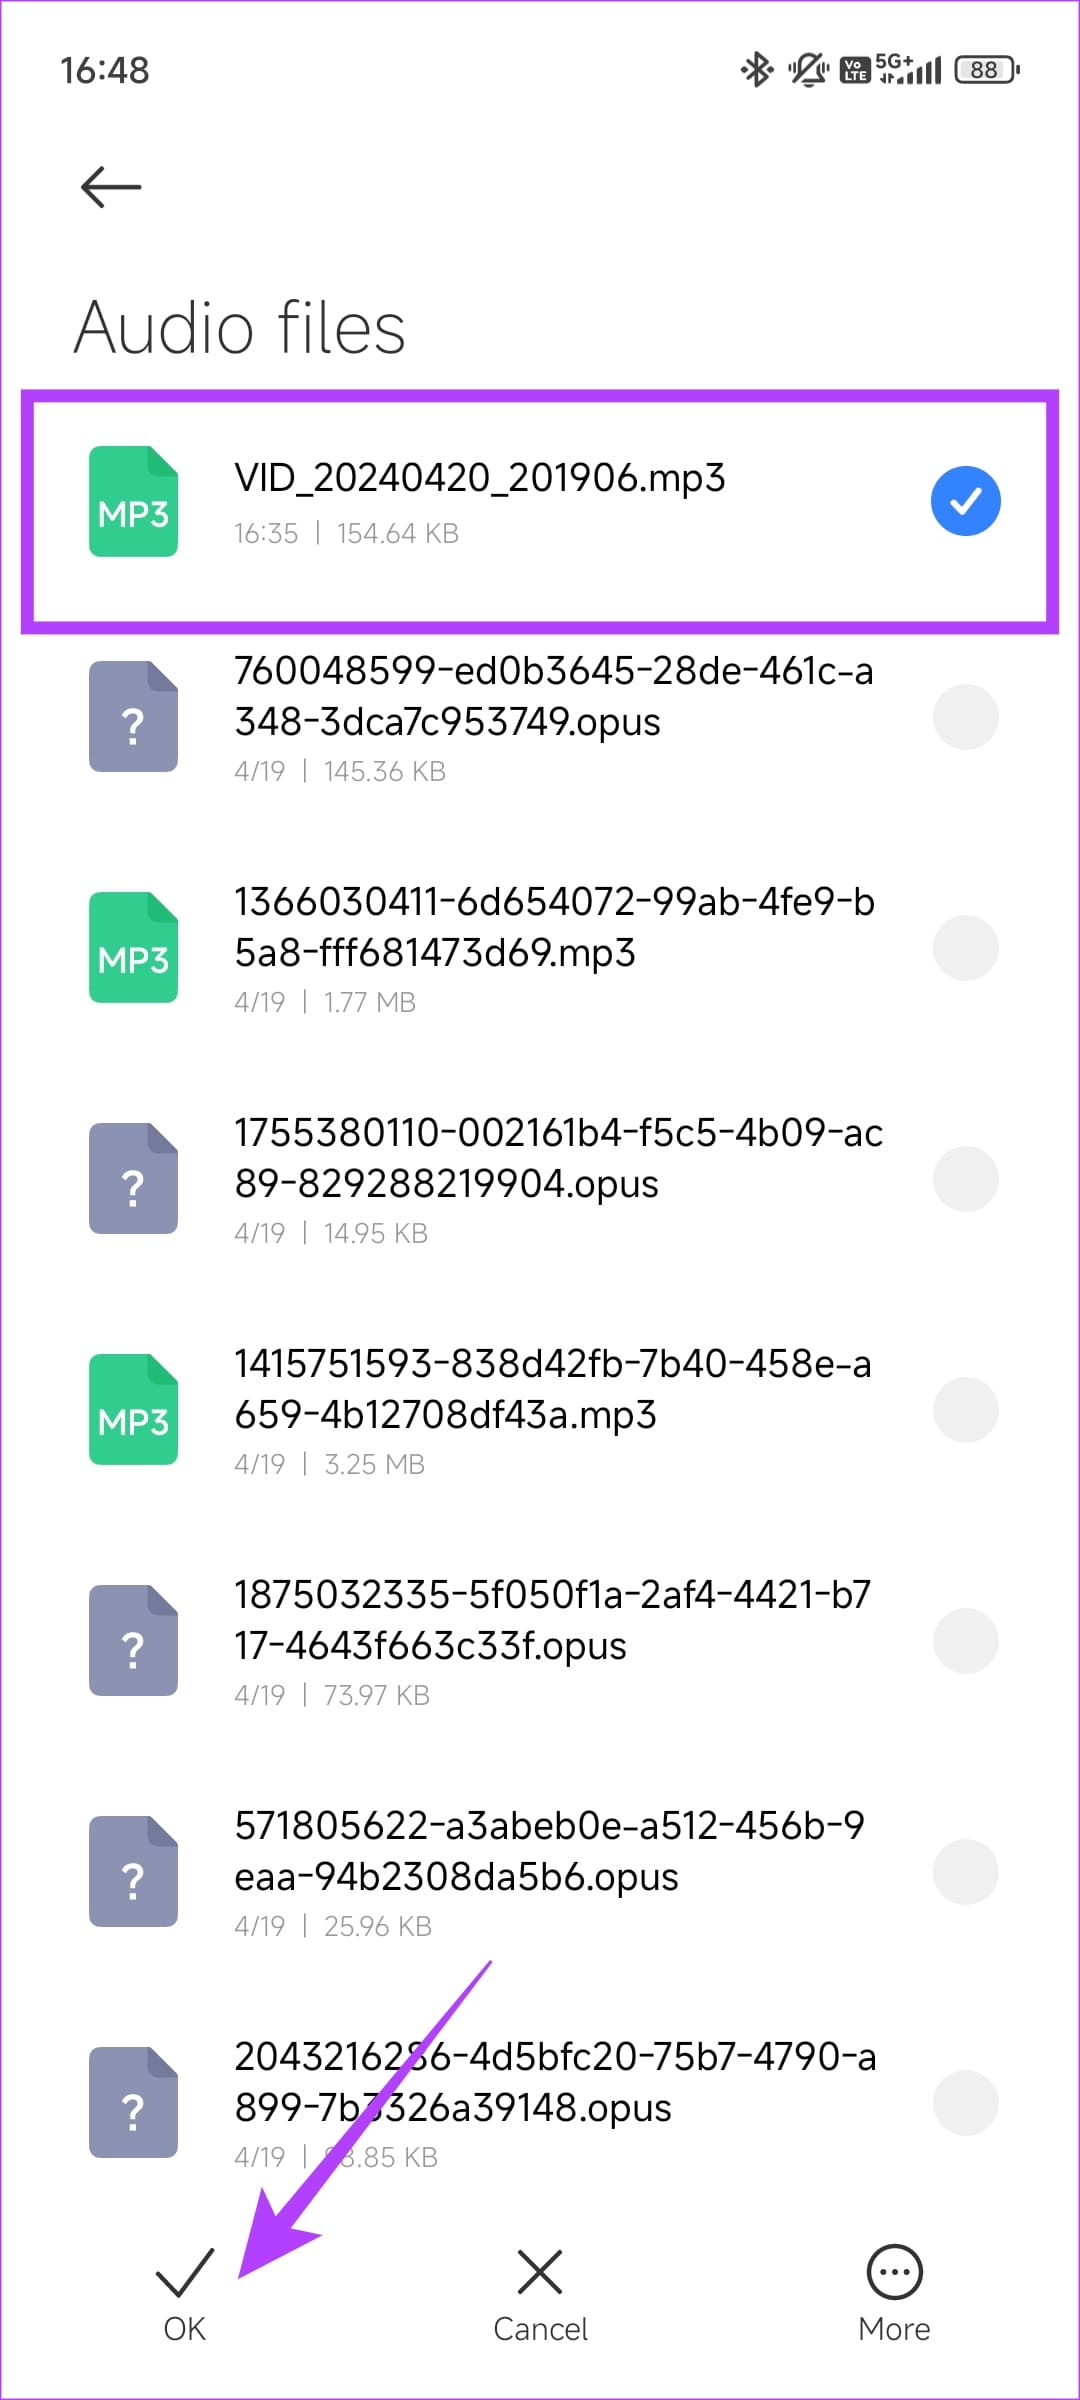
Step 3: Pick the audio you downloaded and hit OK.
You can use the same technique to set a custom notification tone or alarm sound.
No one’s ever been killed in a Windows crash, so the Microsoft jokes don’t die down. But here’s a little program that won’t shut up the Apple fanboys, but will get rid of one of our pet annoyances (apart from the Apple fanboys themselves).
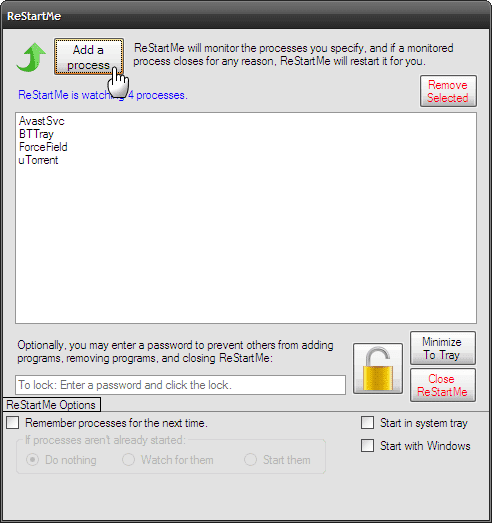
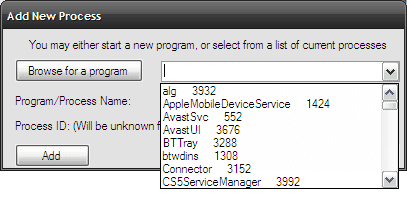
ReStartMe is a tiny application that automatically restarts any programs or Windows process that crashes. There are some programs that you want to run. A crash may bring it down. Alternatively, you can close it accidently. So, ReStartMe saves you the bother of manually starting the program again. For instance, I am always running a torrent client. If the program crashes while I am away, ReStartMe can get back the program without my manual intervention.
ReStartMe is a Single Purpose Service
The idea behind ReStartMe is very simple. The setup is even simpler. ReStartMe (ver. 2.0) is a 456 KB download that runs on all 32-Bit and 64-Bit versions of Windows. After the installation, you can set it up to start with Windows and run from the System Tray.
You have to manually browse to the EXE file of the program you want ReStartMe to monitor and add it to the list. Better still, you can start the program and add it from the dropdown which shows you all the running processes.
What’s nice about the program is that it can watch out for multiple processes in one go. So, you can ensure your critical programs like a download manager, torrent client, firewall, security apps, and parental control software are added to ReStartMe for it do its watchdog job.
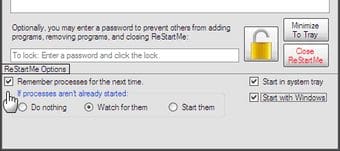
The tool also gives you the option to remember all the processes you have added to the lineup. If the processes haven’t started, you can set the option to start them up with ReStartMe. Optionally you can choose to wait for them to be started manually, or ignore them altogether.
If you do not select the option of remembering the added programs, ReStartMe will start with a blank slate the next time you launch it, and you have to browse for the EXE file of the programs again.
ReStartMe allows you to lock the program so a second person cannot change the settings without your permission.
ReStartMe is similar to another program called Keep Running. Keep Running works for only one program though. ReStartMe is not being actively developed anymore, so glitches if any may not get corrected. Even then, the simplicity and single-function nature of the program should help you use it without a problem.