Helping millions of people navigate the world of technology.

4 Ways to Download WhatsApp Status Videos on Any Device

Method 1. Save WhatsApp Status via File Manager (Android)

Unlike iOS, WhatsApp status media on Android are stored temporarily in a user-accessible directory that can be saved without a third-party app.

You can go there and download or save WhatsApp statuses using a file manager to your desired location. Here are the simple steps:

Note: This method lets you download only watched WhatsApp statuses from your contacts.

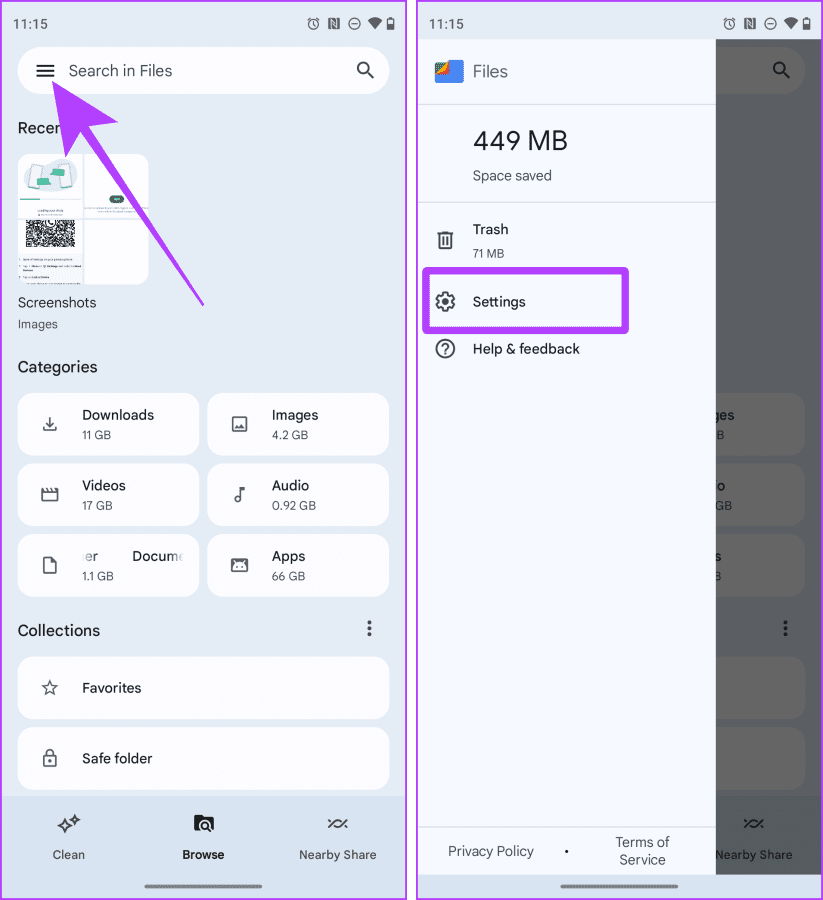
Step 1: Launch the Files app on your Android phone. Tap the hamburger menu (three-line icon).

Step 2: Tap Settings.

Google Files App on Android

Step 3: Enable Show hidden files. Next, tap the back arrow to go back. Here, tap Internal Storage.

Google Files Home

Step 4: Now, go to Android media.

Step 5: Go to com.whatsappWhatsApp.

Navigating to com.whatsapp folder on Android

Step 6: Now, go to Media.Statuses.

WhatsApp Status Media on Android

Step 7: Select photos and videos you want to save by tapping and holding them. Tap the three dots (kebab menu).

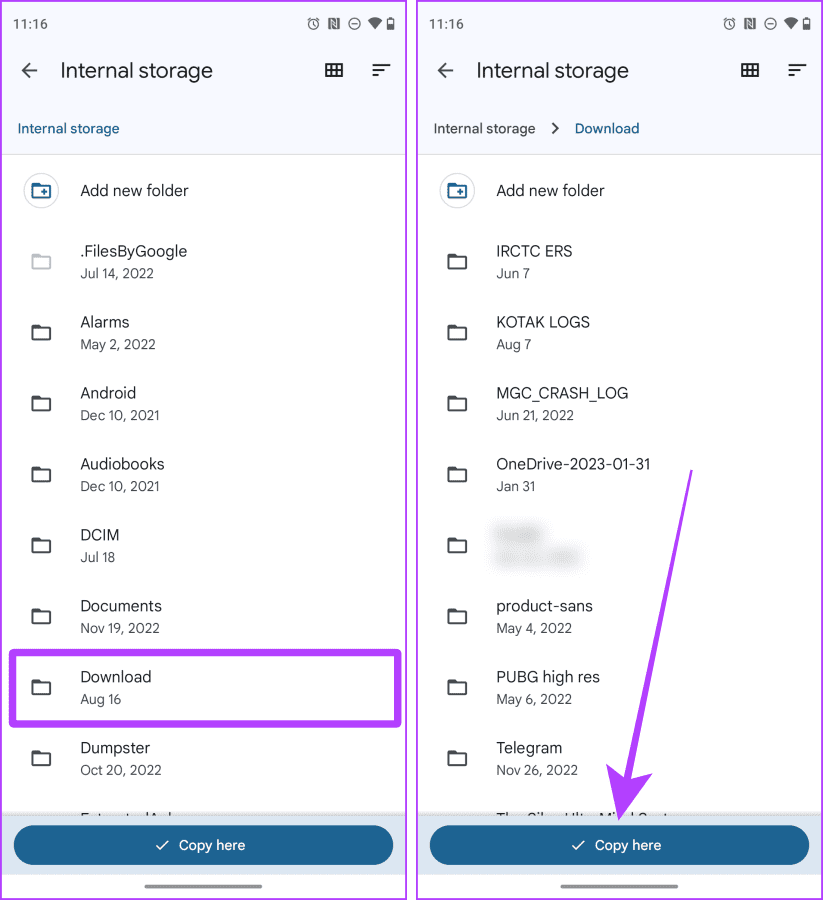
Step 8: Tap Copy to from the drop-down menu. Tap Internal storage.

Copying WhatsApp Status Media to Internal Storage on Android

Step 9: Go to your desired folder and tap Copy here to paste the WhatsApp status

Paste WhatsApp Status Media to Desired Folder on Android

And that’s it; now these WhatsApp Status photos and videos will appear on your smartphone in the Gallery or Photos app.

Note: If you use WhatsApp on an iPhone and have an extra Android device, you can link the device and download WhatsApp Status on the Android device.

Method 2. Record Your Entire Screen (iPhone and Android)

You can record your entire screen to save a video from someone’s WhatsApp status. Notably, this recording will also include the status bar of your device and WhatsApp’s UI (person’s name, etc.). Although, you can always crop the video to get rid of it.

On iPhone

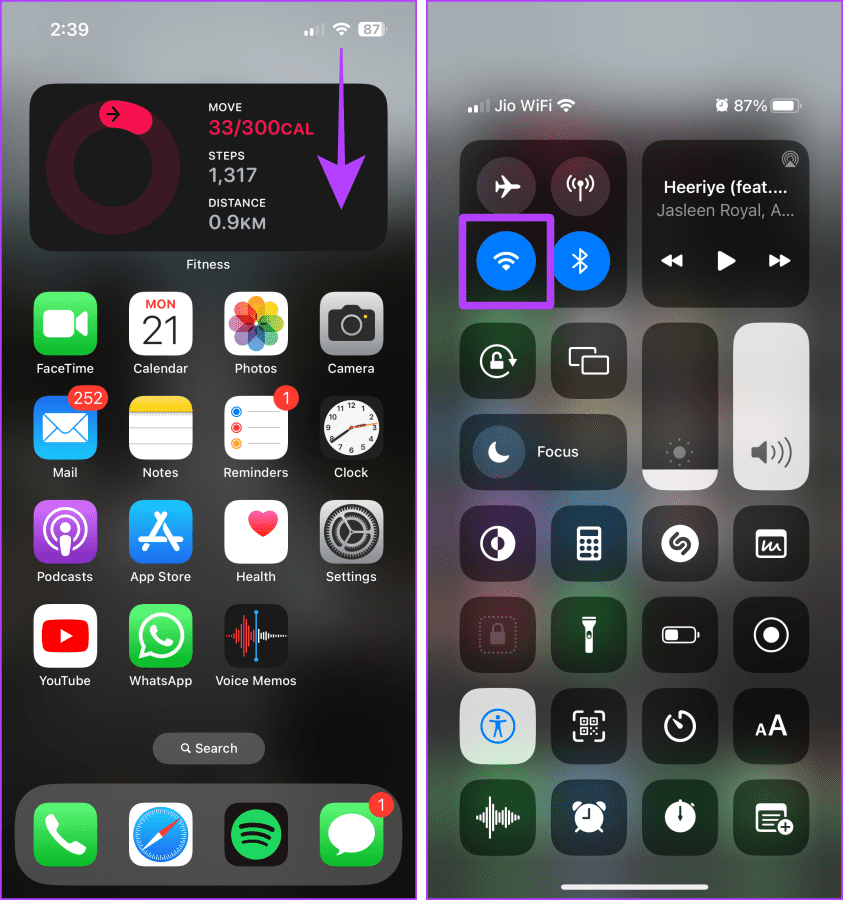
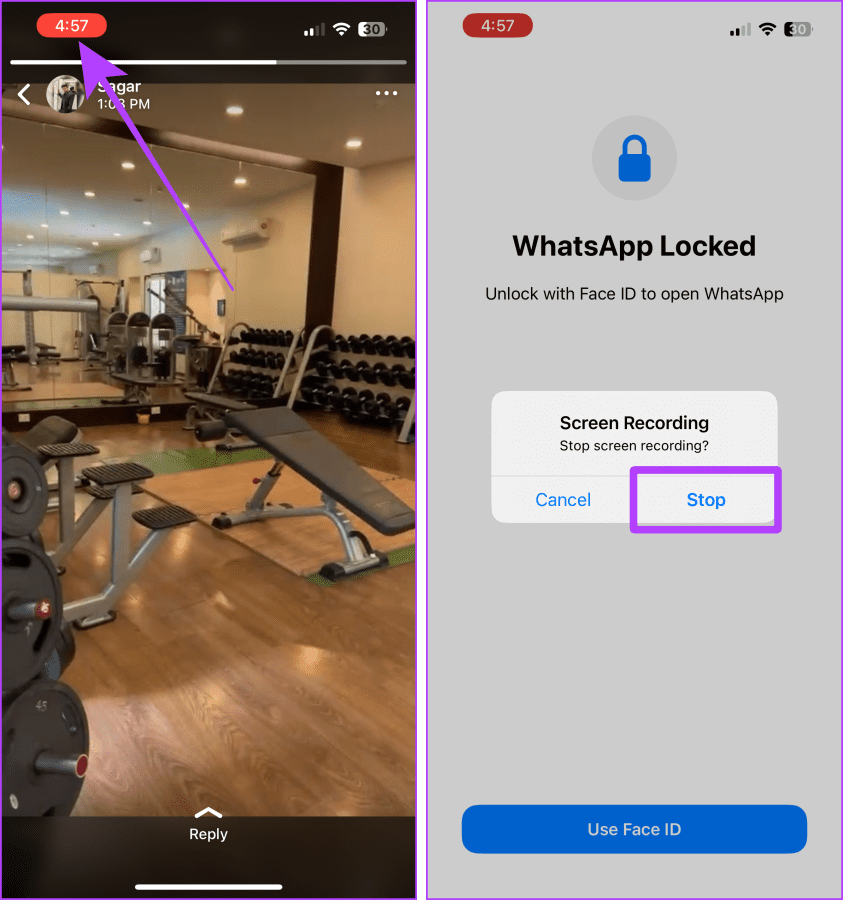
Step 1: Launch WhatsApp. Swipe down from the top right to access the Control Center.

Step 2: Tap the Screen Recording button to start recording.

Screen Record on an iPhone

Step 4: Now, tap to open status in full screen and let it record. Once done, tap the red button to stop recording.

Step 5: Tap Stop.

Stop Screen Recording on an iPhone

On Android

Note: The steps to record your screen vary from one Android to another. For this demonstration, we’re using a Google Pixel phone.

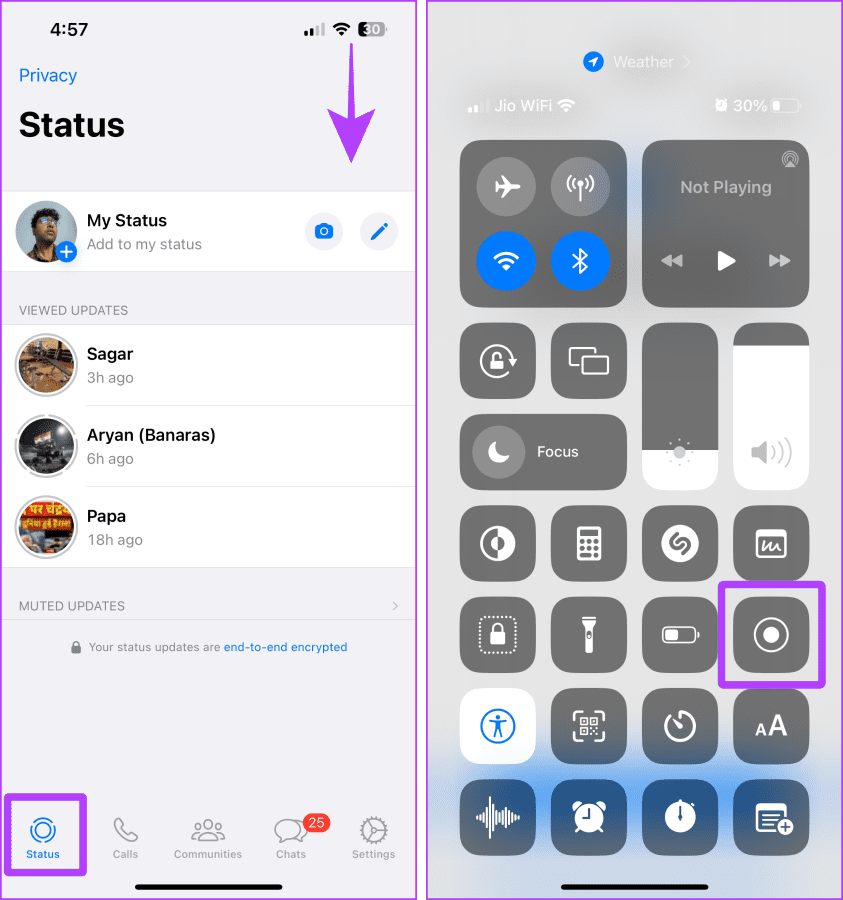
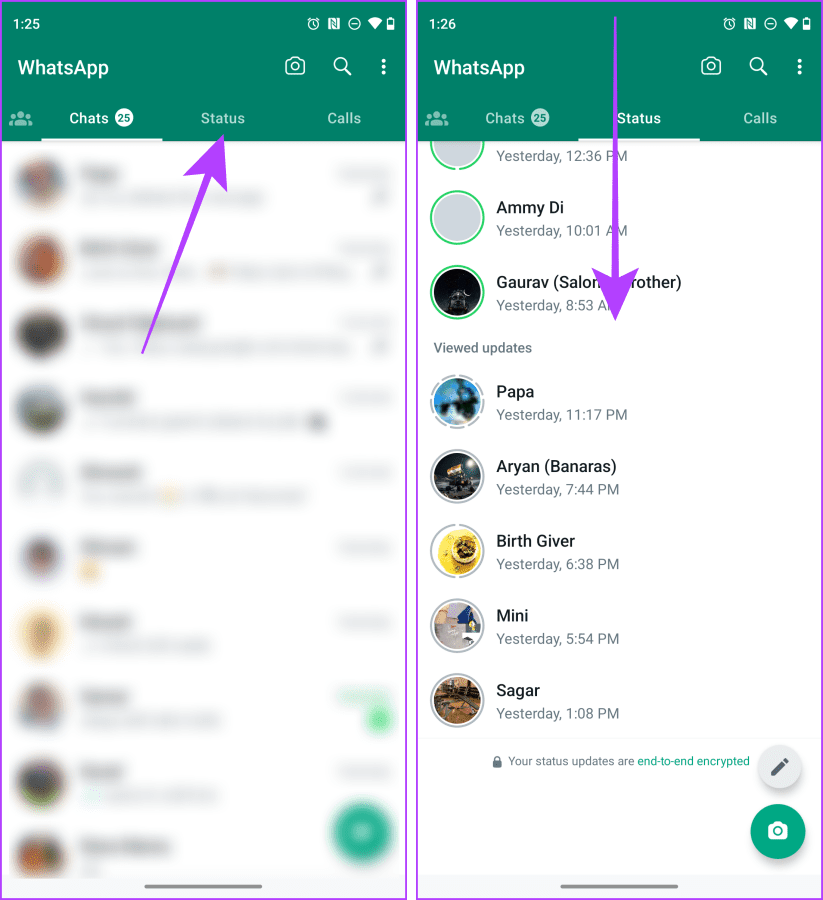
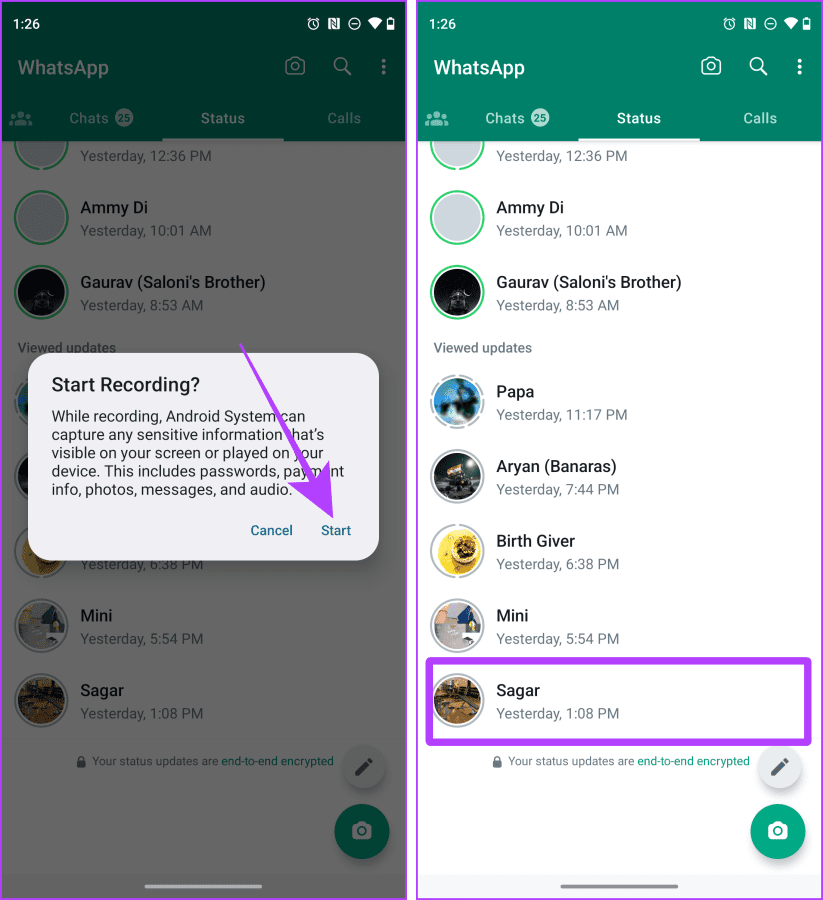
Step 1: Launch WhatsApp and go to the Status tab. Swipe down from the top to access Quick Settings.

WhatsApp Status Tab on Android

Step 3: Swipe one more time to expand Quick Settings. Tap Screen record.

Screen Record Quick Settings on Android

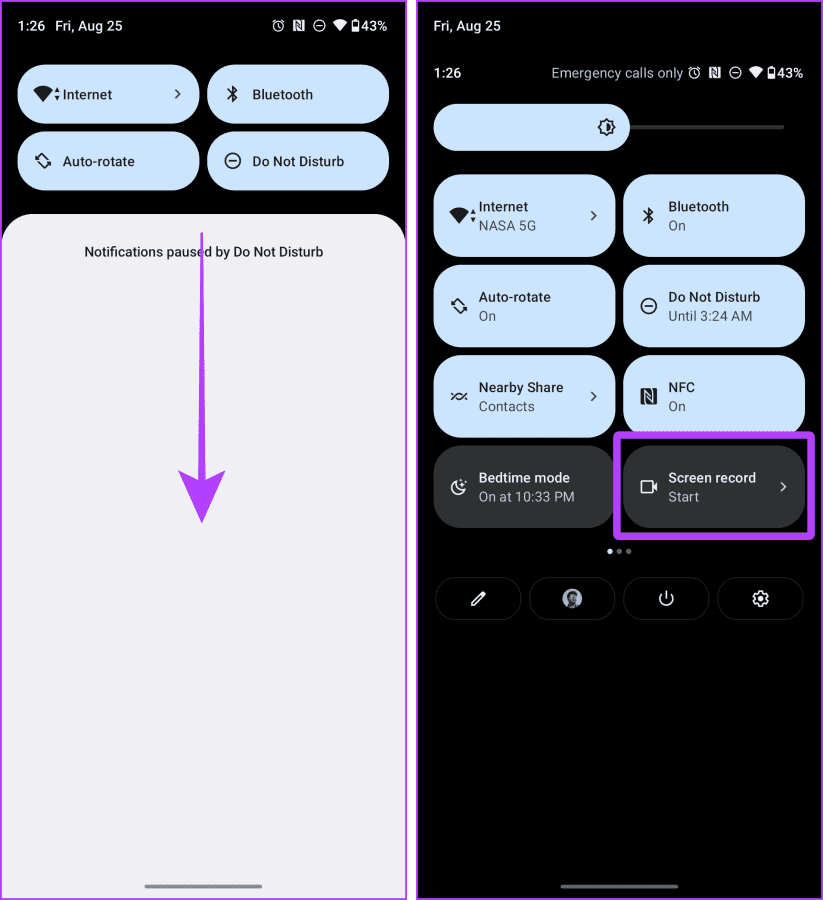
Step 4: A pop-up will appear on the screen; tap Start.

Step 5: Tap the status you wish to save. Record the screen, and when done, lock the screen. The recording will be saved to your phone.

Screen Record WhatsApp Status on Android

Tip: Learn how to blur a video or screen recording on iPhone

Method 3. Download Image From Status Using WhatsApp Web (Mac or Windows)

WhatsApp web allows you to download images from any WhatsApp status in the most straightforward way, i.e., drag and drop. Let’s look at the steps to do so.

Note: This trick works on photos only.

Step 1: Open WhatsApp web in your choice of browser. Link your device if needed.

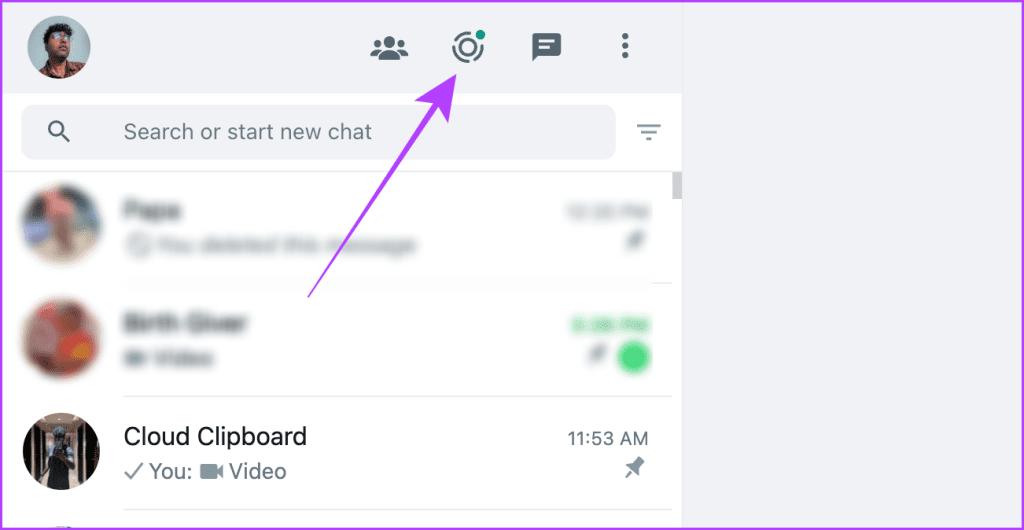
Step 2: Click the Status icon.

Access Status on WhatsApp Web

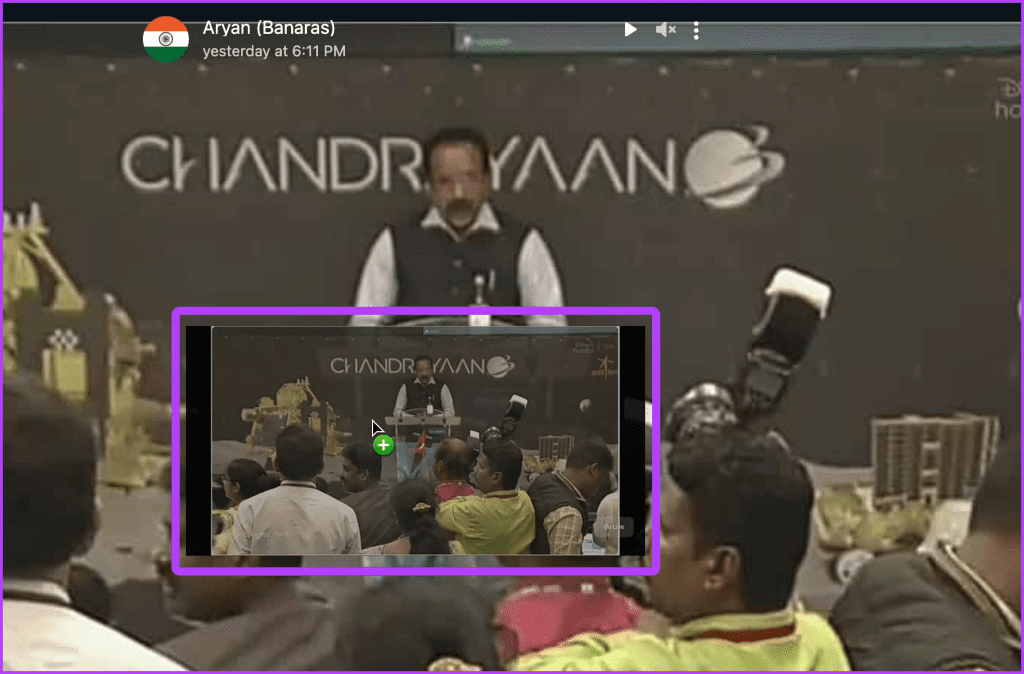
Step 3: Tap on the contact whose status you want to download to view it in full screen.

Open Status in Full Screen on WhatsApp Web

Step 4: Now, click the image and drag and drop it to your desktop or desired folder to download and save the image.

Drag and Drop on WhatsApp Status

Method 4. Use a Third-party App (Android)

Note: This method comes with an associated risk of data breach. Since you’ll have to give the app access to your WhatsApp, proceed only if necessary.

WhatsApp on Android also allows you to download status using a third-party app. While several apps are available, we will use Status Saver. Let’s look at the steps:

Step 1: Download and install the Status Saver. Tap Ok and grant permission to the app.

Grant Permission to the Status Saver App

Step 2: In the next window, tap Use this folder and Allow to set up the app properly.

Step 3: All statuses viewed by you will now appear in the app. Tap the status you want to download to open it on the full screen.

Step 4: Tap the download button to initiate the download.

Download WhatsApp Status using Third Party App

If prompted, allow the app permission to access photos and media. Once done, the app will save all selected statuses to your device.

Was this helpful?

Thanks for your feedback!

Top 8 Ways to Fix Messenger Search in Conversation Not Working on Android and iPhone

As your Messenger conversations grow and the number of messages increases, it can be quite difficult to find specific messages during a conversation. Fortunately, Messenger lets you to search for messages within your chats. However, Messenger’s ‘search in conversation’ feature can sometimes doesn’t show any results and stops working on your Android or iPhone.

Top Ways to Fix Messenger Search in Conversation Not Working on Android and iPhone

Luckily, you don’t need to scroll through your Messenger conversations to find specific messages. This guide packs solutions to restore messages search in a Messenger chat on your Android or iPhone.

1. Close and Reopen the App

When an app like Messenger misbehaves, you may restart the app. This allows your Android or iPhone to terminate all the app-related processes and start them again, effectively resolving any temporary issues.

To close Messenger on Android, long-press on its app icon and tap the info icon from the resulting menu. Then, tap the Force stop option at the bottom-right corner.

To close Messenger on an iPhone, bring up the app switcher by swiping up from the bottom of the screen (or double-tapping the Home Screen button). Locate the Messenger card and swipe up on it to close the app.

Force Close Messenger on iPhone

2. Rule Out Issues With Your Internet

The Messenger app may have trouble searching your conversations if your internet connection isn’t working properly. You can run a quick internet speed test on your phone to see if there is a problem with your network connection.

If the internet seems to be working, continue with the fixes below.

3. Search Your Secret Conversations

Facebook Messenger offers a secret conversation feature that provides end-to-end encryption for your chats. Since Messenger stores these secret conversations separately, they do not appear in the search results when you use the search function in regular conversations.

You will need to locate the secret conversation with the recipient and use the following steps to search for your messages in the conversation.

Step 1: In the Messenger app, open the secret conversation where you want to search for messages. Then, tap the ‘i’ icon in the top right corner.

Step 2: Tap the ‘Search in conversation’ option.

Search in Conversation in Messenger

Step 3: Type the keyword in the text box to find the message.

4. The Message May Have Been Deleted

It’s possible that you or another member of the chat has deleted the message you are looking for. If Messenger cannot find a select few messages, there may be nothing wrong with the app. Since retrieving deleted messages in the Messenger app is impossible, you won’t be able to find them.

5. Sign Out and Sign Back In

Sometimes, issues with your account can cause Messenger’s ‘search in conversation’ feature to stop working on your Android or iPhone. You can try removing your account from the app and adding it back to see if that helps.

Step 1: Open the Messenger app on your phone. Tap the menu icon at the top-right corner and then tap the gear icon to visit the Settings menu.

Step 2: Tap the ‘See more in Account Centre’ option.

Meta Account Center Settings

Step 3: Under Account settings section, select the Password and security option. Then, select ‘Where you’re logged in’ from the following menu.

Step 4: Tap on ‘Select devices to log out.’ Then, select your device from the list and tap the Log Out button at the bottom. You can repeat the same for other devices, especially older ones that you no longer use.

Sign back into the Messenger app and check if you can search for messages.

6. Check if Messenger Is Down

There’s a chance that Facebook Messenger’s servers are having a rough day. If that’s the case, certain features like ‘search in conversation’ may not work in the Messenger app. You can visit a website like Downdetector to check if Messenger is down for others too.

Facebook Messenger Status in Downdetector

If others are reporting issues with Messenger, wait for Meta to fix the issue on its end before trying again.

7. Clear App Cache (Android)

Messenger saves temporary files locally on your Android. While this data is intended to be helpful, it can end up interfering with the app if it becomes corrupted. You clear the Messenger app cache on your Android to see if that restores normalcy.

Step 1: Long-press on the Messenger app icon and tap the info icon from the resulting menu.

Messenger App Info

Step 2: Go to Storage and tap the Clear cache option at the bottom.

8. Update the App

Using an outdated version of the Messenger app can also lead to such issues. So, if the above tips prove ineffective, head over to the Play Store (Android) or App Store (iPhone) to update the Messenger app and check if the ‘search in conversation’ feature works after that.

From Lost to Found

Messenger’s in-app search feature can be incredibly useful when locating important messages buried in long conversations. Hopefully, one of our tips has proven useful, and Messenger’s ‘search in conversation’ feature is working as before.

Was this helpful?

Thanks for your feedback!

7 Fixes for Telegram Not Working on Wi-Fi on iPhone and Android

Let’s look at the detailed solutions to fix Telegram not working on Wi-Fi on iPhone and Android.

Fix 1: Check the Data Settings on the Telegram App

The Telegram app gives you different options to limit data usage. Here’s how to check the same.

Step 1: Open Telegram and tap on the Settings icon at the bottom-right corner (iPhone).

For Android, tap the hamburger menu icon at the top-left corner and select Settings.

Step 2: Select Data and Storage. Then check all the data settings and ensure none has been disabled. You should also disable Use Less Data for Calls on Telegram.

Fix 2: Switch to a 5GHz Wi-Fi Network

Switching to a 5GHz frequency band will instantly improve your internet speed and you can conduct a speed test to confirm that your Internet Service Provider is not facing any downtime.

Fix 3: Disable Low Data Mode and Low Power Mode

For iPhone

Step 1: Open the Settings app on your iPhone and then tap on Wi-Fi.

Step 2: Tap on the ‘i’ icon next to your connected Wi-Fi network. Then turn off the toggle next to Low Data Mode.

Step 3: Go back and tap on Battery in the Settings app. Then turn off the toggle next to Low Power Mode.

For Android

Step 1: Open the Settings app on your Android phone and then tap on Network and Internet.

Step 2: Select Internet. Then tap the Settings icon next to your connected Wi-Fi network.

Step 3: Tap Network Usage and check if it has been set to Detect Automatically.

Step 4: Go back and tap on Battery, select Battery Saver, and ensure the feature has been disabled.

Fix 4: Disable Unrestricted Data Usage (Android)

If you have an Android phone and have enabled Data Saver, you should check if unrestricted data usage has been enabled for Telegram. Here’s how.

Step 1: Long-press the Telegram app icon and tap on App Info. Then tap on Mobile Data and Wi-Fi. Tap the toggle next to Unrestricted Data Usage to enable this feature.

Step 2: Close App Info and open Telegram to check if the problem is solved.

Fix 5: Enable Background App Refresh (iPhone)

To resume your Telegram downloads while the app runs in the background, you should check if you have enabled this feature for the app.

Step 1: Open the Settings app on your iPhone and then tap on Telegram. Tap the toggle next to Background App Refresh to enable the feature.

Step 2: Close Settings and open Telegram to check if the problem is solved.

Fix 6: Switch to Public DNS Service

Sometimes, you might experience connection errors on the default DNS server provided by your Internet Service Provider. In such a case, we suggest switching to a Public DNS service like Google DNS or Open DNS.

Read our post on how to change the DNS server on Android and iPhone to facilitate this.

Fix 7: Clear Telegram Cache

Every app collects cache data over a period to store information that improves app performance and reduces loading times. However, the app cache can get corrupted, leading to issues like this one.

Step 1: Open Telegram and tap on the Settings icon at the bottom-right corner (iPhone).

For Android, tap the hamburger menu icon at the top-left corner and select Settings.

Step 2: Tap on Data and Storage and then select Storage Usage.

Step 3: Tap on Clear Entire Cache.

The last resort is to update the version of Telegram on your iPhone or Android to eliminate bugs or glitches that may be causing this issue.

Was this helpful?

Thanks for your feedback!

10 Best Wear OS Apps to Improve Your Smartwatch Experience

Smartwatches have become ubiquitous, mainly due to their availability at various price points. You can find budget smartwatches for a few hundred dollars or premium ones that can record an ECG. While most of these watches offer a ton of functionality, Wear OS smartwatches take it to the next level by letting you download apps from the Play Store. So, if you recently picked up an Android smartwatch, we’ve made a list of the best Wear OS apps to take its full advantage.

Best_Wear_OS_Apps_to_Improve_Your_Smartwatch_Experience

And no, we won’t mention apps like Strava or Google Fit because activity tracking is a basic feature on every smartwatch. Instead, we’ve come up with a list of cool Wear OS apps that extend the functionality of your smartwatch beyond fitness.

So, for times when you’re not running or hiking, these apps will let you maximize the potential of your Wear OS smartwatch. Let’s get to them now.

Note: All apps mentioned in this list are free. However, they may contain in-app purchases.

1. Samsung Internet Browser: Best Browser for Wear OS

Browsing on a tiny circular display may not be the most exciting idea. However, there may be times when you quickly want to glance at some information. The Samsung Internet Browser lets you do that without pulling your phone out.

The interface is optimized for a smartwatch screen, so you won’t have to use a magnifying glass to navigate around. You can set bookmarks or access your phone’s bookmarks directly on the watch. Moreover, sites like YouTube also load fine, so for whatever reason, if you want to watch a video on your wrist, you can.

It’s a handy app to have on your watch even if you won’t use it every day.

2. WhatsApp Messenger: Best Messaging App for Wear OS

Meta recently introduced WhatsApp for Wear OS, allowing users to send and receive messages directly via their smartwatch. Despite the app being rather popular, we mentioned it because WhatsApp for Wear OS allows you to initiate conversations without your phone.

So, if you’re in a position where you can’t pull out your phone but want to send an important message, WhatsApp comes in handy. The interface is smooth, and you can view your chats with all your contacts on your wrist.

If you don’t want to send SMS texts using the Messages app for Wear OS, you can choose to use WhatsApp.

3. TickTick: Best To-Do List App

A smartwatch is an excellent tool for creating to-do lists on the go. Let’s say you’re working and suddenly remember adding milk to your grocery list. You can do that using TickTick straight from your watch instead of reaching out for your phone and getting distracted.

TickTick can also be used to set reminders. At a particular date and time that you’ve set, the app will notify you on your wrist, along with the required message. You can then mark the task as complete from your watch itself.

If you often create checklists or set reminders for tasks throughout the day, TickTick is a must-have.

4. Seven: Best Quick Workout App

Let’s face it. Many of us want to get fitter but are too lazy to work out. Or you may not have sufficient time to visit the gym every day. Seven is targeted at this specific demographic. As the name suggests, the app gives you a workout routine spanning just seven minutes.

Set your goals and workout intensity in the app, and Seven curates a routine for you. Then, at a set time every day at your convenience, the app sends you a gentle reminder on your wrist to work out. When you start working out, you can see prompts to aid you with your exercise right on your wrist.

Here’s a personal anecdote — my goal was to lose weight, and I lost 3Kg in a month simply by working out for seven minutes daily!

5. Facer: Best Watch Face Customization App

Most Wear OS watches come with many watch face options right out of the box. But, if you don’t like any of them, Wear OS allows you to set third-party watch faces — unlike a fruity competitor.

Facer — along with offering several new watch faces — allows you to customize and create your watch face. So, whether you want an analog clock to replicate a classy Rolex or a digital lookalike of a G-Shock, all the tools are at your disposal.

Browse the thousands of watch faces and pick the one you like. In fact, you can download several watch faces and switch between them depending on the occasion.

6. Velocity GPS Dashboard: Speedometer for Wear OS

Whether walking, running, or traveling by public transport, you may have wondered what speed you’re moving at. Velocity Dashboard tells you exactly that — straight on your wrist. The app uses the built-in GPS module in your smartwatch to calculate your speed based on distance and time.

Apart from this, it also has a journey recorded, so if you want to track your runs, the app lets you do that as well. I use the app when cycling to check my speed since my bike has no speedometer. It’s also fun to check your speed using the app when traveling by train or before takeoff on a flight!

7. Infinity Loop: Best Game for Wear OS

There are many games for Wear OS, so your watch can keep you occupied if you’re stuck in a boring meeting. While it’s difficult to pick one game to recommend, Infinity Loop takes the cake, thanks to its minimalistic interface and logical gameplay.

While keeping you entertained, Infinity Loop also keeps your brain at work since you’re constantly solving tricky puzzles. At the beginning of each round, you’re given a random pattern. You need to rotate the patterns to form closed loops or circles. Trust me, this article was delayed by 30 minutes because I was hooked on to the game when testing it out!

8. Water Tracker: Best App to Track Your Daily Water Intake

It is recommended for adults to consume 2-3L of water daily. Before we move further, ask yourself if you meet this goal regularly. If not, it’s time to download Water Tracker. As the name suggests, Water Tracker lets you log your daily water intake throughout the day.

Every time you drink a glass of water, tap the ‘+’ icon in the app on your smartwatch. Do this until you meet the recommended goal. Now, the thing is, most of us forget to drink water at regular intervals since we’re involved in work. To tackle this, Water Tracker also reminds you at a set interval to get hydrated.

If you think you don’t drink enough water, you need to install Water Tracker on your smartwatch.

9. Wear Casts: Best Podcast App for Wear OS

Several users prefer leaving their phones behind for running or workouts. In such cases, you can stream music on your smartwatch using apps like Spotify or YouTube Music on Wear OS. But what if you listen to podcasts instead of music? Enter Wear Casts.

The app allows you to sync your favorite podcasts to your smartwatch. This way, you can listen to them even when you’re not around your phone. Podcasts from all popular platforms, like Google Podcasts, Apple Podcasts, Spotify, etc., are available on the app. While the app is handy, we wish the UI was more modern and refined.

10. Shazam: Recognize Music on Your Smartwatch

How many times have you heard a song on the radio or in a restaurant and wondered which song it is later on? Thanks to Shazam, you won’t have to live in the regret of not listening to those catchy beats again. While Shazam can be used on your phone, using it on your smartwatch is much more convenient.

You don’t have to pull out your smartphone when listening to a song. Simply fire up the app on your wrist, and it will automatically start listening for any audio playing around you. A few seconds later, you can see the song’s name along with the album and artist.

FAQs About Cool Wear OS Apps

1. Can I use Wear OS apps without being connected to my smartphone?

Yes, you can use most of the apps mentioned above without being tethered to your smartphone. In fact, if you have a cellular smartwatch, you can make calls and use apps that require an internet connection without your smartphone on you.

2. Which is the best Wear OS smartwatch to buy?

Unfortunately, it’s hard to recommend a smartwatch that fits everyone’s needs. You can look at our smartwatch recommendations across various categories and pick the one that’s best suited to your needs

3. Can I sideload Android apps on a Wear OS smartwatch?

You can, in fact, sideload and install APK files on Wear OS smartwatches. However, ensure you download the right version of the app before installing it.

Get the Most Out of Your Smartwatch

A smartwatch is more than a fitness tracker. By downloading a few of the best Wear OS apps from the list above, you can improve the functionality of your smartwatch by multiple folds. What’s your favorite Wear OS app, and why? Let us know in the comments below, and we’ll add it to the list.

Was this helpful?

Thanks for your feedback!

WhatsApp Mute vs. Archive: Understand the Differences

What Is Mute on WhatsApp

Muting someone on WhatsApp stops message notifications from them. You can mute a conversation for 8 hours, a week, or Always.

How to Mute a Conversation on WhatsApp

On Android

Tap and Hold a conversation you want to mute. You can also select multiple chat threads. Tap the mute icon at the top and select 8 hours, 1 week, or always.

On iPhone

Swipe left on a chat, tap on More, and select Mute. Tap to choose 8 hours, 1 week, or Always.

When you mute a WhatsApp group, the app only sends a notification if you are mentioned during a conversation. You can always unmute a conversation using the same steps above.

What Is Archive on WhatsApp

When you archive a conversation, it doesn’t appear in the Chats tab but keeps it hidden inside the Archived section.

How to Archive a Chat on WhatsApp

  • On Android: Tap and hold a Conversation > tap the Archive icon at the top.
  • On iPhone: Swipe left on a conversation > select Archive.

This hides the conversation under the Archived menu on top of all chats.

By default, you will not receive notifications for new messages in archived conversations, and they will remain hidden.

To change these settings, go to Chat settings in WhatsApp and turn off Keep Chats Archived.

Note: When you mute or archive a chat, WhatsApp only silences or hides incoming messages. If the person calls you on WhatsApp, your phone rings with a full-size calling banner. Further, the app doesn’t notify the person when you mute or archive a conversation.

Was this helpful?

Thanks for your feedback!

5 Ways to Fix Spell Check Not Working in Gmail

Fix 1: Make Sure Spell Check Is Enabled

This may seem obvious, but it’s worth double-checking that you haven’t accidentally turned off the spell check feature in Gmail. Here’s how to do it.

Step 1: Open your browser and navigate to Gmail.

Step 2: Click the gear-shaped icon in the top right corner and select See all settings.

Open Gmail Settings

Step 3: Under the General tab, select the following options: Grammar suggestions on, Spelling suggestions on, and Autocorrect on.

Enable Spell Check in Gmail

Step 4: Scroll down to click the Save Changes button.

Save Gmail Settings

Fix 2: Run Spell Check Manually

Another thing you can do is run the spell check feature manually in Gmail. To do so, open Gmail in your browser, click the Compose button, and type in a few misspelled words. Then, click the three-dot icon at the bottom and select the Check spelling option.

Run Gmail Spell Check Manually

Fix 3: Check if Spell Check Is Available in Your Language

Although Gmail’s spell check feature supports various popular languages like English, Spanish, German, Italian, Hindi, and more, it does not cover every language. You need to make sure that Gmail’s spell-check feature supports the language you are writing in.

Step 1: Open Gmail in your browser, compose a new message, and deliberately type a few misspelled words. Click the three-dot menu at the bottom and select the Check spelling option.

Step 2: Click the down arrow next to Re-check to view a list of supported languages.

Check Supported Spell Check Languages in Gmail

Fix 4: Enable Spell Check in Your Browser

If the spell check feature in Gmail is still not working properly, you can try enabling the spell check feature in your browser to see if that resolves the issue.

If you’re using Chrome, type chrome://settings/languages in the URL bar and press Enter. Then, enable the toggle next to Check for spelling errors when you type text on web pages.

Enable Spell Check in Chrome

For those using Edge, type edge://settings/languages in the address bar at the top and press Enter. Then, enable the toggle next to Enable grammar and spellcheck assistance.

Enable Spell Check in Edge

Fix 5: Use Incognito Mode

Gmail’s spell check feature in incognito mode can help you verify whether a third-party browser extension is causing the problem. Click the three-dot menu icon and select New incognito window.

Open Incognito Window in Chrome

Head over to Gmail, sign in with your account, and try using the spell check feature again. If it works fine, one of your extensions is responsible for the issue. To find it, you will need to disable all the extensions and re-enable them one at a time.

Type chrome://extensions (Chrome) edge://extensions (Edge) in the address bar at the top and press Enter. Turn off the toggles next to the extensions to disable them.

Disable Extensions in Chrome

Restart your browser after this and re-enable your extensions one by one. You will need to test Gmail’s spell-check feature after enabling each extension. Once you find the problematic extension, consider removing it.

Was this helpful?

Thanks for your feedback!

macOS Sonoma vs macOS Ventura: What’s the Difference

As of writing this post, Apple has released the macOS Sonoma Public Beta for all users who want to try out the new Mac software upgrade. Like old times, you can expect its stable release in the month of September.

Suppose you plan to upgrade from macOS Ventura but are unsure about the difference between macOS Sonoma vs macOS Ventura. In that case, this post will list the best new features you can expect with the latest macOS version.

Before moving ahead with the new features and helping you decide whether macOS Sonoma is better than macOS Ventura, here’s the list of Mac and iMac models that support the macOS Sonoma update:

  • iMac 2019 or later
  • Mac Pro 2019 or later
  • iMac Pro 2017 or later
  • Mac Studio 2022 or later
  • MacBook Air 2018 or later
  • Mac mini 2018 or later
  • MacBook Pro 2018 or later

1. Desktop Widgets

Just like on your iPhone and iPad, you can now place Widgets on the Desktop of your Mac. In previous macOS versions, you had to rely on the Notification Center to check app notifications on your Mac. But now you can just drag those apps straight to your Mac Desktop. You will be able to use the widgets of your iPhone apps as well. Here’s how.

Step 1: Right-click on your Mac Desktop and click on Edit Widgets.

edit widgets mac desktop

You will see all the app widgets appear on your Mac screen. You can see the apps that are installed on your iPhone on the left side.

widgets desktop mac sonoma

Step 2: Scroll down to select your widget and click the Plus icon to add your widget to the Desktop.

add widget to desktop macOS sonoma

The widget will appear on your Mac. When you open an app window or use Stage Manager, your Desktop widget will fade a bit so to avoid distractions.

desktop widgets macOS Sonoma

You can right-click on the Desktop widget to change the size of your widget or remove it. Do note that using too many Desktop Widgets can impact the battery life of your Mac.

edit desktop widget macOS sonoma

2. Presenter Overlay

The next feature that will improve your presentations during video calls on apps like FaceTime and Zoom is Presenter Overlay. After you share your screen during a video call, you as a Presenter, will be put in the foreground, and your shared screens will appear between you or in the background. The participants on your call can share their thoughts or reactions using hand gestures. But this will apply if you are use Continuity Camera from your iPhone during the video call.

presenter overlay macOS sonoma

3. Game Mode

If you like to give yourself a break from work by playing games on your Mac, the new macOS Sonoma update offers a new Game Mode to improve your experience. Available on Macs or iMac models running on Apple M-series chips, the Game Mode will enhance CPU and GPU usage while reducing the usage of background tasks on your Mac. You can enjoy a better gaming experience, especially while playing graphic-heavy titles like Resident Evil Village on your Mac. If you have connected game controllers or your AirPods during gameplay, the Game Mode will also reduce latency for better responsiveness.

4. Profiles in Safari

Just like Tab Groups in Safari, the new macOS Sonoma update lets you create separate Profiles in Safari on your Mac. Creating a Safari Profile will separate your search history, Extensions, Tab Groups, Cookies, and Favorites. If you like browsing and saving web content on different topics, you can create separate Safari Profiles based on those topics of your interest. Refer our post on how to create Safari Profiles on your Mac.

create a new profile in Safari

5. Improved Private Browsing Experience

Safari has received a few more improvements in terms of Private Browsing. After installing the update, your Private Browsing windows will lock automatically if left unused for a certain period. macOS Sonoma will also completely block trackers from loading pages. Here’s how to enable Touch ID to unlock locked Private Browsing windows.

Step 1: Press Command + Spacebar keyboard shortcut to open Spotlight Search, type Safari, and press Return.

open safari on mac

Step 2: Click on File at the top-left corner and select Settings.

settings safari mac

Step 3: Click on Privacy.

Step 4: Enable the option for Require Touch ID to View Locked Tabs.

require touch id to view locked tabs mac

6. Web Apps In Safari

What if you could make an app for your favorite website and keep it in the Dock on your Mac? With macOS Sonoma, you can do that by creating Web Apps in Safari. Here’s how you can use this feature.

Step 1: Press Command + Spacebar keyboard shortcut to open Spotlight Search, type Safari, and press Return.

open safari on mac

Step 2: Open any website of your choice. For this post, let us take the example of Guiding Tech.

Step 3: Click on File at the top-left corner.

file safari mac

Step 4: Select Add To Dock from the list of options.

add to dock web apps safari mac

The website will be added as a Web App on the Dock.

web app mac dock

7. Location Sharing in Messages App

After the new macOS update, you can share your live location using the Messages app on your Mac. This feature was accessible in macOS Ventura by using Find My Mac. But now you can use the Messages app.

Step 1: Press Command + Spacebar to open Spotlight Search, type Messages, and press Return.

open messages on mac

Step 2: Select the contact with whom you want to share your location.

Step 3: Click the ‘i’ next to the contact name in the top-right corner.

more info contact messages app mac

Step 4: Select Share My Location.

share my location messages app mac

Step 5: Select the duration you want to share your location.

8. Open PDF Files in the Notes App

If you wish to annotate or autofill your PDF files on your Mac, you can do it in the Notes app. You can also flip the pages of your PDF files and use information from your contacts to autofill PDFs in the Notes app itself. You don’t need a separate PDF editor now for your Mac. Copy and paste a PDF file into the Notes app to use all the features.

open pdf in notes app mac

9. Password and Passkey Sharing

With Sonoma, you can select a group of contacts with whom you want to share your passwords and passkey. This is a function of iCloud Keychain that enabled password and passkey sharing with trusted contacts. Here’s how to set it up using your Mac.

Step 1: Press Command + Spacebar keyboard shortcut to open Spotlight Search, type System Settings, and press Return.

open system settings mac

Step 2: Scroll down and click on Passwords from the left menu.

passwords settings mac

Step 3: Authenticate using Touch ID or enter your password to proceed.

Step 4: Click on Get Started below Password and Passkey Sharing.

get started password and passkey sharing mac

Step 5: Click on Continue at the bottom right side.

continue password and passkey sharing Mac

Step 6: Click on Add People to add your trusted contacts.

add people shared group passkey sharing mac

Step 7: Enter the name of your contact and click on Add.

add people to passkey group mac

Step 8: Add a name for your group of contacts and click on Create.

create group to share passkey Mac

10. Improved Autocorrect and Predictive Text

While quickly typing a message or preparing a document, it is common to make spelling or grammatical errors. Now with macOS Sonoma, you will experience improved Autocorrect. Inline Predictive Text will prevent a typing error and suggest a group of words to complete your sentences by guessing what you would most likely want to type next. If the suggested text is correct, press the Spacebar to complete your sentence. It is enabled by default and is initially available for the Notes App, Mail App, and TextEdit. But it is intended to be system-wide.

11. Lockdown Mode

Lockdown Mode was introduced with macOS Ventura and has now been updated with macOS Sonoma. You can enable it to protect your Mac from cyber attacks that can harm the privacy of your data. With the new software update, Lockdown Mode provides improved security to protect you from sophisticated cyber attacks. You can read our post to learn how to enable Lockdown Mode on your Mac.

enable lockdown mode

Upgrade to a New Software Experience

These new features should help you decide what’s new in macOS Sonoma vs macOS Ventura. But in case you can’t install the new software version, you can still download the official macOS Sonoma wallpapers in 4K.

Was this helpful?

Thanks for your feedback!

6 Ways to Turn off Camera Sound on iPhone

Things to Consider Before Turning Off iPhone’s Camera Shutter Sound

Let us quickly look at a few things you should consider before we proceed with the task at hand and turn off the camera shutter sounds for your iPhone.

  • Due to privacy and safety reasons, devices sold in countries like Japan, South Korea, and the United Arab Emirates don’t have the option to disable camera shutter sounds. Trying to circumvent this rule might land you in legal trouble.
  • Because disabling the shutter sound makes taking a picture silent, you should always inform the other party when taking a picture. This is especially true if you’re taking pictures of other people, known or unknown, in a public space.
  • You might accidentally enable the camera sound. So, before taking any picture, always double-check and see if the shutter sound is off.
  • Muting your device will turn off all sounds. So, re-enable them once the relevant pictures have been taken.

How to Disable Camera Click Sound on iPhone

With that out of the way, let us look at 6 workarounds to turn off the camera-click sound on your iPhone.

Method 1: Using Live Photos (Without Muting)

Using the Live Photo mode is one of the easiest ways to disable camera-click sound. To do this, open the Camera app and ensure Live Photo is enabled. Once you take a photo using Live Photos, your device records a short 3-second video. Scroll through the frames and select the perfect one.

Method 2: Using the Silent Switch on iPhone

You can use the ring/silent switch to disable the iPhone camera sound. Push this mute switch to silent (it will show orange). This will also silence all the notifications on your iPhone. So, be sure to pull the switch again after clicking the picture.

Method 3: Using Volume Slider

You can move the volume slider to zero on your iPhone to turn off system volume. This will turn off the camera shutter noise as well. To do this, open the Control Center and pull down the volume slider till the end. Now, take a picture without worrying about the shutter camera sound.

Method 4: Using Picture Feature While Recording

Besides taking photos using the Photos tab, you can also take photos while recording a video using the Camera app. To do this, open the Camera app, start recording, and use the camera option to take a picture without any sound. Here’s how to do it.

Step 1: Open the Camera app and select Video. Tap the record button to start the video recording.

Step 2: Tap the camera button to take pictures while the recording is ongoing. End the recording once done.

Use Video to take photo

Method 5: Connecting iPhone to Earphones

Pairing your iPhone with your Bluetooth earphones can not only enhance your overall audio experience but also silence the shutter sound when taking pictures. You will, however, still hear the shutter sound in your connected earphones. To do this, enable Bluetooth on your iPhone and follow the below steps.

Step 1: Open Settings and tap on Bluetooth. Tap on the relevant device.

Connect iPhone to Bluetooth Device

Once connected, open the Camera app and take pictures without the shutter sound. You can also check out our article if Bluetooth is not working on your iPhone.

Method 6: Setting up Automation

As the name suggests, Automation helps automate processes on your device. This can be anything from enabling grayscale at a specific time to automatically lowering the device volume whenever a particular app is opened. This way, you can automatically disable the camera-click sound. Here’s how to set it up.

Step 1: Open the Shortcuts app and tap on Automation. Tap on Create Personal Automation.

Set up personal Automation

Step 2: Tap on App and ensure the Is Opened option is selected. Tap on Choose.

Select Automation type

Step 3: Use the search bar and select the Camera app. Tap on Next.

Select Camera for Automation

Step 4: Tap on Add Action. Use the search bar to find and select Set Volume.

Add Action for Automation

Step 5: Tap on the volume percentage. Use the slider to set the volume to 0. Tap on Next.

Set Volume to 0

Step 6: Turn off the Ask Before Running toggle. Check the automation details and tap on Done.

Create new Automation

This will create the Automation. Now, whenever you open the Camera app, the device volume will go to the set levels, turning off the shutter sound.

Tip: If the created shortcut is not running, check our guide on fixing Automation not working in Shortcuts app on iPhone

FAQs

1. Can you re-enable camera sounds on iPhone?

Yes, you can always turn on the iPhone camera shutter sound again. To do that, follow the above methods and increase the sound or turn off mute/silent mode on your device.

2. Does turning off camera sounds turn off screenshot sounds as well?

Setting the device on silent or connecting it to Bluetooth earphones will disable the screenshot sounds via your device’s speaker.

Was this helpful?

Thanks for your feedback!

4 Ways to Add Audio to Video on iPhone

Method 1: Use the Photos App

The default Photos app lets you create a memory with several photos and videos. After you create a memory, add one of the built-in audio tracks or pick one from Apple Music.

Step 1: Open the Photos app on your iPhone. Select photos and videos on the default Library tab.

Step 2: Tap the Share icon at the bottom > select Add to Album > tap New Album. Give it a relevant name and tap Save.

Step 3: Go to Albums > select your newly created album. Tap the three dots menu at the top and select Play Memory Video.

Step 4: The Photos app starts playing a memory. Tap the music icon.

Step 5: Check the current audio track. Select the music icon and add your preferred soundtrack from the following menu.

When you select a song from the Apple Music library, it requires an active subscription to the music streaming service.

Step 6: Tap the share icon at the top-right corner and select Save Video.

Method 2: Use iMovie

iMovie is a professional tool to create beautiful movies like never before. The app is available on iPhone, iPad, and Mac, and it’s free to download and use.

Step 1: Install and open iMovie and select Movie under the Start New Project menu.

Step 2: Select videos and photos and tap Create Movie at the bottom. Tap on the + icon.

Step 3: Select Audio. From the My Music menu, you can select a soundtrack, sound effect, or audio clip. Let’s select Soundtracks.

Step 4: Tap + beside an audio clip. iMovie adds the audio clip to your video. Tap the play button to check the preview and hit Done.

Step 5: Select the Share icon at the bottom and tap Save Video.

You can also add a voiceover to your photos and videos. Tap the + icon > select Voiceoverstart recording your audio to add it to the video. Also, check our article if you want to add a soundtrack to a video in iMovie on Mac.

Method 3: Use the Apple Clips App

While iMovie is geared towards professionals, Apple offers a consumer-friendly Clips app for creating fun videos on the go. The app allows you to add different effects, dynamic music, emojis, stickers, and more to your video for free.

Step 1: Install and open the Clips app > tap the gallery icon > open Photos > select a video.

Step 2: Tap Add to add it to the project.

Step 3: Select your video > tap Mute to remove the current sound > tap the music icon at the top.

You can add one of the built-in soundtracks or pick one from the My Music section. Once you select a soundtrack, tap the play icon and check it in action with your video. Tap Done.

Step 4: Tap the share icon at the bottom right > select Save Video.

Launch the Photos app and find your edited video with audio clips.

Method 4: Use Adobe Premier Rush

Speaking of adding audio to video, how can we leave Adobe Premier Rush from the list? It’s one of the best third-party video editor apps for iPhone.

Step 1: Download and open the Adobe Premier Rush app on your iPhone. Tap Create a new project > select a video from the following menu.

Step 2: After importing a video in Premier Rush, select Audio at the bottom. You can mute the audio and tap Browse.

Step 3: Select an audio track and tap Add.

Note: Some soundtracks require a subscription, and you can’t import an audio clip from your iPhone

After you are satisfied with the output, tap Share at the top > check the estimated video size > hit Export.

Was this helpful?

Thanks for your feedback!

4 Quick Ways to Check Hardware ID (HWID) of a Device in Windows 11

Method 1: Using Device Manager

The easiest way to find the Hardware ID (HWID) is by using the Device Manager. It contains the complete information on all the devices. Here’s how to do it:

Step 1: Right-click on the Start button to open the Power User menu. Locate the Device Manager option and click on it to launch the utility.

Power User menu

Step 2: Scroll down to locate the device in the list and right-click on it. Select the Properties option from the context menu.

Check Hardware ID Using Device Manager

Step 3: Switch to the Details tab.

Check Hardware ID Using Device Manager

Step 4: Click on the drop-down list below the Property option. Select the Hardware IDs from the list.

Check Hardware ID Using Device Manager

Step 5: Under the Value section, you will see all the Hardware IDs associated with the device.

Check Hardware ID Using Device Manager

Step 6: If you want to copy the HWID, right-click on a value and select the Copy option.

Check Hardware ID Using Device Manager

Method 2: Using Command Prompt

If the Device Manager is not working on your PC, you can use the Command Prompt to find the Hardware ID of any device. Repeat the following steps:

Step 1: Press the Windows key to open the Start Menu. Type cmd in the search box and press the Control + Shift + Enter keyboard shortcut.

open cmd as admin

Step 2: The User Account Control window will launch. Click on the Yes button to open the Command Prompt with administrator privileges.

user account control window

Step 3: Type the following command and press Enter:

DISM /Online /Get-Drivers /all /Format:Table > C:\a.txt
Check Hardware ID using cmd

Step 4: The above command will create a text file containing the driver details. We purposely did it because the list is long and difficult to navigate in the Command Prompt window.

Step 5: Press the Windows + E keyboard shortcut to open the File Explorer. Navigate to the C drive and then open the newly created text file.

Check Hardware ID using cmd

Step 6: Copy the Published Name of a device. The command to find the Hardware ID using the Published Name is:

DISM /Online /Get-DriverInfo /Driver:Published Name

Step 7: Replace the Published Name part of the command with the text you copied from the file. Our final command looks like this:

DISM /Online /Get-DriverInfo /Driver:oem77.inf

Step 8: Execute the command by pressing Enter and it will generate the HWID of the device.

Step 9: Close the Command Prompt window.

Check Hardware ID using cmd 3

Method 3: Using PowerShell

You can even use the Get-PnPDevice cmdlet in PowerShell to search for the Hardware ID of a device. Here’s how to do it:

Step 1: Press the Windows key to open the Start Menu. Type powershell in the search box and press the Control + Shift + Enter keyboard shortcut simultaneously.

open powershell as admin

Step 2: The User Account Control window will launch. Click on the Yes button to open the PowerShell with administrator privileges.

user account control window

Step 3: Type the following command and press Enter:

Get-PnpDevice -PresentOnly | Sort-Object -Property "Class" | Format-Table -AutoSize > D:\ID.txt
Check Hardware ID using Using Powershell

Step 4: Like the previous method, the above command will save the results to a text file in the D drive. We purposely did it because the results won’t be completely visible in the PowerShell window.

Check Hardware ID using Using Powershell 2

Step 5: Copy the Instance ID of the device from the text file. The command to check the Hardware ID using the Instance ID is:

Get-PnpDeviceProperty -InstanceId "Instance Id" | Format-Table -AutoSize

Step 6: Replace the text inside the “Instance Id” part with the ID you copied from the text file. The final command will look something like this:

Get-PnpDeviceProperty -InstanceId "USB\VID_13D3&PID_3563&MI_00\7&1D754FA2&0&0000" | Format-Table -AutoSize > D:\HWID.txt
Check Hardware ID using Using Powershell 3

Step 7: The above command will export the results to a file called HWID on the D drive. Open the file and find the ‘DEVPKEY_Device_HardwareIds’ entry in the KeyName column. The corresponding value in the data column in the Hardware ID of the device.

Check Hardware ID using Using Powershell 4

Method 4: Using Microsoft’s Windows Drivers Kit

Microsoft offers a tool with the Windows Driver Kit (WDK) that you can use to check the Hardware IDs of devices on your PC. Since the Windows Device Console tool isn’t included with Windows 11, you must download and install the Windows Drivers Kit (WDK) to access the tool on your PC. Here’s how to do it:

Step 1: Download and install the Windows 11 WDK.

Step 2: Press the Windows + E keyboard shortcut to open the File Explorer.

Step 4: Go to the address bar at the top, paste the following path, and press Enter:

C:\Program Files (x86)\Windows Kits\10\Tools\10.0.22621.0\x64
Check Hardware ID using Using Windows Drivers Kit

Step 5: Right-click in the File Explorer window and click on the Open in Terminal option.

Check Hardware ID using Using Windows Drivers Kit

Step 6: Type the following command in the Terminal and press Enter:

devcon hwids * > D:\HWID.txt
Check Hardware ID using Using Windows Drivers Kit

Step 7: Like the previous methods, we have saved the command output to a text file for ease of usage. Open the file and see the Device Name and their Hardware IDs.

Check Hardware ID using Using Windows Drivers Kit

Was this helpful?

Thanks for your feedback!

Can’t Turn on Windows Firewall? Here Is the Fix

Try Basic Fixes

  • Disable third-party antivirus programs: Third-party antivirus programs on your PC can sometimes interfere with the Windows Firewall and prevent it from working correctly. Temporarily disable your antivirus program and turn on the Windows Firewall again.
  • Scan for malware: Your PC may be infected with malware. To overrule this possibility, scan your PC for malware with Windows Defender to check if that is the case.

Fix 1: Download and Run the Windows Firewall Troubleshooter

Microsoft offers a dedicated troubleshooter for identifying and fixing issues related to the Windows Firewall. Since it does not come baked into Windows, you must download the Windows Firewall Troubleshooter first.

Double-click the downloaded file and click Next to run the troubleshooter. Wait for the troubleshooter to run, then check if you can enable the firewall.

Run Windows Firewall

Fix 2: Run the SFC and DISM Scans

Sometimes, problems with your PC’s system files can disrupt Windows processes and prevent you from turning on the firewall. Running the SFC (System File Checker) and DISM (Deployment Image Servicing and Management) scans can help you replace problematic system files with their cached versions.

Step 1: Press the Windows + S keyboard shortcut to open the search menu. Type terminal in the search box, right-click on the first result, and select Run as administrator.

Open Terminal as Admin

Step 2: Type the following command in the console and press Enter to run the SFC scan:

SFC /scannow
SFC Scan on Windows 11

Step 3: Type the following commands one by one and press Enter after each command to run the DISM scan:

DISM /Online /Cleanup-Image /CheckHealth
DISM /Online /Cleanup-Image /ScanHealth
DISM /Online /Cleanup-Image /RestoreHealth
15 DISM Scan on Windows 11 8

This might take a while. After the scan is complete, restart your PC and check if the issue persists.

Fix 3: Reset Windows Firewall Settings

It’s possible that you can’t turn on the Windows Firewall due to misconfigured or corrupted settings. If that’s the case, resetting firewall settings should restore normalcy. Here’s how to do so.

Step 1: Click the search icon on the taskbar, type Windows Defender Firewall in the text box, and press Enter.

Open Windows Defender Firewall Settings

Step 2: Select Restore defaults from the left pane.

Restore Windows Firewall Settings

Step 3: Click on Restore defaults.

Restore Firewall on Windows

Step 4: Select Yes when the confirmation pop-up appears.

Confirm Reset Windows Firewall Settings

Fix 4: Edit Registry Files

Recent system-level changes may have messed up the registry settings on your PC. To rule out this possibility, check the registry entries related to the firewall and ensure that they are configured properly.

Step 1: Press the Windows + R keyboard shortcut to open the Run dialog box. Type regedit in the box and press Enter.

Step 2: Paste the following path in the address bar at the top and press Enter.

Computer\HKEY_LOCAL_MACHINE\SOFTWARE\Policies\Microsoft\Windows Defender

Step 3: If you see the DisableAntiSpyware DWORD in the right pane, right-click on it and select Delete. If there’s no such entry, you don’t need to worry.

Delete Registry DWORD

Step 4: Paste the following path in the address bar and press Enter. Right-click on the BFE key and select Permissions.

Computer\HKEY_LOCAL_MACHINE\SYSTEM\CurrentControlSet\Services\BFE
Registry Key Permissions

Step 5: Click on Add.

Modify Registry Key Permissions

Step 6: Type Everyone in the Enter the object names to select text field and click OK.

Change Registry Key Permissions

Step 7: Select Everyone under Group or user names and tick the Allow checkbox next to Full Control. Then, hit Apply, followed by OK.

Modify Registry Key Permissions on Windows

Restart your PC to apply the changes. Then, enable the firewall one more time.

Was this helpful?

Thanks for your feedback!

How to Fix Echo on iPhone During Voice Calls or FaceTime

We make or receive numerous calls daily. However, if you’ve recently noticed your voice bouncing back during these calls, you’re not the only one. Here are nine ways to help fix this echo on your iPhone during voice or FaceTime calls.

How to Fix Echo on iPhone During Voice Calls or Facetime

Before we troubleshoot the issue, you must check the speaker grills and receiver on your device. If you notice any dirt or debris, try cleaning it first. Additionally, eject and reinsert SIM card to fix any cellular issues. If the issue persists, keep reading.

Why Is My iPhone Echoing

There can be several reasons why your iPhone might be echoing. So, before we move on to fix this issue, let us first look at some of them briefly.

  • The area you’re placing the call from has poor reception. Or, your surrounding has too many objects that might disrupt the signal.
  • You have enabled Wi-Fi calling on your iPhone.
  • Your mobile case is blocking the speaker grill or receiver.
  • There is physical damage to your device’s speakers.
  • Your device’s software updates are pending.
  • A network setting on your device is causing your iPhone to echo during calls.
iPhone speaker crackling

Now that we have a better idea of why the iPhone echoes during calls, let’s proceed to fix this issue.

9 Ways to Fix iPhone Echoing During Calls

Let us now look at nine ways to fix iPhone echoing during voice calls or FaceTime. As long as it is not hardware damage, you can easily fix the issue following the below methods.

1. Check the Reception

When making calls, check the current signal strength using the antenna icon. You will face issues during calls if the signal bar falls below two or disappears completely. This can also cause the calls to cut off completely. When this happens, try moving around to see if the signal bar goes up.

Check the Reception

Additionally, check your surroundings for any disruptions. Concrete walls, too many network-based devices, or a lack of sound-absorbent materials in your surrounding can also cause signal issues or echoes during calls. To fix this, move to a different room or go outside. Then, place the call again to check.

If the echo doesn’t stop, move to the below-mentioned fixes.

2. Turn Off the Device Speaker and Back On

While turning on your device’s speaker can help increase the call volume, it can sometimes create an echo for the other user. This can also happen if the person on the other end of the call has their speaker on.

To check if this is the case, turn off your speaker and turn it back on. Here’s how.

Step 1: Open the call screen.

Step 2: Tap on the Speaker icon to turn it off.

Step 3: Now, tap on the Speaker icon again to turn it back on.

Turn Speaker Off During Call

Then, check and see if there are any echoes in your or the caller’s voice.

Also Read: How to fix iPhone speaker not working during calls

3. Switch to a Headset or Disconnect It

If there is damage to your device’s speaker grill or receiver and you cannot get it repaired immediately, connect your iPhone to Bluetooth headphones to receive calls. However, if your iPhone is already connected to a Bluetooth device, disconnect it to see if this resolves the issue.

Here’s how to do it.

Step 1: Open Settings and tap on Bluetooth.

Step 2: Here, tap on the relevant Bluetooth device.

Switch to a Bluetooth Device

Depending on your connection status, this will connect or disconnect the Bluetooth device from your iPhone.

4. Turn Off Wi-Fi Calling

Enabling Wi-Fi calling can help you make calls over your Wi-Fi, eliminating the low signal strength issue. However, it is also known to cause call disruptions like voice stuttering or echoing during voice calls.

When this happens, you can turn off Wi-Fi calling on your iPhone by following the below steps.

Step 1: Open the Settings menu.

Step 2: Scroll down and tap on Cellular/Mobile Data.

Step 3: Now, tap on ‘Wi-Fi Calling’.

Open Wi Fi Calling Settings

Step 4: Turn off the toggle for ‘Wi-Fi Calling on This iPhone’.

Turn Off Wi Fi Calling

Now, try placing the call again to see if the issue has been fixed.

5. Restart Background Apps

Clearing apps from running in the background stops all app processes. Then, once the apps are reopened, all the processes restart as well. This can help eliminate temporary issues or glitches. Do this if the voice echoes during calls using FaceTime, WhatsApp, or the Phone app.

Step 1: Swipe up from the bottom of the screen. Or, double-press the Home button.

Step 2: Now, go through the currently open background apps and swipe up to clear the relevant ones from the screen.

Force Close Background Apps

Once done, tap on the relevant app icon to reopen the app. Then, place a call, and once it connects, see if the echoing stops.

6. Update Carrier Settings

While it’s usually an automatic process, you can also manually check and install carrier settings updates. This will ensure your device has access to all the latest features and compatibility updates that can enhance your call experience.

It can also help fix certain carrier-related issues, like echo during calls. Follow the below steps to do it.

Step 1: Open Settings and tap on General.

Step 2: Here, tap on About.

Open Carrier Update Settings

If the carrier settings box pops up, tap on Update. Once the settings have been installed, restart your device and check again.

7. Update Your iPhone

Outdated devices can develop issues over time. This can also be one of the reasons why you’re facing echo issues. So, if your iPhone hasn’t been updated in a while, open the Settings menu and install those updates. Then, check and see if this fixes the iPhone echoing issues. Here’s how to do it.

Tip: Check our article to learn what happens when you update your device.

Step 1: Open the Settings app on your iPhone.

Step 2: Scroll down and tap on General.

Step 3: Now, tap on Software Update. If an update is available, tap on Download and Install.

Check for iPhone Software Update

Once your device finishes restarting, open the Phone or FaceTime app and try placing a call. If the issue persists, continue with the following method.

8. Reset Network Settings

As the name suggests, resetting iPhone’s network settings deletes all your device’s network-related settings and data. This includes Wi-Fi passwords, connected devices, mobile data settings, etc. And if your problem is related to any of these settings, doing this will help stop the echo during calls.

Follow the below steps to do it.

Step 1: Open Settings and tap on General.

Step 2: Here, tap on ‘Transfer or Reset iPhone’.

Open iPhone Reset Settings

Step 3: Now, tap on Reset.

Step 4: Tap on ‘Reset Network Settings’. Enter your iPhone’s passcode when prompted.

Reset iPhone Network Settings

This will reset the network settings on your iPhone. Now, try placing a call again to check if this has managed to stop the echo for calls placed from your iPhone.

9. Contact Apple Support

If none of the above methods helped fix the issue, it could be due to hardware damage. So, your last resort is to contact Apple Support and get your iPhone repaired.

That

FAQs for Stopping the Echo During Calls on iPhone

1. Can mobile cases cause audio issues during calls on your iPhone?

If your mobile case doesn’t fit the device’s body, it might obstruct the speaker grills. This can cause your iPhone to echo during calls. So, remove your mobile case and try placing a call. If the issue is solved, either get a new case for your iPhone or leave it off.

2. Is it possible to contact mobile carriers for call-related issues?

If your carrier is experiencing an outage, it might affect the quality of your calls. To confirm if this is the case, contact your carrier. Or wait a while before placing another call.

Stop the Echo

The primary reason for keeping a smartphone is its ability to make calls anywhere. However, constant audio feedback might make this annoying. So, we hope this guide helped fix the echo on your iPhone during calls. You can also check out our article if your iPhone is not making calls but can text.

Was this helpful?

Thanks for your feedback!

5 Ways to Fix Apple TV App Not Working on iPhone or iPad

Basic Fixes

  • Check your network connection: Ensure your device is connected to a good internet connection. I recommend at least 5-10Mbps for HD and 20-25Mbps for 4K quality streaming in the Apple TV app.
  • Check the Apple TV server status: Visit the Apple System Status page to check an active Apple TV service outage.
  • Verify your Apple TV+ subscription: The Apple TV app requires an active subscription. Check your subscription details from the App Store > account picture (top-right corner) > Subscriptions.
  • Disconnect VPN: Open the VPN app and tap Disconnect to disable the active connection. Reopen the Apple TV app.
  • Disable Low Data Mode: Open the Settings app, select Wi-Fi, and tap i next to the connected network. Toggle off the Low Data Mode. If you’re on cellular data, disable Low Data Mode from Settings > Mobile Service > Mobile Data Options.
  • Update iOS and iPadOS: Head to your iPhone/iPad settings, select General, and tap Software Update. Tap Install to update your iPhone or iPad.

Fix 1: Force Close and Restart the Apple TV App

Force closing and restarting the Apple TV app fixes most glitches preventing you from opening it.

Swipe up from the bottom of your screen to switch apps and slide up the Apple TV card to force close it. Reopen the app to use it.

Fix 2: Enable Cellular Data for Apple TV

By default, Apple TV disables streaming on cellular data to limit mobile data usage. Tweak your iPhone settings to fix Apple TV not working on mobile data.

Step 1: Open iPhone Settings, scroll down, and select TV.

Step 2: Turn on the Mobile Data toggle and enable Use Cellular Data under Streaming Options.

Fix 3: Sign Out and Log in Again

Account authentication issue is a common reason for Apple TV not working or crashing on your iPhone or iPad. Sign out and log in again to restore its normal functioning.

Step 1: Open the Apple TV app > tap your account profile at the top-right > select Sign Out.

Step 2: Reopen the app > tap your account at the top > enter credentials to sign back in.

Fix 4: Change Country or Region

If the Apple TV app shows a blank white screen and fails to load its content, switch your device’s country/region to regain access.

Step 1: Open the iPhone setting > tap your Apple account banner > select Media & Purchases.

Step 2: Select View Account and tap Country/Region.

Step 3: Tap Change Country or Region and pick your desired region from the list.

Step 4: Tap Agree at the top right to update your payment details and save changes. Reopen the Apple TV app.

Fix 5: Update or Reinstall the Apple TV App

Lastly, if the issue persists, update or reinstall the Apple TV app on your iPhone or iPad.

Step 1: Open the Apple App Store, search Apple TV, and tap Update (if available).

Step 2: Alternatively, long-tap the Apple TV icon > select Remove app. Tap Delete app when prompted and install it afresh from the Apple App Store.

Was this helpful?

Thanks for your feedback!

4 Ways to Check the .NET Framework Version on Windows 11

Method 1: Visit the Installation Folder

Browsing the .NET Framework installation folder on Windows 11 is a nifty trick to check its version details. Go to the File Explorer app to get started.

Step 1: Press the Windows + E shortcut to open the File Explorer app, copy-paste the path below into the address bar, and press Enter.

C:\Windows\Microsoft.NET\Framework
1 open the .Net installation folder

Step 2: Open the folder starting with the initial v4.0 and right-click any .dll file to access its Properties.

2 access dll file properties

Step 3: Select the Details tab > locate the Product Version to identify the .NET Framework version installed on your PC.

3 check the product version

Method 2: Use the Registry Editor

In addition to visiting the installation directory, you can open the Registry Editor to check the .NET Framework Version details on Windows 11.

Step 1: Press the Windows + R shortcut to open the Run dialog, type regedit, and press Enter.

4 open regedit 1

Step 2: Approve the UAC prompt, paste the following path in the navigation bar, and hit Enter to navigate.

HKEY_LOCAL_MACHINE\SOFTWARE\Microsoft\NET Framework Setup\NDP

Step 3: Expand the v4 key in the list under NDP, select Client, and double-click Version to identify the installed .NET Framework Version.

5 check the .Net framework version

Method 3: Using Command Prompt

If you can’t determine the Framework Version using the Registry Editor, open Command Prompt and execute the query to know the precise details.

Step 1: Press the Windows key, search CMD, and click Run as administrator.

6 open CMD as admin

Step 2: Copy-paste the following command and press Enter to know the version details.

reg query "HKLM\SOFTWARE\Microsoft\Net Framework Setup\NDP\v4\Client" /v Version
7 check .NET framework version

Method 4: Check the .NET Framework Version Using Terminal

Like Command Prompt, you can utilize the Get-child cmdlet in Windows PowerShell to view all .NET Framework versions installed on your PC.

Step 1: Press the Windows key, search PowerShell, and click Run as Administrator.

8 launch powershell as admin

Step 2: Copy-paste the following command and press Enter to view all installed versions.

Get-ChildItem 'HKLM:\SOFTWARE\Microsoft\NET Framework Setup\NDP' -Recurse | Get-ItemProperty -Name version -EA 0 | Where { $_.PSChildName -Match '^(?!S)\p{L}'} | Select PSChildName, version
9 check the .NET version

FAQs

What is the current .NET framework version?

The latest .NET Framework version is 4.8, available for Windows 10 and 11.

How do I update my .NET Framework version?

Windows 11 automatically updates the .NET Framework Version with Windows Updates. Alternatively, you can manually download and install the latest version from Microsoft.

How can .NET Framework 2.0, 3.0, and 3.5 be installed in Windows 11?

Press the Windows Key > search Turn Windows Features on or off > select your desired .NET Framework to enable it.

Was this helpful?

Thanks for your feedback!

5 Fixes for Spell Check Not Working in Microsoft Outlook for Windows

Fix 1: Check Spelling and Autocorrect Settings

The first thing you should do is ensure that spell check is enabled and configured correctly in Outlook. Here’s how to do it.

Step 1: Open the Outlook app on your PC and click the File menu in the top-left corner.

Outlook File Menu

Step 2: Select Options from the left sidebar.

Outlook Options

Step 3: Switch to the Mail tab and tick the checkbox that reads Always check spelling before sending. Then, clear the Ignore original message text in reply or forward checkbox.

Outlook Spell Check Settings

Step 4: Click the Spelling and Autocorrect button.

AutoCorrect in Outlook

Step 5: Tick the Check spelling as you type and Mark grammar errors as you type boxes. Then, click OK.

AutoCorrect Settings in Outlook

Fix 2: Check the Proofing Language

If the spell check is not working even after you turn it on, you may have set the wrong proofing language. Here’s how you can change that.

Step 1: Open Microsoft Outlook and click the New Email button.

Compose Email in Outlook

Step 2: Under the Review tab, select Language > Set Proofing Language.

Set Proofing Language in Outlook

Step 3: Choose your preferred language from the list, and click the Set As Default button.

Change Proofing Language in Outlook

Step 4: Uncheck the Do not check spelling or grammar box. Then, click OK.

Change Proofing Language Settings in Outlook

Fix 3: Run Spell Check Manually

Another thing you can do is run a spell check manually in Outlook. For that, compose an email as you normally would and intentionally type in a few misspelled words. Then, switch to the Review tab and click the Spelling and Grammar option at the top.

Run Spell Check in Outlook

If Outlook’s spell check does not work even when you run it manually, a third-party add-in or corrupted files may be responsible for the issue.

Fix 4: Open Outlook in Safe Mode

An outdated or buggy third-party add-in can cause certain features, like spell check, to stop working in Outlook. To check for this possibility, you can open Outlook in Safe Mode.

Press and hold the Ctrl key on your keyboard and double-click the Outlook shortcut. Click Yes when the confirmation prompt appears. If the spell check feature works as expected while Outlook is in safe mode, you should disable all the add-ins and re-enable them one at a time.

Step 1: In the Outlook app, go to File > Options.

Step 2: In the Outlook Options window, switch to the Add-ins tab. Click the drop-down menu next to Manage and select COM Add-ins. Then, click the Go button next to it.

Outlook Add-ins

Step 3: Uncheck the boxes to disable add-ins and click OK.

Disable Outlook Add-ins

Restart the Outlook app after this and enable your add-ins one by one until the problem occurs again. After you find the problematic add-in, consider updating or removing it.

Fix 5: Run the Office Repair Tool

Running the Office repair tool is an effective way to fix issues with Office apps like Outlook. The tool can automatically scan your Office apps for installation issues or corrupted files and fix them. Here’s how to run it.

Step 1: Right-click on the Start icon and select Installed apps from the list.

Installed Apps on Windows

Step 2: Scroll down to locate the Microsoft Office suite on the list. Click the three-dot menu icon next to it and select Modify.

Modify Microsoft Office on Windows 11

Step 3: Select Online Repair and click on Repair.

Repair Office Apps

Was this helpful?

Thanks for your feedback!

How to Add or Remove Apps From Secure Folder on Samsung Phones

How to Add Apps to Secure Folder

Step 1: Open Secure Folder on your phone.

Tip: You can check our guide to open Secure Folder.

Step 2: Then, enter the Secure Folder passcode or PIN to log in.

Step 3: Tap the (+) Add icon at the top.

Step 4: Now, add existing apps to Secure Folder or install new ones from the Google Play Store or Galaxy Store.

Step 5: If you want to put existing apps in the Secure Folder, tap on the app icons from the list and press the Add button.

The app will show up in the Secure Folder.

Add Apps to Secure Folder

Alternatively, if you want to download new apps, tap Download from Play Store or Download from Galaxy Store. You will have to sign in again to your Google or Samsung account. Then, search for the app and press the Install button.

Once installed, the app will only show in the Secure Folder and not outside it, as it has been installed from the Secure Folder itself.

What Happens When You Move App to Secure Folder

  • Original App: When you add an app already installed on your phone to the Secure Folder, a second copy of the app will be created within the Secure Folder. This app is entirely different and independent of the old app. You can keep both copies or uninstall the original app from the home screen after moving it to the Secure Folder.
  • App Data: The data of the original app will not be moved to the Secure Folder. You must log in and set up the app again in Secure Folder from scratch. Each app will have its own separate login details.
  • App Notifications: By default, you will not receive notifications from the apps you add to the Secure Folder when outside the Secure Folder. But you can change the behavior by opening Secure Folder Settings > Notifications and data > toggle on Show content.
  • App Settings: After moving an app to the Secure Folder, you can access its settings, like permissions, notifications, etc., from the Secure Folder only.

Tip: Know what happens when you clear the data of an Android app.

How to Remove Apps From Secure Folder and Move to Home Screen

Suppose you moved an app to the Secure Folder and deleted the original app from the home screen. Now, if you want to move the app from Secure Folder to the home screen, you cannot.

You must install the app again on the home screen using the Play Store. Once you do so, you can keep or uninstall the app in Secure Folder.

How to Uninstall Apps From a Secure Folder

Step 1: Open the Secure Folder on your Samsung Galaxy phone.

Step 2: Then, long-press on the app icon you want to remove from the Secure Folder. Select Uninstall.

Step 3: A confirmation pop-up will show up. Finally, tap OK to remove the app.

Note: The pre-installed Samsung apps, like Gallery, Camera, etc., cannot be removed from Secure Folder.

Samsung Secure Folder Uninstall apps

What Happens When You Remove Apps from Secure Folder

When you uninstall an app from Secure Folder, all of its data will get deleted, like a regular app. The app will be removed from the Secure Folder. You must add it again in the Secure Folder to use it.

However, nothing will happen to the original app or its data. That is, it will not be uninstalled from the home screen.

Tip: Learn how to transfer Samsung Secure Folder to a new phone.

FAQs on Adding or Removing Secure Folder Apps

1. How to add files to Secure Folder?

Open Secure Folder and tap on the three-dot icon. Select Add Files. Select the type of file that you want to add and choose the files to add.

2. How to remove Secure Folder completely?

To delete Secure Folder, you must uninstall it. To do so, go to Settings > Security and Privacy > Secure Folder > More settings. Tap on Uninstall. You will be asked whether you want to move files out of Secure Folder before uninstalling it.

That’s how you can add or remove apps from Secure Folder. To keep things private, learn to hide photos and videos on Samsung Galaxy phones. Also, check out different ways to hide chats on WhatsApp.

Was this helpful?

Thanks for your feedback!

5 Best Baby Car Cameras to Monitor Your Children

If you often drive around with your children, it’s always advisable to use baby car cameras to keep a check on them. Here’s our list of the best options to monitor your baby in the car.

Itomoro Baby Car Mirror

Itomoro baby camera

The Itomoro car mirror is a 1080p camera that is attached to a mount and rotatable at any desired angle. So, you can simply fix it to the rear seat at any position and adjust the angle to see your child. It also has IR LEDs for low-light vision.

Along with the camera and its accompanying mount, Itomoro also bundles multiple straps with the camera. These straps can be used to either hook the camera onto the headrest of the front seat or to some portions of the rear seat.

What We Like

  • Affordable
  • Wide field of view

What We Don’t Like

  • Average video quality

DoHonest Baby Car Camera

Do honest baby car camera

DoHonest’s baby car camera is pretty similar to Itomoro’s in terms of design. However, the functionality is vastly better as per reviews. The video quality is much better even in low light, and the display unit can be attached to the windshield as well.

The 1080p camera bundled with the DoHonest baby monitor does a good job of capturing minute details like your baby’s facial expressions. So if your child is feeling uncomfortable, you will be able to notice it easily when driving. Moreover, the included display is also bigger at 5 inches.

What We Like

  • Captures good details
  • Easy to set up

What We Don’t Like

  • Included straps are not of good quality

TX Baby Car Camera Monitor

baby car camera

The TX baby car camera is specifically meant for toddlers. Why, you ask? Well, the design of the camera is such that it appeals to young children — making it seem like a toy of some sort. If your kids are intimidated by a standard camera, consider this option from TX.

Along with a fun-looking exterior, the TX baby car camera also provides good output quality. While it’s not as good as the DoHonest camera overall, the TX camera has three different modes that stand out. There’s a daytime mode, a normal mode, and a night mode.

What We Like

  • Looks appealing to kids
  • Different video modes

What We Don’t Like

  • Adhesive used to attach display is weak

Zacro Baby Car Mirror With Camera

Zacro car camera

Despite the Zacro baby camera being similar to a lot of other options, the primary reason it makes it to this list is its sturdy build. Users say that both the camera and display can survive extreme heat so you shouldn’t have an issue even if you park outside for long hours.

Despite being sturdy, reviews indicate that the display has some wobble to it while driving. This can get distracting when you’re driving and want to get a quick look at your child. However, the camera comes with night vision capabilities which as per reviews is surprisingly good.

What We Like

  • Good build quality
  • Night vision camera is good

What We Don’t Like

  • Narrow field of view
  • Slightly wobbly

Luckview BM1 Baby Car Camera With Zoom

luckview mirror bm1

If you compare the prices of all the products in this list, you’ll realize the Luckview BM1 is the most expensive of the lot and by a good margin. That’s mainly because it brings about two major improvements — a higher resolution camera and a better display.

Going by reviews, the Luckview BM1 has a camera that’s detailed and works well even in the dark. In fact, the brand has provided up to 3X zoom capabilities on the BM1 so you can get a closer look at your baby when driving. While this is no optical zoom, the image quality in daylight is still respectable even after zooming in.

What We Like

  • 3X zoom capabilities
  • IPS LCD display

What We Don’t Like

  • Slightly expensive compared to other options

FAQs

1. Is a baby car camera the same as a baby monitor?

A baby car camera is meant to give you a quick glimpse of your baby when driving. A baby monitor, on the other hand, is more like a surveillance camera to keep a check on your baby.

2. Can I use baby car cameras to watch my pets?

Yes, you can use car cameras to monitor your pets too, provided they sit still in one particular spot!

3. Are baby car cameras safe to use when driving?

When driving, it’s advisable to always keep your eyes on the road. If and when you think it’s safe to get a glimpse of your kids, you can look into the baby car mirror.

Was this helpful?

Thanks for your feedback!

5 Ways to Get Better Signal (Service) on iPhone

How to Check Signal Strength on Your iPhone

A weak reception can lead to no internet, call dropping, and even a faster battery drain on your iPhone. So, to know if your iPhone is receiving enough signal, it has a hidden app called Field Test, which shows the exact signal strength your iPhone receives in numbers. Here are the steps to follow:

Note: The RSRP values range from -44dBm to -140dBm for a good 4G network and -80dBm to -100dBm for a good 5G network.

Step 1: Swipe down from the top right corner to access the Control Center.

Step 2: Tap and disconnect any connected Wi-Fi.

Access Control Centre on iPhone

Step 3: Now, launch the Phone app.

Step 4: Dial *3001#12345#* and press the Call button.

Phone app on iPhone 1

Step 5: The Field Test app will now open. Tap RsrpRsrqSinr.

Now, look at the numerical value for rsrp. This shows how strong a signal you are getting on your iPhone.

Field Test app on iPhone

If the value doesn’t fall within the recommended range, proceed to the next section to boost the iPhone signal and get better service.

5 Ways to Fix Weak Signal on Your iPhone

Now that you’ve checked your signal strength, let’s explore how to improve it.

Basic Fixes

  • Toggle Airplane mode: Turn on Airplane mode for a few seconds, then turn it off. This can refresh your phone’s network connection.
  • Force restart your iPhone: A simple restart can solve many connectivity issues. Push the volume up button and release it, then press the volume down button quickly and release it. Hold the side button until the Apple logo reappears on the screen.
  • Remove and reinsert SIM card: Sometimes, a faulty SIM card can cause poor signals. Remove the SIM card, clean it with a soft cloth, then reinsert it.
  • Try a different location or position: Physical barriers like walls and buildings can weaken your signal. Try moving to a different location or changing your position.
  • Switch to eSIM: If your iPhone supports eSIM, try switching to it. This can improve signal strength.

Fix 1: Switch Between 5G and LTE

5G waves tend to travel shorter distances than 4G; hence, using 5G on your iPhone can also cause fewer bars on your iPhone. Turning off 5G and switching to LTE can act as a signal boost for your iPhone.

Step 1: Open Settings on your iPhone > tap on Mobile Service > Mobile Data Options.

Step 2: Tap on Voice & Data > LTE.

Fix 2: Use a Cellphone Signal Booster

If you live in an area with poor signal coverage, you may need a cellphone signal booster. This device can amplify your signal and provide better coverage in your home or office.

Fix 3: Update Your iPhone

iOS updates can improve the overall network connection and stability on your iPhone. So if you’ve not updated your iPhone, try updating it to the latest stable version.

Step 1: Open Settings > General > Software Update.

Settings General iPhone

Step 2: If there’s an update available, tap Download and Install.

Fix 4: Check for Carrier Updates

You can also try updating the carrier settings on your iPhone if the issue is from the carrier itself. Here’s how:

Step 1: Go to Settings > General > About.

Step 2: If a carrier update is pending, you should see a pop-up on the About page. Tap Update.

Note: If there’s no pop-up, this means your SIM is already running on the latest update.

Fix 5: Reset Network Settings

If you still face issues after trying the fixes mentioned above, try resetting the network settings on your iPhone. Here’s how to do it:

Step 1: Open Settings > General > Transfer or Reset iPhone.

Step 2: Tap Reset > Reset Network Settings

Step 3: Enter your device passcode to confirm the reset.

Also Read: How to fix iPhone keeps switching from Wi-Fi to mobile data

Was this helpful?

Thanks for your feedback!

3 Ways to Fix Discord Not Showing Spotify Status

Basic Fixes:

  • Clear Discord cache – A corrupt Discord cache often leads to issues like Spotify not showing on Discord. You should clear the Discord cache and try again.
  • Check Discord status – When Discord faces a server-side outage, you may face issues with basic tasks like sending messages, showing Spotify status, calling, and more. You can visit the company’s dedicated server status website. If there is a major outage, wait for Discord to troubleshoot the problem from their side.
  • Update Discord—Outdated Discord desktop and mobile apps may have problems displaying the Spotify status. You can restart the Discord desktop app, which will start downloading the latest update.

Fix 1. Disable and Enable Spotify Status on Discord

When you first connect your Spotify account on Discord, the app enables permission to display Spotify as your status. If you have disabled it due to privacy concerns, use the steps below to enable it.

On Desktop

Step 1: Launch the Discord app on your desktop. Click the Settings next to your username.

Discord Not Showing Spotify Status 10

Step 2: Select Connections from the left sidebar.

Step 3: Enable the Display Spotify as your status toggle.

Discord Not Showing Spotify Status 11

On Mobile

Step 1: Open the Discord app. Tap your Discord profile icon at the bottom left and select Connections.

Step 2: Enable the Display Spotify as your status toggle under Spotify.

Tip: While it’s not related to Discord as it’s a native feature of Spotify, you can also try enabling Friend Activity on Spotify. This way, you can also share your listening activity through Spotify.

Did you recently change your Spotify account password? Your Spotify status won’t show up due to incorrect account details. Relink the Spotify account in Discord. Here’s what to do.

On Desktop

Step 1: Launch the Discord app. Click the Settings next to your username.

Step 2: Click Connections from the left sidebar. Click the x mark beside your Spotify account.

Discord Not Showing Spotify Status1

Step 3: Click Disconnect to confirm your decision.

Discord Not Showing Spotify Status 12

Step 4: Click the Spotify app icon at the top. Sign in with your account details and give relevant permission.

On Mobile

Step 1: Open the Discord app. Tap your profile icon at the bottom left.

Step 2: Select Connections. Tap the x mark and select Disconnect.

Step 3: Tap Add at the top and select Spotify.

Login with your Spotify account details; the integration is good to go on Discord.

Fix 3. Disable the Game Activity Status Message

Your current gaming activity may conflict with Spotify to display your listening mood on the Discord account. You must stop Steam or Epic Games activity from appearing on your Discord account.

On Desktop

Step 1: Launch the Discord app. Click on Settings next to your username.

Step 2: Select Connections from the left sidebar. Disable the Display on profile toggle for Steam or another gaming account.

Discord Not Showing Spotify Status 13

On Mobile

Step 1: Launch the Discord app. Tap your profile icon → Connections.

Step 2: Disable the Display on profile toggle for Steam, Epic Games, or Xbox.

Was this helpful?

Thanks for your feedback!

How to Add and Remove Line Numbers in Microsoft Word

If you are working on a text-heavy document, and want to make referencing or browsing the document easy, you can try line numbering. Line numbering is common and especially useful for legal professionals. You can find line numbers inside legal texts such as contracts, making it easy for users to navigate the document.

How_to_Add_and_Remove_Line_Numbers_in_Microsoft_Word

If your word processor is Microsoft Word, lines in a document are by default numbered. However, these numbers will be invisible unless you reveal them in your document. Also, whether the lines are visible in all or part of the Word document is left to decide. Here’s how to add and remove line numbers in Microsoft Word.

How to Add Line Numbers in Microsoft Word

The feature to add Line Numbers in Microsoft Word is contained in the Layout tab of the Word Ribbon. Using it, you can select to add line numbers to the entire Word document, a section of the document of selected sections. Here’s how it works:

Add Line Numbers to an Entire Document

Here’s how to add line numbers to an entire document:

Step 1: Click the Start button on the Taskbar and type word to search for the app.

Step 2: From the results, click on the Microsoft Word app or document to open it.

Step 3: Select all the text in your Word document by pressing the Ctrl + A keys simultaneously.

Step 4: On the Microsoft Word ribbon, click the Layout tab.

Step 5: Within the Page Setup group, click the Line Numbers button.

how to add remove line numbers in word 1

Step 6: From the drop-down select any of the following options:

  • Continuous: line numbers consecutively throughout your document
  • Restart Each Page: start the line numbering from 1 on each page of your document
  • Restart Each Section: start the line numbering for 1 after each section break in your document.
how to add remove line numbers in word 2

If it doesn’t appear on your document after selecting your preferred line number format, ensure that your page view is in Print Layout.

Add Line Numbers to a Section or Multiple Sections of a Document

Here’s how to add line numbers to a section or sections of a document:

Step 1: Click the Start button on the Taskbar and type word to search for the app.

Step 2: From the results, click on the Microsoft Word app or document to open it.

Step 3: Select the section or sections in your Word document you would like to introduce line numbers to.

Step 4: On the Microsoft Word ribbon, click the Layout tab.

Step 5: Within the Page Setup group, click the Line Numbers button.

how to add remove line numbers in word 1

Step 6: From the drop-down, select Line Numbering Options to launch the Page Setup dialog box.

how to add remove line numbers in word 3

Step 7: Click the Layout tab on the Page Setup dialog box.

how to add remove line numbers in word 4

Step 8: In the Apply to section, click the drop-down and click Selected sections.

how to add remove line numbers in word 5

Step 9: Click the Line Numbers button to launch the Line Numbers dialog box.

how to add remove line numbers in word 6

Step 10: Tick the box beside Add line numbering and select the type of Numbering you want by filling in the following options:

  • Start at: the number you want the line numbers to start from
  • From text: how far from the text do you want the line numbers to appear.
  • Count by: the intervals you want the line numbers to appear.
how to add remove line numbers in word 7

Step 11: Click OK to close the dialog box and save your changes.

how to add remove line numbers in word 8

Step 12: Click OK to close the Page Setup dialog box.

how to add remove line numbers in word 9

How to Remove Line Numbers in Microsoft Word

If you no longer want numbered lines showing up in your Word document, here’s how to remove it:

Step 1: Click the Start button on the Taskbar and type word to search for the app.

Step 2: From the results, click on the Microsoft Word app or document to open it.

Step 3: On the Microsoft Word ribbon, click the Layout tab.

Step 4: Within the Page Setup group, click the Line Numbers button.

how to add remove line numbers in word 1

Step 5: From the drop-down, select None. This should remove the line numbers from your document.

how to add remove line numbers in word 10

Creating Columns in Microsoft Word

Adding line numbers in a Microsoft Word document is one way to customize the document’s layout. Another way you can change the page layout of a Word document is by creating text columns The text column layout is what you typically find in newspapers and magazines.

Was this helpful?

Thanks for your feedback!