Focus Mode hides the Ribbon and Taskbar on your document to reduce distractions and let you work only on the document’s text and other elements.
Method 1: Using Keyboard Shortcuts
To enable Focus Mode quickly and conveniently in Microsoft Word, you must memorize keyboard shortcuts. On your keyboard, press the Alt + W + O keys simultaneously.
Method 2: Using the Taskbar
On the Taskbar, click on the Focus icon at the bottom right of the Microsoft Word app.
Method 3: Through the Ribbon
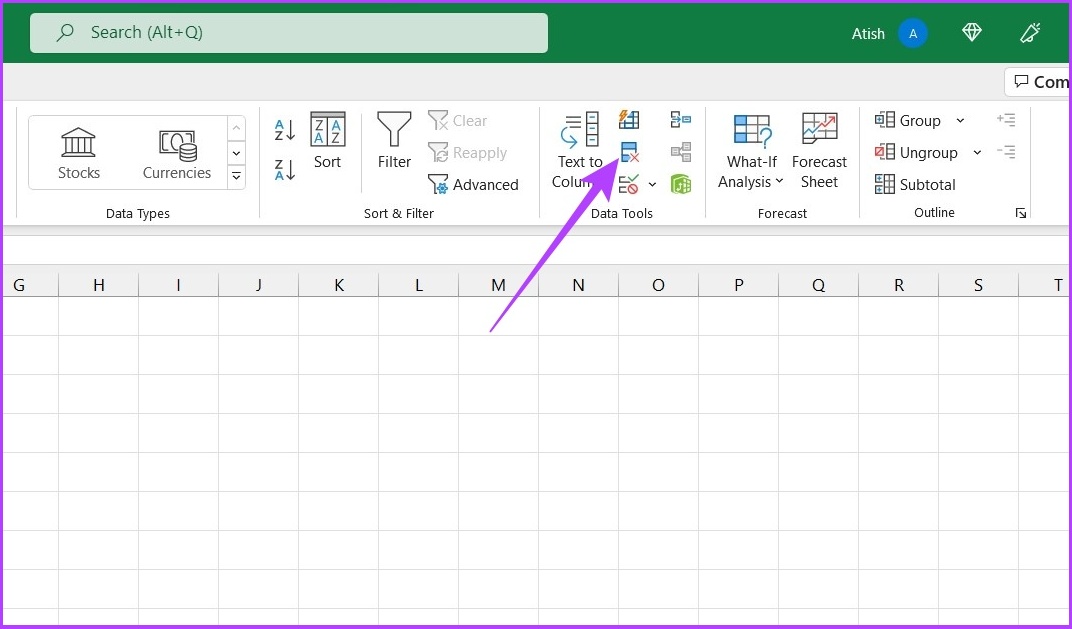
The Ribbon contains many features that help optimize the use of Microsoft Word. Here’s how to enable Focus Mode using it.
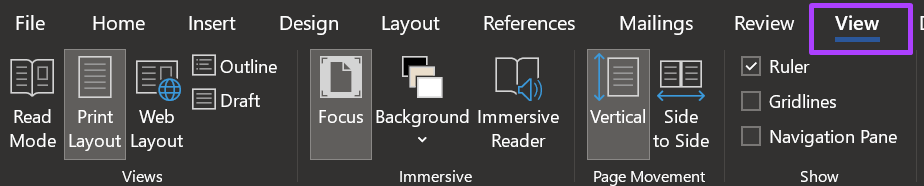
Step 1: On the Ribbon, click on the View tab.
Step 2: From the Immersive group, click on Focus.
Method 4: From the Search Bar
The search bar conveniently locates a feature in Microsoft Word when you forget its location or relevant tab. Here’s how to use it to enable Focus Mode.
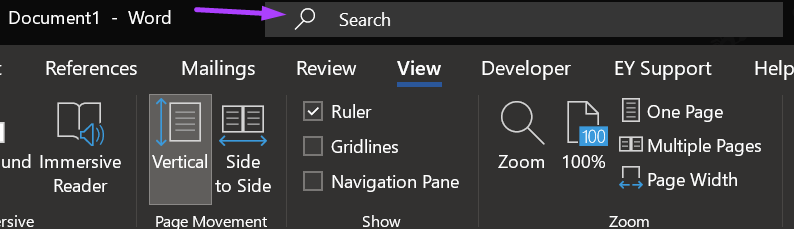
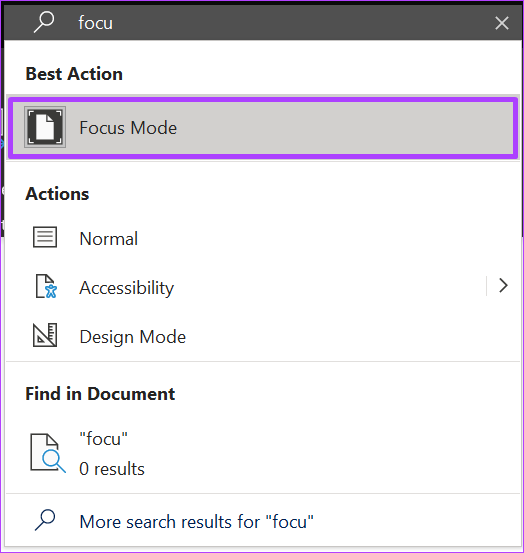
Step 1: Click on the Search bar at the top of the Microsoft Word app.
Step 2: Search for Focus Modeand click on the result.
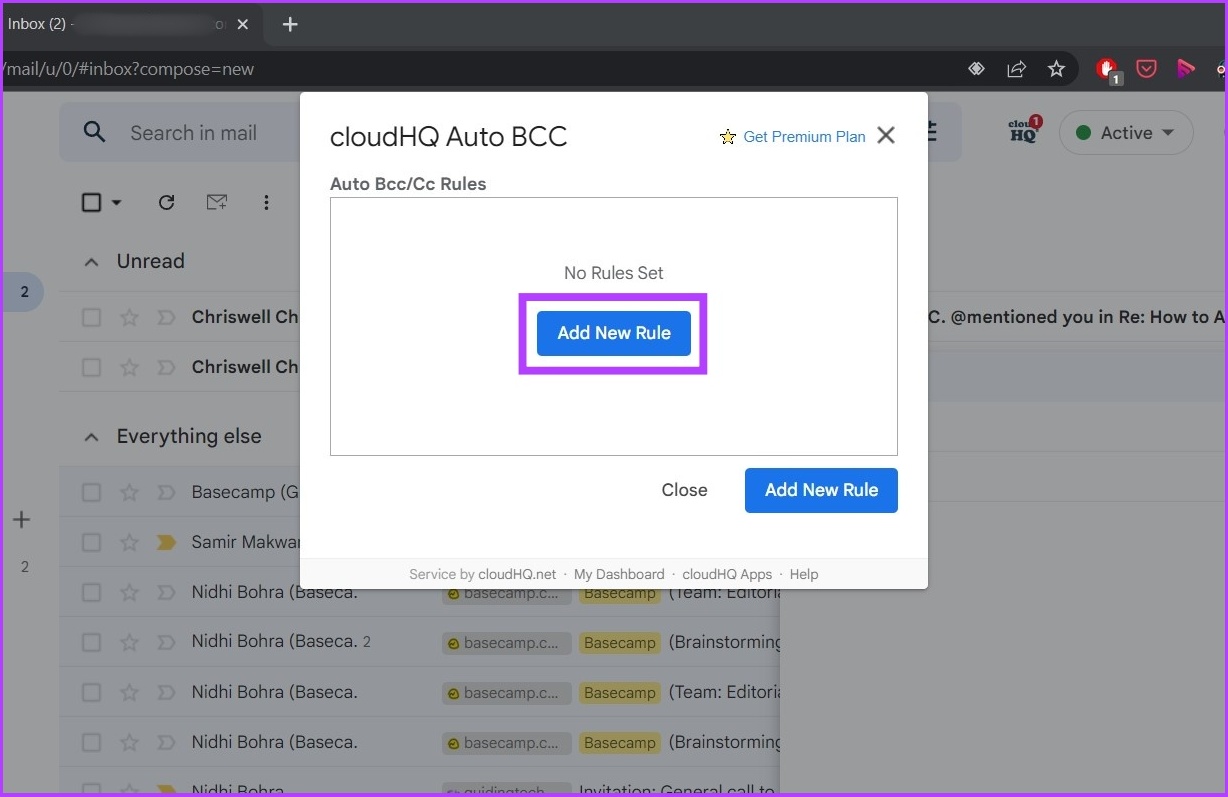
How to Change the Focus Mode Background Color in Microsoft Word
The default background color in Microsoft Word is white. This is the same color also applied in Focus Mode. If the white color distracts you, it can be changed in Focus Mode.
You can’t change the background color in Focus Mode in the standard Word view. Users must enable Focus Mode to access the setting to change the background color.
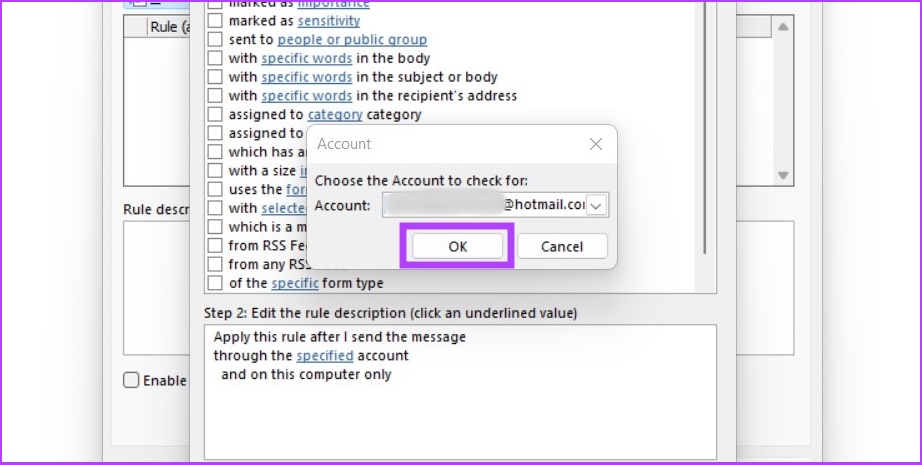
Step 1: After enabling Focus Mode, click on the ellipsis at the top of the screen.
Step 2: On the Ribbon, click on View.
Step 3: From the Immersive group, click on Background.
Step 4: Select your preferred background color from the options displayed.
Check Snapchat server status: If Snapchat’s servers are not working properly, it can cause the security code not to come through. In this case, use Downdetector to check.
Turn Airplane Mode on and off: You can turn Airplane Mode on and off to refresh your phone’s cellular network. Then, request the code again from Snapchat.
Double-check the spam folder: Most messaging apps have dedicated spam folders. So, check to see if the security code message has been accidentally marked as spam.
Check your internet connection: Snapchat uses your device’s internet connection to work. So, if your internet is not working properly, Snapchat might face delays in raising the request for the security code. So, ensure your internet is working properly before proceeding.
Fix 1: Try Receiving the Code via Email
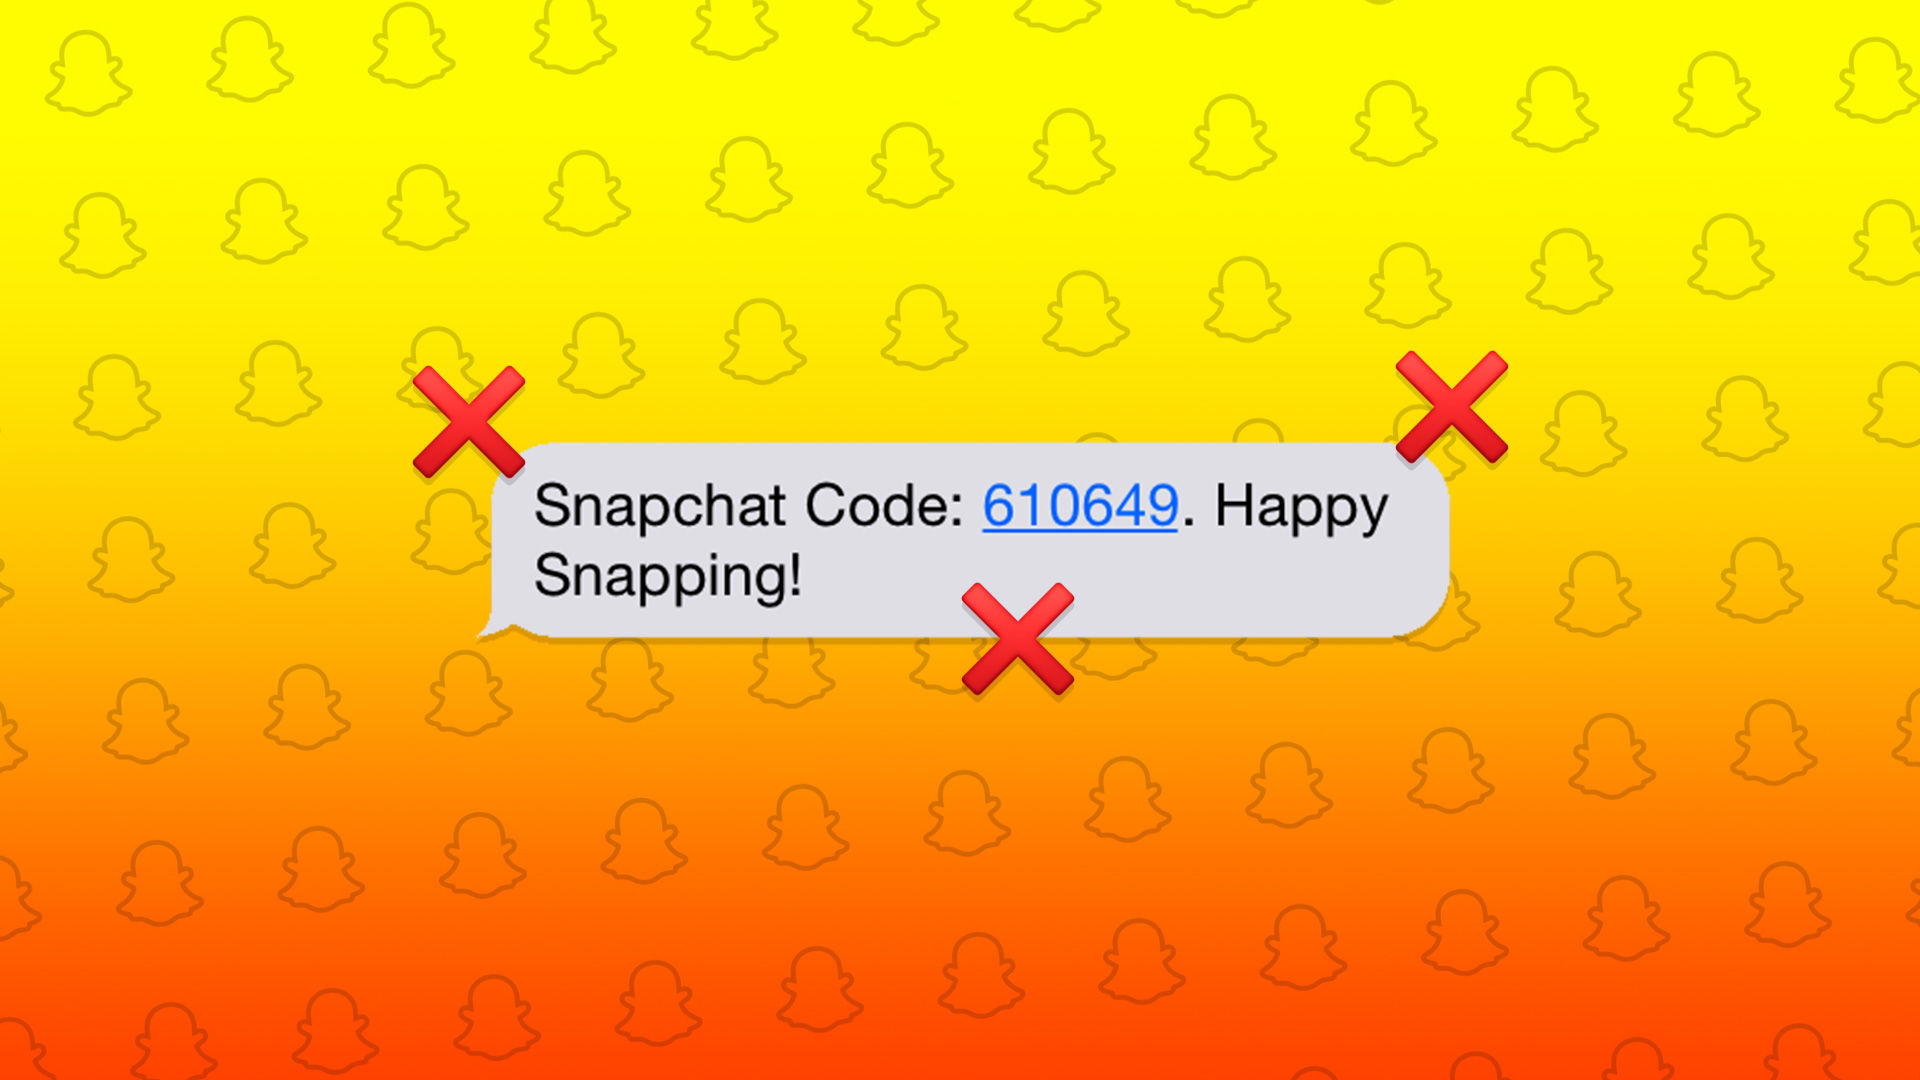
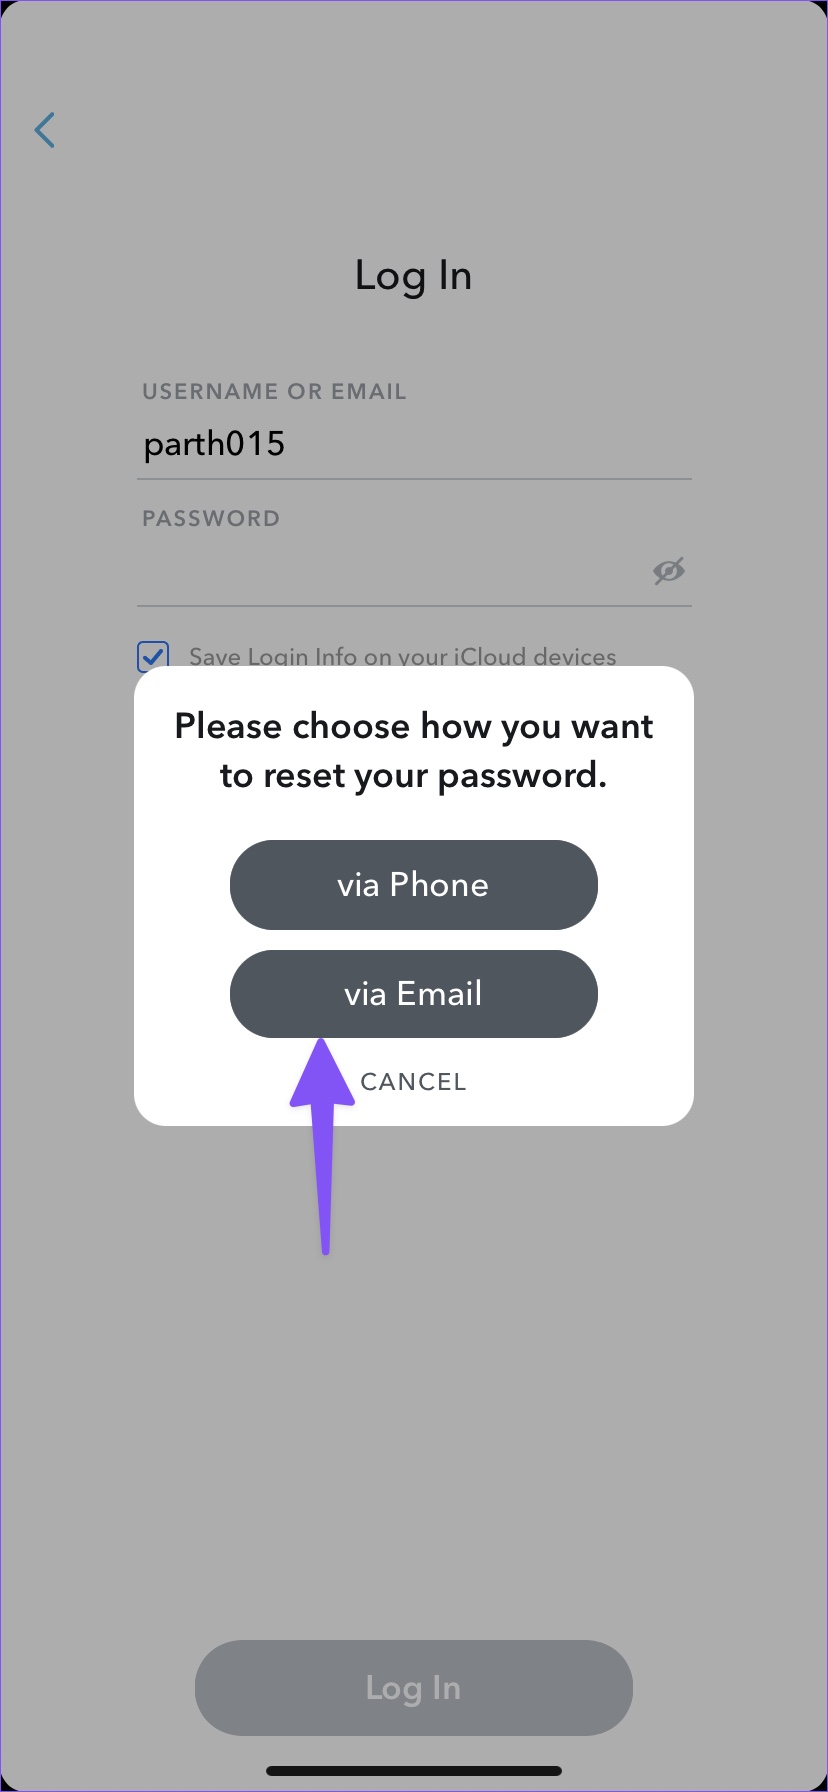
When you forget your Snapchat password, Snapchat allows you to reset it via a security code received by text message or email. If you are not getting a Snapchat verification code on text, you can opt to receive the same in an email instead. Ensure you check all the relevant folders. Here’s how.
Step 1: Open the Snapchat app on your phone and tap on Forgot your password?
Step 2: Then, tap on via Email. Snapchat will send a security code to your saved email address.
Fix 3: Clear Snapchat Cache on Android
Apps use cache to decrease loading time and improve overall app functioning. However, a corrupt app cache can stop it from functioning properly and prevent it from sending the security code. So, you can clear Snapchat cache and try again. Here’s how.
Step 1: Open Settings > tap on Apps. Here, tap on Snapchat.
Step 2: Scroll down and tap on Storage. Then, tap on Clear cache.
Fix 3: Enable 2FA on Snapchat
Once you get access to your Snapchat account, enable two-factor authentication (2FA) via the authenticator app. This way, you don’t need to wait for Snapchat to send a security code next time. You can get a verification code from the 2FA mobile app. Here’s how to do it.
Step 1: Open Snapchat on your phone and tap on your bitmoji icon at the top left corner. Then, tap on the cogwheel icon at the top right corner.
Step 2: Scroll down and tap on Two-Factor Authentication. Then, tap on Continue.
Step 3: Tap on Authentication App and follow the on-screen instructions to complete the process.
If you have tried the above fixes and still have trouble getting the security code from Snapchat, you can contact Snapchat support. Describe your issue in detail and submit a ticket for easy resolution.
It’s the iPhone season once again, which means you’re probably torn between a few different models and can’t decide which to buy. To make things more confusing, the Apple iPhone Plus costs just a bit less than the iPhone 14 Pro.
So you might be wondering which iPhone is best for you. Should you get the large-screen iPhone 14 Plus and save a hundred bucks? Or, should you splurge on the iPhone 14 Pro for those additional ‘Pro’ features? Here’s a detailed comparison between the iPhone 14 Plus and iPhone 14 Pro to help you make the right buying decision.
Key Differences Between iPhone 14 Plus and iPhone 14 Pro
While numbers only tell a part of the story, it’s important to go over them to highlight some immediate differences. Here are all the technical specifications of the iPhone 14 Plus and iPhone 14 Pro.
IP68 Stereo speakers Stainless steel frame Dynamic Island ProRes video Precision dual-frequency GPS
Price
Starts at $899
Starts at $999
Some differences like the additional camera on the Pro and a bigger display on the Plus are straightaway evident. But, let’s delve deeper and discuss aspects that affect usability.
Design and Build
The most obvious difference between the iPhone 14 Plus and iPhone 14 Pro is in terms of size. The iPhone 14 Plus has a huge 6.7-inch display, while the iPhone 14 Pro has a more manageable real estate that spans 6.1-inches.
Despite the larger size, though, the iPhone 14 Plus is 3 grams lighter than the iPhone 14 Pro. This is due to the different materials used in the construction of both phones. While the Plus model has an aluminum frame, the Pro variant gets stainless steel. As a result, the iPhone 14 Pro feels more premium when held.
The premium in-hand experience further extends onto the back of the phone where you find frosted glass on the iPhone 14 Pro. The iPhone 14 Plus uses glossy glass which is still premium but gathers a lot of fingerprints and smudges.
Build materials aside, it all comes down to the preferred size. Some users prefer large phones, while others like compact phones that are easily usable with one hand. If you belong to the former category, the iPhone 14 Plus is the ideal pick.
Display
The preference in size extends to the display department, too. The larger display on the iPhone 14 Plus may attract gamers or users who consume a lot of content on their smartphones. However, there’s a big difference in the display tech between the iPhone 14 Plus and iPhone 14 Pro that might make you lean towards the latter.
Both phones have an OLED panel but the one on the iPhone 14 Pro is a ProMotion LTPO display which means it can refresh at up to 120Hz for smoother animations and scrolling. You will notice the high refresh rate kicking in when you’re scrolling through social media or even playing games.
Thanks to the LTPO panel, the refresh rate can drop to as low as 1Hz, which enables the new Always On Display to show off the iPhone 14 Pro wallpapers. The iPhone 14 Pro can also hit an insane 2000nits of peak brightness when viewing HDR content, compared to the 1200nits on the Plus.
Not to forget, the iPhone 14 Pro gets the new Dynamic Island which replaces the age-old notch. It makes the display look more modern while also being functional as a notification hub. The iPhone 14 Plus, on the other hand, has the same notch as the last-gen iPhone 13 making it look dated.
It’s pretty evident at this point — if you want the sheer size of the iPhone 14 Plus display, that’s the phone to pick. But, if you can deal with a slightly smaller display, the iPhone 14 Pro’s display is leagues ahead.
Battery Life
There’s no competition here at all. The iPhone 14 Plus has a considerably larger battery compared to the iPhone 14 Pro — 4,325mAh vs 3,200mAh — thanks to numbers obtained by MacRumors. If we go by Apple’s claims, the iPhone 14 Plus will last you 3 hours longer during video playback. This should ideally translate to longer real-world usage times as well.
If battery life is your priority, you should pick up the iPhone 14 Plus. This is not to say that the iPhone 14 Pro has bad battery life. You can get through a day’s use with the iPhone 14 Pro, but the Plus can push through to the next day too.
When it’s time to plug the phones in, you might want to consider getting a reliable charger for the iPhone 14 series since Apple doesn’t ship one in the box.
Processor and Performance
While the iPhone 14 Plus was the outright winner in the battery department, the iPhone 14 Pro hits right back with better performance. It’s got the new A16 Bionic chip based on the 4nm manufacturing node. In simple terms, it’s more powerful and consumers lower battery power.
The iPhone 14 Plus retains last year’s A15 Bionic which also powers the older iPhone 13 Pro. It’s still a fantastic chip with reliable performance and excellent battery life. However, the A16 Bionic is just better in terms of efficiency, so you’ll have to worry less about your iPhone overheating.
In day-to-day use, both phones will perform similarly meaning you will not have any issues playing even the best of games or while rendering videos. Both phones run iOS 16 out of the box and should ideally receive the same number of software updates. Of course, the newer chipset on the iPhone 14 Pro makes it slightly more future-proof.
Cameras
If you’re a camera enthusiast, just get the iPhone 14 Pro already. It has the new 48MP primary shooter for better details, accompanied by a dedicated 3X telephoto lens for zoom shots. Not to forget, you get LiDAR for portrait mode shots in the dark. ProRes video is also limited to the iPhone 14 Pro.
The iPhone 14 Plus only has a dual-camera setup and skimps out on the telephoto lens. The primary camera sensor is also limited to 12MP, so you’re going to get less-detailed shots. The front-facing cameras on both phones are the same, though, so if you click a lot of selfies, both phones will serve you well.
If you’re not big on photography, the iPhone 14 Plus is a good pick since the cameras onboard are still solid albeit not as good as the ones on the 14 Pro. For camera enthusiasts, the iPhone 14 Pro is a no-brainer.
Other Features
Both phones have the all-new emergency SOS via satellite feature for safety, along with car crash detection. However, the new precision dual-frequency GPS is exclusive to the iPhone 14 Pro. So, if you want precise location tracking, the Pro has the upper hand. Thankfully, the Action Mode in the camera app is available on both phones.
At the same time, Apple has done away with a physical SIM slot on all iPhone 14 models in the US this year. So, you will have to resort to activating and using an eSIM regardless of which variant you get.
Storage, Price, and Colors
The iPhone 14 Plus is available in five color options — Midnight, Starlight, Blue, Purple, and Product (Red). Apple has added two new color options with the iPhone 14 Pro this time — Space Black and Deep Purple. They are accompanied by the usual Gold and Silver.
As for the storage variants and pricing, here’s a table that will give you the complete idea.
128GB
256GB
512GB
1TB
iPhone 14 Plus
$899
$999
$1199
–
iPhone 14 Pro
$999
$1099
$1299
$1499
iPhone 14 Plus or iPhone 14 Pro: Which Is Better for You
Considering the fact that the price difference between both phones is just $100, the iPhone 14 Pro is clearly the better choice if the size doesn’t matter to you. It’s more powerful, has a better display, better optics, and offers better value overall.
However, if you specifically want a big screen to watch your favorite shows or play games, the iPhone 14 Plus is the way to go. It also has better battery life and if you travel often and want to stay away from the charger, it’s a good pick.
Which new iPhone would you get? The iPhone 14 Plus or the iPhone 14 Pro? Let us know in the comments below!
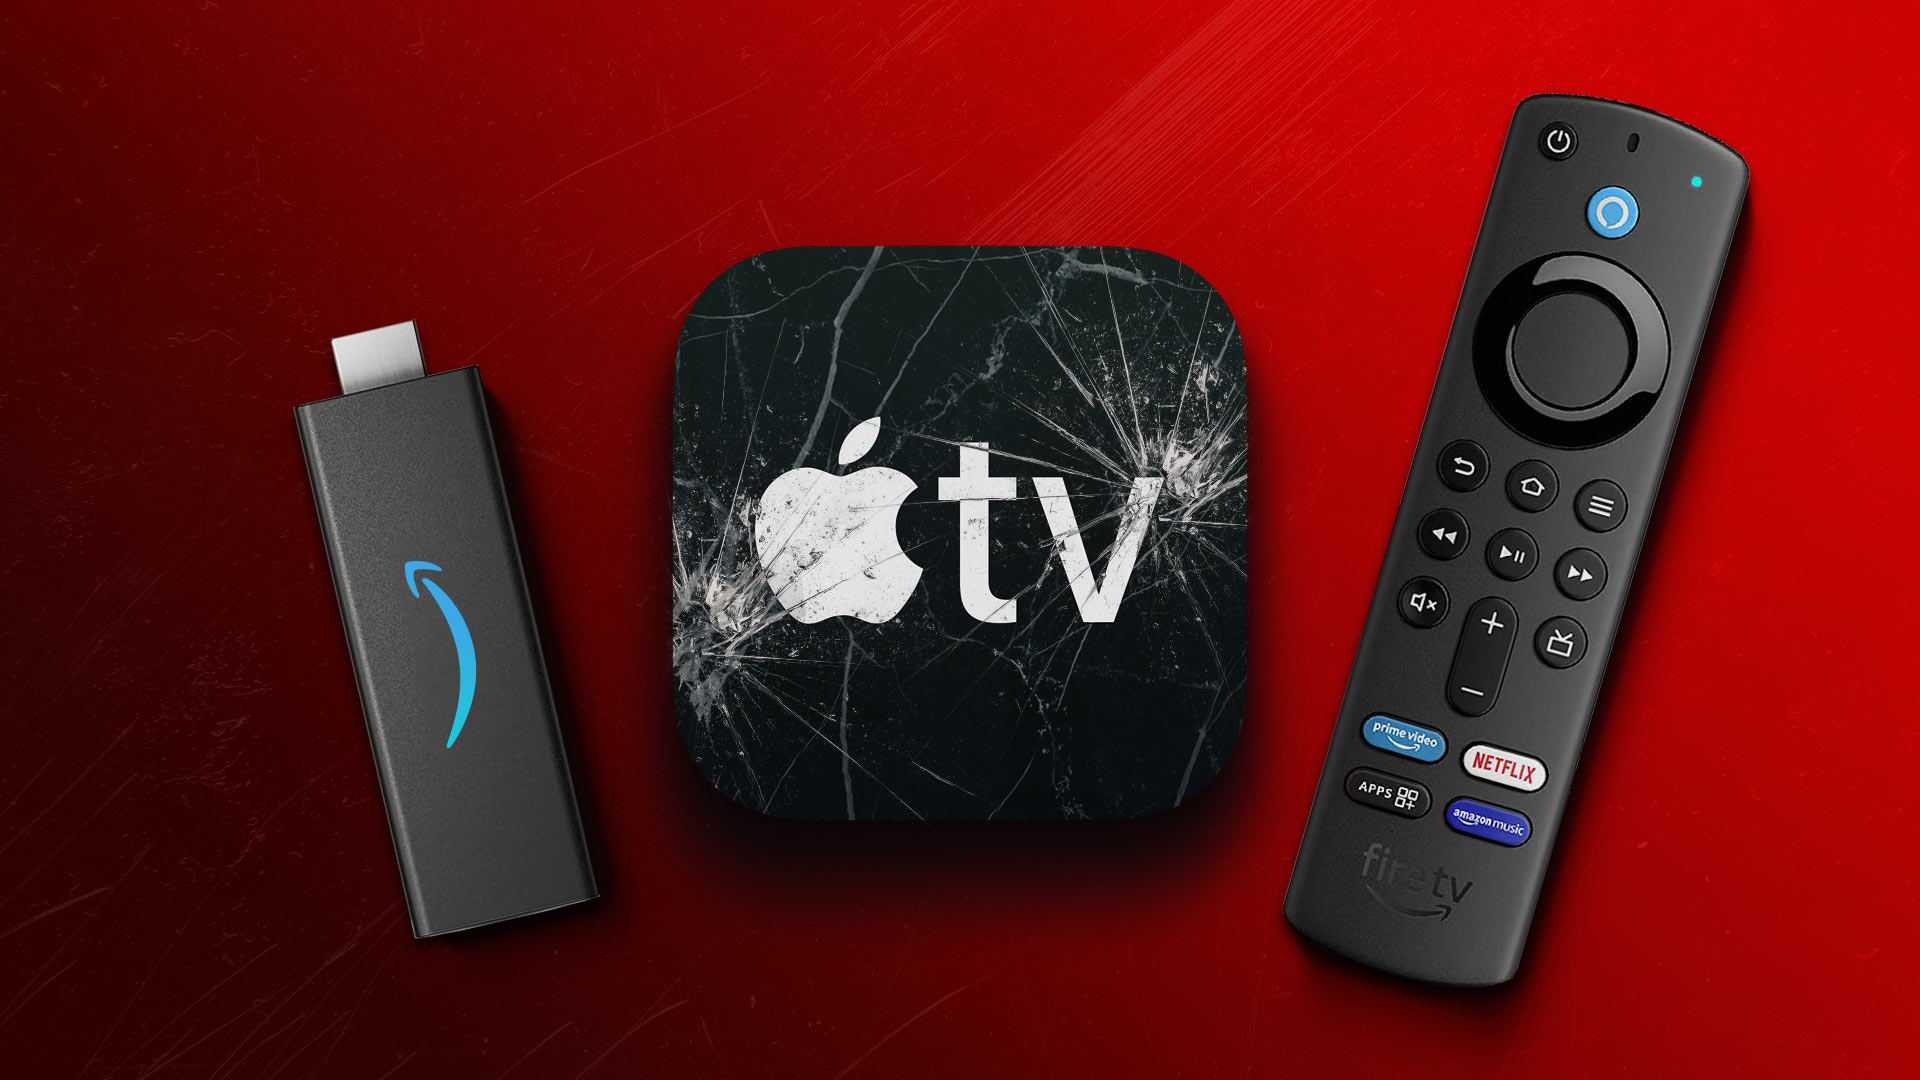
Force quit and relaunch Apple TV app: This will give the app a fresh start on your Firestick.
Clear Apple TV app cache: A corrupted app cache can malfunction the app on your Firestick. So, we suggest clearing the Apple TV app cache.
Reinstall the Apple TV app: You can install the latest version of the app to remove any bugs from the current version.
Update Fire OS version: You can also install an updated version of the Fire OS.
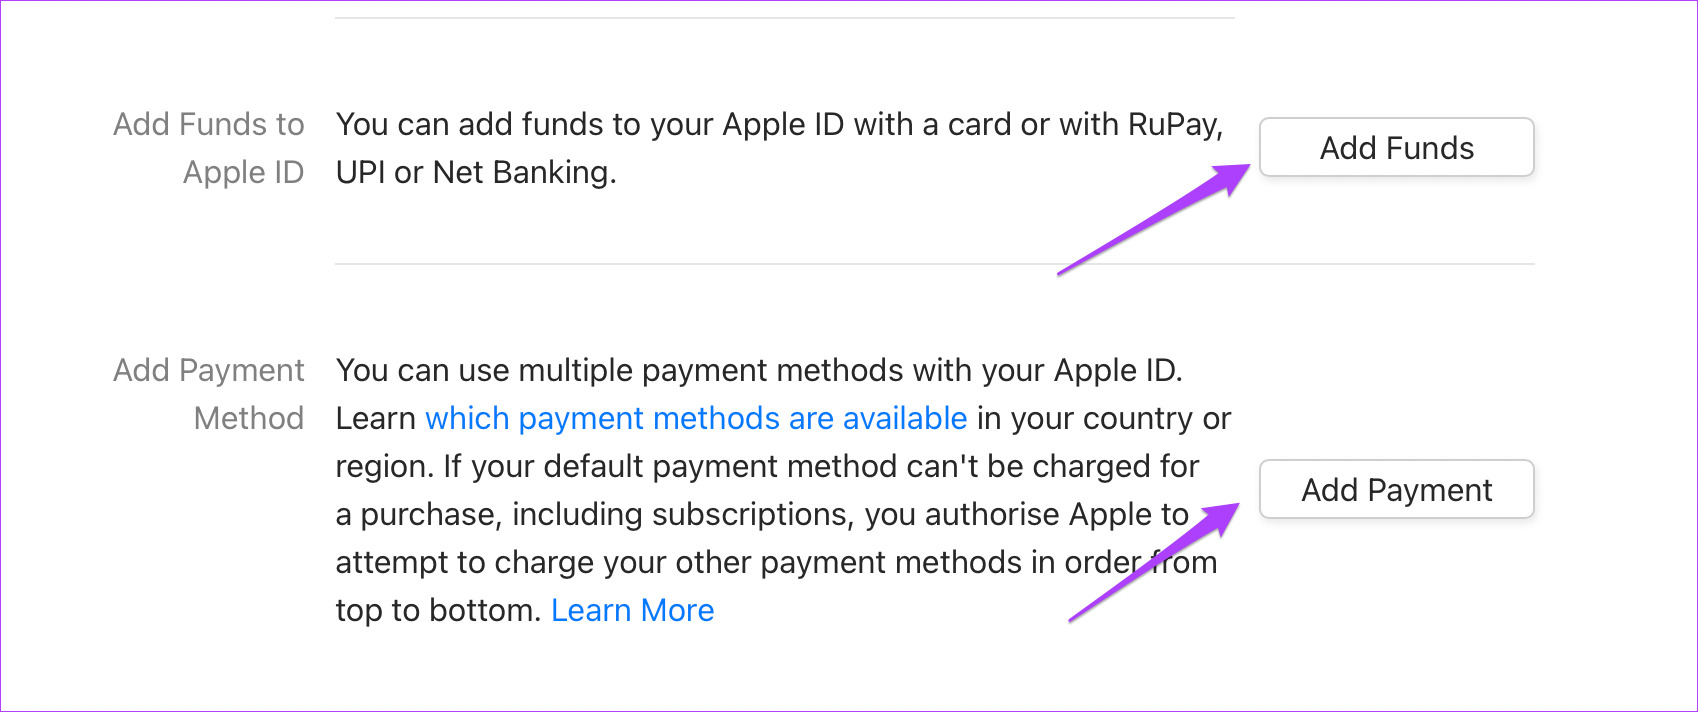
Fix 1: Check Your Apple Account Billing Status
When your Apple TV app does not work on Fire TV Stick, begin by checking your billing status. The payment for your Apple TV+ subscription may not have been processed due to issues with your current payment method.
For iPhone and iPad
Step 1: Open the Settings app on your iPhone or iPad > go to your profile name at the top.
Step 2: Select Payment and Shipping from the list of options. When your preferred payment methods are displayed on the screen, tap on the one that’s causing issues with payment processing.
Step 3: Select Remove Payment Method.
If you use Apple Wallet, you can add funds if it’s low on balance.
For Mac
You must use the Mac App Store to verify or update the payment methods.
Step 1: Open the App Store on your Mac and click the profile icon at the bottom-left corner.
Step 2: Click on Account Settings at the top and sign in with your Apple ID and password. Then, click on Manage Payments on the right side in Account Details.
Step 3: In the Manage Payment section, click on the payment method you wish to remove.
Step 4: Scroll down to see the options of Add Payment Method or Add Funds to Apple Wallet if it has a low balance.
Fix 2: Check if the Apple TV Device Limit Has Exceeded
You can enjoy streaming content using your Apple TV+ subscription on up to six devices simultaneously. So, if your family members or friends are using your account, your account may have hit that device limit.
Step 1: Open the Settings app on your iPhone and tap on your profile name at the top.
Step 2: Scroll down to see the full list of devices connected with your Apple account.
Step 3: Tap on the device you wish to remove. Then, tap on Remove Account on the Device Info page.
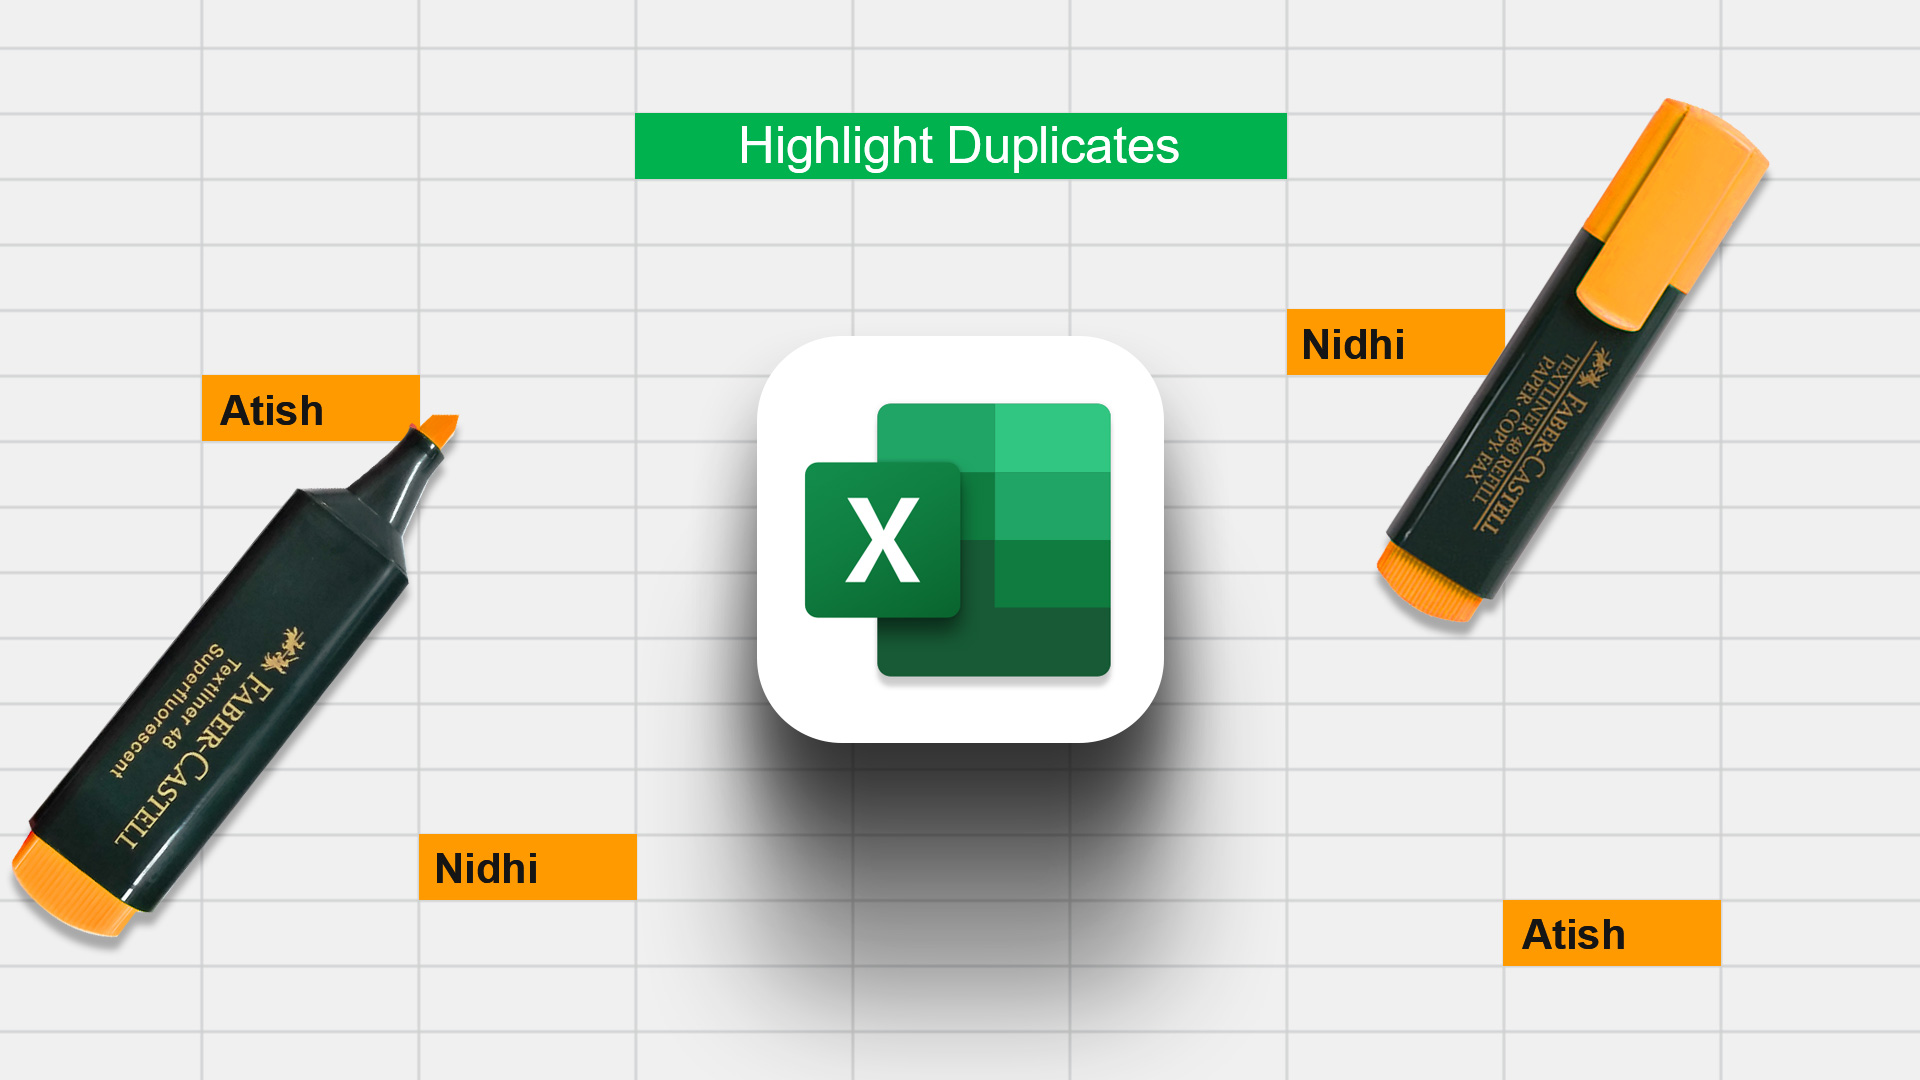
When working with a large spreadsheet in Excel, it can be challenging to spot duplicate entries. Besides, you might also accidentally enter the same piece of information twice. To quickly identify these errors and ensure that your data is clean and accurate, it is better to highlight duplicates in Excel with a few clicks. This can save you plenty of time and frustration in the long run.
There are multiple ways to highlight duplicates in Excel, and the method that you use will depend on the data that you are working with. In this article, we are going to show you all the different ways to get the work done efficiently. Let’s start.
Things to Keep In Mind When Handling Duplicate Values
You must determine whether the duplicates are exact or approximate. Exact duplicates are exact copies of a record, while approximate duplicates may have some slight variations.
It is essential to determine whether the duplicates are within the same or different datasets. If they are within the same dataset, you can simply delete the duplicates. However, if the duplicates are across different datasets, you may have to keep both copies and merge them.
Finally, it is important to consider the impact of the duplicates on any analyses that will be performed. Duplicates can introduce bias and skew results, so it is important to be aware of this when dealing with them.
How to Find Duplicates in Excel
Below are some of the ways to find duplicates in Excel:
Use COUNTIF – This built-in function counts the number of cells that satisfy the criteria you specify. It counts the number of times each value appears in a column. A value is considered a duplicate if it appears more than once.
Use the Conditional Formatting feature – This feature allows you to highlight cells that meet certain criteria. So, to find duplicates, you can use conditional formatting to highlight cells that contain duplicate values.
Use a VBA macro – This method is a bit more advanced and powerful. There are many different ways to write a macro to find duplicates, so I won’t go into detail here. But, if you are interested in learning how to write a macro, there are many resources available online.
No matter which method you use, finding duplicates in Excel can be helpful to clean up your data. Let’s explore the most effortless methods step-by-step.
Highlight Duplicates From Individual Rows/Columns in Excel
To highlight duplicates and non-unique values, follow these steps.
Step 1: Open Spreadsheet with Microsoft Excel.
Step 2: Now, select the dataset in which you want to check for duplicates. Don’t forget to include the column header in your selection.
Step 3: Under the style section, select conditional formatting.
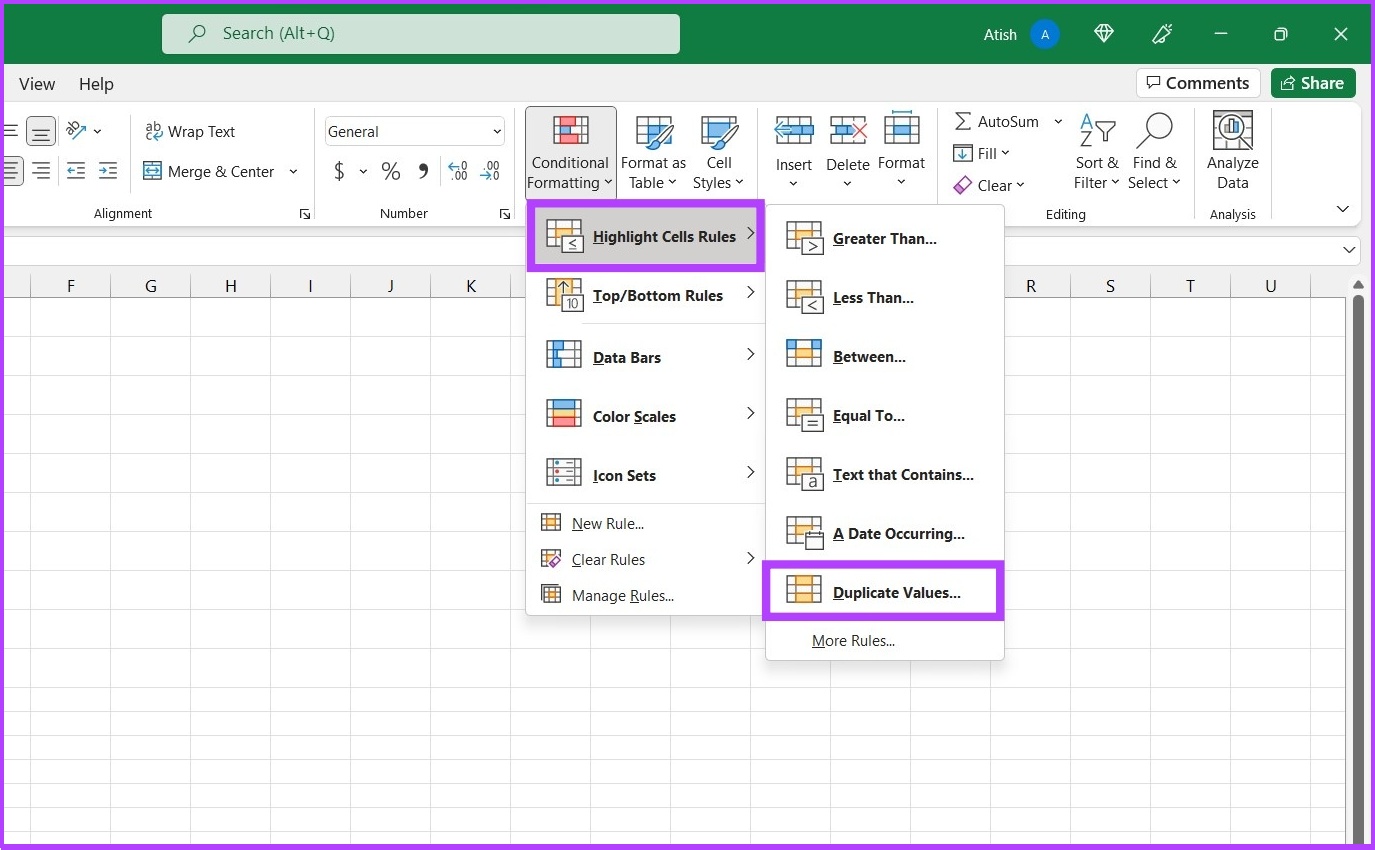
Step 4: Select Highlight Cell Rules and go to Duplicate Values.
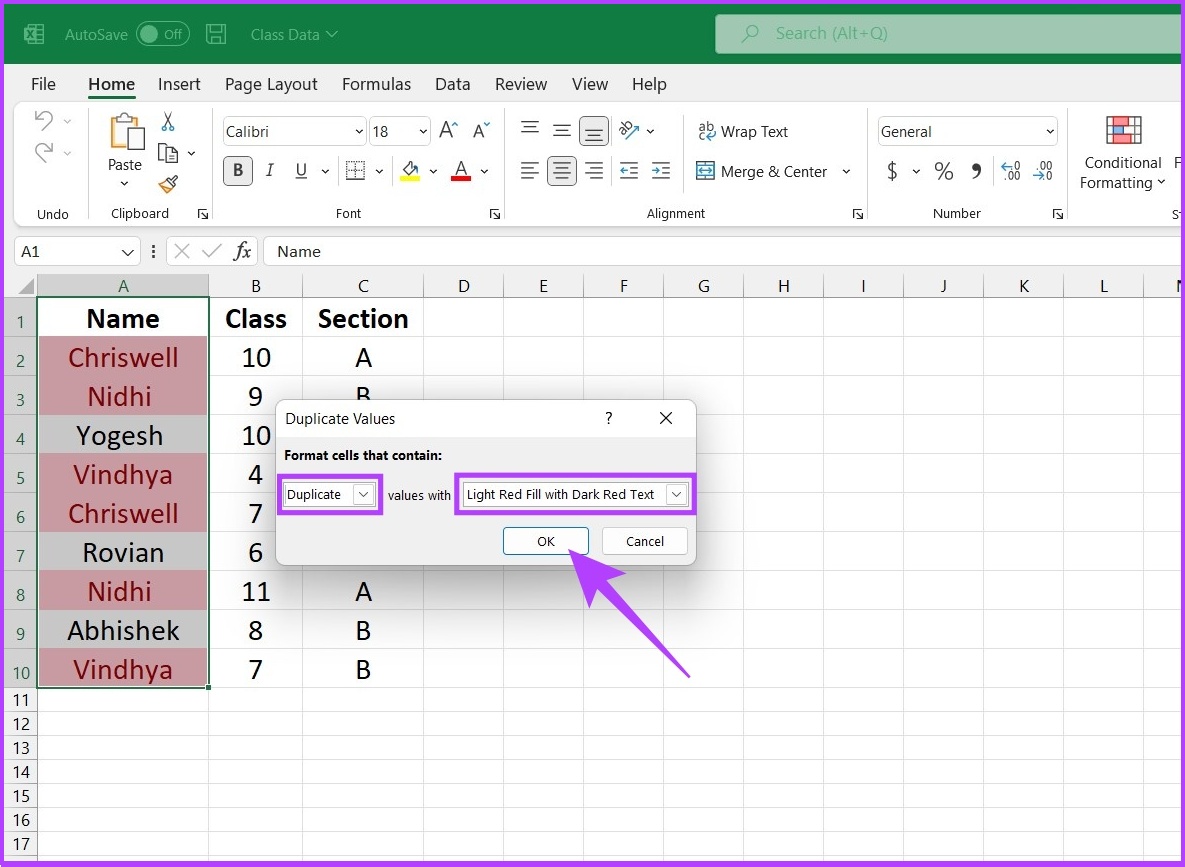
Step 5: Click on the first drop-down menu and choose Duplicate. In the next drop-down, pick the formatting you want to use to highlight the duplicate entries. Now, click on OK.
There you go. On your spreadsheet, you will find that Excel has highlighted the duplicate entries. Wasn’t it simple? That said, if you are struggling with the formatting of tables, check out these best ways to format table data in Microsoft Excel.
How to Use Excel Formula to Find Duplicate Columns or Rows
COUNTIF is one of the most commonly used Excel formulas for highlighting duplicates. As discussed above, it is primarily used to count the number of cells that appear within a defined range and meet the predefined criteria. Besides, it also outstands the contemporary ‘Conditional Formatting’ function as it allows the user to define the command, unlike conditional formatting, which only picks out duplicates.
Using the COUNTIF function, one can not only highlight duplicates but also triplicates and other repetitive values. Moreover, it also eases up highlighting a whole row based on duplicate values in one specific column, multiple columns, or all columns.
Syntax: =COUNTIF (range, criteria)
The range defines the range of cells where the formula needs to be applied and the criteria define the basis that needs to be applied to identify duplicates.
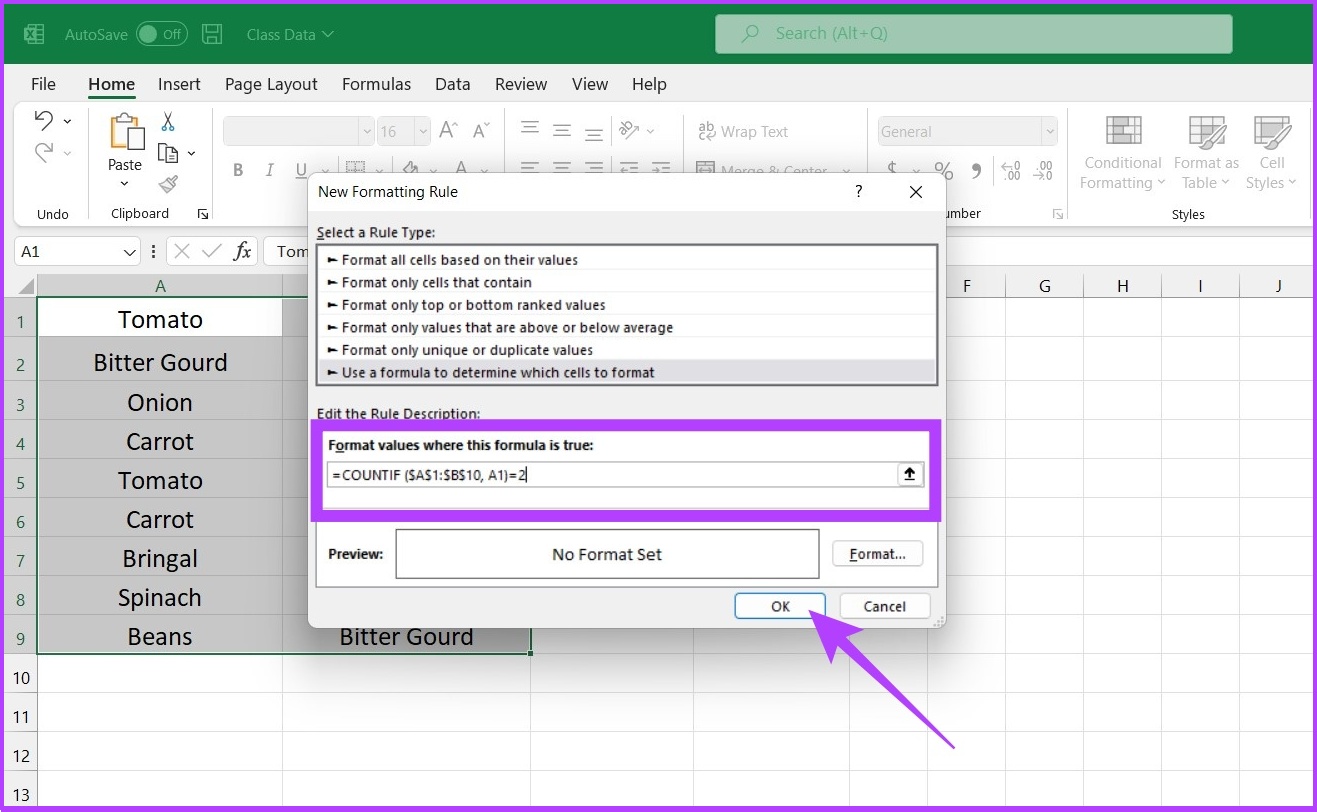
How to Highlight All Values in Spreadsheet
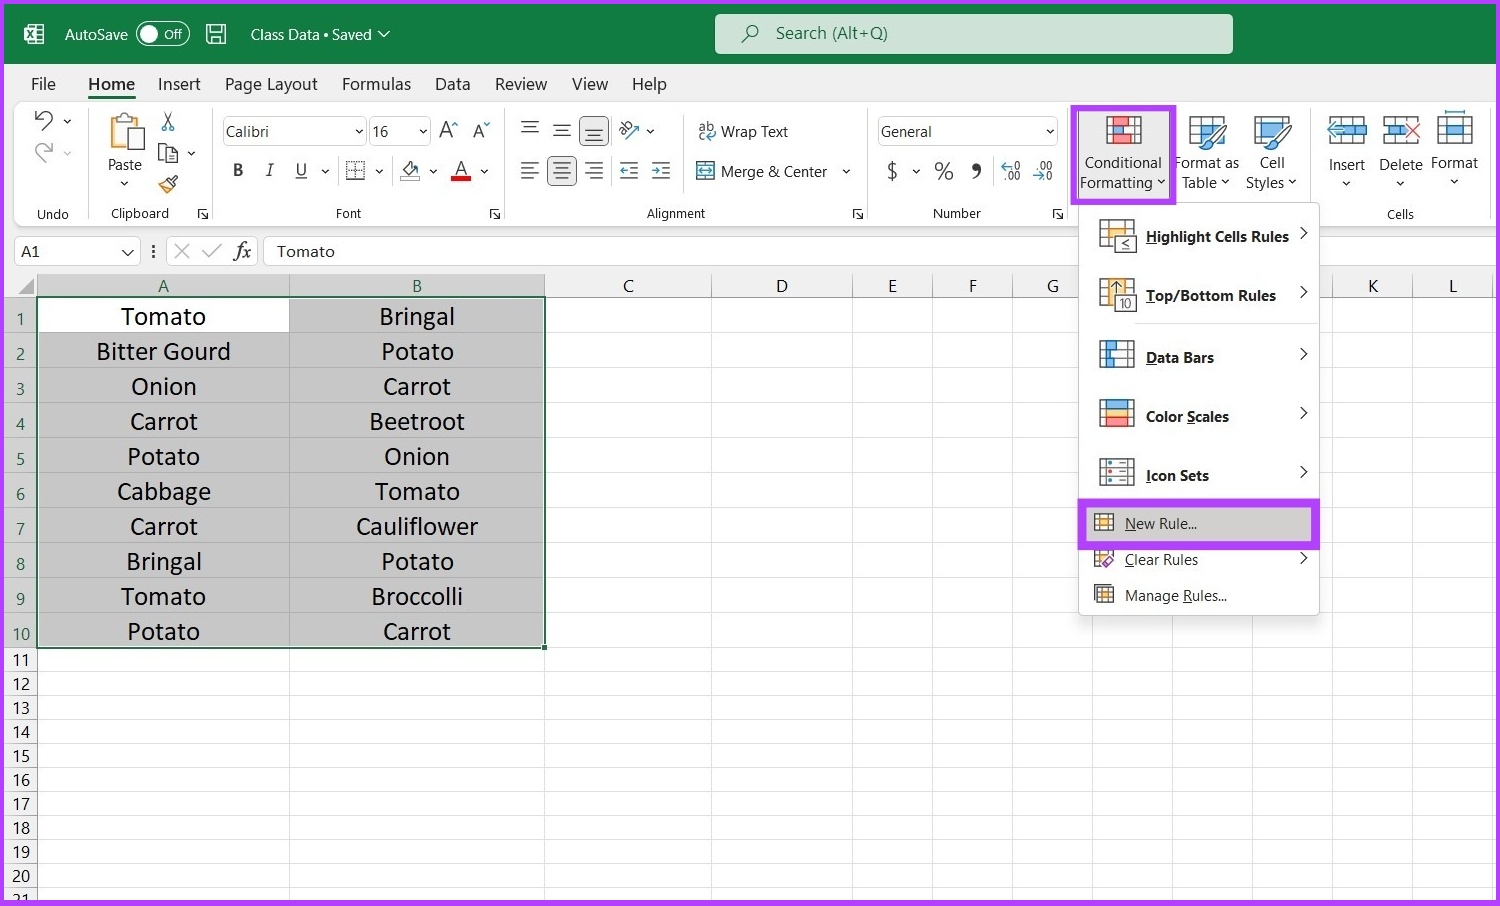
Step 1: Select the range of cells. Now, go to the Conditional Formatting function in the Home tab and select New Rule.
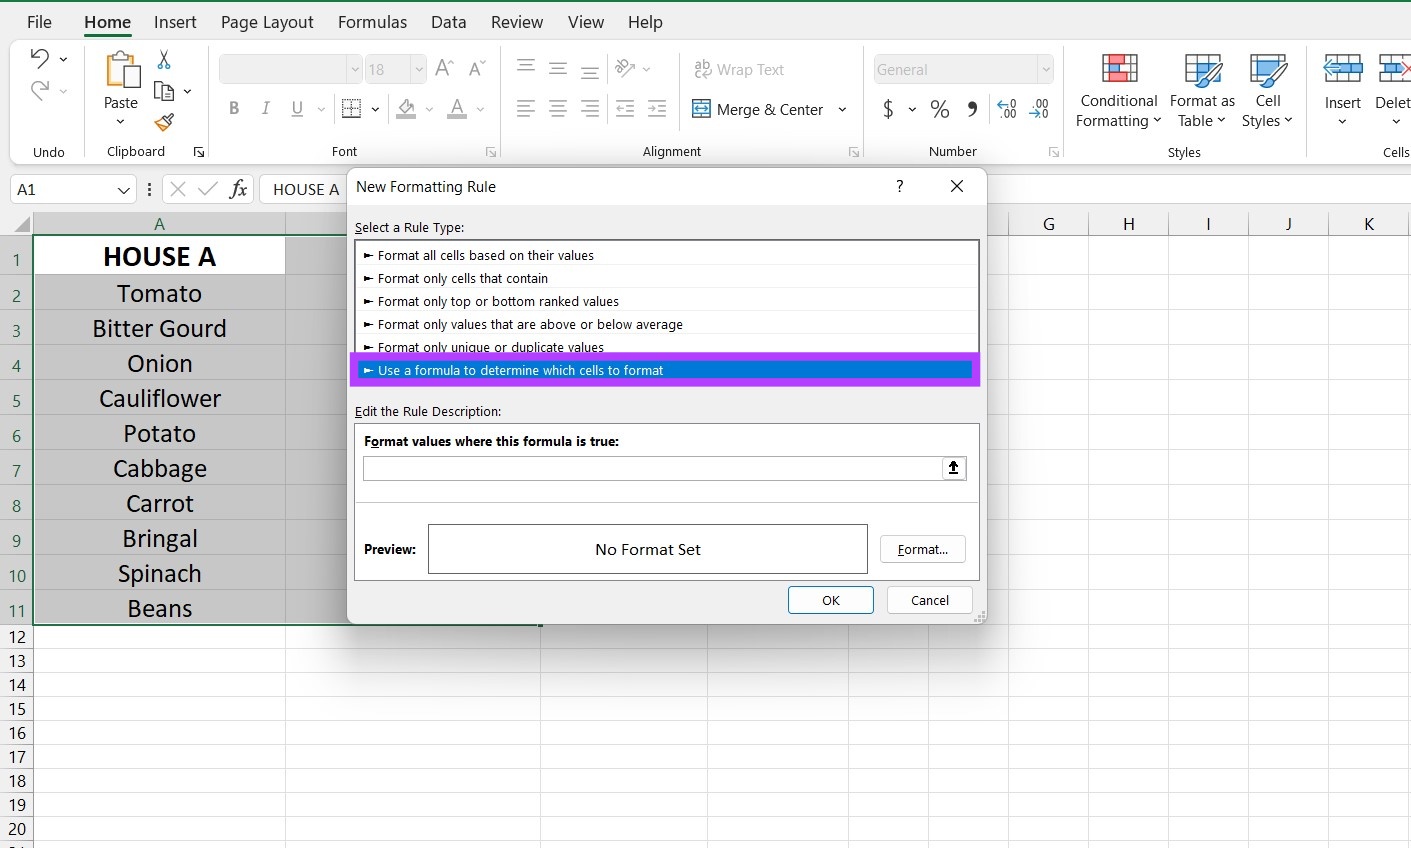
Step 2: Choose the option ‘Use a formula to determine which cells to format’.
Step 3: Now, feed the formula using range and criteria and click on OK.
For example: ‘=COUNTIF ($A$1:$B$10, A1)=2’
In this example, ($A$1:$B$10) defines the range A1:B10 for Excel, whereas A1 is the criterion, meaning Excel will compare and identify the same value as that in cell A1 to the highlighted cells, i.e., A1:B10. The number after equal to determines the number of times the value in A1 should be repeated in A1 to B10 to be highlighted.
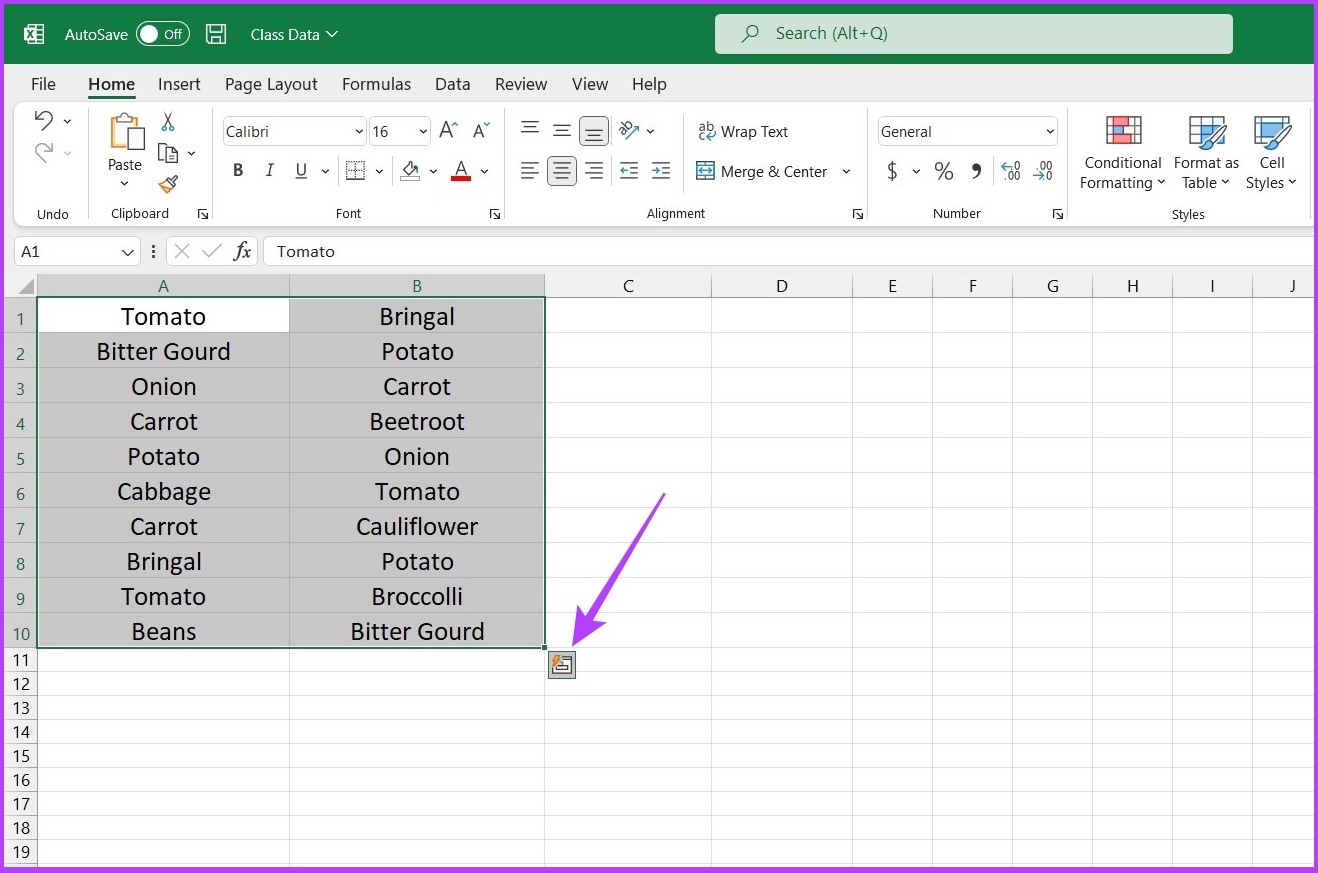
Step 4: Once you have determined the formula, select the defined range and click on the bottom icon to set up the formatting style.
That’s it. If any value appears twice, Excel will highlight the cell.
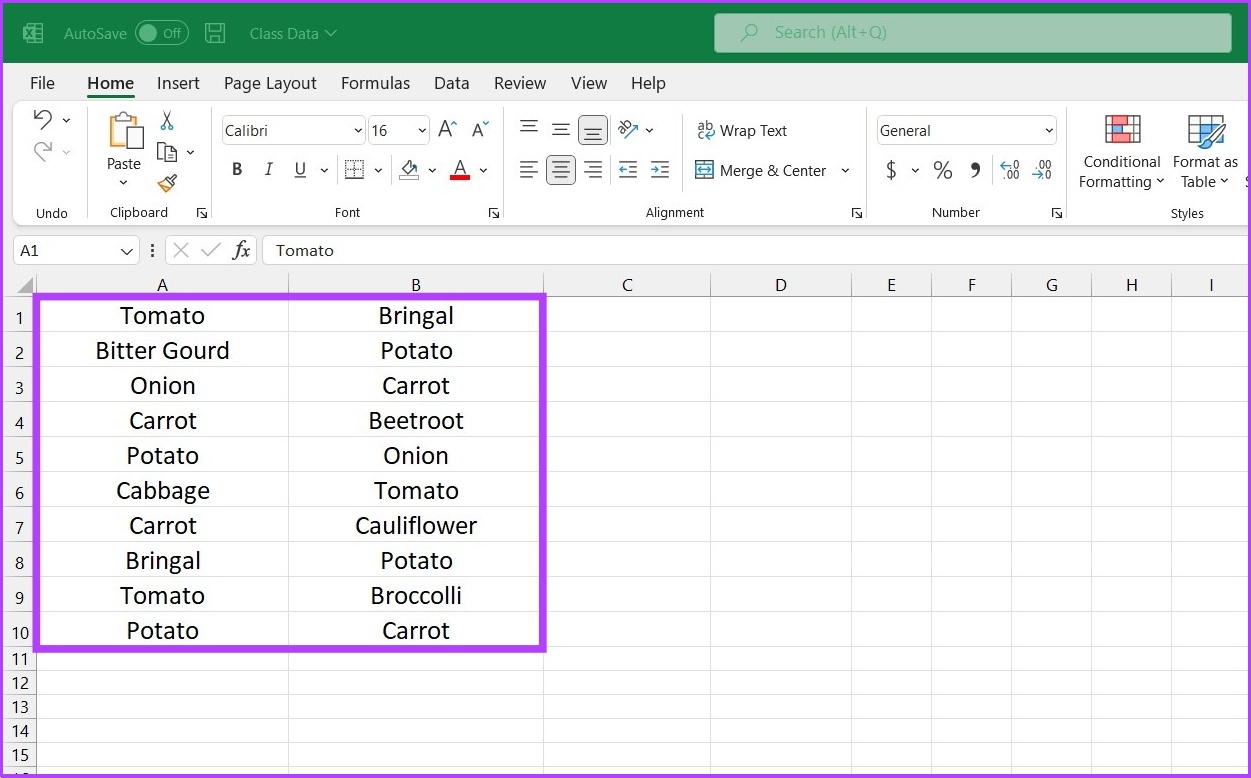
If you notice, Bringal & Carrot were not highlighted, as they don’t appear more than twice. You can amend the COUNTIF formula to get the results you want.
For instance, you can change the formula to =COUNTIF ($A$1:$B$10, A1)= 3 to highlight all triplicate values. Or change the formula to = COUNTIF ($A$1:$B$10, A1) > 3 to highlight cells that appear more than thrice.
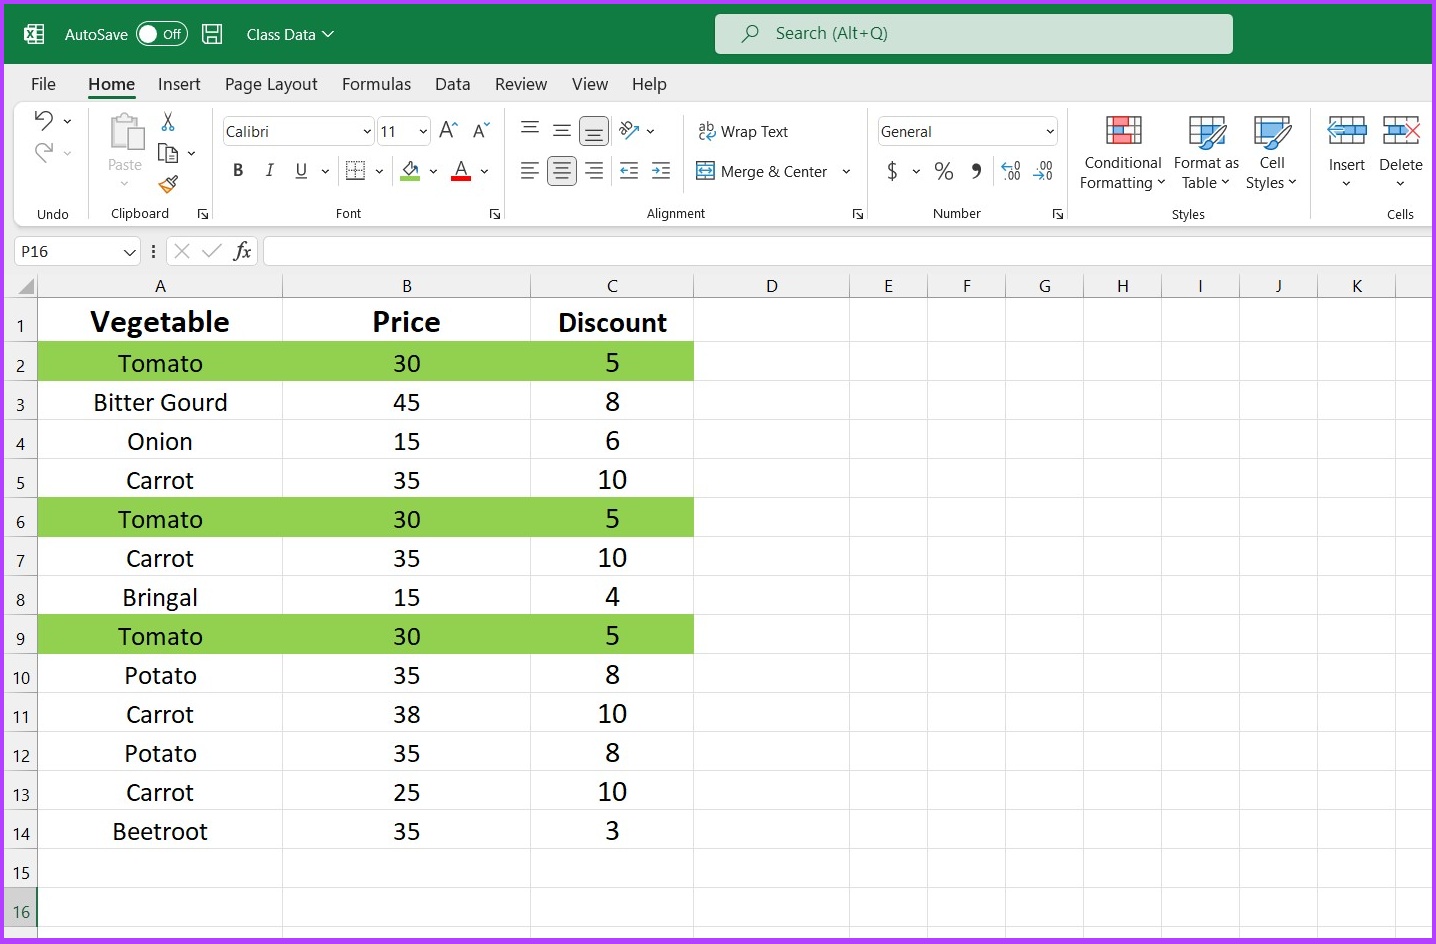
Highlight Duplicates in Rows on Excel
The built-in highlighter duplicates values only at the cell level. That said, if you want to highlight an entire row of duplicate values, you need to tweak the COUNTIF function to achieve your desired result.
Step 1: Firstly, select the cells to check for duplicates.
Step 2: Go to the Conditional Formatting function under the Style section and Select New Rule.
Step 3: Choose the option ‘Use a formula to determine which cells to format’.
Step 4: Enter the formula i.e. ‘= COUNTIFS ($A$2:$A$14,$A2,$B$2:$B$14,$B2,$C$2:$C$14,$C2) = 2’
There you go. Excel will produce the result based on your query.
Mind you, the COUNTIFS function works like the COUNTIF function. If you want to identify triplicates, substitute ‘2’ from the above formula with ‘3’. You can also set criteria as ‘>1’ or ‘<3’.
Not only can you highlight the duplicate dataset, but you can also easily remove it using Excel. Here’s how to do it.
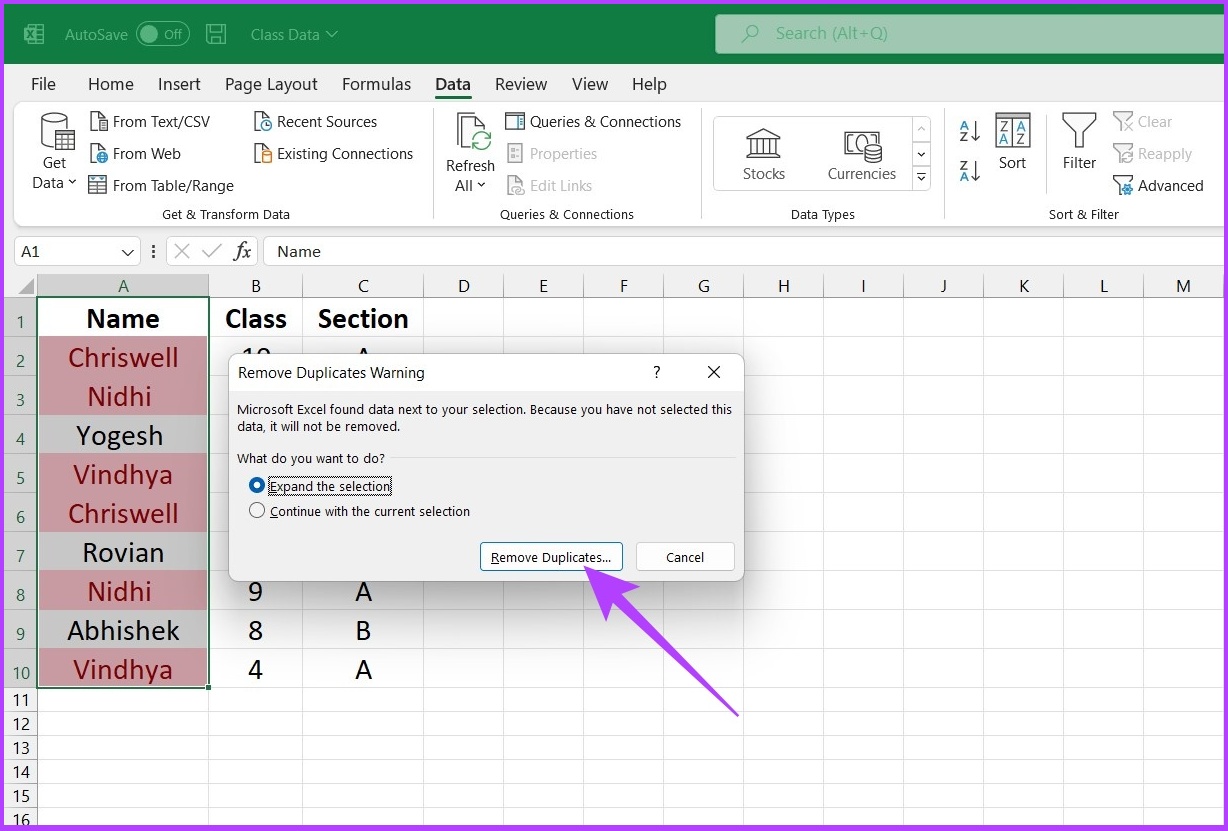
Step 1: Firstly, select the dataset you want to remove duplicates from. Don’t forget to select the column header along with the selected column.
Step 2: In the Excel menu at the top, click the Data tab.
Step 3: Now, from the Data Tools section, click on the Remove Duplicates icon.
Step 4: In the Remove Duplicate Warning dialog box, select Expand the Selection and click on Remove Duplicates.
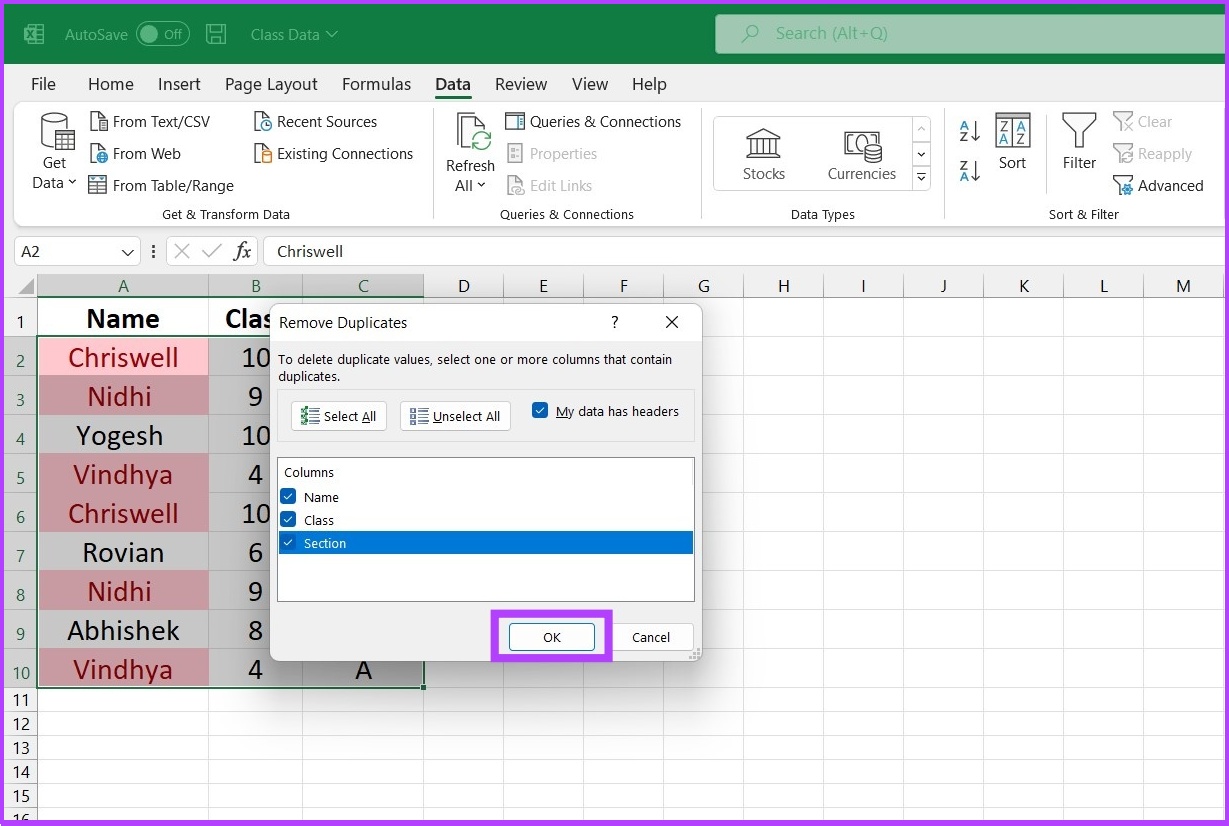
Step 5: Under Remove Duplicates, select duplicate columns you want to delete and click OK.
Excel will remove duplicate entries from the selected dataset and leave the unique data for your processing.
Duplicate-Free Unique Spreadsheet in Excel
Highlighting duplicate cell values will be a smart move if you’re dealing with a large dataset. The above-mentioned methods will help you for sure, irrespective of whether you use Excel regularly or occasionally. I hope this guide helped you in highlighting duplicates in Excel. Need more tricks to efficiently manage your work on Excel? Leave a thumbs up in the comment section below.
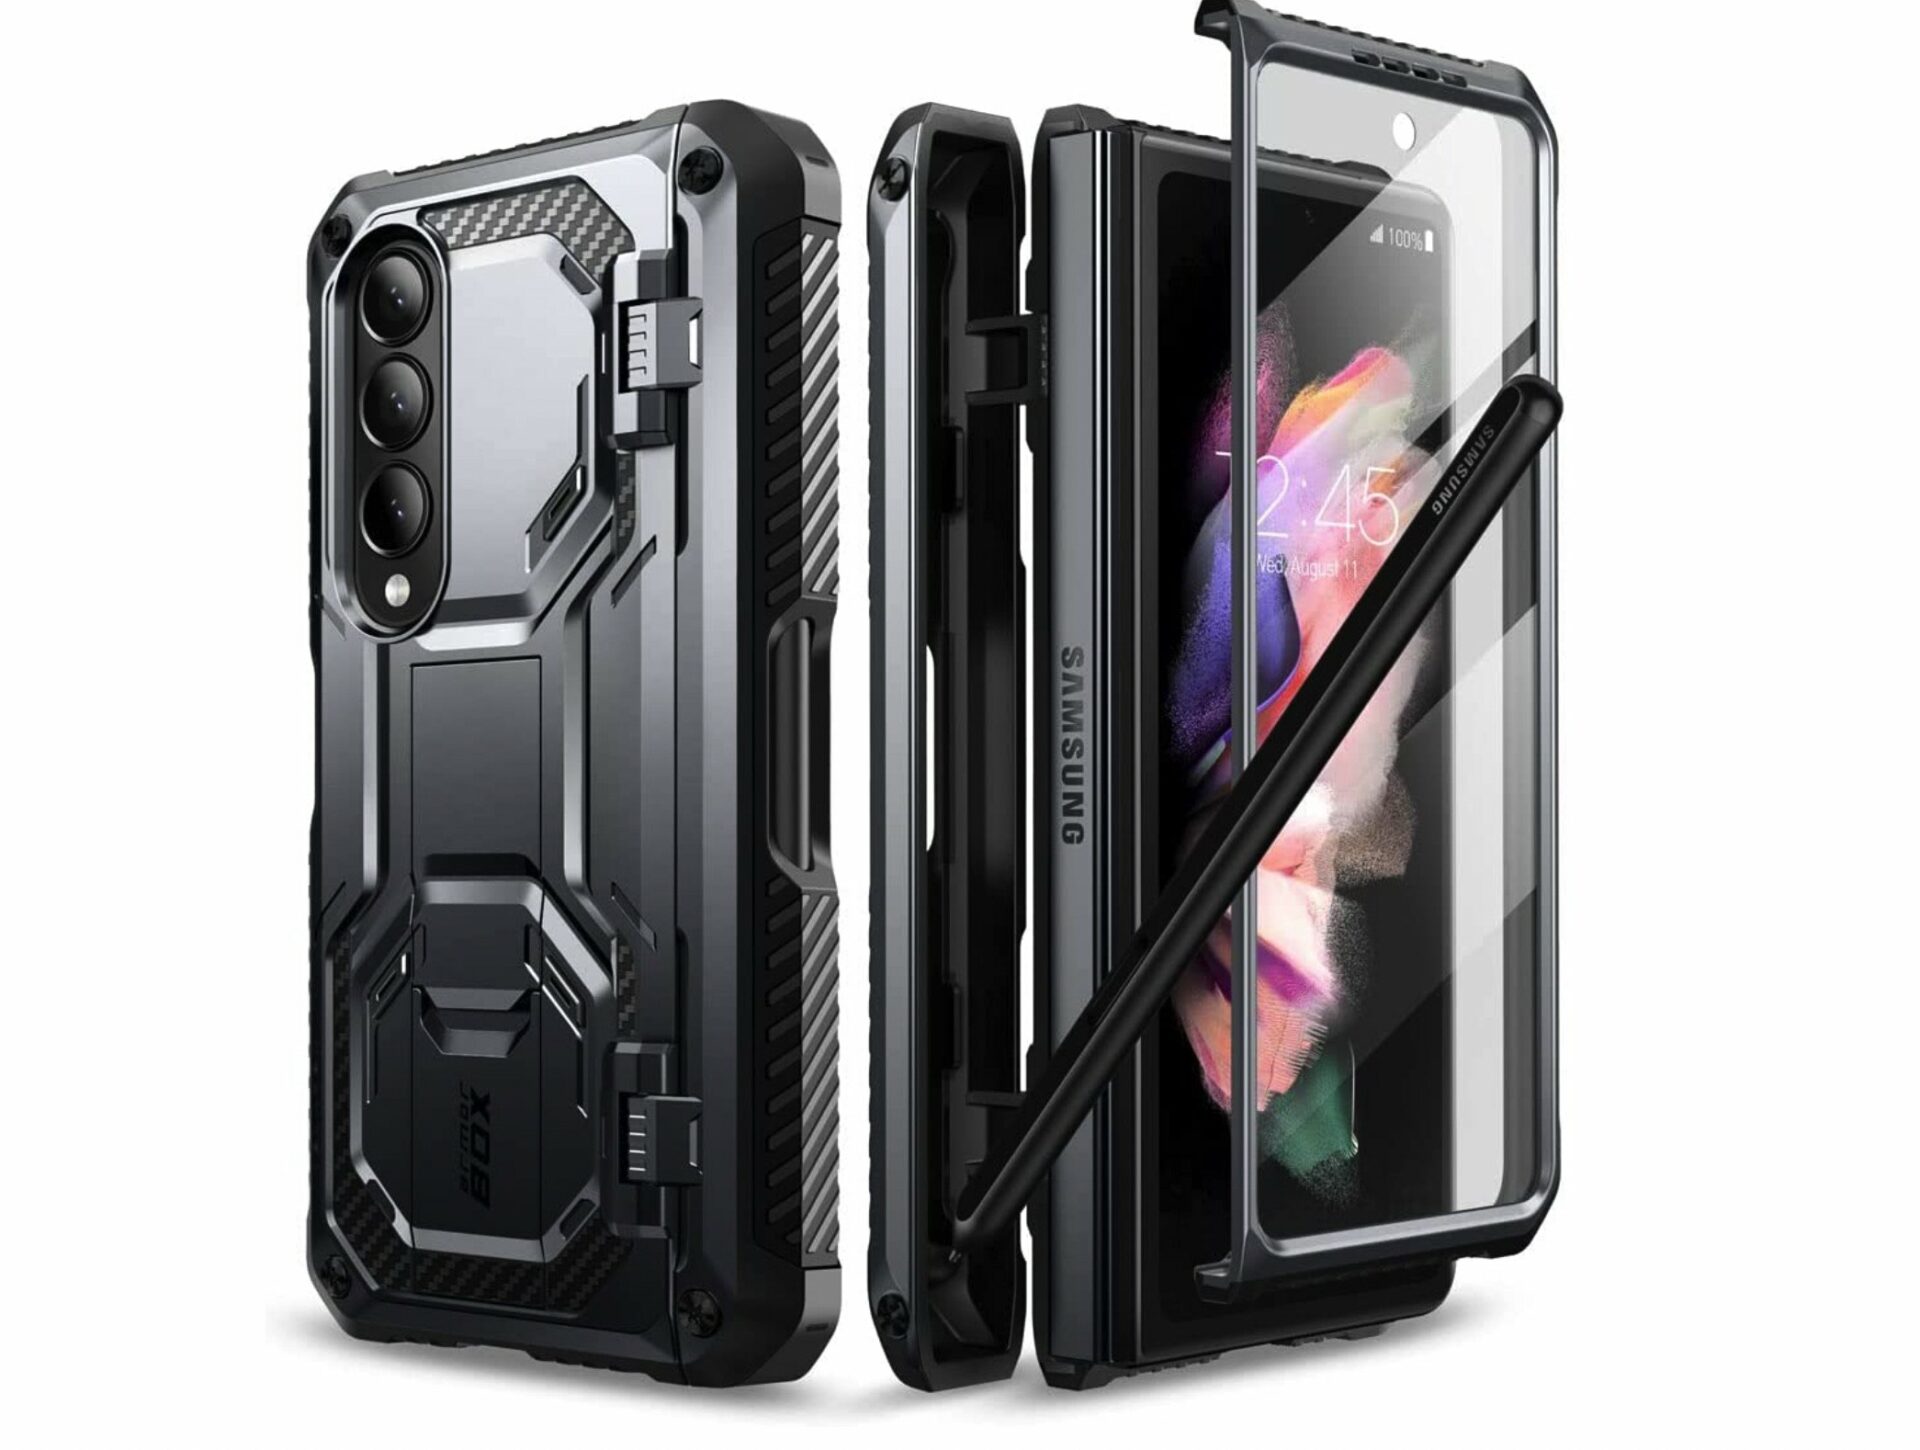
A phone case not only prevents scratches and marks but also absorbs the impact of falls and drops. Hence, it’s always advisable to protect an expensive phone with a case. That’s why we compiled a list of the best MagSafe cases for the iPhone 14 Pro Max. Let’s have a look.
The Caseology Nano Pop is a soft silicone case that adds a pop of color to your iPhone. Its silicone construction ensures good drop resistance while maintaining a slim form factor.
It should be noted that Ceseology’s contender is one of the few iPhone 14 Pro Max silicone cases with MagSafe. The case is available in five colors, each of which sports a dual-tone finish. It’s quite rugged, too, and offers military-grade protection for your iPhones.
The ESR Classic Hybrid is a protective clear case with MagSafe that shows off the back of your iPhone 14 Pro Max. It has reinforced corners and thick edges that provide maximum protection, even if dropped.
The back of the case is made of polycarbonate, so it won’t turn yellow with time. The sides, though, will turn yellow as they’re made of TPU. So, we suggest opting for the variant with black flanks instead. Additionally, ESR claims to offer military-grade protection in this case.
The Spigen Mag Armor has a ribbed texture on the back, providing additional grip. It sits between a rugged and a slim case, so it doesn’t add much bulk. The case allows users to use any MagSafe accessory with their iPhone 14 Pro Max smartphone, too.
Spigen’s air cushion technology ensures your phone sits snugly inside the case. More notably, the case comes with raised bezels, which further protect the smartphone’s camera module and display. That’s not all; the case features precise cutouts for the volume rocker as well as the Silent switch, which is great.
If you don’t want a completely clear case because it turns yellow or attracts fingerprints, this one from Torras is a good alternative. This magnetic case has a translucent back, a smoked finish, and black edges that will not deteriorate with time.
The case’s translucent back looks cool and has a MagSafe ring to attach accessories. You also get reinforced corners for drop protection. Additionally, the case comes with swappable volume buttons of different colors. Speaking of which, the case itself is available in a dozen different hues, so you can choose one that matches your aesthetic.
Otterbox is known for its rugged and protective cases, which makes this a great option if you need maximum protection for your iPhone. The support for MagSafe is the icing on the cake.
While the case offers superb protection, note that you will add a lot of bulk to an already thick phone. The key highlight, however, is that the case is available in a range of colors and finishes. Be it a flowery pattern or a solid color, Otterbox has covered most bases, so you’ll undoubtedly find something you fancy with the company’s Symmetry Series.
If you are looking for a simple, clear case with MagSafe for your iPhone 14 Pro Max, you can’t go wrong with the one from Mkeke. This one offers reinforced corners that protect your iPhone from impacts and drops. It has a snug fit, and the slim design preserves the form factor of your iPhone 14 Pro Max to some extent.
The case also offers the usual bells and whistles, like raised edges along the screen, to protect it from scratches when kept face down. The bundled MagSafe magnet is strong and will stick well to MagSafe-compatible accessories like wireless chargers and car phone mounts.
If you’re in the market for an iPhone 14 Pro Max leather case with MagSafe, Apple’s first-party leather case is arguably the best option and is, therefore, highly recommended. The case is available in several colors and looks great when you put it on your iPhone.
Apple’s official leather cases have a felt lining that protects the iPhone from scratches. The MagSafe magnets are placed behind this lining. Since it is crafted from genuine leather, the case will develop a patina over time, enhancing its appearance. Although slightly pricey, Apple’s leather case is a solid option if you want a dependable MagSafe case.
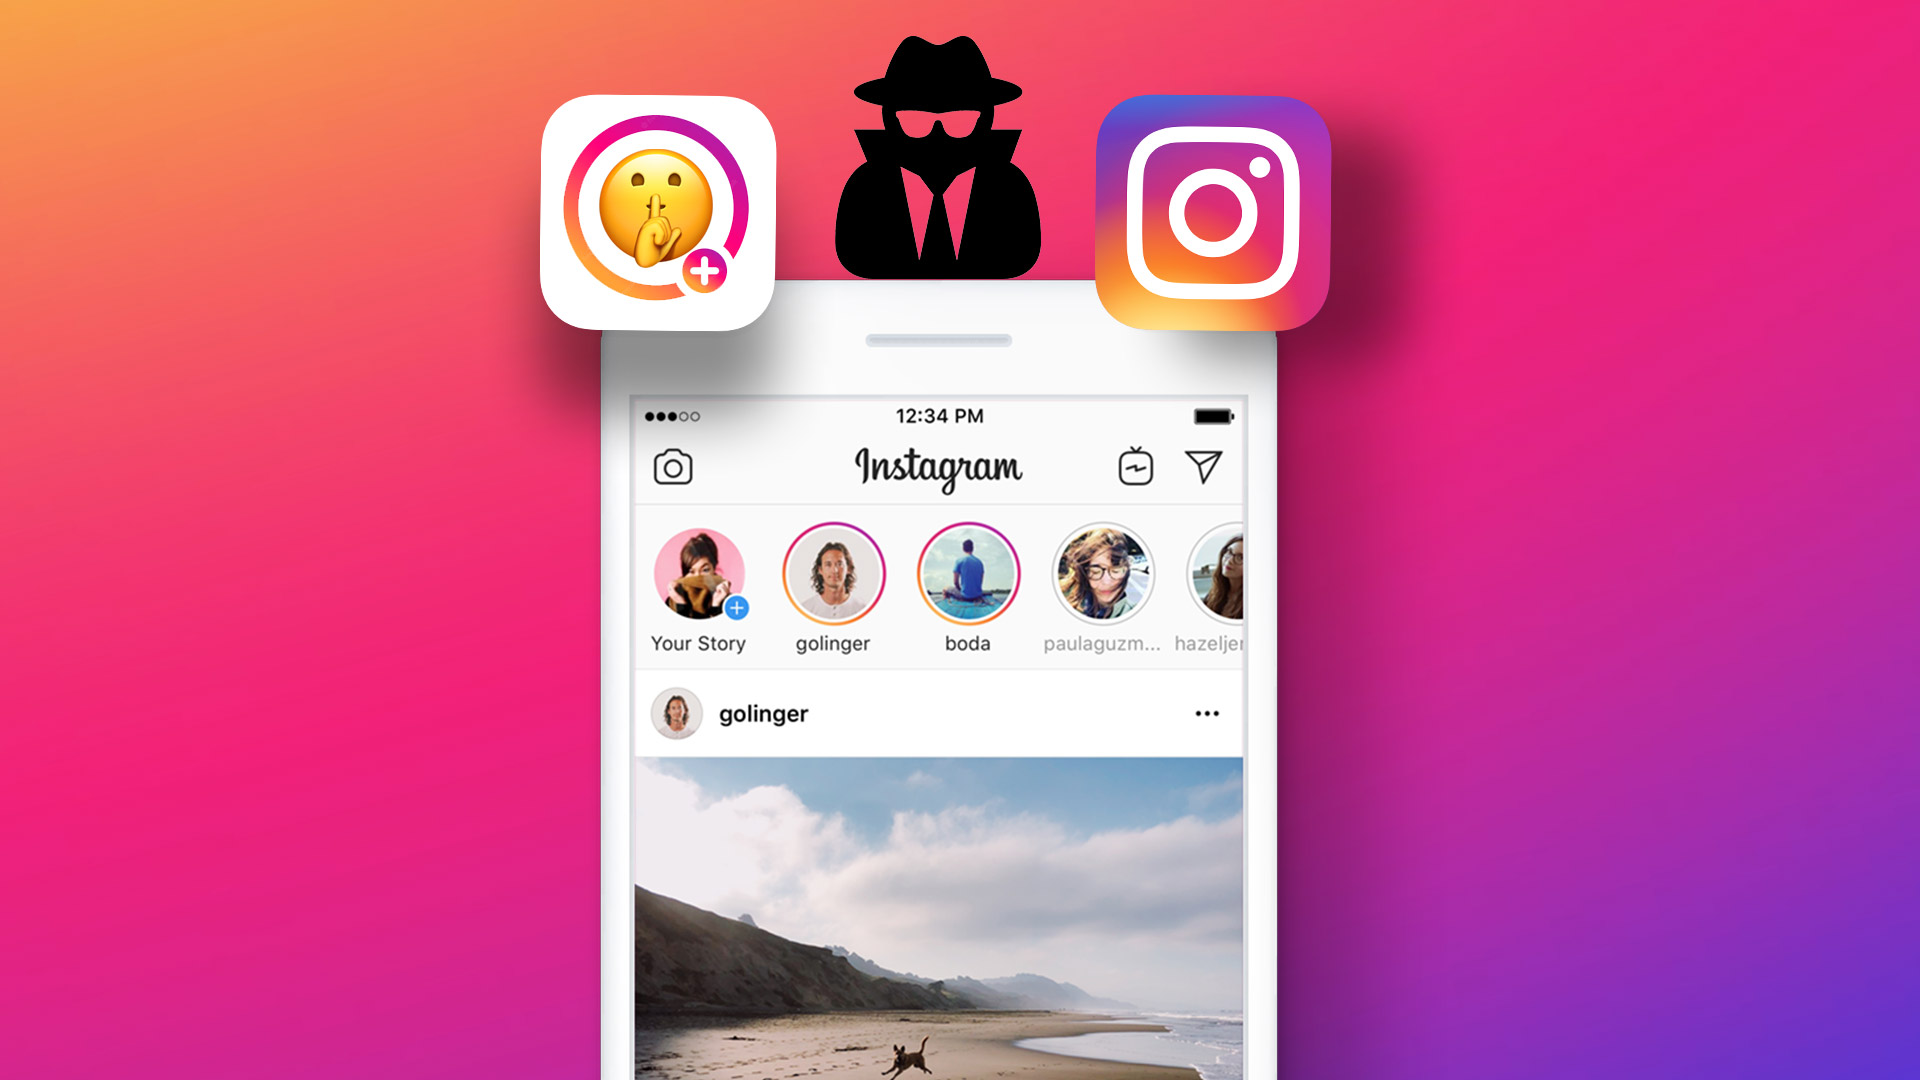
Unlike posts on Instagram (mentioned below), users can see who opened/viewed their Instagram Stories. Moreover, there’s no option to check them without opening an Instagram account. However, there are third-party tools that let you do it. We have compiled a list of the best ones.
But are third-party Instagram profile viewers safe? Well, yes and no. Some Instagram third-party tools, like the ones listed below, use ads as their source to fund the service and do not ask for your personal details, contrary to many other tools.
Method 1: Instagram Downloads
This free tool allows you to view and download Stories, Instagram profile pictures, posts, reels, videos, IGTV, and highlights. Follow the instructions below.
Step 2: Now, type the username in the search field and press Enter.
Step 3: Scroll down and click on Stories to view it.
Step 4: Much like Insta-Stories, even Instagram Downloads allow you to download the Story with a click.
The only noticeable downside of using Instagram Downloads is that you can only view 12 posts, not more.
Note: When you download a Story containing a video, it gets saved as a photo, which was a big letdown for me. So, if you want to download the Story video, use Dumpor (listed below).
Method 2: Dumpor
Dumpor lets you view Posts, Reels, Videos, and Stories without logging in or creating an Instagram account. It also allows you to search based on hashtags and locations, which is nifty. Follow along.
Step 1: Open your default browser and visit Dumpor.
Step 2: Type the username in the search bar and click Search.
Step 3: You will be presented with many profiles. Click on the one you’re looking for.
Step 4: Scroll down and click on Show Stories.
Step 5: Now, select the one you wish to view.
Step 6: Dumpor also allows you to download the stories. Click on the green download icon at the top right to download them.
How to See Instagram Posts Without an Account
There are some prerequisites for this method to work. Firstly, you must use the username of the Instagram profile you wish to view. If you don’t know the username or if the account is private, you can’t view it. That said, here’s how to do it.
Using a Web Browser
Step 1: Open any browser on your phone or computer and type www.instagram.com/ followed by the person’s username. You must type the exact username, including full stops and underscores.
For example: www.instagram.com/therock, wherein therock is the username.
Step 2: You will land on the profile page. Click on x at the bottom right to remove the banner for a better view.
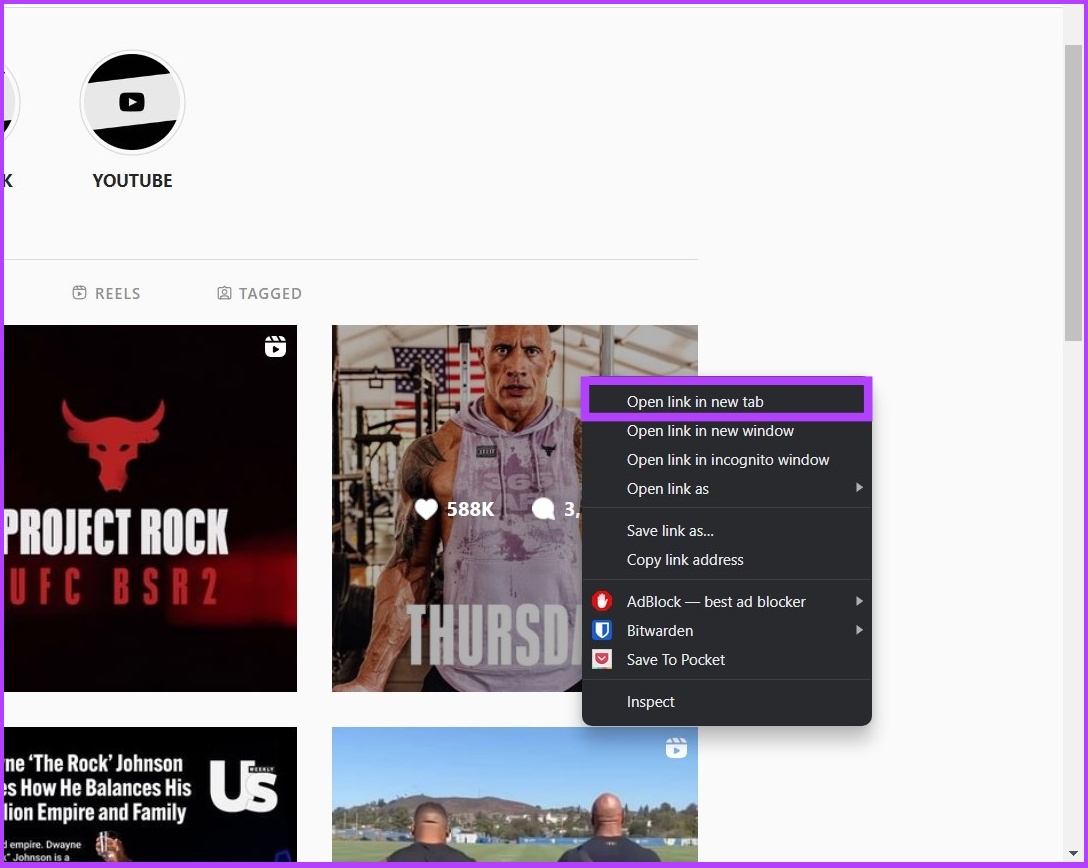
Step 3: Now, find the photo or video you want to view, right-click on the image, and click Open image in a new tab.
This way, you can view the photo or video in full size.
You can play the video, read the comments, and copy the post link to share it with others.
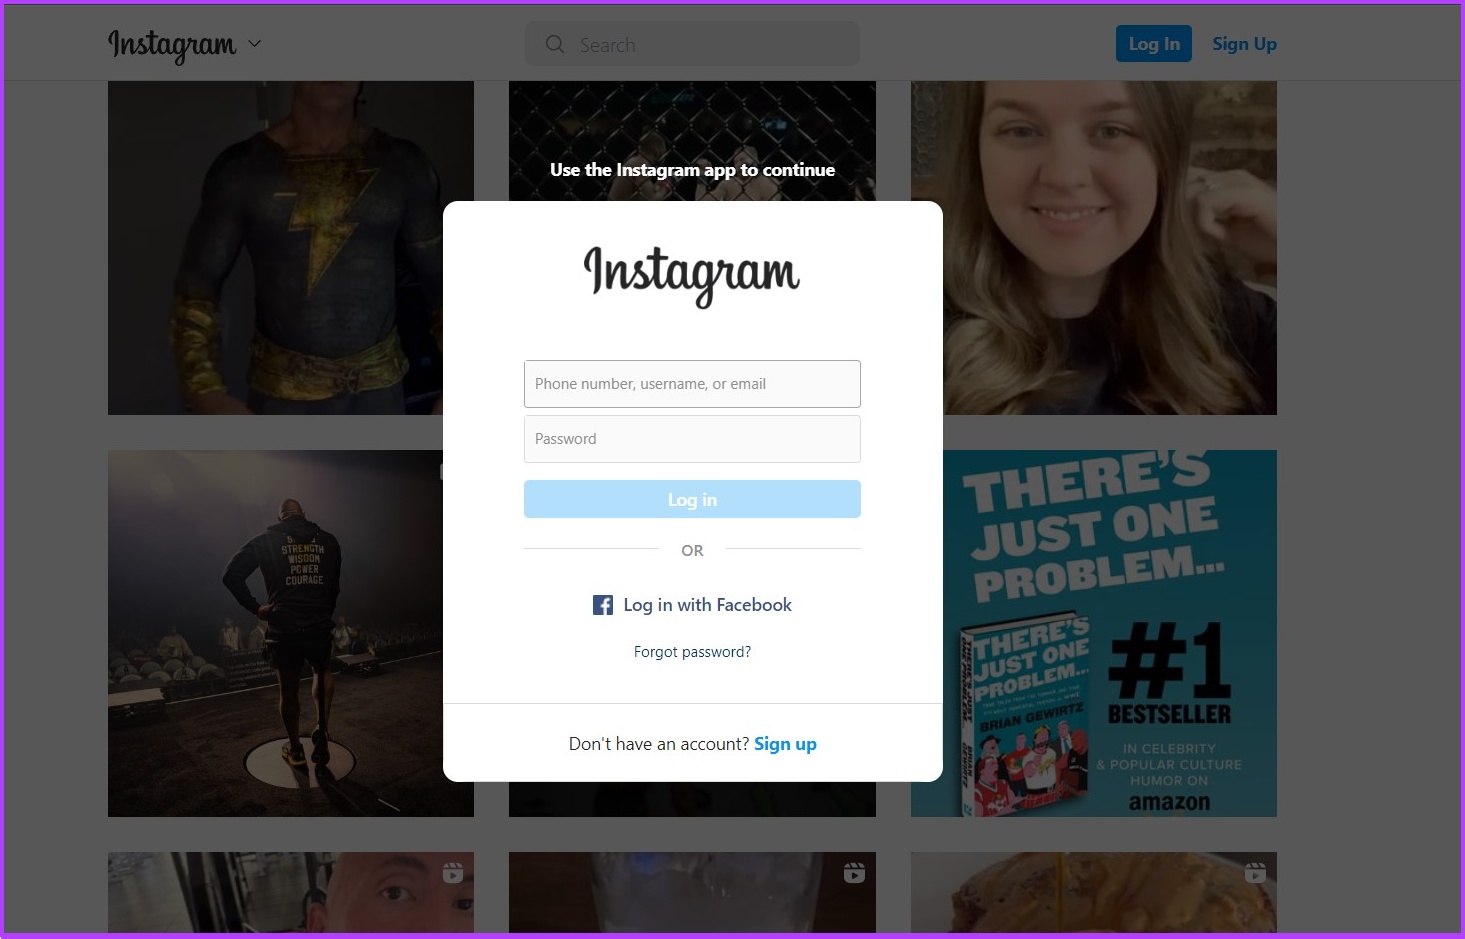
Mind you, Instagram limits unauthorized users from viewing a profile. You can go on to view about 36 of the latest posts of any open account, after which you will see a pop-up window that says ‘Log in to continue’, which cannot be closed.
There are only two solutions to the above problem;
Create an Instagram account and check posts without any limitations.
Use third-party tools to access Instagram without an account.
If you don’t mind using third-party tools, move on to the next section. Besides, these tools will help you find the public profiles even if someone has changed their Instagram username.
View Instagram Profile Using a Third-Party Tool
Step 1: Open the ImgInn website in your web browser.
Step 2: In the search bar, type the username of the Instagram account you want to view and press Enter. You can also enter their name if you don’t know their exact username.
Step 3: Select the account you want to view from the list.
And unlike Instagram, ImgInn doesn’t stop you after 36 latest posts. Besides, it goes one step further to let you download the photos or videos on the account.
FAQs
1. Is it possible to view everyone’s story without an account?
No, Instagram doesn’t let you view Stories without an account. However, you can view the stories of public accounts using the third-party tools mentioned above.
2. Can I see private profiles without logging in?
No, you cannot. Instagram doesn’t allow you to view private profiles without consent. And, of course, you can’t gain consent without an Instagram account.
3. Can I watch Live videos on Instagram without logging in?
If you wish to watch a Live video, you have no option but to create an Instagram account.
Google Chrome is a household name because of its mostly snappy performance. Yes, ‘mostly’ snappy. Over time, we observed that Chrome gets sluggish. If clearing browser data and resetting Chrome does not cut it – you probably need to check out the experimental features called flags. In this article, we’ll show you nine such flags to make Google Chrome faster.
Flags on Chrome are present on a hidden page. This is because enabling the wrong flag can mess up your web browsing experience. Therefore, we advise you to carefully read this article to enable the right flags that will help improve speed and performance on Google Chrome.
What Are Flags in Chrome
Flags are a set of experimental features and configurations on Google Chrome. These are not intended for regular users but for developers.
If you are developing a web application, you obviously must ensure that it runs well on Google Chrome. This of course will need you to test the behavior of the application under each configuration of Google Chrome. And the flags menu on Chrome lets you do all of these tests and experiments, by enabling and disabling many micro-level features on Google Chrome.
However, a few flags are safe to use and enhance the web browsing experience. We looked into such flags and have explained in detail how they will help you. But before we get there, let’s understand how to open the flags menu on Google Chrome.
How to Open Chrome Flags Menu
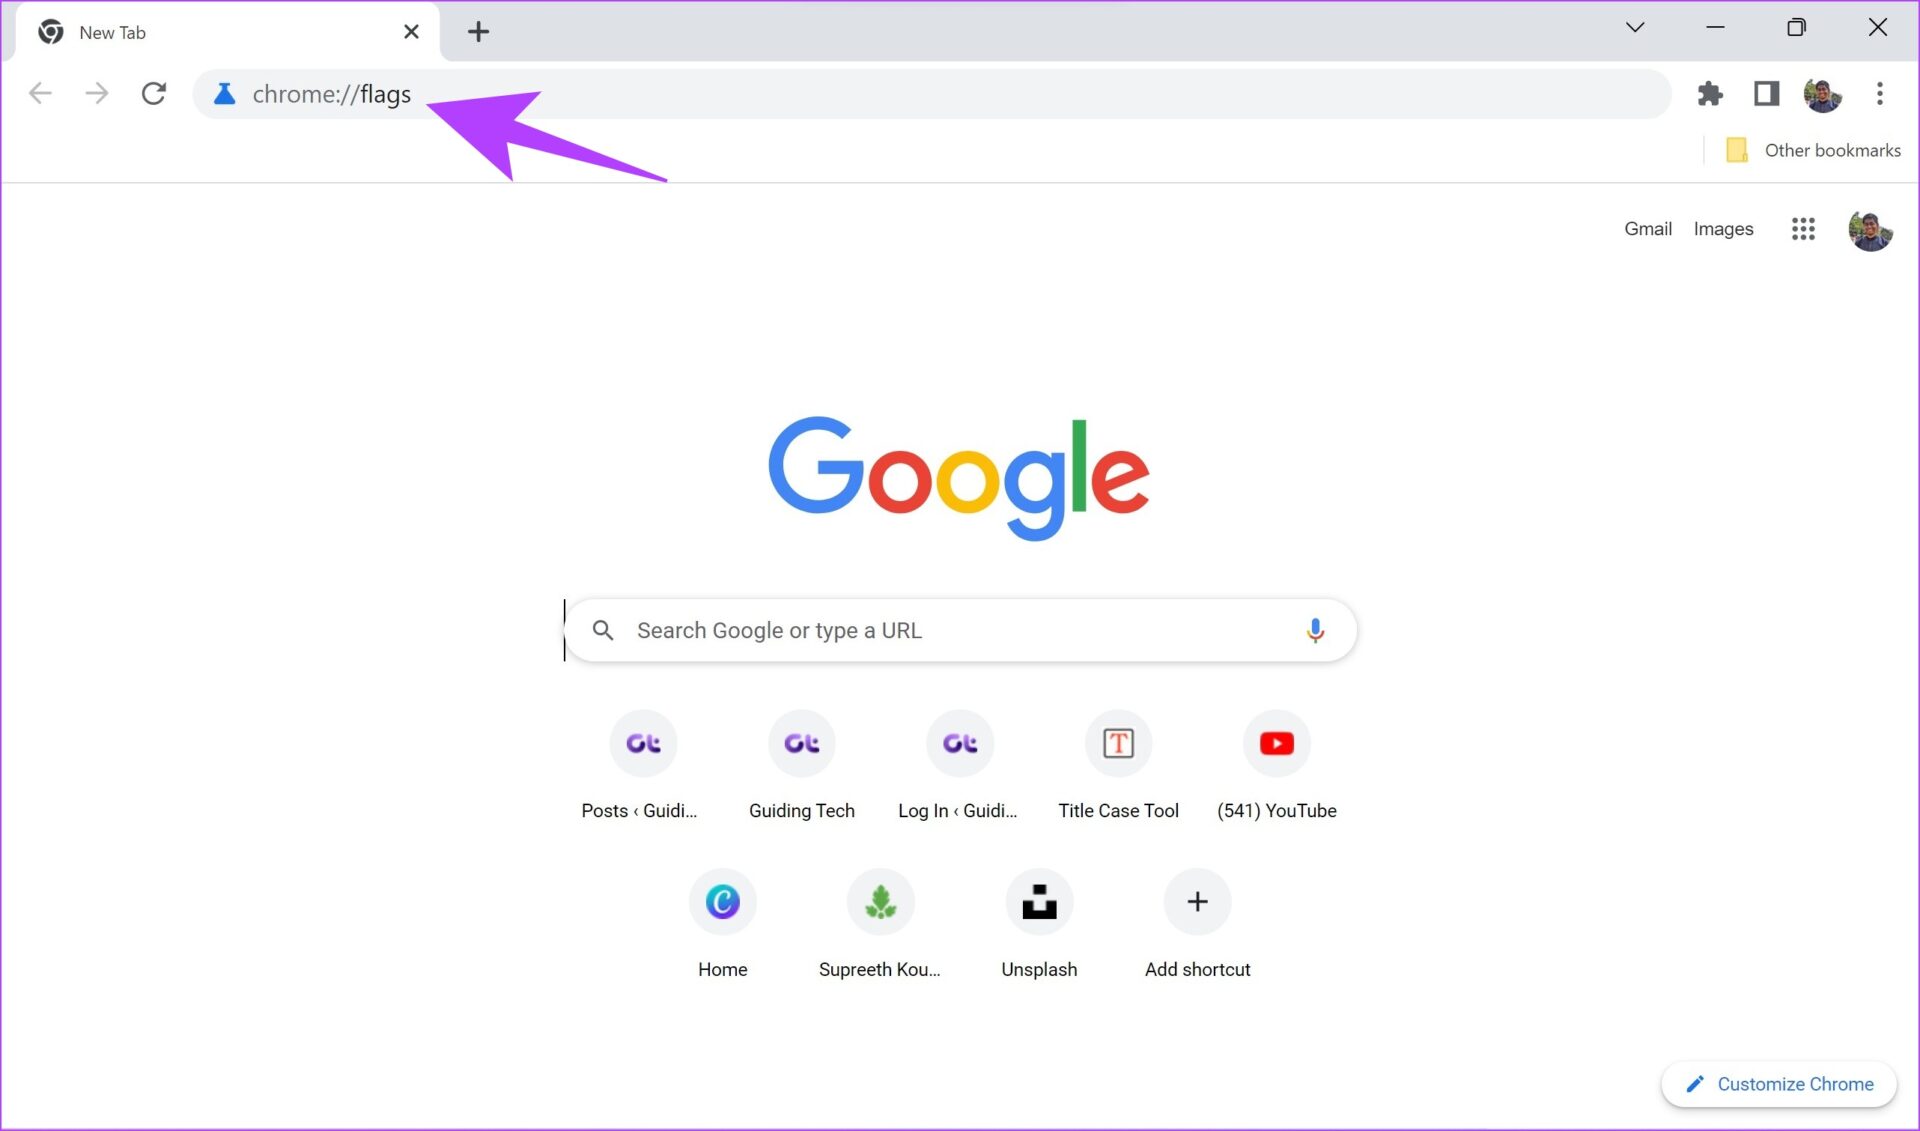
In the address bar of Google Chrome, type in ‘chrome://flags’. This is all you need to do to enter the flags page. It might seem overwhelmingly technical at first but fret not as we have an easy-to-follow procedure to enable useful flags.
But how do we find useful flags and enable and disable them in the long list of flags? Read our next section to find out more.
How to Enable Google Chrome Flags
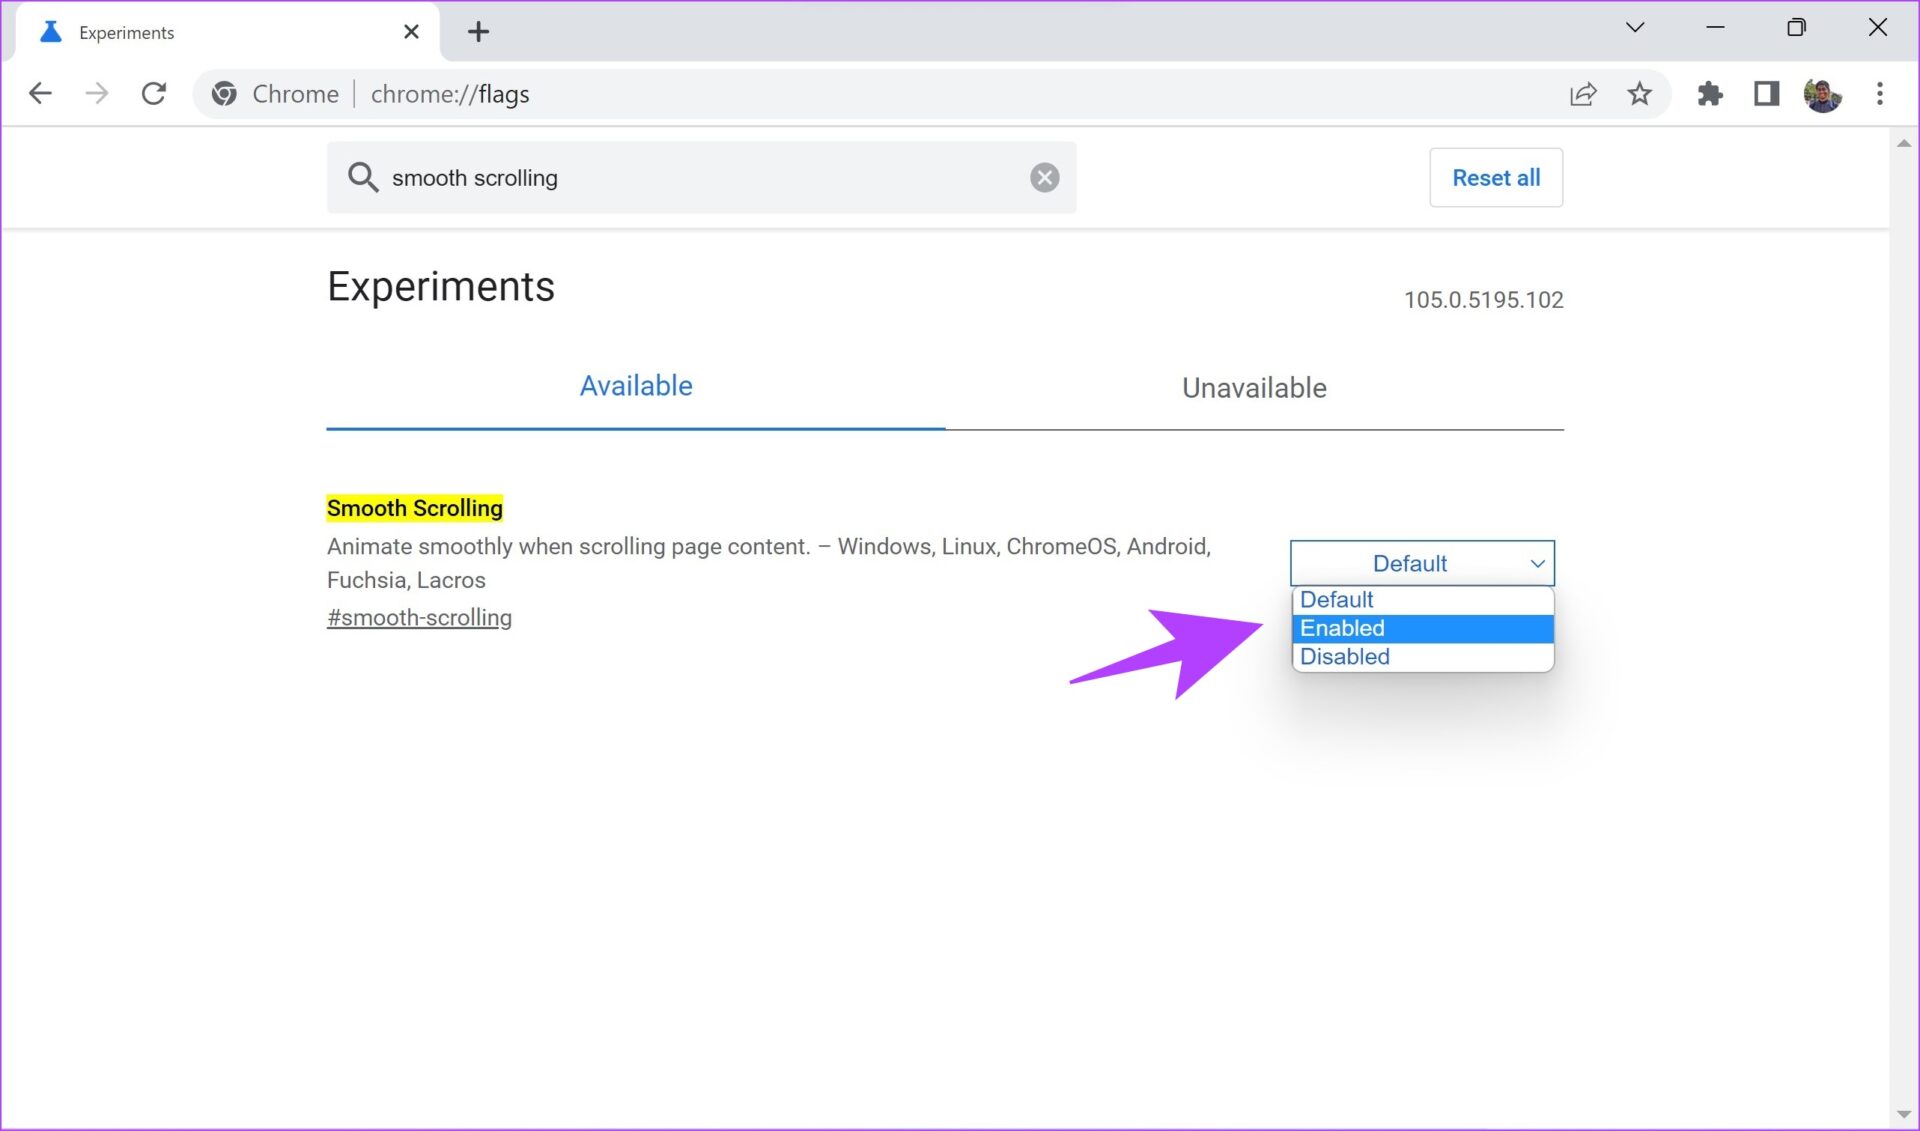
Step 1: Go to chrome://flags.
Step 2: Enter the name of the flag to find it. We have recommended the best ones in the next section.
Step 3: Once you find the flag, click on the drop-down menu next to it.
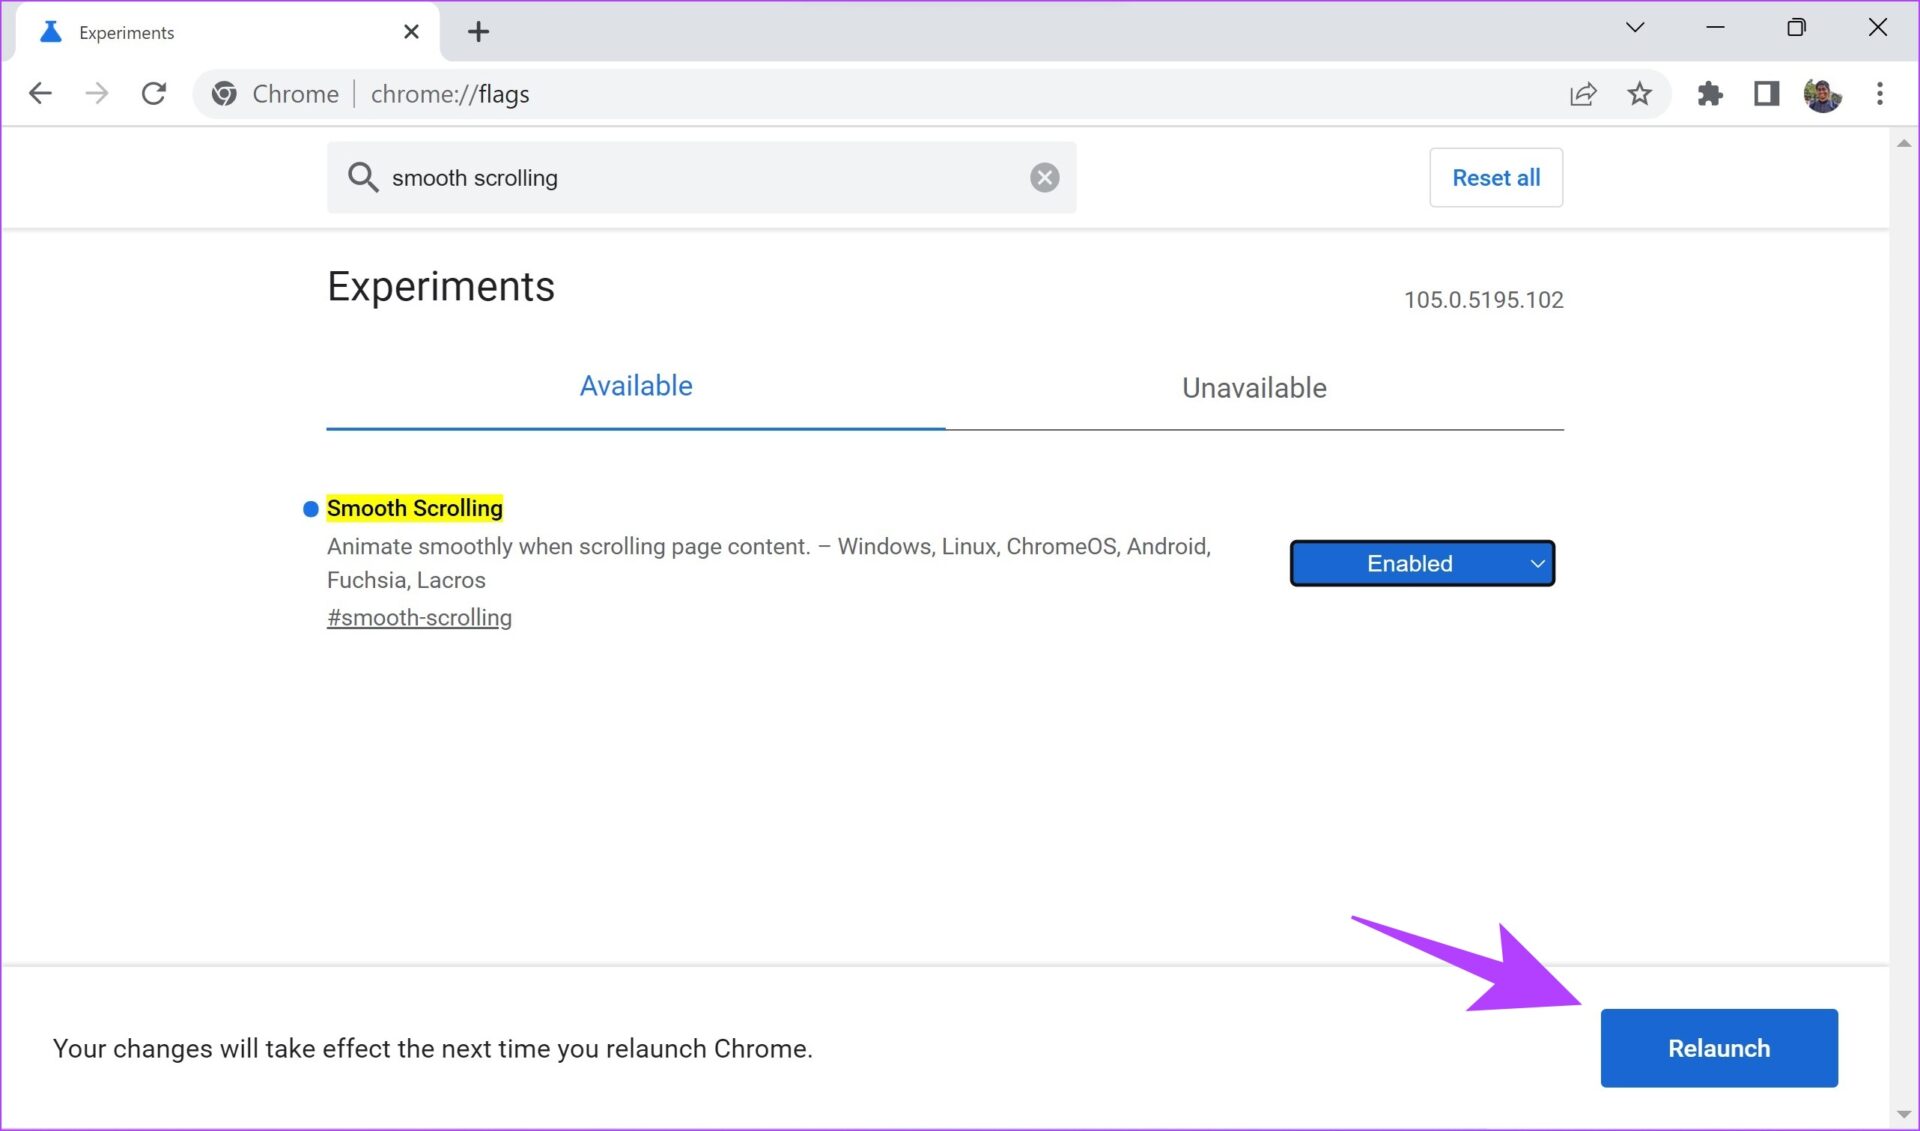
Step 4: Now, click on Enabled to enable the flag.
Step 5: Now, you will be asked to restart Chrome to get the settings into effect. Simply click on Relaunch.
Now that we have learned how to enable flags, it’s time we start searching, and configuring some of the useful flags that’ll help make Chrome faster.
9 Best Flags to Speed Up Google Chrome
Here’s a list of nine flags to improve your web browsing experience on Google Chrome. Read the description to understand what each flag does, and how it can affect Chrome. Once you understand and feel the necessity for it, you can go ahead and enable the same. For convenience, we have added a quick link to open up these flags on Chrome.
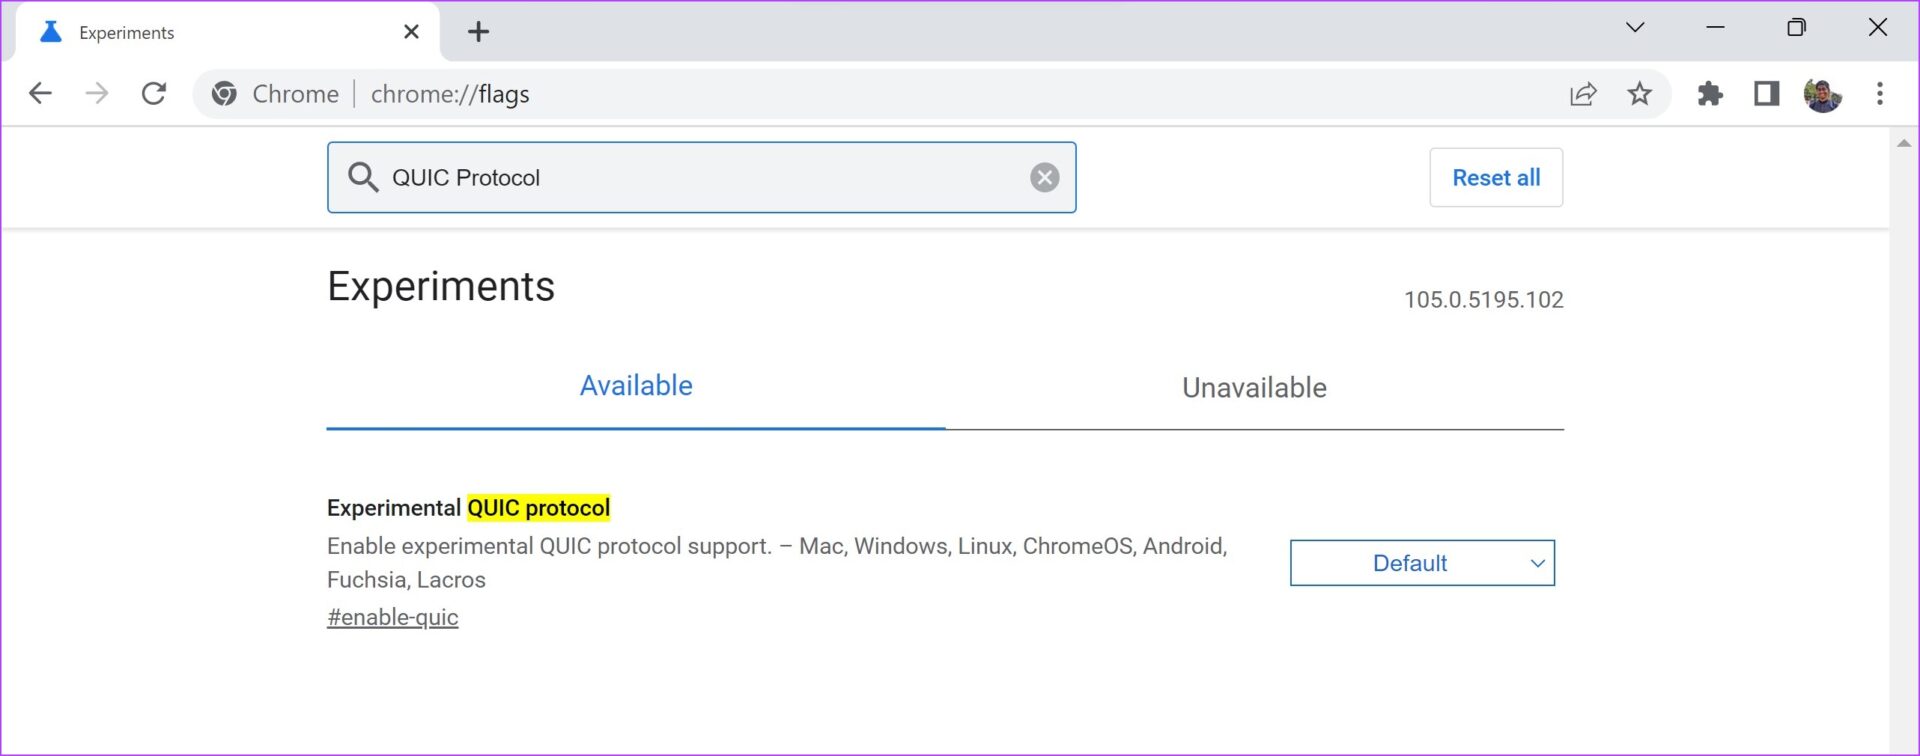
1. Experimental QUIC Protocol
Online protocols are how two applications can exchange information over the internet. QUIC is an experimental protocol developed by Google. The objective of this protocol is to reduce latency, and congestion in comparison to TCP – which is the protocol that is used online. Thus, enabling QUIC can help improve your web browsing speeds.
chrome://flags/#enable-quic
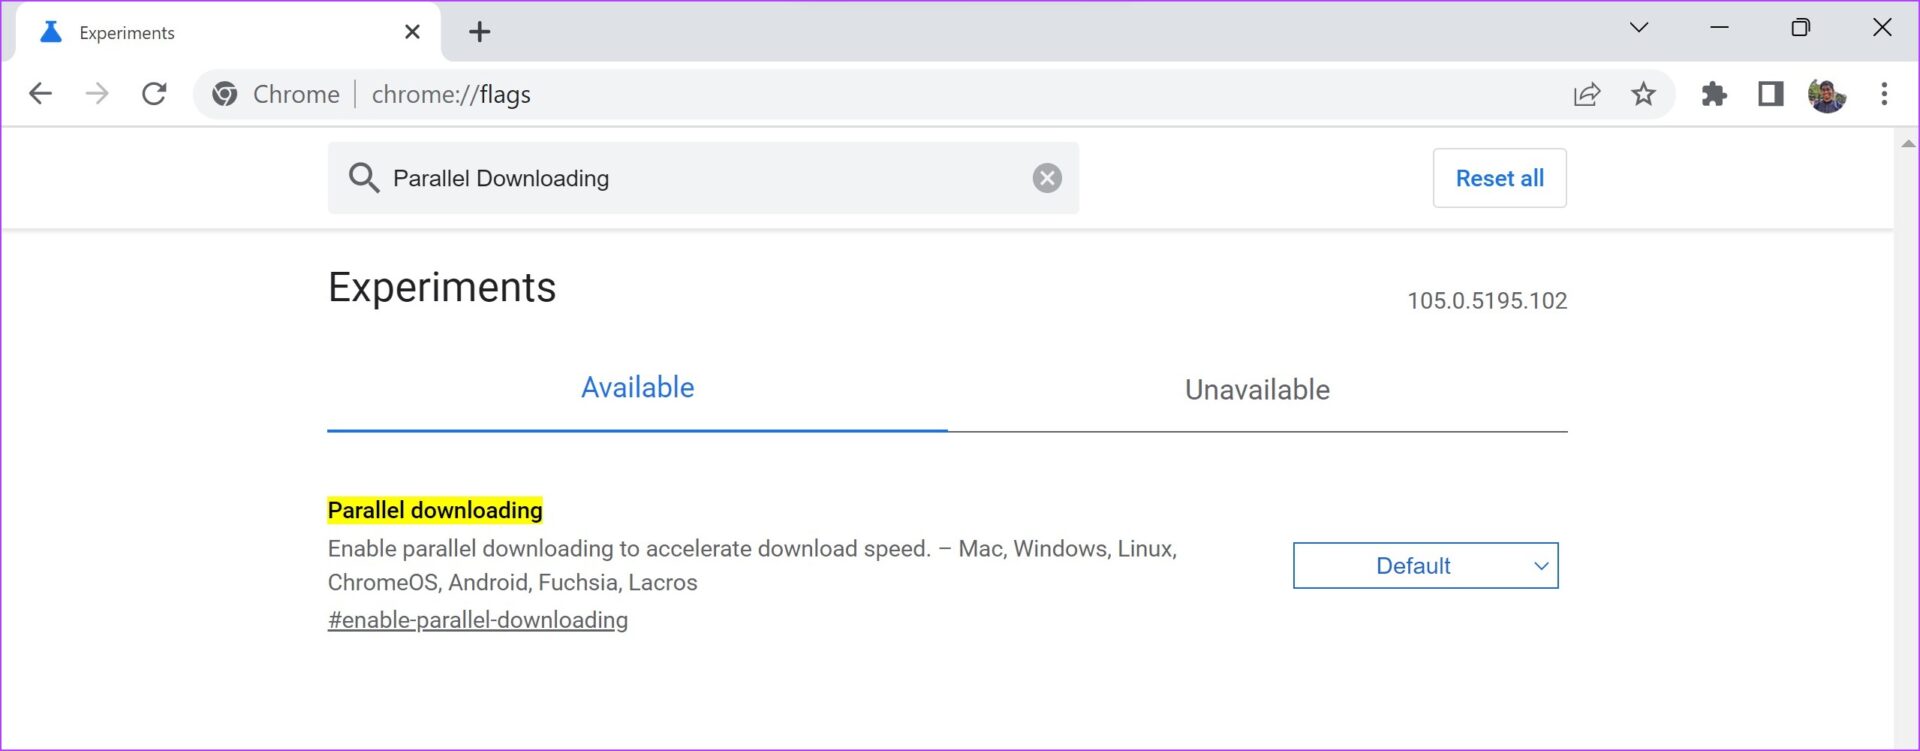
2. Parallel Downloading
Consider a situation where you are downloading a large file on Google Chrome, and it is taking up a lot of time. When you enable Parallel Downloading, the large file is split into different parts. The downloader will establish multiple connections to different servers and download the parts. This can potentially increase the download speeds on Chrome.
chrome://flags/#enable-parallel-downloading
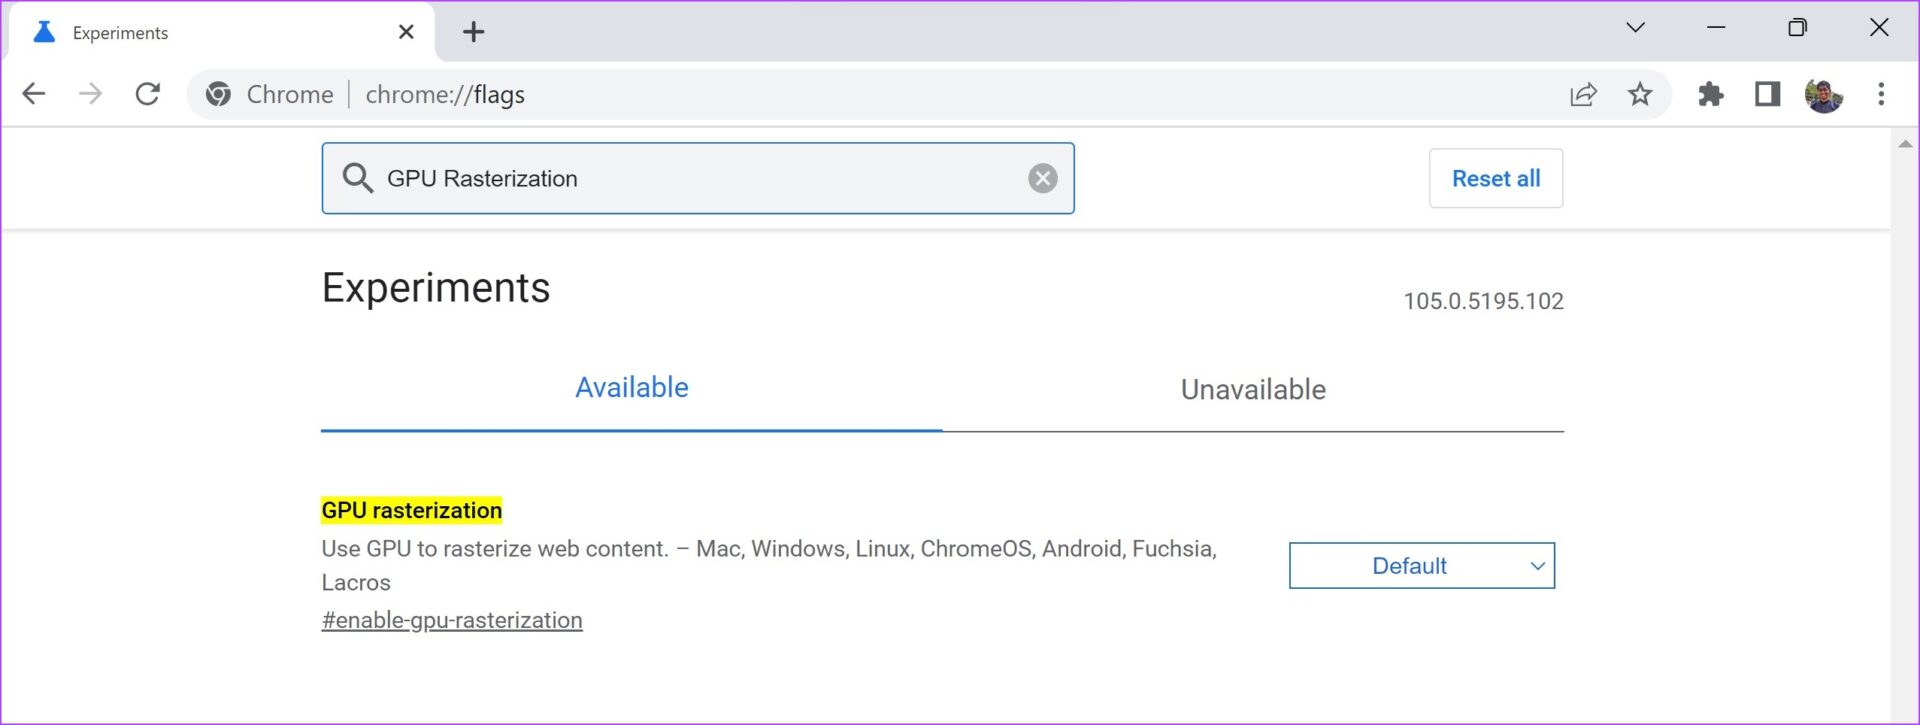
3. GPU Rasterization
By default, Chrome will not use the GPU to process and render media. If your PC has a powerful GPU – you can enable the GPU rasterization flag. This will ensure your GPU also performs a few tasks and thus, improve some efficiency in the performance.
chrome://flags/#enable-gpu-rasterization
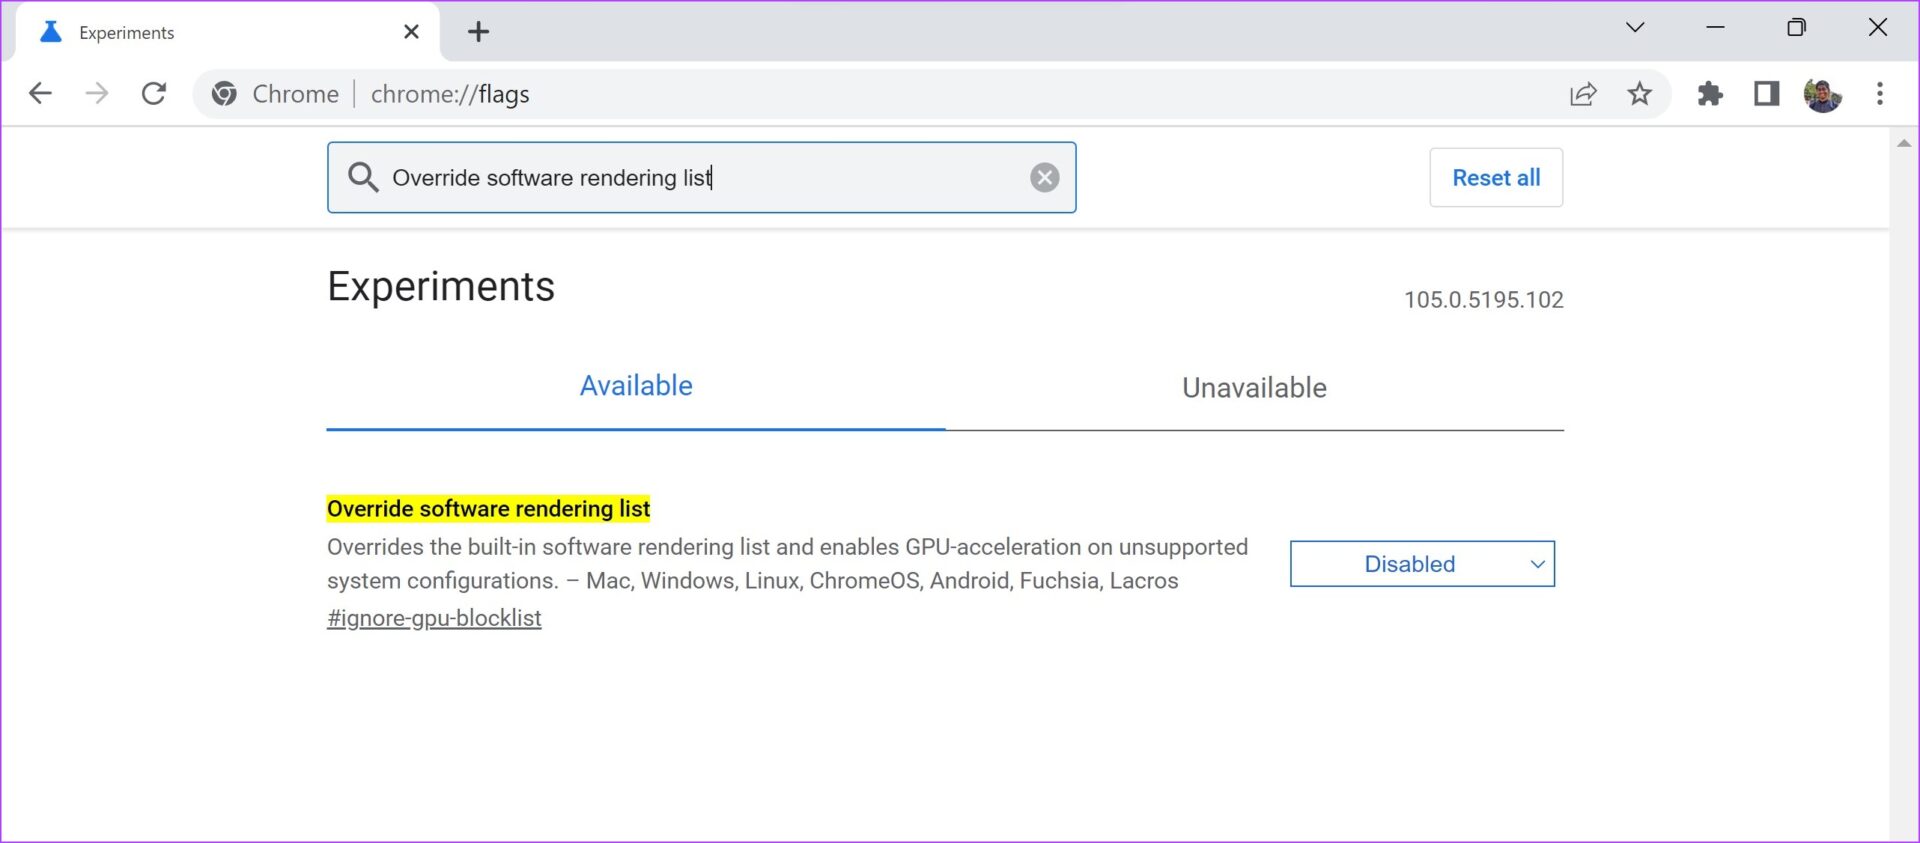
4. Override Software Rendering List
You might have a powerful GPU on your system, but at times Chrome will not be able to use GPU acceleration due to various reasons. This is usually caused by Chrome failing to recognize and enable GPU drivers.
When you enable ‘Override software rendering’, it will force Chrome to use GPU rendering over the default rendering mechanism. Thus, this GPU acceleration can enable a better web browsing performance.
chrome://flags/#ignore-gpu-blocklist
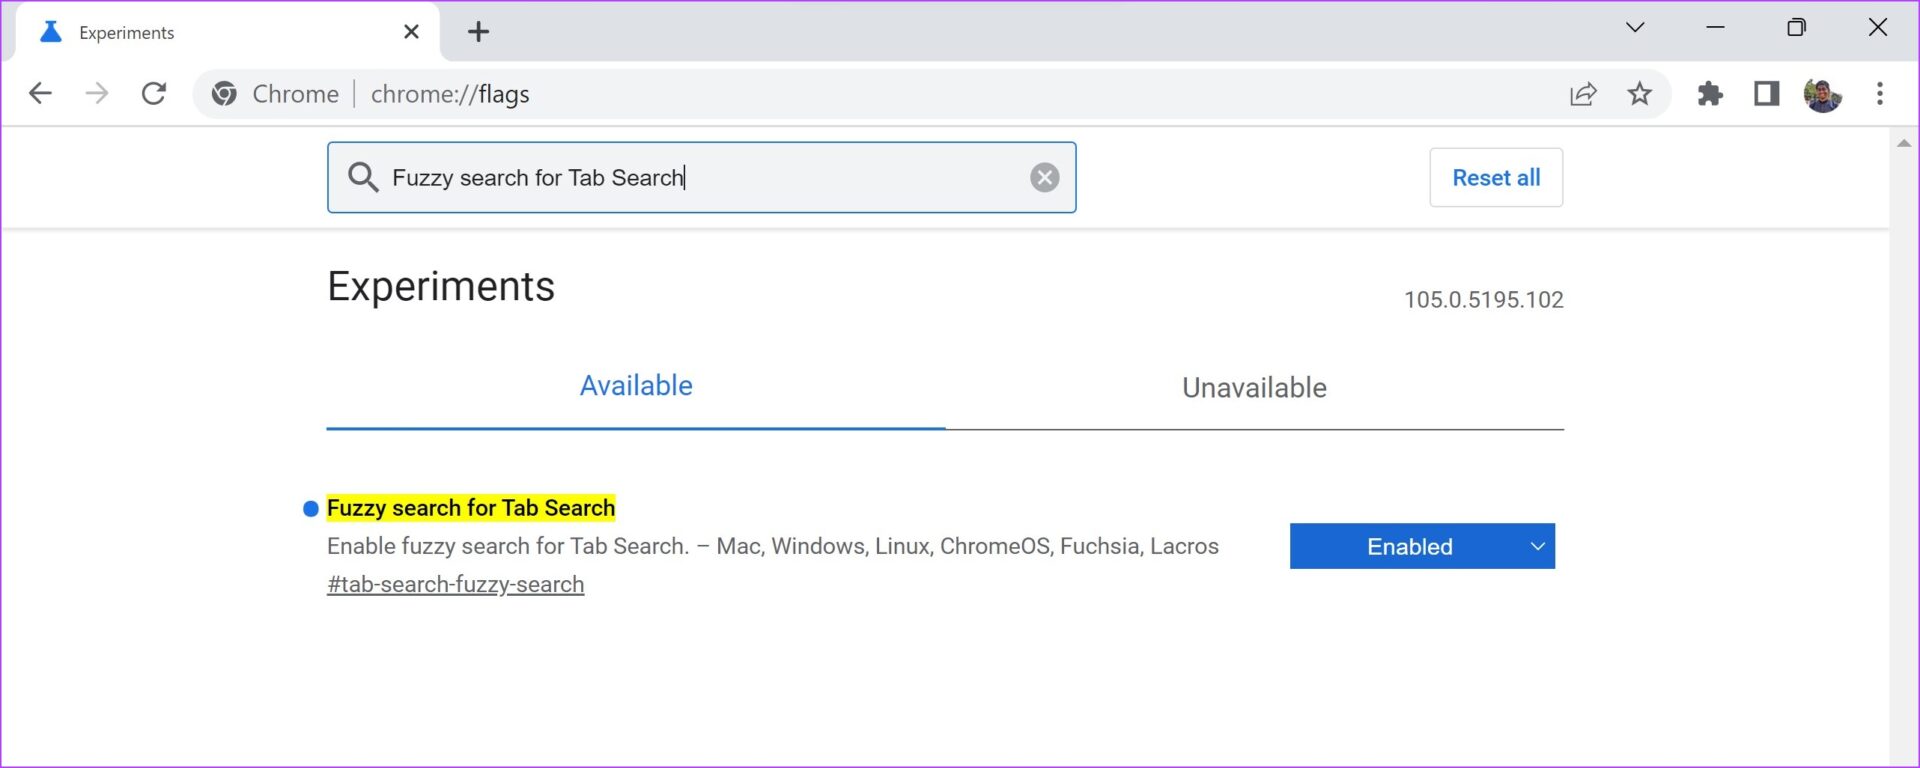
5. Fuzzy Search for Tab Search
All of us have experienced situations where we have hundreds of tabs open on Google Chrome, and we are unable to find that one particular tab. And to solve this problem, there is a tab search option on the Google Chrome toolbar, the bottom-facing arrow next to the minimize icon.
To make the search results even faster, you can enable the ‘Fuzzy search for Tab Search’ flag. It allows you to search for terms similar to your intended search query and not the exact one. For example, if you are searching a Google Calendar tab, you can type in ‘GC’ and it will return the search result that includes the Google Calendar tab.
chrome://flags/#tab-search-fuzzy-search
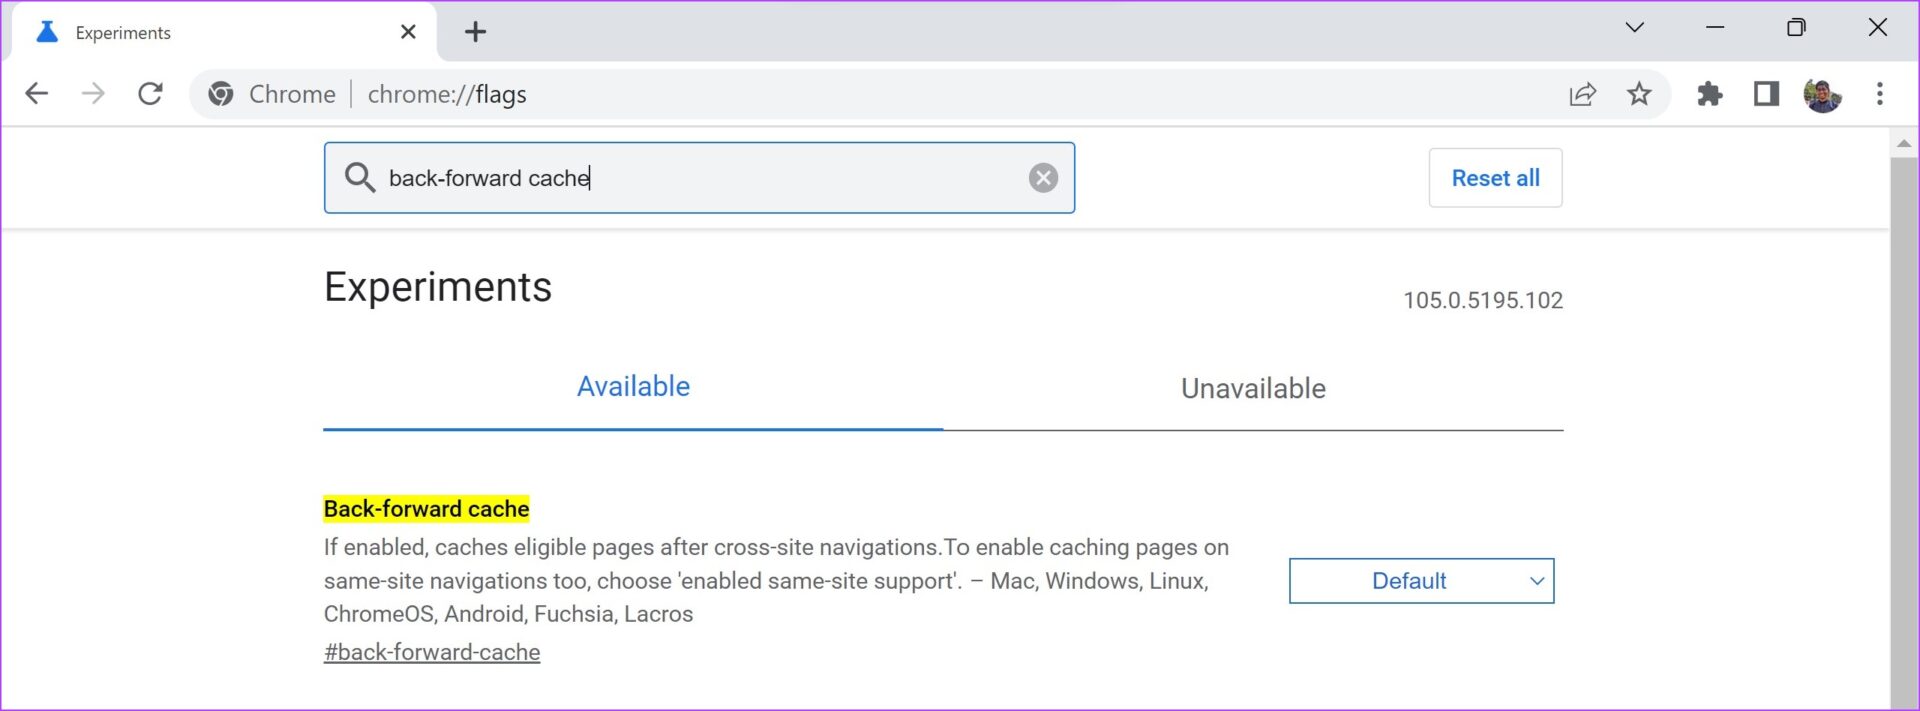
6. Back Forward Cache
The back and forward button on the toolbar of Google Chrome is the fastest way to navigate between websites you just visited. If you have been a fan of this feature and use it all the time, you will appreciate this flag.
Enabling the ‘Back-forward cache’ flag will cache your recently visited websites. This will ensure you can instantly access the last site you visited on the same tab, or go forward a website.
chrome://flags/#back-forward-cache
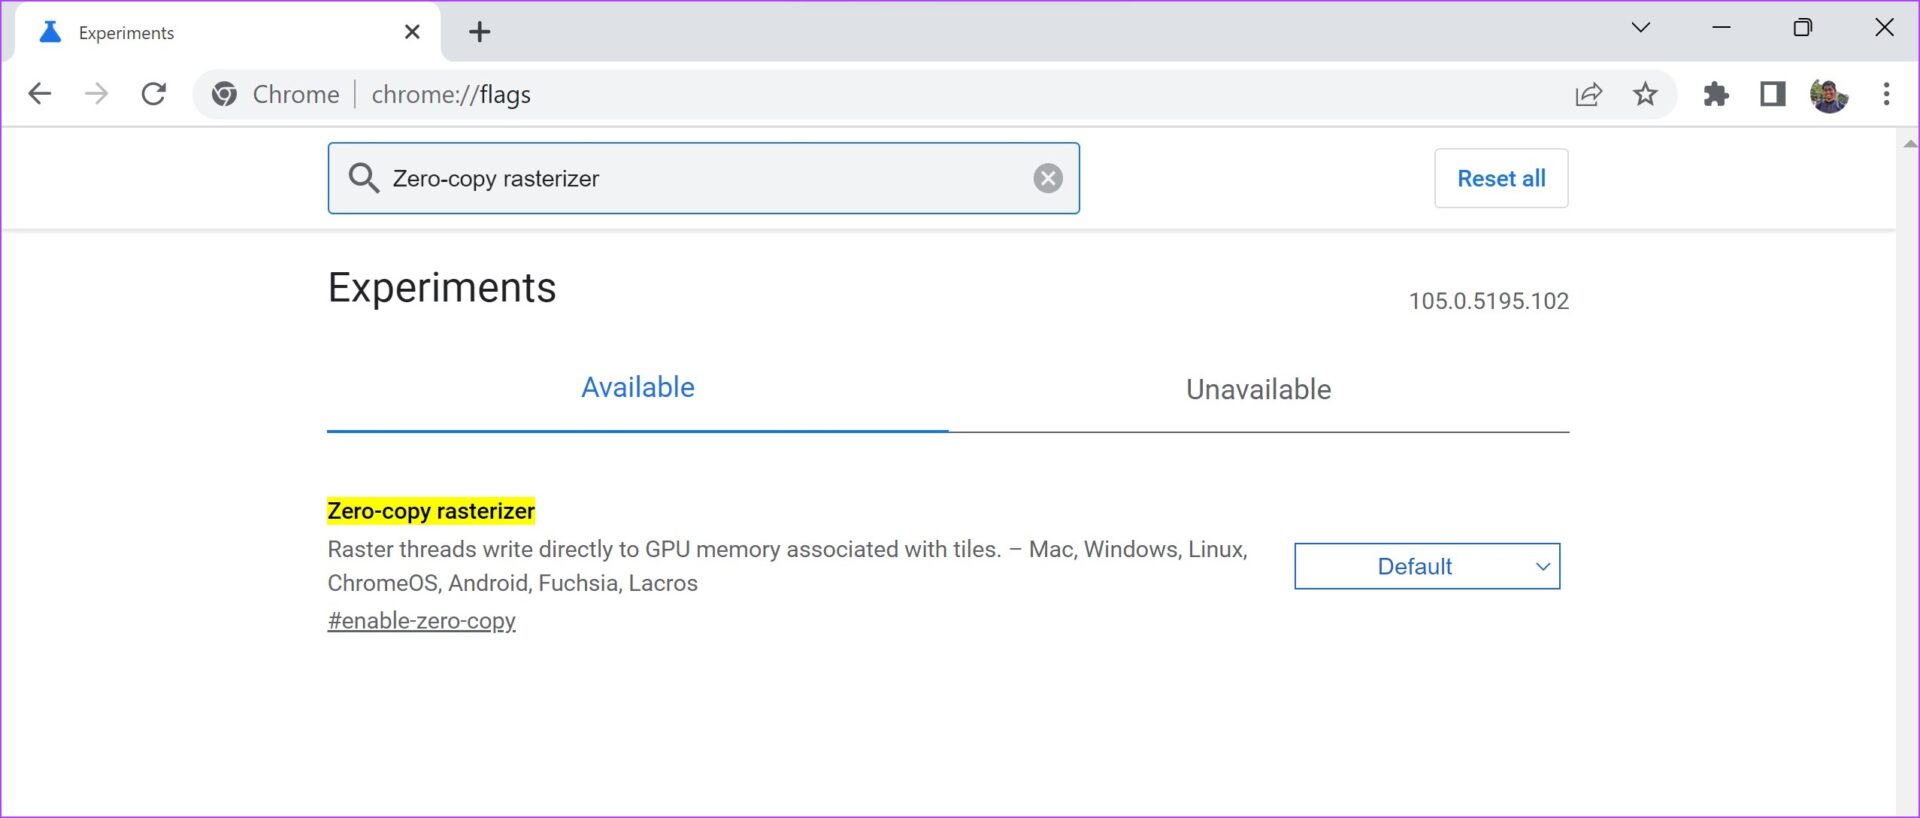
7. Zero-Copy Rasterizer
A GPU has a temporary memory unit called the VRAM. This exclusively works with the GPU. In some cases, especially if you are using an older version of RAM, your VRAM will be significantly faster. This will also help if your RAM is quite low in size.
If you enable the ‘Zero-copy rasterizer’ flag, Chrome will use the VRAM for tasks and increase the speed of your web browsing experience.
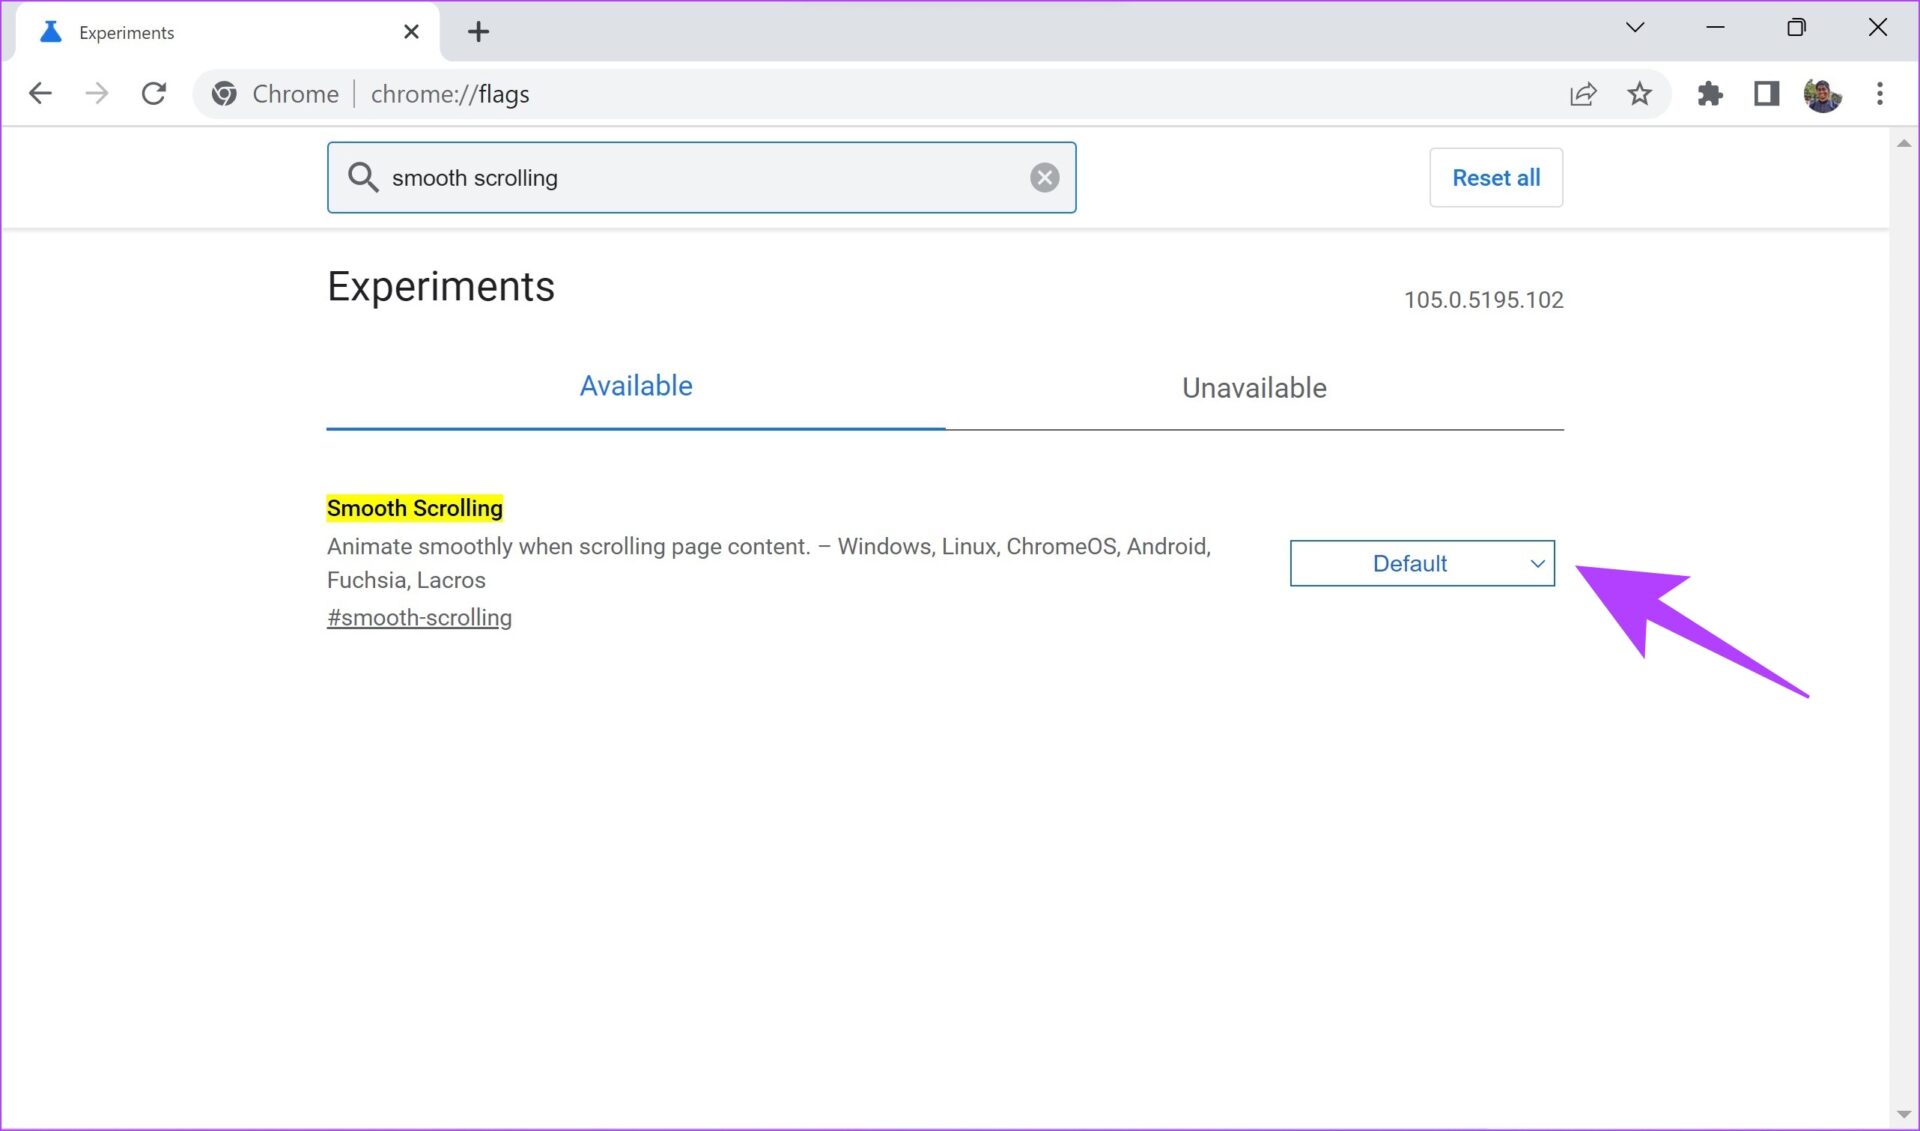
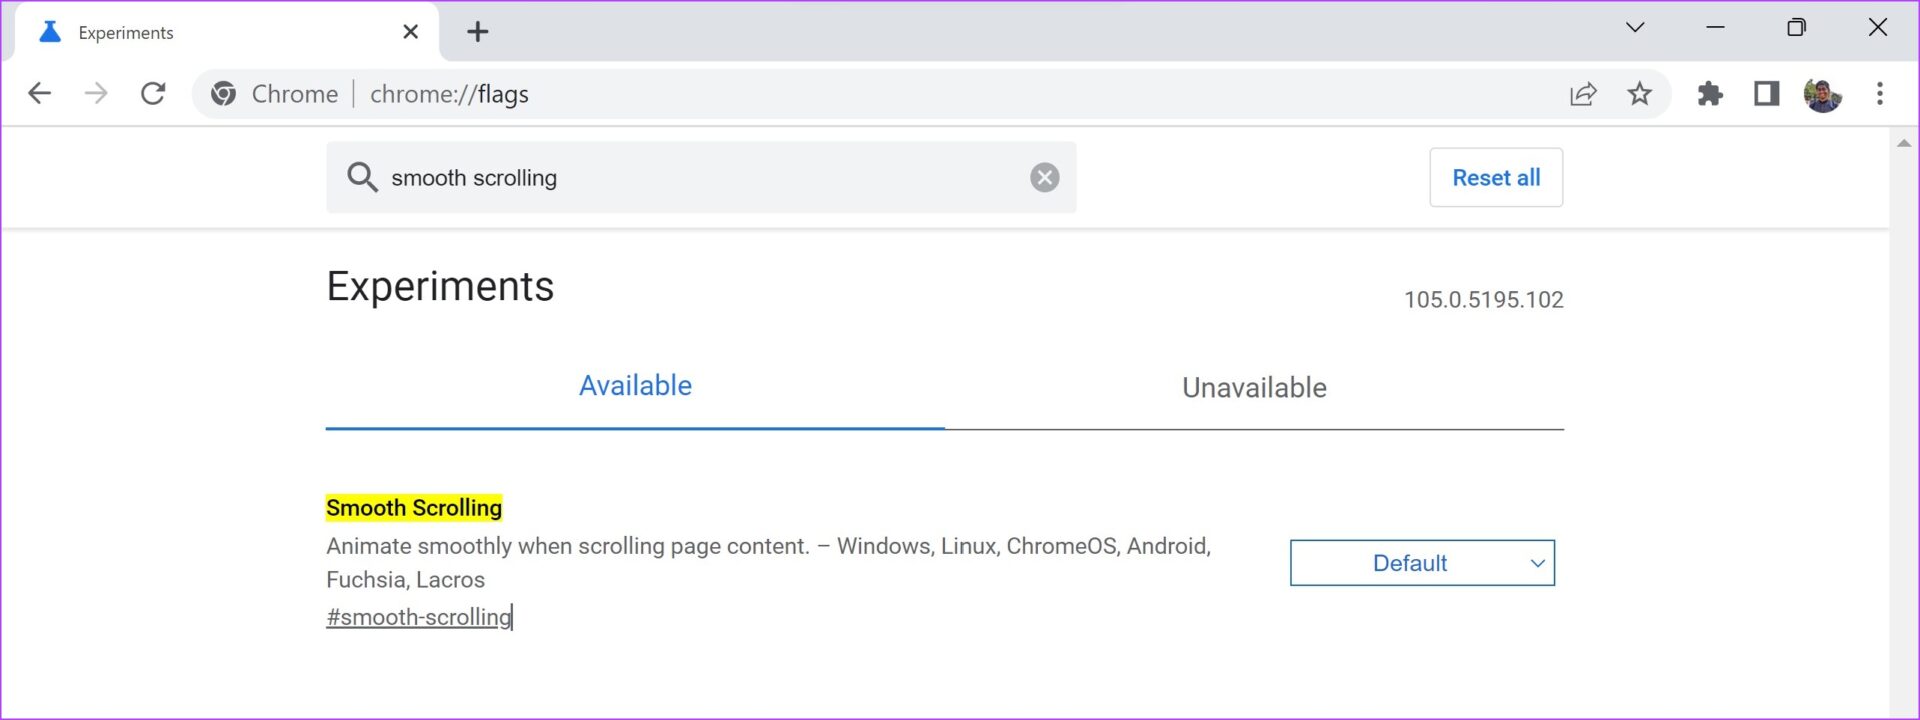
8. Smooth Scrolling
Ever noticed sluggish scrolling on content-heavy webpages? We’re sure you have. We have too, even on PCs with good internals. Thankfully, there is a fix for this issue within flags.
If you enable the Smooth Scrolling flag, you can experience a much smoother and faster scrolling experience. As you enable the flag, it adds a few lines of code in the back end of the website (CSS, React, etc.), that can improve your navigation experience through an animation effect.
chrome://flags/#enable-zero-copy
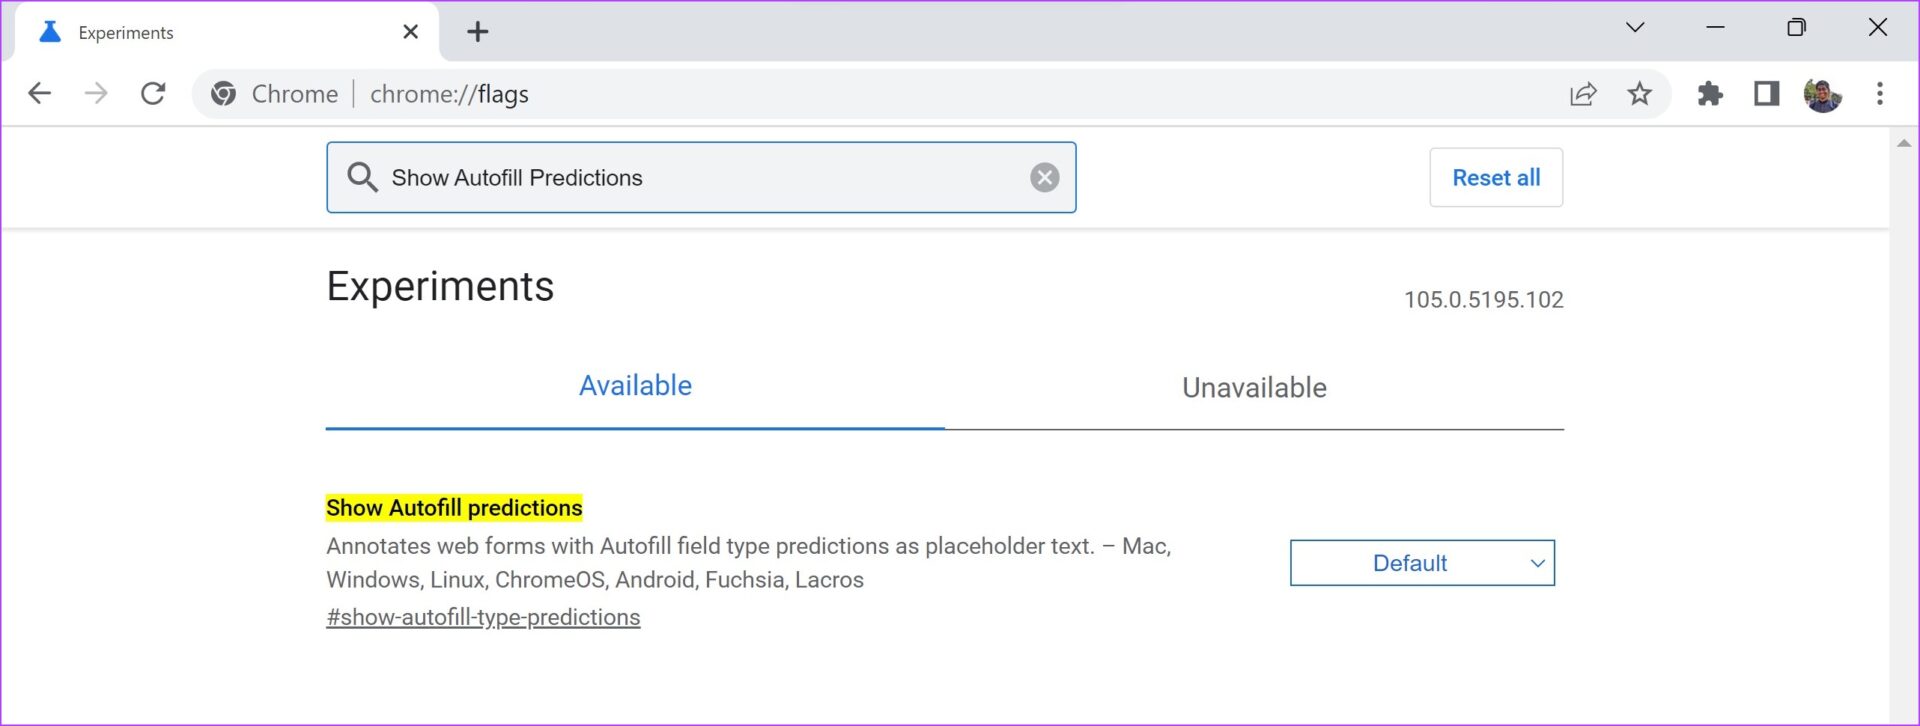
9. Show Autofill Predictions
All of us visit websites that require us to fill in personal details for shipping, registration, etc. One way to speed up this process is to enable the ‘Show Autofill predictions’ flag. When you enable this flag, you get predictions to fill unnamed fields with your existing autofill information saved on Chrome.
chrome://flags/#show-autofill-type-predictions
These are some of the flags to make Google Chrome faster. However, if you have accidentally enabled a flag or want to opt out of flags entirely for whatever reason, here’s how to do it.
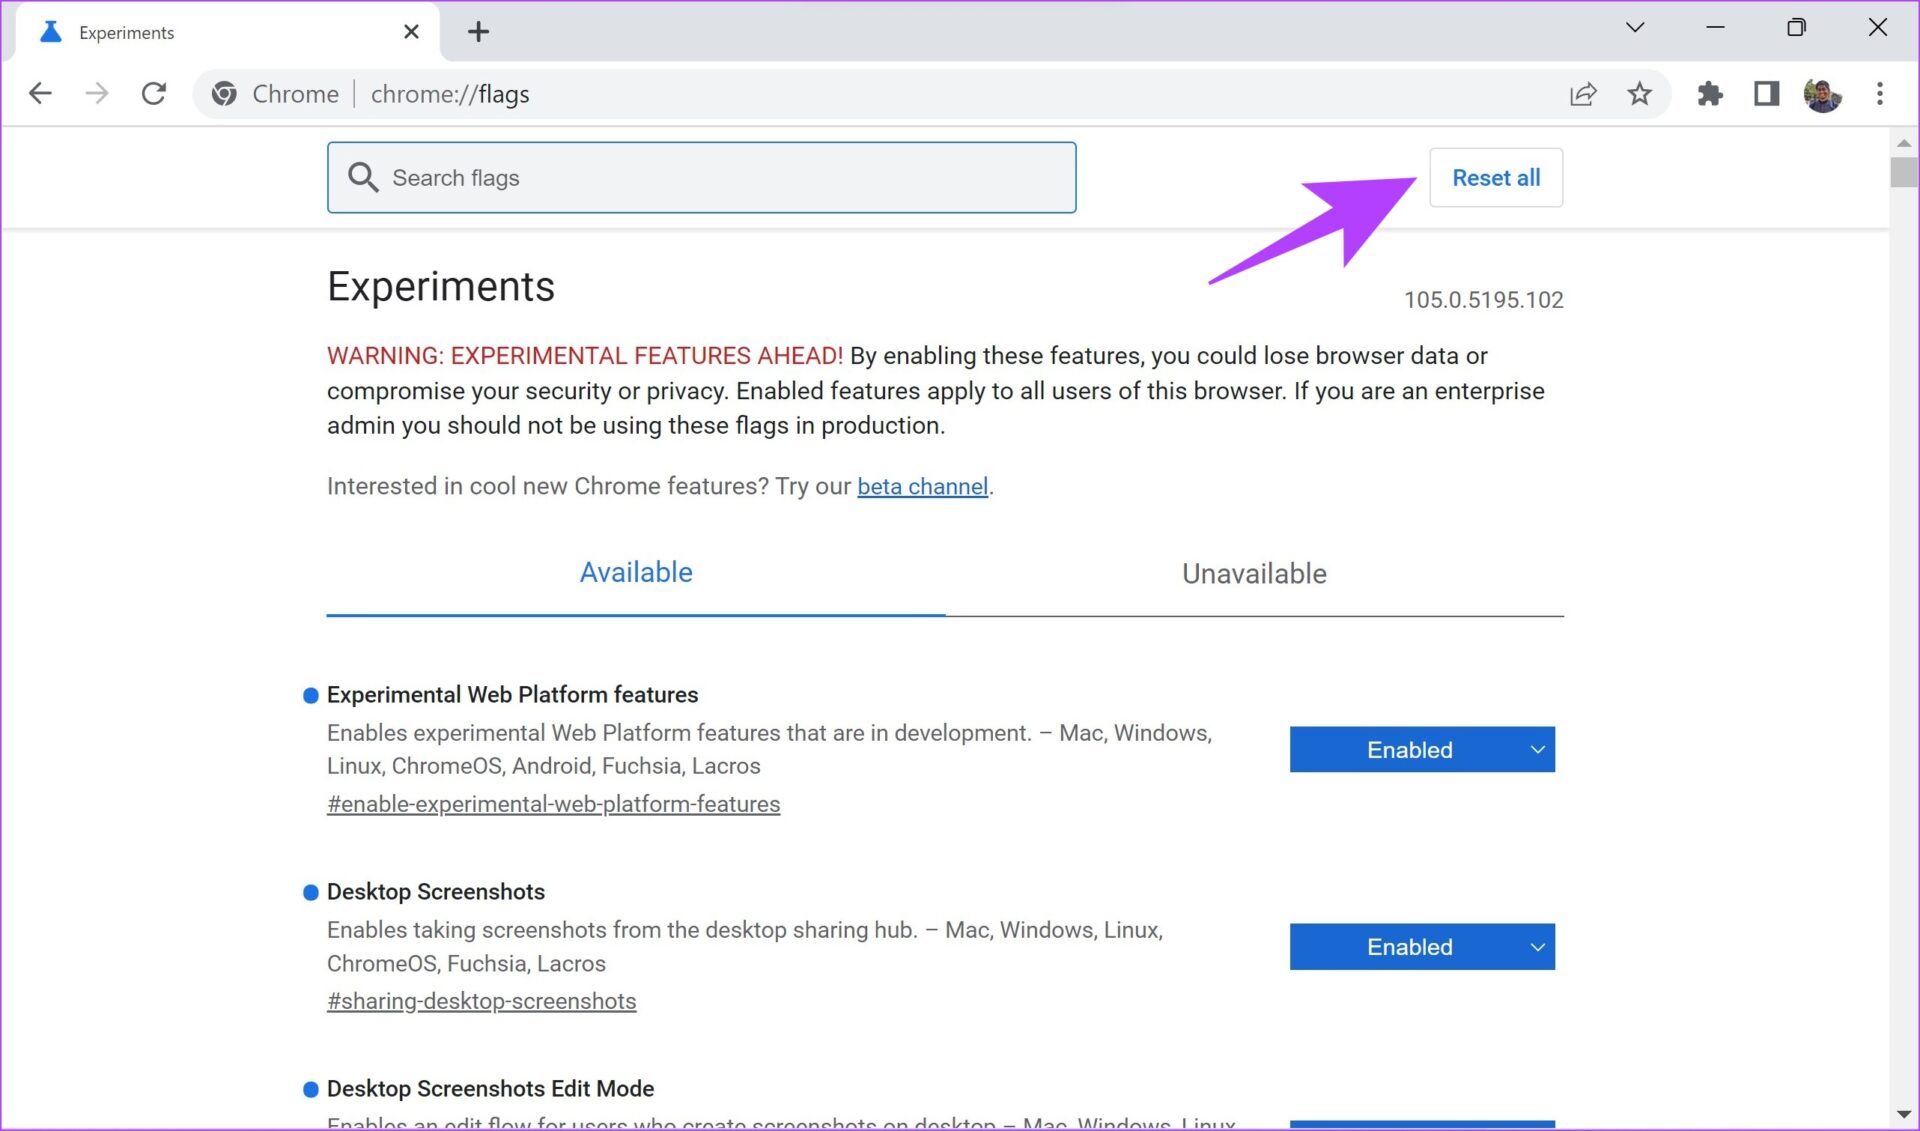
How to Reset Chrome Flag Settings
While you can individually disable flags, it is quite a hassle to search or even remember what you enabled in the first place.
You can quickly disable all flags at once using the ‘Reset all’ button provided on the main page of the flags.
We hope you’re clear on how to enable and use flags on Google Chrome. In case you have a few questions, you can take a look at our FAQ section.
FAQs on Chrome Flags
1. Are Chrome flags safe?
Yes, Chrome flags are safe to use. However, enabling the wrong flag might make your browser unstable, so we recommend enabling only the flags that you are fully aware of.
2. Are Chrome flags available on Mac?
Yes, Chrome flags are available for the following platforms—Chrome for Windows, macOS, iOS, Android, Linux, and Chrome OS.
3. Some flags are not available on my Chrome. What do I do?
Not all flags are available for all users, as it depends upon the device you are using and the build number of your Chrome. The best you can do is ensure to update to the latest version of Google Chrome.
Make the Best Use of chrome://flags
Provided you use it in the right way, flags on Chrome can significantly enhance your web browsing experience. We hope this article helped you use flags to make Google Chrome faster. Stay updated to the latest version of Google Chrome to never miss out on any new set of flags.
Make sure the folder is not in use: You may have difficulty renaming a folder on your PC if it is already open in another program. To avoid this, cycle through all of your open apps and programs and close any that may be using the folder you’re trying to rename.
Scan for malware: The presence of malware on your PC can also cause such anomalies. To overrule this possibility, scan your PC for malware using Windows Defender or a reputable third-party antivirus program.
Install Windows updates: Windows 11 may be having trouble renaming folders due to a bug. If that’s the case, installing pending software updates should help.
Fix 1: Restart Windows Explorer
Windows Explorer is a process that provides the Graphical User Interface (GUI) for File Explorer. If the process encounters any issues, File Explorer may not function properly and you might have trouble renaming folders. Here’s what you can do to fix it.
Step 1: Press Ctrl + Shift + Esc on your keyboard to open the Task Manager.
Step 2: In the Processes tab, right-click on the Windows Explorer process and select Restart.
Fix 2: Disable Controlled Folder Access
Controlled folder access is a feature in the Windows Security app that helps protect your files and folders from unauthorized changes. This feature may occasionally prevent you from renaming folders. You can temporarily disable it to see if it helps.
Step 1: Open the Windows Security app on your PC and navigate to the Virus & threat protection tab.
Step 2: Click on Manage ransomware protection.
Step 3: Toggle off the switch for Controlled folder access.
Fix 3: Get Ownership of the Folder
You might be unable to rename a folder on Windows due to a lack of necessary permissions. To fix this, you should get ownership of the folder you’re trying to rename by following the steps below.
Step 1: Right-click on the folder you wish to rename and select Properties.
Step 2: Under the Security tab, click the Advanced button.
Step 3: Click on Change next to the Owner.
Step 4: Type in your username in the text field and click the Check Names button. Then, click OK.
Step 5: Check the box that reads Replace owner on subcontainers and objects. Then, hit Apply followed by OK.
Fix 4: Try Clean Boot
There’s a chance that a third-party app or program running in the background is interfering with Windows and causing such problems. To verify this, you can boot your PC in a clean boot state where it only runs with essential apps and services.
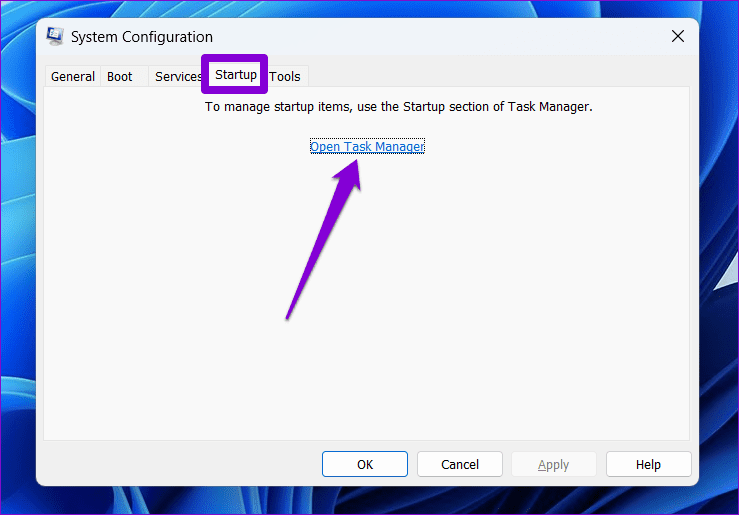
Step 1: Press the Windows key + R to open the Run dialog, type in msconfig, and press Enter.
Step 2: Under the Services tab, mark the box that reads Hide all Microsoft services and click the Disable all button.
Step 3: Switch to the Startup tab and click on Open Task Manager.
Step 4: In the Startup tab, select a third-party app and click the Disable button at the top. Repeat this step to disable all third-party apps and programs.
Restart your PC to enter the clean boot state and see if you can rename folders. If this method works, you’ll need to look through any recently installed apps and programs and remove them.
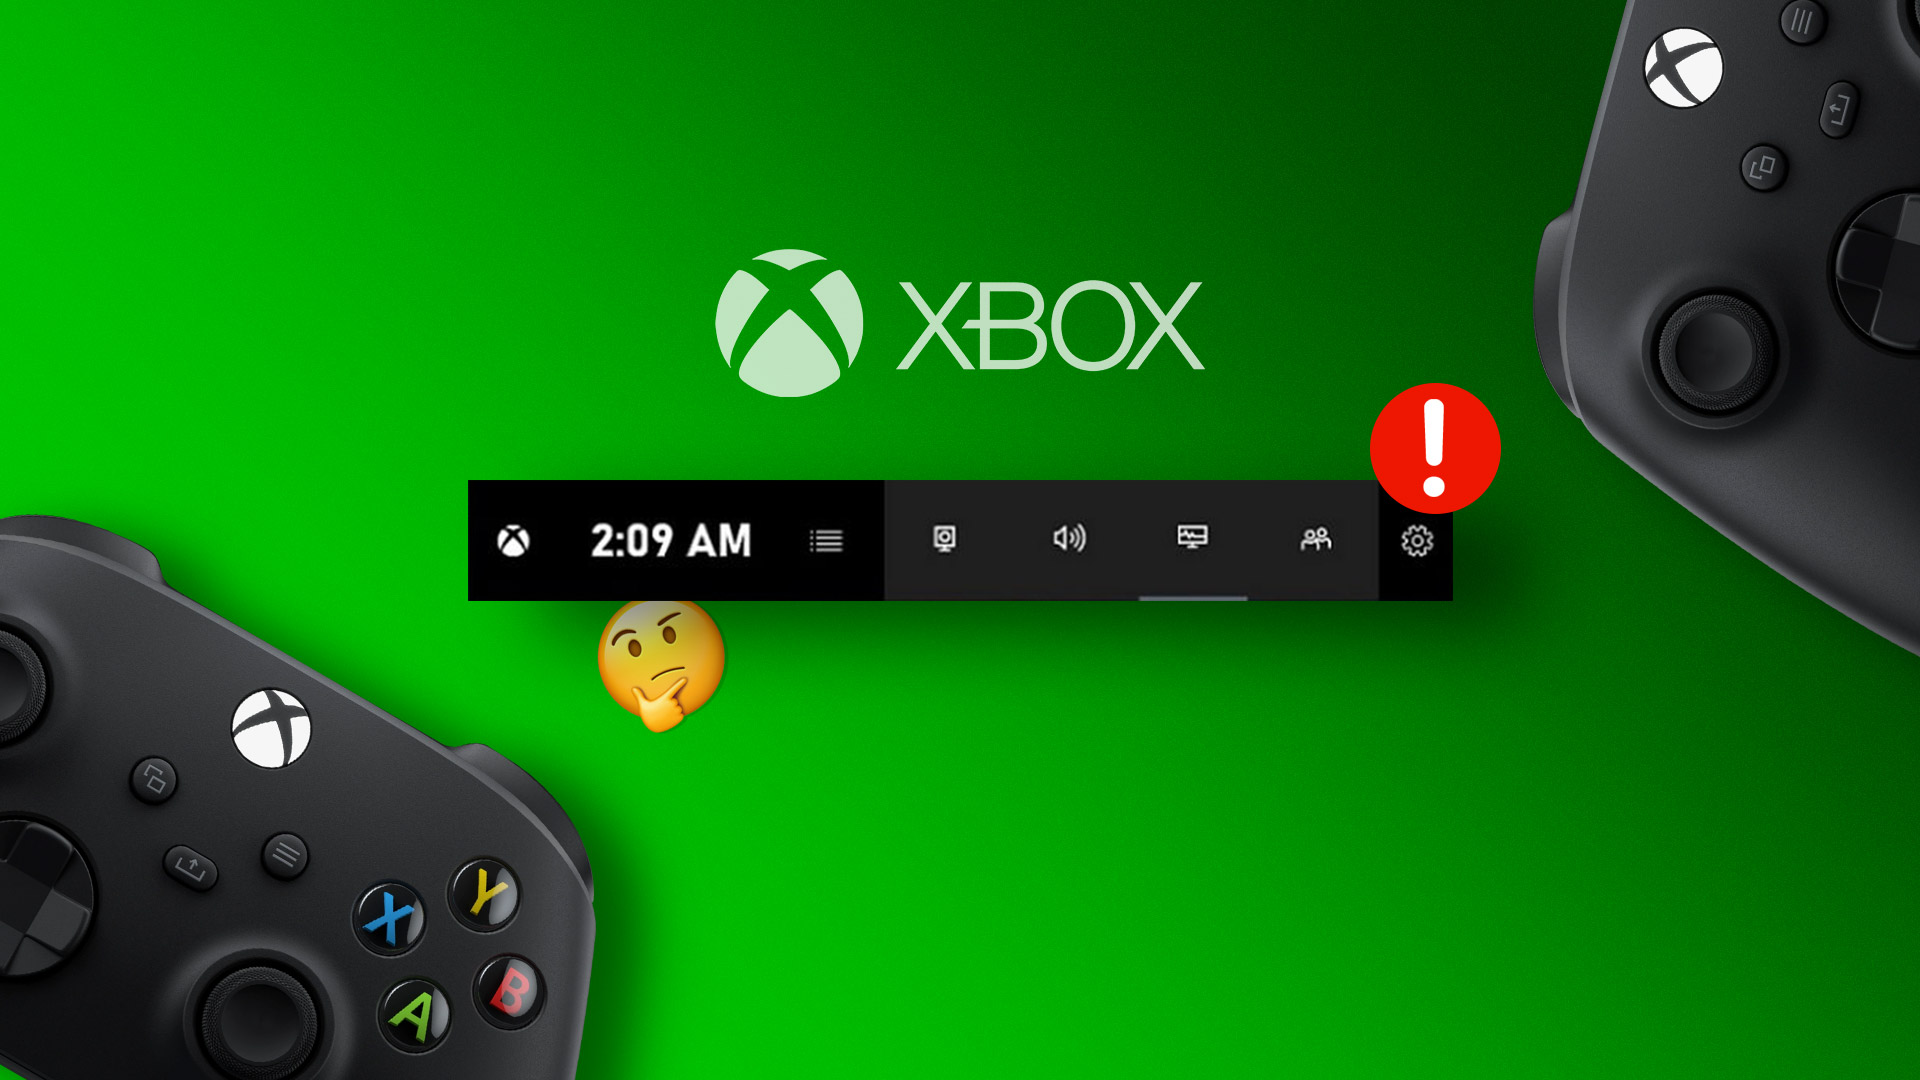
If you can’t launch the Xbox Game Bar from your connected game controller on Windows 11, head to Windows Settings to enable the feature.
Step 1: Press the Windows + I shortcut to open the Settings app, select Gaming from the left sidebar, and click Game Bar.
Step 2: Toggle on Allow your controller to open Game Bar.
Fix 2: Repair the Corrupt IEFRAME.dll File
The IEFRAME.dll system file is crucial for the Xbox Game Bar to function properly. If it gets corrupt, the Xbox Game Bar may fail to open or work on Windows 11. Repair it using the System File Checker (SFC) to resolve the problem.
Step 1: Press the Windows key, search Command Prompt, and click Run as administrator.
Step 2: Approve the UAC prompt, type sfc /scannow in the console, and press Enter. This will automatically repair all corrupted files, including IEFRAME.dll.
Fix 3: Enable Xbox Game Bar From Registry Editor
Besides system file corruption, Xbox Game Bar may not work on Windows 11 if it is disabled in the Windows Registry. Use the Registry Editor app to tweak and enable it manually.
Step 1: Open the Run dialog using the Windows + R shortcut, type regedit, and press Enter.
Step 2: Copy-paste the below path in the navigation bar and hit Enter.
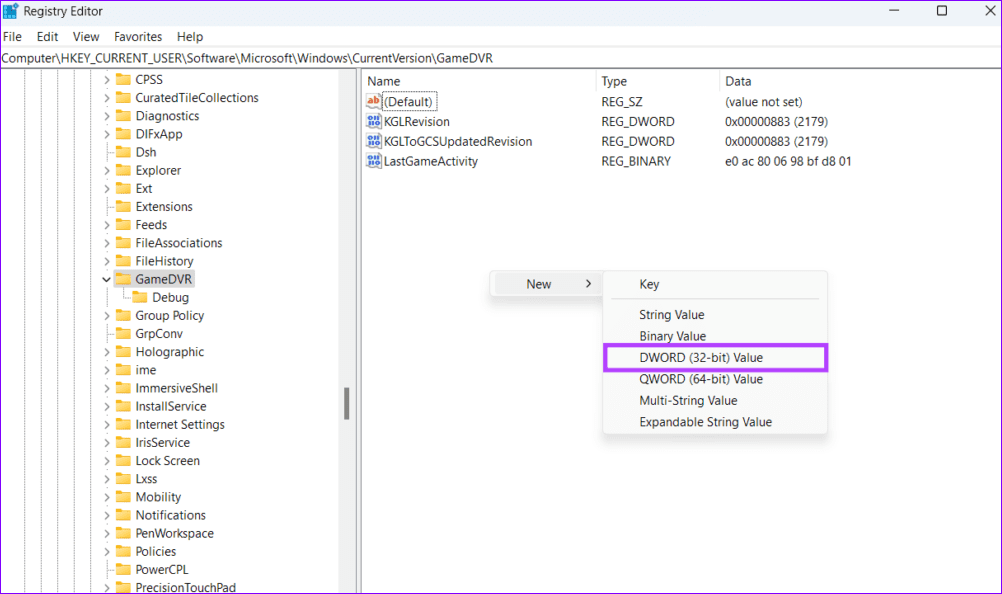
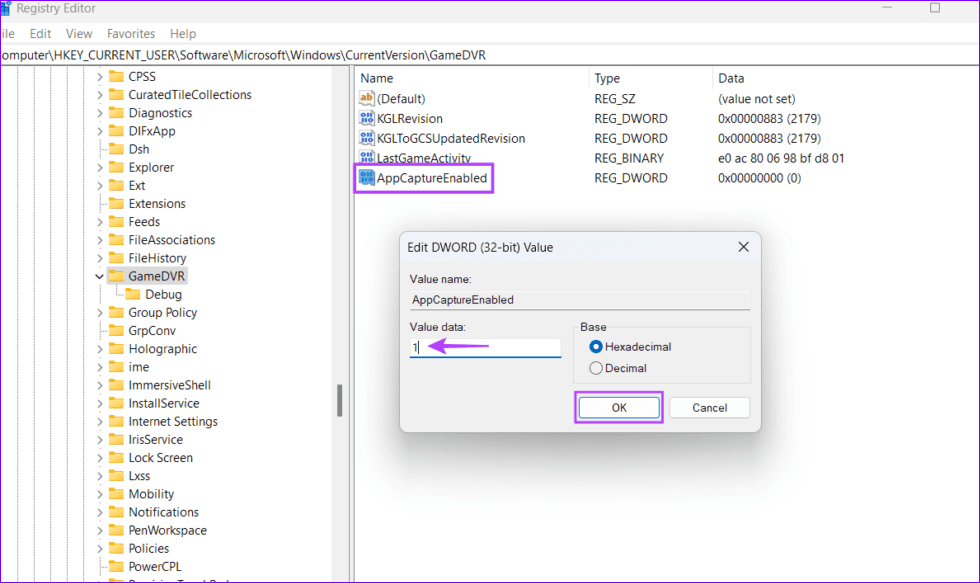
Step 3: Right-click the empty space on the right and select New > DWORD (32-bit) Value.
Step 4: Name it AppCaptureEnabled, press Enter, and double-click it to set its value data to 1. Click OK to save changes and restart your PC.
Fix 4: Tweak Windows Policies to Enable the Xbox Game Bar
If the Game Recording and Broadcasting policy is disabled on Windows 11, the Xbox Game Bar may fail to trigger or launch on your system. Open the Local Group Policy Editor app to turn it on.
Note: The Local Group Policy Editor app is only available on Windows 11 Pro, Education, and Enterprise editions. If you’re running a Home Edition, enable it with the batch file trick.
Step 1: Press the Windows + R shortcut to open the Run dialog, type gpedit.msc, and press Enter.
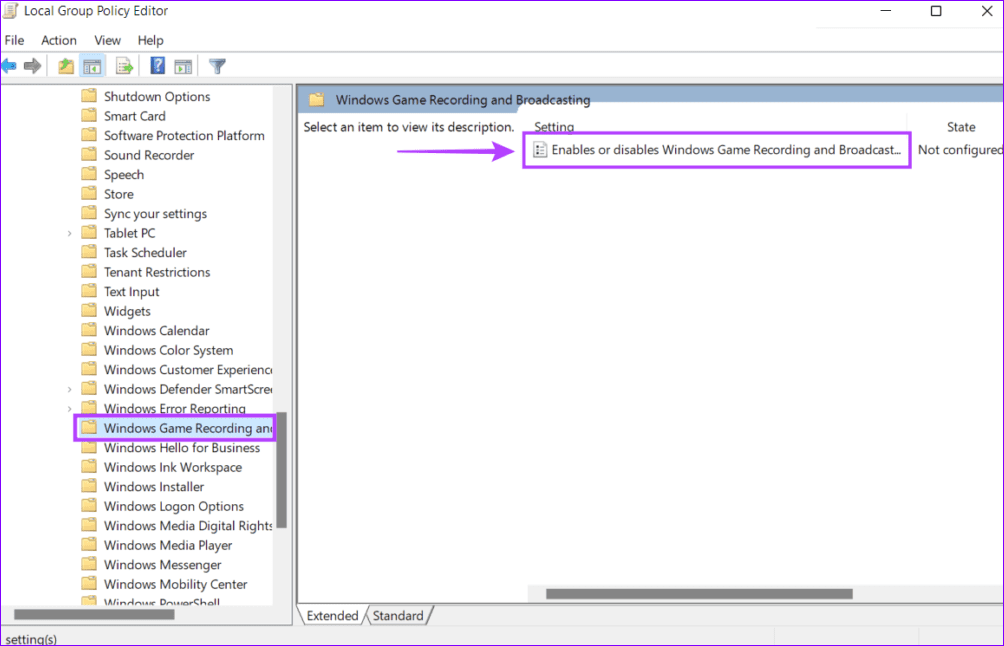
Step 2: Navigate to the following path inside the Local Group Policy Editor app.
Local Computer Policy > Administrative Templates > Windows Components > Windows Game Recording and Broadcasting
Step 3: Locate and double-click the Enables or disables the Windows Game Recording and Broadcasting policy in the right pane.
Step 4: Set its value to Enabled and click Apply to save changes.
Fix 5: Repair or Reset the Xbox Game Bar
Lastly, repair or reset the Xbox Game Bar from Windows 11 settings if nothing works out.
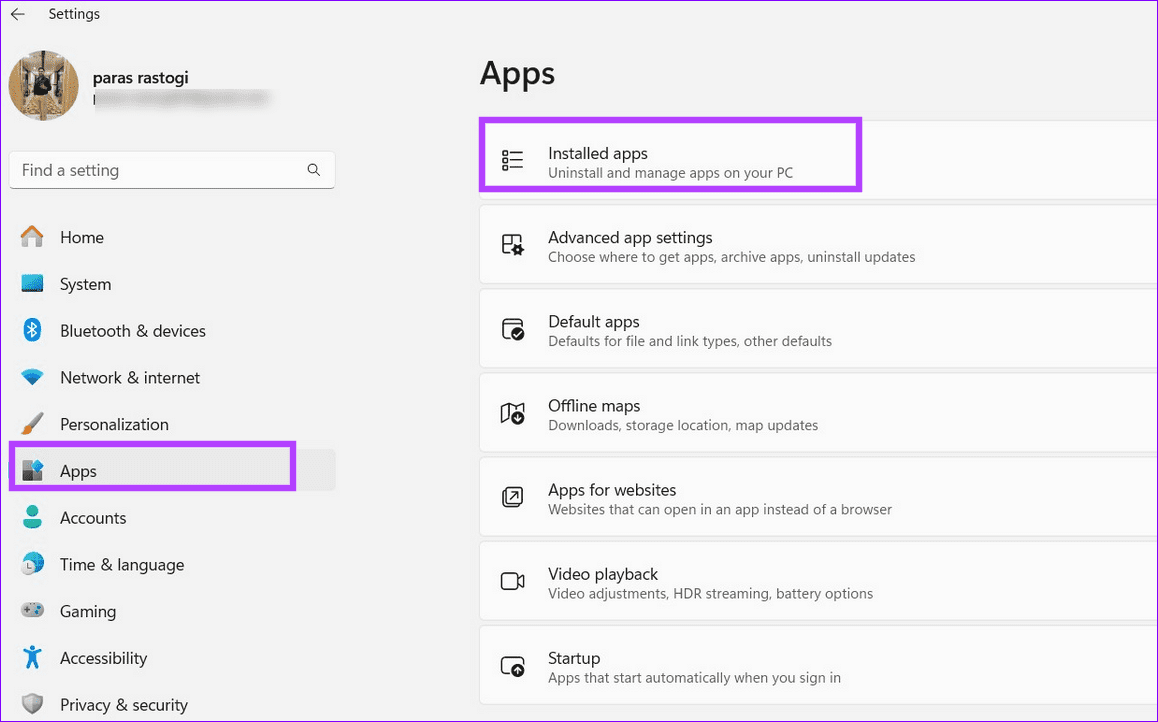
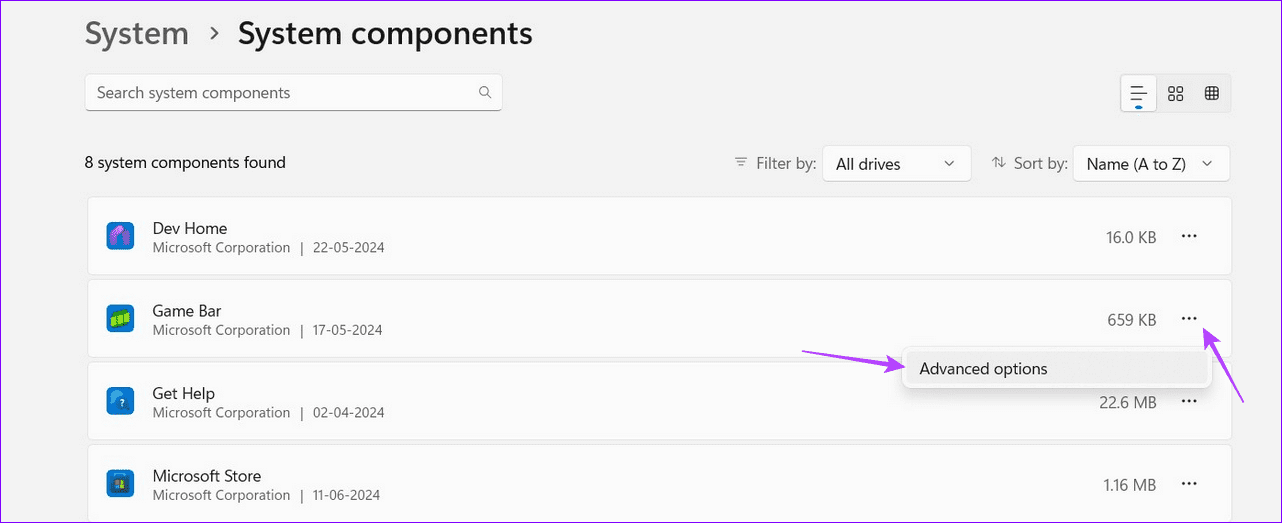
Step 1: Open Windows settings, select Apps from the left sidebar, and click Installed apps.
Step 2: Scroll down and select System components.
Step 3: Click the three-dot menu next to the Game Bar and select Advanced options.
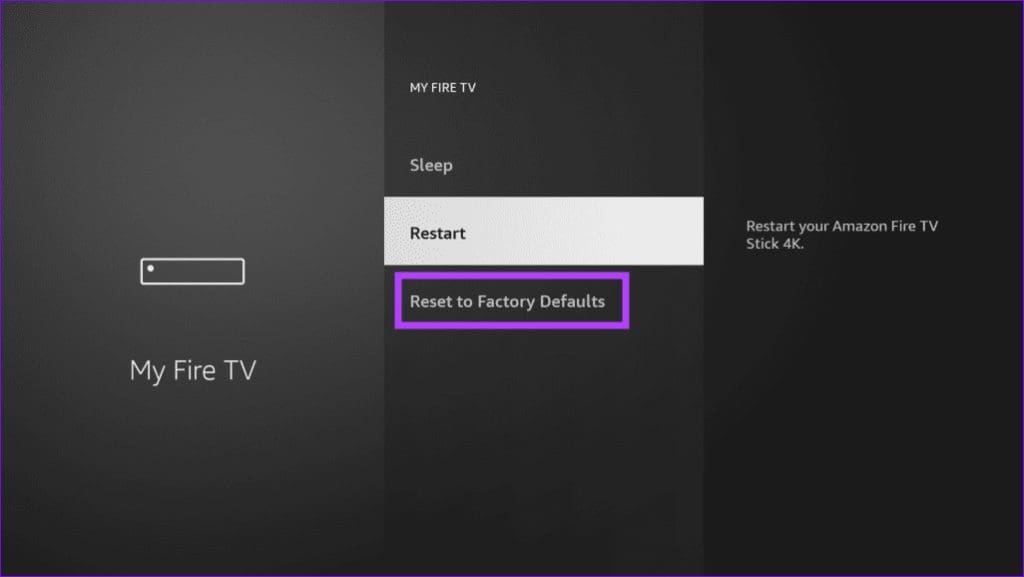
Step 4: Scroll down and click Repair. If the issue persists, select Reset to restore it to factory defaults.
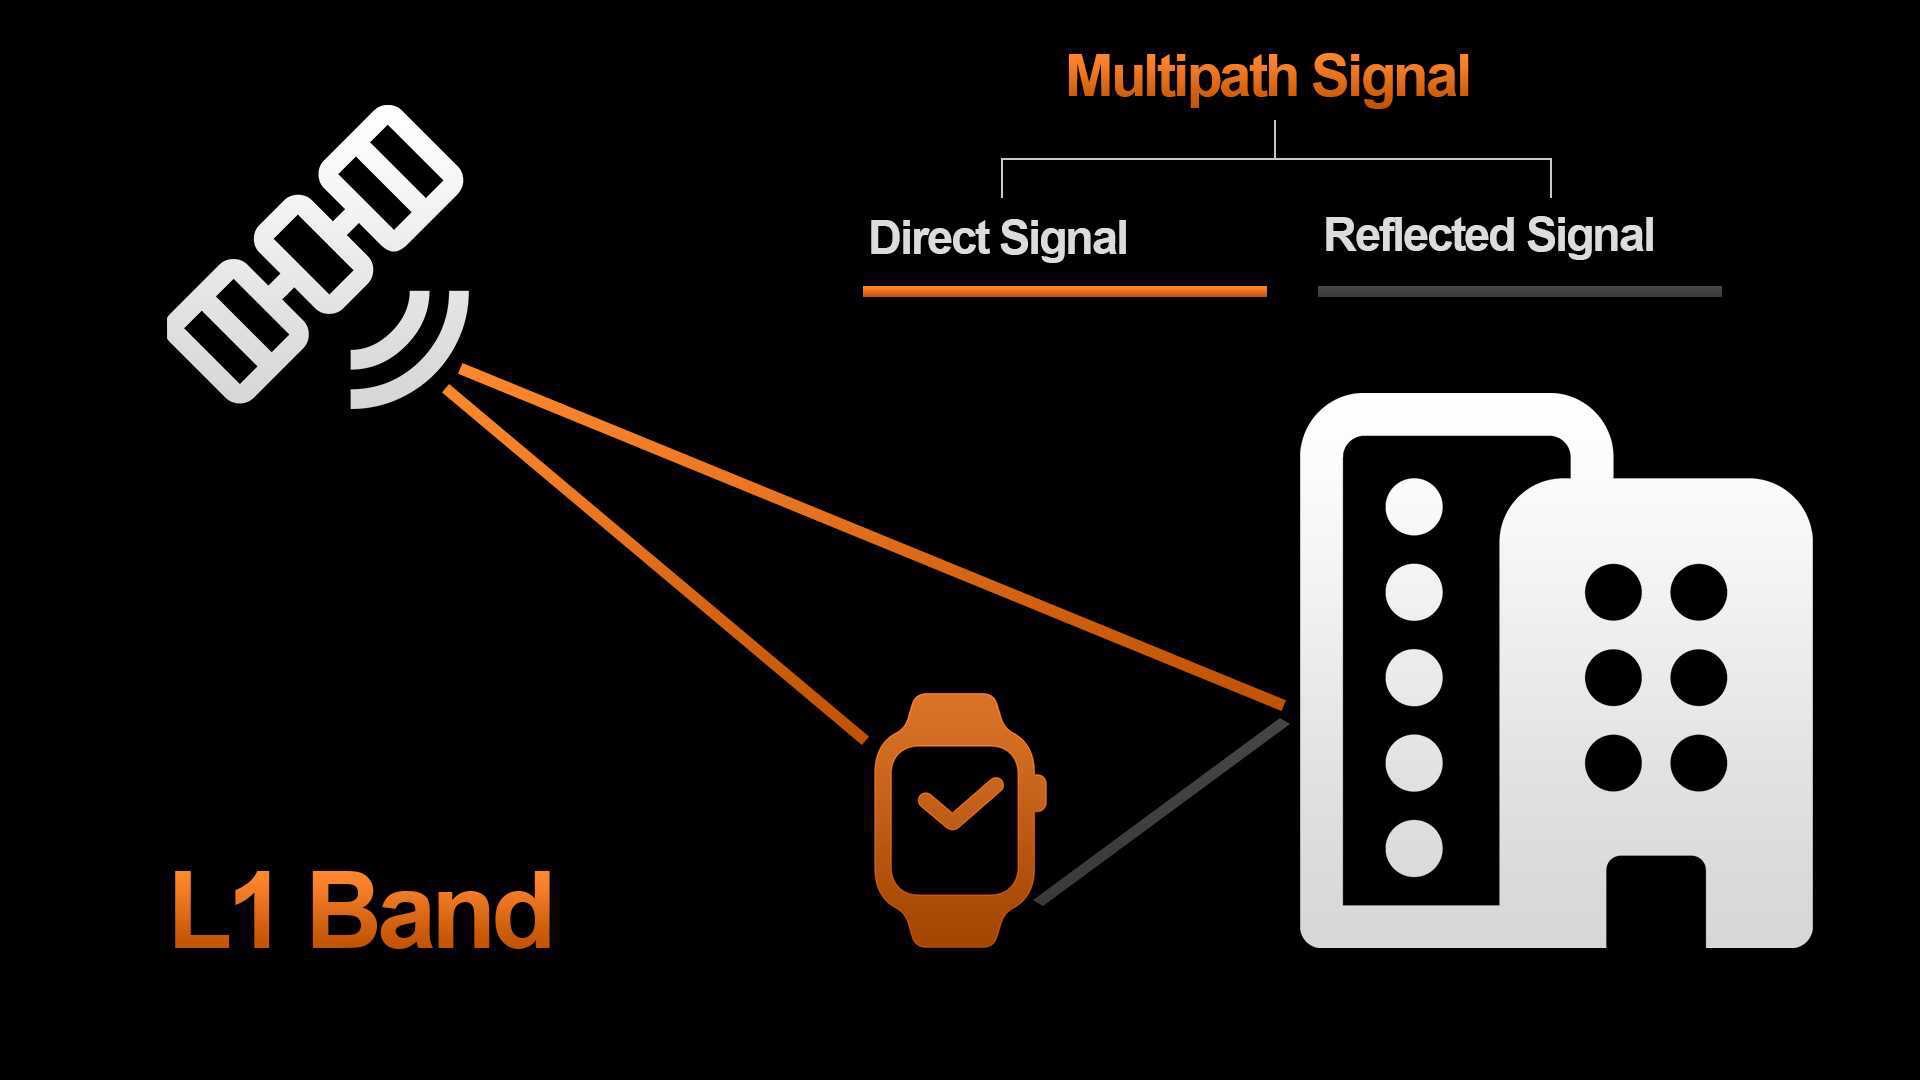
The turn-by-turn directions on your navigation app are a result of a GPS signal received from a satellite. Like all electronic signals, GPS also operates on a certain frequency system. The range of frequencies over which the signal operates is called a frequency band and there are multiple frequency bands. Today, most GPS systems operate on a single frequency band – called the L1 band (more on it later).
Now, to increase the pinpoint location accuracy, a device can be built to use an additional frequency band. This is called a Dual Frequency GPS.
Single vs. Dual-Frequency GPS
The most prominent difference is that a traditional single-frequency GPS offers accuracies of up to 5 meters, whereas a dual-frequency GPS can offer accuracies on a centimeter level.
As mentioned earlier, most single-frequency devices have been using the L1 band for years now. The biggest limitation of the L1 band is that its signal can’t bypass tall objects, atmospheric distortion, or even dense foliage in the path. This leads to inaccuracies.
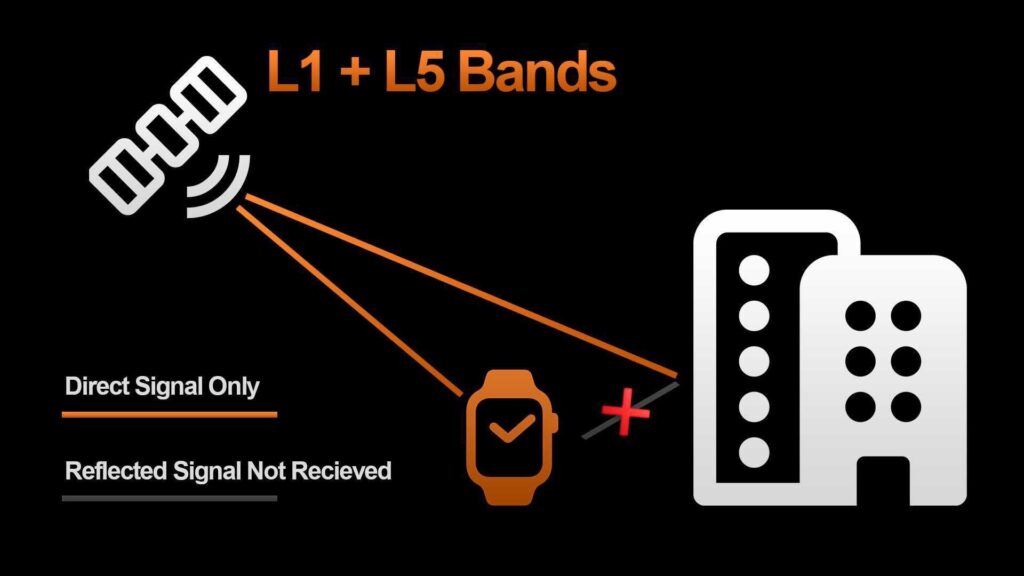
This is where the dual-frequency system proves efficient. Apple uses the L1 band along with the L5 band in the dual-band system to overcome the limitations associated with the former band.
While it would make more sense to use the L5 signal alone for more GPS accuracy, it isn’t possible. The L5 band is currently in its pre-operational stage. Hence, Apple combines L1 and L5 to deliver the best without hiccups. Shortly, we might see L5 signals powering our GPS experience on iPhones; you never know.
How Does the Precision Dual-Frequency GPS Work
The main objective of a dual-frequency system is to improve the quality of the input signal by reducing noise and removing errors. A major error that hampers signal processing is called a multi-path error.
What Are Multi-Path Errors
When you request navigation data, you use your watch (or phone) as a receiver requesting signal and information from a satellite, the transmitter. Now, the signal has to travel from the satellite (transmitter) to your device (receiver).
In L1 bands, a signal that is reflected off an object, say a building will also be received by your device.
The path between the two is not clear and has a lot of objects in between, from larger objects like skyscrapers to smaller objects like particles in the ionosphere. The signal will reflect off these objects to form multiple signal paths. These reflected new signal paths will not contain any useful information.
This will lead to errors in the received information, they are called Multi-path errors and this needs fixing.
How Does the L5 Frequency Band Strengthen GPS Signals
The L5 band has a lot of advantages over the L1 band, like higher power, and higher accuracy but one main advantage is its ability to detect unwanted reflected signals caused by multi-path errors.
So, once the L1 + L5 bands are in action, they identify unwanted signals and ensure that they do not affect the output information at the receiver’s end.
Another parameter we need to know is the chip rate – the number of pulses per second that are transmitted or received. The chip rate of the L5 signal bands is nearly ten times greater than the L1 signal bands. Error reduction capability is directly proportional to the chip rate. Thus, the errors and noise are reduced ten folds when an L5 band is used.
Do You Need a Dual-Frequency GPS Device
The objective of a dual-band frequency system is to improve the precision of GPS data. But let’s face it, we don’t have a lot of users complaining about the current, single-band GPS technology. So who is it meant for?
Apple gave us a relatable example during the launch event – the Chicago Marathon. The path of the marathon has a lot of skyscrapers and as mentioned earlier, this might lead to some inaccuracies in the GPS signal. So, the dual-frequency system can help.
Moreover, if you are an adventure lover and often venture out in the wilderness or live in areas where there is little connectivity, the dual frequency system is for you.
Since this is present on the iPhone 14 Pro, and the 15 Pro series as well, we’re sure another use case can be using this system to control and land drones safely. A centimeter-level accuracy can help you accurately monitor and position your drones.
The iPhone 14 series offers interesting features like Emergency SOS via Satellite but no charger in the box. That means you’ll have to pick a charger separately. Don’t worry though, as we’ve shortlisted the best fast chargers for Apple iPhone 14 series smartphones.
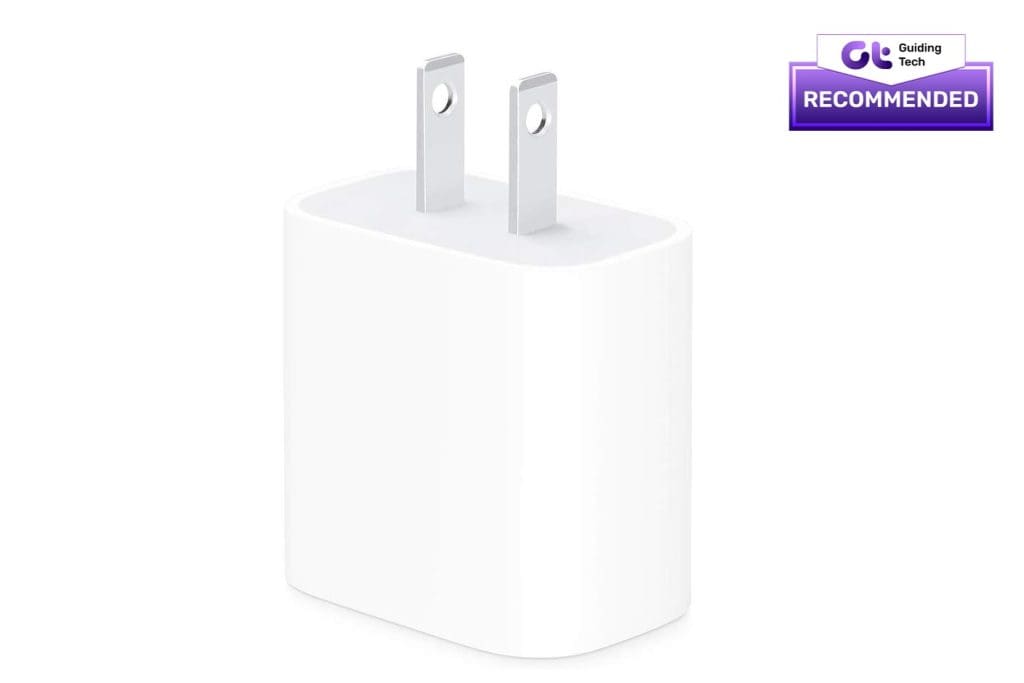
Apple’s first-party charger is a 20W wall adapter, perfect for charging the iPhone 14 series of phones. It’s a simple charging brick with a USB-C port on one end. While it doesn’t offer fancy features, many users prefer it for safety and compatibility reasons.
This adapter can charge your iPhone 14 and iPhone 14 Pro devices at the maximum rated wattage of 20W. The Apple 20W USB-C power adapter is also one of the most affordable charging bricks, which is an essential parameter for most people.
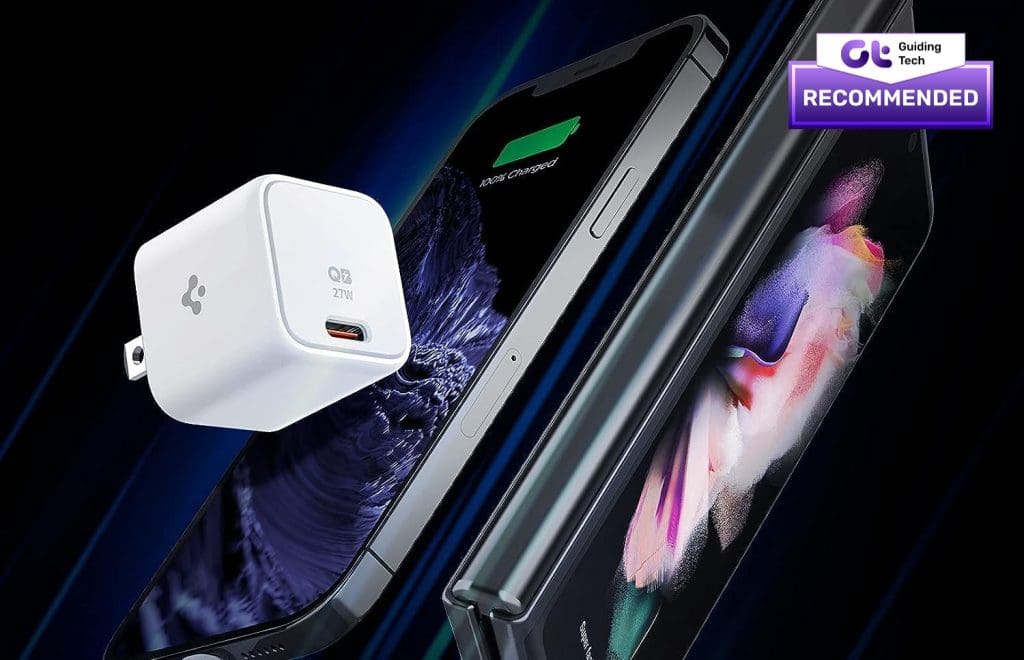
Here’s a GaN charger that can charge your iPhone 14 efficiently while being extremely small and portable. The higher wattage also means you can charge your iPad or other Android devices with this adapter.
This fast charger for iPhone has a tiny footprint, which makes it easily pocketable. However, it packs a decent output wattage of 27W to charge your other devices faster. The form factor is the highlight of this adapter, but one downside is that it doesn’t have foldable prongs.
The Anker Nano 3 is a 30W USB-C charger similar to Spigen’s adapter in terms of form factor. However, you get a bonus with this charger in the form of a foldable plug. This makes it easier to carry around in your pocket or backpack, especially when traveling.
Like the Spigen adapter, this newly released charger from Anker also has a single USB-C port but a slightly higher output of 30W. So devices that support 30W charging can take advantage of this. Another thing to note is that it’s available in purple to match the new iPhone 14 Pro’s purple hue.
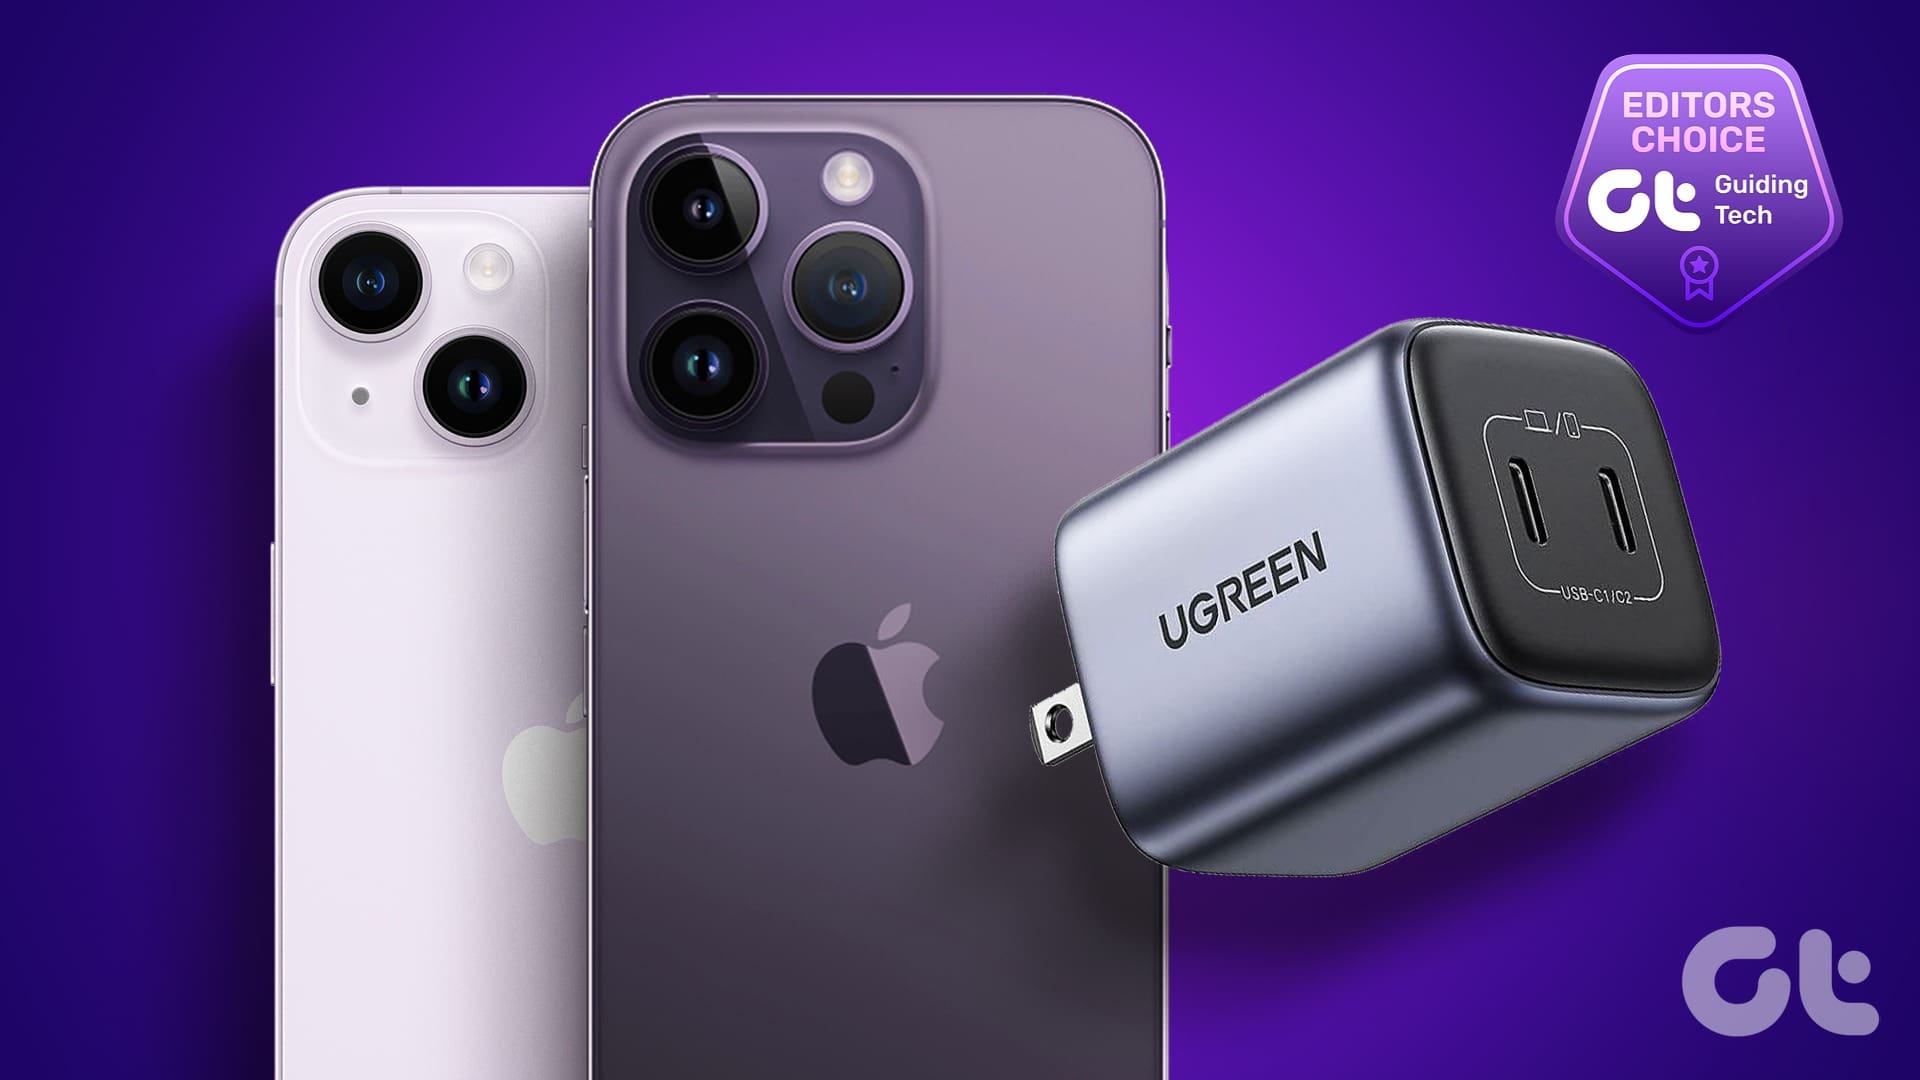
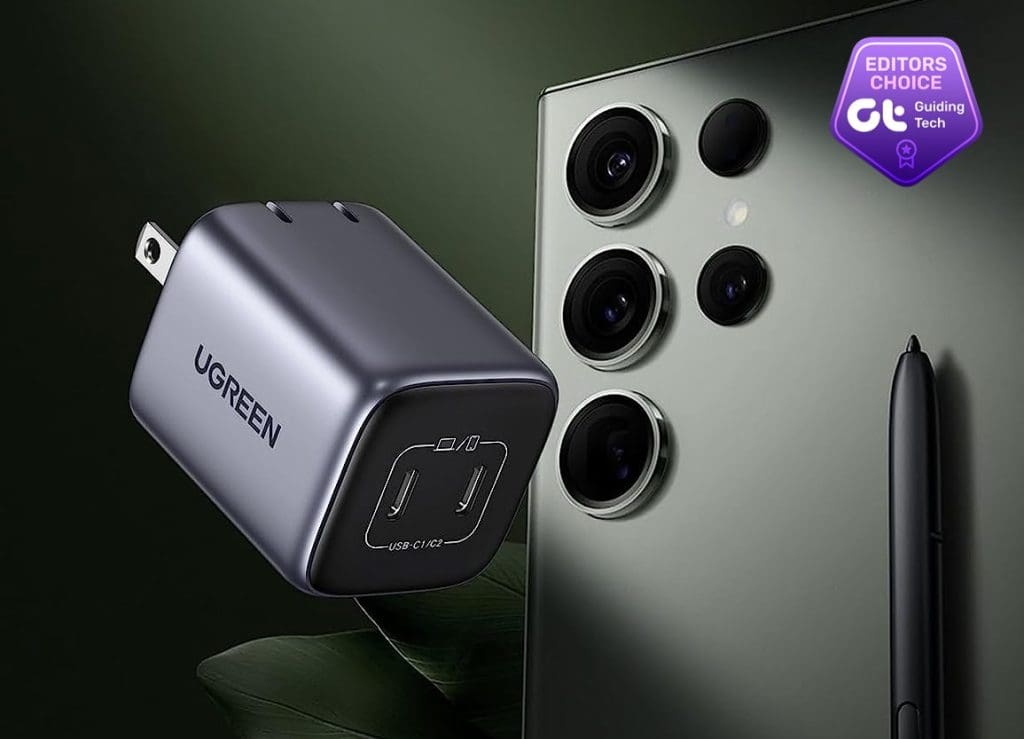
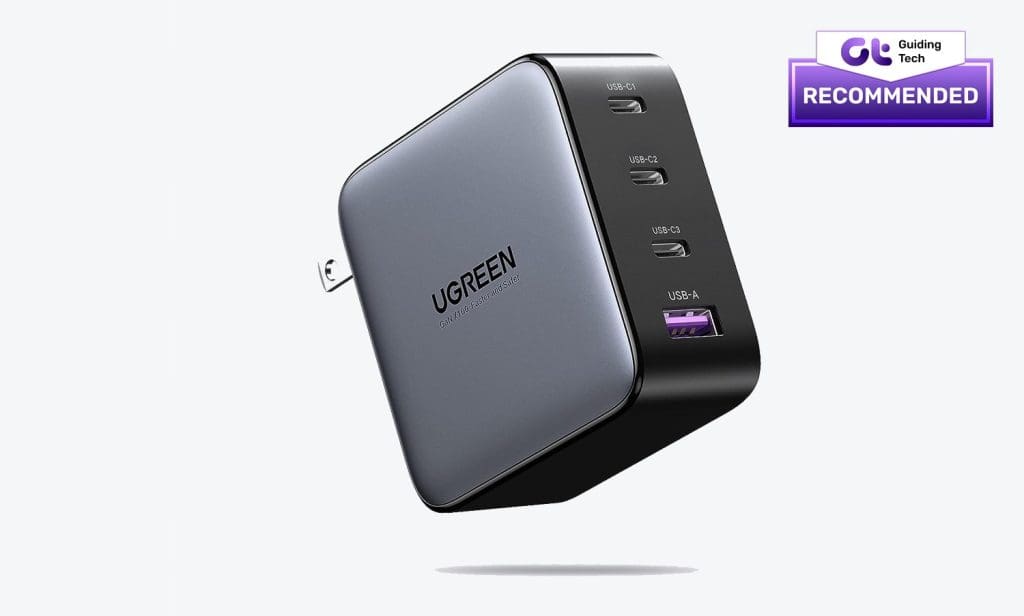
Ugreen’s dual-port PD charger offers an output of 45W from the two USB-C ports onboard. This makes it extremely convenient to charge two devices simultaneously. This reason alone makes it one of the best iPhone 14 chargers.
The 45W output on this Ugreen GaN adapter is divided into 25W and 20W when both ports are used simultaneously. This output can fast-charge both your iPhone 14 as well as your Apple Watch at the same time. And if you’re traveling, this can be a big plus.
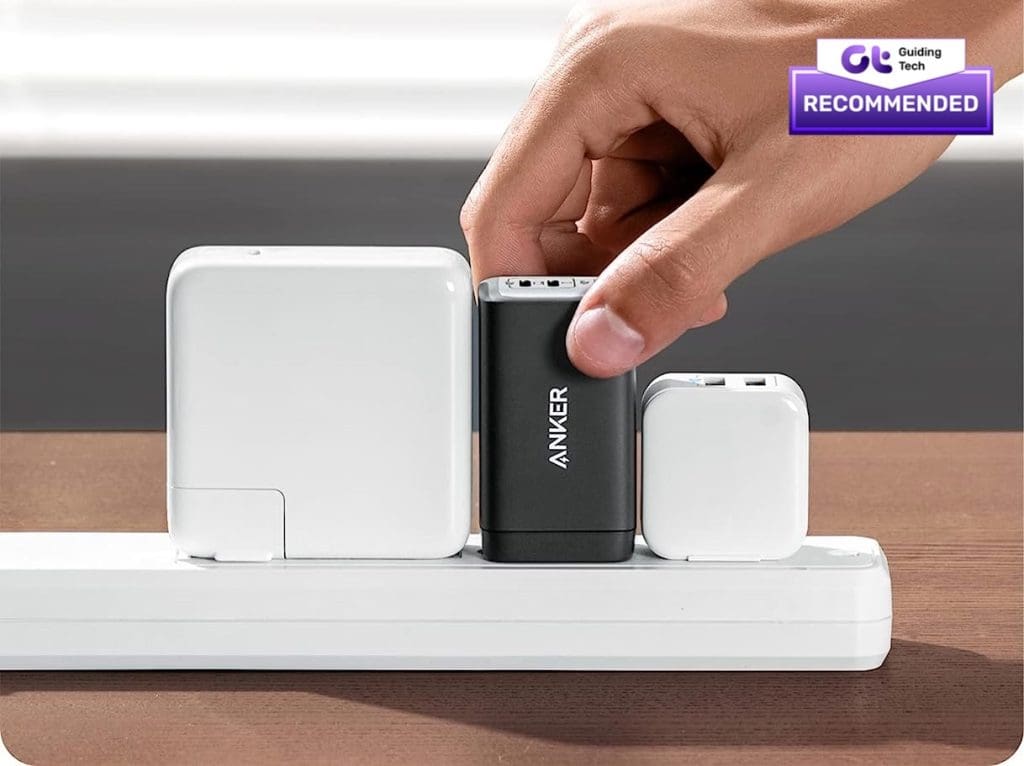
Anker Nano II is a good multi-port charger for the iPhone 14. This compact charger block can charge your iPhone and laptop/Mac at the same time. Thanks to a foldable plug design, it’s also portable and easy to carry around.
Since the Anker Nano II can charge devices at up to 65W, it’s a good charger for the iPhone 14 and a laptop like a MacBook Pro. This iPhone 14 charging block has two USB Type-C ports to fast-charge two devices simultaneously. There’s also a USB-A port to charge accessories like the Apple Watch.
The Ugreen Nexode 100W Wall Charger promises a lot to like. It comes with three USB Type-C ports and a USB Type-A port to charge up to four devices simultaneously, which can be a game-changer if you carry around multiple devices. The three USB-C ports have a maximum output of 100W.
As such, you can use it to charge high-end laptops like the MacBook Pro and your iPhone 14 together and then leave space for more. For example, you can use the USB Type-A port to charge devices requiring less wattage, like Bluetooth headphones. It’s a good investment for frequent travelers.
What We Like
Maximum 100W output
Total 4 output ports
What We Don’t Like
Expensive
FAQs
1. Does the iPhone 14 support fast charging?
Yes, the iPhone 14 series of devices can charge at a maximum wattage of 23W. This should ideally give you 50% of battery life in 30 minutes.
2. Can you charge the iPhone 14 with an old charger?
If you have a USB-A charger, you can still charge your iPhone 14 with it, but not with the included cable. The included cable in the box is USB-C, so you will need a new charger.
3. What is the maximum wattage you can charge the iPhone 14?
The iPhone 14 and iPhone 14 Plus can charge at a maximum wattage of 20W. Whereas, the iPhone 14 Pro and iPhone 14 Pro Max can go slightly higher up to 23W.
4. Is it safe to use a third-party charger to charge the iPhone 14?
If you pick up a charger from a well-established brand like the ones mentioned above, you should not have any problem. However, you should avoid buying cheap chargers from unknown brands as they can damage your iPhone’s battery.
Apple unveiled the next version of its iPad and iPhone’s operating system at WWDC, held in June 2022. The Cupertino-based company added many accessibility features and long-awaited customization options to iOS 16 and unveiled the new iOS 16 wallpapers and iPadOS 16 wallpapers, which are undoubtedly classy.
Since iOS 16 introduced a new customizable Lock Screen, it also added an amazing range of dynamic images that create a depth effect. Additionally, iOS 16 also has exclusive Always-On display wallpapers for iPhone 14 Pro series. Since they won’t work on older devices, they haven’t been included in this post.
However, if you use an iPhone 7 Plus or older device, you can get all the other wallpapers right here. Scroll down to explore and download the all-new iOS 16 wallpaper for your iPhone and iPad.
Note: To get these iOS 16 wallpapers in HD, tap the download button above the images. The image previews are just for presentation; hence, they are low-resolution.
Apple bundles its latest iOS 16 with 42 new iPhone wallpapers, and each wallpaper is beautifully crafted to look great on any model. We have divided them category-wise for your ease.
Lock Screen Personalization: The background has a multi-layered (depth) effect that separates the subject from the rest. You can also change fonts, focus mode, wallpapers, and more.
Focus Mode: You can now tie Focus Mode to a Lock Screen with a swipe. In addition, Apple introduced Focus Filter, which filters out content relevant to the users from apps like Calendar, Mail and Messages, and Safari.
Messages App: You can edit or recall the messages you send. Moreover, the updated SharePlay allows users to watch synced content like movies and music.
Other Features: Ability to schedule emails and even cancel them. Further, Live Text offers quick actions like converting currency and translating text and supports video text detection. Apple Wallet users can split bills and access Apple Pay Later, enabling seamless pay.
iPadOS 16
Collaboration in Messages: This enables you to manage shared content across Files, Numbers, Pages, and Notes in the Messages app. You can also invite other iMessage users to collaborate and edit documents with all changes reflected in real time.
Freeform App: Apple debuted a new collaboration app called Freeform, enabling users to view, share, and collaborate in one place. This app supports Apple Pencil.
Staging Safari for easy collaboration: Sticking to the narrative of collaboration, Apple updated its Safari browser with collaboration features like Shared Tab Groups, which allow users to collaborate on a set of tabs and bookmarks in real time.
Apple has designed a variety of wallpaper styles in iOS 16, and we are sure you will find your style even for your older iPhone. That said, which feature of iOS 16 or iPadOS 16 are you looking forward to? Share your thoughts in the comment section below.
Switch to Wi-Fi: If you are using mobile data, we suggest switching to Wi-Fi on your iPhone.
Choose Google Calendar as the default: Open Settings > Calendar > Default Calendar > Gmail.
Force quit and restart Calendar app: This will give the app a fresh start on your iPhone.
Update iOS version to update Calendar app: Open Settings > General > Software Update > Install if one is available.
Fix 1: Enable Google Account For Calendar App
To see your Google Calendar entries in the Calendar app, permission to use your Google Account needs to be enabled on your iPhone.
Using Settings App
Step 1: Open Settings > Calendar > Accounts.
Step 2: Select Gmail from the list of email accounts.
Step 3: Enable Calendar access.
Using Calendar App
Open the Calendar app > Calendars > Enable Google Calendar > Tap on Done.
Fix 2: Enable New Data Fetch For Google Calendar
If you are unable to see the latest entries for specific dates after enabling Google Calendar in the Calendar app, you should now check if data fetching is enabled for your Gmail account or not. This will help in updating all your Google Calendar data in the app. Here’s how to check the same.
Step 1: Open Settings > Calendar > Accounts.
Step 2: Select Fetch New Data > Gmail > Make sure that Fetch is selected your Google Calendar data
Step 3: Under Fetch, select Automatically at the bottom to regularly update your Google Calendar data
Using Automatic Data Fetching for several apps can impact the data consumption and battery life of your iPhone. To avoid that, you can choose the app to fetch new data based on different time slots – Hourly, Every 30 Minutes or Every 60 Minutes.
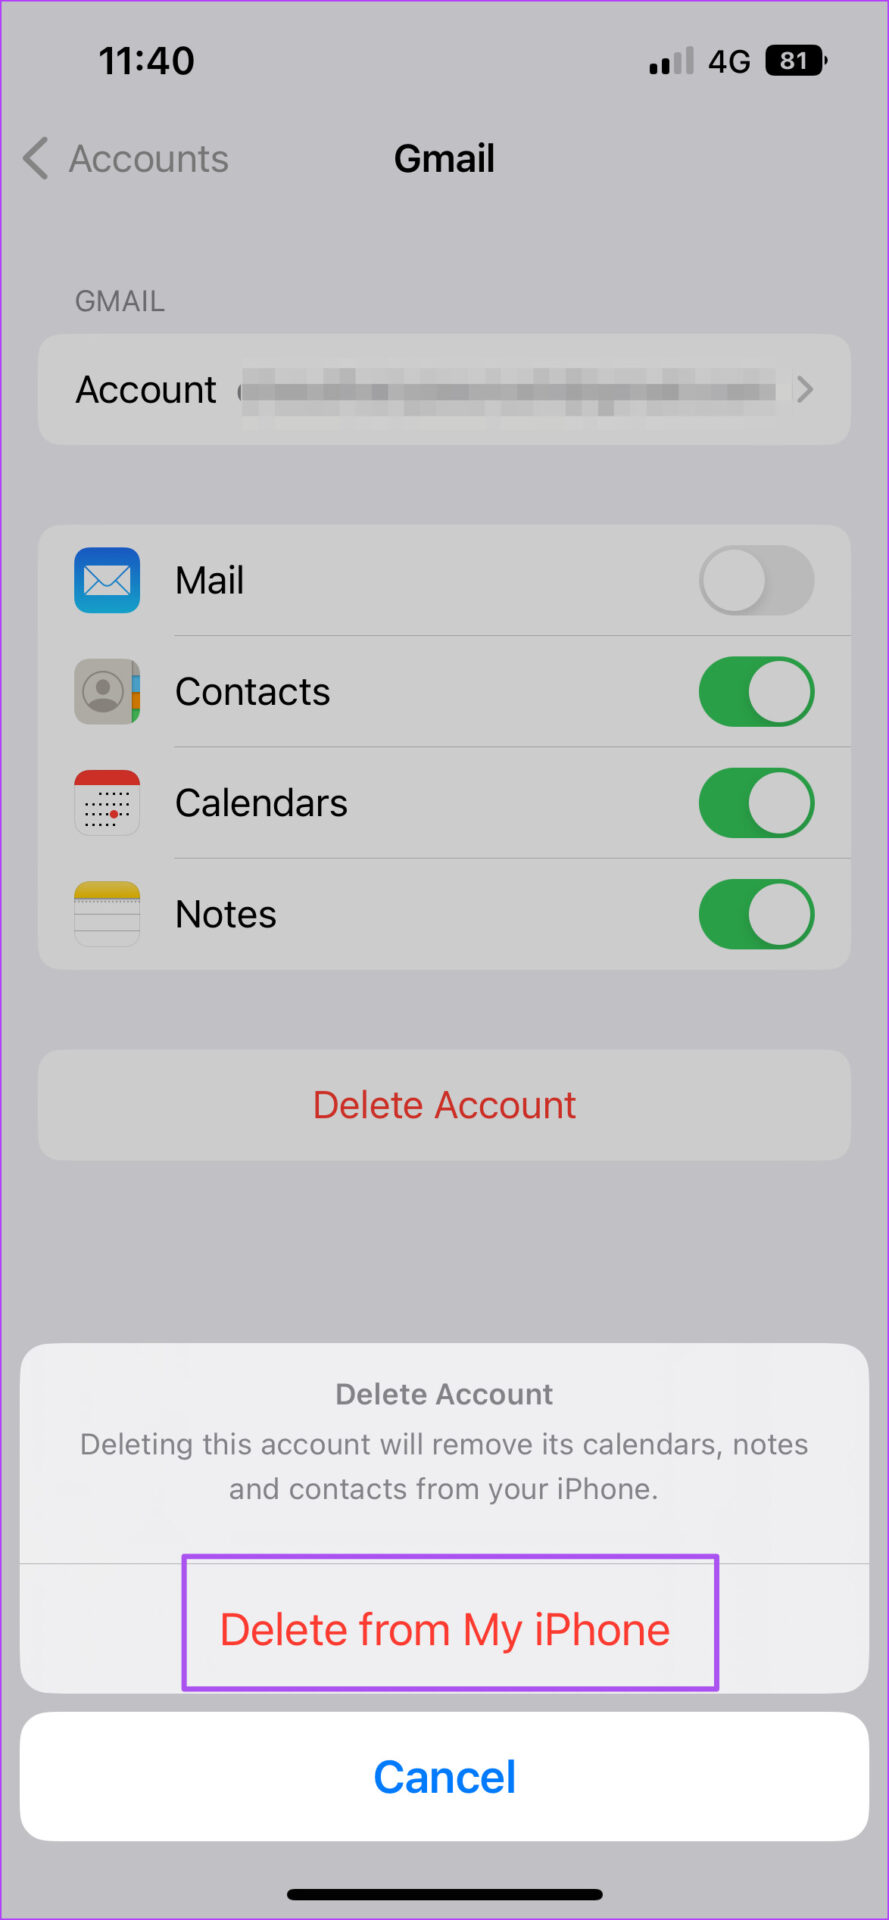
Fix 3: Delete and Add Google Account Again
If you cannot sync Google Calendar on your iPhone, you can try adding your Google account again on your iPhone by following these steps.
Step 1: Open Settings > Calendar > Accounts.
Step 2: Select your Gmail account.
Step 3: Tap on Delete Account.
Step 4: Select Add Account in the Accounts menu and then add your Google account again.
Google Calendar is a good alternative to your iPhone’s default Calendar app. While there are other alternatives for Apple Calendar, you can directly sync them in the default Calendar app without downloading them separately.
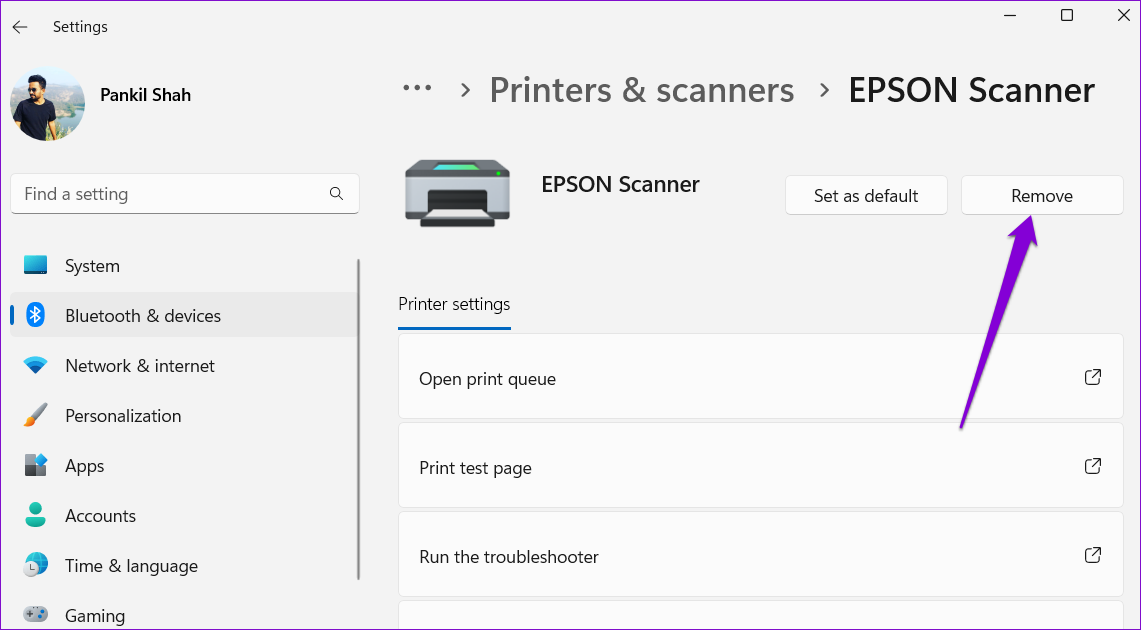
Removing the scanner from Windows and setting it up again can help resolve any problems caused by incorrect configuration. Here’s how you can go about it.
Step 1: Press the Windows key + I to open the Settings app and head to Bluetooth & devices > Printers & scanners.
Step 2: Select your scanner from the list.
Step 3: Click the Remove button at the top.
Step 4: Head back to the Printers & scanners menu. Click Add device and follow the on-screen prompts to set up your scanner again.
Fix 2: Configure Scanner Services
Windows requires certain services to run in the background for the scanner to function properly. For instance, Windows Image Acquisition (WIA) is a service responsible for acquiring images from your scanner.
If one of the scanner-related services fails, Windows may have trouble communicating with the scanner. Here’s what you can do to fix it.
Step 1: Press the Windows key + R to open the Run dialog. Type services.msc in the box and press Enter.
Step 2: Scroll down to locate the Windows Image Acquisition (WIA) service. Double-click it to open its properties.
Step 3: Use the drop-down menu next to Startup type to select Automatic. Then, hit Apply, followed by OK.
You’ll need to repeat the above steps to configure the Remote Procedure Call, DCOM Server Process Launcher, RPC Endpoint Mapper, and Shell Hardware Detection services. After that, restart your PC and try using your scanner again.
Fix 3: Run the Hardware and Devices Troubleshooter
The hardware and devices troubleshooter on Windows can automatically detect and fix any common issues. You can run this Windows troubleshooter to fix any issues that may be preventing your scanner from working.
Step 1: Press the Windows key + R to open the Run dialog. Type msdt.exe -id DeviceDiagnostic in the box and press Enter.
Step 2: In the Hardware and Devices window, click Next to initiate the scan.
Fix 4: Run SFC and DISM Scans
Windows 11 may encounter such issues if some system files are corrupted or missing. In such cases, running the SFC (or System File Checker) scan can help you repair those damaged system files.
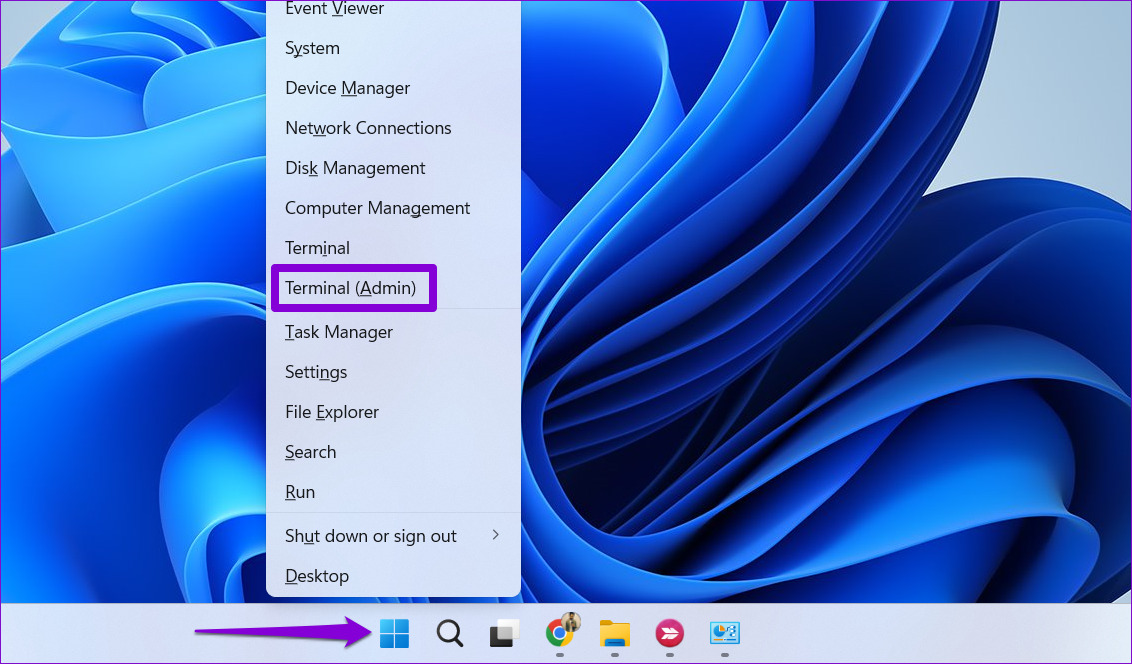
Step 1: Right-click on the Start icon and select the Terminal (Admin) option from the resulting menu.
Step 2: Select Yes when the User Account Control (UAC) prompt appears.
Step 3: Type the command mentioned below and press Enter.
SFC /scannow
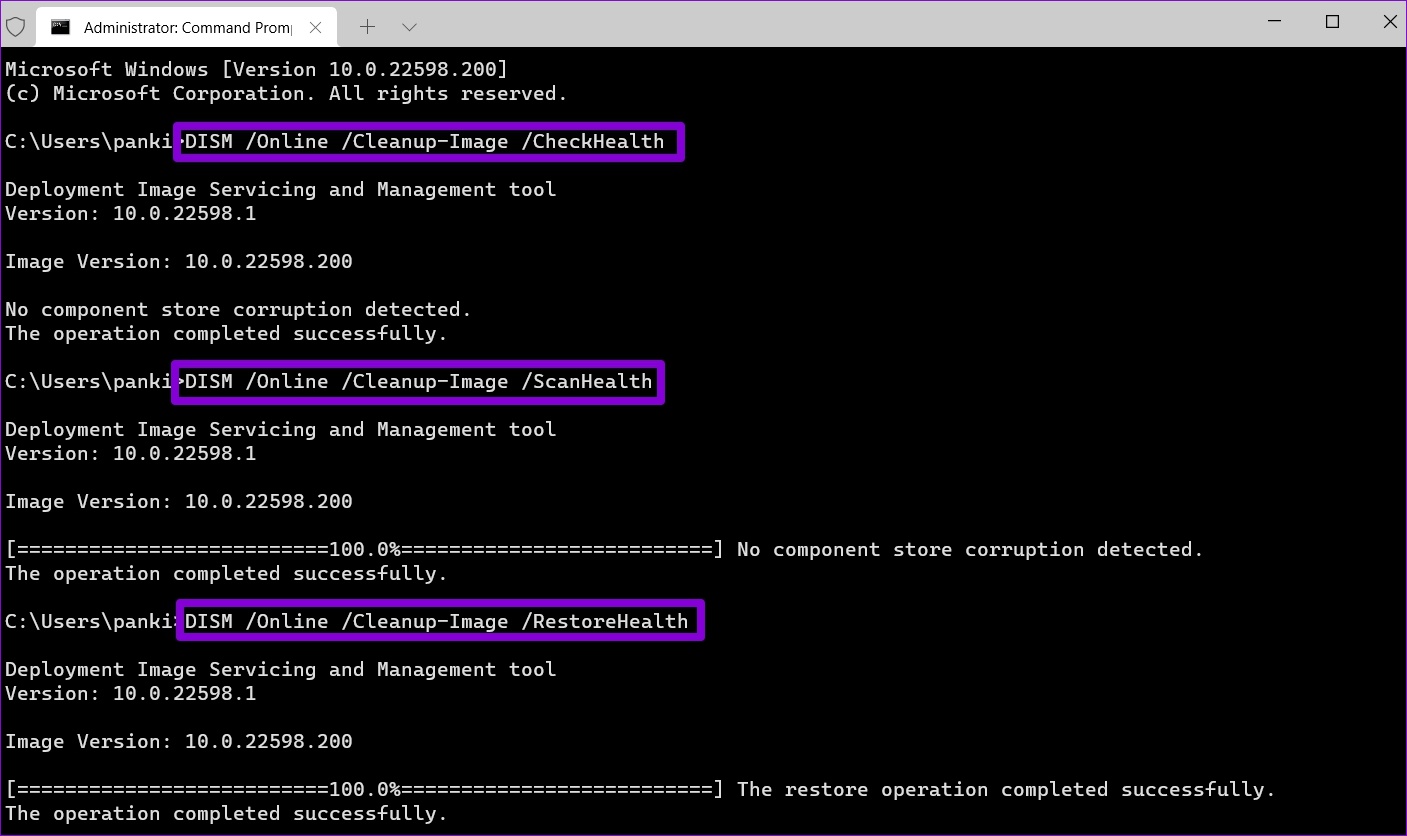
Next, you need to run the DISM (Deployment Image Servicing and Management) scan. Besides scanning system files, it will also download internal system files from Microsoft’s server if required.
Open the Terminal app with admin rights again and run the following commands one by one.
Restart your PC after running the above commands. Following that, your scanner start working on Windows.
Fix 5: Update or Reinstall Scanner Drivers
Outdated or malfunctioning drivers can also prevent Windows 11 from connecting with your scanner. In most cases, you can resolve the issue by updating the driver.
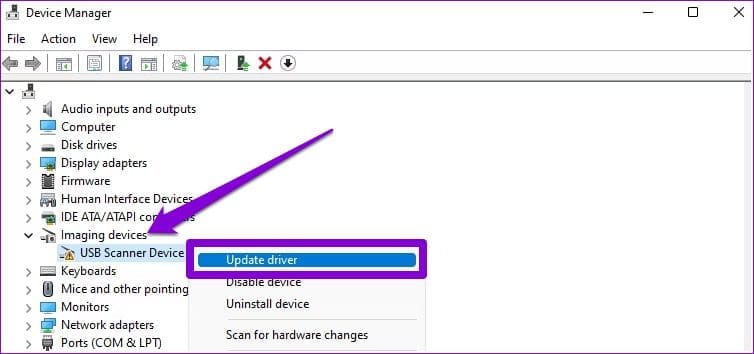
Step 1: Right-click on the Start icon and select Device Manager from the list.
Step 2: Expand Imaging devices, right-click on your scanner, and select Update driver.
Follow the on-screen prompts to finish updating the driver. If the issue persists even after this, there’s a chance that your scanner driver is corrupt. In that case, you’ll have to uninstall the driver. Once removed, restart your computer to let Windows automatically install the missing driver when it boots next.
Check internet access: Switch from mobile data to Wi-Fi and try connecting to a 5GHz frequency band if possible.
Force quit and relaunch the Notes app: This will reload all the contents of the app from scratch on your iPhone.
Update iOS to update the Notes app: Install the latest version of the Notes app on your iPhone to get rid of bugs.
Fix 1: Enable Google Account For Notes App
Instead of downloading the Google Keep app and then transferring iPhone notes to Google Keep, you can enable Gmail account access for the Notes app. So if Google Keep is not syncing with your iPhone, you should first check whether your Google Account access is enabled or not. Here’s how.
Step 1: Open Settings > Notes > Accounts.
Step 2: Select Gmail from the list of email accounts.
Step 3: Tap the toggle next to Notes to enable account access if not enabled.
Fix 2: Enable Automatic Data Fetching For Google Account
After you ensure that the Google Account is enabled for the Notes app, check and enable automatic data fetching. This option automatically checks for new data with your Google Keep account and syncs the updates to the Notes app.
After enabling Google account access for the Notes app, check if Automatic Data Fetch is enabled or not.
Step 1: Open Settings > Notes > Accounts.
Step 2: Tap on Fetch New Data and then select Gmail from the list.
Step 3: Enable Fetch for your Gmail account.
Step 4: Return to the previous screen. Then, select Automatically to ensure new data is available for Google Keep.
Wait a few minutes and open the Notes app to inspect if your Google Keep notes appear normally.
Fix 3: Switch Default Account to Gmail for Notes App
By default, your iPhone sets iCloud as the go-to account to sync the notes in the Notes app. This includes the ones you sync using your Google Account. If you rely more on the Google Keep account for your notes, switch to Gmail as your default account for the Notes app. Here’s how to do it.
Step 1: Open Settings > Notes and then choose Default Accounts.
Step 2: Select Gmail.
Close the Settings app and open the Notes app to check if this changes things.
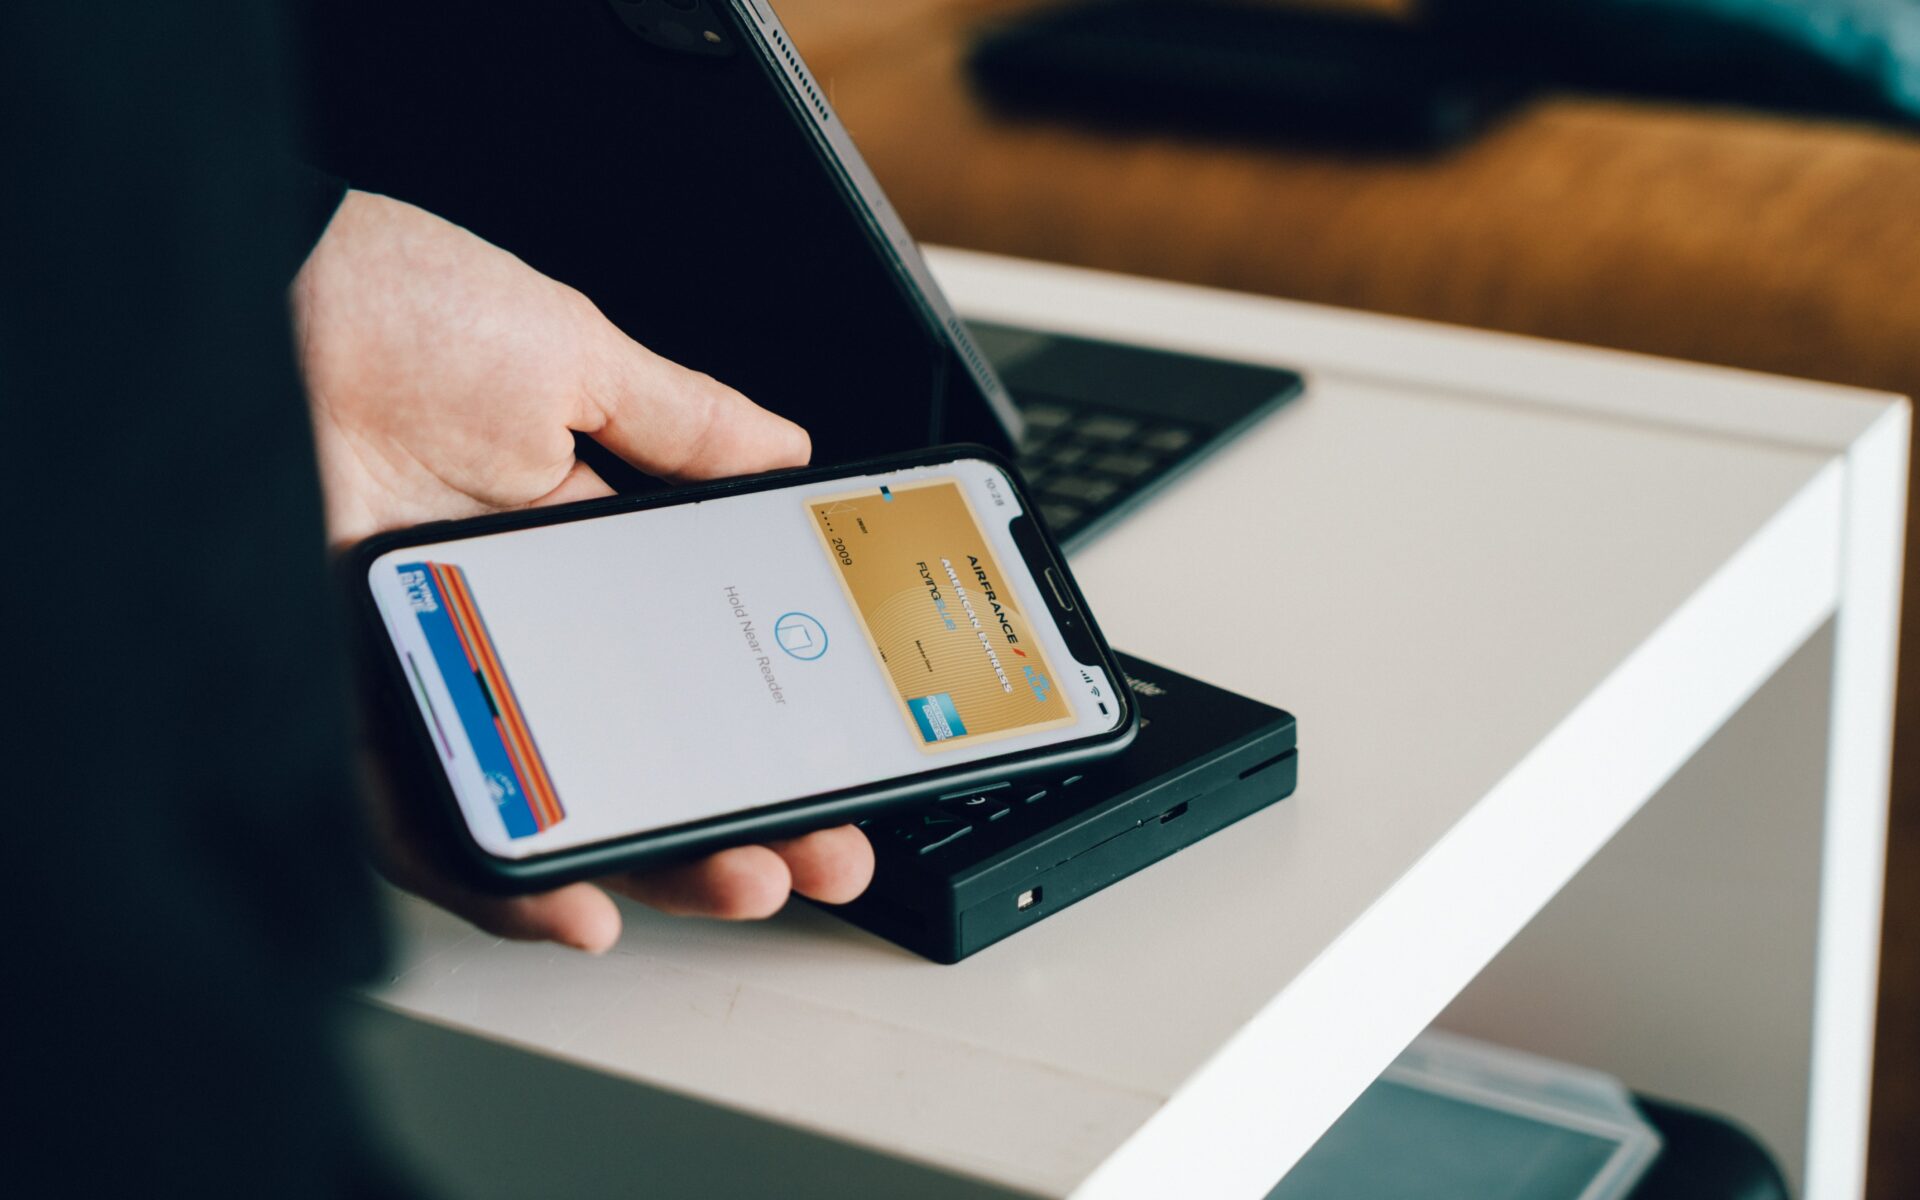
Over the years, NFC has evolved tremendously to facilitate Contactless payments worldwide. You just need to tap your phone or smartwatch to pay at a terminal, making the entire process simple. However, it’s simple only if it works in an intended way. A lot of times, NFC may stop working on your Android phone all of a sudden.
If you rely a lot on contactless payments or if you use NFC on your phone to pair accessories or activate tags, you would want it to work flawlessly every single time. It’s rather embarrassing if your transactions don’t go through while making a purchase. If the issue sounds familiar to you, here are the best ways to fix NFC not working on Android. But first, let’s understand more about NFC.
What Is NFC
NFC (Near Field Communication) is a set of protocols that allows two devices to wirelessly connect to each other when they are in close proximity. When you bring one device with NFC close to another, there are coils in the NFC module that undergo inductive coupling to facilitate the connection.
Where Is NFC Used
NFC is commonly found in several places around us. Most credit cards have NFC to facilitate tap-to-pay transactions. Keycards to access hotel rooms can also have NFC. Apart from that, most modern smartphones have NFC.
You can use it for creating and scanning NFC tags, contactless payments, and connecting to other accessories like compatible headphones and printers.
How to Fix NFC Not Working On Android Phones
If contactless payments are not working on your phone or if the device you’re trying to connect to does not pair via NFC, here are some solutions to fix the issue.
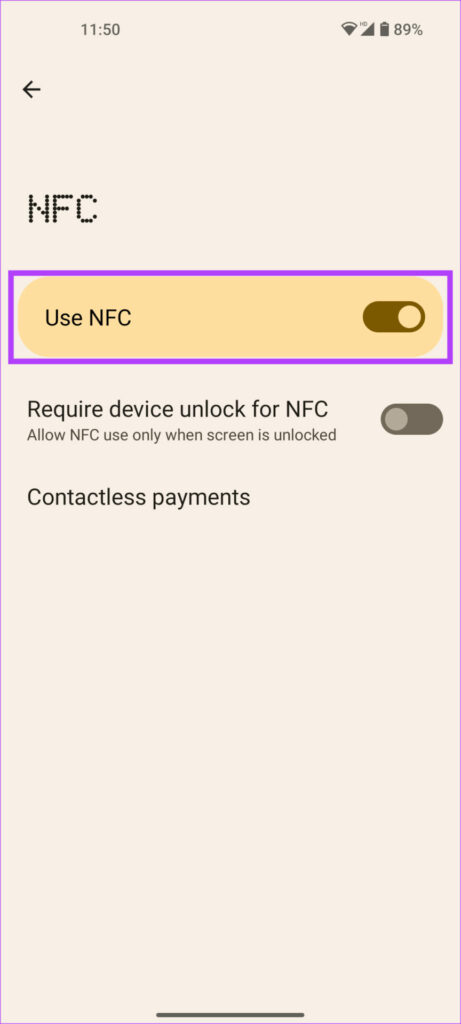
1. Ensure NFC Is Enabled
NFC tags or terminals can be read by your Android phone only when NFC is turned on. While it’s a basic step, you may miss it at times which is why it’s a good idea to check if the NFC toggle is turned on. Here’s how you can enable NFC on Android.
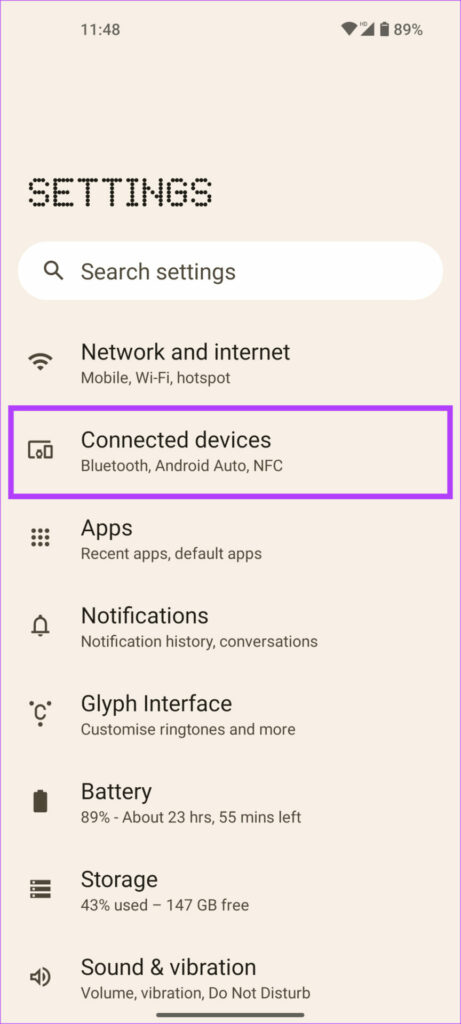
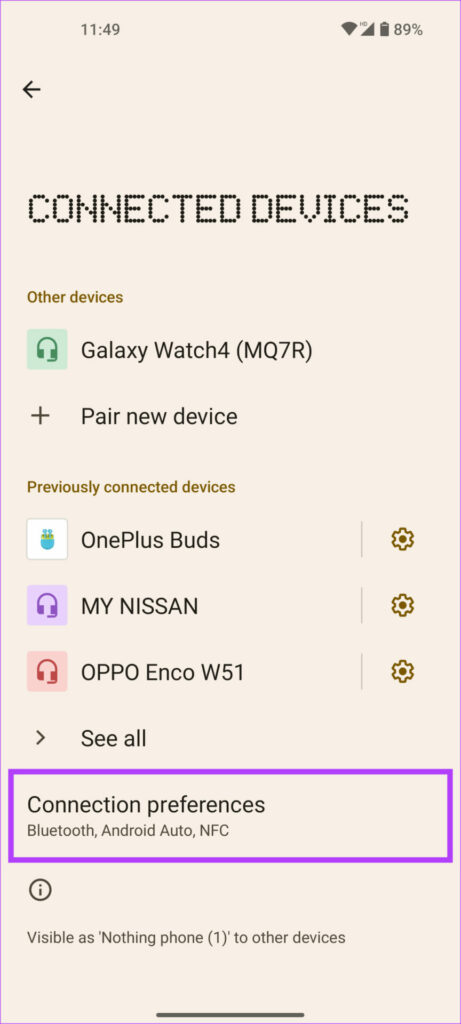
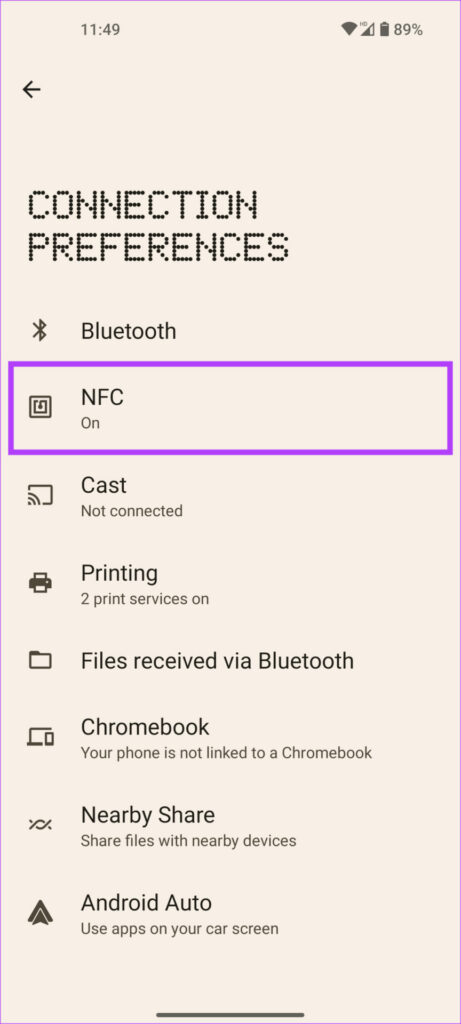
Step 1: Open the Settings app on your phone.
Step 2: Tap on Connected devices.
Step 3: Press the Connection Preferences option.
Step 4: Now, go to the NFC settings page.
Step 5: Toggle on Use NFC.
If the toggle is already on, disable and re-enable it to ensure there’s no glitch that’s preventing NFC from working properly.
2. Tap Your Phone in the Right Area
The NFC module inside your phone is located in a small area generally on the back of the phone. The location varies depending on which phone you have but it is generally at the center of the phone or near the camera module at the top.
When tapping your device to pay or connect via NFC, ensure you’re tapping your phone in the area where the NFC module is located. If you’re unaware of the correct position, just tap different areas of the phone on the NFC tag or POS machine until it gets detected.
It’s also vital that you tap the NFC module of your phone onto the NFC module present in a tag or at a payment terminal. Every payment terminal or POS machine will have a dedicated area for NFC indicated by what looks like the Wi-Fi icon. Tap your phone exactly in that area for it to work.
3. Remove Your Case if It’s Thick or Metallic
Thick and metallic cases could obstruct the working of NFC. NFC works at a maximum distance of 4 cm. So, a thick case might add to the distance and prevent the NFC modules from communicating when you tap your phone on an NFC-enabled terminal.
Further, a metallic case could interfere with the working of the NFC coils. NFC does not work through a metallic surface which is why it’s best to remove a case that has any sort of metallic or magnetic components before using NFC.
4. Unlock Your Phone Before Tapping
The primary use-case of NFC on Android is for contactless payments. This is why, by default, you cannot use NFC when your phone is locked. The feature is present to stop unauthorized payments. Unlock your phone with your PIN or biometrics before tapping your phone to pay at a terminal.
If Google Pay NFC is not working on your phone, this can be the primary reason. If you think this is a hassle and you understand the risks with enabling NFC even when your phone is locked, you can enable NFC even when your phone’s screen is off. Here’s how to do it.
Step 1: Open the Settings app on your phone.
Step 2: Tap on Connected devices.
Step 3: Press the Connection Preferences option.
Step 4: Now, go to the NFC settings page.
Step 5: Toggle off ‘Require device unlock for NFC’.
You can now use NFC on your phone without unlocking it each time.
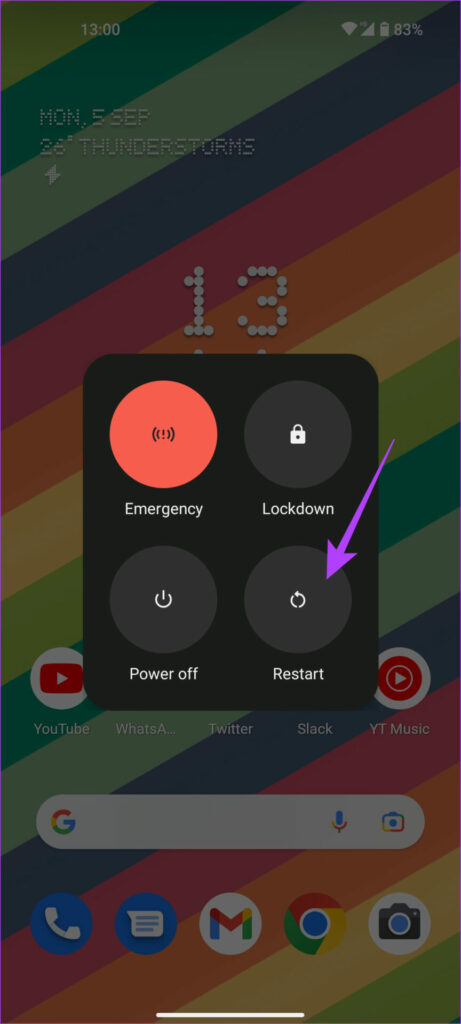
5. Restart Your Phone
A lot of problems — both simple and complex — can be tackled using the customary solution, rebooting your phone. Just hold onto the power button on your phone until you see the power menu.
Then, select the Restart option. Wait for your phone to turn off and turn back on before trying to use NFC again.
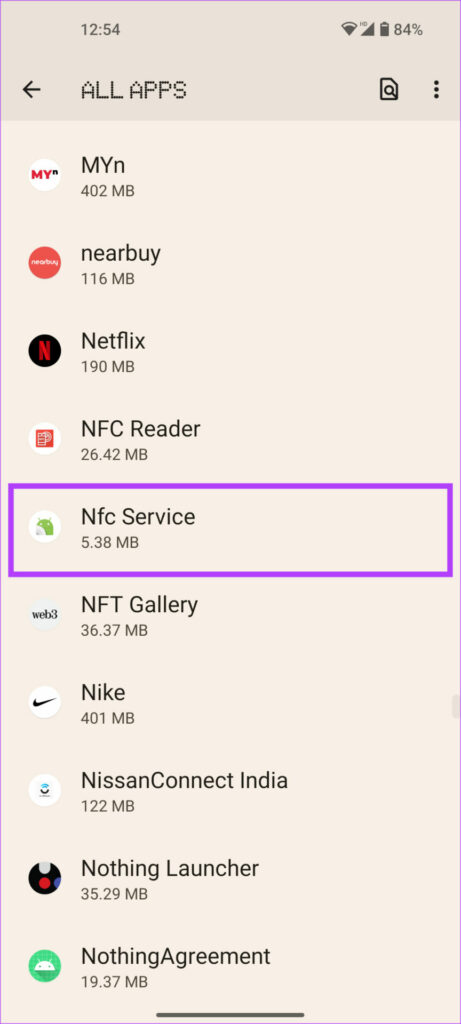
6. Clear Cache of NFC Service
Have issues pertaining to any apps or operations on your Android device? Clearing the cache is your go-to option. Try clearing the cache of the NFC service on your Android phone and check if this fixes your issue.
Here’s how you can clear the cache of the NFC service on your Android device:
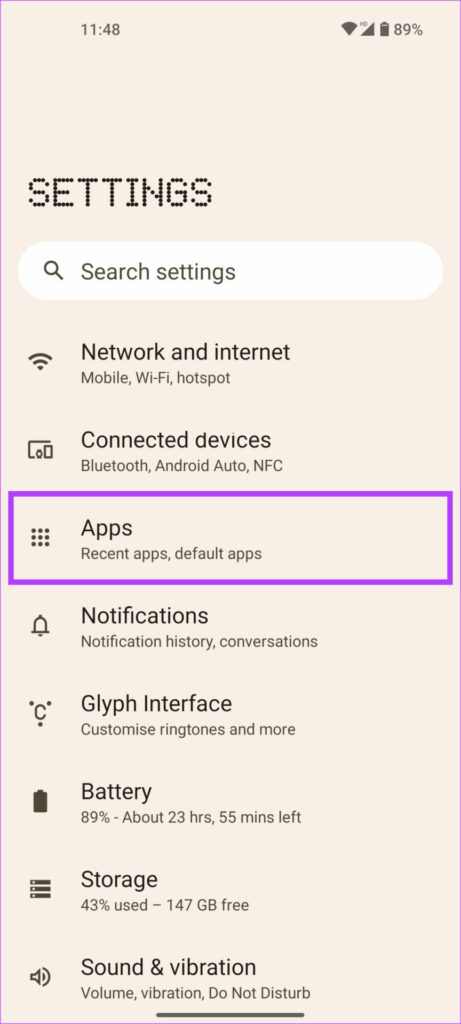
Step 1: Open the Settings app on your device.
Step 2: Tap on the Apps option.
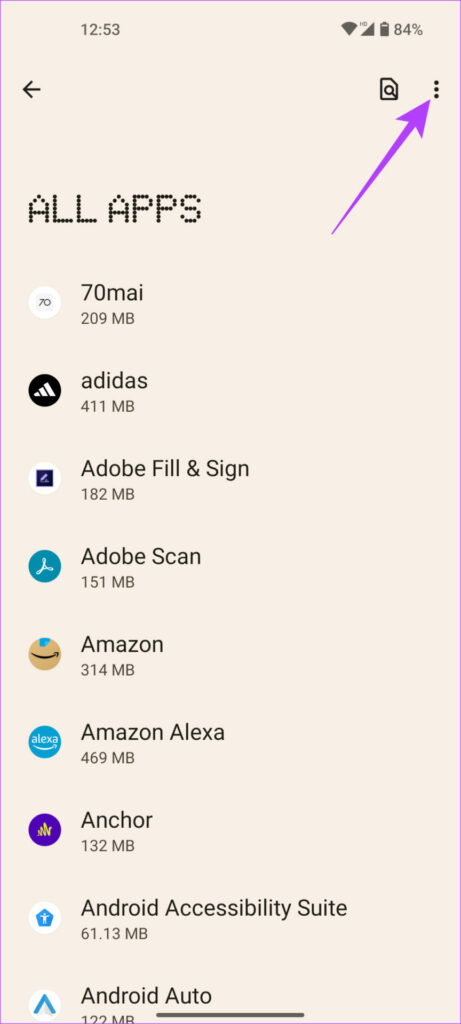
Step 3: Now, go to See all apps.
Step 4: Tap on the three dots in the top right corner.
Step 5: Select Show system.
Step 6: Locate and select NFC Service.
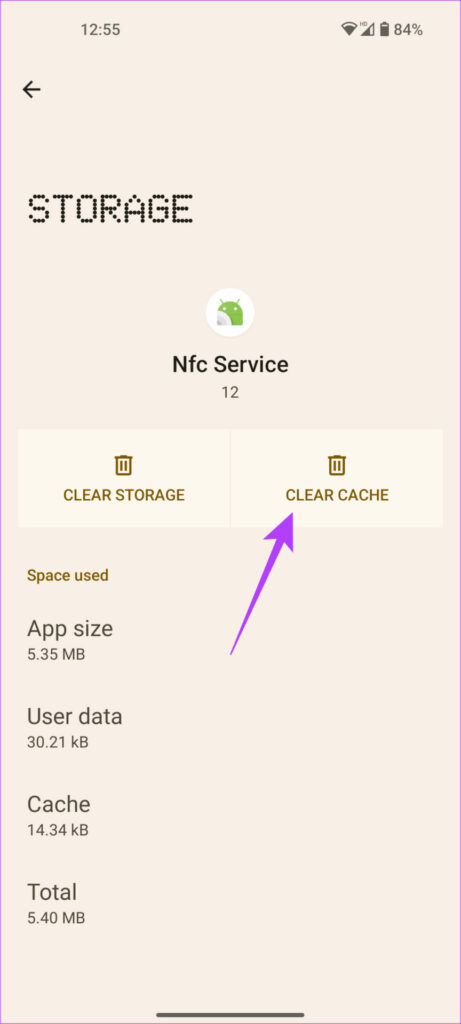
Step 7: Now, tap on Storage and cache.
Step 8: Proceed to clear the cache by hitting the corresponding button.
Restart your phone once and then try using NFC. This solution should work if NFC is not working on your Samsung phone or just about any Android device.
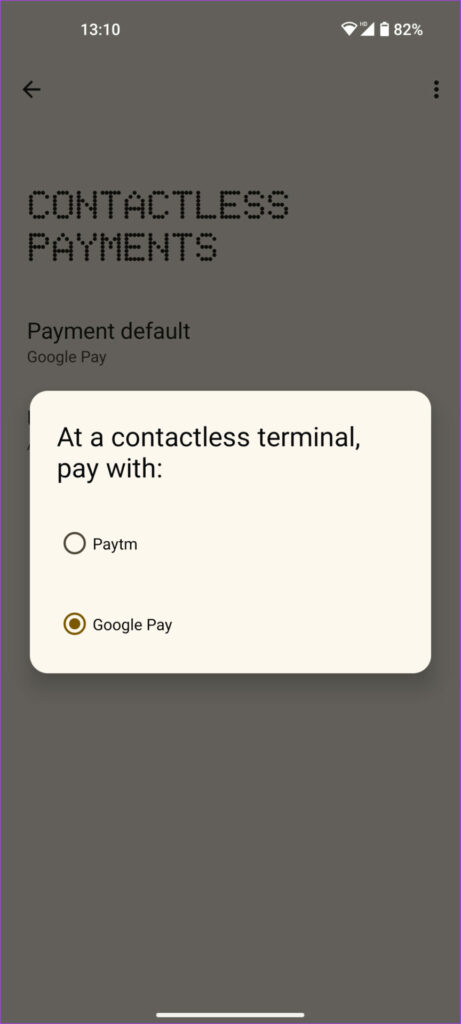
7. Set Default App for Tap and Pay
You may have multiple apps on your phone supporting the tap and pay feature. In such a case, setting a default app is useful since the apps won’t interfere with the working of one another. Here’s how you can set an app of your choice as the default app for NFC payments.
Step 1: Open the Settings app on your phone.
Step 2: Tap on Connected devices.
Step 3: Press the Connection Preferences option.
Step 4: Now, go to NFC.
Step 5: Select Contactless payments.
Step 6: Tap on Payment default.
Step 7: Select the app you use most often and want to pay with every time you tap your phone at a terminal.
Step 8: Now, tap on Use default.
Step 9: Choose ‘Except when another payment app is open’ to allow a different app to use NFC whenever it’s open.
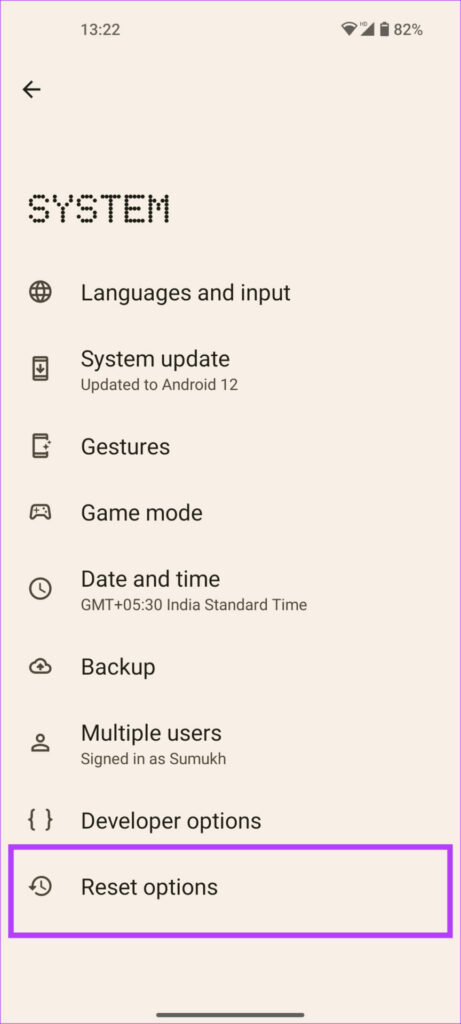
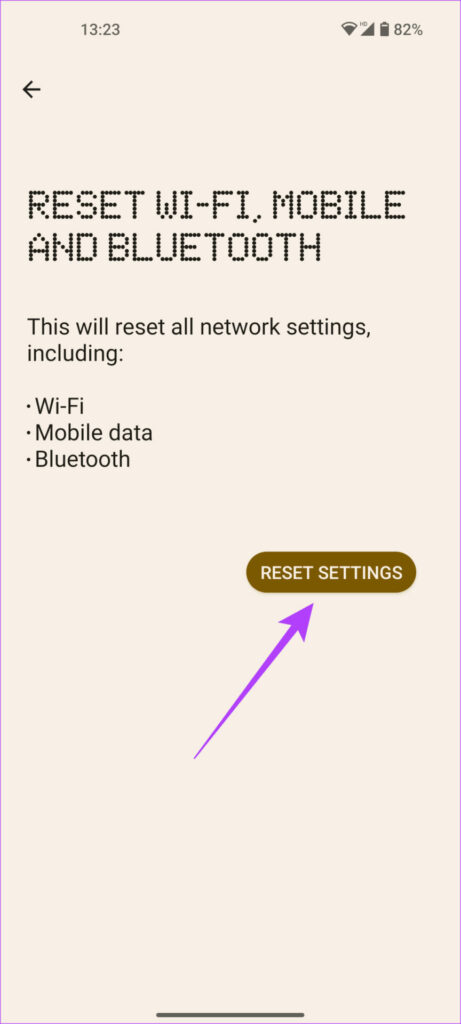
8. Reset Network Settings
Did you try your hand at the above solutions and nothing worked? Resetting your network settings could be your white knight. When you reset the network settings on your device, several parameters including Wi-Fi, Bluetooth, cellular data, and NFC are reset to their default factory settings.
This will ensure that any setting preventing NFC from working properly will be changed. Here’s how to do it.
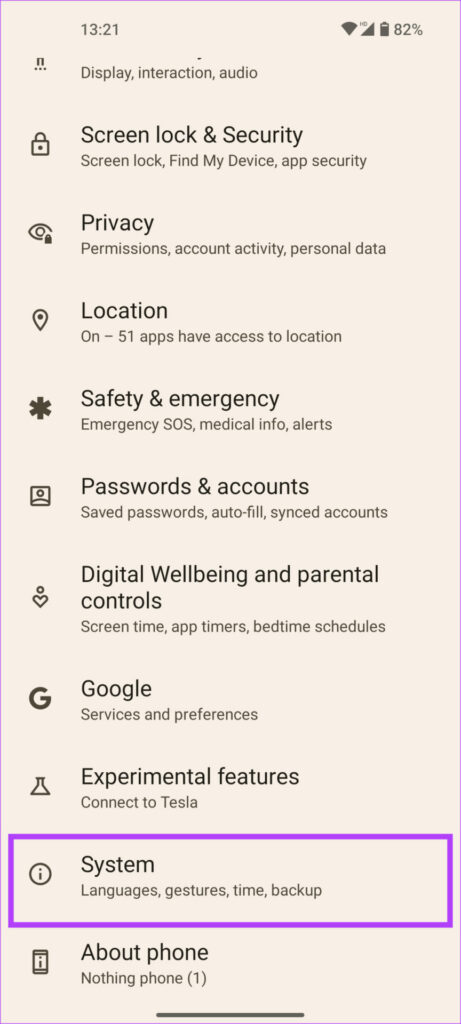
Step 1: Open the Settings app on your Android phone.
Step 2: Scroll down to find the System option and tap on it.
Step 3: Now, go to Reset Options.
Step 4: Tap on ‘Reset Wi-Fi, Mobile, and Bluetooth’.
Step 5: Finally, select the Reset Settings button.
This will reset all the network settings on your phone. Note that resetting the network settings will disconnect and forget all your Wi-Fi networks, Bluetooth devices, and mobile data preferences. You will have to connect to your devices manually once again.
FAQs on NFC Not Working On Anrdoid Devices
1. Do all Android phones have NFC?
No, a lot of budget-oriented devices skimp out on NFC. You can check the manufacturer’s website for specifications to check if your phone supports NFC.
2. Why doesn’t my phone have NFC?
If you stay in a region where NFC isn’t very popular, chances are that your phone will not have NFC as the brand can save some cost by excluding a feature that isn’t widely used.
3. Do contactless payments work without an internet connection?
Yes, you can tap your phone to pay via NFC at any terminal without an active internet connection.
4. Does Google Pay support NFC payments?
Yes, Google Pay supports contactless payments via NFC.
Tap Away in Style
Restore the tap-to-pay functionality on your Android phone by following the steps above so that you can make your payment experience all the more convenient. Generally, when NFC is not working on Android, the problem is with establishing a connection so try the solutions involving the case and tapping in the right place first.
Apple launched the iPhone 14 series, a successor to the iPhone 13 series, in its September 2022 event. And the wait is finally over, or is it? Well, the pre-orders start from September 9th, meaning you cannot get hands-on instantly. However, you can download these cool iPhone 14 wallpapers to augment your experience for now.
Moreover, this time, Apple has further widened the gap between its iPhone 14 Series and iPhone 14 Pro lineup. Hence, it is no surprise that there are two sets of wallpapers to choose from.
Note: To get these iPhone 14 wallpapers in HD, tap the download button above the images. Further, these wallpapers are compatible with older iPhone models.
Download Yellow Variant iPhone 14’s Wallpapers in 4K
Apple released wallpapers for the iPhone 14’s yellow color variant. Apple releases these wallpapers to give users a personalized experience and showcase each model’s unique color.
Get iPhone 14 Series Wallpapers on Your Older iPhone
Apple’s iPhone 14 Series has many cool features like Crash Detection, Action Mode, and Emergency SOS via Satellite. Other than that, the iPhone 14 and iPhone 14 Plus retains the A15 bionic processor, come with a Super Retina XDR display with Ceramic Shield protection, Always-on-display, a new 12-megapixel primary camera, autofocus and true depth in front camera, and Photonic Engine.
Further, the iPhone 14 Series lineup is available in 5 colors: Starlight, Midnight, Purple, Blue, and (PRODUCT)RED.
Are you not a fan of too many colors on your wallpaper? Well, the next section is where you’ll find the ones you like.
Download iPhone 14 Pro Series Wallpapers in HD
The iPhone 14 Pro and iPhone 14 Pro Max come with the new A16 Bionic chip.While we always look for ways to hide the notch, that changes with this launch. The notch became a feature more than a necessity, so props to Dynamic Island.
In addition to this, there’s been a significant camera upgrade. The iPhone 14 Pro lineup has a new 48-megapixel quad-pixel sensor camera, a 12-megapixel Ultra Wide camera lens, and a 12-megapixel Telephoto lens.
That said, below are the wallpapers from the iPhone 14 Pro series.
Is it even an iPhone launch if we don’t talk about its gorgeous wallpapers? Whether you are buying the iPhone 14 or not, the wallpaper that the iPhone 14 series comes with is worth trying.
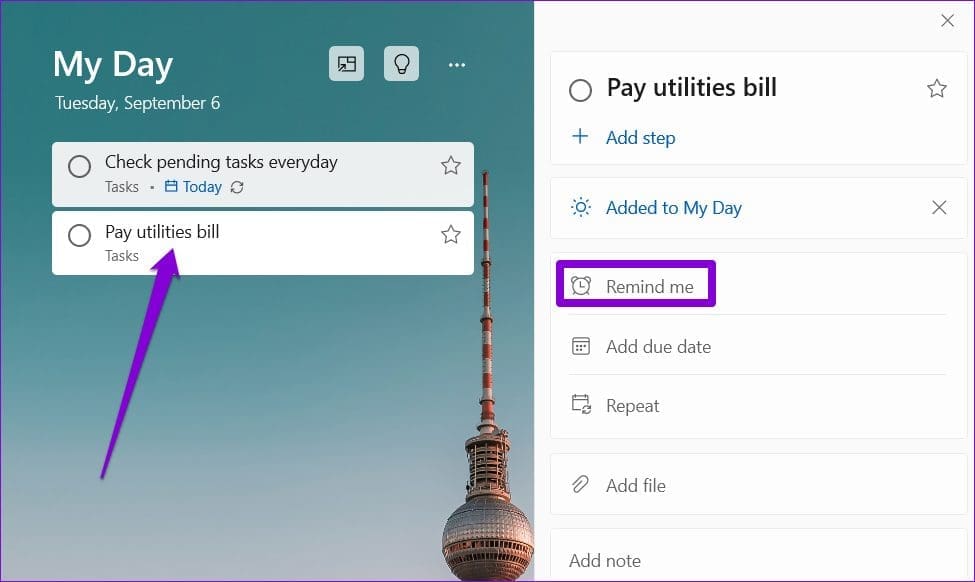
Let’s start with the easiest method. You can use the Microsoft To Do app, which comes pre-installed on Windows, to set up reminders on your PC. Here’s how:
Step 2: Sign in with your Microsoft account. In the My Day tab, click the Add a task button. Type your task details and press Enter.
Step 3: Click on your task and select Remind me from the menu on your right.
Step 4: Choose from the suggested options or set a date and time.
And that’s about it. Microsoft To Do will remind you about the task at the specified date and time. You can also set a recurring reminder for your task by using the Repeat option.
Method 2: Set Up Reminders Using the Calendar App
Another option for setting up reminders on Windows 11 is to use the built-in Calendar app. This can be useful if you have already synced your Google account with the Calendar app and want to view your tasks and reminders in a single app.
Step 1: Open the Calendar app on your PC and click the New event button.
Step 2: Enter your task details. Use the drop-down menu beside the Reminder to define when the app should remind you.
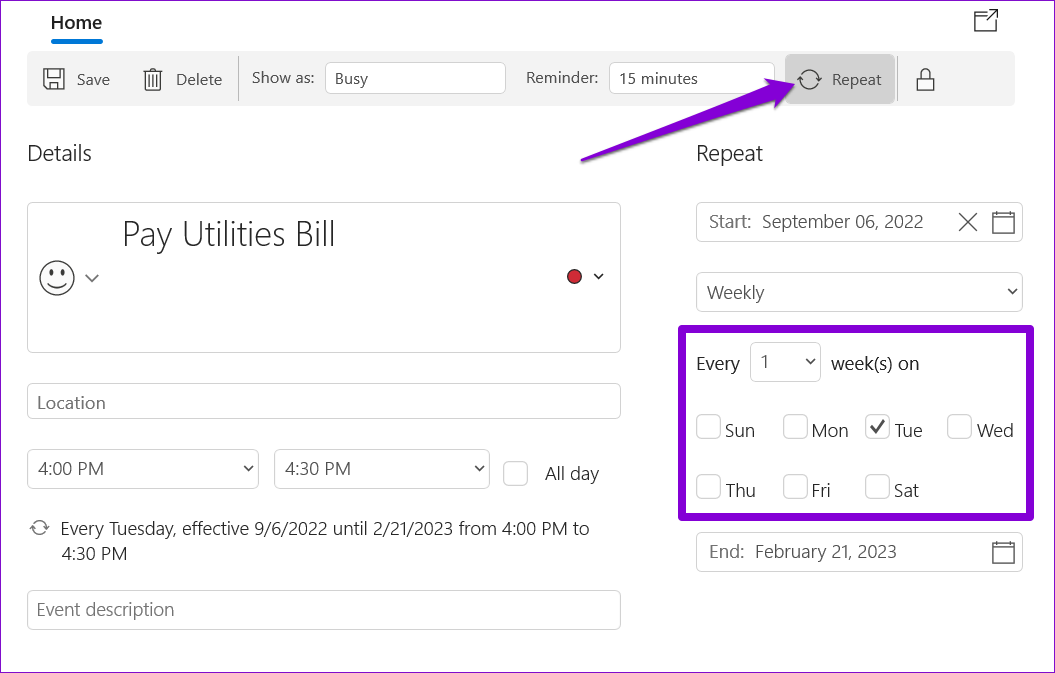
Step 3: Click on Repeat at the top to set up a recurring reminder and specify how frequently the app needs to remind you.
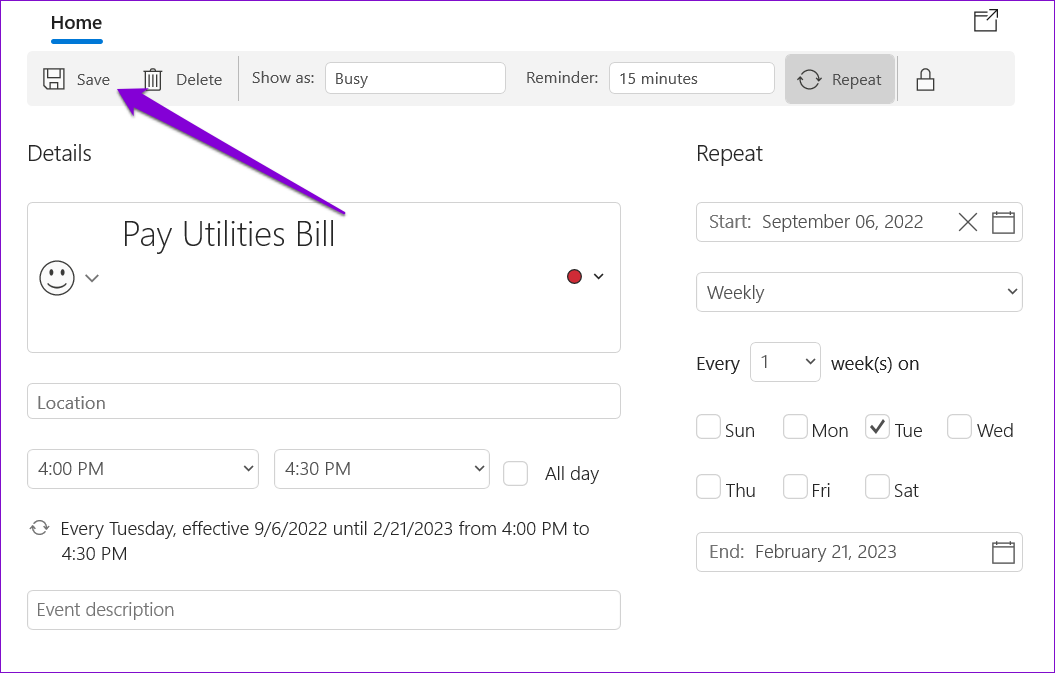
Step 4: Click Save.
Once you complete the above steps, the reminder will appear on your Calendar app. It’s worth noting that the reminder notification will also appear on your other devices where you’ve signed in with your calendar account.
Method 3: Set Up Reminders Using Task Scheduler
Task Scheduler is a powerful utility for automating mundane Windows tasks and setting up reminders on your Windows 11 PC.
Step 1: Right-click on an empty spot on the Desktop and select New > Text Document.
Step 2: Type the reminder text in the following format:
@echo off
Title Reminder
Echo Task Details
pause
Replace Task Details in the above command with the actual reminder message.
Step 3: Press Ctrl + Shift + S keys to open the Save as dialog. Name your file and save it in the .CMD format.
Step 4: Open Task Scheduler using the search menu and select Create Task from the right pane.
Step 5: Enter your task’s name and use the drop-down menu at the bottom to select Windows 10.
Step 6: Switch to the Triggers tab and click New.
Step 7: Define when you want the computer to remind you. You can set up a one-time reminder or a recurring one. Then, click OK.
Step 8: Switch to the Actions tab and click New.
Step 9: Click on Browse and select the .CMD file you created earlier. Then, click Next.
Step 10: Click OK to save your reminder.
Windows 11 will remind you of your task by displaying your message in a Terminal window. To cancel a reminder, disable your scheduled task.
How to Automatically CC or BCC Yourself in Outlook
Step 1: Open Outlook and click on the three-dot menu.
Step 2: Now, go to Rules and select Manage Rules and Alerts in the drop-down menu.
Step 3: Click on New Rule.
Step 4: Click the Apply rule on messages I send and click Next.
Step 5: Check the box next to through the specified account in Step 1, and click on the specified in Step 2.
Step 6: Choose your email account and select OK.
Step 7: Click on Next.
Step 8: In Step 1, check the box next to Cc the message to people or public group and click people or public group in Step 2.
Note: To BCC an email, select ‘Move a copy to the specified folder’ in Step 1.
Step 9: Now, add your Email ID and click OK.
Step 10: Select the exception if you want to exclude this rule for specific emails and click on Next.
Step 11: Enter your Email ID, select Turn on this rule in Step 2, and click Finish.
Note: To undo CC or BCC automation in Outlook, go to Rules > Manage Rules & Alerts > Under Rule, select the rule you created to automate CC and BCC > Click Delete. That’s it. You will be back to normal.
Now, every time you send an email in Outlook, you’ll automatically receive a copy of it. This can be handy if you want to keep track of all the correspondence you send out. However, if you don’t want to CC or BCC yourself in every email, you can simply auto-forward emails in Outlook.
How to Automatically CC or BCC Yourself in Gmail
Gmail doesn’t natively support auto-CC or BCC emails. So, we will use a free browser extension called Auto BCC & Auto CC extension for Chrome.
Step 1: Go to Auto BCC for Gmail and click Add to Chrome to download the Chrome extension.
Step 2: Click on Add extension to add this extension on Chrome.
Step 3: Now, open Gmail on Chrome and click the Compose button.
Step 4: Click the envelope icon right next to the send button.
Step 5: Click on Add New Rule.
Step 6: Under When emails are sent from, you should see your email already filled in. In the drop-down menu beneath it, select to anyone.
Step 7: Select BCC or CC (whatever you prefer) in the drop-down.
Step 8: Now, enter your email address.
Step 9: Click Save Rule.
That’s it. You have enabled auto CC or BCC yourself in Gmail. Finally, click on Close and compose your email as usual.
To turn off auto CC or BCC, go to the Google Account Permission page > CloudHQ > Remove Access. This will remove account access. Once removed, go to Manage Extension on Chrome and remove the Auto BCC for Gmail extension.