Helping millions of people navigate the world of technology.

How to Unfollow on TikTok: 2 Quick Ways

TikTok as a platform is known for its creative content and challenges. Users can follow other users to see their videos in the feed. However, if you followed someone by mistake or don’t wish to follow someone for whatever reason, you can unfollow them on TikTok, like any other platform.

How to Unfollow on TikTok

While you can’t unfollow everyone on TikTok at once, the unfollowing process is usually quick and can be done in a few clicks. You can either unfollow a single person or multiple profiles. In this article, we will show you step-by-step the process for both ways. But, first things first.

Note: We strongly recommend against using bots to manage your TikTok unfollows. This is against TikTok’s policy and can get you removed from the platform.

What Happens When You Unfollow Someone on TikTok

When you unfollow someone on TikTok, their content will no longer appear in your feed. However, they may still be able to see your profile and posts if you haven’t set your account to private. Besides, the person you unfollow won’t be notified about the same. Here’re some more TikTok tips and tricks you can check out.

Now, that that’s out of the way, move on to the next section to unfollow people. If you change your mind and want to see their content again, you can always follow them.

How to Unfollow Someone on TikTok

There are multiple ways to unfollow someone on TikTok. The simplest way is to unfollow them by going to their Profile. Let us show you how.

Step 1: Open the TikTok app and go to the Search tab.

Step 2: Now, type the username you wish to unfollow in the search bar.

Step 3: Tap on the user’s account to visit their Profile.

Step 4: Now, tap on the icon that looks like a person with a checkmark on it.

That’s it! You have just unfollowed the user, and their content will not be displayed in your feed.

How to Unfollow Multiple People at Once on TikTok

If you want to overhaul your TikTok experience, changing what you have subscribed to would be a good starting point. Essentially, in the earlier versions of TikTok, the platform allowed users to unfollow multiple accounts at once. Unfortunately, the method has gone away.

So, follow along to see the fastest and only way to unfollow multiple accounts on TikTok.

Step 1: Open the TikTok app and go to your Profile.

Step 2: Tap on the Following.

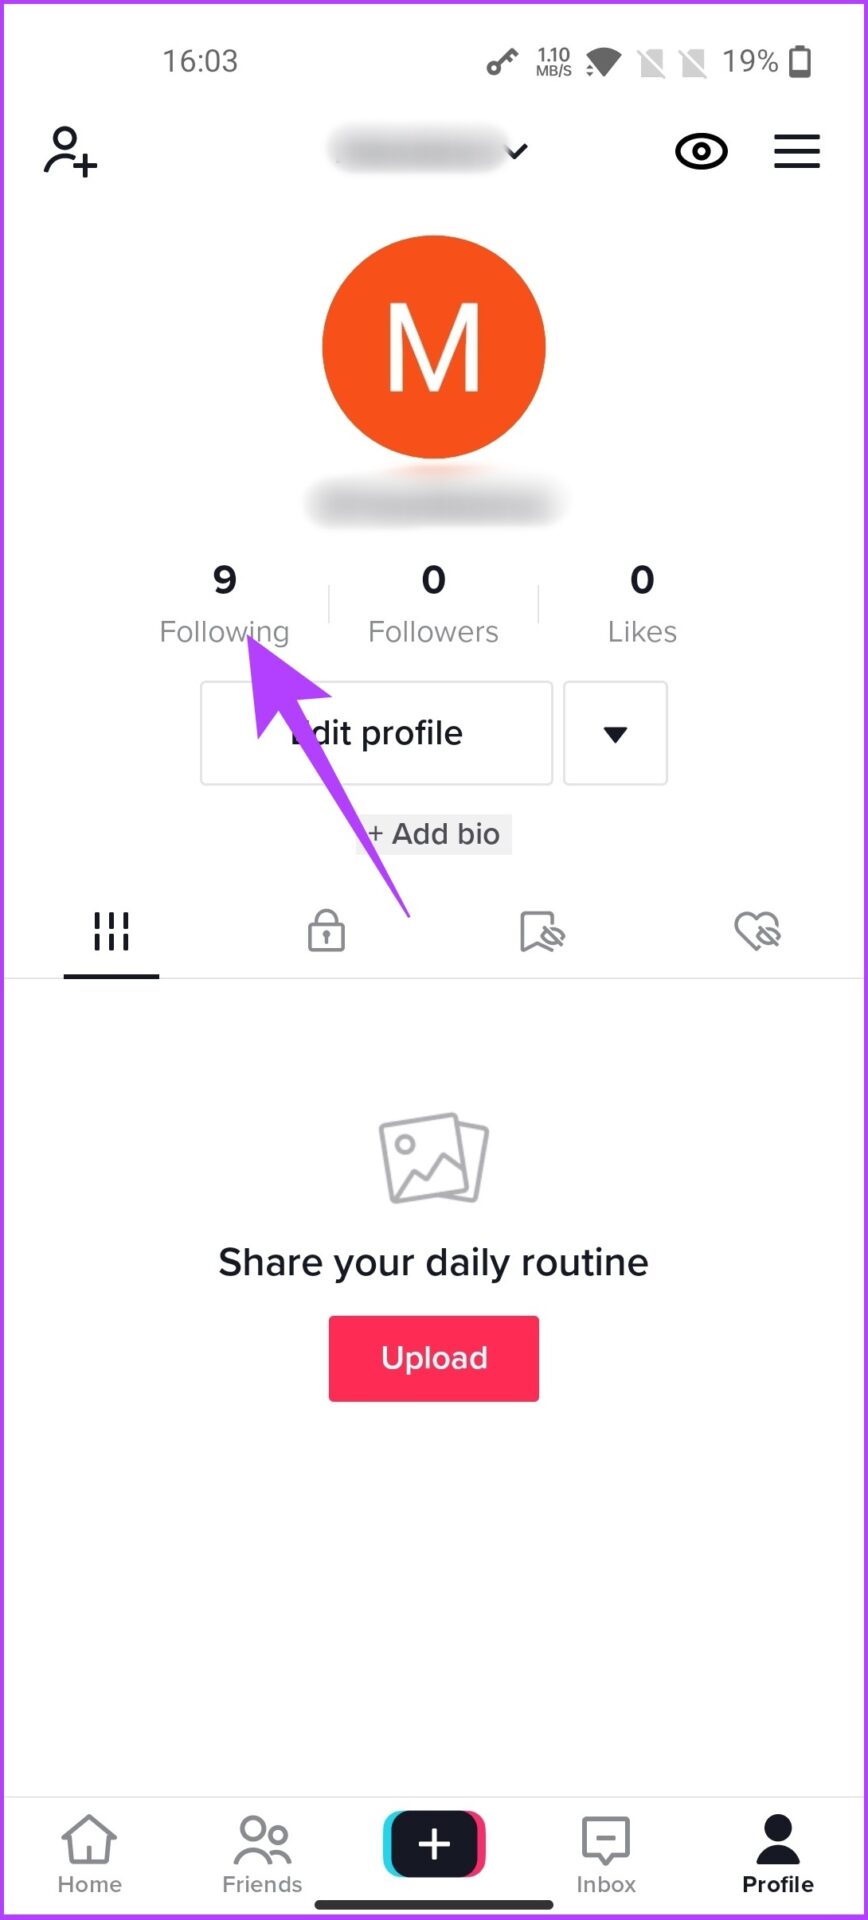
Step 3: Now, tap on Following next to the TikTok account you wish to unfollow.

There you go, you have removed accounts from your following. Straightforward, right? Well, the removed followers can still see and download your TikTok videos if your profile is public. Hence, if you completely want to revoke their access to your account, you can block them too.

How to Block Someone on TikTok

Before we jump onto the steps, you must know that blocking someone on TikTok will prevent them from finding your Profile, seeing your videos, or messaging you. If you’re confident, simply follow the below steps.

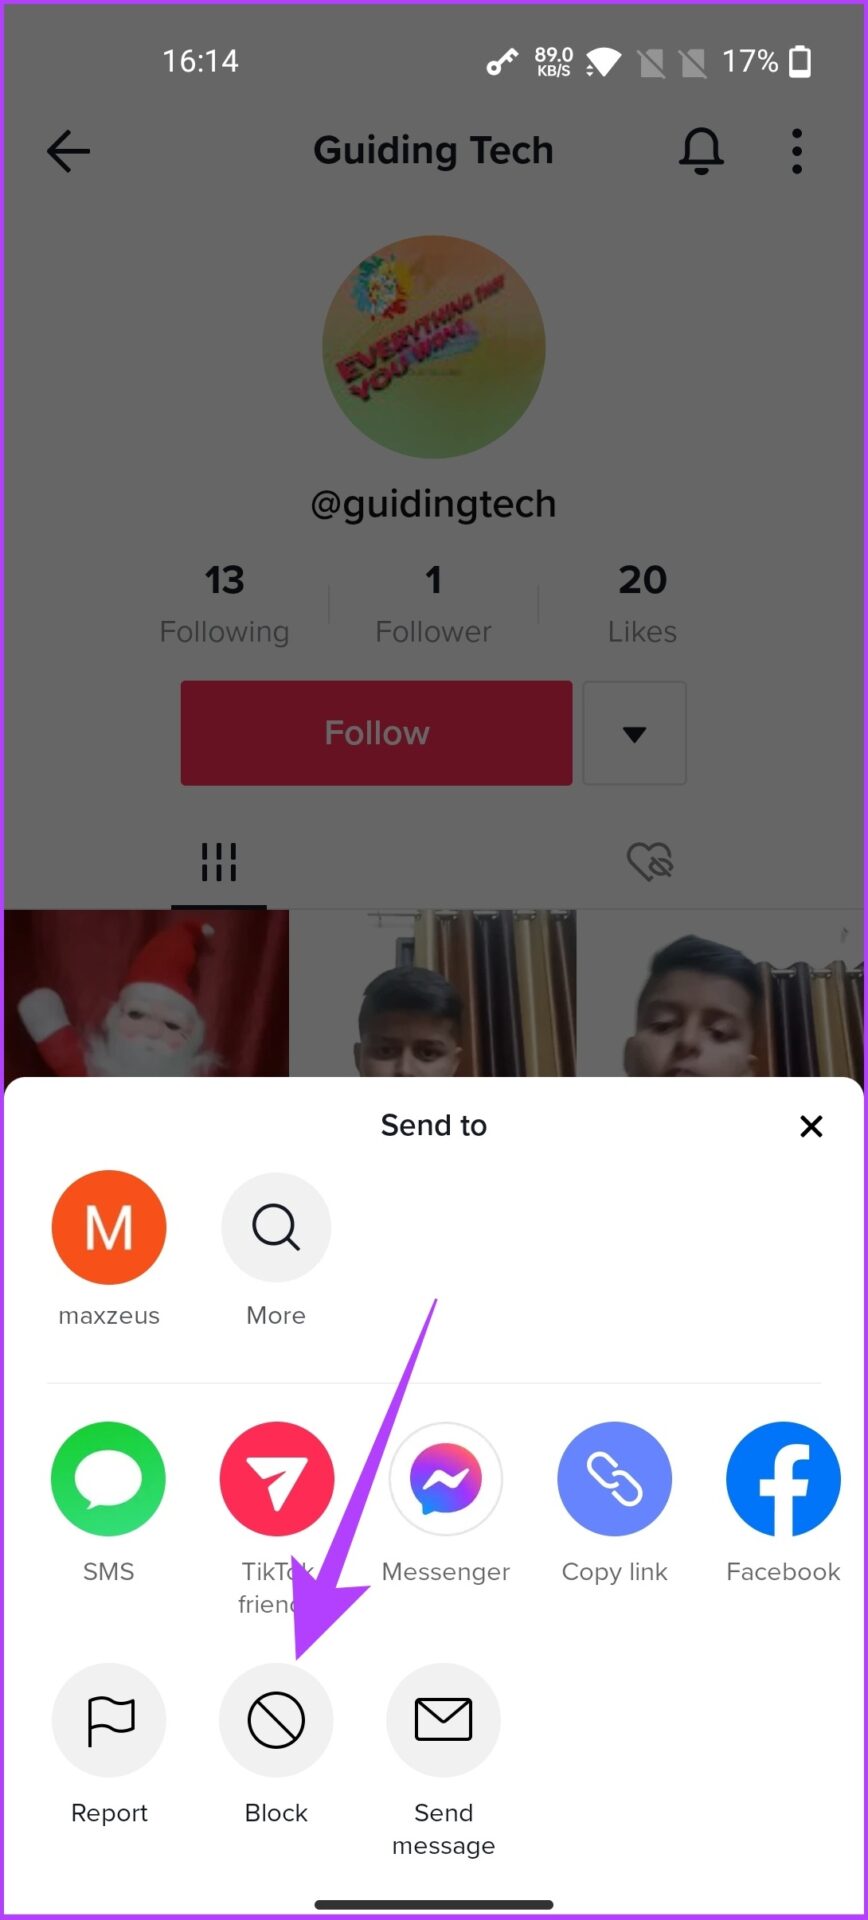
Step 1: Open the TikTok app and tap the Search tab (upper right corner) to enter the account.

Step 2: Go to the account profile and click on the three-dotted lines.

Step 3: Now, select Block and tap on Block when prompted to confirm. 

The account has been blocked and canno longer access your profile, videos, and so on. When they search for your profile, they will simply see the “User name doesn’t exist” error. 

FAQs Related to Unfollowing on TikTok

1. Can you see who unfollowed you on TikTok?

Unfortunately, no. TikTok doesn’t allow you to see who unfollowed you.

2. How can I see my following on TikTok?

You would need to go to your Profile to find your following.

3. Can you hide your following list from others on TikTok?

Yes, you can hide your following list. Go to Profile > tap on horizontal lines at the top right > Settings and privacy > privacy > Following list > change the settings from Everyone to Only me. That’s it. For more tips, check these top 4 TikTok privacy and security settings.

4. Do people get notified when you unfollow them on TikTok?

No, TikTok doesn’t notify users if you have unfollowed them. 

5. How many accounts can I unfollow on TikTok per day?

TikTok allows you to unfollow (or unfollow) a maximum of 200 accounts per day.

Get Rid of Unwanted TikTok Accounts

TikTok is filled with different kinds of content, and some might intrigue you. However, as the trend fades away, the content may start to seem irrelevant or repetitive. To get rid of them, unfollow their TikTok account and declutter your feed. Let us know if you have more queries in the comment section below.

Was this helpful?

Thanks for your feedback!

5 Best Ways To View Windows Update History In Windows 11

By constantly updating your Windows 11 operating system, you get access to new or improved features to deliver a better user experience. However, there is no denying that some updates may do more harm than good, especially when installed on non-supportive hardware. Therefore, before installing any new updates to your PC, it is important to ensure it meets all the requirements.

If you have automatic updates enabled on your computer, a Windows update can happen in the background. And you’ll only get to know when you get the prompt to restart your computer or choose to do it later. In such a situation, you can check the Windows Update History of your PC using any of the methods below.

How to View Your Windows Update History Using the Settings App

The Settings app is the one-stop access to all essential settings to tweak and personalize Windows features on your PC. It also helps you view can also view the Windows update history to check which updates have been installed and which ones failed. Here’s how to use Settings app to check the Windows update history.

Step 1: On your PC, click on the Start menu.

Step 2: Scroll through your apps and click on Settings.

You can use Windows + I keyboard shortcut to launch the Settings menu.

Step 3: On the Settings window, click on System.

Step 4: Click on Windows Update.

Step 5: Click on Update History to view the previous Windows updates.

How to View Your Windows Update History Using Control Panel

The Control Panel on Windows has several uses, including viewing previous updates on your PC. Here’s how to do so:

Step 1: On your PC, click on the Start menu.

Step 2: In the search bar, enter Control Panel.

You can use the Windows + X keyboard shortcut to launch a menu with Control Panel listed.

Step 3: Click on Control Panel to launch it.

Step 4: On the new window, click on Programs.

Step 5: Click on Programs and Features.

Step 6: Click on View Installed Updates to see your Windows update history.

How to View Your Windows Update History Using Windows Terminal

Windows Terminal made a debut with Windows 10. It is a multi-tabbed terminal emulator that runs any command-line app, such as PowerShell and Command Prompt. Here’s how to access it and check your Windows update history.

Step 1: On your PC, click on the Start menu.

Step 2: Scroll through your apps and click on Windows Terminal. Windows Terminal should launch a tab with either PowerShell or Command Prompt.

You can use the Windows + X keyboard shortcut to launch a menu with Windows Terminal listed.

Step 3: On the new window, look out for a blinking cursor after your username.

Step 4: Input the following command after your username:

wmic qfe list

Step 5: Hit Enter on your keyboard to run the command and view your Windows update history.

How to View Your Windows Update History Using Command Prompt

Here’s how to make use of Command Prompt to view your Windows update history:

Step 1: On your PC, click on the Start menu.

Step 2: In the search bar, enter Command Prompt.

You can use the Windows + X keyboard shortcut to launch a menu with Command Prompt listed.

Step 3: Click on Command Prompt to launch it.

Step 4: On the new window, look out for a blinking dash after your username.

Step 5: Input the following command after your username.

wmic qfe list

Step 6: Hit Enter on your keyboard to run the command and view your Windows update history.

How to View Your Windows Update History Using Windows PowerShell

Here’s how to make use of Windows PowerShell to view your Windows update history:

Step 1: On your PC, click on the Start menu.

Step 2: In the search bar, enter PowerShell.

You can use the Windows + X keyboard shortcut to launch a menu with PowerShell listed.

Step 3: Click on PowerShell to launch it.

Step 4: On the new window, look out for a blinking dash after your username.

Step 5: Input the following command after your username.

wmic qfe list

Step 6: Hit Enter on your keyboard to run the command and view your Windows update history.

Checking If You Have Administrator Rights on Windows 11

Using any of the methods mentioned above, you should be able to view your Windows 11 update history. However, unless you have administrator rights with your user profile, you may not be able to uninstall some of the updates. You may use the Settings app, Control Panel, or Command Prompt to check if you have administrator rights on your PC.

Was this helpful?


Thanks for your feedback!

4 Ways to Fix OneDrive Not Opening on Startup in Windows 11

Fix 1: Enable OneDrive as a Startup App

Windows 11 provides several options for running apps at startup. So, if OneDrive fails to launch whenever Windows boots, you can enable it as a startup app by following the steps below.

Step 1: Press the Windows key + I to launch the Settings app. Then, go to Apps > Startup.

Startup Apps on Windows 11

Step 2: Locate Microsoft OneDrive on the list and enable the toggle next to it.

Enable OneDrive as Startup App

Fix 2: Check Group Policy

The Group Policy Editor in Windows enables you to make various administrative-level changes to your system. Among its options, there’s a specific policy that can prevent OneDrive from functioning on Windows. You must ensure this particular policy is not enabled on your PC.

Note: Group Policy Editor is exclusive to Windows 11 Professional, Enterprise, and Education editions. So, if you’re using the Home edition of Windows 11, skip to the next method.

Step 1: Press the Windows key + R to open the Run dialog > type gpedit.msc > press Enter.

Open Group Policy on Windows

Step 2: In the Local Group Policy Editor window, use the left pane to navigate to the following folder:

Computer Configuration\Administrative Templates\Windows Components\OneDrive

Step 3: Double-click the Prevent the usage of OneDrive for file storage policy on your right.

OneDrive Policy on Windows

Step 4: Select the Disabled or Not Configured option. Then, hit Apply, followed by OK.

Enable OneDrive From Group Policy

Fix 3: Tweak Registry Files

When you configure an app to run at startup, Windows creates a registry entry. If a recent Windows update or a system change has altered that entry, OneDrive may fail to run on startup. Here’s what you can do to fix it.

Step 1: Click the search icon on the taskbar, type registry editor, and select Run as administrator.

Open Registry Editor as Admin

Step 2: Select Yes when the UAC prompt appears.

Open Registry UAC Prompt

Step 3: In the Registry Editor window, paste the following path in the address bar at the top and press Enter.

HKEY_CURRENT_USER\Software\Microsoft\Windows\CurrentVersion\Run
Registry Editor Window

Step 4: Within the Run key, locate a string value named OneDrive. If you can’t find it, right-click on an empty spot in the right pane > go to New > select String Value. Name it OneDrive.

Create String Value in Registry Editor

Step 5: Double-click on the OneDrive string value. Paste the following path in the Value Data field > click OK.

"C:\Program Files\Microsoft OneDrive\OneDrive.exe" /background
OneDrive String Value in Registry

Restart your PC to apply these changes. After that, OneDrive will run at startup.

Fix 4: Reset OneDrive

Lastly, if none of the above solutions work, there could be a problem with OneDrive itself. You can try resetting it to see if that works.

Step 1: Open the Start menu, type OneDrive, and click on Open file location.

OneDrive File Location

Step 2: In the File Explorer window, right-click on the OneDrive app, and select Copy as path.

Copy OneDrive File Path

Step 3: Press the Windows key + R to open the Run dialog. In the Open field, paste the file path of the OneDrive executable file, followed by /reset, and hit OK.

Reset OneDrive

After resetting the OneDrive app, configure it to run on startup one more time. You shouldn’t encounter any issues after that.

Was this helpful?

Thanks for your feedback!

3 Ways to Fix Reddit App Not Working on iPhone and Android

Basic Fixes

  • Check Reddit server status: Check the Reddit server status to see if the website is facing any downtime using redditstatus.com.
  • Check internet connectivity: Ensure your device is connected to a Wi-Fi network or cellular data with good signal strength and an active plan.
  • Restart the Reddit app: If you can’t access Reddit on your mobile, quit the app and kill it from the recent apps section, too. Then, wait for a few seconds before relaunching the app.
  • Update or reinstall the app: Try updating the Reddit app on iPhone and Android to see if a newer version fixes the issue. You can also uninstall the Reddit app and download the latest version on your device.

Fix 1: Force Stop the Reddit App (Android)

Some processes running in the background may cause the app to crash. Force stop the Reddit app to kill all its processes and launch it again.

Step 1: Open the Settings app on your Android phone. Navigate to the Apps section.

Step 2: Tap on See all apps. Scroll down and select Reddit from the list of apps. Tap on Force Stop.

Optionally, restart your phone after this step and relaunch the Reddit app.

Fix 2: Clear Reddit Cache

Accumulation of cache can execute bugs and cause problems with the Reddit app. Here’s how you can clear the cache.

On iPhone

Step 1: Open the Reddit app. Tap on your profile picture in the top-right corner and select Settings.

Step 2: Tap on Clear Local History. Tap on the option again to confirm your action.

Doing this clears the cache from the Reddit app on your iPhone.

On Android

Step 1: Long-press on the Reddit app icon on the home screen and tap on App info.

Step 2: Tap on Storage usage and tap on Clear cache.

Fix 3: Check Cellular Data for Reddit

If you’re trying to load Reddit on your mobile data and it does not work, check if you’ve disabled cellular data access for the app.

On iPhone

Step 1: Open the Settings app and tap on Mobile Service.

Step 2: Scroll down and turn on the toggle for Reddit.

On Android

Step 1: Long-tap on the app icon and select App Info. Tap on Restrict Data Usage or any similar option that you see in the menu.

Step 2: Ensure the toggles are turned on for Wi-Fi and Mobile Data – meaning the app can connect to the internet via both of these modes.

Was this helpful?

Thanks for your feedback!

How to Create a Custom Theme in Telegram

How to Create a Custom Theme in Telegram for Desktop

Instead of using the default theme that typically comes with the Telegram app, users can now create their own. They can also share the created themes with the public.

You can create a custom theme for your chat interface using the Telegram desktop app or web version.

Step 1: Open Telegram > Settings > click on Chat Settings.

chat settings telegram desktop

Step 2: Click on the three dots at the top-right of the Chat Settings window and click on Create new theme.

Step 3: Click Create. Then, select your preferred color on the Edit color palette pop-up.

Step 4: Choose your preferred HEX and RGB code on the color wheel and click on Save.

Step 5: Provide a Theme name and click on Save to save your changes and the new theme.

How to Create a Custom Theme in Telegram for Android

Creating a custom theme for your Telegram app on Android is also straightforward. Ensure that you are using the latest version of the app on your device.

Step 1: Open Telegram > tap on Settings > Chat Settings.

chat settings telegram android

Step 2: Tap the three dots at the top-right corner and select Create New Theme.

Step 3: Tap Create Theme to confirm your selection.

Step 4: Enter a name for your new theme and tap Create.

Step 5: Tap Browse Themes on the Chat Settings page. Under the Build my own theme group, tap your new theme’s name.

You may not have the option to change the color of your Telegram theme. You can choose from the other themes displayed below and then change the color.

You can also choose between changing the wallpaper, accent color, or your messages.

How to Create a Custom Theme in Telegram for iPhone

The iPhone users get to enjoy similar features of the Telegram app, but only a few settings may be different. Nevertheless, creating a custom theme in Telegram remains the same.

Step 1: Open the app and go to Settings.

Step 2: Tap on Appearance and select Chat Themes.

Step 3: At the bottom of the Chat Themes page, tap Create a New Theme. Provide a name for your theme and tap on Change Colors to launch a new window.

Step 4: You can now change the background, accent color, and message color per your liking.

Adding Custom Notification Sounds on Telegram

Another way you can personalize your Telegram is by adding custom notification sounds. This way, you will know when a message comes from Telegram.

Was this helpful?

Thanks for your feedback!

5 Ways to Fix YouTube Videos Lagging on Android

Basic Fixes

  • Force stop app: Tap and hold on the YouTube app icon, select App Info, tap on Force Stop, and re-open the app.
  • Check network connection: Ensure there are no problems with the network connectivity on your Android device.
  • Close unwanted apps: Close apps you aren’t using on your phone to free up resources for the YouTube app.
  • Update YouTube app: Update the YouTube app from the Play Store for a bug-free experience.
  • Disable VPN: If you’re not using a high-quality VPN, you will face issues with internet connectivity.

Fix 1: Disable Battery Saver

Once you turn on the battery saver, your Android device will prioritize battery life over performance. Therefore, if YouTube is stuttering on your Android device, turn off the battery saver and check if the app plays videos smoothly. It’s a proven solution that seems to have worked for many users.

Step 1: Open Settings. Tap on Battery. Tap on Power saving mode.

Step 2: Turn off the power saver mode if it is enabled.

Fix 2: Clear the Cache of the YouTube App

Deleting the cache will clean any junk files that may be causing YouTube videos to lag on your phone.

Step 1: Open the Settings app, go to Apps > See All Apps > YouTube.

Step 2: Now, select Storage and Cache and then tap on Clear Cache.

Fix 3: Data Saving Mode

The YouTube app has a data-saving mode that restricts it from consuming a lot of bandwidth to save data. It may be responsible for low-quality videos and can even cause the app to stutter and lag.

Open the YouTube app, tap on your profile picture, and go to Settings. Go to Data Saving and disable it.

Fix 4: Disable the ‘Reduce Video Quality’ Option

Just like the data saving mode, there’s yet another option within the YouTube app that reduces the video quality to save bandwidth. Here’s how to disable this option and prevent YouTube video lags.

Open the YouTube app, tap on your profile picture, and go to Settings. Go to Data Saving, and turn off Reduce video quality.

Also Read: How to Fix YouTube Quality Unavailable issue on Android

Was this helpful?

Thanks for your feedback!

How to Use the Dictation Tool in Microsoft Word

On Microsoft Word for PC or Mac

After you’ve connected a microphone to your computer, you can start using the dictation tool in Microsoft Word. You can use the following steps to dictate documents on both Windows and Mac.

Step 1: Open any document in Microsoft Word.

Step 2: In the Home tab, click the Dictate button.

Dictate Tool in Microsoft Word

Step 3: When you activate the Dictate button, you will see a red dot appear on it. Additionally, a small recording window will also appear. After that, you can start speaking to see text appear on the screen.

Using Dictate Tool in Microsoft Word

Step 4: Click the gear-shaped icon to change your spoken language or select a different audio input device. Additionally, you can enable auto-punctuation and filter for sensitive phrases from this menu.

Dictation Tool Settings

You can pause the dictation tool by clicking the microphone icon or close it by clicking the X icon. Note that if you switch to another app or program on your computer, the dictation tool will pause automatically.

Pause or Close Dictation Tool

On Microsoft Word Online

Using the dictation tool in Microsoft Word Online is a similar experience to one on the desktop. You can use the web version of Microsoft Word for free with your Microsoft account.

The dictation tool in Word Online works with all the popular browsers, including Chrome, Edge, Firefox, and Brave. Here’s how you can use it.

Step 1: Open your preferred web browser and visit Microsoft Word for Web.

Step 2: Sign in with your Microsoft account and open a new or existing document.

Step 3: Click the Dictate icon and allow the browser to access your microphone if you haven’t already.

Dictate Tool in Microsoft Word Online

Step 4: Once the floating dictation window appears, Word should start transcribing everything you say in your document.

Using Dictate Tool in Microsoft Word Online

You can click the cog-shaped icon to change language, microphone device, and access additional options.

Dictation Tool Settings in Word Online

How to Use the Dictation Tool in Microsoft Word on Mobile

Microsoft Word’s dictation tool isn’t just for desktop users. You can also use this tool to dictate documents on your Android or iPhone. This saves you from typing a lot while creating long documents with your phone.

Step 1: Open the Microsoft Word app on your Android or iPhone.

Step 2: Open any existing document or create a new one. Tap the microphone icon on your right. You may have to grant Word permission to record audio if you’re using this feature for the first time.

Step 3: The app should start recording your voice and transcribing everything you say. You can use the available shortcuts to add punctuation, new lines, and erase words.

Step 4: Tap the gear-shaped icon to reveal the dictation settings. You can change the spoken language, enable or disable auto-punctuation, and access other options from this menu. After using the tool, tap the keyboard icon.

Various Dictation Commands You Can Use in Microsoft Word

The best part about Word’s dictation tool is that it lets you edit, format, and insert punctuation marks using voice commands.

You can say the name of the punctuation mark or a symbol you want to insert, and Word will add it to your document. For instance, if you say “comma,” Word will insert a comma. Likewise, you can also say “plus sign” or “equal sign,” and Word will add it to your document.

Add Symbols Using Voice Commands

Aside from inserting symbols and punctuation, you can format your text using voice commands. For instance, if you say “I love using Microsoft Office” and then say “Bold Microsoft,” it will bold the word Microsoft in your sentence. Likewise, you can use formatting commands to italicize, highlight, or underline words in a sentence.

Voice Commands in Word

Here are some additional dictation commands you can use in Microsoft Word.

  • New line: to leave a line break
  • Insert comment: to add a comment box
  • Delete: to delete the last word or punctuation mark
  • Delete that: to remove the last spoken phrase
  • Exit dictation: to close the dictation tool

Was this helpful?

Thanks for your feedback!

How to Turn off Business Account on Instagram

What Is a Business Account on Instagram

An Instagram business account gives businesses access to certain features restricted to personal accounts that help grow their brands. Below are some benefits;

  • View detailed analytics on post-performance, follower demographics, and engagement.
  • Utilize advanced targeting options to reach specific demographics, interests, and behaviors.
  • Tag products in your posts and stories, allowing users to purchase directly from your Instagram page.
  • Partner with influencers and track the success of collaborations with influencer marketing tools.

Overall, an Instagram business account is valuable for businesses of all sizes. However, if you no longer wish to reap these benefits, move on to the next section to learn how you can turn off your professional account on Instagram.

Note: Before you switch from a business account to a personal account, you must know that all your insights data on Instagram will be erased.

How to Switch to a Personal Account on Instagram Using Any Device

Step 1: Open the Instagram app on your phone and tap on the profile icon to go to your profile.

Step 2: Now, tap the three horizontal lines in the upper right corner.

Step 3: Tap on Settings and go to Account.

Step 4: Scroll down, tap on Switch account type, and select Switch to Personal Account.

Step 5: Now, tap Switch to personal account to confirm it.

tap Switch to personal account

Note: You can follow similar steps to turn off the creator account on Instagram.

There you go. You’re back to the regular account. Further, after switching to a personal account, you can change your username on Instagram to remove the last trace of your business.

But wait, that’s not it! There are more ways to tackle your Instagram business account if you don’t wish to use it anymore. Read along.

Other Ways to Turn off the Professional Account on Instagram

1. Deactivate Your Business Account

This method will help you do that without necessarily deleting your business account. You can come back to it in the future.

Note: You can disable your account once a week.

Step 1: Open Instagram on your phone’s browser and go to the Profile tab. Now, tap on Edit profile.

Step 2: Scroll down to find Temporarily disable my account and tap on it.

Step 3: Choose a reason for the account deactivation.

Step 4: Now, enter the account password and tap Temporarily disable my account to confirm. 

tap Temporarily disable my account to confirm

That’s it! You’re off of your Instagram account. This is recommended if you don’t want to permanently lose access to your account and activate it whenever you feel like it. But if you want to go extreme, you can delete your business account.

2. Delete Your Instagram Professional Account

Note: When you delete your account, everything, including your photos, videos, likes, and comments, will be permanently deleted.

Step 1: Go to the Delete your account page and select the reason for deleting the account.

Step 2: Now, re-enter the password and tap Delete [username].

There you go. Your Instagram account will be deleted in 30 days, meaning you have 30 days to revoke it.

FAQs Related to Professional Account on Instagram

1. What happens when you switch to a professional account on Instagram?

When you switch to a professional or business account, Instagram will provide additional features to help you grow your business, such as insights, access to advertising, scheduling posts, the ability to boost posts, swipe-up links, and more.

2. What’s the difference between a creator account and a business account on Instagram?

The Creator account falls between personal and business Instagram accounts. Both accounts have almost the same features. However, business accounts offer more analytics, and creator accounts have more flexible profile options like setting up a contact button and creator type, which are missing on business accounts. 

3. Do I have to pay for an Instagram business account?

No, Instagram doesn’t charge for a business account. However, you will have to pay the set charges to use Instagram’s advertising options.

4. How do I know if my Instagram is a business account?

You can go to profile > tap on three horizontal lines at the top > select Settings > Accounts > scroll down. The options you see there tell you what type of Instagram profile you have.

– Personal profile shows the Switch to the professional account option.
– Creator profile shows the Switch to personal account or Switch to business account options.
– Business profile shows the Switch to personal account or Switch to creator account options.

Was this helpful?

Thanks for your feedback!

3 Ways to Launch Windows Terminal on Windows 11

Method 1: Launch Windows Terminal Using the Run Dialog

The Run dialog lets you execute any program or command within the same network on your computer. You can use it to open Windows Terminal on your Windows 11 PC.

Press the Windows + R shortcut to open Run > type wt.exe > press Enter to open the Windows Terminal. To open it with administrator privileges, press the Ctrl + Shift + Enter keys instead and approve the UAC prompt.

1 Access Terminal Using Run

Method 2: Use the Task Manager App

Besides monitoring and managing system resources, you can use the Task Manager app to open the Windows Terminal.

Step 1: Press the Ctrl + Shift + Esc shortcut to open the Task Manager app > select the Processes tab > click on Run new task.

2 Run New Task

Step 2: Type wt.exe in the text field and press Enter. To run it as an administrator, check the box for Create this task with administrative privileges and hit Enter.

3 Wt.exe

Method 3: Create a Shortcut to Open the Windows Terminal

If you frequently use Windows Terminal, I recommend creating its shortcut on your desktop and assigning a hotkey.

Step 1: Right-click anywhere on your desktop and select New > Shortcut.

4 Create Shortcut

Step 2: Copy-paste the following path in the text field and click Next.

%LocalAppData%\Microsoft\WindowsApps\wt.exe
5 Enter Location

Step 3: Name the shortcut as Windows Terminal and click Finish.

6 Give It a Name

Step 4: Right-click the created shortcut and select Properties.

8 Properties

Step 5: Open the Shortcut tab > select the Shortcut key > press your desired key combination (e.g., Ctrl + Alt + T) to assign it. Click on Apply to save changes.

9 Assign Shortcut Key

Was this helpful?

Thanks for your feedback!

Fix: Folder Icons Showing Black Background in Windows 11

Basic Fixes

  • Change folder icon: Right-click on the folder icon with black background > Properties > Customize > Change icon > select from the folder icon options > click Ok.
  • Restore folder settings to default: Right-click on the folder icon with black background > Properties > Customize > Restore Default > click Ok and then Apply.
  • Update windows 11: Installing the latest version of Windows 11 should fix this issue.

Fix 1: Clear Thumbnails Cache Using Disk Cleanup

Every folder icon in your Windows 11 computer is a thumbnail image preview. A thumbnail acts like a visual identifier for different folders and programs. If you see a black square background behind folder icons, we suggest clearing the Thumbnail cache by performing Disk Cleanup on your Windows 11 computer.

Step 1: Open Disk Cleanup, select C drive, and click Ok.

Step 2: Under the Files to Delete section, scroll down and click the checkbox next to Thumbnails. Then, click Ok at the bottom to confirm.

Step 3: Click on Delete Files to confirm your choice.

Once the Disk Cleanup is complete, check if the problem is solved.

Tip: Refer to our post to learn how to see the hidden files and folders on Windows 11.

Fix 2: Rebuild Icon Cache

Whenever you open a storage drive on your Windows 11 computer, the file and folder icons are displayed quickly or take some time to appear on your screen. Icon Cache takes care of the quick display of icons as it stores all the information about the file and folder icons. This is just like the App Cache on your mobile. If you still see the black background behind folder icons, here’s how to rebuild Icon Cache, which might have corrupted over time.

Step 1: Open Command Prompt as Administrator on your Windows 11 PC or laptop.  

Step 2: Once Command Prompt opens, type the following path in the address bar and press Enter:

cd /d %userprofile%\App Data\Local\Microsoft\Windows\Explorer

Step 3: Type the next command and press Enter:

attrib -h iconcache_*.db

Step 4: Type the next command and press Enter:

del iconcache_*.db start explorer

Step 5: Close the Command Prompt window and restart your Windows 11 computer to rebuild the Icon Cache.

After your system restarts, check if the problem is solved.

Fix 3: Update Display Driver

The Graphics Driver is responsible for the smooth rendering of all visual graphics on your system, including folder icons. If you haven’t updated the Graphics Driver in a while, it’s a good idea to do so right away.

Step 1: Open Device Manager and click Display Adapters from the list of options.

Step 2: Right-click on your video card name and select Update Driver from the list of options.

Step 3: Start the process by clicking on Search Automatically for Drivers.

Close Device Manager and check if the problem is solved.

Fix 4: Run an SFC Scan

SFC (System File Checker) scan is a utility that scans for corrupt or damaged operating system files and replaces them with the correct versions whenever possible. If you still see a black background behind the folder icon, here’s how to try fixing it using SFC Scan.

Step 1: Run Command Prompt as Administrator on your Windows 11 PC or laptop.

Step 2: Type the following command and press Enter.

sfc /scannow

Step 3: After the system scan initiates, wait until the process completes.

Step 4: If you see Windows resource protection found corrupt files and successfully repaired them on your screen, close the Command Prompt window.

Step 5: Restart your system and check if this fixed the problem.

Was this helpful?

Thanks for your feedback!

3 Ways to Fix Volume Buttons Not Working on iPhone

Basic Fixes

  • Remove the case: The case might be tight and restrict the volume buttons from clicking. Or, a few particles might be stuck between the case and the volume buttons.
  • Clean volume button: A few particles might stick in between the volume buttons and their casing. You can gently clean your volume buttons using a soft brush to get these particles out.
  • Re-install app: If the volume buttons are not working within a particular app, the issue is with the app, not your iPhone. You can try reinstalling the app.
  • Restart iPhone: Restarting your iPhone can fix any temporary bugs and glitches.

Fix 1: Check Volume Settings

The volume buttons only change your media volume by default. So, you can change the volume settings on your iPhone to enable the buttons to control the ringer volume too.

Step 1: Open the Settings app > go to Sound & Haptics.

Step 2: Turn on Change With Buttons.

This will ensure you can change your ringer volume level using the volume buttons.

Also Read: How to fix volume level keeps going up or down on iPhone

Fix 2: Contact Apple Support

If your volume buttons are damaged, there’s little you can do to fix the issue by yourself. Therefore, contact Apple customer support to fix the issue.

Fix 3: Temporary Workarounds to Adjust Sound on iPhone

While you wait for the issue to get fixed, here are a few alternate methods to control the volume on your iPhone without using buttons.

1. Use the Volume Slider in the Control Center

The control center provides a slider to control the volume. Here’s how to access the control center on your iPhone to adjust the sound.

  • iPhone X and later: Swipe down from the top-right corner of your screen to open Control Center.
  • iPhone SE, iPhone 8, and earlier: Swipe up from the bottom edge of your screen to open Control Center.
Control Center

2. Use AssistiveTouch

AssistiveTouch provides a set of controls for using your iPhone and has volume control settings.

Step 1: Open the Settings app > select Accessibility > Touch

Step 2: Now, select AssistiveTouch > toggle on AssistiveTouch.

Step 3: You will see a floating button on the home screen. When you click on it, a box of controls opens. Click on Device > tap on Volume Up or Volume Down to adjust the sound.

3. Control Volume Within Settings

Apple also provides a slider within the sound settings to control the volume.

Step 1: Open the Settings app > click on Sound and Haptics.

Step 2: You will find a slider for volume control. Use it to adjust the volume.

4. Ask Siri

Here’s how to use the voice assistant to adjust the volume of your iPhone.

Step 1: Open the Settings app > select Siri & Search > turn on Press Side Button for Siri.

Step 3: Now, press and hold the side button for a few seconds to summon Siri.

Step 4: To adjust the sound, use a simple phrase like ‘decrease the media volumeor ‘increase the ringer volume’. Siri will also give you feedback.

Also Read: How to personalize Siri’s response and actions on iPhone

Was this helpful?

Thanks for your feedback!

5 Ways to Fix Slow Download Speeds on Windows 11

Basic Fixes

  • Connect to a 5GHz network: When you work with a dual-band Wi-Fi router, it’s a good idea to choose a faster 5GHz Wi-Fi frequency band for better internet speeds. 
  • Update web browser: Update your web browser to the latest version to get rid of bugs affecting download speeds.
  • Use ethernet: You will get reliable internet speeds with an ethernet connection compared to Wi-Fi.
  • Use a premium VPN: Using a premium VPN over a free version can help you improve the download speeds on your PC.
  • Pause other downloads: Make sure you aren’t downloading files from multiple apps in the background and that other devices connected to the same network are not downloading large files.

Fix 1: Run Internet Connection Troubleshooter

You can run the built-in internet connection troubleshooter and fix slow download speeds on your Windows 11 PC.

Step 1: Press the Windows + I keys shortcut to open the Settings menu.

Step 2: Select Troubleshoot and open Other troubleshooters from the following menu.

Step 3: Run the internet connection troubleshooter and let Windows handle slow download speeds.

Fix 2: Clear Browser Cache and Try Again

Due to a corrupt cache in your preferred browser, you might face slow download speeds. You must clear your browser cache and try again. Let’s take Google Chrome as an example here.

Note: Your browsing and download history, cookies, and cache will be deleted from Google Chrome and unless selected, your passwords will not be deleted.

Step 1: Open the Google Chrome browser on Windows. Select the three-dot menu at the top right corner and open More Tools.

Step 2: Click on Clear browsing data.

Step 3: Move to the Advanced tab and hit Clear data.

Fix 3: Change DNS Server

Switching to Google’s DNS servers can improve download speeds by providing faster and more reliable domain name resolution.

Step 1: Open the Control Panel, select Network and Internet, and then select Network and Sharing Center.

Step 2: Select your network.

Step 3: Now, select Properties. Check the box next to Internet Protocol Verison 4 and click on Properties.

Wifi properties

Step 4: Check the box for Use the following DNS server addresses to enter the DNS server address manually.

Step 5: Now, enter the address 8.8.8.8 in the Preferred DNS server box and 8.8.4.4 in the Alternative DNS server box. These are the addresses for the Google DNS server. Click on OK to apply the changes.

Fix 4: Check Metered Connection on Windows

When the metered connection toggle is enabled, apps might work differently to help reduce data usage. You can disable the metered connection and complete the downloads.

Step 1: Press the Windows + I keys shortcut to open the Settings menu and head to Network & internet.

Step 2: Open Data usage.

Step 3: Disable the Metered connection toggle.

Fix 5: Reset Network Settings

Resetting the network settings on your Windows PC fixes any misconfiguration that may be causing issues with your internet connectivity. Here’s how you can do it.

Step 1: Open the Settings app and select Network & Internet. Click on Advanced network settings.

Advanced Network Settings

Step 2: Select Network reset.

Select Network Reset

Step 3: Click Reset now. Select Yes to confirm.

Reset Now

Was this helpful?

Thanks for your feedback!

5 Ways to Remove a Stuck Print Job in Windows 11

Fix 1: Clear Print Queue Using the Settings App

One of the most straightforward ways to remove stuck print jobs is to clear the entire print queue in Windows 11. Hence, try that first.

Step 1: Press the Windows key + I to launch the Settings app.

Step 2: Navigate to Bluetooth & devices and click on Printers & scanners.

Step 3: Select your printer from the list.

Step 4: Click on Open print queue.

Step 5: Click the three-dot menu at the top-right corner and select Cancel all.

Fix 2: Restart the Print Spooler Service

Print Spooler is an essential service that handles print operations on Windows. If the service encounters an error or stops functioning, your print jobs may get stuck. In most cases, restarting the Print Spooler service will fix any issues.

Step 1: Press the Windows key + R to open the Run dialog. Type services.msc in the box and press Enter.

Step 2: In the Services window, scroll down to locate Print Spooler. Right-click on it and select Restart. If the service is not running, select Start.

Wait for Windows to restart the Print Spooler service. Following that, you should be able to delete print jobs from the queue.

Fix 3: Use Command Prompt to Clear the Print Queue

Occasionally, Windows may prevent you from clearing the print queue due to a lack of permissions. So, you can open Command Prompt with administrative privileges and run a few commands to clear the print queue.

Step 1: Right-click on the Start icon and select Terminal (Admin) from the list.

Step 2: Paste the following command and press Enter to stop the Print Spooler service.

net stop spooler

Step 3: Run the following command to clear the print queue.

del %systemroot%\System32\spool\printers\* /Q

Step 4: Paste the following command to start the Print Spooler service.

net start spooler

Fix 4: Clear Print Queue Manually From File Explorer

Windows stores your print jobs in the printer directory before printing. Deleting files from the printer directory also removes them from the print queue. For that, you must stop the Print Spooler service on your PC.

Step 1: Press the Windows key + R to open the Run dialog. Type services.msc in the box and press Enter.

Step 2: In the Services window, scroll down to locate Print Spooler. Right-click on it and select Stop.

Step 3: Press the Windows key + R to open the Run dialog box. Paste the following path in the Open field and press Enter:

%systemroot%\System32\spool\printers\

Step 4: In the File Explorer window, select all files and click the trash icon at the top. That will purge all the print jobs.

Step 5: Switch to the Services window after deleting the files. Right-click on the Print Spooler service and select Start.

Fix 5: Reinstall the Printer Driver

Printer drivers on your PC allow Windows to communicate with your printer device. However, if the current printer drivers on your PC are malfunctioning, you’ll face all kinds of printer issues, including this one. Try reinstalling the printer drivers to fix the issue.

Step 1: Right-click on the Start icon and select Device Manager from the list.

Step 2: Expand the Print queues section, right-click your printer, and select Uninstall device.

Once removed, go ahead and restart your PC. Windows should install the missing printer drivers during boot. Following this, you should be able to remove the stuck print jobs in Windows 11 without issues.

Was this helpful?

Thanks for your feedback!

How to Fix Taskbar Icons Missing on Windows 11

Windows 11’s new Taskbar looks great and feels modern, but it’s not as perfect as it used to be. You might encounter occasional bugs that may render it unusable, such as when the icons on the Taskbar go missing, or the Start menu becomes unresponsive.

However, it’s just bizarre if the icons on your Taskbar go missing out of the blue. To help you remedy that, we have compiled a list of the five best solutions to restore the missing Taskbar icons on your Windows 11 PC.

1. Restart the File Explorer

Windows Explorer provides you a gateway to all the important files and folders on your computer. However, it can lead to several issues whenever it fails to function normally and you may experience glitches such as disappearing icons, the preview pane not working, and so on.

Thankfully, you can quickly fix such issues by restarting the Windows Explorer. Follow the steps below:

Step 1: Press the Ctrl + Alt + Del keys to open the Security options menu and select Task Manager.

Step 2: In the Task Manager window that appears, head to the processes tab and select the Windows Explorer process. Then, click on the ‘Restart task’ button.

If you see more than one process related to File Explorer, select the one with more memory usage. 


After you restart the File Explorer, the icons may reappear on the Taskbar. If that didn’t work, let’s move to the next solution. Find additional methods to restart Windows Explorer if the preceding one is not working for you.

2. Restart Windows Components

Many issues related to other Windows components can cause numerous problems on your PC, and disappearing Taskbar icons being one of them.

You can quickly fix issues related to Windows components by restarting them, as shown in the steps below:

Step 1: Press the Ctrl + Alt + Del keys to open the Security options menu and select Task Manager.

Step 2: When the Task Manager window appears, head to the details tab, as pointed in the image below. 

Step 3: Under the details tab, scroll down and select the ‘ShellExperienceHost’ process. Click the End task button. 

Step 4: When a confirmation dialog appears, select the End process option.Follow the same four steps above to end three other processes, including SearchIndexer, SearchHost, and RuntimeBroker.

Step 5: Click on the ‘Run new task’ button.

Step 6: In the Create new task dialog, type SearchIndexer.exe and click ok.

Repeat the same for the processes (ShellExperienceHost, SearchHost and RunTimeBroker) that you killed previously. If you get an error while launching a particular one, Windows might have already restarted that task.

After you restart all four services, check if the icons return on the Taskbar. If this didn’t help, move on to the next solution. 

3. Rebuild the Icon Cache

Windows creates several icon cache files to reduce the time it takes to load icons whenever you start your PC. However, over time, the accumulated icon cache can cause unfavorable issues that may affect the stability of your PC instead of helping it.

If you want to fix any icon-related issues on your PC, you can easily rebuild the icon cache. Here’s how you can do so on your Windows 11 PC:

Step 1: Press the Windows + S keys and type Command Prompt. Then, from the results for Command Prompt, click on ‘Run as administrator.’


Step 2: Click on Yes when a User Account Control (UAC) prompt appears on the screen.

Step 3: Copy and paste the following command into the Command Prompt window and press Enter to access the Windows Explorer system folder.

cd /d %userprofile%\AppData\Local\Microsoft\Windows\Explorer

Step 4: Type the following command into the Command Prompt window and press Enter to access the directory where the icon cache is stored:

dir

Step 5: Copy and paste the following command into the Command Prompt window and press Enter to delete all the icon cache files.

del iconcache*


After removing icon cache files restart your PC. When Windows 11 restarts, it will build a fresh set of icon cache files and that will bring back the app icons on the Taskbar.

4. Delete the Iris Service

The Iris service is responsible for the proper functioning of Microsoft ads, lock screen suggestions, Bing wallpaper of the day, and more. Deleting the same on your system can also help you fix the missing Taskbar icons and other Taskbar-related issues.

However, keep in mind that you might lose access to certain features such as Bing wallpaper of the day, and lock screen suggestions, to count a few, if you delete the Iris service. With that said, here’s how you can delete the Iris service on your Windows 11 PC:

Step 1: Press the Windows key + R keys to open the Run dialog and type regedit in the text field. Then, press Enter.


Step 2: Copy and paste the following location into the Navigation bar:

Computer\HKEY_CURRENT_USER\SOFTWARE\Microsoft\Windows\CurrentVersion\IrisService

Step 3: Right-click on the folder that says IrisService and select Delete. 

Step 4: Click on Yes when a Confirm Key Delete dialog appears.

Restart your PC to apply the changes and wait for the app icons on the Taskbar reappear. 

5. Use SFC and DISM Commands

At times, a corrupt system file can also break important features on Windows leading to unfavorable issues that might render your PC unstable or even unusable in severe cases.

If you think this might be the reason behind your woes, you can quickly run an SFC (System File Checker) scan followed by a DISM (Deployment Image Servicing and Management) scan to fix the corrupt system files. Here are the steps for the same:

Step 1: Press the Windows + S keys and type Command Prompt. Then, from the results for Command Prompt, click on ‘Run as administrator.’

Step 2: Click on Yes when a User Account Control (UAC) prompt appears on the screen.

Step 3: Type the following command into the Terminal window and press Enter:

SFC /scannow


After the SFC (System File Checker) scan completes scanning your PC, you’ll see a message indicating whether or not it found any problems that need fixing.

If the SFC scan didn’t find any issues, you would get a message saying, ‘Windows Resource Protection did not find any integrity violations.’ However, if any issues relating to corrupted configuration files are discovered, it will automatically repair them for you.

Step 4: Run a DISM (Deployment Image Servicing and Management) scan once you have completed the SFC scan. To perform a DISM scan, execute all the commands listed below one command at a time by typing each command and pressing the Enter key.

DISM /Online /Cleanup-Image /CheckHealth
DISM /Online /Cleanup-Image /ScanHealth
DISM /Online /Cleanup-Image /RestoreHealth

This DISM scan might take some time. Restart your PC after completing both scans to see if it helps to restore the missing Taskbar icons.

Also Read: Taskbar Disappeared on Windows 11? Here is the Fix

Say Goodbye to Missing Icons From the Taskbar

After following the above solutions, Windows will bring back the missing Taskbar icons on your computer. Let us know which solution worked out for you or if you’ve found another trick to bring back the missing Taskbar icons.

Was this helpful?

Thanks for your feedback!

5 Best Tools to Extract RAR Files on Windows 11 (Free and Paid)

Whenever we talk of RAR file extraction tools, WinRAR immediately comes to mind. It is one of the oldest and most reliable tools for this task. It is compatible with both Windows 11 and Windows 10. It is available in 50 languages and both 32-bit and 64-bit.

Here’s how to use it.

Step 1: Download and install WinRAR on your computer.

Step 2: After installing WinRAR, double-click on the RAR file you wish to extract. The RAR file on your system will have the WinRAR icon.

Step 3: Click Open to see the contents of the RAR file.

Step 4: After seeing all your files, select the file you want to extract and click on Extract To to choose a location on your PC.

Step 5: Select the location of your system where you want the extracted file to be saved. Then, click Ok at the bottom-right corner.

Price: Free, Pro Verison: $29 (lifetime subscription)

Note: WinRAR offers a 40-day trial. However, you can continue using WinRAR for free after the trial ends. Click on Use Evaluation Copy when you use the tool for the first time.

2. WinZip – The Perfect Alternative to WinRAR

Our next suggestion is WinZip. Like WinRAR, you can choose a free trial or a paid subscription. It supports all major formats, such as Zip, Zipx, RAR, 7z, TAR, GZIP, VHD, XZ, POSIX TAR, etc. For individuals and organizations dealing with sensitive data, Secure File Transfer Protocol (SFTP) provides increased file transfer security.

Step 1: Download and install WinZip.

Step 2: After installing WinZip, double-click on the RAR file in your system that you want to exact.

The RAR file will have the WinZip icon.

Step 3: Select your preferences to extract the RAR file. We have selected No, just show me its contents.

Step 4: After you see all your files, select the file you want to extract. Then, click the down arrow next to Unzip To on the right side.

Step 5: Select the file location on our PC  and then click on Unzip at the bottom-right corner.

Price: Free, Pro Verison: $35.34 (Standard), $58.94 (Pro)

For the Enterprise version, contact the WinZip support team.

Note: WinZip offers a free trial of 21 days. Once you install the software, click on Use Evaluation Version when you use it for the first time

3. 7-Zip: A Free Open-Source Option

Speaking of alternatives to the usuals, we now have 7-Zip. It supports all file formats, but most importantly, 7-Zip offers a high compression ratio in 7z format with LZMA and LZMA2 compression. Compared to WinZip, 7-Zip is available in over 87 languages.

Step 1: Download and install 7-Zip.

Step 2: After installing it, right-click on your RAR file and then select Show More Options.

Step 3: Click on 7-Zip from the list of more options.

Step 4: You can now choose to Extract Files or click on Extract Here to select a location for saving extracted files.

Price: Free

4. AukZip – RAR Zip: The Cheapest Option for Pro Features

Another app available in the Microsoft Store is AukZip – RAR Zip. The free version offers features like previewing the images in archives without extracting, batch compressing files, batch extracting & decompressing specified files and archives, and protected archives with AES-256 encryption strongly.

The paid version offers additional features, such as repairing and unzipping broken files and extracting a single file from a group of files.

Step 1: Download and install AukZip on your Windows PC.

Step 2: Drag and drop your ZIP file in the AukZip window.

Step 3: Select the location for extracting your files and then click on Extract All.

extract all aukzip windows 11

Price: Free, Pro Verison: $4.99/year (billed annually), $9.99 (lifetime access)

5. Unarchiver One RAR and ZIP File Manager: A Cleaner Layout

As the name suggests, this tool allows you to add and extract RAR files on your Windows PC. It is available as an app on the Microsoft Store and offers a cleaner layout, making it more intuitive. Do note that it has limited language support of up to 11 languages. However, it supports all file formats.

Step 1: Download and install Unarchiver on your Windows PC.

Step 2: Click the Extract menu on the left pane. Click Add Archives and then select the zipped file to be extracted.

Step 3: Click Extract All, then select the location for the extract.

extract all unarchiver windows 11

Price: Free

Was this helpful?

Thanks for your feedback!

How to Change Language on Amazon: A Complete Guide

How to Change Amazon’s Language on Web Browser

Note: Amazon’s URL dynamically adjusts depending on the region you’re accessing it from. So, if you encounter a prompt asking to change the country after launching Amazon on your web browser, go ahead and give it a try.

On a Desktop or Website

Step 1: Open any web browser and navigate to Amazon’s website.

Step 2: Move the cursor over the flag icon (next to Account & Lists) and select your preferred language from the drop-down menu.

select the Language you prefer from the dropdown menu

If you want to change your region, click on country/region. The supported languages will change accordingly, as they are specific to regions. Like on the US website, you can only choose English or Spanish. 

On Mobile Website

Step 1: Open Amazon’s website on your preferred browser on your mobile, scroll to the bottom to find and tap on the globe icon.

Step 2: Select the preferred language > tap on Save changes

Amazon will send you an email to confirm the updated language preference, and that’s it.

Change the Language on the Amazon App (Android and iPhone)

Step 1: Open the Amazon mobile app and tap on the three horizontal lines icon at the bottom right.

Step 2: Tap on Settings and select Country & Languages.

Open Amazon mobile app
Tap Settings and select 'Country & Languages'

This selection will display a list of region-specific language options too.

Step 3: Now, choose the language you prefer from the list.

That’s it! You will now see Amazon in your preferred language. Additionally, Amazon will also notify you about the language update confirmation on your registered email.

FAQs

1. How to change my Amazon back to English?

It depends on your device. If you have the Amazon app, tap on the three horizontal lines icon > select Settings > tap on Country & Languages > select the language you want.

2. Why is my Amazon in Spanish all of a sudden?

Amazon may display pages in Spanish if your browser has multi-language support and settings that allow it. This problem could also arise if you change the language settings or click on some foreign link.

Was this helpful?

Thanks for your feedback!

3 Ways to Fix Control Panel Not Opening on Windows 11

Common Fixes

  • Update Windows 11: Press the Windows + I shortcut to open the Settings app, select Windows Update from the left sidebar, and install available system updates.
  • Perform a clean boot: A recently installed software might be conflicting with the Control Panel app. Clean boot your Windows 11 system, and retry opening it.
  • Restart the Windows Explorer: The Control Panel app may fail to open if there’s an issue with the Windows Explorer process. Restart it manually and reopen the Control Panel.

Fix 1: Open the Control Panel Using the Run Dialog

If the Control Panel app isn’t opening directly on Windows 11, you can use the following nifty trick to regain access.

Step 1: Press the Windows + R shortcut to open the Run dialog, type appwiz.cpl, and press Enter.

1 open the Run dialog

Step 2: Click Control Panel Home at the top left to access the app’s home screen.

2 open Control Panel home

Fix 2: Repair Corrupt System Files to Fix the Control Panel

The Control Panel app may fail to open if Windows system files are corrupt. Run the System File Checker (SFC) and Deployment Image Servicing and Management (DISM) scans to repair and restore your system image.

Step 1: Press the Windows key, search Command Prompt, and click Run as administrator.

14 run CMD as admin 1

Step 2: Type SFC /scannow in the console and press Enter to let System File Checker repair corrupt system files.

3 run SFC scan

Step 3: Next, execute the following DISM commands sequentially and reboot your PC.

DISM /Online /Cleanup-Image /CheckHealth
DISM /Online /Cleanup-Image /ScanHealth
DISM /Online /Cleanup-Image /RestoreHealth
4 run DISM scan

Fix 3: Manually Restart the Windows Services

When one of the Windows services stops working in the background, the system might fail to open the Control Panel. Start them manually from the Services window and try reopening the app.

Step 1: Press the Windows key, search Services, and click Run as administrator.

5 Open Windows Services as admin

Step 2: Locate and double-click Software Protection, and click Start.

6 start software protection service

Step 3: Finally, double-click Windows Error Reporting Service, click Start, and retry opening the Control Panel.

7 start Windows error reporting service

Was this helpful?

Thanks for your feedback!

7 Ways to Fix Touchscreen Not Working On iPhone

While the iPhone is known for its robust design and quality, it doesn’t mean it’s free from problems. Some users recently reported that their iPhone’s touchscreen is not working. It is only natural to feel frustrated as it makes your phone useless. However, the good news is that this article can help fix the problem, but there’s a catch.

iPhone Touchscreen Not Working

Similar to the ghost touch issue, there can be various reasons why the touchscreen is not working on your iPhone. However, as long as the problem is software-related, you can fix the issue following the methods in this guide. If these don’t help, it is probably a hardware-related issue and you will have to take your device to Apple Support as the last resort.

So, try these fixes first and see if fix the iPhone screen not responding to touch. Let’s begin with the simplest and most efficient solution.

1. Force Restart iPhone

We’re sure you have tried turning off your iPhone, but your faulty touchscreen is not allowing you to use the slider to power off your iPhone. This is exactly why the force restart iPhone option was designed. This does not require any touch controls. If the iPhone touchscreen is not working due to a software issue, this is your best bet to fix the same.

iPhone Force Restart

The steps to force restart the iPhone depend upon your version. So, we have listed the steps for each iPhone model. Pick the one that you have.

On iPhone 8, iPhone SE 2nd gen, and later:

Step 1: Press and quickly release the volume up button.

Step 2: Press and quickly release the volume down button, then press and hold the side button.

Step 3: When the Apple logo appears, release the button.

On iPhone 7 and iPhone 7 Plus:

Step 1: Press and hold both the volume down button and the Sleep/Wake button at the same time.

Step 2: When the Apple logo appears, release both buttons.

On iPhone 6s, and iPhone SE 1st gen:

Step 1: Press and hold both the Sleep/Wake button and the Home button at the same time.

Step 2: When the Apple logo appears, release both buttons.

This is all you need to do to force restart your iPhone. If your touchscreen works fine post-force restart, it probably was an issue with a process or an application running in your previous session.

2. Clean and Dry Your Screen

The human body is a conductor of electricity. So, when you touch a screen, you distort the electrical field on it and the screen recognizes where it happens. Based on that, you are provided an output as a result of your touch. Now if any solid or liquid particles interfere between your fingertips and the screen, this ‘distortion’ will not take place and you will not receive any feedback.

Thus, making you believe that your iPhone touchscreen is not working. So, it is always better to clean the screen first. Follow the below steps to do so.

Step 1: Ensure all the cables are unplugged from the iPhone.

Step 2: Press the sleep/wake button and lock your iPhone.

Step 3: Use a microfiber cloth, and gently wipe across your screen.

Step 4: If the particles do not seem to go, use a soft lint-free cloth with very small amounts of soapy water. Wipe across your screen. Ensure you do not go near the earpiece, Touch ID button, or the edges of your device.

Using the above steps, carefully clean your iPhone. Ensure you gently wipe your screen, and avoid using a lot of liquid in the process. Now, see if the touchscreen is working.

3. Remove Case and Screen Protector

In the previous section, we looked into dust particles interfering with your fingertips and screen. This blocks the electrical conductance and you cannot receive feedback from the touchscreen. This can also happen if you are using a thick screen protector or a case that comes in contact with your screen.

Hence, we recommend removing the case and the screen protector and then try using the screen. If it works fine, you’ve found the culprit. We recommend using a good quality case and a screen protector to prevent a similar issue in the future.

4. Uninstall Problematic Apps

If the touchscreen does not work on specific apps only, the issue is not with your display but with the app itself. You guessed it right. You need to uninstall the app. Here’s how you can delete an app on your iPhone.

Step 1: Long-press on the app icon until they start to wiggle. Now, click on the ‘-‘ button at the app icon’s top left.

Long press on App Icon

Step 2: Now, click on Delete App.

Click on Delete App

If the issues persist, you can probably check if your iPhone is due for a software update. Read to the next section to know how.

5. Update iPhone

Apple constantly rolls software updates to fix bugs and issues on your iPhone. So, to try and fix the touchscreen issue, we highly recommend you update your iPhone to the latest, if not already. The good part is that you can update your iPhone using Windows or Mac machine. Let me show you how.

Update iPhone Using Mac

Step 1: Connect the iPhone to your Mac using the lightning cable.

Step 2: In the list of devices, select your iPhone.

Click on iPhone

Step 3: Now, select ‘Check for Update’. If there is any available update, go ahead and update your iPhone to the latest version.

Click on Check for Update

If you are on the other side and use a Windows machine, here’s how you can update your iPhone using iTunes.

Update iPhone on Windows

Step 1: Download and install iTunes using the Microsoft Store.

Get iTunes for Windows

Step 2: Install and open iTunes on your PC.

Step 3: Connect your iPhone using the lightning cable.

Step 4: Now, your iPhone should appear on the sidebar. Select your device and click on Summary.

Select iPhone

Step 5: Click on ‘Check for Updates. This will tell you if an update is available for your iPhone and will let you update it using iTunes itself.

Check for Update

If the issue persists even after updating your iPhone, try and reset your iPhone. The steps for which, are explained in the section below.

6. Factory Reset iPhone

Another classic, but one of the last resort solutions to fix the touchscreen not working on the iPhone is to factory reset it. Here’s a step-by-step procedure to do the same.

Step 1: Open the Settings App.

Open Settings

Step 2: Select General.

Select General

Step 3: Select ‘Transfer or Reset iPhone’.

Select Transfer or Reset iPhone

Step 4: Select Reset.

Select Reset

Step 5: Select ‘Reset All Settings’ and follow the on-screen instructions to complete the process.

Select Reset All Settings

Step 6: Optional – Click on ‘Erase All Content and Settings’ if the issue persists.

Select Erase all content and settings

Step 7: Select Continue. Follow the on-screen instructions to erase and reset your iPhone.

Select Continue

If none of the above steps work, you probably need to get it checked by an Apple-authorized service center. We’ll help you with some information regarding this in the next section.

7. Contact Apple Support

Taking your device to an Apple-authorized service center can be the safest option. It is a safe way to diagnose the issue and get a solution for the same. Despite this process costing you money, this will help you solve any issue as Apple offers good after-sales support. We’ve inserted some important links below to help you contact Apple Support.

Tap Away on Your iPhone

This is how you can fix the touchscreen not working on iPhone. Facing such an issue might get frustrating. But we advise you to stay put, and patiently try these methods. You can also explore Apple Care services for your iPhone to save some money in the long run.

Was this helpful?

Thanks for your feedback!

4 Fixes When the Windows 11 Activation Key Is Not Working

Basic Fixes:

  • Confirm the OS is running an updated Windows 11: You may use the built-in Winver utility to check your OS version and update status.
  • Ensure you have a valid and legitimate product key: If your activation key is not valid, it won’t work. So, ensure it is not an expired key.
  • Verify there is no mismatch: Ensure the Windows version matches your purchased product key.
  • Clean install Windows: You may perform a clean installation using the correct version of Windows.

Fix 1: Run the Windows Activation Troubleshooter

Windows bundles several dedicated troubleshooters to figure out issues and apply fixes automatically. For example, you can run the dedicated troubleshooter for Windows Activation when the key is not working on your Windows 11 computer.

Step 1: Press the Windows + I shortcut to open the Settings app. Select System from the left column, scroll down, and click Activation.

Windows activation option

Step 2: Under Activation Settings, click on Activation state. Since your key didn’t work, the state will show as Not active.

 Activation state

Step 3: When the drop-down opens, click on Troubleshoot.

Activation Troubleshoot button

Step 4: Wait a few minutes until the Windows Activation troubleshooter runs in the background to detect the problem.

running Troubleshoot

Step 5: After the troubleshooter finishes checking, it will show a few details about the problem and a potential fix related to Windows Activation. Then, click on Close.

Complete troubleshooting

The Windows Activation Troubleshooter might work in most cases. However, if it doesn’t work for you, move to the next solution.

Fix 2: Activate Windows via Phone Using SLUI 4

Try the Software Licensing User Interface utility to activate your Windows 11 copy using a phone. Run the SLUI 4 command and find a location-based toll-free number. Call it to retrieve a confirmation ID that can be used to activate Windows 11 on your computer.

Step 1: Press the Windows + R keys to open the Run dialog. In the text field, type SLUI 4. Then, press Enter.

Running SLUI 4

Step 2: In the blue window, select your country or region by clicking on the drop-down menu. Then, click Next.

Starting SLUI 4 process

Step 3: Call the toll-free number as denoted below and give them your device’s installation ID. Then, click on Enter confirmation ID.

Enter confirmation ID option

Step 4: After revealing your Installation ID, Microsoft will provide a Confirmation ID. Enter the confirmation ID and click on Activate Windows.

Final Activate Windows process

Fix 3: Try Activating Windows 11 Using Command Prompt

Windows also includes a Software Licensing Management Tool (slmgr) as a VBS (Visual Basic Script) file to run commands for managing the Windows product activation. You can use the Command Prompt to run this VBS file to activate Windows 11. Here are the steps to follow:

Step 1: Press the Windows + S keys and type Command Prompt. Then, click Run as administrator.

Run command prompt

Step 2: Click Yes when a User Account Control (UAC) prompt appears on the screen.

Step 3: Type the following command into the Command Prompt window, replacing the X with the letters from the Activation key. Then, press Enter.

slmgr.vbs -ipk xxxxx-xxxxx-xxxxx-xxxxx-xxxxx
Entering activation code

Step 4: Click OK when a Windows Script Host dialog appears on the screen.

Windows Script Host

If the activation succeeds, the Windows Script Host dialog states, “Installed activation key XXXX-XXXX-XXXX-XXXX-XXXX successfully”.

If the activation fails, you might get a message – “Error: OxC004FOSO The Software Licensing Service reported that the activation key is invalid”.

Fix 4: Rearm Windows 11 Activation Key

Your PC may not be able to contact Microsoft’s activation servers. However, you can potentially extend the 30-day trial window and put off the Activate Windows watermark for a few more days using the rearm command.

Step 1: Press the Windows + S keys and type Command Prompt. From the Command Prompt results, click Run as administrator.

Running the CDM

Step 2: Click Yes when a User Account Control (UAC) prompt appears on the screen.

Step 3: Type the following command into the Command Prompt window and press Enter:

slmgr /rearm
rearm code command

Step 4: Click OK when a Windows Script Host dialog appears on the screen. Then, restart your PC.

Windows Script Host

After that, your computer will restart to complete the rearming process, and you will have at least 30 more days until you retry activating your Windows 11 computer.

You may also try some free methods of activating Windows 11, but if none of these work, contact Microsoft Support as a last resort.

Was this helpful?

Thanks for your feedback!

How to Setup and Use Snapchat on Web

Setup Your Snapchat Account on the Web

Step 1: Open the Microsoft Store, search for Snapchat, and download it.

Step 2: Launch the Snapchat app and log in with your account details. If you have enabled 2FA (two-factor authentication) on your account, Snapchat might ask for a verification code.

Snapchat login screen

Step 3: Snapchat will ask you to provide camera permission. Click Got it to provide the permission.

Camera permission in Snapchat

Step 4: The web will ask to allow the camera and microphone permission to function smoothly. Select Allow if you plan to compose/receive voice or video calls on Snapchat or want to send snaps using the laptop camera.

Snapchat DM (direct messages) menu will appear on the left with your most recent conversations.

Enable Snapchat Notifications on the Web

To receive real-time messages, snaps, and incoming calls on the desktop, you must enable notification permission for the Snapchat web.

Step 1: Open the Snapchat app > click the three dots icon at the top bar > choose Privacy > Manage privacy settings.

Privacy setting of Snapchat

Step 2: Choose Allow from the Notifications drop-down menu.

Allow option in Snapchat

Step 3: Reload the tab to apply the changes.

To disable notifications from a specific contact, go through the steps below.

Step 1: Open a conversation on the Snapchat web, click the contact’s name at the top, and select Message notifications.

Step 2: Click the radio button beside Silent to mute notifications.

Also Read: How to fix Snapchat “Something went wrong” error on Android and iPhone

Was this helpful?

Thanks for your feedback!