Underline Text and the Spaces Between
The default setting in Microsoft Word allows you to underline both text and spaces. Here’s how to do so:
Step 1: Launch the Microsoft Word app.
Step 2: Select the text you want to underline on the Word canvas.

Step 3: On the Word Ribbon, click the Underline icon. Alternatively, press the Control + U keyboard shortcut on Windows or Command + U on Mac to underline the selected text and any space.

You can remove the underline following the same steps as above or by tapping the Control + U keyboard shortcut.
Underline Text Without the Spaces Between
If you just want to underline the text in your Word document and not the accompanying space, here’s how to do so:
Step 1: Launch Microsoft Word.
Step 2: Select the text you want to underline on the Word canvas, including the spaces.

Step 3: Right-click on the Word canvas > select Font from the menu to launch the Font dialog box.

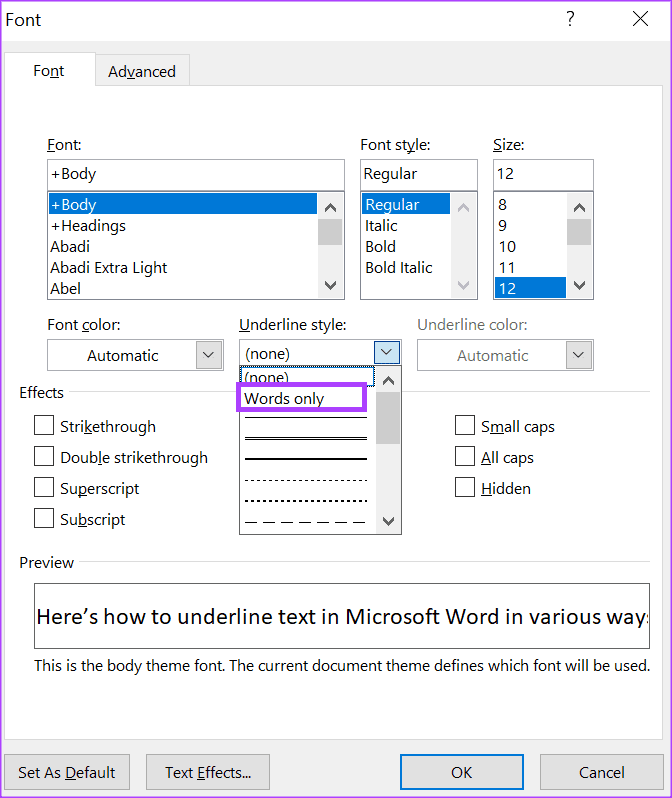
Step 4: In the Font dialog box, click the drop-down menu beneath the Underline style group.
Step 5: From the Underline style menu, select Words only. The Preview pane of the Font dialog box will show you a preview of what this looks like.
Step 6: Click OK to save your changes.
Underline Blank Spaces Before Typing
With certain documents, such as forms, blank spaces are typically left for individuals to fill. You can use an underline to indicate the fields where form responses should be written. Here’s how to do so:
Using the Keyboard Shortcut
The hyphen key on your keyboard can be used to underline blank spaces. Here’s how to do so:
Step 1: Launch Microsoft Word.
Step 2: On the Word canvas, place your cursor in the blank space you want to underline.

Step 3: On your keyboard, hold down the Shift key and continuously tap the Hyphen key (-) until you get the desired length of underline.

Using the Tab Key
You can also underline the blank spaces in your Word document using tab stops. Here’s how to do so:
Step 1: Launch Word.
Step 2: On the Word canvas, place your cursor in the blank space you want to underline.
Step 3: Tap the Tab key on your keyboard till it reaches your desired length (by default, the tab stops and moves 0.5 inches to the right at every tap).

Step 4: Using your mouse, select the tab stops you inserted by dragging the cursor through them.

Step 5: To draw an underline, click the Underline button on the ribbon or tap the Control + U keyboard shortcut on Windows or Command + U on Mac.

Using a Table
Another way to underline blank spaces in Word is by inserting a table and adjusting the borders. Here’s how to do so:
Step 1: Launch Word.
Step 2: On the Word canvas, place your cursor in the blank space you want to underline.

Step 3: On the Word Ribbon, click the Insert tab.
Step 4: Click the Table drop-down.

Step 5: Select the 1 x 1 Table. The table should stretch to the width of your document.

Step 6: Right-click on the Table and select Table Properties.

Step 7: Go to the Table tab > select Borders and Shading at the bottom.

Step 8: In the Borders and Shading dialog box, click the grids in the Preview to remove the top and side borders. Only the bottom border should remain.

Step 9: Click OK to save your changes. You should see only a single line left underlining your blank space.

Once done, start typing above the underline. If you have issues typing, follow the steps in our extensive guide to fix it.
Was this helpful?
Last updated on 08 August, 2024
Read Next
 3 Best Ways to Double Underline Text in Google Docs
Method 1: Using Paragraph Borders This option is best used to underline text in a paragraph.
3 Best Ways to Double Underline Text in Google Docs
Method 1: Using Paragraph Borders This option is best used to underline text in a paragraph.
 Apple Pages vs Microsoft Word: Which Word Processing Software Is Better
Every major tech company out there is offering their version of the productivity suite.
Apple Pages vs Microsoft Word: Which Word Processing Software Is Better
Every major tech company out there is offering their version of the productivity suite.
 4 Fixes for Can’t Select or Highlight Text in Microsoft Word for Windows
Try Basic Fixes Rule out issues with your mouse or touchpad: A malfunctioning mouse or touchpad might fail to register clicks and drag motions.
4 Fixes for Can’t Select or Highlight Text in Microsoft Word for Windows
Try Basic Fixes Rule out issues with your mouse or touchpad: A malfunctioning mouse or touchpad might fail to register clicks and drag motions.
 4 Ways to Clear All Text Formatting in Microsoft Word
Method 1: Using Keyboard Shortcuts With keyboard shortcuts, you can clear the text formatting within a Microsoft Word document.
4 Ways to Clear All Text Formatting in Microsoft Word
Method 1: Using Keyboard Shortcuts With keyboard shortcuts, you can clear the text formatting within a Microsoft Word document.
 Google Docs vs. Microsoft Word Online: Which Word Processor Is Better
Google Docs vs.
Google Docs vs. Microsoft Word Online: Which Word Processor Is Better
Google Docs vs.
 How to Add, Customize and Delete a Text Box in Microsoft Word
Like in Microsoft PowerPoint, you can add a text box to a Microsoft Word document.
How to Add, Customize and Delete a Text Box in Microsoft Word
Like in Microsoft PowerPoint, you can add a text box to a Microsoft Word document.
 4 Ways to Write a Fraction in Microsoft Word
Method 1: Using Equations Unlike the symbols and autoformat options, which present limited fraction types to insert in your document, you can try creating your fraction using equations.
4 Ways to Write a Fraction in Microsoft Word
Method 1: Using Equations Unlike the symbols and autoformat options, which present limited fraction types to insert in your document, you can try creating your fraction using equations.
 How to Lock Parts of a Microsoft Word Document
Method 1: Using Restrict Editing Feature As the name suggests, this feature lets you set up editing restrictions for your Word document.
How to Lock Parts of a Microsoft Word Document
Method 1: Using Restrict Editing Feature As the name suggests, this feature lets you set up editing restrictions for your Word document.
The article above may contain affiliate links which help support Guiding Tech. The content remains unbiased and authentic and will never affect our editorial integrity.