Fix 1: Increase Lock Screen Timeout
You can start by verifying the set lock screen timeout duration on your PC. Windows will keep locking itself if the set duration is 1 or 2 minutes. Here’s how you can change that.
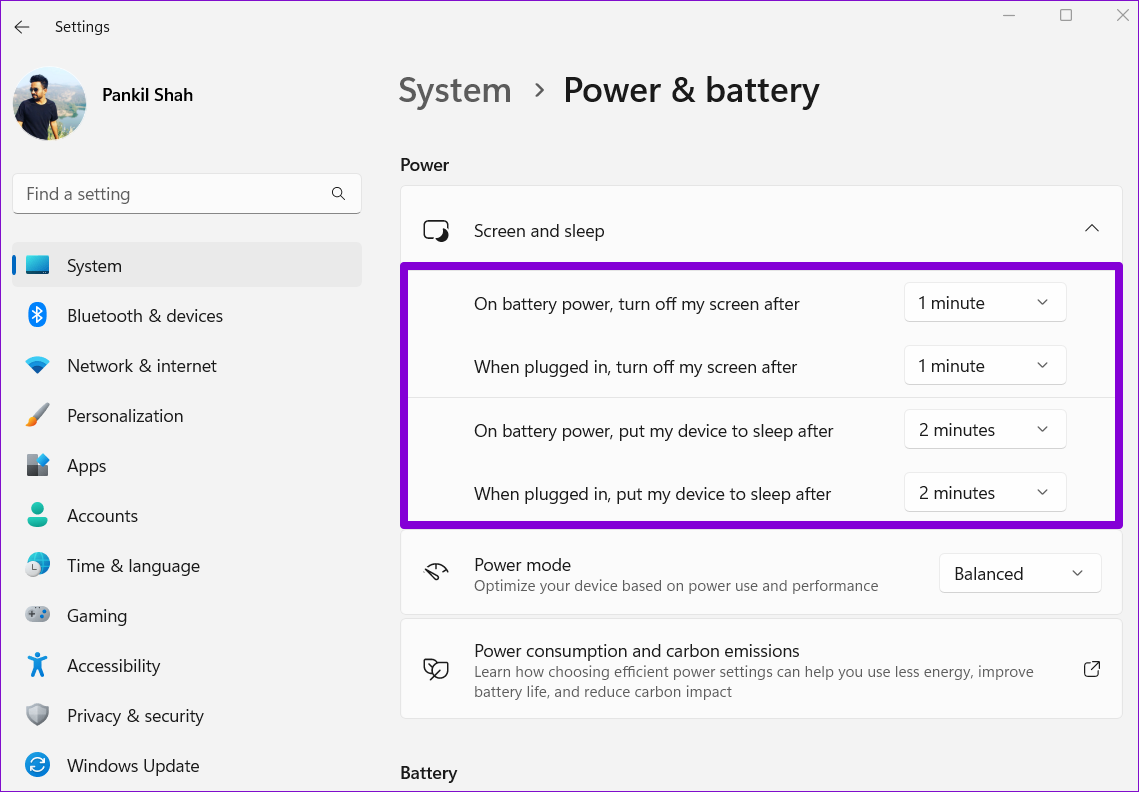
Step 1: Press the Windows key + I to open the Settings app and head to System > Power & battery.

Step 2: Under the Power section, click on Screen and sleep to expand it.
Step 3: Use the drop-down menus under “Screen and sleep” to increase the time duration before Windows turns off your screen or goes to sleep. Alternatively, you can also set those time durations to Never to keep Windows from putting your PC to sleep.
Fix 2: Turn Off Dynamic Lock
Dynamic lock is a nifty feature on Windows that automatically locks your PC when you leave it unattended. It does this every time your paired Bluetooth device goes out of range. So, if you’ve enabled Dynamic lock on your PC, Windows will keep locking itself automatically, regardless of the set lock screen timeout.
To disable Dynamic lock on Windows:
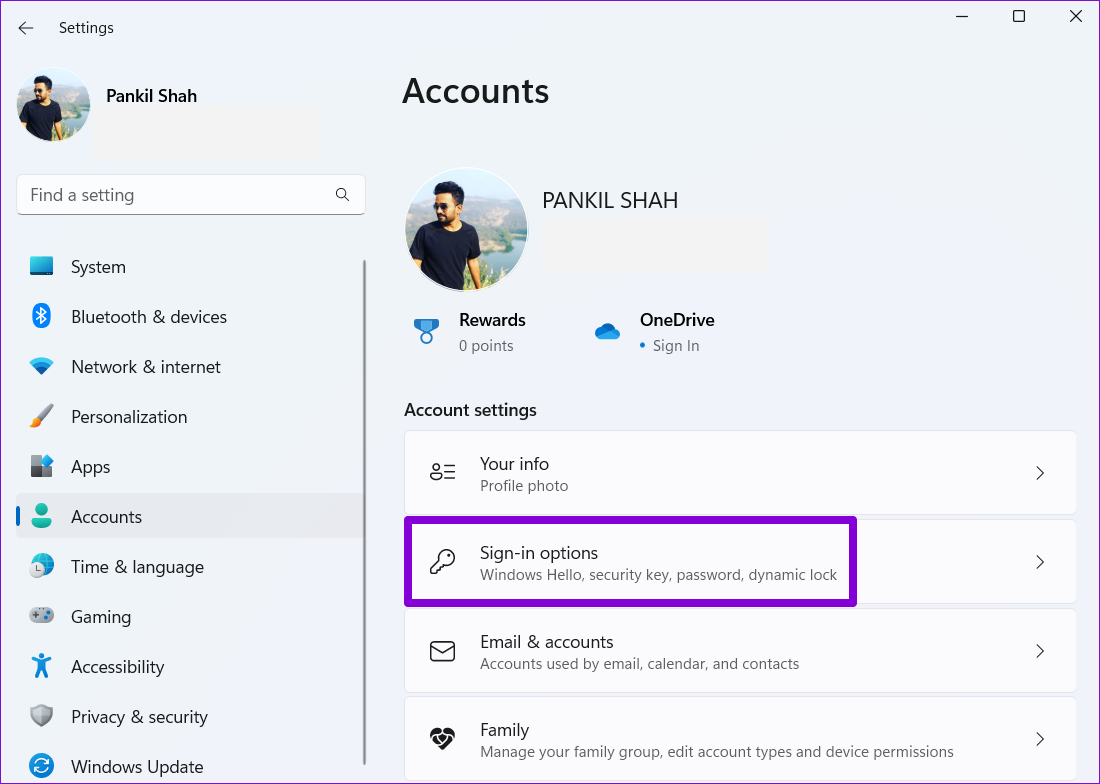
Step 1: Press the Windows key + I to launch the Settings app and head to Accounts > Sign-in options.
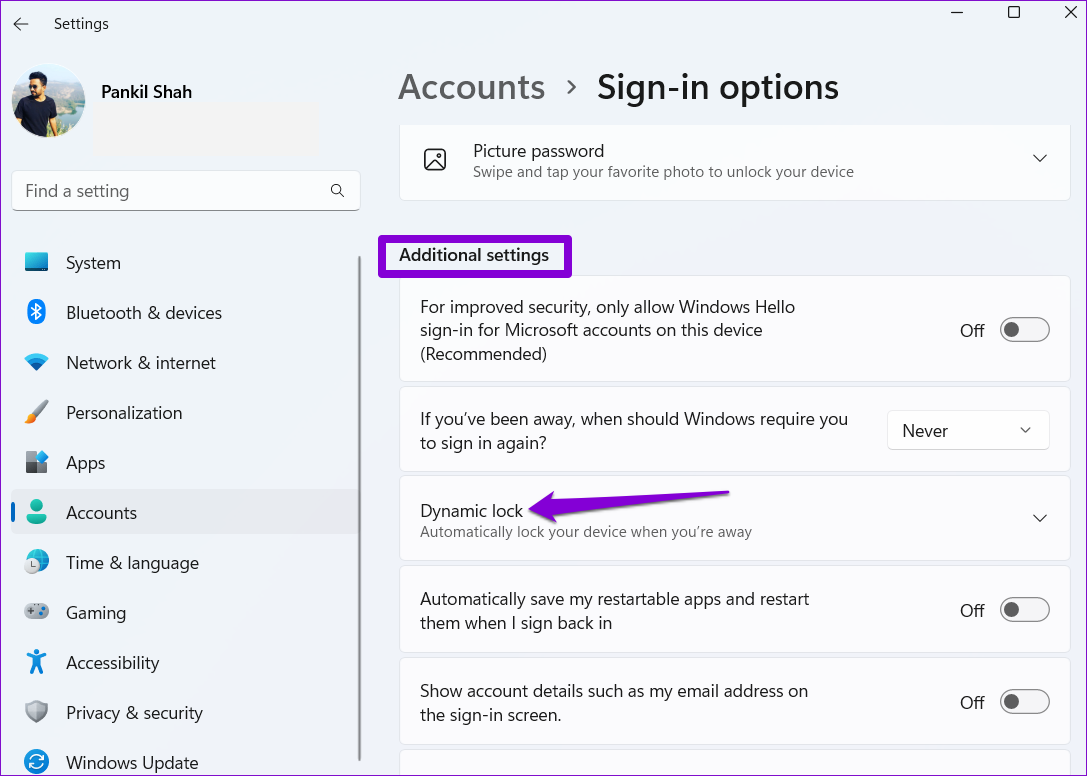
Step 2: Scroll down to Additional settings and click on Dynamic lock to expand it.
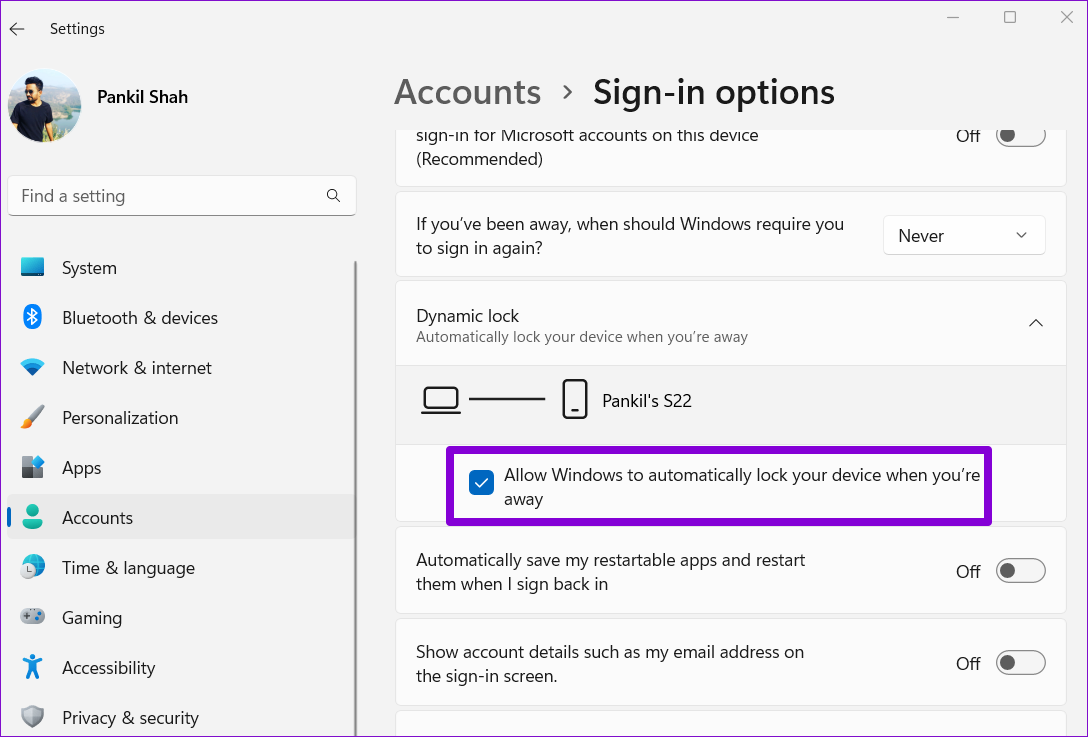
Step 3: Uncheck the Allow Windows to automatically lock your device when you’re away option to disable Dynamic lock.
Fix 3: Modify Power Options
If the above solutions don’t help, you can go through the power options on your PC to change the “System unattended sleep timeout.” Several users on the forums reported success in fixing the issue with this method. You can also give it a try.
Step 1: Press the Windows key + R to open the Run dialog box. Type in control in the Open field and press Enter.
Step 2: In the Control Panel window, use the drop-down menu in the top right corner to change the view type to large or small icons. Then, go to Power Options.

Step 3: Click on Change plan settings next to your active power plan.

Step 4: Click on the Change advanced power settings option.
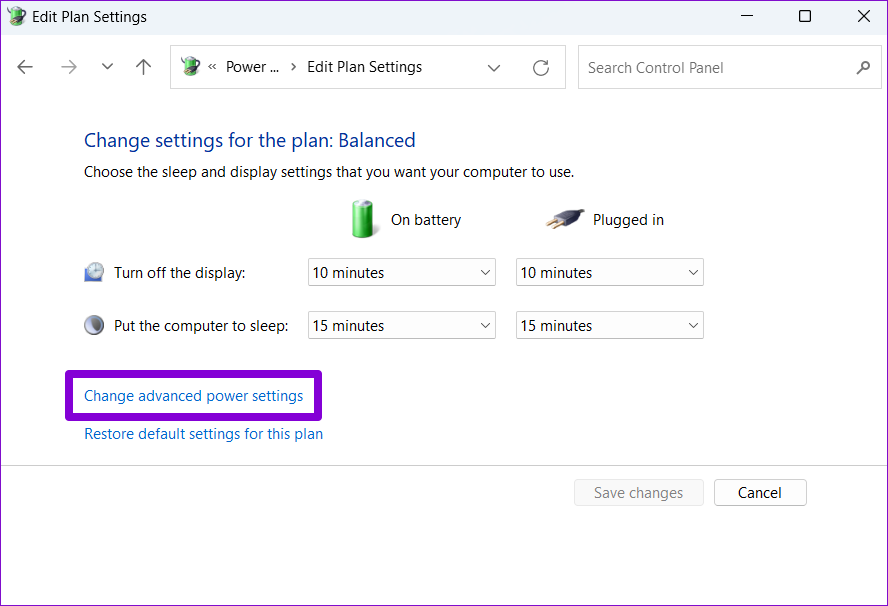
Step 5: In the Power Options window, double-click on Sleep to expand it.
Step 6: Under Sleep, double-click on System unattended sleep timeout to view the set duration.

Step 7: Modify screen timeout to your liking and click Apply to save changes.

Note: If you’re using a Windows laptop, increase the “System unattended sleep timeout” for both “On battery” and “Plugged in” mode.
This will keep Windows from going to the lock screen repeatedly. However, if you can’t seem to locate the “System unattended sleep timeout” under Sleep settings, you’ll have to employ the following registry method to enable it first.
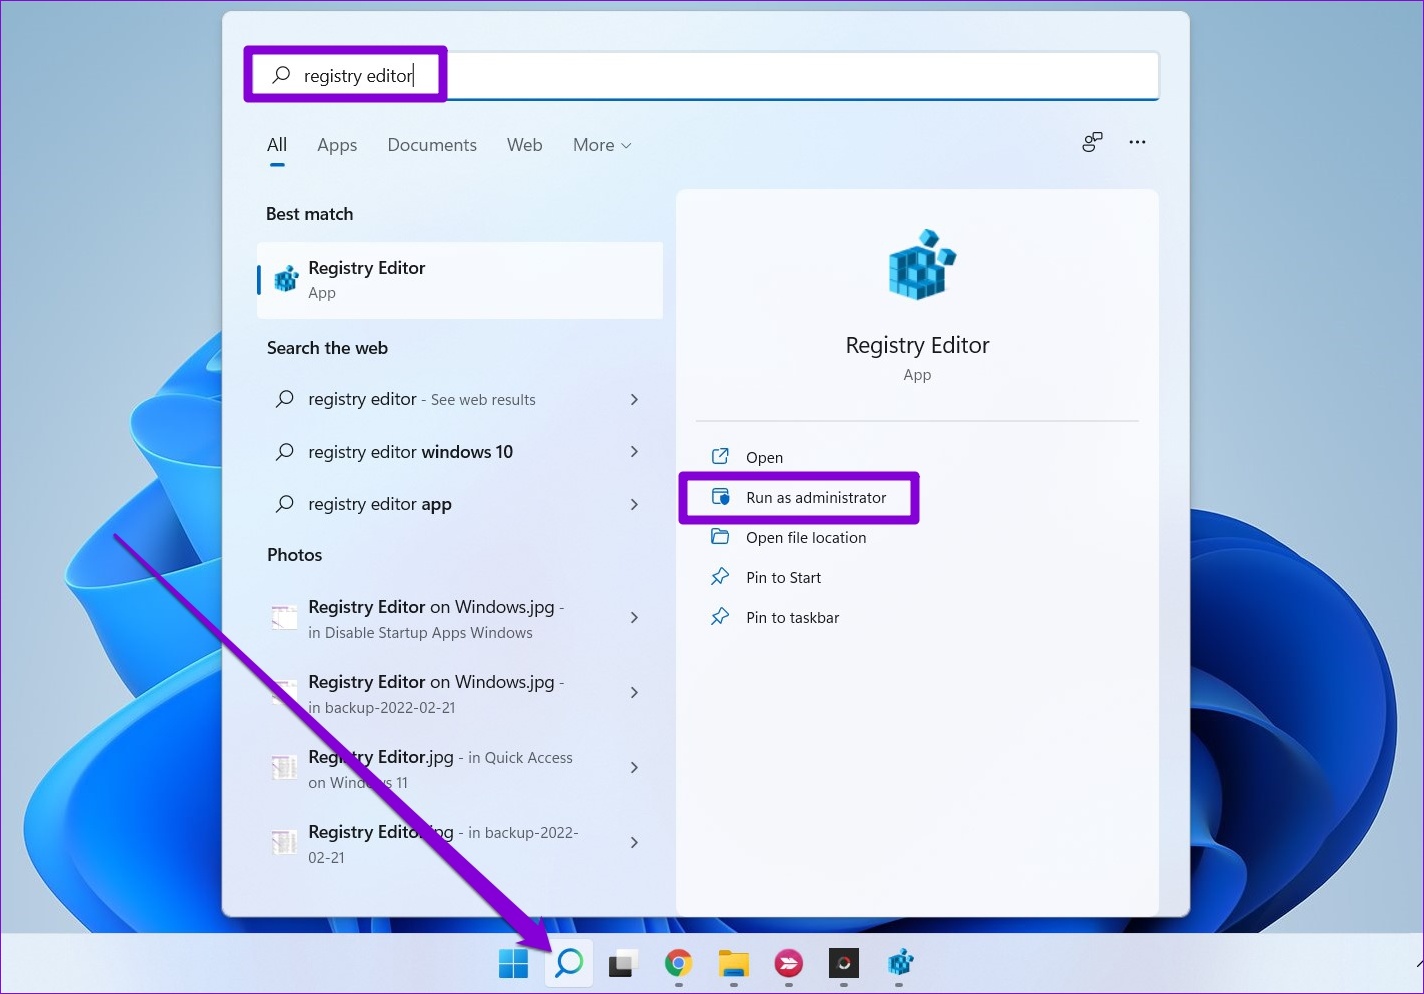
Step 1: Click on the search icon on the taskbar, type in registry editor, and click Run as administrator.
Step 2: In the Registry Editor window, paste the following path into the address bar at the top and hit Enter:
HKEY_LOCAL_MACHINE\SYSTEM\CurrentControlSet\Control\Power\PowerSettings\238c9fa8-0aad-41ed-83f4-97be242c8f20\7bc4a2f9-d8fc-4469-b07b-33eb785aaca0

Step 3: In the right pane, double-click on Attributes and change its value data to 2. Then, click OK.

The change should take effect immediately. Exit the Registry window and use the steps mentioned earlier to access the “System unattended sleep timeout” option.
Was this helpful?
Last updated on 23 July, 2024
1 Comment
Leave a Reply
Read Next
 How to Stop iPhone From Turning Off, Sleeping, or Locking Automatically
Basic Fixes Restart Device: You can try restarting your device to see if it fixes the problem.
How to Stop iPhone From Turning Off, Sleeping, or Locking Automatically
Basic Fixes Restart Device: You can try restarting your device to see if it fixes the problem.
 What Does Locking the Taskbar Mean in Windows
Many features exist on our Windows PC that we seldom use.
What Does Locking the Taskbar Mean in Windows
Many features exist on our Windows PC that we seldom use.
 3 Ways to Fix Mouse Keeps Scrolling Automatically Windows 10 and Windows 11
https://youtu.be/1UZ3PWNr-lE Try Basic Fixes Disconnect and reconnect the mouse: Unplug your mouse cable or wireless adapter from your computer and reconnect it to a different port.
3 Ways to Fix Mouse Keeps Scrolling Automatically Windows 10 and Windows 11
https://youtu.be/1UZ3PWNr-lE Try Basic Fixes Disconnect and reconnect the mouse: Unplug your mouse cable or wireless adapter from your computer and reconnect it to a different port.
 6 Ways to Fix Samsung Internet Browser Keeps Opening Automatically
Fix 1: Block Pop-Ups Blocking pop-ups on Samsung Internet is one of the most effective ways to stop the browser from opening on its own.
6 Ways to Fix Samsung Internet Browser Keeps Opening Automatically
Fix 1: Block Pop-Ups Blocking pop-ups on Samsung Internet is one of the most effective ways to stop the browser from opening on its own.
 7 Ways to Fix Windows 11 Not Connecting to Wi-Fi Automatically
Fix 1: Enable Connect to Wi-Fi Automatically Windows 11 may not connect to a known network automatically if you haven't configured it to do so.
7 Ways to Fix Windows 11 Not Connecting to Wi-Fi Automatically
Fix 1: Enable Connect to Wi-Fi Automatically Windows 11 may not connect to a known network automatically if you haven't configured it to do so.
 7 Ways to Fix Volume Level Automatically Goes Up or Down in Windows 11
Fix 1: Run the Audio Troubleshooter Microsoft offers several troubleshooters to help you identify and resolve common system-related issues on Windows.
7 Ways to Fix Volume Level Automatically Goes Up or Down in Windows 11
Fix 1: Run the Audio Troubleshooter Microsoft offers several troubleshooters to help you identify and resolve common system-related issues on Windows.
 6 Ways to Fix Print Spooler Keeps Stopping on Windows 10 and Windows 11
Fix 1: Run Printer Troubleshooter Windows comes with a dedicated printer troubleshooter that can automatically diagnose and fix any printing issues on your PC.
6 Ways to Fix Print Spooler Keeps Stopping on Windows 10 and Windows 11
Fix 1: Run Printer Troubleshooter Windows comes with a dedicated printer troubleshooter that can automatically diagnose and fix any printing issues on your PC.
 3 Ways to Stop OneDrive From Deleting Files Automatically on Windows 11
Basic Fixes: Check for Windows updates: An out-of-date Windows version can also cause issues, such as OneDrive moving files to the recycle bin by itself. So, install the latest software updates
3 Ways to Stop OneDrive From Deleting Files Automatically on Windows 11
Basic Fixes: Check for Windows updates: An out-of-date Windows version can also cause issues, such as OneDrive moving files to the recycle bin by itself. So, install the latest software updates
The article above may contain affiliate links which help support Guiding Tech. The content remains unbiased and authentic and will never affect our editorial integrity.

so far so good
thank you