Method 1: Overlap Images in Google Docs With Google Drawings
In this method, you must first add your image as a drawing. Then, you can add images and text over the same image. Here are the steps in detail.
Step 1: Open your Google Docs document.
Step 2: Click Insert at the top > choose Drawing > New.

Step 3: You will be taken to the built-in Google Drawing module. Click on the Image icon to add your background image.
Step 4: When the image has been inserted into the Drawing panel, you can add text or another image on top of it. To add text, click on the text icon.
Step 5: Once done, click Save and Close at the top to insert this picture into your document.

Step 6: Similarly, click the image icon you used in step 3 to add another image. Open the image you want to add to the top.

Step 7: It will appear above your background image. Using the mouse, drag it to the required position or change its size from its corners. Click on Save and Close to add the modified image with your logo or layered image in the document.

If you want to edit any element of this image later, double-click on the image in Google Docs. You will be taken to the Drawing panel, where you can edit existing elements or add more of them.
Method 2: Layer Images Using Wrap Text in Google Docs
The second method makes layering possible in Google Docs by keeping the margin at 0 in the Wrap text feature. Here are the steps to achieve this.
Step 1: Open your Google Docs document.
Step 2: Click on Insert at the top > go to Image > add your image. It can be any image – background or foreground.

Step 3: Repeat step 2 and add the second photo to your document. Here’s how the two pictures would look in Google Docs.

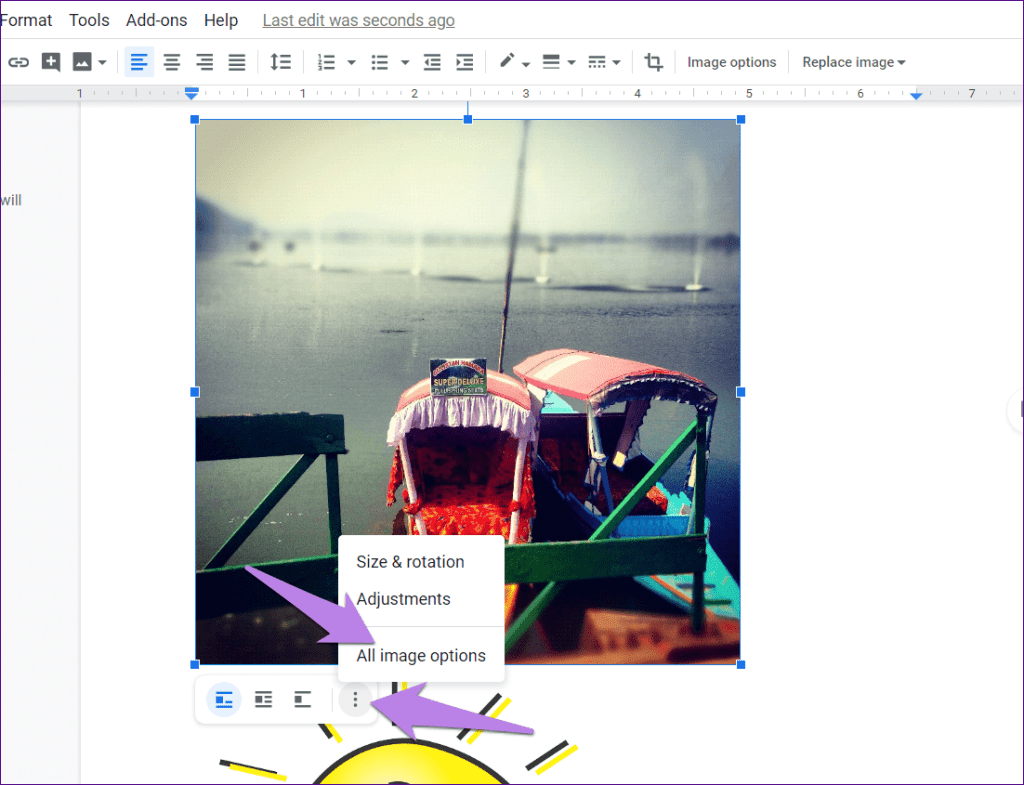
Step 4: Click on the first image to select it. A toolbar will appear. Click on the three-dot icon > choose All image options.
Step 5: The Image options panel will open on the right side. Go to the Text Wrapping section > select Wrap text.

Step 6: You will notice that new options appear in the toolbar below your photo. Click on the margin drop-down box > choose 0.

Pro Tip: You can skip step 5 by clicking on the second icon in the toolbar that appears when you click on the image. That will activate the Wrap text feature. Then, change the margin value.
Step 7: Repeat steps 5-7 for the second image as well. If the text appears to move with the image when you perform these steps, select Fix position on page from the same image toolbar where you changed the margin for both images.

Step 8: Now, drag the second image on top of the first image. Voila! You have successfully overlapped images in Google Docs without using any photo editor.
Tips to Overlay Images in Google Docs
The following tips will come in handy while using the second method of layering images.
1. Change Images
If you have added the wrong images at any point, you don’t need to repeat all the steps. Right-click on the image you want to change and hit the Replace image option.

2. Change Transparency of Watermark
If you are adding a logo or a watermark to an image using method 2, you can control its transparency. For that, click on the image > hit the three-dot icon from the toolbar > select All image options.

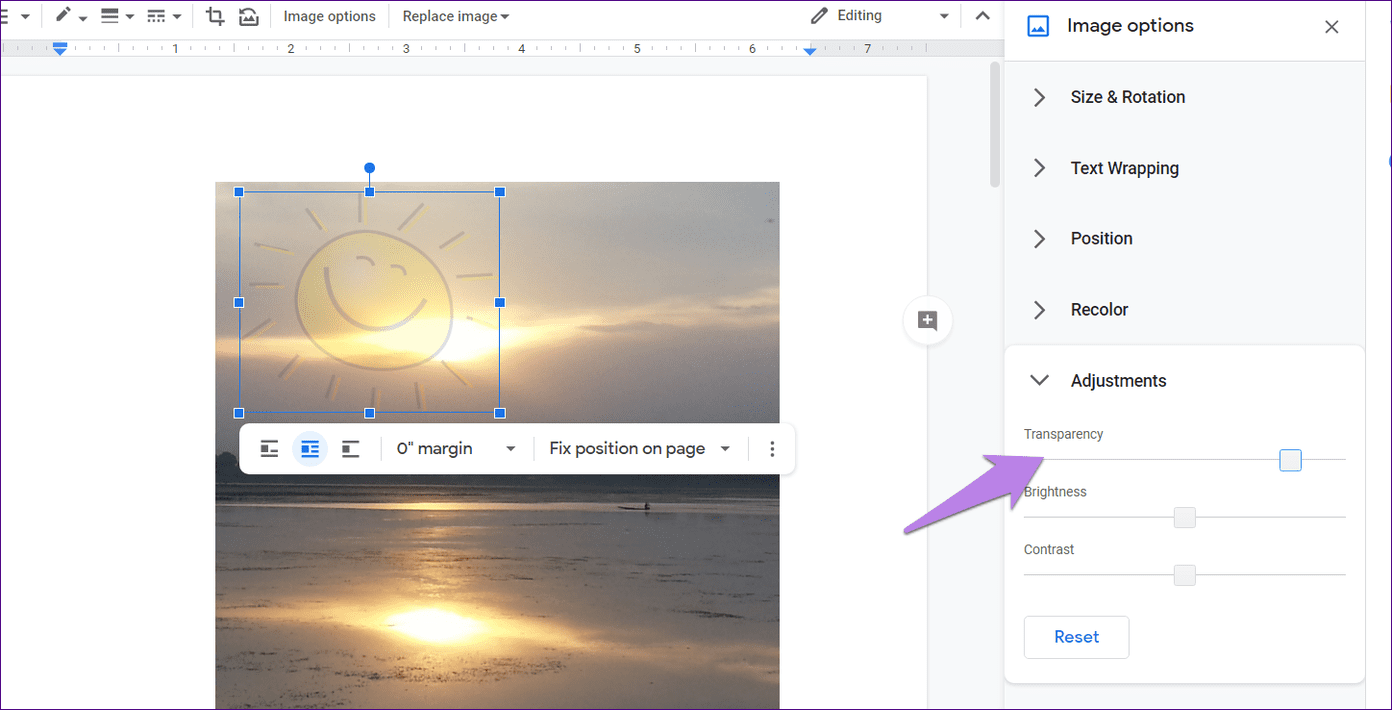
Go to Adjustments from the right panel. Adjust the slider under Transparency.
Was this helpful?
Last updated on 28 May, 2024
Read Next
 How to Download and Save Images From Google Docs on Phone and PC
How to Export Images From Google Docs on Desktop Method 1: Save to Google Keep Step 1: Open the Google Docs document to extract an image.
How to Download and Save Images From Google Docs on Phone and PC
How to Export Images From Google Docs on Desktop Method 1: Save to Google Keep Step 1: Open the Google Docs document to extract an image.
 4 Ways to Add Captions to Images in Google Docs
Method 1: Use the Drawing Panel Using the Drawing panel is probably the most effective way of captioning images in Google Docs.
4 Ways to Add Captions to Images in Google Docs
Method 1: Use the Drawing Panel Using the Drawing panel is probably the most effective way of captioning images in Google Docs.
 4 Ways to Insert Images in Google Docs
Method 1: Add Photos From Camera Roll to Google Docs You can add photos in Google Docs from the Camera Roll of your iPhone or Android phone.
4 Ways to Insert Images in Google Docs
Method 1: Add Photos From Camera Roll to Google Docs You can add photos in Google Docs from the Camera Roll of your iPhone or Android phone.
 How to Add or Remove Strikethrough Text in Google Docs
Method 1: Add or Remove Strikethrough on Desktop Step 1: Launch Google Docs and highlight the text that needs the strikethrough.
How to Add or Remove Strikethrough Text in Google Docs
Method 1: Add or Remove Strikethrough on Desktop Step 1: Launch Google Docs and highlight the text that needs the strikethrough.
 3 Easy Ways to Insert a Text Box In Google Docs
Because of its simple yet powerful interface, Google Docs has become the preferred option for many.
3 Easy Ways to Insert a Text Box In Google Docs
Because of its simple yet powerful interface, Google Docs has become the preferred option for many.
 How to Make and Customize Text Columns in Google Docs
How to Turn Text Into Columns in Google Docs By default, Google Docs's page setup is Pages.
How to Make and Customize Text Columns in Google Docs
How to Turn Text Into Columns in Google Docs By default, Google Docs's page setup is Pages.
 How to Change the Text Direction in Google Docs
Change the Text Direction in Google Docs Using a PC By default, when you type on the Google Docs canvas, the text direction goes from left to right.
How to Change the Text Direction in Google Docs
Change the Text Direction in Google Docs Using a PC By default, when you type on the Google Docs canvas, the text direction goes from left to right.
 3 Best Ways to Double Underline Text in Google Docs
Method 1: Using Paragraph Borders This option is best used to underline text in a paragraph.
3 Best Ways to Double Underline Text in Google Docs
Method 1: Using Paragraph Borders This option is best used to underline text in a paragraph.
The article above may contain affiliate links which help support Guiding Tech. The content remains unbiased and authentic and will never affect our editorial integrity.