Method 1: Using Restrict Editing Feature
As the name suggests, this feature lets you set up editing restrictions for your Word document. You can also use the Exceptions field by ticking the box beside everyone or selecting More users to input the addresses of individuals who can edit select parts of the document.
Step 1: Open the Word document where you want to lock the parts.
Step 2: On the Ribbon, click on the Review tab and click on the drop-down beneath the Protect option.

Step 3: Click on Restrict Editing from the drop-down menu. The new Restrict Editing window should open to the right of your document.
Step 4: Under the Editing restrictions field, tick the box for Allow only this type of editing in the document.
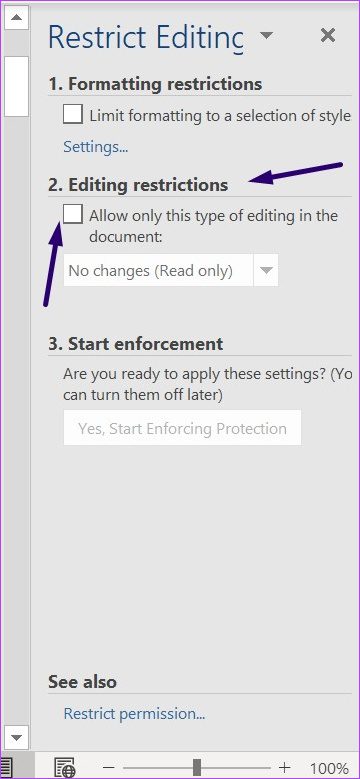
Step 5: Select No changes (Read only) from the drop-down.
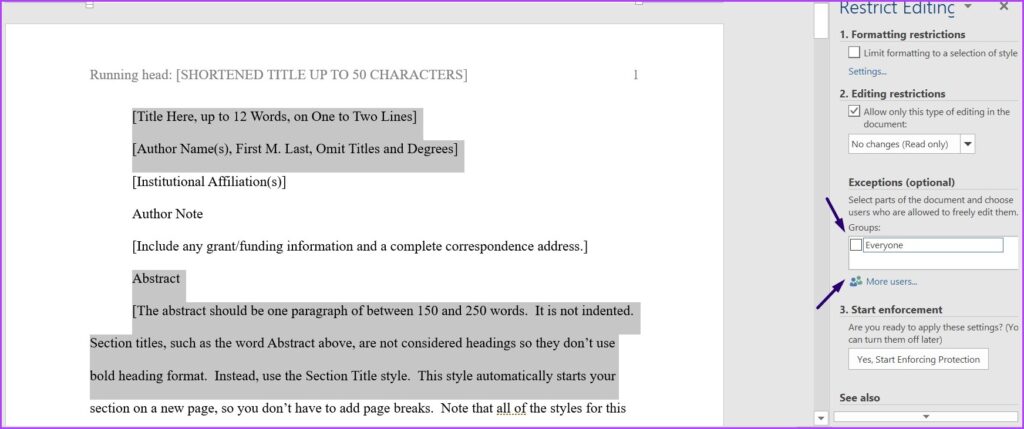
Step 6: Place your cursor on the Word document and select the sections other users can edit.
Tip: To select different parts of a Word document, hold down the Ctrl key.
Step 7: Back on the Restrict Editing window, tick the box beside everyone or select More users under the Exceptions field. This will input the addresses of individuals who can edit select parts of the document.
Step 8: Under the Start enforcement field, click Yes, Start Enforcing Protection.
Step 9: In the Start Enforcing Protection dialog box, select between using a Password and User authentication to restrict access to the Word document.

Step 10: If you select the Password option, input your desired password. If you select the User authentication option, individual users in the More users exceptions field can edit the document.
Step 11: Click Ok to save your selection.
Step 12: Save the document. After this, Word will lock the sections that you chose to protect.
Method 2: Using Content Control in the Developer Tab
This tab gives you content developer properties to add control over what can or cannot be deleted from your Word document.
Step 1: Open the Word document and place your cursor on the document to select the section you would like to restrict access to.
Unlike the first method, you cannot select multiple sections of the Word document to restrict edit access.
Step 2: On the Ribbon, click on the Developer tab > Rich Text Content Control.
Step 3: In the Developer tab, click on Properties.

Step 4: On the launched Content Control Properties dialog box, name the content control.
Step 5: Check the box for the Content control cannot be deleted and Contents cannot be edited options, and click on Ok.

Step 6: In the Developer tab, click on Restrict Editing to launch the Restrict Editing pane.
Step 7: Now, check the box for Limit formatting to a selection of styles.

Step 8: Check the box for Yes, Start Enforcing Protection.
Step 9: In the Start Enforcing Protection dialog box, select between using a Password and User authentication to restrict access to the Word document.
Step 10: If you select Password, input your desired password. If you select User authentication, individual users listed on the More users exceptions field will be validated before they can edit the document.
Step 11: Click Ok to save your selection.
Step 12: Save the document. After this, Word will lock the sections you choose to protect from others.
Tip: Learn how to create or edit custom properties for Microsoft Word files
Was this helpful?
Last updated on 10 June, 2024
Read Next
 How to Convert WordPad Document to Microsoft Word
Method 1: Using WordPad Step 1: Open the WordPad document you want to convert to Docx.
How to Convert WordPad Document to Microsoft Word
Method 1: Using WordPad Step 1: Open the WordPad document you want to convert to Docx.
 How to Insert Videos in a Microsoft Word Document
How to Insert an Online Video in Microsoft Word Microsoft Word for desktop allows you to insert videos from Vimeo, YouTube, and SlideShare.
How to Insert Videos in a Microsoft Word Document
How to Insert an Online Video in Microsoft Word Microsoft Word for desktop allows you to insert videos from Vimeo, YouTube, and SlideShare.
 How to Add or Edit Document Properties in Microsoft Word
How to Add Custom Properties to a Word Document You can assign numeric, text, or time values to custom properties.
How to Add or Edit Document Properties in Microsoft Word
How to Add Custom Properties to a Word Document You can assign numeric, text, or time values to custom properties.
 How to Lock an Image in Microsoft Word
https://youtu.be/n0rtmAPvjOQ Lock an Image Using the Restrict Editing Feature The restrict editing feature allows users to protect an image using a password.
How to Lock an Image in Microsoft Word
https://youtu.be/n0rtmAPvjOQ Lock an Image Using the Restrict Editing Feature The restrict editing feature allows users to protect an image using a password.
 5 Ways to Change Background in a Word Document
Method 1: Using a New Background Color Changing the background color of your Word document is a little similar to the process you would take when changing the font color.
5 Ways to Change Background in a Word Document
Method 1: Using a New Background Color Changing the background color of your Word document is a little similar to the process you would take when changing the font color.
 How to Import Styles from Another Word Document
Import Styles from Another Word Document You can import styles via the Developer tab in Microsoft Word.
How to Import Styles from Another Word Document
Import Styles from Another Word Document You can import styles via the Developer tab in Microsoft Word.
 How to Save a Word Document as a PDF on Windows and Mac
While Microsoft Word is a powerful word processing tool, it is ideal to convert the document to a PDF before sharing it with anyone.
How to Save a Word Document as a PDF on Windows and Mac
While Microsoft Word is a powerful word processing tool, it is ideal to convert the document to a PDF before sharing it with anyone.
The article above may contain affiliate links which help support Guiding Tech. The content remains unbiased and authentic and will never affect our editorial integrity.