Set Up iCloud Email to New Outlook App
On Windows
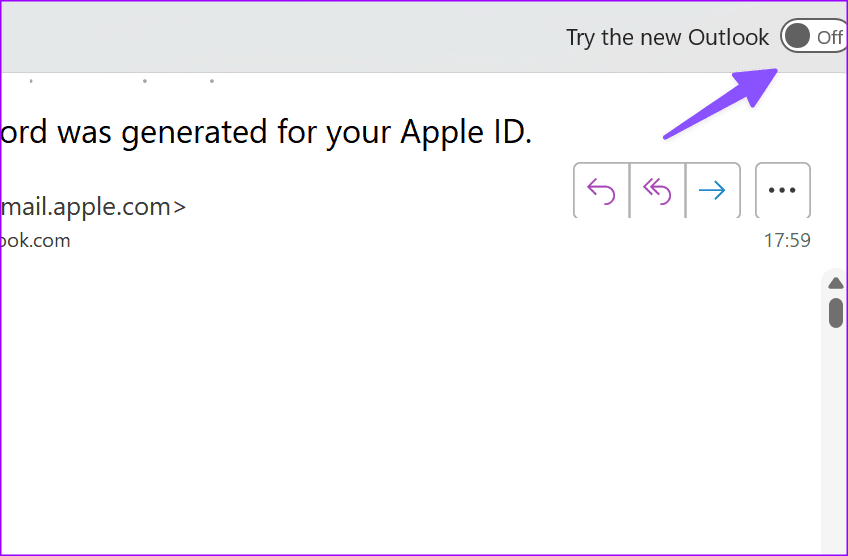
Microsoft has started promoting the web-based Outlook app on Windows. If you haven’t already received access to the new Outlook app, use the steps below. You can just tap the toggle next to Try the new Outlook at the top-right corner to get started.
Once done, here’s how to add your account.
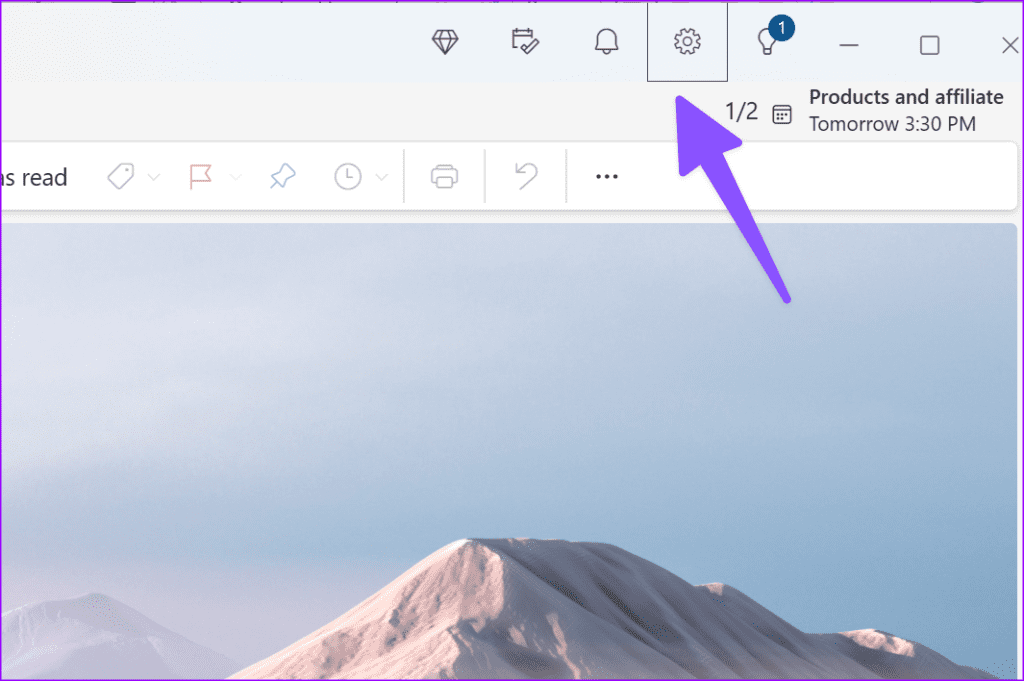
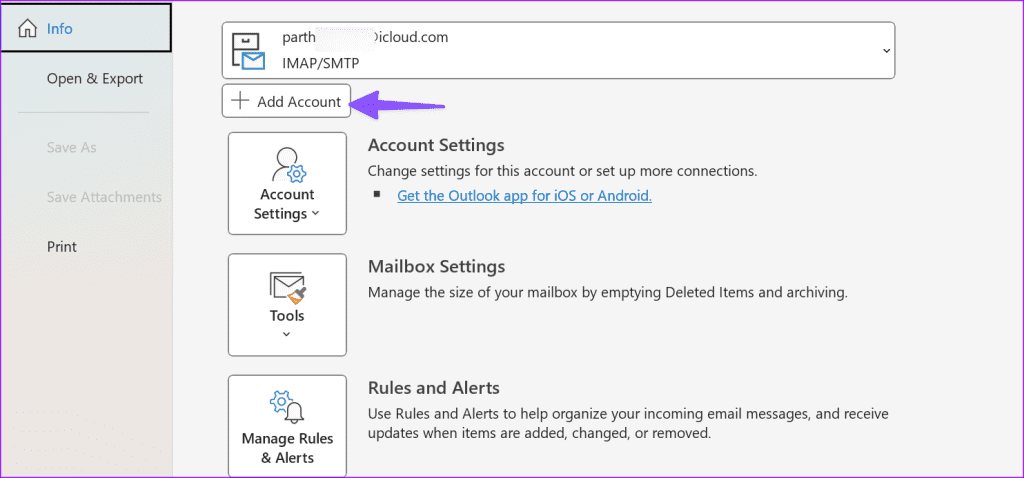
Step 1: Go to Settings at the top-right corner.
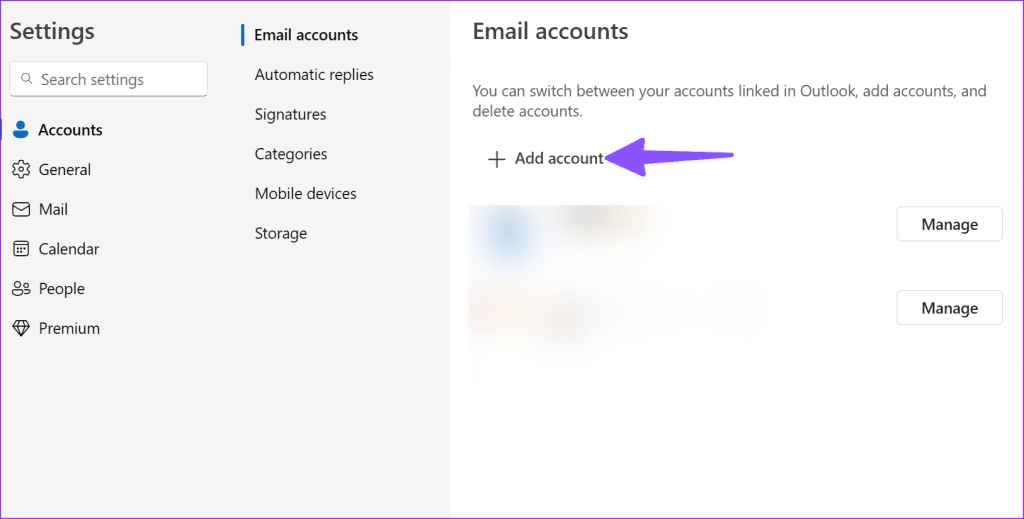
Step 2: Select Accounts > Email accounts > Add account.
Step 3: Enter your iCloud email address and then hit Continue. Now like classic Outlook, the new web-based app asks for an app-specific password.
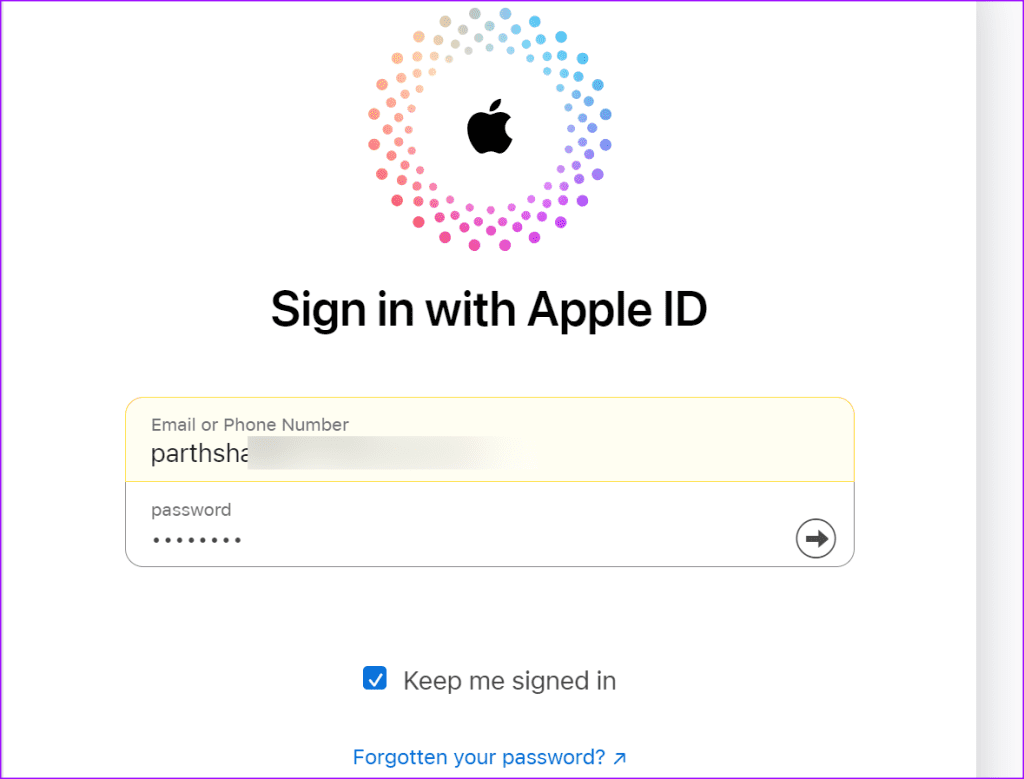
Step 4: Head to the Apple website and then sign in with your login details. If you have enabled two-factor authentication for your Apple account, you shall receive a six-digit code on one of your trusted devices. Find it and then enter the six-digit code to confirm your identity. Select Connect.
Step 5: Select Sign-in and Security from the sidebar and click App-Specific Passwords.
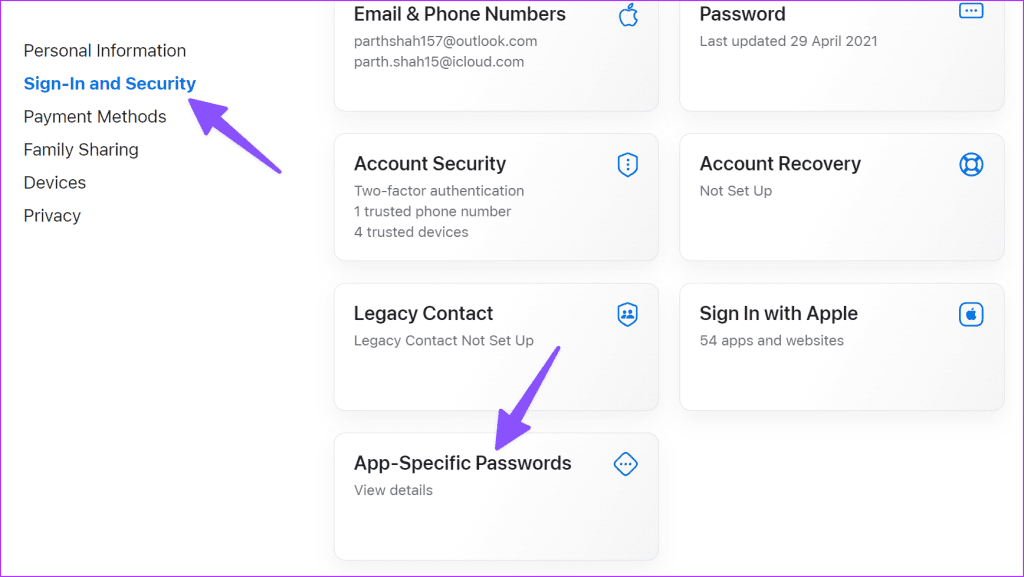
Step 6: Click Generate an app-specific password.
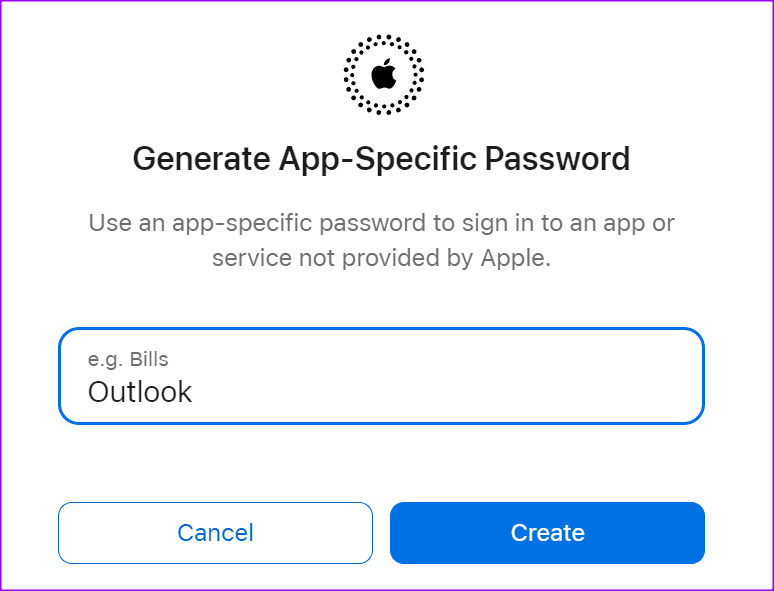
Step 7: Enter an app name and click Create. You can use an app-specific password to sign in to an app or service not provided by Apple.
Step 8: Enter your Apple ID password for security purposes.
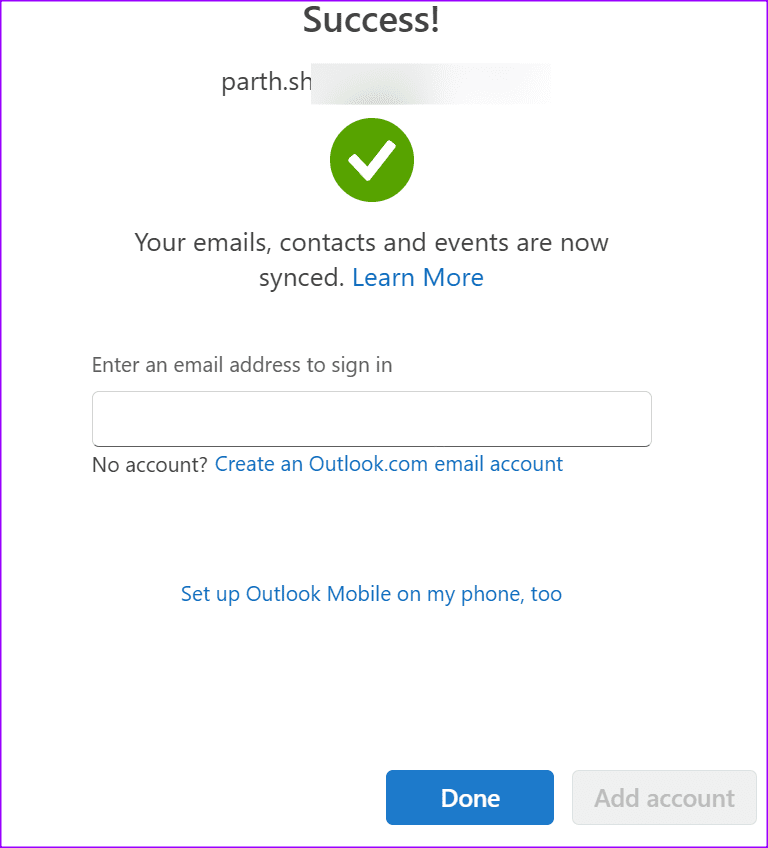
Step 9: Check and copy your app-specific password and then hit Done.
Step 10: Go back to Outlook and then enter your app-specific password.
You shall receive a confirmation once you enter an app-specific password on Windows. You can check all your email accounts (including iCloud) from the same menu.
You can also move to the Calendar tab and check your iCloud calendars in action.
On Mac
For Mac, you can tap the toggle next to Legacy Outlook at the top-right corner to switch to the New Outlook version.

Once done, here’s how to add your iCloud account.
Step 1: Click Outlook at the top-left corner > Select Settings.

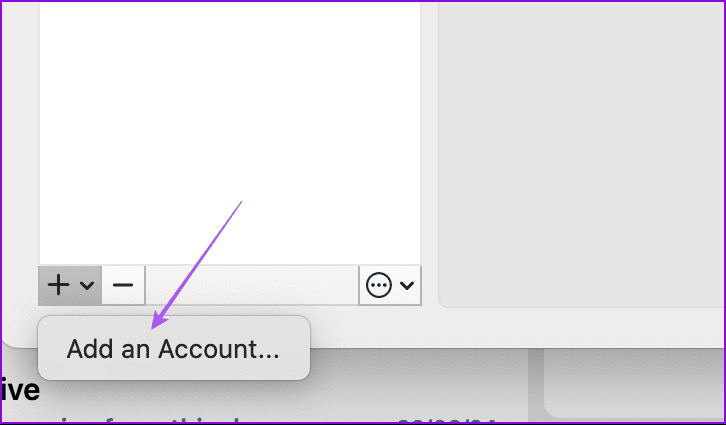
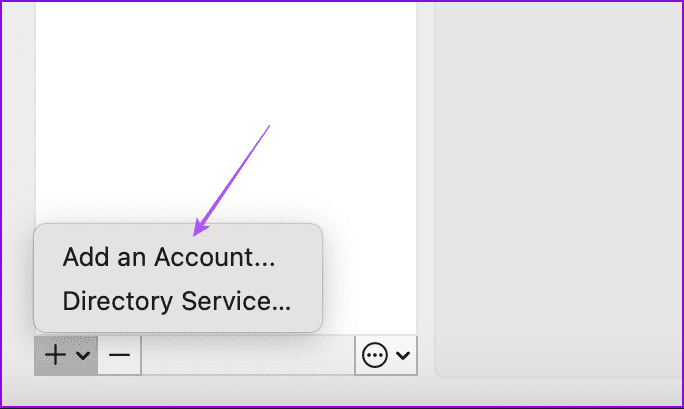
Step 2: Click on Accounts > Plus icon at the bottom-left corner > Add an Account.
Step 3: Enter your iCloud account details and then follow the same steps as mentioned above for Windows.
Set Up iCloud Email to Classic Outlook App
On Windows
Let’s talk about how to use the Classic Outlook version to connect your iCloud account. We start with the steps for Windows users.
Step 1: Open Outlook > File > Add Account.
Step 2: Enter your iCloud email address > Hit Connect.
Step 3: Since Outlook is a non-Apple app, you need to create an app password for Outlook to add your iCloud account. You need to follow the same steps as mentioned above for the new Outlook version to create an app password.
Step 4: Once done, go back to Outlook and then enter your app-specific password.
You shall receive a confirmation once you enter an app-specific password on Windows. You can check all your email accounts (including iCloud) from the same menu.
On Mac
Step 1: Just like the New Outlook version, you can click on Outlook > Settings > Plus icon > Add Account and then follow the same steps for the Classic Outlook version.
Step 2: Once done, go back to Outlook and then enter your app-specific password.
Was this helpful?
Last updated on 22 August, 2024
Read Next
 How to Connect Your Gmail Account to Outlook (Web and App)
Why You Should Integrate Gmail with Outlook Outlook has excellent native apps compared to Gmail’s web solution on desktop.
How to Connect Your Gmail Account to Outlook (Web and App)
Why You Should Integrate Gmail with Outlook Outlook has excellent native apps compared to Gmail’s web solution on desktop.
 How to Add and Delete a Hyperlink in an Outlook Email
Inserting a Hyperlink into an Outlook Email As one of the popular email solutions for organizations, different types of information get passed across on Microsoft Outlook.
How to Add and Delete a Hyperlink in an Outlook Email
Inserting a Hyperlink into an Outlook Email As one of the popular email solutions for organizations, different types of information get passed across on Microsoft Outlook.
 How to Save a Microsoft Outlook Email as a PDF (Desktop and Mobile)
1.
How to Save a Microsoft Outlook Email as a PDF (Desktop and Mobile)
1.
 6 Ways to Fix Microsoft Outlook Not Showing Email Content on Windows
Fix 1: Disable Offline Mode Your first step is to ensure that Outlook is not in offline mode.
6 Ways to Fix Microsoft Outlook Not Showing Email Content on Windows
Fix 1: Disable Offline Mode Your first step is to ensure that Outlook is not in offline mode.
 5 Fixes for Email Templates Missing in Microsoft Outlook
Fix 1: Check the Email Templates Folder An obvious reason why your Outlook email templates may not show up is that you have accidentally deleted them.
5 Fixes for Email Templates Missing in Microsoft Outlook
Fix 1: Check the Email Templates Folder An obvious reason why your Outlook email templates may not show up is that you have accidentally deleted them.
 How to Connect Outlook Calendar With Google Calendar: 4 Best Ways
Note: The methods recommended in the article allow two-way syncs in the calendar.
How to Connect Outlook Calendar With Google Calendar: 4 Best Ways
Note: The methods recommended in the article allow two-way syncs in the calendar.
 How to Insert Emojis in a Microsoft Outlook Email
Have you ever typed a work email and wished there was a way to add a touch of personality or convey emotions through your words?
How to Insert Emojis in a Microsoft Outlook Email
Have you ever typed a work email and wished there was a way to add a touch of personality or convey emotions through your words?
 How to Add Pictures to Outlook Email (Body or Attachment)
Add Inline Image to Outlook Email on Desktop For Windows Step 1: Open the Outlook app and click on New Email at the top-left corner.
How to Add Pictures to Outlook Email (Body or Attachment)
Add Inline Image to Outlook Email on Desktop For Windows Step 1: Open the Outlook app and click on New Email at the top-left corner.
The article above may contain affiliate links which help support Guiding Tech. The content remains unbiased and authentic and will never affect our editorial integrity.

