Fix 1: Check Default File Association for MSC Files
MSC (Microsoft Saved Console) files on your computer store information about various systems and third-party services. If these MSC files are not configured to open with the Microsoft Management Console, the Services app may fail to open. Here’s what you can do to fix it.
Step 1: Press the Windows key + I to open the Settings app and head to Apps > Default apps.

Step 2: Type .msc in the search box and click the current default app.
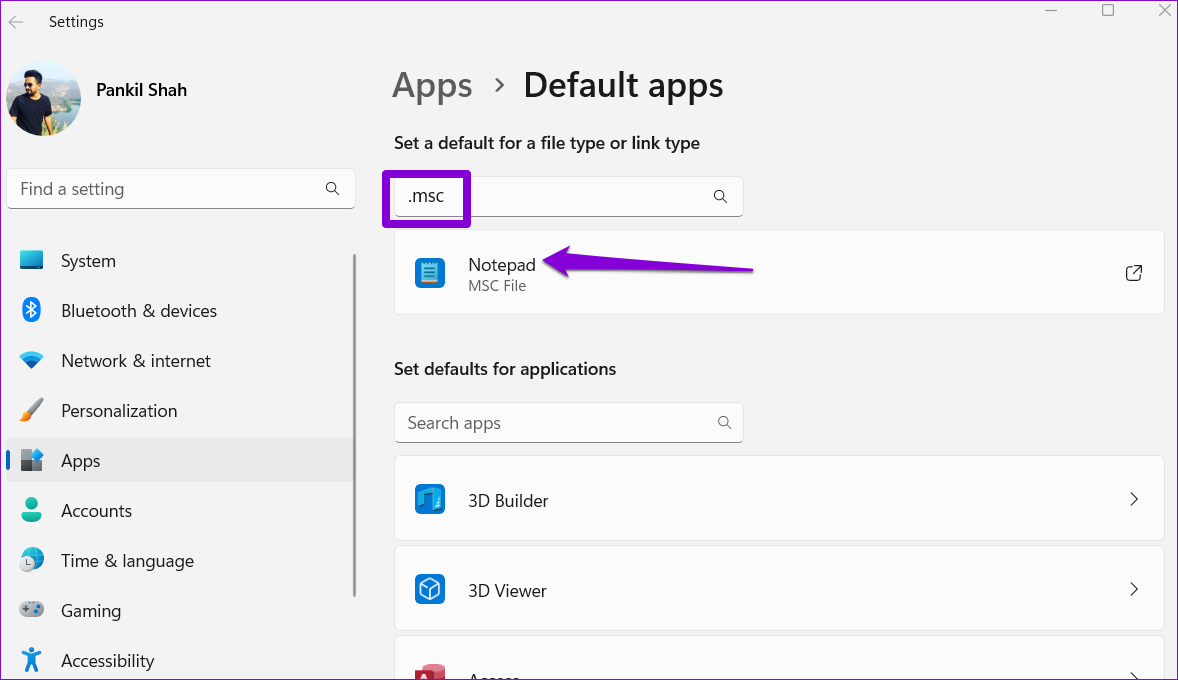
Step 3: Select Microsoft Management Console and click the Set default button at the bottom.

Fix 2: Run System Maintenance Troubleshooter
You can always rely on Windows’ built-in troubleshooters whenever you encounter system-level issues. In this case, you can run the System Maintenance troubleshooter to fix issues with unused files, shortcuts, disk errors, and other system-related issues.
Step 1: Press the Windows key + R to open the Run dialog box. Type msdt.exe -id MaintenanceDiagnostic in the Open field and press Enter.
Step 2: In the System Maintenance window, click Next and follow the on-screen instructions to run the troubleshooter.

Fix 3: Check for Corrupt System Files
At times, important Windows system files can corrupt and prevent Windows from opening your apps. The System File Check (SFC) and DISM (Deployment Image Servicing and Management) tools can automatically find and fix damaged system files on your computer. Here’s how you can run them.
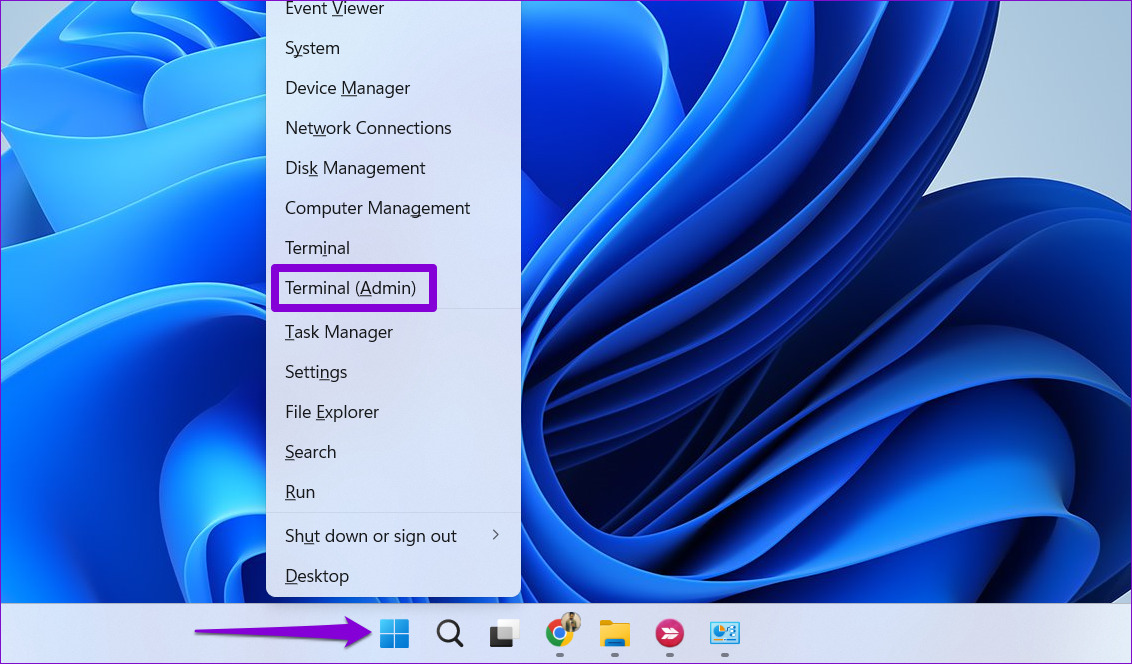
Step 1: Right-click on the Start icon and select Terminal (Admin) from the list.
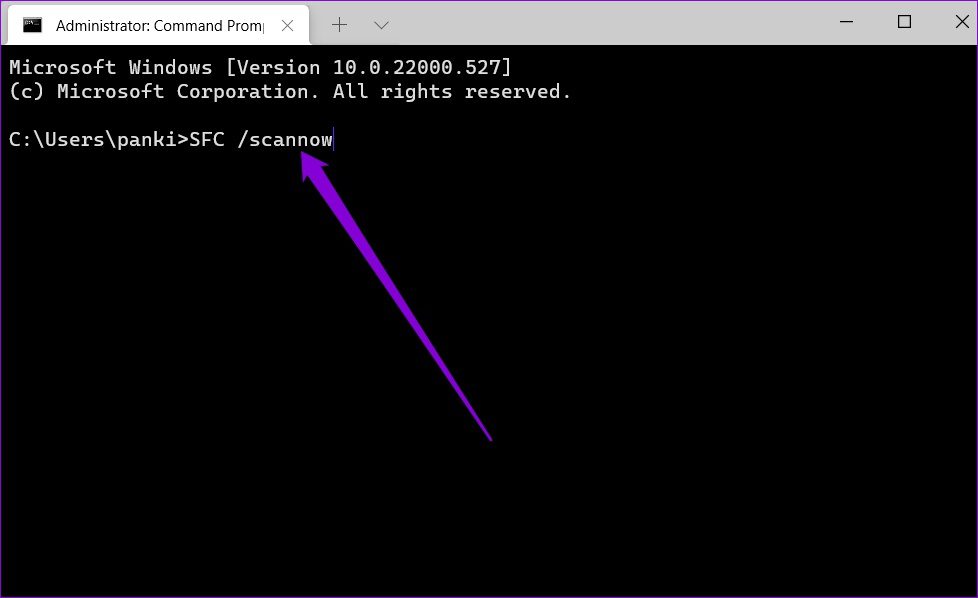
Step 2: In the console, type the following command and press Enter.
SFC /scannow
Step 3: Run the following commands one by one for the DISM scan.
DISM /Online /Cleanup-Image /CheckHealth
DISM /Online /Cleanup-Image /ScanHealth
DISM /Online /Cleanup-Image /RestoreHealth
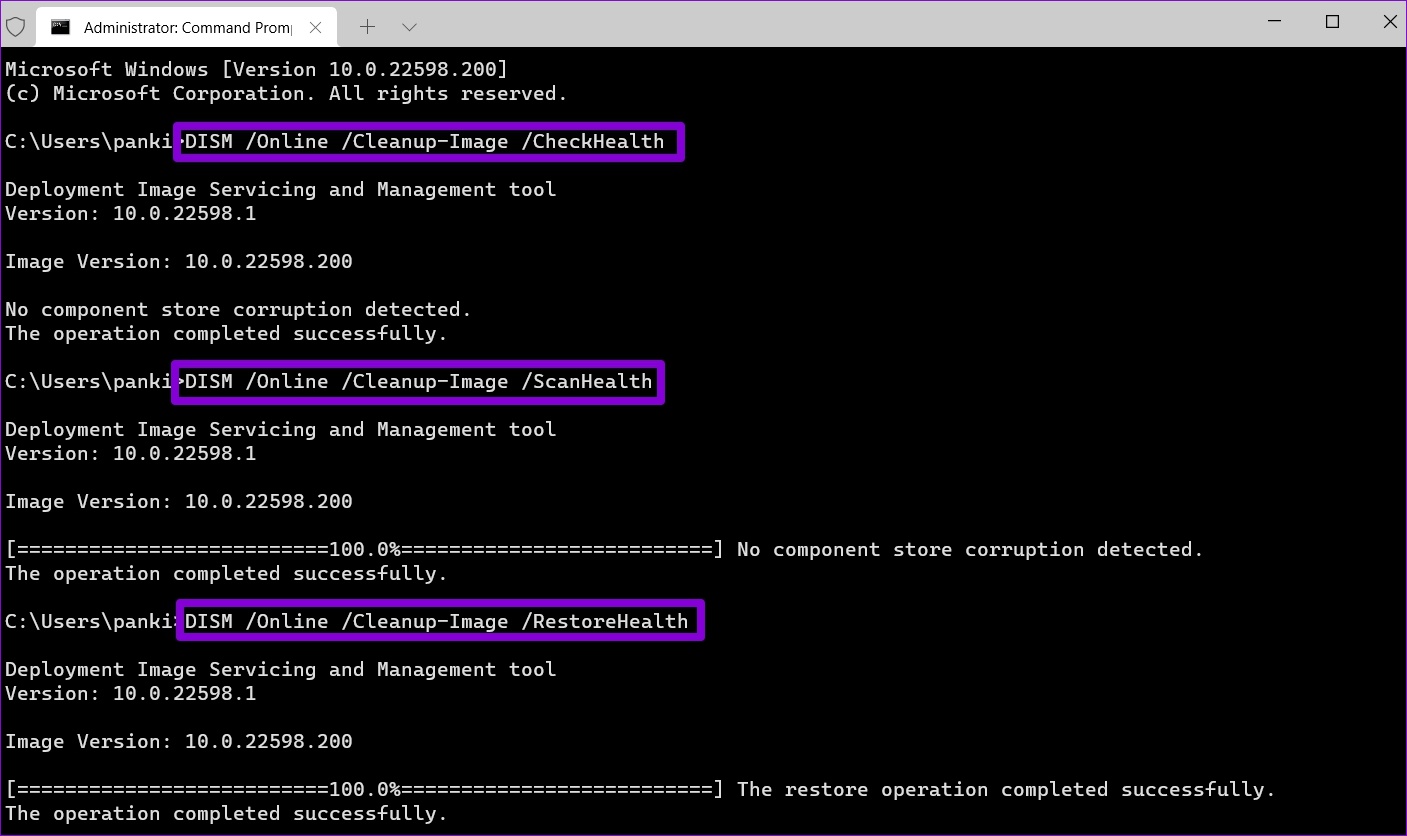
After running the above commands, restart your PC and try to access the Services app again.
Fix 4: Re-Register DLL Files Using Command Prompt
If the SFC and DISM scans fail to find any issues, you can re-register the DLL files associated with the Services app. Here’s how to do it.
Step 1: Press the Windows key + S to open the search menu. Type terminal in the box, right-click on the first result and select Run as administrator.

Step 2: In the console, run the following commands individually and press Enter after each command.
regsvr32 msxml.dll

regsvr32 msxml2.dll

regsvr32 msxml3.dll
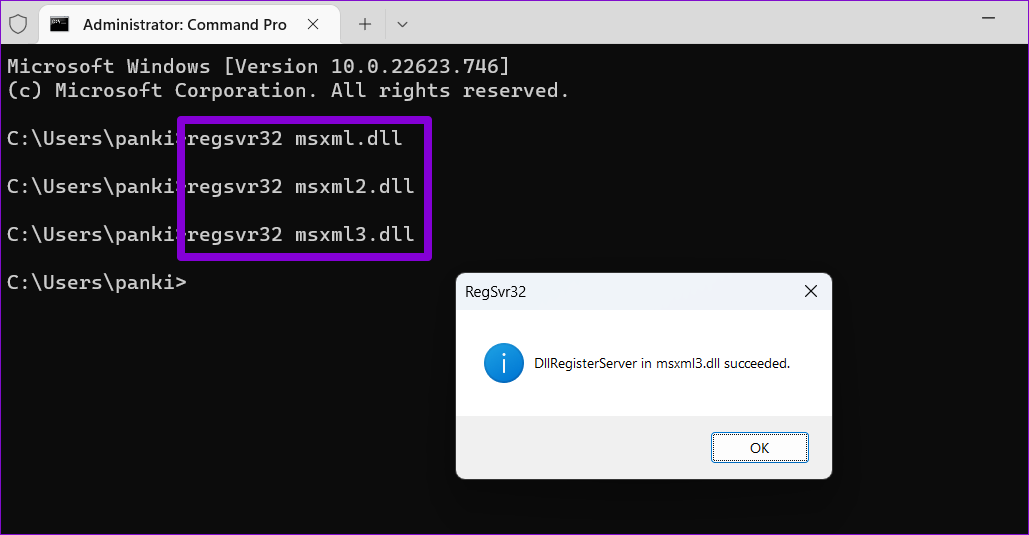
Restart your PC and see if you can open the Services app after that.
Fix 5: Try Clean Boot
There’s a chance that a third-party app or program is interfering with Windows and preventing it from opening the Services app. You can boot your PC in a clean boot state to check for this possibility by following the steps below.
Step 1: Press the Windows key + R to open the Run dialog, type msconfig.msc in the box, and press Enter.
Step 2: Under the Services tab, mark the box that reads Hide all Microsoft services and then click the Disable all button.

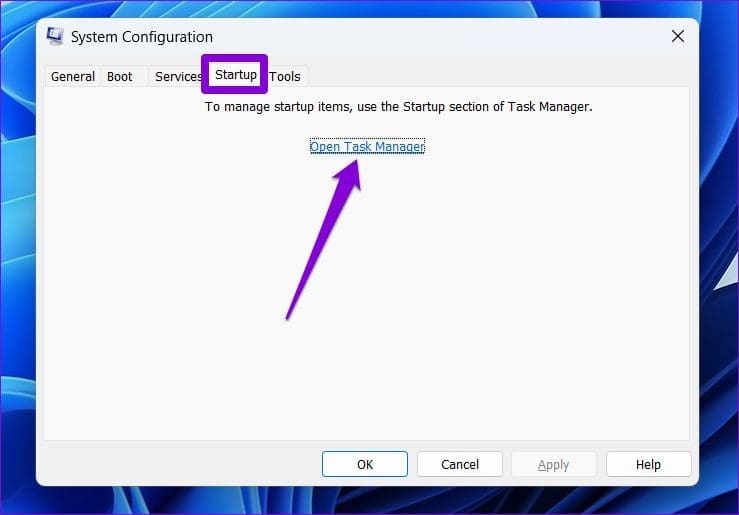
Step 3: Switch to the Startup tab and click Open Task Manager.
Step 4: On the Startup apps tab, select a third-party app and click the Disable button at the top. Repeat this step to disable all the third-party startup apps.

Restart your PC to enter the clean boot state. If the Services app opens as usual during a clean boot, one of the third-party apps or programs is to blame. You’ll need to review any recently installed apps and programs and remove them to resolve the issue.
Was this helpful?
Last updated on 26 June, 2024
1 Comment
Leave a Reply
Read Next
 4 Ways to Fix Location Services Grayed Out on Windows 11
Fix 1: Configure Geolocation Service Geolocation Service is a small program that needs to run in the background for the location services to work.
4 Ways to Fix Location Services Grayed Out on Windows 11
Fix 1: Configure Geolocation Service Geolocation Service is a small program that needs to run in the background for the location services to work.
 4 Ways to Fix Gaming Services Won’t Update on Windows
Try Basic Fixes Close the Xbox app and try again: Since the Gaming Services app is tightly integrated with the Xbox app, you may have trouble installing or updating it
4 Ways to Fix Gaming Services Won’t Update on Windows
Try Basic Fixes Close the Xbox app and try again: Since the Gaming Services app is tightly integrated with the Xbox app, you may have trouble installing or updating it
 5 Quick Ways to Open Services on Windows 11
Method 1: Using the Task Manager The Task Manager is used to monitor computer performance, background applications running, and system resource usage.
5 Quick Ways to Open Services on Windows 11
Method 1: Using the Task Manager The Task Manager is used to monitor computer performance, background applications running, and system resource usage.
 2 Ways to Fix Discord Not Opening on Windows 10 and Windows 11
Try Basic Fixes End Discord processes: Press Ctrl + Shift + Esc to launch the Task Manager.
2 Ways to Fix Discord Not Opening on Windows 10 and Windows 11
Try Basic Fixes End Discord processes: Press Ctrl + Shift + Esc to launch the Task Manager.
 6 Ways to Fix Windows Security Not Opening or Working on Windows 11
Try Basic Fixes Uninstall any third-party antivirus program: Third-party antivirus programs can sometimes interfere with the Windows Security app and prevent it from opening on your Windows 11 PC.
6 Ways to Fix Windows Security Not Opening or Working on Windows 11
Try Basic Fixes Uninstall any third-party antivirus program: Third-party antivirus programs can sometimes interfere with the Windows Security app and prevent it from opening on your Windows 11 PC.
 4 Ways to Fix Firefox Not Opening on Windows 10 and Windows 11
Fix 1: Force Close Firefox Processes Sometimes, Firefox processes may become unresponsive on your PC, resulting in such issues.
4 Ways to Fix Firefox Not Opening on Windows 10 and Windows 11
Fix 1: Force Close Firefox Processes Sometimes, Firefox processes may become unresponsive on your PC, resulting in such issues.
 4 Ways to Fix Windows Terminal Not Opening on Windows 11
Fix 1: Ensure Windows Terminal Is Not Disabled If you cannot launch Windows Terminal via the Start menu or Run dialog box, ensure the app is not disabled on your
4 Ways to Fix Windows Terminal Not Opening on Windows 11
Fix 1: Ensure Windows Terminal Is Not Disabled If you cannot launch Windows Terminal via the Start menu or Run dialog box, ensure the app is not disabled on your
 4 Ways to Fix Device Manager Not Opening on Windows
Fix 1: Open Device Manager With Admin Rights To start, you can try opening Device Manager with admin rights on Windows and see if it works.
4 Ways to Fix Device Manager Not Opening on Windows
Fix 1: Open Device Manager With Admin Rights To start, you can try opening Device Manager with admin rights on Windows and see if it works.
The article above may contain affiliate links which help support Guiding Tech. The content remains unbiased and authentic and will never affect our editorial integrity.

FANTASTIC tip! Worked as stated and is a GREAT resource for ANYONE needing assistance in this administrative area. If MicroSh1t could actually code software, this site wouldn’t be needed! thank you!