Method 1: Using Microsoft Photos
The Microsoft Photos app is a fantastic tool to view and edit a picture on a Windows computer. You can also use it to add arrows to a picture. Sadly, it doesn’t let you add text to a photo.
Step 1: Open the desired photo in the Microsoft Photos app. You can double-click on any photo to open it in the Photos app as it is the default app.
Step 2: Click on the Edit icon at the top.

Step 3: The Microsoft Photos editor will open. Click on the Markup button at the top.

Step 4: Double-click on any of the first two pencils.
A pop-up window will show up. Select the arrow style (single-side, double-side, or wavy arrow) that you want to add. Change the color and size of the arrow using the available options.
Step 5: Then, draw the arrow on the image using your mouse.
Step 6: Click on the Save as copy button to save the image with the arrow as a new picture. Your original picture will remain unaffected.
Method 2: Using MS Paint
If you enjoy using the traditional MS Paint app, you can use it to add arrows and text to pictures on your Windows PC.
Step 1: Launch MS Paint on your computer.
Step 2: Click on the File option and select Open.

Step 3: Choose the image on which you want to add an arrow or text.
Step 4: Once the image loads in MS Paint, click on the arrow shape pointing in the preferred direction from the Shapes section.
Step 5: Use the customization options like color, size, outline, and fill styles in the toolbar to customize your arrow. If you enable fill style, select the second color option and choose the desired color.
Step 6: Finally, draw the arrow on your picture at the desired position. Please note that you cannot move the arrow after creating it.
Step 7: To put text on your picture, click on the ‘A‘ button.

Step 8: Draw a text box using the mouse on the image. Use the text formatting toolbar to customize the text font, size, alignment, and background fill options.

Step 9: When done, click on File > Save as and select the desired image format to download the edited image on your Windows computer.
Tip: Learn how to put a transparent image over a picture in Paint
Method 3: Add Arrow or Text to Images Using Paint 3D
If MS Paint feels a bit outdated, you should use its upgraded version Paint 3D to edit photos.
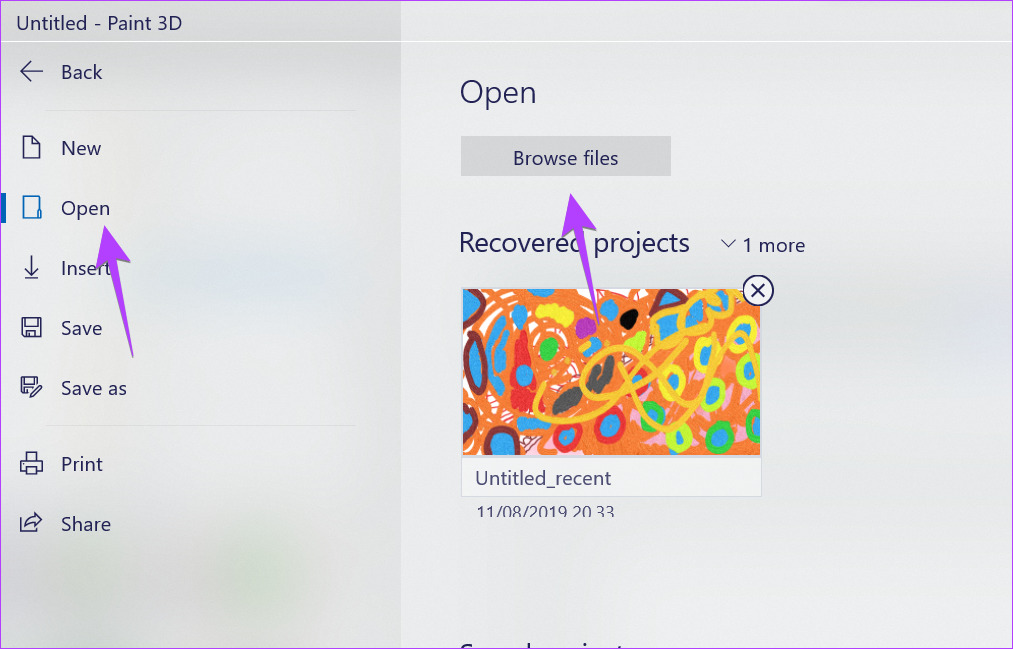
Step 1: Open the Paint 3D app on your Windows PC.
Step 2: Click on Menu.

Step 3: Click on Open followed by Browse files. Then, select the desired image.
Step 4: Once the image opens in the editor, click on the 2D Shapes button in the top toolbar.
Step 5: Click on the shapes icon in the right sidebar to see the available shapes. Select Arrow from the list.
Step 6: Draw the arrow and drag it to the desired position.
Step 7: Use the Color button in the right sidebar to set the line and fill in the color and style of your arrow.
Step 8: Click on the three-bar icon at the right to rotate or flip the arrow. Alternatively, click on the semi-circle icon on the arrow to rotate it.
Note: Do not click anywhere outside the arrow when you are editing the arrow.
Step 9: To add text, click on the Text button in the top toolbar. However, don’t draw a text box yet on the image.
Step 10: Click on the ‘T‘ button in the right sidebar and select the text box style from 2D or 3D. Also, click on the Filter button and customize the text font style, size, and alignment.

Step 11: Now, draw a text box on the image and enter your text in it. If you face any problems, check out our complete guide on how to add and customize text in Paint 3D.

Step 12: Finally, click on Menu > Save as > Image to download the image with arrow and text to your computer.

Method 4: Using Free Third-Party Apps
If the above methods don’t suit your needs, you can try free third-party apps to add arrows or text to your pictures on a Windows computer.
Some of the good photo editing apps are:
Or, you can use the following services to add arrows to images online:
Was this helpful?
Last updated on 26 June, 2024
5 Comments
Leave a Reply
Read Next
 5 Apps to Add Arrows and Text to Images on Android
1.
5 Apps to Add Arrows and Text to Images on Android
1.
 3 Ways to Remove Shortcut Arrows in Windows
Method 1: Remove Shortcut Arrows by Manually Editing the Registry The Windows Registry is a database that stores configuration settings for your computer.
3 Ways to Remove Shortcut Arrows in Windows
Method 1: Remove Shortcut Arrows by Manually Editing the Registry The Windows Registry is a database that stores configuration settings for your computer.
 How to Add Text to Video in Microsoft Photos on Windows 10
Once the reality hits you that Windows Movie Maker no longer exists on Windows 10, you start exploring its replacement, the Photos app.
How to Add Text to Video in Microsoft Photos on Windows 10
Once the reality hits you that Windows Movie Maker no longer exists on Windows 10, you start exploring its replacement, the Photos app.
 4 Ways to Add Text to a Photo on iPhone
Method 1.
4 Ways to Add Text to a Photo on iPhone
Method 1.
 4 Ways to Add Text to Videos on iPhone
Method 1: Use Clips to Add Text Prompts on Videos iPhone's default video editor doesn’t support inserting text on videos.
4 Ways to Add Text to Videos on iPhone
Method 1: Use Clips to Add Text Prompts on Videos iPhone's default video editor doesn’t support inserting text on videos.
 5 Ways to Fix Google Photos App Not Showing All Photos
Basic Fixes Check your network connection - Ensure your phone is connected to a good internet connection.
5 Ways to Fix Google Photos App Not Showing All Photos
Basic Fixes Check your network connection - Ensure your phone is connected to a good internet connection.
 3 Ways to Extract Text From Images on Windows 11
Method 1: Using Snipping Tool's Text Action The Snipping Tool comes with a very capable Text Action feature.
3 Ways to Extract Text From Images on Windows 11
Method 1: Using Snipping Tool's Text Action The Snipping Tool comes with a very capable Text Action feature.
The article above may contain affiliate links which help support Guiding Tech. The content remains unbiased and authentic and will never affect our editorial integrity.

Adding arrows on pictures using MS Photos is not possible as you show in Item 1, Step 4.
The pen tools in the latest version of the application does not include arrows. Only free hand line.
And one has to have a pretty steady hand to draw a nice looking arrow.
Hi Josef, I just checked again and the arrow tool is available in the Photos app on Windows 11.
In case you still don’t have it, press the Shift button while drawing a line to make a straight line.
What if I want to get the same result as you do with the arrows? See that in your screenshots you use a different type of arrows. What software did you use?
PhotoScape X.
I think it’s hypocritical of Mehvish to use PhotoScape X to create nice looking stylized arrows in guides for how to draw crappy arrows.
Windows 10 version of photos does not have the arrows option. I am not updating to Win 11 just for that.