Whether you want to annotate an image with an arrow, draw a flowchart, or add an arrow to a math equation, Google offers multiple ways to insert arrows in Google Docs. You can add regular directional arrows, double-sided arrows, and even arrows in different shapes.
Furthermore, you can make an arrow in Google Docs using a keyboard shortcut, type using ALT code, use Google Drawings, or the equations feature. Let’s check all the ways to insert arrows in Google Docs.
Method 1: Type an Arrow in Google Docs Using Keyboard Shortcut
One of the easiest ways to add an arrow in your Google Docs document is using the keyboard shortcut. You can make a right, left, or double arrow using the keyboard.
For instance, type dash (-) twice followed by the greater than sign without any space between them (- – >) to create a right arrow.
Use the following keyboard shortcuts to add arrows in Google Docs:
Pro Tip: Go to Tools followed by Preferences and then Substitutions to replace these shortcuts with your shortcut.
Tip: Learn how to use and customize bullet points in Google Docs.
Method 2: Insert Arrow Using Special Characters
Another way to add arrows in your Google Docs document is by using the special characters feature. You can insert all types of arrows using this method, such as straight, diagonal, curved, etc.
Follow these steps to insert arrows in Google Docs using Special Characters:
Step 1: In your Google Docs document, click on Insert from the top menu and select Special Characters from the menu.
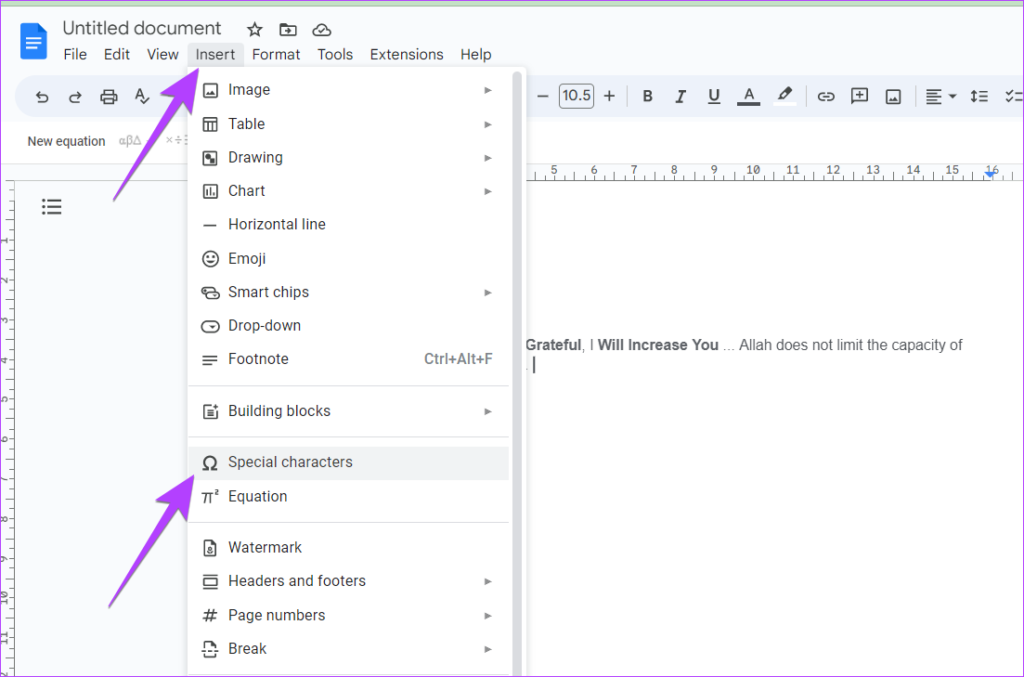
Step 2: The Insert special characters window will show up. Make sure the Symbol and Arrows are selected in the given drop-down boxes. You will be greeted by all sorts of arrows.

Step 3: Place the cursor wherever you want to insert an arrow. Then, click on the arrow you want to insert into your document. Click on the X icon to close the window.
Method 3: Add Arrow to Photo or Text in Google Docs Using Google Drawings
Whether you want to add an arrow in your text or add it to a screenshot or image, you can take the help of Google Drawing for the same as shown below:
Step 1: Open the Google Docs document where you want to insert an arrow.
Step 2: Click on Insert followed by Drawing and New.
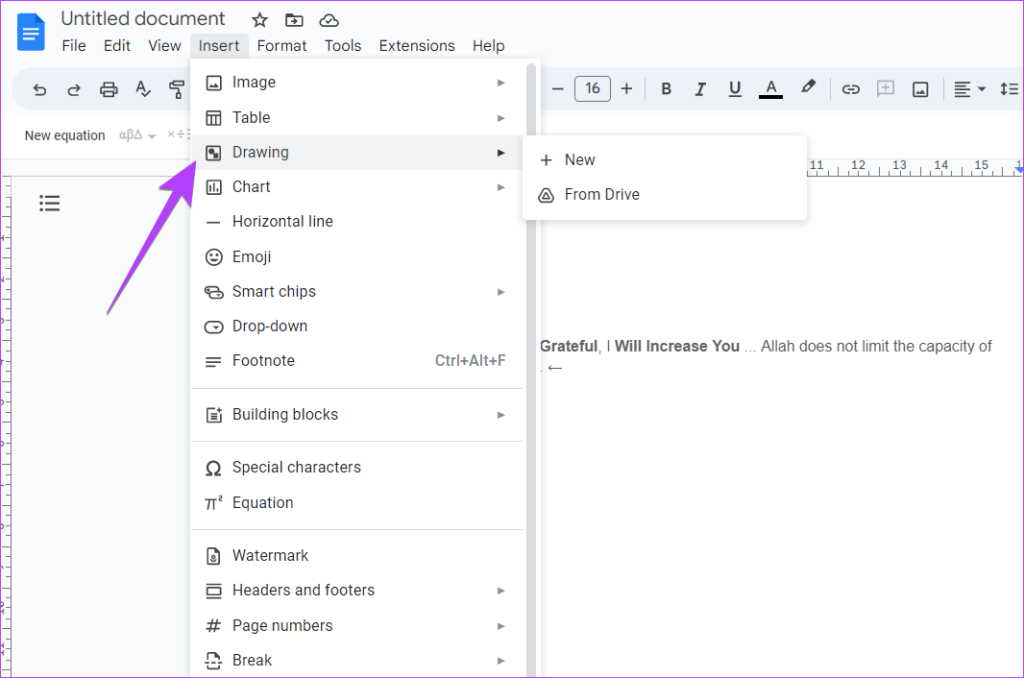
Step 3: The Drawing window will show up. Click on the small arrow next to the Line icon and select Arrow from the list.
Note: Click on the Image icon in the Drawing window to add a picture and then add an arrow on top of it. Learn how to group items in Google Drawings.
Step 4: Click anywhere on the canvas to add an arrow. Alternatively, hold the left mouse button and drag the mouse to draw an arrow at the required position.
Step 5: Click on the arrow to select it. You can then customize it from the options present in the top bar. For instance, you can change the arrow color, size, and type.
Step 6: Alternatively, if you want to add advanced arrows, click on the Shape icon in the top toolbar and select Arrows from the menu. Choose the desired arrow from the available options. Click or draw the arrow manually on the canvas.
Step 7: Once you are satisfied, click on the Save and Close button to insert the arrow in your document.

The arrow will be added to your document. You can resize or edit it like any other image.
Method 4: How to Make Arrows with Keyboard in Google Docs Using Alt Code
If you like using ALT codes, we are happy to say that you can make arrows in Google Docs using Alt Codes as well. If you aren’t familiar with ALT codes, don’t worry. The following steps will help you.
Step 1: Make sure your computer has a number pad. It’s the one usually present on the right side of the keyboard. Next, enable the Number Lock on your keyboard.
Step 2: Hold down the left Alt key on your keyboard and type the alt code from the following list to make an arrow of your choice.
Method 5: Put an Arrow Over a Letter in Google Docs
If you want to add an arrow over any letter in Google Docs, especially those present in math equations, you must use the Equation feature as shown below.
Step 1: In your document, click on Insert followed by Equation.

Step 2: An empty box will show up in your document. Type \vec in the box and press Spacebar.
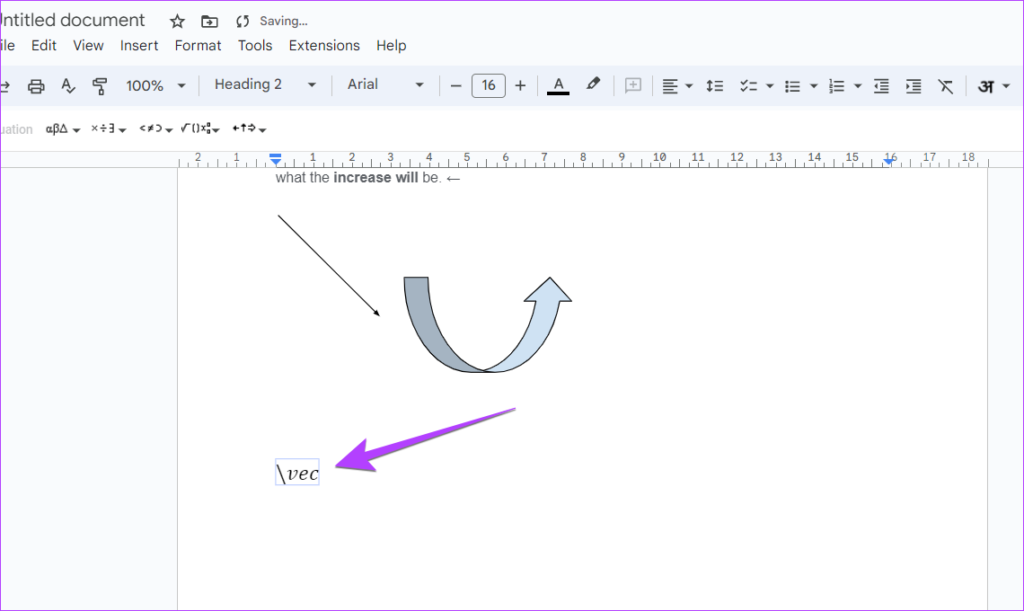
Step 3: An arrow will show up above the blank space. Now, type the letters and they will have arrows on them.
Tip: Learn how to add subscripts or superscripts in Google Docs.
Method 6: Add Arrow Using Math Operators
Another way to add arrows is by using the Math Operators.
Step 1: Click on Insert followed by Equation in your document.
Step 2: A blank box will appear in your document and you will see the equation toolbar below the Formatting toolbar.
Step 3: Click on Arrows in the Equation toolbar and select the arrow that you want to add to your document.
Point in the Right Direction
Now that you know how to insert arrows in Google Docs, you should also know how to add a text box to your document. Before you go, check out these tips and tricks for Google Docs.
Was this helpful?
Last updated on 06 April, 2023
1 Comment
Leave a Reply
Read Next
 How to Insert a Date Picker in Google Sheets and Google Docs
Google Sheets and Google Docs provide a free, online alternative to Microsoft Office, along with unique features.
How to Insert a Date Picker in Google Sheets and Google Docs
Google Sheets and Google Docs provide a free, online alternative to Microsoft Office, along with unique features.
 4 Ways to Add Arrows or Text to Photos on Windows
Method 1: Using Microsoft Photos The Microsoft Photos app is a fantastic tool to view and edit a picture on a Windows computer.
4 Ways to Add Arrows or Text to Photos on Windows
Method 1: Using Microsoft Photos The Microsoft Photos app is a fantastic tool to view and edit a picture on a Windows computer.
 3 Easy Ways to Insert a Text Box In Google Docs
Because of its simple yet powerful interface, Google Docs has become the preferred option for many.
3 Easy Ways to Insert a Text Box In Google Docs
Because of its simple yet powerful interface, Google Docs has become the preferred option for many.
 8 Ways to Insert Emojis in Google Docs
Method 1: Using the Menus Search Feature You can add an emoji to your Google Docs file with a simple keyboard shortcut.
8 Ways to Insert Emojis in Google Docs
Method 1: Using the Menus Search Feature You can add an emoji to your Google Docs file with a simple keyboard shortcut.
 4 Ways to Insert Images in Google Docs
Method 1: Add Photos From Camera Roll to Google Docs You can add photos in Google Docs from the Camera Roll of your iPhone or Android phone.
4 Ways to Insert Images in Google Docs
Method 1: Add Photos From Camera Roll to Google Docs You can add photos in Google Docs from the Camera Roll of your iPhone or Android phone.
 5 Apps to Add Arrows and Text to Images on Android
1.
5 Apps to Add Arrows and Text to Images on Android
1.
 3 Ways to Remove Shortcut Arrows in Windows
Method 1: Remove Shortcut Arrows by Manually Editing the Registry The Windows Registry is a database that stores configuration settings for your computer.
3 Ways to Remove Shortcut Arrows in Windows
Method 1: Remove Shortcut Arrows by Manually Editing the Registry The Windows Registry is a database that stores configuration settings for your computer.
 How to Insert and Edit Pictures in Google Docs on Mobile and PC
How to Insert a Picture in Google Docs on PC Drag and drop: Open the Google Docs document and place your cursor where you want to insert the image.
How to Insert and Edit Pictures in Google Docs on Mobile and PC
How to Insert a Picture in Google Docs on PC Drag and drop: Open the Google Docs document and place your cursor where you want to insert the image.
The article above may contain affiliate links which help support Guiding Tech. The content remains unbiased and authentic and will never affect our editorial integrity.


I want the purple arrows that are shown in the demonstration. How hard is it to show us how to do that?