Basic Fixes:
- Check cables, adapters, and ports: A loose connection or incorrect wire can prevent the HDMI from detecting your monitor. To ensure this is not the case, check and see that the correct wire has been plugged in. Also, check the connection on both sides and ensure they’re not loose.
- Restart all devices: Temporary glitches or bugs can cause issues like DisplayPort (DP) having no signal or not connecting. To ensure this does not happen, power cycle both devices. Make sure all cables are disconnected before proceeding.
- Use an active HDMI to DisplayPort adapter: If your laptop is having trouble supporting the extra screen, you can also use an active HDMI to DisplayPort adapter to connect both devices. This can help resolve compatibility issues, especially if you’re connecting more than one screen.
- Try using a different device: If your DisplayPort is still not working, connect your Windows PC to a different device. This way, if the connection is successful, you can rule out issues with your Windows device.
Fix 1: Check HDMI Input Selection
There can be times when your DisplayPort is not working, but HDMI is working. This can happen when incorrect HDMI input options are selected on your monitor. To fix this, open the Settings menu on your monitor or display device and manually select the input option. Here’s how.
Step 1: On your device, use the relevant buttons to open Settings. Select Input.
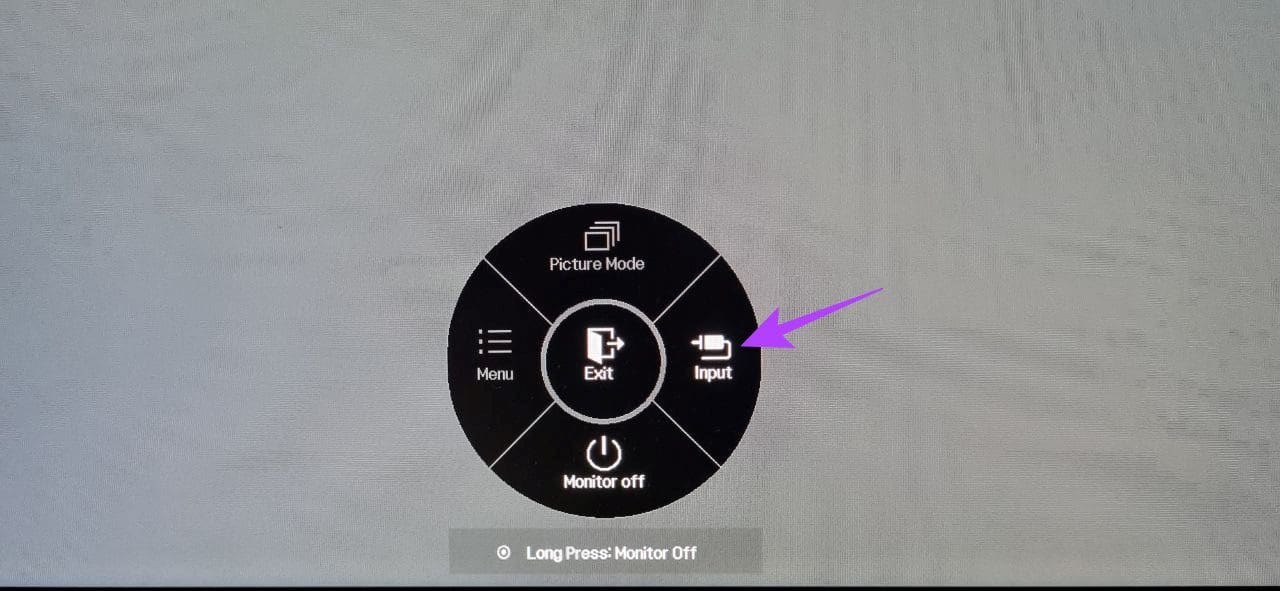
If further display input settings are available, use the menu options to select the relevant HDMI device. Then, check and see if your display device is still showing the ‘Not receiving signal’ error.
Fix 2: Check Display Settings
Incompatible display settings on the display device can cause issues and lead to your DisplayPort not working as expected. To fix this, open the display settings on your monitor and ensure the correct settings have been selected. Here’s how.
Step 1: Open your monitor or supported device and open Settings. Select Menu.
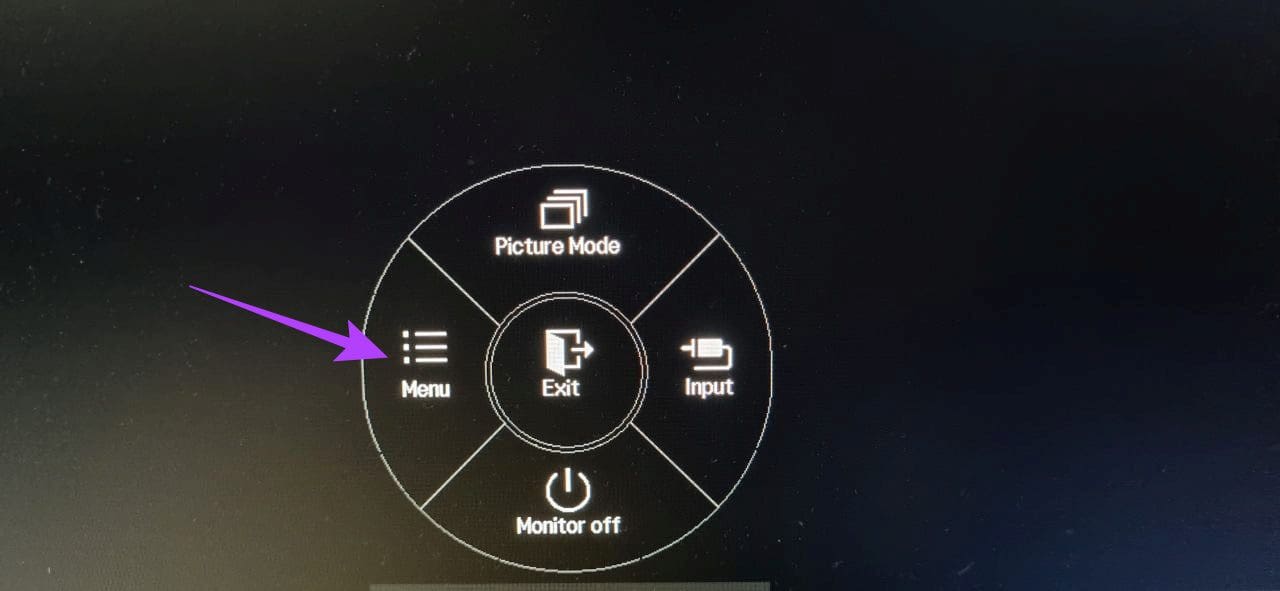
Step 2: Go to Picture settings. Use the options to adjust the Picture Mode and other Picture settings.

Fix 3: Enable the HDMI Port
Certain display devices come with the option of enabling the HDMI port from their Settings menu. However, if that option is unavailable, open the Settings menu on your Windows device and check that the HDMI settings have been enabled and the correct device has been selected. Here’s how to do it.
Step 1: Use the Windows + I key to open Settings. Go to System and click on Display.

Step 2: Go to Detect other display and click on Detect.
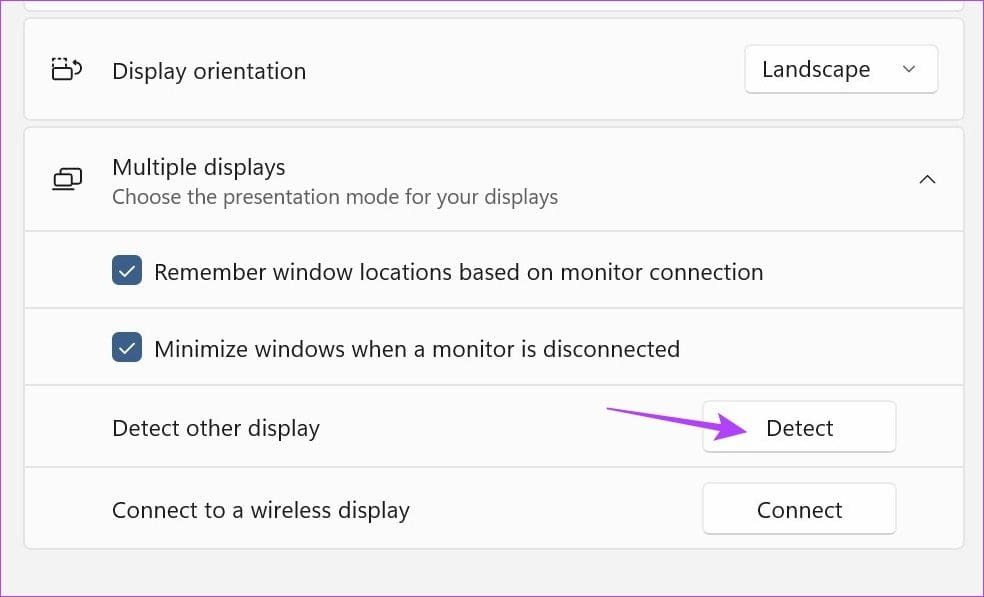
Step 3: Once your display device is visible, scroll up to the Display drop-down and select the relevant display setting.

Fix 4: Check for Driver Updates
The display drivers on your Windows device help ensure your device stays compatible with other devices while fixing any bugs or security issues from the previous update. And even though drivers are usually automatically updated, you can check and install the updates manually as well. Here’s how to do it.
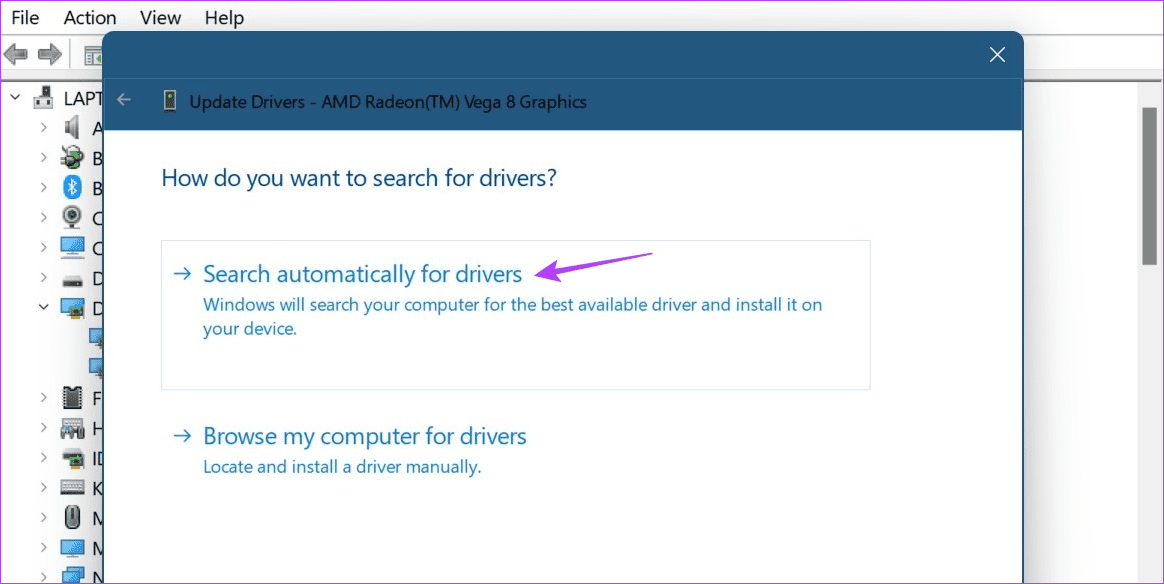
Step 1: Open Device Manager and click on Display adapters. Right-click the display driver and click on Update driver.
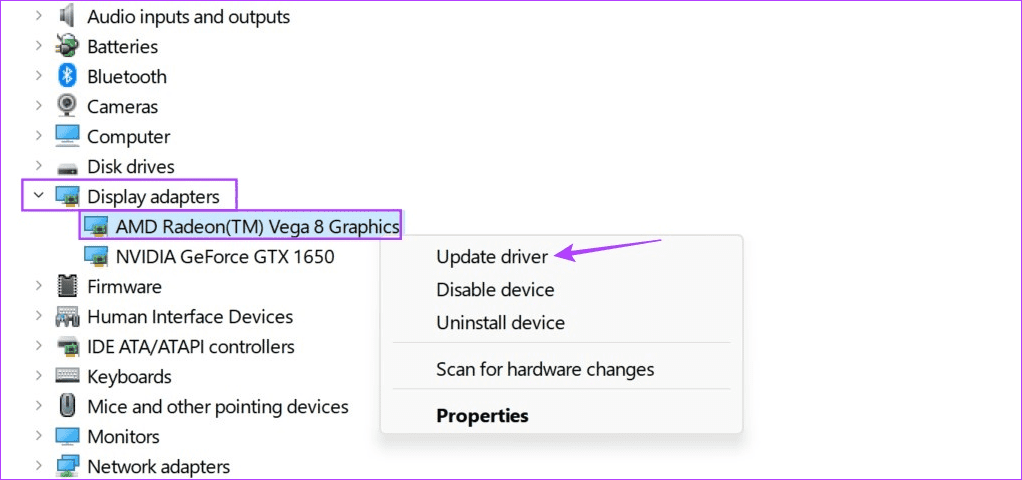
Step 2: Click on Search automatically for drivers.
If an update is available, follow the on-screen instructions to finish installing it. Then, restart both devices and try again.
FAQs
QGeeM’s HDMI to DisplayPort converter lets you stream 4K content in peace. Additionally, you can also go for the Foinnex HDMI to DisplayPort adapter if you’re primarily a Mac user. For more, check out our article for more HDMI to DisplayPort cables and adapter options.
If you’re having issues, check your HDMI cable. Double-check the cable connection to your Windows device to ensure it’s properly connected. Then, restart your Windows device and connect to HDMI again manually. For more details, check out our explainer on fixing the HDMI port not working on Windows.
Was this helpful?
Last updated on 30 August, 2024
Read Next
 4 Best HDMI to DisplayPort Adapters That You Can Buy
Have you been stuck with a laptop with an HDMI output and a monitor with DisplayPort input?
4 Best HDMI to DisplayPort Adapters That You Can Buy
Have you been stuck with a laptop with an HDMI output and a monitor with DisplayPort input?
 HDMI 2.0 vs DisplayPort 1.4: Which Display Tech Should You Choose
Not all ports are created equal, especially when it comes to enjoying high-resolution media or gaming on your computer.
HDMI 2.0 vs DisplayPort 1.4: Which Display Tech Should You Choose
Not all ports are created equal, especially when it comes to enjoying high-resolution media or gaming on your computer.
 5 Best DisplayPort to HDMI Cables
Whether you want to deliver a presentation at the office or watch your favorite TV show at home on the weekend, a small laptop screen might not be enough.
5 Best DisplayPort to HDMI Cables
Whether you want to deliver a presentation at the office or watch your favorite TV show at home on the weekend, a small laptop screen might not be enough.
 5 Ways to Fix DisplayPort Not Working on Windows
Basic Fixes: Replug both the DP and the monitor cables.
5 Ways to Fix DisplayPort Not Working on Windows
Basic Fixes: Replug both the DP and the monitor cables.
 6 Best Mini HDMI to HDMI Cables That You Can Buy
Whether it's a DSLR, a Raspberry Pi, or your slim ultrabook laptop, Mini HDMI ports are still quite common these days.
6 Best Mini HDMI to HDMI Cables That You Can Buy
Whether it's a DSLR, a Raspberry Pi, or your slim ultrabook laptop, Mini HDMI ports are still quite common these days.
 11 Easy Ways to Fix HDMI Audio Not Working in Windows 11
When watching a movie, series, show, etc., using HDMI audio seems to have become a staple.
11 Easy Ways to Fix HDMI Audio Not Working in Windows 11
When watching a movie, series, show, etc., using HDMI audio seems to have become a staple.
 5 Ways to Fix HDMI Port Not Working on Windows 11
Common Fixes Check for physical damage: Ensure the HDMI cable and connectors are intact.
5 Ways to Fix HDMI Port Not Working on Windows 11
Common Fixes Check for physical damage: Ensure the HDMI cable and connectors are intact.
 6 Best USB-C to DisplayPort Cables That You Can Buy
USB-C is a powerful connector found on most ultrathin, compact laptops, such as the MacBook Air, Dell XPS 13, or the Microsoft Surface Laptop 3.
6 Best USB-C to DisplayPort Cables That You Can Buy
USB-C is a powerful connector found on most ultrathin, compact laptops, such as the MacBook Air, Dell XPS 13, or the Microsoft Surface Laptop 3.
The article above may contain affiliate links which help support Guiding Tech. The content remains unbiased and authentic and will never affect our editorial integrity.