When watching a movie, series, show, etc., using HDMI audio seems to have become a staple. With better sound quality and other audio enhancements, users often use HDMI to connect their Windows PC to TV or external displays. However, sometimes this also leads to issues like sound not playing through HDMI. If you are facing this issue too, here’s how to fix HDMI audio not working in Windows 11.
Packed with features, Windows 11 is user-friendly, with inbuilt troubleshooters and flexible settings that can be easily modified according to the users’ needs. So, let’s explore more on how to fix no sound coming through HDMI in a Windows 11 device with fixes ranging from simply double-checking the HDMI cable to checking Sound Drivers and beyond.
1. Check the HDMI Cable and HDMI Port Used
Before starting with troubleshooting, it is always recommended to check the HDMI cable connection with both, the input and the output device. To do this, simply unplug the HDMI cable from the Windows 11 device as well as the output device and then plug it back in.
Next, try changing the HDMI cable and use a different HDMI port to dock the cable as well. If the HDMI audio works fine, then you have pinned the problem. If it still doesn’t work, proceed with the below-mentioned troubleshooting steps.
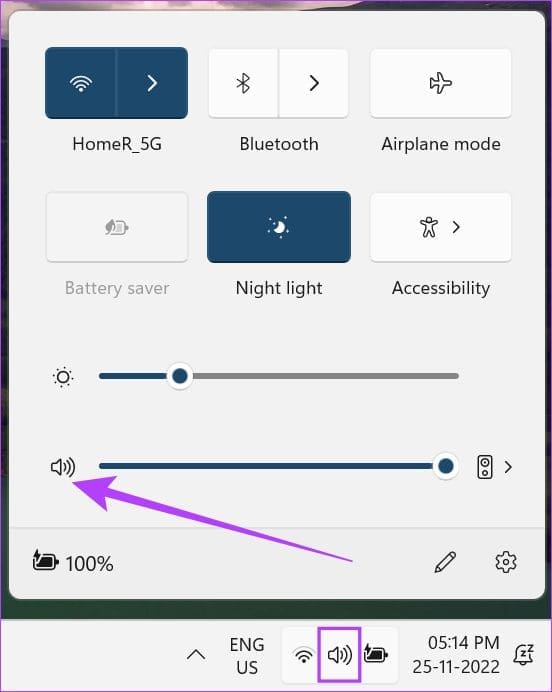
2. Check Volume Levels on Windows and TV
In any device, always make sure that the sound is working. It might seem like a basic step, but if the sound is not working in Windows, it won’t work for the device connected through HDMI either. It is also recommended to check the TV sound settings and make sure that everything is working properly.
The easiest way to check the sound is to simply click on the Sound icon in the Windows taskbar and check volume levels.
3. Restart Your Windows PC and TV
Another simple fix for HDMI audio not working is to restart the devices. Restarting a Windows device helps in improving performance, fixing any minor application errors, and making the RAM process more efficient. Here’s how to restart Windows.
Step 1: Go to the Windows taskbar and click on the Start icon.
Step 2: From the Start menu, click on the Power button.
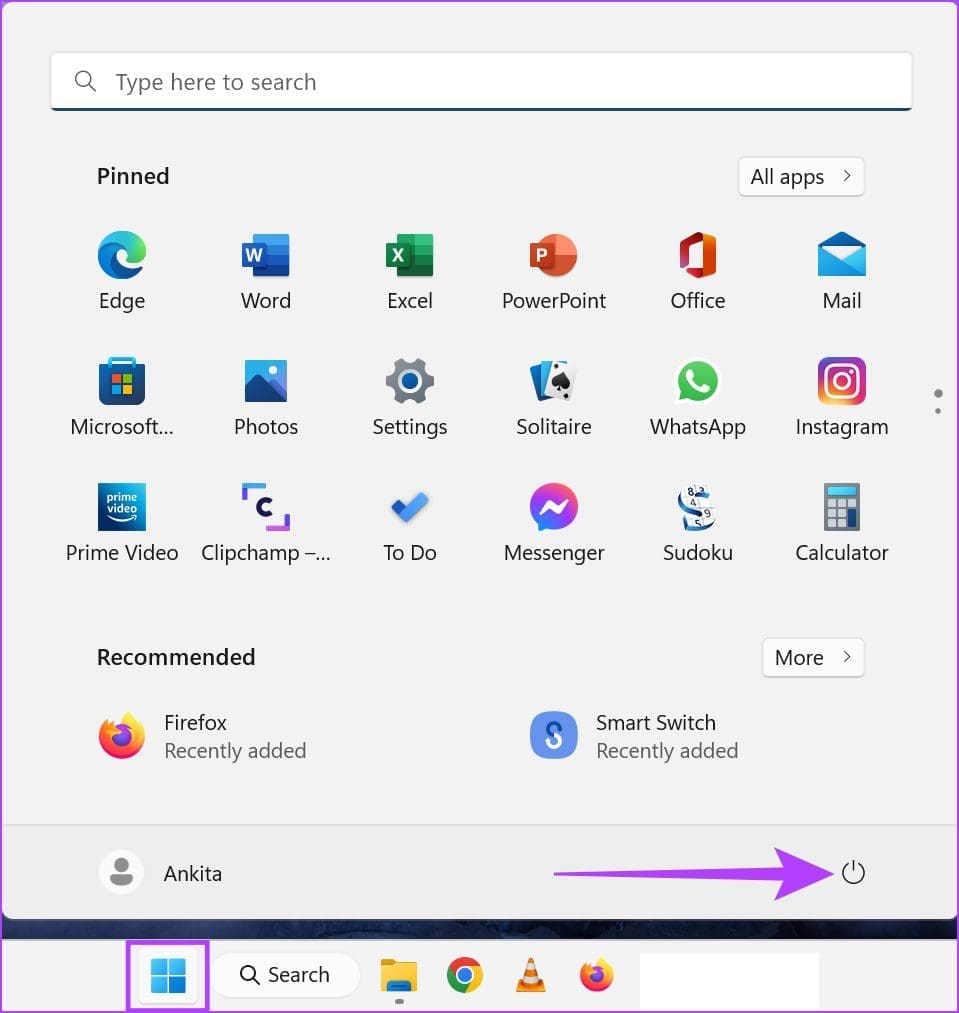
Step 3: Here, select Restart.
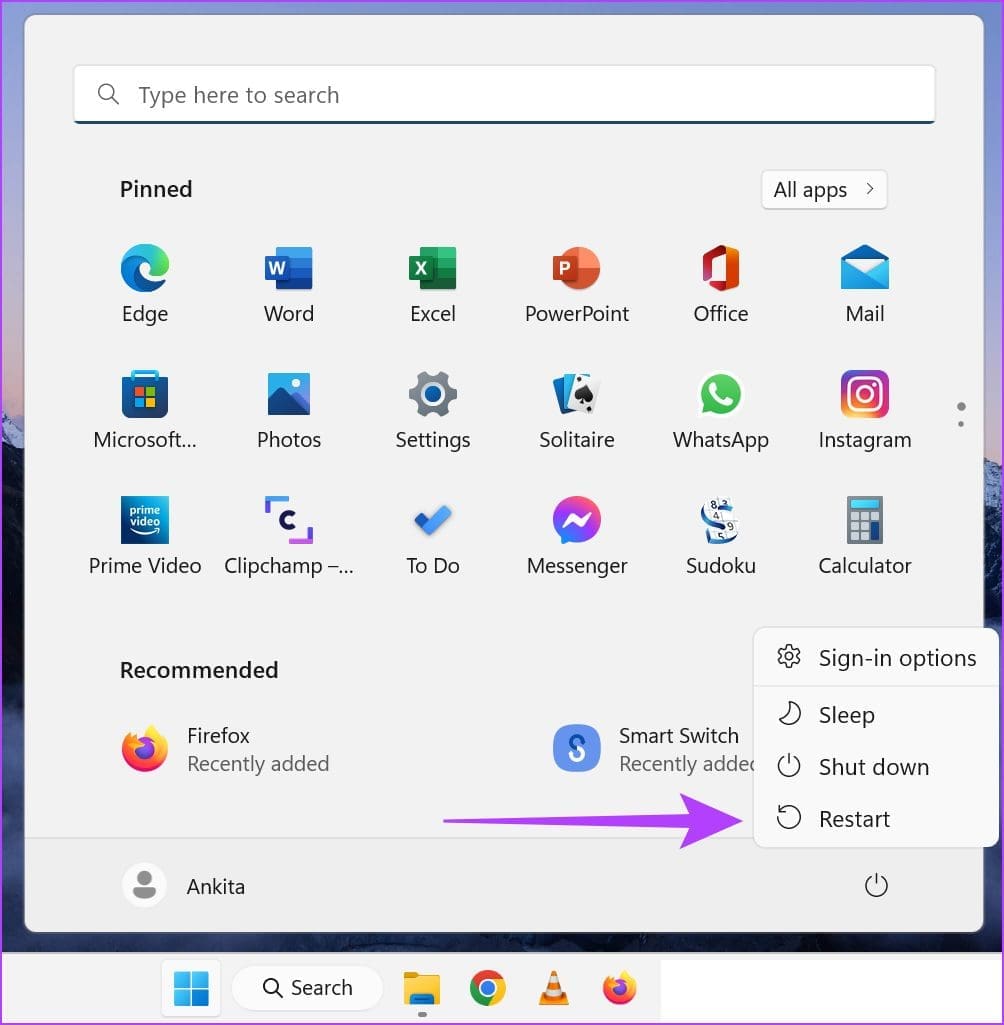
Now, your Windows will restart.
To restart the TV, hit the Power button on the TV remote and turn the TV off, then press the button to turn it back on. Alternatively, you can also press the Power button present on the TV unit to turn the TV off and back on.
4. Manually Select HDMI Output From Sound Settings
Usually, Windows automatically picks up on any external audio device when connected. However, there are times when the auto-detection feature does not work. So, here are the steps on how to manually switch from Windows audio to HDMI audio.
Step 1: Click on the Search icon in the taskbar and type Sound settings. Now, open Sound Settings.
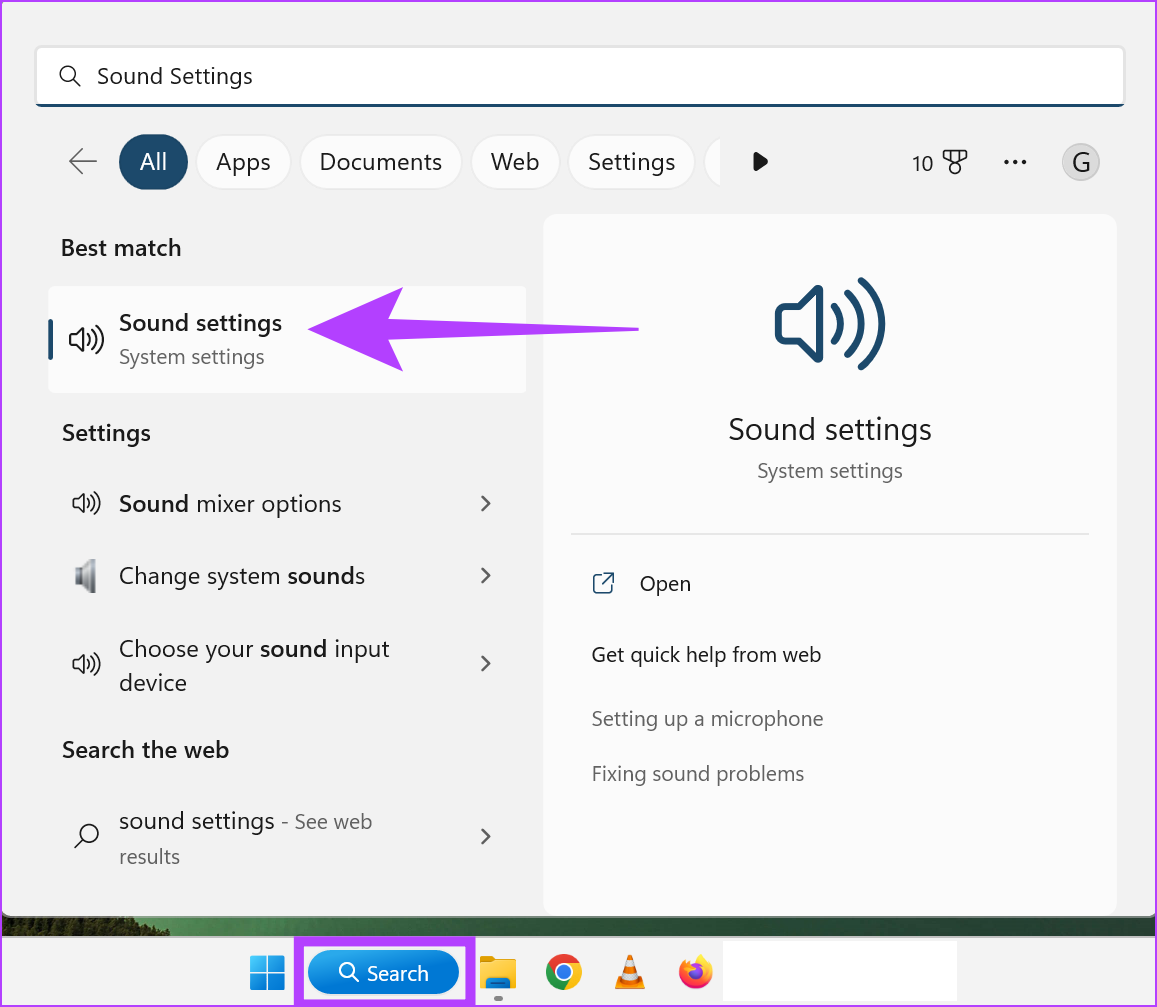
Step 2: From the ‘Choose where to play sound’ list, select your audio output device.

Alternatively, users can also use the Sound icon in the System Tray to change the default playback device. Here’s how to do it.
Step 1: Go to the System Tray and click on the Sound icon to open the volume controls.
Step 2: Click on > symbol at the end of the volume control bar.
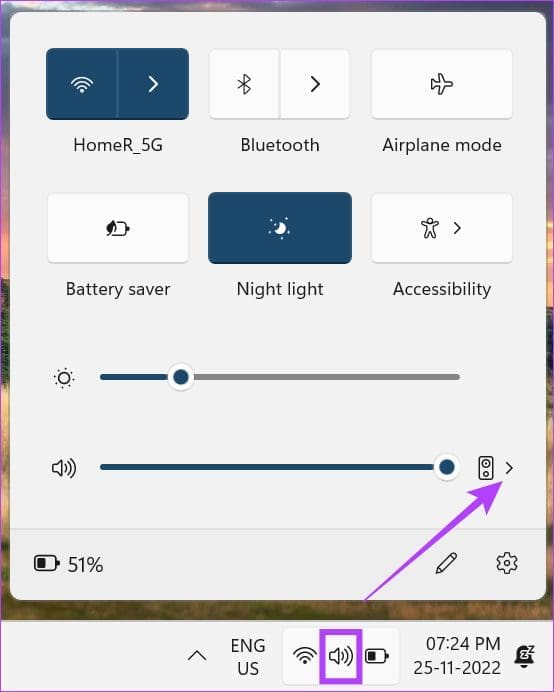
Step 3: Click on the desired HDMI output from the list.

After selecting the output device, try connecting to HDMI audio. If the problem persists, follow the below methods.
5. Set HDMI as Default Playback Service
Windows might not be able to detect HDMI due to problems with the detection of default playback services. Hence, you can set HDMI as the default playback service. Follow these steps.
Step 1: Click on the Search icon in the taskbar and type Sound settings. Then, open Sound settings.
Step 2: In the Sound settings menu, scroll down to the Advanced section and click on More sound settings.
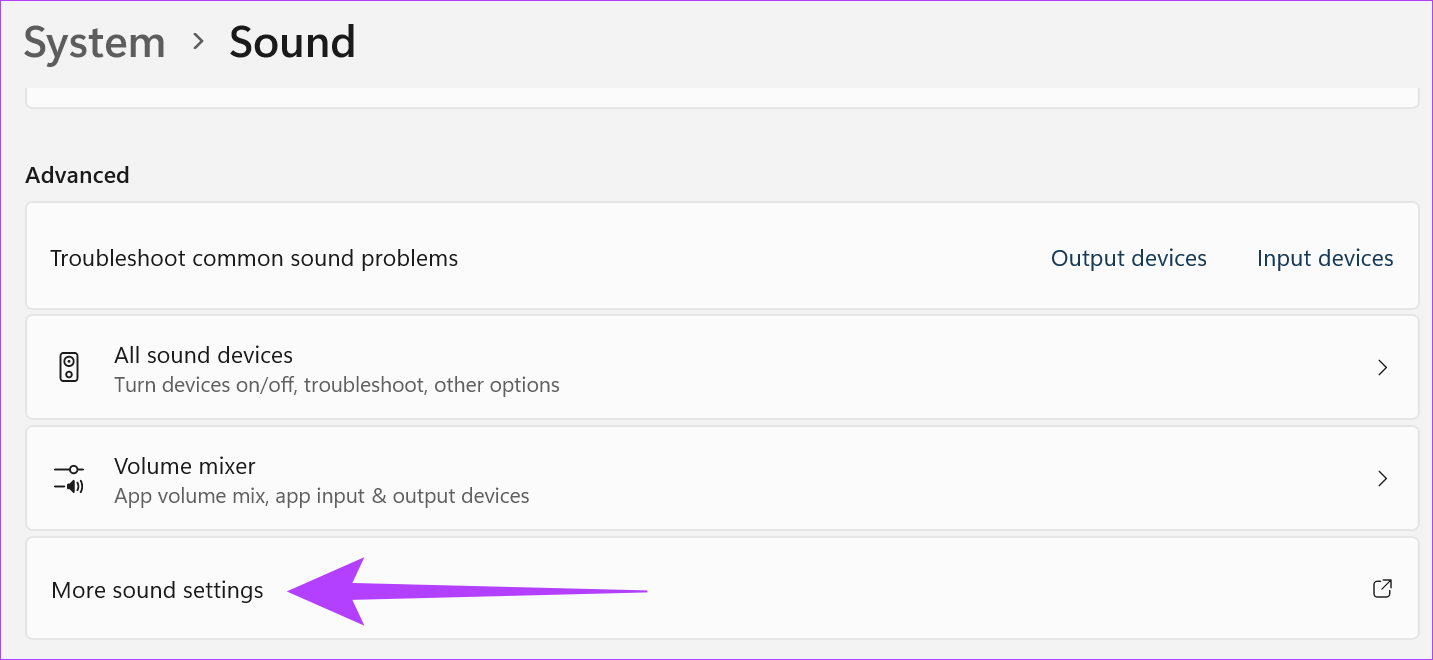
Step 3: Here, from the Playback tab, click on the desired HDMI output. Next, click on Set Default.

Now, when the HDMI output is connected, Windows will automatically select it as the default output option.
6. Turn On HDMI Auto-Detection
If the auto-detection for external sound devices is turned off, Windows might not be able to detect any external sound devices. Here is how to turn on auto-detection for any audio output device.
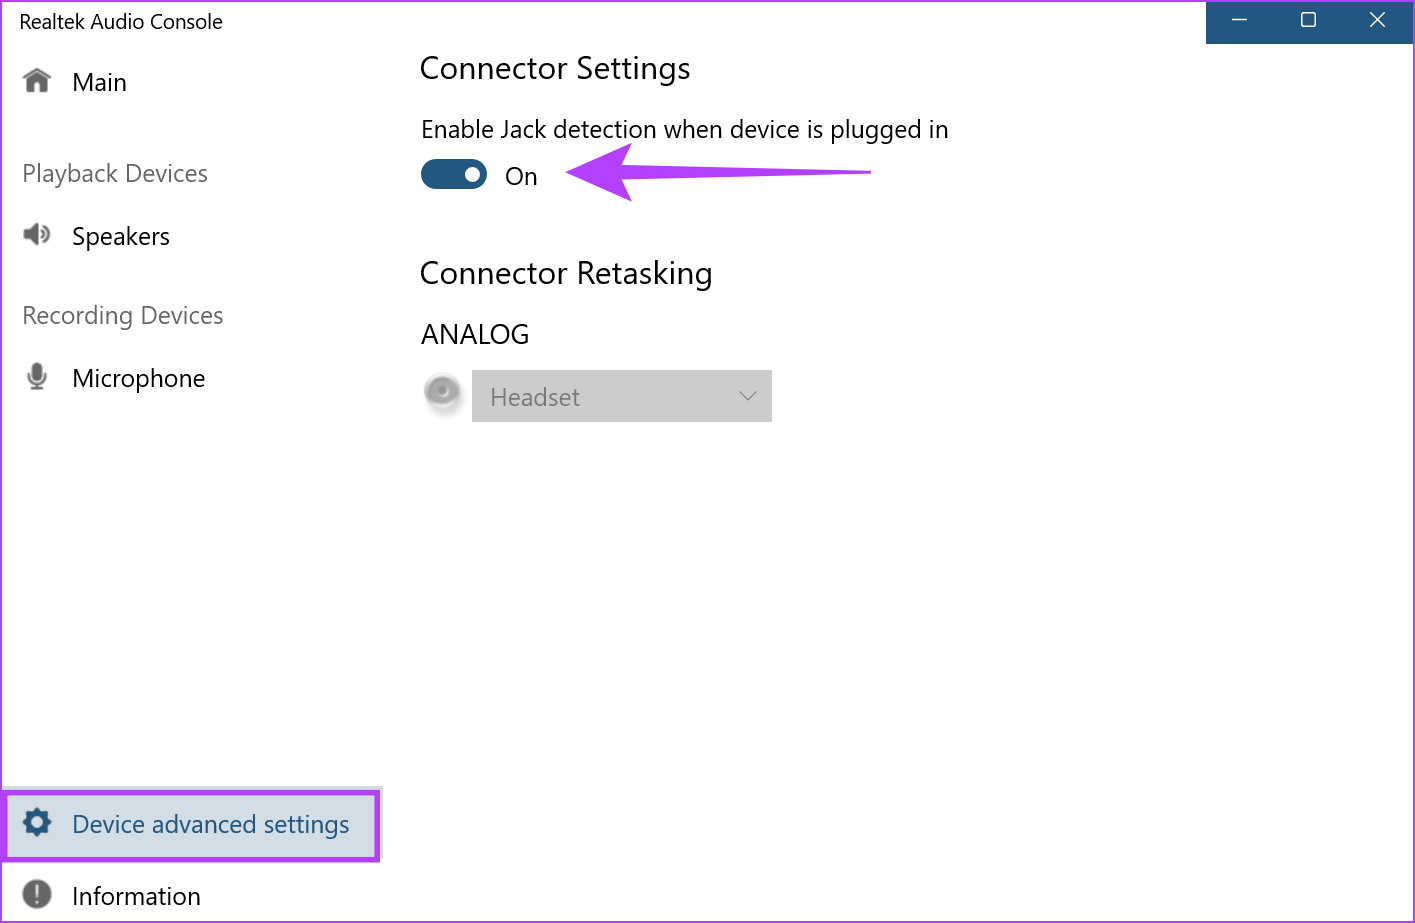
Step 1: Go to search and open the device’s audio console. Click on the icon to open the Audio Console.

Step 2: Go to ‘Device advanced settings’.
Step 3: Turn on the toggle for the ‘Enable Jack detection when device is plugged in’ option.
Windows will now automatically detect HDMI audio output. That should probably solve your problems with the HDMI audio not working.
7. Run Windows Sound Troubleshooter
All Windows devices come with built-in troubleshooters to help diagnose and solve any issues. Here’s how to use the Windows sound troubleshooter for fixing HDMI audio not working.
Step 1: Click on the Search icon in the taskbar and type Sound settings. Now, open Sound settings.
Step 2: Scroll down to the Advanced section and click on Output devices.
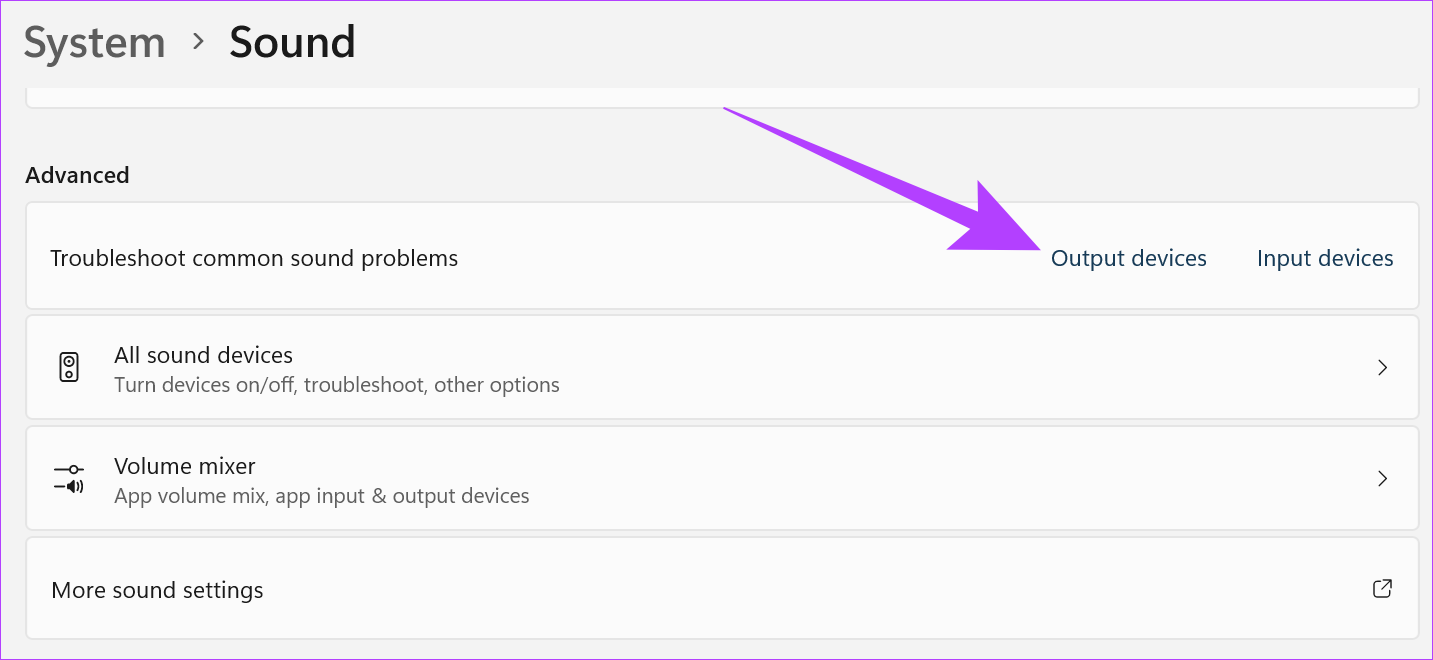
Step 3: Once the troubleshooter starts, click on the output device from the device options. Then click on Next.
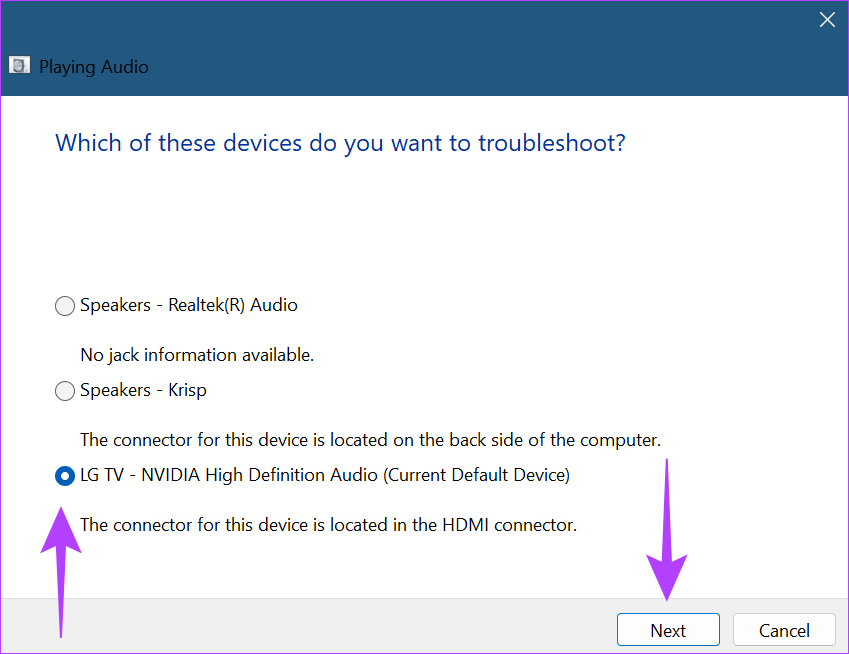
Follow the steps and troubleshoot your Windows HDMI audio output device.
8. Check for Windows Updates
At times, Windows functions might not work properly due to bugs in the previous version or the version simply being out of date. To resolve these issues, it is always advised to regularly download and install the latest Windows updates. Here’s how to check for Windows updates in Windows 11.
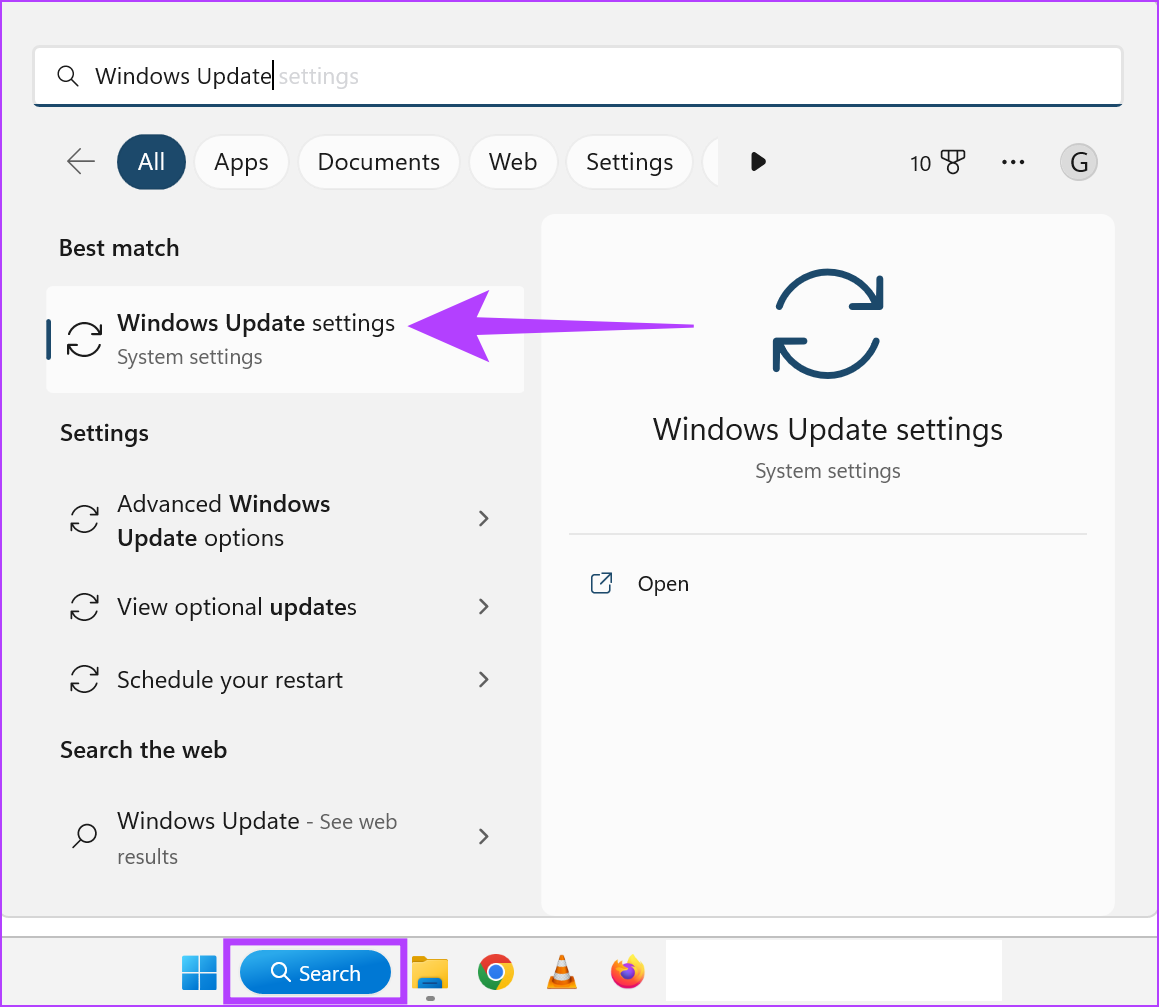
Step 1: Click on the Search icon in the taskbar and type Windows Update. From the search results, open Windows Update settings.
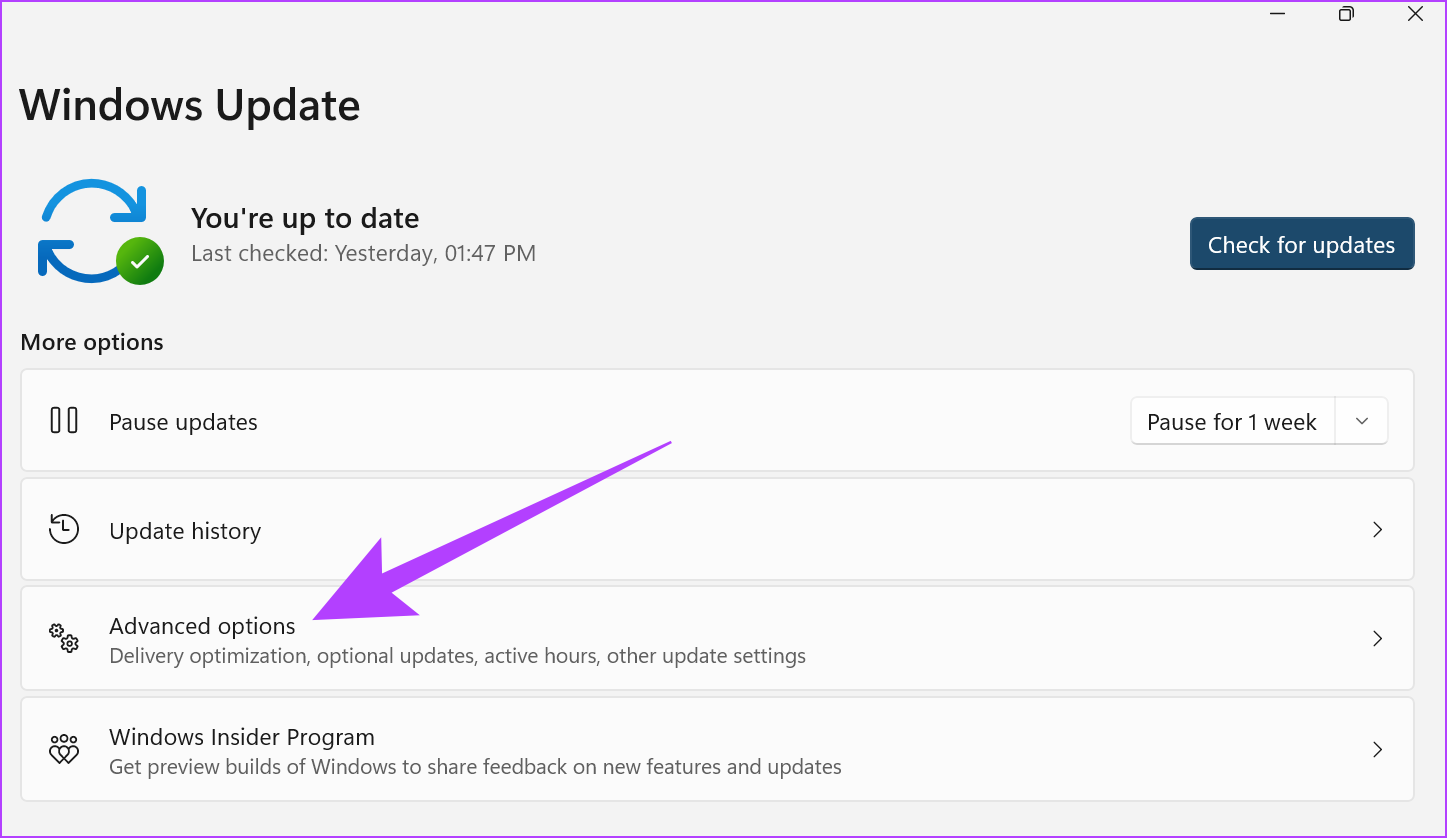
Step 2: On the top right corner, click on Check for updates.

If an update is available, click on install. If not, follow these steps.
Step 3: Click on Advanced options.
Step 4: Scroll down and click on Optional updates.
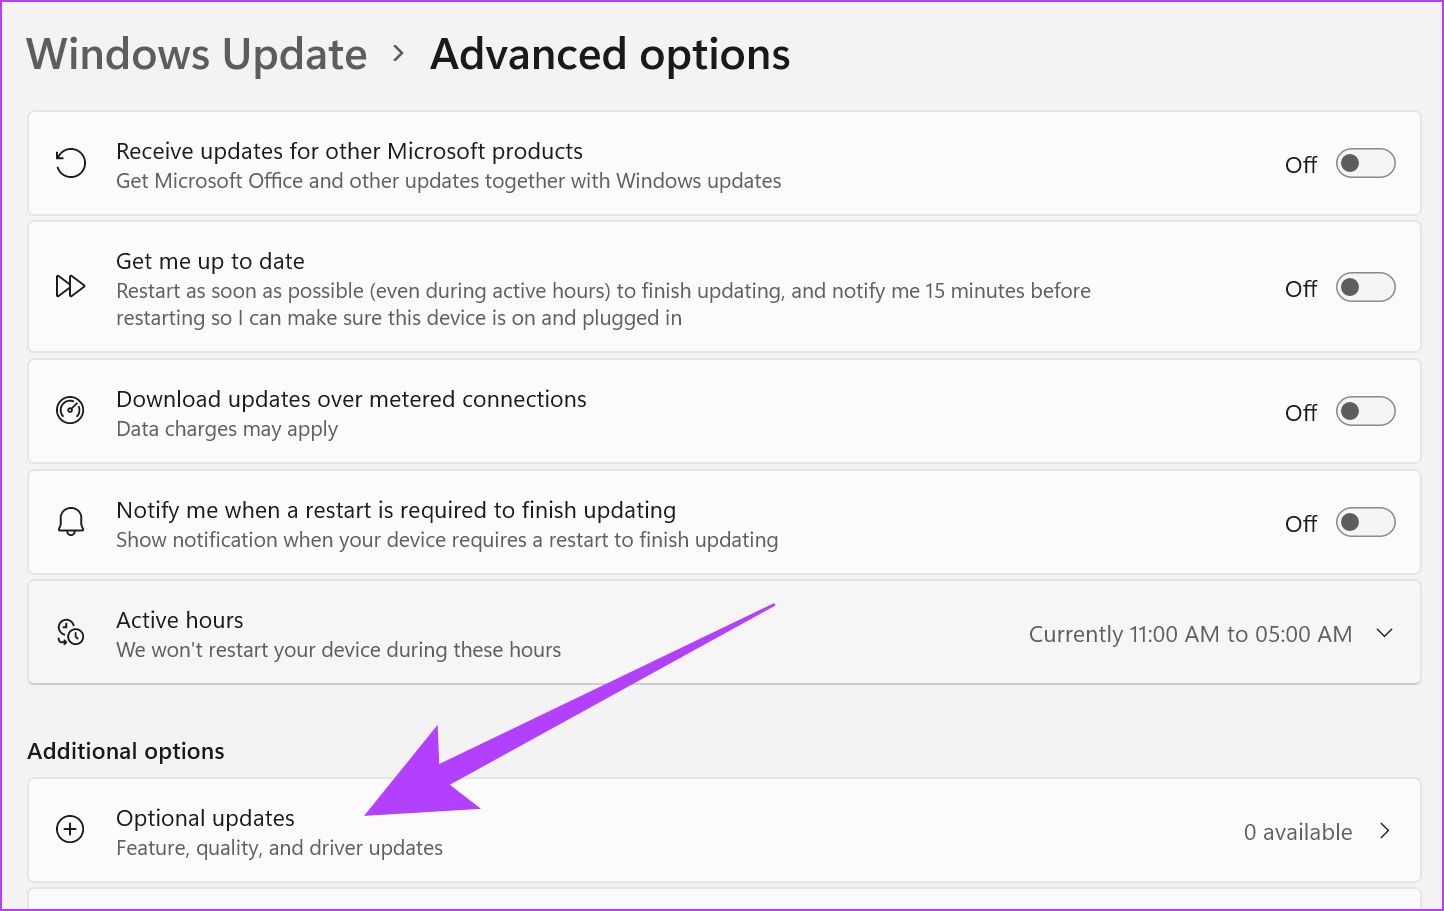
If any optional updates are available, install them. Once all the updates finish downloading, if prompted, restart the device to finish installing the updates. This should probably fix the HDMI audio not working on Windows.
9. Check the Sound Drivers in Windows 11
Often in Windows, old versions of drivers or corrupted driver updates might cause the HDMI audio not to connect properly. Hence, here are a few ways to resolve sound driver issues in Windows 11.
Update Sound Drivers in Windows 11
To update sound drivers in Windows 11, follow these steps.
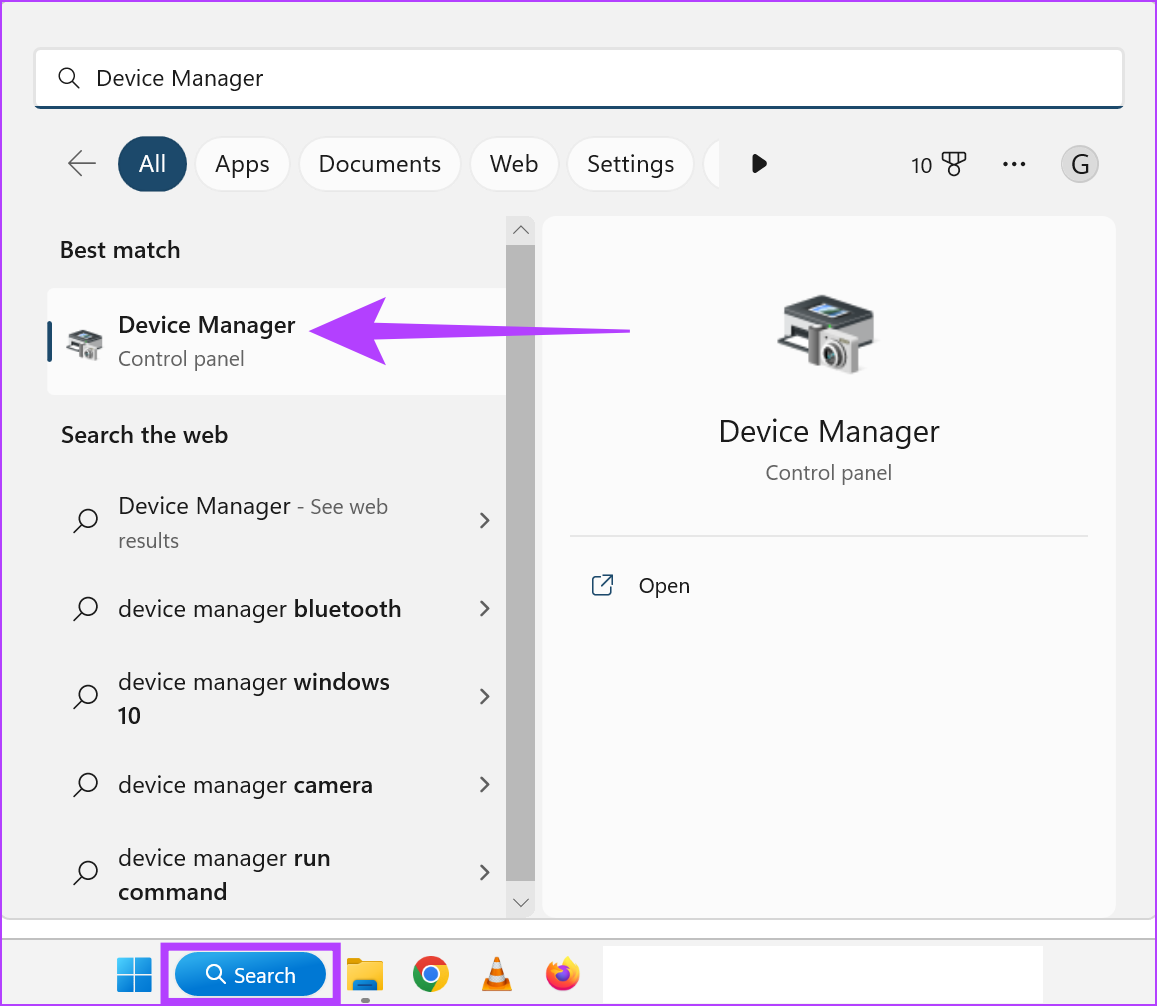
Step 1: Click on the Search icon in the taskbar and type Device Manager. Next, open the relevant option from the search result.
Step 2: Scroll down and click on ‘Sound, video and game controllers’.

Step 3: Right-click on the audio driver name and click on Update driver.

Step 4: Here, click on ‘Search automatically for drivers’. Install driver updates, if available.
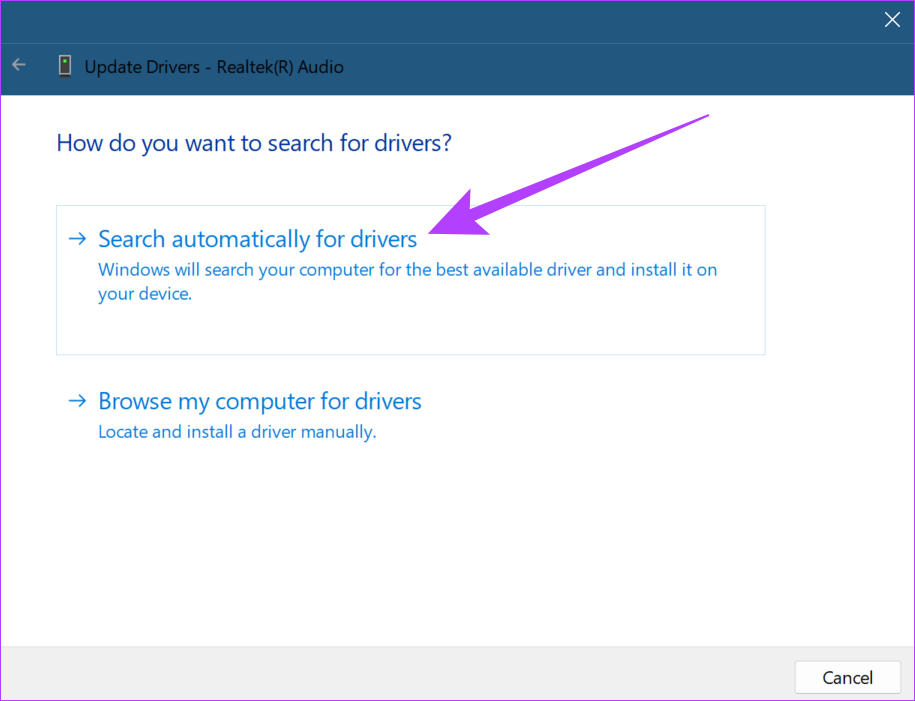
After you update the driver software, connect to HDMI audio once again. If there is still no sound from HDMI, follow the steps below.
Roll Back Updates on Sound Driver in Windows 11
If a driver is not functioning properly, rolling back to the last update is always an option. Follow these steps to roll back the sound driver update for Windows 11.
Step 1: Click on the Search icon in the taskbar, type Device Manager, and open the relevant result.
Step 2: Scroll down and click on ‘Sound, video and game controllers’.
Step 3: Right-click on the audio driver name and click on Properties.

Step 4: Select the Driver tab at the top and click on Roll Back Driver. Then, click on ok.
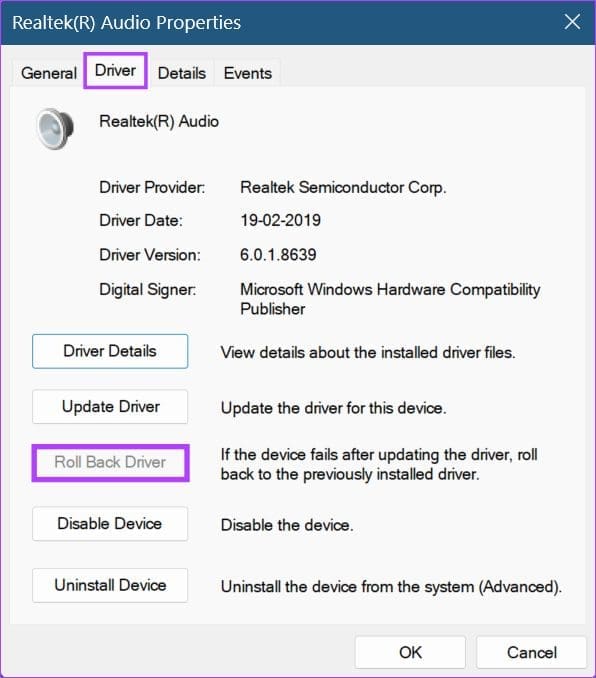
Once the driver updates roll back, HDMI audio should start working. If it still doesn’t work, follow the steps listed below.
Reinstall Sound Driver in Windows 11
At times, when there are problems with installing the latest driver updates, re-installing the driver helps in resolving it. So here’s how to uninstall and reinstall the sound driver in Windows.
Step 1: Go to the Search icon in the taskbar and type Device Manager. Click to open the relevant option from the search result.
Step 2: Open ‘Sound, video and game controllers’ from Device Manager.
Step 3: Right-click on the audio driver name and click on Uninstall device.
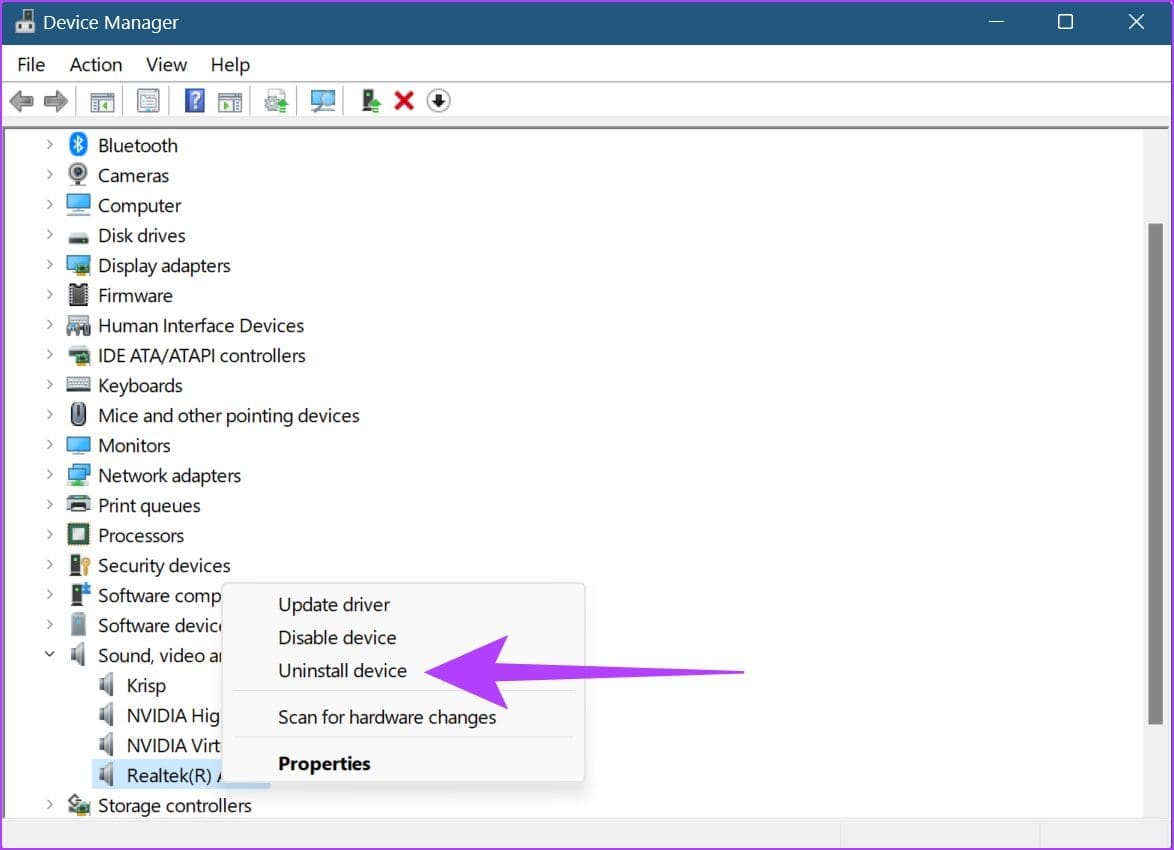
Step 4: In the Uninstall Device window, again click on Uninstall.
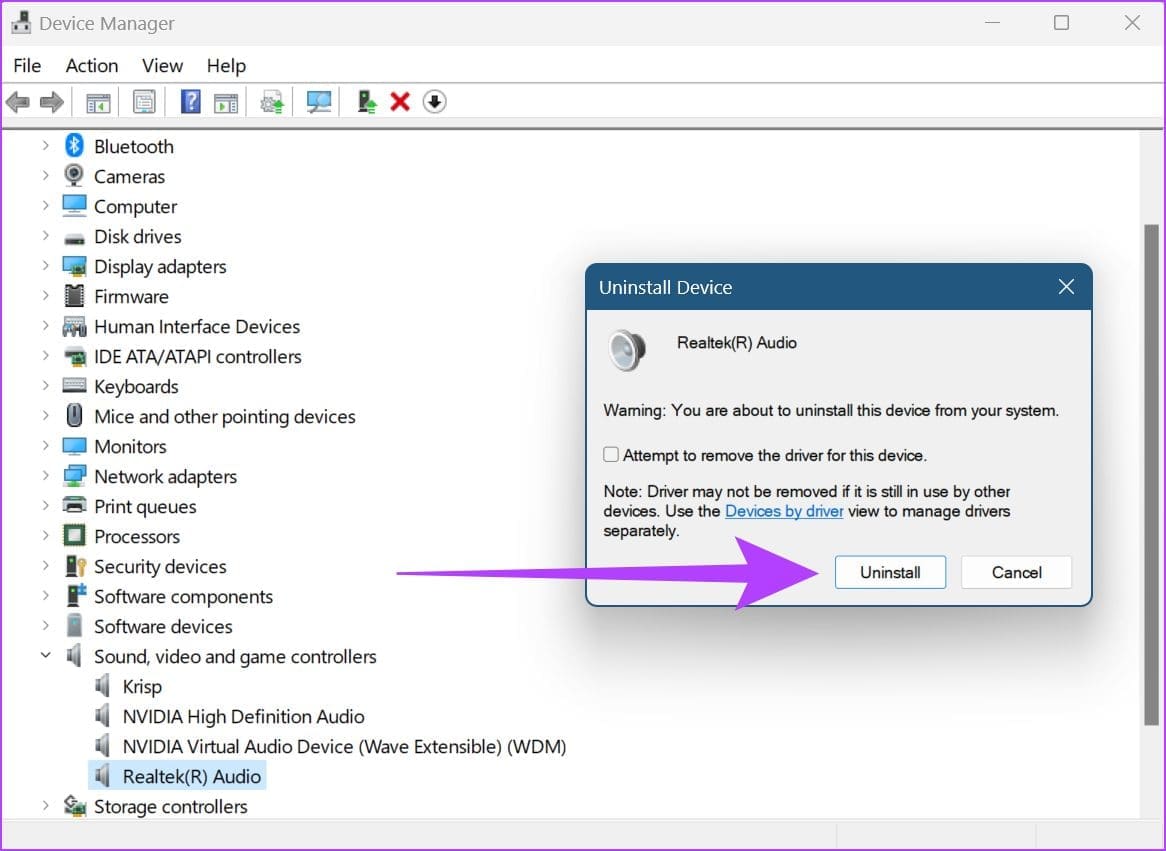
Once the driver finishes uninstalling, restart windows to install a fresh version of the Windows audio driver.
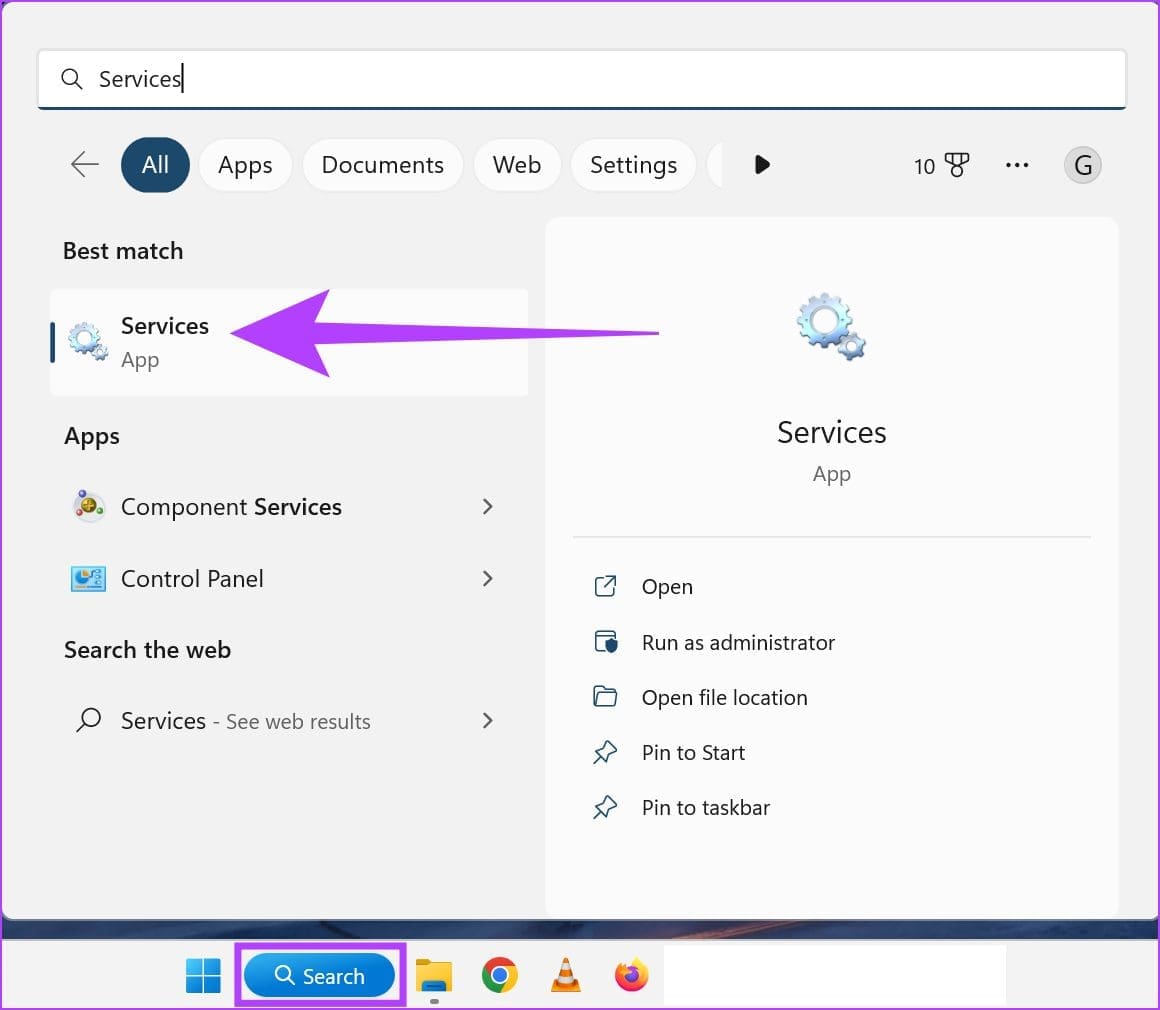
10. Restart Windows Audio From Services
If Windows audio services are not working properly, restarting it might stop the HDMI device from connecting. Here are the steps to restart Windows audio from the Services menu.
Step 1: Click on the Search icon in the taskbar and type Services. Open the Services menu from the results.
Step 2: Here, scroll down and right-click on Windows Audio.
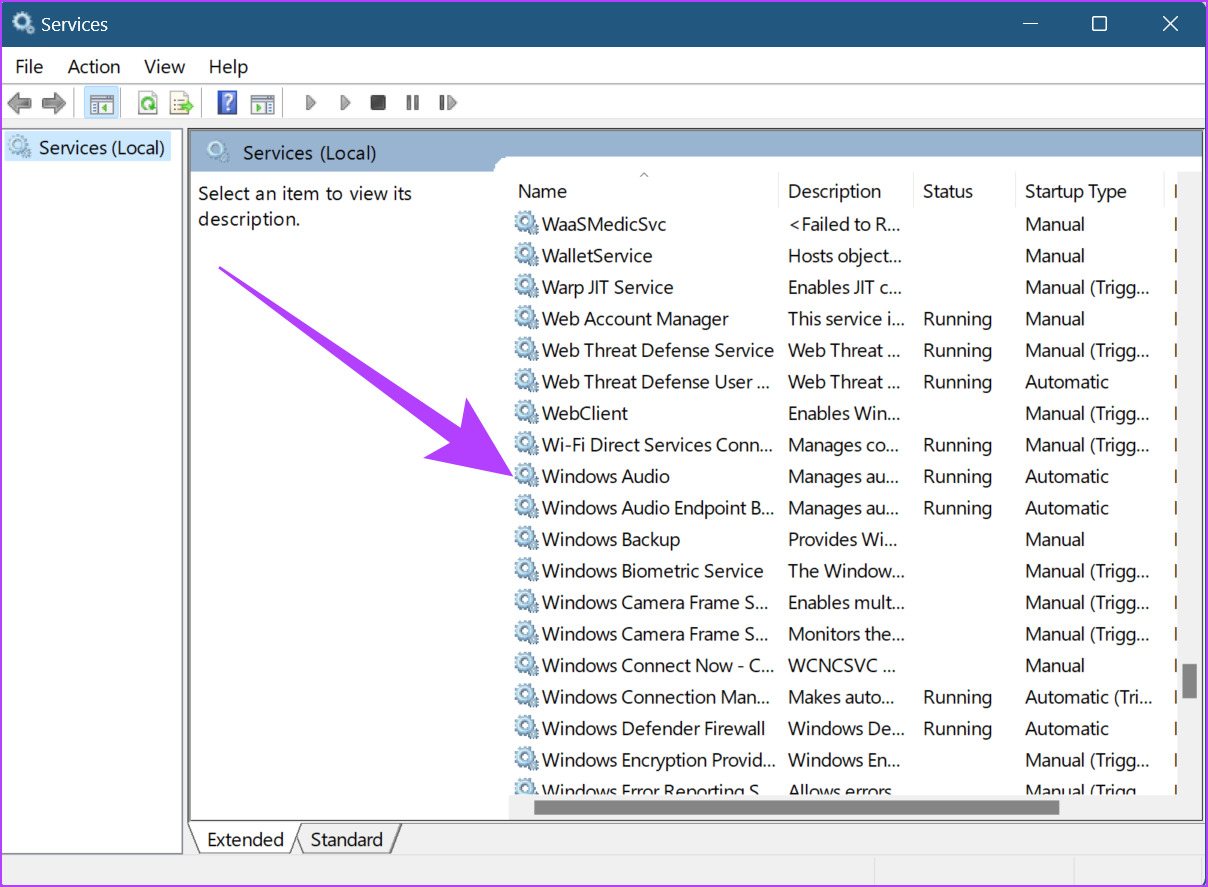
Step 3: From the menu options, click on Restart.

Step 4: Here, click on Yes.

This will restart the Windows audio services.
11. Reset Windows
The big brother of all troubleshooting is the Reset Windows option. Ideally, the reset Windows option will uninstall and reinstall all the drivers on your desktop, thus, solving any driver-related issues. When resetting a PC, there are two major options available:
- Keep my files: This is a soft reset. All the user-installed applications and account data will be deleted and drivers will be reinstalled, but, without the loss of user data like files, folders, videos, etc.
- Remove everything: Selecting this option deletes everything. In addition to drivers and external applications, a complete reset of Windows deletes all data like files, programs, and applications. It can also be considered the last resort when troubleshooting.

You can also refer to our guides to know more about the Keep my files reset option and how to reset Windows to start afresh.
FAQs on Using HDMI Audio in Windows 11
Yes, it is possible to change HDMI audio output back to Windows audio. Simply open Sound Settings and change Output to Windows audio.
Yes, when checking for Windows updates, it is recommended to install any other driver updates available.
Yes, but only to a certain extent. If Windows is muted, the output audio might mute as well. In addition to this, make sure that your Windows audio is at maximum to allow better sound output results.
Amp up Your Sound With HDMI Audio
Basic laptop speakers are often not pre-fitted with audio enhancements, making HDMI audio a preferred option for getting an immersive experience. And so, no sound through HDMI has been an intermittent problem in Windows devices. In this article, we talked about how to fix HDMI audio not working in Windows 11 to help make the user experience better. And while traditionally, HDMI devices have always been connected via cable, wireless HDMI connectors can now also be used for a more hassle-free experience.
Was this helpful?
Last updated on 29 November, 2022
1 Comment
Leave a Reply
Read Next
 6 Best Mini HDMI to HDMI Cables That You Can Buy
Whether it's a DSLR, a Raspberry Pi, or your slim ultrabook laptop, Mini HDMI ports are still quite common these days.
6 Best Mini HDMI to HDMI Cables That You Can Buy
Whether it's a DSLR, a Raspberry Pi, or your slim ultrabook laptop, Mini HDMI ports are still quite common these days.
 5 Ways to Fix HDMI Port Not Working on Windows 11
Common Fixes Check for physical damage: Ensure the HDMI cable and connectors are intact.
5 Ways to Fix HDMI Port Not Working on Windows 11
Common Fixes Check for physical damage: Ensure the HDMI cable and connectors are intact.
 4 Ways to Fix HDMI to DisplayPort Not Working
Basic Fixes: Check cables, adapters, and ports: A loose connection or incorrect wire can prevent the HDMI from detecting your monitor.
4 Ways to Fix HDMI to DisplayPort Not Working
Basic Fixes: Check cables, adapters, and ports: A loose connection or incorrect wire can prevent the HDMI from detecting your monitor.
 5 Ways to Fix VLC Audio Not Working on Windows 11
Basic Fixes Disable Audio Enhancements on Windows: It conflicts with the VLC audio output.
5 Ways to Fix VLC Audio Not Working on Windows 11
Basic Fixes Disable Audio Enhancements on Windows: It conflicts with the VLC audio output.
 4 Best Fixes for Windows 10 Not Detecting HDMI TV/Monitor
You'd find a few video connection ports on a typical Windows computer.
4 Best Fixes for Windows 10 Not Detecting HDMI TV/Monitor
You'd find a few video connection ports on a typical Windows computer.
 6 Best Fixes for Windows 11 Not Detecting HDMI TV/Monitor
An HDMI connection is the preferred versatile choice to stream content from a Windows 11 PC to a TV or monitor.
6 Best Fixes for Windows 11 Not Detecting HDMI TV/Monitor
An HDMI connection is the preferred versatile choice to stream content from a Windows 11 PC to a TV or monitor.
 How to Fix Audio Not Working on Windows 10
Audio problems can be annoying while watching your favorite movie or during a video call.
How to Fix Audio Not Working on Windows 10
Audio problems can be annoying while watching your favorite movie or during a video call.
 Top 10 Fixes for HDMI Port Not Working on Mac
Following a short absence, the HDMI port returned in the latest MacBook Pro line up.
Top 10 Fixes for HDMI Port Not Working on Mac
Following a short absence, the HDMI port returned in the latest MacBook Pro line up.
The article above may contain affiliate links which help support Guiding Tech. The content remains unbiased and authentic and will never affect our editorial integrity.

As this is one of the top results for Windows not showing an HDMI audio device with a comment section, I hope I can provide a fix for a very stupid reason I had trouble for over a year. If you make the same stupid mistake of having left an HDMI cable going from the receiver to the monitor, Windows CAN recognize the device with enough driver reinstalls and restarts, but it is extremely confused. My specific issue was I had video going directly from my GPU to the monitor via DisplayPort, and an HDMI cable to the receiver for sound, but I had left an HDMI cable going from the receiver to the monitor. Windows was confused because it was seeing the same device in multiple ways it could not make sense of, and as soon as I fixed this dumb mistake, Windows no longer randomly wouldn’t see the receiver if I restarted or changed the source on the receiver. Now I can actually use my other sources again and Windows immediately moves over to the computer audio when I turn it back.