Traditionally, when talking about setting up second screens, we focus more on using an external monitor for a dual monitor display. However, since your laptop also has a screen, can you use a laptop as a second monitor? The answer is a resounding yes. Read on to know how to do it.
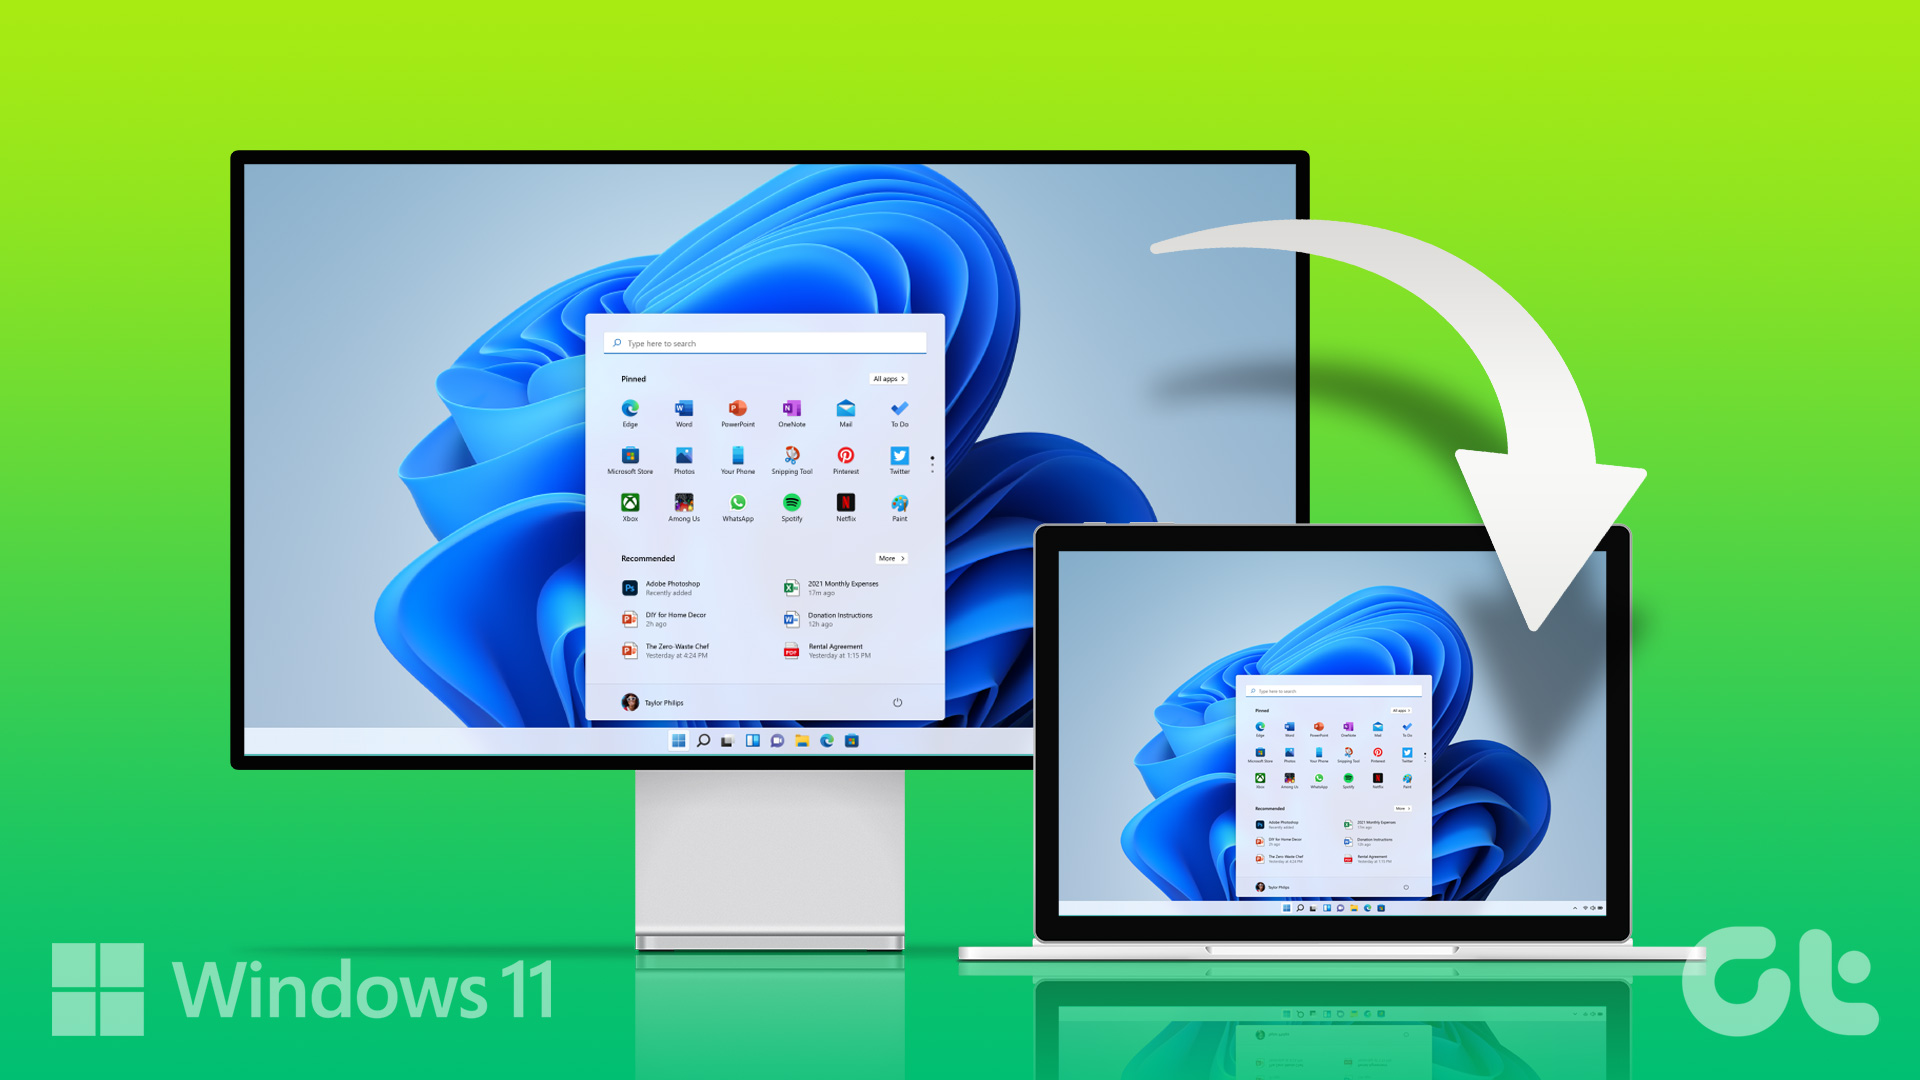
A second screen can massively help in increasing productivity, especially if you’re working in an environment where you need to handle multiple tasks at once. It can give you more space to work, open tabs, programs, and much more. But to do this, you don’t necessarily need to buy a new second screen. How? By using your laptop as the second monitor.
Let’s have a detailed look at how to do it.
1. Use the Windows 11 Settings to Turn Your Laptop Into a Monitor
The Settings app in Windows 11 has most of the major features and functions available. This can come in handy when configuring your laptop to act as a second screen for your Windows 11 PC. Now, you can either go through your Windows 11 PC’s Display settings or use the Apps menu to do this. This will allow you to access your PC’s display and cast settings, allowing it to cast its display onto your laptop.
Let’s have a detailed look at how to use your laptop as a second monitor using both methods.
Method 1: Through Windows 11 Display Settings
Note: If you’re using a wired setup, ensure your PC and laptop are connected via an HDMI cable before proceeding. If you’re connecting the devices via a wireless connection, ensure they’re both connected to the same network.
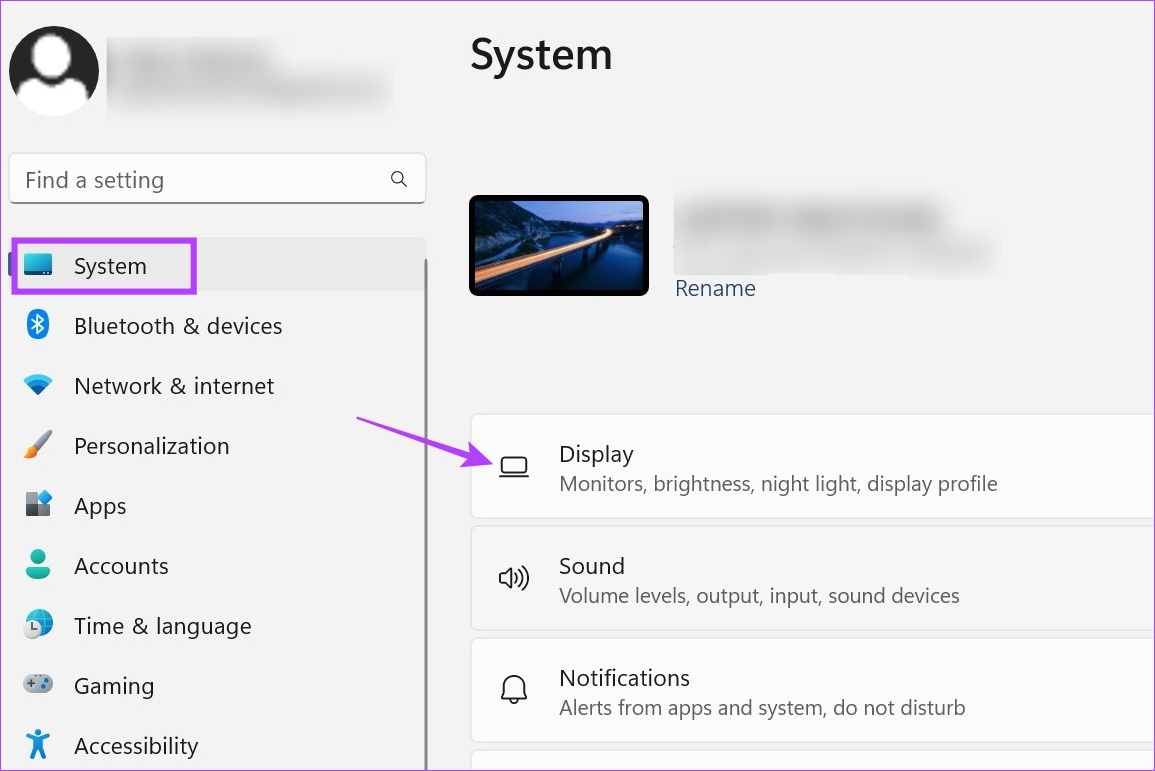
Step 1: Press Windows + I on your keyboard to open the Settings menu.
Step 2: Then, click on System from the menu options.
Step 3: Here, click on Display.
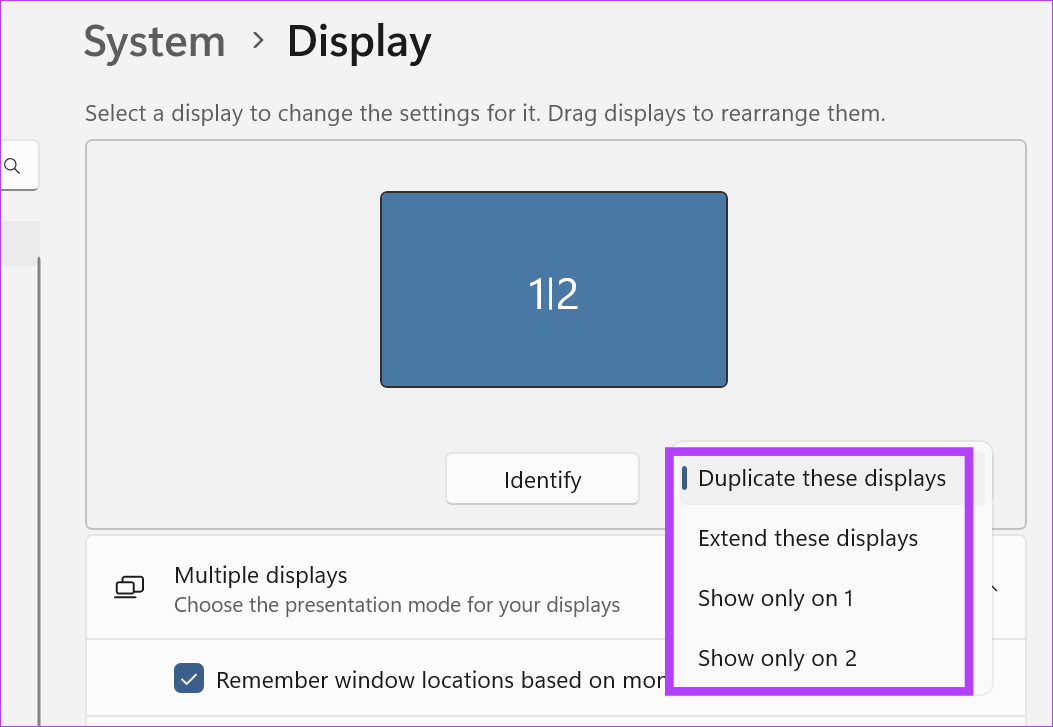
Step 4: Go to the Multiple displays section and click on the arrow to expand the menu options.
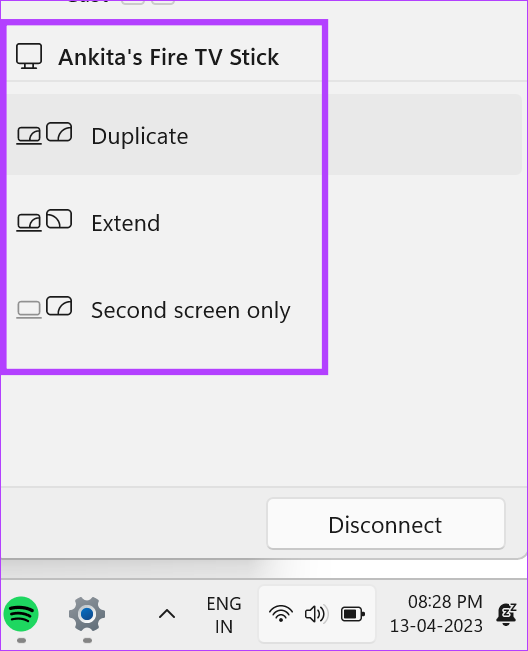
Step 5: Now, if you’re using a wireless display, click on Connect. This will open the Cast window.
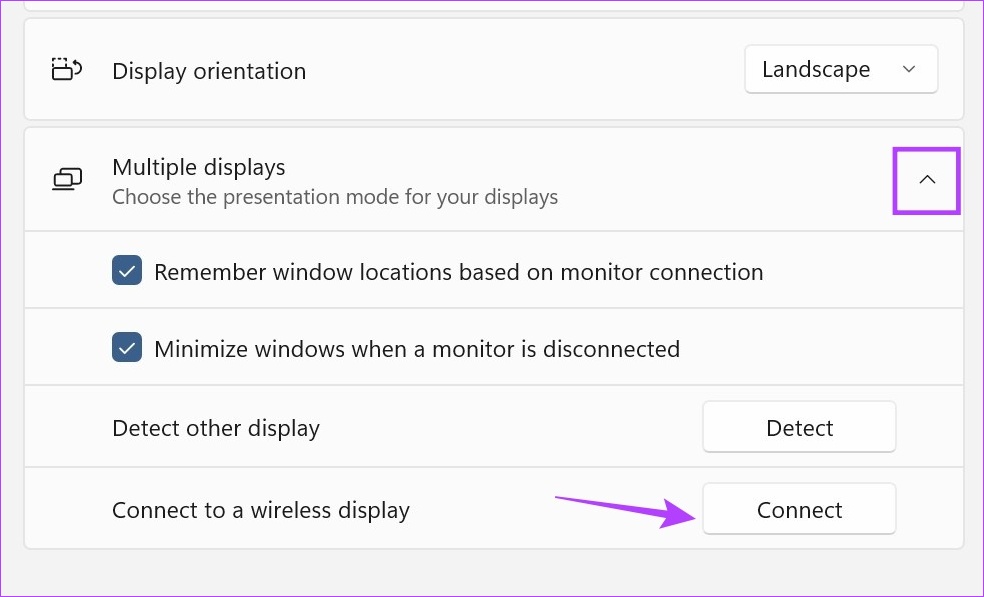
Step 6: Here, select the device you want to cast to and then select how you want to use the second display.
Tip: Choose Duplicate or Secon screen only to display a presentation or watch a movie. If you wish to work, choose Extend as it spreads the work screen on two screens.
Step 7: If you’re using HDMI to connect to your laptop, it should appear in the Display menu automatically. Here, select how you want the screen to be projected onto the second screen.
Step 8: On the off chance that you have HDMI auto detection turned off, go to the Multiple displays menu and click on Detect.
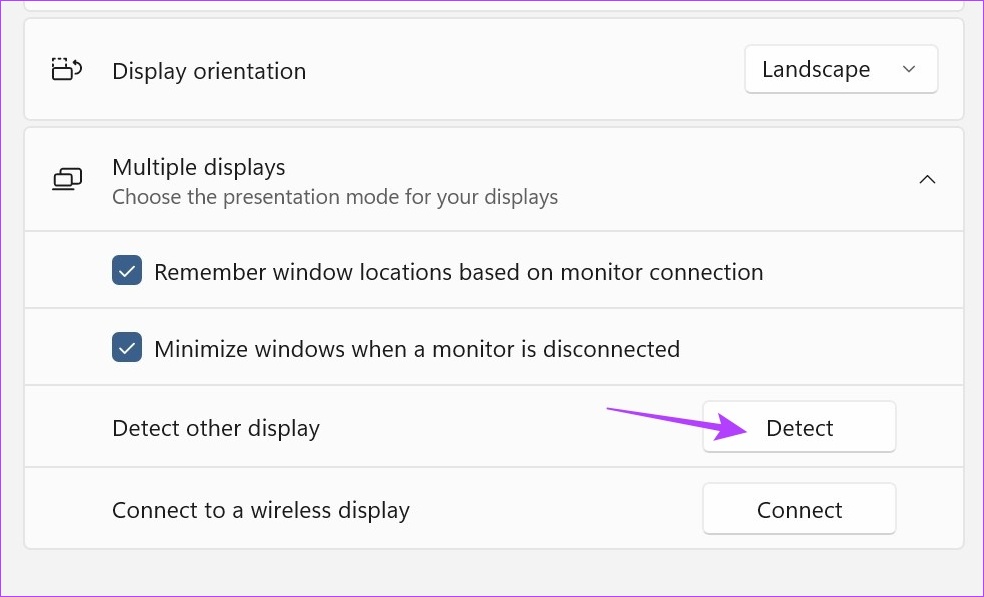
This will detect and connect the two laptop screens. Then, follow the above steps to configure how the extra monitor will work.
Method 2: By Adding Optional Features
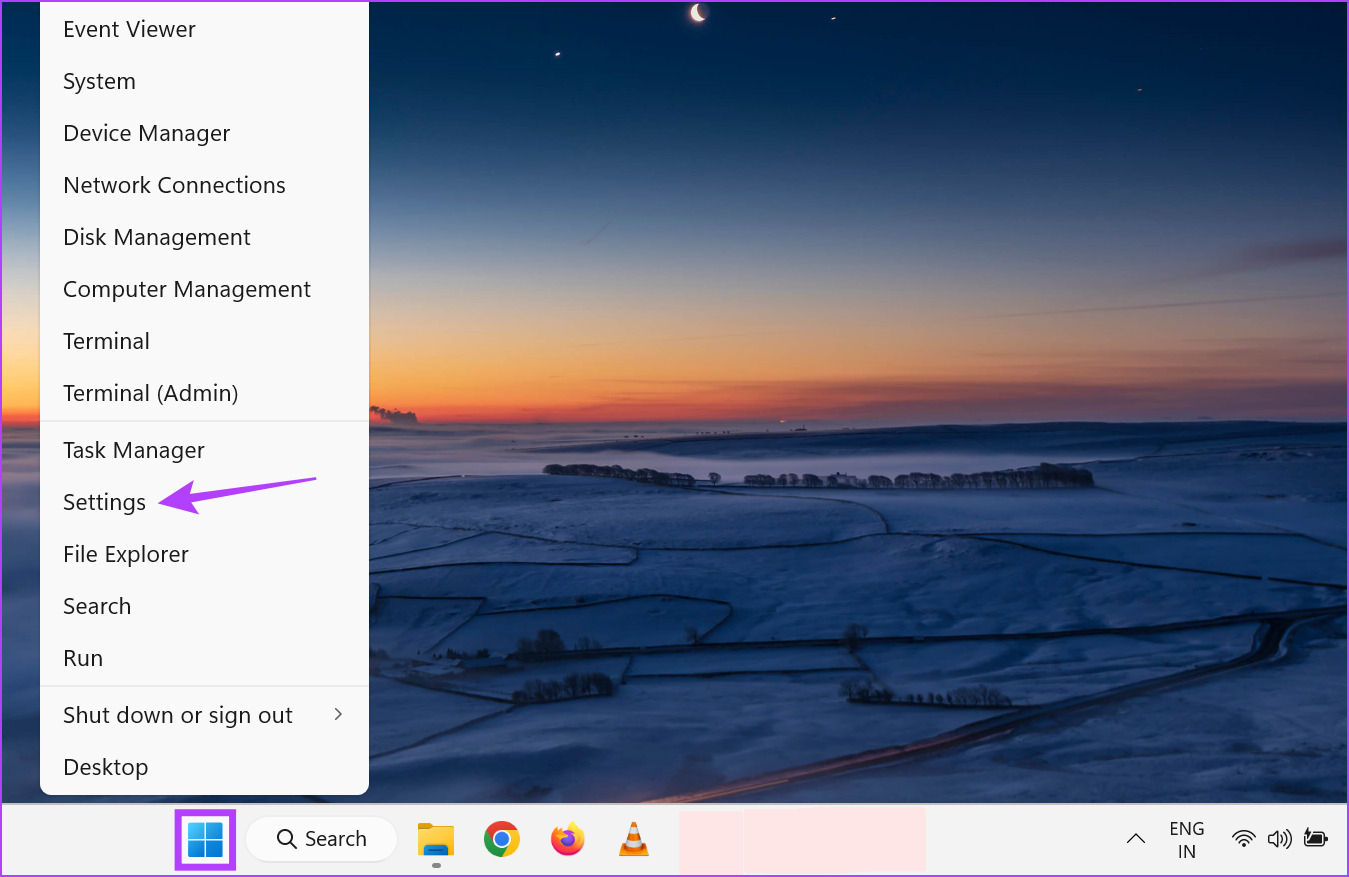
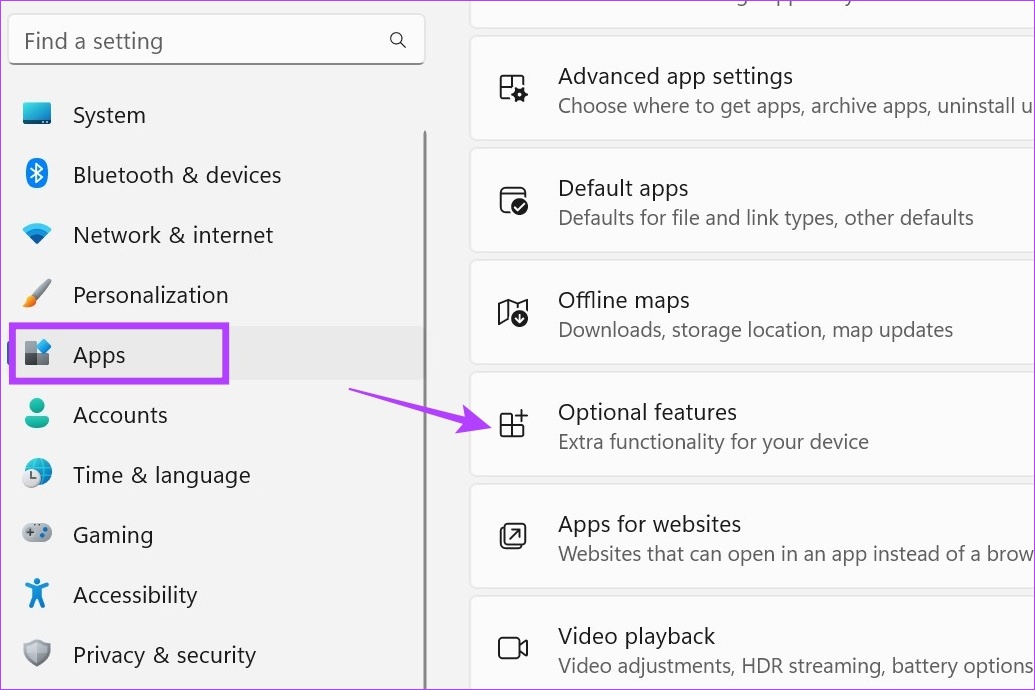
Step 1: Right-click on the Windows icon and click on Settings from the options.
Step 2: Then, from the menu options, click on Apps.
Step 3: Scroll down and click on Optional features.
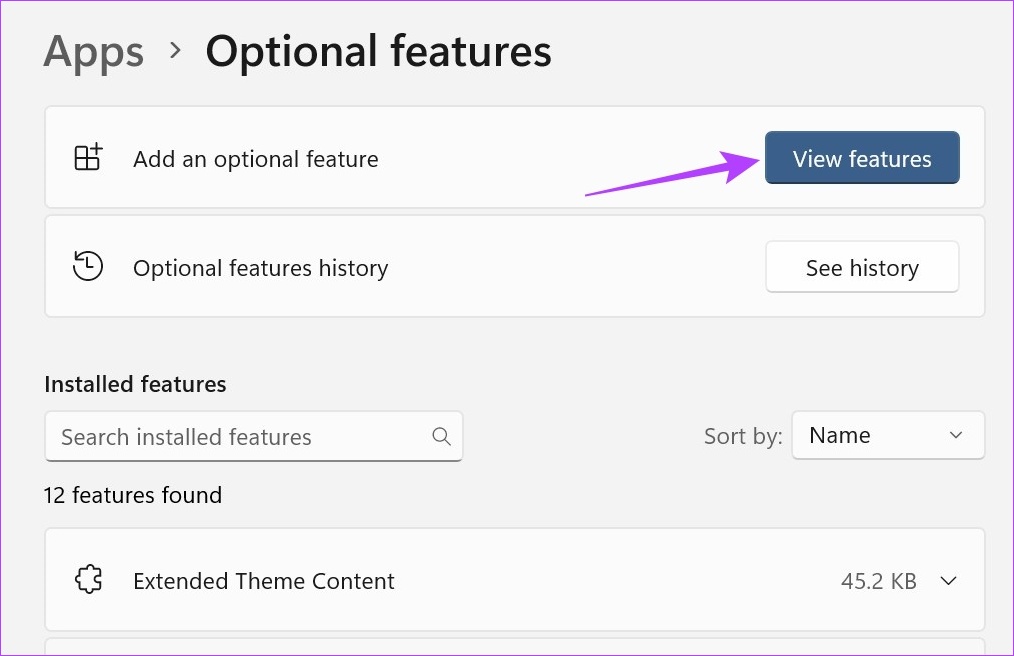
Step 4: Here, click on View features. This will open a separate window.
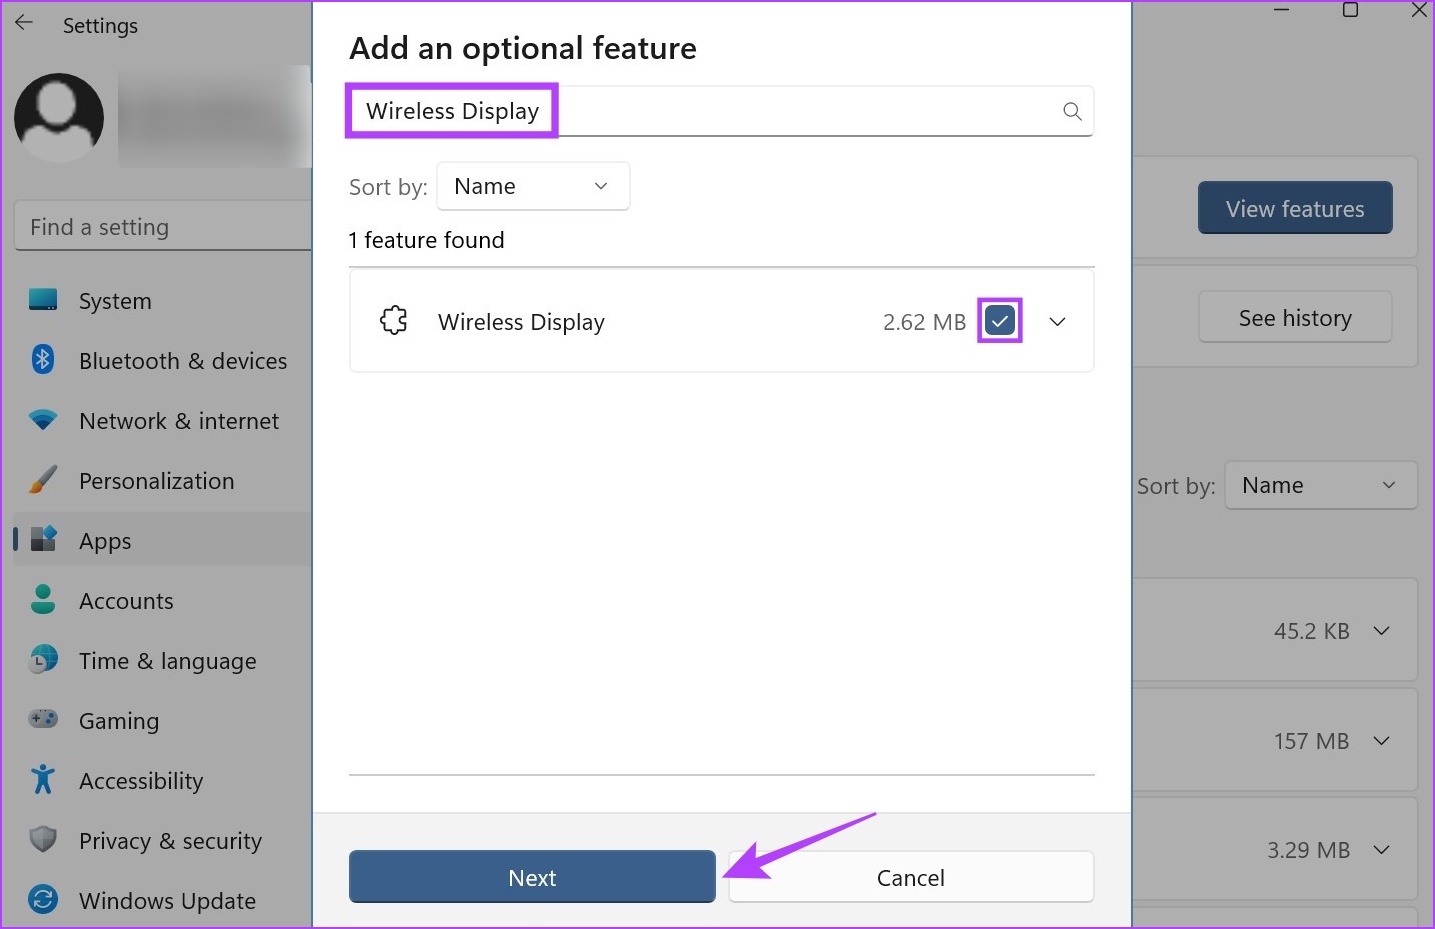
Step 5: In the search bar, type Wireless Display. Once the option appears, click the box in front of it.
Step 6: Then, click on Next.
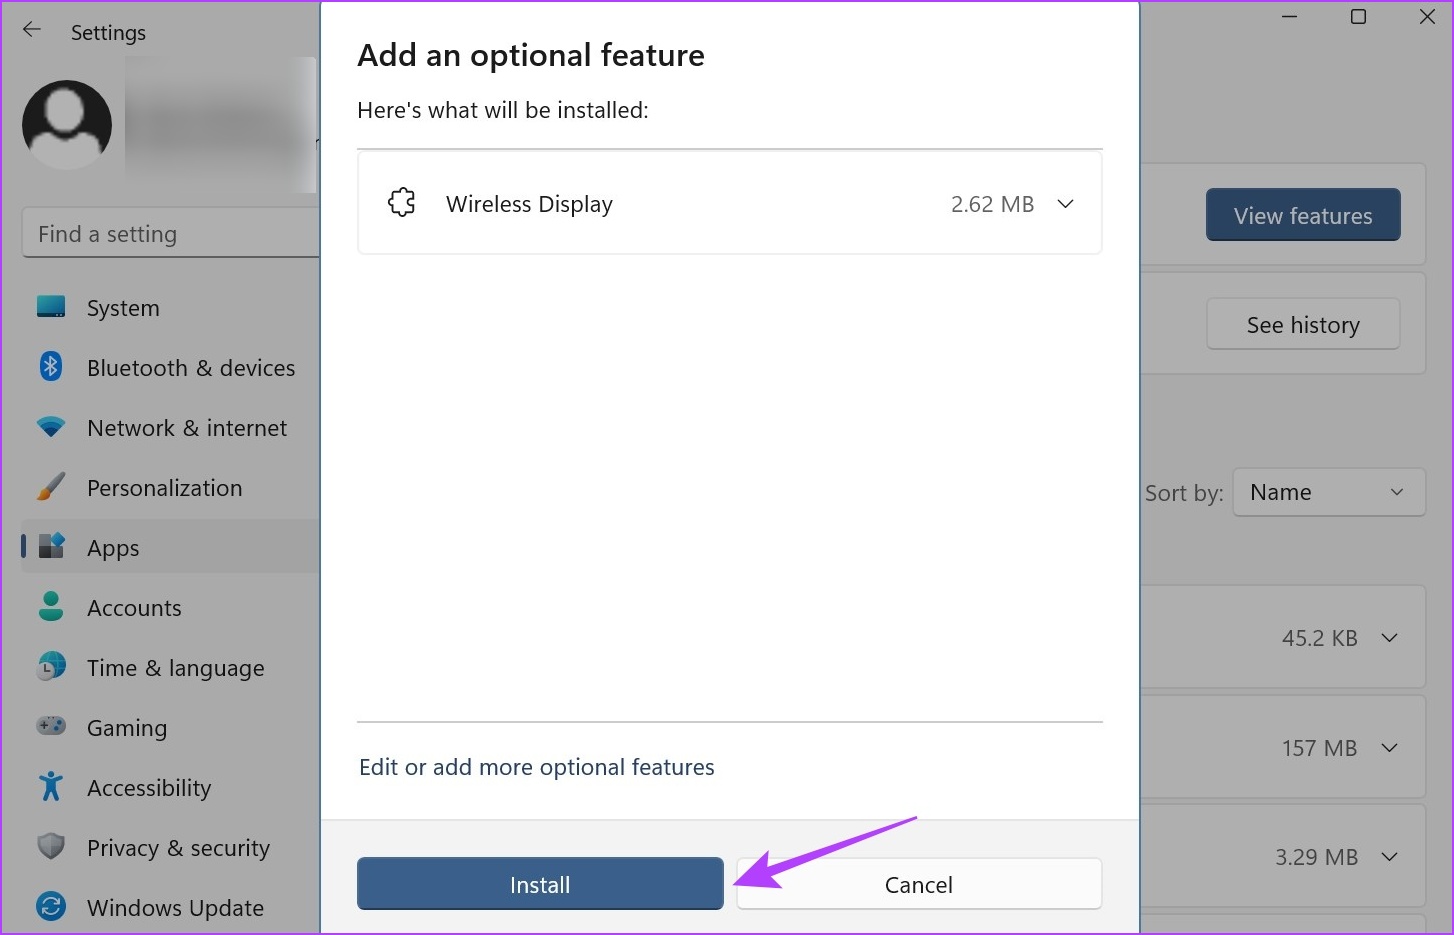
Step 7: Here, click on Install. Now, wait for the feature to finish installing.
Step 8: Then, click on System from the menu icons.
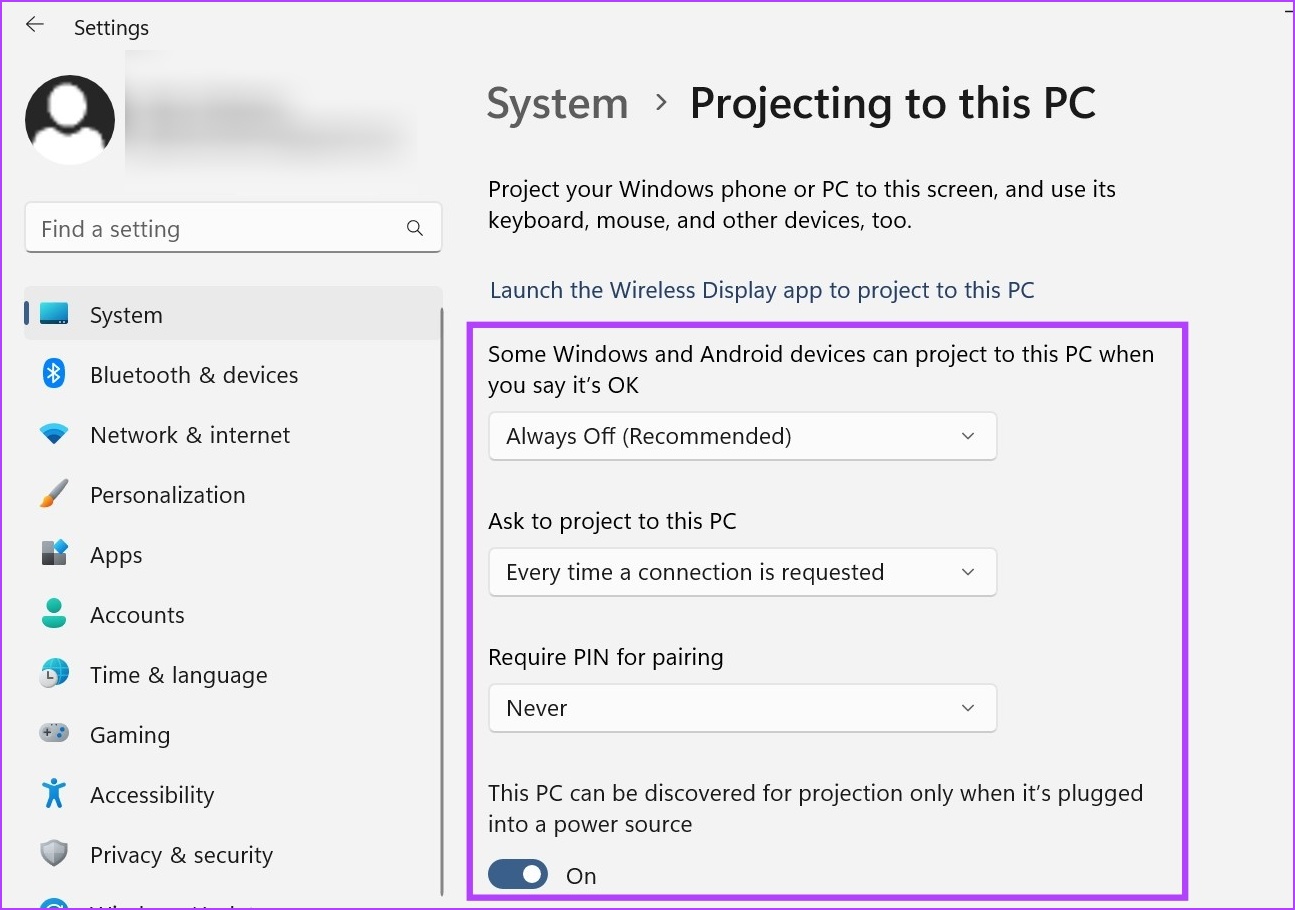
Step 9: Scroll down and you will find the ‘Projecting to this PC’ now available. Click on it.
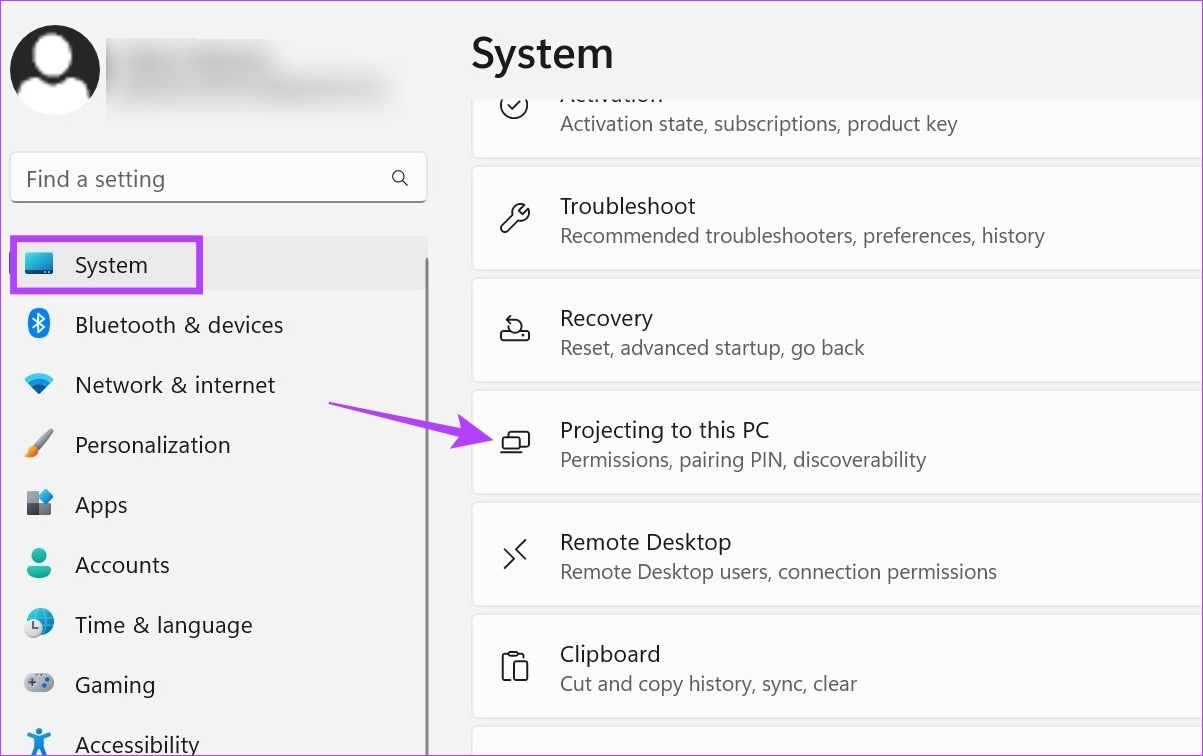
Step 10: Here, adjust the settings as per your requirements.
Step 11: Then, use the Windows Key + K on your keyboard to open the Cast window.
Here, choose the relevant option to use your laptop as the secondary monitor and adjust the way you want to cast accordingly.
2. Use Windows 11 Laptop as Monitor Through Quick Settings
The Windows 11 Quick Settings menu has a list of menu icons available for easy access. Using this, you can easily connect your Windows 11 PC to your laptop and use it as a second screen. Follow the below steps to do it.
Tip: If you’re having trouble finding the Cast icon, check our guide on how to customize Windows 11 Quick Settings to add the Cast icon.
Step 1: Use the Windows key + A shortcut to open the Quick Settings panel.
Step 2: Here, click on Cast. This will open a list of available displays.
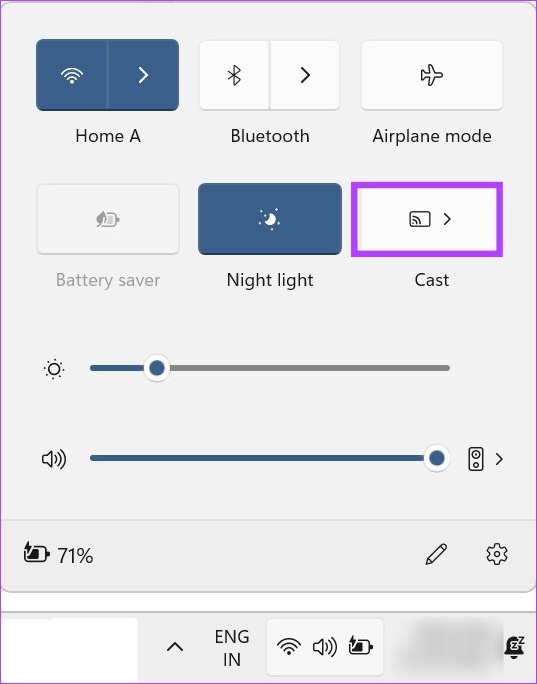
From this list, select the display you want to cast to. This will enable you to cast your screen onto the second screen, that too without using Miracast. Additionally, if you want more options on how you want the screen to be cast, you can also use the Project menu option. Here’s how to access it.
Step 1: Use the Windows key + P shortcut to open the Project menu.
Step 2: Then, select how you want the screen to be cast.

This will allow you to use your laptop as the secondary monitor.
FAQs for Using Laptop as Second Monitor
Yes, you can use third-party apps like Space Desk to use your laptop as a monitor.
Yes, you can disconnect your laptop display from the connected device. If you’re connected wirelessly, simply click on Disconnect to turn off sharing. If you’re using an HDMI cable, turn off the display from the Project window and disconnect the cable.
Use Your Laptop as You Want
Having an extra screen is always nice, especially if you’re working on multiple projects or just want to watch something on a bigger screen. So, we hope that our article helped you in figuring out how to use your laptop as a second monitor in Windows 11.
If you’re having issues with screen size and wish to recalibrate your display, here’s how to change your screen resolution in Windows 11.
Was this helpful?
Last updated on 17 April, 2023
Read Next
 How to Take Screenshots of One Monitor on Windows 11 With a Multi-Monitor Setup
Method 1: PikPick Some screenshot tools allow you to configure their settings so that they will only capture screenshots of one monitor.
How to Take Screenshots of One Monitor on Windows 11 With a Multi-Monitor Setup
Method 1: PikPick Some screenshot tools allow you to configure their settings so that they will only capture screenshots of one monitor.
 How to Close Your Laptop and Use External Monitor on Windows
How to Connect and Use External Monitor Your attempt to use your external monitor with a closed laptop will work if you use the correct display configuration.
How to Close Your Laptop and Use External Monitor on Windows
How to Connect and Use External Monitor Your attempt to use your external monitor with a closed laptop will work if you use the correct display configuration.
 What Is Second Space in MIUI: A Definitive Guide
MIUI is Xiaomi's custom Android firmware running on almost all of its phones.
What Is Second Space in MIUI: A Definitive Guide
MIUI is Xiaomi's custom Android firmware running on almost all of its phones.
 5 Best Second Monitors for iMac M3 in 2024
The iMac M3 is a powerhouse of a desktop, but even the mightiest machine can benefit from a trusty sidekick.
5 Best Second Monitors for iMac M3 in 2024
The iMac M3 is a powerhouse of a desktop, but even the mightiest machine can benefit from a trusty sidekick.
 3 Ways to Adjust Resolution for Second Display on Mac
https://youtu.be/62dyX2dyuUw Method 1: Tweak Display Scaling Level for External Monitor If you don’t want to deal with third-party apps, you can tweak the display with these simple steps.
3 Ways to Adjust Resolution for Second Display on Mac
https://youtu.be/62dyX2dyuUw Method 1: Tweak Display Scaling Level for External Monitor If you don’t want to deal with third-party apps, you can tweak the display with these simple steps.
 3 Best Ways to Adjust Brightness on External Monitor in Windows 10
One can easily adjust the screen brightness of their Windows 10 laptop or computer using the slider in the Action Center or with buttons on the keyboard.
3 Best Ways to Adjust Brightness on External Monitor in Windows 10
One can easily adjust the screen brightness of their Windows 10 laptop or computer using the slider in the Action Center or with buttons on the keyboard.
 5 Ways to Fix Monitor Goes Black Randomly on Windows 11
Basic Fixes Check the monitor connection: Ensure the monitor cable isn't loose.
5 Ways to Fix Monitor Goes Black Randomly on Windows 11
Basic Fixes Check the monitor connection: Ensure the monitor cable isn't loose.
 3 Ways to Open Resource Monitor on Windows 11
Method 1: Open Resource Monitor via File Explorer Like most Windows tools, Resource Monitor resides in the System32 folder under your Windows installation drive.
3 Ways to Open Resource Monitor on Windows 11
Method 1: Open Resource Monitor via File Explorer Like most Windows tools, Resource Monitor resides in the System32 folder under your Windows installation drive.
The article above may contain affiliate links which help support Guiding Tech. The content remains unbiased and authentic and will never affect our editorial integrity.