Basic Fixes:
- Check the network connection: If your internet speeds are less than ideal, it might cause the Windows update to fail mid-way. You can run a speed test to check the same. If there are issues, move closer to your modem and check again.
- Restart your Windows PC: Temporary system bugs can also prevent Windows updates from installing properly. To fix them, restart your Windows 11 device. Then, try installing the relevant update again.
- Check hard drive space: Your device can’t store the update if there’s insufficient space. In this case, free up space on your Windows 11 device. Once done, retry the update installation.
Fix 1: Restart Windows Update Service
If the Windows update services are not working properly, it can cause Windows update error. When this happens, restart the Windows update service on your PC and try updating it again. Here’s how to do it.
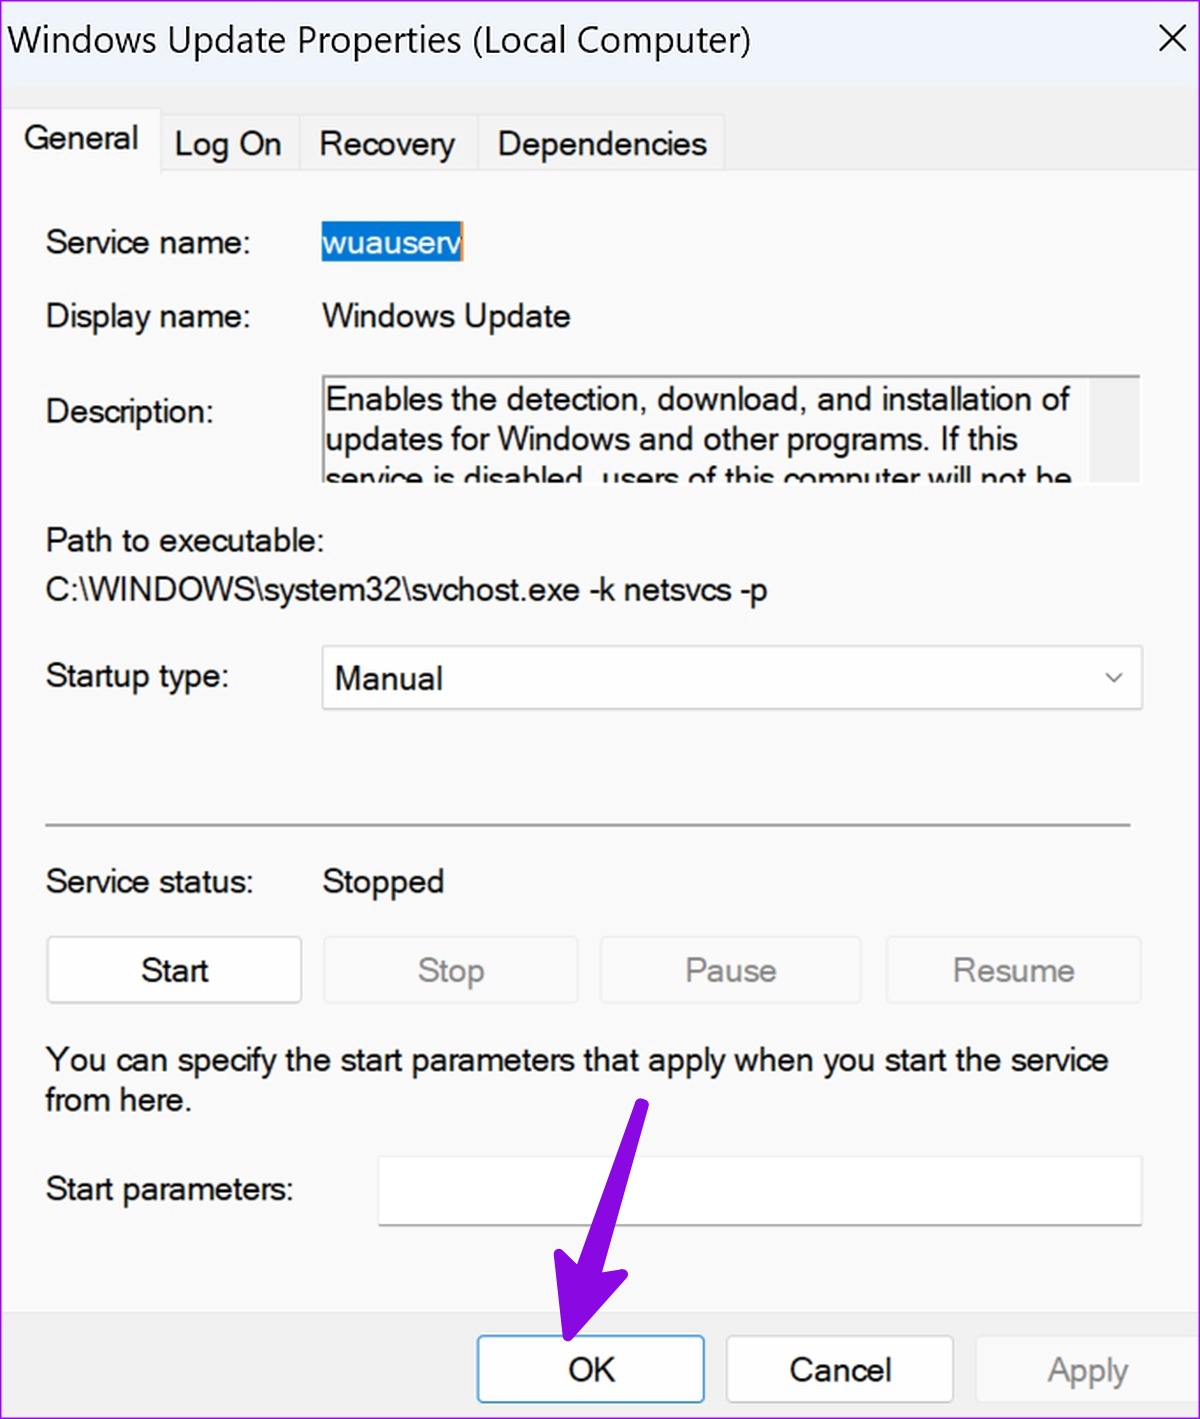
Step 1: Open Services > right-click on Windows Update > click on Properties.

Step 2: Select Start > hit OK.
Fix 2: Run the System File Checker Scan
Known as an SFC scan, it effectively deals with malicious and corrupt files on your computer. It’s a handy trick to fix issues with Windows updates failing, getting stuck, and other errors. Here’s what you need to do.
Step 1: Open the Command Prompt with administrator privileges.
Step 2: Type the following command and press Enter. Wait for the scan to run and check.
SFC /scannow

Fix 3: Run Windows Update Troubleshooter
Microsoft offers a troubleshooter tool to fix issues regarding the update process. You can run it to fix errors encountered during the Windows update process. Here’s what you need to do.
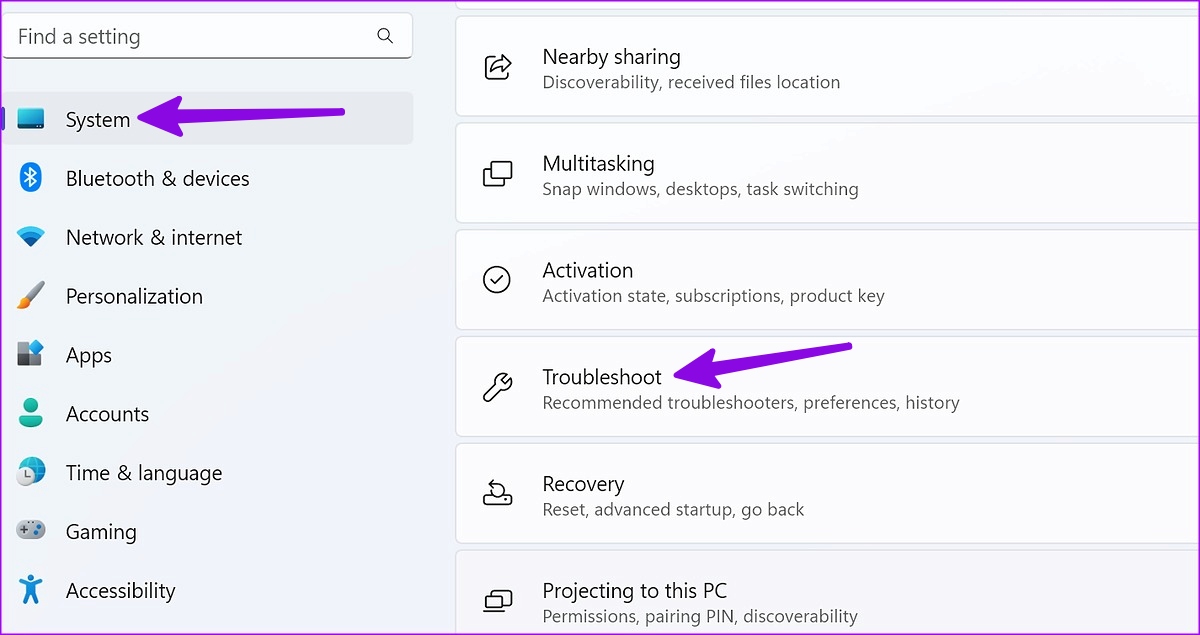
Step 1: Press the Windows + I key to open Settings.
Step 2: Click on System from the sidebar > click on Troubleshoot.
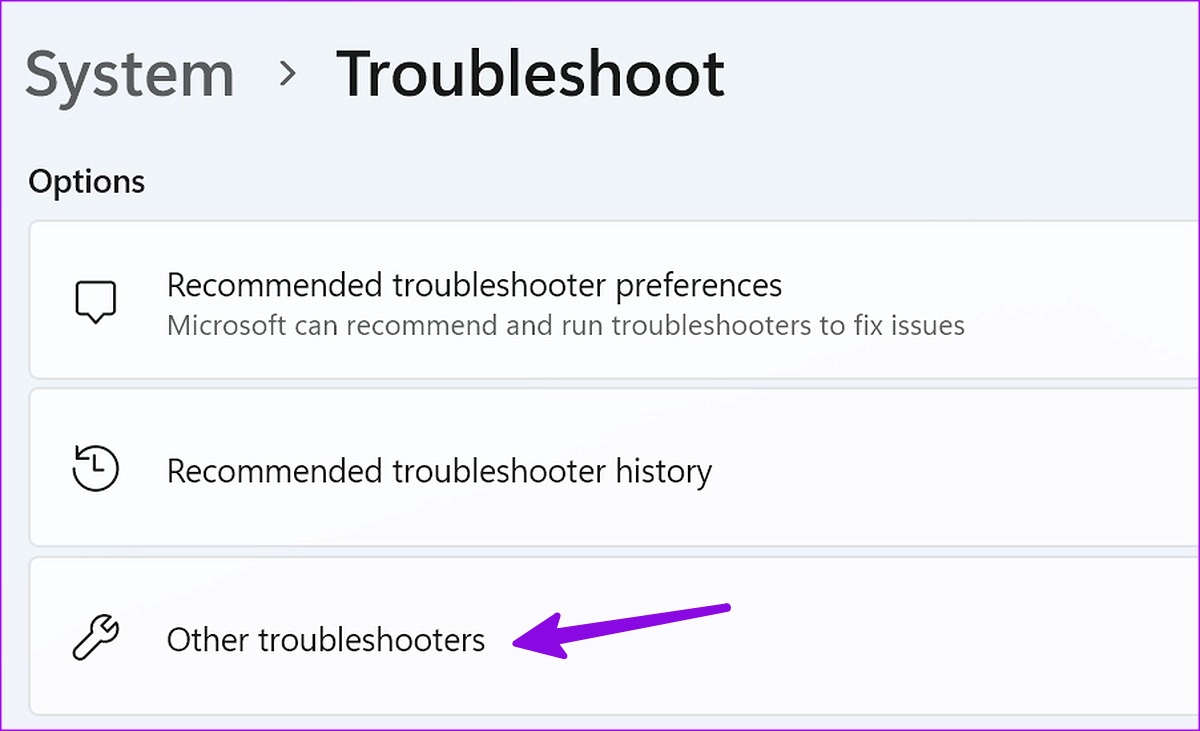
Step 3: Click Other troubleshooters.
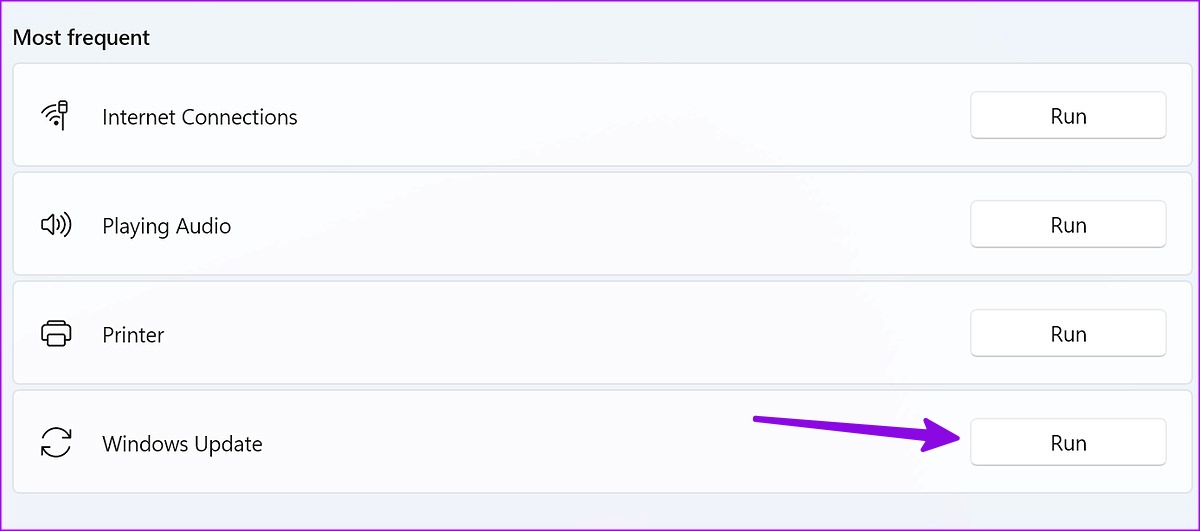
Step 4: Click the Run button next to Windows Update. Follow the recommendations when prompted.
Also Read: How to fix Windows update error 0x800f081f in Windows 11
Fix 4: Ensure Secure Boot Is Enabled
Secure Boot helps ensure your Windows 11 device boots up with all the software that your device’s manufacturer trusts. If it is disabled, it can cause issues with certain device functions, like installing updates. So, follow the below steps to check and enable Secure Boot on Windows 11.
Note: The steps to enter BIOS and locate the Secure Boot menu might differ based on your device’s OEM. We’re using an ASUS device for demonstration.
Step 1: Restart your laptop. Once you see your device’s logo, repeatedly press the F2 or Esc key to enter BIOS.
Step 2: Once you enter the BIOS, go to the Security tab.

Step 3: Go down and select Secure Boot.

Step 4: Select the Secure Boot Control drop-down and select Enabled.

Once done, use the F10 key to save the changes and exit the BIOS. Once your laptop boots up, try installing the Windows update again.
Fix 5: Restore Windows Update-Related Services
If one of the services related to Windows updates faces an issue, you may run into an error encountered during the update process. You can use the Command Prompt to restore related services and resolve the issue. Here’s how.
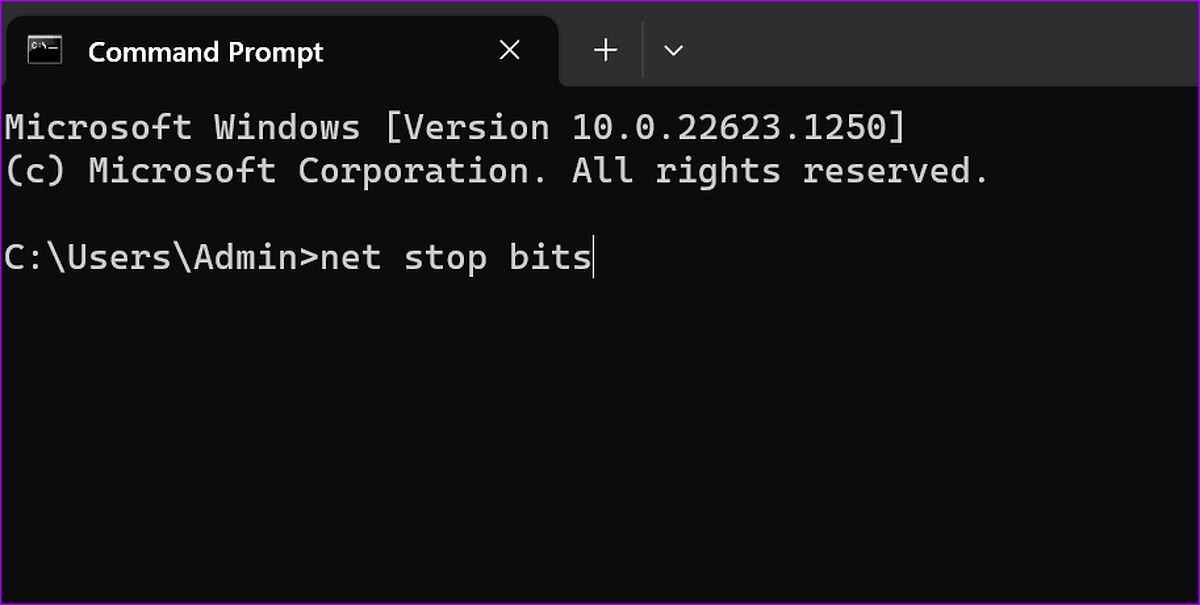
Step 1: Open Command Prompt and type the following command. Press enter to run it.
net stop bits
Step 2: Now, type the following commands and run them using the enter key one by one.
net stop wuauserv
net stop appidsvc
net stop cryptsvc
Step 3: Once done, enter the following commands > press enter to run them.
Ren %systemroot%\SoftwareDistribution SoftwareDistribution.old
Ren %systemroot%\system32\catroot2 catroot2.old

Step 4: Now, start Windows update-related services by running the below commands.
net start bits
net start wuauserv
net start appidsvc
net start cryptsvc
Once done, close Command Prompt and try installing the relevant Windows update again to check if the issue has been fixed.
Was this helpful?
Last updated on 30 August, 2024
Read Next
 5 Ways to Fix Android Phone Screen Goes Black During a Call
Before you begin, try restarting your Android device and update it to the latest available software version.
5 Ways to Fix Android Phone Screen Goes Black During a Call
Before you begin, try restarting your Android device and update it to the latest available software version.
 Top 8 Ways to Fix Proximity Sensor Not Working During Calls on Android
There are several components that contribute to the basic functioning of a smartphone.
Top 8 Ways to Fix Proximity Sensor Not Working During Calls on Android
There are several components that contribute to the basic functioning of a smartphone.
 4 Ways to Fix Android Phone Keeps Cutting Out During Calls
Basic Fixes Eject and re-insert SIM: Eject the SIM card from your phone, and insert it again.
4 Ways to Fix Android Phone Keeps Cutting Out During Calls
Basic Fixes Eject and re-insert SIM: Eject the SIM card from your phone, and insert it again.
 5 Ways to Fix Some Update Files are Missing or Have Problems Error on Windows 11
Fix 1: Run the Windows Update Troubleshooter Windows 11 includes a dedicated troubleshooter to automatically identify and resolve any common issues with the Windows Update process.
5 Ways to Fix Some Update Files are Missing or Have Problems Error on Windows 11
Fix 1: Run the Windows Update Troubleshooter Windows 11 includes a dedicated troubleshooter to automatically identify and resolve any common issues with the Windows Update process.
 9 Ways to Fix “Update Device Settings to Accept Media Transfers” Error on Windows 11
When you connect your Android or iPhone to your Windows device, you can see most files in the Photos app.
9 Ways to Fix “Update Device Settings to Accept Media Transfers” Error on Windows 11
When you connect your Android or iPhone to your Windows device, you can see most files in the Photos app.
 How to Fix iPhone Screen Goes Black During Call
https://youtu.be/AoTMsNjBpdw Why Does My iPhone Screen Go Black During Call?
How to Fix iPhone Screen Goes Black During Call
https://youtu.be/AoTMsNjBpdw Why Does My iPhone Screen Go Black During Call?
 How to Fix Samsung Phone Screen Goes Black During Call
Basic Fixes Restart the phone: Sometimes, the screen goes black due to a minor software glitch.
How to Fix Samsung Phone Screen Goes Black During Call
Basic Fixes Restart the phone: Sometimes, the screen goes black due to a minor software glitch.
 How to Fix Echo on iPhone During Voice Calls or FaceTime
We make or receive numerous calls daily.
How to Fix Echo on iPhone During Voice Calls or FaceTime
We make or receive numerous calls daily.
The article above may contain affiliate links which help support Guiding Tech. The content remains unbiased and authentic and will never affect our editorial integrity.

