Common Fixes
- Press Ctrl + Alt + Delete – This shortcut refreshes the login interface to bring up the login screen.
- Install pending system updates – Open Settings (press Windows + I keys) > click Windows Update in the left sidebar > install new updates.
Prerequisite: Boot Into Safe Mode
If you’re stuck on the login screen, boot Windows 11 in safe mode to apply nifty fixes to troubleshoot the issue.
Step 1: Press and hold your PC’s physical power button until it shuts down. After a few seconds, turn it on.
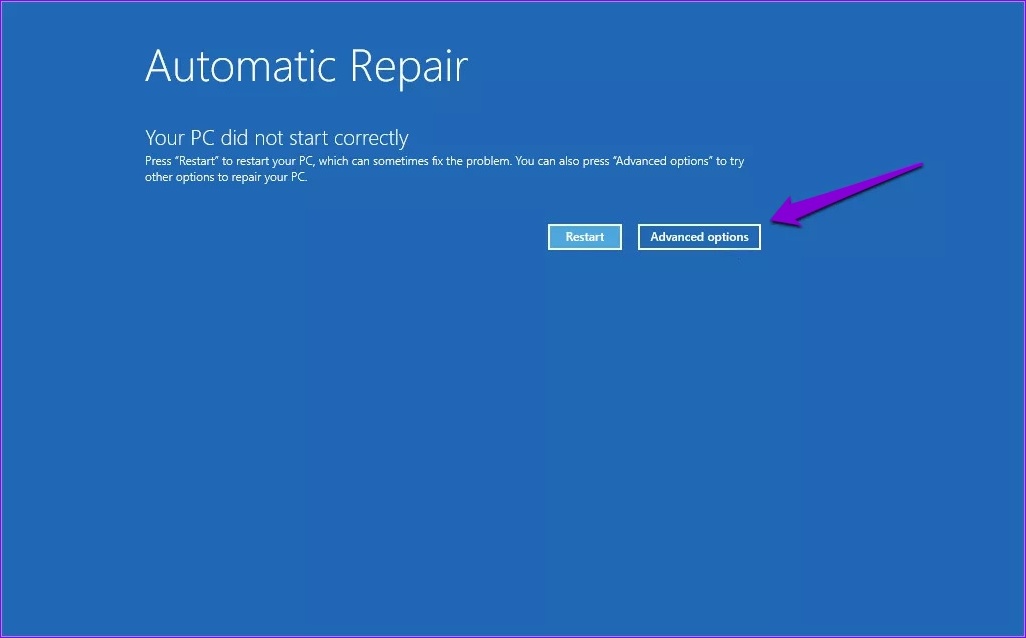
Step 2: Press and hold the power button while booting to restart the PC again. Repeat this step to interrupt the boot process three times till Windows displays the Automatic Repair wizard and select Advanced options.
Step 3: Click Troubleshoot in the next menu and press Advanced options.

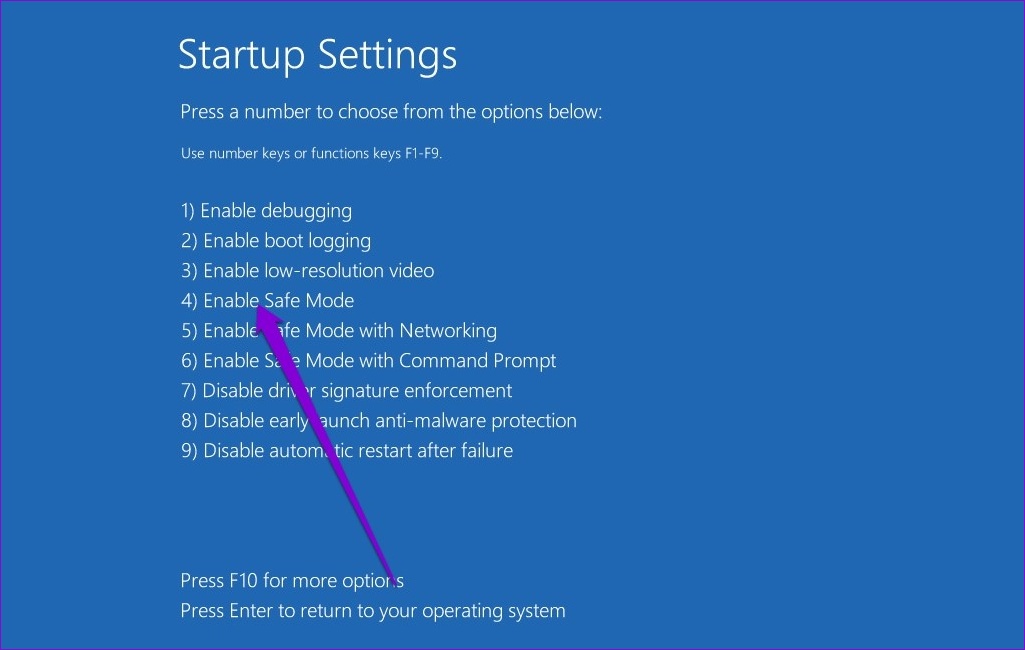
Step 4: Click Startup Settings under Advanced options > press Restart when prompted.

Step 5: Finally, press 4 or F4 on your keyboard to restart your PC in Safe Mode.
Now that you’ve entered in the Safe Mode, apply the following fixes:
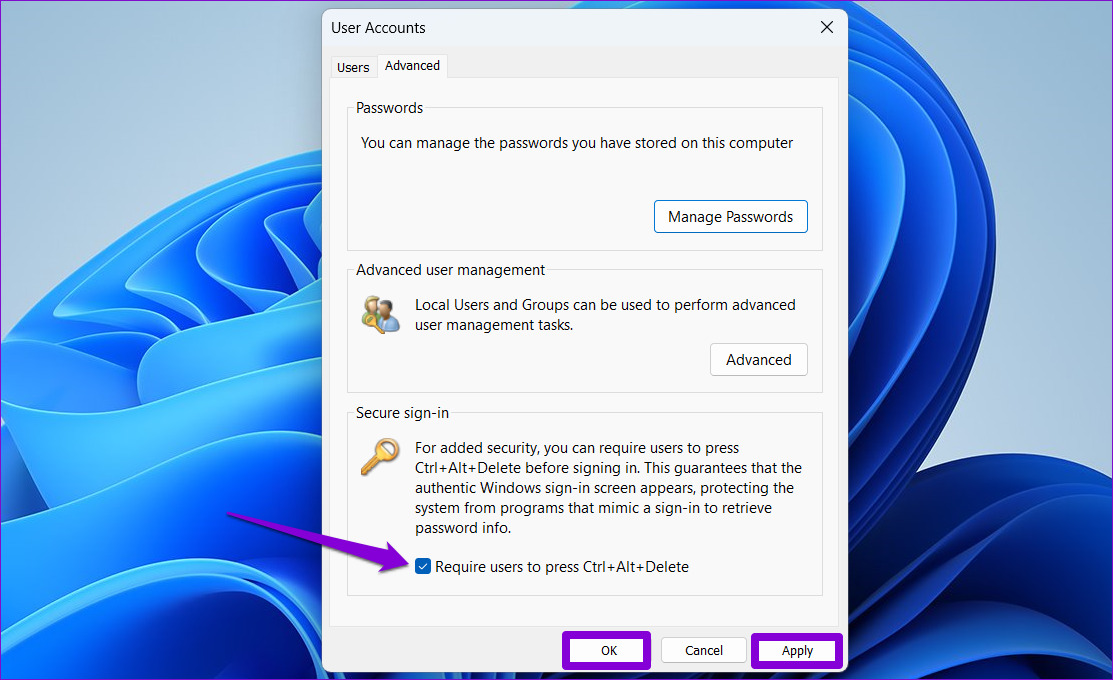
Fix 1: Disable Secure Sign-In
When Secure Sign-in is enabled, press Ctrl + Alt + Delete to view the login screen. Disabling it will remove this security layer so you can see the login screen directly.
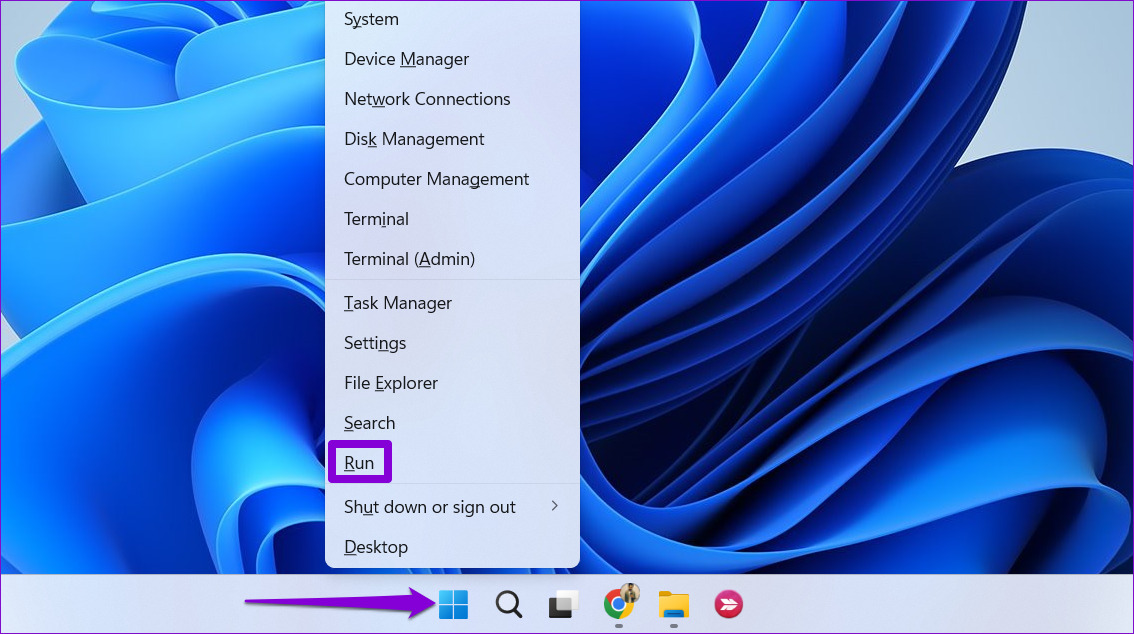
Step 1: Right-click the Start icon and select Run from the Power User menu.
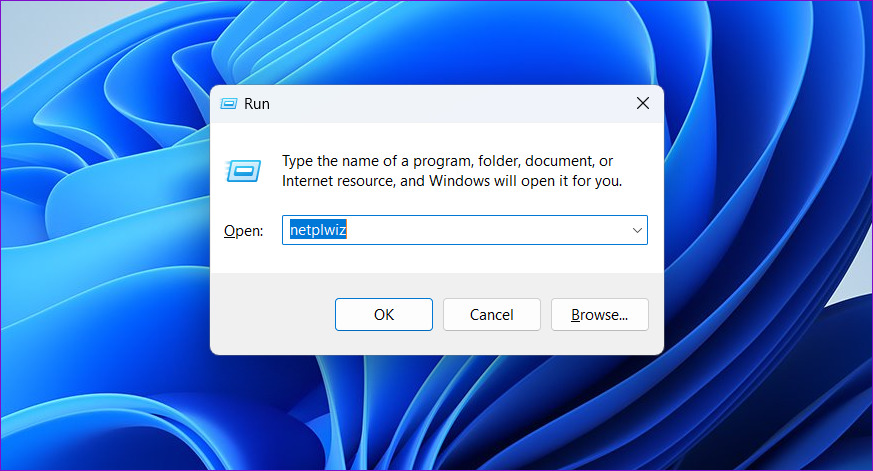
Step 2: Type netplwiz and press Enter.
Step 3: Switch to the Advanced tab > uncheck Require users to press Ctrl+Alt+Delete > select Apply, followed by OK.
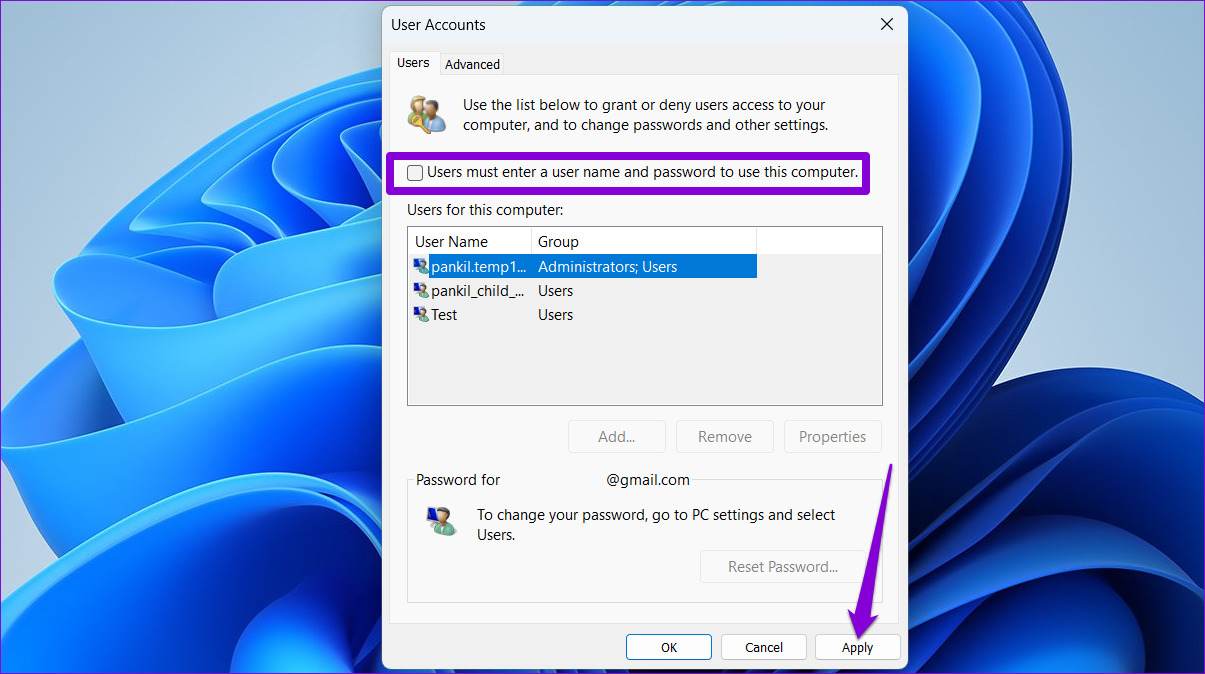
Fix 2: Turn off Automatic Login
If you’ve enabled the automatic login feature before, you won’t see the login screen when booting your Windows 11 machine. Turning it off should restore the login screen in no time.
Step 1: Press the Windows + R keys to open the Run dialog, type netplwiz, and press Enter.
Step 2: In the User Accounts window, check the box for Users must enter a user name and password to use this computer and click Apply.
Fix 3: Disable Fast Startup
Fast startup can sometimes create issues with the boot process and prevent Windows from showing the login screen. Turning off this feature should resolve the issue.
Step 1: Click Windows Search in the taskbar > search Control Panel > open it.

Step 2: Open Power Options in the Control Panel menu and click Choose what the power buttons do in the sidebar.

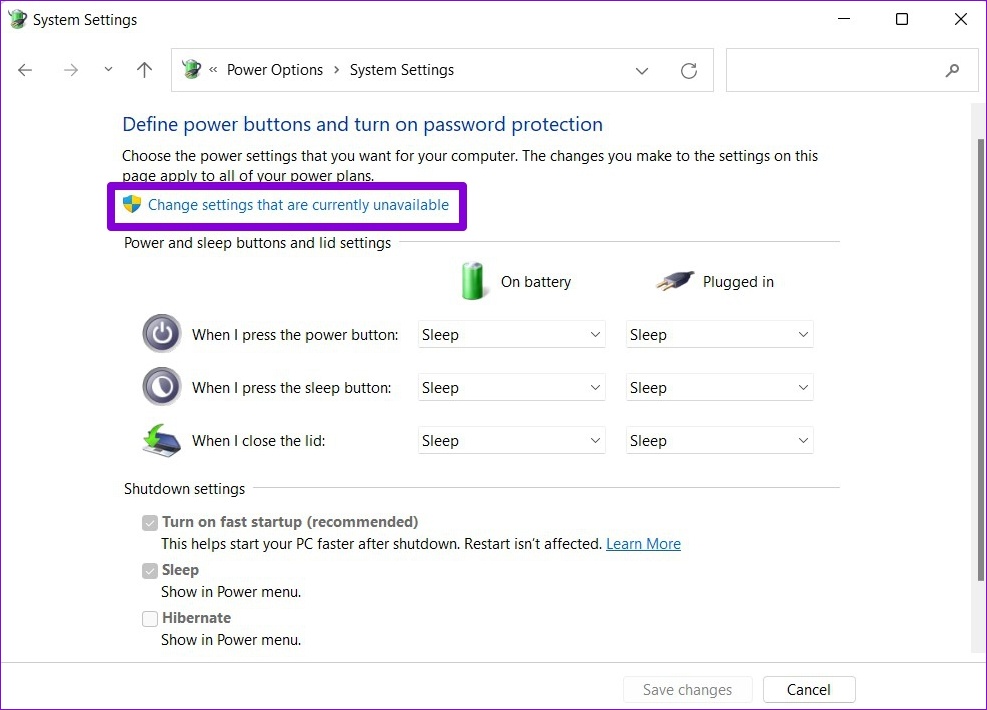
Step 3: Click Change settings that are currently unavailable and approve the UAC prompt when it appears.
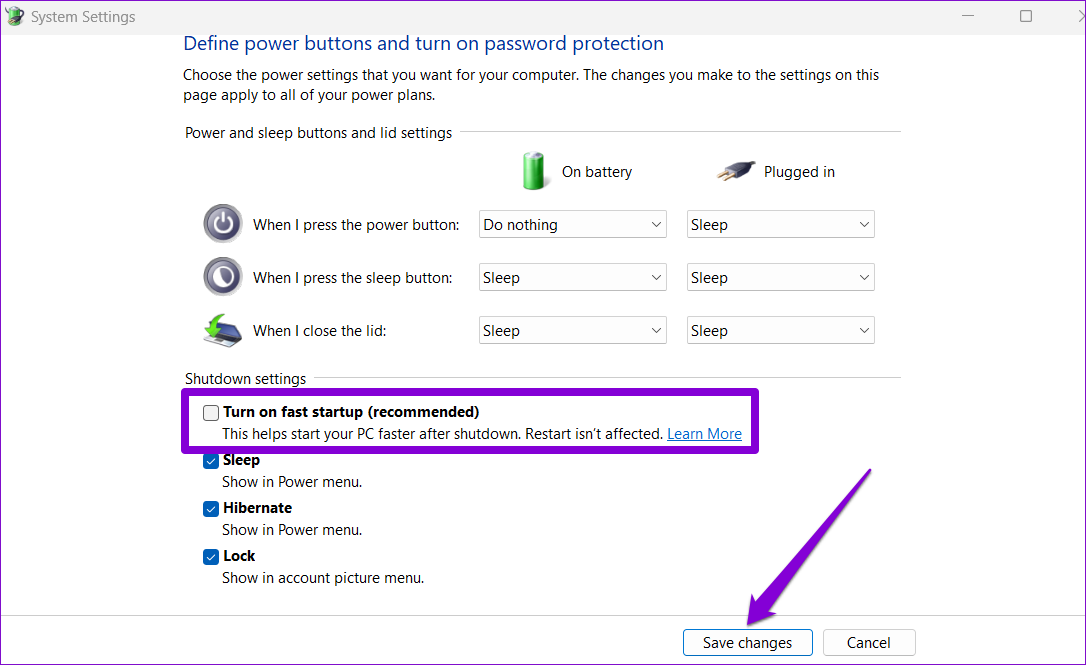
Step 4: Uncheck Turn on fast startup (recommended) and click Save Changes.
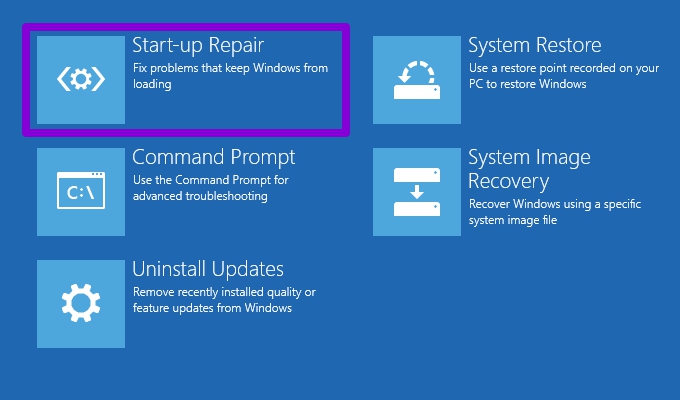
Fix 4: Run Start-up Repair
Running the Start-up Repair utility can resolve issues preventing Windows from booting correctly, such as the absence of a login screen.
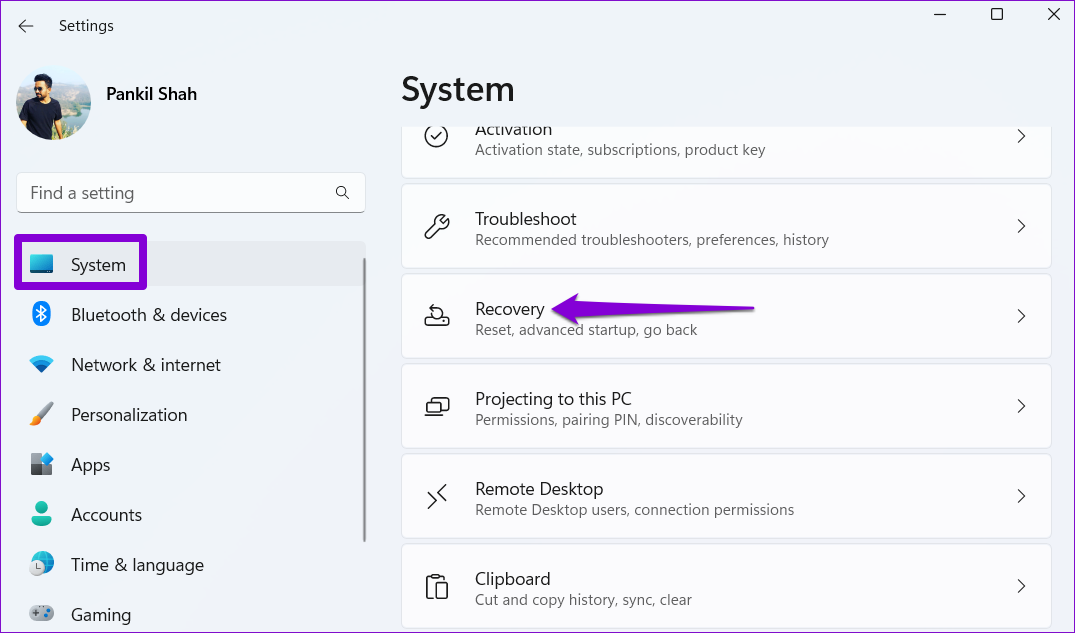
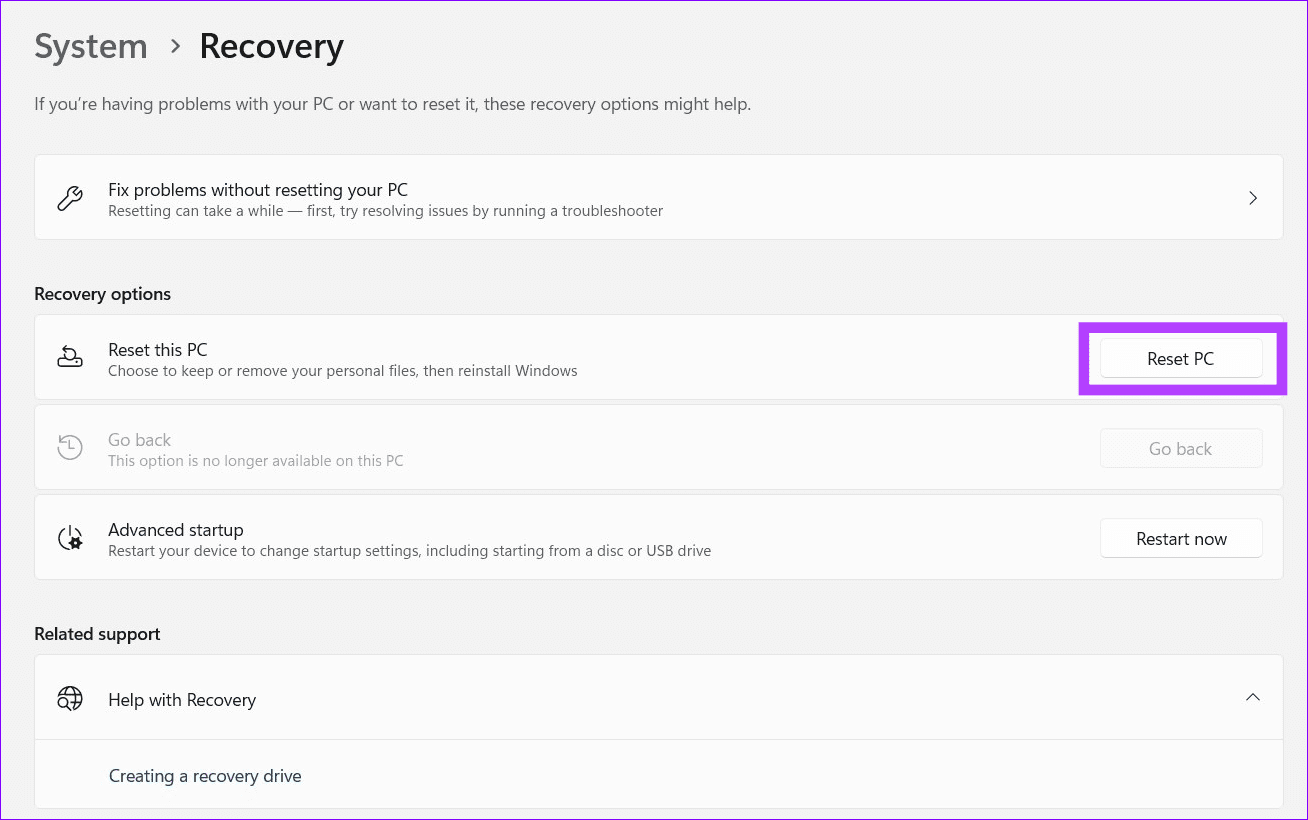
Step 1: Open the Windows Settings app, click System in the left sidebar, and select Recovery.
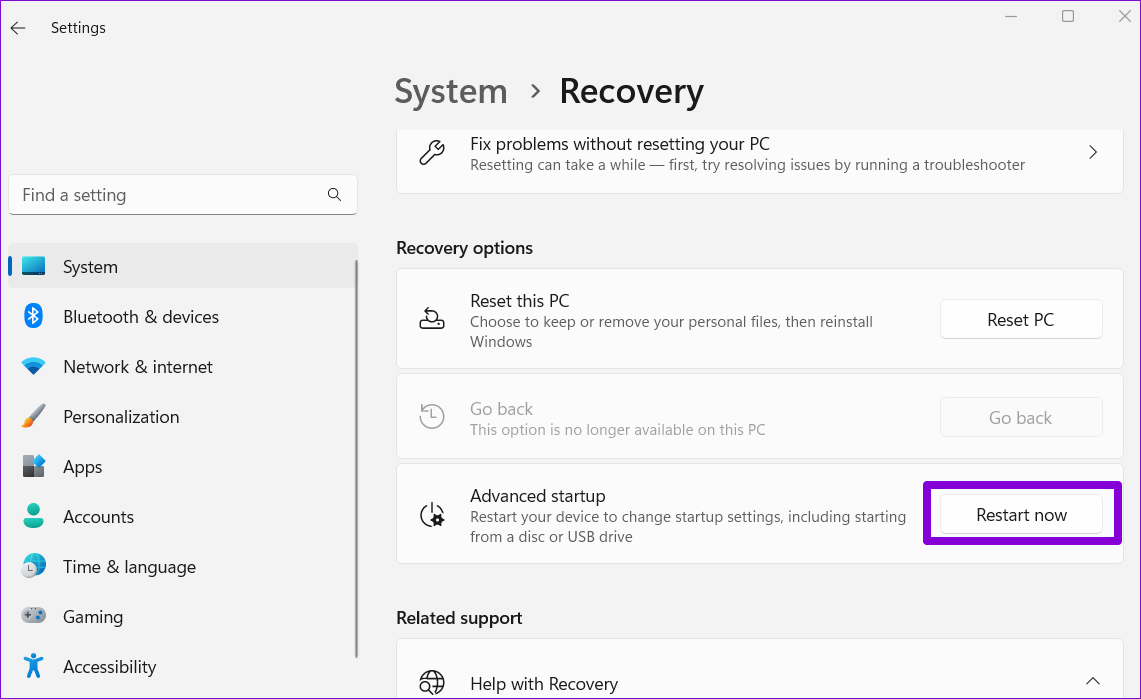
Step 2: Click Restart Now next to Advanced startup. Press the Restart Now button when prompted.
Step 3: Wait for your PC to boot into the Advanced Startup environment and click Troubleshoot.

Step 4: Press Advanced options in the next menu > select Start-up Repair. The utility should run and fix the login screen issue.
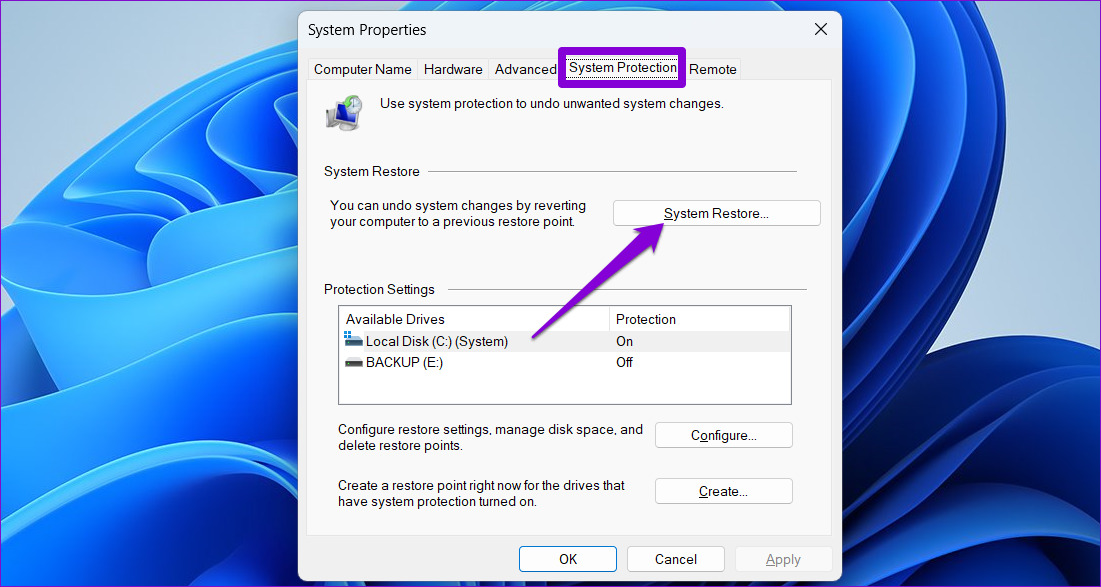
Fix 5: Do a System Restore
If you’ve enabled System Restore on Windows 11, you can revert bad system-level changes causing login screen issues. Follow these steps to restore Windows 11 with this feature:
Step 1: Click the Windows Search icon in the taskbar, search create a restore point, and hit enter.

Step 2: Switch to the System Protection tab > click System Restore.
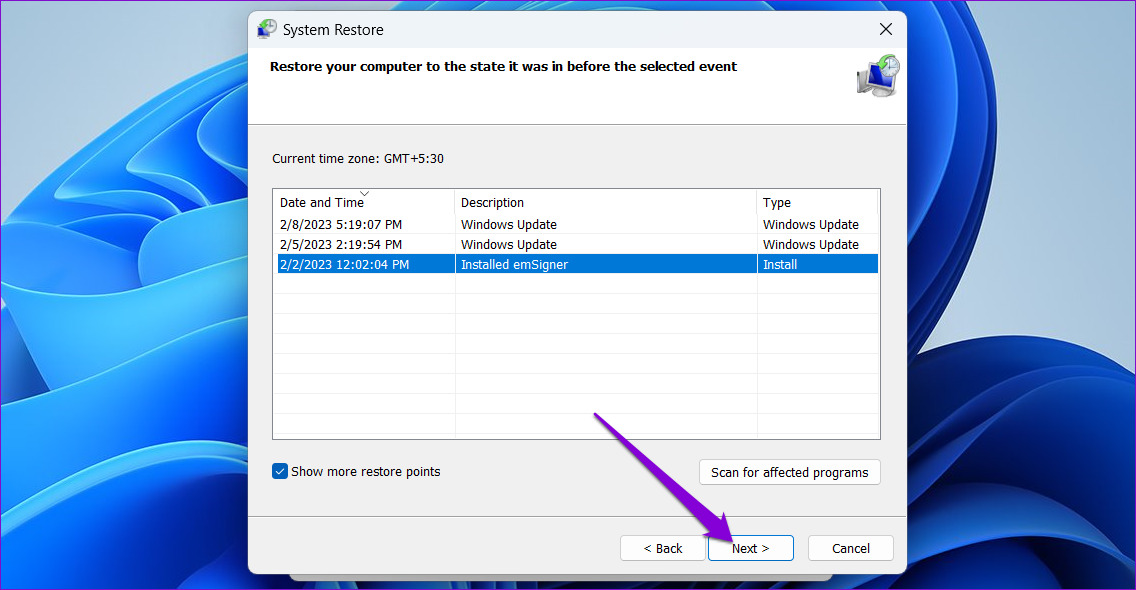
Step 3: Click Next, select a restore point before the issue first appeared > press Next.
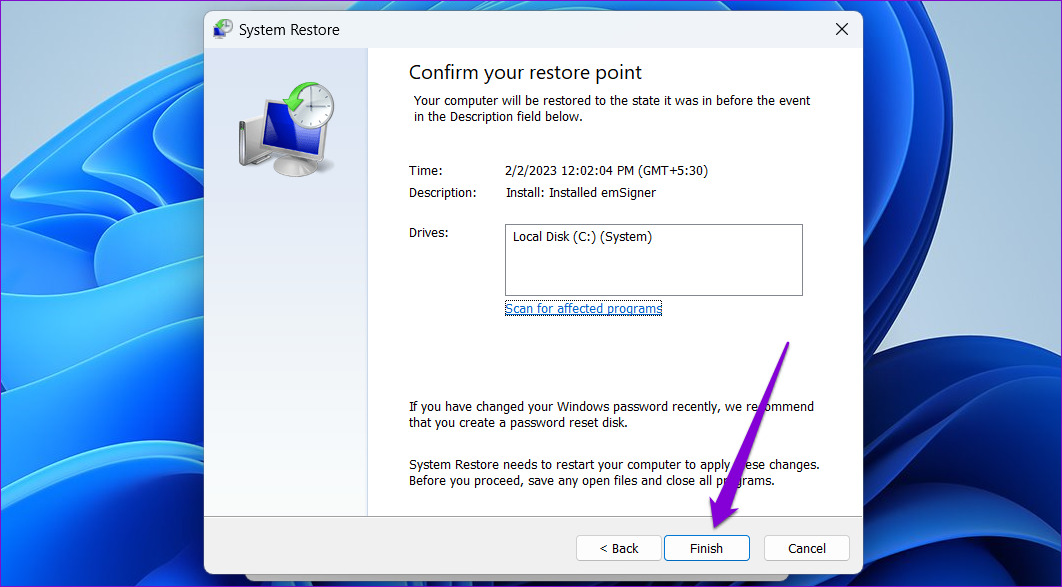
Step 4: Click Finish to restore Windows to the previous restore point.
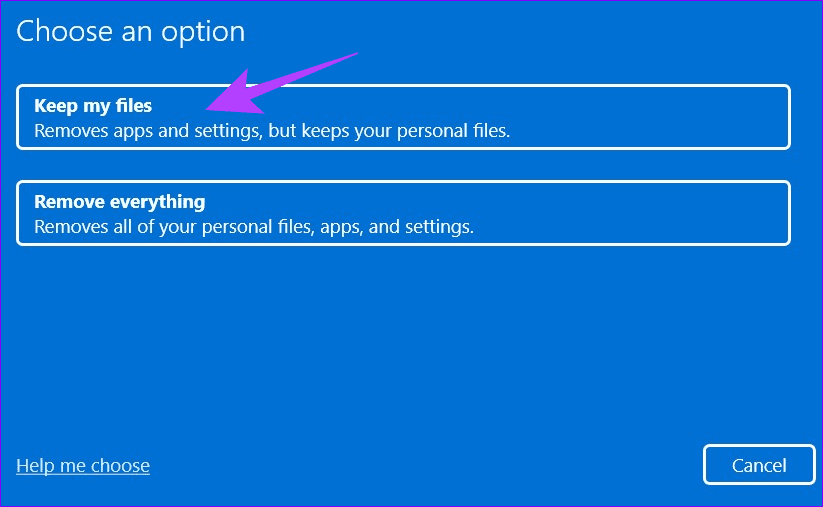
Fix 6: Reset Windows While Keeping Your Files
If nothing works, resetting Windows 11 while keeping your files will fix the login screen not showing error.
Step 1: Press the Windows key, search Reset this PC, and click to open it.
Step 2: Click Reset PC under Recovery options.
Step 3: Select Keep my files and follow the on-screen instructions.
Was this helpful?
Last updated on 22 April, 2024
Read Next
 4 Ways to Disable Login Screen After Sleep on Windows 11
Method 1: Disable Login After Sleep From Settings The easiest way to skip the login screen after sleep mode is by modifying the sign-in options in the Settings app.
4 Ways to Disable Login Screen After Sleep on Windows 11
Method 1: Disable Login After Sleep From Settings The easiest way to skip the login screen after sleep mode is by modifying the sign-in options in the Settings app.
 How to Fix “Switch User” Missing From Windows Login Screen
Fix 1: Enable Inactive Accounts If the other user accounts on your system are disabled, they won’t appear on the login screen.
How to Fix “Switch User” Missing From Windows Login Screen
Fix 1: Enable Inactive Accounts If the other user accounts on your system are disabled, they won’t appear on the login screen.
 Top 8 Ways to Fix Wi-Fi Login Page Not Showing on iPhone
Public Wi-Fi networks have become ubiquitous.
Top 8 Ways to Fix Wi-Fi Login Page Not Showing on iPhone
Public Wi-Fi networks have become ubiquitous.
 3 Ways to Fix Wi-Fi Login Page Not Showing on Android
https://youtu.be/PI8mmzRDJ0c Try Basic Fixes Disable and re-enable Wi-Fi: Temporary issues with your Android's Wi-Fi may prevent it from communicating with the network and loading the login page.
3 Ways to Fix Wi-Fi Login Page Not Showing on Android
https://youtu.be/PI8mmzRDJ0c Try Basic Fixes Disable and re-enable Wi-Fi: Temporary issues with your Android's Wi-Fi may prevent it from communicating with the network and loading the login page.
 How to Disable the Login Password Screen in Windows 10
Entering a password every time you log in to your Windows 10 computer can get tiring after a while.
How to Disable the Login Password Screen in Windows 10
Entering a password every time you log in to your Windows 10 computer can get tiring after a while.
 7 Fixes for Wi-Fi Login Page Not Showing Up on Mac and Windows
https://youtu.be/ZVvbLZKKXKk Fix 1: Forget the Network and Reconnect to It Try forgetting the network so you can reconnect to it.
7 Fixes for Wi-Fi Login Page Not Showing Up on Mac and Windows
https://youtu.be/ZVvbLZKKXKk Fix 1: Forget the Network and Reconnect to It Try forgetting the network so you can reconnect to it.
 4 Ways to Fix the Login Error Code E84 in Steam for Windows
Switch to a different network connection: A slow or intermittent internet connection can also cause login errors in Steam.
4 Ways to Fix the Login Error Code E84 in Steam for Windows
Switch to a different network connection: A slow or intermittent internet connection can also cause login errors in Steam.
 4 Ways to Remove Login Password From Windows 11
Method 1.
4 Ways to Remove Login Password From Windows 11
Method 1.
The article above may contain affiliate links which help support Guiding Tech. The content remains unbiased and authentic and will never affect our editorial integrity.