Phones have become an integral part of our lives for everything from communication to entertainment. We stay connected to the internet all day for social media updates and other news. In such times, it’s hard to deal with slow internet or stay disconnected from the internet for too long. Seeing the No Service error on your iPhone is surely a nightmare for most people worldwide.
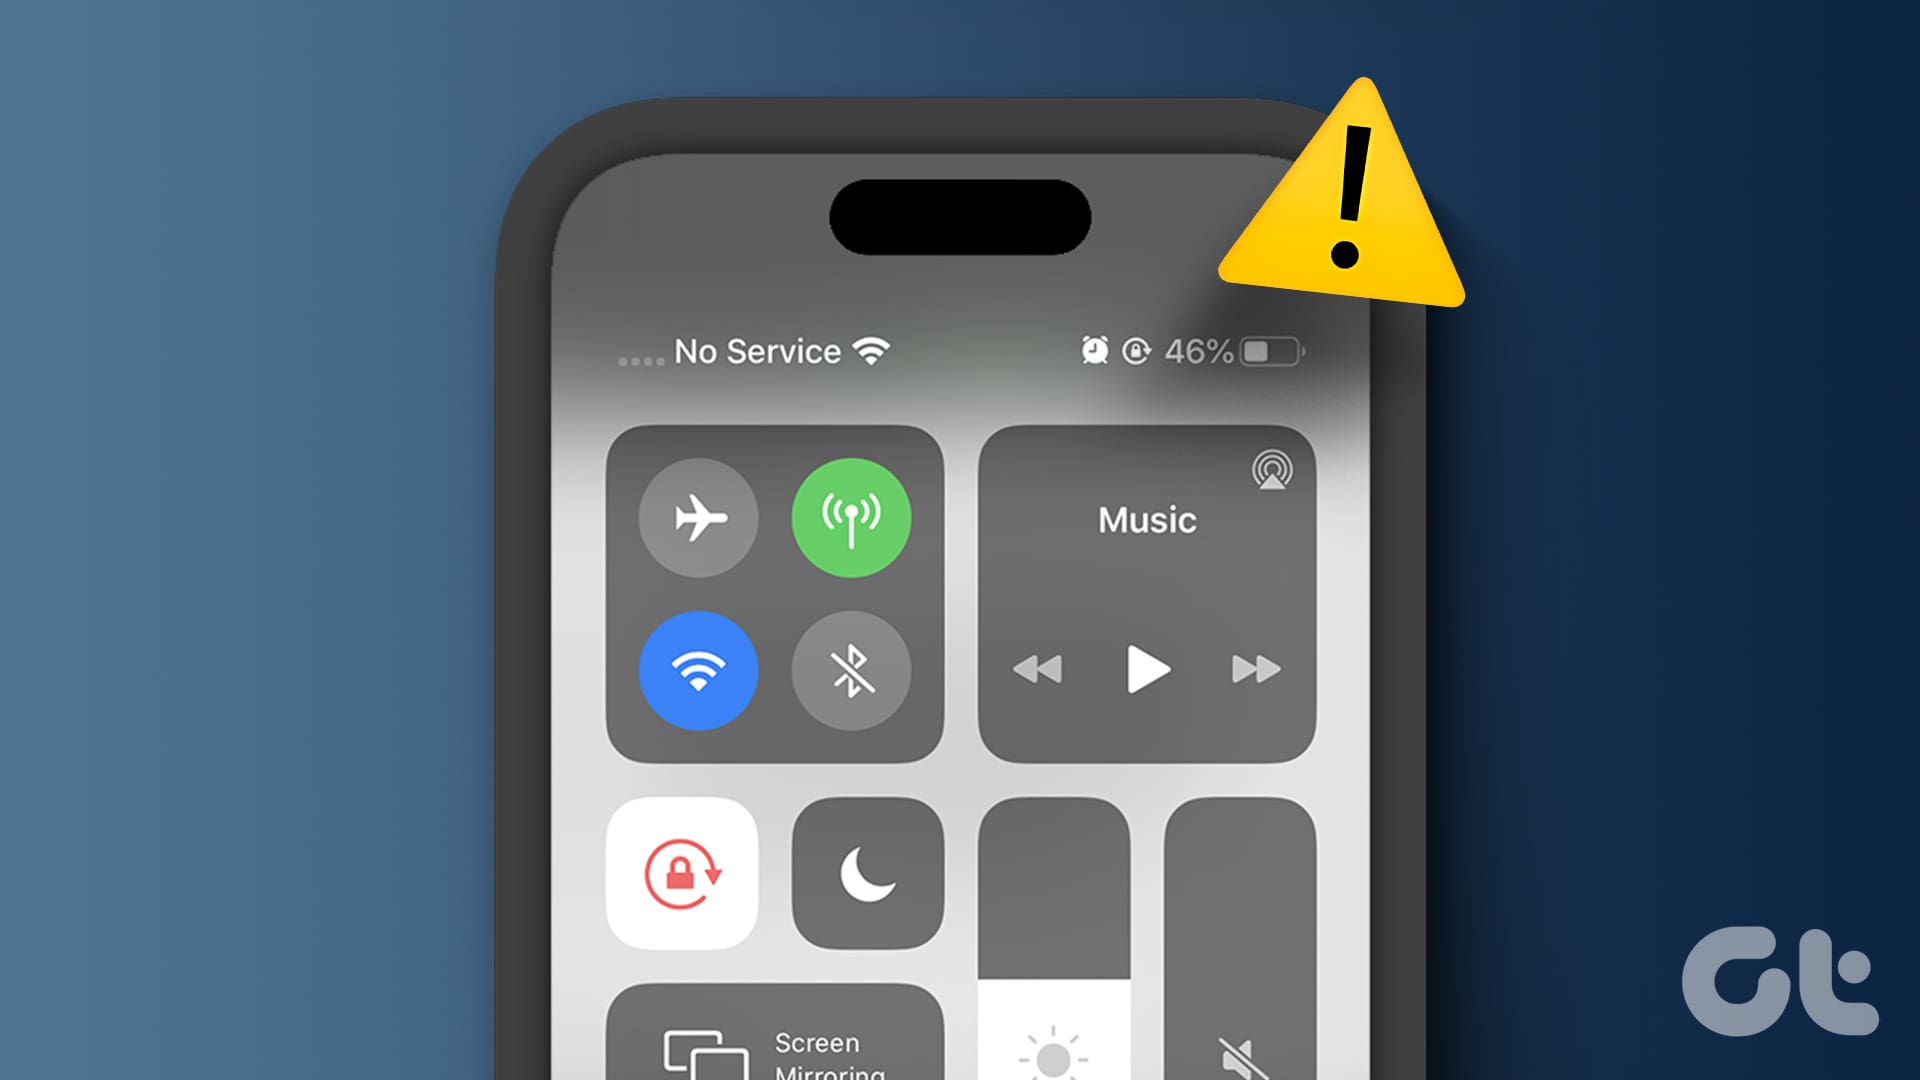
If you’re in an area with low signal strength or traveling to a new location, you may experience that your cellular data is not working. You may also notice that your iPhone says No Service in the status bar. Sometimes, you may observe that a SIM card is inserted but you still see No Service on your iPhone. If you face this issue, here are a few steps to help you get back network connectivity on your iPhone to go online again.
Why Does My iPhone Say No Service
The No Service message means that your iPhone is unable to establish a connection with the network. In simple words, your device isn’t connected to a mobile network. This could either be because you’re based in an area with no cellular towers or there may be a glitch with your network carrier’s servers.

In fact, the No Service message could also indicate an issue with your SIM. To find out quick fixes for your iPhone saying No Service, try your hand at the solutions listed below.
How to Fix No Service on iPhone
1. Remove and Reinsert Your SIM Card
This is the first thing you should do if you see no bars on your iPhone or your iPhone keeps losing service. The customer support of your telecom operator is going to suggest the same. It’s possible that your iPhone is unable to read the SIM card.
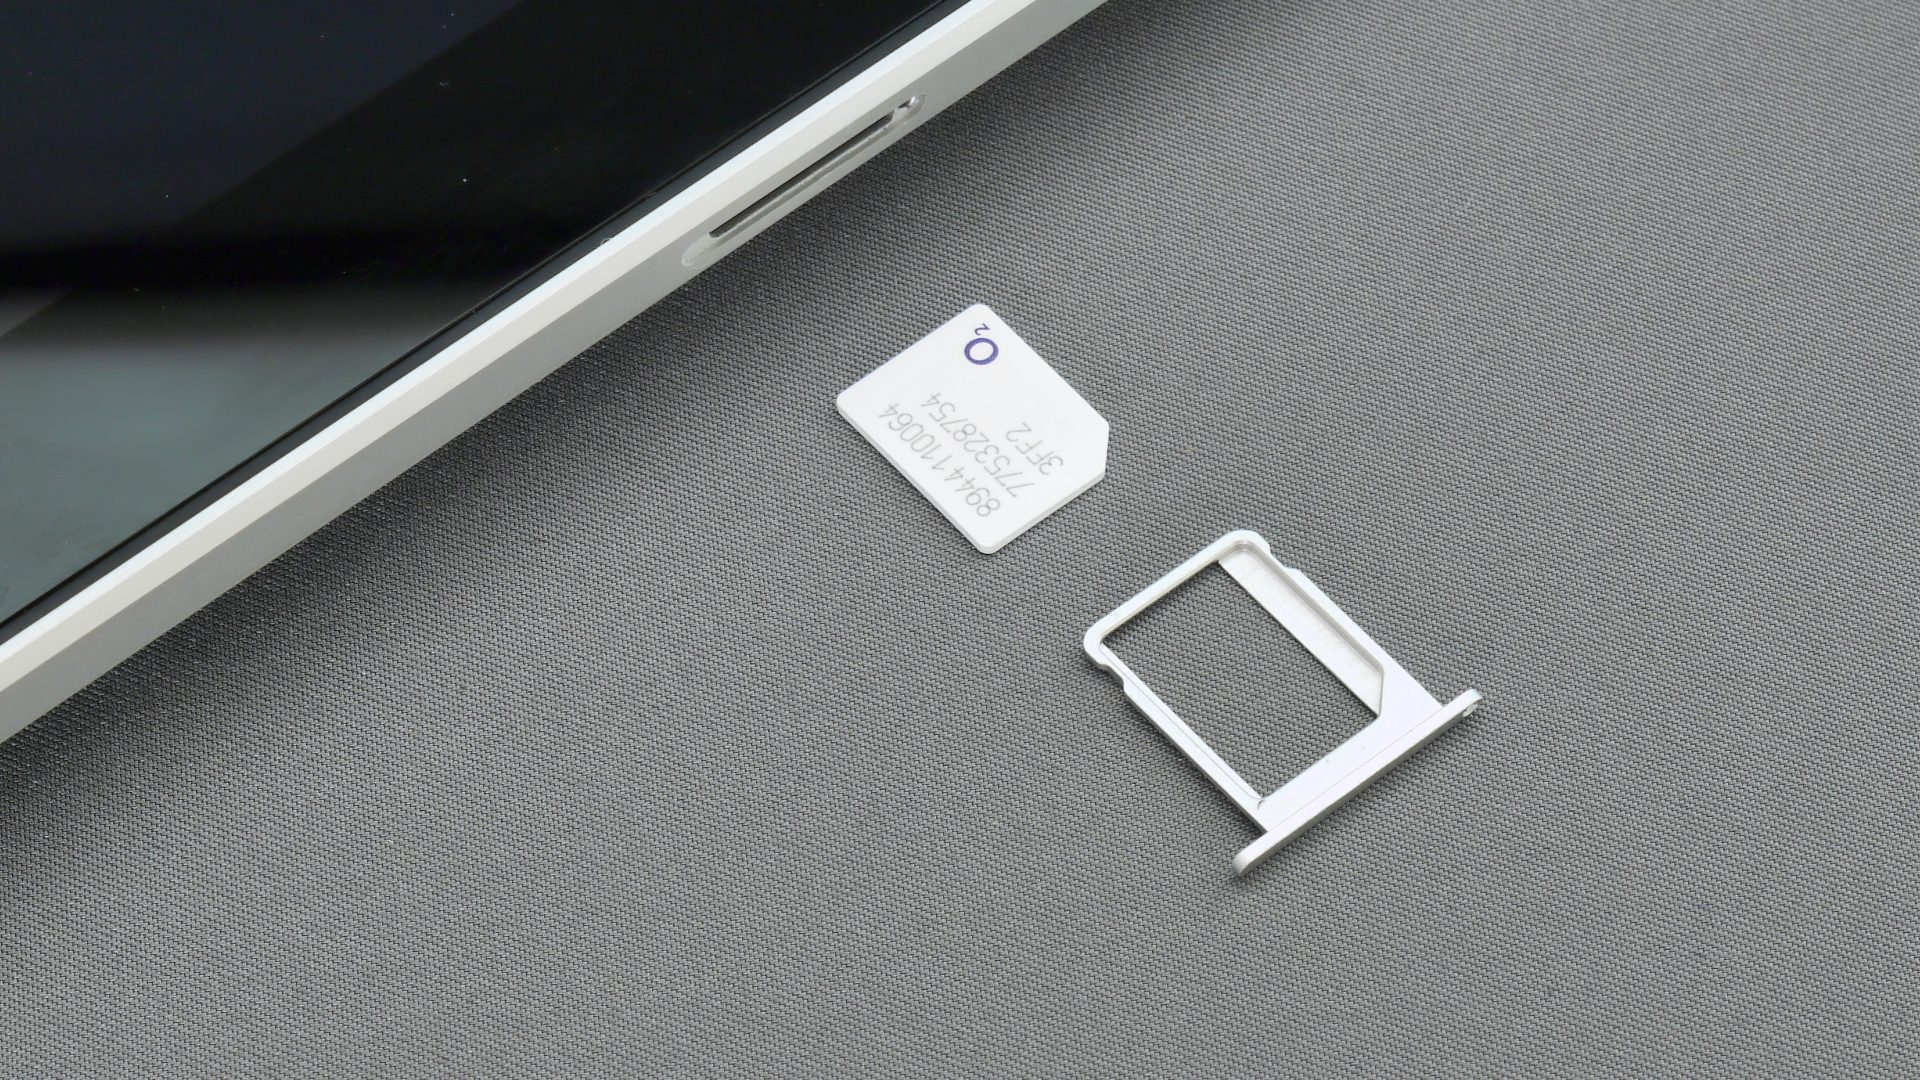
Use a SIM ejector tool to remove the SIM tray. After at least half a minute, place the SIM properly inside the tray and insert it back into the phone. Let the iPhone detect and latch on the best available network automatically.
2. Toggle Airplane Mode
Sometimes a toggle can save you hours of frustration. Enable the Airplane Mode temporarily for it shuts off all radio signals on your iPhone. When you toggle it off, all the radios enable, and your iPhone starts searching for signals.
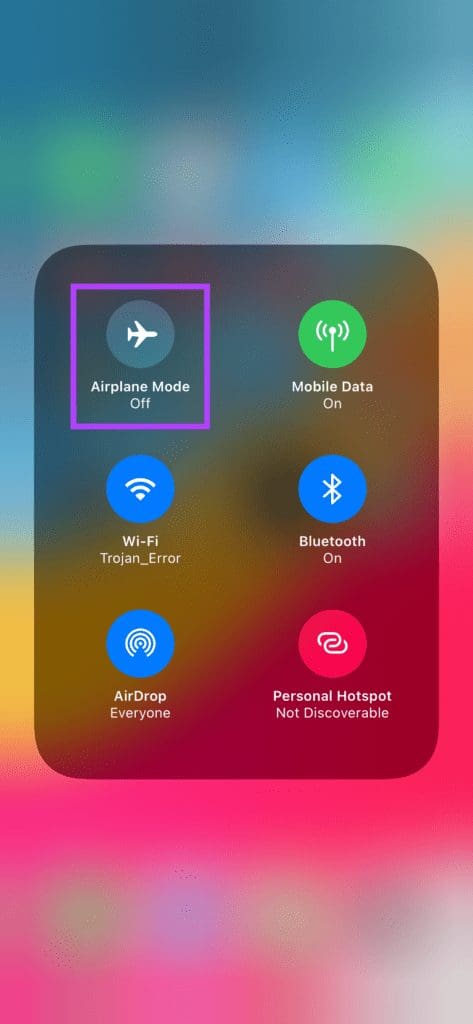
This gives a fresh start to your iPhone to initiate a reliable connection with a mobile network. You can get rid of most iPhone network problems this way.
3. Try Going to an Open Space
If you’re in a closed building with lots of walls and obstructions or in a parking lot, the chances are that your iPhone is unable to connect to a nearby cell tower. This leads to the No Service error being displayed on your iPhone.

Try moving to an open space or a balcony to get a better signal on your iPhone.
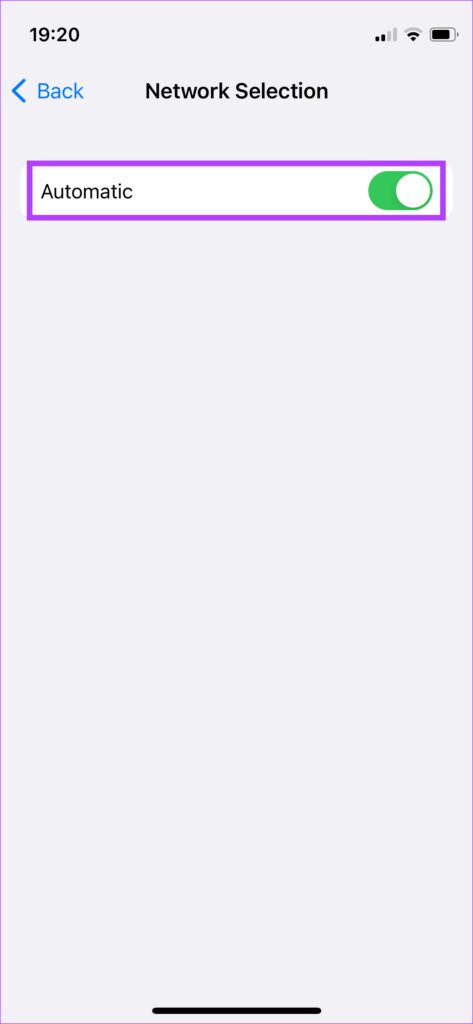
4. Manually Select Network
Usually, the iPhone’s antennas are smart enough to latch onto the network and keep you connected automatically. However, there may be no network tower nearby, and your iPhone can’t connect. You can try manually selecting a network and connecting your iPhone to it in such a case. Here’s how to manually select the network on your iPhone.
Step 1: Open the Settings app on your iPhone. Navigate to the Mobile Data/Cellular section.

Step 2: Here, you will find the Network Selection option. Tap on it.

Step 3: Disable the toggle next to Automatic. This will allow you to choose a network manually.
Step 4: Allow your iPhone to search for nearby signals. After a few seconds, you will see a list of available networks.
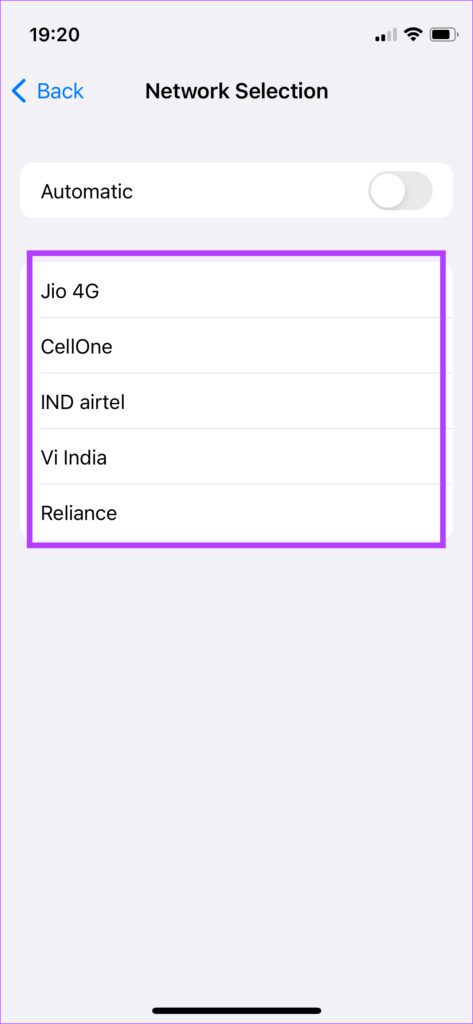
Step 5: Pick the network as per the carrier you’re using and tap on it. Wait for some time, and your iPhone should now be back online.
5. Switch From 5G to LTE
While 5G promises lower latencies and faster speeds in comparison to other spectrums, 5G’s coverage doesn’t come close to the wide coverage provided by 4G as of yet. Due to the fewer towers in a given area, you may see no signal on your iPhone if you’re trying to force 5G connectivity in areas where it’s not available.
In such situations, it is best to switch from 5G to 4G LTE. While LTE is slightly slower in comparison to 5G, you’ll at least have a stable network connection. Here’s how you can switch from 5G to 4G LTE on your iPhone.
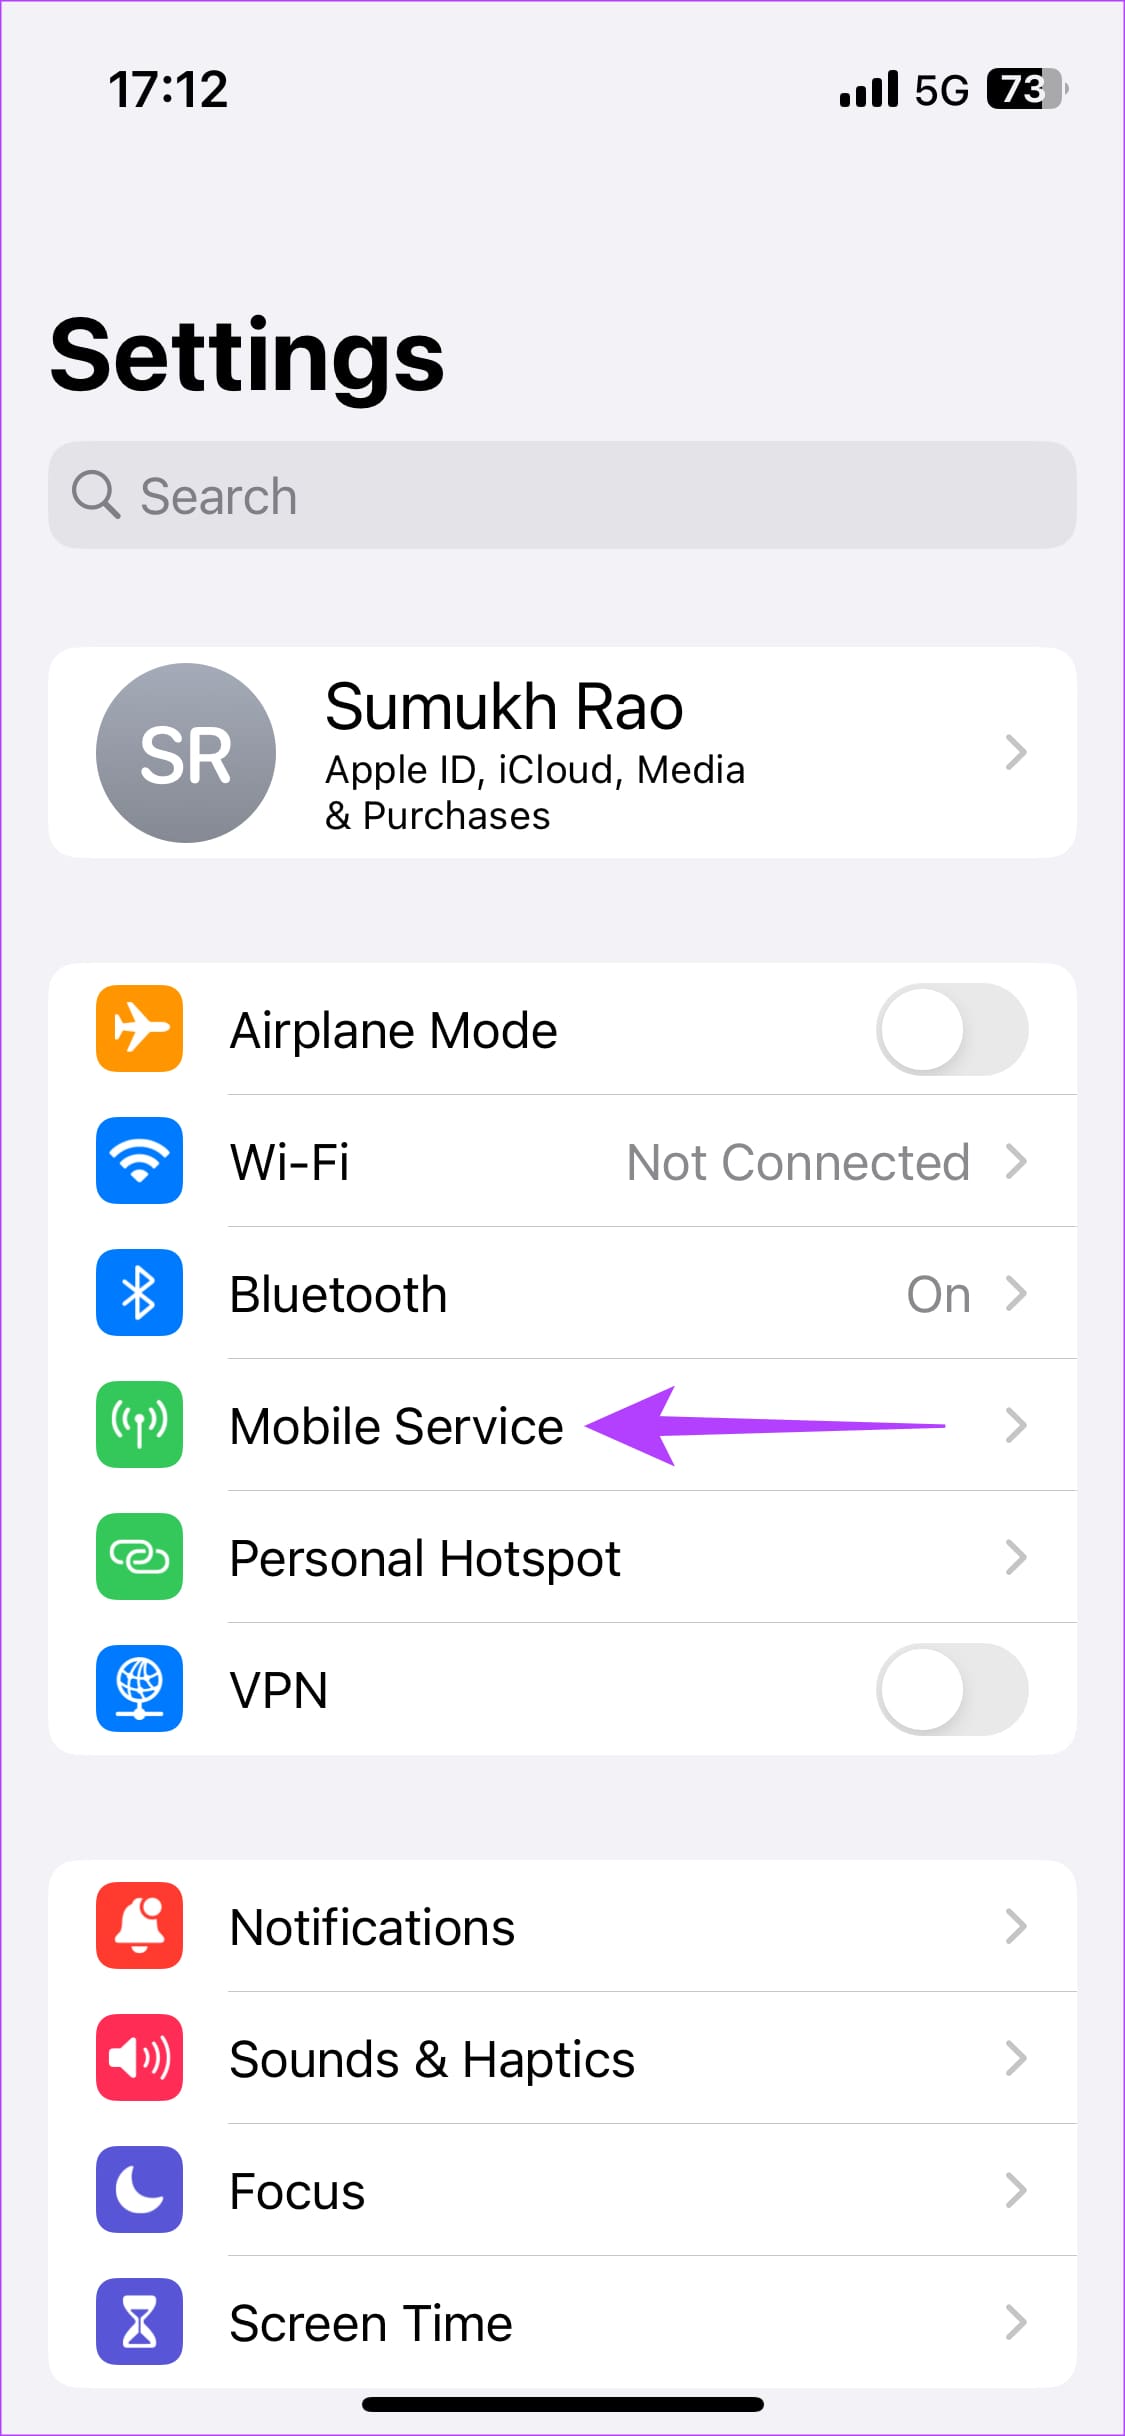
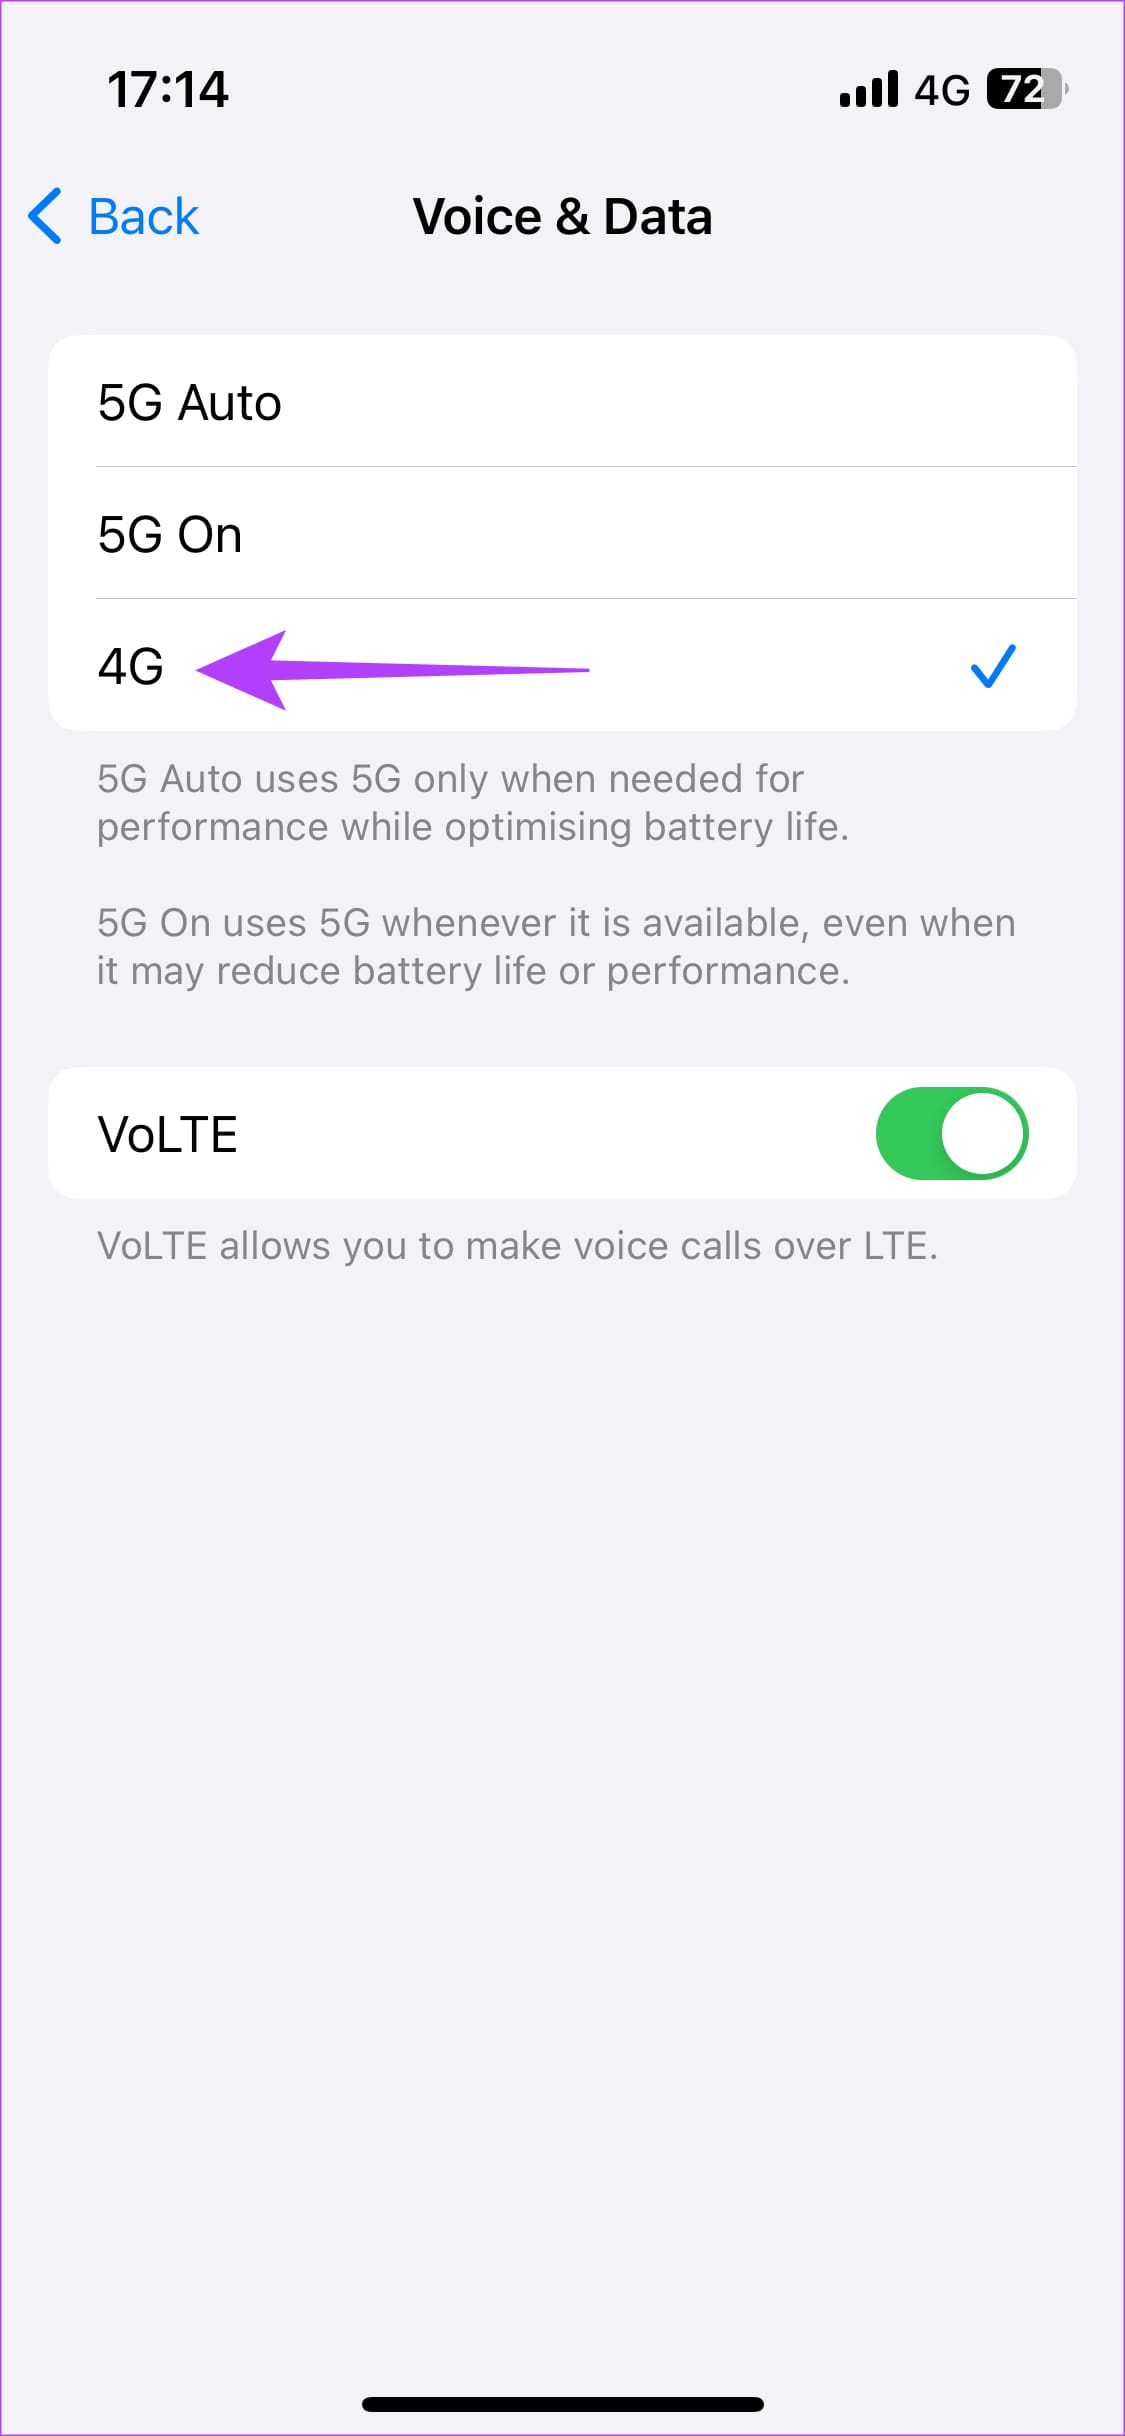
Step 1: Open the Settings app on your iPhone and select Mobile Service or Cellular. Then, tap on ‘Mobile Data Options’.
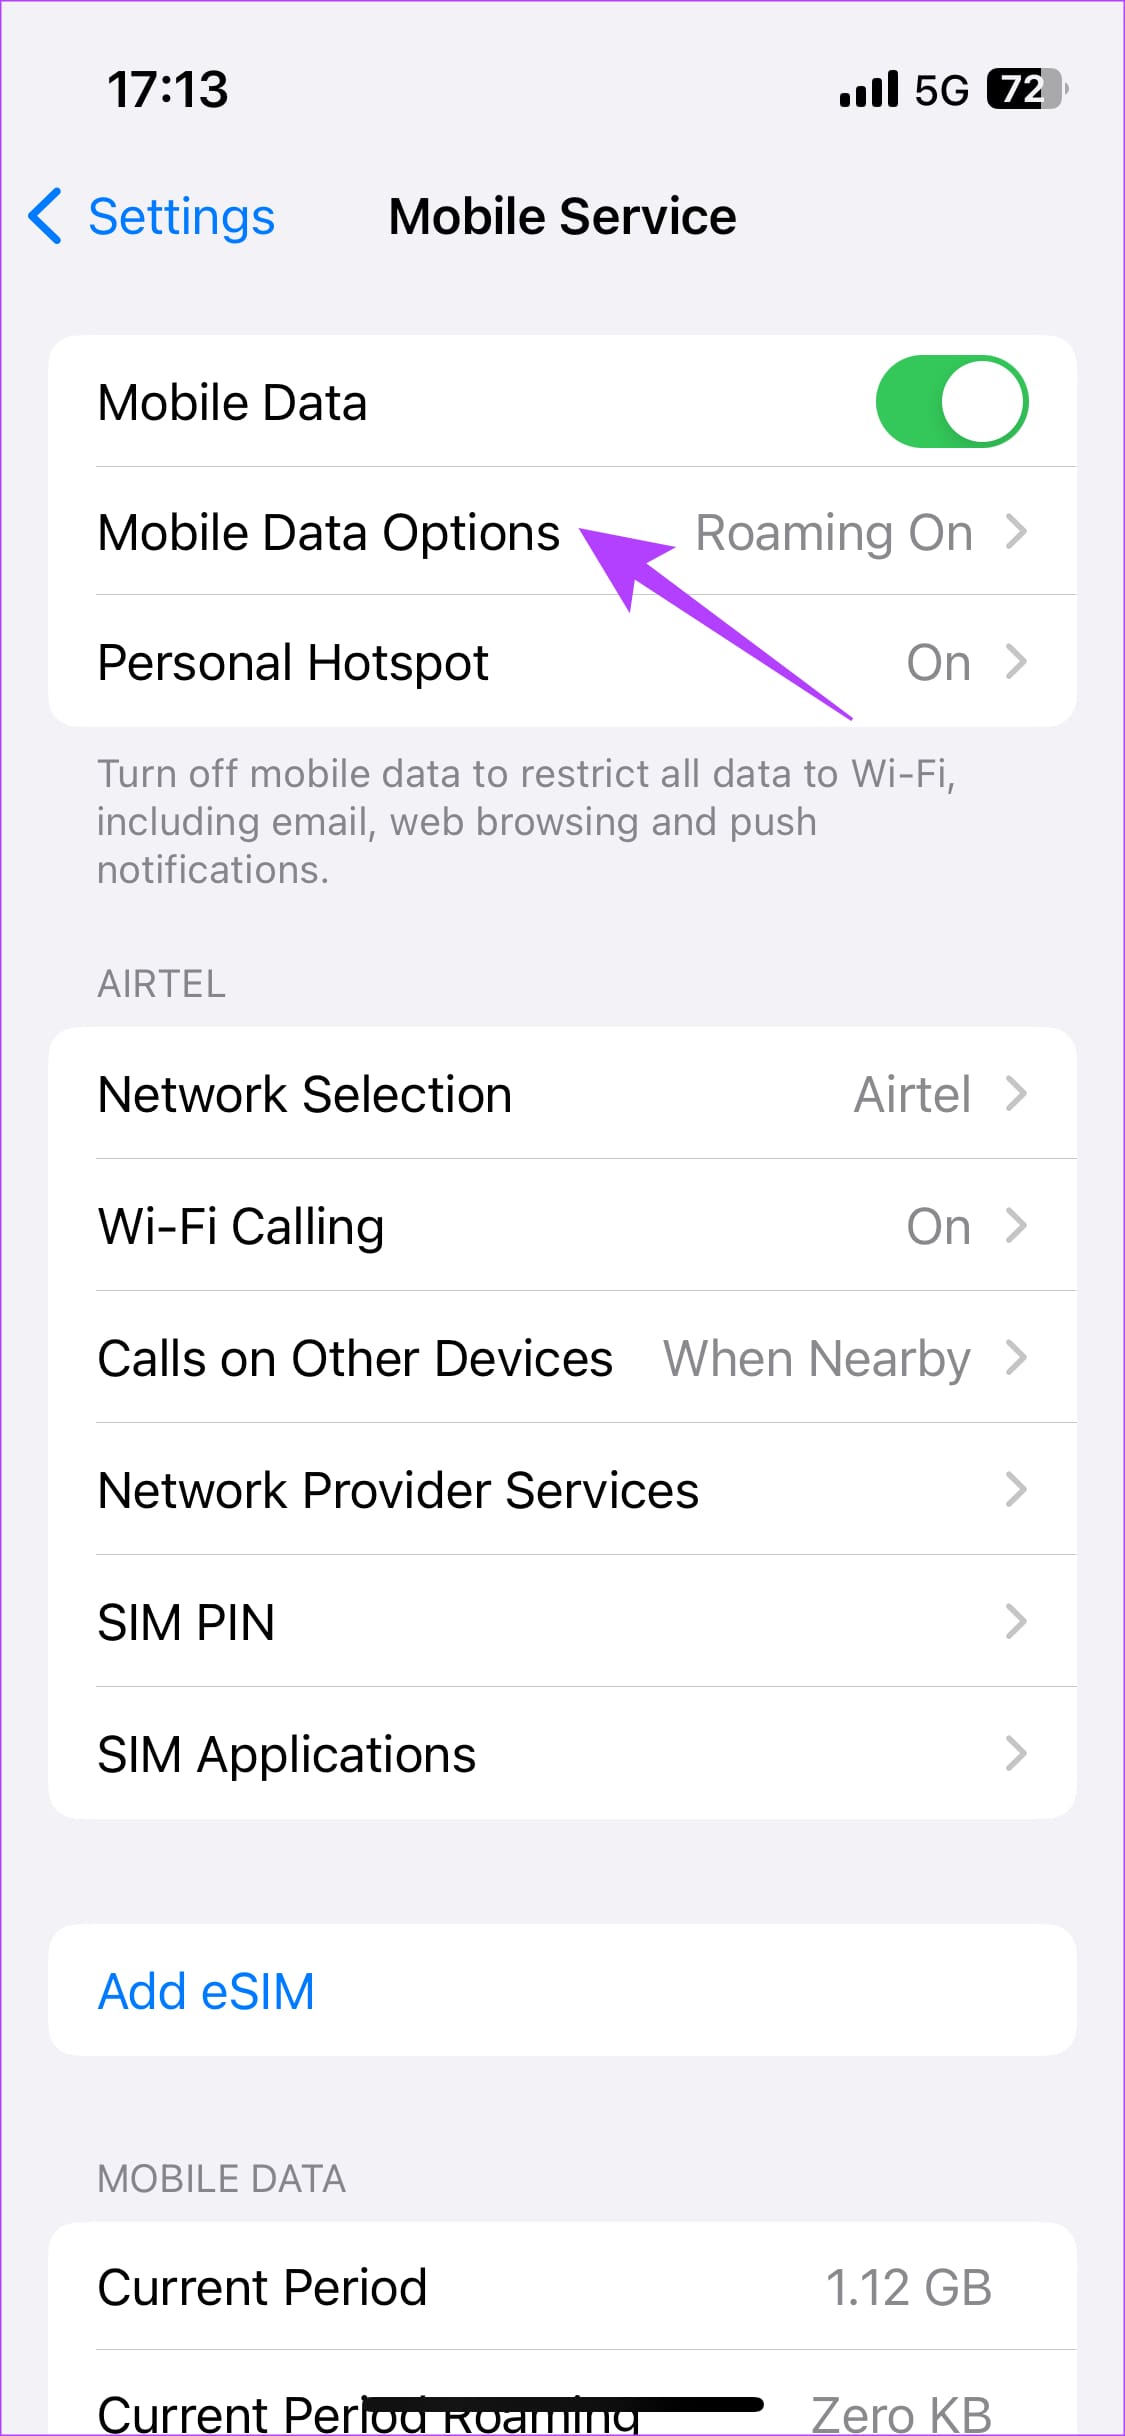
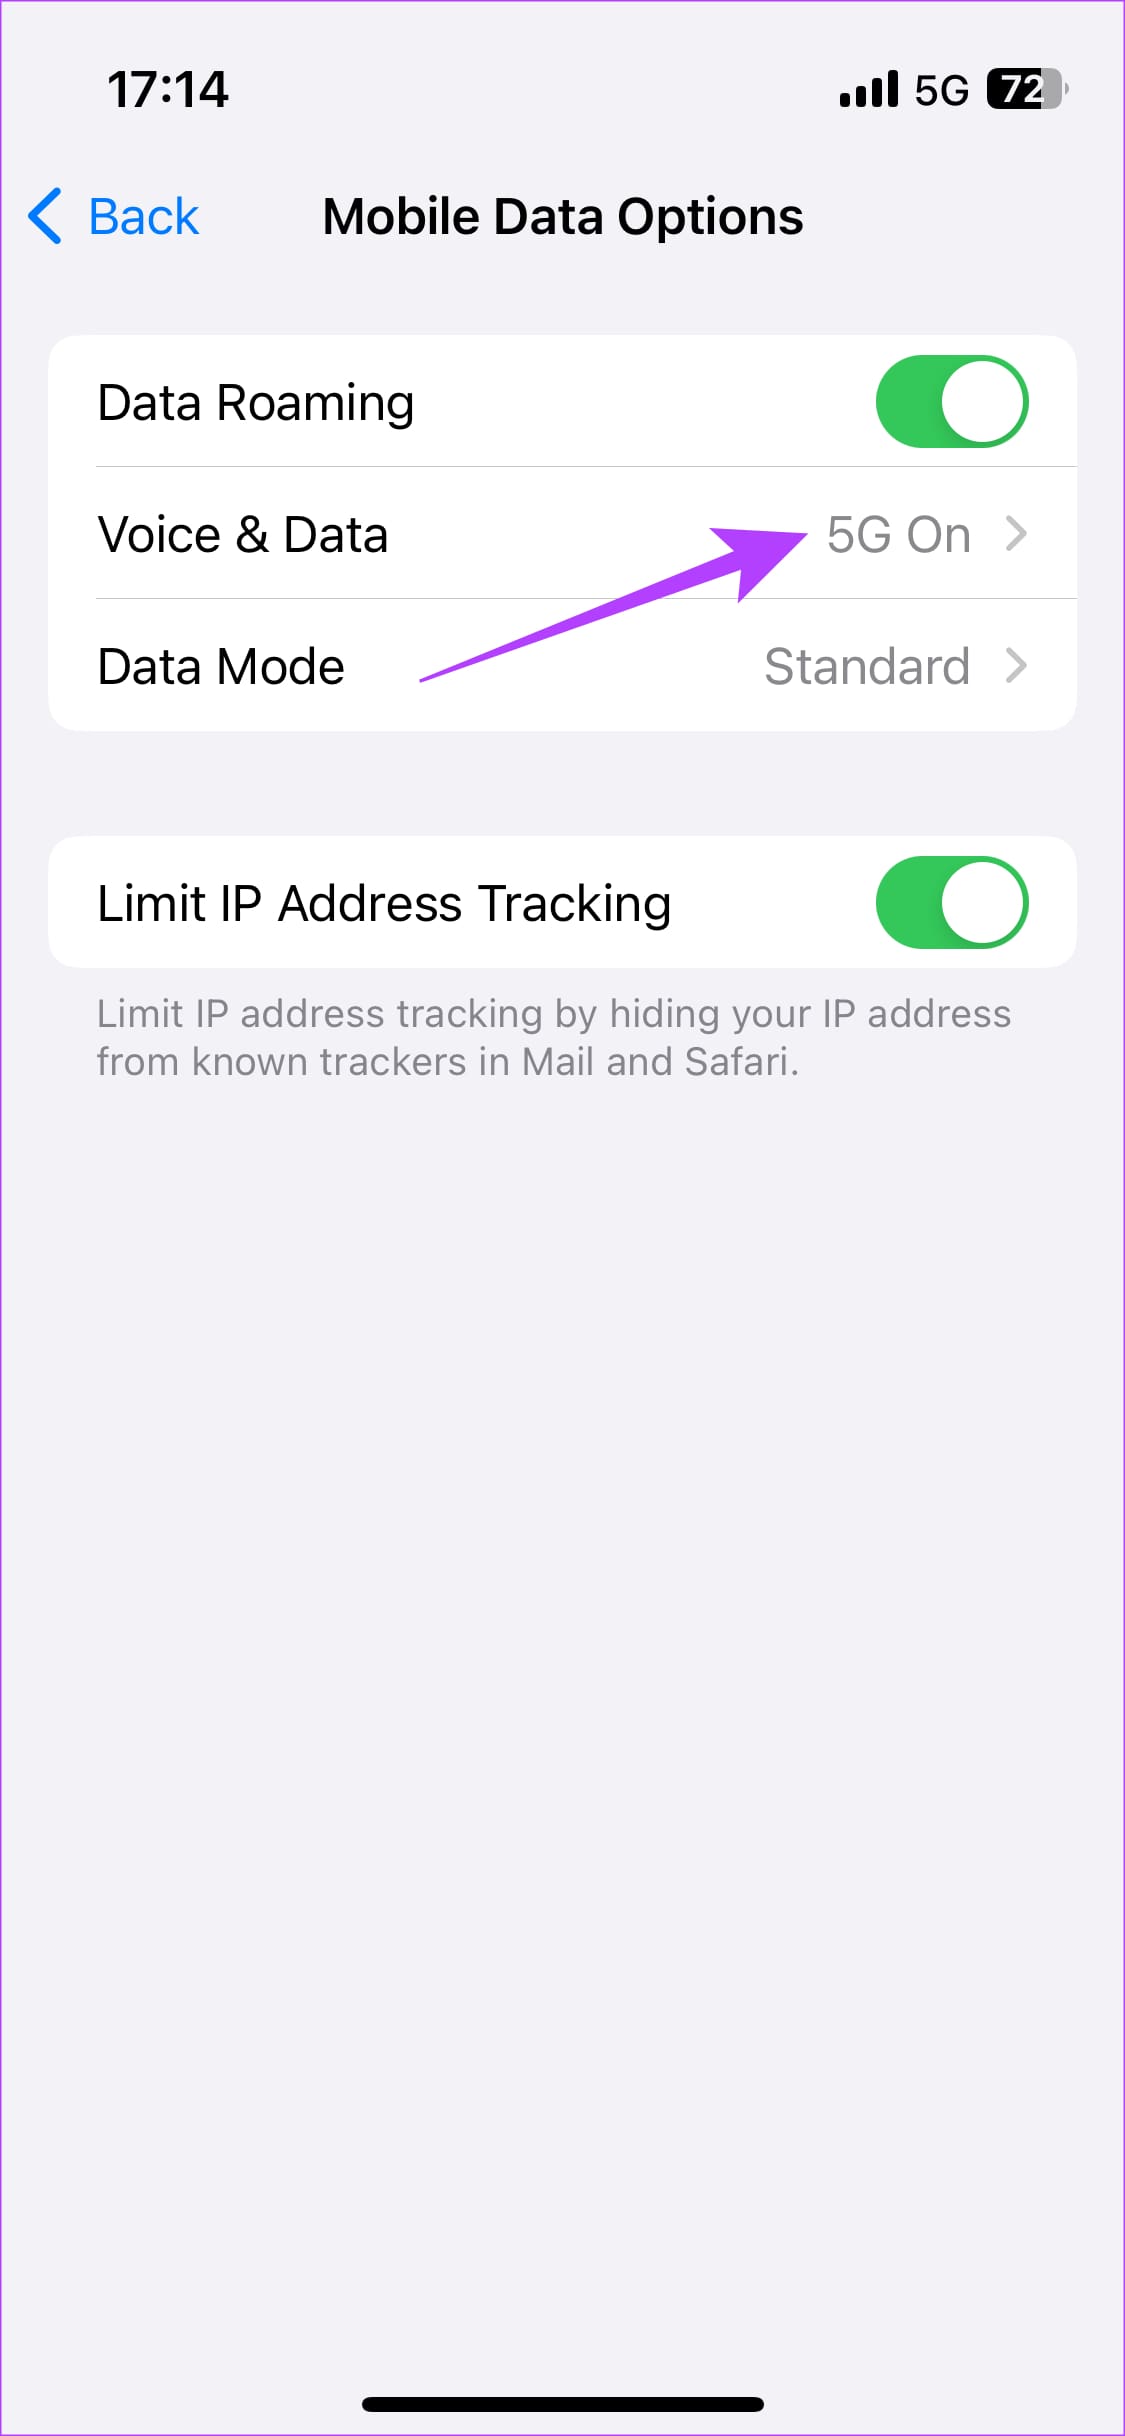
Step 2: Head to ‘Voice & Data’. If you’ve turned on 5G services, choose the 4G option instead.
6. Make Sure You Have a Valid Data Plan
The cellular plan on your connection must be active in order for your iPhone to connect to the network. If you have a prepaid line, make sure your service validity hasn’t expired. For a postpaid connection, any outstanding or missed payments may lead to suspension. It’s best to contact your carrier for detailed information if your iPhone service bars are flashing.
7. Ensure Roaming Is Enabled
Whether you’re traveling to a different state in your country or you’re flying to a new country, you need to enable roaming services to access the network at your destination.
So, if your iPhone is showing No Service from the time you’ve left your town, you need to check if you’ve turned on roaming services. Follow the steps below to turn on roaming on your iPhone.
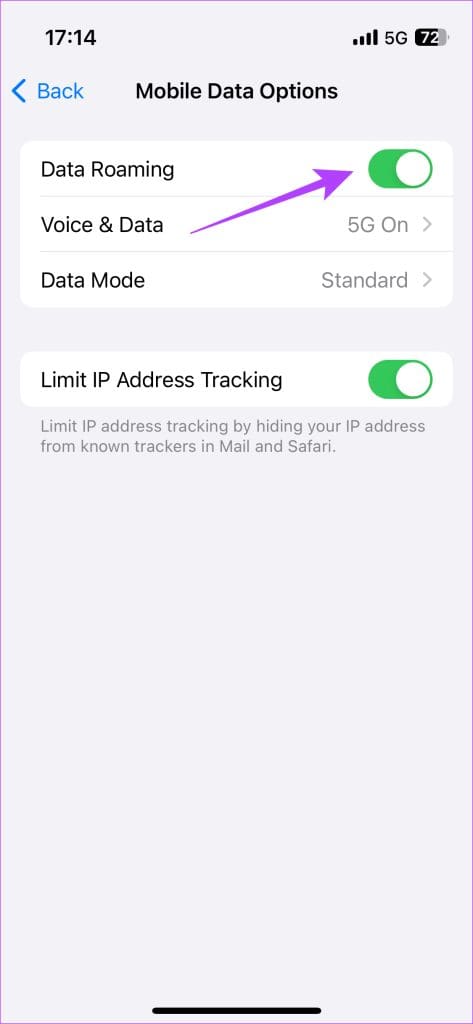
Step 1: Open the Settings app on your iPhone and select Mobile Service/Cellular. Tap on ‘Mobile Data Options’.
Step 2: Now, turn on the toggle beside Data Roaming. If the toggle is already enabled, disable it. Then re-enable it to turn it on.
8. Enable Wi-Fi Calling
While this won’t necessarily fix your issue, it will help you stay connected and make calls via a Wi-Fi network. First, connect your iPhone to a Wi-Fi network and enable Wi-Fi calling. This will help you make and receive calls via Wi-Fi instead of your iPhone’s cellular network. Here’s how to enable it.
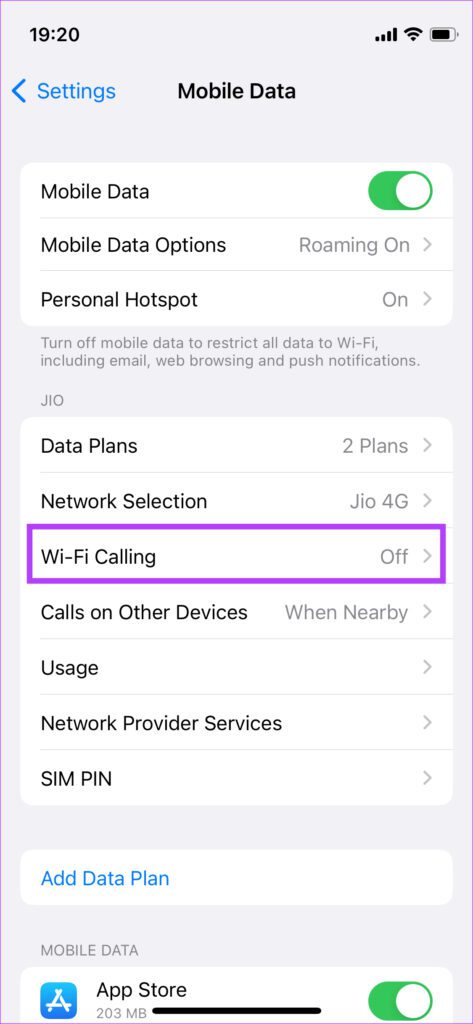
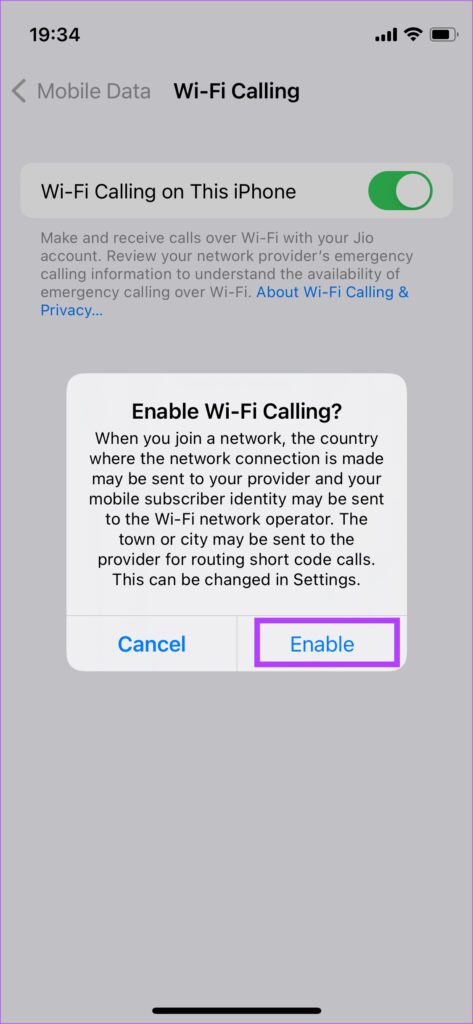
Step 1: Open the Settings app on your iPhone. Navigate to the Mobile Data/Cellular section.
Step 2: Tap on the Wi-Fi calling option.
Step 3: Turn on the toggle next to ‘Wi-Fi Calling on This iPhone.’ This allows your iPhone to use your Wi-Fi network to make calls.
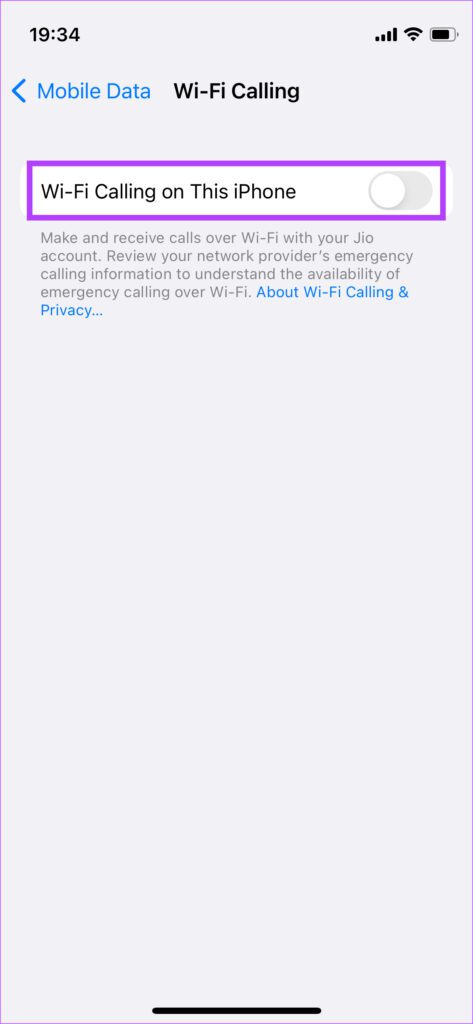
Step 4: Select Enable when prompted.
You should now be able to make a call even if your iPhone is not registered to a network.
9. Force Restart iPhone
A force restart can sometimes fix common issues and help when you’ve just reinserted the SIM card. Here’s how you can force restart your iPhone and see if it fixes the No Service issue.
For iPhone 6s or lower:
Press and hold the Home button and the Power button at the same time. Release them when you see the Apple logo on the screen.
For iPhone 7:
Press and hold the Volume down key and the Power button. Release them when you see the Apple logo on the screen.
For iPhone 8 and higher:
Press and release the Volume up key, press and release the Volume down key, and then press and hold the Side/Power button. Release them when you see the Apple logo on the screen.
10. Reset Network Settings
Resetting the network settings on your iPhone could come in handy if other solutions do not work. This will reset all network parameters such as saved Wi-Fi networks, Bluetooth devices, data plans, etc. You will have to set them up again manually.
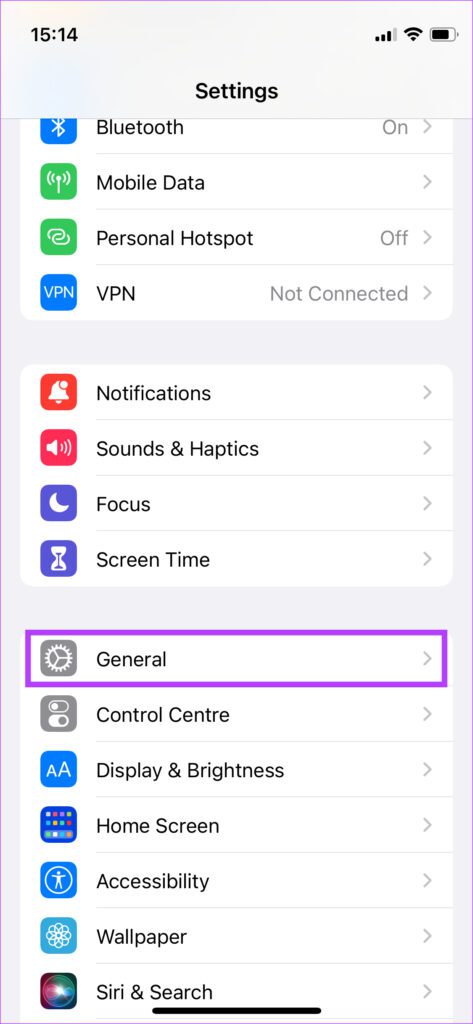
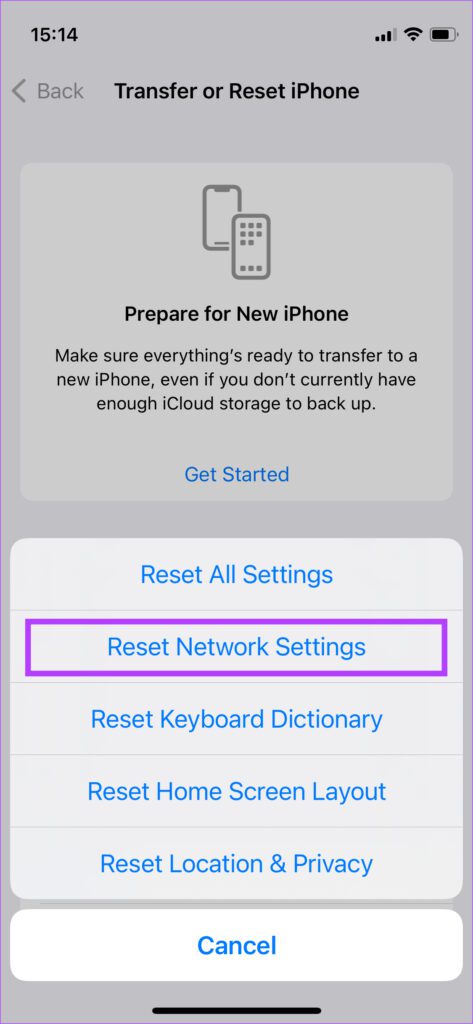
Step 1: Open the Settings app on your iPhone. Tap on General.
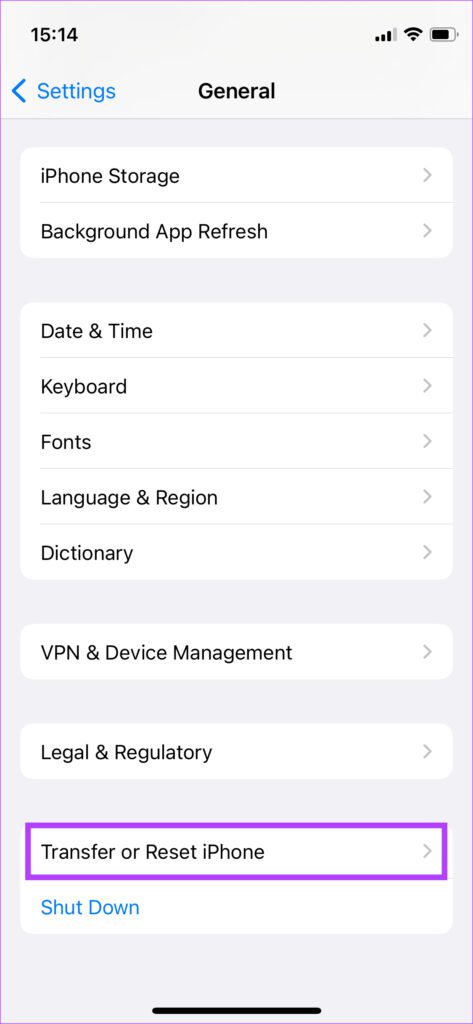
Step 2: Scroll down to the bottom. Select ‘Transfer or Reset iPhone’ and tap on it.
Step 3: Choose the Reset option here. Ensure you don’t select ‘Erase All Contents and Settings’.
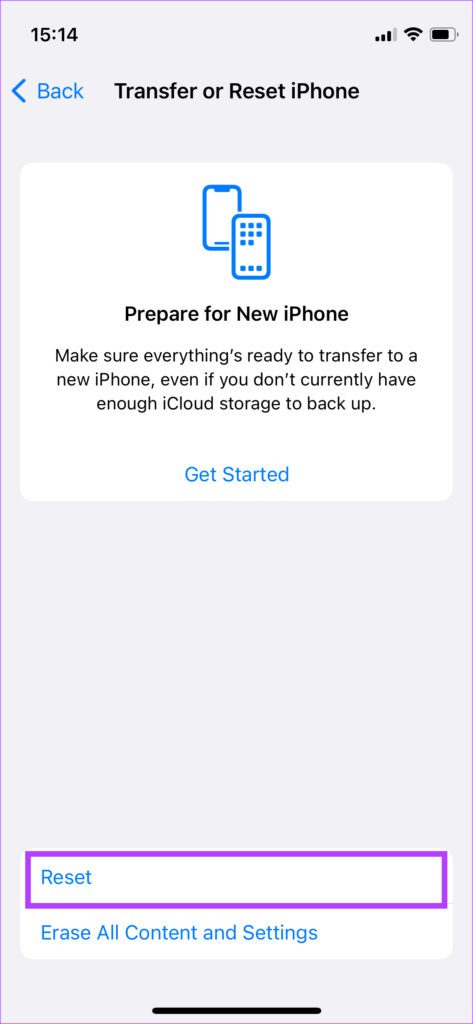
Step 4: Now, select ‘Reset Network Settings’.
Your iPhone should now connect to the network.
11. Switch From iOS Beta to Stable
The beta version of iOS might give you access to several new features. But given that it’s in the beta stages, it may also bring some bugs and issues. One of them could be the inability to connect to a stable network.

So, roll back to the stable version of iOS on your iPhone to ensure your device doesn’t drop a connection frequently.
12. Update to the Latest iOS Version
Some versions of iOS can be plagued with several bugs. So, it could be that there are no real issues with your SIM but your iPhone is still throwing the error. Try updating your iPhone to the latest iOS version to see if this fixes it.
Step 1: Open the Settings app on your iPhone. Navigate to the General section.
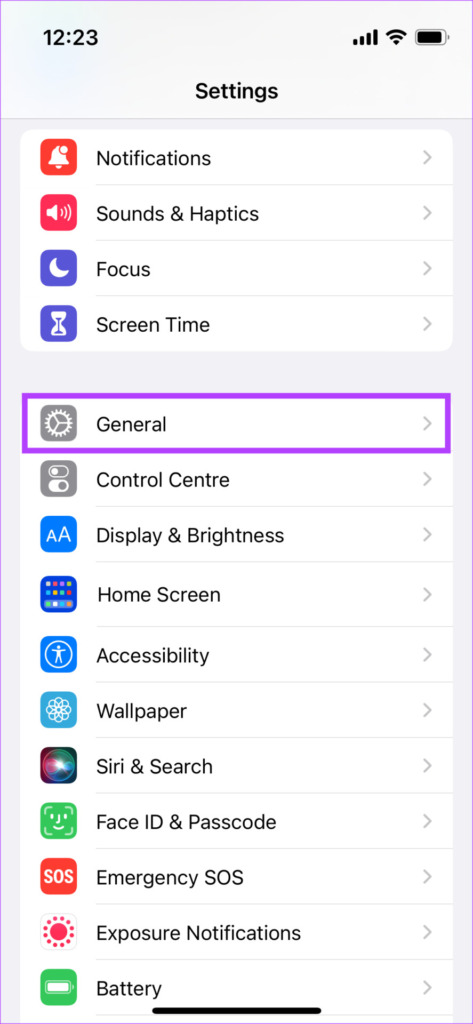
Step 2: Tap on Software Update.
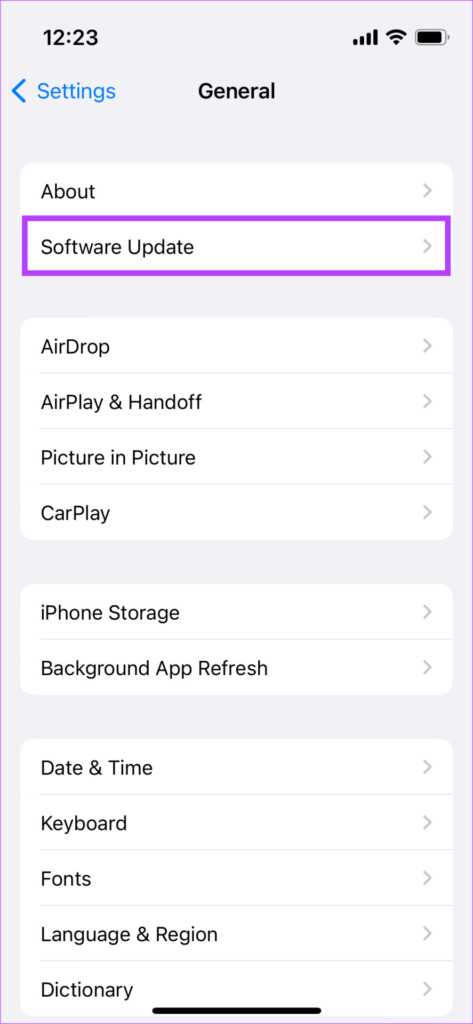
Step 3: If a new update is available, you will see it here. Select Install and wait for the installation to complete.

13. Contact the Carrier and Get Your SIM Replaced
Have you tried all the fixes above and now you’re wondering if there is something wrong with your phone? Well, your phone could be perfectly alright but there may be an issue at your carrier’s end.
First, check with your network provider if there is any downtime or network issue at their end. As a second diagnosis, find out whether your SIM card is damaged. If there is a network downtime, check if the signal bars on your iPhone are restored after a while. Otherwise, there could be a problem with your SIM. So, we suggest that you get your SIM card replaced by heading to your carrier’s store.
If you’re using an eSIM, ensure it’s activated and ready to use.
14. Take Your iPhone to Apple
If you tried all the fixes and your carrier said they couldn’t do anything about it, it’s time to adopt the last resort. Head over to an Apple store and let them have a look at the issue. Ideally, they should help you solve the issue by performing a few checks and applying a fix via software. If there’s a hardware issue and your iPhone is under warranty, you should ideally get a replacement for free.
FAQs for No Service on iPhone
If you have an iPhone 14 and above, you can use satellite communication to make SOS calls. This means that you would not require network signals to make SOS calls on these models. However, if you see the SOS badge at the top of your iPhone screen, you will be able to make emergency calls even for iPhones below the 14 version.
The iPhone supports global network bands. So whatever your destination is, just insert a local SIM card to enable services such as calling and data.
Apple allows you to smoothly transfer your eSIM from your iPhone to another iPhone. However, you will have to contact your network provider if you wish to transfer your eSIM to an Android phone.
While you cannot physically remove your eSIM, Apple provides a toggle in the Cellular Settings section to turn the eSIM services off and then turn it on.
Regain Access to the Network and Get Back Online
Follow these steps, and you should be able to fix the No Service issue on your iPhone. It surely must be a huge sigh of relief getting back online and refreshing the feed on your favorite app.
Was this helpful?
Last updated on 30 August, 2023
Read Next
 5 Ways to Get Better Signal (Service) on iPhone
How to Check Signal Strength on Your iPhone A weak reception can lead to no internet, call dropping, and even a faster battery drain on your iPhone.
5 Ways to Get Better Signal (Service) on iPhone
How to Check Signal Strength on Your iPhone A weak reception can lead to no internet, call dropping, and even a faster battery drain on your iPhone.
 4 Ways to Fix Roblox Error 503 “This Service Is Unavailable”
Why Are You Seeing Roblox Error Code 503 Server overload: One of the most common reasons for Roblox error 503 is when the servers become overloaded with too many user
4 Ways to Fix Roblox Error 503 “This Service Is Unavailable”
Why Are You Seeing Roblox Error Code 503 Server overload: One of the most common reasons for Roblox error 503 is when the servers become overloaded with too many user
 4 Ways to Stop Microsoft GameInput Service From Crashing Your Windows PC
Fix 1: Uninstall Microsoft GameInput One of the most effective ways to stop Microsoft GameInput from crashing your Windows 10 or 11 PC is to remove it.
4 Ways to Stop Microsoft GameInput Service From Crashing Your Windows PC
Fix 1: Uninstall Microsoft GameInput One of the most effective ways to stop Microsoft GameInput from crashing your Windows 10 or 11 PC is to remove it.
 4 Ways to Fix “We Couldn’t Connect to the Update Service” Issue on Windows
Basic Fixes Restart PC: Restart your PC to fix temporary bugs and glitches.
4 Ways to Fix “We Couldn’t Connect to the Update Service” Issue on Windows
Basic Fixes Restart PC: Restart your PC to fix temporary bugs and glitches.
 How to Fix “Windows Installer Service Could Not Be Accessed” Error
Common Fixes Restart your PC: Press the Windows + X shortcut to open the Power User Menu, select Shut down or sign out, and click on Restart.
How to Fix “Windows Installer Service Could Not Be Accessed” Error
Common Fixes Restart your PC: Press the Windows + X shortcut to open the Power User Menu, select Shut down or sign out, and click on Restart.
 How to Fix “Wireless AutoConfig Service Not Running” Issue on Windows 11
Basic Fixes Reboot PC: Press the Windows + X shortcut to open the Power User Menu, select Shut down or sign out, and click Restart.
How to Fix “Wireless AutoConfig Service Not Running” Issue on Windows 11
Basic Fixes Reboot PC: Press the Windows + X shortcut to open the Power User Menu, select Shut down or sign out, and click Restart.
 Fix: Background Intelligent Transfer Service (BITS) Keeps Stopping
Fix 1: Set Background Intelligent Transfer Service to Automatic (Delayed Start) If the Background Intelligent Transfer Service or its related services are misconfigured, you must reset them to their default
Fix: Background Intelligent Transfer Service (BITS) Keeps Stopping
Fix 1: Set Background Intelligent Transfer Service to Automatic (Delayed Start) If the Background Intelligent Transfer Service or its related services are misconfigured, you must reset them to their default
 How to Contact Amazon Customer Service
Starting as a marketplace for books, Amazon today has almost any and every product available.
How to Contact Amazon Customer Service
Starting as a marketplace for books, Amazon today has almost any and every product available.
The article above may contain affiliate links which help support Guiding Tech. The content remains unbiased and authentic and will never affect our editorial integrity.