Basic Fixes
- Restart PC: Restart your PC to fix temporary bugs and glitches.
- Check network connection: Ensure there’s no problem with the network connectivity on your Windows PC.
- Check storage: Ensure there’s enough storage space left on your PC to accommodate the update.
- Run SFC scan: Run the SFC scan to detect and fix any corrupted system files on your PC.
Also Read: 10 ways to fix Windows Update stuck at 100% Issue.
Fix 1: Run Windows Update Troubleshooter
The Windows Update Troubleshooter can help your PC detect and fix problems related to Windows Update Services.
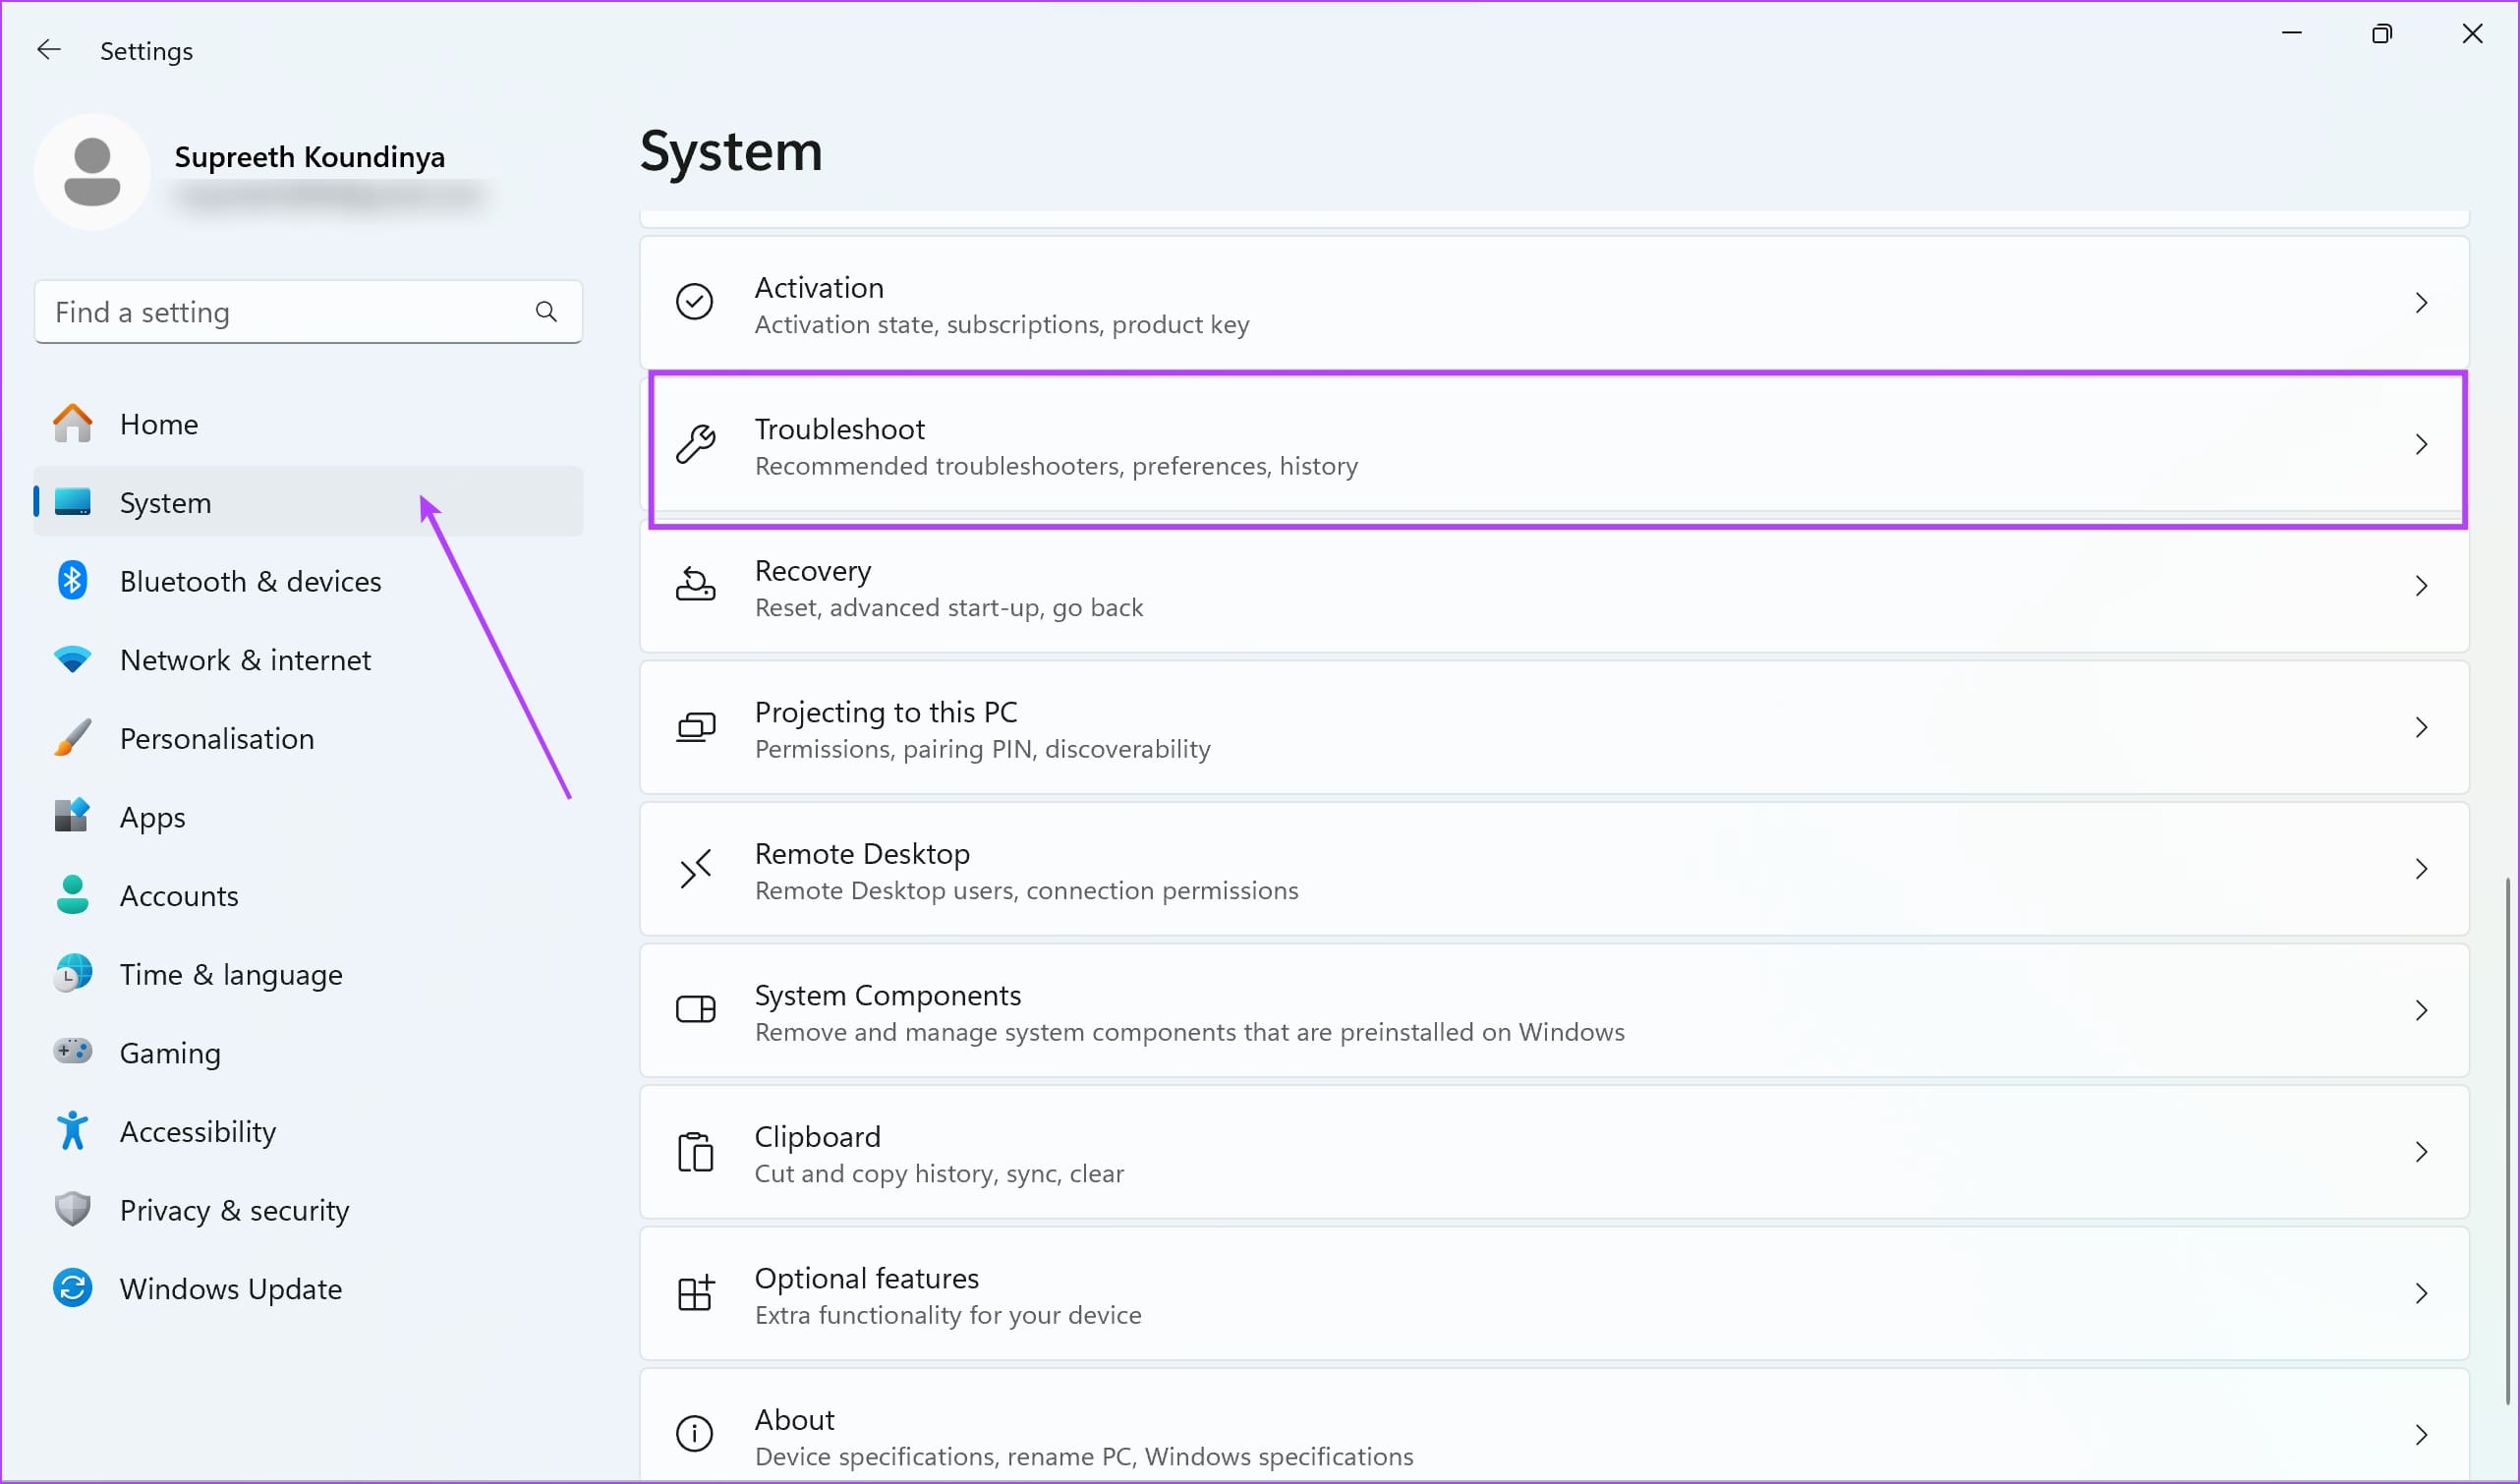
Step 1: Open the Settings app on your PC. Select System from the sidebar.
Step 2: Select Troubleshoot.
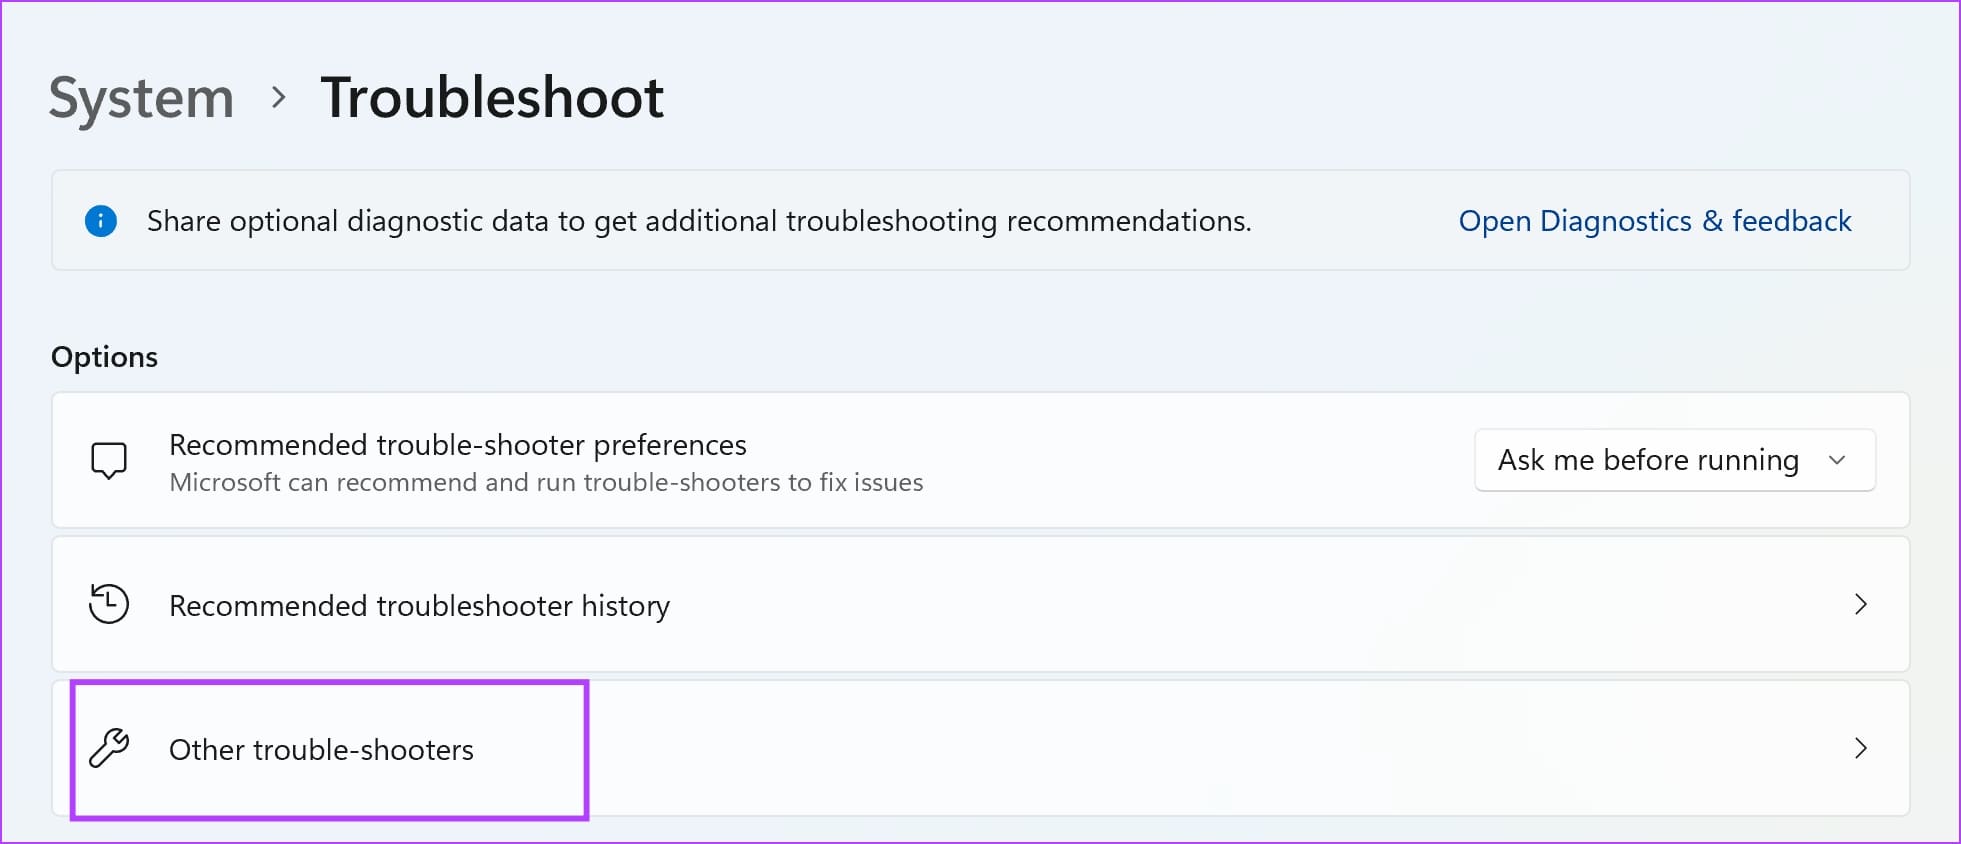
Step 3: Click on Other trouble-shooters.
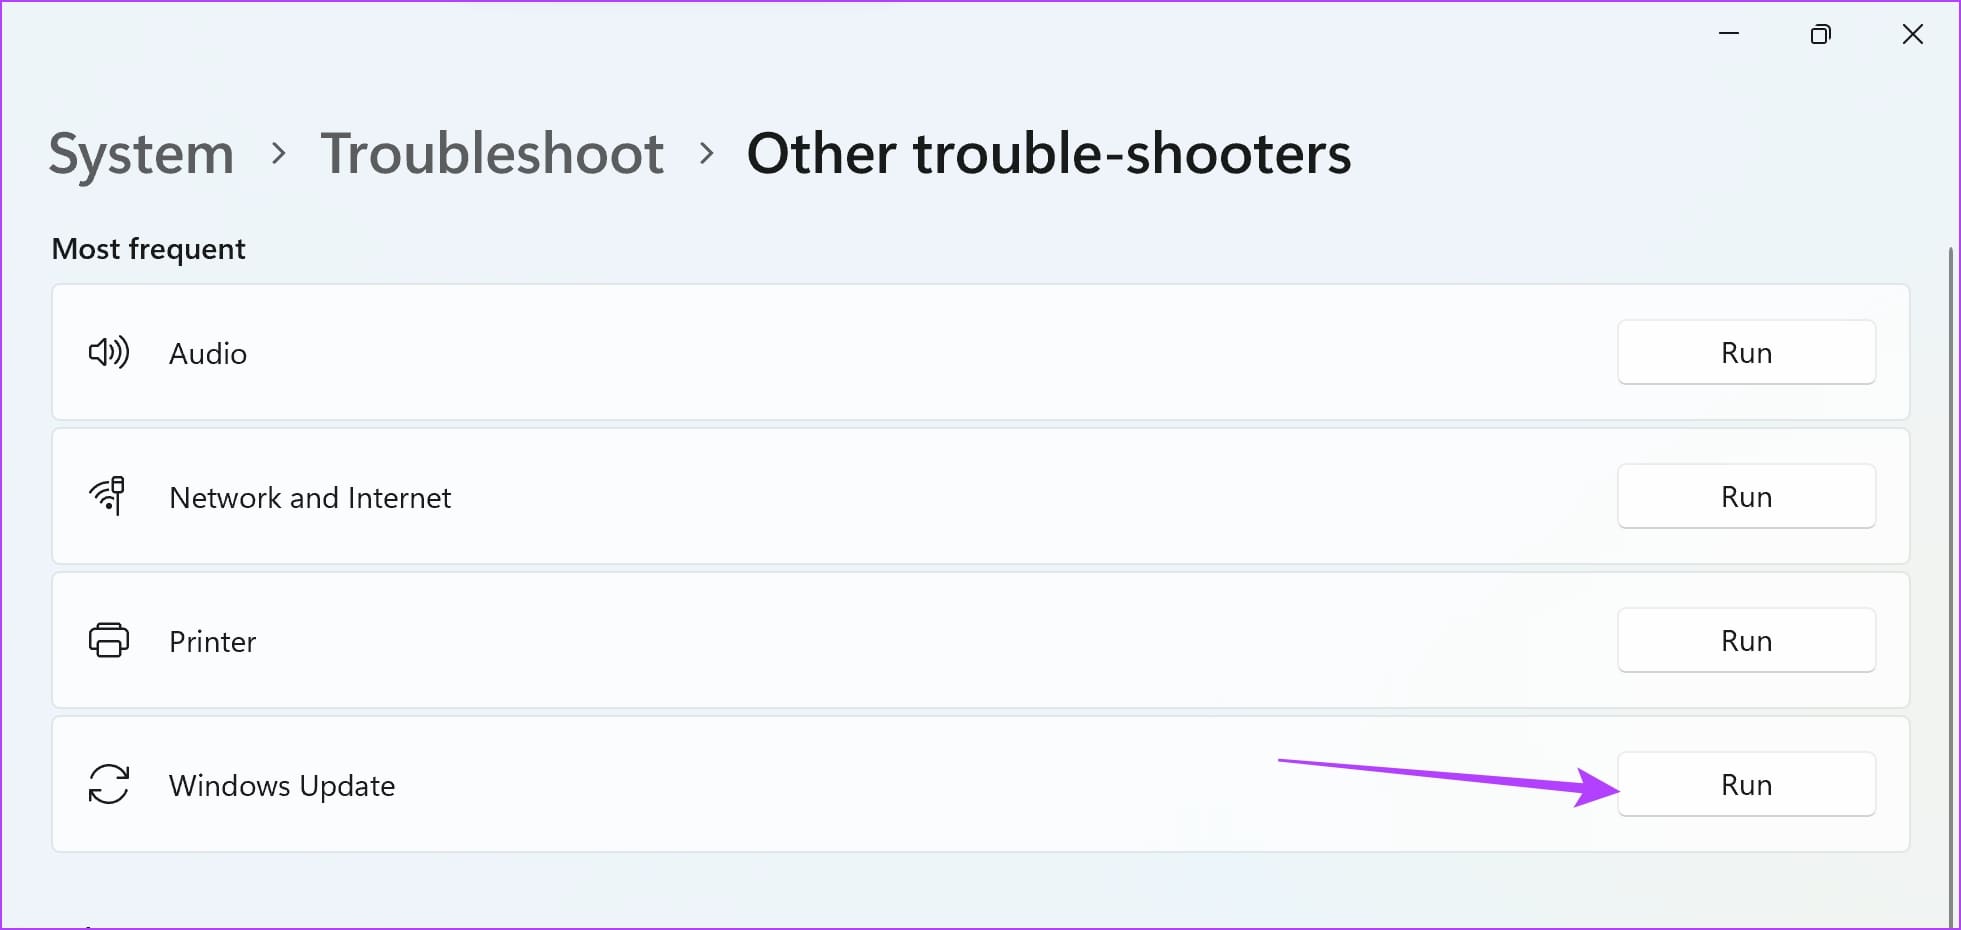
Step 4: Click on Run next to Windows Update. This will open the troubleshooter, and you can follow the on-screen instructions to fix the problem.
Fix 2: Change DNS Servers
At times, the DNS (Domain Name System) servers used by your PC can fail to point Windows Update in the right direction. If restarting your PC or router didn’t help, consider changing the DNS servers of your PC.
Using a popular DNS provider such as Google Public DNS can help get rid of the ‘We Couldn’t Connect to the Update Service’ error. The steps below will help you change the DNS servers for your PC.
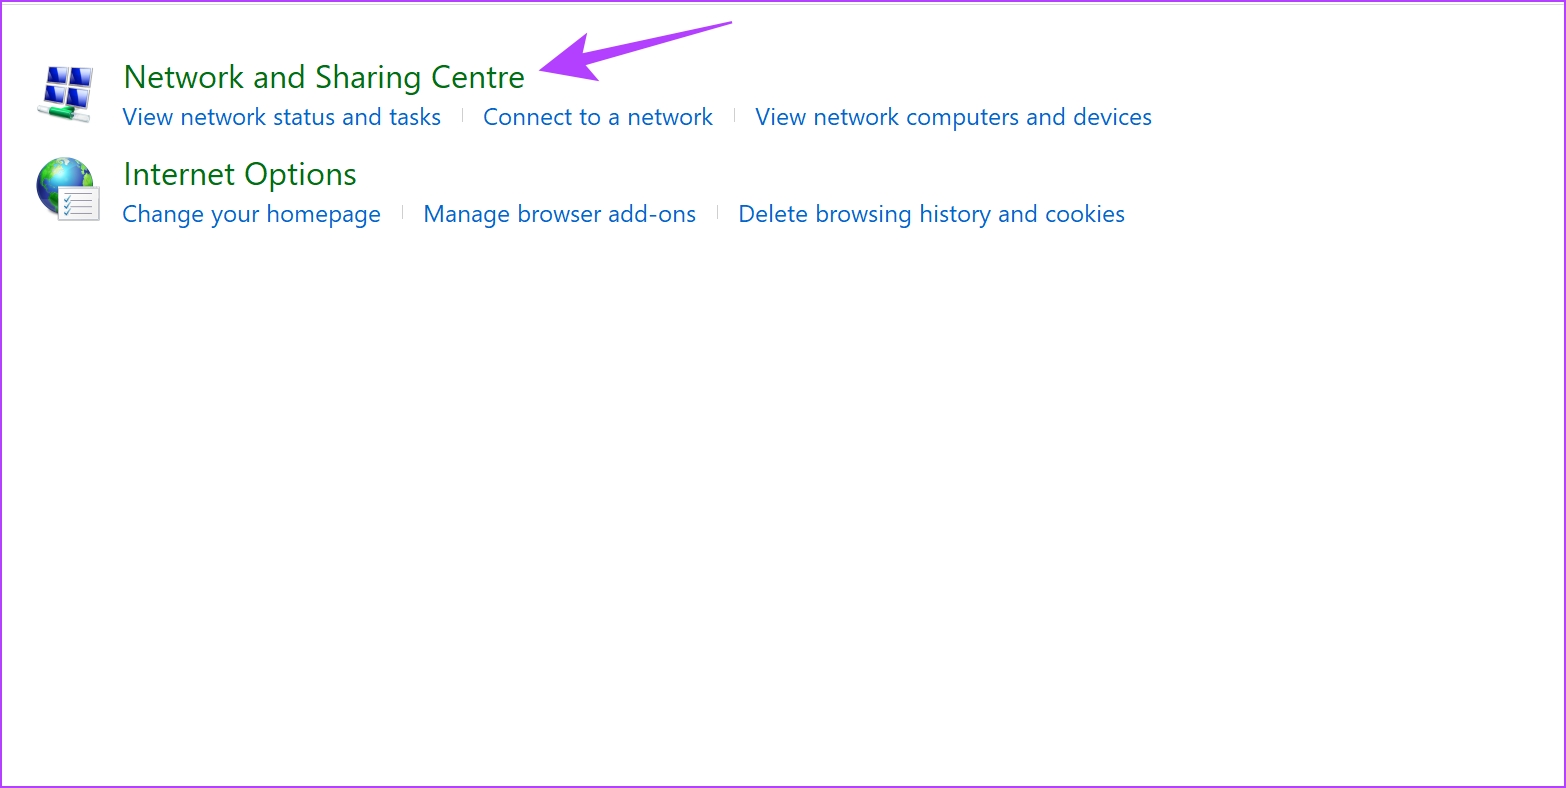
Step 1: Open the Control Panel and select Network and Internet.

Step 2: Open Network and Sharing Center.
Step 3: Select your network.
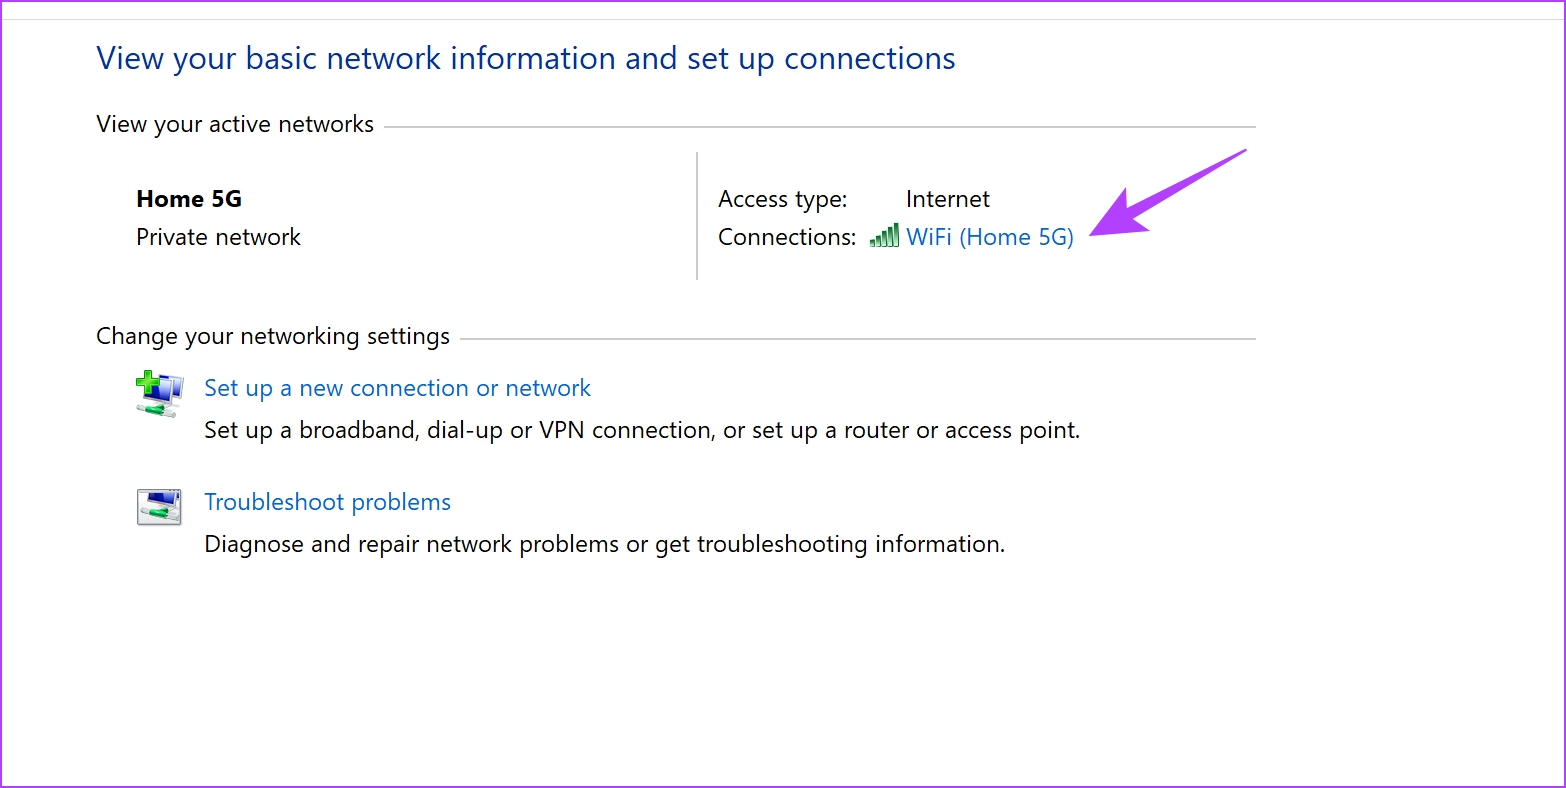
Step 4: Now, select Properties.

Step 5: Check the box next to Internet Protocol Verison and click on Properties.

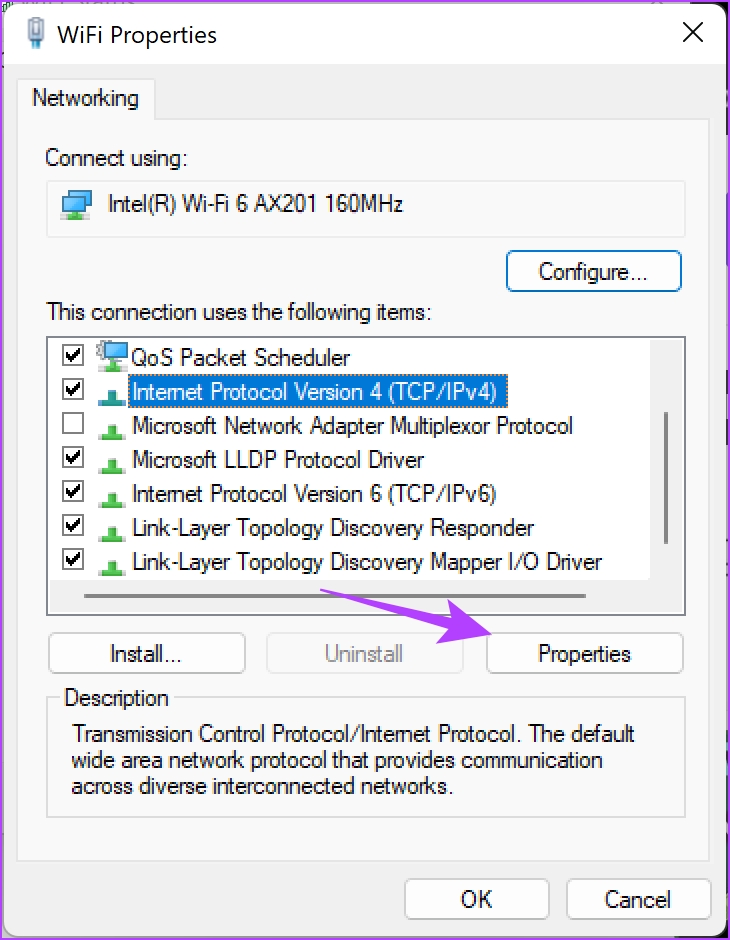
Step 6: Check the box for Use the following DNS server addresses to manually enter the DNS server address.
Step 7: Now, enter the address 8.8.8.8 in the ‘Preferred DNS server’ box and 8.8.4.4 in the ‘Alternative DNS server’ box. These are the addresses for the Google DNS server IPv4.
Or, you can also use Google Public DNS IPv6 version – 2001:4860:4860::8888, and 2001:4860:4860::8844 (alternative).
Step 8: Lastly, click on OK to apply the changes.


Additionally, you can also try clearing the DNS cache on your Windows PC. Read: 6 easy ways to flush DNS Cache on Windows.
Fix 3: Restart the Windows Update Service
Restarting the Windows Update Service on your PC can resolve the issue by getting rid of any bugs and corrupted processes.
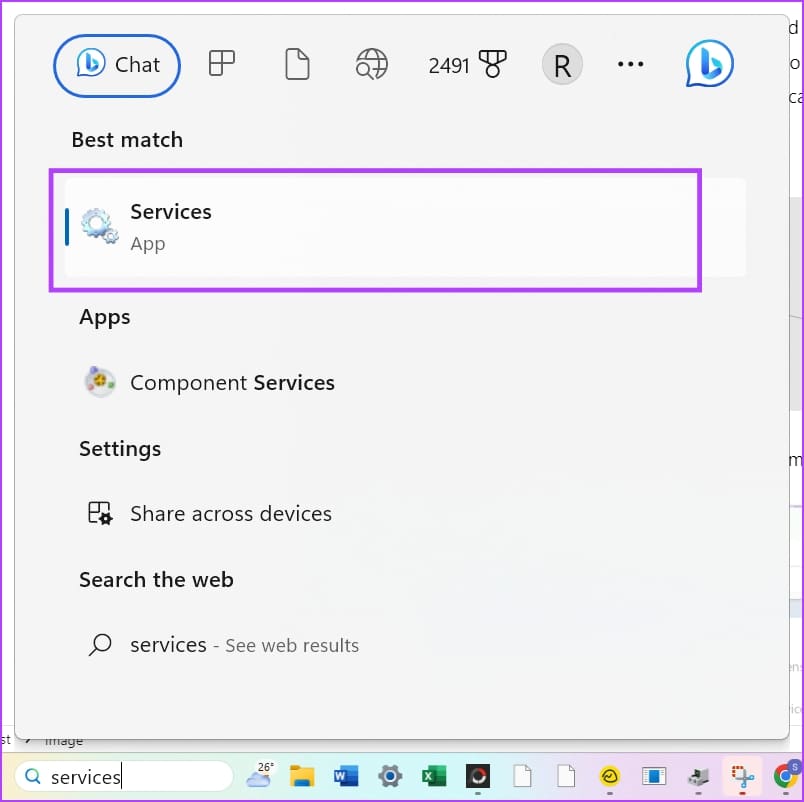
Step 1: Open the Services app on your PC using the start menu.
Step 2: In the list of services, scroll down and find Windows Update.
Step 3: Right-click on the same, and select Restart.
This will restart the Windows Update service, and you can try checking for an update once again.

Fix 4: Reset Network Settings
Resetting the network settings on your Windows PC fixes any misconfiguration that may be causing issues with your internet connectivity. This can prevent your Windows PC from connecting to the Windows Update service. Here’s how you can do it.
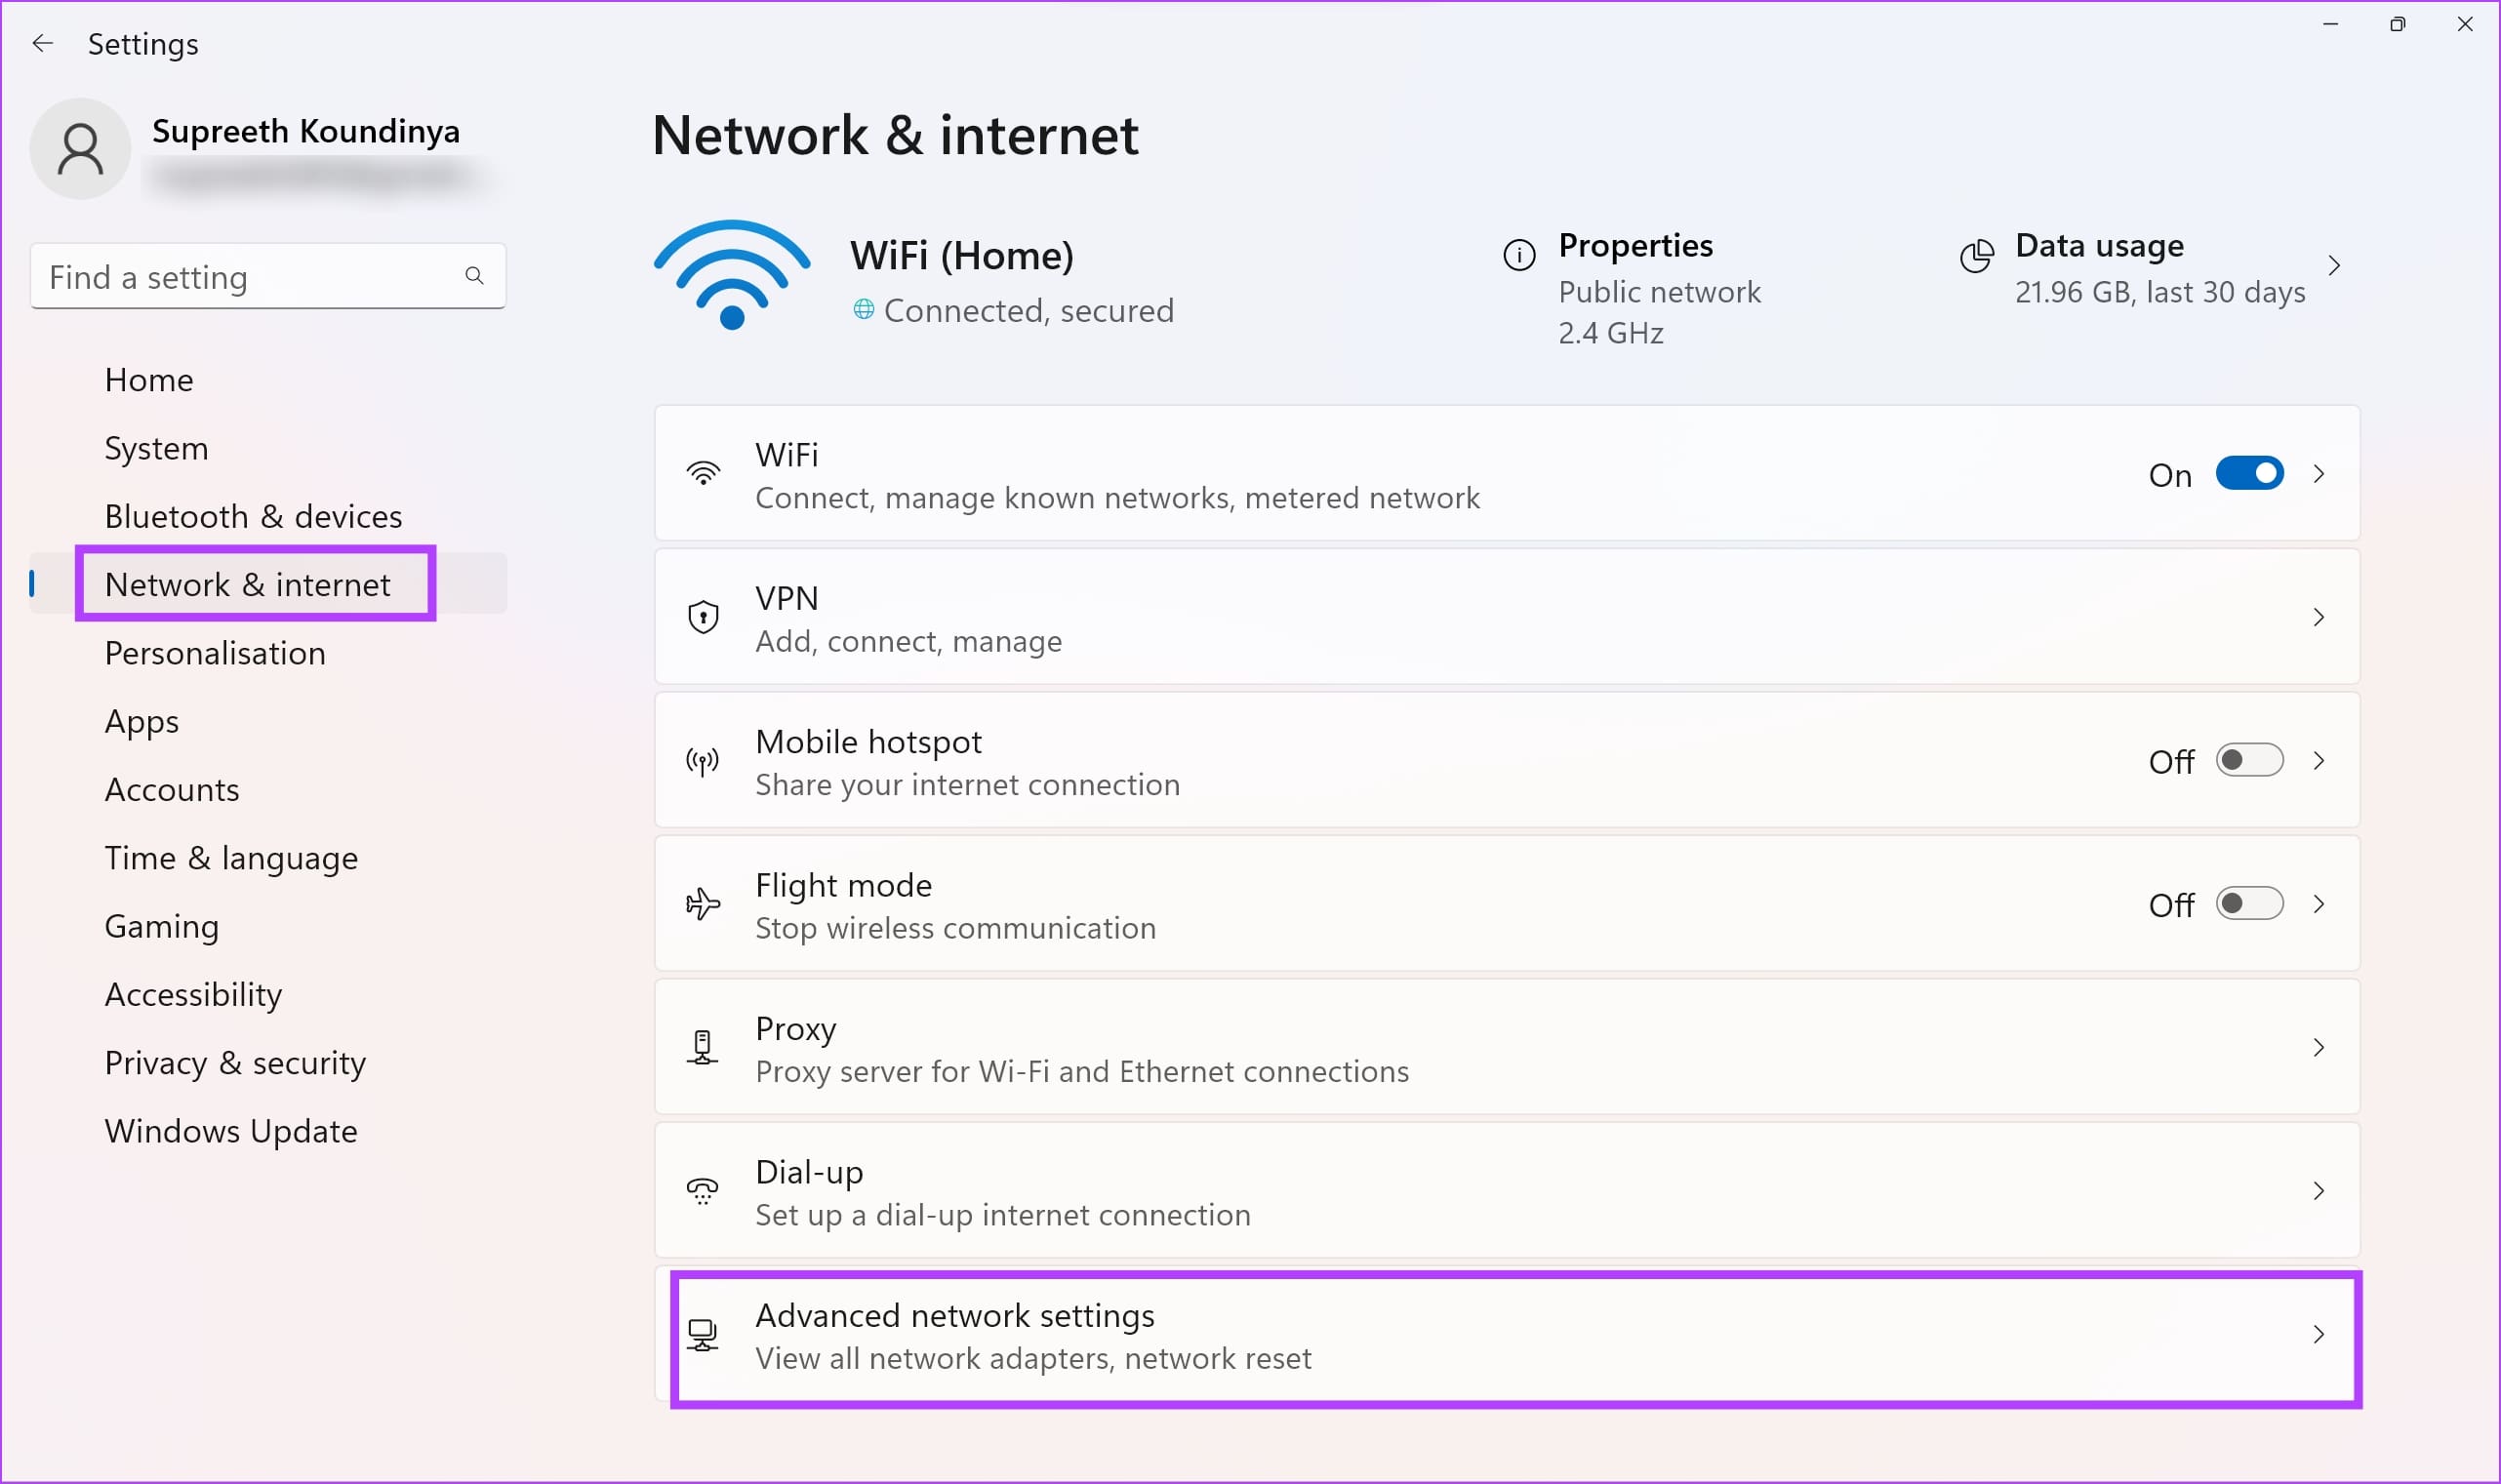
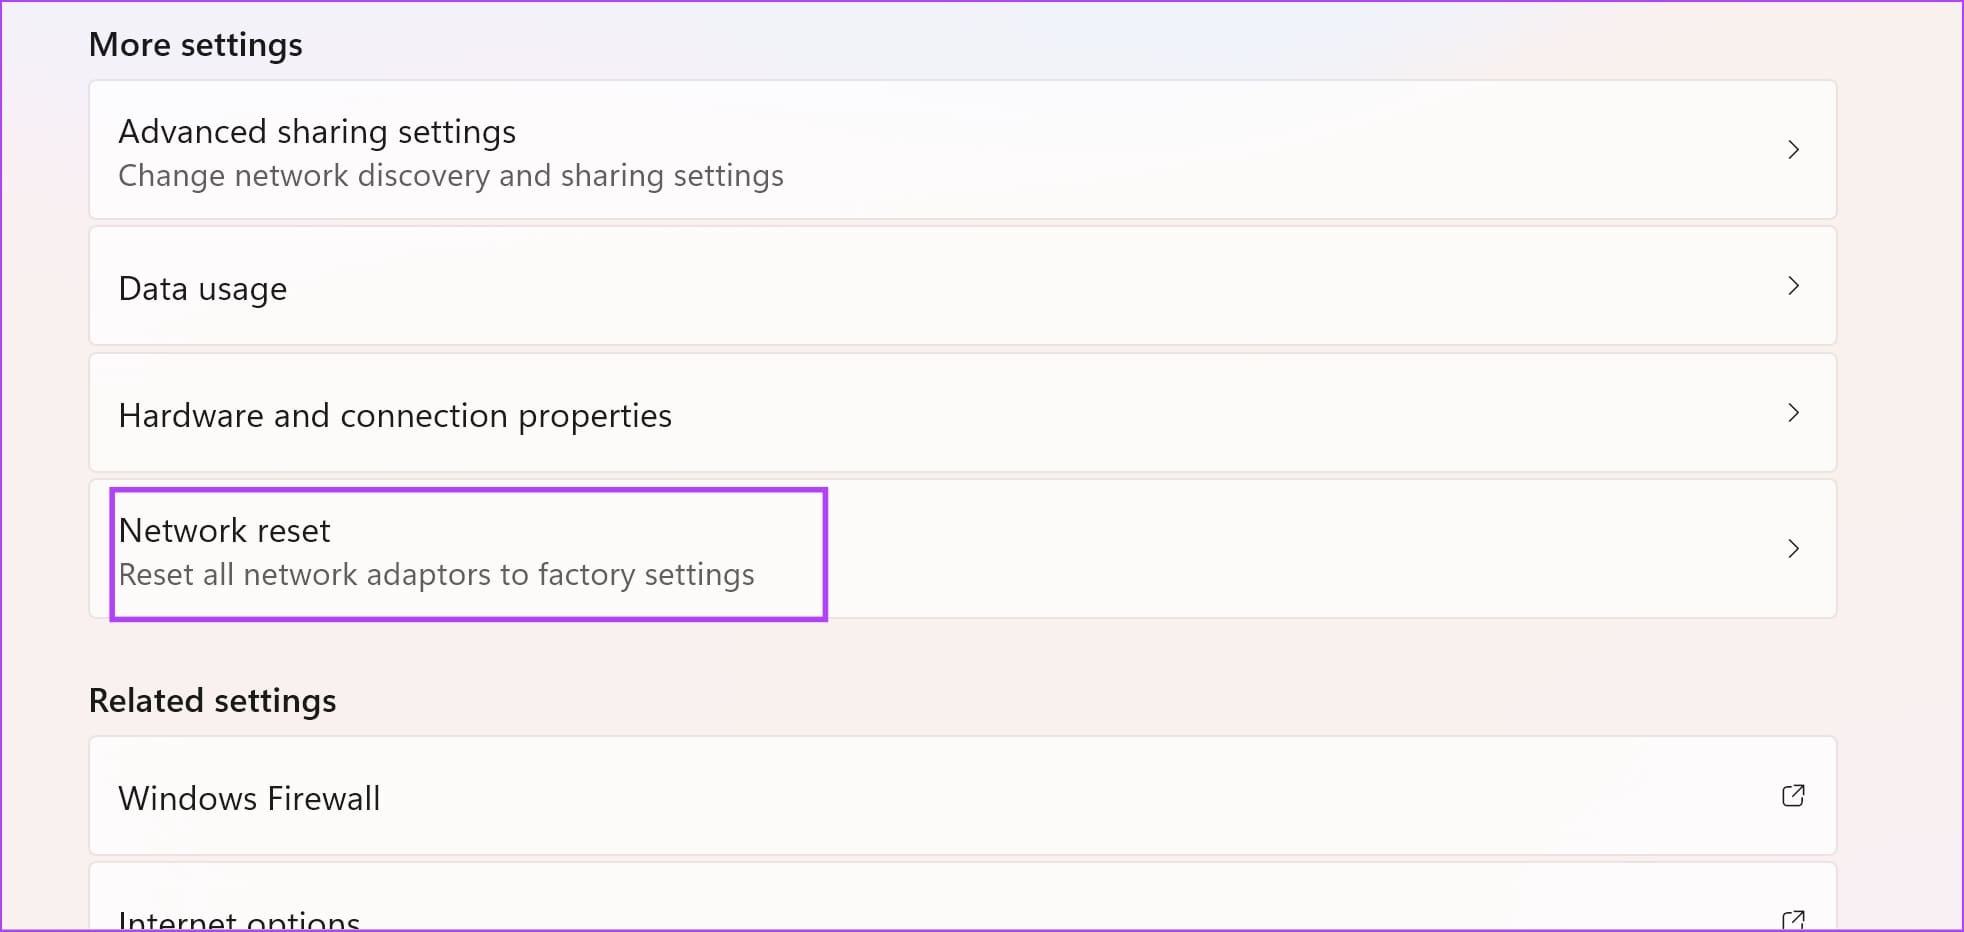
Step 1: Open the Settings app and select Network & Internet.
Step 2: Click on Advanced network settings.
Step 3: Select Network reset.
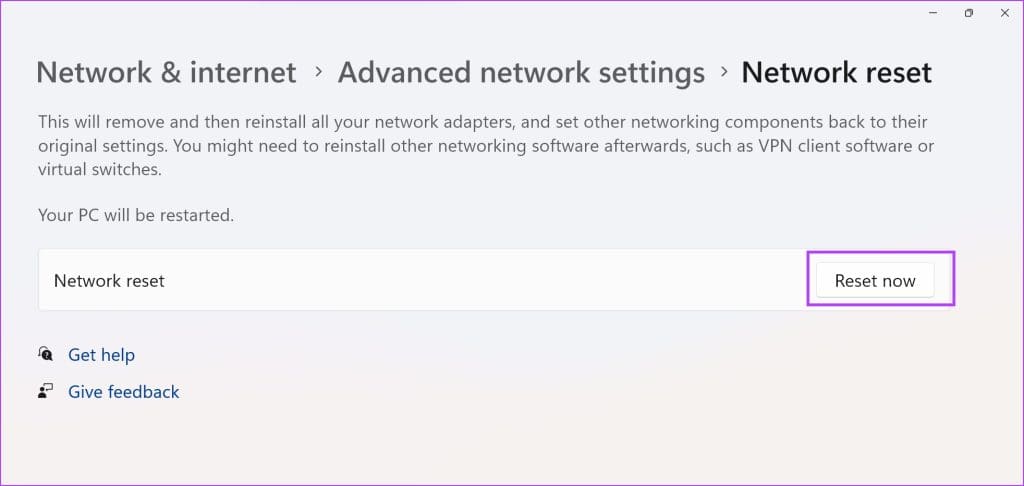
Step 4: Click Reset now.
Step 5: Select Yes to confirm.
Was this helpful?
Last updated on 14 August, 2024
Read Next
 How to Fix “Wireless AutoConfig Service Not Running” Issue on Windows 11
Basic Fixes Reboot PC: Press the Windows + X shortcut to open the Power User Menu, select Shut down or sign out, and click Restart.
How to Fix “Wireless AutoConfig Service Not Running” Issue on Windows 11
Basic Fixes Reboot PC: Press the Windows + X shortcut to open the Power User Menu, select Shut down or sign out, and click Restart.
 How to Fix Cannot Connect to Bluetooth Device Issue in Windows 10
Bluetooth changed the way how we connect various devices.
How to Fix Cannot Connect to Bluetooth Device Issue in Windows 10
Bluetooth changed the way how we connect various devices.
 10 Ways to Fix Windows Update Stuck at 100% Issue
Keeping your Windows device up-to-date ensures you get access to the latest features and bug fixes.
10 Ways to Fix Windows Update Stuck at 100% Issue
Keeping your Windows device up-to-date ensures you get access to the latest features and bug fixes.
 How to Fix Windows 10 Asking to Update and Shutdown Every Time Issue
If bandwidth isn't a factor, then Windows 10 offers a super-convenient way to stay updated with minimal involvement on your part.
How to Fix Windows 10 Asking to Update and Shutdown Every Time Issue
If bandwidth isn't a factor, then Windows 10 offers a super-convenient way to stay updated with minimal involvement on your part.
 4 Ways to Stop Microsoft GameInput Service From Crashing Your Windows PC
Fix 1: Uninstall Microsoft GameInput One of the most effective ways to stop Microsoft GameInput from crashing your Windows 10 or 11 PC is to remove it.
4 Ways to Stop Microsoft GameInput Service From Crashing Your Windows PC
Fix 1: Uninstall Microsoft GameInput One of the most effective ways to stop Microsoft GameInput from crashing your Windows 10 or 11 PC is to remove it.
 How to Fix “Windows Installer Service Could Not Be Accessed” Error
Common Fixes Restart your PC: Press the Windows + X shortcut to open the Power User Menu, select Shut down or sign out, and click on Restart.
How to Fix “Windows Installer Service Could Not Be Accessed” Error
Common Fixes Restart your PC: Press the Windows + X shortcut to open the Power User Menu, select Shut down or sign out, and click on Restart.
 8 Ways to Fix Wi-Fi Doesn’t Connect After Sleep in Windows 10
Typically, when you restart your computer or wake it up from sleep or hibernate, the Wi-Fi connects automatically.
8 Ways to Fix Wi-Fi Doesn’t Connect After Sleep in Windows 10
Typically, when you restart your computer or wake it up from sleep or hibernate, the Wi-Fi connects automatically.
 7 Ways to Fix Can’t Connect to 5GHz Frequency Band of Wi-Fi on Windows 11
Fix 1: Check if Your PC Supports the 5GHz Frequency Band The 5GHz frequency band of Wi-Fi networks may not show up on your Windows 11 PC if it doesn’t
7 Ways to Fix Can’t Connect to 5GHz Frequency Band of Wi-Fi on Windows 11
Fix 1: Check if Your PC Supports the 5GHz Frequency Band The 5GHz frequency band of Wi-Fi networks may not show up on your Windows 11 PC if it doesn’t
The article above may contain affiliate links which help support Guiding Tech. The content remains unbiased and authentic and will never affect our editorial integrity.

