Fix 1: Uninstall Microsoft GameInput
One of the most effective ways to stop Microsoft GameInput from crashing your Windows 10 or 11 PC is to remove it. Several users on a Reddit thread reported fixing the issue with this trick. Hence, it’s the first thing you should try.
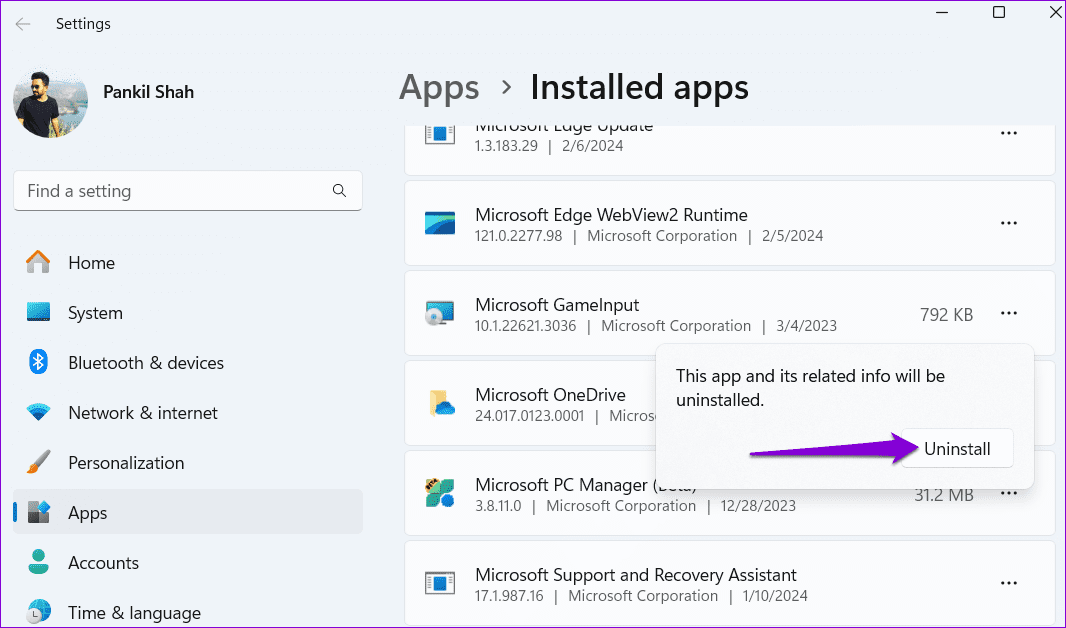
Step 1: Right-click on the Start icon and select Installed apps from the list.

Step 2: Use the search tool or scroll through the list to locate Microsoft GameInput. Click the three-dot icon next to it and select Uninstall.

Step 3: Select Uninstall to confirm.
Fix 2: Rename or Delete the GameInput Folder
In addition to uninstalling Microsoft GameInput, you should also delete the associated files from your system. Here are the steps for the same.
Step 1: Press the Windows key + R to open the Run dialog box. Type C:\Program Files (x86)\ in the box and press Enter.
Step 2: Locate and select the Microsoft GameInput folder. Then, click the trash icon at the top. If you don’t wish to delete the folder, you can also rename it.

Completing the above steps should help you get rid of Microsoft GameInput for good. As such, Windows should now be able to create a new GameInput folder, fixing any issues.
Fix 3: Configure the GameInput Service
The Services app on Windows makes it simple to manage background services on your system. You can use it to disable the GameInput service, preventing it from running on your PC or reinstalling itself.
To configure the GameInput service, use these steps:
Step 1: Click the search icon on the taskbar, type services in the box, and press Enter.

Step 2: In the Services window, double-click the GameInput Service to open its properties.

Step 3: Use the drop-down menu next to Startup type to select Disabled. Then, hit Apply followed by OK.

Restart your PC after this and check if your Windows PC still crashes.
Fix 4: Run SFC and DISM Scans
Your Windows PC relies on system files to perform most tasks. If some of these files are damaged or missing, Windows might crash. SFC (System File Checker) and DISM (Deployment Image Servicing and Management) are built-in tools that can help you repair any problematic system files on your PC. Here’s how to run them.
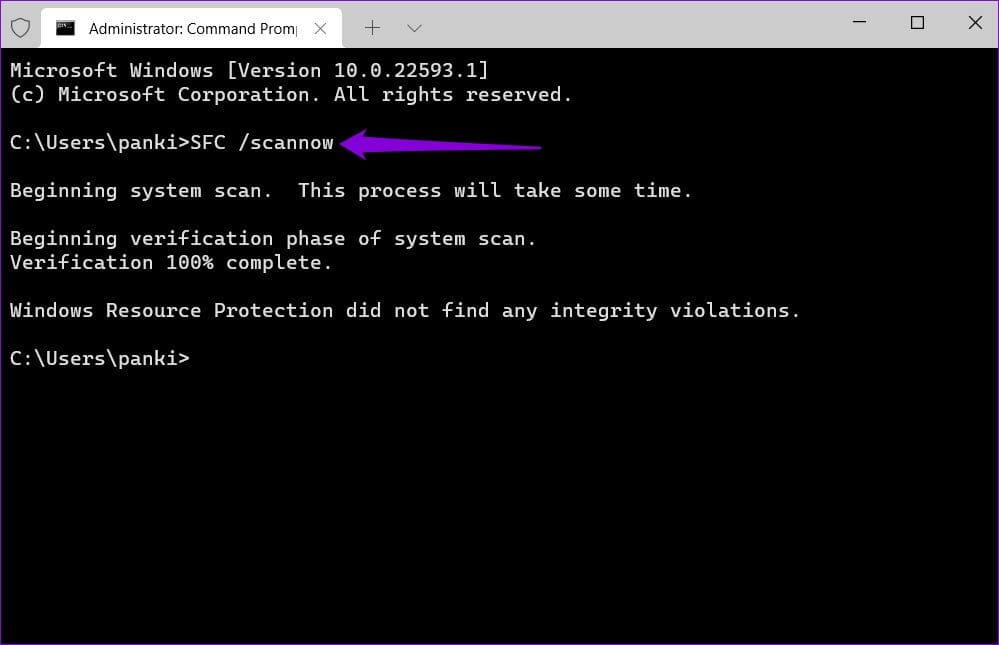
Step 1: Right-click on the Start icon to select Terminal (Admin) from the list.

Step 2: In the console, type the following command and press Enter.
SFC /scannow
Step 3: Run the following commands one by one and press Enter after each one to run the DISM scan.
DISM /Online /Cleanup-Image /CheckHealth
DISM /Online /Cleanup-Image /ScanHealth
DISM /Online /Cleanup-Image /RestoreHealth

This might take a while, so be patient. Restart your PC after the scan is complete and check if the issue is still there.
Was this helpful?
Last updated on 15 August, 2024
Read Next
 6 Ways to Fix Microsoft Teams Crashing on Windows 11
Common Fixes Check service outage - Access Microsoft Service health and click Teams in the left sidebar to check service status.
6 Ways to Fix Microsoft Teams Crashing on Windows 11
Common Fixes Check service outage - Access Microsoft Service health and click Teams in the left sidebar to check service status.
 4 Ways to Fix “We Couldn’t Connect to the Update Service” Issue on Windows
Basic Fixes Restart PC: Restart your PC to fix temporary bugs and glitches.
4 Ways to Fix “We Couldn’t Connect to the Update Service” Issue on Windows
Basic Fixes Restart PC: Restart your PC to fix temporary bugs and glitches.
 Top 3 Ways to Stop Microsoft Teams From Starting Automatically on Windows 10
Microsoft Teams app is great for team management and communication.
Top 3 Ways to Stop Microsoft Teams From Starting Automatically on Windows 10
Microsoft Teams app is great for team management and communication.
 2 Ways to Fix the Telegram App Crashing on Windows 11
Basic Fixes Check the Telegram server status: Visit Downdetector to check for an active Telegram server outage.
2 Ways to Fix the Telegram App Crashing on Windows 11
Basic Fixes Check the Telegram server status: Visit Downdetector to check for an active Telegram server outage.
 Top 10 Ways to Fix Google Chrome Keeps Freezing or Crashing on Windows 10
Google Chrome is the go-to browser of millions across the world.
Top 10 Ways to Fix Google Chrome Keeps Freezing or Crashing on Windows 10
Google Chrome is the go-to browser of millions across the world.
 5 Ways to Fix Spotify Keeps Crashing Issue on Windows
Basic Fixes Restart Spotify: Open the Task Manager, right-click on Spotify, and select End Task.
5 Ways to Fix Spotify Keeps Crashing Issue on Windows
Basic Fixes Restart Spotify: Open the Task Manager, right-click on Spotify, and select End Task.
 5 Ways to Fix Discord Keeps Crashing on Windows Computer
https://youtu.be/_uU0Ob5vTWM Try Basic Fixes End Discord processes using Task Manager: Press Ctrl + Shift + Esc keys to open Task Manager.
5 Ways to Fix Discord Keeps Crashing on Windows Computer
https://youtu.be/_uU0Ob5vTWM Try Basic Fixes End Discord processes using Task Manager: Press Ctrl + Shift + Esc keys to open Task Manager.
 7 Ways to Fix Steam Not Opening or Crashing on Windows 11 or 10
Try Basic Fixes Check if Steam is down: If Steam servers face an outage, you might run into errors.
7 Ways to Fix Steam Not Opening or Crashing on Windows 11 or 10
Try Basic Fixes Check if Steam is down: If Steam servers face an outage, you might run into errors.
The article above may contain affiliate links which help support Guiding Tech. The content remains unbiased and authentic and will never affect our editorial integrity.