Method 1: Check All User Accounts Using the Settings App
The Settings app can be used to create new user accounts and check those already present on your computer. Here’s how.
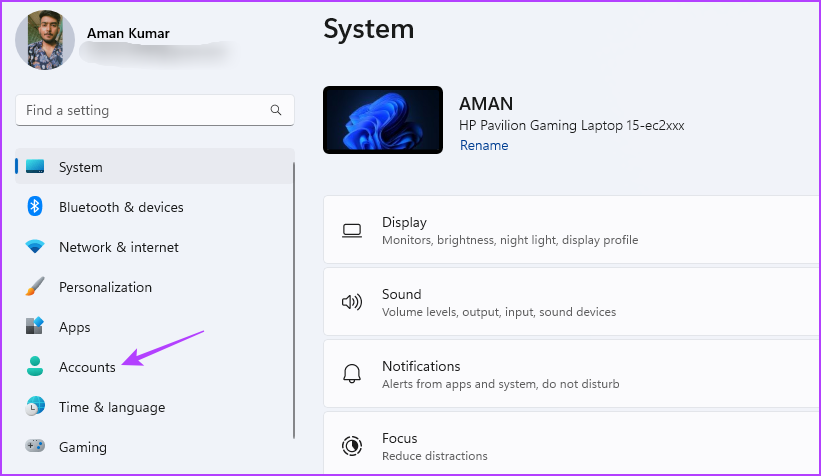
Step 1: Press the Windows + I key to open the Settings app.
Step 2: Choose Accounts from the left sidebar.
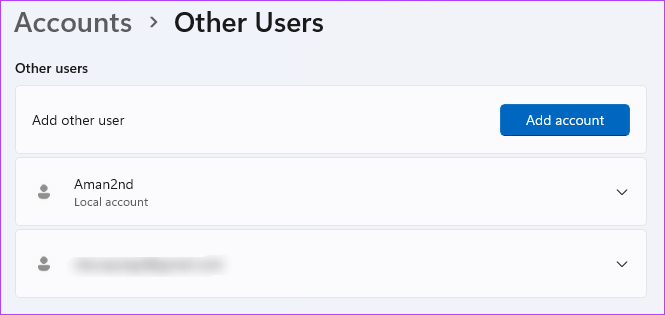
Step 3: Click on the Other users option in the right pane, which should show you all the users’ accounts on your Windows PC.
Method 2: Check All User Accounts Using the Control Panel
Control Panel is another Windows utility that allows you to view all users’ accounts on your Windows 11 PC. Here’s how:
Step 1: Press the Windows key to open the Start Menu, type Control Panel in the search bar, and press Enter.
Step 2: Choose User Accounts.

Step 3: Click on the Change account type option.
In the Manage Accounts window, you will see all the accounts on your computer.

Method 3: Use the Command-line Tools
You can use Windows PowerShell and Command Prompt to perform advanced tasks like getting rid of corrupted files, flushing the DNS cache, and more. They can also come in handy when viewing all the user accounts on your Windows 11 PC.
Step 1: Click the Windows icon on the Taskbar to open the Start Menu, type Command Prompt in the search bar, and choose Run as administrator from the right pane.

Step 2: Type the following command and press Enter:
net user
You’ll see all the user accounts on your PC in the result.

If you want to check user accounts using Windows PowerShell, follow these steps:
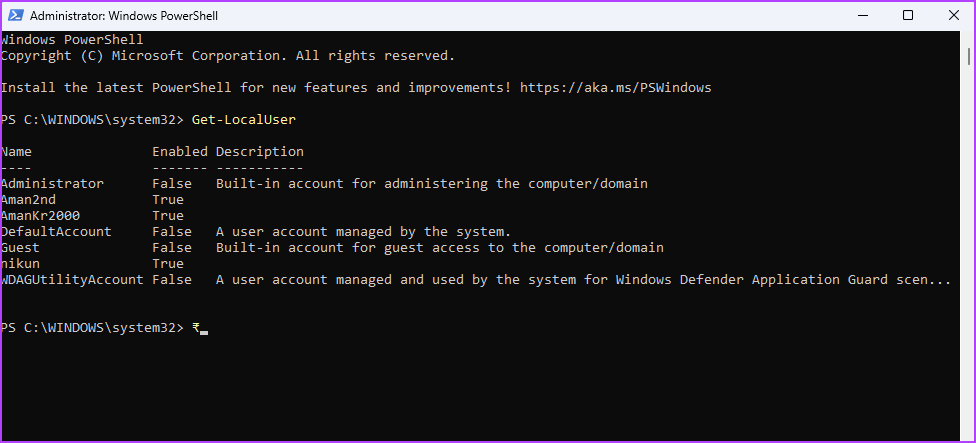
Step 1: Press the Windows key to open the Start Menu, type Windows PowerShell in the search bar, and choose Run as administrator.
Step 2: Type the following command in the PowerShell window and press Enter.
Get-LocalUser
Was this helpful?
Last updated on 03 June, 2024
Read Next
 6 Ways to Switch User Accounts in Windows 11
Method 1: Switch User Accounts From the Start Menu The most popular way to switch user accounts on a Windows computer is via the Start menu.
6 Ways to Switch User Accounts in Windows 11
Method 1: Switch User Accounts From the Start Menu The most popular way to switch user accounts on a Windows computer is via the Start menu.
 How to Add and Manage Multiple OneDrive Accounts in Windows 10
Both smartphones and computers are smart enough to run multiple accounts of the same app or service.
How to Add and Manage Multiple OneDrive Accounts in Windows 10
Both smartphones and computers are smart enough to run multiple accounts of the same app or service.
 How to Fix Windows 10’s User Profile Cannot Be Loaded Error
Logging in to a computer is as easy as typing a password (if any) and tapping the sign-in button.
How to Fix Windows 10’s User Profile Cannot Be Loaded Error
Logging in to a computer is as easy as typing a password (if any) and tapping the sign-in button.
 How to Rename the User Folder in Windows 11
https://youtu.be/CLd5GCQFMMs What Is the User Folder on Windows 11 Every copy of Windows 11 installed will have a folder named after the user account.
How to Rename the User Folder in Windows 11
https://youtu.be/CLd5GCQFMMs What Is the User Folder on Windows 11 Every copy of Windows 11 installed will have a folder named after the user account.
 How to Change or Remove User Account Image in Windows 11
How to Change User Account Image You can quickly change your user account image on Windows 11 using the Settings app.
How to Change or Remove User Account Image in Windows 11
How to Change User Account Image You can quickly change your user account image on Windows 11 using the Settings app.
 How to Fix “Switch User” Missing From Windows Login Screen
Fix 1: Enable Inactive Accounts If the other user accounts on your system are disabled, they won’t appear on the login screen.
How to Fix “Switch User” Missing From Windows Login Screen
Fix 1: Enable Inactive Accounts If the other user accounts on your system are disabled, they won’t appear on the login screen.
 5 Fixes for “User Profile Service Failed the Sign-In” Error in Windows 11
Fix 1: Configure the User Profile Service If the User Profile Service on your PC is not set to run automatically, you could encounter the "User Profile Service failed the
5 Fixes for “User Profile Service Failed the Sign-In” Error in Windows 11
Fix 1: Configure the User Profile Service If the User Profile Service on your PC is not set to run automatically, you could encounter the "User Profile Service failed the
 5 Fixes For a Corrupted User Profile on Windows 11
Basic Fixes: Update the computer: Windows updates often include bug fixes and patches and may correct the corrupted user profile.
5 Fixes For a Corrupted User Profile on Windows 11
Basic Fixes: Update the computer: Windows updates often include bug fixes and patches and may correct the corrupted user profile.
The article above may contain affiliate links which help support Guiding Tech. The content remains unbiased and authentic and will never affect our editorial integrity.

