What Is the User Folder on Windows 11
Every copy of Windows 11 installed will have a folder named after the user account. This folder is where your downloads, documents, pictures, and other personal data are stored.
By default, Windows 11 assigns a five-letter name to this folder, which turns out to be the first five characters of your email ID registered with Windows. This can be annoying, especially if your name has six letters, but good old Windows drops the last letter when naming the User folder.
How To Rename the User Folder
Unfortunately, you cannot just right-click on the User folder and rename it. There are two ways to change the User folder name in Windows 11. Let us explain both methods in step-by-step form.
Method 1: Rename the User Folder by Creating a New User Account
Step 1: Click on the Search icon on your Windows 11 taskbar.
Step 2: Enter Settings in the search bar and click on the app to open it.
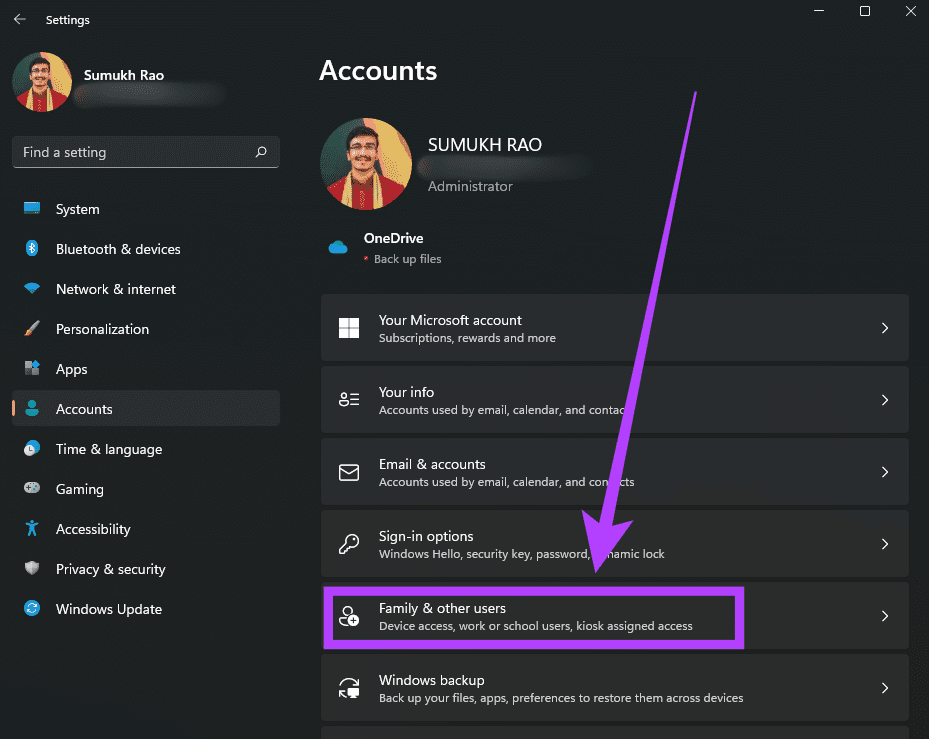
Step 3: Navigate to the Accounts section in the left panel.
Step 4: Select Family & other users.
Step 5: Click on the Add account option next to Other users.

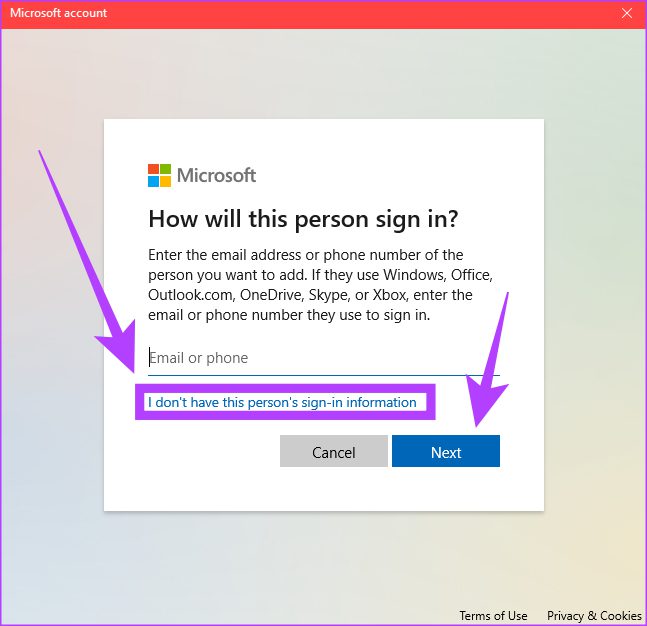
Step 6: You will now see an account setup wizard. Note that you have to select I don’t have this person’s sign-in information to proceed further.
Note: Do not use your Microsoft account at this stage.
Step 7: Enter a name for the new user account. This will be the name of your User folder as well. You can also choose to enter a password to secure the account. Once done, click on Next.
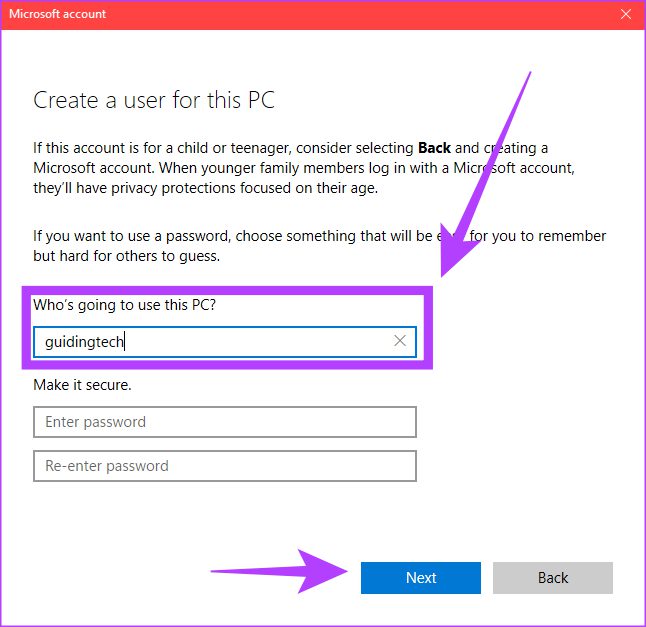
Your new account is now ready.
Step 8: Now, click on the small arrow next to the new user account and select Change account type.
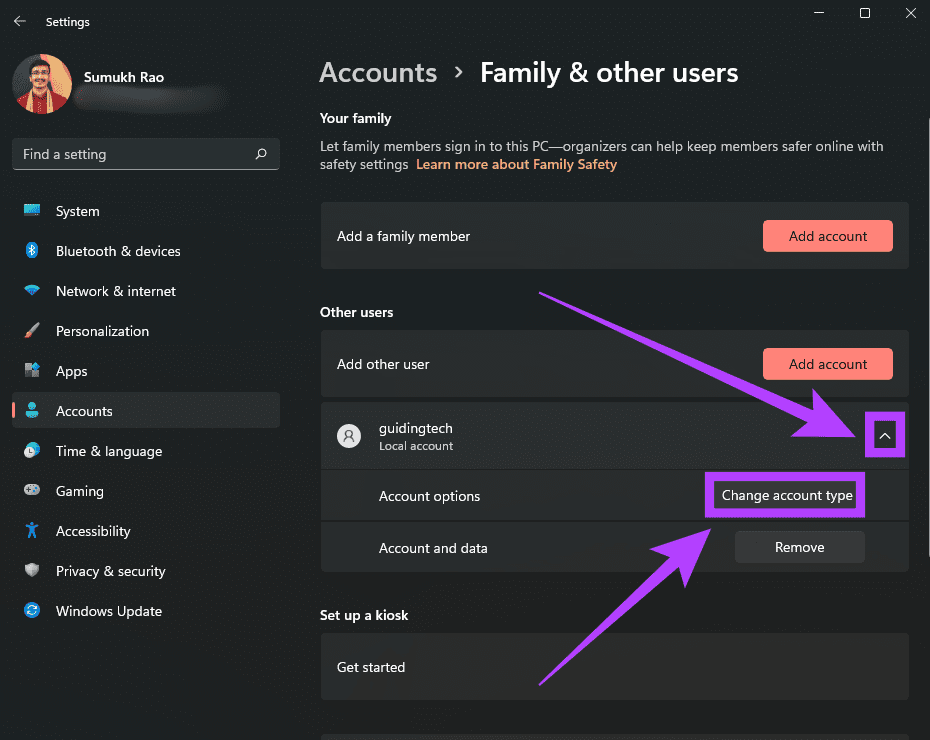
Step 9: Select Administrator as the account type and click on OK.

Step 10: Shut down your PC, and the next time you turn it on, log in using the new user account.
That’s one way to get a User folder with a desired, easy name. If you want another way to rename the user folder, continue reading.
Method 2: Rename the User Folder Using the Registry Editor
Step 1: Create a new user account using the steps mentioned in the first method above. Restart your PC and log in to that account.
Step 2: Press the Windows key, and type Command Prompt. Click on the app to open it.
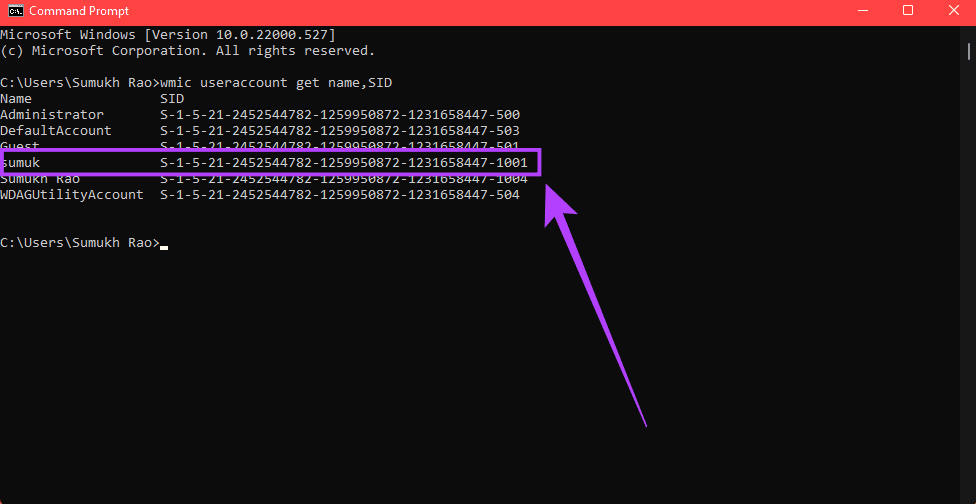
Step 3: Type in the below command and hit Enter.
wmic useraccount get name,SID

Step 4: From the list of user accounts displaying their respective SIDs, note the SID of the username for which you want to rename the user folder.
Step 5: Press the Windows key + R to launch Run. Type the below command and click OK.
regedit

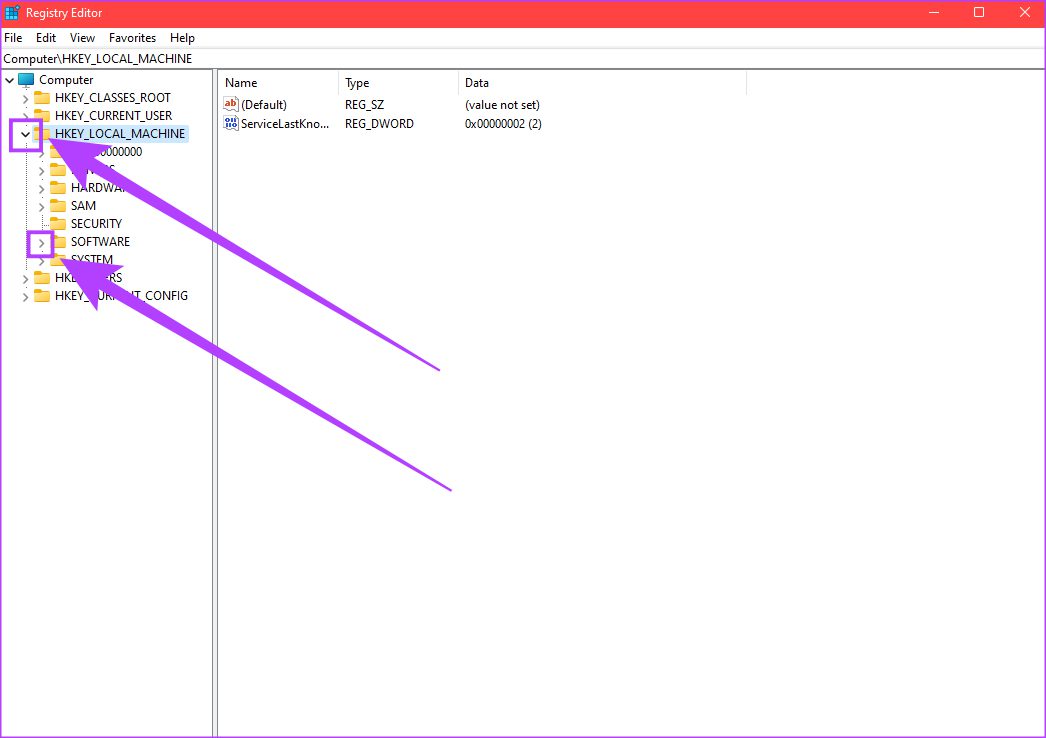
Step 6: In the Registry Editor, click on the small arrow next to the HKEY_LOCAL_MACHINE folder on the left.
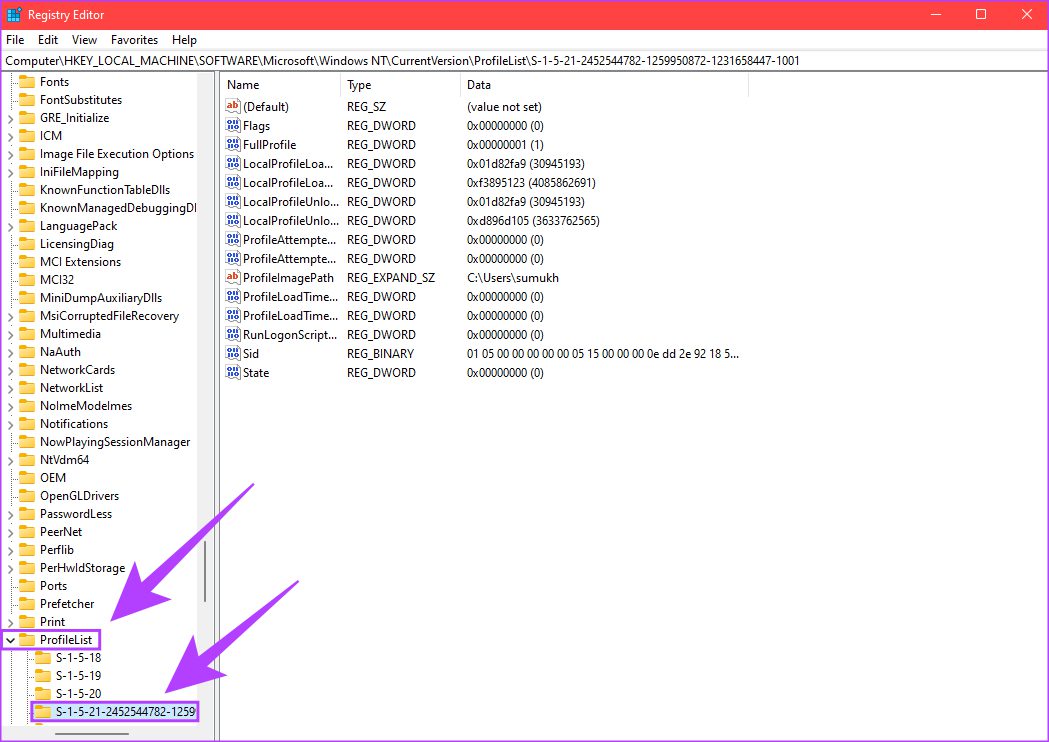
Step 7: Then, click on the arrow next to SOFTWARE. Keep doing this till you reach \Microsoft\Windows NT\CurrentVersion\ProfileList\SID, where the SID is the one you noted down earlier.
Step 8: Click on the SID to expand the contents on the right half of your screen.
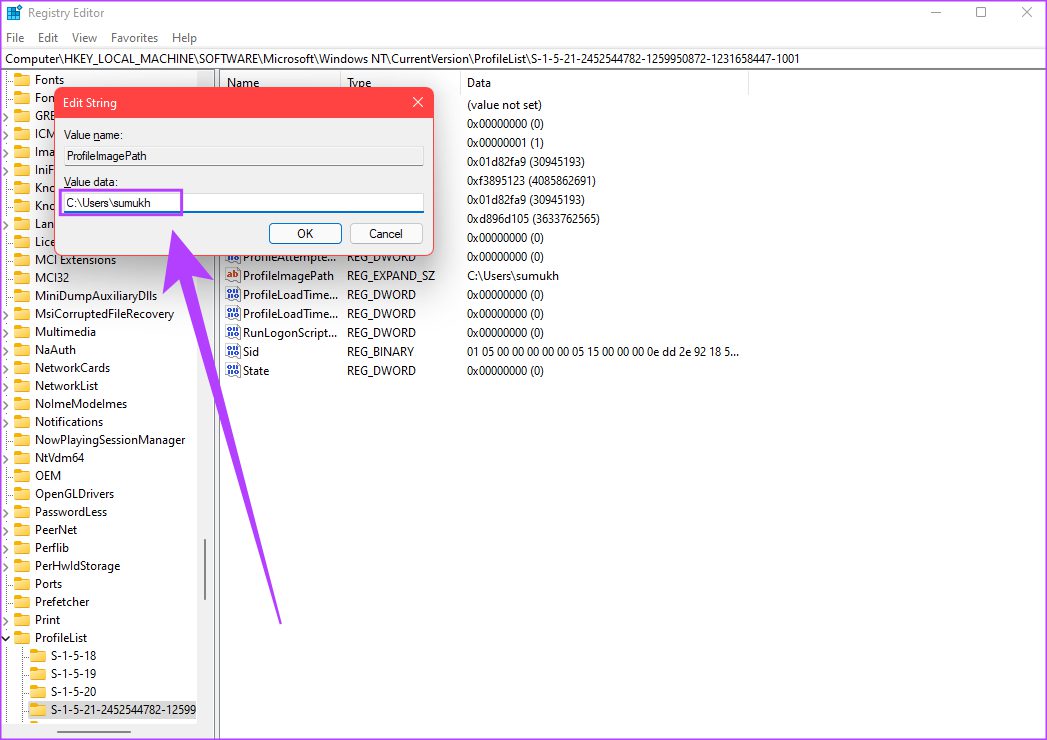
Step 9: On the right pane, select the ProfileImagePath file and right-click on it. Click on Modify.
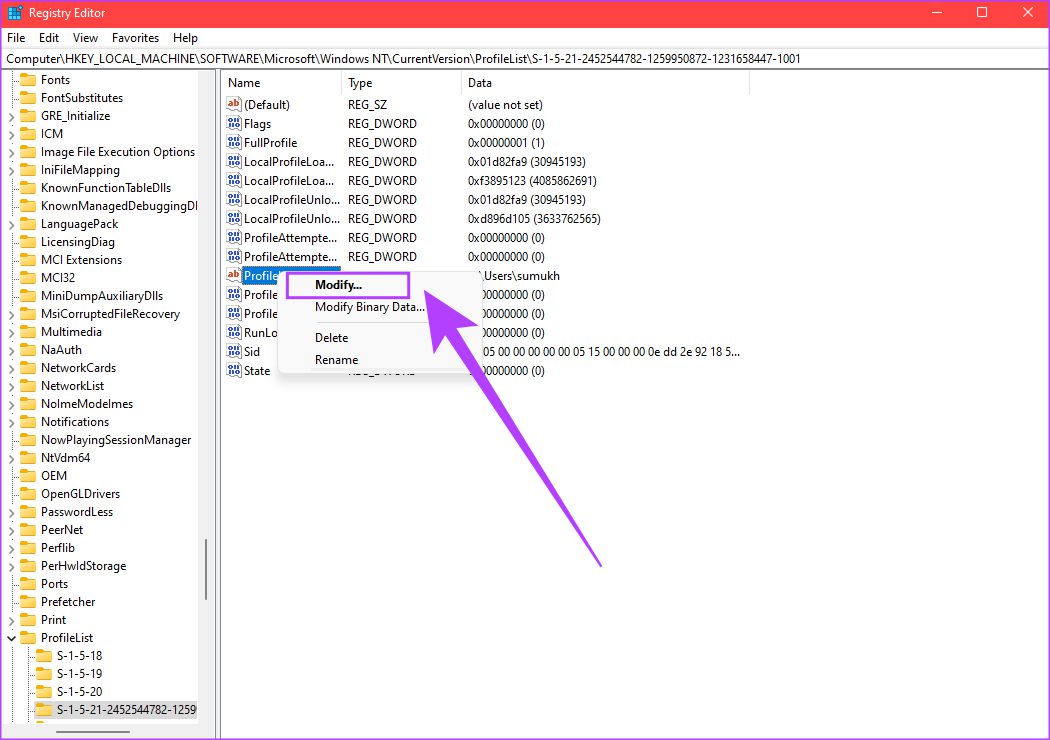
Step 10: Enter the desired name for the user folder after the ‘C:\Users\’ path. Click OK.
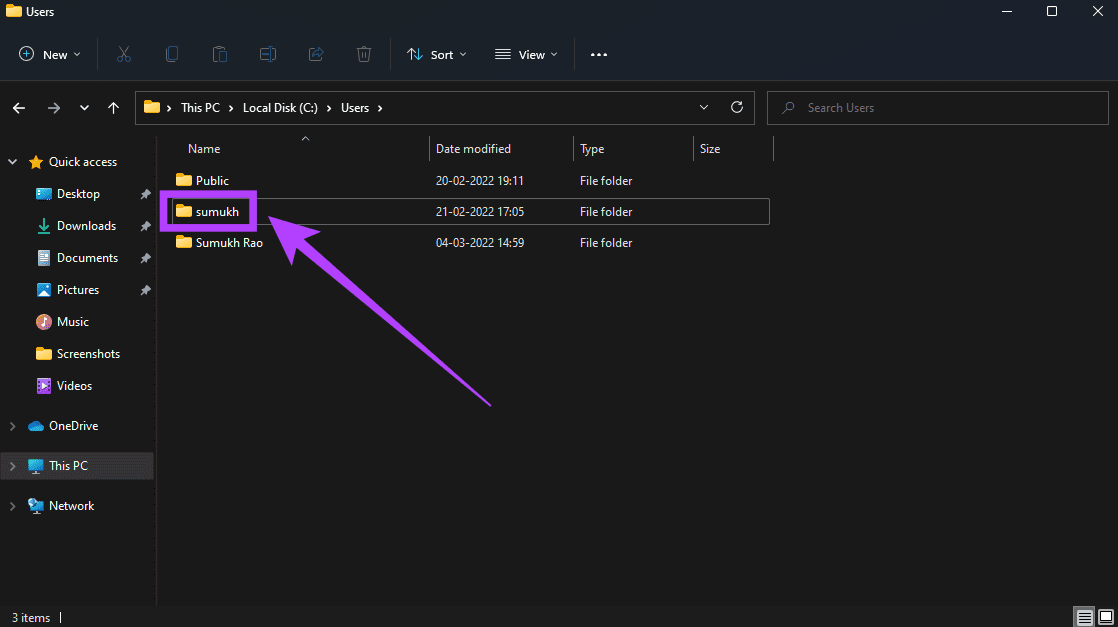
Step 11: Go to the user directory in Windows Explorer. You will find the user folder with the old name. Right-click on it and select Rename.
Step 12: Enter the same name as what you entered in the Registry Editor. Once done, hit Enter.
Restart your PC and log in to the account you have renamed the admin user folder.
FAQs on Renaming the User Folder in Windows 11
Renaming the user folder can lead to issues with certain applications and system functions. It’s generally not recommended unless you are experienced with Windows customization.
While there are third-party tools that claim to help with this, it’s generally safer to avoid them as they can lead to unpredictable behavior.
If you encounter issues after renaming the user folder, it’s a good idea to seek assistance from Microsoft Support or consult relevant forums for possible solutions.
With this, you can promptly and efficiently modify the user folder, especially if you find yourself limited to the 5 letters of your registered Microsoft email address.
Was this helpful?
Last updated on 25 July, 2024
15 Comments
Leave a Reply
Read Next
 How to Share Gmail Folder With Another User Along With Emails Automatically
How to Share a Gmail Label With Other Users To share your Gmail labels with another person, you will need a Chrome extension called Label Sharing for Gmail by cloudHQ.
How to Share Gmail Folder With Another User Along With Emails Automatically
How to Share a Gmail Label With Other Users To share your Gmail labels with another person, you will need a Chrome extension called Label Sharing for Gmail by cloudHQ.
 4 Ways to Fix Unable to Rename Folders on Windows 11
Try Basic Fixes Make sure the folder is not in use: You may have difficulty renaming a folder on your PC if it is already open in another program.
4 Ways to Fix Unable to Rename Folders on Windows 11
Try Basic Fixes Make sure the folder is not in use: You may have difficulty renaming a folder on your PC if it is already open in another program.
 3 Easy Ways to Batch Rename Files on Windows 11
1.
3 Easy Ways to Batch Rename Files on Windows 11
1.
 How to Rename or Delete SoftwareDistribution and Catroot2 Folders
What Happens When You Reset SoftwareDistribution and Catroot2 Folders Catroot2 folder contains catalog files (.cat) that are cryptographic hashes and digital signatures for system files.
How to Rename or Delete SoftwareDistribution and Catroot2 Folders
What Happens When You Reset SoftwareDistribution and Catroot2 Folders Catroot2 folder contains catalog files (.cat) that are cryptographic hashes and digital signatures for system files.
 How to Rename Photos, Videos, and Albums on iPhone and iPad
Rename and Save Photos in the Files App Since the Photos app on your iPhone doesn't have renaming options, you must use the Files app.
How to Rename Photos, Videos, and Albums on iPhone and iPad
Rename and Save Photos in the Files App Since the Photos app on your iPhone doesn't have renaming options, you must use the Files app.
 How to Fix Windows 10’s User Profile Cannot Be Loaded Error
Logging in to a computer is as easy as typing a password (if any) and tapping the sign-in button.
How to Fix Windows 10’s User Profile Cannot Be Loaded Error
Logging in to a computer is as easy as typing a password (if any) and tapping the sign-in button.
 How to Change or Remove User Account Image in Windows 11
How to Change User Account Image You can quickly change your user account image on Windows 11 using the Settings app.
How to Change or Remove User Account Image in Windows 11
How to Change User Account Image You can quickly change your user account image on Windows 11 using the Settings app.
 6 Ways to Switch User Accounts in Windows 11
Method 1: Switch User Accounts From the Start Menu The most popular way to switch user accounts on a Windows computer is via the Start menu.
6 Ways to Switch User Accounts in Windows 11
Method 1: Switch User Accounts From the Start Menu The most popular way to switch user accounts on a Windows computer is via the Start menu.
The article above may contain affiliate links which help support Guiding Tech. The content remains unbiased and authentic and will never affect our editorial integrity.

Everything is perfect until the last step — Step 14 of the second method. Then the system asks for Administrator permission, and when I click “Continue” to give that permission it says “The action can’t be completed because the folder or a file in it is open in another program”. But there are no programs open except Windows Explorer. (I shut the computer down and re-started it, to make sure nothing else is open.) Any idea of what to do?
Hi Sumukh,
I followed these steps but after editing the name in the registry as I have done a number of times on Windows 10, I am unable to modify the folder name- windows says it is open or in use. I have tried making sure that account was logged out. Any ideas what I could do?
Hi Martin,
I had the same issue.
I rebooted in Safe Mode and was easily able to rename the folder using the command prompt.
ren oldname newname
I’m guessing that it will also work from the Windows Explorer window.
On step 13, there is no option to rename after right clicking..
Hi James, with Windows 11, the Rename appearing in text now appears as the icon as shown in the Step 13. Quite inconvenient, if I may.
icon for renaming the folder is not showing
Now when I login I get the error “c:\users\OLDNAME\OneDrive\Desktop is unavailable…” How can I fix this?
Open Registry Editor and search for “C:\users\OLDNAME\OneDrive”
In every found entry rename OLDNAME to NEWNAME.
Hi FredD!
To fix your problem, open Registry Editor same way as in this tutorial.
Then search for “C:\Users\OldName\OneDrive\Desktop” and rename “OldName” to a “NewName”.
After that sign out of your profile or restart computer.
I would also suggest you to find any line in Registry Editor which contains “C:\Users\OldName\OneDrive” and rename “OldName” to a “NewName” so all the paths corresponds your “NewName”.
I have the same issue in Windows 11. After renaming the user account, the user account name differs from the folder name in C:\Users\
I thought it would be a good idea to check how many instances of there were in the registry. Using regedit and the search function, I counted around 180 instances!! — Related to desktp icons and all the programs that appear in the C:\Users\ folder.
I decided to live with the discrepancy rather than risk getting it wrong or there being some other hidden uses of the C:\Users\ name, maybe in data files used by apps or in some of my own programming where I’d used an explicit folder name & path rather than a system variable.
I NEED HELP.
My PC won’t let me login to my everyday User. I’m stuck on a TEMP User. What can i do? I think messed up the process and i just want to go back to where it was.
My PC won’t let me login to my everyday User. I’m stuck on a TEMP User. What can i do? I think messed up the process and i just want to go back to where it was.
This is a terrible and time comsuming article. most on the internet searches give these same instructions and so are copied from website to website. 1) after all of this, you cannot simply rename the user/folder…windows locks it 2) there are many, many, many references that win 11 and other software builds to the old username folder. the chances of getting all of this right is extraordinarily low.
If you do not mind, or need, keeping the old folder names to ensure any old references still work then create a junction folder to the old name once you renamed to the new one.
In command prompt:
Example: mklink /j “C:\Users\OldName” “C:\Users\NewName”
With that, you get your profile mostly on the new name but any old reference would work to the oldname. Which will essentially be the same file on the new name folder but indirectly, and transparently, accessed using the old name junction link.
Zak
Hi Zak,
thanks for your comment, this is great! There are two small errors in there unfortunately, the correct prompt should be
mklink /J “C:\Users\NewName” “C:\Users\OldName”
/J is case sensitive, and the link needs to be put before the target. Also, this only works by running the command line with admin rights. In the startup menu type cmd, then, on the right, click “Run as administrator”