Fix 1: Unlock and Trust the Device
Some devices, like iPhones or Androids, have an added layer of authentication to verify user identity. When you connect your phone for the first time to a computer, you need to unlock it; otherwise, the computer may not recognize it.
Step 1: Connect the phone to a USB.
Step 2: On an iOS device, tap the Trust option in the Trust This Computer pop-up.
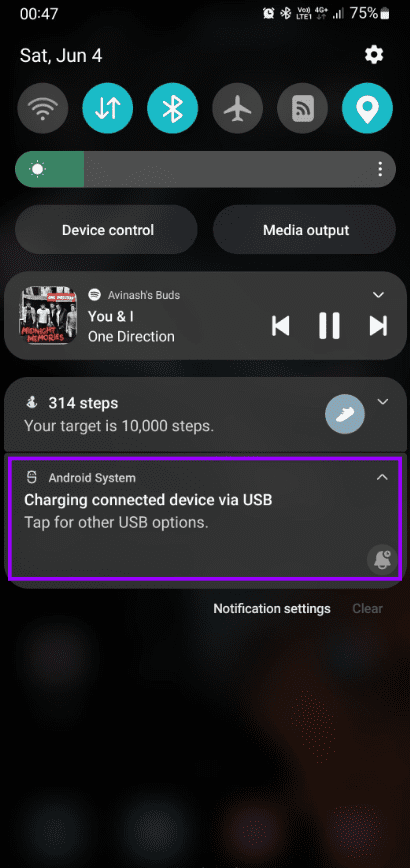
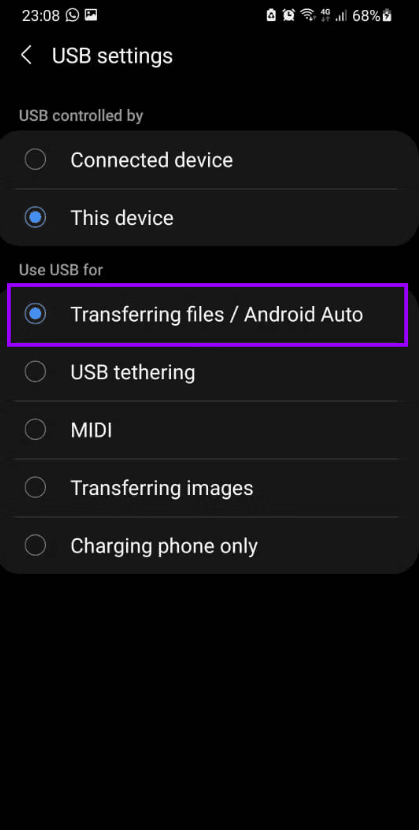
Alternatively, if it’s an Android phone, drag down the notification area > tap Charging connected device via USB > select Transferring files.
Fix 2: Check BIOS to See if USB Is Recognized
This fix is important because if the USB device is detected in the BIOS, the other solutions below may fix the issue. If it is not detected, there is a higher chance of hardware malfunction, so you may want to check cables or the device itself. You must first enter BIOS, then use the arrow keys to navigate to USB. Steps will vary depending on the manufacturer.
You may identify a recognized USB if the device is under the Listed Devices, and you should ensure a USB Controller Status, if available, is enabled.
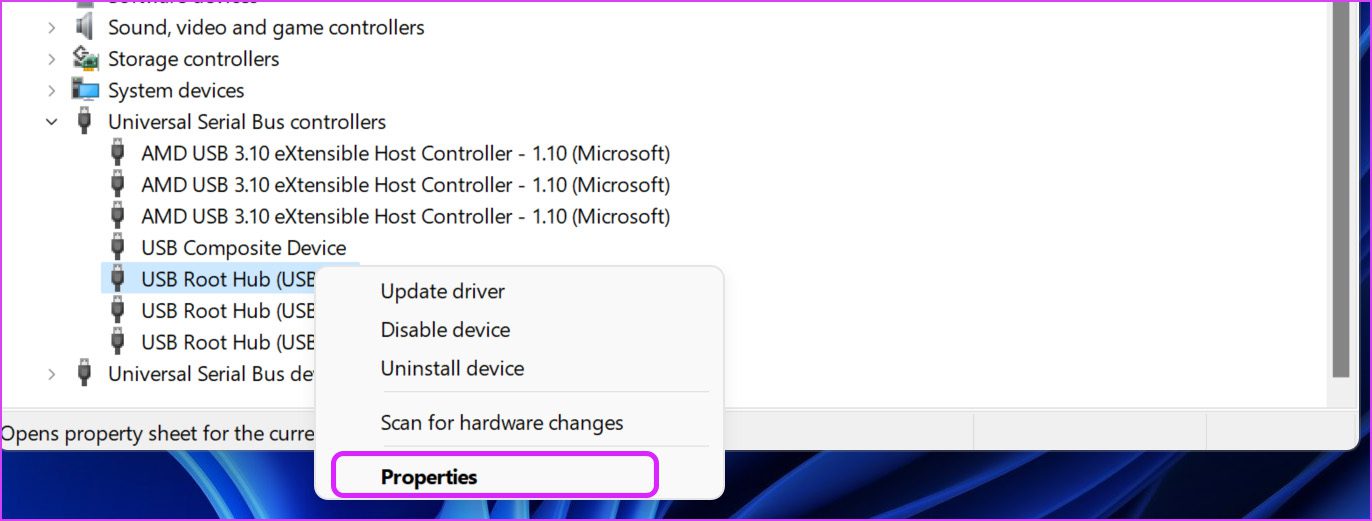
Fix 3: Reinstall USB Drivers
Buggy USB drivers on your Windows 11 PC can cause problems recognizing USB devices. To fix this, uninstall the USB drivers from the Device Manager menu. Follow the steps below.
Step 1: Right-click on the Start menu and select Device Manager.

Step 2: When it opens, scroll down to the Universal Serial Bus Controllers section > locate and right-click on the USB Root Hub device.
Step 3: Select Uninstall Drivers and confirm your choice.
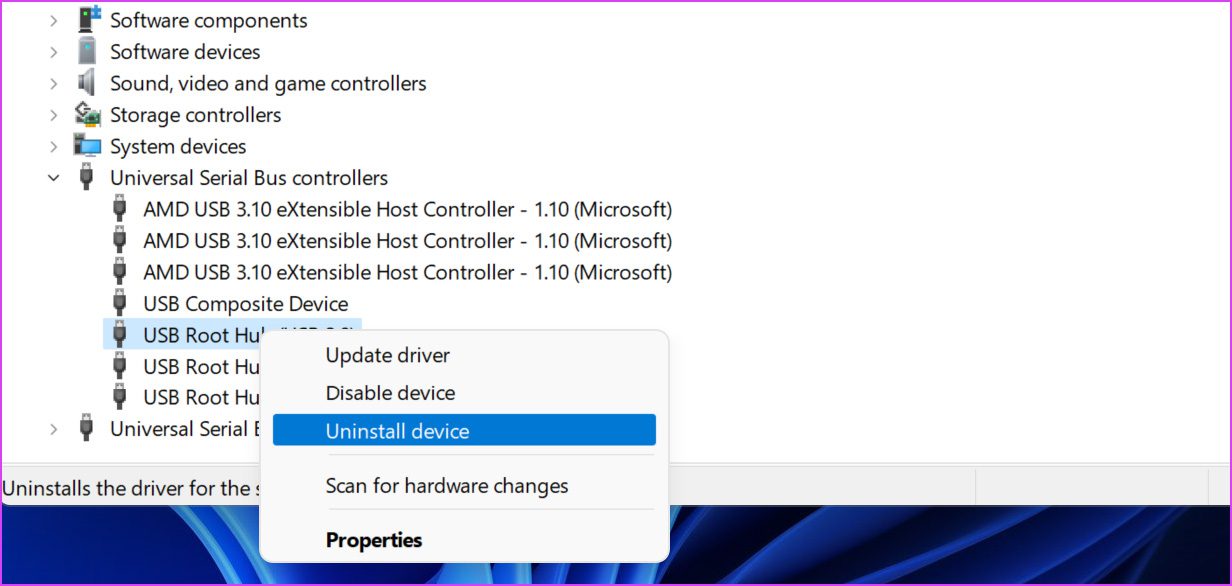
Step 4: Restart your PC and wait for Windows 11 to automatically install the required drivers after plugging in the USB device.
Fix 4: Update or Reinstall Chipset Drivers
Chipset drivers act as translators behind the scenes. They ensure that the PC’s motherboard communicates effectively with connected components. Updating them can fix the USB problem. The steps will depend on your manufacturer, but for AMD chipset drivers, you may download them on the AMD driver website.
Step 1: First, click on the magnifying lens on the Taskbar, type system info, and click on System Information.

Step 2. Take note of your BaseBoard Product value.
Step 3: Open the AMD driver website, type the BaseBoard Product value in the search field, and click Enter.
Step 4: Note the Chipset name—in our case, it is AMD Socket A4—and click on it.
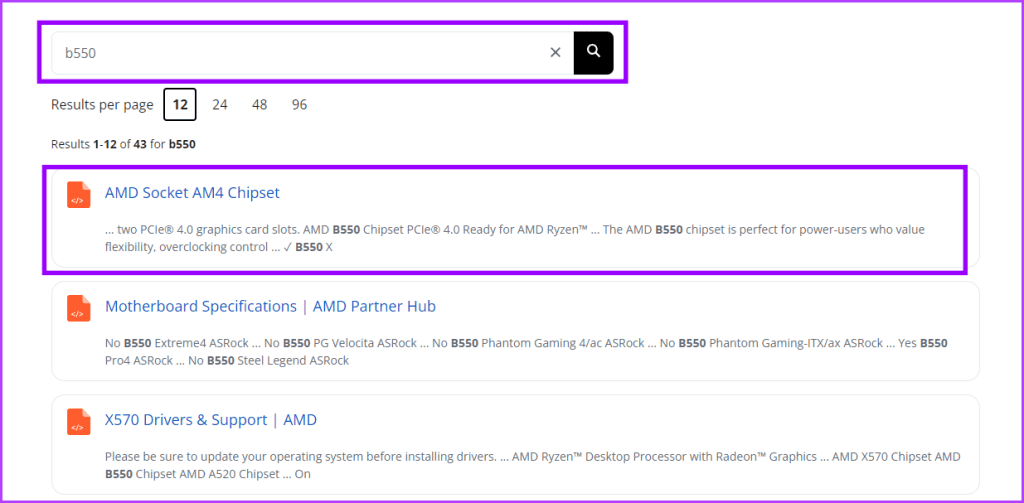
Step 5: Select Chipset > select the Chipset name for your computer > choose your BaseBaord value > click Submit.

Step 6: Choose your operating system and click on Download for your Chipset driver.
Step 7: Double-click to run the downloaded setup file and click Install.
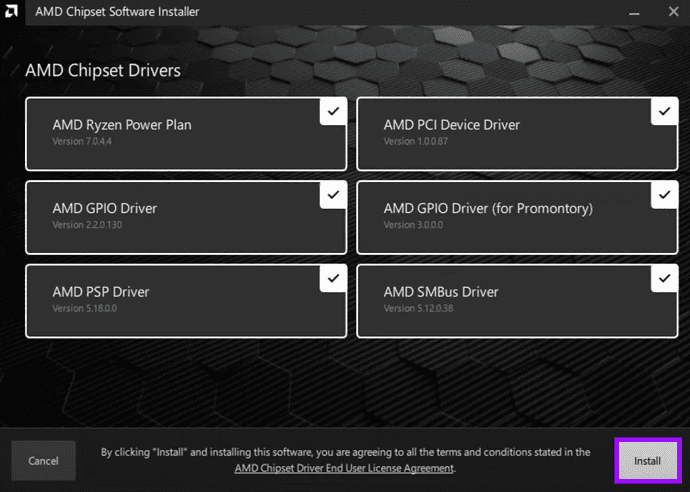
Step 8: Restart the computer once the installation is completed.
Fix 5: Disable USB Suspend Settings
This is yet another setting tweak that can affect USB operations on Windows. To reduce battery usage, Windows 11 suspends USB operations after a while. Let’s change the behavior.
Step 1: Press the Windows key, type edit power plan, and hit Enter. Windows will open Power options in the Control Panel.
Step 2: Select Change advanced power settings.

Step 3: Scroll down to USB settings > select USB selective suspend setting > choose Disabled.

Step 4: Click Apply and OK.
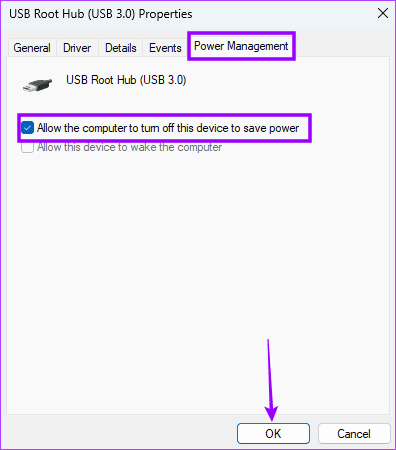
Fix 6: Change Power Management Settings
By default, Windows 11 suspends the USB device operations in the background to save power, especially on laptops. You can disable the tweak from the Device Manager menu.
Step 1: Right-click the Start menu > open the Device Manager menu.
Step 2: Expand Universal Serial Bus controllers, find the USB device from the list, and right-click on it.
Step 3: Select Properties from the context menu.
Step 4: Go to the Power Management menu, disable Allow the computer to turn off this device to save power, and click OK.
Was this helpful?
Last updated on 23 April, 2024
2 Comments
Leave a Reply
Read Next
 3 Fixes for Amazon Fire TV Stick 4K Not Recognizing USB Drive
Basic Fixes Avoid using largely sized USB drives: You need to avoid using USB drives that are larger than 128GB in size.
3 Fixes for Amazon Fire TV Stick 4K Not Recognizing USB Drive
Basic Fixes Avoid using largely sized USB drives: You need to avoid using USB drives that are larger than 128GB in size.
 5 Fixes for Apple Photos Not Recognizing Faces on iPhone
Fix 1: Disable and Re-Enable iCloud Photos Sync A common reason why the Apple Photos app may fail to recognize and organize photos by face is due to sync issues
5 Fixes for Apple Photos Not Recognizing Faces on iPhone
Fix 1: Disable and Re-Enable iCloud Photos Sync A common reason why the Apple Photos app may fail to recognize and organize photos by face is due to sync issues
 4 Fixes for PS5 Not Recognizing External Hard Drive
Try Basic Fixes Make sure the hard drive is compatible: Your PS5 supports nearly all external hard drives ranging from 250GB to 8TB in storage capacity, connected via the SuperSpeed
4 Fixes for PS5 Not Recognizing External Hard Drive
Try Basic Fixes Make sure the hard drive is compatible: Your PS5 supports nearly all external hard drives ranging from 250GB to 8TB in storage capacity, connected via the SuperSpeed
 Top 9 Ways to Fix Windows 11 Computer Not Recognizing Headphones
Connecting your favorite pair of headphones allows you to isolate yourself from the surrounding noise and lets you focus on the task at hand.
Top 9 Ways to Fix Windows 11 Computer Not Recognizing Headphones
Connecting your favorite pair of headphones allows you to isolate yourself from the surrounding noise and lets you focus on the task at hand.
 Top 7 Ways to Fix Steam Not Recognizing Controller on Windows 11
Select games on your PC are more fun with a controller rather than the keyboard and mouse combo.
Top 7 Ways to Fix Steam Not Recognizing Controller on Windows 11
Select games on your PC are more fun with a controller rather than the keyboard and mouse combo.
 4 Ways to Fix USB Devices Keep Disconnecting and Reconnecting in Windows 11
https://youtu.be/tUV-xdBsm5o Try Basic Fixes Reconnect the device: Unplugging your USB device and plugging it back in should help fix any issues caused by a loose connection.
4 Ways to Fix USB Devices Keep Disconnecting and Reconnecting in Windows 11
https://youtu.be/tUV-xdBsm5o Try Basic Fixes Reconnect the device: Unplugging your USB device and plugging it back in should help fix any issues caused by a loose connection.
 6 Best USB-C (USB 3) Cables for iPhone 15 Pro and iPhone 15 Pro Max
The iPhone 15 Pro series has received significant enhancements.
6 Best USB-C (USB 3) Cables for iPhone 15 Pro and iPhone 15 Pro Max
The iPhone 15 Pro series has received significant enhancements.
 4 Fixes for Kindle Books Not Syncing Between Devices
Basic Fixes Use the same Kindle account: You should be using the same Amazon Kindle account on all your devices.
4 Fixes for Kindle Books Not Syncing Between Devices
Basic Fixes Use the same Kindle account: You should be using the same Amazon Kindle account on all your devices.
The article above may contain affiliate links which help support Guiding Tech. The content remains unbiased and authentic and will never affect our editorial integrity.


The FIRST thing I would do would be to change the batteries in the keyboard (usually 2 AAA size). I bet that more often than not, your keyboard will spring back to life. All of the other lengthy and complicated measures are probably completely unnecessary and you will be up and running and back to work much faster. The old adage (Keep It Simple S—–d (KISS) strikes again.
All the best to everyone. Take care.
My keyboard operates via usb and I’m simply locked out cannot type my password not a single usb works