Try Basic Fixes
- Disable and re-enable Wi-Fi: Temporary issues with your Android’s Wi-Fi may prevent it from communicating with the network and loading the login page. Try disabling and re-enabling Wi-Fi on your phone and see if that works.
- Open any webpage in your browser: Sometimes, your Android may fail to load the captive portal login page immediately after connecting to a network. In that case, you can try opening a random website in your browser and see if that redirects you to the login page.
- Open the router’s default page: Open your preferred browser, type the IP address, like 192.168.1.1 into the address bar, and select the first result that appears. If that doesn’t work, type 192.168.0.1 instead or check the router’s support page to know the exact address to open the admin page.
- Disable VPN: A VPN connection could also prevent your Android from communicating with the Wi-Fi network and cause problems. It’s a good idea to immediately turn off your VPN connection and see if that gets the Wi-Fi login page to show up on your Android.
Fix 1: Disconnect and Reconnect to the Wi-Fi Network
Removing and re-adding the Wi-Fi network is another classic troubleshooting tip that can help with various Wi-Fi issues on Android, including this one. Doing so will allow your Android to establish a fresh connection and resolve issues that may have been preventing the login page from loading.
Step 1: Open the Settings app on your phone, go to Connections, and tap on Wi-Fi.


Step 2: Tap the gear icon next to your Wi-Fi network and tap the Forget option at the bottom.
Step 3: Tap on the Wi-Fi network’s name to connect to it. After this, the captive portal login page will show up.


Fix 2: Avoid Using Custom DNS
Are you using a third-party DNS server on your Android device to improve internet speeds? That may prevent the Wi-Fi login page from showing up. You can turn off custom DNS settings on your Android and see if that resolves the issue.
Step 1: Open the Settings app on your phone and navigate to Connections > More connection settings.
Step 3: Tap on Private DNS, select Automatic, and hit Save.


Fix 3: Reset Network Settings
Such anomalies can also occur if there’s an issue with the network preferences on your Android. In that case, your best option is to reset your Android phone’s network settings and start over.
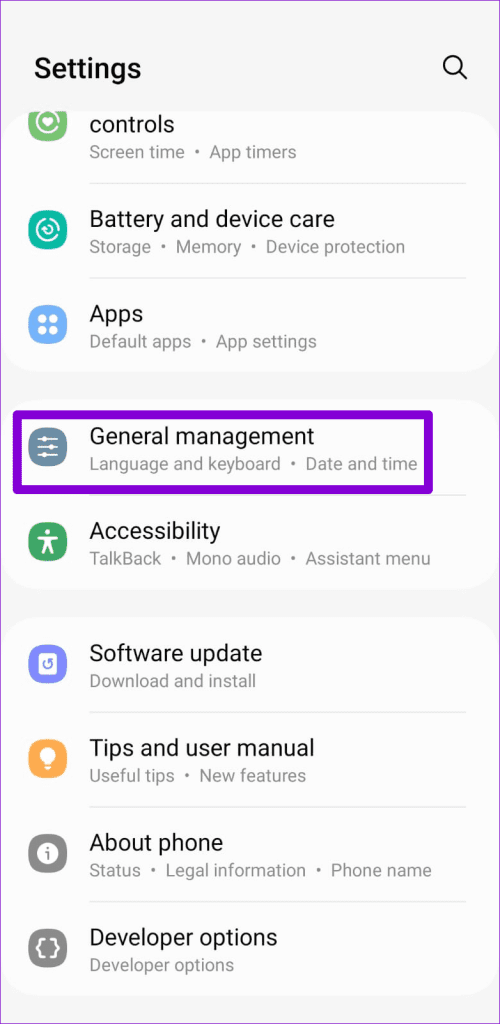
Step 1: Open the Settings app and scroll down to tap on General management.
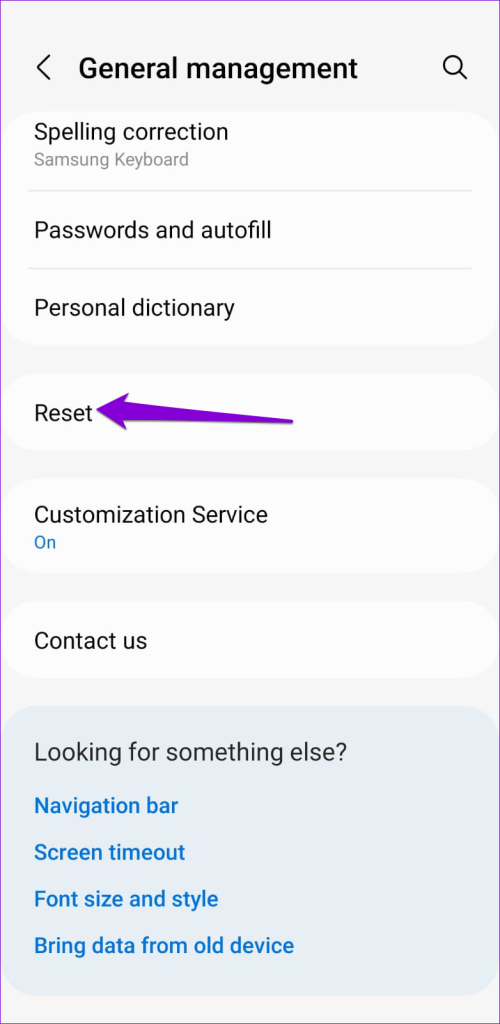
Step 2: Tap Reset and select Reset network settings from the following menu.
Step 3: Hit the Reset settings button and enter your device PIN if required.

Was this helpful?
Last updated on 25 July, 2024
2 Comments
Leave a Reply
Read Next
 Top 8 Ways to Fix Wi-Fi Login Page Not Showing on iPhone
Public Wi-Fi networks have become ubiquitous.
Top 8 Ways to Fix Wi-Fi Login Page Not Showing on iPhone
Public Wi-Fi networks have become ubiquitous.
 7 Fixes for Wi-Fi Login Page Not Showing Up on Mac and Windows
https://youtu.be/ZVvbLZKKXKk Fix 1: Forget the Network and Reconnect to It Try forgetting the network so you can reconnect to it.
7 Fixes for Wi-Fi Login Page Not Showing Up on Mac and Windows
https://youtu.be/ZVvbLZKKXKk Fix 1: Forget the Network and Reconnect to It Try forgetting the network so you can reconnect to it.
 6 Ways to Fix Login Screen Not Showing in Windows 11
Common Fixes Press Ctrl + Alt + Delete - This shortcut refreshes the login interface to bring up the login screen.
6 Ways to Fix Login Screen Not Showing in Windows 11
Common Fixes Press Ctrl + Alt + Delete - This shortcut refreshes the login interface to bring up the login screen.
 5 Ways to Fix Google Chrome Showing Untitled Blank Page
Basic Fixes: Close and restart Chrome: Temporary browser glitches can cause Chrome to show an untitled blank page.
5 Ways to Fix Google Chrome Showing Untitled Blank Page
Basic Fixes: Close and restart Chrome: Temporary browser glitches can cause Chrome to show an untitled blank page.
 4 Ways to Fix the Login Error Code E84 in Steam for Windows
Switch to a different network connection: A slow or intermittent internet connection can also cause login errors in Steam.
4 Ways to Fix the Login Error Code E84 in Steam for Windows
Switch to a different network connection: A slow or intermittent internet connection can also cause login errors in Steam.
 3 Ways to Fix ChatGPT Login Not Working
Why ChatGPT Login Isn’t Working ChatGPT may fail to log you in due to one of the following reasons: You're connected to an unstable or slow internet.
3 Ways to Fix ChatGPT Login Not Working
Why ChatGPT Login Isn’t Working ChatGPT may fail to log you in due to one of the following reasons: You're connected to an unstable or slow internet.
 4 Ways to Disable Login Screen After Sleep on Windows 11
Method 1: Disable Login After Sleep From Settings The easiest way to skip the login screen after sleep mode is by modifying the sign-in options in the Settings app.
4 Ways to Disable Login Screen After Sleep on Windows 11
Method 1: Disable Login After Sleep From Settings The easiest way to skip the login screen after sleep mode is by modifying the sign-in options in the Settings app.
 4 Ways to Remove Login Password From Windows 11
Method 1.
4 Ways to Remove Login Password From Windows 11
Method 1.
The article above may contain affiliate links which help support Guiding Tech. The content remains unbiased and authentic and will never affect our editorial integrity.

I resolved the issue by typing in a web address, this then informed me that my date and time were incorrect. As no connection, it would not allow me to use auto date and time option. Putting the information in manually, forgetting the network, and then reconnecting solved the issue.
thank you, it works for my android phone.. Nice post..