Try Basic Fixes
- Use the updated Wi-Fi password: If the password is incorrect, your Android may fail to connect to a Wi-Fi network automatically. This can happen if someone has changed the Wi-Fi password and you haven’t updated it on your phone. To fix this, disconnect from the network and reconnect to it.
- Disable battery saver mode: When you enable battery saver mode, Android restricts some of the background activities. This can prevent your phone from scanning for and connecting to saved Wi-Fi networks. To prevent this, avoid using the battery-saver mode when not required.
Fix 1: Configure Auto Reconnect Settings
Step 1: Open the Settings app > navigate to Connections > Wi-Fi.


Step 2: Tap the gear icon next to your network > enable the toggle for Auto reconnect.


If your Android is not connected to the network, use the three-dot menu icon at the top-right corner and go to Advanced settings > Manage networks. Then, select the network you want to configure. Note that you’ll need to repeat the above steps for each Wi-Fi network separately.
Fix 2: Configure Android to Turn On Wi-Fi Automatically
Your Android phone can automatically turn on Wi-Fi when you’re close to your frequently-used networks. If you’ve previously disabled this option, turn on the Wi-Fi manually each time you want. Here’s how to change that.
Step 1: Open the Settings app > tap on Connections > select Wi-Fi from the following page.
Step 2: Tap the three-dot menu icon at the top-right corner > select Intelligent Wi-Fi.
Step 3: Turn on the toggle for Turn Wi-Fi on/off automatically > disable the toggle for Switch to mobile data.


Fix 3: Reset Network Settings
As a last resort, reset the network settings on your Android. This will reset all the network settings to default and fix any issues caused by misconfigured settings. Since this process removes your saved Wi-Fi networks, you must connect to each of your networks again.
Step 1: Open the Settings app > tap on General management.
Step 2: Tap Reset > select Reset network settings.

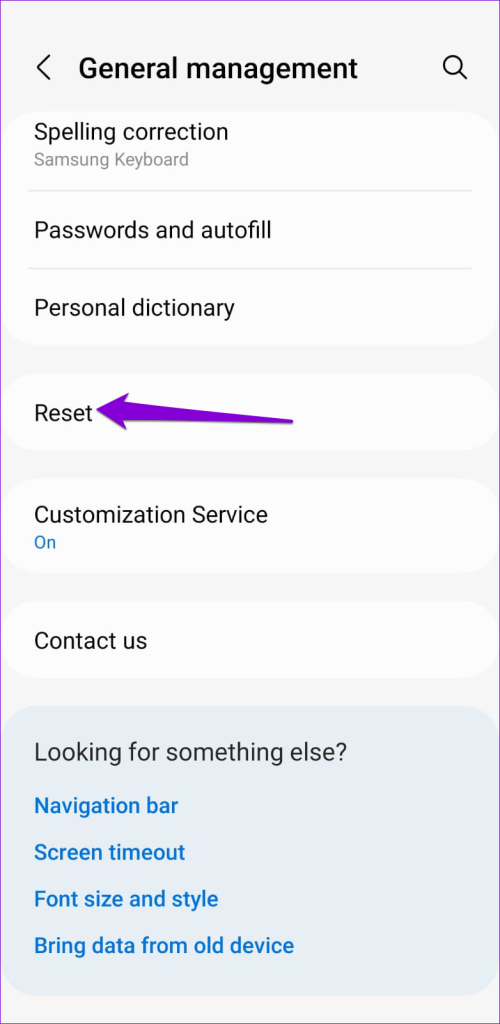

Step 3: Tap the Reset settings button to confirm.
After your phone reboots, reconnect to the Wi-Fi network you want to use. Your phone will automatically connect to that network whenever it is in range.
Was this helpful?
Last updated on 01 August, 2024
1 Comment
Leave a Reply
Read Next
 5 Ways to Fix Wireless Android Auto Not Connecting Automatically
Fix 1: Disable Mobile Hotspot I have personally noticed that keeping the mobile hotspot enabled prevented my phone from connecting to Android Auto, or it keeps disconnecting when turned on.
5 Ways to Fix Wireless Android Auto Not Connecting Automatically
Fix 1: Disable Mobile Hotspot I have personally noticed that keeping the mobile hotspot enabled prevented my phone from connecting to Android Auto, or it keeps disconnecting when turned on.
 7 Ways to Fix Windows 11 Not Connecting to Wi-Fi Automatically
Fix 1: Enable Connect to Wi-Fi Automatically Windows 11 may not connect to a known network automatically if you haven't configured it to do so.
7 Ways to Fix Windows 11 Not Connecting to Wi-Fi Automatically
Fix 1: Enable Connect to Wi-Fi Automatically Windows 11 may not connect to a known network automatically if you haven't configured it to do so.
 3 Ways to Fix iPhone Not Automatically Connecting to Wi-Fi
Before you begin, ensure that there isn't any problem with your network connectivity and the Wi-Fi router.
3 Ways to Fix iPhone Not Automatically Connecting to Wi-Fi
Before you begin, ensure that there isn't any problem with your network connectivity and the Wi-Fi router.
 2 Fixes for Bluetooth Device Not Connecting Automatically on iPhone
Basic Fixes Reconnect device: Open the Settings app, go to Bluetooth, select your device, and tap on Forget.
2 Fixes for Bluetooth Device Not Connecting Automatically on iPhone
Basic Fixes Reconnect device: Open the Settings app, go to Bluetooth, select your device, and tap on Forget.
 3 Ways to Fix Android Not Connecting to Bluetooth Devices
Basic Fixes Use 5GHz Wi-Fi: Bluetooth uses a 2.4GHz frequency band, which can overlap the signals and cause problems.
3 Ways to Fix Android Not Connecting to Bluetooth Devices
Basic Fixes Use 5GHz Wi-Fi: Bluetooth uses a 2.4GHz frequency band, which can overlap the signals and cause problems.
 4 Ways to Fix Android Phone Not Connecting to PC
Basic Fixes Ensure your phone is unlocked: Keep this in mind while connecting to PC.
4 Ways to Fix Android Phone Not Connecting to PC
Basic Fixes Ensure your phone is unlocked: Keep this in mind while connecting to PC.
 Top 6 Ways to Fix Mac Not Connecting to Hotspot
Using a mobile hotspot is a great way to connect to the internet when away from a Wi-Fi network.
Top 6 Ways to Fix Mac Not Connecting to Hotspot
Using a mobile hotspot is a great way to connect to the internet when away from a Wi-Fi network.
 4 Ways to Fix Android Phone Automatically Goes into Silent Mode
Basic Fixes Restart device: Restart your Android device to fix temporary bugs and glitches.
4 Ways to Fix Android Phone Automatically Goes into Silent Mode
Basic Fixes Restart device: Restart your Android device to fix temporary bugs and glitches.
The article above may contain affiliate links which help support Guiding Tech. The content remains unbiased and authentic and will never affect our editorial integrity.


Done all this. It still waits for me to manually connect . It connects only if I manually do it everywhere. That’s my problem . Telling it to auto connect is inoperable.