Fix 1: Run Quick Assist as an Administrator
If the Quick Assist app lacks the necessary permissions, some features may not function as expected. To avoid this, you can try launching the Quick Assist app with administrator rights.
Press the Windows key + S shortcut to open the search menu, type in quick assist, and select Run as administrator.

Fix 2: Repair or Reset Quick Assist
Windows 11 carries a handy repair tool that can help you fix most problems with an app without affecting any of the app data. Here’s how you can use it to get the Quick Assist app working on Windows.
Step 1: Press the Windows key + I to open the Settings app and head to Apps > Installed apps.

Step 2: Scroll down to locate Quick assist. Use the three-dot menu next to it to select Advanced options.

Step 3: Scroll down to the Reset section and click on Repair.

If the issue remains, repeat the above steps and click the Reset option. This will clear all the app data and revert the app to its default state.
Fix 3: Reset Internet Settings
Misconfigured internet settings on your Windows PC can also interfere with the Quick Assist app and prevent it from working correctly. Here’s what you can do to fix it.
Step 1: Open the search menu, type in internet options, and press Enter.

Step 2: In the Internet Properties window, head over to the Advanced tab and click the Restore advanced settings button. Then hit Apply followed by OK.

Fix 4: Ensure Quick Assist Is Not Blocked
It’s not uncommon for an antivirus program to become cautious and block otherwise safe apps. You can disable the antivirus program on your PC to verify this.
Once disabled, check to see if Quick Assist works fine. If it does, you’ll need to dig through the settings on your antivirus program to unblock Quick Assist.
Fix 5: Re-register the Quick Assist App
If all else fails, you can attempt re-registering the Quick Assist app on your PC using PowerShell. It’s a straightforward process that only requires running a single command.
Step 1: Click the search icon taskbar, type in Windows PowerShell, and click on Run as administrator.
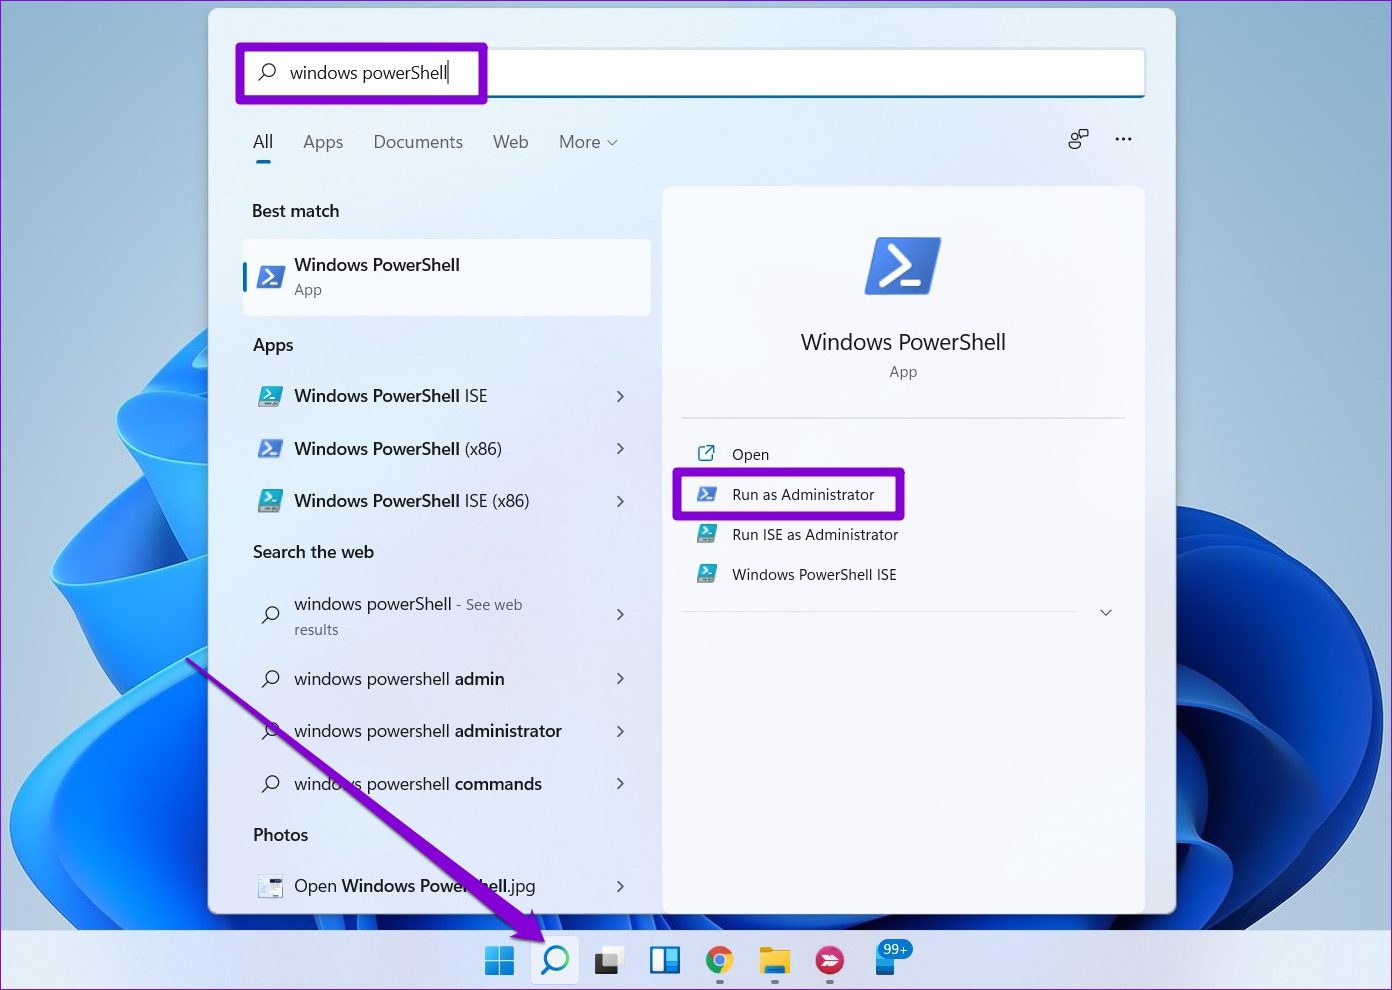
Step 2: In the console, type the command given below and press Enter.
Get-AppXPackage | Foreach {Add-AppxPackage -DisableDevelopmentMode -Register "$($_.InstallLocation)\AppXManifest.xml"}

Was this helpful?
Last updated on 19 May, 2024
1 Comment
Leave a Reply
Read Next
 How to Fix Windows Snap Assist Not Working
Windows Snap Assist is a productivity tool that portions your screen into quarters or halves, allowing you to have multiple applications open at once.If your Snap Assist isn’t behaving properly,
How to Fix Windows Snap Assist Not Working
Windows Snap Assist is a productivity tool that portions your screen into quarters or halves, allowing you to have multiple applications open at once.If your Snap Assist isn’t behaving properly,
 5 Ways to Fix Quick Settings Not Working on Windows 11
Try Basic Fixes Restart Windows Explorer: Windows Explorer facilitates the graphical interface for several utilities, including the Quick Settings panel.
5 Ways to Fix Quick Settings Not Working on Windows 11
Try Basic Fixes Restart Windows Explorer: Windows Explorer facilitates the graphical interface for several utilities, including the Quick Settings panel.
 5 Ways to Fix Quick Access Not Working on Windows 11
https://youtu.be/NlAnVpZD1hA Fix 1: Check File Explorer Options If Quick Access is not showing your recently opened files and frequently used folders, check File Explorer's Options to ensure the feature is
5 Ways to Fix Quick Access Not Working on Windows 11
https://youtu.be/NlAnVpZD1hA Fix 1: Check File Explorer Options If Quick Access is not showing your recently opened files and frequently used folders, check File Explorer's Options to ensure the feature is
 3 Quick Ways to Find Product Key on Windows 10 or Windows 11
1.
3 Quick Ways to Find Product Key on Windows 10 or Windows 11
1.
 5 Quick Ways to Fix Can’t Change Power Plan in Windows 11
Are you unable to change the power plan on your Windows PC?
5 Quick Ways to Fix Can’t Change Power Plan in Windows 11
Are you unable to change the power plan on your Windows PC?
 4 Ways to Disable Delivery Optimization in Windows 11
Method 1: Disable Delivery Optimization Using the Settings App The Settings app is the go-to option to configure important Windows settings like Delivery Optimization.
4 Ways to Disable Delivery Optimization in Windows 11
Method 1: Disable Delivery Optimization Using the Settings App The Settings app is the go-to option to configure important Windows settings like Delivery Optimization.
 7 Quick Ways to Open Remote Desktop Connection Tool in Windows 11
Method 1.
7 Quick Ways to Open Remote Desktop Connection Tool in Windows 11
Method 1.
 5 Quick Ways to Show FPS Counter in Windows 11
Method 1: Using the Xbox Game Bar Xbox Game Bar is baked into Windows 10 and Windows 11.
5 Quick Ways to Show FPS Counter in Windows 11
Method 1: Using the Xbox Game Bar Xbox Game Bar is baked into Windows 10 and Windows 11.
The article above may contain affiliate links which help support Guiding Tech. The content remains unbiased and authentic and will never affect our editorial integrity.


I tried everything on here and nothing seems to help. I cannot imagine what is wrong with this. It used to work many months ago but suddenly it just quit. I even uninstalled it and reinstalled it and that didn’t work.
If you come up with anymore ideas, I’m here to try them.
Thank you,
Ronald T.