What Is Hardware Accelerated GPU Scheduling?
Hardware Accelerated GPU Scheduling (HAGS) is a feature that allows the GPU to manage its own memory and schedule tasks, reducing the workload on the CPU. The primary goal is to improve performance and reduce latency in graphical tasks, especially in gaming and other graphics-intensive applications.
- System Requirements: Ensure your system has an NVIDIA GT 1030 or later, or an AMD 5600 or later GPU, and the latest graphics drivers.
How Does HAGS Work?
- With HAGS enabled, the GPU takes over the scheduling of its tasks and memory management.
- Allows the GPU to handle graphics tasks more efficiently and with lower latency.
- The CPU is freed up to handle other tasks, potentially improving overall system performance.
How to Enable Hardware Accelerated GPU Scheduling
Hardware-accelerated GPU Scheduling is disabled by default on Windows 11. Therefore, you must enable it manually. Let’s begin.
Method 1: Using the Settings App
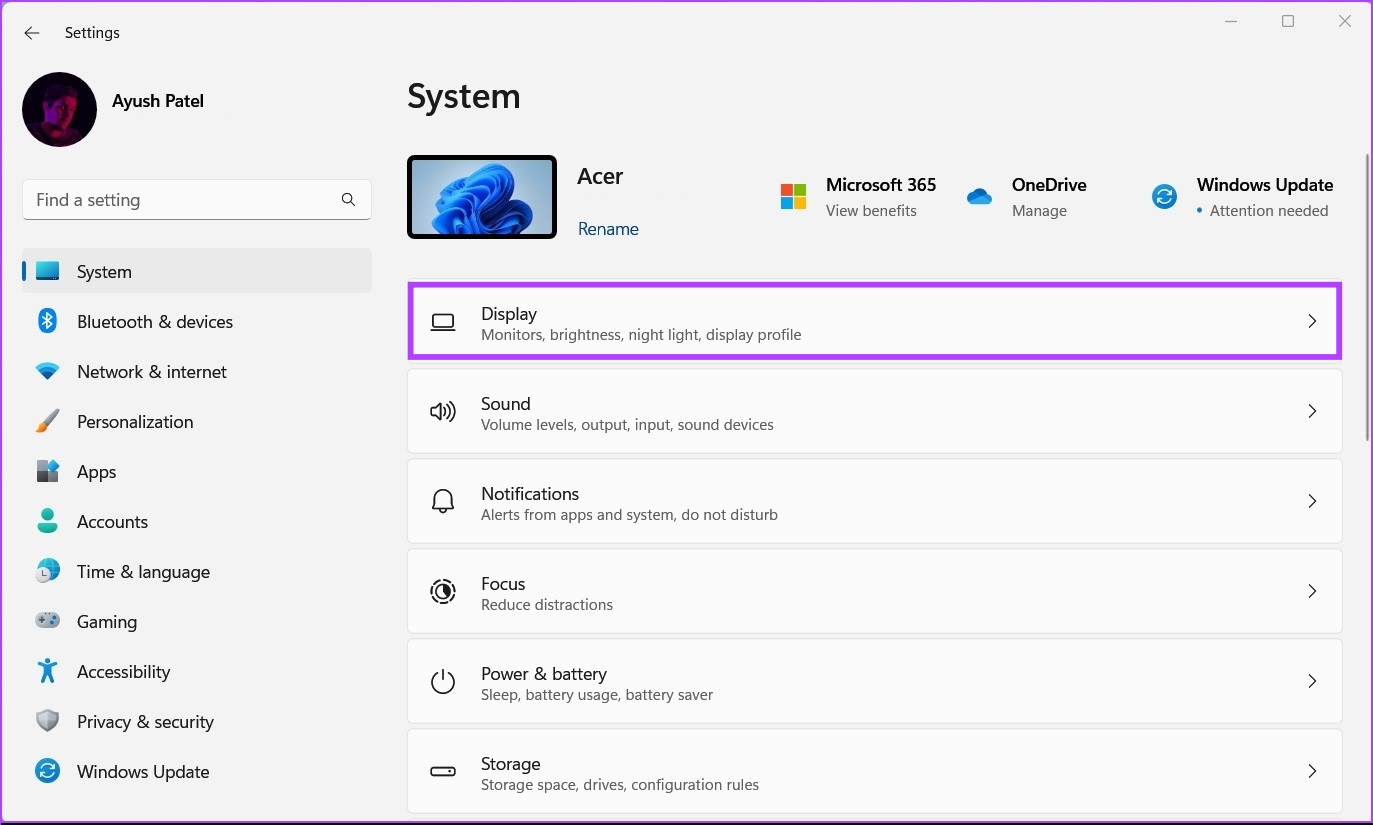
Step 1: Press the Windows + I keys to open the Settings app.
Step 2: In the Settings window, stay on the System tab and click on Display.
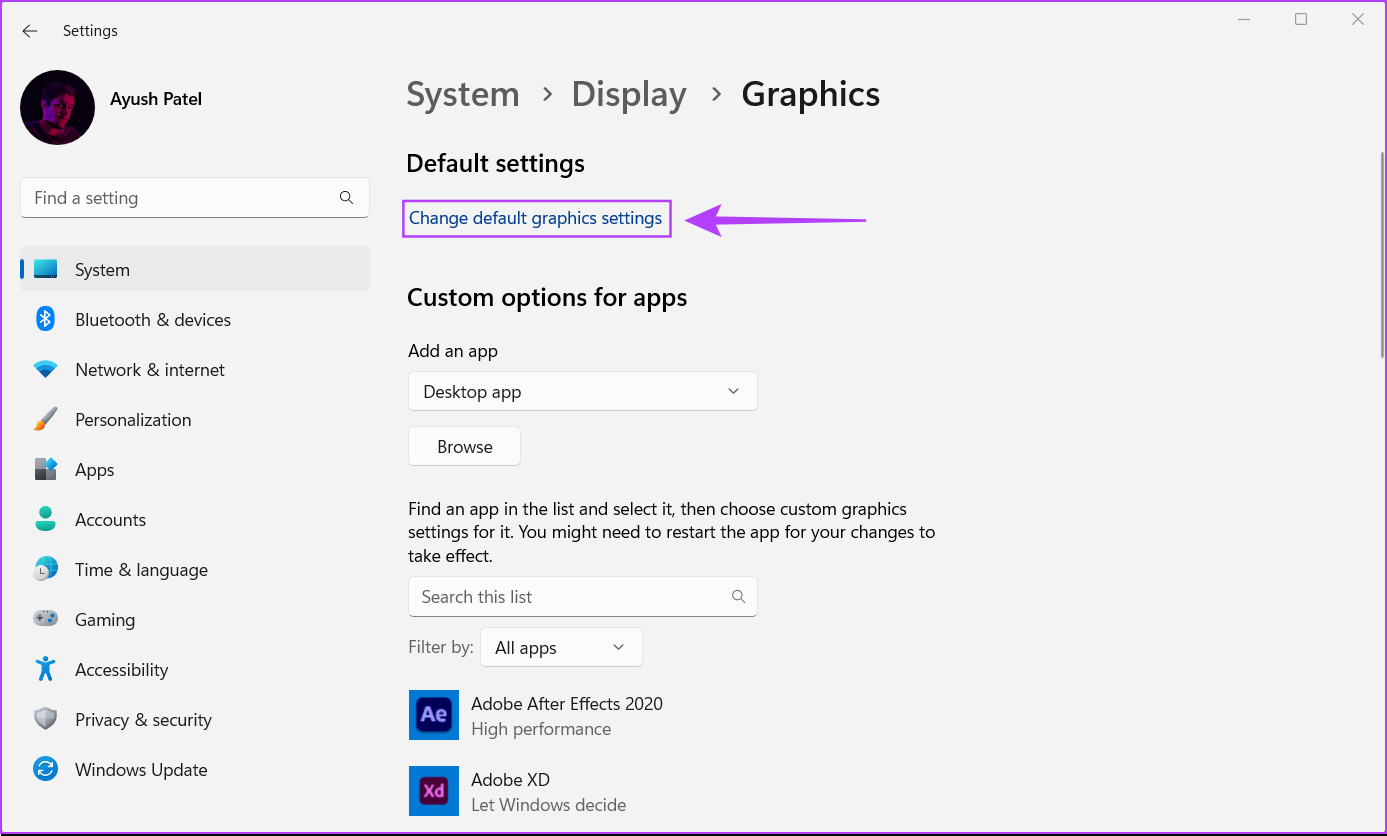
Step 3: Under Display settings, scroll down and click Graphics.
Step 4: Click on the blue Change Default Graphics Settings option.
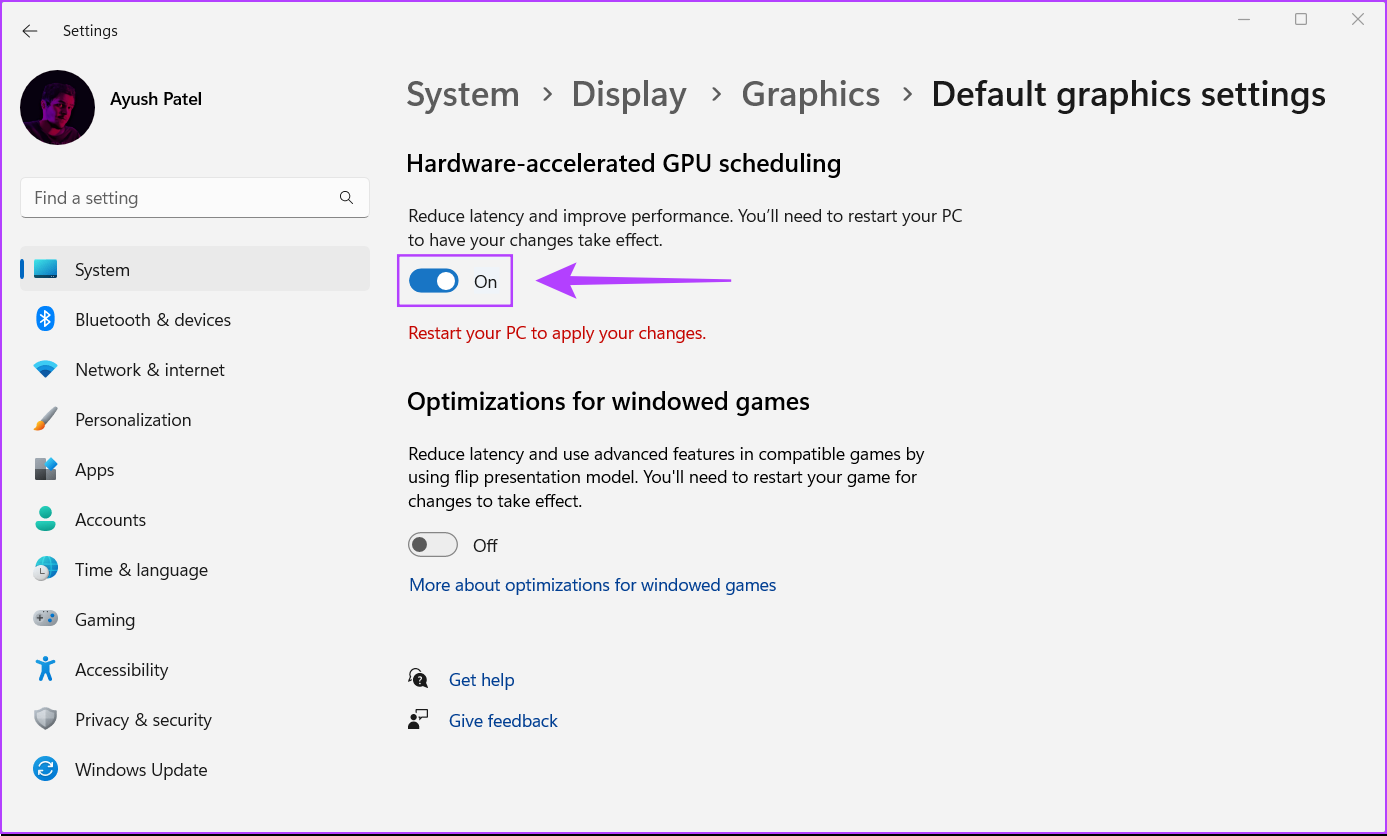
Step 5: On the Default graphics settings screen, turn on the toggle for Hardware-Accelerated GPU Scheduling. After that, restart your PC to apply the changes.
Method 2: Using Registry Editor
Step 1: Press the Windows key + R keys and type regedit in the text field. Then, press Enter.
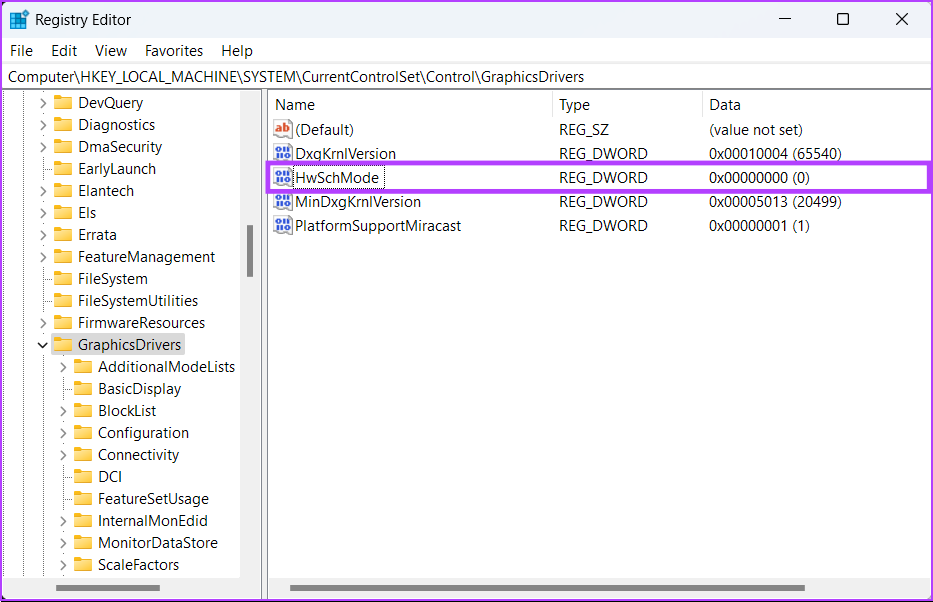
Step 2: Copy and paste the following location into the navigation bar:
HKEY_LOCAL_MACHINE\SYSTEM\CurrentControlSet\Control\GraphicsDrivers
Step 3: Right-click anywhere in the right pane and select New > DWORD (32-bit) Value.
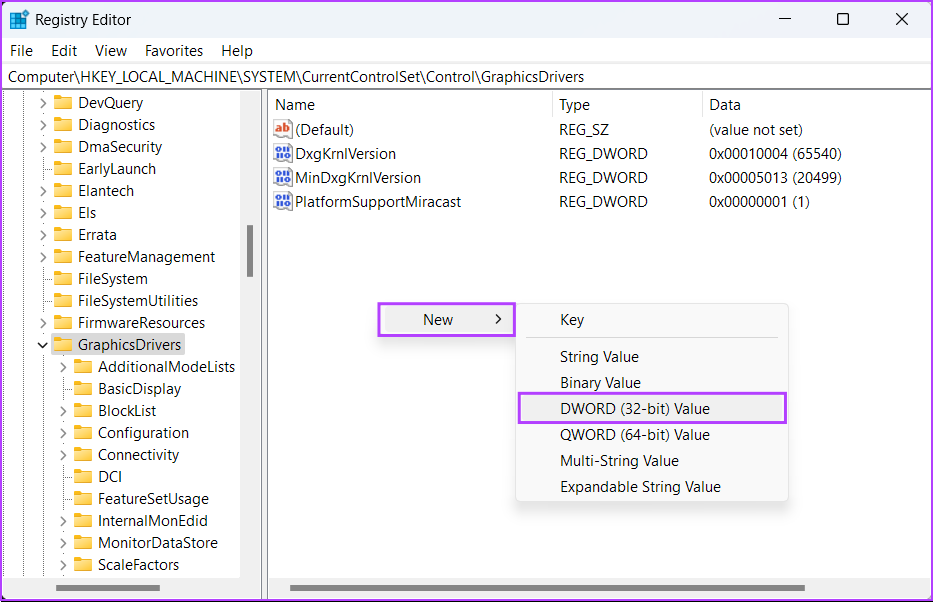
Step 4: Type HwSchMode > press Enter to create the new DWORD (32-bit) Value.
Step 5: After you create the new HwSchMode DWORD, double-click on the new entry to edit its value.
Step 6: Set its value data to 2. Then, click on OK.
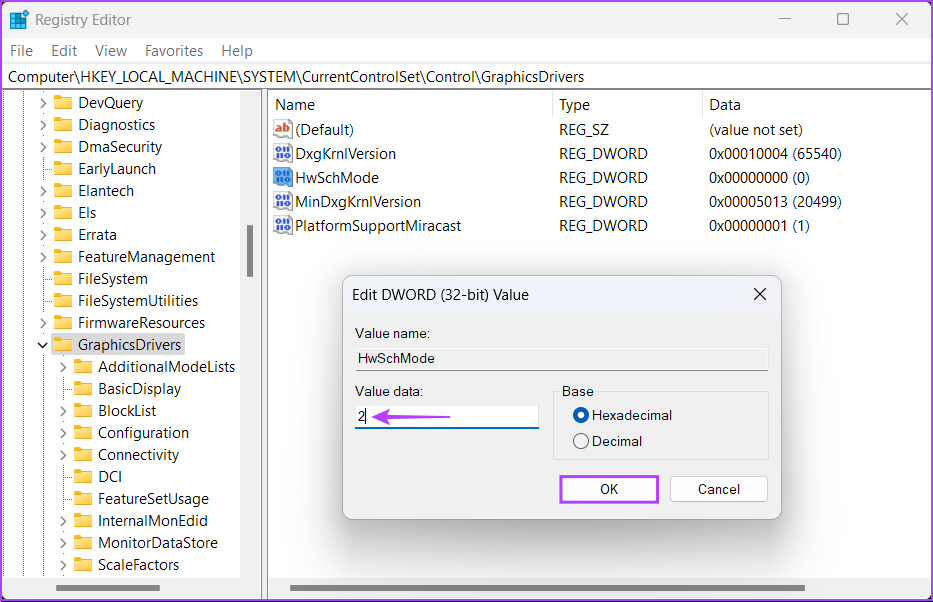
Restart your PC to apply the changes. With this, you have successfully turned on Hardware-accelerated GPU Scheduling on your Windows machine.
FAQs
While many applications and games can benefit from this feature, its impact may vary. Some applications may see more improvement than others, and not all software may be optimized to take full advantage of hardware-accelerated GPU scheduling.
Yes, you can disable hardware-accelerated GPU scheduling by going to Settings > System > Display > Graphics settings and toggling off Hardware-accelerated GPU scheduling.
The impact on battery life is minimal, as hardware-accelerated GPU scheduling primarily affects the performance and scheduling of the GPU during graphics-intensive tasks.
While Hardware-Accelerated GPU Scheduling typically reduces the overall CPU workload, it may initially see a slight increase in CPU usage as the GPU takes over scheduling tasks. This temporary bump shouldn’t affect performance and should settle down quickly.
Was this helpful?
Last updated on 20 August, 2024
Read Next
 Top 5 Ways to Fix a D3D11-Compatible GPU is Required to Run the Engine Error on Windows 11
Preliminary Fixes Update DirectX: Updating DirectX can resolve compatibility issues and errors related to the D3D11 GPU.
Top 5 Ways to Fix a D3D11-Compatible GPU is Required to Run the Engine Error on Windows 11
Preliminary Fixes Update DirectX: Updating DirectX can resolve compatibility issues and errors related to the D3D11 GPU.
 5 Ways to Check GPU Health on Windows
https://youtu.be/JGwJ-_hIzfg Method 1: Using Task Manager The Windows Task Manager can help you in checking GPU health.
5 Ways to Check GPU Health on Windows
https://youtu.be/JGwJ-_hIzfg Method 1: Using Task Manager The Windows Task Manager can help you in checking GPU health.
 Best 5 Fixes for Windows 11 Not Detecting GPU
Basic Fixes: Update Windows: While this will not work every time, there is a chance that specific components will be outdated and no longer function correctly.
Best 5 Fixes for Windows 11 Not Detecting GPU
Basic Fixes: Update Windows: While this will not work every time, there is a chance that specific components will be outdated and no longer function correctly.
 How to Completely Uninstall Existing GPU Drivers the Right Way
How to Uninstall GPU Drivers Using DDU Step 1: Download the DDU installer from the Guru3D dedicated webpage.
How to Completely Uninstall Existing GPU Drivers the Right Way
How to Uninstall GPU Drivers Using DDU Step 1: Download the DDU installer from the Guru3D dedicated webpage.
 4 Quick Ways to Check Hardware ID (HWID) of a Device in Windows 11
https://youtu.be/F2oYyUSnUy4 Method 1: Using Device Manager The easiest way to find the Hardware ID (HWID) is by using the Device Manager.
4 Quick Ways to Check Hardware ID (HWID) of a Device in Windows 11
https://youtu.be/F2oYyUSnUy4 Method 1: Using Device Manager The easiest way to find the Hardware ID (HWID) is by using the Device Manager.
 5 Ways to Fix Intel Wi-Fi 6 AX201 Adapter Driver or Hardware Issues
Fix 1: Update or Reinstall Driver The software drivers for the Intel Wi-Fi 6 AX201 on your Windows PC may be outdated and are due for an update.
5 Ways to Fix Intel Wi-Fi 6 AX201 Adapter Driver or Hardware Issues
Fix 1: Update or Reinstall Driver The software drivers for the Intel Wi-Fi 6 AX201 on your Windows PC may be outdated and are due for an update.
 6 Best GPU Support Brackets You Can Buy
With the increasing weight and size of modern GPUs, you must provide additional support to the graphics card in a bid to prevent sagging and avoid potential damage to the
6 Best GPU Support Brackets You Can Buy
With the increasing weight and size of modern GPUs, you must provide additional support to the graphics card in a bid to prevent sagging and avoid potential damage to the
The article above may contain affiliate links which help support Guiding Tech. The content remains unbiased and authentic and will never affect our editorial integrity.