Basic Fixes:
- Update Windows: While this will not work every time, there is a chance that specific components will be outdated and no longer function correctly. An update will resolve this.
- Uninstall updates: If you notice the problem just after an update, it is buggy and should be rolled back.
Fix 1: Update the System BIOS
A BIOS update is critical when Windows 11 is not detecting the GPU because a newer GPU may need the update for compatibility and proper motherboard communication. Also, since the BIOS controls the hardware component’s initialization process, an update will ensure no initialization errors. If you have made any changes to the BISO settings, you may consider restoring them to their default settings.
Note: The BIOS update process will differ by manufacturer. You may have to consult the manufacturer’s website. However, we show you how to update the HP BIOS below using HP PC Hardware Diagnostics.
Step 1: Download and install HP PC Hardware Diagnostics software on your computer.
Step 2: Launch the newly installed tool.
Step 3: Click the Check for BIOS update button under BIOS-System Firmware.

Step 4: If an update is available, click the Agree button to start the update. If you see a message like the one below, it means your computer is up to date.

Fix 2: Enable the Graphics Card and Confirm It Is Properly Inserted
When a graphics card is not detected, the connection between it and your motherboard may not have been proper. To determine if it is inserted correctly, you may check the Device Manager to see if it is listed. If not, you must take it apart and re-insert it physically. The steps will depend on your computer’s brand.
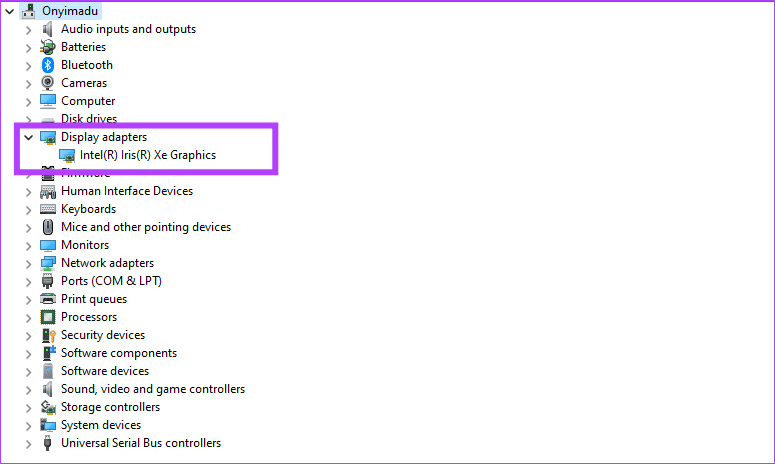
Step 1: Right-click the Start menu and click Device Manager.

Step 2: Expand Display Adapters and verify your GPU driver is listed. If not, following the instructions from your manufacturer, you may open the computer and re-insert the GPU.
Fix 3: Update or Reinstall the Graphics Driver
When your graphics driver is outdated or corrupt, you may expect a few anomalies while using the computer. One such case is when Windows 11 does not detect the GPU. You need to update the driver or reinstall it. You may download an updated version from your manufacturer’s website or use the Device Manager utility, as shown below.
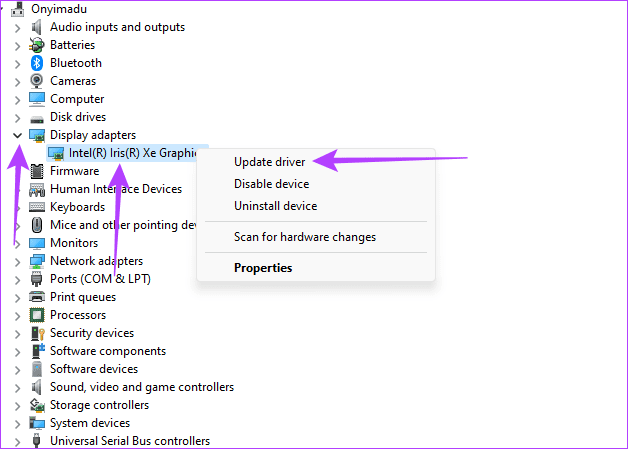
Step 1: Right-click the Start menu and click Device Manager.
Step 2: Expand the Display adapters category, right-click your graphics driver, and click Update driver.
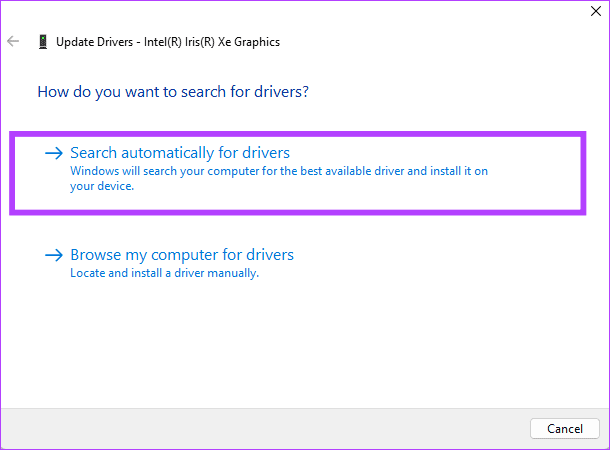
Step 3: Click Search automatically for updates and follow any onscreen instructions to complete the process.
Alternatively, you may reinstall the graphics driver by following the steps below.
Step 1: Right-click the Start menu and click Device Manager.
Step 2: Expand the Display adapters category, double-click your graphics driver, and confirm your choice.

Step 3: Restart the computer, relaunch the Device Manager, and click on the Scan for hardware changes icon.

Fix 4: Show and Enable Hidden GPU Driver
While your computer may have detected the GPU, there is a chance that it is hidden and disabled on the Device Manager. So, you should double-check if it shows up as a hidden driver, and then you may enable it. This solution will be useful, especially if the GPU is detected in the BIOS but not on the Windows 11 Device Manager.
Step 1: Right-click the Start menu and click Device Manager.
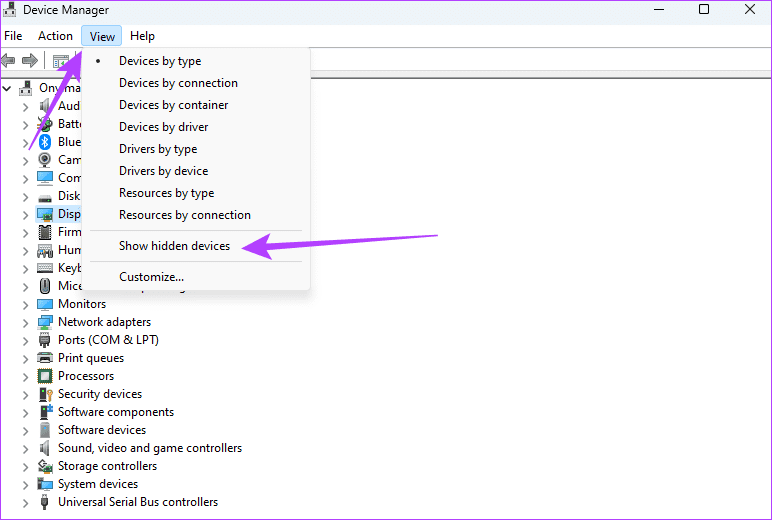
Step 2: Click the View menu, then click Show hidden devices.
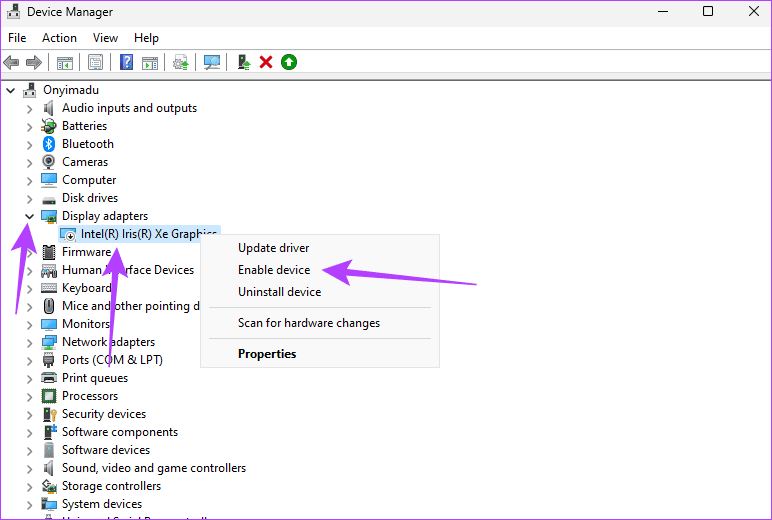
Step 3: Expand Display Adapters, right-click your driver, and click Enable device.
Fix 5: Temporarily Disable Additional Hidden PCIe Devices
When your Windows 11 device is not detecting the GPU, you may have an issue with the PCIe controller, which manages PCIe slots on the motherboard. Conflicting devices are a primary cause of this driver issue. You should temporarily disable any additional PCIe devices. These are often hidden in the Device Manager.
Step 1: Right-click the Start menu and click Device Manager.
Step 2: Click the View menu, then click Show hidden devices.
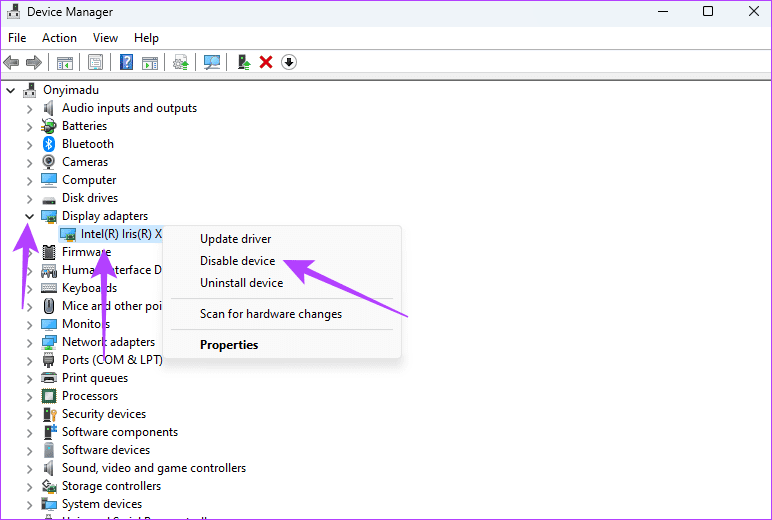
Step 3: Expand Display Adapters, right-click an additional PCIe driver, click Disable device, and confirm your choice. You should repeat this process for every additional PCIe driver. Note that once you restart your computer, these drivers will be re-enabled.
Was this helpful?
Last updated on 03 September, 2024
Read Next
 4 Best Fixes for Windows 10 Not Detecting HDMI TV/Monitor
You'd find a few video connection ports on a typical Windows computer.
4 Best Fixes for Windows 10 Not Detecting HDMI TV/Monitor
You'd find a few video connection ports on a typical Windows computer.
 6 Best Fixes for Windows 11 Not Detecting HDMI TV/Monitor
An HDMI connection is the preferred versatile choice to stream content from a Windows 11 PC to a TV or monitor.
6 Best Fixes for Windows 11 Not Detecting HDMI TV/Monitor
An HDMI connection is the preferred versatile choice to stream content from a Windows 11 PC to a TV or monitor.
 2 Fixes for iPhone Not Detecting Headphones
Try Basic Fixes Rule out issues with your headphones: Before you troubleshoot your iPhone, it’s a good idea to ensure that your wired or wireless headphones are working properly.
2 Fixes for iPhone Not Detecting Headphones
Try Basic Fixes Rule out issues with your headphones: Before you troubleshoot your iPhone, it’s a good idea to ensure that your wired or wireless headphones are working properly.
 Top 4 Ways to Fix Windows 10 Not Detecting PS4 Controller
While Xbox reigns to work as a controller with Windows, there are plenty of PS4 owners who struggle to use their Dual Shock controller with Windows.
Top 4 Ways to Fix Windows 10 Not Detecting PS4 Controller
While Xbox reigns to work as a controller with Windows, there are plenty of PS4 owners who struggle to use their Dual Shock controller with Windows.
 5 Ways to Fix Microsoft Teams Not Detecting Camera on Windows 11
Common Fixes Check the camera hardware: Ensure your camera's view isn't blocked.
5 Ways to Fix Microsoft Teams Not Detecting Camera on Windows 11
Common Fixes Check the camera hardware: Ensure your camera's view isn't blocked.
 6 Ways to Fix Windows Not Detecting Microphone in Headset
Basic Fixes Check cable and Bluetooth connection: Check the microphone and its wire for significant damage on either side.
6 Ways to Fix Windows Not Detecting Microphone in Headset
Basic Fixes Check cable and Bluetooth connection: Check the microphone and its wire for significant damage on either side.
 3 Ways to Fix Discord Not Detecting Games on Windows
Try Basic Fixes Restart your game: If it’s just a one-off glitch preventing Discord from detecting your game, restarting it will help.
3 Ways to Fix Discord Not Detecting Games on Windows
Try Basic Fixes Restart your game: If it’s just a one-off glitch preventing Discord from detecting your game, restarting it will help.
 How to Use Hardware Accelerated GPU Scheduling on Windows 11
What Is Hardware Accelerated GPU Scheduling?
How to Use Hardware Accelerated GPU Scheduling on Windows 11
What Is Hardware Accelerated GPU Scheduling?
The article above may contain affiliate links which help support Guiding Tech. The content remains unbiased and authentic and will never affect our editorial integrity.