Basic Fixes
- Clean boot Windows and relaunch Disk Cleanup: An installed software may conflict with the Disk Cleanup utility. Clean boot your Windows 11 system and reopen it.
- Update Windows 11: Press the Windows + I shortcut to open Settings, select Windows Update from the left sidebar, and install available system updates.
Fix 1: Cancel, Restart Your PC, and Run the Disk Cleanup Again
Cancelling and restarting the Disk Cleanup process removes hiccups, causing it to get stuck in the calculating stage.
Step 1: Click the Cancel button to terminate the running Disk Cleanup utility.

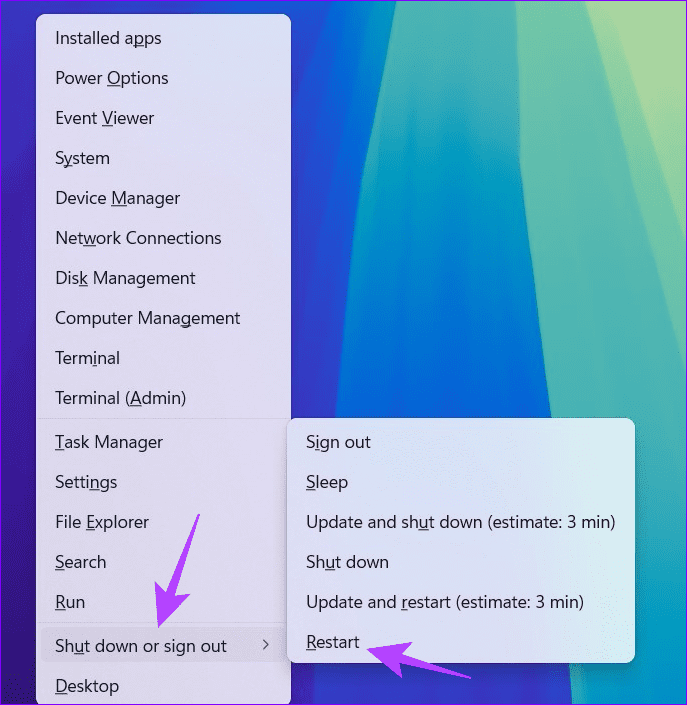
Step 2: Press the Windows + X shortcut to open the Power User Menu, select Shut down or sign out, and click Restart.
Step 3: Finally, press the Windows key, search Disk Cleanup, and click to open it.

Fix 2: Delete Content From SoftwareDistribution Folder
The SoftwareDistribution folder houses Windows Update files. If they get corrupt, the Windows Update and Disk Cleanup process will fail. To fix it, delete its folder contents and retry opening Disk Cleanup.
Step 1: Press the Windows + E shortcut to open the File Explorer, open the drive containing Windows installation files (e.g. C drive), and select the Windows folder.

Step 2: Locate and open the SoftwareDistribution folder.

Step 3: Use Ctrl + A to select all files and press the Delete key on your keyboard to remove them. Then, reopen the Disk Cleanup utility.

Fix 3: Delete the Windows.old Folder
When you update Windows, its older version gets stored in the Windows.old folder to allow reversion. However, these files can create conflicts, leading to an indefinite calculating message in Disk Cleanup. Remove them manually to resolve the issue.
Step 1: Open File Explorer using the Windows + E shortcut, select the Windows installation drive (e.g. C), and double-click the Windows.old folder.
Tip: If you can’t find the Windows.old folder, enable Hidden items from View > Show > Hidden items.

Step 2: Press the Ctrl + A shortcut to select all files and subfolders, right-click, and select Delete.
Fix 4: Manually Clear Temporary Windows Files
Excessive temporary files often cause problems when running utility programs such as Disk Cleanup. Remove them using the Run dialog to restore normalcy.
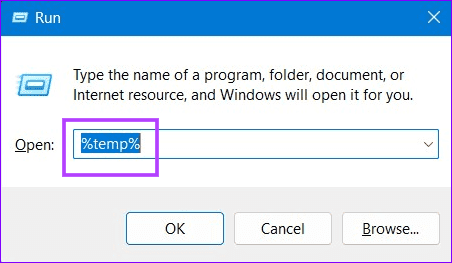
Step 1: Press the Windows + R shortcut to open the Run dialog, type %temp%, and hit Enter to open the folder containing all temporary files.
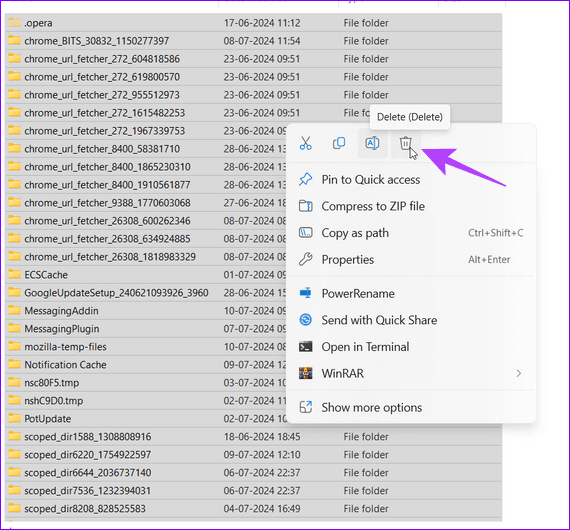
Step 2: Select all files using the Ctrl + A shortcut and press Delete on your keyboard to remove them. Re-open the Disk Cleanup utility.
Fix 5: Run the Windows Update Troubleshooter
Lastly, run the built-in Windows Update troubleshooter to fix the Disk Cleanup stuck on calculating issue on Windows 11.
Step 1: Open Windows Settings using the Windows + I shortcut, select System from the sidebar, and click Troubleshoot.

Step 2: Select Other troubleshooters.

Step 3: Click Run next to Windows Update and wait a few seconds for Windows 11 to resolve the issue.

Was this helpful?
Last updated on 15 July, 2024
Read Next
 6 Ways to Run Disk Cleanup on Windows 11
Method 1: Run the Disk Cleanup Utility From the Control Panel The Control Panel app houses a majority of crucial system tools and Windows settings.
6 Ways to Run Disk Cleanup on Windows 11
Method 1: Run the Disk Cleanup Utility From the Control Panel The Control Panel app houses a majority of crucial system tools and Windows settings.
 8 Ways to Fix Windows Stuck on Repairing Disk Errors
If your Windows PC is stuck on repairing disk errors and shows that 'this might take an hour to complete,’ we are here to fix this issue without you having
8 Ways to Fix Windows Stuck on Repairing Disk Errors
If your Windows PC is stuck on repairing disk errors and shows that 'this might take an hour to complete,’ we are here to fix this issue without you having
 Top 5 Ways to Fix Disk Structure Is Corrupted and Unreadable Error on Windows 10
Windows 10 gives you alerts whenever the external storage disk goes corrupt.
Top 5 Ways to Fix Disk Structure Is Corrupted and Unreadable Error on Windows 10
Windows 10 gives you alerts whenever the external storage disk goes corrupt.
 5 Ways to Fix Google Chrome High Disk Usage on Windows
Basic Fixes Restart Chrome: Open Task Manager, end the process for Google Chrome, and reopen the browser.
5 Ways to Fix Google Chrome High Disk Usage on Windows
Basic Fixes Restart Chrome: Open Task Manager, end the process for Google Chrome, and reopen the browser.
 6 Ways to Fix Not Enough Disk Space Error in Steam on Windows 11
Why Don’t I Have Enough Disk Space While Running Steam?
6 Ways to Fix Not Enough Disk Space Error in Steam on Windows 11
Why Don’t I Have Enough Disk Space While Running Steam?
 Top 8 Ways to Fix External Drive Not Showing Up in Disk Management on Windows
Disk Management is a built-in utility on Windows to manage your hard drivers, SSDs, and other external drives.
Top 8 Ways to Fix External Drive Not Showing Up in Disk Management on Windows
Disk Management is a built-in utility on Windows to manage your hard drivers, SSDs, and other external drives.
 9 Ways to Solve 100% Disk Usage Error in Windows 10
You know why you are here, right?
9 Ways to Solve 100% Disk Usage Error in Windows 10
You know why you are here, right?
 3 Ways to Run CHKDSK Utility to Repair Disk Errors on Windows 11
Method 1: Run Check Disk Utility From File Explorer File Explorer provides an easy way to run the Check Disk Utility on your selected system drive to repair its errors.
3 Ways to Run CHKDSK Utility to Repair Disk Errors on Windows 11
Method 1: Run Check Disk Utility From File Explorer File Explorer provides an easy way to run the Check Disk Utility on your selected system drive to repair its errors.
The article above may contain affiliate links which help support Guiding Tech. The content remains unbiased and authentic and will never affect our editorial integrity.